WDAC-4277C - Security Camera Weldex - Free user manual and instructions
Find the device manual for free WDAC-4277C Weldex in PDF.

| Product Type | Security Camera |
| Brand | Weldex |
| Model | WDAC-4277C |
| Video Resolution | 1080p Full HD (1920x1080) |
| Lens Type | Fixed focal length, 3.6mm |
| Night Vision | Infrared LEDs, up to 30 meters |
| Protection Rating | IP66 weatherproof |
| Power Supply | 12V DC, 1A (adapter included) |
| Power Consumption | 4.5W (typical) |
| Dimensions (L x W x H) | 160mm x 70mm x 70mm |
| Weight | 0.35 kg (without cable) |
| Mounting Type | Wall or ceiling mount (bracket included) |
| Video Output | BNC (analog) / CVBS |
| Field of View | 90° diagonal |
| Operating Temperature | -30°C to 60°C |
| Main Functions | Day/night auto switching, motion detection, OSD menu |
| Maintenance | Clean lens with soft dry cloth; avoid solvents |
| Safety | Use only supplied power adapter; install securely to prevent fall |
| Spare Parts Availability | Contact Weldex support for replacement parts |
| General Information | Compatible with most DVRs; includes 1-year warranty |
Frequently Asked Questions - WDAC-4277C Weldex
User questions about WDAC-4277C Weldex
0 question about this device. Answer the ones you know or ask your own.
Ask a new question about this device
Download the instructions for your Security Camera in PDF format for free! Find your manual WDAC-4277C - Weldex and take your electronic device back in hand. On this page are published all the documents necessary for the use of your device. WDAC-4277C by Weldex.
USER MANUAL WDAC-4277C Weldex
Original Equipment Manufacturer of CCD Cameras, DVR's & LCD Monitors
Operation Manual
High Resolution Digital BOX Camera
natural_image
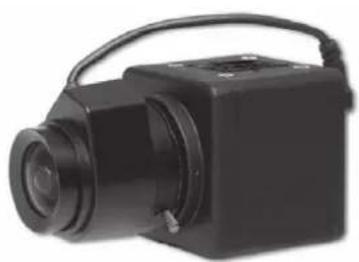
Black camera with lens and handle (no visible text or symbols)WDAC-4277DT
Please read carefully before using and keep in a safe place. Design and specifications are subject to change without notice.
V.011


TO REDUCE THE RISK OF ELECTRIC SHOCK, DO NOT REMOVE COVER (OR BACK) NO USER SERVICEABLE PARTS INSIDE. REFER SERVICING TO QUALIFIED SERVICE PERSONNEL.

The lightning flash with an arrowhead symbol, within an equilateral triangle is intended to alert the user to the presence of uninsulated dangerous voltage within the product's enclosure that may be of sufficient magnitude to constitute a risk of electric shock to persons.

The exclamation point within an equilateral triangle is intended to alert the user to the presence of important operating and maintenance (servicing) instructions in the literature accompanying the appliance.
Regulatory Notice
This device complies with Part 15 of the FCC Rules. Operation is subject to the following two conditions :
(1) This device may not cause harmful interference, and
(2) this device must accept any interference received, including
interference that may cause undesired operation.
This equipment has been tested and found to comply with the limits for a Class A digital device, pursuant to Part 15 of the FCC Rules.
These limits are designed to provide reasonable protection against harmful interference in a residential installation.
This equipment generates, uses, and can radiate radio frequency energy and, if not installed and use in accordance with the instructions, may cause harmful interference to radio communications.
Operation of this equipment in a residential area is likely to cause interference, in which case the user will be required to correct the interference at his own expense.
WARNING- Changes or modifications not expressly approved by the manufacturer could void the users authority to operate the equipment.
CAUTION- To prevent electric shock and risk of fire hazards:
- Do NOT use power sources other than that specified. - Do NOT expose this appliance to rain or moisture.
Digital BOX Camera Installation Guide 3
1.0 Features
• 1/3"Sony Super HAD CCD II : 410K(NTSC)/470K(PAL) pixels
• High Resolution 600 TV Lines
• Day & Night (ICR)
• Digital Wide Dynamic Range
• Digital Noise Reduction
- Privacy mask Function
- On Screen Display
- Motion detection
- Parking Line
• High Light Compensation
- IR Smart
2.0 Warnings
• The camera needs periodic inspection.
Contact an authorized technician for inspection.
- Stop using your camera when you find a malfunction.
If you use your camera around smoke or unusual heat for a long time, fire may be caused.
- Do not install the camera on a surface that can not support it.
Unless the surface is suitable, it could cause falling or other hazards.
- Do not hold plug with wet hands.
It could cause an electric shock.
- Do not disassemble the camera.
It may result in fire, electric shock or other hazards.
- Do not use the camera close to a gas or oil leak.
It may result in fire or other hazards.
Digital BOX Camera Installation Guide 5
3.0 Precautions
Do not install the camera in extremeDo not install or use the camera in an temperature conditions. environment where the humidity is high.


Do not install the camera under unstable lighting conditions.
Do not touch the front lens of the camera.

Only use the camera under conditions It can cause the image quality to be where temperatures are between -10 poor.
Deg. C and +50 Deg. C.(14 Deg. F and
122 Deg. F) Be especially careful to provide ventilation when operating under high temperatures.
Severe lighting change or flicker can cause the camera to work improperly.
It is one of the most important parts of the camera. Be careful not to be stained by fingerprint.
Note • If the camera is exposed to spotlight or object reflecting strong light, smear or blooming may occur
• Please check that the power satisfies the normal specification before connecting the camera.
Do not drop the camera or subject them to physical shocks.

It can cause malfunctions to occur.
Never ke ep the camera face to strong light directly.

It can damage the CCD.
Do not expose the camera to rain or spillbeverage on it.

Do not expose the camera to radioactivity.

If it gets wet, wipe it dry immediately. Liquids can contain minerals that corrode the electronic components.
If it is exposed to radioactivity, For heated CCD, it will be oubf order.
Contents
1.0 Features 3
2.0Warnings 4
3.0 Precautions 5
4.0 Components 7
5.0 Names and Functions of Parts 8
5.1 Front 8
5.2 Side 9
5.3 Bottom 9
5.4 Back 10
6.0 Installation 11
6.1 Lens 11
6.2 Connecting to a Monitor....12
6.3 ConnectingtoPower 12
7.0 Setup Menu 13
7.1 Main Menu 13
7.2 Exposure 13
7.3 White Balance 14
7.4 Backlight 14
7.5 Day & Night 15
7.6 DPC 16
7.7 Special 16
8.0 Troubleshooting 19
9.0 Specifications 21
Digital BOX Camera Installation Guide 7
4.0 Components
natural_image
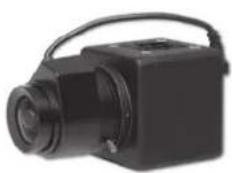
Black handheld camera with adjustable lens and handle (no visible text or symbols)COLOR BOX CAMERA WDAC-4277DC

text_image
WELDEX CORPORATION Operation Manual High Performance Digital MAX Control WOAC-4277DTOperation Manual

C-Mount adaptor
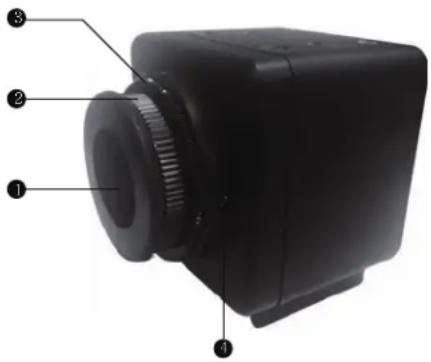
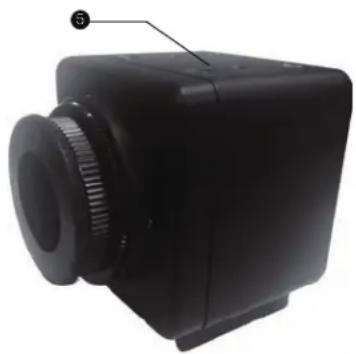
5.0 Names and Functions of Parts
5.1 Front
① Lens protection cap
Please cover the lens when not using it.
C-Mount lens adaptor
Please attach the C-Mount lens here.
⑥ CS-Mount lens adaptor
Please remove the C-MOUNT lens adaptor and then attach it.
- Back Focus clamp screw
Please loosen the clamp screw with a screwdriver before adjusting the Back Focal length.
text_image
Labeled diagram of a camera module with numbered parts for identificationDigital BOX Camera Installation Guide 9
5.2 Bottom
5 Mounting bracket screw hole
Please use the screw hole when fixing the camera onto the mounting bracket.
Please use the clamp screw as specified below.
☐ The mounting bracket can be separated and attached to the top of the camera. In this instance please do not tighten the screw to a depth of more than 5mm, otherwise serious damage can occur to the inside of the camera.
natural_image
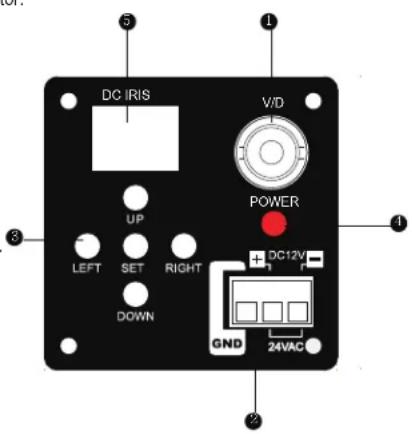
Black rectangular electronic device with a circular lens and gear-like head (no visible text or symbols)5.3 Back
■ Video output terminal
Sends video signals and connects to the video input terminal of the monitor.
2 Power Connector terminal
AC24V / DC12V Input connector
SET button: Used for the menu display. This button can be used to confirm settings after changing the value of the selected function or current conditions. It is Jog Controller then you move Left&Right / Up & Down.
UP & DOWN buttons: Used for selecting items by moving the cursor up or down on the menu screen.
LEFT & RIGHT buttons: Used when changing item values, by moving the cursor to the left or right on the menu screen.
Power lamp
Lights up when the correct power is supplied to the camera.
5 Lens Connector
Connects C/ CS Lens mount
text_image
DC IRIS V/D POWER UP LEFT SET RIGHT DOWN DC12V GND 24VACDigital BOX Camera Installation Guide 11
6.0 Installation
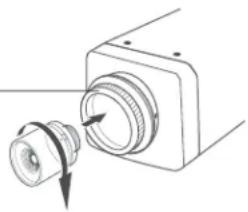
6.1 Lens
Lenses are sold separately. Lenses such CS-Mount lens and C-Mount lens can be used.
- When using a C-Mount lens
Please take off the lens protection cap and attach the C-Mount lens to the camera by screwing it in clockwise.
C-mount adaptor
natural_image
Diagram of a camera module with an arrow indicating rotation direction (no text or symbols)- When using a CS-Mount lens
① Please take off the lens protection cap and C-mount adaptor. ② Please attach the CS-Mount lens to the camera by screwing it in clockwise.
C-mount adaptor

6.2 Connecting to a Monitor
Please connect the video output terminal located on the back of the camera to the monitor.
6.3 Connecting to Power
Each model has a different power input specification. Please check the model type and standard power requirement before connecting to power.

text_image
DC IRIS UP LEFT SET RIGHT DOWN POWER DC12V GND AC Power Type (AC 24V, 500mA) DC Power Type (DC 12V, 500mA)Digital BOX Camera Installation Guide 13
7.0 Setup Menu
7.1 MAIN MENU
| SETUP | |
| LENS | DC |
| EXPOSURE | |
| WHITE BAL | ATW1 |
| BACKLIGHT | OFF |
| DAY&NIGHT | AUTO |
| DPC | |
| SPECIAL | |
| RESET | |
| EXIT | |
The menu consists of the "Main Menu" and "Sub Menu". The main menu is 8 kinds of camera functions can be selected. To the right of each main menu selection, the sub-menu is displayed.
LENS
- LENS : Select lens type
▶ DC /VIDEO / MENUAL
7.2 EXPOSURE

flowchart
graph LR
    A["SETUP"] --> B["EXPOSURE"]
    A --> C["LENS DC"]
    A --> D["EXPOSURE"]
    A --> E["WHITE BAL ATW1"]
    A --> F["BACKLIGHT OFF"]
    A --> G["DAY&NIGHT AUTO"]
    A --> H["DPC"]
    A --> I["SPECIAL"]
    A --> J["RESET"]
    A --> K["EXIT"]
    B --> L["SHUTTER AUTO"]
    B --> M["BRIGHTNESS 50"]
    B --> N["AGC ----"]
    B --> O["DWDR OFF"]
    B --> P["RETURN RET"]
- SHUTTER: You can set to auto or manual mode.
AUTO, 1/60(50), FLK, 1/250, 1/500, 1/1000, 1/2000, 1/4000, 1/5000, 1/10000, 1/100000sec
- BRIGHTNESS: You can adjust brightness level.
0(dark) \~ 255 (bright) steps
- AGC: You can select auto gain control level ▶ OFF / LOW / MIDDLE / HIGH
- DWDR : You can select WDR (Wide Dynamic Range) level.
- DWDR : OFF / ON
- LEVEL : 0\~35 steps
7.3 WHITE BALANCE
| SETUP | WB MANUAL | ||
| LENS | DC | COLOR TEMP | MANUAL |
| EXPOSURE | BLUE | 111 | |
| WHITE BAL | ATW1 | RED | 095 |
| BACKLIGHT | OFF | RETURN | RET |
| DAY&NIGHT | AUTO | ||
| DPC | |||
| SPECIAL | |||
| RESET | |||
| EXIT | |||
- WHITE BAL: You can select white balance mode.
ATW1 / ATW2 / AWC → SET / MANUAL (INDOOR / OUTDOOR / MANUAL)
▶ ATM1: Automatically adjusts color according to the available lighting. (2500°K → 9500°K)
▶ ATW2: Automatically adjusts color according to the available lighting. (2300°K → 10000°K)
▶ AWC—SET : It is a fixed white balance mode that may be automatically readjusted only by
▶ pressing SET Button in ONE PUSH mode
▶ OUTDOOR : Set color temperature to be Outdoor light (5400°K)
▶ INDOOR : Set color temperature to be Indoor light (3200°K)
▶ MANUAL : Color can be corrected when the user increases or decreases * Red Gain* or "Blue Gain"
▶ RED GAIN : Adjust R gain value 0 \~ 255
▶ BLUE GAIN : Adjust B gain value 0 \~ 255
7.4 BACKLIGHT
| SETUP | BLC | ||
| LENS | DC | AREA SEL | AREA1 |
| EXPOSURE | AREA STATE | ON | |
| WHITE BAL | ATW1 | GAIN | 042 |
| BACKLIGHT | OFF | HEIGHT | 005 |
| DAY&NIGHT | AUTO | 004 | |
| DPC | LEFT/RIGHT | 006 | |
| SPECIAL | TOP/BOTTOM | 005 | |
| RESET | RETURN | RET# | |
| EXIT | |||
- BACKLIGHT:Select OFF / BLC / HLC
▶ BLC (Back Light Compensation)
▶ BLC : Select area, gain
▶ AREA SEL : Select AREA1, AREA2
▶ AREA STATE : Select OFF / ON
▶ GAIN : Select 0 \~ 255 steps
▶ HEIGHT : Select 0 \~ 15 steps
▶ WIDTH : Select 0 \~ 15 steps
▶ LEFT / RIGHT : Select 0 \~ 15 steps
TOP / BOTTOM : Select 0 \~ 15 steps
Digital BOX Camera Installation Guide 15
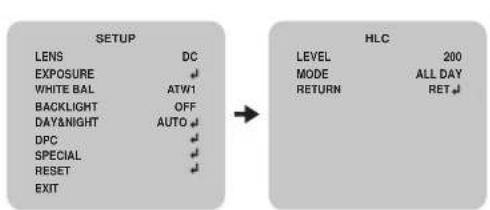
flowchart
graph LR
    A["SETUP"] --> B["HLC"]
    A --> C["LENS DC"]
    A --> D["EXPOSURE ↑"]
    A --> E["WHITE BAL ATW1"]
    A --> F["BACKLIGHT OFF"]
    A --> G["DAY&NIGHT AUTO ↓"]
    A --> H["DPC ↓"]
    A --> I["SPECIAL ↓"]
    A --> J["RESET ↓"]
    A --> K["EXIT"]
    B --> L["LEVEL 200"]
    B --> M["MODE ALL DAY"]
    B --> N["RETURN RET ↓"]
▷HLC (High Light Compensation)
▶ LEVEL : Select 0 \~ 255 steps
▶ MODE: ALL DAY, NIGHT ONLY
7.5 DAY & NIGHT
| SETUP | |
| LENS | DC |
| EXPOSURE | |
| WHITE BAL | ATW1 |
| BACKLIGHT | OFF |
| DAY&NIGHT | AUTO |
| DPC | |
| SPECIAL | |
| RESET | |
| EXIT | |
▶ IR SMART : OFF / ON
▶ R GAIN : 0 \~ 255
▶ HEIGHT : 0\~15
WIDTH:0\~15
LEFT/RIGHT:0\~15
TOP/BOTTOM:0\~15
▶ IR LEVEL : HIGH / LOW
▷ EXT : Day & Night EXT mode
7.6 DPC (Dead Pixel Compensation) 7.7 SPECIAL

flowchart
graph LR
    A["SETUP"] --> B["LENS DC"]
    A --> C["EXPOSURE"]
    A --> D["WHITE BAL ATW1"]
    A --> E["BACKLIGHT BLC"]
    A --> F["DAY&NIGHT AUTO"]
    A --> G["DPC"]
    A --> H["SPECIAL"]
    A --> I["RESET"]
    A --> J["EXIT"]
    B --> K["COVER THE LENS"]
    B --> L["THEN"]
    B --> M["PRESS ENTER KEY"]
• DPC : Select dead pixel compensation processing

text_image
SETUP LENS DC EXPOSURE WHITE BAL ATW1 BACKLIGHT BLC DAY&NIGHT AUTO DPC SPECIAL RESET EXIT SPECIAL CAM TITLE OFF MOTION OFF PRIVACY OFF PARK.LINE OFF IMAGE ADJ. COMM ADJ. LANGUAGE ENGLISH VERSION 21 01 10 RETURN RET• CAM TITLE : Select camera title menu (Text edit).
• MOTION : Select camera title menu (Text edit)
▶ AREA SEL : Select AREA1, AREA2, AREA3, AREA4
▶ AREA STATE : Select OFF / ON
▶ HEIGHT : Select 0 \~ 15 steps
▶ WIDTH : Select 0 \~ 15 steps
▶ LEFT / RIGHT: Select 0 \~ 15 steps
▶ TOP / BOTTOM : Select 0 \~ 15 steps
▶ DEGREE : Select 0 \~ 255 steps
▶ VIEW : OFF / ON
Digital BOX Camera Installation Guide 17
- PRIVACY: You can select Hide an area on the screen.
▶ AREA SEL : Select AREA1, AREA2, AREA3, AREA4, AREA5, AREA6, AREA7, AREA8
▶ AREA STATE : Select OFF / ON
▷ HEIGHT : Select 0 \~ 124 steps
▷ WIDTH : Select 0 \~ 200 steps
▷ LEFT / RIGHT: Select 0 \~ 200 steps
▷ TOP / BOTTOM : Select 0 \~ 124 steps
▶ COLOR : Select 0 \~ 15 steps
- PARK. LINE : You can select parking line on the screen.
LT: You can adjust the top left area on screen.(0 \~ 255 steps)
LB: You can adjust the bottom left area on screen.(0 \~ 255 steps)
RT: You can adjust the top right area on screen.(0 \~ 255 steps)
RB: You can adjust the bottom right area on screen.(0 \~ 255 steps)
F: You can adjust the front area on screen.(0 \~ 255 steps)
▷ N : You can adjust the near area on screen.(0 \~ 255 steps)
▷ T : You can adjust the parking line thickness.(0 \~ 15 steps)
flowchart
graph LR
    A["SPECIAL"] --> B["IMAGE ADJ."]
    A --> C["CAM TITLE OFF"]
    A --> D["MOTION OFF"]
    A --> E["PRIVACY OFF"]
    A --> F["PARK.LINE OFF"]
    A --> G["IMAGE ADJ."]
    A --> H["COMM ADJ."]
    A --> I["LANGUAGE ENGLISH"]
    A --> J["VERSION 210110"]
    A --> K["RETURN RET"]
    B --> L["LENS SHAD. OFF"]
    B --> M["2DNR ON"]
    B --> N["MIRROR OFF"]
    B --> O["FONT COLOR 📋"]
    B --> P["CONTRAST 138"]
    B --> Q["SHARPNESS 021"]
    B --> R["DISPLAY CRT 📋"]
    B --> S["NEG. IMAGE OFF"]
    B --> T["RETURN RET 📋"]
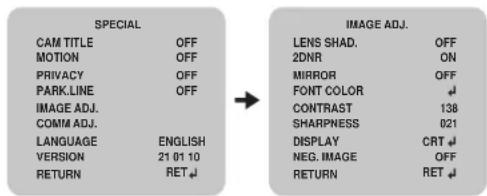
• IMAGE ADJ.: You can adjust camera image.
▷ LENS SHAD : You can adjust lens shading on screen.
▶ LEVEL : 0 \~ 255 steps
2DNR: You can select Digital Noise Reduction on screen. (OFF/ON)
MIRROR: You can select mirror on screen. (OFF/ON)
▶ FONT COLOR : You can select font color on screen.
▶ FONT: O \~ 15 steps
▶ ID & TITLE : 0 \~ 15 steps
CONTRAST : You can adjust contrast on screen. (0 \~ 255 steps)
▶ SHARPNESS : You can adjust sharpness on screen. (0 \~ 31 steps)
▷ DISPLAY : You can adjust display. (CRT / LCD / USER)
▶ CRT (Cathode Ray Tube, Braun tube)
▶ PED LEVEL : 0 \~ 63 steps
▶ COLOR GAIN : 0 \~ 255 steps
▶ LCD (Liquid Crystal Display)
▶ GAMMA : 0.05 \~ 1.00 steps
▶ PED LEVEL : 0 \~ 63 steps
▶ COLOR GAIN : 0 \~ 255 steps
▶ USER
▶ GAMMA : 0.05 \~ 1.00 steps
▶ PED LEVEL : 0 \~ 63 steps
COLOR GAIN: 0 \~ 255 steps
▶ NEG.IMAGE : You can select negative display. (OFF/ON)
text_image
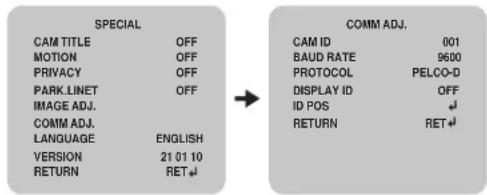
SPECIAL CAM TITLE OFF MOTION OFF PRIVACY OFF PARK.LINET OFF IMAGE ADJ. COMM ADJ. LANGUAGE ENGLISH VERSION 21 01 10 RETURN RET COMM ADJ. CAM ID 001 BAUD RATE 9600 PROTOCOL PELCO-D DISPLAY ID OFF ID POS RETURN RET• COMM ADJ.: You can adjust command.
▶ CAM ID : Select the camera ID
▶ 0 \~ 255
BAUD RATE : Select serial communication speed.
▶ 2400 / 4800 / 9600 / 19200 / 38400 / 57600 bps
▷ PROTOCOL : Select operating protocol
▶ PELCO-D / PELCO-P
▷ DISPLAY ID : Select display item.
▶ OFF/ON
ID POS : You can adjust ID position on screen.
LANGUAGE: You can select language
ENGLISH / CHINESE
VERSION : Factory vision.
RESET : Factory default reset.
Digital BOX Camera Installation Guide 19
8 TROUBLESHOOTING
If there are problems in operation, please refer to the items below.
If the problem persists, please contact the agent you purchased this product from.
| Problems Troubleshooting | |
| Nothing appears on the screen. | Please check the power connection.Please check the video signal line connection.Please check and make sure that the lens mode is set to DC (VIDEO) when using a VIDEO (DC) lens. |
| The video image is not clear. | Please clean the lens with a clean cloth or brush.Please adjust that the screen is not exposed directly to a bright light.Please move the camera if necessary.Please readjust the back-focus of the camera. |
| The screen is dark. | Please adjust the contrast feature of the monitor.If you have an intermediate device, set the 75Ω /Hi-Z properly, and check the terminiPlease check if an auto iris lens is being used and adjust the brightness level. |
| The MOTION DETECTION function is not working | Please check if “MOTION DETECTION” mode is turned on.Please check if the MD Sensitivity is too low.Please check the setting of the MD AREA. |
| The WDR function is not working | Please check if the WDR Level is too low.Please check if the AE Mode is set to MANUAL. The WDR doesn't work in MANUAL Exposure mode. |
| Colors are not quite right. | Please check if the camera is facing directly into sunlight or fluorescent light.Please check if an auto iris lens is being used.Please check the connection of the lens connector cable. |
| The Day&Night function doesn't work | Please check if the AGC of EXPOSURE menu is set to OFF.The Auto Day&Night Function doesn't work in AGC OFF. |
Digital BOX Camera Installation Guide
9 Specification
| Model | NTSC | PAL |
| Image Sensor | 1/3" SONY Super FAD OCC II | |
| Total Pixels | Do PG G W C PGGFGGCGGGGGGGGGGG OgPG G O P | |
| Scanning system | 2-1 Interlace | |
| Scanning Frequency | U ro Q#S U o Q R#P##o UY r o Q#S W# O P | |
| Sync. System | Internal | |
| Resolution | Max 600 TV lines in color(850TV lines in BW) | |
| Min. illumination | Color: 0,1 lux, BW: 0.05 lux (9 lux @ IR LED on) | |
| Video Output | 1,0 Vp-p (75 cpm. composite) | |
| S/N Ratio | more than 50dB (A@C off) | |
| Exposure | Shutter/Brightness/AGC/DWORD | |
| Lens | DC / MANUAL | |
| Gain Control | Off / Low / Middle / High | |
| Shutter Speed | 1/50 ~ 1/100,000 sec | 1/50 ~ 1/100,000 sec | |
| DWDR | Off / On (0 ~ 35 steps) | |
| Flickerless | Off / On | |
| Brightness | 0 ~ 255steps | |
| White Balance | ATW1 / ATW2 / AWC / Outdoor / Indoor / Manual | |
| BLC | Off / BLC / HLC | |
| R/C | Area / Gain selectable | |
| HLC | All Day / Night / (0~255 steps) | |
| Day&Night | Auto / Color / BW / Ext | |
| Auto | Level / Delay selectable | |
| BW | Burst off/on / FI Smart off/on (Gain/lowd selectable) | |
| DPC | Dead Pixels Compensation | |
| Special | Title / MD / PM / Parking / Image / Comm / Language / Version | |
9 Specification
| Model | NBC | PA |
| Cam Title | Text Edit | |
| McI on | Off / On (4 position) | |
| Privacy | Off / On (8 position) | |
| Park Line | Off / On (variable size) | |
| Comm ADJ. | Cam ID / Baud Hats 2400, 4500, 9500, 19700, 38400, 57600 | |
| Protocol (Pelco-P/D) / ID Display (Position) | ||
| Language | English / China | |
| Image ADJ | Lens Shad / DNR / Mirror / Font color / Contrast /Sharpness / Display / Neg. Image | |
| Lens Shading | Off / On (0~255 steps) | |
| DNR | Off / On | |
| Mirror | Off /On | |
| Font Color | ID & Title / OSD Fort color selectable | |
| Contrast | 0~255 steps | |
| Sharpness | 0~31 steps | |
| Display | CRT / LCD / Use | |
| Negative Image | Off / On | |
| Power Source | AC24V / DC12V | |
| Power Input | Connector | |
| Operating Temperature | -10°C ~ +50°C | |
| Operating Humidity | 0 ~ 58% (non-condensing) | |
| Storage Temperature | -20°C ~ +60°C | |