
PSH2440TB - Heating KING - Free user manual and instructions
Find the device manual for free PSH2440TB KING in PDF.

| Product Type | Fan Heater |
| Brand | King |
| Model | PSH2440TB |
| Power | 2000 W |
| Voltage | 220-240 V |
| Frequency | 50/60 Hz |
| Heating Element | Ceramic |
| Fan Speeds | 2 speeds (low/high) |
| Thermostat | Adjustable thermostat |
| Oscillation | Yes, 70° wide |
| Overheat Protection | Yes |
| Tip-Over Switch | Yes |
| Dimensions (W x D x H) | 20.0 x 15.0 x 25.0 cm |
| Weight | 1.5 kg |
| Power Cord Length | 1.5 m |
| Control Type | Manual knobs |
| Noise Level | ~45 dB (low speed) |
| Room Coverage | Up to 20 m² |
| Housing Material | Plastic, heat-resistant |
| Cleaning | Wipe with damp cloth; do not immerse |
| Safety Certifications | CE, RoHS |
Frequently Asked Questions - PSH2440TB KING
User questions about PSH2440TB KING
0 question about this device. Answer the ones you know or ask your own.
Ask a new question about this device
Download the instructions for your Heating in PDF format for free! Find your manual PSH2440TB - KING and take your electronic device back in hand. On this page are published all the documents necessary for the use of your device. PSH2440TB by KING.
USER MANUAL PSH2440TB KING
INSTALLATION AND MAINTENANCE
king
PSH2440TB
Portable Shop Heater
natural_image
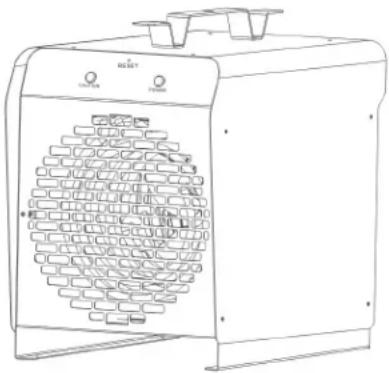
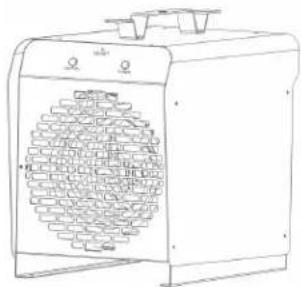
Line drawing of a portable air heater with ventilation grilles and control knobs (no text or symbols)| SPECIFICATIONS | |
| BTU | 13,000B |
| Was 3 | 750W |
| Heang Area (2) 450 2 | |
| Power (Volts) | 240V~60Hz |
| Amps | 16A |
| Heat Sengs 1 On/O | |
| Heat Sengs 2 Thermostat | |

The Yellow Jacket Junior is a versatile 240 volt heater that is perfect for any garage workspace or construction site. Ideal for portable temporary heating or it can be permanently mounted to the wall of ceiling by using the included heavy duty bracket. Designed for durability and safety with industry-leading Sure Stop Safety Limit Protection.

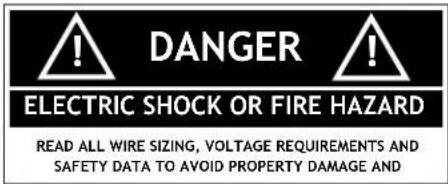
WARNING

READ CAREFULLY - Use the heater only as described in this manual. Any other use is not recommended and could result in fire, electric shock, and personal injury. Following these instructions will prevent difficulties that might occur during the installation and use of the heater. Please studying the instructions first, as they may save considerable time and trouble during installation in addition to providing important safety information. Make sure to save these instructions for future use.
NEVER LEAVE HEATER UNATTENDED WHILE CONNECTED TO A POWER SOURCE
WARNING FIRE OR EXPLOSION MAY OCCUR! During normal operation the heater has hot components and arching or sparking parts inside. Do not use it in areas where gasoline, paint or other flammable liquids are used or stored.
WARNING RISK OF FIRE. To prevent a possible fire, do not block the intakes or exhaust in any manner. Do not use on soft surfaces, like a bed where openings may become blocked. Keep clear of all obstructions. Maintain a 3 foot minimum clearance from front & 12 inches from sides and rear. Heaters must be kept clean of lint, dirt, & debris.
WARNING RISK OF FIRE. DO NOT use heater with extension cord. Plug the heater directly into a 208-240VAC receptacle.
WARNING OVERHEATING OR FIRE MAY OCCUR. Do not place heater behind a door.
WARNING BURN HAZARD. This heater is hot when it is in use. To avoid burns, do not touch the case, grill or interior parts of the heater when in use. Use handles when moving the heater. Allow the heater to cool down before touching it.
WARNING RISK OF ELECTRIC SHOCK OR INJURY. Do not run the power cord under carpeting, throw rugs, runners or other similar coverings. Do not route the cord under furniture or appliances. Keep the cord away form a traffic area so it will not cause a tripping hazard. Do not operate the heater with a damaged cord or plug, after the heater malfunctions, or if it has been dropped or damaged in any manner. Discard heater immediately, do not try to repair.
WARNING RISK OF ELECTRICAL SHOCK. Connect the heater to a properly grounded outlet only. Do not insert or allow foreign objects to enter the intake or exhaust opening of the heater as this may cause an electric shock or fire and damage the heater. Unplug the heater before performing any maintenance or when not in use. To disconnect heater, turn thermostat control to low, then remove plug from outlet.
WARNING NEVER SUSPEND OR HANG ANY OBJECTS FROM A MOUNTED HEATER.
WARNING CAUTION—RISK OF ELECTRIC SHOCK. DO NOT OPEN HEATER CASE WHEN PLUGGED INTO AN ELECTRICAL OUTLET.
KING ELECTRIC MFG CO · 9131 10TH AVENUE SOUTH · SEATTLE, WA 98108 · PH:206 762 0400 · FAX: 206 763 7738 · www.king-electric.com
SAFTEY INFORMATION
| Minimum ClearanceFrom Combustibles | |
| Front 3 ft. | |
| Top 1 ft. | |
| Sides 1 ft. | |
| Rear 1 ft. | |
Warning: Prior to operating, make sure the electrical outlet is of the configuration and capacity appropriate for the heater.
- Use extreme caution when heater is used near children or people with disabilities.
- Do not use outdoors.
- Not intended for use in bathrooms, laundry areas or other similar wet locations. Never locate heater where it may have contact with water.
- Do not use heater in wet or moist locations.
-
Always locate heater on a stable and level surface.
-
Do not place the heater against cardboard or low-density fiberboard surfaces.
- Avoid using an extension cord because the extension cord may overheat and cause a risk of fire.
- Use only the electrical power (voltage and frequency) specified on the model plate of the heater.
- Use only three-prong, grounded outlet.
- ALWAYS unplug the heater when not in use.
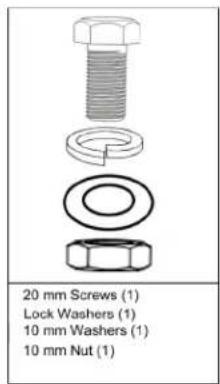
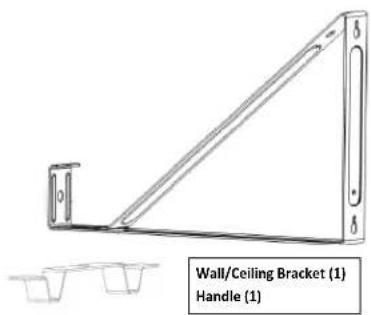
WHAT'S IN THE BOX

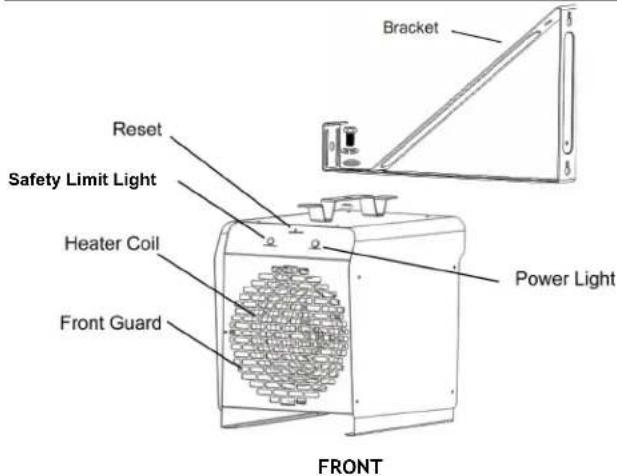
HEATER DIAGRAM
ASSEMBLY INSTRUCTIONS

PSH2440TB
Portable Shop Heater
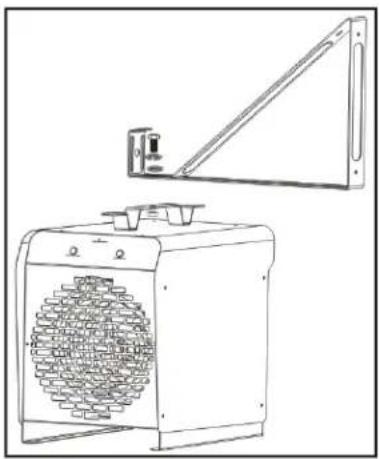
INSTALLATION INSTRUCTIONS
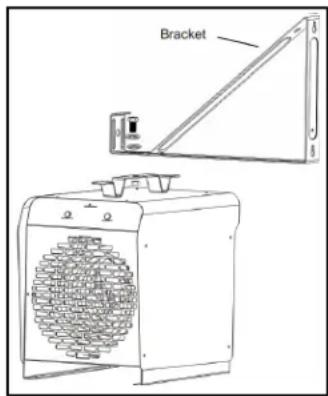
FOR WALL MOUNT APPLICATIONS
natural_image
Line drawing of a mechanical device with a circular vent and a suspended arm (no text or symbols)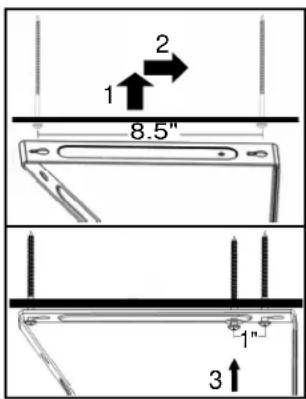
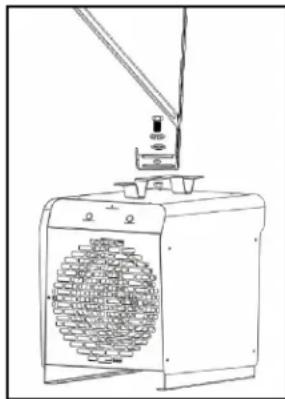
FOR CEILING MOUNT APPLICATIONS
TOOLS NEEDED:
- Power Drill
- 4 mm or 5/32 in. drill bit
- Phillips head screwdriver
- Stud finder
Remove heater & all packaging materials from the box.

Tip: Be sure to remove the hardware package from the Styrofoam packaging.
FOR WALL OR CEILING MOUNT APPLICATIONS
Attaching Heater to Wall Bracket
- Line up hole on bracket with hole on the heater handle.
- Attach heater to bracket with 20mm screw and nut, larger 10 mm washer and locking washer.

WARNING
Be certain adjustment knobs are tightened firmly to secure heater to swivel bracket.
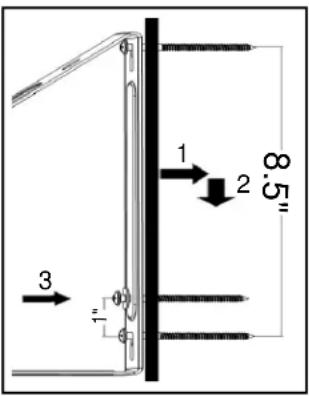
Wall or Ceiling Mounting
- Locate wood stud in wall or joist in ceiling to mount heater.
- Use holes in bracket to mark 3 holes for drilling.
- Pre-drill 3 holes for screws. Be sure holes are drilled into the wood stud in wall or joist in ceiling.
- Secure two 66 mm screws to wall leaving 1/8" exposed. Two (2) screws must be attached to a wood stud (min 1.5").
- Attached bracket to wall by inserting screws through keyholes on bracket and pushing down to lock in place.
- Tighten screws against bracket to secure.
- Insert the third 66 mm screw with a washer through the mid hole on bracket, tighten screw against bracket to secure.

WARNING
HEATER MUST BE ATTACHED TO A JOIST WITH A MINIMUM OF TWO (2) SCREWS IN OPPOSING HOLES.

WARNING
Use appropriate fasteners. The screws included are for installing in wood studs only and not intended for metal joists.
OPERATION
natural_image
Line drawing of a portable air heater with a circular vent grille (no text or symbols)| SPECIFICATIONS | |
| BTU 13,000B | |
| Was 3,750W | |
| Heang Area (2) 450 2 | |
| Power (Volts) 240V~60Hz | |
| Amps 16A | |
| Heat Sengs 1 On/O | |
| Heat Sengs 2 Thermostat | |

OPERATION
Operation
- Position the fan heater so that it stands upright on a firm, level surface (When used as a portable) and at a safe distance from wet locations and flammable objects.
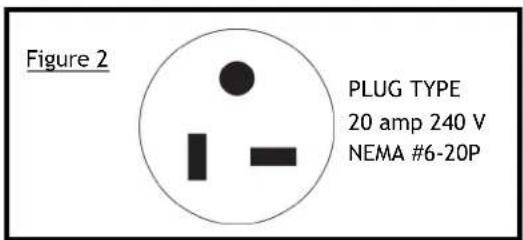
- Connect the fan heater to the proper electrical power. See grounding instructions (Figure 2)
- Set the thermostat dial to the maximum temperature.
- Once the room reaches the desired temperature, turn the thermostat dial back until heating element turns off. The heater will cycle automatically around this preset temperature. To increase temperature, turn the thermostat knob clockwise. To lower temperature, turn the thermostat counterclockwise.
- LOW setting on thermostat does not prevent heater from turning ON. Turn power switch to OFF or unplug from wall to prevent heater from turning ON. Before unplugging heater, turn power switch to OFF position.
IMPORTANT: This heater has a built-in Fan Delay designed to exhaust heat from the unit until the elements are cool (Cool Down Cycle). This improves energy efficiency. The fan may cycle on/off for a few minutes after the thermostat is set to the LOW position or power switch is set to OFF. This is normal and required to cool down heater and also prevent the safety limit from nuisance tripping.
i HOW TO RESET THE HEATER (SURESTOP™ SAFTEY LIMIT)
This heater is equipped with an internal safety limiting thermostat and overheat protection circuit.
If SAFTEY LIMIT light illuminates, an abnormal condition has turned off the heating elements. TO RESET, WAIT 10 MINUTES to allow the heater to cool down, then insert a small screw driver tip into the hole on the front of the heater marked "LIMIT RESET" and push firmly until you hear a click.
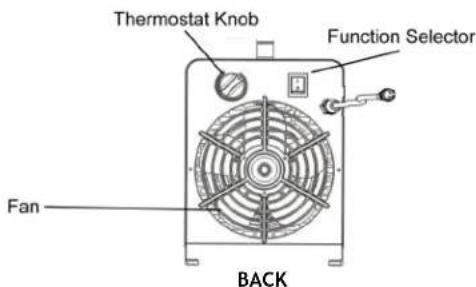
Thermostat Instructions
- At first, set the thermostat to “+” and let the heater operate with full power input. When the room temperature reaches the required value, turn the thermostat to the left until it switches off.
- The thermostat will then switch on and off automatically to control the room temperature according to the preset value and keep the room temperature constant.
- When using the heater for the first time, you may notice a slight emission of smoke. This is quite normal and it stops after a short time. The heating element is made of steel and was coated with a layer of protective oil during production. The smoke is caused by the leftover oil as it is heated.
Grounding Instructions
- This heater is for use on 240 (or 208) volts. The cord has a plug as shown in figure 2 (below). No adapter is available for this blade configuration, and none should be used. The type outlet is a 240 (or 208) volt grounding outlet. When properly installed, it provides a ground connection through the cord to the heater to protect the operator from electric shock.
- Be sure that the electrical receptacle is of the configuration and capacity appropriate for the heater.
TROUBLESHOOTING
king
PSH2440TB
Portable Shop Heater
natural_image
Technical line drawing of a portable air conditioner unit with a mounted bracket and fan (no text or symbols)| SPECIFICATIONS | |
| BTU 13,000B | |
| Was 3,750W | |
| Heang Area (2) 450 2 | |
| Power (Volts) 240V~60Hz | |
| Amps 16A | |
| Heat Sengs 1 On/Φ | |
| Heat Sengs 2 Thermostat | |

MAINTANANCE
Cleaning and Maintenance
- Before cleaning the appliance, disconnect it from the power outlet and let it cool down.
- In order to protect the enclosure, don't splash water onto the heater, and never use a solvent like gasoline, isoamyl
acetate, toluene, etc. to clean the heater
- The enclosure is easy to get dirty. Wipe it often with a soft sponge. For very dirty parts, wipe with a sponge dipped in < 122°F water and mild detergent, then dry the heater enclosure with a clean cloth. Be careful not to let the water enter the inside of the appliance.
TROUBLESHOOTING GUIDE
| Problem | Cause | Solution |
| Fan stays on when heat shuts off. | Fan runs continuously while the heater is operating. | Heater is operating correctly. |
| Heating element does not glow red. | Heating element is made of stainless steel and will not glow red to produce heat. | Heater is operating correctly. |
| Do not feel heat or air flow. | No power to heater.Desired room temperature reached.Heater does not heat area in front of heater, it will disperse heat throughout room to heat entire space. | Check power connections / connect heater to power supply.Thermostat will shut off once desired room temperature is reached. Heater is operating correctly.Heater is operating correctly. |
KING ELECTRIC MFG CO · 9131 10TH AVENUE SOUTH · SEATTLE, WA 98108 · PH:206 762 0400 · FAX: 206 763 7738 · www.king-electric.com
- INSTALLATION AND MAINTENANCE
- king
- PSH2440TB
- Portable Shop Heater
- WARNING
- NEVER LEAVE HEATER UNATTENDED WHILE CONNECTED TO A POWER SOURCE
- SAFTEY INFORMATION
- ASSEMBLY INSTRUCTIONS
- INSTALLATION INSTRUCTIONS
- TOOLS NEEDED:
- FOR WALL OR CEILING MOUNT APPLICATIONS
- Attaching Heater to Wall Bracket
- Wall or Ceiling Mounting
- OPERATION
- Thermostat Instructions
- Grounding Instructions
- TROUBLESHOOTING
- MAINTANANCE
- Cleaning and Maintenance
Brand : KING
Model : PSH2440TB
Category : Heating