
ColorFox 100 - Projector MARTIN - Free user manual and instructions
Find the device manual for free ColorFox 100 MARTIN in PDF.


| Product Type | Lighting Controller (DMX) |
| Brand | Martin |
| Model | ColorFox 100 |
| Dimensions (L x W x H) | 110 x 100 x 29 mm |
| Weight | 240 g |
| Power Supply Input | 100 to 240 VAC, 50/60 Hz |
| Controller Input | 48 VDC via Power over Ethernet (PoE) |
| Power Consumption | 2 W |
| Control Interface | DMX 512 |
| Control Channels | 512 |
| Maximum Fixture Types | 10 |
| Maximum Fixtures | 100 |
| Recallable Presets | 4 |
| Connections: AC Power (Power Supply) | IEC 3-pin |
| Connections: PC | USB mini-B |
| Connections: DC Power In/DMX Data Out | RJ-45 |
| Software Compatibility | pixmove (Windows XP) |
| Mounting | Wall-mounted with included bracket |
| Approvals (Power Supply) | cUL/UL, CE, CCC, TUV, FCC |
| Approvals (Controller) | CE |
| Safety | Not for household use; ground power supply; use only indoors |
Frequently Asked Questions - ColorFox 100 MARTIN
User questions about ColorFox 100 MARTIN
0 question about this device. Answer the ones you know or ask your own.
Ask a new question about this device
Download the instructions for your Projector in PDF format for free! Find your manual ColorFox 100 - MARTIN and take your electronic device back in hand. On this page are published all the documents necessary for the use of your device. ColorFox 100 by MARTIN.
USER MANUAL ColorFox 100 MARTIN
Dimensions


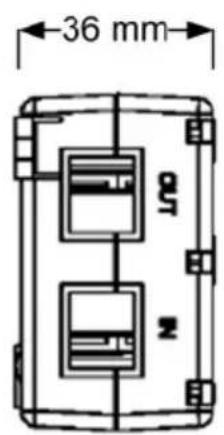
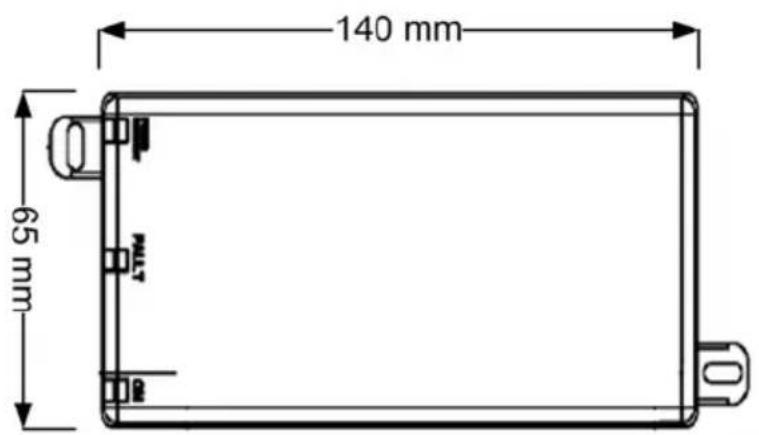
Contents
Dimensions 2
Safety Information.... 4
Introduction 5
Installation....6
Connections....7
Setup....9
Troubleshooting 14
Specifications.... 15
Safety Information
Warning! This product is not for household use.
Read this manual before installing and operating the controller, follow the safety precautions listed below, and observe all warnings in this manual.
Preventing electric shocks

Always ground (earth) the power supply.
Use only a source of AC power that complies with local building and electrical codes, and that has both overload and ground-fault protection.
If the controller or power supply are in any way damaged, defective, wet, or show signs of overheating, disconnect the power supply from AC power and contact Martin Service for assistance.
Do not install or use the device outdoors. Do not spray with or immerse in water or any other liquid.
Do not remove any covers or attempt to repair the controller or power supply. Refer any service to Martin.

natural_image
Simple line drawing of a trash bin with crossed lines indicating no waste or restriction (no text or symbols)Disposing of this product
Martin products are supplied in compliance with Directive 2002/96/EC of the European Parliament and of the Council of the European Union on WEEE (Waste Electrical and Electronic Equipment), as amended by Directive 2003/108/EC, where applicable.
Help preserve the environment! Ensure that this product is recycled at the end of its life. Your supplier can give details of local arrangements for the disposal of Martin products.
Introduction
About the ColorFox 100
The ColorFox 100 is a revolutionary new lighting controller for DMX controllable color changing lights. Programmed with each fixture's unique color curve, it provides the simplest, yet most powerful interface ever developed to control and match colors from multiple sources.
Package contents
The ColorFox 100 package contains the following items.
• ColorFox 100 Controller
• 48 V Power over Ethernet (POE) power supply
• CD-ROM with documentation and pixmove software
- 5 m UTP patch cable
- 1.5 m USB cable
About this document
This guide describes how to install and set up the ColorFox 100 controller.
For a description of how to operate the controller, please refer to the ColorFox 100 Quick Guide.
For help with pixmove, refer to the program's online help.
For installation and setup of lighting devices, please refer to their user manuals.
Installation
Controller and bracket
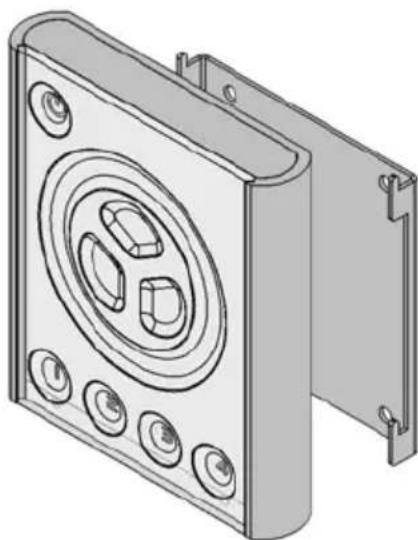
The ColorFox 100 is designed to be wall-mounted using the included bracket. To mount:
-
Loosen the set screw on the bottom of the ColorFox 100 with a 2 mm hex wrench and remove the wall bracket.
-
Center the bracket on the desired mounting position with the hooks pointing up.
-
Fasten the bracket to the wall with four suitable screws (not included).
-
Plug the included 5 m UTP patch cable into the RJ-45 socket on the back of the controller.
-
Place the controller on the bracket and slide it down over the hooks.
-
Tighten the set screw a few turns to hold the controller in place. Do not over tighten: stop as soon as you feel light resistance!
natural_image
Technical line drawing of a mechanical housing or enclosure component with circular cutouts and mounting brackets (no text or symbols)Power supply
Install the power supply in a dry location within a 40 meter cable run of the controller.
Connections
flowchart
graph TD
    A["Color Channel"] --> B["Data"]
    C["POE in out"] --> D["Power"]
    E["Terminator"] --> F["Data"]
    G["Control Panel"] --> H["1 2 3 4"]
Controller to power supply
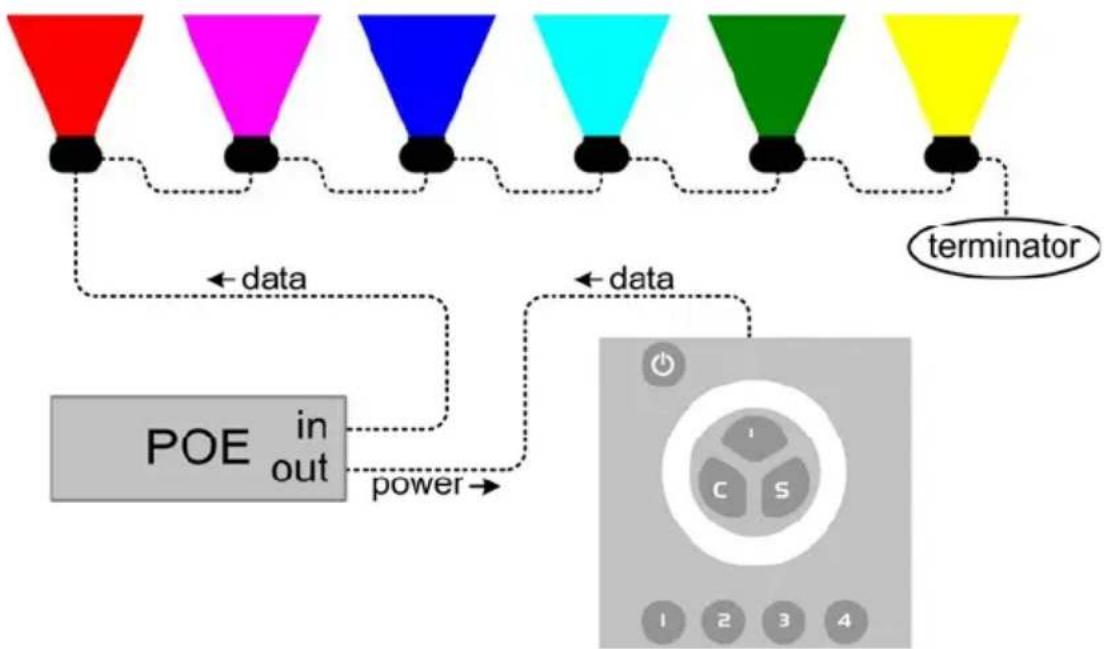
Connect a UTP patch cable (provided) between the RJ-45 socket on the back of the controller and the OUT socket on power supply before connecting the power supply to AC.
When power is applied to the power supply, all 3 LEDs will light for 2 seconds and then the "ON" LED will illuminate green. The "CONNECT" LED illuminates green when the controller is connected and receiving power.
Power supply to lights
Connect another UTP patch cable (not included) between the power supply's IN socket and the DMX input on one of the lights. If the light does not have an RJ-45 socket, you will need a 3-pin or 5-pin XLR-to-RJ45 adaptor that connects the pins as shown below.
| XLR pin RJ45 | pin Function | |
| 1 7, 8 signal common | ||
| 2 2 data - | ||
| 3 1 data + | ||
| 4, 5 no contact not used | ||
Connect the lights together in a serial chain, output to input. Connect no more than 32 lights and keep the total cable run to 300 m (1000 ft.) or less. If the application exceeds these limits, DMX splitter/amplifiers may be used after the power supply to increase the cable run and/or number of lights.
Line terminator
Terminate the end of the data line to prevent reflections that can distort the signal. This is usually accomplished by inserting a suitable 120 ohm termination plug into the DMX output of the last fixture in the line.
AC power supply cable plug

Warning: Risk of electric shock! Plug installation shall be performed by a qualified electrician.
A grounding-type (earthed) power plug that fits the local power outlet must installed on the AC cable for the power supply. Alternatively, you can acquire an IEC power cable with a suitable grounding-type plug from most consumer electronics stores.
When installing the plug connect pins as follows:
• yellow and green wire to ground (earth)
- blue wire to neutral
- brown wire to live
Setup
Introduction
The included pixmove software allows you to
- configure the ColorFox 100 for use with specific lighting fixtures,
- create and load lighting designs, and
- update fixture profiles and controller firmware.
This section describes how to configure the controller. The other features are described in the pixmove help file.
Software installation
pixmove requires Windows XP. Install the software as follows:
- Place the CD-ROM in the drive. If autoplay is enabled, an installation dialog opens automatically after loading the CD-ROM.
- If the installation dialog does not open, you must run the boot.bat file on the CD-ROM. Select Run from the Start menu, enter [CD-ROM drive letter]:boot.bat, and click OK.
- From the installation menu, select whether you want to download and install the latest version of the software from the Internet (recommended), or the version on the CD-ROM.
- Review and acknowledge the user agreement. Click Next.
- The installation wizard opens. Follow the instructions on screen to complete the process.
Fixture setup
Though sometimes called “intelligent” lights, lighting fixtures can not identify themselves to the controller. Before first use, and whenever changes are made to the lighting installation, the controller must be configured with the number and types of connected lights.
Configure the controller as follows.
-
If you have not already done so, install the pixmove software.
-
Start pixmove.
-
Connect the ColorFox 100 to any USB port on the computer using the included USB cable. Do not connect the controller to the PC before the software is installed.
-
Within a few seconds, the computer detects the controller and asks whether you want to load data from the device. Click Yes.

- The next prompt alerts you that loading data will cause any unsaved changes to be lost. Click Yes to continue.

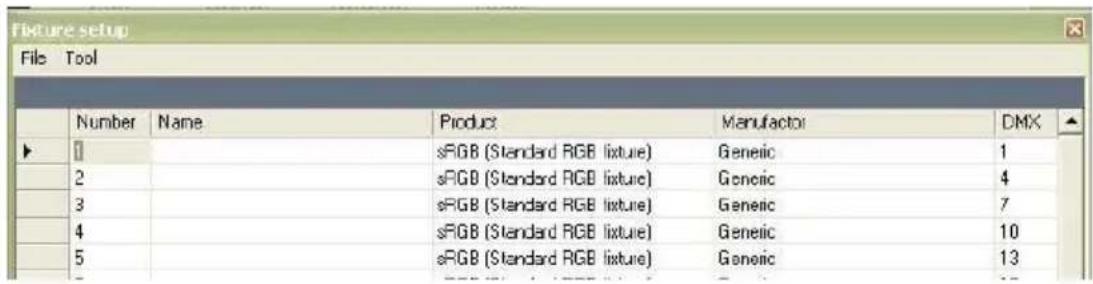
- Click Setup > Fixture setup from the main menu. The Fixture setup dialog opens.
-
If configuring the ColorFox 100 for the first time, delete the pre-loaded fixture setup. Select Tool > Clear all from the dialog menu.
-
Add fixtures to the setup. Select Tool > Add fixture(s) from the dialog menu. Double-click the manufacturer name in the Select fixture type dialog, then click the model. Enter the quantity of fixtures of this type in the Numbers to Add field. Click Add.

-
The quantity of fixtures is inserted starting at the cursor location. The following fields are displayed:
-
fixture number (1 to 100)
- fixture name (user designated)
- fixture type
- fixture manufacturer
- fixture DMX channel
| Number | Name | Product | Manufacturer | DMX | |
| 1 | Cyclo 04 | Martin Professional | 1 | ||
| 2 | Cyclo 04 | Martin Professional | 5 | ||
| 3 | Cyclo 04 | Martin Professional | 9 | ||
| 4 | Cyclo 04 | Martin Professional | 13 | ||
| 5 | Cyclo 04 | Martin Professional | 17 | ||
| 6 | Cyclo 04 | Martin Professional | 21 | ||
| 7 | Cyclo 04 | Martin Professional | 25 | ||
| 8 | Cyclo 04 | Martin Professional | 29 | ||
| 9 | Cyclo 04 | Martin Professional | 33 | ||
| 10 | Cyclo 04 | Martin Professional | 37 | ||
| 11 | 0 | ||||
| 12 | 0 |
- Repeat step 8 for each type of fixture. The ColorFox 100 may be configured with up to 10 types of fixtures and a total of up to 100 lights.
- (Optional) You can enter names for the fixtures in the Name column to help identify them.
- (Optional) If you want to save the fixture setup on the computer, select File > Save to file from the dialog menu. Select the file location and name in the Save dialog and click OK.
- Close the Fixture setup dialog. Click Yes at the prompt to keep the changes.
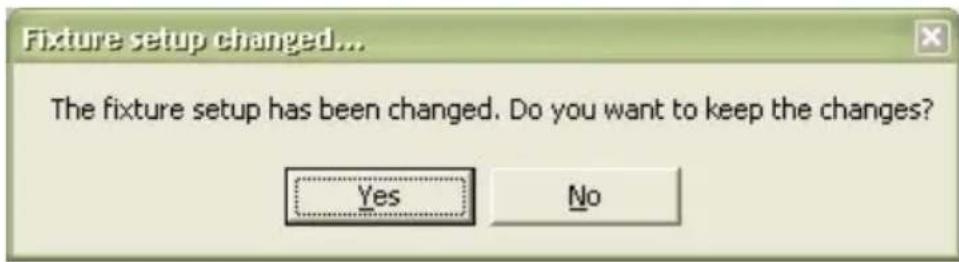
- The fixture setup must now be saved to the controller.
- Click either Device or File in the main window.

- Click Save to device.
- Click Yes at the confirmation prompt.

- The Colorfox 100 is now configured and ready for use. Before operation, the lights must be set to the DMX addresses assigned in the Fixture setup dialog.
Troubleshooting
| Problem Probable | Cause Solution | |
| No response from controller when on/off button is pressed | Cables reversed at power supply | Verify that patch cable from controller is connected to power supply's OUT socket |
| Dynamic designs do not execute when a preset button is pressed | Other lighting settings have been saved in the preset memory | Press and hold the preset button for about 4 seconds until the controller sounds twice |
| One or more lights has the wrong color, flashes, or blinks randomly | Interference in DMX data line | Verify that the end of the data line is terminated |
| Data line length or fixture limit exceeded | Add a DMX splitter/amplifier to the data line | |
| Lights do not respond to controller | Incorrect fixture setup | Configure controller |
| Fixtures addressed incorrectly | Verify that fixtures are addressed as per the Fixture setup dialog |
Specifications
Physical
Dimensions (L x W x H).... 110 x 100 x 29 mm
Weight 240 g
Electrical
Power supply input....100 to 240 VAC, 50/60 Hz
Controller input 48 VDC
Power consumption 2 W
Control and programming
Control interface.....DMX 512
Control channels....512
Maximum number of fixture types ....10
Maximum number of fixtures....100
Recallable memories (presets)......4
Connections
AC power (power supply)......IEC 3-pin
PC.... USB mini-B
DC power in/DMX data out.... RJ-45
Approvals
Power supply...... cUL/UL, CE, CCC, TUV, FCC
Controller.....CE
Ordering information
ColorFox 100 Controller P/N 90734500
- Dimensions
- Contents
- Safety Information
- Preventing electric shocks
- Disposing of this product
- Introduction
- About the ColorFox 100
- Package contents
- About this document
- Installation
- Controller and bracket
- Power supply
- Connections
- Controller to power supply
- Power supply to lights
- Line terminator
- AC power supply cable plug
- Setup
- Software installation
- Fixture setup
- Specifications
- Physical
- Electrical
- Control and programming
- Approvals
- Ordering information
Brand : MARTIN
Model : ColorFox 100
Category : Projector