
XMRT3S - Action Camera Epcom - Free user manual and instructions
Find the device manual for free XMRT3S Epcom in PDF.


| Product Type | Action Camera |
| Brand | Epcom |
| Model | XMRT3S |
| Dimensions | Approx. 60 x 40 x 30 mm |
| Weight | Approx. 100 g |
| Power Source | Rechargeable lithium-ion battery, 1000 mAh |
| Video Resolution | Up to 4K @ 30fps |
| Photo Resolution | Up to 12 MP |
| Waterproof Rating | Up to 30 m (with housing) |
| Connectivity | Wi-Fi, USB-C, Micro HDMI |
| Memory Card Support | microSD up to 128 GB |
| Battery Life | Approx. 90 minutes at 1080p |
| Field of View | 170° wide angle |
| Image Stabilization | Electronic image stabilization |
| Main Features | Time-lapse, slow motion, loop recording, burst mode |
| Waterproof Housing | Included |
| Mounting Accessories | Helmet mount, handlebar mount, adhesive pads |
| Maintenance | Clean lens with soft cloth; dry after use in water; charge with included cable |
| Safety | Avoid overheating; do not disassemble; use only specified charger |
| Spare Parts & Repairability | Battery and mounts available online; service by qualified technician |
| General Information | Ideal for outdoor sports, vlogging, and travel |
Frequently Asked Questions - XMRT3S Epcom
User questions about XMRT3S Epcom
0 question about this device. Answer the ones you know or ask your own.
Ask a new question about this device
Download the instructions for your Action Camera in PDF format for free! Find your manual XMRT3S - Epcom and take your electronic device back in hand. On this page are published all the documents necessary for the use of your device. XMRT3S by Epcom.
USER MANUAL XMRT3S Epcom
natural_image
Close-up of a black handheld device with a red button labeled 'B' on the back panel (no readable text or symbols beyond the button)Content
- Introduction......1
Package Contents....1
- Structure design.... 2
2.1 Structure introduce.... 2
- Basic Operations....4
3.1 Menu introduction....4
- Device using....7
4.1 Turning on the Camera....7
4.2 Turning off the Camera....7
4.3 Recording Video....7
4.4 F button operation....7
4.5 Charging the Battery....7
1. Introduction
XMRT3S is a full featured body worn camera specifically designed for Law Enforcement. The camera features real time HD video, 1080P recording, with wide angle; The rugged design is resilient to withstand demanding work environments faced by law enforcement officers, corrections, military and security detail.
Package Contents
* Body worn camera
*USB cable
* USB power adapter
*CD with manual and software
* Universal metal clip
2. Structure design
2.1 Structure introduce

| Item | Name | Description |
| 1 | Lens | The wide angle HD camera lens |
| 2 | REC button | Press the button to start the audio recording only. |
| 3 | IR light | Record clear image in HD in low light situations. 10 m visible. |
| 4 | IR sensor | The sensor will detect the brightness of the environment, then activate the IR light and switch to night vision m |
| 5 | Intercom Mic | Capture the environment voice during using the intercor |
| 6 | Mult-function button | Long press it to turn off screen and LEDDouble press it to turn off the microphoneShort press it to turn off the screen only |
| 7 | ON/OFF button | Slid it on to turn on, slid it down to turn off. |
| 8 | USB port | Connect USB cable for charging or connection to PC |
| 9 | External camera port | Connects to external camera, when it is connected, it show an icon in the screen. T3S not support external ca |
| 10 | Speaker | The speaker for playback and voice report. |
| 11 | Display screen | Display all the status information of the camera. |
| 12 | Charging light | Red means camera is recharging, solid green means th battery full charged. |
| 13 | Status light | Red blinking means video recording, solid green mean standby. |
| 14 | Speaker | The speaker for playback and voice report. |
| 15 | Data interface | The interface for docking, walkie-talkie and external batt connection. |
The body worn camera LCD screen is a small monitor to display various camera information and operation status.

| Item | Icon | Name | Description |
| 1 |  | Time | The real time of the camera |
| 2 |  | Time | AM or PM time |
| 3 |  | Week | It will display the first three words the each day of week. |
| 4 | 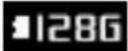 | Capacity | The remain capacity of the SD car |
| 5 |  | Status | Red icon means camera is recording |
| 6 |  | External camera | Display this icon means external is connected success, otherwise not. |
| 7 |  | Mute | Display this icon means the microphone is turned off |
| 8 |  | Battery | It display the battery status |
3. Basic Operations
3.1 Menu introduction
Connect the body camera to the BWC-Tool, you can setup all the parameter setting of the camera, as follow:

1. Video resolution
The body worn camera offers five different recording resolutions. Resolution and frame rate options feature a proper balance between video quality and maximizing amount of video stored.
| Options | Display resolution | Images per second |
| 720P30 | 1280*720 | 30 |
| 848P60 | 848*480 | 60 |
| 848P30 | 848*480 | 30 |
| 1080P30 | 1920*1080 | 30 |
| 720P60 | 1280*720 | 60 |
2. Video quality
Select video quality based on the need of video recording. High means the best quality, which will
encode with big bit rate.
3. Video clip
Video clip selection defines the length of each video segment, and this option only is used for video recording, invalid for audio recording.
Sub-option: Auto, 10 minutes, 20 minutes, 30 minutes; auto means it will create a file in almost 2GB size, and the time is about one hour, depends on the video resolution.
4. Pre-recording
Pre-recording saves an additional seconds of video before the video recording button is pressed, and the additional seconds is about 30 seconds. After the option of pre-recording is enabled, the camera cannot snapshot, but the snapshot will work during the video recording.
For example, we set the value(between setting the pre-recording and pressing the video recording button) as X, if X <30s, the camera will store an additional video for X seconds before the video recording button is pressed, if X>=30s, the camera will store an additional video for 30 seconds before the video recording button is pressed.
5. Video loop
When you create one new video recording file, if the file size is more than the remaining storage of camera, the camera will delete the most original file, so that the new file can be saved. Here if the video file is tagged as imp file, the imp file cannot be deleted.
6. Indicate sound
This option means when the user operates camera, it will give the corresponding response, OFF, beep or voice, and it will applied to the operations as follows:
- Start video recording;
- Stop video recording;
- Power on the camera;
- Power off the camera;
- Low battery;
- Inadequate storage space;
7. Indicate light
Select to turn all the LED ON or OFF, including the status LED and power LED.
8. Vibration
It will be used in the situations:
-
press the video recording button;
-
press the audio recording button;
-
Power off the camera;
-
Power on the camera.
It will remind the users that the function is in use.
9. Auto IR switch
If the option is on, during video recording (not preview mode), the IR will work when the environment is dark, similarly, when the environment is bright, the IR will be closed automatically.
10. Language
The language will be applied to the screen display and all the voice notice, and the users can choose English, 日本語, Español, русский and so on.
11. Microphone
Select to turn the built-in microphone ON or OFF, when start audio recording, even the microphone is OFF, it will be active automatically.
When microphone is OFF, video recording will have not any voice.
12. IR Sensitive
It will help the camera to detect the brightness of environment, and check if the camera will activate or inactivate the IR.
13. Pre-recording audio
This option is for the audio microphone switch during the recording, when it's ON, the recording will have audio, if it's OFF, and there is no audio during the recording.
4. Device using
4.1 Turning on the Camera
In power off status, Slid the "power on/off" button to up status, the camera will be turn on. Meanwhile, the status indicator will turn green.
4.2 Turning off the Camera
In preview mode, Slid the “power on/off” button to down status, the camera will save the current status and power off. Meanwhile, the status indicator will turn off.
4.3 Recording Video
In preview mode, short press the front button to start recording. Meanwhile, the status indicator will turn red and flash. Short press again to stop recording and the video will be saved in MP4 format automatically.
4.4 F button operation
Long press it to turn off screen and LED
Double press it to turn off the microphone
Short press it to turn on/off the screen only
4.5 Charging the Battery
This camera has a chargeable battery built in. In case of low battery, please connect this camera to power supply for battery charging.
Connect this camera and adaptor via USB cable, and connect adaptor to power supply to charge the battery. In charging status, the status indicator will turn red. Once the battery is fully charged, the status indicator will turn green.

natural_image
Diagram showing a device with an LCD panel connected to a USB plug (no text or symbols present)Remark: When you recharge the body camera, please make sure it is OFF. Also, even you don't use the camera for a long time; please recharge it every 3 months.
- Content
- Introduction
- Package Contents
- Structure design
- Structure introduce
- Basic Operations
- Menu introduction
- Video resolution
- Video quality
- Video clip
- Pre-recording
- Video loop
- Indicate sound
- Indicate light
- Vibration
- Auto IR switch
- Language
- Microphone
- IR Sensitive
- Pre-recording audio
- Device using
- Turning on the Camera
- Turning off the Camera
- Recording Video
- F button operation
- Charging the Battery
Brand : Epcom
Model : XMRT3S
Category : Action Camera