ECX300 - Uncategorized Seacliff - Free user manual and instructions
Find the device manual for free ECX300 Seacliff in PDF.

| Product Type | Digital Camcorder |
| Model | ECX300 |
| Brand | Seacliff |
| Dimensions (L x W x H) | 5.0 x 5.0 x 2.5 cm |
| Weight | 150 g (including battery) |
| Power Supply | Rechargeable lithium-ion battery (3.7V, 1000mAh) |
| Charging Method | USB-C cable (5V, 1A) |
| Battery Life | Up to 2 hours continuous recording |
| Recording Resolution | 1920x1080 Full HD at 30fps |
| Photo Resolution | 12 megapixels |
| Storage | MicroSD card up to 64GB (not included) |
| Lens Aperture | F/2.8 |
| Field of View | 120 degrees |
| Waterproof Rating | IPX8 (up to 30m with housing) |
| Connectivity | Wi-Fi, Bluetooth 4.0 |
| Display | 2.0-inch LCD touchscreen |
| Key Functions | Video recording, time-lapse, slow motion, burst photo |
| Maintenance & Cleaning | Wipe with soft dry cloth; clean lens with microfiber |
| Safety Warnings | Do not expose to extreme temperatures; keep away from water when open |
| Spare Parts & Repairability | Battery and charger available; non-user serviceable internal components |
| Included Accessories | USB cable, waterproof case, mounting bracket, user manual |
Frequently Asked Questions - ECX300 Seacliff
User questions about ECX300 Seacliff
0 question about this device. Answer the ones you know or ask your own.
Ask a new question about this device
Download the instructions for your Uncategorized in PDF format for free! Find your manual ECX300 - Seacliff and take your electronic device back in hand. On this page are published all the documents necessary for the use of your device. ECX300 by Seacliff.
USER MANUAL ECX300 Seacliff
text_image
CFX310 SEACLIFF CFX310 SEACLIFF SFX310Colours and appearances may vary
User Manual
[Revision 6.0 March 2022]
Safety
Basic precautions, including the following important safety instructions, should always be followed when using this equipment. Read all instructions before use.

When engaging in any type of water activity, it is critical that you understand all warnings, and follow all safety recommendations. Failure to do so may result in injury, ing the possibility of death.
- Use this product for its intended use only as described in this user manual. Do not use attachments not supplied or recommended by the manufacturer.
• Maximum weight capacity = 105 kg.
• Maximum cold inflation pressure = 12 PSI (0.8 Bar / 83 kPa).
• Always wear an approved water safety vest / personal floatation device (PFD). - Do NOT use in poor weather or water conditions that may affect your ability to properly control the equipment or return to shore.
- Do NOT allow children to use the equipment, unless under very close adult supervision.
- Do NOT use the equipment if tired or under the influence of drugs, alcohol or medication.
- Do NOT use the equipment in low light conditions.
- Do NOT use the equipment in any way that is beyond your skills or abilities.
- Use the equipment in accordance with local laws / regulations – paddle legally.
- Do NOT leave the equipment exposed to direct sunlight when out of the water.
• Always check the condition of the equipment (seams, valves etc) before every use. - Do not store the equipment in its carry bag for extended periods.
- This equipment is not intended for use by persons (including children) with reduced physical, sensory or mental capabilities, or lack of experience and knowledge, unless they have been given supervision or instruction concerning use of the equipment by a person responsible for their safety.
Table of Contents
Safety....2
Parts Identification....4
Spare Parts 5
Inflatable Board Care....6
Set-Up....7
Inflating the Board....7
Installing the Fin....7
Assembling the Paddle 8
Installing the Tether....8
Installing the Kayak Seat....9
Care and Maintenance....9
Cleaning....9
Storage 9
Valve Tightening 9
Repairing the Board 10
Specifications....10
Parts Identification
Before your first use, ensure that you received all the items that were stated on the listing that you purchased from. Products will include some or all of the following items. Please note that all parts in this list are not available with all models. Please refer to your specific product listing for more information regarding the included parts

text_image
Labeled diagram of various seacliff equipment including swimmer, lunge, and leaping tools with numbered parts.| No. | Description |
| 1 | Board (shown rolled) |
| 2 | Fin |
| 3 | Seat |
| 4 | Paddle Tube |
| 5 | Centre Tube |
| 6 | Handle Tube |
| No. | Description |
| 7 | Pump |
| 8 | Inflation Hose |
| 9 | Tether |
| 10 | Repair Kit |
| 11 | Carry Bag |
| 12 | Valve Spanner |
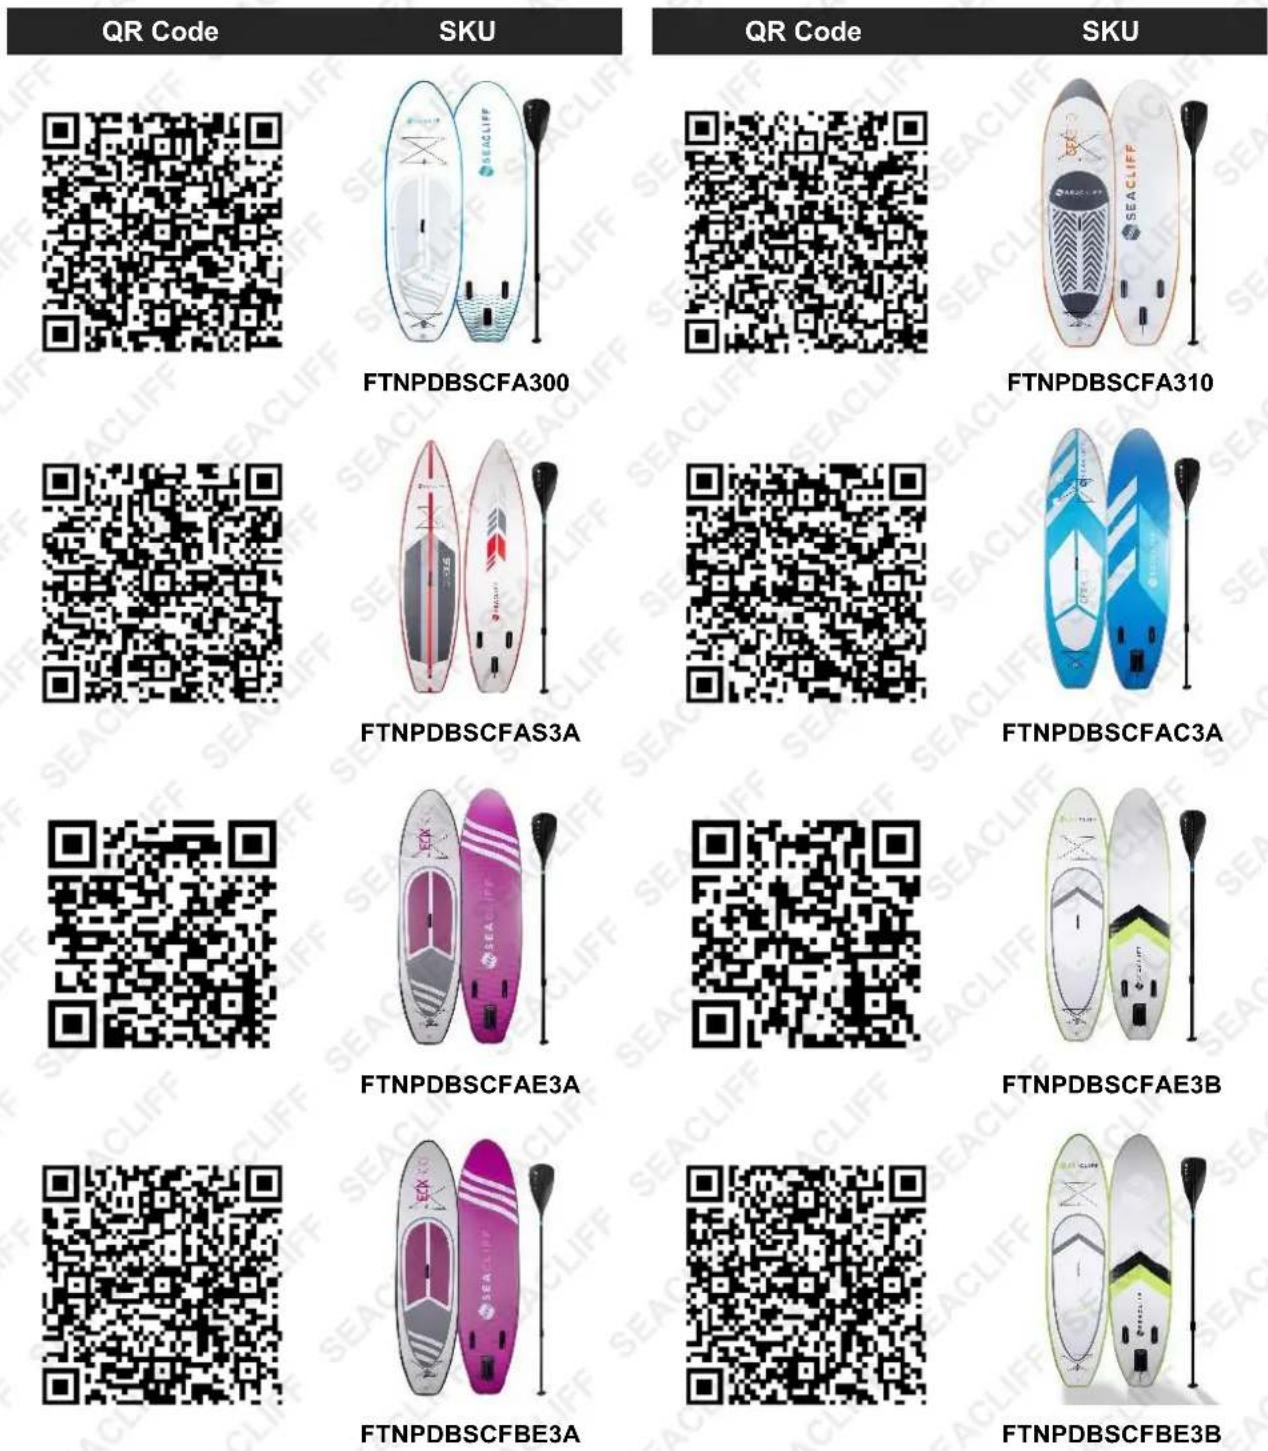
Spare Parts

Spare parts available for purchase, scan QR codes below:
text_image
QR Code SKU QR Code SKU FTNPDBSCFA300 FTNPDBSCFA310 FTNPDBSCFAS3A FTNPDBSCFAC3A FTNPDBSCFAE3A FTNPDBSCFAE3B FTNPDBSCFBE3A FTNPDBSCFBE3B
text_image
QR code image containing encoded data, no visible human-readable text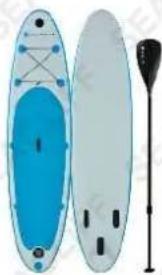
natural_image
Illustration of two blue and gray floating kites with a paddle, no text or symbols presentFTNPDBSCFAE3D

text_image
QR code image containing encoded data, no visible human-readable text
natural_image
Two orange and gray water paddleboards with side handles, one with a black paddle and the other with a white paddle (no text or symbols visible)FTNPDBSCFAE3F
Inflatable Board Care

Exposure to direct sunlight / excessive heat will damage the inflatable board. Equipment damage caused by sun / heat exposure is NOT covered under warranty.
The inflatable board is very susceptible to heat. Heat can be from exposure to direct sunlight, or being in a hot place, such as inside a car. Even on a mild day, the board can be severely damaged if left in direct sunlight for a period of time. Similarly, the inside of a vehicle can be 3 times the outside temperature.
- Always keep the board in the shade when not in the water. If you must expose your board to direct sunlight during transport or temporary storage, it is safest to keep the lighter side facing up.
- Max pressure is 12 PSI (0.8 Bar / 83 kPa). If inflated cold to maximum pressure, the pressure in the board will increase in the sun – this can potentially damage the board.
- Do not carry the board in an inflated state on the top of a vehicle.
- After every use, thoroughly rinse the board clean with fresh water, and store in a cool and dry environment. Do not store the board in its carry bag for extended periods.
Set-Up
Inflating the Board
- Unroll the board, with the top surface facing up.
- Connect the pump end of the inflation hose (A) to the top of the pump (B) – rotate the coupling right (clockwise) to tighten it. If the hose is not placed on the pump correctly, air will escape from it during inflation.
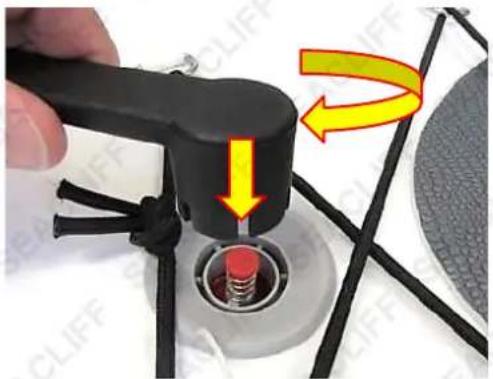
- Rotate the valve cover (C) left (anti-clockwise) to unlock it. If the valve stem (D) is "down", which is the pressure release position, press it so it "pops up" to the pressurise position. Connect the free end of the inflation hose to the valve by pushing it down over the valve and rotating it right until it locks to the valve.
- Use your feet to steady the pump, then pull-push the pump handle to inflate the board. Check the pressure using the pump pressure gauge – do NOT inflate the board to more than 12 PSI (0.8 Bar / 83 kPa) pressure.
- Rotate the hose in the valve left (anti-clockwise) to unlock it. Place the valve cover over the valve, then push it and rotate it right until it locks to the valve.

text_image
A B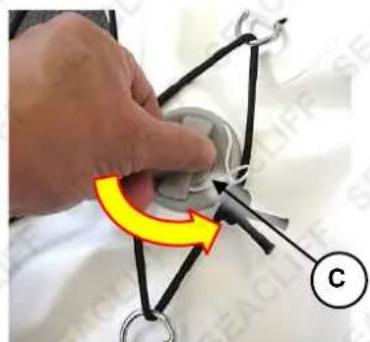
natural_image
Close-up of a hand holding a small mechanical component with a yellow curved arrow and label 'C' (no readable text or symbols)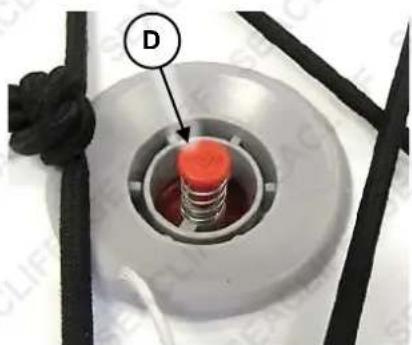
natural_image
Close-up of a mechanical component with a red cylindrical part inserted into a circular housing, labeled 'D' (no text or symbols on the object itself)To deflate the board, remove the valve cover, then push down on the valve stem until it locks in the pressure release position. When all air has escaped from the board, begin rolling the board up from the front end. Ensure the board is completely dry before rolling. Roll the board as tightly as possible so it easily fits in the carry bag.

natural_image
Close-up of a hand inserting a cable into a device with a yellow arrow indicating rotation (no text or symbols visible)Installing the Fin
- Turn the inflated board over so the fins are facing up.
- Slide the fin (A) into the fin slot (B). Ensure that the curve of the fin is facing rearward.
- Insert the locking clip (C) through the fin to secure it.
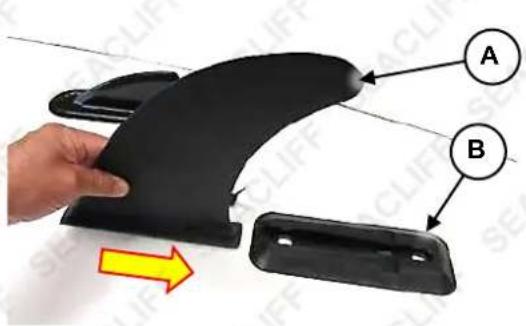
text_image
Diagram showing a hand holding a black plastic component with labeled parts A and B, and an arrow indicating direction.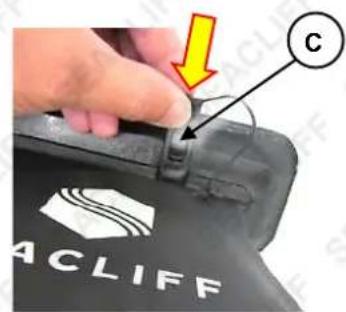
text_image
ACCLIFF C
natural_image
Black ergonomic assistor with a clip and handle (no visible text or symbols)To remove the fin, press down the locking clip tab (D), then withdraw the clip from the fin and fin slot. Slide the fin from the slot.
Assembling the Paddle
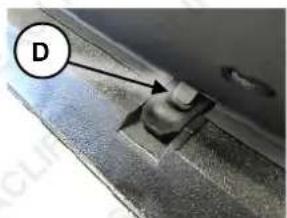
natural_image
Close-up of a metallic mechanical component with a labeled point D (no text or symbols beyond label)- Connect the paddle tube (A) and centre tube (B). Press in the spring-loaded button (C) when joining the parts, and ensure the pin "pops" into the hole in the paddle tube.

text_image
A C B E D 1 &STOP SEACLIFFInstalling the Tether
To help prevent losing the board, install the tether to the rear of the board. Attach the free-end of the tether to your ankle:
-
Slide the unpadded end of the tether (A) through the "eye" (B) at the rear of the board.
-
Wrap the Velcro straps over one another so the tether is held very firmly.

text_image
Instructional image showing a hand holding a black cable with a yellow arrow indicating rotation, labeled A and B.Installing the Kayak Seat
For using the board as a kayak, install the kayak seat:
Place the seat (A) onto the board, just behind the carry handle.
Attach the front seat straps (B) to the forward "eyes" (C) and the rear seat straps (D) to the rear "eyes" (E).
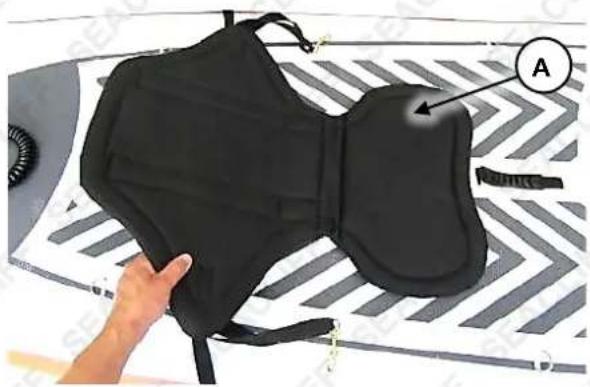
natural_image
Close-up of a black athletic satch with labeled component A, held by a hand (no text or symbols on the satch itself)Adjust the strap lengths as necessary so the seat is held firmly in position.

text_image
E D B CCare and Maintenance

Some maintenance activities described may be beyond the scope of some users. For procedures that you are not comfortable with or have the tools, knowledge or experience for, have the unit
serviced by a service centre or qualified technician.
Cleaning
The equipment can be cleaned with a soft cloth and clean water. Do not use abrasives, solvents or harsh chemicals. After each use, thoroughly clean the board, paddle etc, particularly after use in salt water.
Storage
Store the equipment in a clean and dry indoor environment. Never leave the unit in direct sunlight or near sources of heat. Ensure that all parts are clean and dry before storing. Do NOT store the board in the carry bag for extended periods.
Valve Tightening
Occasionally, the inflation valve may become loose. If the valve can be rotated or if it leaks air, the valve needs to be tightened. To tighten, use the supplied valve spanner and rotate the valve to the right (clockwise) until tight. Tighten using your hands only and do not over-tighten.
natural_image
Close-up of a black mechanical device with red and yellow arrows indicating motion or force direction (no text or symbols)Repairing the Board

To avoid skin irritation, wear latex gloves when repairing and handling the adhesive cement. Do not allow the adhesive cement to come into contact with your skin or eyes and avoid inhaling the vapours.
Small leaks / tears can be repaired using the supplied repair kit (contains a patch and adhesive cement). For damaged seams or larger repairs, contact an authorised service centre for assistance.
- Fully deflate the board.
- Thoroughly clean the surface around the leak and the matte side of the repair patch with rubbing alcohol. Both surfaces must be completely free of moisture, oil and debris.
- Apply the adhesive cement carefully and evenly to both the board surface and the matte side of the repair patch. Use a glue applicator or flat stick to apply the adhesive.
- Allow the adhesive cement on the board and patch to become dry to the touch. Once dry, re-apply a very thin layer of adhesive cement around the perimeter of the patch.
- Once the adhesive cement is again touch-dry, carefully apply the patch to the board and firmly work it in so the adhesive is well pressed together and there are no air bubbles between the board and patch.
- Allow a minimum 8 hours for the adhesive cement to cure before inflating the board.
Specifications
Weight Capacity
105kg

Some experts believe the incorrect or prolonged use of almost any product could cause serious injury or death. For information that may reduce your risk of serious injury or death, consult the points below and additionally, the information available at www.datastreamserver.com/safety
- Consult all documentation, packaging and product labelling before use. Note that some products feature online documentation which should be printed and kept with the product.
- Check product for loose / broken / damaged / missing parts, wear or leaks (if applicable) before each use. Never use a product with loose / broken / damaged / missing parts, wear or leaks (if applicable).
- Products must be inspected and serviced (if applicable) by a qualified specialist every 6 months assuming average residential use by a person of average weight and strength, above average technical aptitude, on a property matching average metropolitan specification. Intended use outside these guidelines could indicate the product is not suitable for intended use or may require more regular inspection or servicing.
-
Ensure all possible users of the product have completed an industry recognized training course before being given access to the product.
-
The product has been supplied by a general merchandise retailer that may not be familiar with your specific application or your description of the application. Be sure to attain third-party approval for your application from a qualified specialist before use regardless of prior assurances by the retailer or its representatives.
- This product is not intended for use where fail-safe operation is required. As with any product (take an automobile, aircraft, computer or ball point pen for example), there is always a small chance of technical issues that needs to be repaired or may require replacement of the product or a part. If the possibility of such failure and the associated time it takes to rectify could in any situation inconvenience the user, business or employee then the product is not suitable for your requirements. This product is not for use where incorrect operation or a failure of any kind, including but not limited to a condition requiring product return, replacement, service by a technician or replacement of parts could cause a financial loss, loss of employee time or an inconvenience requiring compensation.
- If this item has been purchased in error after considering the points above, simply contact the retailer directly for details of their returns policy, if required.

text_image
my topia .com.au©2022 Seacliff. All rights reserved. No part of this document, including descriptive content, concepts, ideas, diagrams or images may be reproduced or transmitted in any form or by any means, electronic or mechanical, including photocopying, scanning or recording, or any information storage and retrieval system, without express permission or consent from the publisher.