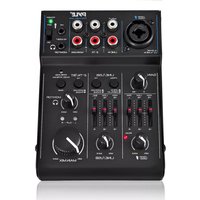
PAD30MXUBT - Turntable Pyle - Free user manual and instructions
Find the device manual for free PAD30MXUBT Pyle in PDF.


| Product Type | Belt-Drive Turntable with Bluetooth |
| Dimensions (W x D x H) | 16.5 x 13.5 x 7 inches |
| Weight | 9.5 lbs |
| Power Supply | AC 100-240V, 50/60Hz |
| Motor Type | Belt-Drive |
| Speeds | 33 1/3, 45, 78 RPM |
| Cartridge Type | Ceramic Stereo Cartridge |
| Output Options | RCA Line Out, Bluetooth, USB |
| Built-in Speakers | Yes, 2 x 3W |
| USB Recording | Yes, to USB flash drive |
| Bluetooth Version | 5.0 |
| Turntable Material | Aluminum Platter |
| Dust Cover | Included, hinged |
| Cleaning | Wipe with dry cloth; use stylus brush for needle |
| Safety Instructions | Keep away from moisture; do not disassemble |
| Replaceable Parts | Stylus (needle), belt, cartridge |
| Repair Service | Contact Pyle customer support |
| General Use | Home audio, vinyl playback |
Frequently Asked Questions - PAD30MXUBT Pyle
User questions about PAD30MXUBT Pyle
0 question about this device. Answer the ones you know or ask your own.
Ask a new question about this device
Download the instructions for your Turntable in PDF format for free! Find your manual PAD30MXUBT - Pyle and take your electronic device back in hand. On this page are published all the documents necessary for the use of your device. PAD30MXUBT by Pyle.
USER MANUAL PAD30MXUBT Pyle
3 Channel Mic-Line Mixer-USB Audio Interface built in Bluetooth

User's Manual
IMPORTANT SAFETY INSTRUCTIONS - READ FIRST


This symbol, wherever it appears, alerts you to the presence of uninsulated Dangerous voltages inside the enclosure that may be sufficient to constitute a risk of shock

This symbol, wherever it appears, alerts you to important operating and maintenance instructions in the accompanying literature. Please read the manual.
Read instructions
Retain these safety and operating instructions for future reference. Heed all warnings printed here and on the equipment. Follow the operating instructions printed in this user guide.
Do not open
There are no user serviceable parts inside. Refer any service work to qualified technical personnel only.
Power sources
Only connect the unit to mains power of the type described in this user guide or marked on the rear panel. The power source must provide a good ground connection.
Power cord
Use the power cord with sealed mains plug appropriate for your local main supply as provided with the equipment. If the provided plug does not fit into you outlet consult your service agent. Route the power cord so that it is not likely to be walked on, stretched or pinched by items placed upon or against.
Grounding
Do not defeat the grounding and polarization means of the power cord plug. Do not remove or tamper with the ground connection on the power cord.
Moisture
To reduce the risk of fire or electrical shock, do not expose the unit to rain, moisture or use in damp or wet conditions. Do not place container of liquid on it, which may spill into any openings
Heat
Do not locate the unit in a place close to excessive heat or direct sunlight, as this could be a fire hazard. Locate the unit away from any equipment, which produces heat such as: power supplies, power amplifiers and heaters.
Environment
Protect from excessive dirt, dust, heat, and vibration when operating and storing. Avoid tobacco ash, drink spillage and smoke especially that associated with smoke machines.
Handling
Protect the controls from damage during transit. Use adequate padding if you need to ship the unit. To avoid injury to yourself or damage to the equipment take care when lifting, moving or carrying the unit.
Servicing
Switch off the equipment and unplug the power cord immediately if it is exposed to moisture, spilled liquid or the power cord or plug becomes damaged during a lightning storm or if smoke odor or noise is noted. Refer servicing to qualified technical personnel only.
Installation
Install the unit in accordance with the instruction printed in the user guide.
4) Turn up the control LEVEL(22) for channel LINE/USB until you obtain a good input. LINE/USB audio source can be select come from USB port (5) or LINE IN Rea jacks (2) by button switch (9).
5) For channel LINE/USB, adjust the sound with the controls HI and LO(21) and the balance with the control BAL (19).
6) Use the controls LEVEL (18, 22) to mix the input signals of channels CH1 and LINE/USB or to fade them in and out. When a channel is not used, set it's control to "MIN."
7) Use the controls MAIN MIX (15) to set the level of the output signal that is sent via the jacks MAIN MIX(4) and the USB port (5). If one of the overload LEDs CLIP (14) shows red, turn back the control MAIN MIX accordingly.
8) The headphone output MONITOR/PHONE(8) allows to monitor the output signal of the mixer. For this purpose, the button 2TK TO MAIN MIX/ PHONE (11). Adjust the headphone volume with the control MONITOR/PHONES (13).
WARNING: Never adjust the headphones to a very high volume. Permanent high volumes May damage your hearing! Your ear will get accustomed to high volumes which do not seem to be that high after some time. Therefore, do not further increase a high volume after getting used to it.
5 Specifications
Sensitivity/ Impedance
Mic: 1mV/1.7KΩ(Gain max)
Line, channel 1: ----3mV/12KΩ(Gain max)
Line, channel 2/3: ----150mV/22KΩ
2-TK in: 300mV/22KΩ
Output level: 5.8V max (MAIN: MONITOR)
Frequency range: 20-25000 Hz
THD: ≤0.05%
S/N ratio: 81dB (A weighted)
Equalizer
Bass range:±15dB/80Hz
High range: ±15dB/12kHz
Headphone impedance: - - - - - ≥16Ω
USB interface:----USB1.1 compatible, 16-Bit Delta-Sigma, 44.1kHz Sampling rates; 48kHz max.
Bluetooth: ----Compliant with Bluetooth Specification V3.0 + EDR Phantom power :----+18V
Power supply: Via USB port(5V/500mA) of the computer or via Power supply unit provided and connected to
AC100 240V 50/60Hz
101*40*135 mm
Dimensions: 101*40*135 mm
Weight: 430 g
Suitable operating system for data transfer via USB interface:
Windows 2000, XP or higher; Mac OS 9.0.4 or higher, 10.X or higher.
Windows is a registered trademark of Microsoft Corporation in the USA and other countries.
Mac OS is a registered trademark of Apple Computer, Inc. in the USA and other countries.
Subject to technical modification.
2) The computer recognizes the USB interface of the mixer as an external device for audio input and audio output, e.g. as "USB Ear-Microphone", depending on the operating system. The required drivers (standard drivers of the operating system) are available on the computer. Note: If not all drivers required are available on the computer, install them, e.g. via the original CD of the operating system. Restart the computer after installation, if necessary.
3) Open the reproduction/ recording program and make the required settings for audio reproduction via the mixer or audio recording from the mixer (user manual of the program). If it is not possible to record or reproduce any sound, make sure to activate the USB interface for audio input or audio output in the System settings of the operating system of the computer. Hint: If the mixer is connected to a computer and to any units carried via their mains cables (e.g. amplifiers), there may be hum noise due to ground loops. To eliminate this noise, connect the mixer to the corresponding unit via a ground isolator.
3.2 Operation with power supply unit
Via its USB connection, the power supply unit must provide an output voltage of 5V and an output current of 500mA. Connect the power supply unit to the USB port (5) via the USB cable provided, then connect it to a mains socket. Switch on the mixer with the switch POWER(7)[position ON]. The LED ON(6) lights up.
3.3 Operation with Bluetooth player
a. Press down the PAIR button (12) to turn on the Bluetooth player, and the LED is to display the working status of the Bluetooth player:
b. Press down the PAIR button the Bluetooth player into the Search mode and the LED display: flashes every one seconds. In this mode, you can connect Bluetooth devices with your Bluetooth mobile phone or computer (Note: connect Bluetooth devices below BT3.0 version, you need to enter a matching Password "0000" if Necessity.)
c. When connected Bluetooth device, the LED display: flashes twice every five seconds..
d. If the connected Bluetooth devices too far of distance and disconnected, the Bluetooth player will automatically find it and connected the devices in 30 seconds, or enter standby mode. In the standby mode the LED flash every five seconds.
4 Operation
The following steps merely serve as an aid, other ways of procedure are also possible.
1) As a basic setting first —set all control GAIN (16), EQ (17, 21), PAN/BAL(19) to mid-position. —Turn all control LEVEL (13, 15, 18, 22) back to the left stop. —Disengage the button PAIR (12)
2) When a microphone is connected to the jack MIC IN (1) or Headset(8), speak into the microphone and turn up the corresponding control LEVEL(18) until you obtain a good microphone signal. If you need to turn up the control LEVEL completely for this purpose, further turn up the control GAIN(16). However, if the led PEAK (20) lights up and is not extinguished immediately, turn back the control gain. The led PEAK must only briefly light up with level peaks.
3) Use the panorama control PAN(19) to place the microphone signal on the stereo Base. Adjust the sound with the controls HI and LO (17).
1 Operating Elements and Connections
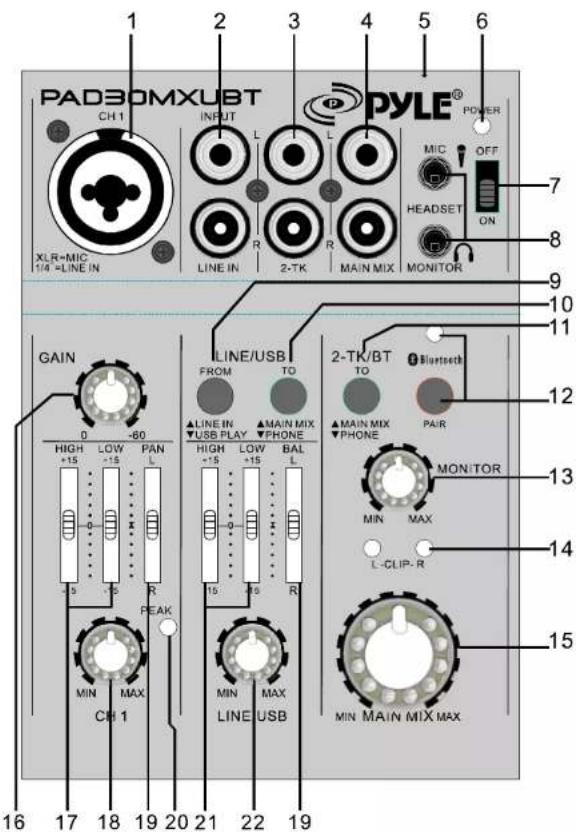
- MIC/LINE IN: This combined jack can be used to connect mono signal, such as XLR microphone or 1/4" line level.
Note: a, Please choose balanced cable and MIC to connect. Do not use the unbalanced ones. When the unit is powered on, remember not to connect the high level signal to XLR Mic In, which may damage the unit.
B, At the XLK jack, a phantom power of +18 V is always present. 2. Stereo input LINE IN (RCA jacks) to connect an audio source with line signal Level (e.g. CD player) to channel CH2/3.
- Stereo input 2-TK (RCA jacks) to connect stereo line signal level sources.
-
Stereo outputs MAIN MIX (RCA jacks) to connect the input of an amplifier or a recorder.
-
USB port (type B) to connect a computer or a power supply unit with USB connection; When operating the mixer with a computer, it is possible to use this port as an Audio output (Output of the mixed signal) and as an audio input (feed-in of audio data to be reproduced via Channel LINE/USB)
-
Power Led: This LED will light up when the unit is powered on.
-
POWER switch
-
HEADSET connections (MIC/PHONES)
Note: Headset connected to the built-in microphone, must be connected MIC IN and PHONES in order to avoid unnecessary noise.
-
From LINE IN/USB Play source selector switch.: Pushing the button in, the signal of channelLINE/USB comes from USB PLAY(computer); When the Switch is disengaged, signal will be from RCA jacks of channel 2/3.
-
To LINE/USB switch assigns signal to Main Mix or Monitor(Phones)
-
2TK/BT control switch: This is the assign control of 2TK input and Bluetooth input. When this control is engaged, the signal of 2TK/BT will be assigned to MONITOR(8). When the controlIs disengaged, the signal of 2TK/BT will be Assigned to MAIN MIX (4) and USB (5).
-
Bluetooth PAIR and LED display
-
Volume control MONITOR/PHONES for the headphone output MONITOR/PHONES (8).
-
Overload LEDs CLIP for the stereo output signal adjusted with the control MAIN MIX (15).
-
MAIN MIX control to set the level of the output signal sent via the outputs MAIN MIX (4) and the USB port (5).
-
Control GAIN for channel CH1 to set the input amplification.
-
High frequency control HI and low frequency control LO for channel Ch1
-
Control LEVEL for channel Ch1
-
PAN/BAL This is the panorama control or balanced control. This control is used for stereo Effect field of the signal. Set this control in middle position, signal level of Channel L & R will be same. When the control is set to top stop, only Channel L receives the signal, Channel R can not. Vice Versa.
-
PEAK LED This is clip LED indicator of CH1 level. When this LED illuminates, it means that PFL CH1 level is clipped.
-
High frequency control HI and low frequency control LO for channel LINE/USB.
-
Control LEVEL for channel LINE / USB
2. Applications
This compact 3-channel audio mixer with USB interface is suited for universal applications, e.g. For audio recording on the computer. The mono input channel allows to connect a (phantom-powered) microphone; The stereo input channel allows to connect an audio source with line signal level. In addition, the mixer is provided with connections for a recorder and headphones. The mixed signal is sent to the output via a RCA jacks and the USB port. It is also possible to use the USB port as an input to transfer audio data from the computer to the mixer. When connecting the mixer to a computer, power is supplied via the USB connection. When operating the mixer without a computer, either use a suitable power supply unit with USB connection to operate the mixer
3. Setting into Operation
Prior to connection/disconnection and prior to each switching on, the output controls MONITOR/PHONES (13) and MAIN MIX (15) should be turned back to ? min?
1) As audio sources, microphones and/or audio sources with line signal level (e.g. Effect units, musical instruments, players) can be connected to the five input channels. Mono channels Ch1: Combined XLR/6.35mm jack are available as inputs (1)-Connect microphones to the balanced XLR jack or HEADSET jacks The XLR jack (CH1) and 3.5mm jack (HEADSET MIC IN) always supplies a +18V phantom power and it thus suitable for a condenser Microphone operated with this phantom power.
Caution! Do not connect a microphone with unbalanced output via XLR plug; it may be damaged by the phantom power.
-Connect mono sources with line level to the 6.35 jack.
-Do not use both CHI Input (1)-MIC IN and HEADSET (8)-MIC IN.
2) The input LINE IN(2) of the stereo channel LINE/USB allows to connect an audio source with line signal level (e.g. CD player) via RCA plugs: L= left channel, R= right channel.
3) The input 2TK(3) of the stereo channel allows to connect an audio source with line signal level(e.g. Recorder, MP3 player...c.t.c)
4) The 3.5mm jack MONITOR/PHONES(8) allows to connect stereo headphones (Impedance ≥16ohm). Thus, you will be able to monitor the output signal or the input signal of the jacks 2TK(3) via headphones.
5) At the stereo MAIN MIX(4), the output signal adjusted with the MAIN MIX Control(15) is Present. This output allows to connect an amplifier or a second mixer via a 3.5mm plug
3.1 Operation with a computer
When operating the mixer with a computer, either use the audio software supplied with the operating system or an audio software installed additionally. Various programs for audio reproduction/ recording are available on the internet free of charge.
1) Start the computer. Connect the USB port (5) to a USB connection on the computer via the USB cable provided. Switch on the mixer with the switch POWER(7) [Position ON]. The LED ON(6) lights up.
- IMPORTANT SAFETY INSTRUCTIONS - READ FIRST
- Read instructions
- Do not open
- Power sources
- Power cord
- Grounding
- Moisture
- Heat
- Environment
- Handling
- Servicing
- Installation
- Specifications
- Equalizer
- Operation with power supply unit
- Operation with Bluetooth player
- Operation
- Operating Elements and Connections
- Applications
- Setting into Operation
- Operation with a computer
Brand : Pyle
Model : PAD30MXUBT
Category : Turntable