PLMRM4BTA - Subwoofer Pyle - Free user manual and instructions
Find the device manual for free PLMRM4BTA Pyle in PDF.


| Brand | Pyle |
| Model | PLMRM4BTA |
| Product Type | Marine Subwoofer with Bluetooth |
| Peak Power Output | 400 Watts |
| RMS Power Output | 200 Watts |
| Impedance | 4 Ohms |
| Sensitivity | 92 dB |
| Frequency Response | 40Hz - 200Hz |
| Cone Material | Polypropylene |
| Magnet Size | 30 oz |
| Mounting Depth | 5.5 inches |
| Cutout Diameter | 9.8 inches |
| Overall Dimensions (W x H x D) | 12.2 x 12.2 x 7.8 inches |
| Weight | 9.5 lbs |
| Weatherproof Construction | Yes |
| Grille Included | Yes |
| Bluetooth Connectivity | Yes (for audio streaming) |
| Operating Voltage | 12V DC |
| Recommended Enclosure | Sealed or ported |
| Maintenance & Cleaning | Wipe with damp cloth; avoid abrasive cleaners |
| Safety | Disconnect power before maintenance; use in marine environments only |
| Spare Parts & Repairability | Contact Pyle support for parts and service |
| General Information | 1-year limited warranty |
Frequently Asked Questions - PLMRM4BTA Pyle
User questions about PLMRM4BTA Pyle
0 question about this device. Answer the ones you know or ask your own.
Ask a new question about this device
Download the instructions for your Subwoofer in PDF format for free! Find your manual PLMRM4BTA - Pyle and take your electronic device back in hand. On this page are published all the documents necessary for the use of your device. PLMRM4BTA by Pyle.
USER MANUAL PLMRM4BTA Pyle


Waterproof Rated Amp Audio Control Unit, MP3/USB/AUX
USER MANUAL
CONTENTS
Installation 3
Wiring Connection 5
Location of Keys 6
Operation 7
USB Play Operation 7
BT Operation 8
Remote Control 9
Troubleshooting 11
Specification 12
INSTALLATION
Notes:
- Choose the mounting location where the unit will not interfere with the normal driving function of the driver.
- Before finally installing the unit, connect the wiring temporarily and make sure it is all connected up properly and the unit and the system work properly.
- Use only the parts included with the unit to ensure proper installation. The use of unauthorized parts can cause malfunctions.
- Consult with your nearest dealer if installation requires the drilling of holes or other modifications of the vehicle.
- Install the unit where it does not get in the driver's way and cannot injure the passenger if there is a sudden stop, like an emergency stop.
- If installation angel exceeds 30^ from horizontal, the unit might not give its optimum performance.
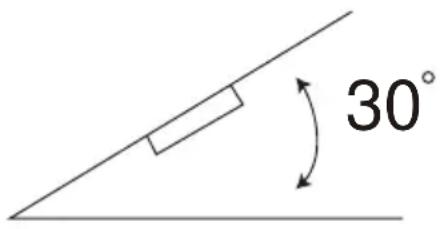
- Avoid installing the unit where it would be subject to high temperature, such as from direct sunlight, or from hot air, from the heater, or where it would be subject to dust, dirt or excessive vibration.
INSTALLATION
Mounting
Once a suitable location has been determined, drill the hole and secure the stereo using the metal mounting bracket. If the bracket needs to be shortened, remove the appropriate number of breakaway segments using a pair of pliers.

WIRING CONNECTION
ISO CONNECTION

OPERATION
LOCATION OF KEYS
Once a suitable location has been determined, drill the hole and secure the stereo using the metal mounting bracket. If the bracket needs to be shortened, remove the appropriate number of breakaway segments using a pair of pliers.

- IR Window
- ⏻ Button/Mute Button
- Vol+/▶▶Button
- Mode Button
- Vol-/◀◀ Button
OPERATION
TURN ON/OFF THE UNIT
Press button (2) to turn ON the unit. When the unit is on, press and hold button (2) for 2 seconds to turn the unit OFF.
MUTE
When the unit is on. Shortly press MUTE button (2) to mute the audio output. Press it again to recover output.
TURN UP/DOWN VOLUME
Press Vol+/▶▶ or Vol-/◀◀ button to turn up/down volume. Press and hold it for turning it up/down volume continuously.
SELECTING FILES
Press and hold MODE button for 2 seconds. Then press or button Vol+/▶▶or Vol-/▶◀ to move to the next file or previous file. If both buttons have not been pressed for several seconds. It will return to VOL mode.
MODE
Shortly press MODE button on the panel to change the source. Press and hold it for 2 seconds. It change the VOL+/- button to ▶I / ◀ function. If both buttons (▶I / ◀) have not been pressed for several seconds. It will return to VOL mode.
AUXILIARY INPUT
The unit can be connected a portable audio player through the AUX IN interface.
Normal in colder weather. Allow unit to run for 1-2 hours. This will burn off moisture.
USB PLAY OPERATION
On the back side of the unit, there is a USB interface. You can connect an USB driver through this interface. When you connect an USB driver through the interface, the unit will search the MP3/WMA files in the USB driver and start to play automatically. If in other mode, you can also press MODE button on the remote control to select USB mode. It supports the MP3/WMA file in the device.
SELECTING SONGS IN SINGLE STEP
Press ▶▶I button or ◀◀ button on the remote control to move to the following song or the previous song. Press and hold ▶▶I button or ◀◀ button for 2 seconds to fast forward or fast reverse. Song playing starts from when you release the button.
PAUSING PLAYING
Press 1 ▶ button on the remote control to pause playing. Press it again to resume playing.
SELECTING SONGS BY BND BUTTON
In USB mode. Press AMS button on the remote control to active the file search mode. In this moment enter desired song number and press SEL button to confirm. It will play the song.
Note:
BAND: 7
▶:8
▶: 9
BDISP: 0
SEL: Confirm
FOLDER+/- FUNCTION
When MP3/WMA playing. Press DIR+/- button on the remote control it will to the next folder or back to the previous folder.
+10/-10 FUNCTION
When MP3/WMA playing. Press and hold +10/-10 button for 2 seconds on the remote control it will skip to +10/-10 songs to play.
CAUTION:
When there are important files in the USB Device, do not connect it to the main unit to play, because any wrong operation may cause files loss. Our company assumes no responsibility for this.
BLUETOOTH OPERATION
I. When use Bluetooth, please make sure the mobile phone supports Bluetooth function.
II. For the different kind of mobile phone, Bluetooth emissive power has some difference. To get the best conversation quality, it is commended that the distance between the mobile phone and the unit is within 3m. And please don't put any metal object or any obstacle between the path of the mobile phone and the unit.
- PAIRING
I. On the mobile phone, select the Bluetooth set up. (Please refer to the instruction manual of your mobile phone on how to operate Bluetooth.)
II. "PyleUSA" appear in the list on your mobile phone, please select "PyleUSA" input password "0000" if necessary if needed.
- Bluetooth Audio (A2DP function)
Press MODE key on the remote control till to the BT mode. Then turn ON the music player of the mobile phone and playing a song. The sound will come out from the speaker of the unit.
Press ▶▶▶ key on the remote control to pause/play the song. Press ▶▶▶ button or ▶▶▶ button on the remote control to select next/previous song.
REMOTE CONTROL HANDSET

FUNCTION KEY & CONTROL
-
⏻ Power ON/OFF Button.
-
VOL+ Volume up button.
-
BAND No function.
-
SEL In MP3/WMA searching mode press it for confirm function.

In MP3/WMA mode: Press it shortly for skip previous file.
Press and hold it for fast reverse.
- EQ Press it to select desired audio equalization.
7.1/▶II In MP3/WMA mode: Press to pause/resume playing.
- 4/RDM In CD/MP3/WMA mode: turn on/off random function.
9.6/+10/DIR+: In MP3/WMA mode: Press it to next folder.
Press and hold for 2 seconds for +10 function.
- 5/-10/DIR-: In MP3/WMA mode: Press it back to previous folder.
Press and hold for 2 seconds for -10 function.
-
3/RPT In CD/MP3/WMA mode: Press it turn on/off repeat function.
-
2/INT In CD/MP3/WMA mode: Press it turn on/off INTRO function.
-
DISP In CD/MP3/WMA mode: when searching file it is 0 number.
-
VOL- Volume down button.
-
In MP3/WMA mode: Press it shortly for skip next file.
Press and hold it for fast forward.
-
AMS In MP3/WMA mode: it is song searching function.
-
Press to mute the sound. Press it again to recover the Sound.
-
MODE Press to change the source.
TROUBLESHOOTING
Before going through the checklist, check wiring connection. If any of the problems persist after checklist has been made. Consult your nearest service dealer.
| Symptom Cause Solution | ||
| No power | The car ignition switch is not ON. | If the power supply is connected to the car accessory circuits, but the engine is not moving, switch the ignition key to “ACC”. |
| The fuse is blown. Replace the fuse. | ||
| No sound | Volume is in minimum | Adjust volume to a desired level. |
| Wiring is not properly connected. | Check wiring connection | |
PLMRM4BTA
Marine Bluetooth Amplifier Receiver
Waterproof Rated Amp Audio Control Unit, MP3/USB/AUX
Features:
• Sound System Amp Receiver for Audio Control
• Built-in Bluetooth Receiver for Wireless Streaming
• Water Resistant Marine Grade Construction
- Universal Standard Size for Dashboard/Console Panel Installation
- Wired USB Flash Drive Reader
• MP3 Digital Audio File Playback
- Connect & Stream Audio from External Devices
• Aux RCA (L/R) Input Connectors
- Aux RCA (L/R) Audio Output Connectors
• Used for Boat, Automobile, Off-Road, Mobile and Marine Watercraft Vehicles
Bluetooth Connectivity:
• Built-in Bluetooth for Wireless Audio Ability
- Works with All of Your Favorite Devices
(iPhone, Android, Smartphone, iPad, Tablet, etc.)
- Bluetooth Version: 2.1
- Bluetooth Wireless Range: 30'+ ft.
- Bluetooth Network Password: '0000' (4 zeroes)
Technical Specs:
• MAX Power Output: 4 x 50 Watt
• Marine Grade Rating: IP-X5
• Frequency Response: 20Hz-20kHz (+/-3dB)
- Impedance: 4 Ohm
- S/N Ratio: 55dB
- Stereo Separation: >30dB, @ 1kHz
- Tone Control: Bass/Treble +/-10dB
• Maximum USB Flash Support: 32GB
• Digital Audio File Support: MP3/WMA
- Power: DC 12V
- Current Drain/Power Consumption: 10 Amp (Max.)
• Total Front Face Diameter: 4.0" -inches
- Cutout Diameter: 3.1" -inches
- Chassis Mounting Depth: 2.9" -inches
What's in the Box:
- Bluetooth Amplifier Receiver
• Power & Wiring Harnesses - Remote Control

natural_image
Close-up of an electric motor with attached wiring and a PYLE remote control (no visible text or symbols)PYLE
PyleUSA.com

natural_image
Illustration of a laptop with a red checkmark on the screen (no text or symbols)VISIT US ONLINE:
Have a question?
Need service or repair?
Want to leave a comment?
PyleUSA.com/ContactUs

- CONTENTS
- INSTALLATION
- Notes:
- Mounting
- WIRING CONNECTION
- ISO CONNECTION
- OPERATION
- LOCATION OF KEYS
- TURN ON/OFF THE UNIT
- MUTE
- TURN UP/DOWN VOLUME
- SELECTING FILES
- MODE
- AUXILIARY INPUT
- USB PLAY OPERATION
- SELECTING SONGS IN SINGLE STEP
- PAUSING PLAYING
- SELECTING SONGS BY BND BUTTON
- FOLDER+/- FUNCTION
- +10/-10 FUNCTION
- CAUTION:
- BLUETOOTH OPERATION
- - PAIRING
- - Bluetooth Audio (A2DP function)
- FUNCTION KEY & CONTROL
- TROUBLESHOOTING
- PLMRM4BTA
- Marine Bluetooth Amplifier Receiver
- Waterproof Rated Amp Audio Control Unit, MP3/USB/AUX
- Features:
- Bluetooth Connectivity:
- Technical Specs:
- What's in the Box:
- PYLE
- PyleUSA.com
Brand : Pyle
Model : PLMRM4BTA
Category : Subwoofer