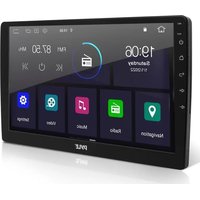
PLINTBL10 - Subwoofer Pyle - Free user manual and instructions
Find the device manual for free PLINTBL10 Pyle in PDF.


| Product Type | Subwoofer |
| Brand | Pyle |
| Model | PLINTBL10 |
| Woofer Size | 10 inches |
| Impedance | 4 ohms |
| RMS Power Handling | 350 Watts |
| Peak Power Handling | 700 Watts |
| Sensitivity | 90 dB |
| Frequency Response | 30 - 300 Hz |
| Voice Coil | Dual 4-ohm voice coil |
| Cone Material | Polypropylene |
| Surround Material | Rubber |
| Mounting Depth | 5.75 inches |
| Cutout Diameter | 9.1 inches |
| Recommended Enclosure Type | Sealed or ported |
| Recommended Sealed Box Volume | 0.8 - 1.2 cubic feet |
| Recommended Ported Box Volume | 1.5 - 2.0 cubic feet |
| Terminals | Spring-loaded push terminals |
| Magnet Weight | 40 oz |
| Dimensions (W x D x H) | 10.6 x 10.6 x 5.7 inches |
| Weight | 5.5 lbs |
| Cleaning Instructions | Wipe with dry cloth; avoid moisture |
| Safety Precautions | Keep away from water; do not exceed rated power |
| Spare Parts Availability | Contact Pyle customer service |
| Warranty | 1-year limited warranty |
Frequently Asked Questions - PLINTBL10 Pyle
User questions about PLINTBL10 Pyle
0 question about this device. Answer the ones you know or ask your own.
Ask a new question about this device
Download the instructions for your Subwoofer in PDF format for free! Find your manual PLINTBL10 - Pyle and take your electronic device back in hand. On this page are published all the documents necessary for the use of your device. PLINTBL10 by Pyle.
USER MANUAL PLINTBL10 Pyle
natural_image
Red sports car parked on a snowy mountain road, displayed in a digital interface with 'PYLE' watermark (no text on car or road)★★★☆★☆
[Non-Text]
WIFI/GPS/AM/FM, Car Radio with 1080P HD Touch Screen, Multimedia Player + Mirror link for Android/iOS, Support Rearview Cam and Dual USB
USER GUIDE
Note: This unit is based on Android platform. Besides the standard Apps we provided with the unit, you can also download thousands of Apps and install it on our platform. Please kindly note NOT all Apps are compatible with this platform. If you have any compatibility problem with a 3rd party App, please contact your App provider. For the operation instruction of a certain 3rd party App, please also contact your App provider. We are not responsible for any problem with your 3rd party Apps.
To enjoy the unit's features, along with proper and safe operation, please be sure to read through this manual before use. It is especially important to thoroughly understand and follow all system warnings and precautions. Keep the manual in a safe location for future reference when necessary. Contact your dealer or the nearest authorized repair center for any service, repair or technical support assistance.
CONTENTS
System Installation 2
Installation Guide 2
Front Panel and Buttons 2
Turning Power On 2
User Interface 3
Navigation 3
Local music 3
Online music 4
Video playback 4
Calendar 4
Radio 4
Wireless BT 5
EQ 6
Phone Link APP 6
Third Party Apps 6
Steering wheel learning 6
Brightness setting 6
Volume settings 6
GPS monitoring 6
Sound settings 6
Memory clean 7
Desktop wallpaper 7
WLAN (Wi-Fi settings) 7
Reset 7
Time setting 7
Troubleshooting 7
Wiring 9
Note:
We are constantly aiming to improve the customer experience and your receiver's features and specifications are continually changing for the better, with improvements to the user interface experience, software updates, bug fixes, etc. System descriptions and features reflected as herein stated by this user manual serves to express our Headunit Receiver features at the current production period. We reserve the right to change terms and conditions of system specifications, features and descriptions at any time, as we continue to improve and provide our customers with upgrades in safety, performance and system operation in general.
System Installation:
Before starting: To prevent short circuits, be sure to disconnect the battery terminal before starting.
Installation Guide
Caution:
- Consult your vehicle dealership before making any modifications to your car's body (ex. Drilling holes)
- Use included screws in installation. Improper operation may damage machine or cause accidents.
Do not install unit in any area where:
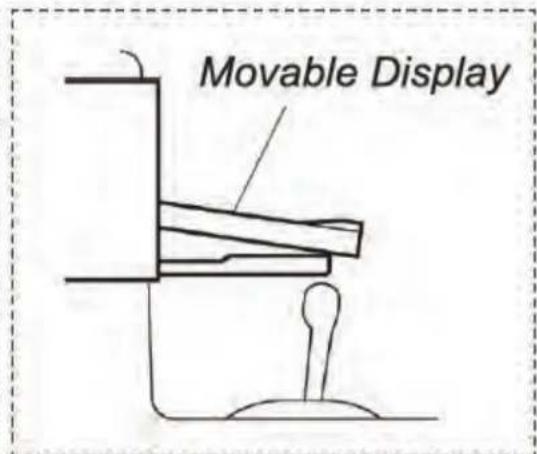
- It may obstruct the steering wheel and gearshift lever operations
- It may obstruct the operation of safety devices such as air bags
- It may obstruct visibility

Front Panel and Buttons
Button & Feature Layout
RST Use a pin to insert into reset port to trigger unit reset. (Hold for 20 secs. to reset)
Hold to power up.
Home
Return
Volume up
Volume down
Turning Power On
-
Turn on the engine key to the "ACC" or "ON" position
-
Press and hold the power button for 3 seconds
- When the engine key is turned to off position, the unit Status Bar is turned off (on the top of radio screen and app screen) you can swipe down for more.
App Screen - Interface Layout

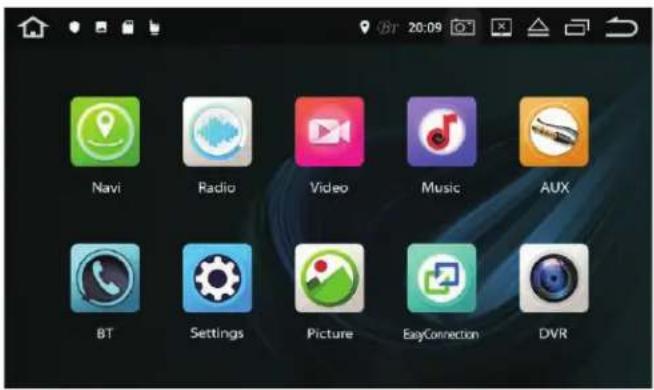
Swipe UP/DOWN to access more apps
| Navigation | |
| Radio | |
| All Apps list | |
| Music | |
| Settings |
| Navi | Loads Navigation software (if you have several maps in this device, you can set the default map. Setting → Car setting → Navi setting.) |
| Radio | AM/FM Tuner |
| Bluetooth® | Wireless BT |
| Clock | Shortcut to Time Setting |
| Calculator | Opens Calendar app |
| Clear cache | Clear Cache |
Navigation
Click the main interface "navigation" to enter the navigation interface.
If the memory card does not have map data, it will prompt download and enter the map management interface after confirming.
Clicking icon description
- Map download: Click the top left corner, "B" then click offline data, and then click on the offline map, select the city map data you need to download.
- Download Management: Download all or pause, also you can click the city to cancel or pause the download.
- Download Manager: You can update all apps, click the city to select "delete data" or "update". Top left corner, "←" Return to the previous level interface.
Local music
Click the main interface "music" to enter the local music interface.
This operation is valid when the unit has a SD card or USB interface and the corresponding media files.
Online music
Click on the main interface "online music" to enter the online music interface.
Need to connect to the internet.
Music player button function description
Folder
Enter the sound settings
Loop playback mode switch
Previous/next song
II Pause (Play)

Video playback
Click "Video Player" to enter the video player interface (supports 1080P HD video).
This operation is valid when the unit has a SD card or USB interface and the corresponding media files.
Click the "All icon" to switch between All/SD/U Disk/File Browser. When the video file is read, the system automatically plays the file that has not been played last time the video player is opened again.
Clicking icon description
Menu
Last track
Play/Pause
Next song
Full screen

Calendar
Displays the day, month and year. Use forward and back arrows the view past or future months. Selected dates are highlighted in blue.
Radio
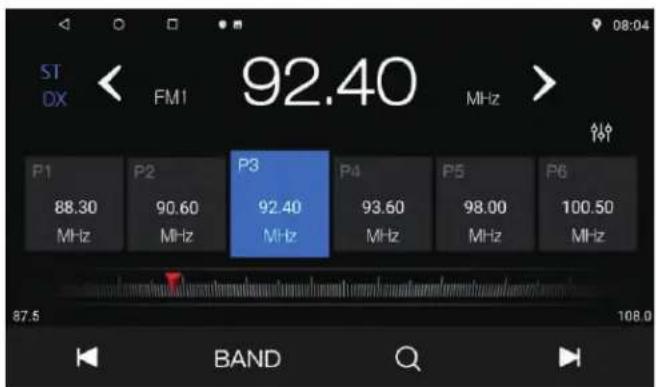
Click the main interface "radio" to enter the local radio
Clicking icon description interface (FM / AM band can store 40 effective platforms each)
Click to search channel backwards then stop when find clear channel.
BAND BAND to switch between mode FM1/FM 2
Search for radio station
Click to search channel forwards then stop when find strong and clear channel1.
Forward tuning radio
Backward tuning radio
DX Locate and DX
Audio settings
Wireless BT
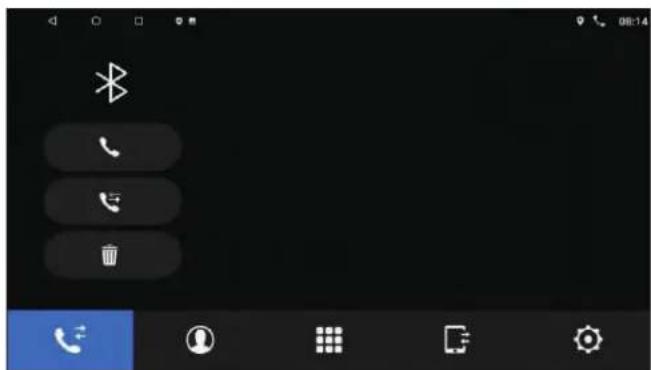
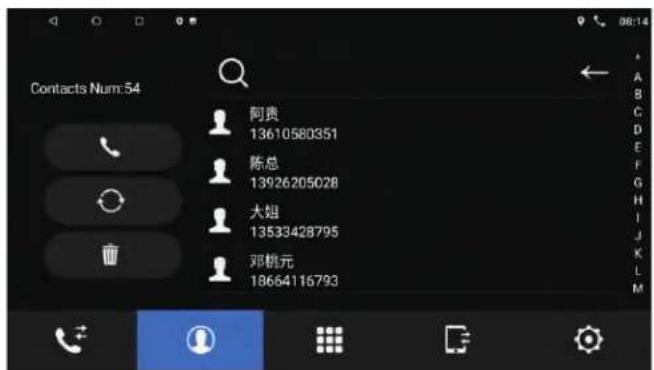
Click the main interface "Bluetooth®" to enter the Wireless BT connection interface.
When the BT is not connected: Enter the Wireless BT interface, there is no BT connection device displayed. Click the Wireless BT interface, such as the dial key, you will be prompted "Please connect HFP."


EQ - Equalizer

Phone Link APP
For the detailed operation instruction for Phone Link, please follow the instruction on actual unit.
Third Party Apps
For the detailed operation instruction for a certain 3rd party App, such as Google map, Youtube etc., please contact your 3rd party App provider for further service.
Steering wheel learning
Steering wheel learning steps are as follows:
- Press any key on the steering wheel, the interface will display "please long-press and hold a direction key", without pressing the steering wheel button for a certain period of time will lead to failure.
- Click on the screen to access docking function
- Press the corresponding function button on the steering wheel.
Follow the steps 1 - 3 until all control buttons on the steering wheel is finished.
Note: Click "○" will reset all the saved keys.
If you perform a "System Reset" operation in "Factory Mode Settings", please resave the steering wheel before using again.
The realization of this feature:
- For non-bus control of the original car steering wheel.
- The original car steering wheel keys need to be voltage input control.
Brightness setting: Click the "+" or "-" icon to adjust the value.
Volume settings: Slide the button directly to adjust the media volume and call volume.
GPS monitoring: View related GPS information, click "to restart GPS.
Sound settings
- Click the slider to adjust Subwoofer, bass, midrange, treble.
- Settings can be made in Rock/Custom/Classic/Jazz/Pop by clicking the corresponding icon.
- Click the upper right corner of the speaker to "◀▶▲▼" et four icons or dick the centre dot to adjust the speaker position settings.
- Click the "default" icon will restore the sound settings parameters to the system default state.
Memory clean
Cleaning up memory speeds up the system.
Desktop wallpaper
According to your personal preference, you can go from "wallpaper" to "dynamic wallpaper" the "gallery" sets the wallpaper as prompted.
WLAN (Wi-Fi settings)
Click "☐" to switch from OFF to ON.
After searching for nearby wireless Wi-Fi, select the Wi-Fi hotspot you want to connect from the list. Enter your wireless connection password in the pop-up password box, then click "Connect". Enter the correct password, it will connect successfully after a while and display "connected."
Reset
Reset Network: This will reset all network settings, including (WLAN, Mobile Data Network, Wireless BT) Restore factory settings: This will restore the system to factory settings and clear all data in your device's memory.
Time setting
Determining the date and time automatically can be turned on, optionally using the network or provided by GPS. If you need to adjust the time manually, it need to be switched off, click directly to mobilize the time or date. Determining the time zone automatically can also be opened. It can be manually adjusted after switching off. It can also open or close the 24-hour system.
Troubleshooting
Q: Unit doesn't power up.
A: Use a multi-meter to check for 12v+ to red and yellow wires. Check for proper Ground on the Black wire.
Q: My video does not play.
A: Attach "PARK" wire to parking break. When this wire is grounded the video will play (Grounding trigger of the parking brake)
Q: Reverse camera does not come up on the screen.
A: Attach "BACK UP CAMERA" wire to reverse tail light 12v+ (Make sure camera is and sending video signal)
Q: Can I set up steering wheel control?
A: Key 1 and Key 2 wires need to be wired to your vehicle's steering wheel column
Q: The time I set is not saved after device reboot.
A: Are other setting saved? If not: Check that yellow memory wire is attached to 12v+ constant
A: Turn off GPS auto update Go to radio settings > Set Time > switch off auto update
Q: My GPS gets no reception.
A: Check if the antenna properly connected.
A: Mount Antenna directly to your vehicle (GPS antenna is to be magnetically mounted, it will boost GPS reception when attached)
A: Check alternate antenna placement to test for interference
Q: How to I set the time?
A: System setting, set time
Q: How do I turn up GPS instruction volume (I Can't hear it over music)
A: Change GPS sound settings
Go to Navi > Settings > Sounds > Set GPS voice level to max > Set radio volume to min (Adjust accordingly)
Q: Where can I download firmware updates?
A: This unit's hardware does not allow it to be updated with new OS or firmware.
Q: My BT microphone is not working as expected.
A: Check that nothing is covering microphone port.
Check to see if closer proximity to the mic affects its pickup
Check that phone connection is good
Make sure the call recipient has speaker volume set to an appropriate level
Check that the mic is not picking up too much background noise
Note: The built-in mic cannot be changed, replaced or upgraded.
Q: I am having trouble setting up Wireless BT.
A: Check that your device is Wireless BT compatible 4.0+
Check if you are able to pair with alternate devices via Wireless BT.
Clear out your device history in your Wireless BT setting menu and attempt to pair/connect again
Q: How do I play video files? My unit cannot read my digital video files.
A: Make sure SD card is compatible
A: Check file format of your file. (You may need to convert your video file to an alternate file format)
You have entered the 'Touch Screen Calibration Menu'. For optimum touchscreen performance, this feature enables you to enjoy the best functionality of your device's touch screen.
To complete the touchscreen calibration, an "X" will appear in the circles on the screen in numbered order, continue to press the center of the "X" as it passes through each numbered circle.
(In circle number one, you will see an "X", touch the center of the "X", then the "X" will move to circle number two. Continue to touch the center of the "X" as it will move to the other circles in numbered order. If calibration senses an error, the process may restart; Repeat if necessary.)
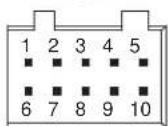
Wiring - Back Panel:
- For power cable
- For radio antenna
- For GPS antenna

A

- AMP_+12V
- R_AXU_R
- R_AXU_L
- NC
- NC
- NC
- NC
- NC
- DVR_CVBS
- MIC-
- GND
- RCA_FL
- RCA_FR
- GND
- GND
- GND
- CVBS_OUT1
- SUB_OUT
- AUXINCVBS
- MIC+
B

- GND
- RCA_RL
- FRONT_IR
- CAN_TXD
- NC
- RCA_RR
7.NC - CAN_RXD
D

- USB_5V
- GND
- USB2- DM2
- USB1+ DP1
- USB1-DM1
- USB2+ DP2
C

- USB_5V
- GND
- USB0+ DP0
- USB0-DM0
E
- TXD_TPMS
- RXD_TPMS
- IR
- CAM_12V
- PBK
- WIFI_ANT
- GND
- CAM_CVBS
- GND
-
BT_ANT
-
For power cable

flowchart
graph TD
    A["SPEAKER FRONT R"] --> B["KEY_F1"]
    C["BACK UP CAMERA"] --> D["ACC_IN"]
    E["TO REVERSE LIGHT"] --> F["GROUND"]
    G["POWER B+"] --> H["ILLUMINATION"]
    I["AUTO ANT"] --> J["KEY_F2"]
    K["SPEAKER REAR L"] --> L["Speaker FRONT L"]
    M["SPEAKER FRONT R"] --> N["Speaker FRONT R"]
    O["Speaker FRONT L"] --> P["Speaker FRONT L"]
    Q["Speaker FRONT L"] --> R["Speaker FRONT L"]
    S["Speaker FRONT L"] --> T["Speaker FRONT L"]
    U["Speaker FRONT L"] --> V["Speaker FRONT L"]
    W["Speaker FRONT L"] --> X["Speaker FRONT L"]
    Y["Speaker FRONT L"] --> Z["Speaker FRONT L"]
    AA["Speaker FRONT L"] --> AB["Speaker FRONT L"]
    AC["Speaker FRONT L"] --> AD["Speaker FRONT L"]
    AE["Speaker FRONT L"] --> AF["Speaker FRONT L"]
WIRING
| 1 | Black | GROUND | Connect to (—) side of car battery | ||
| 2 | Red | ACC | Ignition Accessory 12V+ | ||
| 3 | Pink | BACK UP CAMERA | 12 volt + trigger from reverse lights | ||
| 4 | Green | SW-KEY-F 1 | Steering wheel control Key 1 interface wire | ||
| 5/6 | Gray | Speaker Front R | Front right speaker | Gray (+) | Gray/Black (-) |
| 7/8 | White | Speaker Front L | Front left speaker | White (+) | White/Black (-) |
| 9 | Yellow | FUSE/ POWER B+ | Connect to (+) side of car battery | ||
| 10 | Orange | ILLUMINATION | 12 volt + trigger dash board illumination | ||
| 11 | Gray | SW-KEY-F 2 | Steering wheel control Key 2 interface wire | ||
| 12 | Blue | AUTO ANTEN NA | 12 volt + trigger output | ||
| 13/14 | Green | Speaker Rear L | Rear left speaker | Green (+) | Green/Black (-) |
| 15/16 | Purple | Speaker Rear R | Rear right speaker | Purple (+) | Purple/Black (-) |
* Pink wire tells the monitor when to activate and display rearview camera on the display (optional)
PYLE
PyleUSA.com

natural_image
Illustration of a laptop with a red checkmark on screen (no text or symbols)VISIT US ONLINE:
Have a question?
Need service or repair?
Want to leave a comment?
PyleUSA.com/ContactUs
PYLE
Questions? Issues?
We are here to help!
Phone: (1) 718-535-1800
Email: support@pyleusa.com
- CONTENTS
- Note:
- System Installation:
- Installation Guide
- Caution:
- Do not install unit in any area where:
- Front Panel and Buttons
- Button & Feature Layout
- Turning Power On
- App Screen - Interface Layout
- Swipe UP/DOWN to access more apps
- Navigation
- Clicking icon description
- Local music
- Online music
- Music player button function description
- Video playback
- Calendar
- Radio
- Clicking icon description interface (FM / AM band can store 40 effective platforms each)
- BAND BAND to switch between mode FM1/FM 2
- Wireless BT
- EQ - Equalizer
- Phone Link APP
- Third Party Apps
- Steering wheel learning
- The realization of this feature:
- Sound settings
- Memory clean
- Desktop wallpaper
- WLAN (Wi-Fi settings)
- Reset
- Time setting
- Troubleshooting
- Wiring - Back Panel:
- PYLE
- PyleUSA.com
Brand : Pyle
Model : PLINTBL10
Category : Subwoofer