
ATV40 - Television ASPES - Free user manual and instructions
Find the device manual for free ATV40 ASPES in PDF.


| Product Type | LED Television |
| Brand | Aspes |
| Model | ATV40 |
| Screen Size | 40 inches (102 cm) |
| Resolution | 1920 x 1080 (Full HD) |
| Aspect Ratio | 16:9 |
| Refresh Rate | 60 Hz |
| Connectivity | 3x HDMI, 2x USB, 1x RF, 1x VGA, 1x Headphone |
| Power Supply | AC 100-240V, 50/60Hz |
| Power Consumption (Typical) | 70 W |
| Standby Power | < 0.5 W |
| Weight (with Stand) | 8.5 kg |
| Weight (without Stand) | 8.0 kg |
| Dimensions (with Stand) | 900 x 550 x 200 mm |
| Dimensions (without Stand) | 900 x 520 x 80 mm |
| Color | Black |
| Remote Control | Included (model RC-ATV40) |
| Wall Mount Compatible | Yes, VESA 200 x 200 mm |
| Speaker Power | 2 x 8 W |
| Tuner | DVB-T2/C/S2 |
| Energy Efficiency Class | A+ |
| Care and Cleaning | Wipe with a soft, dry cloth. Do not use solvents. |
| Safety Precautions | Ensure adequate ventilation; do not cover vents. |
Frequently Asked Questions - ATV40 ASPES
User questions about ATV40 ASPES
0 question about this device. Answer the ones you know or ask your own.
Ask a new question about this device
Download the instructions for your Television in PDF format for free! Find your manual ATV40 - ASPES and take your electronic device back in hand. On this page are published all the documents necessary for the use of your device. ATV40 by ASPES.
USER MANUAL ATV40 ASPES
natural_image
Exterior view of a modern black flat-screen TV with visible screen and stand (no text or symbols on screen)ATV40
Please read this manual carefully for proper usage before installation and use. It is recommended to keep this manual properly for future check. The pictures in this manual are only for reference.
Contents
Safety Warning and Notice....1
Mounting and Connecting....3
Packing list....3
Mounting the TV set....3
C onnecting peripheral equipment…………4
Panel Control Keys....5
Remote Control 5
Basic Operations 7
Turning/ Standby....7
Signal source selection 7
Menu operation description....7
Program scanning... 7
REC option 8
Time Shift option 8
Mul media player....8
Troubleshooting....9
Technical Specifications...9
Base Installation Instructions .... 10
Use of a TV wall mounting....11
Safety Warning and Notice
Thanks for choosing the high-performance and multifunctional intelligent IED TV produced by our company. This precious thing will bring you better audiovisual enjoyment. The design of this product has given consideration to factors affecting personal safety, and the product itself has gone through strict tests prior to delivery. However, improper operation may result in electric shock and fire disaster. To ensure safety, prolong the service life of this product, and make sure the best performance of this product can be given full play to, please read the manual and marking label carefully before using it and comply with the following safety instructions. Please keep the user manual for later use.
| Warning | May result in casualties | |
| ○ | Indicate the behaviors that must be prohibited |
| Attention | May result in personal injury or property losses |
| Indicate the operations that must be performed |
Under Following Conditions
● Power failure or unstable voltage.
● Abnormal sound or smell from the device.
● AC power cord is damaged.
● TV set is damaged due to falling off, knock or impact.
● Any liquid or foreign matters enter into the TV set.
Turn off the TV set immediately, unplug the power cord from the power outlet, and contact authorized maintenance personnel.
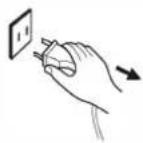
- If coal gas or other flammable gases leak, do not unplug the power cord of the TV set or other electric appliances; instead, close the valve of the gas immediately and open the doors and windows.

Warning

● Only use 100-240VAC, 50/60Hz power supply.
● All cables can be connected or pull out only after power supply is turned off.
- Do not fix the TV set on instable position, or else it may cause falling off, damage, or even fire.
● Do not put the TV set in the environment:
- With direct sunshine, moisture, overheating, undercooling or heavy dust;
- With flammable or explosive substance;
- With flammable or corrosive gas;
-
In bathroom, kitchen, etc.
-
Do not use damaged or improper power socket, and ensure that the plug and socket are connected properly.
-
Keep the power plug and socket free of dust and metal pieces.
● Do not damage the power cord: -
It is prohibited to refit the power cord;
- Do not put heavy object on the power cord;
- Keep the power cord away from heat source;
- Do not drag the power cord when unplugging.
- Do not connect too many appliances to one power strip, or else it may cause fire due to high power consumption.

Warning

- Do not let open flame (e.g. lit candle) approach the TV set, or else it may cause electric shock or fire.
- Do not put the container filled with water on the TV set, to avoid electric shock or fire caused by water drop of splashing.
- Do not penetrate any sharp object, metal or liquid into the signal connector or air vents, to avoid short circuit and product damage as well as electric shock.
● The slots on the case is designed to release heat so as to assure that all inside components will not reach an extra high temperature and can work normally for a long time. Please do not cover the holes while place it.

Do not touch the plug with wet hands, or else it may cause electric shock.

Do not turn on the TV set in thunderstorm weather; instead, unplug the power plug and antenna connector to avoid lightning strike.

Do not disassemble the TV set by yourself, or else it may cause electric shock or fire. Contact qualified personnel for maintenance.

Attention
● Do not let children climb onto the TV set.
- Keep the small accessories away from children's reach to avoid swallowing.
- If the TV set won't be used for a long time, please turn off the device and unplug the power cord.
● Before cleaning the TV set, unplug the power cord and wipe with soft cloth; do not use chemical reagents and avoid foreign substances entering into the device. The incorrect cleaning (such as cleaning fluid, water, etc) may lead to damage of product's appearance, erasing products printing information, even flow into the machine and damage components, cause machine can not display.
● To adjust the position or angle of the TV set, please disconnect all wires and move slowly

Attention
to avoid falling off.
- Do not rub with hard object, knock at, bend or squeeze the screen.
- Do not use machine immediately after transferring machine to the places with high temperature from low temperature, which will cause fogging inside machine and failures.
- If the screen is broken and the liquid splashes on skin, please wash with clean water immediately for 15 minutes, and go to see your doctor.
● To carry the TV set with hands, please grasp the corners and hold the bottom; do not apply force on the panel.
- Displaying the same image for a long time or active image with fixed words, icons will leave "image persistence" on screen which will not disappear after powering off for a long time. This undesirable phenomenon is not covered by warranty.
● Healthy TV watching:
1. Watch in appropriate light; poor light or long time watching may hurt your eyes.
2. Adjust the volume appropriate to avoid hurting your hearing.
● Unplug the power cord of the device to cut off the power supply.
- If a power plug or appliance coupler is used as disconnecting device, it should ensure easy operation.
● Power plug shall be connected reliably. Loose power plugs may cause sparkle and fire.
- All the technical specifications in the user's manual and on the packaging are subject to changes without prior notice. If there is slight deviation between the user's manual and actual operation, the latter shall prevail.
● This appliance is intended for domestic use only.
● The illustrations are reference images, your device may differ.
HDMI®
HIGH-DEFINITION MULTIMEDIA INTERFACE
The terms HDMI and HDMI High-Definition Multimedia Interface, and the HDMI Logo are trademarks or registered trademarks of HDMI Licensing Administrator, Inc. in the United States and other countries.
Mounting and Connecting
Packing list
- The TV set.
- User Manual.
- Remote control.
- Power cord (or attached to TV set).
Mounting the TV set
Tips on Installation
● The TV set should be mounted near the AC power socket for easy plugging and unplugging.
- For your safety, please select appropriate wall mount bracket or base.
● To avoid hurt, it is required to place the TV set on stable plane, or fix on firm wall.
- Ask qualified personnel to mount the TV set on the wall. Improper mounting may result in instable TV set.
- Do not place the TV set at any place susceptible to mechanical vibration.
- Do not place the TV set at any place that insects may enter.
- Do not mount the TV set against air conditioner, or else the internal panel of the display may condense moisture and cause failure.
- Do not place the TV set at any place with strong magnetic field, or else it may be interfered with and damaged by electromagnetic wave.
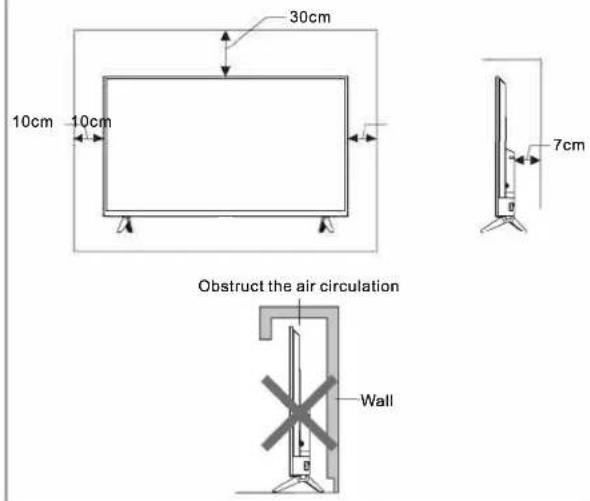
Mount on the base
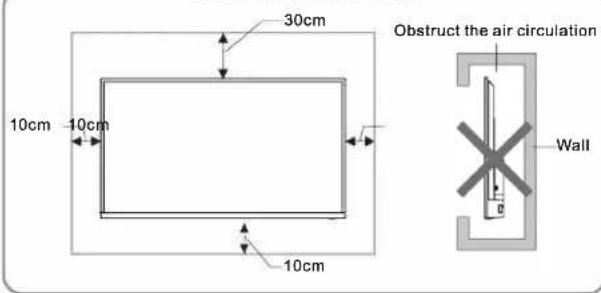
Mount on the wall
Ventilation
- Please keep this space at least around the TV, as shown in the figure.
- Do not cover the air vents or insert any object into the enclosure.
- Do not put the device in limited space, e.g. bookcase or embedded closet, unless the TV set is properly ventilated.

Warning
Never place a television set in an unstable location. A television set may fall, causing serious personal injury or death. Many injuries, particularly to children, can be avoided by taking simple precautions such as:
● Using cabinets or stands recommended by the manufacturer of the television set.
● Only using furniture that can safely support the television set.
● Ensuring the television set is not overhanging the edge of the supporting furniture.
● Not placing the television set on tall furniture (for example, cupboards or bookcases) without anchoring both the furniture and the television set to a suitable support.
● Not placing the television set on cloth or other materials that may be located between the television set and supporting furniture.
● Educating children about the dangers of climbing on furniture to reach the television set or its controls.
If your existing television set is being retained and relocated, the same considerations as above should be applied.
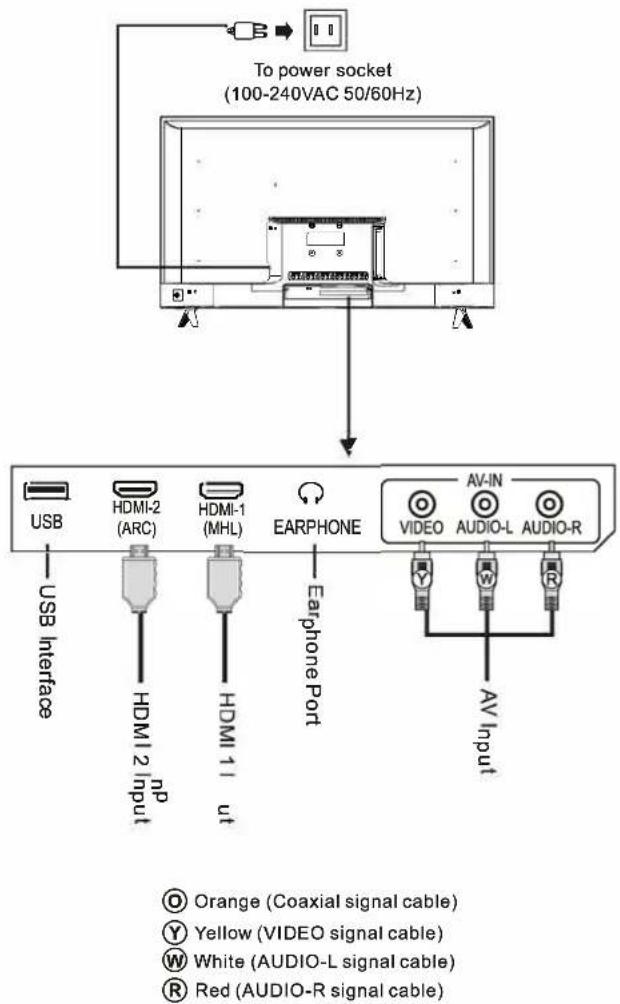
Connecting peripheral equipment
Remark:
- USB interfaces support peripheral equipment, including USB mass storage device.
- When you need to connect the device which support the ARC function, please select the HDMI-2 interface.
- When you need to connect the device which support the MHL function, please select the HDMI-1 interface.
- HDMI connector can realize DVI connector function with external HDMI/DVI commutator.
- TV2(DVB-S) interface is optional, please refer to the device.
- The peripheral equipment and cables described in this manual should be purchased separately.
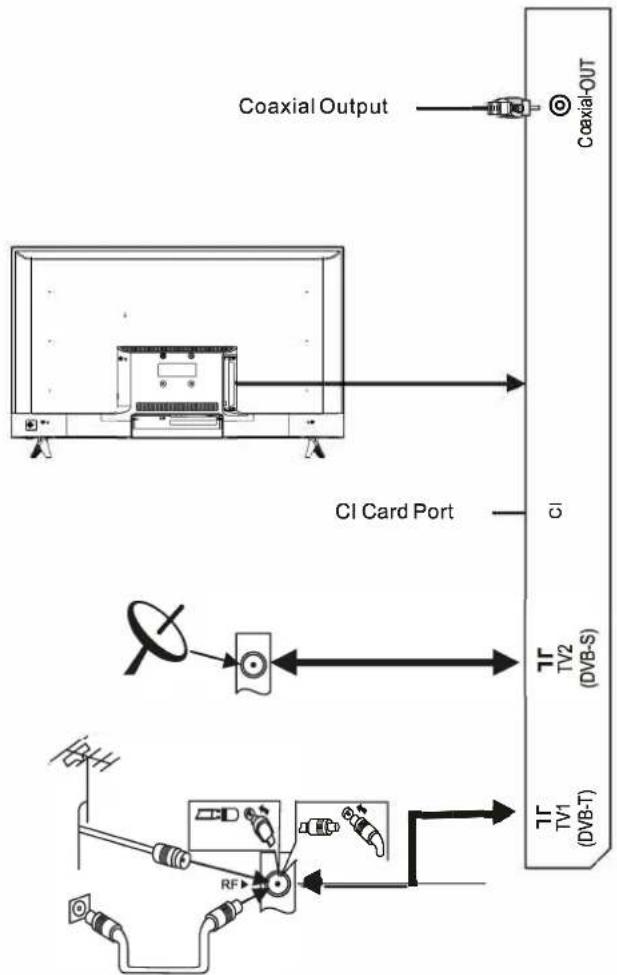
flowchart
graph TD
    A["Coaxial Output"] --> B["Coaxial-OUT"]
    B --> C["CI Card Port"]
    C --> D["TV2 (DVB-S)"]
    C --> E["TV1 (DVB-T)"]
    D --> F["Signal Link"]
    E --> G["Signal Link"]

Warning
When connecting outdoor antenna to signal port of the TV set, please turn off the main power switch of the TV set first. Do not approach the outdoor antenna to high voltage mains power line to avoid electric shock. The wired network antenna connected to this TV set must be isolated from the protective grounding, or else it will cause fire or other hazards.
Panel Control Keys
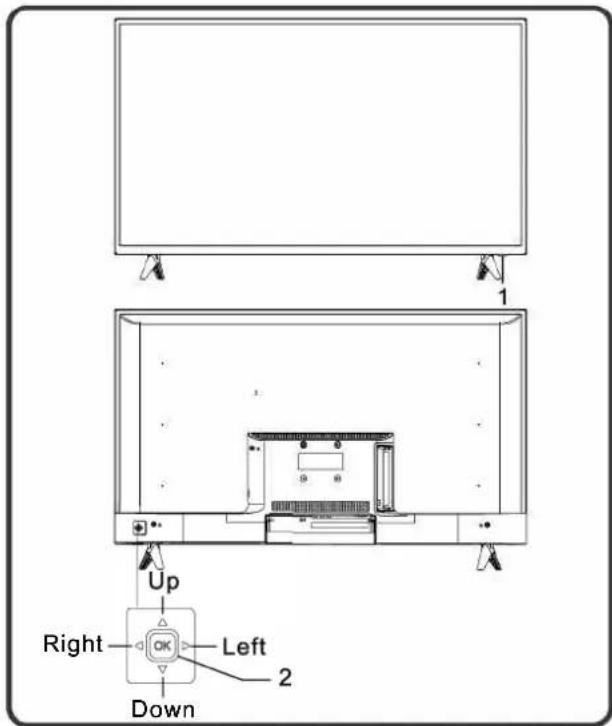
Note: The illustration is a reference image, your device may differ
-
Power LED indicator and remote receiving window.
-
Rocker button combination key:
Power on or standby with OK rocker:
①. When Plugged power cord into the electrical socket, you can press OK rocker to turn on the TV.
②. In power on state, press OK rocker to display the function menu, then move rocker Left/Right to select Power and press OK rocker to switch to standby mode.
After turn on the TV, Press OK Rocker:
①. In non-OSD menu operation, press OK rocker to display the menu which includes 4 sorts: Menu, Source, Power, Exit.
②. During the menu operation, press OK rocker to confirm the operation, the function is the same with pressing [OK] key on the remote control.
Move rocker Left/Right:
①. In non-OSD menu operation, move rocker Left/Right to decrease/increase the volume, the function is the same with pressing [VOL-]/[VOL+] key on the remote control.
②. In OSD menu operation, move rocker Left/Right
to adjust the analog value of selected item, the function is the same with pressing [◀]/[▶] key on the remote control.
Move rocker Up/Down:
①. In non-OSD menu operation, move rocker Up/Down to select the channel, the function is the same with pressing [CH+]/[CH-] key on the remote control.
②. In OSD menu operation, move rocker Up/Down to select the adjustment items, the function is the same with pressing [▲]/[▼] key on the remote control.
Note: Different models may have different appearances; please refer to the actual device.
Remote Control
Method for Installation of Remote Control Battery
Remove the battery compartment cover and insert two AAA (No. 7, 1.5V) batteries; make sure the polarity of the batteries is in compliance with the polarity mark "+" and "-" in the battery compartment of the remote control.
Precautions for using the remote control
● The remote control should be pointed at the remote control sensor during operation. An object placed between the remote control and the remote control sensor may impede normal operation.
● The remote control should be prevented from strenuous vibration. Besides, please do not set or place the remote control under direct sunshine, as heating power may result in deformation of the remote control.
● Remote control failure may occur when the remote control sensor of the main unit is under direct sunshine or strong lighting; in this case, please change the angle of lighting or this TV set, or operate the remote control near the remote control sensor.
● Low battery will influence the remote control distance, in which case, the battery should be replaced with a new one. If the remote control is going to be idle for a long time or the battery runs out, please take the battery out to prevent the remote control from being corroded by battery leakage which may result in damage and failure of the remote control.
- Please do not use batteries of different types. It is not allowed to use old and new batteries together; the batteries should be replaced in pair.
- Please do not throw the batteries into fire or charge or decompose the batteries; do not charge, short-circuit, disassemble/assemble, heat or burn used batteries. Please dispose the waste batteries pursuant to relevant regulations on environmental protection.
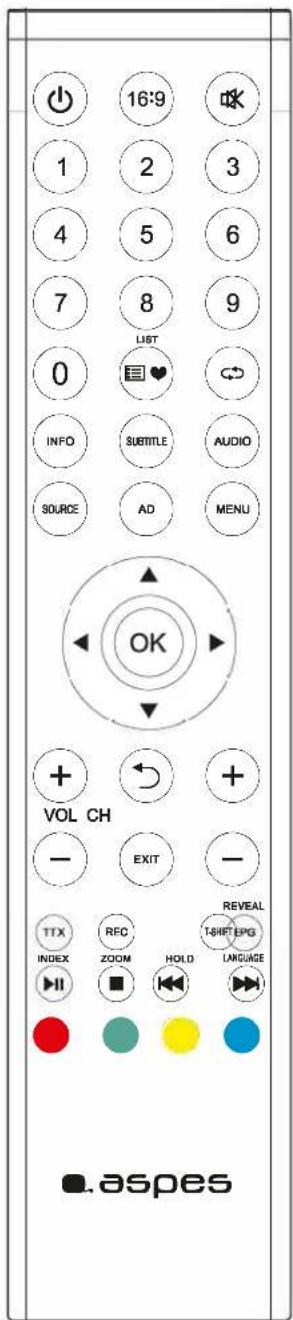
Keys of the Remote Control
Note: The illustration is a reference image, your device may differ
| Keys Function | |
| Power(⏻) | Switch between working and standby status. |
| 16:9 | Switch the display mode. |
| MUTE(⏻) | Turn on/off the sound. |
| Number keys(0~9) | Enter numbers or select channel. |
| List(⏻♥) | View program list. |
| ⊂⊃ | Return to last watching channel. |
| SOURCE | Select the signal source.(only in TV mode) |
| MENU | Show the OSD menu. |
| Cursor keys(▲,▼,◀,▶) | Select items or adjust values. |
| OK | Confirm the operation. |
| VOL+/- | Turn up/down the volume. |
| Return(⊃) | Return to previous page. |
| EXIT | Exit the current interface |
| CH+/- | Change program channel. |
| INFO | Show the information of the TV program. |
| SUBTITLE | Select subtitle language. |
| AUDIO | Select audio language. |
| AD | Turn on/off the associated audio. |
| TTX Open teletext | mode. |
| REC | Record programme. |
| T-Shift | Time shift in DTV mode. |
| REVEAL(EPG) tele | Displays the hidden text in text mode.(Electronic channel instructions.) |
| INDEX(▶II) | Displays the index page in teletext mode.(Play/pause function in multimedia) |
| ZOOM(■) | Adjust the teletext size.(Stop function in multimedia) |
| HOLD(◀◀) | Hold the displays at the current page.(Last file in multimedia). |
| LANGUAGE(▶▶) | Change teletext language.(Next file in multimedia). |
| Red key | Special function key |
| Green key | |
| Yellow key | |
| Blue key |
Basic Operations
Remark:
- The keys operation refers to remote control operation, for panel control keys operation please refer to "Panel Control Keys" operation explanation.
- Menu Operation Instruction in this manual is explained according to TV mode. The operations in other modes are similar to the one in TV mode, and users can take it as reference.
- Before power-on platform, please make sure that the power supply is stable.
Turning on/Standby
Plug power cord into the electrical socket. Press [☐] key to turn on the TV. Press [▲]/[▼]/[◀]/[▶] key to select the OSD language which you wish and press [OK] key to confirm. Press [▲]/[▼] key to select DVB Type and press [OK] key to next step.
In display showing interface, press [◀]/[▶] key to select Tune Type which you wish, then press [▼] key and you can select country where you are by pressing [▲]/[▼]/[◀]/[▶] key. Next, press [OK] key to confirm (If you select France, you need to set a password. and you need to select BW when several countries were chosen), and the machine starts automatic searching channel. (If the selected DVB Type is DVB-C, you need to set Tuning Mode as Network or Full. When you set it as Network, you need to press [▲]/[▼] key to select Frequency, Modulation, Network ID and Symbol Rate. Then press [◀]/[▶] key to adjust the items. Finally, select Search and press [OK] key to starts scanning.)
In power on state, press [⏻] key to switch to standby mode.
★ Special Tips: This device adopts energy saving technology. If there is no signal input in power on state, it will enter standby state automatically in five minutes; The device will enter standby state automatically at specified sleep time;
Signal source selection
You can connect various devices to the TV set and view high quality images. If the video device has HDMI, AV and other video output ports. You can select one of them and connect to corresponding input ports of the TV set. After connected, turn on the device and press [SOURCE] key, then menu of signal source will be displayed on the screen. Press the [▲]/[▼] key to select the input signal, and press [OK] key to confirm.
Menu operation description
Press [MENU] key to show the main menu on the screen:
- Press [◀]/[▶] key to select a menu from CHANNEL, PICTURE, SOUND, TIME, OPTION, LOCK.
- Press [▲]/[▼] key to select an item in the menu.
- Press [OK] key to enter the submenu.
- Press [◀]/[▶] key to adjust the value or setting.
- When the main menu shows on the screen, press [⊃]/[MENU] key to exit the main menu; Press [⊃]/[MENU] key to return to previous menu when the TV display the submenu.
- During menu operation, the icons of invalid options will change into grey.
Note: The default password for the lock system is 0000.
Program scanning
Tune the programs before watching the TV for the first time. Before scanning, please make sure that the antenna has been connected properly and select Antenna Type which want to choose. The following example channel searching Tune Type is under DVB-T.
Auto Tuning
Press [MENU] key, and select CHANNEL > Auto Tuning, then press [OK] key. Next, press [◀]/[▶] key to select Tune Type: DTV+ATV, DTV, ATV. Press [▼] key, then you can select country where you are by pressing [▲]/[▼]/[◀]/[▶] key and the machine starts auto tuning after pressing [OK] key.(If you select France, you must enter the password. And you need to select BW when several countries were chosen).If you choose DTV+ATV, the screen displays "Do you want to skip ATV tuning?" by pressing [⊃] key during auto tuning ATV channel. Press [◀] key to confirm, then the machine starts automatic searching DTV channel, or press [▶] key to cancel. During auto tuning DTV channel, the screen displays "Do you want to skip DTV Tuning?" by pressing [⊃] key. Press [◀] key to confirm, or press [▶] key to cancel.
DTV Manual Tuning (In DTV signal source) Press [MENU] key, Select CHANNEL> DTV Manual Tuning, Press [OK] key to enter DTV Manual Tuning menu, Press [◀]/[▶] key to select channel, then press [OK] key to confirm. During the search you may press [⊃] key to interrupt the search and return to the last menu.
ATV Manual Tuning (In ATV signal source) Press [MENU] key, Select CHANNEL > ATV Manual Tuning, Press [OK] key to enter ATV Manual Tuning menu, Press [▲]/[▼] key to select Sound System, Color System, Current CH, and press [◀]/[▶] key to select which you wish. Select Search, press [◀]/[▶] key to search for low frequency or high frequency. After searching, select Fine-Tune and press [◀]/[▶] key to tune for low frequency or high frequency. During manual searching, you can press [⊃]key to interrupt the search and return to the last menu.
REC option
In DTV mode, Press [REC] key, REC option menu shows on the screen, and system begins recording right now. Press [■] key to stop and quit recording; Press [MENU] key and select OPTION> Recorded List, then you can select the file you want to play, and press [OK] key to play it.
| Icon | Description |
| ▶ | Play: Play. |
| ■ | Stop: Stop and quit. |
| II | Pause: Pause. |
| ◀◀ | FB: Fast back, press [INDEX] key to play normally. |
| ▶▶ | FF: Fast forward, press [INDEX] key to play normally. |
| ▶◀ | FF 30S: Make a 30S jump forward. |
| ◀◀ | FB 30S: Make a 30S jump backward. |
Note: The recording function can only support memorizer with FAT32 file system. Memorizer with other file systems need to be formatted; Before formatting memorizer, back-up useful data because the content of memorizer can not recover after formatting.
Time Shift option
In DTV mode, Press [T-shift] key, Time Shift option menu shows on the screen and the program is in
suspended state. Press [INDEX] key to resume play program. Press [■] key to stop and quit time-shift. When user leaves program for a short time, time-shift function can suspend and cache the playing program to U disk. When user resumes playing, the program can continue to be played.
| Icon | Description |
| ▶ | Play: Play. |
| ■ | Stop: Stop and quit. |
| II | Pause: Pause. |
| ◀◀ | FB: Fast back, press [INDEX] key to play normally. |
| ▶▶ | FF: Fast forward, press [INDEX] key to play normally. |
| ▶◀ | FF 30S: Make a 30S jump forward. |
| ◀◀ | FB 30S: Make a 30S jump backward. |
Multimedia player
Press [SOURCE] key, then press [▲]/[▼] key to select USB and press [OK] key to enter. Select the file type from Movie, Music, Photo.
■ Playing Files in local disk device: Before playing files in the local disk, insert the USB mass storage device into the USB interface.
Select local disk device in the file directory and press [OK] key to enter. Select Return in the directory, press [OK] key to return to previous folder. Select the target folder and press [OK] key to enter the folder. Then press [▲]/[▼]/[◀]/[▶] to select the target file and press [▶II] to play it. Press [⊃] key to return to the desktop.
Attention:
- Nonstandard USB devices can't be recognized probably; in this case, please replace a standard USB device;
- The stream media system has certain restriction on the format of files; the playing will be abnormal if it is out of the system restriction;
- Do not remove the USB device while playing, or else the system or device may have problem; Before replace the USB device, please turn off the machine's power supply;
- The system supports standard USB1.1 and USB2.0 devices, such as USB mass storage devices and removable hard disks;
- The maximum output current of the USB port of this device is 500mA, and the self-protection will be enabled if it is beyond this limit; please use
external power supply if an external device of higher current will be connected;
- The system is complicated; when it is reading or playing files, the screen may be still or certain functions may be invalid due to the compatibility and stability of the USB device; in this case, please turn off the device and re-initialize the system.
Press [INFO] key can display or hide toolbar, While playing, select the menu option which you want, and press [OK] key to perform the operation; you can press [→] key to exit playing, or press [▶II]/[■]/[◀◀]/[▶▶] key on the remote control to perform shortcut operation.
Troubleshooting
■ Snowflake spots occur in the TV images and there is noise in accompanying sound.
-
Check if the antenna plug is loose or the cable is in good condition.
-
Check the antenna type (VHF/UHF).
-
Adjust the direction and position of the antenna.
-
Try to use signal enhancer.
■ There is neither display nor sound on the screen. The indication light is not on.
Check if the power line is connected.
■ Dotted line or strip disturbance occurs in TV images.
Do not use electric hair dryer aside the TV set and adjust the antenna direction to reduce disturbance.
■ Double images occur on the TV screen.
-
Use high oriented antenna.
-
Adjust the direction of the antenna.
■ The images are colorless.
Enter "Picture" setting to increase color saturation.
■ The TV has no accompanying sound.
-
Adjust the volume to a proper degree.
-
Press [OK] key on the remote control to cancel mute mode.
■ No signal input images show on the machine screen. The indicator light is blinking.
-
Check if the signal connecting cable is loose or falls off. Reconnect it.
-
The computer may be in standby mode, please reboot.
■ The remote control distance is short or out of control.
-
Remove the object to avoid blocking the remote control receiving window.
-
Replace the battery.
■ Machine is slow, system crash, can't operate the machine.
Disconnect the power supply first, and connect the power supply after about 1-2 minutes, then turn on the TV again.
Technical Specifications
Master unit
| Max. Resolution | 1920× 1080 |
| Best Resolution | 1920 × 1080@60Hz |
| Power Supply | 100-240VAC 50/60Hz |
| Power Consumption of Speaker | 6W+6W |
Dimension (L×W×H) and Weight
| Excluding base | Unpacking: 904×70 ×519(mm3) |
| Including base | Unpacking: 904×177×573(mm3)Packing: 995×118×610(mm3)Net Weight: 5.8kgGross Weight: 7.7 kg |
Operating environment:
Temperature: 5°C\~40°C
RH: 20%\~80%
Atmospheric pressure: 86kPa\~106kPa
Storage environment:
Temperature: -20 ℃\~55 ℃
RH: 20%\~80%
Atmospheric pressure: 86kPa\~106kPa
Technical specifications for TV
- Supported standard:
ATV: PAL D/K, I, B/G, SECAM D/K, B/G;
DTV: DVB-T/C(DVB-S/S2/T2 optional).
- Antenna input: 75 Ω coax, unbalanced.
- AV video input: 75 Ω, 1±0.1Vp-p, RCA terminal.
- AV audio input: 20KΩ, 0.2\~2Vrms.
- HDMI video input: 480i, 480P, 576i, 576P, 720P, 1080i, 1080P.
HDMI display mode
| VESA mode | |||
| NO. | Mode | Resolution | Refresh rate |
| 1 | VGA | 720×400 | 70Hz |
| 2 | 640×480 | 60Hz | |
| 3 | SVGA | 800×600 | 60Hz |
| 4 | XGA | 1024×768 | 60Hz |
| 5 | WXGA | 1360×768 | 60Hz |
Power management
| Mode | Power Consumption |
| Normal working | ≤55W |
| Standby | ≤0.5W |
Base Installation Instructions
Put the machine flat first, distinguish left and right base and base installation front and back direction, then install the bases in the bottom of the machine back cover as arrow direction in figure. Align screw holes, then fasten screws (notice that base module has to be adjusted at figure status, otherwise it cannot be installed in.)
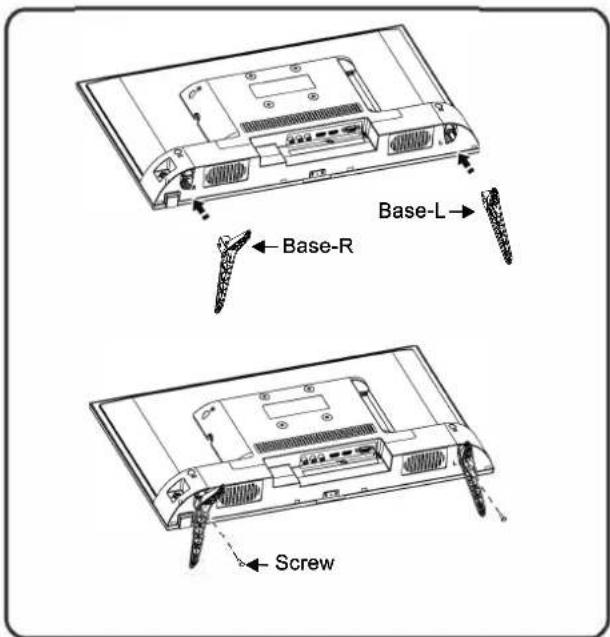
Remark: The actual base and machine appearance may be different from pictures; please refer to the actual device.
Use of a TV wall mounting

Warning
- Please purchase a suitable TV wall mount when mounting your TV on the wall.
- Ensure that the bearing capacity of the wall for mount installation is no less than 4 times the weight of the TV set and the wall mount so as to avoid falling.
- Please refer to the instructions provided with the TV set and wall mount for installation.
● Make sure there is no cable or conduit in the wall section where a wall mount will be installed. - Please entrust a professional technician to complete installation. The company shall not be liable for accidents, personal injury or damage caused by improper installation of TV set.
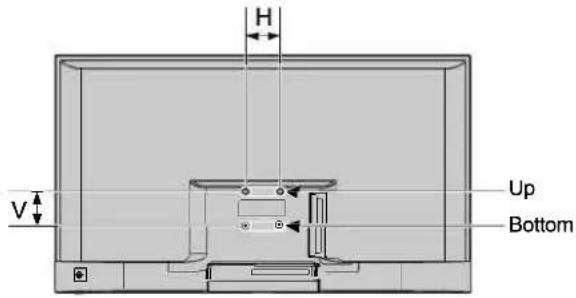
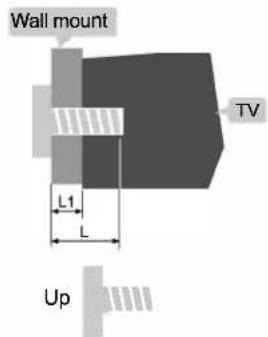
L1: Thickness of wall mount
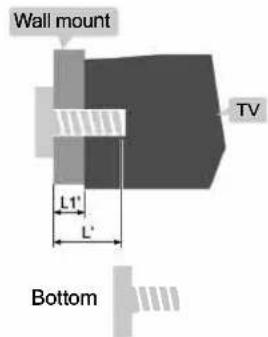
L1': Thickness of wall mount
| Distance between holes on the wall(H×V)(mm) | Required screws (recommended bolt length)(mm) |
| 75×75 | Up: 2×M4 (L=5+L1), Machine screwsBottom: 2×M4 (L'=8+L1'), Flat tail self-tapping screws |
Note:
- If any screws are found in the screw hole for wall mount behind the TV set before installing the wall mount, the screws shall be removed and put in place for later use.
- Please buy the wall screws according to the actual situation.
- If there are flat tail self-tapping screws in the accessories, please decide whether it is suitable for use according to the actual situation of the wall mount.
ST4×10mm flat tail self-tapping screws 2pcs (option)
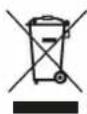
This symbol on the product or in the instructions means that your electrical and electronic equipment should be disposed at the end of its life separately form your household waste.
There are separate collection systems of recycling in the EU. For more information, please contact the local authority or your retailer where you purchased the product.

This television is in compliance with the essential requirements and other relevant provisions of Directives 2014/53/EU (RED), and 2011/65/EC, (EU)2015/863(RoHS).

AUDIO
Manufactured under license from Dolby Laboratories. Dolby, Dolby Audio, and the double-D symbol are trademarks of Dolby Laboratories.

This mark shows that the construction of the product is double-insulated.

This mark shows that it is danger, high voltage inside! To avoid electric shock, please do not open the back cover. There are not user serviceable parts inside, so please contact professional and authorized personnel!
|
—
[Non-Text]
[Non-Text]
[Non-Text]
[Non-Text]
[Non-Text]
[Non-Text]
[Non-Text]
[Non-Text]
[Non-Text]
[Non-Text]
[Non-Text]
[Non-Text]
[Non-Text]
[Non-Text]
[Non-Text]
[Non-Text]
[Non-Text]
[Non-Text]
[Non-Text]
[Non-Text]
[Non-Text]
[Non-Text]
[Non-Text]
[Non-Text]
[Non-Text]
[Non-Text]
[Non-Text]
[Non-Text]
[Non-Text]
[Non-Text]
[Non-Text]
[Non-Text]
[Non-Text]
[Non-Text]
[Non-Text]
[Non-Text]
[Non-Text]
[Non-Text]
[Non-Text]
|
广力云
[Non-Text]
[Non-Text]
[Non-Text]
[Non-Text]
. aspes
SVAN TRADING S.L.
- ATV40
- Contents
- Safety Warning and Notice
- Under Following Conditions
- Warning
- Attention
- HDMI®
- Mounting and Connecting
- Packing list
- Mounting the TV set
- Tips on Installation
- Ventilation
- Connecting peripheral equipment
- Remark:
- Panel Control Keys
- Move rocker Up/Down:
- Remote Control
- Method for Installation of Remote Control Battery
- Precautions for using the remote control
- Keys of the Remote Control
- Basic Operations
- Turning on/Standby
- Signal source selection
- Menu operation description
- Program scanning
- Auto Tuning
- REC option
- Time Shift option
- Multimedia player
- Attention:
- Troubleshooting
- Technical Specifications
- Operating environment:
- Storage environment:
- Technical specifications for TV
- Base Installation Instructions
- Use of a TV wall mounting
- Note:
- aspes
Brand : ASPES
Model : ATV40
Category : Television