Mullions - Hardware Accessories Dormakaba - Free user manual and instructions
Find the device manual for free Mullions Dormakaba in PDF.


| Product Type | Mullion (vertical bar for double doors) |
| Brand | Dormakaba |
| Model | Mullions |
| Category | Hardware Accessories |
| Material | Metal (steel or aluminum alloy) |
| Installation Type | Surface mounted on door frame soffit and sill |
| Lock Cylinder Type | Mortise cylinder (DORMA supplied) |
| Fasteners | 5/16-18 x 1-1/2 in. screws for top fitting; 12-24 x 3/4 in. screws for stabilizers |
| Drill Bit Sizes | "F" drill bit for top fitting holes; 3/4 in. drill bit for bottom fitting holes |
| Components Included | Top fitting, bottom fitting, mullion tube, stabilizers (4), screws, anchors |
| Fire Rated | Yes, stabilizers required for fire-rated installation |
| Functions | Secures double doors; removable with key rotation |
| Height Adjustment | Field-cut from bottom end; subtract 1 in. from floor-to-soffit height |
| Maintenance | Periodic check of screw tightness and cylinder operation |
| Cleaning | Wipe with damp cloth; avoid abrasive cleaners |
| Safety | Ensure mullion snaps firmly and is easily removable with key; for fire-rated doors, install all stabilizers |
| Spare Parts Availability | Contact Dormakaba for replacement cylinders, fittings, and screws |
| Repairability | User-serviceable: replace cylinder, adjust alignment, replace screws |
| Warranty | Refer to Dormakaba terms (not specified in manual) |
Frequently Asked Questions - Mullions Dormakaba
User questions about Mullions Dormakaba
0 question about this device. Answer the ones you know or ask your own.
Ask a new question about this device
Download the instructions for your Hardware Accessories in PDF format for free! Find your manual Mullions - Dormakaba and take your electronic device back in hand. On this page are published all the documents necessary for the use of your device. Mullions by Dormakaba.
USER MANUAL Mullions Dormakaba
natural_image
Technical line drawing of a vertical metal frame with mounting holes and a small circular feature (no text or symbols)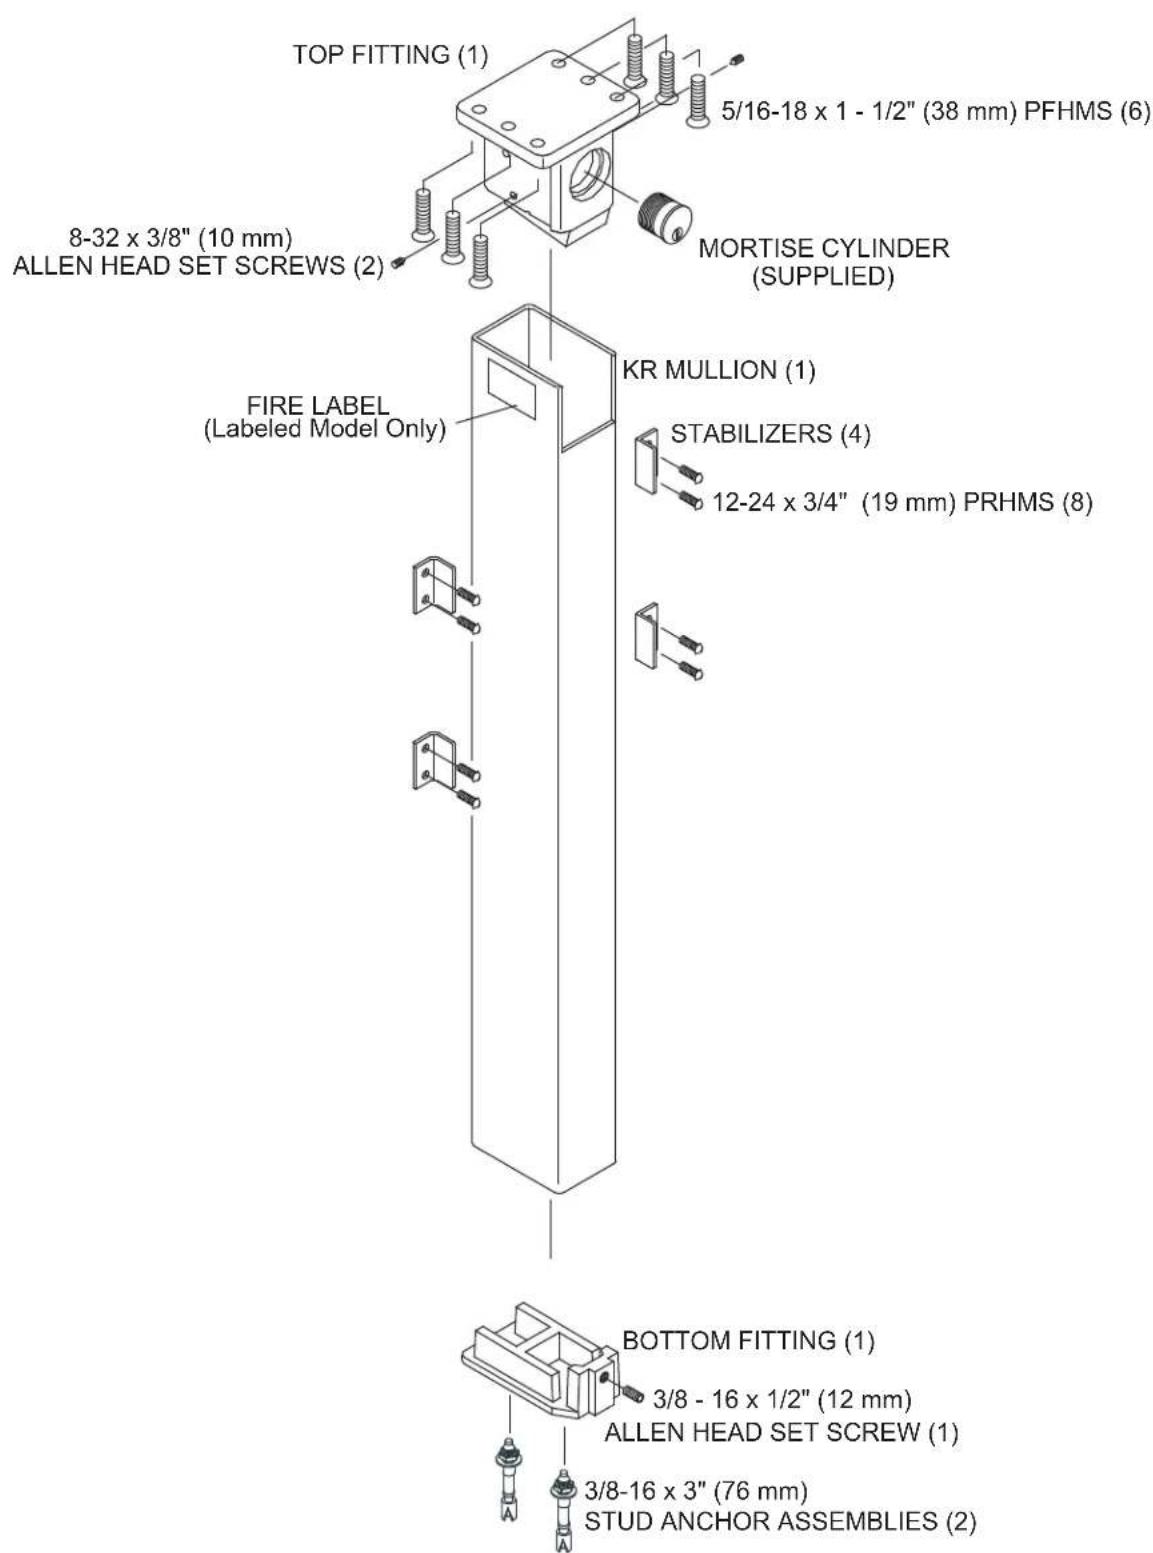
INSTALLATION
Read the entire instruction sheet prior to installation.
- Determine and mark the center of the width of the door opening at the soffit and at the sill. See illustration at right.
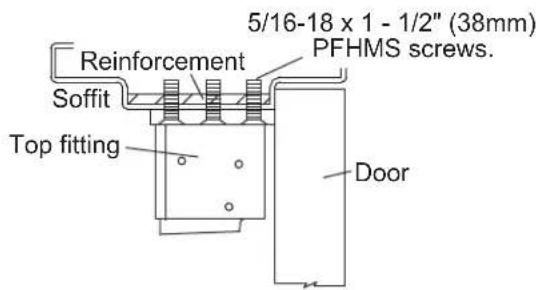
- Place top fitting on soffit of frame. Align the centering notch in fitting with the mark you made on soffit. Close doors and butt the notched side of fitting to doors. Mark and drill (4 or 6) holes with "F" drill bit, tap holes for 5/16-18 screws. (Note: A shim may be required for front two (2) holes between fitting and stop.)

- DORMA Mortise cylinder supplied with top fitting assembly. If using other then manufactures supplied cylinder, refer to cylinder and cam specifications below.

- Install mortise cylinder into fitting as shown, cam at bottom pointing up. Tighten cylinder mounting set screws (2) securely & evenly. (Do not overtighten, as to crush housing.) Both should be flush with sides of the fitting. Insert key and rotate 90 degrees to right. The latch should retract fully.

natural_image
Technical line drawing of a mechanical bracket with mounting holes and threaded component (no text or symbols)- Attach top fitting to soffit with (4 or 6) 5/16-18 x 1 - 1/2" screws.
Note: Due to not all soffit widths being the same; a spacer or shim may be required for additional support.
-
Trial fit the mullion. If there is a threshold, be sure to cut out threshold so that the bottom fitting is resting on non-flammable flooring.
-
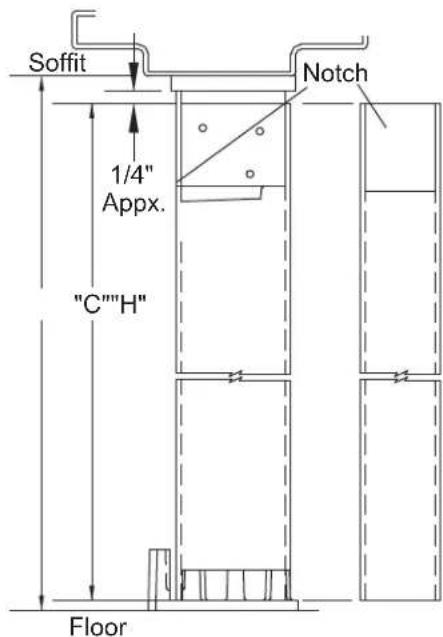
If it is to long, measure distance from the soffit to the finished floor; subtract 1" to 1 116 " from this dimension. Mark mullion tube and cut from the bottom end (end with out notch).
$$ " H" - 1" = " C" $$
- Place mullion tube into bottom fitting and pivot the top inward into place. Close doors. Slide bottom fitting forward until mullion tube is butted against doors. Align center of fitting with marks on sill from step 1.
Do Not Cut
This End.

-
Carefully remove mullion. Mark and drill (2) 3/4" dia. holes 2 1/4" deep for bottom fitting.
-
Attach the bottom fitting with anchors and screws provided. Place mullion over bottom fitting and pivot top forward into place. The mullion should snap firmly into place. Ensure that the mullion is easily removable when the key is turned in its cylinder.

- Install mullion stabilizers (4) on doors as shown using (8) 12-24 x 3/4" P.H.F.H. screws.
NOTE: STABILIZERS ARE REQUIRED ON FIRE RATED MULLIONS.

Brand : Dormakaba
Model : Mullions
Category : Hardware Accessories