
GVC 18DTC5-WSA - Air Conditioning Godrej - Free user manual and instructions
Find the device manual for free GVC 18DTC5-WSA Godrej in PDF.


| Product Type | Window Air Conditioner |
| Brand | Godrej |
| Model | GVC 18DTC5-WSA |
| Cooling Capacity | 5050 W |
| Power Input (Rated) | 1640 W |
| Rated Voltage | 230 V |
| Frequency | 50 Hz |
| Phase | 1∅ |
| Refrigerant | R32 |
| Refrigerant Charge | 0.70 Kg |
| Air Flow Volume | 725 CMH |
| Rated Input Current | 8.00 A |
| Compressor LRA | 18.00 A |
| Net Weight | 52.00 Kg |
| Operating Mode | Cooling only |
| Fan Speeds | Auto, Low, Medium, High |
| Special Features | 4-Way Air Distribution, Slide-Out Chassis, Turbo Cooling, Sleep Mode, Energy Saver, Programmable Timer, Digital Display, Real Time Clock, Swing, Removable Filter |
| Remote Control | Full Function with LCD Display |
| Filter Cleaning | Every 2 weeks, washable |
| Installation | Window sill, requires stabilizer |
Frequently Asked Questions - GVC 18DTC5-WSA Godrej
User questions about GVC 18DTC5-WSA Godrej
0 question about this device. Answer the ones you know or ask your own.
Ask a new question about this device
Download the instructions for your Air Conditioning in PDF format for free! Find your manual GVC 18DTC5-WSA - Godrej and take your electronic device back in hand. On this page are published all the documents necessary for the use of your device. GVC 18DTC5-WSA by Godrej.
USER MANUAL GVC 18DTC5-WSA Godrej
natural_image
Front view of a ventilation grille with a side panel showing a grid layout and a control panel labeled 'Galaxy' (no text or symbols on the grille itself)| >100% of the total. |
Dear Customer,
On behalf of Godrej Appliances, we welcome you to the Godrej family, and thank you for giving us an opportunity to serve you.
Godrej Appliances is a leading brand not just in technology and performance but also for its excellent customer service, we have more than 660 service centres across India, so that we can be close to our customers and serve them better.
In order to get maximum out of your superior Air Conditioner, we urge you to go through this detailed user manual, if you need any assistance at any time, do not hesitate to call us on 1800 209 5511 or write to us at smartcare@godrej.com
We again thank you for giving us the privilege to serve you, and look forward to a long and delightful association.
Warm Regards Team Godrej
| PERFORMANCE PARAMETERS | |
| MODEL NAME | GVC 18DTC5-WSA |
| OPERATING MODE | Cooling |
| RATED VOLTAGE | 230 V |
| RATED FREQUENCY/PHASE | 50 Hz/1∅ |
| COOLING CAPACITY (W) | 5050 W |
| RATED POWER INPUT (W) | 1640 W |
| AIR FLOW VOLUME | 725 CMH |
| RATED INPUT CURRENT | 8.00 A |
| REFRIGERANT | R32 |
| REFRIGERANT CHARGE | 0.70 Kg. |
| COMP LRA | 18.00A |
| NET WEIGHT | 52.00 Kg. |
Usage recommended with Stabilizer only
Protection of Environment:
Protection of environment* is one of the core values of Godrej and we seek your co-operation to make sure that the product, packaging and plastic material is not disposed as unsorted municipal waste.

This symbol is known as the "Crossed-out Wheelie Bin Symbol". It means that the product should not be disposed of with your general house-hold waste.
It should be disposed of only through the company's collection points with special treatment so as to prevent any damage to the environment. Please call : 1800 209 5511 for applicable buy back arrangement or visit : www.godrejappliances.com/green-think for details about Godrej Appliances authorised collection points.
User Manual
Contents
Product Features....5
Methodology 6
Installation 7
Remote Control 11
Remote Control Operation 12
Manual Operation 14
Tips for Comfort and Economy 15
Error Codes 16
Operating your Air Conditioner 17
Inserting the batteries 18
Caution 19
Troubleshooting chart 20
Care & Maintenance 21
Appliances Division Address 22
Warranty Air Conditioner 23
Service Card 24
Product Features
COMFORT COOLING

4 Way
Air Distributor
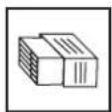
Slide-Out Chassis
3-Speed
Cooling

Swing

Turbo
Cooling
CONVENIENCE

Long Life

Rotary
Compressor

Programmable Timer
Full Function Remote

Great Looks

Sleep Mode
TECHNOLOGY

Most
Advanced
Fan Motor

Digital
Display

Real time clock
HEALTH

Power Saver
Compressor

Removable Filter

Energy
Saver
STAR RATED NDITIONERS
Methodology

How to fix the compressor frequency for full load and half load cooling capacity test for Inverter AC.
Access Method:
Full Load Rated Mode:
- Turn on the main switch.
- Turn on remote controller.
- Press remote control cooling high fan speed.
- Set temperature at 16 degree.
- Continuously press "DISPLAY" button for eight times.
Half Load Rated Mode:
- Turn on the main switch.
- Turn on remote controller.
- Press remote control cooling high fan speed.
- Set temperature at 17 degree.
- Continuously press "DISPLAY" button for eight times.
Installation
Please ensure that you get only an authorised Technician to install the airconditioner for you, as many factors need to be considered for the efficient performance of your Window Airconditioner.
LOCATION
1 To get the best results, install the window air conditioner at window sill level.
2 Ensure that neither the air-throw outlet nor the air intake grille is blocked by any furniture or other such equipment, for a distance of at least three feet.
3 Identify the area within your room which you are most likely to occupy. Then ensure that there is a line-of-sight view from there to the window airconditioner, because otherwise you cannot use your remote control conveniently.

natural_image
3D rendering of a room corner with a wall-mounted monitor and decorative panel (no text or symbols)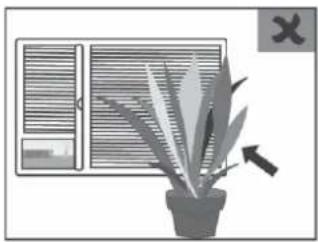
natural_image
Illustration of a potted plant with leaves next to a window, no text or symbols present
natural_image
Illustration of a remote control unit connected to a wall-mounted device (no text or symbols visible)LOCATION
4 Install the airconditioner as much to the centre of the wall as possible. Avoid using a corner.

natural_image
Simple 3D wireframe diagram of a room corner with a wall-mounted door (no text or symbols)5 Do not install the airconditioner too close to an entrance which is likely to be opened and closed frequently

6 Outside the room, ensure that the hot air from the rear end of the unit discharges freely into the open atmosphere. A minimum clearance of 30cm on the two sides and 1.0m at the rear of the external portion of your airconditioner is advisable.
Select a location that supports the weight of your airconditioner. Also, there should be no vibration as that results in increased noise.

| PROCEDURE | SUPPORT & PROTECTION |
Remove the Front Panel from the polythene.Insert the unit into the installation opening space, which should be created slightly larger than the unit size. When installing the unit, it should be slanted in backwards (by 10-15mm).Fill up gaps between the cabinet (unit) and the wood work/support structure with sponge or foam. | Use Iron SupportIf the installation opening is not strong enough to support the airconditioner, iron supports should be installed externally on the building.Use Sunshade BoardInstall a sunshade over the unit on the outside to prevent direct sunlight on it, as well as to protect it from falling objects.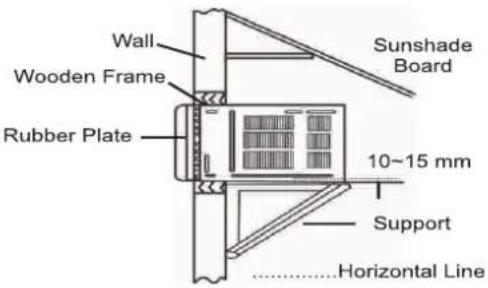 |
| DRAIN WATER | RELOCATION |
To achieve maximum cooling efficiency, the airconditioner is designed to splash the condensation water on the condenser coil.In order to avoid the splashing sound, an external drain can be provided by using the following procedure. This may however cause a small loss of performance.1. Slide out the chassis from the cabinet.2. Remove the rubber plug from the body base plate.3. Install the drain pan at the corner of the cabinet with two screws.4. Connect the drain hose to the outlet on the bottom of the drain pan.5. Slide the chassis into its original place in the cabinet. Internal View Internal View | To relocate the airconditioner, please contact your dealer.Relocation should be carried out only under the direction of an authorised professional technician.  loseExternal View loseExternal View |
| ELECTRIC WIRING | |
Ensure proper earthing.Use an exclusive circuit.Do not use removable sockets which could lead to poor contact.Install MCB in the AC circuit to suit the capacity.The wiring should be as per the table:A - Active wireBrown/Red Power CN - Neutral wireBlue/Black  E - Earth wireYellow/Green* Use approved voltage stabiliser. E - Earth wireYellow/Green* Use approved voltage stabiliser. |
| MODEL | WIRING |
| GVC 18DTC5-WSA | 1.5 sq mm |
Remote Control

* Some Models don't have this Function
Remote Control Operation
ON/OFF Button
To start the operation of the unit press the ON/OFF Button.
To stop the operation of the unit press the ON/OFF Button again.
Using MODE button, Cool, Fan, Dry & Auto Modes can be selected cyclically.

In Cool and Dry modes, temperature can be set between 16°C and 30°C
SETTING DESIRED TEMPERATURE
By pressing (▲) (▼) these buttons, the temperature setting can be increased or decreased.
Temperature range for Celsius degree setting: 16°C-30°C. Recommended setting is 24°C
SELECTING FAN SPEED
Using Speed button, Auto, Low, Medium and High fan speeds can be cyclically selected. When Auto fan speed is selected in the Cool mode, the fan speed will be selected automatically to Low, Medium or High Fan speed as per requirement.

ADJUSTING AIRFLOW DIRECTION
Press the H swing button to select Air Swing. The vertical louvres start to rotate for better airflow and distribution around the room.
Press the swing button again to stop Air Swing function.
Note: Using your hands to adjust the direction of the louvres may cause them to malfunction. If this happens, stop operation immediately and restart.
1- When H-Swing is Enable Then Icon Will Display
2- When H-Swing is Disable Then Icon Will Disappear
Energy Saver function can be selected in Cool Mode only. "ES" is displayed on the AC Control Panel when Energy Saver is set.
Set Temp becomes 24°C and Fan Speed is become middle on remote
Energy Saver gets deactivated on Main Power On/Off or Power fail.
*Energy Saver mode is activated by display panel key also, after enabling through display panel only, "ES" is displayed. If enabled through remote, "ES" is not displayed.
SETTING TIME ON REMOTE
SET TIME: This Key is used to set the set time, Press this key enter edit mode, followed by UP/Down key to edit time Used HOU/MIN key to toggle b/w HOU/MIN during setting time. Press the key again to set the temperature. Set the clock every time when batteries are replaced or removed.
Remote Control Operation
SETTING TIMER
Timer : Press the timer button and it will activate the Timer function and after that use the Up/Down key to set the desired time, Once the time is set it will blink 5 times and after that it will become constant with TIMER ON display activated on remote, which means ON timer is set.
Timer : Press the timer button and it will activate the Timer function and after that use the Up/Down key to set the desired time, Once the time is set it will blink 5 times and after that it will become constant with Timer OFF display activated on remote, which means OFF timer is set.
Note:
1 To set the timer value, press timer (Timer On or Timer Off) Key once. This brings the timer in edit mode and corresponding timer starts blinking. Now set the timer value by pressing Up/Down Keys. Once desired time is set it will blink for 5 times and becomes constant with TIMER ON/TIMER OFF display activated on remote.
2 Least count for TIMER is one hour Least count for clock(SET TIME) is 1 minute.
ADJUSTING TEMPERATURE AND ON-OFF TIMER
UP and DOWN buttons can be used with Temp and Timer buttons to adjust the temperature setting of the unit by an interval of 1^ C or timer by an interval of 1 hour.
SLEEP MODE
Press sleep button to select "Sleep On" or "Sleep Off". At power on, Sleep Off is the default. When Sleep function is set, the Sleep signal will be displayed on the unit. It is possible to set the timer in Sleep mode. Sleep mode is not available under Auto, Dray or Fan modes. When the unit is turned off, the Sleep function is canceled. In this mode the set temperature increases automatically by 1°C every hour for next 2 hours.
*In some models, Sleep function is only accessible via Remote Control.
Note:-Sleep Mode is Disable When Turbo Mode is Enable
TURBO MODE
Turbo function can be selected in Cool Mode only. "tu" is displayed on the AC Control Panel when Turbo is set. Set Temp becomes 16°C and Fan Speed becomes High and are not changeable.
Turbo gets deactivated automatically after 30min or on Main Power On/Off or Power fail and the Set Temperature and Fan Speed are restored to the earlier settings.
*In some models, Turbo function is only accessible via Remote Control. *In Turbo Mode Set Temperature is Changeable.
Note:- Turbo Mode is Disable Press Again Turbo Key, Sleep Mode Enabled, E-Saving Enable & Speed Change.
Manual Operation

flowchart
graph TD
    A["1"] --> B["AIR SWING"]
    B --> C["2"]
    B --> D["3"]
    B --> E["4"]
    B --> F["5"]
    B --> G["6"]
    B --> H["7"]
    B --> I["8"]
    J["POWER ON/OFF"] --> K["COOL"]
    J --> L["DRY"]
    J --> M["FAN"]
    N["SLEEP"] --> O["MODE"]
    P["TIMER"] --> Q["FAN SPEED"]
    R["Temp"] --> S["ECO"]
1 Louvre Swing
2 Energy Saver Mode
3 Fan Speed: Auto/Low/Med/High
4 Temp Adjust Up
5 Temp Adjust Down
6 Mode Button (Cool/Dry/Fan)
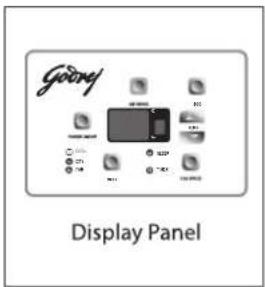
7 Display Panel
8 Power ON/OFF
*Auto & Turbo features are available, but icons will not appear in Touch Control Panel
Tips for Comfort and Economy
Do not overcool the room
This is not good for health and wastes electricity.
Keep blinds or curtains closed
Do not let direct sunshine enter the room when the airconditioner is in operation.
Keep room temperature uniform
Adjust vertical and horizontal airflow direction to ensure uniform temperature in the room.
Make sure that the doors and windows are closed
Avoid opening doors and windows as much as possible to ensure effective air-conditioning in the room.
Clean the air filter regularly
Blockages in the air filter reduce dehumidifying effects. Clean the air filter at least once every two weeks.
Ventilate the room occasionally
Since windows are kept closed, it is a good idea to open them and ventilate the room periodically. When starting the unit, curtains and windows should be closed to prevent loss of cooling.
Error Codes
ERROR SIGNALS ON THE DISPLAY
| Code | Error Description |
| EE | Indoor machine EE fault |
| E3 | Indoor coil sensor fault |
| E4 | Indoor ambient temperature sensor fault |
| E0 | Outdoor EE fault |
| E6 | Main board and drive board communication fault |
| F1 | Compressor starting abnormal (phase, failure, reverse) |
| F2 | Compressor out of step fault |
| F3 | IPM module fault |
| F5 | Discharge temperature sensor fault |
| F8 | Outdoor ambient temperature sensor fault |
Operating Your Air Conditioner
REMOTE FEATURES
1- Cool (CL): In Cool Mode temperature range is 16°C\~30°C & fan speed control - powerful fan, high fan, med fan and low fan.
2- Dry (D):- In Dry Mode setting temperature 24^ C & Clock function is available.
3 Fan (F):- In Fan Mode remote control setting temperature function is cancelled. setting temperature will not be displayed and unable to be Adjusted. cooling temperature is display.
4 Auto (Au):- In auto mode machine will start running after the selection of operation mode. air conditioner will automatically select cooling mode
SLEEP
1 When sleep is selected, the Set temp will increase 1 degree every hour, for maximum 2 hours.
2 Sleep can be selected only in Cool Mode.
3 Sleep is stored in memory (Auto Restart).
4 Sleep function get disabled after power reset.
TURBO
1 Operational in Cool Mode only.
2 Turbo gets deactivated automatically after 30min and Set Temp & Fan Speed are restored to
3 the earlier settings.
"tu" is displayed for 5sec when Turbo is set.
4 Set temperature is changeable.
Note- If ECO, sleep Mode Enable & turbo press again then turbo mode Deactivated.
ENERGY SAVER
1 Operational in Cool Mode only.
2 Set Temp is 24^ C and Fan Speed becom middle on remote. ing
3 "ES" is displayed for 5sec when Energy Saver is set.
4 Energy saver mode is activated by display panel key also,
5 After enabling through display panel only, "ES" is displayed.
Note- If "ECO" is enable through Controller & press again "ECO" on Controller or any signal from remote then "ECO" disable.
TIPS FOR COMFORT AND ECONOMY
Do not overcool the room:
This is not good for health and wastes electricity.
Keep blinds or curtains closed:
Do not let direct sunshine enter the room when the airconditioner is in operation.
Keep room temperature uniform:
Adjust vertical and horizontal airflow directions to ensure uniform temperature in the room.
Make sure that the doors and windows are closed:
Avoid opening doors and windows as much as possible to ensure effective air-conditioning in the room.
Clean the air filter regularly:
Blockages in the air filter reduce dehumidifying effects. Clean the air filter at least once every two weeks.
Ventilate the room occasionally:
Since windows are kept closed, it is a good idea to open them and ventilate the room periodically. When starting the unit, curtains and windows should be closed to prevent loss of cooling.
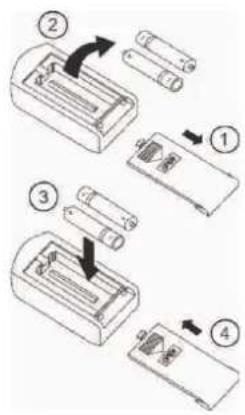
Inserting the Batteries
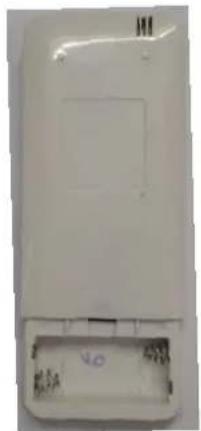
1 Slightly press the battery cover where it is marked in the arrowhead direction to open the battery compartment of the remote control.
2 Take out the old batteries.
3 Insert two new AAA 1.5V dry batteries. When inserting the new batteries, pay attention to the polarity.
4 Reattach the back cover of the remote control.
Notes:
- Do not use old batteries, or batteries of different brands as this can cause malfunction of the wireless remote control.
- Remove the batteries if the remote control is not going to be used for a long time.
• Operation should be within the receiving range of the remote control. - The remote control should be placed at least 1m away from television or audio systems.
BE SURE TO OBSERVE THE FOLLOWING:
- During operation, make sure that the remote control is aimed at the control panel on the airconditioner.
- Do not drop or throw the remote control.
- Do not place the remote control in a location that is exposed to direct sunlight or next to a heating unit or other heat source.
- If the remote controller does not operate normally, please take the batteries out and reinsert them after 30 seconds. If it still does not operate properly, try replacing the batteries.
natural_image
White plastic electronic device casing with a small labeled component (no visible text or symbols)Caution
• Do not pull out the power cord.
• Damage to the cord may result in serious electric shocks.
- Do not use the airconditioner for purposes other than for cooling the room.
- Do not block the air intake and outlet vents. This causes lowered performance and irregular operation.
- Do not insert sticks or other objects into the vents as it is dangerous to touch the electric components and the fan.
- Select the most appropriate temperature to suit the prevalent weather conditions.
- Do not use heating apparatus in the vicinity. The airconditioners plastic parts may melt if exposed to excessive heat.
- Avoid exposing yourself and others directly to a continuous unidirectional airflow for long periods. This is not recommended for health reasons.
• Always wait at least three minutes before switching the airconditioner on again after you have switched it off.
• Always turn off the airconditioner and main power supply before cleaning, to ensure safety.
In the following situations, immediately stop operation of the unit and contact your dealer:
• Operation starts or stops abnormally.
• Power fuse or switch often breaks.
• Water or other liquid is accidentally splashed into the airconditioner.
• Electrical lines are very hot or lines cover breaks.
• Other abnormal situations.
Troubleshooting Chart
| Symptoms | Possible Causes | Suggested Remedy |
| Unit does not start | MCB has tripped | Reset MCB |
| Fuse has burnt | Replace fuse wire | |
| Input voltage to the stabiliser is below acceptable range | Wait for input voltage to be within acceptable range.If it is a perennial problem please use a buck-boost stabiliser to get the required input voltage. | |
| Unit does not cool (Even after the normal time delay of approx. 2/3 minutes for compressor to start) | The airflow paths are not free | Use the remote to turn the compressor on |
| Selected temperature is more than room temperature | Remove all obstructions to make the airflow paths free | |
| The air filter is not clean | Clean the air filter | |
| The unit is in the fan mode | Change to AC/ COOL mode |

natural_image
Illustration of a mechanical device labeled MCB, showing a housing with a handle and a hanging component (no text or symbols on the device itself)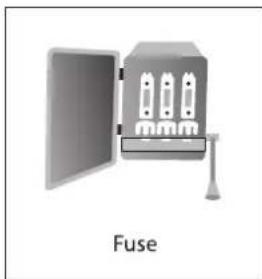
natural_image
Illustration of a fuse with three test tubes inside a box (no text or symbols on the diagram itself)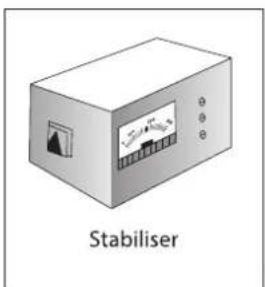


NOTE: If the unit still does not work, or if any other types of symptoms are encountered, shut off the mains (switch fuse unit) and call the service engineer/technician.
Care and Maintenance
CLEANING THE UNIT
• Turn off power before cleaning.
- Use soft cloth while cleaning the cabinet. If the cabinet is very dirty, dip cloth into warm water below 40°C. The air filter behind the intake grille should be washed at least once every two weeks, or as often as it needs cleaning.
- Do not use gas, benzene, solvent, chemical solvent, etc. for cleaning.
- Do not splash water directly on the indoor unit, as it may damage the microcomputer or circuit plate.
AIR FILTER
As mentioned, the air filter behind the intake grille should be washed at least once every two weeks, or as often as it needs cleaning.
CLEANING THE AIR FILTER
- To remove the air intake grille, grasp the tab on the filter and pull to take out.
• Vacuum clean the filter on the dusty side to remove light dust. - Wash the filter, cleaner side up, under gently flowing water to wash out accumulated dust and lint.
- If the filter is very dirty, use a mild household detergent in the wash water. Let the filter dry thoroughly before reinstalling it. If necessary, please ask professional personnel to clean it.
- Check if air inlet and outlet of outdoor unit are blocked.
| GODREJ & BOYCE MFG. CO. LTD., Appliances Division | |
| Branch | Address |
| Ahmedabad | 4th Floor, APM Shopping Mall Near IOCL Petrol Pump, Shyamal-Karnavati 100 ft. Road, Satellite, Ahmedabad-380 015 |
| Bangalore | 3rd Floor, The Karnataka Film Chamber of Commerce Bldg. 28, 1st Main, Crescent Road, High Grounds Nr.Shivanand Circle, Bangalore - 560 001 |
| Bhopal | 217, Zone I, M.P. Nagar, Beh. Jyoti Talkies, Bhopal - 462 011 |
| Bhubaneshwar | Highway Complex, NH-5, Rudrapur, Bhubaneshwar - 752 101 |
| Chandigarh/Mohali | Plot No. A-40, Phase VIII-A, Industrial Area, Mohali - 160 059 |
| Chennai | No. 1, Sidco Industrial Estate, Ambattur, Chennai - 600 098 |
| Coimbatore | 585-590, Sathya Towers, 3rd Floor, D.B. Road, R.S. Puram, Coimbatore - 641 002 |
| Delhi | Godrej Bhavan, 2nd Floor, Shershah Suri Marg, Okhla, New Delhi - 110 065 |
| Faridabad | Godrej Bhavan, 2nd Floor, Shershah Suri Marg, Okhla, New Delhi - 110 065 |
| Ghaziabad | Godrej Bhavan, 2nd Floor, Shershah Suri Marg, Okhla, New Delhi - 110 065 |
| Guwahati | Godrej Building, G.S. Road, Ulubari Flyover, Guwahati - 781 007 |
| Hyderabad | 201 & 202, Lala-1 Land Mark, 5-4-94 to 97, 2nd Floor, Above Digital Shoppy,Ranigunj, M.G. Road, Secunderabad - 500 003 |
| Jaipur | 502-506, 5th Floor, Gaurav Towers, Malviya Nagar, Jaipur - 302 017 |
| Kochi | 2nd Floor, Angels' Arcade, South Kalamassery, Near CUSAT Signal, Ernakulam - 682 022 |
| Kolkata | Block GN, Sector V, Salt Lake, Kolkata - 700 091 |
| Lucknow | C 3/3 & C 3/4, Sanjay Complex Behind Akashwani Bhawan, Vidhan Sabha Marg, Lucknow -226 001 |
| Mumbai | Appliance Division, Plant 4, Pirojshahnagar, Vikhroli, Mumbai - 400 079 |
| Nagpur | Dr. Bhiwapurkar Chamber, 2nd Floor, Opp. Yashwant Stadium, Dhantoli, Nagpur - 440 012 |
| Patna | JeevanDeep Building, Exhibition Road, Patna - 800 001 |
| Pune | Apollo Building Square, Plot No. 60,Survey No. 599, Sahaney Sujan Park, Lullanagar,Bibewadi Road, Pune - 411 040 |
| Raipur | 9/1, Besides Bharat Petrol Pump, Opp, Hotel Picadelly, Mahoba Bazaar, G.E. Road,Raipur - 492 001 |
| Ranchi | C/o. Surya Motors, Near Krishi Bazaar Samiti Panda, Ranchi (Jharkand) - 835 222 |
| Telephone Nos.: 1800-209-5511 (Toll Free, Accessible from all Operators) | |
| Website: www.godrejappliances.com & www.godrejsmartcare.comE-mail: smartcare@godrej.com | |
Warranty Air Conditioner
The Godrej Air Conditioner comes with a FIVE year warranty on compressor for fixed speed Air conditioners and TEN year warranty on compressor for Inverter Air Conditioners. Along with this, you also get ONE year warranty on all other parts (except grill & plastic parts) from the date of purchase, against defective material or workmanship. In case of any such defect found during the first year from date of purchase, Godrej & Boyce Mfg. Co. Ltd.-Appliance Division will undertake repairs to the warranted part free of charge, subject to terms and conditions below. In the warranty period beyond the first year from date of purchase, only the compressor will be provided free of necessary charges. The warranty will be required to be damaged by the manufacturer will repair on payment of necessary charges. The warranty does not cover the demonstration/installation of the Air Conditioner.
INSTRUCTIONS FOR THE CUSTOMER
- Kindly ensure that the dealer fills the warranty card correctly and completely.
- You should retain the warranty card for record and produce the same in the event of any warranty repairs.
- In the event of a defect developing in the product, contact the nearest authorized Godrej & Boyce Service Center for obtaining warranty service and inform the defect, Model details & Serial No.
- Product will function between +/-10% of rated volts at 50Hz. For any fluctuation beyond specified limit, company shall not be responsible and warranty stands terminated.
- In areas where voltage fluctuates below 10% of rated voltage, customer is advised to use a voltage stabilizer which steps up voltage to a minimum of 190V.
- Earthing provision is necessary for safety. Improper domestic wiring leading to hazards such as shock or fire is not covered under this warranty.
- The product must be maintained to ensure hygiene. If there are any insects or rodents in it causing obstruction to the functioning of the product, the company shall not be responsible and in-turn warranty stands terminated.
TERMS AND CONDITIONS
- Repairs and replacement will be carried out by the companies authorized service centers or through authorized dealer's service center.
- All transportation and handling expenses incurred while repairing will be payable by the customer in advance.
- For any Air Conditioner installed beyond the municipal limits of the jurisdiction of the authorized customer service center, charges towards technician's visit will be borne by the customer
- While the company will make every effort to carry out the repairs at the earliest, it however is made expressly clear that the company is under no obligation to do so in a specified period of time.
- The company will retain any part(s), compressor and/or other components when replaced at its discretion.
- Warranty does not cover accessories to the Air Conditioner.
- Refrigeration system gas charging and consumables will be charged for any such repairs after one year from the date of purchase.
- Company will not be liable for any consequential loss or compensation nor refund of purchase price nor replacement of the Air Conditioner.
- Customer must ensure the routine maintenance including cleaning of filter etc. for proper operation.
- Any change in location/damages on handling will be serviced at extra material and labor cost.
- While Company would take all necessary steps to repair the Air Conditioner supplied under the warranty and keep sufficient stock of the spare parts of the Air Conditioner with them, however, in certain cases, at the sole discretion of the Company, the Company may due to non-availability of spare parts of the Air Conditioner, resulting into the Air Conditioner not being repaired by the Company, offer a replacement scheme to the purchasers of such Air Conditioner which cannot be repaired due to non-availability of spare parts of the Air Conditioner, purchased under the warranty, the Company would offer a replacement of the Air Conditioner. The details of the replacement offer is subject to change from year to year and shall also be applicable on the MRP of the product to be purchased as a replacement.
- Two (2) free preventive maintenance service (Labour only) will be provided to the customer during first year warranty period. To avail these free services customer has to register the call at the call center number 1800 209 5511. After expiry of 12 (twelve) months from date of purchase company is not liable for any free service.
Godrej & Boyce Mfg. Co. Ltd.- Appliance Division
CUSTOMER COPY
MODEL NO.
AIR CONDITIONER SERIAL No.:
| CUSTOMER'S NAME & ADDRESS |
| TEL. |
DATE OF PURCHASE
| DEALER'S NAME & ADDRESS |
| TEL. |
Customer's Signature:
This warranty is valid only if it is filled in and stamped by our authorized dealer on the date of purchase.
Warranty Voids If:
- The warranty card is not completed properly at the time of purchase. 2. The completed warranty card is not presented to the authorized personnel at the time of service of the product. 3. The Air Conditioner is not operated and maintained according to instructions given in the 'User Guide'. 4. Defects are caused by improper use, which shall be determined by the company personnel. 5. Unauthorized persons carry out any repair work. 6. Defects are caused by reasons beyond control, like abnormal voltage (exceed 253 V or below 207 V), acts of God, or while in transit to service center or purchaser's residence. 7. The warranty is not valid in case the serial number is deleted, defaced or altered. 8. Damage to the Air Conditioner or any parts due to transportation or shifting is not covered by the warranty. 9. The warranty automatically expires after the stipulated period from the original date of purchase, even if the Air Conditioner may not be in use for any time for whatever reasons.
STAR RATED WINDOW AIR CONDITIONERS
Service Card

Please fill the warranty card and send it to your nearest branch to avail of 2 free services

 | AIR CONDITIONERS | AIR CONDITIONERS | Dry | Dry | Wet |  | |||
| Bill No. | Date of Sale | Model No. | Sr. No. | ||||
| Customer/User's Name | Phone No. | ||||||
| Address | Sp. instructions, if any | ||||||
| City | Pin Code | ||||||
| Dealer/ASP's Name & Address | I confirm that the service has been provided to my satisfaction | ||||||
| Customer's Sign & Date | |||||||

 | AIR CONDITIONERS | AIR CONDITIONERS | Dry | Dry | Wet |  | |||
| Bill No. | Date of Sale | Model No. | Sr. No. | ||||
| Customer/User's Name | Phone No. | ||||||
| Address | Sp. instructions, if any | ||||||
| City | Pin Code | ||||||
| Dealer/ASP's Name & Address | I confirm that the service has been provided to my satisfactionCustomer's Sign & Date | ||||||

Notes
STAR RATED
WINDOW AIR CONDITIONERS
Notes
STAR RATED
WINDOW AIR CONDITIONERS
STAR RATED
WINDOW AIR CONDITIONERS
Godrej
Godrej & Boyce Mfg. Co. Ltd. - Appliance Division, Plant I I, Pirojshanagar, Vikroli (W), Mumbai 400 079.
Disclaimer-The images shown in the manual are representative. Actual products may vary
- Protection of Environment:
- User Manual
- Contents
- Product Features
- COMFORT COOLING
- CONVENIENCE
- TECHNOLOGY
- HEALTH
- Methodology
- Access Method:
- Full Load Rated Mode:
- Half Load Rated Mode:
- Installation
- LOCATION
- Remote Control
- Remote Control Operation
- ON/OFF Button
- SETTING DESIRED TEMPERATURE
- SELECTING FAN SPEED
- ADJUSTING AIRFLOW DIRECTION
- SETTING TIME ON REMOTE
- SETTING TIMER
- Note:
- ADJUSTING TEMPERATURE AND ON-OFF TIMER
- SLEEP MODE
- TURBO MODE
- Tips for Comfort and Economy
- Error Codes
- Operating Your Air Conditioner
- REMOTE FEATURES
- SLEEP
- TURBO
- ENERGY SAVER
- Do not overcool the room:
- Keep blinds or curtains closed:
- Keep room temperature uniform:
- Make sure that the doors and windows are closed:
- Clean the air filter regularly:
- Ventilate the room occasionally:
- Inserting the Batteries
- Notes:
- BE SURE TO OBSERVE THE FOLLOWING:
- Caution
- In the following situations, immediately stop operation of the unit and contact your dealer:
- Care and Maintenance
- CLEANING THE UNIT
- AIR FILTER
- CLEANING THE AIR FILTER
- Warranty Air Conditioner
- INSTRUCTIONS FOR THE CUSTOMER
- TERMS AND CONDITIONS
- Godrej & Boyce Mfg. Co. Ltd.- Appliance Division
- CUSTOMER COPY
- MODEL NO.
- Service Card
- Notes
- Godrej
Brand : Godrej
Model : GVC 18DTC5-WSA
Category : Air Conditioning