
Rocpro U34 - Disk array Rocstor - Free user manual and instructions
Find the device manual for free Rocpro U34 Rocstor in PDF.


| Product Type | 4-bay Hardware RAID Disk Array |
| Model | Rocpro U34 |
| Brand | Rocstor |
| Interfaces | 1x eSATA, 1x USB 3.1 Gen 1 Type-C (with Power Delivery), 1x DisplayPort 1.1a |
| Compatible Drives | 4x 3.5"/2.5" SATA III HDD/SSD (up to 6 Gbps) |
| Supported RAID Modes | JBOD, RAID 0, RAID 5 |
| Cooling System | 8 cm low noise fan |
| Power Supply | 100-240V AC, 50-60Hz, single phase, max 150W |
| Operating Temperature | 32° to 104°F (0° to 40°C) |
| Storage Temperature | -4° to 116°F (-20° to 47°C) |
| Relative Humidity | 5% to 95% (non-condensing) |
| Dimensions (H x W x D) | 166 x 124 x 210 mm (6.5 x 4.875 x 8.25 inches) |
| Weight (Enclosure Only) | 6.60 lbs (3 kg) |
| Certifications | CE, FCC |
| Supported Operating Systems | Windows 7 or above, macOS 10.10 or above |
| DisplayPort Resolution | Up to 4K@30Hz (DP 1.1a) |
| USB Power Delivery Output | Up to 24W (12V/2A, 9V/2A, 5V/3A) |
| Warranty | 3 years parts and labor |
| Maintenance | Clean with a soft dry cloth; keep vents clear; avoid moisture and extreme temperatures |
| Safety Precautions | Use only supplied power adapter; ensure proper ventilation; do not remove drives during operation unless hot-swapping for rebuild |
| Spare Parts & Repairability | Contact Rocstor for replacement drives, fans, or power supply; repairs are carried out by authorized service centers |
| Package Contents | Rocpro U34 unit, USB 3.1 Type-C to Type-C cable, USB 3.0 Type-C to Type-A cable, e-SATA cable, power cord, quick installation guide, screws and keys |
Frequently Asked Questions - Rocpro U34 Rocstor
User questions about Rocpro U34 Rocstor
0 question about this device. Answer the ones you know or ask your own.
Ask a new question about this device
Download the instructions for your Disk array in PDF format for free! Find your manual Rocpro U34 - Rocstor and take your electronic device back in hand. On this page are published all the documents necessary for the use of your device. Rocpro U34 by Rocstor.
USER MANUAL Rocpro U34 Rocstor
Thank you for purchasing ROCSTOR products. Before using your Rocpro U34, please read this manual thoroughly. At time of publish, all the information contained in this user manual has been verified. Any revision updates or important technical information may be found on www.rocstor.com.
Product specifications are subject to change without notice. If you have any questions regarding Rocpro U34, or you would like to know the latest product information, user manual update, or firmware update, please contact Rocstor or visit www.rocstor.com for further information.
Copyright © Rocstor. All rights reserved.
Table of Contents
- Package Contents and Product Views
- Operating Information
- Visual Status Indicator Definitions
- Hardware requirement & precautions
- Hardware Installation
- Description of Front Panel Operation
- Other Applications
- Important Notice
-
Frequently Asked Questions
-
Replacement of Malfunctioning Drive and Data Rebuild Instructions
-
System Temperature Overheat and Fan Failure Management
| Model No Rocpro U34 USB RAID Storage | |||
| Interfaces eSATA Port x1,USB 3.1 Gen 1 Type-C x1,Support 24W (12V/2A) / 18W (9V/2A) / 15W (5V/3A) Power Delivery.DP 1.1a DisplayPort x1 | Touch | button | function |
| Compatible Drive 4 x 3.5"/2.5" SATA III HDD/SSD (up to 6 Gbps) | |||
| Certification | CE/FCC | ||
| Storage Mode JBOD - Independent ModeRAID 0 - Speed ModeRAID 5 - Safe Mode | |||
| Operating System Support Windows 7 or above, OS X 10.10 or above | |||
| Cooling System 8 cm Low noise fan | |||
| Electrical and Operating * Line voltage: 100-240V ACRequirements * Frequency: 50Hz to 60Hz, single phase* Maximum continuous power: 150W* Operating temperature: 32° to 104° F (0° to 40°C)* Storage temperature: -4° to 116° F (-20° to 47°C)* Relative humidity: 5% to 95% noncondensing | |||
| Size and Weight H 166 x W 124 x D 210 mm (H 6 1/2 x W 4 7/8 x D 8 1/4 inches)Weight: 6.60 lbs = 3 kg (enclosure only) | |||
| Package Accessories * Rocpro U34 RAID Storage Unit x 1* USB 3.1 (Type-C to Type-C) Cable x 1(with E-Mark)* USB 3.0 (Type-C to Type-A Male) Cable x 1* e-SATA Cable x 1* Power Cord x1* Quick Installation Guide x1 | * | Accessory | Kit |
1. Package Contents & Product Views
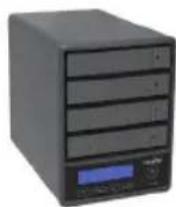
Rocpro U34

Quick Installation Guide
AC Power cable USB 3.1 Cable


Screws and Keys
"Supplied with Enclosure Only"


e SATA Cable


2. Operating Information
Operating Temperature: 41 \~ 95 F - (5 \~ 35c)
Storage Temperature: -20\~47 F - (-4 \~ 116 c)
Line Voltage : 100 \~ 240V AC
3. Visual Status Indicator Definitions
| Status Power LED Alarm LED | HDD LED Buzzer | |||||
| RAID JBOD | RAID JBOD | |||||
| No HDD Blue light always on — — — — — — — | ||||||
| Access Blue light always on — — — — — | Blue light flashing | |||||
| Disk Idle Blue light always on — — Blue light always on | — — | |||||
| Rebuilding - Source | Blue light always on — — | Blue light Flashing | — — | — — | ||
| Rebuilding - Target | Blue light always on — — | Purple light Flashing | — — | — — | ||
| Fan Failed | Blue light always on | Red light always on | Blue light always on | YES | ||
| Over Temp | Blue light always on | Red light always on | Blue light always on | YES | ||
4. Hardware Requirements and Precautions
- All hard drives must be installed into the system for the device to work properly.
- Only one interface connection may be used at once per computer system.
- For the best performance of the system, it's strongly recommended that you install hard drives of the same model and if need be, replace faulty hard drives also with the same model. If the same model of HDD is unobtainable, please replace with a model that is at least 20GB larger in capacity.
- All data on replacement hard drive will be erased once inserted into the system.
- The actual usable storage capacity may differ from the stated capacity once the drives in the system have been formatted.
- Always safely dismount the volume from the Operating System before removing Rocpro U34 from host computer.
- Do not remove the hard drive(s) while the system is powered on or switch the position of the drives. Always remember to power off the unit prior to removing the hard drives (unless hot-swapping for the purpose of a rebuild in a RAID 1 configuration).
- In RAID 1 mode, only 1 hard disk failure is permitted. Please seek help from data recovery services should there be further data-loss due to failures in a RAID 0 mode.
- It is highly recommended for users to back up important data. Rocstor will not be responsible for any lost of data caused during the use of the unit or the recovery of the data lost.
- The default setting of Rocpro U34 is RAID 1. To set it in a data protection mode, please set it to RAID 1. Please set U34 to RAID 0 mode when speed and large storage capacity is required.
- Users can set the RAID level and the basic functions of Rocpro U34 using the buttons on the right side of LCD screen in front of the product.
5. Hardware Installation
Please follow the instructions below to complete the hardware installation:
Step 1:
Open the package and take out the product making sure that all contents are not damaged or missing. Should you find any damage or missing contents, please contact your supplier immediately.
Step 2:
Place the system on a stable surface. Ensure that it is installed in a well ventilated area with acceptable airflow for the vent and keep product away from moisture.
Step 3:
Use the provided key in the accessory kit to eject the removable tray, pull tray handle to remove from U34.

Step 4:
Install your hard drives onto the removable drive tray and secure it with the screws included in the accessory kit. Once completed, insert the hard drive tray into the system.
Step 5:
Connect the AC power cable to the U34, and then plug the AC power to the wall socket. Boot-up the unit. Then Connect the cable to the PC and the U34 port.
Step 6:
First turn the power main switch on the back of the product to "I" to turn the power on, then gently press the power touch switch on the front of the product until the power symbol "○" lights up.
Step 7:
Set the storage mode using the LCD and buttons on the front (please refer to section 5 for front panel and LCD information).
Step 8:
After boot-up, your operating system will automatically detect the storage capacity of your hard drives. Please follow the operating system instructions to configure and format your drives. The formatted drives can be configured for the RAID setup.
Step 9:
If you are not using the product for a while, you can put the product into shutdown mode: first press the power touch switch on the front of the product until the power symbol "○" is off; if you want to use the product, gently press the power touch switch on the front of the product until the power is turned on. The symbol "○" is illuminated.
Step 10:
If the product is not used for a long time, please turn off the product main power switch: first gently press the power touch switch on the front of the product until the power symbol "○" is off, then turn the power main switch on the back of the product to "O" to turn off the power.
6. Description of Front Panel Operation
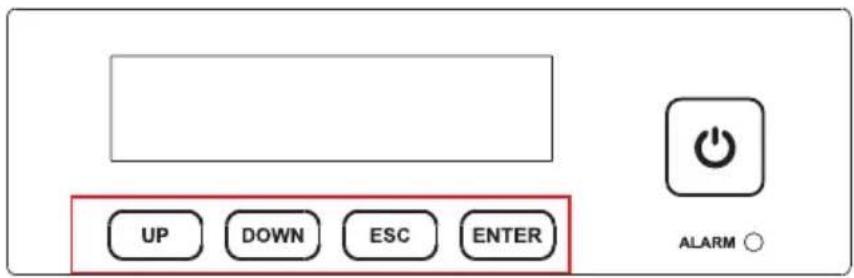
Enter: Enter to next level or Confirm
Esc: Back to next level or Cancel
Up / Down: Select Items
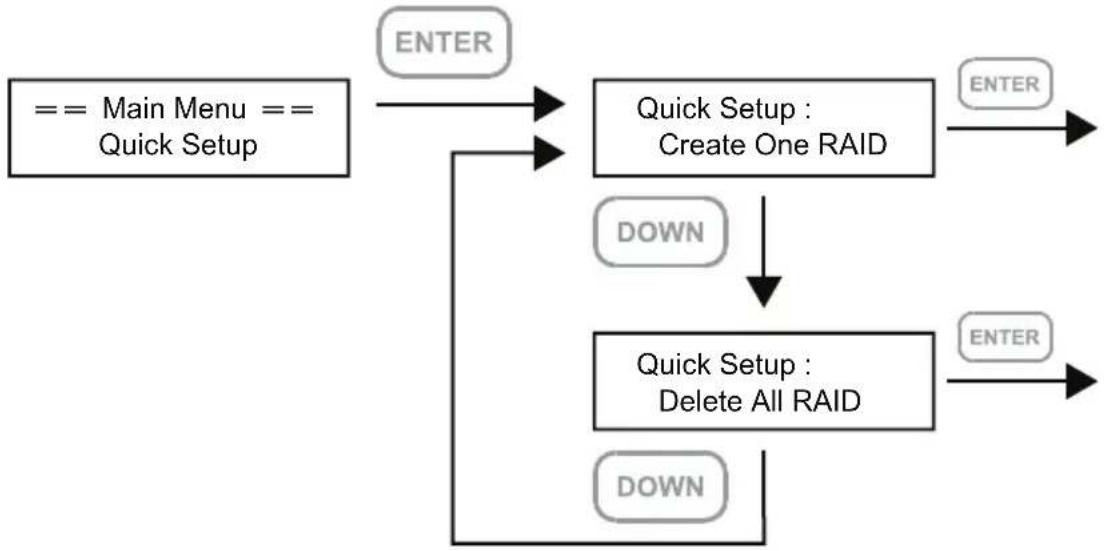
Users can set the RAID mode using the LCD and buttons on the front. The default is JBOD mode. With the "Quick Setup" feature, users can quickly change the RAID mode to RAID 0 or RAID 5 quickly.
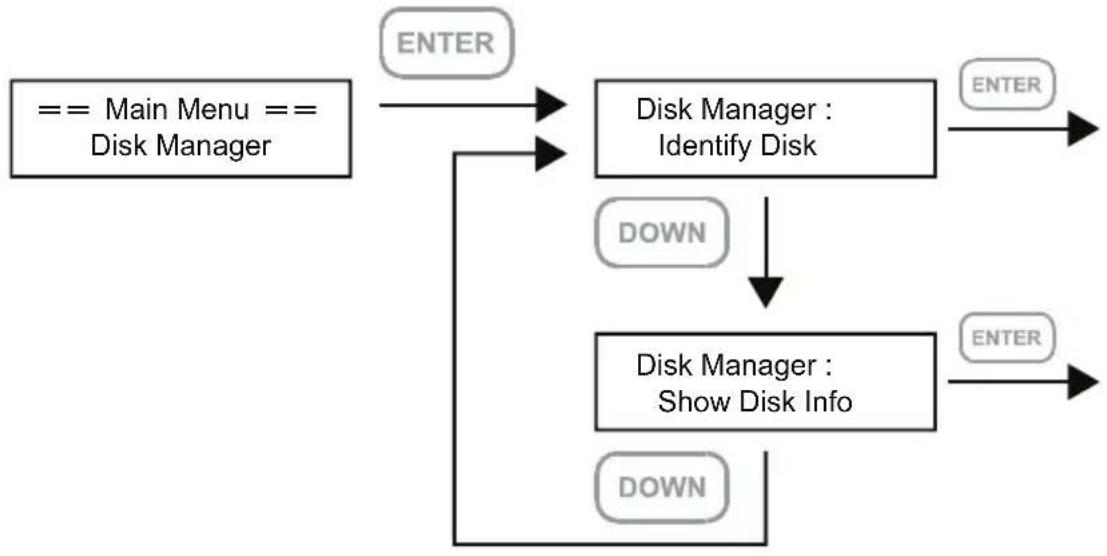
Please refer to LCD information as below for other setting
| Level 0 Level 1 Level 2 Level 3 Level 4 | ||||
| External 4BAY HARDWARE RAID | Quick Setup | Create One RAID RAID | 0/ RAID 5 Select Disk | |
| Delete All RAID | ||||
| Disk Manager | Identify Disk | Disk 1 Check Disk LED | ||
| Disk 2 Check Disk LED | ||||
| Disk 3 Check Disk LED | ||||
| Disk 4 Check Disk LED | ||||
| Show Disk Info < Disk Info > | ||||
| RAID Manager | Identify RAID Select RAID | |||
| Create RAID RAID 0 / RAID 5 Select Disk | ||||
| Delete RAID Select RAID | ||||
| RAID Info ☒ | ||||
| Change RAID Pwd < Password > for RAID Setup | ||||
| Rebuilding Priority Highest/High/Medium/Low/Lowest | ||||
| System Manager | System Info Firmware Version | |||
| Changhe Password < Password > for System Info | ||||
| Logout From Menu < Y or N > | ||||
| Alarm Control | Mute the Buzzer | |||
| Hardware Monitor | Voltage Monitor | < 3.3V / 5V / 12V > | ||
| Temp. Monitor < Temp. > | ||||
| Fan Monitor | < Fan Speed / Fan Level > | |||
The following is the display status for the first time:
Level 0 Level 1

flowchart
graph TD
    A["EXTERNAL 4 BAY HARDWARE RAID"] --> B["ENTER"]
    B --> C["== Main Menu == Quick Setup"]
    C --> D["DOWN"]
    D --> E["== Main Menu == Disk Manager"]
    E --> F["DOWN"]
    F --> G["== Main Menu == RAID Manager"]
    G --> H["DOWN"]
    H --> I["== Main Menu == System Manager"]
    I --> J["DOWN"]
    J --> K["P8~9"]
    K --> L["ENTER"]
    L --> M["P10"]
    M --> N["ENTER"]
    N --> O["P11~13"]
    O --> P["ENTER"]
    P --> Q["P14~16"]
Level 1
flowchart
graph TD
    A["== Main Menu == Quick Setup"] --> B["ENTER"]
    B --> C["Quick Setup : Create One RAID"]
    C --> D["ENTER"]
    C --> E["DOWN"]
    E --> F["Quick Setup : Delete All RAID"]
    F --> G["ENTER"]
    F --> H["DOWN"]
Level 2

flowchart
graph TD
    A["Quick Setup : Create One RAID"] --> B["Select Level : RAID 0"]
    B --> C["Select Level : RAID 5"]
    C --> D["Down"]
    D --> B
    E["Enter"] --> F["Enter Password : -"]
    F --> G["Enter"]
    G --> H["Enter Password : -"]
    H --> I["Enter Setup : Delete All RAID"]
    I --> J["Enter Setup : Delete All RAID"]
    J --> K["Enter Setup : Create One RAID"]
    style A fill:#f9f,stroke:#333
    style K fill:#f9f,stroke:#333
Note 1. If you don't want to set password, please press "ENTER" to go to next step.
Note 2. If user forgot the password, it will not be allowed to access the data from the storage or write new data into it. Rocstor will not be held liable for the damage or loss of data you stored on the storage.
Level 1 Level 2
flowchart
graph TD
    A["== Main Menu == Disk Manager"] --> B["Disk Manager : Identify Disk"]
    B --> C["ENTER"]
    B --> D["DOWN"]
    D --> E["Disk Manager : Show Disk Info"]
    E --> F["ENTER"]
    E --> G["DOWN"]
    G --> H["ENTER"]
    H --> I["ENTER"]
    I --> J["ENTER"]
    J --> K["ENTER"]
    K --> L["ENTER"]
    L --> M["ENTER"]
    M --> N["ENTER"]
    N --> O["ENTER"]
    O --> P["ENTER"]
    P --> Q["ENTER"]
    Q --> R["ENTER"]
    R --> S["ENTER"]
    S --> T["ENTER"]
    T --> U["ENTER"]
    U --> V["ENTER"]
    V --> W["ENTER"]
    W --> X["ENTER"]
    X --> Y["ENTER"]
    Y --> Z["ENTER"]
Level 2 Level 3 Level 4

flowchart
graph TD
    A["Disk Manager : Identify Disk"] --> B["Disk Manager : Disk 1"]
    B --> C["Disk Manager : Disk 2"]
    C --> D["Disk Manager : Disk 3"]
    D --> E["Disk Manager : Disk 4"]
    E --> F["Disk Manager : Check Disk LED"]
    F --> G["Disk Manager : Check Disk LED"]
    G --> H["Disk Manager : Disk 1"]
    H --> I["Disk Manager : Disk 2"]
    I --> J["Disk Manager : Disk 3"]
    J --> K["Disk Manager : Disk 4"]
    K --> L["Disk Manager : Disk 1"]
    L --> M["Disk Manager : Disk 2"]
    M --> N["Disk Manager : Disk 3"]
    N --> O["Disk Manager : Disk 4"]
    O --> P["Disk Manager : Check Disk LED"]
    P --> Q["Disk Manager : Check Disk LED"]
    Q --> R["Disk Manager : Check Disk LED"]
    R --> S["Disk Manager : Check Disk LED"]
    S --> T["Disk Manager : Check Disk LED"]
    T --> U["Disk Manager : Check Disk LED"]
    U --> V["Disk Manager : Check Disk LED"]
    V --> W["Disk Manager : Check Disk LED"]
    W --> X["Disk Manager : Check Disk LED"]
    X --> Y["Disk Manager : Check Disk LED"]
    Y --> Z["Disk Manager : Check Disk LED"]
    Z --> AA["Disk Manager : Check Disk LED"]
    AA --> AB["Disk Manager : Check Disk LED"]
    AB --> AC["Disk Manager : Check Disk LED"]
    AC --> AD["Disk Manager : Check Disk LED"]
    AD --> AE["Disk Manager : Check Disk LED"]
    AE --> AF["Disk Manager : Check Disk LED"]
    AF --> AG["Disk Manager : Check Disk LED"]
    AG --> AH["Disk Manager : Check Disk LED"]
    AH --> AI["Disk Manager : Check Disk LED"]
    AI --> AJ["Disk Manager : Check Disk LED"]
    AJ --> AK["Disk Manager : Check Disk LED"]
    AK --> AL["Disk Manager : Check Disk LED"]
    AL --> AM["Disk Manager : Check Disk LED"]
    AM --> AN["Disk Manager : Check Disk LED"]
    AN --> AO["Disk Manager : Check Disk LED"]
    AO --> AP["Disk Manager : Check Disk LED"]
    AP --> AQ["Disk Manager : Check Disk LED"]
    AQ --> AR["Disk Manager : Check Disk LED"]
    AR --> AS["Disk Manager : Check Disk LED"]
    AS --> AT["Disk Manager : Check Disk LED"]
    AT --> AU["Disk Manager : Check Disk LED"]
    AU --> AV["Disk Manager : Check Disk LED"]
    AV --> AW["Disk Manager : Check Disk LED"]
    AW --> AX["Disk Manager : Check Disk LED"]
    AX --> AY["Disk Manager : Check Disk LED"]

flowchart
graph LR
    A["Disk Manager : Show Disk Info"] -->|ENTER| B["Select Disk : Disk 1/2/3/4"]
    B -->|ENTER| C["Model :"]
Level 1

flowchart
graph TD
    A["== Main Menu == RAID Manager"] --> B["RAID Manager : Identify RAID"]
    B --> C["DOWN"]
    C --> D["RAID Manager : Create RAID"]
    D --> E["DOWN"]
    E --> F["RAID Manager : Delete RAID"]
    F --> G["DOWN"]
    G --> H["RAID Manager : RAID Info"]
    H --> I["DOWN"]
    I --> J["RAID Manager : Change RAID Pwd."]
    J --> K["DOWN"]
    K --> L["RAID Manager : Rebuilding Priority"]
    L --> M["DOWN"]
    M --> B
    B --> N["ENTER"]
    D --> O["ENTER"]
    F --> P["ENTER"]
    H --> Q["ENTER"]
    J --> R["ENTER"]
    L --> S["ENTER"]
Level 2
Level 2 Level 3 Level 4

flowchart
graph LR
    A["RAID Manager : Identify RAID"] -->|ENTER| B["RAID Manager : Select RAID"]
    B -->|ENTER| C["Select RAID : RAID Set x"]

flowchart
graph TD
    A["RAID Manager : Create RAID"] --> B["RAID Manager : RAID 0"]
    B --> C["RAID Manager : RAID 5"]
    C --> D["Select Disk :"]
    D --> E["ENTER"]
    E --> F["ENTER"]
    F --> G["DOWN"]
    G --> B
    style A fill:#f9f,stroke:#333
    style B fill:#ccf,stroke:#333
    style C fill:#cfc,stroke:#333
    style D fill:#fcc,stroke:#333
    style E fill:#ffc,stroke:#333
    style F fill:#fcc,stroke:#333
    style G fill:#ffc,stroke:#333
ENTER : Enter to next level or Confirm
ESC : Back to next level or Cancel
UP : Select HDD/SSD
DOWN : Cancel the select HDD/SSD

flowchart
graph LR
    A["RAID Manager : Delete RAID"] -->|ENTER| B["Select RAID :"]
    B -->|ENTER| C["Are You Sure? Enter : Yes Esc : No"]

flowchart
graph LR
    A["RAID Manager : RAID Information"] --> B["ENTER"]
    B --> C["Select RAID : Information"]
    C --> D["ENTER"]

flowchart
graph LR
    A["RAID Manager : Change RAID Pwd"] -->|ENTER| B["Select RAID :"]
    B -->|ENTER| C["< Password >"]
    C -->|Note| D["End"]
for RAID Setup
Note 1. If you don't want to set password, please press "ENTER" to go to next step.
Note 2. If user forgot the password, it will not be allowed to access the data from the storage or write new data into it. Rocstor will not be held liable for the damage or loss of data you stored on the storage.
Level 2 Level 3

flowchart
graph TD
    A["RAID Manager : Rebuilding Priority"] -->|ENTER| B["Select RAID :"]
    B -->|ENTER| C["Select Priority : Medium Level"]
    C -->|DOWN| D["Select Priority : Low Level"]
    D -->|DOWN| E["Select Priority : Lowest Level"]
    E -->|DOWN| F["Select Priority : Highest Level"]
    F -->|DOWN| G["Select Priority : High Level"]
    G -->|DOWN| C
Level 4
Level 1 Level 2
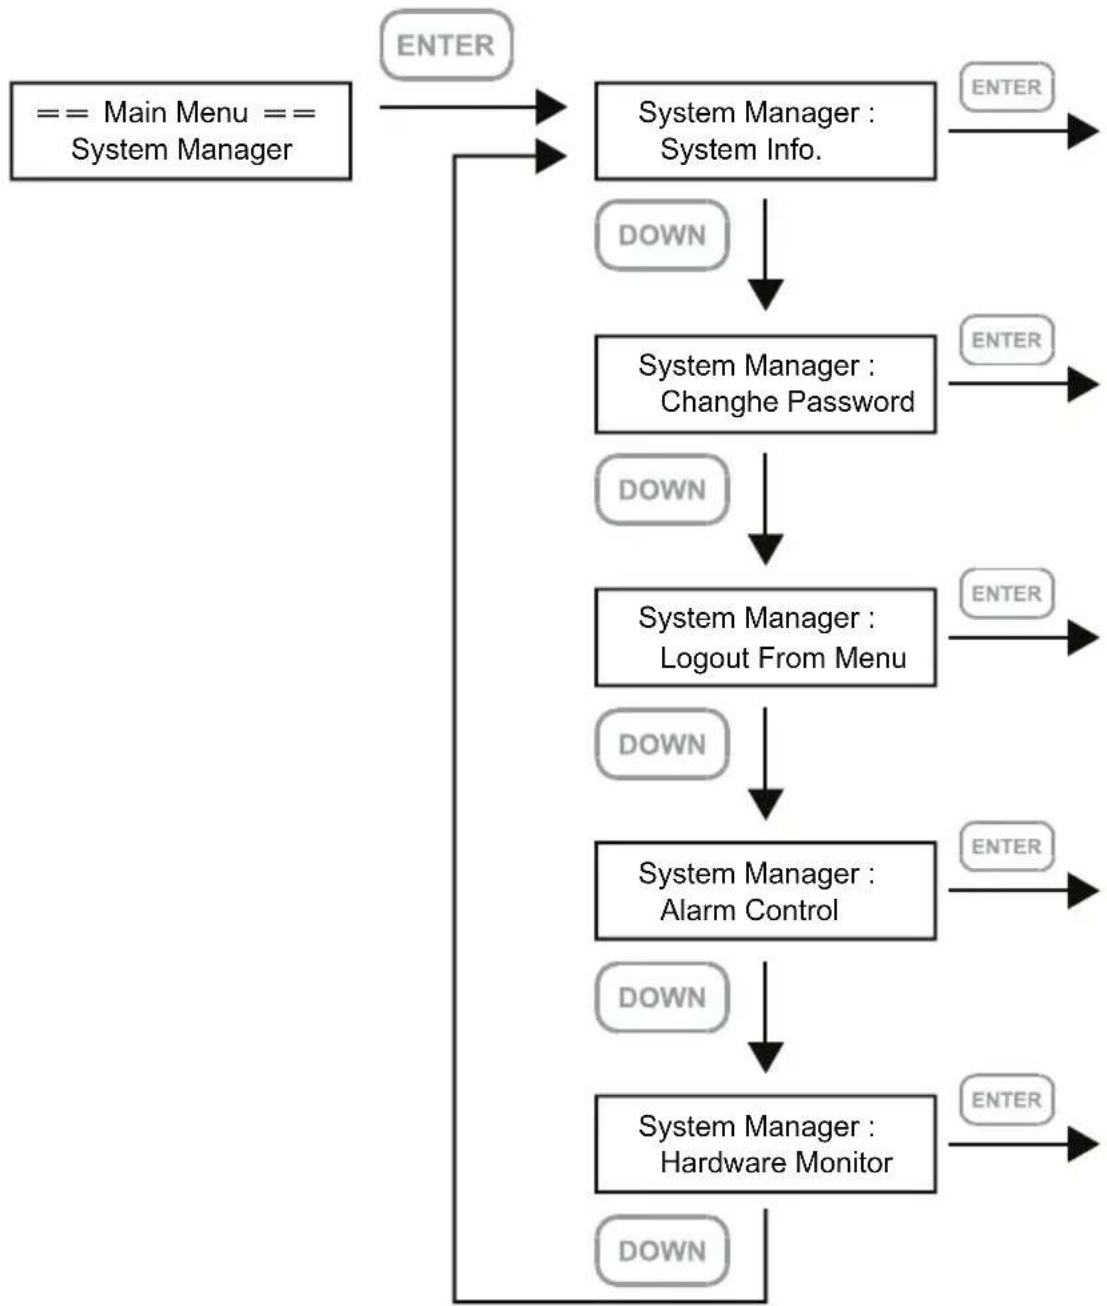
flowchart
graph TD
    A["== Main Menu == System Manager"] --> B["ENTER"]
    B --> C["System Manager : System Info."]
    C --> D["DOWN"]
    D --> E["System Manager : Changhe Password"]
    E --> F["DOWN"]
    F --> G["System Manager : Logout From Menu"]
    G --> H["DOWN"]
    H --> I["System Manager : Alarm Control"]
    I --> J["DOWN"]
    J --> K["System Manager : Hardware Monitor"]
    K --> L["DOWN"]
    L --> C
    C --> M["ENTER"]
    E --> N["ENTER"]
    G --> O["ENTER"]
    I --> P["ENTER"]
    K --> Q["ENTER"]
Level 3 Level 4

flowchart
graph TD
    A["System Manager : System Info."] -->|ENTER| B["Firmware Version"]
    C["System Manager : Changhe Password"] -->|ENTER| D["< Password >"]
    E["System Manager : Logout From Menu"] -->|ENTER| F["Are You Sure? Enter : Yes Esc : No"]
    G["System Manager : Alarm Control"] -->|ENTER| H["Mute The Buzzer? Enter : Yes Esc : No"]
Note 1. If you don't want to set password, please press "ENTER" to go to next step.
Note 2. If user forgot the password, it will not be allowed to access the data from the storage or write new data into it. Rocstor will not be held liable for the damage or loss of data you stored on the storage.
Level 3 Level 4 Level 5
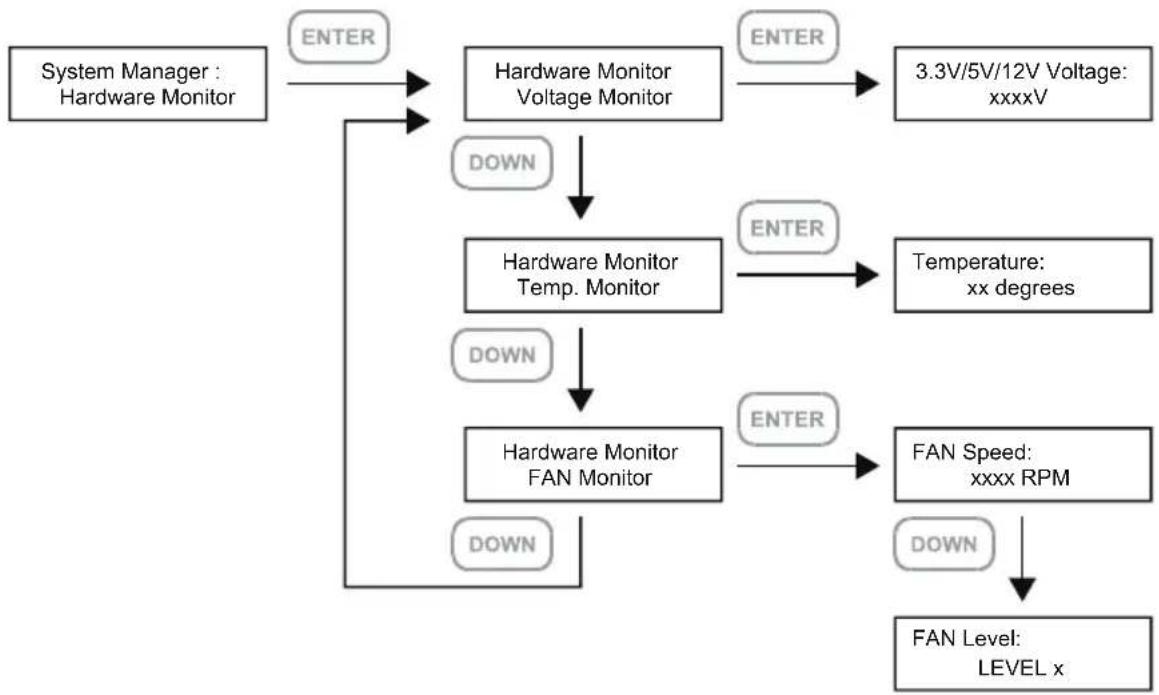
flowchart
graph TD
    A["System Manager : Hardware Monitor"] --> B["ENTER"]
    B --> C["Hardware Monitor Voltage Monitor"]
    C --> D["3.3V/5V/12V Voltage: xxxxV"]
    C --> E["DOWN"]
    E --> F["Hardware Monitor Temp. Monitor"]
    F --> G["Temperature: xx degrees"]
    F --> H["DOWN"]
    H --> I["Hardware Monitor FAN Monitor"]
    I --> J["FAN Speed: xxxx RPM"]
    I --> K["DOWN"]
    K --> L["FAN Level: LEVEL x"]
7. Other Applications
Support DisplayPort
-
The Rocpro U34 offers a DisplayPort support DP1.1a, provides up to 4K@30Hz resolution, and is compatible with monitor and cables with DisplayPort.
-
By using third-party's DisplayPort adapter, it can be connected to the monitor with Mini DisplayPort interface.
-
By using third-party's active DisplayPort adapter, it can be connected to the monitor with VGA, DVI and HDMI interface.

natural_image
Diagram showing connections between a laptop, monitor, and power drive (no text or symbols present)Support USB Power Delivery (USB-PD)
-
USB Power Delivery (USB-PD) introduces charging technology and unified cable standards. U34 supports USB-PD. Use USB Type-C to USB Type-C cable, it can provide up to 24W (5V/3A (15W), 9V/2A (18W), 12V/2A (24W)) power charging to the host.
-
If the connected host is a notebook that supports USB-PD (5V/9V/12V) charging, it will remain charging after the notebook is powered off or restarted while the U34 is still power on.
-
If the U34 cannot be recognized after the notebook restarted, please reconnect the Type-C cable or restart the U34.

Note: Notebook will need to support 5V/9V/12V charge.
8. Important Notice
- When connected to the computer system, it's prohibited to remove, insert or swap the hard drive while data transfer is being performed.
- It's prohibited to change the positioning of the drives once the initial installation has been completed as the changes made to the drive positions may destroy the RAID formation.
-
The product needs to be restarted after adding or changing the RAID mode, and the update is guaranteed to be the new RAID mode.
-
When the Notebook which support USB PD function is only connected to Rocpro U34 can provide up to 24W (12V/2A) power supply, but if then connected to other power supply such like the original Notebook power supply, Notebook will automatically judge which one will be the main power source, usually the one which can provide more Wattage will be. At this time, U34 may be interrupted and re-identified by the Notebook. Therefore, before connecting to other power supplies, please make sure that there are no data accessed between Notebook and U34.
-
U34 can only provide 24W at most, which is different from the original Notebook power supply. It mainly to extend the Notebook's usage time. Take Macbook Pro 13" as an example, the original power supply is 60W, assuming it take 2 hours for it to fully charge the battery, use U34 might need three times time. Therefore, if user need to use Notebook for a long time, it is recommended to connect the original power supply first before connect U34.
-
Whenever turning off or unplugging the U34 from your computer system becomes necessary, always remember to safely remove it from your operating system first.
-
It is highly recommended for users to back up important data contained within the U34 unit on a regular basis or whenever the user feels necessary to a remote or a separate storage device. Stardom will not be responsible for any lost of data caused during the use of the unit or the recovery of the data lost.
9. Replacement of Malfunctioning Drive and Data Rebuild Instructions
When a front hard drive indicator has lit up red and the audio alarm sounds, this could mean the indicated hard drive may be malfunctioning. If this occurs, you may press the mute button at the rear of the system to shut off the audio alarm and power off the system immediately if in the allowed operational state, and then re-power on the system to double check and see if in fact the indicated hard drive has malfunctioned. If the problem persists, please turn off the system and follow the directions below:
-
Remove the drive tray containing the malfunctioned hard drive and disassemble the hard drive from drive tray.
-
Mount the new hard drive onto the tray and insert it back to the empty drive position of the U34, then push the latch into place making sure it is secured and locked.
-
In RAID 5 mode, when you turn the system on, the hard drive status indicator of the replacement drive will interchangeably blink red and purple to inform that the data is being rebuilt to the replacement drive. During data rebuild, you may operate the U34 as normal. When the indicator stops, the data rebuild process has been completed.
10. System Temperature Overheat and Fan Failure Management
If the alarm indicator has lit up red and the audio alarm sounds, this could mean that either a system fan has stopped operating entirely or the system temperature has exceeded over the default temperature of 55^ C. When this occurs, you may press the mute button at the rear of the system to shut off the audio alarm and power off the system immediately if in the allowed operational state to let the system cool. Check and see if the overall operation environment is well ventilated and make sure there are no blockages to the enclosed fan and then re-power on the system to continue use. If the problem persists, please turn off the system and contact your supplier or the STARDOM tech support for further assistance.
11. Frequently Asked Questions
Q1. Which drive format should I choose to format the hard drives in the U34?
A: It depends on the computer system you most often use. See the below suggestions:
- Use NTFS format for Windows 2000/XP/Vista/7/8/10 system
- Use HFS+ (Mac OS Extended) format for a Mac OS X system
- Choose FAT32 format if you'll use the U34 in both Windows and Mac environments (the maximum size of one single file may not exceed 4GB0.
Q2. Why cant my U34 reach the transfer performance speed of 200 MB/s via e-SATA interface as stated on your website?
A: 1. Please first check if your PCI-E SATA host adapter would only support PCI-E (1X). This type of host adapters cannot reach the transfer performance speed beyond 135MB/s.
2. The U34 will need to be set to RAID 0 mode also.
LIMITED WARRANTY
This Limited Warranty is provided by Rocstorage, Inc. (hereinafter: Rocstor) for all lines of products.
General Terms
EXCEPT AS EXPRESSLY SET FORTH IN THIS LIMITED WARRANTY, ROCSTOR MAKES NO OTHER WARRANTIES OR CONDITIONS, EXPRESS OR IMPLIED, INCLUDING ANY IMPLIED WARRANTIES OF MERCHANTABILITY AND FITNESS FOR A PARCTICULAR PURPOSE. ROCSTOR EXPRESSLY DISCLAIMS ALL WARRANTIES AND CONDITIONS NOT STATED IN THIS LIMITED WARRANTY. ANY IMPLIED WARRANTIES THAT MAY BE IMPOSED BY LAW ARE LIMITED IN DURATION TO THE LIMITED WARRANTY PERIOD. SOME STATES OR COUNTRIES DO NOT ALLOW A LIMITATION ON HOW LONG AN IMPLIED WARRANTY LASTS OR THE EXCLUSION OR LIMITATION OF INCIDENTAL OR CONSEQUENTIAL DAMAGES FOR CONSUMER PRODUCTS. IN SUCH STATES OR COUNTRIES, SOME EXCLUSIONS OR LIMITATIONS OF THIS LIMITED WARRANTY MAY NOT APPLY TO YOU.
This Limited Warranty applies to the Rocstor branded hardware products sold by or leased from Rocstorage, Inc., its worldwide subsidiaries, affiliates, authorized resellers, or country distributors (collectively referred to in this Limited Warranty as "Rocstor") with this Limited Warranty. This Limited Warranty is applicable in all countries and may be enforced in any country where Rocstor or its authorized service providers offer warranty service subject to the terms and conditions set forth in this Limited Warranty. However, warranty service availability and response times may vary from country to country and may also be subject to registration requirements in the country of purchase.
Rocstor warrants that the Rocstor hardware product and all the internal components of the product that you have purchased or leased from Rocstor are free from defects in materials or workmanship under normal use during the Limited Warranty Period. The Limited Warranty Period starts on the date of purchase or lease from Rocstor. Your dated sales or delivery receipt, showing the date of purchase or lease of the product, is your proof of the purchase or lease date. You may be required to provide proof of purchase or lease as a condition of receiving warranty service. You are entitled to warranty service according to the terms and conditions of this document if a repair to your Rocstor branded hardware is required within the Limited Warranty Period. This Limited Warranty extends only to the original purchaser or lessee of this Rocstor branded product and is not transferable to anyone who obtains ownership of the Rocstor branded product from the original purchaser or lessee.
Rocstor products are manufactured using new materials or new and used materials equivalent to new in performance and reliability. Spare parts may be new or equivalent to new. Spare parts are warranted to be free from defects in material or workmanship for thirty (30) days or for the remainder of the Limited Warranty Period of the Rocstor hardware product in which they are installed, whichever is longer.
Rocstor's Obligation under the Limited Warranty
During the Limited Warranty Period, Rocstor will repair or replace the defective component parts or the hardware product. All component parts or hardware products removed under this Limited Warranty become the property of Rocstor. The replacement part or product takes on either the Limited Warranty status of the removed part or product or the thirty (30) day limited warranty of the spare part. In the unlikely event that your Rocstor product has a recurring failure, Rocstor, at its discretion, may elect to provide you with a replacement unit of Rocstor's choosing that is at least equivalent to your Rocstor branded product in hardware performance. Rocstor reserves the right to elect, at its sole discretion, to give you a refund of your purchase price or lease payments (less interest) instead of a replacement. This is your exclusive remedy for defective products.
The original Limited Warranty is not extended when the product, or a part of the product, is repaired or replaced during the Limited Warranty period. Rocstor shall not be responsible or liable for backing up any data that is on a drive being returned for service
YOU SHOULD MAKE PERIODIC BACKUP COPIES OF THE DATA STORED ON YOUR HARD DRIVE OR OTHER STORAGE DEVICES AS A PRECAUTION AGAINST POSSIBLE FAILURES, ALTERATION, OR LOSS OF THE DATA. BEFORE RETURNING ANY UNIT FOR SERVICE, BE SURE TO BACK UP DATA AND REMOVE ANY CONFIDENTIAL, PROPRIETARY, OR PERSONAL INFORMATION. ROCSTOR IS NOT RESPONSIBLE FOR DAMAGE TO OR LOSS OF ANY PROGRAMS, DATA, OR REMOVABLE STORAGE MEDIA. ROCSTOR IS NOT RESPONSIBLE FOR THE RESTORATION OR REINSTALLATION OF ANY PROGRAMS OR DATA OTHER THAN SOFTWARE INSTALLED BY ROCSTOR WHEN THE PRODUCT WAS MANUFACTURED.
Rocstor does not warrant that the operation of this product will be uninterrupted or error-free. Rocstor is not responsible for damage that occurs as a result of your failure to follow the instructions that came with the Rocstor branded product.
This Limited Warranty does not apply to expendable parts. This Limited Warranty does not extend to any product from which the serial number has been removed or that has been damaged or rendered defective (a) as a result of accident, misuse, abuse, or other external causes; (b) by operation outside the usage parameters stated in the user documentation that shipped with the product and/or posted on the Rocstor website; (c) by the use of parts not manufactured or sold by Rocstor; (d) as a result of normal wear; or (e) by modification or service by anyone other than (i) Rocstor, (ii) a Rocstor authorized service provider, or (iii) your own installation of end-user replaceable Rocstor or Rocstor approved parts if available for your product in the servicing country.
These terms and conditions constitute the complete and exclusive limited warranty agreement between Rocstor and you regarding the Rocstor branded product you have purchased or leased. These terms and conditions supersede any prior agreements or representations including representations made in Rocstor sales literature or advice given to you by Rocstor or an agent or employee of Rocstor-that may have been made in connection with your purchase or lease of the Rocstor branded product. No change to the conditions of this Limited Warranty is valid unless it is made in writing and signed by an authorized representative of Rocstor.
Buyer's Obligation under the Warranty
The person requesting coverage under this warranty shall prove that he or she is the original purchaser and declares that the product has not been sold, leased, bartered or otherwise changed possession. The purchaser shall frequently backup the Rocpro hard drive and backup the data immediately prior to returning the drive for warranty service.
The buyer must notify Rocstor and show proof of notification, through any reasonable means of communication. See full street address email address and toll free phone numbers below or updated contact information are available on Rocstor.com website. The notification shall identify any defect, malfunction, or nonconformity promptly upon discovery. Rocstor will acknowledge receipt of the communication and issue a Return Merchandise Authorization (RMA) code. The buyer is obligated to securely and safely package(s) the product, preferably in the original packing materials, WITH THE RMA number, and deliver it together with a copy of the original purchase receipt and a description of the problem to the Rocstor home office. Buyer is responsible for the product until it is received by Rocstor. It is recommended that the product be insured during transportation by the sender. You must prepay any shipping charges, taxes, or duties associated with transportation of the product. In addition, you are responsible for insuring any product shipped or returned for service. You assume risk of loss during shipping.
Limitation of Damages (Liability)
IF YOUR ROCSTOR BRANDED HARDWARE PRODUCT FAILS TO WORK AS WARRANTED ABOVE, THE ORIGINAL PURCHASER'S SOLE AND EXCLUSIVE REMEDY SHALL BE REPAIR OR REPLACEMENT. ROCSTOR'S MAXIMUM LIABILITY UNDER THIS LIMITED WARRANTY IS EXPRESSLY LIMITED TO THE LESSER OF THE PRICE YOU HAVE PAID FOR THE PRODUCT OR THE COST OF REPAIR OR REPLACEMENT OF ANY ROCSTOR HARDWARE COMPONENTS THAT MALFUNCTION IN CONDITIONS OF NORMAL USE. ROCSTOR IS NOT LIABLE FOR ANY DAMAGE TO ANY OTHER PRODUCT CONNECTED TO A ROCSTOR PRODUCT.
Limitation on Consequential Damages
ROCSTOR IS NOT LIABLE FOR ANY DAMAGES CAUSED BY THE PRODUCT OR THE FAILURE OF THE PRODUCT TO PERFORM, INCLUDING ANY LOST PROFITS OR SAVINGS OR SPECIAL, INCIDENTAL OR CONSEQUENTIAL DAMAGES. ROCSTOR IS NOT LIABLE FOR ANY CLAIM MADE BY A THIRD PARTY OR MADE BY YOU FOR A THIRD PARTY. THIS LIMITATION OF LIABILITY ALSO APPLIES WHETHER DAMAGES ARE SOUGHT OR A CLAIM IS MADE UNDER THIS LIMITED WARRANTY OR AS A TORT CLAIM (INCLUDING NEGLIGENCE AND STRICT PRODUCT LIABILITY), A CONTRACT CLAIM OR ANY OTHER CLAIM. THIS LIMITATION OF LIABILITY CANNOT BE WAIVED OR AMENDED BY ANY PERSON. THIS LIMITATION OF LIABILITY WILL BE EFFECTIVE EVEN IF YOU HAVE ADVISED ROCSTOR OR AN AUTHORIZED REPRESENTATIVE OF ROCSTOR OF THE POSSIBILITY OF ANY SUCH DAMAGES.
THIS LIMITED WARRANTY GIVES YOU SPECIFIC LEGAL RIGHTS. YOU MAY ALSO HAVE OTHER RIGHTS THAT MAY VARY FROM STATE TO STATE OR FROM COUNTRY TO COUNTRY. YOU ARE ADVISED TO CONSULT APPLICABLE STATE OR COUNTRY LAWS FOR A FULL DETERMINATION OF YOUR RIGHTS.
Disclaimer
We accept no liability for any loss of data, damages and the inability of Rocstor products to work with any third party equipment. Nor can Rocstor accept any liability or responsibility for software or third party hardware products.
Limited Warranty Period
The limited warranty period for the Rocpro U34 is three (3) Year Parts and Labor. This Limited Warranty extends only to the original purchaser or lessee of this Rocstor branded product and is not transferable to anyone who obtains ownership of the Rocstor branded product from the original purchaser or lessee
Types of Limited Warranty Service
Your Rocstor Limited Warranty consists of repair or replacement of defective parts, including hard drives identified by Rocstor Support Organization as "pre-failure".
Carry-in Limited Warranty Service Available Monday - Friday
Under the terms of carry-in service, you may be required to deliver your Rocstor product to the Rocstor Service Center or an authorized service location for warranty repair. You must prepay any shipping charges, taxes or duties associated with transportation of the product. In addition, you are responsible for insuring any product shipped or returned for service. You assume risk of loss during shipping.
YOU SHOULD MAKE PERIODIC BACKUP COPIES OF THE DATA STORED ON YOUR HARD DRIVE OR OTHER STORAGE DEVICES AS A PRECAUTION AGAINST POSSIBLE FAILURES, ALTERATION OR LOSS OF THE DATA. BEFORE RETURNING ANY UNIT FOR SERVICE, BE SURE TO BACK UP DATA AND REMOVE ANY CONFIDENTIAL, PROPRIETARY OR PERSONAL INFORMATION. ROCSTORAGE IS NOT RESPONSIBLE FOR DAMAGE TO OR LOSS OF ANY PROGRAMS, DATA OR REMOVABLE STORAGE MEDIA. ROCSTORAGE IS NOT RESPONSIBLE FOR THE RESTORATION OR REINSTALLATION OF ANY PROGRAMS OR DATA OTHER THAN SOFTWARE INSTALLED BY ROCSTORAGE WHEN THE PRODUCT WAS MANUFACTURED.
Rocstorage shall not be responsible or liable for backing up any data that is on a drive being returned for service. Expect that all data on the drive will be destroyed and not retrievable when returned for warranty service.
Rocstor Replaceable Parts Program
Where available, the Rocstor Replaceable Parts program ships approved replacement parts directly to you to fulfill your warranty. This will save considerable repair time. After you call the Rocstor Technical Support Center at 888.877.8777 a replaceable part can be sent directly to you. Once the part arrives, call the Rocstor Technical Support Center. A technician will assist you over the phone to ensure that the installation is quick and easy.
Service Upgrades
Rocstor offers extra coverage for your product. For information on service upgrades, visit www.rocstor.com. Service upgrades purchased in one country are not transferable to another country.
Capacity Disclaimer
Actual accessible hard drive capacity will indicate up to 10% lower than stated under different Operating Systems and formatting.
The storage volume is measured in total bytes before formatting. References to round numbers of gigabytes or terabytes are an approximation only. For example, a disk drive labeled as having 500GB (Gigabytes) has space for approximately 500,000,000 bytes before formatting. After formatting, the drive capacity is reduced by about 5% to 10% depending on the operating system and formatting used or "1GB = 1,000,000,000 bytes.
Options and Software
The Limited Warranty terms and conditions for Rocstor options are as indicated in the Limited Warranty applicable to Rocstor options. ROCSTOR DOES NOT WARRANTY SOFTWARE PRODUCTS, INCLUDING ANY SOFTWARE PRODUCTS OR THE OPERATING SYSTEM PREINSTALLED BY ROCSTOR. Rocstor's only obligations with respect to software distributed by Rocstor under the Rocstor brand name are set forth in the applicable end-user license or program license agreement. Non-Rocstor hardware and software products are provided "AS IS" and without any Warranty. However, non-Rocstor manufacturers, suppliers or publishers may provide their own warranties directly to you.
The data stored in Rocstor and Rocsecure storage product lines are not guaranteed by Rocstor (or the hard disk manufacturer.) We are not responsible for any loss of data. Always back up data regularly
TECHNICAL SUPPORT
Software Technical Support
Software technical support is defined as assistance with questions and issues about the software that was either preinstalled by Rocstor on the Rocstor branded product or that was included with the Rocstor branded product at the time of your purchase or lease of the product. Technical support for software is available for the first ninety (90) days from date of product purchase or lease. Your dated sales or delivery receipt, showing the date of purchase or lease of the product, is your proof of the purchase or lease date. You may be required to provide proof of purchase or lease as a condition of receiving software technical support. After the first ninety (90) days, technical support for software that was either preinstalled by Rocstor on the Rocstor branded product or included with the Rocstor branded product at the time of your purchase or lease of the product is available for a fee.
WARNING: The individual user should take care to determine prior to use whether this device is suitable, adequate or safe for the use intended. Since individual applications are subject to great variation, the manufacturer "Rocstor" makes no representation or warranty as to the suitability or fitness of these devices for any specific application.
Technical Support
The Rocpro series are backed by free telephone technical support for three (3) years from the date of purchase. Please register your product with Rocstor. To register, fill in the Limited Warranty Registration form in the Support tab at www.rocstor.com.
Free telephone technical support is available weekdays from 9 AM until 6 PM Pacific Standard Time. Customers in the United States and Canada can call toll-free: (888) 877-8777; all others must call (818) 449-2000.
When calling for support, please have the product's serial number (printed on the label on the bottom of the drive) and system hardware information available.
TRADEMARKS ACKNOWLEDGEMENTS
© 2018, Rocstorage, Inc; acknowledges the following trademarks for company names or products mentioned within the Rocstor site, portal pages and Articles/text/manuals: Rocstor, Rocsecure and Rocpower are registered trademarks of Rocstorage, Inc. Rocpro, Rocport, Rocbit, Rocsafe ... are the trademarks of Rocstorage, Inc. "store your future", "secure your future" and "power your future" are the slogan marks of Rocstorage, Inc. Apple, the Apple logo, Mac, Power Macintosh, FireWire, and Mac Pro, Leopard ... are trademarks of Apple Computer, Inc. in the United States and other countries. Microsoft, MS-DOS, Windows CE, Windows NT, Windows 98, Soft Windows, Vista ... are registered trademarks of Microsoft Corporation in the United States and other countries.
Intel, Itanium, Pentium, Celeron, and Xeon MMX ... are registered U.S. trademarks of Intel; Thunderbolt and the Thunderbolt logo are trademarks of Intel Corporation in the United States and other countries. HyperDuo is the Register Trademark of Marvell Technology Group LTD.
This product is (may also be) integrated with SATA hard drives from the following manufactures: Seagate, Samsung, Western Digital, Hitachi, Toshiba, Fujitsu ... All other names are trademarks of their respective companies.
Rocstor wishes to acknowledge the use of tables, charts, graphs and texts from the Wikipedia website. © 2000 - 2020
CONTACT INFORMATION
Corporate Headquarters
12979 Arroyo Ave
San Fernando, CA 91340
Office: +1 (818) 727-7000
Email: info@Rocstor.com
Technical Support / RMA
Hours: 9:00 am - 5:00 pm PST
Mon - Fri (excluding holidays)
Tell: +1 (818) 727-7000 (Domestic and Internationals)
Email: support@Rocstor.com
Sales Info
Hours: 8:00 am - 5:00 pm PST
Mon - Fri (excluding holidays)
Tell: +1 (818) 727-7000 (Domestic and Internationals)
Email: support@Rocstor.com
Corporate, Government and Academic Customers
Our Corporate Sales Team's goal is to help our U.S.A. and Canadian customers find a storage solution that best serves their needs. We will help you determine your best purchasing options. For more information please contact the appropriate department below or call us at +1 (818) 727-7000.
General sales information: sales@Rocstor.com
Corporate sales information: corporate_sales@Rocstor.com
Educational sales information: academic_sales@Rocstor.com
Federal, State & Local government sales information: government_sales@Rocstor.com
Resellers/Business Development/OEM Partners
All Channel National and International Resellers, VARs, Consultants ...
contact Rocstor Channel Sales: call: +1 (818) 727-7000
Email: reseller_info@Rocstor.com
COPYRIGHTS
© 2020 Rocstorage, Inc. This Manual is protected by United States copyright law and may not be reproduced, distributed, transmitted, displayed, published or broadcast without the prior written permission of Rocstorage, Inc. You may not alter or remove any trademark, copyright or other notice from copies of this Manual.

Assembled and integrated in U.S.A. using domestic and / or foreign components.

- Table of Contents
- Package Contents & Product Views
- Operating Information
- Visual Status Indicator Definitions
- Hardware Requirements and Precautions
- Hardware Installation
- Step 1:
- Step 2:
- Step 3:
- Step 4:
- Step 5:
- Step 6:
- Step 7:
- Step 8:
- Step 9:
- Step 10:
- Description of Front Panel Operation
- Please refer to LCD information as below for other setting
- The following is the display status for the first time:
- Other Applications
- Support DisplayPort
- Support USB Power Delivery (USB-PD)
- Important Notice
- Replacement of Malfunctioning Drive and Data Rebuild Instructions
- System Temperature Overheat and Fan Failure Management
- Frequently Asked Questions
- LIMITED WARRANTY
- General Terms
- Rocstor's Obligation under the Limited Warranty
- YOU SHOULD MAKE PERIODIC BACKUP COPIES OF THE DATA STORED ON YOUR HARD DRIVE OR OTHER STORAGE DEVICES AS A PRECAUTION AGAINST POSSIBLE FAILURES, ALTERATION, OR LOSS OF THE DATA. BEFORE RETURNING ANY UNIT FOR SERVICE, BE SURE TO BACK UP DATA AND REMOVE ANY CONFIDENTIAL, PROPRIETARY, OR PERSONAL INFORMATION. ROCSTOR IS NOT RESPONSIBLE FOR DAMAGE TO OR LOSS OF ANY PROGRAMS, DATA, OR REMOVABLE STORAGE MEDIA. ROCSTOR IS NOT RESPONSIBLE FOR THE RESTORATION OR REINSTALLATION OF ANY PROGRAMS OR DATA OTHER THAN SOFTWARE INSTALLED BY ROCSTOR WHEN THE PRODUCT WAS MANUFACTURED.
- Buyer's Obligation under the Warranty
- Limitation of Damages (Liability)
- Limitation on Consequential Damages
- Disclaimer
- Limited Warranty Period
- Types of Limited Warranty Service
- Carry-in Limited Warranty Service Available Monday - Friday
- Rocstor Replaceable Parts Program
- Service Upgrades
- Capacity Disclaimer
- Options and Software
- TECHNICAL SUPPORT
- Software Technical Support
- TRADEMARKS ACKNOWLEDGEMENTS
- CONTACT INFORMATION
- Corporate Headquarters
- Technical Support / RMA
- Sales Info
- Corporate, Government and Academic Customers
- Resellers/Business Development/OEM Partners
- COPYRIGHTS
Brand : Rocstor
Model : Rocpro U34
Category : Disk array