ClimateWizard - Air-conditioner Convair - Free user manual and instructions
Find the device manual for free ClimateWizard Convair in PDF.

| Product Type | Air Conditioner |
| Brand | Convair |
| Model | ClimateWizard |
| Cooling Capacity (BTU/h) | 12,000 |
| Power Supply | 115 V ~ 60 Hz |
| Current Draw | 10 A |
| Dimensions (W x H x D) | 23.6 x 18.1 x 26.0 in |
| Weight | 68 lb |
| Airflow (CFM) | 350 |
| Noise Level (dB) | 52 (high), 45 (low) |
| Refrigerant | R-32 |
| Modes | Cool, Fan, Dry, Sleep |
| Fan Speeds | 3 (Low, Medium, High) |
| Thermostat Range | 62 – 86 °F (17 – 30 °C) |
| Timer | 24-hour on/off |
| Remote Control | Yes (included) |
| Air Filter | Washable, reusable |
| Installation Type | Window |
| Safety Features | Auto restart, child lock, anti-freeze |
| Energy Efficiency (EER) | 12.0 |
| Warranty | 1 year (parts and labor) |
| Included Accessories | Installation kit, remote, manual |
Frequently Asked Questions - ClimateWizard Convair
User questions about ClimateWizard Convair
0 question about this device. Answer the ones you know or ask your own.
Ask a new question about this device
Download the instructions for your Air-conditioner in PDF format for free! Find your manual ClimateWizard - Convair and take your electronic device back in hand. On this page are published all the documents necessary for the use of your device. ClimateWizard by Convair.
USER MANUAL ClimateWizard Convair
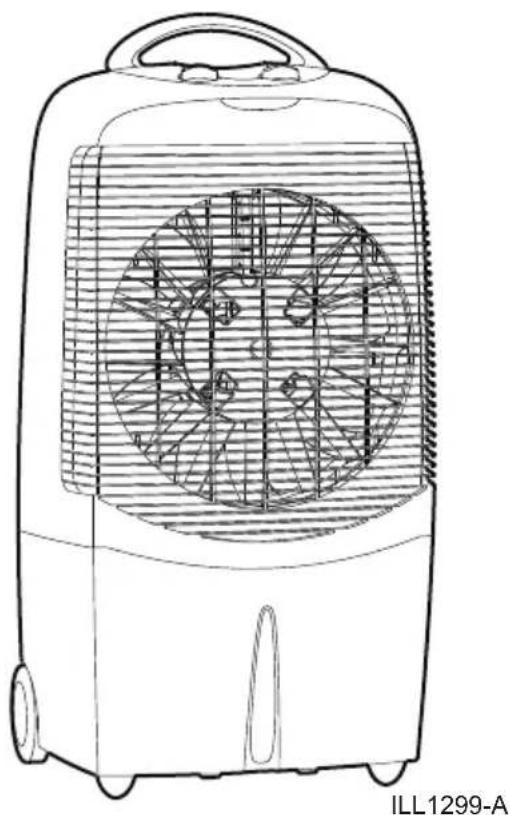
Portable Evaporative Cooler
natural_image
Line drawing of an outdoor air conditioner unit with fan blades and ventilation grille (no text or symbols)Magicool™ ClimateWizard™ Magicool™ compact
(English) (NGP, NGPF)
CONTENTS
SAFETY....1
General Safety
Electrical Safety
COMPONENT LOCATION.2....
ASSEMBLY 3....
OPERATING THE COOLER 3-4....
Filling with water
Using the cooler - Low fan speed
★ High fan speed
★ Fan only (vent)
Conditioning of Cooling pads
How to get the best cooling performance
MAINTENANCE.5-6....
To drain water
Water strainer and Cooling pad
Pump belt replacement / Drain Plug
TROUBLESHOOTING 7
SPARE PARTS LIST & EXPLODED VIEW.8-9......
WARRANTY....10-12
Waste electrical products must not be disposed of with household waste. This product should be taken to your local recycling centre for safe treatment.
SAFETY
Portable evaporative air cooler - important safety instructions
Please read these instructions before assembling the cooler and keep for future reference.
This appliance is not intended for use by persons (including children) with reduced physical, sensory or mental capabilities, or lack of experience and knowledge, unless they have been given supervision or instruction concerning use of the appliance by a person responsible for their safety.
Children should be supervised to ensure that they do not play with the appliance.
General Safety
For indoor use only.
Use only in the upright position on a flat level surface and at least 50cm from any objects.
Clean the air inlets and outlets at regular intervals to prevent airflow reduction (refer Maintenance section).
Do not place objects on the air cooler, or through the ventilating slots or restrict the air inlets & outlets.
Closely supervise any children and pets when the air cooler is in use.
Do not store or operate the appliance near any flammable substances.
During operation, water is present in the bottom tank of the air cooler. Be careful when moving the unit to prevent water from spilling.
Always switch your cooler off and unplug it before cleaning or maintenance.
Electrical Safety
Caution! before connecting the electrical power cord to a power outlet, check that the air cooler voltage is the same as your power supply (refer to the rating label located on the rear of the unit).
Do not pull the unit along by the power cord or place the power cord near a source of heat. Always unroll the power cord completely before use.
If the power supply cord is damaged it must be replaced by the manufacturer, a service agent or similarly qualified persons in order to avoid a hazard.
Switch off and unplug when not in use.
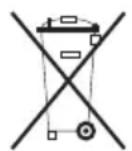
COMPONENT LOCATION

Front View
Congratulations on purchasing your Convair cooler, manufactured and backed by Convair, a world leader in climate control.
In one compact, lightweight, easy to use and attractive design, the Convair cooler keeps your office or home space clean and cool all year long.
The Convair cooler is a powerful evaporative cooler, that will give you plenty of cool, fresh air. Place the cooler in front of an open door or window so that it is drawing in fresh air. Open a door or window opposite to create flow through ventilation. Ensuring the cooler has adequate ventilation is important in maintaining cooler performance.
Featuring an exclusive High Airflow Filter, the Climate Wizard™ helps filter dust, pet dander, pollen and other contaminants down to 0.3 microns in size, and releases filtered air back into the room.
Back View
Component List

HANDLE (Magicool & Climate Wizard)

FILTER CARTRIDGE CLIPS (Climate Wizard)

CONTROLS

REAR PANEL

FRONT GRILLE

FILTER CARTRIDGE AND FILTER (Climate Wizard)

WATER TANK

WATER FILLING AREA

WATER LEVEL WINDOW

RATING LABEL

WHEEL

DRAIN PLUG

FLIP OUT FOOT (Magicool)

REAR PANEL CLIPS
ASSEMBLY
Handle Assembly
The Climate Wizard and Magicool coolers are supplied with a handle, which can be fitted to the cooler. The Magicool compact is not supplied with a handle.
To attach the handle, simply push it into the slot at the back of the cooler (Fig 01).
The handle has been designed to be a permanent addition to the cooler. Do not attempt to remove the handle once it is fitted.

natural_image
Technical line drawing of a heat exchanger or radiator component (no text or symbols)Once clipped into place, the handle will aid in the manoeuvrability of the cooler around your home or office.
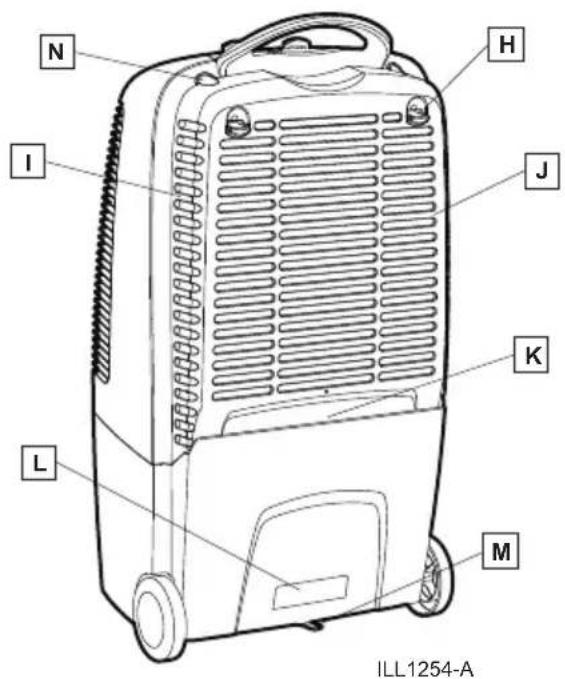
Flip-out Foot
The Magicool cooler is fitted with a flip out foot. Climate Wizard and Magicool compact models do not have this function.
The flip-out foot can be used to increase the angle of the air flow. Hold the cooler firmly at the top and lean it slightly backwards.
Locate the foot at the bottom of the tank and pivot it forward until it locks into place (Fig 02).
natural_image
Technical line drawing of an outdoor air purifier with a scroll wheel and fan (no text or symbols)Return the cooler to its upright position, so it is resting, at the front, on the flip-out foot. You should now notice the cooler angled back slightly, increasing the height of the air flow.
-
Place the cooler in front of an open window or door so that it is drawing in fresh air.
-
Pour clean water into the opening at the back of the cooler (Fig 03).
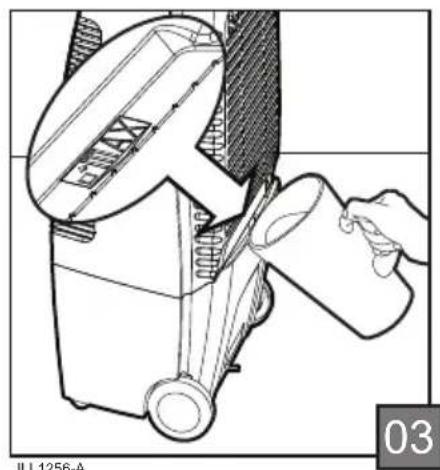
natural_image
Technical line drawing of a mechanical device with a hand pouring liquid into a container (no text or symbols)The water capacity of the cooler is 13 litres. The minimum amount of water required to operate the pump is 1.9 litres. No damage occurs to the cooler when it is operated without water.
-
Fill the cooler with water until the water reaches the maximum fill level indicated at the rear of the cooler (Fig 03). Do not overfill the cooler as water will spill on the floor.
-
Refill the cooler with clean water whenever the water level in the window appears low (Fig 04).
OPERATING THE COOLER cont.
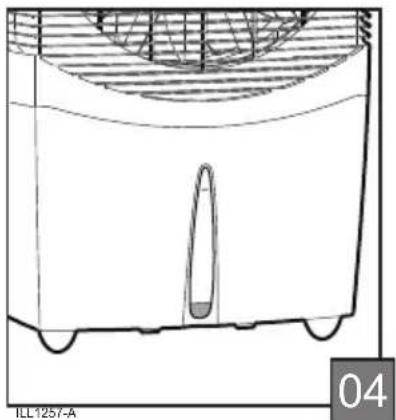
natural_image
Technical line drawing of a mechanical component with internal structure and mounting base (no text or symbols)-
Ensure that there is adequate ventilation in the room by leaving a door or window opposite the cooler.open
-
Plug the cord into the power outlet and turn the power on.
-
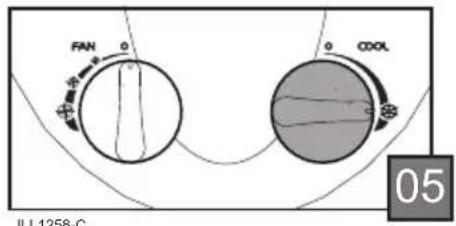
Turn the cool knob ( ⚙️) to the "cool" position (Fig 05).
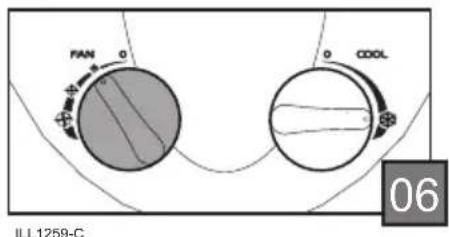
- Turn the fan ( ) on to the desired speed (Fig 06). Maximum cooling capacity will not be reached until the cooling pad is completely saturated. This may take several minutes.
-
If the desired comfort level is not achieved after this time, increase the fan speed. Lower fan speeds provide quieter operation.
-
If the room becomes too cool or too humid, turn the cool knob (※) off and/or turn the fan knob (⊕) to a lower setting.
-
To turn your cooler off, simply turn the fan knob (⊕) off.
Your cooler is fully operational when you receive it, and is ready to provide hours of efficient cooling.
As with many new items, your cooler may have a 'new' cooler odour when first used. This may persist for 4-8 hours, but will fade with use.
To assist with this process, you can drain the water tank and refill with clean water after approx. 12 hour.
How to get the best cooling performance
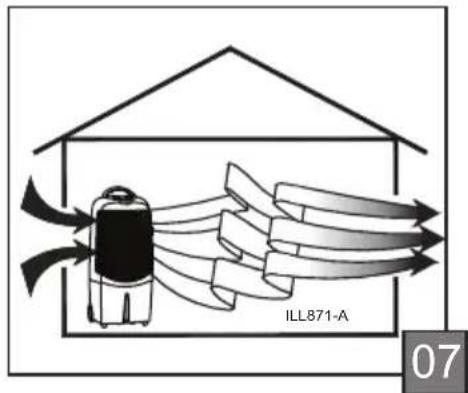
Place the cooler with its back near to an open window or door so it can draw in 100% fresh air.
Open another window or door on the opposite side of the room for "flow through" ventilation. This cooler will not cool properly in a closed room (Fig 7).
MAINTENANCE
Warning! Ensure the cooler is switched off and the plug is removed from the power socket before performing any maintenance.
To clean the exterior of the cooler, use a damp cloth and mild household detergent.
At the end of each season it is advisable to carry out some simple maintenance on your cooler. This will help maintain its high performance. Follow the next few steps.
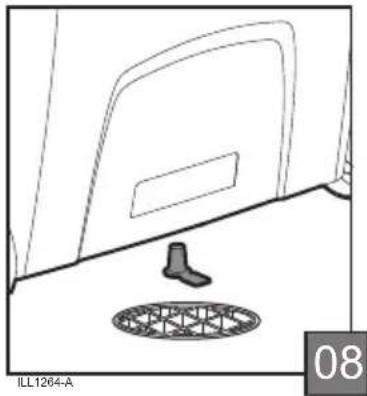
- Drain the water from the cooler. Move the cooler to a drain and remove the drain plug located on the bottom of the tank (Fig 08). When the cooler is empty replace the plug in the tank.
natural_image
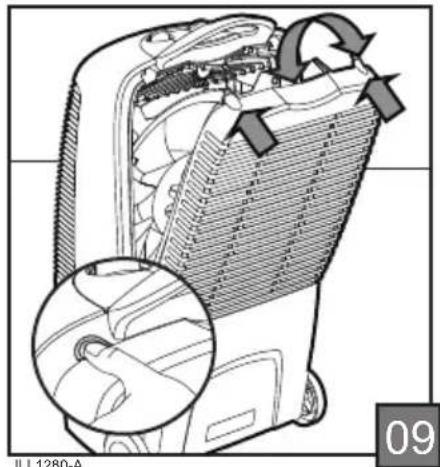
Technical line drawing of a car interior with a mesh drain and door (no text or symbols)- To gain access to the inside of the cooler, remove the rear panel by disengaging the clips at the top. Pivot the rear panel backwards and lift it off (Fig 09). Take care when removing the rear panel as water may drip from the pad secured to the inside of the panel.
natural_image
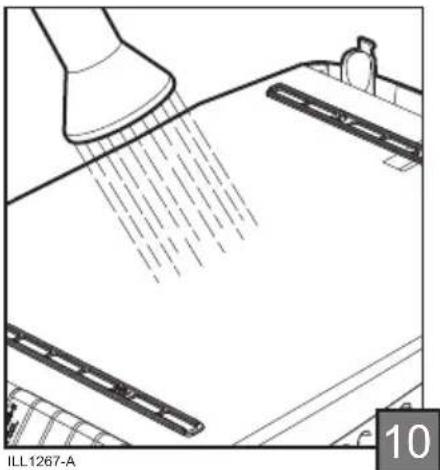
Technical illustration of a device interior with a magnified inset showing a hand seatbelt mechanism (no text or symbols)- Wash the pad with a gentle spray of water while it is still in the rear panel (Fig 10). Do not use a high pressure hose to clean the pad. Replace the pad if salt (a white coating) has built-up and reduced the cooler's performance.
natural_image
Technical line drawing of a spray gun spraying liquid onto a surface, with no visible text or symbols- For Climate Wizard coolers only, clean or replace the filter every three months, or sooner as required. The filter can be vacuumed or cleaned with water, however, to maintain maximum performance it is recommended that the filter be replaced. To remove the filter, disengage the filter cartridge clips (Fig 11) at the top rear of the cooler while lifting the cartridge up and outwards.

natural_image
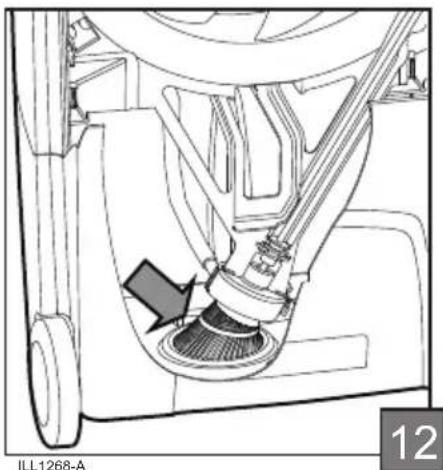
Illustration of a portable air conditioner unit with a magnified inset showing hand placement (no text or symbols)- Clean the tank and the perforated water strainer located in the tank (Fig 12). Remove any foreign matter. This will ensure that the strainer does not clog up during operation.
MAINTENANCE cont.
natural_image
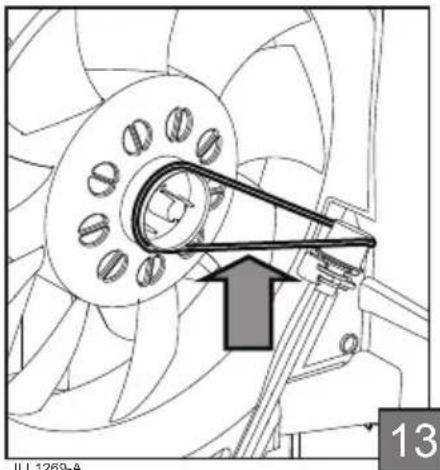
Technical line drawing of a mechanical assembly with no visible text or symbols- If the pump drive belt needs replacing simply remove it from the pulleys. Ensure that the belt is replaced in the same orientation as shown in the diagram (Fig 13) so that the pump rotates in the right direction.
natural_image
Technical line drawing of a mechanical assembly with a central component and directional arrow (no text or symbols)- Replace the rear panel by placing the bottom of the rear panel in the tank and pivoting it forward until the clips engage (Fig 09, Pg 5).
TROUBLESHOOTING
CONDITION POSSIBLE CAUSE REMEDY
| 1. Cooler will not operate at first. | 1.1 Power outlet or supply faulty. | 1.1.1 Switch on power outlet.1.1.2 Check power supply.1.1.3 Check power outlet. |
| 1.2 Wrong voltage. | 1.2.1 Check that power supply is the same as specified on the rating label. | |
| 2. Cooler stops operating after running for some time. | 2.1 Motor overheated (safety cutout). | 2.1.1 Wait 30-45 minutes for motor to cool down and it will restart automatically. If condition persists take the cooler to a service agent. |
| 3. No cooling. | 3.1 Cooling control is off. | 3.1.1 Turn cool knob to 'COOL'. |
| 3.2 Reservoir is empty or nearly empty. | 3.2.1 Fill with water again until water level indicator is at the 'FULL' position. Water capacity is 13 litres | |
| 3.3 Weather is too humid. | 3.3.1 Turn cool knob to '0' and use cooler as a fan only. | |
| 3.4 Aspen cooling pad and / or pump inlet screen blocked or dirty. | 3.4.1 Clean parts - see maintenance page 5. | |
| 3.5 Pump is not working properly. | 3.5.1 The pump is NOT a separate electric pump. It is connected to the fan motor and is driven mechanically. Turn the cooler off and completely drain the reservoir. Refill with water. Switch fan knob to high speed (3), turn the cool knob to 'COOL',run the cooler for 10-15 minutes non-stop. This will help dissolve and flush out the dirt. The cooling pad should now be wet. If the pad is not visibly wet and there is no cooling, have the cooler checked by a service agent. | |
| 3.6 Fan/pump not running fast enough on low speed. | 3.6.1 Check that supply voltage is up to correct level.3.6.2 Fan and pump will pick up speed slightly as the motor reaches normal operating temperature. Allow the cooler to run for 30-60 minutes and check again. If there is no improvement have the cooler checked by a service agent. | |
| 3.7 Pump drive belt faulty or broken. | 3.7.1 Replace drive belt as shown on page 6. | |
| 4. Cooler makes bad smell. | 4.1 Reservoir or cooling pad dirty. | 4.1.1 Drain reservoir and fill the cooler with clean water. If it still smells clean the reservoir and replace the cooling pad or proceed to 4.2.1. |
| 4.2 Water quality is poor. | 4.2.1 Add a little vanilla essence or perfume to the water. | |
| 5. Cooler makes scraping or rattling noise on new season start up. | 5.1 Dirt has accumulated inside pump. | 5.1.1 Proceed as in 3.5.15.1.2 Replace drive belt as shown on page 6. |
| 6. Water overflows from reservoir. | 6.1 Too much water in reservoir. | 6.1.1 Drain some water out (see page 5). |
| 7. Cooler will not operate at all. | 7.1 Electrical fault. | 7.1.1 Electrical parts must only be repaired and replaced by Authorised Service Agents. |
| 8. Damaged power supply cord. | 8.1.1 If the power supply cord of this appliance is damaged it must be replaced. Electrical parts must only be repaired and replaced by Authorised Service Agents. |
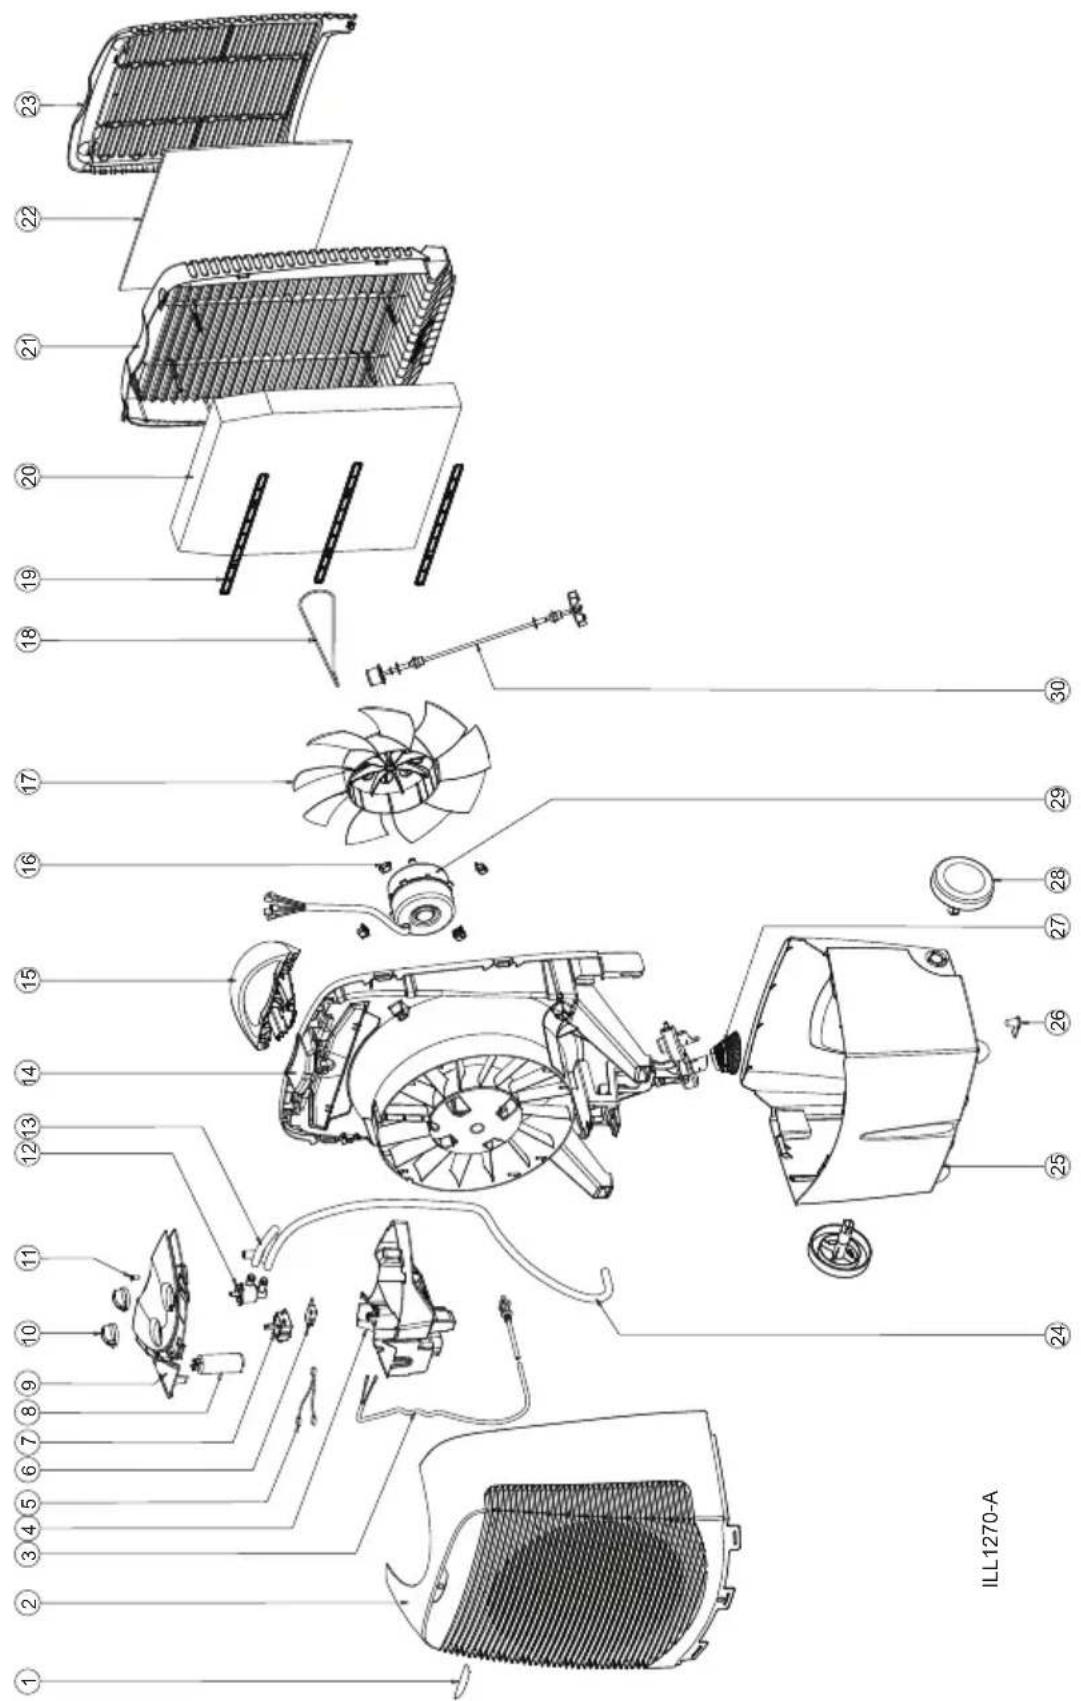
SPARE PARTS LIST
SPARE PARTS LIST When ordering spare parts, please specify the model / serial number and colour of your cooler.
| Item Description | |
| 21.2 | Rear Panel (Chillcel) |
| 22 | 3M Filter |
| 23 | Filter Cartridge |
| 24 | Hose to Pump |
| 25.1 | Tank (includes Wheels and Plug) |
| 25.2 | Tank (includes Flipout foot, Wheels and Plug) |
| 26 | Drain Plug |
| 27 | Strainer |
| 28 | Wheel |
| 29.1 | Motor 230V 50Hz (includes 4 Motor Rubbers) |
| 30 Pump Shaft Assembly | |
| Item Description | |
| 1 | Badge - Convair |
| 2 | Front Panel (includes Convair badge) |
| 3 | Plug and Cord Set Australia |
| 4 | Control Box |
| 5 | Switch Wire |
| 6 | Microswitch |
| 7 | Switch |
| 8 | Capacitor 3.2uf |
| 9.1 | Control Panel - Climate Wizard |
| 9.2 | Control Panel - Magicool |
| 10 | Knob |
| 11 Screw | |
| 12 | Water Valve Assembly |
| 13 | Hose to Spreader |
| 14 | Chassis |
| 15 | Handle |
| 16.1 | Motor Rubber - Round Motor (each) |
| 16.2 | Motor Rubber - Square Motor (each) |
| 17 | Fan |
| 18 | Drive Belt |
| 19 | Pad Retainer |
| 20 | Aspen Woodwool Pad |
| 20.1 | Chillcel pad |
| 21.1 | Rear Panel (Woodwool) |
When ordering replacement parts please quote Item Number, Description, Product Number and Serial Number.
EXPLODED VIEW
WARRANTY
In this warranty:
We or us means Seeley International Pty Ltd ABN 23 054 687 035, and our contact details are set out at the end of this warranty;
You means you, the original end-user purchaser of the Goods;
Supplier means the authorised distributor or retailer of the Goods that sold you the Goods in Australia; and
Goods means the product, unit, appliance or equipment which was accompanied by this warranty and purchased in Australia.
Our Goods come with guarantees that cannot be excluded under the Australian Consumer Law. You are entitled to a replacement or refund for a major failure and for compensation for any other reasonably foreseeable loss or damage. You are also entitled to have the Goods repaired or replaced if the Goods fail to be of acceptable quality and the failure does not amount to a major failure.
In addition to any rights and remedies that You may have under the Australian Consumer Law or any other law, subject to the terms of this warranty, We provide the following warranty:
-
If, during the first 24 months from the date of first retail purchase (Warranty Period), the Goods upon examination prove defective by reason of improper workmanship or material, We will repair at our nearest service centre or replace (at our option), the product or any part thereof without charge. Should we deem in our absolute discretion to replace the Goods, we may substitute any similar good even if it is not on our current price/equipment list. Further, Goods presented for repair may be replaced by refurbished goods of the same type rather than being repaired. Refurbished parts may be used to repair the Goods.
-
We are under no obligation to repair or replace the Goods under clause 1 if the Goods have not been used only for personal, domestic or household purposes or have not been operated and maintained in accordance with the instructions in the Owner's Manual. The addition of any third party device or the removal or the alteration of any of our components will void this warranty. In addition, the warranty granted under clause 1 does not apply to:
• Consumable components such as filters,
• Adjustments necessary due to misuse of the cooler,
- Normal user maintenance,
- Setting of controls,
- Transit damage, or
- Damage caused by user misuse, tampering, or failure to observe the care and special provisions in the instructions.
- The warranty granted under clause 1 is limited to repair or replacement only. As far as the law permits, We will not be liable for any consequential loss suffered through, or resulting from, the non operation, or ineffective operation of the Goods. The warranty granted under clause 1 does not cover damage to the Goods or other loss resulting from acts of God.
WARRANTY cont.
-
We are not responsible in any way for any failure and/or inadequate performance of the Goods which arises from or is connected to the use in the Goods of non-genuine spare parts. We strongly recommend that only spare parts supplied or approved by us are used in the Goods.
-
No other person, firm or corporation is authorised by us to offer or give on our behalf any other or greater warranty than that given under this warranty. The benefits conferred by this warranty are in favour of You and any person deriving title to the Goods through or under such person and are intended to be separate from and additional to all other rights and remedies that they may have in law in respect of the Goods.
-
In order to claim under the warranty granted under clause 1 you must:
(a) either:
(i) contact us within the Warranty Period on: 1300 650 644;
or
(ii) log a claim on our website www.seeleyinternational.com within the Warranty Period; and
(b) return the Goods to your nearest service centre (or to us at the address below) by prepaid freight within the Warranty Period, together with (i) the legible and unmodified proof of purchase, which clearly indicates the name and address of the original retailer, the date and place of purchase, the product name or other product serial number, and (ii) a copy of the completed Warranty Information page below. (If you choose to return the Goods to us, there is an additional requirement - they will also need to be accompanied by a covering letter which states your name and address and daytime telephone number, and the model and serial number of the goods.)
-
This warranty does not cover the cost of claiming under the warranty, it is your responsibility to cover all forwarding and return freight costs incurred in sending the Goods to and from your nearest service centre or us.
-
This warranty is only valid and enforceable in Australia.
Our liability under this warranty is limited to the extent permitted by law. That is, to the extent that it is fair and reasonable, if the Goods are not of a kind ordinarily acquired for personal, domestic or household use or consumption, your remedies associated with any failure or defect of the Product will be limited to:
(a) the replacement of the Goods or the supply of equivalent goods;
(b) the repair of the Goods;
(c) the payment of the cost of replacing the Goods or of acquiring equivalent goods;
(d) the payment of the cost of having the Goods repaired
and subject to the terms and conditions included in this warranty.
WARRANTY cont.
To ensure that service either pursuant to the above warranty or otherwise is readily available, we have established in all States authorised service centres, which are available to deal with service requirements.
For further information about your nearest service centre and other enquiries please call our Service Centre on:
1300 650 644
Please retain your receipt as proof of purchase. Every request for warranty must be accompanied by proof of purchase.
Complete the following for your records:
Serial Number:
Product: Convair
Model: □ Magicool NGP Climate Wizard NGPF
□ Magicool Compact NGP
Purchased from: ....
Date purchased: ...../...../.....
Service Department
Seeley International Pty Ltd
112 O'Sullivan Beach Road, Lonsdale, South Australia, 5160
Customer service centre in Australia: 1300 650 644
Website: www.seeleyinternational.com
It is the policy of Seeley International to introduce continual product improvement. Accordingly, specifications are subject to change without notice. Please consult with your dealer to confirm the specifications of the model selected.

Warranty Service
Australia 1-300-650-644
seeleyinternational.com
cenvair®