
CT70 - Mobile Phone SIEMENS - Free user manual and instructions
Find the device manual for free CT70 SIEMENS in PDF.


| Product Type | Mobile Phone |
| Brand | Siemens |
| Model | CT70 |
| Dimensions | 99 x 45 x 20 mm |
| Weight | 80 g |
| Battery Type | Li-Ion 700 mAh removable |
| Standby Time | Up to 250 hours |
| Talk Time | Up to 5 hours |
| Display | STN, 128x128 pixels, 65K colors |
| Camera | VGA (640x480) with digital zoom |
| Internal Memory | 1.8 MB |
| Memory Card Slot | No |
| Network | GSM 900/1800/1900 |
| Connectivity | Infrared, USB (cable) |
| Radio | FM radio with RDS |
| Polyphonic Ringtones | Yes, downloadable |
| Phonebook Capacity | 500 contacts |
| SMS Storage | 100 messages |
| USB Charging | No, dedicated charger |
| SAR Level | 0.6 W/kg (head) |
Frequently Asked Questions - CT70 SIEMENS
User questions about CT70 SIEMENS
0 question about this device. Answer the ones you know or ask your own.
Ask a new question about this device
Download the instructions for your Mobile Phone in PDF format for free! Find your manual CT70 - SIEMENS and take your electronic device back in hand. On this page are published all the documents necessary for the use of your device. CT70 by SIEMENS.
USER MANUAL CT70 SIEMENS
issued by Siemens Communications
Haidenauplatz 1
D-81667 Munich
© Siemens AG 2004
All rights reserved. Subject to availability.
Rights of modification reserved.
Siemens Aktiengesellschaft
www.siemens.com/c70
Designed for life
C70
CT70
Safety precautions 2
Overview of phone (schematic) ... 4
Display symbols 6
Getting started 8
Switch on/off, PIN entry ..... 11
General instructions ...... 12
Standard functions ...... 14
Security 15
Text entry 17
Calling 19
Default book 21
Addressbook 22
Phonebook 24
Call records 26
Camera 27
Message lists 29
SMS 30
MMS 32
Voice message/CB 36
Surf & fun 37
Setup 40
Fast access 49
Organiser 50
Extras 52
My stuff 57
Customer Care 58
Care and maintenance ...... 60
Product data 61
SAR – European Union (RTTE) ....62
SAR – International (ICNIRP) .... 63
Guarantee certificate (UK) ..... 64
Guarantee certificate (IRL) .....65
Menu tree 66
Index 72
Safety precautions
Information for parents
Please read the operating instructions and safety precautions carefully before use. Explain the content and the hazards associated with using the phone to your children.

Remember to comply with legal requirements and local restrictions when using the phone. For example, in aeroplanes, petrol stations, hospitals or while driving.

Mobile phones can interfere with the functioning of medical devices such as hearing aids or pacemakers. Keep at least 20 cm between phone and pacemaker. When using the mobile phone hold it to the ear which is further away from the pacemaker. For more information consult your doctor.

The ring tone (p. 42), info tones (p. 44) and handsfree talking are reproduced through the loudspeaker. Do not hold the phone to your ear when it rings or when you have switched on the handsfree function (p. 19). Otherwise you risk serious permanent damage to your hearing.

Do not use an optical magnifier to look at the activated infrared interface [Class 1 LED product (classification as per IEC 60825-1)].

Only use original Siemens batteries (100% mercury-free) and charging devices. Otherwise you risk serious damage to health and property. The battery could explode, for instance.

The SIM card may be removed. Caution! Small parts like this could be swallowed by young children.
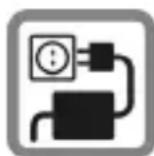
The mains voltage specified on the power supply unit (V) must not be exceeded. Otherwise the charging device may be destroyed.
The mains adapter must be connected to an easily accessible power socket to charge the battery. After charging the battery, the charger can only be switched off by unplugging it.

Do not open the phone. Only the battery (100% mercury-free) or SIM card may be replaced. You must not open the battery under any circumstances. Any other changes to this device are strictly prohibited, as they will invalidate the type approval required for operation of the unit.
Important:

Please dispose of unwanted batteries and phones as permitted by the laws in your country.

The phone may cause interference in the vicinity of TV sets, radios and PCs.

Use only Siemens original accessories. This will avoid potential risks to health or property and ensure compliance with all relevant regulations.
Improper use will invalidate the guarantee! These safety instructions also apply to Siemens original accessories.
Overview of phone (schematic)
① Call key
Dial displayed/highlighted phone numbers/names, take calls. Show last phone numbers dialled in standby mode.
② On/Off/End key.
- Switched off: press and hold to switch on.
- During a conversation or in an application: press briefly to finish.
- In menus: press briefly = go back a level. Press and hold = go back to standby mode.
• In standby mode: press and hold to switch off phone.
③ Joystick

Press the joystick down vertically to start an application or function.
In standby mode:

Open main menu.

Open user profiles.

Open Phonebook/Address-book.

Open Inbox.

Start the camera.
In lists, messages and menus:

Scroll up and down.

Back a level.

Has the same function as the right soft key.
During a call:

Set volume.

Call options.

④ Soft keys
The current functions of this key are shown in the bottom line of the display as Text/symbol (e.g. 📧).
⑤ Additional symbol to display which function pressing the joystick has in different situations (see p. 7).
① Integrated antenna
Do not obstruct the phone above the battery cover unnecessarily. This reduces the signal quality.
② Loudspeaker
③ Display
④ Infrared interface (IrDA)
⑤ Access to the Internet portal
⑥ Input keys
⑦ Ringtone
- Press and hold in standby mode: Switch all audible signals on/off (except alarm).
- Press and hold on incoming call: Switch off ringtone for this call only.
⑧ Key lock
Press and hold in standby mode: Switch key lock on/off.
⑨ Connection socket
For charger, headset, flash etc.
⑩ Connection for external antenna
⑪ Camera lens
⑫ Mirror (depending on phone model)


Display symbols
Display symbols (selection)
| Signal strength | |
| Charging | |
| Battery charge level, e.g. 50 % | |
| Phonebook | |
| Call records | |
| Surf & fun/Service provider portal | |
| Organiser | |
| Messages | |
| Camera | |
| Extras | |
| My stuff | |
| Setup | |
| All calls are diverted | |
| Ringer off | |
| Short ring (beep) only | |
| Ringer only if the caller is stored in the Phonebook. | |
| Alarm set | |
| Keypad locked | |
| Auto answer feature on | |
| T9Abc | Text input with T9. |
| Activated and available | |
| Registered |

Temporarily interrupted

Browser offline


Browser online


 | SMS memory full |
 | MMS memory full |
 | Phone memory full |
 | No network access |
 | Missed call |
| Delete assistant |

Message symbols (selection)
| Unread | |
 | Read |
 | Draft |
 | Sent |
 | MMS not sent |
 | MMS received |
 | MMS read |
 | MMS with DRM contents (p. 12) |
 | Voice mail received |
| Camera symbols | |
| Brightness | |
| Zoom factor | |
| White balance | |
| Flash connected | |
| Joystick symbols | |
| Camera | |
| Call/accept call | |
| Menu | |
| Zoom | |
| OK | |
Getting started
Insert SIM card/battery
All data for your connection is saved on your SIM card.
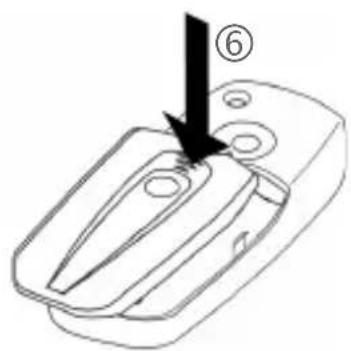
Press grooved area ①, then push cover in the direction indicated by the arrow ②.

Insert SIM card into the slot ③ with the contact surface facing downwards.


Insert the battery sideways into the phone ④ and then press it downwards ⑤.
natural_image
Technical line drawing of a mechanical component with an arrow pointing to a feature (no text or symbols present)Push cover onto the side hooks ⑥, until it clicks into position.
Additional information
Switch the phone off before opening it. Only 3V SIM cards are supported. Please contact your service provider if you have an older card.
Charge battery
Charging procedure
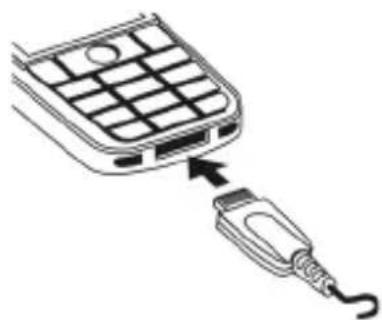
The battery is not fully charged when delivered. Plug charger cable into the bottom of the phone, plug power supply unit into a mains power socket and charge for at least two hours.
natural_image
Line drawing of a mobile phone with a cable inserted into the socket (no text or symbols)
Display during charging.
Charging time
An empty battery is fully charged after about 2 hours. Charging is only possible within a temperature range of 5 °C to 45 °C. If the temperature rises/falls 5 °C above/below this, the charge symbol flashes a warning. The mains voltage specified on the power supply unit must not be exceeded.
Operating times
The operating time depends upon the respective conditions of use. Extreme temperatures considerably reduce the phone's standby time. Avoid placing the phone in the sun or on a heater.
Talktime: 100 to 300 minutes Standby time: 60 to 250 hours
Charge icon not visible
If the battery has been discharged fully, the charge icon is not immediately visible when the power supply is plugged in. It will appear after up to two hours. In this case the battery is fully charged after 3 to 4 hours.
Only use the plug-in power supply unit supplied!
Display while in service
Charge level display during operation (empty – full):

A beep sounds when the battery is nearly empty. The charge level of the battery is only displayed correctly after an uninterrupted charging/discharging cycle. You should therefore not remove the battery unnecessarily and where possible not finish the charging process prematurely.
Additional information
The power supply unit heats up when used for long periods. This is normal and not dangerous.
If the battery is removed for longer than 30 seconds, the clock must be reset.
Changing CLIPlt™ covers
You can use CLIPlt™ covers (accessories) to personalise the appearance of your phone as you wish.
Before changing the keypad or faceplate, switch the phone off.
Dismantle the phone
Take off the battery cover and remove the battery (see p. 8).
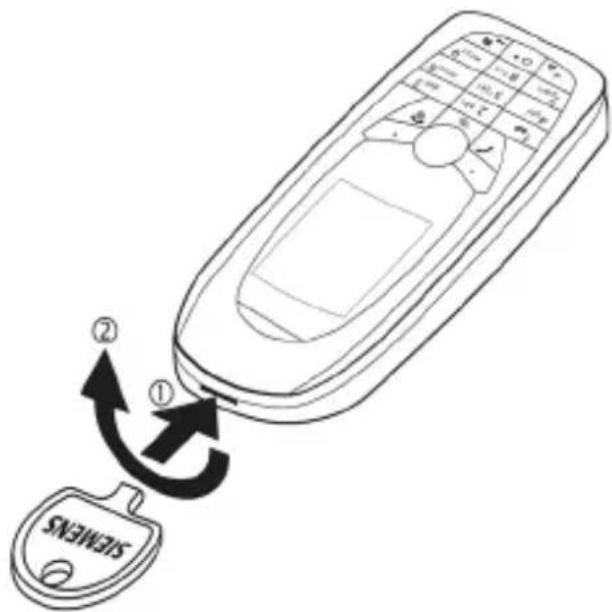
To remove the faceplate, insert the key into the opening provided, apply slight pressure ① and turn it at the same time ② to open the lock.
Do not use the key to lift the phone as this could damage the faceplate.
Assemble the phone
First insert the keypad mat ③ into the faceplate. Ensure that it is sitting exactly in place.

*) If there are small pins at the bottom of the faceplate: position the tabs on both sides of the keypad mat precisely on these pins. before carrying out step ④.
Insert the phone into the bottom of the upper faceplate ④ and then push it in carefully until it clicks into position ⑤. Finally, replace battery cover (see p. 8).

Switch on/off, PIN entry
Switching phone on/off

Press key and hold.
Entering the PIN
The SIM card can be protected with a 4 to 8-digit PIN.

Enter the PIN using the number keys. The characters **** appear to ensure nobody can read your PIN on the display. Correct with ◀C.

Confirm by pressing the joystick. Logging on to the network will take a few seconds.
Additional information
Change PIN....p. 15
Clear SIM card barring ......p. 16
Emergency number (SOS)
Only to be used in real emergencies!
By pressing the soft key SOS you can make an emergency call on any network without a SIM card and without entering a PIN (not available in all countries).
Switching on your phone for the first time
Time/date
Set the clock correctly on a one-off basis when getting started.

Press this key, then select Change.

First enter the date (day/month/year), then the time (24 hours, including seconds).

Press. The time and date are updated.
Time zones
Set the time zone for your area.

Select the city in the desired time zone from the list ...
Set ... and set it.
Copy SIM addresses
The first time the SIM card is inserted, the entries on it can be copied to the Addressbook. Please do not interrupt this procedure. During this time do not accept incoming calls. Follow the instructions in the display.
You can also copy data from the SIM card at a later time (p. 25).
General instructions
Standby mode
The phone is in standby mode and is ready for use when the name of the service provider appears on the display.

By pressing and holding, you can return to standby mode from any situation.
Signal strength

Strong receiving signal.

A weak signal reduces the call quality and may lead to loss of the connection. Change your location.
Digital Rights Mgmt. (DRM)
Remember that your telephone has Digital Rights Management. The use of downloaded pictures, sounds or applications can be restricted by the suppliers, e.g., copy protection, use for a limited period of time only, number of times it can be used etc.
Main menu
The main menu is displayed graphically with symbols:

Call up from standby mode.

Select the application symbols.

Start an application.
Main menu options
Options
Open menu.
Different functions are available depending on the context:
| Big letters | Select between two font sizes. |
| Illumination | Set display illumination to brighter/darker. |
| Help | Display a help text. |
User guide
Menu controls
The steps needed to reach a function are shown in a condensed form in this user guide, e. g., to display record of missed calls in condensed form:

→ 📋 → Calls missed
This comprises the following steps:

Open main menu.
Select (highlight) 📋 by moving the joystick upwards, then press vertically down on the joystick before using the joystick to highlight Calls missed.
Select Confirm. The record is opened.
Menu speed dialling
All menus are numbered so that a function (such as writing a new SMS) can be selected directly from standby mode by entering a number:

Press to display the main menu. Then press

for Messages, then
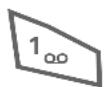
for Create new, then

for SMS text.
Symbols
The following symbols are used to explain operation:

Enter numbers/letters.
On/Off/End key
Call key
Soft keys
Displays a soft-key function.
The joystick can be moved in 5 directions.

natural_image
Abstract geometric shapes including concentric circles, arrows, and hexagons with no text or symbolsPress the joystick vertically, e.g., to call up the menu.
Press the joystick in the direction indicated.
Function dependent on service provider; special registration may be required.
Standard functions
Option menus
List of functions repeatedly appearing in options menus.
Options Open menu.
| Edit | Open the entry to edit. |
| View | Display entry. |
| Delete/Delete all | Delete entry / delete all entries after confirmation. |
| New entry | Create new entry. |
| Send... | Select transmission service and medium for sending. |
| Reply/Reply to all | The sender becomes the recipient. The received text is transferred into the new message. |
| Save | Store entry. |
| Save to [IMAGE] | Save recipients in the current address directory. |
| Sort | Set sort criteria (according to alphabetical order, type, time). |
| Text input (p. 17) | T9 preferred:Activate/deactivate T9 input.Input language:Select language for text. |
| Rename | Rename selected entry. |
| Capacity | Display memory capacity. |
| Attributes | Display properties of the highlighted object. |
| Help | Display help text. |
Highlighting mode
Highlight one or more entries in order to perform a function on it/them.
Options Open menu.
Mark Activate mode.
Mark Highlight a non-highlighted entry.
Unmark Remove the highlighting from a highlighted entry.
Additional highlighting functions:
| Mark all | Highlight all entries. |
| Unmark all | Delete highlighting on all highlighted entries. |
| Delete marked | All selected entries are deleted. |
Security
The phone and SIM card are protected against misuse by several security codes.
Keep these security codes in a safe place where you can access them again if required.
Codes
| PIN | Protects your SIM card (personal identification number). |
| PIN2 | This is needed to set the charge detail display and to access additional functions on special SIM cards. |
| PUK PUK2 | Key code. Used to unlock SIM cards after the wrong PIN has been entered repeatedly. |
| Phone code | Protects your phone. Must be entered at the first security setting. |


PIN control
The PIN is usually requested each time the phone is switched on. You can deactivate this feature but you risk unauthorised use of the phone together with your SIM card. Some service providers do not permit deactivating the control.
Select Press.

Enter PIN.

Confirm input.
Change PIN
You can change the PIN to any 4 to 8-digit number you find easier to remember.

Enter current PIN.

Press.

Enter new PIN.

Repeat new PIN.

→ → Security
→Codes
→ Select function
Change PIN2
(Display only if PIN2 is available). Proceed as with Change PIN.
Chg.phonecode
(Change phone code)
You define the phone code (4 to 8 digits) when you call up a phone-code protected function for the first time (e.g. Direct call, p. 46). It is then valid for all phone-code protected functions. Following the third unsuccessful attempt, access to the phone code and the functions that use it is denied. If this occurs, contact the Siemens Service (p. 58).
Clear SIM card barring
If the PIN is entered incorrectly three times, the SIM card is barred. Enter the PUK (MASTER PIN) provided by your service provider with the SIM card in accordance with the instructions. If the PUK (MASTER PIN) has been lost, please contact your service provider.
Preventing accidental activation
Even if PIN control is deactivated (p. 15) confirmation is required to switch on the phone.
This prevents accidental activation of the phone, e.g. when you are carrying it in a bag or when you are travelling in an aircraft.

Press and hold.

Press. The phone switches on.

Press this key or take no action. The phone does not switch on.
Text entry
Text entry without T9
Press number key repeatedly until the required letter appears.
Example:

Press once briefly to write the letter a, twice to write b etc. Press and hold to write the number.

Press briefly to delete the letter before the cursor; press and hold to erase the whole word.

Move the cursor (forwards/back).

Press briefly: Swap between abc, Abc, T9abc, T9Abc, T9ABC, 123.
Press and hold: All input-variants are displayed.

Press briefly: Special characters are shown.
Press and hold: Open input menu.

Press once/repeatedly:
$$ .,?!" 0 + - () @ /: _ $$
Press and hold: Writes 0.

Writes blank. Press twice = line break.
Special characters

Press briefly.
| 1) | ¿ | i | - | ; | . | , | ? | ! |
| + | - | " | , | * : | / | ( | ) | |
| α | ¥ | $ | £ | € | @ | \ | & # | |
| [ | ] | { | } | % ~ < = > | ||||
| | | ^ | ` | § | Γ | Δ | Θ | Λ | ≡ |
| Π | Σ | Φ | Ψ | Ω |
1) Line break

Navigate to characters.
Select Press.
Text entry menu

Press and
hold:
Text format (SMS only), Input language, Mark, Copy/Insert
Text input with T9
"T9" deduces the correct word from the various key inputs.

Activate/deactivate T9.
Select input language
Options Open text menu.
Select Text input, then select Input language.
Select Confirm.
Write with T9
It is best if you finish a word without looking at the display.
You simply press the keys where the relevant letter is located once.

A blank space or moving to the right ends the word.
Do not input special characters such as Ä. Use standard characters only e.g.A.T9 will do the rest.
T9 word suggestions
If several options are found in the dictionary for a word, the most probable is displayed first.

Press. If this word is also incorrect, press

Keep pressing until the correct word is displayed.
Add a new word to the dictionary:

Select and enter word
without T9. Then Save.
Correct a word
Words written with T9:

Move left or right, word by word, until the required word is highlighted.

Scroll through the T9 word suggestions again.

Deletes the last character in a word and displays a new possible word.
Additional information

Press briefly: Switch between: abc, Abc, T9abc, T9Abc, 123.
Press and hold: All input modes are displayed.

Press and hold: Opens input menu (p. 17).
T9® Text Input is licensed under one or more of the following:
U.S. Pat. Nos. 5,818,437, 5,953,541, 5,187,480, 5,945,928 and 6,011,554;
Canadian Pat. No. 1,331,057;
United Kingdom Pat. No. 2238414B;
Hong Kong Standard Pat. No. HK0940329;
Republic of Singapore Pat. No. 51383;
Euro.Pat. No. 0 842 463 (96927260.8)
DE/DK, FI, FR, IT, NL, PT, ES, SE, GB;
and additional patents are pending worldwide.
Text modules


Text modules can be stored in the phone for adding to your messages (SMS, MMS).
Calling

Enter the number (always with dialling code / international dialling code).
< C A short press clears the last digit, a long press clears the entire phone number.

Dial phone number.
End call

Press the End key briefly.
Set volume

Press upwards / downwards to regulate the volume.
Redial previous numbers

Press twice. The phone number last called is redialed.
Call up the redial list:

Press once.

Pick out a phone number, then to dial press the ...

... key.
Auto. redial
Auto dial
The phone number is dialled up to 10 times at increasing time intervals.
Reminder
Prompt A beep reminds you to redial the displayed phone number after 15 minutes.
Accept call

Press.
Reject call

Press
briefly.
Additional information
Accept the call before bringing the phone to your ear in order to avoid ear damage caused by the ringtones.

Store phone number in the Addressbook/Phonebook.
Handsfr.
Playback using loudspeaker (handsfree talking).
Always switch off "handsfree talking" before holding the phone to your ear. This will avoid damage to your hearing.

Press and hold to switch microphone off.
International dialling codes

Press and displayed.
hold un
Country
Select country.
Call options
Options
Functions which are only available during the call are offered.
Swap between two calls

Establish a second connection
Options Open menu
Hold Hold current call, then dial the new phone number.
Options Open menu.
Swap Swap between calls.
Incoming calls during a call
You will hear the "call waiting" tone and you can now:
- Accept the waiting call in addition to the first
Swap Accept the call and put the current call on hold.
- Reject the waiting call
Reject Reject the call, or divert it to the mailbox via Divert.
- Accept the waiting call and end the current call

End call
Accept new call.
End call(s)

Press the End key.

Resume held call.
No End all calls.
Conference Ⓜ!
You call up to 5 conference participants one after the other. Once you have established a connection:
Options
Open menu and select Hold. The current call is put on hold.

Now dial a new number. When the new connection is established ...
Options
... open menu and select Conference. Repeat until all participants are connected.
End

All calls in the multiparty conversation are ended when the End key is pressed.
Tone sequences (DTMF)
Enter tone sequences (digits) for remote inquiries to an answering machine.
Options
Open menu and select Send DTMF.
Default book


→ Select function.
Show entries
The entries in the default book (Addressbook or Phonebook) are shown.

Select a name with the first letter and/or scroll.
New entry
Create new entry.
Addressbook (see also p. 22)
Phonebook (see also p. 24)
Default book
You can set which directory you prefer to use.
The selected default book is opened in standby mode with the joystick.

Open Phonebook or Addressbook
Addressbook
A lot of data can be recorded in the Addressbook for each entry, and additional functions (e.g., pictures, birthdays) can be used.
Phonebook
The Phonebook is located on the SIM card. Only one phone number can be entered per entry. The Phonebook on the SIM card can easily be transferred into a different phone.
Business card
Create your own business card to send to a different GSM-phone. If no business card has been created yet, you will be asked for your input.

Move from field to field to enter your details.
Save Press.
Additional information
The contents of the business card and the Addressbook entries correspond to international standards (vCard).

Copy numbers from Addressbook/Phonebook.
Groups
See p. 23.
See p. 25.
Addressbook
The Addressbook can store up to 1000 entries, each with a variety of phone numbers and additional address details. These entries are managed separately from those in the Phonebook in the phone memory.
New entry
The Addressbook is set as standard:

Open Addressbook (in standby mode).

Display input fields.

Select required input fields.

Fill in input fields.
At least one name must be entered. Always enter phone number with prefix.
Special input fields:
Group: Allocation to a group (p. 23).
Address: Extension to enter the complete address: Street:, Post code:, City:, Country:
Inst. message
Information if the entry is being used as a contact for Inst. Message or Walky Talky:
Nickname:, Walky Talky ID:, Walky Talky type:, WV user ID:, ICQ number:, AIM screen name:
Birthday: After activation, you can enter the date of birth.
Reminder: The telephone reminds you one day before the birthday at the time entered.
Picture: Assign a picture to the entry. It is displayed if you are called by a corresponding phone number.
All fields/Reduced fields
Displays the required input fields.
Save Save the entry.
Additional information

Temporary switch to Phonebook.
Display/find entry

Open Addressbook (in standby mode).

Select required entry.

Display.
Display options
Options Displays functions for the selected input field.
Change entry

Open Addressbook (in standby mode).

Select entry and press Edit.

Select input field and, if applicable, press Edit.

Make changes, then Save.
Call entry

Open Addressbook (in standby mode).

Select a name with the first letter and/or scroll.

The number is dialled.
If there are several numbers in the Addressbook entry, these are offered for selection.
Addressbook options
Different functions are available, depending on the context:
Options Open menu.
| Move to ... | Copy current entry or highlighted entries to a group. |
| Copy to SIM | Copies name and number to the SIM card (Phonebook). |
| Import | Set up readiness to receive for an Addressbook entry via IrDA (p. 45) or SMS (p. 30). |
| (For standard functions, see p. 14) | |
Groups
Nine groups are specified in your phone to enable you to arrange your Addressbook entries clearly. You can rename seven groups.

Open Addressbook (in standby mode).

Select group.
Ringtone for group
See p. 42.
Phonebook
Entries in the Phonebook (on the SIM card) are managed separately from the Addressbook.
New entry
If the Phonebook has been selected as standard:

Open Phonebook (in standby mode).

Select

Display input fields.

Navigate between and fill in the input fields.
Phone number:
Always enter phone number with dialling code. An entry is not saved without a phone number.
Name:
Enter first and/or last names.
Group:
Default No group
Important phone numbers are combined together in a group (VIP).
Location:
Default SIM
Special SIM cards can save phone numbers in a protected area (Protected SIM) (PIN2 required).
Record number:
Is automatically assigned to every entry. The phone number can be dialled with your entry number.
Save Press to store the new entry.
Additional information

Temporary switch to Addressbook.

International dialling code......p. 19
Call (search for an entry)

Open Phonebook.

Select a name with the first letter and/or scroll. Phone number is dialled.

Change entry

Select entry in Phonebook.
Edit Press.

Select desired input field.

Make changes.
Save Press.
Phonebook options
The following functions are available, depending on the current situation.
Options
Open menu.
| Copy into | Copy all highlighted entries to the Addressbook. |
| Copy all to | Copy all entries to the Addressbook. |
| Delete all | Delete entire Phone-book. PIN-protected. |
| Import | Set up readiness to receive for a Phonebook entry via IrDA (p. 45) or SMS (p. 30). |
| (For standard functions see p. 14) | |

Open Phonebook and select
Enter "own" phone numbers in Phonebook (e.g., fax) for information.
Display the phone numbers saved in the VIP group.
Entries stored in the Phonebook on the SIM card can also be used on other GSM phones.

On special SIM cards, phone numbers can be stored in a protected location. PIN2 is required for editing.
/
There might be phone numbers saved in your Phonebook that have been provided by your service provider.
Call records
Phone numbers are saved to make it easier to redial them.


Select record.

Open record.

Select phone number.

Dial phone number.
10 phone numbers can be stored in each call record:
Calls missed

The phone numbers of calls that you have received but not answered are stored for call back purposes.

Missed call.
Calls received
Accepted calls are listed.
Calls dialled
Access to the last numbers dialled by you.

Fast access in standby mode.
Delete records
The records are deleted.
Time/charge
You can display the charges and duration during a call.

Last call:, Incoming calls:, Outgoing calls:, All calls:, Remaining units:
Reset Reset the selected setting.
Charge sett.

Open menu.
Personal rate
Enter the currency as well as the charge per unit and time.
Account limit
Special SIM cards allow you or the service provider to define a credit limit or a period after which the phone is barred for outgoing calls.
Auto display
Call duration and charges are displayed automatically.
Camera
You can view photos recorded on the integrated camera immediately and
- use the photo as a background image, logo, a switch on/off animation or a screensaver.
- send the photo via MMS.
Switch on

Or
Start camera in standby mode.
The current (preview) image is displayed. You will see the following in the first line from left to right:

Brightness

Zoom factor

White balance

Flash connected.
The number of photos that can still be taken in the selected resolution is displayed in the top right-hand corner of the preview image.
This number varies considerably from motif to motif (storage space required). Information about the selected resolution is located under the preview image.
Record

Takes a photo.

Displays the preview image of the next photo.
The photo is saved with a name, the date and the time. To enter the name, see Setup in the options menu (p. 28).
Settings prior to taking a photo:

Sets the brightness.

Sets the zoom factor.
Image resolution
It is possible to set the quality of the image regardless of the preview image resolution, e.g.
Premium
Medium
Wallpaper
The resolution may decrease depending on the selected digital zoom.
Flash (Accessories)
If the flash is active, this is shown by a symbol in the display. The flash is charged constantly while it is connected to the phone and the camera is activated. This reduces the stand-by time.

This symbol appears when the flash is being loaded.
For settings, see options menu.
Camera options
The following functions are available, depending on the current situation.
Options Open menu.
| Settings | • Name for recordings• Image resolution |
| Pictures | The last picture taken is shown. |
| Use flash | Choose between:Automatic, Off,Red eye red. |
| Self timer | The photo is taken approx. 15 seconds after triggering. For the last 5 seconds, you will hear a signal tone each second. |
| White balance | Choose between:Automatic, Indoor, Outdoor |
| (For standard functions see p. 14) | |
Additional information

There is insufficient storage space available. Start the delete assistant to delete specific data (p. 44).
Message lists
Inbox
The central inbox folder contains all messages which have been received. The entries are marked with a symbol to indicate their type and status (p. 6).
To call up the central inbox folder, e.g. if a new SMS has been received:

Press the soft key beneath the symbol.
When you open an entry, the relevant application also starts. After a set time (Options), entries which have already been read and opened are only displayed in the message-related incoming lists.
You will find the following message types in the inbox folder:: SMS, MMS
System messages:
Message about MMS, Missed alarm, Missed appts., Calls missed, WAP push, Voice message
Data items:
Ringtones, Pictures, calendar entries, Notes and Business card.
Message lists
All SMS and MMS are each displayed in four lists.

flowchart
graph LR
    A(( )) --> B(( ))
    B --> C["Inbox"]
    C --> D["Select message type."]
List of received messages.

flowchart
graph LR
    A["○"] --> B["→"]
    B --> C["Draft"]
    C --> D["Select message type."]
List of saved drafts.

flowchart
graph LR
    A["Received"] --> B["Envelope"]
    B --> C["Unsent"]
    C --> D["Select message type."]
List of messages not yet successfully sent.

flowchart
graph LR
    A["○"] --> B["✉"] --> C["Sent"]
    B --> D["Select message type."]
List of sent messages.
Options Call up the function menu to process the messages.
Inst. message

This function is not offered by all service providers. Please contact your service provider for more information. You will find a description in the comprehensive user guide on the Internet at:
www.siemens.com
SMS
You can transmit and receive very long messages (up to 760 characters) on your phone. They are automatically composed of several "normal" SMS messages (note higher charges). You can also insert simple pictures and sounds in an SMS.
Write/send


→ Create new
→ SMS text

Enter text (see also p. 17).
Options Text creation functions.


Start sending procedure.
Select phone number from the Phonebook/Addressbook or enter it.

The SMS is transmitted to the service centre to be sent.
Special functions
Picture&sound
Send simple pictures and tones with or without accompanying text. Remember that these may be protected (DRM, p. 12).
With the text input field open:
Options
Open menu.

Select Picture&sound.
The menu contains: Fix animations, Fix sounds, Own animat., Own pictures, Own sounds

Select list.

Confirm. The first entry of the selected section is displayed.

Scroll to entry required.
For Fix animations/Fix sounds:

The selection is added to the SMS.
For Own animat., Own pictures, Own sounds:

The selection is dis- played/played back.

The selection is added to the SMS.
SMS archive

→ SMS archive
The list of SMS messages stored in the phone is displayed.
SMS to group
You can send an SMS message as a "circular" to a recipient group.
Options Open menu.
Send Select.
Group The list of groups is displayed.

Select group.
Open group and highlight all/individual entries.

Transmission is started after a security prompt.
Read

Arrival of a new SMS announced in the display.
Inbox is opened. It offers you a quick overview of the messages that have been received.

To read the SMS, press the joystick.

Scroll through message line by line.

If this symbol flashes, the SIM memory is full. Delete or archive messages.
Reply
You can answer the currently open SMS immediately. The newly added text is placed above the received text.

Functions for a direct reply.
Setting
SMS signature

→ Message setup → SMS → SMS signature
You can enter a "signature" with a maximum of 16 characters. This signature will then be attached to each SMS except for a Reply and when changes are made to an existing SMS.
SMS profiles

→ Message setup → SMS → SMS profiles
Up to 5 SMS profiles can be set. The transmission characteristics of an SMS are defined in these.
Activate profile

Select profile.

Activate.
Set profile

Select profile and open with Edit to process it.
MMS
The Multimedia Messaging Service enables you to send texts, pictures and sounds in a combined message to another mobile phone.
Depending on your telephone setting, you will either receive the complete message or only a notification with sender details and size. The actual MMS can then be downloaded manually later.
Create
An MMS consists of the address header and the content. This may consist of a series of pages. Each page may contain a text, a picture and a sound. Remember that pictures and sounds may be protected (DRM, p. 12).
Create standard MMS


→ Create new
→ MMS
First select an object for processing to be added to the first page of the MMS:

Display picture functions: Insert picture, Camera

Display sound functions: Insert sound, Record

Display text functions (see also p. 17).
Options
Options Open menu.
| Send | Send MMS. |
| Preview | Playback entire MMS on the display. |
| Picture... | See above. |
| Sound... | See above. |
| Text... | See above. |
| Page... | Add page: Insert new page behind current one.Delete page: Delete current page.Page list: Display available pages.Timing: Enter the lifespan of a page in seconds. |
| Msg. details | Enter sending parameters (see next chapter). |
| Save as templ. | Save created MMS as a template. See also below: |
| Layout | Select one of four possible layouts:Text above, beneath, beside (on left or right of) picture. |
| Colour... | Select the colours for:Picture backg.Text backg.Text colour |
| (For standard functions see p. 14) | |
Templates


→ MMS templates
MMS templates are saved MMSs with no address. They can be sent as new MMSs or used as part of a new MMS. A maximum of 10 templates can be saved.
Create templates by writing a new MMS or using an MMS which you have already received.
Options Open menu and select Save as templ.
Send
The page(s) of the new MMS has (have) already been created. The MMS is displayed.

Open address entry.

Subject: Enter a brief description of the MMS.
Send to: Enter one or more phone number(s).
Size: Display the MMS size.

Start sending procedure. The MMS is sent after confirmation.

More: Provide additional address fields.
Sending options
Options Open menu.
| Send | Send MMS. |
| Play | Play entire MMS on the display. |
| Edit | Display object selection to change an object. |
| Add recipient | Add recipient from the current address directory. |
| Delete recip. | Delete individual recipient. |
| Add attachm. | Add attachment:FileBusiness cardAppointmentPictureSound |
| Page list | Display MMS pages for viewing and/or changing. |
| Save as templ. | Save created MMS as a template. |
| (For standard functions see p. 14) | |
Receive

Arrival of new MMS/notification announced on display.

Start reception. Depending on the setting, (p. 35) the MMS/notification is transferred into the central incoming message list (Inbox).
In order to receive the complete MMS subsequently, the notification must be opened.
Receive Start transmission.
Read
An MMS has been received in full.

Start playback.
Key functions for playback:

To the next page.

Press briefly once to return to the start of the current page; press briefly twice to return to the start of the previous page.

Set volume.

End.
The message details are displayed when the MMS is complete.
Subject: Description of the MMS.
From: Information about the sender.
Size: Size of the MMS in KB.
More: Additional input fields.
Setting

→ Message setup → MMS
→ Select function.
MMS profile:
Six MMS profiles can be set. The sending properties are specified in these profiles. In most cases, the setting has already been made. If necessary, please check with your service provider.

Select profile.
Open to edit the profile.
Setting options
Options Open menu.
Activate, Rename, Change sett.
User settings
Set the MMS dispatch to suit your requirements:
| Delivery report: | Request delivery confirmation for sent messages. |
| Default priority: | Send priority:Normal, High, Low |
| Page duration: | Length of display for an MMS page (Manual, Automatic). |
| Expiry time: | Select the period in which the service centre is to try to deliver the message:Manual, 1 hour,3 hours, 6 hours,1 day, 1 week, Maximum** Maximum period that the service provider permits. |
| Retrieval: | Receive complete MMS or only notification of arrival.AutomaticReceive complete MMS immediately.Auto.homenetReceive complete MMS immediately in home network.ManualOnly the notification is received. |
| Creation mode: | Free, Restricted, WarningCan be used to receive a warning message or to limit the size of the message. |
| Size indication: | Set a max. message size and how it is to be dealt with. |
Voice message/CB
Voice message

→ Setup → Voice message
If you have a mailbox, a caller can leave a voice message for you
- if your phone is switched off or not ready to receive,
- if you do not want to answer,
• or if you are making a phone call.
You may have to register for this function and set it manually.
Setup 🔗!
The service provider supplies you with two phone numbers:
Save mailbox number
Call this phone number to listen to your voice messages.

→ Setup → Voice message
Enter phone number and confirm with OK.
Save call divert number
Calls are diverted to this phone number.

→ Phone setup → Divert → e.g. Unanswered → Set
Enter phone number and register it at the network with OK.
Listen to message

A new voice message can be announced as follows, depending on the service provider:

Symbol plus beep.
Or

Notification via SMS.
Or
You receive a call with an automatic announcement.
Call your mailbox and play the message(s) back.

Press and hold (if necessary enter mailbox number once). Confirm with OK and Mailbox depending on your service provider.
CB services

→ Setup → CB services
Some service providers offer information services (info channels, Cell Broadcast). If reception is activated, you will receive messages on the activated topics in your Topic list.
Surf & fun
Get the latest information from the Internet that is specifically adapted to the display options of your phone. In addition, you can download games and applications to your phone. Internet access may require registration with the service provider.
Internet


Internet
The browser is activated with the pre-set option as soon as you call up the function (Browser settings, S. 38; may be specified/pre-assigned by service provider).
Browser menu
Options Open menu.
| Homepage | Call up the pre-set homepage or the current profile (p. 38). |
| Bookmarks | Display bookmarks stored in the phone; save bookmark. |
| Go to... | Enter a URL. |
| Reload | Reload current page. |
| Show URL | Display the URL of the page currently loaded for sending via SMS/e-mail. |
| History | Display last Internet sites to be visited. |
| Disconnect | Disconnect the Internet. |
| File | Save object on the current page or save the complete page, display saved pages. |
| Setup | Browser settings (p. 38). |
| Exit browser | Close the browser. |
End connection

Press and hold to clear down the connection and close the browser.
Navigation in the browser

- Select a link.
- Settings, status on/off.

- Press briefly: back a page.
- One input field/link forward/back.
- Scroll one line.
Display symbols in the browser

Connect

No network

Network

GPRS online
Enter special characters

Select important special characters.
Browser settings


→ Internet
Options Open menu.
Setup Select.
| Browser | Set start option as well as handling of pictures and tones and send options. |
| Profiles | The list of profiles is displayed for activation/setting (see below). |
| Protocol parameters | Set protocol parameters, push messages and abort time as well as handling of Cookies. |
| Security | Set encryption. |
| Context | Reset session; delete cache, history and Cookies. |
Your Internet browser is licensed by:

OPENWAVE™

Profiles
Preparation of the phone for Internet access depends on the service provider concerned:
Profile pre-set
In most cases, access profiles have already been created for one or more service provider(s).

Select profile.

Activate profile.
Set profile manually
If necessary, contact your service provider. You can change settings and delete profiles here.
Bookmarks


→Bookmarks
URLs stored in the phone are displayed. New bookmarks can be saved. It is possible to process or manage bookmarks in files.
Games and Applications
Games and applications are offered on the Internet. Once downloaded these are available to you on your phone. Most applications include instructions. Some applications and games are already pre-installed on your phone. You will find these listed here:
www.siemens.com
Requirements
Browser profile (p. 38) and the access (p. 45) must be configured.
Download
Select the correct access depending on whether you are loading games or applications:

→ Games/Applications
In addition to URLs and service providers for the download, any available applications/games and folders will be displayed.
Additional information
You can use the browser to download applications (e.g. ringtones, games, images, animations) from the Internet.
Siemens excludes all warranty and liability claims in respect of or in connection with any applications subsequently installed by the customer and any software not included in the original delivery package. This also applies to functions enabled subsequently at the customer's instigation. The purchaser bears sole risk for the loss of, damage to, and any defects arising in, this device or the applications and for any direct damage or consequential damage of whatever nature resulting from the use of this application.
For technical reasons, such applications and subsequent enabling of certain functions are lost in the event of the device being replaced/re-supplied and may be lost if it is repaired. In such cases, the buyer is required to download or release the application again. Please ensure that your phone has Digital Rights Management (DRM) so that downloaded applications are protected from unauthorised reproduction. These applications are then exclusively intended for your phone and cannot be transferred from this even to create a backup.
Siemens does not warrant, guarantee or accept any liability for the customer's ability to download or enable applications again or to do so free of charge. It is recommended from time to time to back up applications on the PC using the "Mobile Phone Manager" (www.siemens.com)
Downl. assist.

→ 📊 → Downl. assist.
You will not be left on your own during the download!
Setup
Profiles

→ → Profiles
Several settings can be stored in a phone profile in order, for example, to adapt the phone to the surrounding level of noise.
- Five standard profiles are provided with default settings. They can be changed however: Normal environment, Quiet environment, Noisy environment, Car Kit, Headset
- You can set two personal profiles (
). - The special profile Aircraft mode is fixed and cannot be changed.
Profile settings
Edit a default profile or create a new personal profile:

Select profile.
Options Open menu and select Change sett.
The list of available functions is displayed. When you have finished setting a function, you return to the profile menu where you can change a further setting.
Car Kit
If an original Siemens Car Kit is used, the profile is switched on automatically when the phone is inserted into the cradle (see accessories also).
Headset
The profile is only switched on automatically if an original Siemens headset is used (see accessories also).
Aircraft mode
The acoustic signals and vibration for the alarms (appointments, alarm clock) are switched off. The alarms continue to be shown in the display only.
Switch on

Scroll to Aircraft mode.

Confirm selection.

Confirm safety prompt again to activate the profile. The phone switches itself off automatically.
Normal mode
When you switch on your phone again, the previously set profile will be reactivated automatically.
Themes

→ → Themes
Load a completely new visual presentation onto your phone. At the press of a key, various functions are re-organised on a theme basis, e.g. switch on/off animation, background image, screensaver, switch on/off melody, additional animations.
Theme files are compressed to save memory space. After being downloaded (p. 39) or called up from My stuff, these are automatically unzipped when activated.
Activate new theme

Select theme.
Display theme preview.
Activate new theme.
Display

→ Display → Select function.
Language
Set the language of the display text. When "automatic" is set, the language of your home service provider is used. If a language that you do not understand happens to be set, the phone can be reset to the language of your home service provider with the following input (in standby mode):
*#0000#
Text input
T9 preferred
Activate/deactivate intelligent text entry.
Input language
Select language for text entry.
Wallpaper
Set wallpaper graphic for the display.
Logo
Choose graphic to be displayed instead of the provider logo.
Colour skin
Select colour scheme, incl. background image for the entire user interface
Screensaver
The screensaver shows a picture in the display when a period set by you has elapsed. An incoming call and/or pressing any key will end the function except if the safety function is activated.
Note
The "picture" (animated) and "digital clock" screensavers significantly reduce the phone's standby time.
Start up anim.
Shown when the phone is switched on.
Shutdn anim.
Shown when the phone is switched off.
Own greeting
Is displayed instead of an animation when you switch on the phone.
Big letters
You can choose between two font sizes for the display.
Illumination
Set display illumination to brighter/darker.
Contrast
Set display contrast.
Ringtones

Set the signal tones on the phone to suit your requirements.
Ringer setting
Activate/deactivate the ringer or reduce it to a short beep.
Silent alert
To avoid the disturbance caused by a ringing phone, you can activate the silent alert function as an alternative. The vibration alarm can be switched on in addition to the ring-tone. This function is deactivated when the battery is being loaded and accessories are connected (except the headset).
Volume
Set different volumes for types of call/functions.
Additional information
Please make sure you have accepted the call before holding the phone to your ear. This will avoid damage to your hearing from loud ringtones.
Assign ringtone
A ringtone which has already been selected will be played or the list of possible ringtones will be displayed for selection.
Call setup

→ Call setup
→ Select function.
Hide ID

If activated, your phone number will not appear on the other party's display (depending on the service providers).
Call waiting Ⓧ!
If you are registered for this service, you can check whether it is set and you can activate/deactivate it.
Divert
You can specify when calls should be diverted to your mailbox or other phone numbers.
Set up call divert (example):
Unanswered


Select Unanswered. (Includes the conditions Not reachable, No reply, Busy, see below.

Confirm and select Set, then enter the phone number to which the call will be diverted.

Confirm. The setting is confirmed by the network.
All calls

All calls are diverted.

Icon in the top line of the display in standby mode.
Other possibilities for divert:
Not reachable, No reply, Busy, Receiving fax, Receiving data
Call screening
Only calls from phone numbers that are in the Phonebook/Addressbook or assigned to a group are signalled. Other calls are only displayed.
Any key answ.
Incoming calls can be accepted by pressing any key
(except for ☐).
Minute beep
During a call you have initiated you, and only you, will hear a beep every minute so you can check the call's duration.
Phone setup

→ Phone setup → Select function.
Key tones
Set the type of acoustic key acknowledgement.
Info tones
Set service and alarm tones.
Automatic switch off
The phone switches off each day at the set time.
Phone identity
The phone identity number (IMEI) is displayed. This information may be useful for customer service.
Alternatively enter in standby mode: * # 0 6 #
More Display further information about the appliance.
Device check
A self-test and an individual test are offered after the last information page. If you select Selftest, individual tests are carried out.
Software version
Display in standby mode:
* #06#, then press More.
Memory assis.
The delete assistant will help you if there is insufficient phone memory.
File system
Format
(Phone-code protected)
The phone memory is formatted and all saved data such as ringtones, pictures, games etc. are deleted. Formatting may take longer than 1 minute.
Clean up
Create more memory by deleting temporary files no longer required.
Master reset
Reset phone to default values (factory setting). This does not affect the SIM card or the network settings.
Alternatively enter in standby mode:
*#9999#
Clock


→ Clock
→ Select function.
Time/date
Change First enter the date, then the time.
Time zones
World map: Displays world time zones.

Select a time zone.
City list: List of world cities.

Select a city in the selected time zone.
Date format
Select the display format for the date.
Time format
Select 24h or 12h.
Buddhist year
Switch over to the Buddhist year.
Show clock
Activate/deactivate time display.
Auto time zone

The time is set automatically via the GSM network.
Connectivity


→ Connectivity
→ Select function.
GPRS

(General Packet Radio Service)
GPRS is a method for transmitting data faster in the mobile network. For symbols in the display see p. 6.
GPRS info
Display connection information.
IrDA
Your phone has an infrared interface. The distance between the two devices must not exceed 30 cm. The infrared windows in both appliances must be aligned as accurately as possible with each other. For symbols in the display see p. 6.
Data services
Default setting and activation of the connection profiles for MMS, WAP applications. The phone default setting varies from service provider to service provider. Consult your service provider or go to this address in the Internet for more information
www.siemens.com/
mobilephonescustomercare in the FAQ section.
HTTP profile
The phone default setting varies from service provider to service provider. Consult you service provider or go to this address on the Internet for more information
www.siemens.com/
mobilephonescustomercare in the FAQ section.
Authentication
Activate or deactivate encrypted WAP dial-up (CSD connections only).
Security

flowchart
graph LR
    A["Start"] --> B["Security"]
    B --> C["Select function"]
Auto key lock
The keypad is locked automatically if no key has been pressed for one minute in standby mode. This prevents the phone from being used accidentally. However, you can still be called and you can still make an emergency call.
Additional information
Block/unblock in standby mode. In each case:

Press and hold.
Direct call
Only one phone number can be dialled. The required phone code (4 to 8 digits) is set by you and entered at the first security prompt.

To switch off, press and hold, then enter the phone code.
Only 🔍 8!
Restrict calls to SIM-protected numbers in the Phonebook.
This SIM only ⓧ!
Your phone is prevented from being used with a different SIM card.
Codes
For description see p. 15: PIN control, Change PIN, Change PIN2, Chg.phonecode
Barrings 🔒!
Network barring restricts the use of your SIM card.
All outgoing
All outgoing calls except emergency numbers are barred.
Outgoing intl. (outgoing international)
Only national calls can be made.
Out.int.x.home (outgoing international without home country)
No international calls, only calls to the home country.
All incoming
The phone is barred for all incoming calls.
When roaming
You will not receive calls when outside your home network.
Status check
Status check for network barring.
Clear all
Clear all barrings.
Network

flowchart
graph LR
    A["Start"] --> B["→ Network"]
    B --> C["Select function"]
Line
Two independent phone numbers must be registered.
Network info
The list of GSM networks currently available is displayed.
Choose netwrk
Network search is restarted.
Auto network
If activated, the next network is dialled in the order of your "preferred networks".
Pref. network
Set the service providers you prefer when you leave your home network.
Band selection Ⓧ!
Select either GSM 900, GSM 1800 or GSM 1900.
Fast search
Network reconnection is speeded up.
User group Ⓧ!
Depending on the service provider, you can create groups with this service. These can have access to internal (company) information, for example, or special tariffs apply. Please check with your service provider for details.
Accessories

→ → Accessories
→ Select function.
Car Kit
Only in combination with an original Siemens handsfree car kit (see accessories). The car kit profile is activated automatically when the phone is inserted into the cradle.
Auto answer
(factory default: off)
Calls are accepted automatically after a few seconds. Eavesdropping is possible!
Automatic switch off
(factory default: 2 hours)
The phone is powered by the car's power supply. Set the time that must elapse after the ignition has been switched off before the phone is automatically switched off.
Car loudspk.
Improves playback in certain circumstances.
Headset
Only in conjunction with an original Siemens headset (see accessories). If an original Siemens headset is used the profile is automatically activated when the headset is plugged in.
Auto answer
(factory default: off)
Calls are accepted automatically after a few seconds (except where the ringer is switched off or set to beep). You should therefore be wearing the headset.
Auto answer
If you do not notice that your phone has accepted a call, there is the danger that the caller may eavesdrop.
Fast access
Soft keys
Assign one phone number or function to each of the two soft keys.
Change
For example, the Internet function is assigned to the soft key. To change this (in standby mode):
Internet
Press briefly, then Change.
Select a new function from the list and confirm with Ⓞ.
Apply
The "Internet" is just used as an example here.
Internet
Press and hold; the application is started.
Speed dialling keys
Assign a phone number or function to each of the keys from 2 to 9. Number key 1 is reserved for the mailbox.
Assign
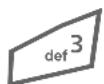
Press number key (e.g. the 3) briefly then press Set.
Select a new function from the list and confirm with Ⓞ.
Apply
Select a stored phone number or start a stored application (e.g. Internet).
In standby mode:

Press
and
hold.
My menu

Press.
My menu Press.
Set up your own menu. The list of 10 entries is preset, but can be changed.
Change menu
You can replace each entry (1-10) with another entry from the selection list.

Select entry.
Change
Open the function list to make a selection.

Select the the list.
new

Confirm. The entry is saved.
Reset all
Reset all
Select. After a security prompt, the default setting is reset.
Organiser


→ Select function.
Calendar
You can enter appointments in the calendar. Time and date must be set correctly.
The calendar offers you three views: monthly view, weekly view, daily view.
The various entries are colour-coded. Appointments are shown as a vertical colour bar on the horizontal hour division.
Navigation:

Scroll between weeks/days/hours.
Calendar setup
Start of day:
Time when the working day begins.
Start of week:
Weekday on which the monthly and weekly view on the left starts
Set weekend
Set the days for the weekend.
Show birthdays:
Appointments
Appointments are displayed in chronological order in a list.
Enter new appointment
Select.
Types:

Memo: Text input for description.

Voice memo: Enter voice memo.

Call: Enter phone number. This is shown with the alarm.

Meeting: Text input for description.

Holiday: Enter start and end date.

Birthday: Enter name and date.
Different input/selection fields are displayed depending on the type. The number of fields can be restricted, see Standard at the end of the list.
Additional information

Alarm clock, alarm set.

Appointment, alarm set.
An alarm sounds even when the phone is switched off (except in Aircraft mode, p. 40). The phone does not go to standby mode. To deactivate it press any key.
Tasks
A task is displayed like an appointment in the agenda for the selected day. However, unlike an appointment it does not require a time. When no time is entered the task appears at the top of the list every day until it is marked as completed. The entries are same way as Appointments (see "Appointments").
Notes
T9 support (p. 17) makes writing short notes such as shopping lists easier. Save confidential notes with the phone code.
Missed appts.
Events with an alarm (Appointments, Tasks) to which you have not reacted are listed for reading.
Dictat.machine
Use the dictating machine to record short voice memos.
New recording

After a brief beep, say the text.

Alternate between pause/record.

End recording. The recording is automatically saved with a time stamp. Rename with Options.
Playback

Select the desired recording.

Alternate between play-back/pause.

Press and hold rapid rewind and fast forward.
Warning!
The use of this feature may be subject to restrictions under criminal law.
Please inform the other party to the conversation in advance if you want to record the conversation and please keep such recordings confidential.
You may only use this feature if the other party to the conversation agrees.
Time zones
See p. 45.
Extras


→ Select function.
Walky Talky

This application can be used to simultaneously connect multiple subscribers. Like a normal WalkieTalkie, only one subscriber can speak at a time. The others can only listen until the speaker allows others to talk. Please note that additional costs may be incurred as a result of using this application. Your service provider can provide further information.
A recipient is selected using their WalkyTalky address (WT ID) or their phone number. Groups created in advance (p. 53) can be invited to a session.
To do this, GPRS (p. 45) must be switched on and Walky Talky (p. 54) activated.
Preparing a seesion


→ Walky Talky
Select.
The possible functions as well as already added subscribers are displayed.
You have several options to combine the subscribers:
Search and add a recipient in the Addressbook.
Enter WT address for a recipient or a group.
Select a subscriber from an earlier session.
First select the group, and then select the recipient.
Starting a session

Start a session.
Speaking rights
The list of subscribers is displayed. The current authorised speaker is shown in bold.

Request speaking rights. When this is delegated, the requester can speak.

Returning speaking rights.
Inviting additional subscribers
You can invite additional subscribers during a session.
Options
Open menu, select Invite and mark new subscribers.
You are being invited
The invitation is shown in a window.

Accept the invitation.
Leaving the session and ending
Only if you yourself started the session.
Options Open menu.
Quit session
Select. You will leave and end the current session.
Letting the session run in the background
The current session remains active in the background. A phone call ends the session.
Putting Walky talky in the background

Press and hold.
Using Walky talky again


Sessions Continue session again.
Records


Select the list of received and made WT calls as well as the option to delete all lists.
Groups


Only your groups are displayed and can be edited.
Create and define a new group.
List of subscribers with whom a session is not desired.
List of subscribers whose invitation is automatically accepted.
Starting a session (group conversation)

Select a group.

Start a session.
Viewing group properties

Select a group.

View properties.
Options
Open menu for further properties or for editing.
My presence


flowchart
graph LR
    A["→"] --> B["→ Walky Talky"]
    C["→"] --> D["→ Presence → My presence"]
The following of your properties can be set:
Interruption
Allow, forbid interruption
Mood Display your mood.
Notes Note.
Settings


flowchart
graph LR
    A["→"] --> B["→ Walky Talky"]
    C["→ Settings"] --> D["→ Settings"]
Some settings must be made by the user or can be copied from your service provider. You can find further information in the full version of the user guide at www.siemens.com

Select and confirm the function, area.
Walky Talky
Activate/deactivate WalkyTalky.
Dwnl. settings
Download settings from the server of the service provider.


Select function.
SIM services (optional)
SIM services
Your service provider may offer applications such as mobile banking, share prices, etc. via the SIM card.

Symbol for SIM services.
For further information, please contact your service provider.
Alarm clock
The alarm will ring at the time set by you, even when the phone is switched off.

Activate/deactivate the alarm.

Set the time for the alarm call (hh:mm).

Navigate to the various days.

Display options: alarm call time and days.

Set days for alarm calls. Press and hold to highlight/unhighlight all the days.

Confirm setting.
You can set the alarm to repeat with Snooze.
Sound recorder
Use the Sound recorder to record noises or sounds for use as ringtones.
New recording
Select. The remaining time available, as well as the recording time, are shown in the display.
Start it from another application as follows:
The recording display appears:

A brief tone sounds when the recording starts.

Alternate between pause/record.

End recording.
The recording is saved with a timestamp in the Sounds folder. Rename with Options.

Transfer the recording into the application.
Playback

Select the desired recording.

Alternate between play-back/pause.


Press and hold for rapid rewind and fast forward.
Calc.
The calculator can be used in a basic version with an extended range of functions (Options).

Enter digit(s).

Navigate functions.

Use function.
Unit converter
You can convert various measurement units into other measurement units.

Select the source unit/ currency, then enter the quantity.

Select the target measurement unit/currency. The result is displayed.
Special key functions:

Set decimal point.

Change sign.
Currency
When you first call up the function, enter the basic currency.

Enter currency (e.g. euro) and save the entry with Save.
Now enter the name and exchange rate of the currency to be converted.
Stopwatch
Two intermediate times can be recorded and saved.

Start/stop/reset to zero.
Countdown
A set time elapses. The last 3 seconds are indicated by a beep. At the end a special beep sounds.
Remote synchronisation
You can use this function remotely to access externally filed data (addresses, calendar, etc.) and synchronise these with the data on your phone.
Synchronise
Sync Select calculator, start synchronisation.
Next Scroll through the various displays.
Sync. setting
You can choose between 5 profiles.
My stuff
A file management function is available for you to organise your files. This functions in the same way as on a PC. Folders have already been created for different data types. The relevant folders contain the download function for loading new items such as pictures and sounds.

The list of the folders and files is displayed.
Navigation

natural_image
Abstract geometric shapes including arrows, circles, and concentric circles (no text or symbols)Select file/folder in lists.
The cursor can be moved as required in the preview.
Open folder, start download or start file with related application.
Options Access to various administration functions.
Media player
When you are viewing a picture or listening to a melody, the application starts a media playback.

Browse to the next media file.

Switch on display illumination.
Pictures

Zoom. The two soft keys (+/-) enlarge/reduce the picture. The joystick moves the picture detail.

Centre picture.

Switch to full screen mode and back again.
Send E.g., send via MMS.
Melodies

Play or stop, depending on the situation.

Switch to mute.

Set volume.

End playback.
Picture processing
Options Open menu and select Edit.
Customer Care
We offer fast, individual advice! You have several options:
Our online support on the Internet:
www.siemens.com/ mobilephonescustomercare
We can be reached any time, any place. You are given 24 hour support on all aspects of our products. Here you will find an interactive fault-finding system, a compilation of the most frequently asked questions and answers, plus user guides and current software updates to download.
You can also get personal advice about our range of products on our Premium Hotline:
United Kingdom 0906 9597500
(£0.75 per minute)
Qualified Siemens employees are waiting to offer you expert information about our products and installation.
In some countries repair and replace services are impossible where the products are not sold through our authorised dealers.
If repair work is necessary, please contact one of our service centres:
Abu Dhabi 0 26 42 38 00
Argentina 0 80 08 88 98 78
Australia....13 00 66 53 66
Austria....05 17 07 50 04
Bahrain 40 42 34
Bangladesh....0 17 52 74 47
Belgium....0 78 15 22 21
Bolivia 0 21 21 41 14
Bosnia Herzegovina....0 33 27 66 49
Brazil....0 80 07 07 12 48
Brunei 02 43 08 01
Bulgaria.... 02 73 94 88
Cambodia 12 80 05 00
Canada 1888770211
China 02138984777
Croatia 0 16 10 53 81
Czech Republic....2 33 03 27 27
Denmark 35 25 86 00
Dubai 0 43 96 64 33
Egypt....0 23 33 41 11
Estonia.... 06 30 47 97
Finland....09 22 94 37 00
France....01 56 38 42 00
Germany * 0 18 05 33 32 26
Greece 80 11 11 11 16
Hong Kong 28 61 11 18
Hungary 06 14 71 24 44
Iceland 5 11 30 00
India....22 24 98 70 00 Extn: 70 40
Indonesia 0 21 46 82 60 81
Ireland....18 50 77 72 77
Italy 02 24 36 44 00
Ivory Coast.... 05 02 02 59
Jordan....0 64 39 86 42
Kenya....2723717
Kuwait 2454178
Latvia 7 50 11 18
Lebanon 01 44 30 43
Libya 02 13 50 28 82
Lithuania 8 52 74 20 10
Luxembourg.... 43 84 33 99
Macedonia 02 13 14 84
Malaysia....+60377124304
Malta + 35 32 14 94 06 32
Mauritius 2 11 62 13
Mexico 01 80 07 11 00 03
Morocco 22 66 92 09
Netherlands 0 90 03 33 31 00
New Zealand....08 00 57 43 63
Nigeria 0 14 50 05 00
Norway.... 22 70 84 00
Oman 79 10 12
Pakistan 02 15 66 22 00
Paraguay 8 00 10 20 04
Philippines 027571118
Poland....08 01 30 00 30
Portugal 8 08 20 15 21
Qatar....04 32 20 10
Romania 02 12 04 60 00
Russia....8 80 02 00 10 10
Saudi Arabia 0 22 26 00 43
Serbia 01 13 07 00 80
Singapore 62 27 11 18
Slovak Republic 02 59 68 22 66
Slovenia....0 14 74 63 36
South Africa 08 60 10 11 57
Spain....9 02 11 50 61
Sweden....0 87 50 99 11
Switzerland 08 48 21 20 00
Taiwan 02 23 96 10 06
Thailand....0 27 22 11 18
Tunisia 71 86 19 02
Turkey....0 21 65 79 71 00
Ukraine 8 80 05 01 00 00
United Arab Emirates....0 43 66 03 86
United Kingdom 087 05 33 44 11
USA 1888770211
Vietnam....84 89 20 24 64
Zimbabwe 04 36 94 24
Care and maintenance
Your phone has been designed and crafted with great care and attention and should also be treated with care. The suggestions below will help you to enjoy your phone for many years.
- Protect your phone from moisture and humidity! Precipitation, humidity and liquids contain minerals that will corrode electronic circuits. Should your phone nonetheless become wet, disconnect it immediately from any power supply, remove the battery and leave the open phone to dry at room temperature!
- Do not use or store the phone in dusty, dirty areas. Its moving parts may become damaged.
- Do not store your phone in hot areas. High temperatures can shorten the life of electronic devices, damage batteries and warp or melt certain plastics.
- Do not store your phone in cold areas. When the phone warms up again (to its normal ambient temperature), moisture can form inside the phone, which may damage electronic components.
- Do not drop, knock or shake your phone. Rough handling can damage components inside the device!
- Do not use harsh chemicals, cleaning solvents, or strong detergents to clean the phone!
The suggestions given above apply equally to your phone, battery, charger and all accessories. If any of these parts are not working properly, take them to your nearest qualified service outlet. The personnel there will assist you and, if necessary, repair the device.
Battery quality declaration
The capacity of your mobile phone battery is reduced each time you charge/discharge it. Storing the battery at temperatures that are too high or too low also causes a gradual loss of capacity. This can significantly reduce the operating times of your mobile phone, even after it has been fully charged.
The battery is, however, designed to be capable of being charged and discharged for a period of six months from when the mobile phone was purchased. Following this six-month period, we recommend replacing your battery if you experience a significant drop in performance. Only purchase original Siemens batteries.
Display quality declaration
For technological reasons, a few small dots with different colours may appear in the display in exceptional cases.
Please note that the appearance of brighter or darker dots generally does not mean that a fault has occurred.
Product data
Declaration of conformity
Siemens Information and Communication mobile hereby declares that the phone described in this user guide is in compliance with the essential requirements and other relevant provisions of European Directive 1999/5/EC (R&TTE). The declaration of conformity (DoC) concerned has been signed. Please call the company hotline if you require a copy of the original, or:
www.siemens.com/mobiledocs
CE
0168
Technical data
GSM class: 4 (2 watt)
Frequency range: 880 - 960 MHz
GSM class: 1 (1 watt)
Frequency range: 1,710 - 1,880 MHz
GSM class: 1 (1 watt)
Frequency range: 1,850 - 1,990 MHz
Weight: 86 g
Size: 105 x 47 x 18 mm
(75.6 ccm)
Li-Ion battery: 600 mAh
Operating
temperature: -10 °C to 55 °C
SIM card: 3.0 V
Phone ID
You will need the following details if you lose your phone or SIM card:
the number of the SIM card (on the card):
15-digit serial number of the phone (under the battery):
the customer service number of the service provider:
Lost phone
If you lose your phone or SIM card contact your service provider immediately to prevent misuse.
Operating times
The operating time depends upon the respective conditions of use. Extreme temperatures considerably reduce the phone's standby time. Avoid placing the phone in the sun or on a heater.
Talktime: 100 to 300 minutes Standby time: 60 to 250 hours
| Action taken Time (min) | Reduction of stand-by time by |
| Calling 1 30 - 90 minutes | |
| Light * 1 40 minutes | |
| Network search 1 5 - 10 minutes | |
| * Keypad input, games, organiser etc. | |
SAR – European Union (RTTE)
INFORMATION ON RF EXPOSURE /SPECIFIC ABSORPTION RATE (SAR)
THIS MOBILE PHONE MEETS THE LIMITS SET BY THE EU (1999/519/EC) FOR PROTECTION OF THE HEALTH OF THE PUBLIC FROM THE EFFECTS OF EXPOSURE TO ELECTROMAGNETIC FIELDS
These limits are part of comprehensive recommendations for the protection of the public. The recommendations were developed and confirmed by independent scientific organisations through periodic and thorough evaluation of scientific studies*. The limits include a substantial safety margin designed to assure the safety of all persons, regardless of age and health.
Before a radio equipment may be placed on the market, compliance with the European laws and the respective technical limit requirements must be demonstrated. Only then the CE mark may be affixed**. The limit for mobile phones recommended by the Council of the European Union employs a unit of measurement known as the Specific Absorption Rate, or SAR. This SAR limit is 2.0 W/kg***. This corresponds with the requirements of the International Commission for Non-Ionizing Radiation Protection ICNIRP and was adopted into the European Norm for Mobile Radio Equipment EN 50360. The SAR of mobile phones is determined in accordance with the European Norm EN 50361. This involves measuring the maximum value in all frequency bands of the mobile phone with the phone transmitting at its highest power level. The actual SAR level of the phone during normal operation may be well below the maximum value. This is because the phone is designed to operate at multiple power levels so as to use only the power required to reach the network. In general, the closer you are to a base station, the lower the power output.
The highest SAR value for this model phone when tested for compliance against the norm is
$$ 0. 7 3 \mathrm{W} / \mathrm{kg} ^ { * * }. $$
The SAR information can also be found on the Siemens web site at
www.siemens.com
While there may be differences between the SAR levels of various phones and at various positions, all Siemens products meet the legal requirements.
* The World Health Organization (WHO, CH-1211 Geneva 27, Switzerland) states that present scientific information does not indicate the need for any special precautions for use of mobile phones.
Further information:
www.who.int/peh-emf,
www.mmfai.org,
www.siemens.com
** The CE mark confirms that the product is in compliance with the legal requirements of the European Union as a prerequisite for the placing on the market and the free movement of goods within the European internal market.
*** averaged over 10 g body tissue.
**** SAR values may vary depending on national requirements and frequency bands. SAR information for different regions can be found at www.siemens.com
SAR – International (ICNIRP)
INFORMATION ON RF EXPOSURE /SPECIFIC ABSORPTION RATE (SAR)
THIS MOBILE PHONE MEETS THE LIMITS FOR PROTECTION OF THE HEALTH OF THE PUBLIC FROM THE EFFECTS OF EXPOSURE TO ELECTROMAGNETIC FIELDS
Your mobile phone is a radio transmitter and receiver. It is designed and manufactured not to exceed the limits for exposure to radio frequency (RF) energy recommended by international guidelines from the International Commission on Non-Ionizing Radiation Protection (ICNIRP). These limits are part of comprehensive guidelines for the protection of the public and establish permitted levels of RF energy for the population. The guidelines were confirmed by independent scientific organisations through periodic and thorough evaluation of scientific studies*. The limits include a substantial safety margin designed to assure the safety of all persons, regardless of age and health.
The exposure limit for mobile phones employs a unit of measurement known as the Specific Absorption Rate, or SAR. The SAR limit stated in the international guidelines is 2.0 W/kg**. Tests for SAR are conducted in all frequency bands using standard operating positions with the phone transmitting at its highest power level. The actual SAR level of the phone during operation can be well below the maximum value. This is because the phone is designed to operate at multiple power levels so as to use only the power required to reach the network. In general, the closer you are to a base station, the lower the power output.
The highest SAR value for this model phone when tested for use at the ear is
$$ 0. 7 3 \mathrm{W} / \mathrm{kg} ^ { * }. $$
SAR information can also be found at www.siemens.com
While there may be differences between the SAR levels of various phones and at various positions, they all meet the international guidelines for safe RF exposure.
* The World Health Organization (WHO, CH-1211 Geneva 27, Switzerland) states that present scientific information does not indicate the need for any special precautions for use of mobile phones.
Further information:
www.who.int/peh-emf,
www.mmfai.org,
www.siemens.com
** averaged over 10 g of tissue.
*** SAR values may vary depending on national requirements and frequency bands. information for different regions can be found at www.siemens.com
Guarantee certificate (UK)
Without prejudice to any claim the user (customer) may have in relation to the dealer or retailer, the customer shall be granted a manufacturer's Guarantee under the conditions set out below:
- In the case of new devices and their components exhibiting defects resulting from manufacturing and/or material faults within 24 months of purchase, Siemens shall, at its own option and free of charge, either replace the device with another device reflecting the current state of the art, or repair the said device. In respect of parts subject to wear and tear (including but not limited to, batteries, keypads, casings, small parts on casings, protective coverings where included in the scope of delivery), this warranty shall be valid for six months from the date of purchase.
- This Guarantee shall be invalid if the device defect is attributable to improper treatment and/or failure to comply with information contained in the user manuals.
- This Guarantee shall not apply to or extend to services performed by the authorised dealer or the customer themselves (e.g. installation, configuration, software downloads). User manuals and any software supplied on a separate data medium shall be excluded from the Guarantee.
- The purchase receipt, together with the date of purchase, shall be required as evidence for invoking the Guarantee. Claims under the Guarantee must be submitted within two months of the Guarantee default becoming evident.
- Ownership of devices or components replaced by and returned to Siemens shall vest in Siemens.
- This Guarantee shall apply to new devices purchased in the European Union.
For Products sold in the United Kingdom the Guarantee is issued by Siemens plc, Siemens House, Oldbury, Bracknell, Berkshire, RG12 8FZ. - Any other claims resulting out of or in connection with the device shall be excluded from this Guarantee. Nothing in this Guarantee shall attempt to limit or exclude a Customers Statutory Rights, nor the manufacturer's liability for death or personal injury resulting from its negligence.
- The duration of the Guarantee shall not be extended by services rendered under the terms of the Guarantee.
- Insofar as no Guarantee default exists, Siemens reserves the right to charge the customer for replacement or repair.
- The above provisions does not imply a change in the burden of proof to the detriment of the customer.
To invoke this Guarantee, please contact the Siemens telephone service. The relevant number is to be found in the accompanying user guide.
Guarantee certificate (IRL)
Without prejudice to any claim the user (customer) may have in relation to the dealer or retailer, the customer shall be granted a manufacturer's Guarantee under the conditions set out below:
- In the case of new devices and their components exhibiting defects resulting from manufacturing and/or material faults within 24 months of purchase, Siemens shall, at its own option and free of charge, either replace the device with another device reflecting the current state of the art, or repair the said device. In respect of parts subject to wear and tear (including but not limited to, batteries, keypads, casings, small parts on casings, protective coverings where included in the scope of delivery), this warranty shall be valid for six months from the date of purchase.
- This Guarantee shall be invalid if the device defect is attributable to improper care or use and/or failure to comply with information contained in the user manuals. In particular claims under the Guarantee cannot be made if:
- The device is opened (this is classed as third party intervention)
• Repairs or other work done by persons not authorised by Siemens. - Components on the printed circuit board are manipulated
• The software is manipulated - Defects or damage caused by dropping, breaking, lightning or ingress of moisture. This also applies if defects or damage was caused by mechanical, chemical, radio interference or thermal factors (e.g.: microwave, sauna etc.)
• Devices fitted with accessories not authorised by Siemens - This Guarantee shall not apply to or extend to services performed by the authorised dealer or the customer them-
selves (e.g. installation, configuration, software downloads). User manuals and any software supplied on a separate data medium shall be excluded from the Guarantee.
- The purchase receipt, together with the date of purchase, shall be required as evidence for invoking the Guarantee. Claims under the Guarantee must be submitted within two months of the Guarantee default becoming evident.
- Ownership of devices or components replaced by and returned to Siemens shall vest in Siemens.
- This Guarantee shall apply to new devices purchased in the European Union. For Products sold in the Republic of Ireland the Guarantee is issued by Siemens Ireland Limited, Ballymoss Road, Sandyford Industrial Estate, Dublin 18 - The Republic of Ireland.
- Any other claims resulting out of or in connection with the device shall be excluded from this Guarantee. Nothing in this Guarantee shall attempt to limit or exclude a Customers Statutory Rights, nor the manufacturer's liability for death or personal injury resulting from its negligence.
- The duration of the Guarantee shall not be extended by services rendered under the terms of the Guarantee.
- Insofar as no Guarantee default exists, Siemens reserves the right to charge the customer for replacement or repair.
- The above provisions does not imply a change in the burden of proof to the detriment of the customer.
To invoke this Guarantee, please contact the Siemens helpdesk on 1850 777 277.
This number is also to be found in the accompanying user guide.
Menu tree

flowchart
graph TD
    A["Default book"] --> B["Show entries <New entry>"]
    B --> C["Business card Groups"]
    C --> D["Default book <Info numbers>"]
    E["Call records"] --> F["Calls missed"]
    F --> G["Calls received"]
    G --> H["Calls dialled"]
    H --> I["Delete records Time/charge"]
    I --> J["Last call All outgoing All incom.calls Remain. units Charge sett."]
    J --> K["Currency Personal rate"]
    L["Surf & fun"] --> M["URL/service provider Account limit"]
    M --> N["Games Auto display Applications Downl. assist. Bookmarks Internet"]
    O["Camera"] --> P["Create new Inst. message"]
    P --> Q["SMS text MMS"]

flowchart
graph TD
    A["Messages"] --> B["Inbox"]
    B --> C["SMS"]
    B --> D["MMS"]
    B --> E["WAP push"]
    B --> F["CB messages"]
    A --> G["Draft"]
    G --> H["SMS"]
    G --> I["MMS"]
    A --> J["Unsent"]
    J --> K["SMS"]
    J --> L["MMS"]
    A --> M["Sentbox"]
    M --> N["SMS"]
    M --> O["MMS templates MMS"]
    M --> P["SMS archive"]
    M --> Q["Text modules"]
    M --> R["Message setup"]
    A --> S["Organiser"]
    S --> T["Calendar"]
    S --> U["Appointments"]
    S --> V["Tasks"]
    S --> W["Notes"]
    S --> X["Missed appts."]
    T --> Y["Text zoom"]
    Y --> Z["SMS setup"]
    Y --> AA["MMS setup SMS signature"]
    Y --> AB["WAP push set."]
    Y --> AC["Voice message Help"]
    Y --> AD["CB services"]
    Z --> AE["SMS profiles"]
    AA --> AF["Security sett."]
    AB --> AG["Receive CB"]
    AG --> AH["Read new CB"]
    AG --> AI["Topic list"]
    AG --> AJ["Auto display"]
    AG --> AK["Topic index"]
    AG --> AL["CB languages"]
| Organiser | Dictat.machineTime zonesCalendar setup | |
| Extras | SIM servicesAlarm clockWalky TalkySound recorderCalc.Unit converterStopwatchCountdownRemote syncr. | |
| My stuff | ||
| Setup | ProfilesThemesDisplayLanguageText input Wallpaper Input languageLogoColour skinScreensaverStart up anim.Shutdn anim.Own greetingBig lettersIllumination | T9 preferred |
| Ringtones | Ringer settingSilent alert | |
Setup
Ringtones
Volume
Calls
Group calls Messages
Other calls CB services
Walky Talky Alarm clock
More melodies
Calls
Walky Talky
Organiser
System
Applications
Messages
Alarm clock
Organiser
Startup melody
Shutdown mel.
Sound recorder
Call setup
Hide ID
Call waiting
Divert
Call screening Unansw. calls
Any key answ. Not reachable
Minute beep No reply
All calls
Busy
Status check
Clear all
Phone setup
Key tones
Info tones
Automatic switch off
Phone identity
Memory assis.
File system
Master reset Clean up
Format
| Setup | Clock | Time/dateTime zonesDate formatTime formatBuddhist yearShow clockAuto time zone |
| Connectivity | GPRSGPRS infoIrDAData servicesHTTP profileAuthentication | |
| Security | Auto key lockDirect callOnlyCodesThis SIM onlyBarrings | |

flowchart
graph LR
    A["Setup"] --> B["Network"]
    B --> C["Accessories"]
    C --> D["Line\nNetwork info Protected\nChoose netwrk\nAuto network\nPref. network\nBand selection\nFast search\nUser group"]
    D --> E["Select line"]
    C --> F["Car Kit"]
    F --> G["Headset"]
    G --> H["Active\nSelect group\nOutgo. access\nPref. group"]
    F --> I["Auto answer\nAutomatic switch off\nCar loudspk."]
    F --> J["Auto answer"]
Index
A
Addressbook
Dial entry.... 23
Groups 23
New entry.... 22
Read entry 23
Aircraft mode 40
Alarm (alarm clock) 55
Alarm clock 55
All calls (diversion) 43
All incoming (barrings) 47
Answering service (external)...... 36
Any to answer 43
Appointments 50
Auto display
Clock 45
Duration/charges 26
Auto key lock.... 46
Auto. network selection...... 47
Auto. redial 19
B
Band selection...... 48
Battery
Charge....8
Insert......8
Operating times...... 9, 61
Quality declaration...... 60
Big letters...... 42
Bookmarks 38
Browser...... 37
Buddh. year...... 45
Business card.... 21
C
Calculator.... 56
Calendar.... 50
Call
Accept/end......19
Barring...... 47
Charges....26
Conference 20
Divert....43
End 19
Hold....20
Menu 20
Reject.... 19
Swap (change) ......20
Call divert 43
Call screening 43
Call waiting...... 43
Calling 19
Calls dialled (call record) ......26
Calls received (call record)...... 26
Camera.... 27
Car kit (setting) 48
Care of phone 60
Cell Broadcast (CB)......36
Central inbox 29
Change the faceplate 10
Change the keypad mat ...... 10
Charge rate....26
Charges 26
Charging the battery .....9
CLIPlt™ covers.... 8, 10
Clock 45
Colour skin......41
Conference 20
Connectivity 45
Control code (DTMF)...... 20
Countdown...... 56
Credit limit......26
Currency......56
Customer care 58
D
Date format.... 45
Default book 21
Delete assistant 44
Dialling code 19
Dialling with number keys ...... 19
Dictating machine 51
Display
Illumination 42
Language 41
Symbols...... 6
Wallpaper 41
Divert 43
DRM....12
DTMF tones (tone sequences)..... 20
Duration/charges 26
E
Emergency number 11
Extras.... 52
F
Fast access 49
Fast search 48
File system 44
Formatting (phone memory) ..... 44
Frequency range 48
G
Games and applications...... 39
GPRS 45
Groups 23
Guarantee certificate 64
H
Handsfree talking 19
Headset (setting)...... 48
Hide ID 43
Highlighting mode.... 14
Hold call 20
Hotline 58
|
Identity number (IMEI) 44
IMEI number 44
Info tones 44
Information services (CB) ...... 36
Infrared 45
Infrared (IrDA) 45
Input language (T9) 17
Inst. Message....29
International dialling code...... 19
Internet 37
K
Key tones......44
L
Language...... 41
Limit (call time/charge) 26
Logo 41
Loss of phone, SIM card 61
M
Mailbox 36
Maintenance of phone ......60
Master reset......44
Media player 57
Menu
Controls 13
My menu 49
Speed dialling 13
Menu tree.... 66
Message
CB....36
Lists 29
MMS 32
SMS 30, 31
Minute beep 43
Missed appointments......51
Missed calls (call record) 26
MMS
Receive.... 34
Send.... 33
Write 32
My stuff.... 57
N
Network
Barring 47
Connection...... 47
Setup...... 47
Notes 51
0
Only 47
Operating times (battery) ..... 9, 61
Organiser 50
Own (phone) numbers 25
P
Phone code 15
Phone data.... 61
Phone identity number (IMEI) ..... 44
Phone number transmission ..... 43
Phonebook
Call an entry 24
New entry.... 24
Protected SIM 25
Special books.... 25
VIP numbers 25
Photo 27
Pictures & sounds (SMS) 30
PIN
Change.... 15
Control 15
Enter 11
PIN2.... 15
Preferred network...... 47
Preventing accidental
activation 16
Product data 61
Profiles (phone) 40
Provider logo 41
PUK, PUK2 15
R
Records.... 26
Redial 19
Reminder 19
Remote synchronisation...... 56
Ringtones 42
S
Safety precautions 2
Screensaver 42
Security 15
Security codes.... 15
Service tones 44
Set time/date 45
Settings 40
Short message (SMS) 30
Shown in the display...... 6
Shut down animation......42
Signal strength 12
Silent alert 42
SIM card
Clear barring 16
Insert 8
SIM services (optional) 55
SMS
Archive 30
Read 31
Settings 31
To group 31
Write.... 30
SMS push.... 29
SOS 11
Sound recorder 55
Special books 25
Special characters...... 17
Speech time (battery) 61
Speed dialling keys 49
Standard functions ...... 14
Standby mode 13
Standby time....9
Start up animation...... 42
Stopwatch.... 56
Storage location (Phonebook)..... 24
Surf & fun...... 37
Swap...... 20
Switch off phone Automatic.... 44
Manually 11
Switch on phone 11
Symbols 6
Synchronisation.... 56
T
T9
Text entry 17
Word suggestions ...... 18
Tasks.... 51
Technical data 61
Text entry...... 17
Text modules.... 18
Themes 41
This SIM only...... 47
Time zones.... 11, 45
U
Unanswered 43
Unit converter.... 56
Upper and lowercase letters (T9) 17
User group...... 48
V
Voice message 36
Volume
Handset volume ......19
Profiles......40
Ringtone 42
W
WalkyTalky.... 52
Wallpaper (display) 41
- Safety precautions
- Information for parents
- Important:
- Overview of phone (schematic)
- ① Call key
- ② On/Off/End key.
- ③ Joystick
- In standby mode:
- In lists, messages and menus:
- During a call:
- ④ Soft keys
- Display symbols
- Getting started
- Insert SIM card/battery
- Additional information
- Charge battery
- Charging procedure
- Charging time
- Operating times
- Charge icon not visible
- Display while in service
- Changing CLIPlt™ covers
- Dismantle the phone
- Assemble the phone
- Switch on/off, PIN entry
- Switching phone on/off
- Entering the PIN
- Emergency number (SOS)
- Switching on your phone for the first time
- Time/date
- Time zones
- Copy SIM addresses
- General instructions
- Standby mode
- Signal strength
- Digital Rights Mgmt. (DRM)
- Main menu
- Main menu options
- Options
- User guide
- Menu controls
- Menu speed dialling
- Symbols
- Standard functions
- Option menus
- Highlighting mode
- Options Open menu.
- Mark Highlight a non-highlighted entry.
- Unmark Remove the highlighting from a highlighted entry.
- Security
- PIN control
- Change PIN
- Change PIN2
- Chg.phonecode
- Clear SIM card barring
- Preventing accidental activation
- Text entry
- Text entry without T9
- Special characters
- Text entry menu
- Text input with T9
- Select input language
- Write with T9
- It is best if you finish a word without looking at the display.
- T9 word suggestions
- Correct a word
- Text modules
- Calling
- End call
- Set volume
- Redial previous numbers
- Auto. redial
- Auto dial
- Reminder
- Accept call
- Reject call
- Handsfr.
- International dialling codes
- Country
- Call options
- Swap between two calls
- Establish a second connection
- Incoming calls during a call
- End call(s)
- Conference Ⓜ!
- End
- Tone sequences (DTMF)
- Default book
- Show entries
- New entry
- Addressbook
- Phonebook
- Business card
- Groups
- Special input fields:
- Inst. message
- Display/find entry
- Display options
- Change entry
- Call entry
- Addressbook options
- Ringtone for group
- Phone number:
- Name:
- Group:
- Location:
- Record number:
- Call (search for an entry)
- Phonebook options
- /
- Call records
- Calls missed
- Calls received
- Calls dialled
- Delete records
- Time/charge
- Charge sett.
- Personal rate
- Account limit
- Auto display
- Camera
- Switch on
- Record
- Image resolution
- Flash (Accessories)
- Camera options
- Message lists
- Inbox
- System messages:
- Data items:
- SMS
- Write/send
- Special functions
- Picture&sound
- SMS archive
- SMS to group
- Read
- Reply
- Setting
- SMS signature
- SMS profiles
- Activate profile
- Set profile
- MMS
- Create
- Create standard MMS
- Templates
- Send
- Sending options
- Receive
- MMS profile:
- Setting options
- User settings
- Voice message/CB
- Voice message
- Setup 🔗!
- Save mailbox number
- Save call divert number
- Listen to message
- Or
- CB services
- Surf & fun
- Internet
- Browser menu
- End connection
- Navigation in the browser
- Display symbols in the browser
- Enter special characters
- Browser settings
- Profiles
- Profile pre-set
- Set profile manually
- Bookmarks
- Games and Applications
- Requirements
- Download
- → Games/Applications
- Downl. assist.
- → 📊 → Downl. assist.
- Setup
- Profile settings
- Options Open menu and select Change sett.
- Car Kit
- Headset
- Aircraft mode
- Normal mode
- Themes
- Activate new theme
- Display
- Language
- Text input
- Wallpaper
- Logo
- Colour skin
- Screensaver
- Note
- Start up anim.
- Shutdn anim.
- Own greeting
- Big letters
- Illumination
- Contrast
- Ringtones
- Ringer setting
- Silent alert
- Volume
- Assign ringtone
- Call setup
- Hide ID
- Call waiting Ⓧ!
- Divert
- Set up call divert (example):
- Unanswered
- All calls
- Call screening
- Any key answ.
- Minute beep
- Phone setup
- Key tones
- Info tones
- Automatic switch off
- Phone identity
- Device check
- Software version
- Memory assis.
- File system
- Format
- Clean up
- Master reset
- Clock
- Date format
- Time format
- Buddhist year
- Show clock
- Auto time zone
- Connectivity
- GPRS
- GPRS info
- IrDA
- Data services
- HTTP profile
- Authentication
- Auto key lock
- Direct call
- Only 🔍 8!
- This SIM only ⓧ!
- Codes
- Barrings 🔒!
- All outgoing
- Outgoing intl. (outgoing international)
- Out.int.x.home (outgoing international without home country)
- All incoming
- When roaming
- Status check
- Clear all
- Network
- Line
- Network info
- Choose netwrk
- Auto network
- Pref. network
- Band selection Ⓧ!
- Fast search
- User group Ⓧ!
- Accessories
- Auto answer
- Car loudspk.
- Fast access
- Soft keys
- Change
- Apply
- Speed dialling keys
- Assign
- My menu
- Change menu
- Reset all
- Organiser
- Calendar
- Calendar setup
- Start of day:
- Start of week:
- Set weekend
- Show birthdays:
- Appointments
- Enter new appointment
- Types:
- Tasks
- Notes
- Missed appts.
- Dictat.machine
- New recording
- Playback
- Warning!
- Extras
- Walky Talky
- Preparing a seesion
- Starting a session
- Speaking rights
- Inviting additional subscribers
- You are being invited
- Leaving the session and ending
- Quit session
- Letting the session run in the background
- Putting Walky talky in the background
- Using Walky talky again
- Records
- Starting a session (group conversation)
- Viewing group properties
- My presence
- Interruption
- Settings
- Dwnl. settings
- SIM services (optional)
- SIM services
- Alarm clock
- Sound recorder
- Start it from another application as follows:
- Calc.
- Unit converter
- Currency
- Stopwatch
- Countdown
- Remote synchronisation
- Synchronise
- Sync. setting
- My stuff
- Navigation
- Media player
- Pictures
- Melodies
- Picture processing
- Customer Care
- www.siemens.com/ mobilephonescustomercare
- Care and maintenance
- Battery quality declaration
- Display quality declaration
- Product data
- Declaration of conformity
- Technical data
- Phone ID
- Lost phone
- SAR – European Union (RTTE)
- INFORMATION ON RF EXPOSURE /SPECIFIC ABSORPTION RATE (SAR)
- www.siemens.com
- SAR – International (ICNIRP)
- Guarantee certificate (UK)
- Guarantee certificate (IRL)
- Menu tree
- Index
- A
- B
- C
- Call
- D
- E
- F
- G
- H
- |
- K
- L
- M
- N
- 0
- P
- PIN
- R
- S
- SIM card
- T
- U
- V
- W
Brand : SIEMENS
Model : CT70
Category : Mobile Phone