
SEW-3035WN - Baby monitor SAMSUNG - Free user manual and instructions
Find the device manual for free SEW-3035WN SAMSUNG in PDF.


| Product Type | Digital Wireless Baby Monitor |
| Brand | Samsung |
| Model | SEW-3035WN |
| Display | 3.5" Color LCD (320 x 240 resolution) |
| Camera Resolution | VGA (640 x 480 effective pixels) |
| Night Vision | 8 IR LEDs, distance up to 3m (10ft) |
| Wireless Range | Up to 350ft (100m) in open space |
| Two-Way Audio | Yes, built-in microphone and speaker |
| Temperature Sensor | Yes, displays ambient temperature on monitor |
| Remote Nightlight | Yes, can be turned on/off from receiver |
| Expandable | Supports up to 4 cameras (additional cameras sold separately) |
| Video Recording | MicroSD card recording (supports up to 32GB, recommended brands: Kingston, SanDisk) |
| Power Source - Camera | AC adapter (5V DC) or 3 AA batteries (not included) |
| Power Source - Receiver | AC adapter (5V DC) or rechargeable battery |
| Camera Dimensions (WxHxD) | 94 x 148 x 94 mm |
| Receiver Dimensions (WxHxD) | 75 x 128 x 25 mm |
| Camera Weight | 148g |
| Receiver Weight | 170g |
| Operating Temperature | -10°C to 40°C (14°F to 104°F) |
| Warranty | 1 year (extendable to 15 months upon product registration) |
Frequently Asked Questions - SEW-3035WN SAMSUNG
User questions about SEW-3035WN SAMSUNG
0 question about this device. Answer the ones you know or ask your own.
Ask a new question about this device
Download the instructions for your Baby monitor in PDF format for free! Find your manual SEW-3035WN - SAMSUNG and take your electronic device back in hand. On this page are published all the documents necessary for the use of your device. SEW-3035WN by SAMSUNG.
USER MANUAL SEW-3035WN SAMSUNG
SecureVIEW™ Baby Monitor
User Manual
SEW-3035


If you have additional questions or need further assistance, contact Samsung support at (877) 349-3149.
To extend your one year warranty by three months, be sure to go to www.samsungsv.com and register your product.
SecureVIEW™ Baby Monitor User Manual
Copyright
©2011 Samsung Techwin Co., Ltd. All rights reserved.
Trademark
SAMSUNG SAMSUNG TECHWIN is the registered logo of Samsung Techwin Co., Ltd. The name of this product is the registered trademark of Samsung Techwin Co., Ltd. Other trademarks mentioned in this manual are the registered trademark of their respective company.
Restriction
Samsung Techwin Co., Ltd shall reserve the copyright of this document. Under no circumstances, this document shall be reproduced, distributed or changed, partially or wholly, without formal authorization of Samsung Techwin.
Disclaimer
Samsung Techwin makes the best to verify the integrity and correctness of the contents in this document, but no formal guarantee shall be provided. Use of this document and the subsequent results shall be entirely on the user's own responsibility. Samsung Techwin reserves the right to change the contents of this document without prior notice.

SPECIFY SERVICE INSTRUCTIONS AND WARRANTY TERMS
This device complies with Part 15 of the FCC Rules.
Operation is subject to the following two conditions: (1) this device may not cause harmful interference, and (2) this device must accept any interference received, including interference that may cause undesired operation.
FCC NOTE:
THE MANUFACTURER IS NOT RESPONSIBLE FOR ANY RADIO OR TV INTERFERENCE CAUSED BY UNAUTHORIZED MODIFICATIONS TO THIS EQUIPMENT. SUCH MODIFICATIONS COULD VOID THE USER'S AUTHORITY TO OPERATE THE EQUIPMENT.
WARNING
- STRANGULATION HAZARD - Keep cord out of child's reach. NEVER place camera or cords within 3 feet of crib or playpen. Use enclosed wire clips to help secure cord away from child's reach. Never use extension cords with AC Adapters. Only use the AC Adaptors provided.
• Some adult assembly or installation required. - This product contains small parts that may cause choking. Keep small parts away from children.
- This product is NOT intended to replace proper supervision of children. You MUST check your child's activity regularly, as this product will not alert parents to silent activities of a child.
- Before using this product, read and follow all instructions contained in this booklet, and read and follow all instructions and warnings on the product.
- To prevent entanglement with adapter cords, NEVER PLACE THE CORD IN OR NEAR A CRIB OR PLAYPEN. DO NOT place the product or its AC adapter cords within reach of children.
- ALWAYS KEEP THE TRANSMITTER, RECEIVER AND AC ADAPTERS OUT OF REACH OF CHILDREN.
- NEVER use the transmitter or receiver near water, including near a bathtub, sink, laundry tub, wet basement, etc.
• This product is intended for indoor use only. - This product is not intended for use as a medical monitor and its use should not replace adult supervision.
- Check reception regularly. Test monitor before use and after changing camera location.
• Always unplug AC adapters from wall outlets and power sources during periods of non-use.
The wireless signal transfer range may be shortened if there exists an obstacle such as a concrete wall between.

- To prevent overheating, keep the product and AC power adapters away from any direct sunlight and heat sources such as radiators, heat registers, cooking devices (e.g., stoves and ovens) and other appliances that produce heat (e.g., amplifiers, televisions and stereos).
- Ensure that the product is well ventilated during use. Avoid contact with pillows and furniture that may block ventilation.
- Use only the AC adapters provided with the product, as other adapters may damage the product. Plug the adapters only into standard household current (120 volts AC). Place the AC adapters avoiding pinch points otherwise you can damage the adapters.
- When an AC adapter is plugged into a power source, DO NOT touch the exposed end of the AC adapter's cord.
- Do not use extension cords with the AC power adapters to avoid entanglement.
- This product should only be serviced by qualified and authorized Samsung service centers.
- Images and sounds are transmitted by the product over public airwaves and transmissions may be picked up by other units.
- Caution if you use the system to watch a young child, do not place the camera where the child can reach.
- When using the system with only battery power and the charge is low, then the picture and or sound may affected.
- If this occurs then please connect the AC power adapter and/or replace with new batteries.
- If you are using the optional rechargeable battery then plug in the AC power adapter to recharge.
BATTERY WARNING
When using the product in portable mode, check batteries regularly.
DO NOT use the monitor in portable mode when batteries are low.
- DISPOSE OF OR RECYCLE BATTERIES PROPERLY IN ACCORDANCE WITH APPLICABLE LAWS, which may vary by location.
- Insert batteries with the correct polarity.
- Do not mix new and used batteries.
- Remove exhausted batteries from the product.
- Keep all batteries away from children.
- THERE IS A RISK OF EXPLOSION IF INCORRECT BATTERIES ARE USED.
- Do not disassemble or modify the battery pack.
- Do not use batteries if there is any evidence of leakage or deformity.
Contents
GeTTinG STArTed
Features 4
Getting to know your Monitoring system 5
inSTALLATION
How to Install 9
Viewing Mode Display 10
Menu operATion
Menu Operation 11
Video Playback 12
Appendix
Selecting a Memory Card For Video Recording 13
Hardware and CD driver installation 13
Using Your Monitor with Skype 14
Using Your Monitor with MSN 14
Specifications 15
Troubleshooting 16
GETTING STARTED
Features
- Samsung's digital wireless technology provides excellent image quality and clarity.
- Virtually eliminates interference using a secure and private signal
- Up to 350ft (about 100m) wireless open space transmission range. The actual range may vary depending on the use environment.
- Listen in with exceptional sound clarity
- Safety warning feature on monitor notifies you when the camera is out of range of the transmitter.
- System is expandable up to 4 cameras (additional cameras sold separately).
- Two-way audio communication.
• Camera temperature display on monitor.
Camera Features
• VGA resolution camera.
- Night vision allows for low-light viewing up to 3.0m/10ft .
Performance varies depending on environmental conditions.
• Built-in microphone and speaker.
- Camera can be battery operated for true portable wireless operation.
• Temperature sensor.
- Remote Nightlight
Receiver Features
- 3.5" color LCD monitor/receiver with superior image quality.
- Video/Audio output for viewing on TV/Monitor or recording on VCR/DVD recorder.
- Rechargeable battery for true portability.
• Audio level indicator and alarm.
• Room temperature display. - Micro SD card recording function.
What's Included
The system comes with the following components:
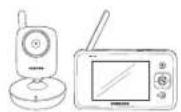

Wireless camera & Wireless receiver Adapter (2EA)

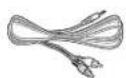
USB Cable RCA Cable
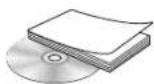

CD & User Manual Warranty Card & Quick Guide


Screws (2EA) & Plastic anchor (2EA) Wire Clips (6EA)
Check your package to confirm that you have received the complete system, including all components shown above.
4 · Getting Started

Getting to know your Monitoring system
Wireless Receiver
After opening the box, fully charge the monitor before use. After initial charge, recharge as needed.
Front Controls
![Receiver Antenna Receives and sends signals from or to the camera. 3.5" LCD Screen Displays video from the camera. SLEEP / Button Used to activate the screen saver mode. Press the [A/M] or [SLEEP] button again to exit the screen saver mode. If Power Saving mode is deactivated by a sound trigger, the device will go back to black screen approximately 8 seconds after the last trigger. This button is also used to delete the selected data on the Micro SD card while the monitor is in search mode. MENU Button Press to access the receiver menu. Press the button again to exit. Navigation Controls/Button Use the controls to move and select while in Viewing Mode and Menu Mode. Play Press to go to "File List" if Micro SD card is inserted. Microphone Transmits audio to the camera when Talk Button is pressed down and held like a walkie talkle.](/content/2026/05/1035178/images/7439b8dcbc45262deb52538480e929997f715e2a27705496f801c6de0c03831d.jpg)
✨ Navigation Controls /Button
Viewing Mode: The following controls are used while watching live video from the camera:
- Press the [+] or [-] keys to increase or decrease the volume.
- Press the [A] key to view cameras in automatic switching mode.
- Press the [M] key to manually switch between cameras.
Menu Mode: Use the ±/ A/M key arrows to navigate in Menu Mode.
Press the [1%] button to confirm the menu selection.
English · 5
Back Controls
![A/M record Press to auto record or manual record during monitoring. Only available when the Micro SD card is inserted. REC [A] : Start recording when an alarm is detected. REC [M] : Start recording when the button is pressed. Night Light Button Press to remotely turn on/off the night light on the camera or the camera currently being displayed on the LCD screen). When the night light is on, an indication icon will be displayed on the LCD screen. Kick Stand Use to hold the receiver onto a table. Antenna Locking Switch Slide the switch to unlocking position, the receiver antenna will pop up. Then you can adjust the antenna for better signal reception. Speaker Produces the sound transmitted from the camera(s). Belt Clip When you carry the receiver, use the belt hanger to hold the receiver onto your belt.](/content/2026/05/1035178/images/a46e0b6ada30cbc0b210aceb23b5b30cccbcf72eca587d7f0b523147431a576e.jpg)

- You must have more than one camera configured on the system when using the functions that requires more than one camera.
* Not included
Side Controls


Using this feature will disable the LCD screen. The LCD screen will turn back on when the A/V cable is disconnected.
6 · Getting Started

Wireless Camera
Front & Back Controls
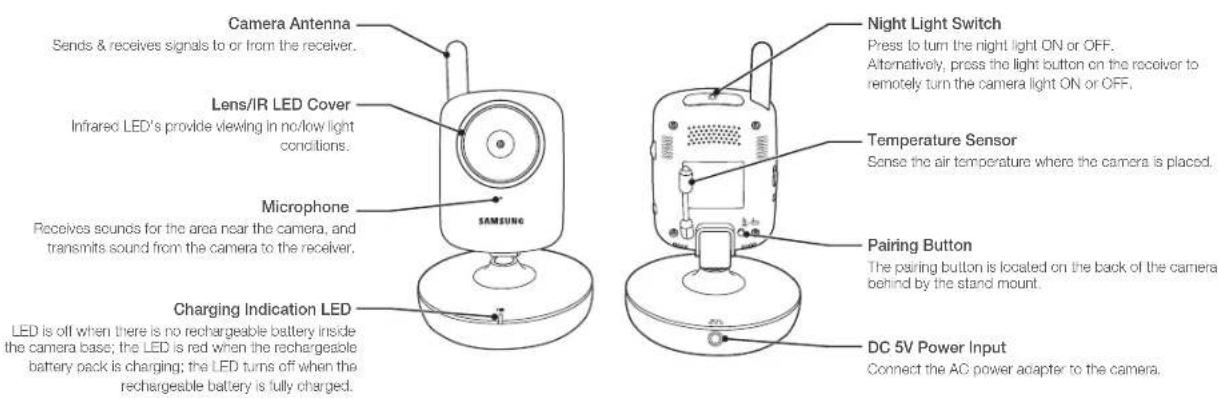

The camera can also be powered using 3 AA batteries (not included) installed in the base. If the camera is plugged in with the AC adapter, the batteries will not be used. The batteries are intended for short term, portable camera use.
- Remcely control Night Light ON or OFF is available only when the camera is paired to the receiver.
The IR indicator will be activated in a low contrast scene and cause an increase of the temperature, which may affect the temperature sensor.
English · 7
Side Controls

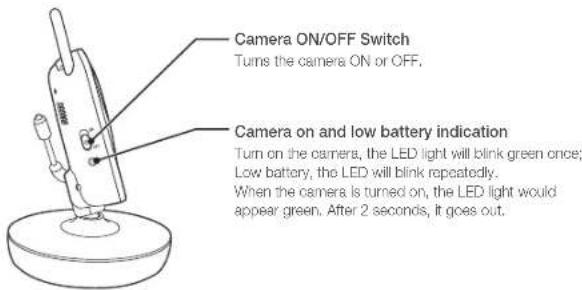
To Use The Battery Mode
You can use the battery to power the camera if it's distant from the power source or if you want to carry the camera.

This camera has built-in IR LED's, which provides the camera with the ability to view images in no/low light conditions. It is important to use the provided power adapter (and not the batteries) when using the camera for prolonged periods in low light conditions, as the built-in IR LED's will deplete the battery more quickly than regular daytime use.
- Remove the battery cover from the base of the camera.
- Insert 3 AA batteries (not included) into the Battery Pack. Make sure to correctly line up the Positive (+) and negative (-) terminals of the batteries.
- Replace the battery pack cover. When the battery level is low and requires recharging, the LED light will blink intermittently.
When using the system with only battery power and the charge is low, then the picture and or sound may affected.
If this occurs then please connect the AC power adapter and/or replace with new batteries. If you want to use the product for a longer time than using the default AA battery without the AC adapter, purchase the optional charging battery (SEA-B100). If you are using the optional rechargeable battery then plug in the AC power adapter to recharge
BATTERY WARNING
When using the product in portable mode, check batteries regularly.
DO NOT use the monitor in portable mode when batteries are low.
- DISPOSE OF OR RECYCLE BATTERIES PROPERLY IN ACCORDANCE WITH APPLICABLE LAWS, which may vary by location.
- Insert batteries with the correct polarity.
- Do not mix new and used batteries.
- Remove exhausted batteries from the product.
- Keep all batteries away from children.
- THERE IS A RISK OF EXPLOSION IF INCORRECT BATTERIES ARE USED.
- Do not disassemble or modify the battery pack.
- Do not use batteries if there is any evidence of leakage or deformity.
8 · Getting Started

INSTALLATION
How to Install
Caution if you use the system to watch a young child, do not place the camera where the child can reach.
Wireless Receiver
- Place the receiver in a place that will have clear reception with your camera(s).
- Pull out the stand.

Do not pull up the stand lever with an excessive force. Otherwise, it may be broken.
Wireless Camera
Before you install the camera, carefully plan where and how it will be positioned, and where you will route the cable that connects the camera to the power adapter. Before starting permanent installation, verify its performance by observing the image on the receiver when camera is positioned in the same location/position where it will be permanently installed and the receiver is placed in the location where it will be used most of the time.
Installation Warnings
Aim the camera(s) to best optimize the viewing area: Select a location for the camera that provides a clear view of the area you want to monitor, which is free from dust, and is not in line-of-sight to a strong light source or direct sunlight.
Avoid installing the camera where there are thick walls or obstructions between the camera and the receiver.
STRANGULATION HAZARD - Keep cord out of child's reach. NEVER place camera or cords within 3 feet of crib or playpen. Use enclosed wire clips to help secure cord away from child's reach. Never use extension cords with AC Adapters. Only use the AC Adaptors provided.

-
Carefully unpack the camera.
If you are installing cameras that did not come with the system, please see the pairing camera section of this manual for details on installation. -
Mount the camera to the wall.
Mark the position of the screw holes on the wall, and drill holes and insert 2 screws, then firmly attach the camera to the wall by placing the stand over the installed screws and pushing the base downwards.
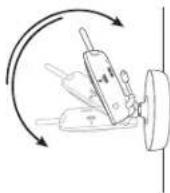

The camera can also be placed on a flat surface, such as a table or shelf, and no mounting hardware is required.
3. Adjust the viewing angle of the camera

- You can install additional cameras (maximum of 4 cameras). When adding cameras that were not included in the original box, you will need to pair up the cameras with the receiver. For paring to add a camera, refer to "Pairing". (Page 12)
How it works in viewing mode
If you want to view the child's scene (on the camera display) on a larger screen such as TV or computer monitor, use the provided AV cable to connect the wireless receiver with the TV.

- When using with a TV or computer monitor, the picture may appear to be grainy as the camera limits video resolution to VGA. This is not a product defect. For best performance, use with the TV/Monitor PIP (Picture in Picture) function. Check your TV/Monitor product manual to see if this feature is available on your TV/Monitor. - When connected to the TV or monitor, the receiver will show black screen.
English·9

Viewing Mode Display
Wireless Receiver
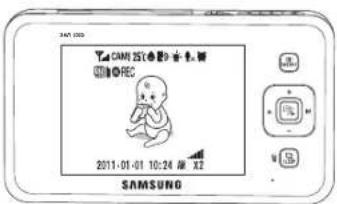

Signal Indicator
The signal indicator shows the strength of the signal being received from the camera. The number of bars in the signal indicator shows the strength of the signal - One or no bars indicate the signal is poor, and 4 bars indicate a strong signal.
CAM1
Camera Number
Indicates the number of camera that is displayed on the current screen. Press the [M] key on the receiver to switch between available cameras.

To automatically switch between channels, press the [A] key (AUTO). For paring to add a camera, refer to "Pairing". (Page 12)
25°C
Temperature
Shows the ambient temperature where the wireless camera is installed.

Trigger Alert
Indicates the type of alert when audio is detected on the camera.

Talk
Press and hold 📄 the monitor to talk back to the camera currently being displayed on the LCD screen. Indicates that unit is on talking mode.


Night light
Press [] on the wireless receiver to remotely turn on/off the night light on the wireless camera currently being displayed. An indicator light will be visible if on.

Auto Mute
If you set Auto Mute to

Micro SD card status
Indicates when a Micro SD card is inserted. It indicates that micro SD card get full capacity when the icon is red, and card has some spaces when icon is white. It displays the recording type if you press REC [A] or REC [M] button.

File List
Indicates if recording file exists.
To go to file list press[%] button.
M REC
A/M record
Press to auto record or manual record during monitoring. Only available when the Micro SD card is inserted.
REC [A]: Start recording when an alarm is detected.
REC [M]: Start recording when the button is pressed.

Volume adjustment
The receiver volume can be adjusted by using the [+] , [-] keys when viewing a camera. Press the [-] key to decrease the volume, and press the [+] key to increase the volume. When the volume bar is disappear, the volume will be muted and no sound will be emitted by the device. The volume adjustment icon will be displayed during volume changes, and w disappear after 5 seconds of inactivity.

Alarm
Indicates if the alarm set to
Time/ZOOM
Displays the time that is set in the current receiver.
Displays zoom size if it sets x2.
No Signal Warnings
The "OUT OF RANGE" message means the receiver cannot access the camera. Please reposition the camera, or check the camera power.
10 · Installation

MENU OPERATION
Menu Operation
How to use the buttons to setup

Enter menu setting

Move to menu

Select the menu

Adjust level Save the

e change
- Press [MENU] button to enter the menu setting or exit the menu setting.
- Move to other menu by press [A] or [M] key.
- Press the [9] button for option selection mode.
- Adjust option level by [+] or [-] key.
- Press the [%] button to complete.
Icons used in setup

Brightness
Adjusts the brightness of the image.

Zoom
Zoom in 1x or 2x of the video image.
In double size mode, press the navigation control buttons to pan up/down and left/right while viewing live image.

Power Saving
Enables receiver power save mode (when no activity on the camera is detected).
The Power Saving Menu is used to turn off the screen at a predetermined time, to conserve battery power.
After selected time, the monitor will go to a select screen saver or black screen if blank is selected as the screen saver.
Power Saving mode will be deactivated by pushing [A], [M] or [SLEEP] on the front panel of monitor or by higher sound detected by cameras.
If Power Saving mode is deactivated by pushing [A], [M] and [SLEEP], the monitor will go back to black screen after the time you set if there is no sound trigger during that time.

Screen Saver
After selected time, the monitor will go to a select screen saver or black screen if blank is selected as the screen saver.

Auto Mute
Automatically cuts off the audio when there is only slight environmental noise on the camera side.
Choose
If auto mute is enabled, the receiver will automatically mute if there is no audio detected from the camera. If the audio is detected on the camera, the receiver will automatically unmute.

Alert Setting
Select the type of alert when audio is detected on the camera.
You may select the Vibration or Beep as the trigger alert manner while something has been detected by camera side.
When choose vibration, all the buttons automatically in mute function.

Temperature Unit
Select the temperature unit °C or °F for you option to show in the screen.

Temperature Alert
Sels the temperature alert range.
When temperature on camera side is out of the set range, the monitor will be alerted.


Alarm Setting
Sets the time value with HH, MM and select the ON or OFF to decide alarm or not.

Date Setting
Sets the year, month, date value to show in the monitor screen.

Date Format
Sets the date format to show in the monitor screen.

Time Setting
Sets the time value with hour, minute to show in the monitor screen.

A/V Out Format
Choose the TV system when outputting the video/audio to TV, DVR/VCR or other viewing/recording devices.

Pairing
You can register a wireless camera with the receiver using the registration menu where you can view the video of the selected wireless camera.
Pairing The system comes with a camera that has already been paired with the receiver unit.
The pairing function assigns the camera to a channel on the wireless receiver. Up to 4 Cameras (each additional camera sold separately) may be paired, which each optional camera on its own channel.
If additional cameras are paired, they must each be configured separately.

It is highly recommended to pair the cameras to the receiver before permanently mounting the cameras. See the pairing section on this manual for details.

Reset
Choose

■ Camera pairing settings will NOT be affected by a reset. The camera will remain paired with the receiver.

Memory-format
Delete recorded data.
Choose
12 · Menu Operation

Pairing Camera
-
Power on and turn the switch to ON. The power LED for the camera and receiver should be ON.
-
Press the [MENU] button on the receiver.
-
Select Pairing menu by pressing [A] or [M] key. Press the [%] button to go into the Pairing menu.
-
Select a channel by pressing the [+] or [-] key. A message will be displayed on the receiver screen. The receiver will count down from 30\~0 sec you must press the pairing button on the camera during this time to successfully pair the camera.
-
Press the Léblation on the back of the camera. If not, the receiver will return to the view screen, and no pairing will take place. Once the camera has been paired, it will be immediately viewable on the receiver monitor.
Video Playback
You can search and play if recording data exists on the Inserted Micro SD card.
-
Press [ ] button during monitoring. File List shows.
-
Choose a file folder desired to play by using [+], [-] button.
-
Press [ ] button to play the selected video.
- : Stops playback temporarily
- : Stops playback
A: Rewind (X1, X2, X4, X8)
M : Fast Forward (X2, X4, X8)
- Press [MENU] button to go back to search mode during playback. You will see a confirm message if you press [💡].

To go back to monitoring mode press [MENU] button.
APPENDIX
Selecting a Memory Card For Video Recording
Your Samsung BabyVIEW® baby monitor supports MicroSD memory cards. You may experience compatibility issues depending on the model and maker of the memory card. For your Samsung BabyVIEW® baby monitor, we recommend you use a MicroSD memory card from the following manufacturers: SandisR and Kingston®. However, these memory card brands are only recommendations, and other Micro SD card brands will function with your baby monitor.
| Micro SD Card Capacity | Estimated Recording Time | ||
| Kingstorf6 | Sandisk6 | ||
| QVGA resolution VGA resolution QVGA resolution VGA resolution | |||
| 512MB 1:15 0:50 1:20 0:55 | |||
| 1GB 2:30 1:30 2:45 1:50 | |||
| 2GB 4:45 3:15 5:15 3:30 | |||
| 4GB 9:30 6:45 10:00 7:00 | |||
| 8GB 19:20 13:45 20:15 14:15 | |||
| 16GB 40:00 28:00 42:00 30:00 | |||
| 32GB 77:30 55:15 86:30 57:30 | |||

Recording times are shown in hours and minutes.
Recording times are estimated based on product usage with Kingsfand Sandls® branded Micro SD memory cards. Usage of alternative brands and/or non-branded media may result in different recording time. In addition, Recording time may vary depending on the environment of operation.
Hardware and CD driver installation
-
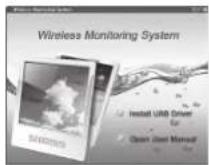
Put CD into CD ROM on computer and click the icon of Install USB Driver to run installation program.
-
Click the
> button to continue -
Select "I accept the terms of the license agreement" and then press
button. -
Click the
button, select the destination folder and then press button. -
Press the
button to complete the driver program. -
After installation is finished, you can find "Wireless Monitoring System" in the Device Manager

It can also work as a wireless webcam for MSN Messenger and SKYPE after installation is complete.


Appendix
Using Your Monitor with Skype™
- Install USB Driver (see previous section).
- Connect your monitor to a PC. Your monitor should indicate that it is in "USB PC CAMERA MODE".
- Install and Open Skype".
-
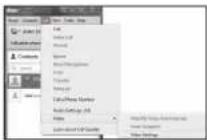
Select "Echo / Sound Test Service" under contacts. Then, on the Skype® Toolbar, select the "Call" menu, mouse over "Video" and select "Video Settings".
-
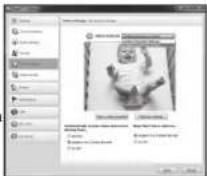
Next to 'Select webcam:', make sure that 'Wireless Monitoring System' is selected.
- Click
. - You are now ready to stream live video from your baby monitor camera to your friends and family via Skype". Next time you make a video call to your contacts, they will see what your baby monitor camera sees.
Using Your Monitor with MSN™
- Install USB Driver (Page 13).
- Connect your monitor to a PC. Your monitor should indicate that it is in "USB PC CAMERA MODE".
- Install and Open MSN".
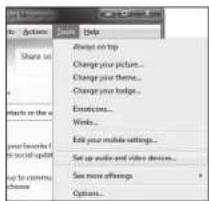
- First, reveal the MSN toolbar by hitting the ALT key on your keyboard. Under the MSN toolbar, select "Tools", then select "Set up audio and video devices..."
- The 'Speaker/Microphone or Speakerphone' window will pop up. Click
once to move onto the "Webcam" window. - Under 'Select the webcam you want to use to place video calls', make sure "Wireless Monitoring System" is selected. Then click
. - You are now ready to stream live video from your baby monitor camera to your friends and family via MSN™. Next time you make a video call to your contacts, they will see what your baby monitor camera sees

14 · Appendix

Specifications
| Item Details | |
| Camera | |
| Transmit Frequency Range 2.40GHz~2.4835GHz | |
| Data Rate 2.0 Mbps | |
| Transmitting Power 16dBm (MAX) | |
| Modulation Type GFSK | |
| Transmitting Distance 350ft (about 100m) / (Line of Sight) | |
| Image Sensor Type 1/4" Color CMOS Image Sensor | |
| Effective Pixels H: 640 V: 480 | |
| Image Processing Motion JPEG | |
| Image Resolution / Frame Rate H: 640 V: 480 / 12 fps Max (H: 320, V:240 / 20 fps) | |
| White Balance Auto | |
| Lens 4.9mm / F2.8 | |
| Viewing Angle (Diagonal) 50° | |
| Minimum Illumination 2 LUX (without IR LED illumination) | |
| IR LED / Night Vision Range 8 LEDs / 940nm, 3m (with IR LED) | |
| Power Requirement | 5V DC ±5% |
| Power Consumption | 500mA MAX (IR LED),340mA MAX (without IR LED) |
| Operating Temperature | -10°C ~ 40°C (14°F ~ 104°F) |
| Operating Humidity 0%~85% RH | |
| Weight | 148g |
| Size(WXHXD) | 94 x 148 x 94mm |
| Item Details | |
| Receiver | |
| Receiving Frequency Range 2.40GHz~2.4835GHz | |
| Monitor | 3.5" Color LCD |
| Data Rate 2.0 Mbps | |
| Receiving Sensitivity | -81dBm |
| Demodulation Type GFSK | |
| Resolution | 320 x 240 (RGB) |
| Viewing Angle | H: 120° V: 100° |
| AV Output / Resolution | VGA |
| Power Requirement | 5V DC +5% |
| Power Consumption | 450mA Max without charging850mA with charging |
| Operating Temperature | -10°C ~ 40°C (14°F ~ 104°F) |
| Operating Humidity 0%~65% RH | |
| Weight | 170g |
| Size(WXHXD) | 75 x 128 x 25mm |
| No. of cameras supported | Max. 4 |

Appendix
English·15
Troubleshooting
| Problem Solution | |
| The monitor beeps or vibrates for no apparent reason | The unit may be beeping or vibrating because the sound sensitivity on the camera is too high.1. Try lowering the sound alarm trigger on the camera (shown on page 6) to an appropriate sensitivity level. |
| No picture from a camera | 1. Check all connections to the camera. Make sure the adapter is plugged in.2. Make sure that the cameras and receiver are both ON.3. Make sure that the camera is in range of the receiver.4. If using the battery adapter, try replacing the batteries.5. Make sure the camera and monitor are paired.6. Adjust the monitor antenna to vertical position. |
| Audio problems Ensure that the volume on the TV is on.2. Make sure that there is sound within range of the camera microphone.3. If the unit omits a loud scroching noise (feedback), move the camera or receiver farther apart. | |
| The picture is or has become choppy | The picture may become choppy when experiencing a lower frame rate (i.e. 10 frames per second vs. a higher 20 frames per second).1. Try moving the camera closer to the receiver.2. Remove obstructions between the receiver and camera.3. Adjust the monitor antenna to vertical position. |
| The Picture appears to be grainy when using AV out function to view on a large screen TV/Monitor | The purpose of the AV output is for convenience only. When using with large screen TV/Monitor, the picture might be grainy as the camera limits video resolution to VGA.This is not a product defect.1. For best performance use with TV/Monitor PIP (Picture in Picture) function. Check your TV/Monitor product manual to see if this feature is available on your TV/Monitor.2. View video on a smaller screen TV/Monitor. |

- Low batteries will cause the supply current to become unstable and will affect the quality of the video/audio. Please charge the battery fully or replace the batteries for use for superior video.

Samsung Techwin cares for the environment at all product manufacturing stages, and is taking measures to provide customers with more environmentally friendly products. The Eco mark represents Samsung Techwin's devotion to creating environmentally friendly products, and indicates that the product satisfies the EU RoHS Directive.

Correct disposal of batteries in this product
(Applicable in the European Union and other European countries with separate battery return systems.)
This marking on the battery, manual or packaging indicates that the batteries in this product should not be disposed of with other household waste at the end of their working life. Where marked, the chemical symbols Hg, Cd or Pb indicate that the battery contains mercury, cadmium or lead above the reference levels in EC Directive 2006/68. If batteries are not properly disposed of, these substances can cause harm to human health or the environment.
To protect natural resources and to promote material reuse, please separate batteries from other types of waste and recycle them through your local, free battery return system.

Correct Disposal of This Product
(Waste Electrical & Electronic Equipment)
(Applicable in the European Union and other European countries with separate collection systems)
This marking on the product, accessories or literature indicates that the product and its electronic accessories (e.g. charger, headset, USB cable) should not be disposed of with other household waste at the end of their working life. To prevent possible harm to the environment or human health from uncontrolled waste disposal, please separate these items from other types of waste and recycle them responsibly to promote the sustainable reuse of material resources.
Household users should contact either the retailer where they purchased this product, or their local government office, for details of where and how they can take these items for environmentally safe recycling.
Business users should contact their supplier and check the terms and conditions of the purchase contract. This product and its electronic accessories should not be mixed with other commercial wastes for disposal.
16 · Appendix

TEMPLATE
This template is used to install the camera on the wall.
![67mm [2.6 inch] Screw holes for the Camera installation CAMERA FRONT](/content/2026/05/1035178/images/a94443d9d27b2201e366afdeba79be03a98339333b413db3b5cd4181d5416971.jpg)
SAMSUNG
SALES NETWORK
SAMSUNG TECHWIN CO., LTD.
Samsungtechwin R&D Center, 701, Sampyeong-dong, Bundang-gu, Seongnam-si, Gyeonggi-do, Korea, 463-400
TEL: +82-70-7147-8740\~60 FAX: +82-31-8018-3745
100 Challenger Rd. Suite 700 Ridgefield Park, NJ 07660
Toll Free : +1-877-213-1222 Direct : +1-201-325-6920
Fax: +1-201-373-0124
www.samsungsv.com
SAMSUNG TECHWIN EUROPE LTD.
Samsung House, 1000 Hillswood Drive, Hillswood Business Park Chertsey, Surrey, UNITED KINGDOM KT16 OPS
TEL: +44-1932-45-5300 FAX: +44-1932-45-5325
- SecureVIEW™ Baby Monitor
- SecureVIEW™ Baby Monitor User Manual
- Copyright
- Trademark
- Restriction
- Disclaimer
- SPECIFY SERVICE INSTRUCTIONS AND WARRANTY TERMS
- FCC NOTE:
- WARNING
- BATTERY WARNING
- Contents
- GeTTinG STArTed
- inSTALLATION
- Menu operATion
- Appendix
- Features
- Camera Features
- Receiver Features
- What's Included
- Getting to know your Monitoring system
- Wireless Receiver
- ✨ Navigation Controls /Button
- Back Controls
- Side Controls
- Wireless Camera
- Front & Back Controls
- To Use The Battery Mode
- · Getting Started
- How to Install
- Installation Warnings
- Adjust the viewing angle of the camera
- How it works in viewing mode
- Viewing Mode Display
- Signal Indicator
- CAM1
- Camera Number
- 25°C
- Temperature
- Trigger Alert
- Talk
- Night light
- Auto Mute
- Micro SD card status
- File List
- M REC
- A/M record
- Volume adjustment
- Alarm
- Time/ZOOM
- No Signal Warnings
- How to use the buttons to setup
- Icons used in setup
- Brightness
- Zoom
- Power Saving
- Screen Saver
- Alert Setting
- Temperature Unit
- Temperature Alert
- Alarm Setting
- Date Setting
- Date Format
- Time Setting
- A/V Out Format
- Pairing
- Reset
- Memory-format
- Pairing Camera
- Video Playback
- Selecting a Memory Card For Video Recording
- Hardware and CD driver installation
- Using Your Monitor with Skype™
- Using Your Monitor with MSN™
- Correct disposal of batteries in this product
- Correct Disposal of This Product
- TEMPLATE
- SAMSUNG
- SALES NETWORK
Brand : SAMSUNG
Model : SEW-3035WN
Category : Baby monitor