NC-ZA1M - Coffee maker PANASONIC - Free user manual and instructions
Find the device manual for free NC-ZA1M PANASONIC in PDF.

| Product Type | Coffee Maker |
| Brand | Panasonic |
| Model | NC-ZA1M |
| Dimensions (W x D x H) | Approx. 25.0 x 20.0 x 35.0 cm |
| Weight | Approx. 3.5 kg |
| Power Supply | AC 120 V, 60 Hz, 1050 W |
| Water Reservoir Capacity | 1.2 L |
| Carafe Type | Thermal stainless steel carafe |
| Brewing Capacity | Up to 10 cups (150 ml each) |
| Grinder | Built-in burr grinder |
| Programmable Timer | Yes, 24-hour |
| Auto Shut-Off | Yes, after 2 hours of inactivity |
| Strength Selector | Mild, Regular, Strong |
| Water Filter | Replaceable carbon filter |
| Cleaning | Removable brew unit, descaling indicator |
| Safety Features | Automatic shut-off, boil-dry protection, cool-touch handle |
| Spare Parts | Water filter, carafe, brew unit, drip tray |
| Repairability | User-replaceable parts and service center support |
Frequently Asked Questions - NC-ZA1M PANASONIC
User questions about NC-ZA1M PANASONIC
0 question about this device. Answer the ones you know or ask your own.
Ask a new question about this device
Download the instructions for your Coffee maker in PDF format for free! Find your manual NC-ZA1M - PANASONIC and take your electronic device back in hand. On this page are published all the documents necessary for the use of your device. NC-ZA1M by PANASONIC.
USER MANUAL NC-ZA1M PANASONIC
Operating Instructions
使用說明書
Arahan Pengendalian
تعليمات التشفيل
Automatic Espresso Machine (Household Use)
自動特濃咖啡機(家庭用)
Mesin Espresso Automatik (Kegunaan rumah tangga)
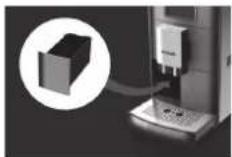
natural_image
Exterior view of a Panasonic water dispenser device (no visible text or symbols on body)English

中文(繁體)

Melayu


Contents
Page
Safety Precautions EN3
Important Information EN8
Parts Names and Handling Instructions EN9
Display EN11
Flavour setting EN13
Before Use EN14
Espresso/Coffee EN17
Powder coffee preparation EN22
Hot water EN24
Turn off the power EN25
Changing the setting EN27
Memory setting EN31
How to Clean EN33
Troubleshooting EN42
Error display EN44
Replacement parts EN45
Specifications EN45
Thank you for purchasing the Panasonic product.
- This product is intended for household use only.
- Please read these instructions carefully to use the product correctly and safely.
- Before using this product please give your special attention to “Safety Precautions” (Page EN3–EN8).
- Please keep this Operating Instructions for future use.
Safety Precautions
Please make sure to follow these instructions.
In order to prevent accidents or injuries to the user, other people, and damage to property, please follow the instructions below.
■ The following charts indicate the degree of damage caused by wrong operation.

WARNING: Indicates serious injury or death.

CAUTION: Indicates risk of injury or property damage.
■ The symbols are classified and explained as follows.

This symbol indicates prohibition.

This symbol indicates requirement that must be followed.

WARNING

Do not damage the power cord or power plug.
Following actions are strictly prohibited. Modifying, touching on or placing near heating elements, bending, twisting, pulling, pulled over sharp edges, putting heavy objects on top, bundling the power cord and carrying the appliance by the power cord.
(It may cause electric shock, or fire due to short circuit.)
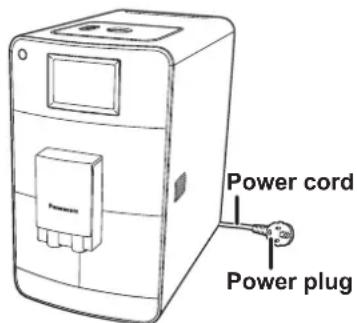
●Do not use the appliance if the power cord or power plug is damaged or the power plug is loosely connected to the outlet.
(It may cause electric shock, or fire due to short circuit.)
→ If the power cord is damaged, it must be replaced by the manufacturer, its service agent or similarly qualified persons in order to avoid a hazard.
●Do not plug or unplug the power plug with wet hands.
(It may cause electric shock.)
- Always ensure that hands are dry before handling the power plug or switching on the appliance.

WARNING
●Make sure the voltage indicated on the label of the appliance is the same as your local supply.
(It may cause electric shock or fire.)
Also avoid plugging other devices into the same outlet to prevent electrical over heating. However, if you are connecting a number of power plugs, make sure the total wattage does not exceed the rated wattage of the outlet. The use of extension cords is not recommended.
- Insert the power plug firmly.
(Otherwise it may cause electric shock and fire due to heat that may be generated around the power plug.
- Place the appliance where the power plug can be easily pulled out.
●Clean the power plug regularly.
(Dust and moisture build-up on the power plug may cause insufficient insulation, which may cause a fire.
→ Unplug the power plug, and wipe with a dry cloth.
- Keep the power cord out of reach of children. Do not let the power cord hang over the edge of the table or worktop.
(It may cause burns, injury or electric shock.)

- Do not immerse the appliance in water or splash it with water.
(It may cause electric shock, or fire due to short circuit.)
●Do not disassemble, repair or modify this appliance.
(It may cause fire, electric shock or injury.)
→ Please contact the service centre for the repair.
●Do not touch or get your face close to places where steam is coming out.
(It may cause burns or injury.)
- Especially keep the appliance out of reach of infants and children.

WARNING

●This appliance is not intended for use by persons (including children) with reduced physical, sensory or mental capabilities, or lack of experience and knowledge, unless they have been given supervision or instruction concerning use of the appliance by a person responsible for their safety.
Children should be supervised to ensure that they do not play with the appliance.
(It may cause burns, injury or electric shock.)
●Always keep the children away from the appliance and cleaning agent.
(It may cause burns or injury.)
- Children do not realise dangers that are likely to occur because of improper use of appliances.
●Discontinue using the appliance immediately and unplug in the unlikely event that this appliance stops working properly.
(It may cause smoking, fire, electric shock or burns.)
e.g. for abnormal operation or break down
- The power plug and the power cord become abnormally hot.
- The power cord is damaged or the appliance power fails.
- The main body is deformed, has visible damage or is abnormally hot.
• Water is leaking from the inside of main body. - There is another abnormality or failure.
→ Please unplug the appliance immediately and contact the service centre for the check or the repair.

●Do not allow infants and children to play with packaging material.
(It may cause suffocation.)
●Do not open the water tank, dispenser or tray while the coffee is brewing.
(It may cause burns.)

CAUTION

●Do not use the appliance for any purpose other than those described in these instructions.
(It may cause burns or injury.)
- Panasonic will not accept any liability if the appliance is subject to improper use, or failure to comply with these instructions.
●Do not insert any object in the gaps.
(It may cause electric shock.)
- Especially metal objects such as pins or wires.
●Do not touch the hot surface such as coffee spouts while appliance is in use or immediately after use.
(It may cause burns.)
- Never touch the appliance with wet hands.
●Do not use the appliance on following places.
- On uneven surfaces, on carpet, non-water-resistant surface or table cloths etc.
(It may cause fire or injury.)
- Places where it may be splashed with water or near a heat source.
(It may cause electric shock or electrical leakage.)
- Near any open water such as bathtubs, sinks, or other containers.
(It may cause electric shock or electrical leakage.)
- Near a wall or furniture.
(It may cause discolouration or deformation.)
- Places that could be damaged even by moderate heat.
(It may cause discolouration or deformation.)
- Places where it is not strong enough to hold the appliance.
(It may cause damage or injury.)
- In enclosed spaces such as a built-in cupboard.
(It may cause discolouration or deformation.)

CAUTION

- Do not remove the cup or pot while brewing. (It may cause burns.)
●Do not move the appliance by holding dispenser or drip tray. (It may cause injury.)
●Do not reach into the grinding unit. (It may cause injury.)
●Do not hold the espresso machine with the power cord. (It may cause fire or electric shock.)

●Make sure to hold the power plug when unplugging the power plug. Never pull on the power cord.
(Otherwise it may cause electric shock, or fire due to short circuit.)
●Always ensure the appliance is switched off and unplug the power plug when the appliance is not in use, before moving and before cleaning (except cleaning function).
(Otherwise it may cause electric shock, or fire due to electric leakage.
●Place the appliance (including the drip tray and Latte Macchiato plate) on a firm, dry, clean flat heatproof worktop. (Otherwise it may cause burns or injury.)
●Beware not to be tripped over or get caught in the power cord while in use.
(Otherwise it may cause burns or injury.)
●Do not touch, block or cover the steam vent holes during use. (It may cause discolouration.)
- Especially pay attention when supervising children.

CAUTION
●Unplug and allow the appliance to cool down fully before cleaning and storing away.
(It may cause burns.)
●Make sure to clean the appliance after every use.
(Otherwise it may cause burns due to overflow by clogging the filter holder.
●Avoid getting contact with the skin or eyes while handling cleaning agent.
(It may cause injury.)
→ In case of contact with skin or eyes, rinse immediately with plenty of water and consult a doctor.
- If the cleaning agent comes into contact with sensitive surfaces, clean up any splashes immediately.
(It may cause discolouration damage.)
Important Information
- Do not fill the water tank with milk (including soy and rice milk), mineral water, sparkling water or hot water etc. Only use tap water. (It may cause a malfunction.)
- Do not use the appliance outdoors.
- Do not place coffee powder in the powder coffee shaft when the appliance is not turned on.
- Adjust the grinding level only while coffee beans are ground. (P. EN10)
- Do not fill the coffee bean container with freeze-dry, candied or caramelised or oily coffee beans or water.
- Do not use any attachment and cleaning agent other than those provided or recommended by the manufacturer. (P. EN45)
- If leaving the appliance unattended for long time, turn the power off.
- Do not use the appliance in a place where the temperature could drop below freezing point.
(It may cause a malfunction.)
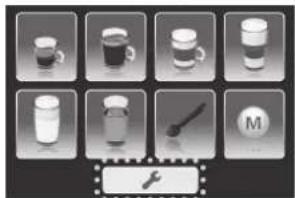
Parts Names and Handling Instructions
■ Wash the all detachable parts before using the appliance for the first time or when you have not used it for a while. (P. EN33) For parts names inside the door, refer to "How to Clean" on pages EN34–EN36.
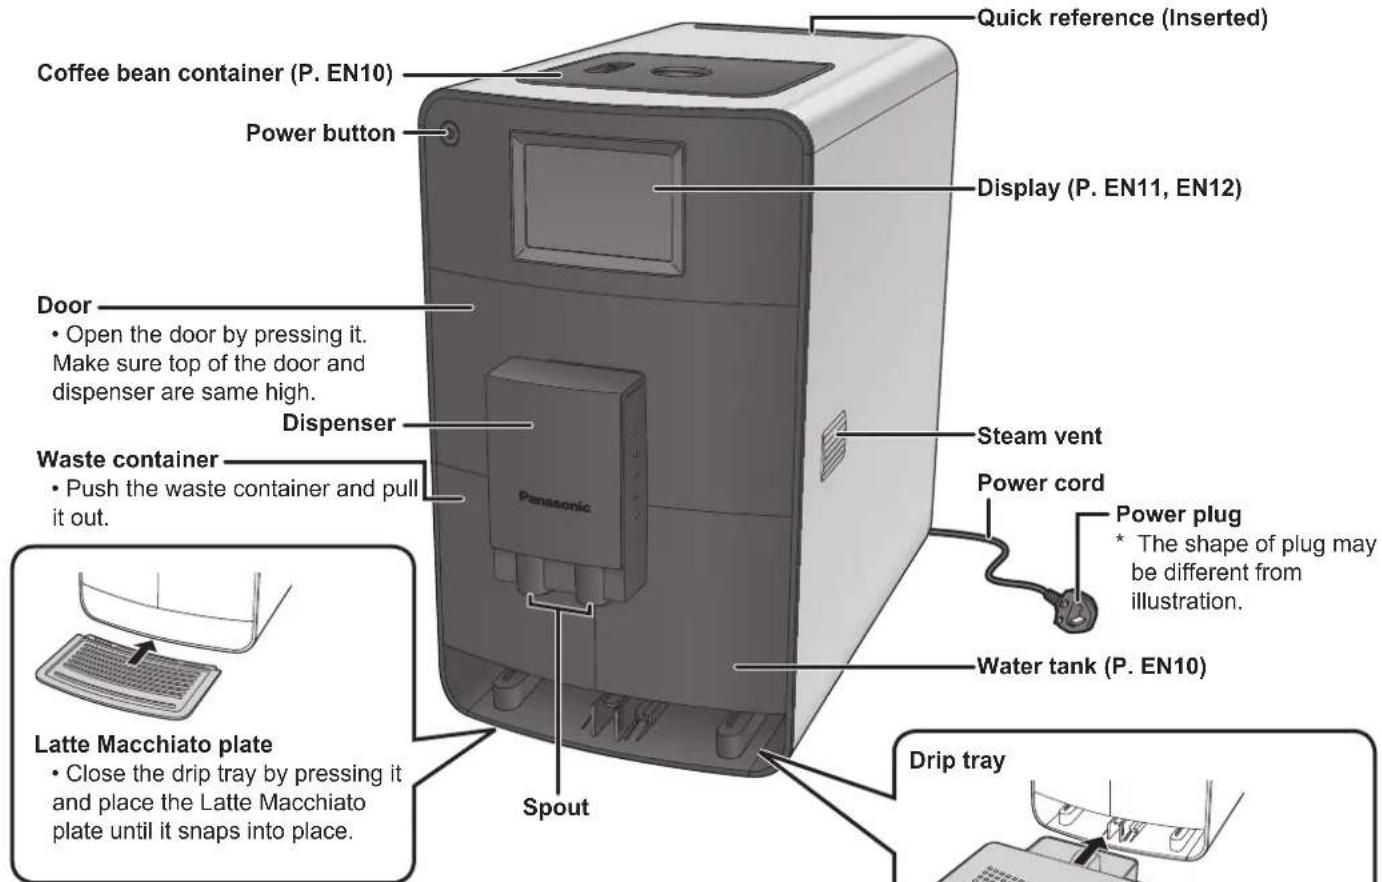
Accessories
Measuring spoon
(with cleaning brush)
and setting function)

Bean container extension (P. EN10)

Adapter
(for filter cartridge)
Milk hose
Cleaning tablets*
Descaling agent*

Test strip
(for determining the water hardness)
Quick reference
Milk system cleaner*
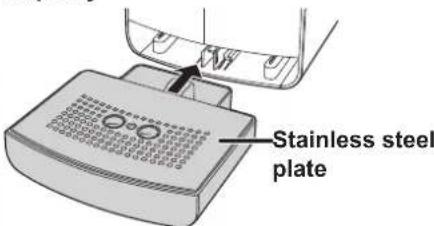
Place the stainless steel plate (rounded edge is facing up) on the drip tray. Push them into the espresso machine until they snap into place. Open the drip tray by pressing it.
Sold separately
Filter cartridge
It may only be used together with the BRITA INTENZA water filter cartridge; cartridge is not supplied by default. Cartridges are available from your local BRITA or Panasonic customer service: www.brita.net http://panasonic.net/ (Availability varies by country.)
Parts Names and Handling Instructions (Continued)
Coffee bean container
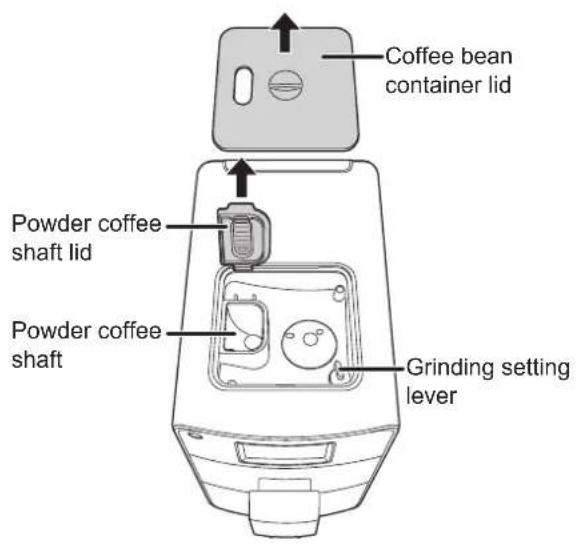
Setting the grinding fineness
Turn the grinding setting lever to the desired level of fineness. Only set the grinding fineness when the grinder is running. During grinding, do not touch coffee beans or put fingers into the grinder. Close the coffee bean container lid after adjusting the lever.
Fine ground for "Intensive taste". Use this setting for light roasted coffee beans.

Medium ground for "normal taste". Use this setting for medium roasted coffee beans.
Coarse ground for "mild taste". Use this setting for dark roasted coffee beans.
- Taste does not meet at your desire right away. Wait for a few times brewing to get desire taste.
To attach the bean container extension
- If you desire to increase the capacity of the standard coffee bean container from 125 g to 250 g, proceed as follows.
① Remove the coffee bean container lid from its holder.
② Remove the powder coffee shaft lid by opening it to an upright position and pulling it out of its holder.
③ Put the bean container extension onto the coffee bean container. Make sure that the grinding setting levers are at the same position each other.
④ Attach the powder coffee shaft lid and close the coffee bean container lid.
Water tank
natural_image
Technical line drawing of a rectangular mechanical part with two circular holes and a labeled section (no text or symbols beyond the label)Filter time control
Helps to keep in mind changing time of the filter cartridge.
IN: Time the filter cartridge was attached. OUT: Time to change the filter cartridge.
Water tank lid Filter cartridge\*
Lift up the lid to open.
① Attach the adapter to the filter cartridge.
② Insert the filter cartridge with the adapter into the guides as the illustration.
* sold separately
Note
- The cartridge must be from BRITA INTENZA. Similar INTENZA from different manufacture will not fit to this espresso machine.
Display
Menu display
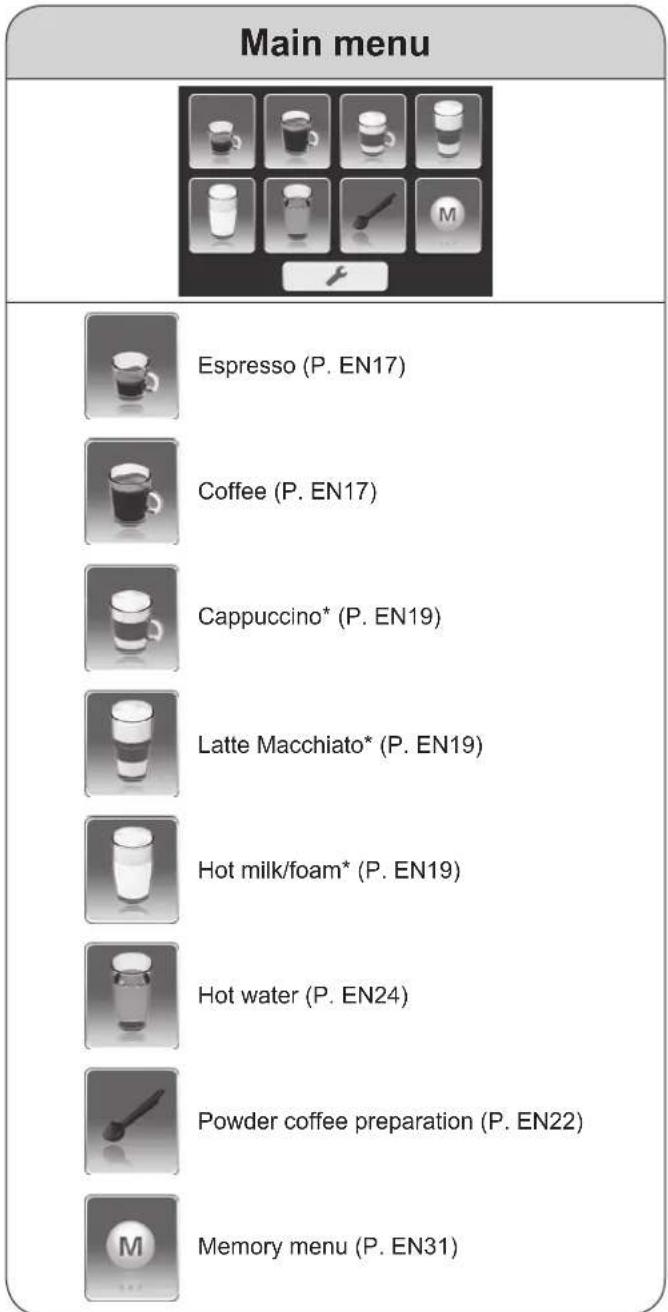
- If no action for 1 minute, display turns dark. *Milk menu
Operation icon
Display (Continued)
Information display
Following displays appear during operations.
Refill with water
After the water tank is replaced, it takes approx. 5 seconds to detect it.
To ensure there is sufficient water for one dispensing, this display shows even when there may be water remaining in the water tank.
Empty the waste container
Only empty it when the espresso machine is turned on.
Otherwise, it shows again next time power is turned on.
Open the drip tray
Simple rin
Refill with coffee beans
Rins

Attach the waste container
Close the door
Cleaning the milk system

Restart brewing
Cleaning programme
In process
It shows after the brewing and rinsing etc.
Descaling programme


Stop the process
Flavour setting
Espresso/Coffee
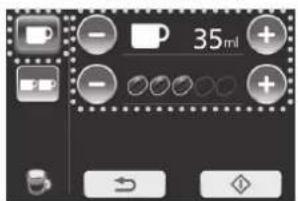
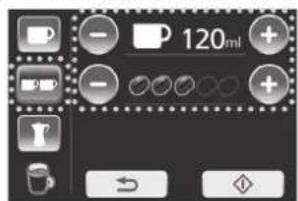
| Espresso Coffee | |||||
| Setting range Default | Setting range Default | ||||
| Coffee amount | < mL>20–100 mL (change by 5 mL)< oz>0.7–3.5 oz (change by 0.1 or 0.2 oz) | 35 mL1.2 oz | < mL>60–300 mL (change by 10 mL)< oz>2.1–10.6 oz (change by 0.3 or 0.4 oz) | 120 mL4.2 oz | |
| Bean level |  | extra light | normal |  | extra light |
 | light light |  | |||
 | normal normal |  | normal | ||
 | strong strong |  | |||
 | extra strong extra | strong |  | ||
| Number of cups for a pot | — | — | 3–6 cups each: 120 mL/4.2 oz | 3 cups | |
Milk menu
| Setting range | Default | |||
| Cappuccino | Latte Macchiato | Hot milk | ||
| Coffee amount | < mL>60–300 mL (change by 10 mL)< oz>2.1–10.6 oz (change by 0.3 or 0.4 oz) | 120 mL4.2 oz | 180 mL6.3 oz | 120 mL4.2 oz |
| Bean level |  extra light extra light light light normal normal strong strong extra strong extra strong | normal normal— | ||
| Milk foam |  no foam no foam normal normal rich rich extra rich extra rich | extra rich extrarich | extra rich | |
| Milk and coffee ratio | Milk : Coffee80 : 20–20 : 80 | Milk : Coffee60 : 40 | Milk : Coffee80 : 20 | — |
- Select your flavour by pressing the -or icon repeatedly.
Note
- First time of use or change the type of coffee beans, taste does not meet at your desire right away. Wait for a few times brewing to get desire taste.
Before Use
1 Fill the water tank with fresh cold water. ① Push the dispenser up into the upper position.
① Push the dispenser up into the upper position.
② Push the water tank and pull it out.
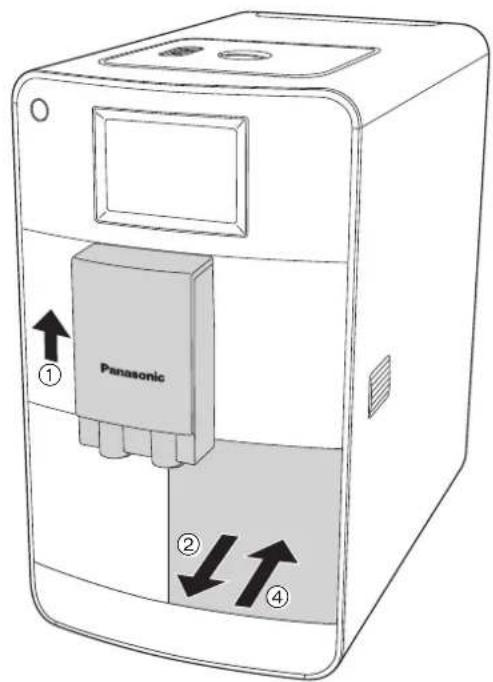
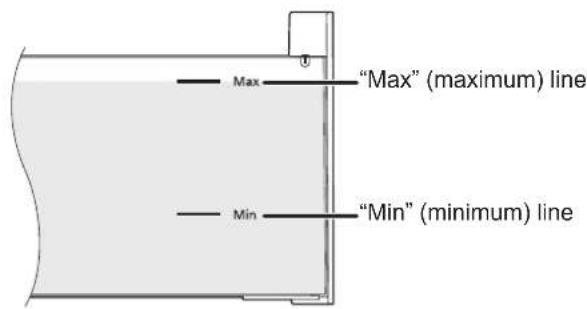
③ Fill the water tank with tap water up to "Max" (maximum) line. Dry off the out side of water tank.
④ Replace the water tank. Push it until it snaps in.
Note
- Do not fill the water tank with milk (including soy and rice milk), mineral water, sparkling water or hot water etc. Only use tap water.
- When filling the water tank with water, hold the bottom of the water tank with both hands.
2 Turn the power on.
① Plug in and press the power button.
- Make sure the waste container, water tank, drip tray and stainless steel plate are fitted. - Open the drip tray by pressing it. (Attention for drip tray display will show for 3 seconds after the espresso machine is heated up.)

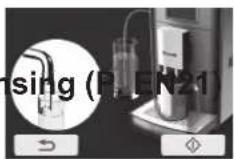
② Press to start rinsing.
- Make sure the drip tray is opened. Otherwise hot water will dispense onto the countertop.
flowchart
graph TD
    A["Device Input"] --> B["Process Step"]
    B --> C["Output"]
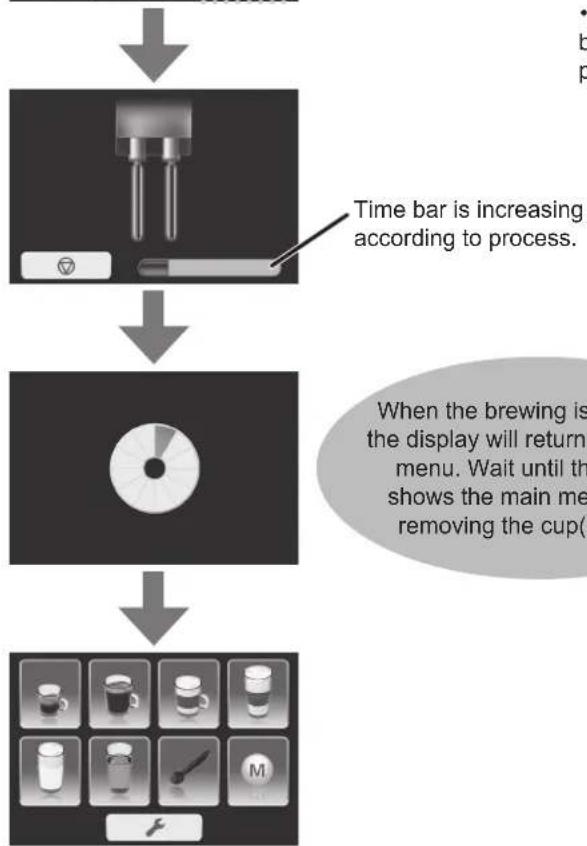
When rinsing is complete (dispense hot water 4 times), the display will return to the main menu. Wait until the display shows the main menu.
Note
- When starting up for the first time or when the water tank was completely emptied, water suction may take a little longer dispensing hot water for rinsing cycle. - A small amount of water can get into the waste container during each rinsing cycle. This is system-related and not a fault. - If is pressed during the rinsing cycle, it immediately stops the process.
After STOP flashes, the display will return to the previous display.
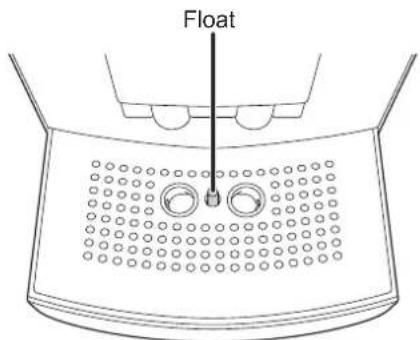
- When dispensing hot water into the drip tray during rinsing cycle, you may place the container under the dispenser. - During the rinsing, water is to collect in the drip tray. When water is full in the drip tray, the red float will be float up. - If the drip tray is closed with the red float is float up, the red float may be stuck inside. Try to open the drip tray by pressing it. If it still does not open, remove the water tank and waste container and press down the red float through the opening to remove the drip tray.
Before Use (Continued)
Before using the espresso machine for the first time, it should be set to the appropriate water hardness for your area.
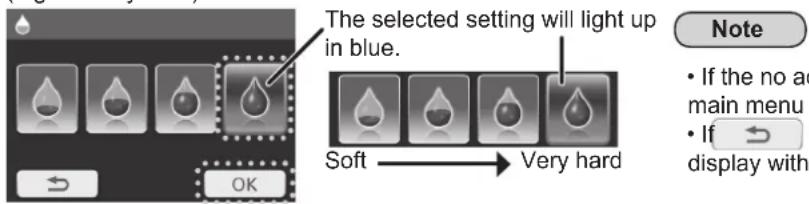
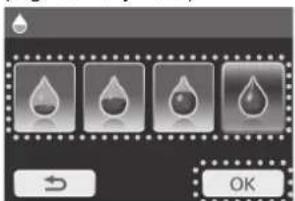
1 Determine the water hardness.
① Dip the test strip into cold water for 1 second and shake off the excess water.
② Read the water hardness from the pink-coloured areas on test strip after approximately 1 minute.
| Water hardness level | 1 soft | 2 medium-hard | 3 hard | 4 very hard |
| Water hardness mol/m3German hardnessFrench hardness | up to 1.24 up to 7°up to 12.6° | up to 2.5 up to 14°up to 25.2° | up to 3.7 up to 21°up to 37.8° | over 3.7 over 21° over 38° |
| Test strip | 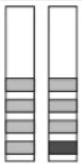 | [A2XH] | [XSSA] | [26C0] |
2 Press .
natural_image
Grid of eight grayscale icons representing various beverage and food items, including glasses, mugs, and a pencil (no text or symbols)3 Select "water hardness level".
Note
- If the no action for 30 seconds or is pressed, the display will return to the main menu.
4 Select level and press to save the setting.
(e.g. for very hard)
Note
- If the no action for 30 seconds, the display will return to the main menu without saving the settings.
- If is pressed, the display will return to the previous display without saving the setting.
Espresso/Coffee
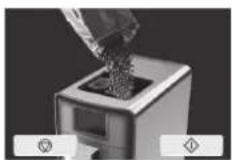
1 Fill the coffee bean container with whole coffee beans and close the lid. Then place a cup(s) or pot under the spout.
- When preparing drink for a pot, use the Latte Macchiato plate. (Height between the dispenser and Latte Macchiato plate: approx. 14 cm)
• Make sure the door is closed firmly.
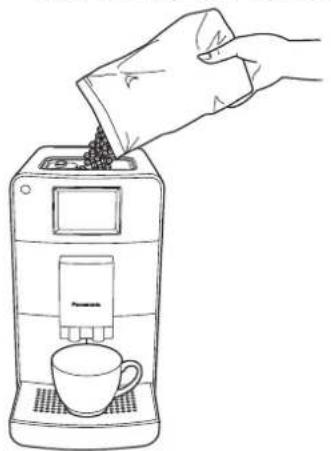
natural_image
Line drawing of a hand pouring coffee into a digital coffee machine with a cup (no text or symbols)Note
- In order to reduce heat and splashing, adjust the dispenser height to suit your cup size by moving it up and down. If the dispenser is difficult to move, clean it. (P. EN34)
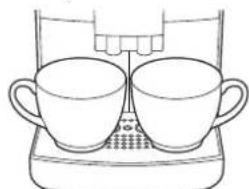
- When preparing 2 cups of drink, place the cups under the spout side by side.

natural_image
Line drawing of a coffee machine with two cups on top (no text or symbols)- Preheat a cup(s) or pot by pouring hot water or use the hot water menu (P. EN24) to have hot and tasty coffee.
After preheating a cup(s) or pot, throw the hot water away.
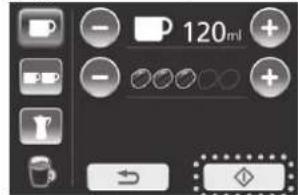
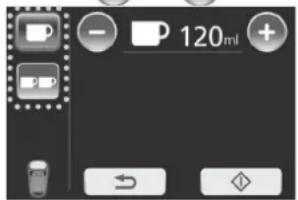
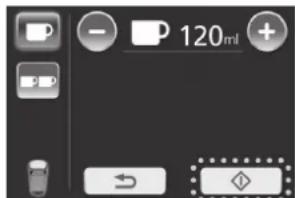
2 Select "Espresso" or "Coffee" on the main menu.
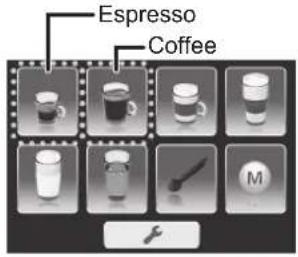
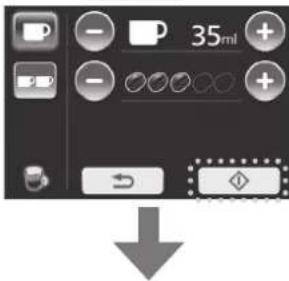
3 Select the number of cups or pot and adjust the taste to your desire.
• The selected cup will light up in blue.
- Press + or - repeatedly to adjust quantity for coffee and coffee beans. (P. EN13)
- If adjustment is unnecessary, move on to step 4.
(e.g.: When 1 cup is selected on espresso menu)
(e.g.: When 2 cups are selected on coffee menu
(e.g.: When pot is selected on coffee menu

(Not available for espresso)
Note
- If is pressed, the display will return to the previous display.
- Fill the water tank with water up to "Max" (maximum) line when preparing 6 cups of drink for a pot.
- If you wish to memorise your settings, see P. EN31.
Espresso/Coffee (Continued)
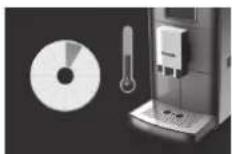
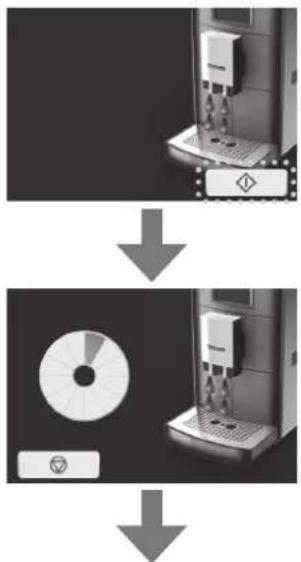
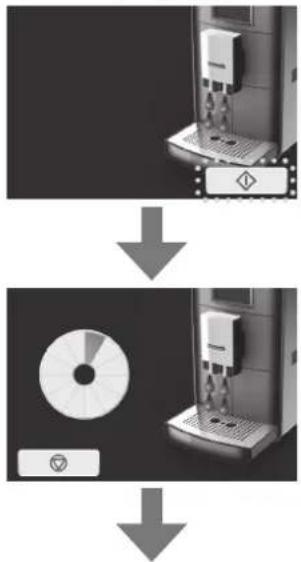
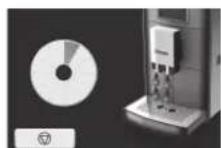
4 Press to start brewing.
(e.g.: When 1 cup is selected on coffee menu)
Note
- If is pressed during the brewing process, it immediately stops the process.
After STOP flashes, the display will return to the main menu.
- If ↻ is pressed, the display will return to the previous display.
- If the temperature of the water is not sufficient to brew coffee, the heating up process will be used prior to the brewing process.

flowchart
graph TD
    A["Start"] --> B["Time bar is increasing according to process."]
    B --> C[" preview with a pie chart"]
    C --> D["Product image with 10 cups and a brush icon at the bottom"]
■ To turn off the power after use → P. EN25
If following display shows;
refill with beans. refill
empty the waste container.
Preparations: ① Fill the water tank with water. (P. EN14) ② Operate rinsing cycle.
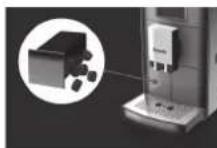
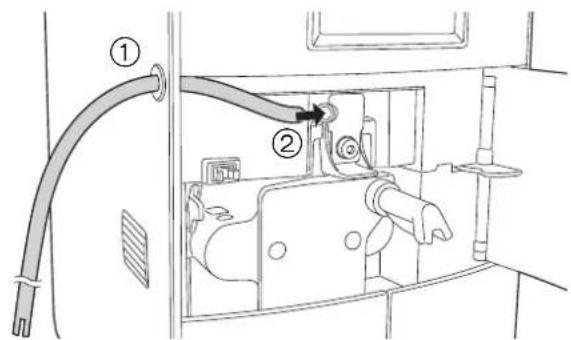
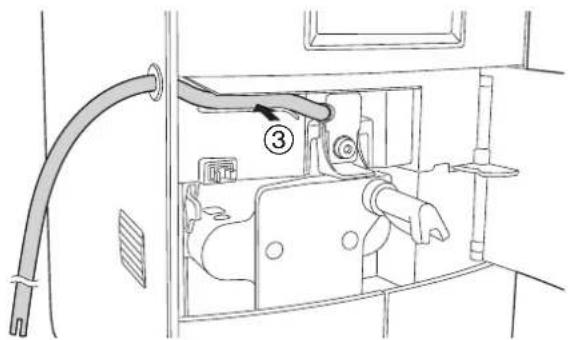
1 Attach the milk hose. ① Insert the straight cut end of t
① Insert the straight cut end of the milk hose through the side opening of the espresso machine.
② Insert the end of the milk hose into the opening on the side of the milk foamer until it stops.
③ Press the milk hose into the guide, then close the door.
④ Insert the milk hose into the milk package. Do not use soy or rice milk otherwise it may influence the milk foam quality.
2 Fill the coffee bean container with whole coffee beans (except hot milk preparation). Then place a cup(s) under the spout.
- When using a tall cup, use the Latte Macchiato plate instead of the drip tray.
• Preparing hot milk, move on to step 3.
natural_image
Line drawing of a hand pouring coffee into a coffee maker with a cup (no text or symbols)Note
- In order to reduce heat and splashing, adjust the dispenser height to suit your cup size by moving it up and down. If the dispenser is difficult to move, clean it. (P. EN34)
- When preparing 2 cups of drink, place the cups under the spout side by side.
natural_image
Line drawing of a coffee machine with two cups on top (no text or symbols)- Preheat a cup(s) or pot by pouring hot water or use the hot water menu (P. EN24) to have hot and tasty coffee.
After preheating a cup(s) or pot, throw the hot water away.
• Result of the Latte Macchiato may vary by the shape of glass.
3 Select "Cappuccino", "Latte Macchiato" or "Hot milk" on the main menu.
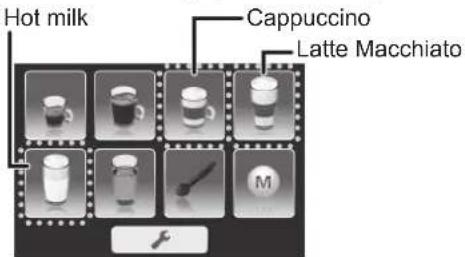
Cappuccino/Latte Macchiato/Hot milk (Continued)
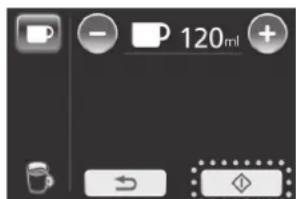
4 Select the number of cups and adjust the taste as desired.
• The selected cup will light up in blue.
- If adjustment is unnecessary, move on to step 6.
- Press + or repeatedly to adjust quantity of coffee, coffee beans and milk foam. (P. EN13)
(e.g.: When cappuccino or Latte Macchiato) is selected for 1 cup
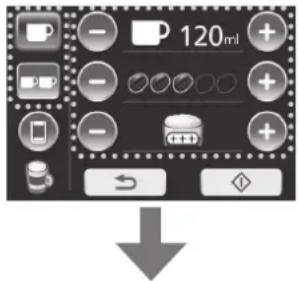
To adjust coffee and milk ratio, press 📋 and move on to step 5.
(e.g.: When hot milk is selected for 1 cup)
To start, move on to step 6.
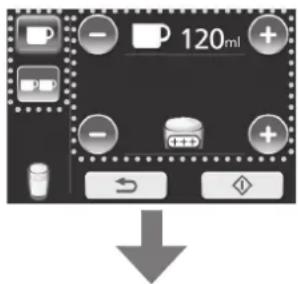
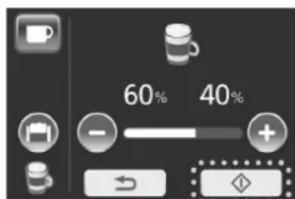
5 Adjust the coffee and milk ratio to your desire. • If adjustment is unnecessary, move on to the step 6.
- If adjustment is unnecessary, move on to the step 6.
- Press + or repeatedly to adjust the coffee and milk ratio. (P. EN13)
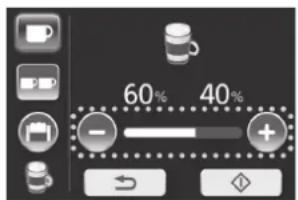
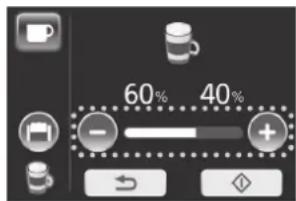
(e.g.: When cappuccino is selected 60% : 40% = milk : coffee )
Note
- When “Latte Macchiato” is selected, the coffee and milk ratio will be displayed as 80% and 20%.
- If ↩ is pressed, the display will return to the main menu.
- If you wish to memorise your settings, see P. EN31.
- If is pressed, return to step 4.
6
Press to start brewing.
(e.g.: When cappuccino is selected)
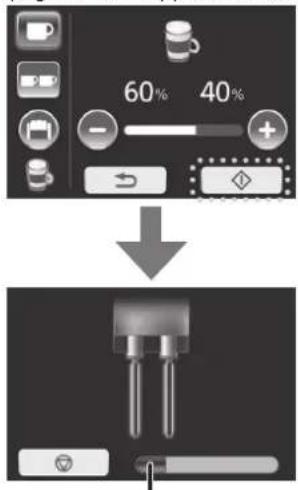
Time bar is increasing according to process.
Wait until display shows
to remove the cup(s).
Note
- Be careful with steam coming out after is pressed.
- If is pressed during the brewing process, it immediately stops the process.
After STOP flashes, the display will move on to step 7.
- If the temperature of the water is not sufficient to brew coffee, the heating up process will be performed first.
- When brewing cappuccino or Latte Macchiato, the display shows as follows.
Between brewing milk and coffee, brewing will be paused.
- If surface of milk is higher than the spouts position, it may cause milk to drip from the dispenser. In that case, pull up the dispenser to the highest position. If it does not stop, pull the hose out from the milk package and re-insert.
(simple rinsing)
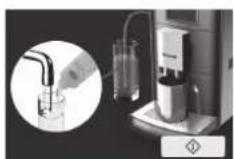
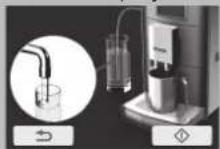
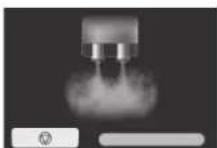
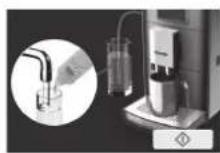
7 Fill a glass with clean water and press to start rinsing.
- This cleaning cycle is for next drink preparation without milk residue.
- Switch the milk hose from milk package to the glass and set the empty cup under the dispenser. (Cup size > 250 mL)
natural_image
Diagram showing a water tap being inserted into a glass, with another water dispenser and a download arrow (no text or symbols)The display will return to the main menu when the rinsing cycle is completed.
Note
- If you prepare milk menu continuously, skip this cycle by pressing ↻.
- If is pressed during the rinsing cycle, it immediately stops the process.
After STOP flashes, the display will return to the previous display.
■ To turn off the power after use → P. EN25
Powder coffee preparation
Preparations: ① Fill the water tank with water.
(P. EN14)
② Operate rinsing cycle.
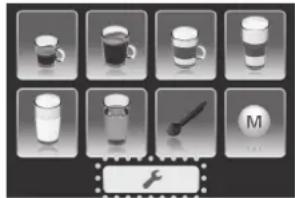
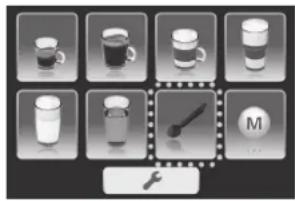
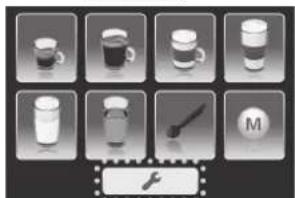
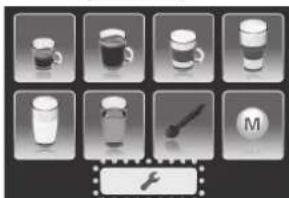
1 Select "powder coffee preparation" on the main menu.
natural_image
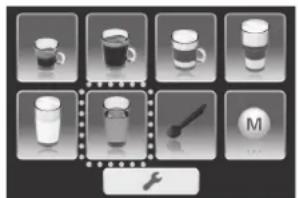
Grid of nine grayscale icons showing various beverage and food items, including glasses, mugs, and a pencil (no text or symbols)2 Select drink menu.
- If you select milk menu, attach the milk hose to the espresso machine. (P. EN19)
Espresso

Note
- If is pressed, the display will return to the main menu.
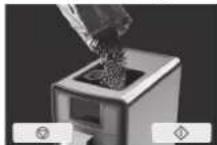
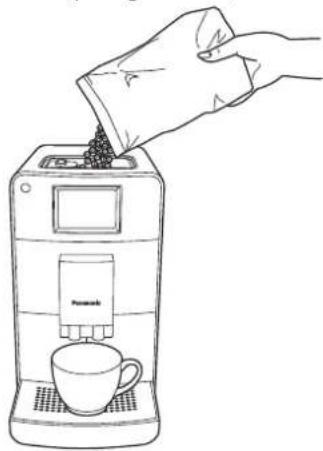
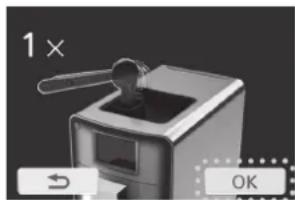
3 Fill the powder coffee shaft with one level measuring spoon of fresh coffee powder and close the lids. Place a cup under the spout. Then press
OK
- Make sure the powder coffee shaft is dry before filling with coffee powder. Continuous usage may cause condensation in the powder coffee shaft.
- Make sure the door is closed firmly.
natural_image
Close-up of a mechanical device with a lever and lid, showing no visible text or symbols.Note
- In order to reduce heat and splashing, adjust the dispenser height to suit your cup size by moving it up and down. If the dispenser is difficult to move, clean it. (P. EN34)
- Ensure that you only use the measuring spoon provided.
- Do not fill more than one level measuring spoon (max. 10 g) of coffee powder.
- Do not fill the powder coffee shaft with water-soluble, freeze-dried, instant products or other drink powders.
- Too finely ground coffee powder may clog the brewing unit.
- Preheat a cup by pouring hot water or use hot water menu (P. EN24) to have hot and tasty coffee.
After preheating a cup, throw the hot water away.
- If ↩ is pressed, the display will return to the previous display.
4 Adjust cup filling quantity and/or milk foam as desired.
- If adjustment is unnecessary, move on to the step 6.
- Press + or repeatedly to adjust quantity for coffee and/or milk foam. (P. EN13)
To start, move on to step 6. To adjust coffee and milk ratio, press 📋 and move on to step 5.
Note
- Only one cup can be prepared with this function.
- If is pressed, the display will return to the select drink menu (step 2). At same time the Espresso machine release the coffee powder into the waste container. Refill the powder coffee at step 3.
5 Adjust coffee and milk ratio.
/ e.g.: Cappuccino
60% : 40% = milk : coffee,
Note
- When “Latte Macchiato” is selected, the cup filling quantity will be displayed as 80% and 20%.
- If ↩ is pressed, the display will return to the select drink menu.
6 Press to start brewing.
(e.g.: Espresso/Coffee) (e.g.: Cappuccino)
Note
- If is pressed during the brewing process, it immediately stops the process.
After STOP flashes, the display will return to the main menu.
- When brewing is completed, display will return to the main menu. Wait until display shows the main menu to remove the cup(s).
■ To turn off the power after use → P. EN25
Hot water
Preparations: ① Fill the water tank with water.
(P. EN14)
② Operate rinsing cycle.
- Make sure the milk hose is not attached.
1 Select "hot water" on the main menu. Then place a cup(s) under the spout.
natural_image
Grid of nine grayscale icons showing various glassware and objects, no text or symbols presentNote
- If simple rinsing is skipped after milk menu, milk residue may mix into the hot water. (Step 7 on P. EN21) In that case dispense the hot water a few times.
2 Select the number of cups and adjust quantity.
• The selected cup will light up in blue.
- If adjustment is unnecessary, move on to the step 3.
- Press + or repeatedly to adjust quantity for hot water.
Note
- If is pressed, the display will return to the previous menu.
3 Press to start brewing.
Note
- If is pressed, the display will return to the main menu.
- If is pressed during the brewing process, it immediately stops the process.
After STOP flashes, the display will return to the main menu.
- When brewing is completed, display will return to the main menu. Wait until display shows the main menu to remove the cup(s).
■ To turn off the power after use → P. EN25
Turn off the power
After the power is turned off, the cleaning cycle starts. The cleaning cycle will vary depending on which menus have been used whilst the espresso machine is turned on. If milk menus were used, milk system cleaning will be included.
1 Turn off the power.
- If milk system cleaning is not necessary, cleaning will start from step 3.
- If the coffee or milk menus are not prepared, it will turn off without cleaning.

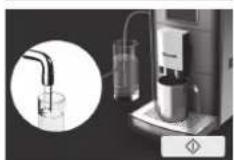
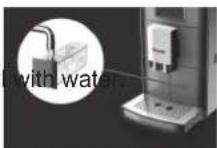
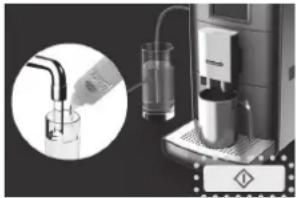
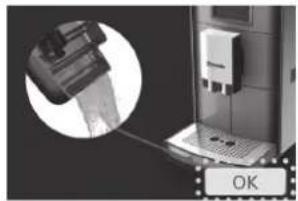
2 Clean the milk system. (Only for milk menu)
① Fill a glass with 250 mL of water and 7.5–15 mL of milk system cleaner.
Place an empty cup under the dispenser.
(Cup size > 250 mL)
Then press .
- If the milk hose is not attached, attach it to espresso machine. (P. EN19)
natural_image
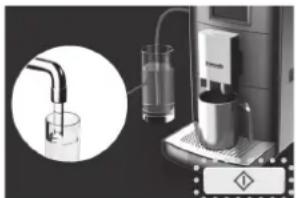
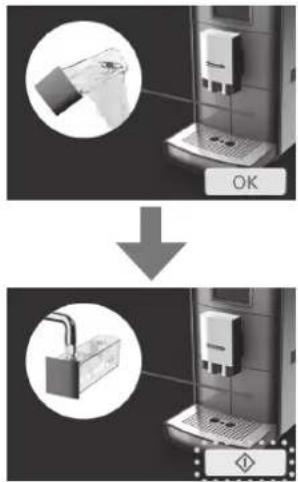
Close-up of a water dispenser with a glass and water bottle, showing liquid being poured into a glass tube (no text or symbols visible)② Fill the glass with clean water and press
to start the rinsing cycle again. Place an empty cup under the dispenser before starting. (Cup size > 250 mL)
natural_image
Close-up of a water dispenser with a glass of clear water being poured into it, alongside its control panel (no visible text or symbols)Note
- Be careful with steam coming out after is pressed.
- If ◇ is not pressed for 15 minutes, the espresso machine will turn off without running the rinsing cycle.
- If is pressed, it immediately stops the rinsing process.
After STOP flashes, the display will return to the previous display. - Clean the milk foamer nozzle every day that a milk menu drink is prepared. (P. EN36)
Turn off the power (Continued)
3 Press to start the rinsing cycle.
flowchart
graph TD
    A["Device Input"] --> B["Process Step"]
    B --> C["Output"]
When the rinsing cycle has finished, the power turns off. Then unplug the espresso machine.
Note
- Before starting, following display shows to make actions. (Shows 3 seconds each)
empty the waste container.
natural_image
Two-step diagram showing a device being processed, with one icon highlighting a component (no text or symbols present)open the drip tray.
- If is not pressed for 15 minutes, the espresso machine will turn off without running the rinsing cycle.
- If is pressed, it immediately stops the rinsing process.
After STOP flashes, the display will return to the previous display.
Espresso machine will turn off automatically in the following conditions.
- When the time set in auto shut off is reached. (P. EN28)
- No action for 15 minutes on step 2 or step 3. Shut off without rinsing process.
In that case, the machine starts with the cleaning cycle the next time power is turned on.
Changing the setting
● Changing settings from the default.
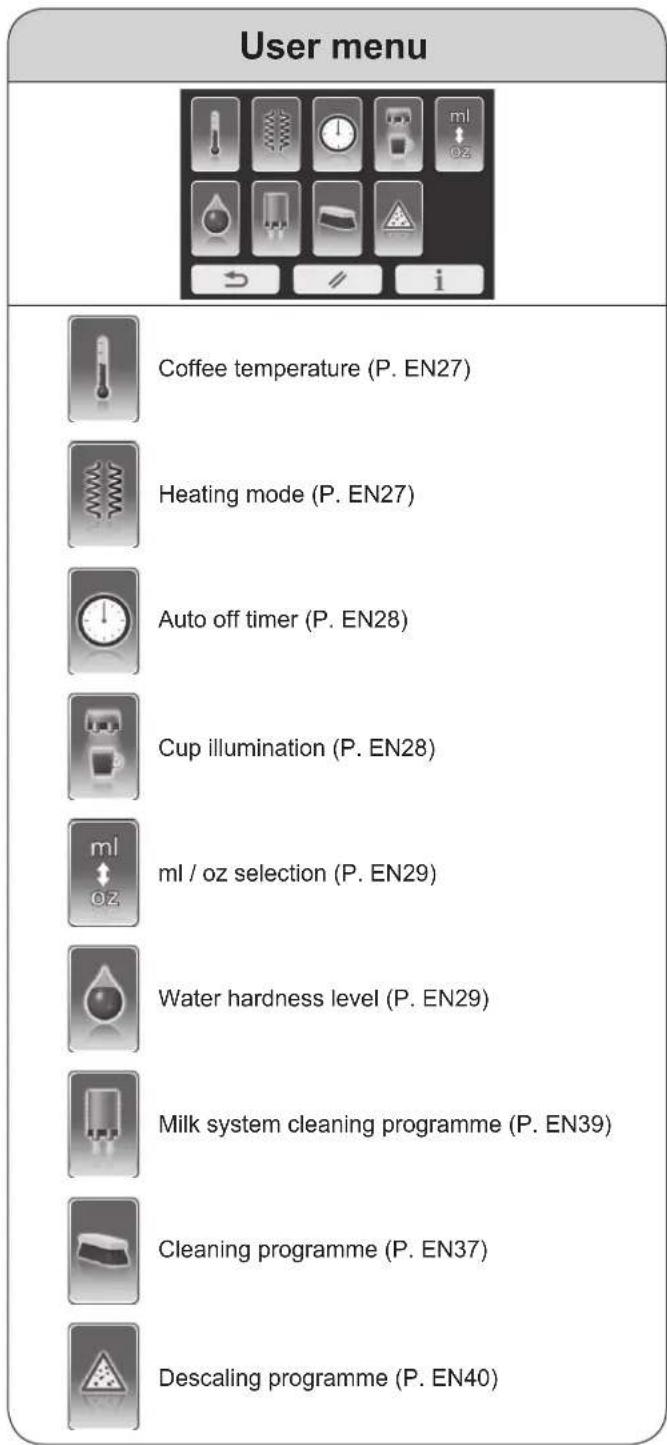
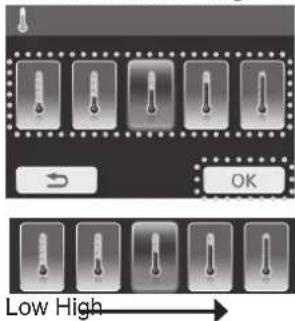
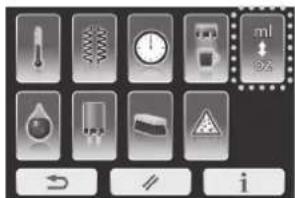
Coffee temperature
Select temperature from 5 levels on your drink. (Default setting: middle)
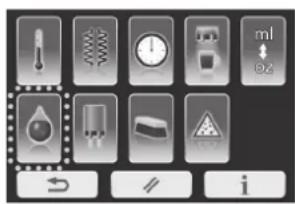
1 Press on the main menu.
natural_image
Grid of eight grayscale icons showing various glassware and objects, no text or symbols present2 Select "coffee temperature" on the user menu.
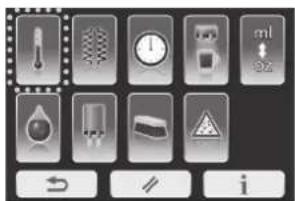
3 Select level and press to save the setting.
• The selected setting will light up in blue.
Note
- If there is no action for 30 seconds, the display will return to the main menu without saving the setting.
- If ↩ is pressed, the display will return to the previous display without saving the setting.
- When setting is completed, the display will return to the user menu. To return to the main menu, press ↩.
Heating mode
Select heater condition from 3 modes. (Default setting: Eco mode)
1 Press on the main menu.
natural_image
Grid of eight grayscale icons showing various beverage and food items, including glasses, mugs, and a pen (no text or symbols)2 Select "heating mode" on the user menu.

3 Select level and press to save the setting.
• The selected setting will light up in blue. Eco mode
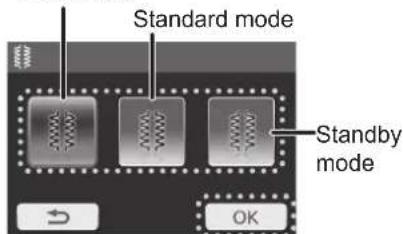
(Eco mode)
There is a short wait as the heating system is only switched on when a drink is to be brewed.
Recommended when the machine is used occasionally.
(Standard mode)
The heating system is turned on, only for coffee and espresso with a short waiting time. Recommended for frequent preparation of coffee and espresso.
(Standby mode)
The heating system and additional heating are activated permanently. Recommended for frequent preparation of milk menus.
Changing the setting (Continued)
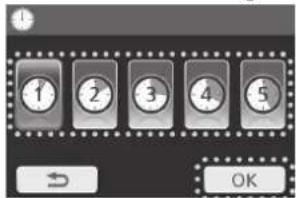
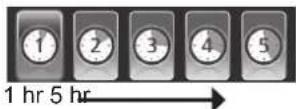
Auto off timer
Select auto off timing from 5 auto off times (1–5 hours). (Default setting: 1 hour)
1
Press on the main menu.
natural_image
Grid of eight grayscale icons showing various glass and liquid objects, including mugs, vials, and a pen (no text or symbols)2
Select "auto off timer" on the user menu.
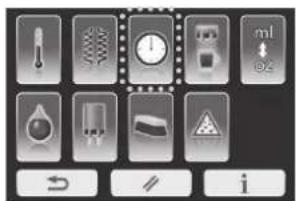
3
Select time and press to save the setting.
• The selected setting will light up in blue.
- The shut-off time begins after the last operation.
Cup illumination
Select cup illumination on the dispenser from 3 modes. (Default setting: auto)
1
Press on the main menu.
natural_image
Grid of eight grayscale icons showing various beverage and food items (no text or symbols)2
Select "cup illumination" on the user menu.

3
Select desired operating mode and press to save the setting.
- The selected setting will light up in blue. OnOff
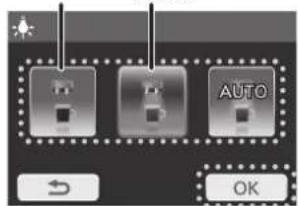
(Off)
Cup illumination is off.
(On)
Cup illumination is always on.
(Auto)
Cup illumination is turned on and off by operation of the espresso machine.
ml / oz selection
1 Press on the main menu.
natural_image
Grid of eight grayscale product images showing various glassware and accessories (no text or symbols visible)2 Select "ml / oz selection" on the user menu.
3 Select "ml" or "oz" and press save the setting.
tok
• The selected setting will light up in blue.

*1 oz is approx. 28.41 mL
Water hardness level
1 Press on the main menu.
natural_image
Grid of eight product icons including glasses, mugs, and a wrench, displayed in grayscale (no text or symbols)2 Select "water hardness level" on the user menu.
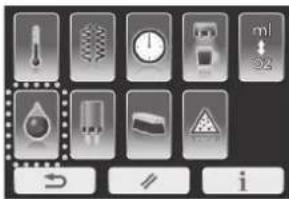
3 Select level and press to save the setting.
- The selected setting will light up in blue. (e.g. for very hard)
natural_image
Four identical droplet icons arranged in a row, each with a circular arrow indicator (no text or symbols on the droplets)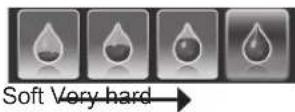
■ To check water hardness → P. EN16
■ To purchase a new test strip → P. EN45
Note
- If there is no action for 30 seconds, the display will return to the main menu without saving the setting.
- If ↩ is pressed, the display will return to the previous display without saving the setting.
- When setting is completed, the display will return to the user menu. To return to the main menu, press ↩
Changing the setting (Continued)
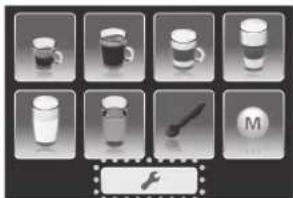
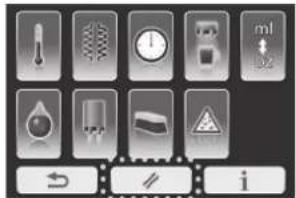
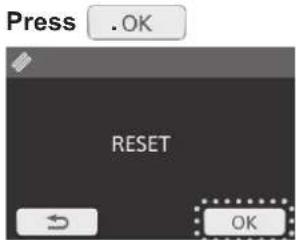
Reset
You can reset all settings to factory settings by this mode.
1
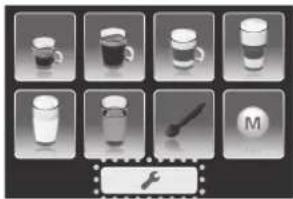
Press on the main menu.

natural_image
Grid of eight grayscale icons representing various beverage and food items, including glasses, mugs, and a spoon (no text or symbols)2
Press on the user menu.
3
Information
This displays the total cups made and setting information for this espresso machine. If there is a problem with the espresso machine, the setting information will be helpful for service.
1
Press on the main menu.
natural_image
Grid of eight grayscale icons showing various kitchenware and objects, including mugs, glasses, vials, a tool, and a magnifying glass (no text or symbols)2
Press on the user menu.
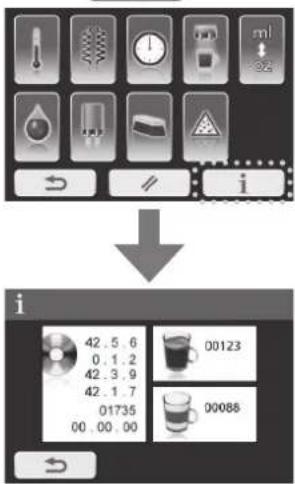
3

Note
- If there is no action for 30 seconds, the display will return to the main menu.
- If ↻ is pressed, the display will return to the previous display.
- When setting is completed, the display will return to the user menu. To return to the main menu, press ↩.
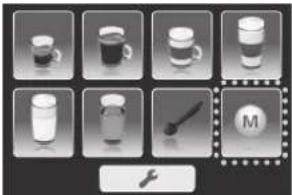
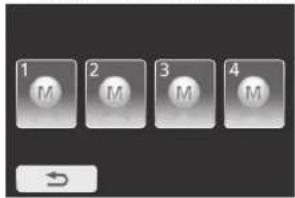
Memory setting
Memory setting
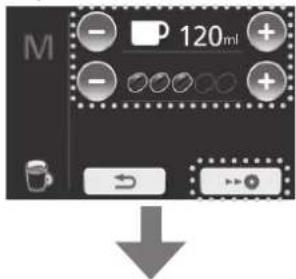
1 Select "memory menu" in the main menu.
natural_image
Grid of grayscale icons showing various beverage and food items, including glasses, mugs, bottles, and a pen (no text or symbols)2 Select an available memory from the memory menu.
- Greyed-out icons are yet to be used.
3 Select desired drink. (e.g. for coffee)
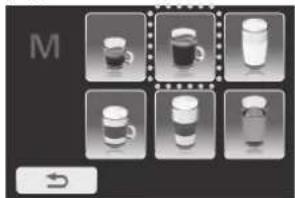
natural_image
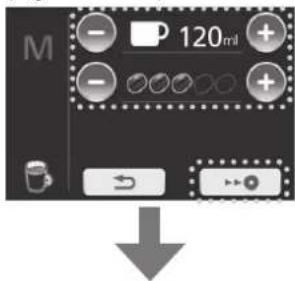
Six grayscale images of various mugs or mugs arranged in a grid, each with a different color and label 'M' (no text or symbols on the mugs themselves)4 Adjust the quantity and taste. Then press to save the setting. (e.g. for coffee)
Returns to the memory menu
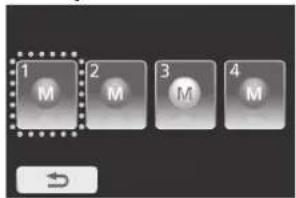
Using memory setting
1 Display the memory menu as step 1 on "Memory setting". Then select "memory" you wish to use.
- Blue icons can be selected.
2 Press to start brewing.
Returns to the main menu after brewing
Note
- If is pressed, the display will return to the previous display.
Memory setting (Continued)
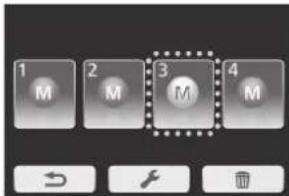
Changing memory setting
1 Display the memory menu as step 1 on "Memory setting". Then press
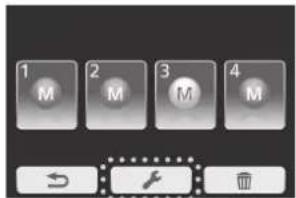
2 Select "memory" you wish to change. • Greyed-out icons cannot be selected.
3 Adjust the quantity and press save the setting. too
(e.g. for coffee)
Returns to the memory menu
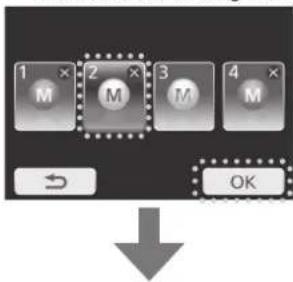
Deleting memory setting
1 Display the memory menu as step 1 on "Memory setting". Then press
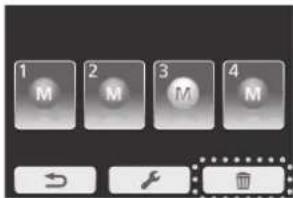
2 Select "memory" to delete and press . OK • The selected setting will light up in blue.
flowchart
graph TD
    A["1 M"] --> B["2 M"]
    B --> C["3 M"]
    C --> D["4 M"]
    E["↓"] --> F["OK"]
Returns to the memory menu
Note
- If is pressed, the display will return to the previous display.
How to Clean
■ Clean the appliance after every use.
■ Unplug and make sure that the appliance has cooled down before cleaning.
Note
- Do not use benzine, thinner, alcohol, bleach, polishing powder, metal brush or nylon brush, otherwise the surface will be damaged.
- Do not wash in a dishwasher.
- Do not clean the appliance with pointed object such as a toothpick or pin.
Main body
Wipe with a well-wrung cloth.
Coffee bean container/powder coffee shaft
Wipe them off with a lint-free cloth.
After removing the parts, wash with diluted dish soap (neutral) and a soft sponge. Then dry them well.
Waste container/water tank
After removing the parts, wash with diluted dish soap (neutral) and a soft sponge.
Drip tray/Latte Macchiato plate
After removing the parts, wash with diluted dish soap (neutral) and a soft sponge.
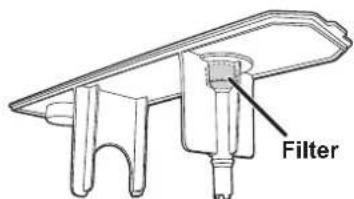
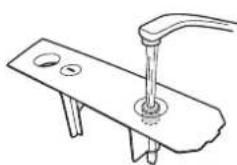
Filter
Wash the filter of the water tank under running water through the opening. (It is not removable.)
natural_image
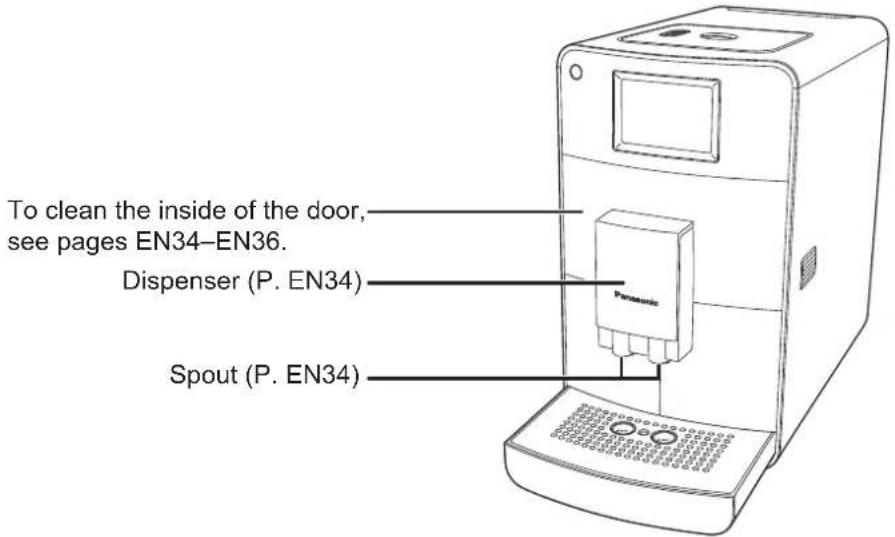
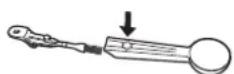
Line drawing of a mechanical clamp or fixture with a base and handle (no text or symbols)Dispenser:
Clean the dispensing spouts weekly or if used intensively, clean it frequently.
Clean the dispenser from the inside and outside with warm water and a suitable brush to remove any residue and prevent mould from forming.
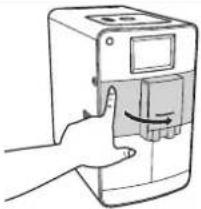
1 Press the left side of the door with the dispenser to open. (P. EN9)
2 Press the dispenser upwards. Pull the distribution hose lightly from the inner side of the door and pressing to the left so that it clicks out of the fastener. Then remove the dispenser.
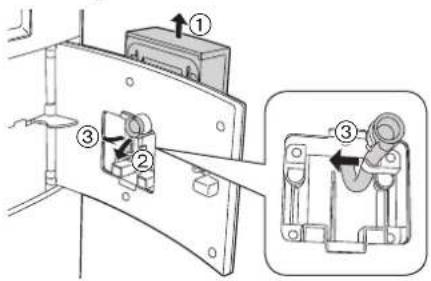
1 Place the dispenser in the upper position back into the door and push it slightly and slide it down until top of door high.
2 Pull the hose from inner side of the door opening and press it to the right into the holder and push the funnel-shaped part of the hose back into the collar until it fits perfectly.
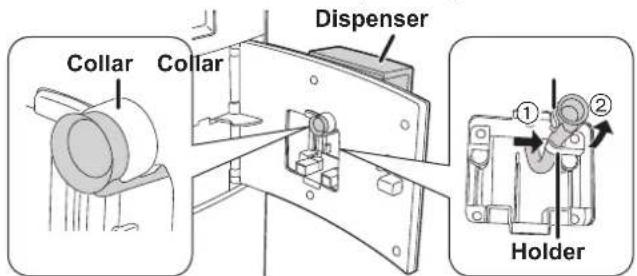
3 Make sure top of the door and dispenser are same high, and close the door firmly.
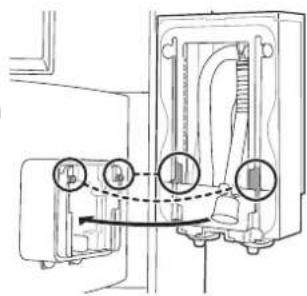
Cleaning when spout is clogged
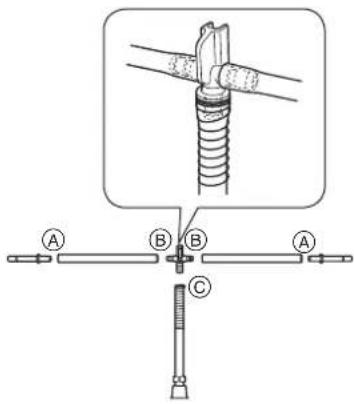
1 Disassemble the dispenser. Grip and pull the loose hose end near to the spring and pull both hose ends with the sleeve ends out of the spout.
2 Pull the sleeves out of hoses Ⓐ and disconnect the hoses from the connecting piece Ⓑ. Pull the hose and spring together from connecting piece Ⓒ.
3 Leave the parts immersed in a milk system cleaner for several hours. Refer to the instructions on the milk system cleaner for the exact quantity. Then rinse them thoroughly with clean water.
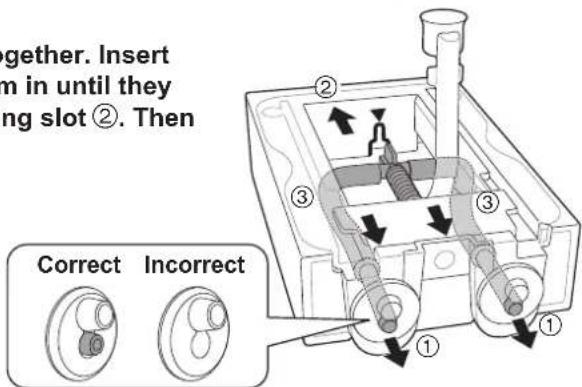
4 To assemble, insert both sleeve ends and hoses back together. Insert both sleeve ends into the small spouts ① and press them in until they snap in properly. Push the connecting piece into the fixing slot ②. Then push the hoses to the right and left under the frame ③.
Note
- If sleeves are inserted into large spouts, coffee is not dispensed straight.
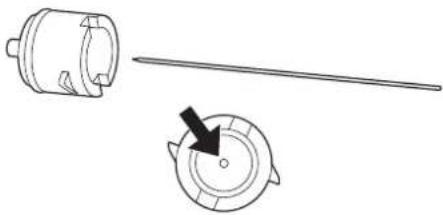
Brewing unit:
Clean the brewing unit weekly or if used intensively, clean it frequently.
1 Press the left side of the door with the dispenser to open. (P. EN9)
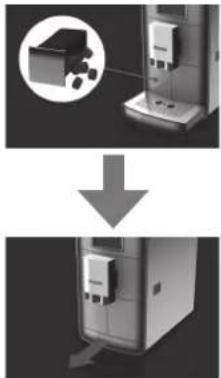
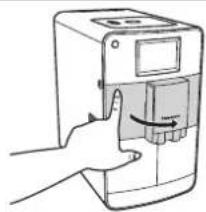
2 Remove the waste container by pressing the container and pulling it out of the espresso machine.
3 Grip the lower front part of the brewing unit and pull it out to the front. Use your other hand to stop it from falling out.
4 Turn the brewing unit upside down and clean the opened brewing unit under warm running water with a brush, then shake it lightly. In particular, the stainless steel filter must be rinsed out well to remove any coffee residue.
- To clean the two stainless steel filters, open the brewing unit, turn it upside down and fold down the ejector. If the brewing unit cannot be opened because it is blocked, refer to page EN44 (U10) on how to open it.
Recommendation:
Soak the brewing unit for approximately 30 minutes in lukewarm water containing a diluted dish soap (neutral) and rinse well.
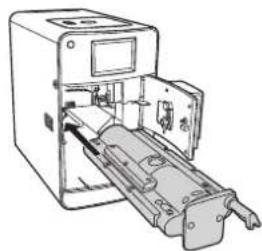
5 After the brewing unit is dried off well, insert it into the guide grooves and push it completely into the espresso machine.
6 Place the waste container into the espresso machine and close the door.
- Make sure top of the door and dispenser are same high, and close the door firmly.
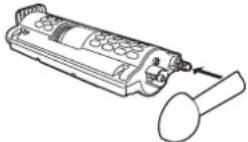
natural_image
Hand inserting a device into a digital device (no text or symbols visible)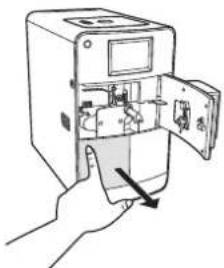
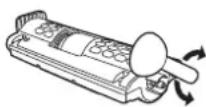
natural_image
Hand inserting a device into an open device (no text or symbols visible)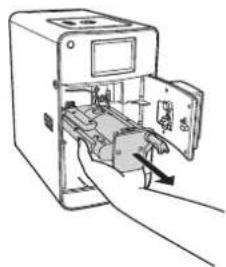
natural_image
Illustration of a hand inserting a device into a machine (no text or symbols visible)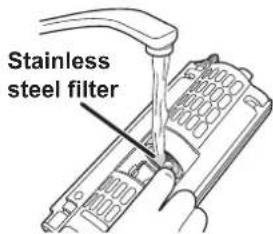
natural_image
Technical line drawing of a mechanical device with internal components (no text or symbols)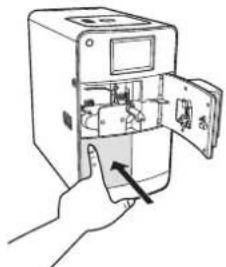
natural_image
Hand inserting a device into a machine (no text or symbols visible)How to Clean (Continued)
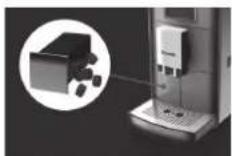
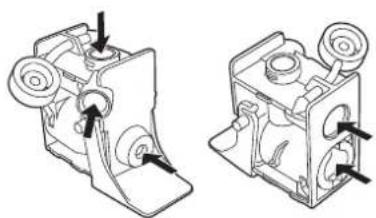
Milk foamer nozzle:
Clean the milk foamer nozzle every day that a milk menu drink is prepared.
1 Press the left side of the door with the dispenser to open. (P. EN9)
- When opening and closing the door, the dispenser should be located at the upper position, otherwise the milk hose on the inside will be jammed.
natural_image
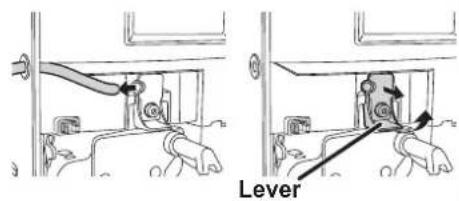
Hand pressing a button on a device (no text or symbols visible)2 Pull the milk hose out of the milk foamer. Then fold the lever on the milk foamer upwards and pull the milk foamer out towards you.
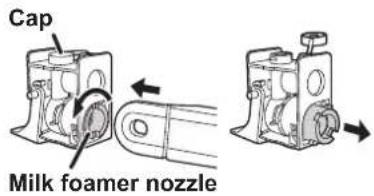
3 Open the cap from the milk foamer. Then remove the milk foamer nozzle from the milk foamer by inserting the rounded end of the measuring spoon into the slot of the milk foamer nozzle and turning 45° to pull it out. The nozzle is lifted up slightly during turning, so that it can be removed more easily.
4 Clean the milk foamer nozzle with a thin needle. • Do not use a metal brush or nylon brush.
natural_image
Diagram showing two mechanical components with a tool interacting, one with a black arrow indicating rotation (no text or symbols)5 Mix 250 mL of water with 7.5–15 mL of milk system cleaner.
6 Leave all parts of the milk foamer in the cleaner solution for 5 hours or over night and rinse well.
7 Use the brush of the measuring spoon to clean all parts of the milk foamer nozzle. Make sure that all vents of the milk foamer and its nozzle are cleaned with brush and rinse well.
natural_image
Technical line drawing of two mechanical components with arrows indicating motion or assembly (no text or symbols)8 Put all parts back together by reversing steps 1–3.
- Make sure top of the door and dispenser are same high, and close the door firmly.
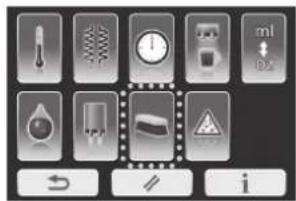
Cleaning Cycle:
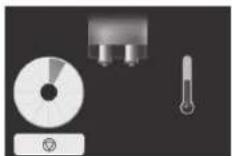
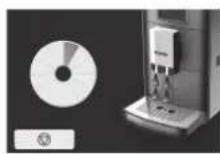
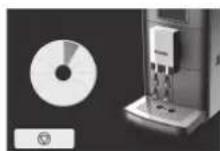
Use this cycle occasionally and/or when the display shows

This cleaning programme enables intensive cleaning of inaccessible areas. This programme takes approx. 8 minutes and should not be interrupted. When display shows 📄, press 📋 and follow steps from 3.
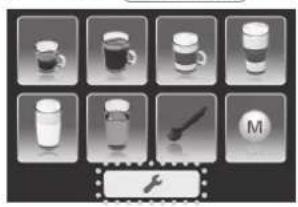
1 Press on the main menu.
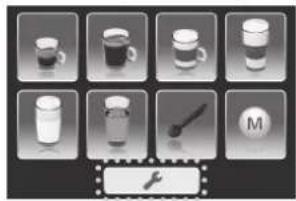
natural_image
Grid of nine grayscale icons showing various beverage and food items, including glasses, mugs, and a pen (no text or symbols)2 Select "cleaning programme".
Note
- If is pressed, the display will return to the main menu.
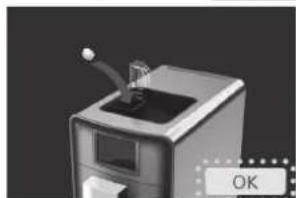
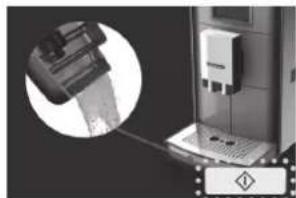
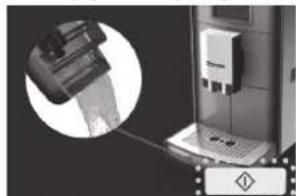
3 Fill the water tank with water, then press .OK
natural_image
Close-up of a hand holding a padlock next to a coffee maker, with no visible text or symbols on the device itself.Note
- If is pressed, the display will return to the previous display.
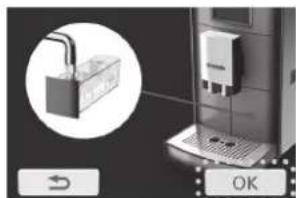
4 Place the cleaning tablet into the powder coffee shaft and close the lids, then press OK.
natural_image
3D rendered image of a coffee machine with a lid and spout, no visible text or symbolsHow to Clean (Continued)
5 Press to start cleaning cycle. • Empty the drip tray before starting cleaning cycle.
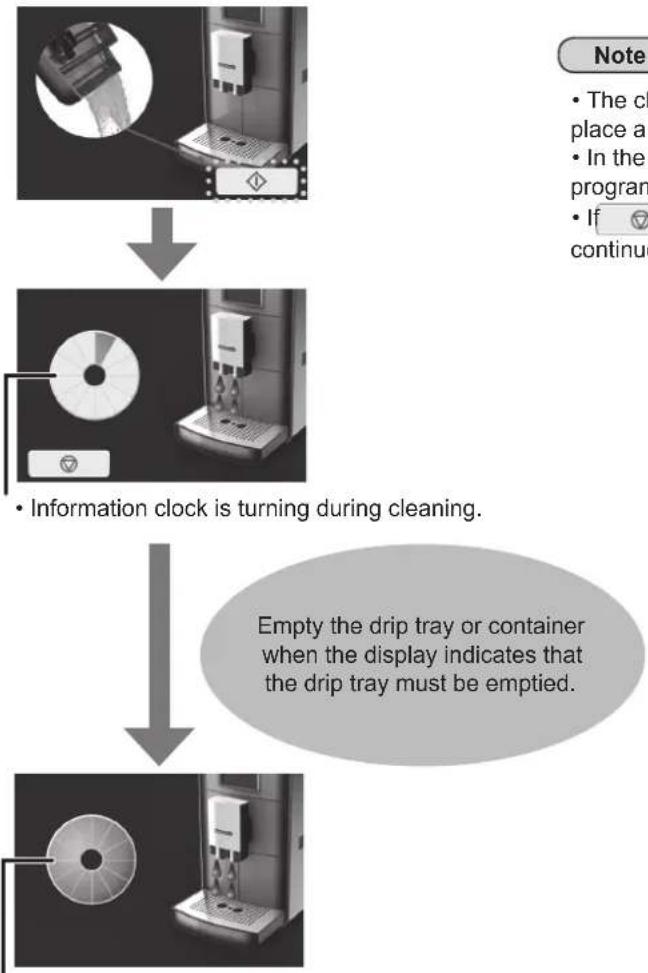
• Information clock is turning during cleaning.
Empty the drip tray or container when the display indicates that the drip tray must be emptied.
- When cleaning is completed, information clock will be full bars, then return to the main menu.
Note
- The cleaning water is collected in the drip tray. Alternatively, you can place a container (> 250 mL) under the spout.
- In the event of power failure during the cleaning programme, the programme has to be restarted.
- If is pressed during cleaning, the process will be paused. To continue the cleaning cycle, press
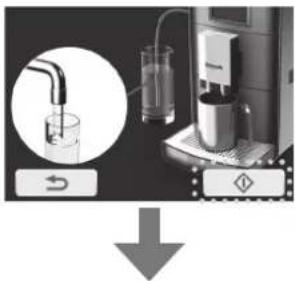
Milk system cleaning:
Use this programme when quality of foam is low and when milk residue gets into coffee, espresso or hot water during espresso machine use.
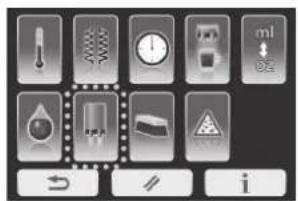
1 Press on the main menu.
natural_image
Grid of nine grayscale product images showing various beer and glass items, including cups, bottles, and a tool (no text or symbols)2 Select "Milk system cleaning programme".
Note
- If is pressed, the display will return to the main menu.
3 Fill a glass with 250 mL of water and 7.5–15 mL of milk system cleaner. Place an empty cup under the dispenser. (Cup size > 250 mL) Then press to start rinsing cycle for milk system.
- If the milk hose is not attached, attach it to espresso machine. (P. EN19)
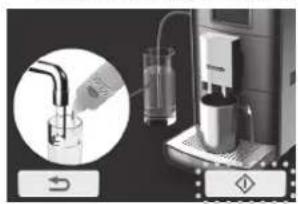
natural_image
Close-up of a hand pouring liquid into a glass over a coffee maker (no visible text or symbols)Note
- If is pressed, it immediately stops the rinsing process.
After flashes, the display will show the following display.
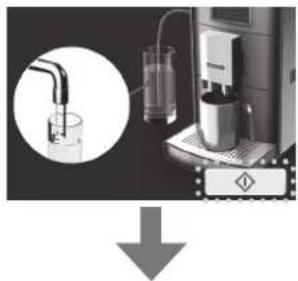
4 Fill the glass with clean water and press to start the rinsing cycle again. Place an empty cup under the dispenser before starting. (Cup size > 250 mL)
natural_image
Diagram showing a water absorption setup with a beaker, glass cups, and a coffee machine (no text or symbols visible)Note
- If is pressed, it immediately stops the rinsing process. After STOP flashes, the display will return to the previous display.
Display will return to the main menu when the rinsing cycle is completed.
How to Clean (Continued)
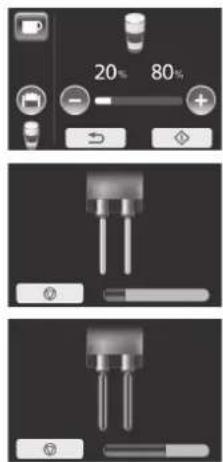
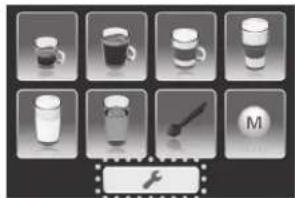
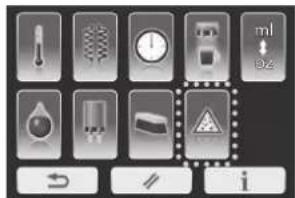
Decalcification cycle:
Use this cycle occasionally and/or when the display shows

This decalcification cycle enables simple and effective descaling. This programme runs in 2 phases and it takes approximately 11 minutes and should not be interrupted. When display shows ⚠️, press and follow steps from 3.
1 Press on the main menu.
natural_image
Grid of eight grayscale icons showing various glassware and objects, no text or symbols presentNote
- If the filter cartridge is set in the water tank, remove it before this programme starts.
2 Select "descaling programme".
Note
- If is pressed, the display will return to the previous display.
(First phase)
3 Fill the water tank with 250 mL of water and add 125 mL of descaling agent, then press OK.
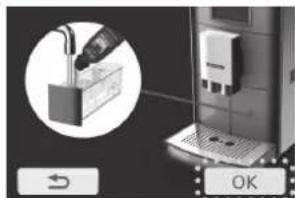
natural_image
Close-up of a kitchen appliance with a hand holding a tool, showing no visible text or symbols.Note
- If is pressed, the display will return to the previous display.
4 Press to start decalcification cycle. (Approx. 9 min.) • Empty the drip tray before starting the cleaning cycle.
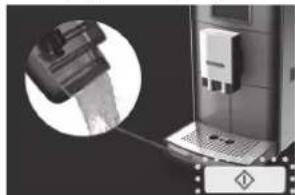
natural_image
Close-up of a mechanical device with a magnified inset showing a component inserted into a slot (no visible text or symbols)Note
- If is pressed during descaling, the display indicates to empty the drip t continue the descaling cycle, press
5
Empty the drip tray and press
. OK
natural_image
Close-up of a printer with a magnified inset showing a printer tip, next to a machine (no visible text or symbols)(Second phase)
6
Dispose of the water in the water tank and rinse it thoroughly. Press OK. Then fill it with clean water and press to continue the process. (Approx. 2 min.)
Note
- If is pressed during descaling, the display indicates to empty the drip tray. To continue the descaling cycle, press
7
Press
- Empty the drip tray.
natural_image
Close-up of a mechanical device with a circular inset showing a hand holding a tool, no visible text or symbols.Note
- If is pressed during descaling, the display indicates to empty the drip tray. To continue the descaling cycle, press
8
Press to return the main menu.
- Empty the drip tray.
natural_image
Close-up of a mechanical device with a magnified inset showing a component (no visible text or symbols)Note
- The cleaning water is collected in the drip tray. Empty the drip tray or container when the display indicates that the drip tray must be emptied.
- In the event of power failure during the descaling cycle, the programme has to be restarted.
- If is pressed during descaling, the process will be paused. To continue the descaling cycle, press .
Troubleshooting
Problem Cause an
Drinks are not hot enough.
Drinks are too weak or strong.
Abnormal loud noise during grinding.
No milk foam or milk is not dispensed.
Low quality foam. Latte Macchiato is not three layers.
Display shows “Refill with water” even though the water tank is full.
"Refill with water" does not appear in the display despite an empty water tank.
on
● Temperature setting is low. (P. EN27)
● Cups are too cold.
→Warm up cups with hot water.
● Room temperature is too cold.
● It is first time use of the espresso machine or shortly after changing coffee beans.
→Wait for a few times brewing to get desire taste.
[Powder coffee]
● Not enough or too much coffee powder is being used.
→Measure coffee properly with measuring spoon provided. (Max: 1 level of measuring spoon)
→Try different kinds of coffee powder.
[Coffee beans]
● The settings are not properly adjusted.
→Try to change setting of ground coffee quantity. (P. EN17, EN20)
→Change grinding fineness. (P. EN10)
→Try different kinds of coffee beans.
● Coffee bean type or grinding fineness setting is changed.
→As there are remaining ground coffee beans in the espresso machine, it will take a few cups for the new beans to come through.
● The grinding mechanism is clogged with foreign matter.
→Contact an authorised service centre to have the espresso machine inspected.
● The distribution hose or milk hose is not connected correctly or bended.
→Check the distribution hose or milk hose connection. (P. EN19, EN34)
● The milk foamer is not inserted correctly.
→Fit the milk foamer correctly. (P. EN36)
● The milk foamer cap is open.
→Check the milk foamer cap. (P. EN36)
● The milk hose bent.
→Reinstall the milk hose. (P. EN19)
● The milk foamer is clogged.
→Clean the milk foamer nozzle by soaking. (Step 6 on P. EN36)
● The steam outlet of the espresso machine is blocked.
→Descale the espresso machine. (P. EN40)
● Milk is too warm, too old or too high or low in fat.
→Use fresh cold milk and/or try use different ratio in fat.
● The milk foam nozzle is clogged.
→Clean the milk foamer nozzle. (P. EN36)
● The milk foamer is not clean.
→Clean the milk foamer. (P. EN36)
● The steam outlet of the espresso machine is blocked.
→Descale the espresso machine. (P. EN40)
● There is air in the water system.
→Dispense a little hot water. (P. EN24)
● The water flow system is clogged.
→Descale the espresso machine. (P. EN40)
● Too much moisture on the water tank.
→Remove the water tank and dry it off thoroughly.
Problem Cause an
"Empty the waste container" displayed after empty the waste container.
Coffee dispensing too slow.
Water in the waste container.
The espresso machine turns off after rinsing or dispensing coffee.
The espresso machine cannot be turned on.
The coffee dispensing is very uneven or only one-sided.
Only hot water is dispensing on coffee menu.
Hot water is not dispensing.
The appliance is not working well.
Milk is dripping from spouts.
on
- Waste container was emptied while the espresso machine was switched off. →Empty the waste container only when the espresso machine is switched on.
- When confirmation display is shown for "Empty the waste container", was pressed. →Press OK when confirmation display is shown for "Empty the waste container".
● Grinding fineness set too fine.
→Set coarser grinding fineness.
● Grinding quantity set too high.
→Set ground coffee quantity lower.
● The water flow system is clogged.
→Run the descaling programme. (P. EN40)
● Coffee powder is too fine or too much has been used.
→Use coarser coffee powder or use less coffee powder. (Max: 1 level of measuring spoon)
● Water leaks into the waste container during each rinsing process.
→No remedy necessary. (Technical reasons.)
● Brewing unit is blocked or maladjusted.
→Adjust the brewing unit. (P. EN44)
● The pressure in the brewing unit is too high.
→Remove and clean the brewing unit. If the brewing unit is closed, open before cleaning. Unscrew the brewing unit at the black tooth pin. (P. EN44)
● The power plug is not plugged in.
→Plug in the power plug.
● The brewing unit is not set.
→Set the brewing unit properly. (P. EN35)
● Brewing unit was not pushed in completely.
→Push the brewing unit in until it stops. (P. EN35)
● The spout is clogged or blocked by foreign matter (e.g.: coffee bean or similar).
→Pull the coffee spout upwards and clean the inside or remove the foreign matter (e.g.: coffee bean).
● The sleeve with distribution hose inside of dispenser is inserted into the coffee outlet.
→Insert the sleeve with distribution hose correctly. (P. EN34)
● Coffee powder is clogging the powder coffee shaft.
→Turn the power off and push any coffee powder down into the powder coffee shaft using a stick.
● The milk foamer is not set.
→Set the milk foamer. (P. EN36)
● Turn off the appliance and wait approx. 5 minutes. Turn the appliance back on and if problem remains, contact the authorised Panasonic service centre for inspection.
- The surface of milk is higher than the spouts position. →In that case, pull up the dispenser to the highest position. If it does not stop, pull the hose out from the milk package and re-insert.
Troubleshooting (Continued)
Problem Cause an
Display shows “Descaling programme” or “Cleaning the milk system” when power is turned on.

● The espresso machine is turned off without cleaning last time of use. →Clean the espresso machine before use. (P. EN39, EN40)
Display shows “Refill with coffee beans” even though there are sufficient coffee beans.

- If oily coffee beans are used, it may be difficult for them to flow into the grinder. Feed them towards the grinder or try other types of coffee beans.
Coffee crema overflows from the rear of the spouts.

- Depending on the type of beans, there may be a lot of crema. (It is not a malfunction.)
Error display
Display Cause
H01-H08
Action
If this message appears on the display,
① Turn off the espresso machine.
② Wait until the espresso machine has cooled down completely then turn the power on again.
③ If the message is displayed again, an error has occurred. Contact an authorised service centre for inspection.
U10
● Brewing unit is blocked. (Technical reason)
→Pull out the brewing unit then, using the setting function of the measuring spoon, loosen it at the rear. To loosen, push the toothed opening on the measuring spoon onto the pin and turn the pin completely at least 3 times. Then thoroughly rinse out the brewing unit.
→Clean the brewing unit. (P. EN35)
U11
● Over filled coffee powder.
→Clean the brewing unit. (P. EN35)
● The adapter without filter cartridge is still in the water tank.
→Remove the adapter from the water tank.
● Out side of the water tank is too wet or the filter of the water tank lid is clogged.
→Clean the water tank and dry them well.
● Grinding fineness set too fine or coffee powder used is too fine.
→Clean the brewing unit.
→Set grinding fineness coarser or use a different, coarser coffee powder.
U12
● The room temperature is too low or the espresso machine is too cold.
→Use the espresso machine in the place above 10 °C and wait until it warms up to room temperature.
● The temperature inside of the espresso machine is high with continued use.
① Wait until the espresso machine has cooled down completely then turn the power on again.
② If the message is displayed again, an error has occurred. Contact an authorised service centre for inspection.
Replacement parts
| Part name Part number | |
| Bean container extension ACK05-155U | |
| Latte Macchiato plate ACK06-155 | |
| Measuring spoon ACK10-155U | |
| Milk hose ACK08-155 | |
| Adapter for filter cartridge ACK07-155U | |
| Test strip ACK11-155 | |
| Cleaning tablets* ACK12-155U | |
| Descaling agent* ACK13-155U | |
| Milk system cleaner* ACK14-155 | |
| Quick reference ACZ78H155U (EN/HK: ACZ76H15500U, MA/AR: ACZ77H15500U) | |
| Milk foamer unit ACW33-155U | |
* Not Panasonic brand
Specifications
| NC-ZA1 | |
| Power supply | 220 – 240 V ~ 50 – 60 Hz |
| Power consumption 1550 W | |
| Max. amount of water 1.4 L | |
| Dimensions (W × D × H) (approx.) 19.5 × 41.0 × 33.5 cm | |
| Mass (approx.) 10.3 kg | |
| Length of the power cord (approx.) | 115 cm |
Panasonic Taiwan Co., Ltd.
Web Site : http://panasonic.net/
© Panasonic Taiwan Co., Ltd. 2013