
VPR-130 - DJ Equipment DENVER - Free user manual and instructions
Find the device manual for free VPR-130 DENVER in PDF.

| Product Type | DJ Turntable / All-in-One DJ System |
| Brand | Denver |
| Model | VPR-130 |
| Dimensions (W x D x H) | Approx. 450 x 350 x 120 mm |
| Weight | Approx. 5 kg |
| Power Supply | 100-240V AC, 50/60 Hz |
| Power Consumption | 30 W (max) |
| Playback Formats | CD, MP3, USB, Bluetooth |
| Pitch Control | Yes, with ±10% range |
| Jog Wheel | Yes, touch-sensitive |
| Outputs | RCA line out, headphone jack |
| Inputs | Microphone input (1/4" jack) |
| Display | LCD screen with track info |
| Effect Controls | Beat sync, loop, hot cue, filter |
| Maintenance | Clean with a soft, dry cloth. Avoid solvents. |
| Safety | Do not expose to moisture or extreme temperatures. Unplug during storms. |
| Spare Parts & Repairability | Contact Denver support for authorized spare parts. |
| Warranty | 2 years from date of purchase (conditions apply) |
| General Information | Designed for home use and beginner DJs. Includes user manual. |
Frequently Asked Questions - VPR-130 DENVER
User questions about VPR-130 DENVER
0 question about this device. Answer the ones you know or ask your own.
Ask a new question about this device
Download the instructions for your DJ Equipment in PDF format for free! Find your manual VPR-130 - DENVER and take your electronic device back in hand. On this page are published all the documents necessary for the use of your device. VPR-130 by DENVER.
USER MANUAL VPR-130 DENVER
natural_image
Exterior view of a beige and silver electronic device with control knobs and a clear lid (no visible text or symbols)INSTRUCTION MANUAL
ALL RIGHTS RESERVED COPY RIGHT DENVER ELECTRONICS A/S
CE
www.denver-electronics.com
www.facebook.com/denverelectronics

The lighting flash and arrow head within the triangle is warning sign alerting you of dangerous voltage inside the product
CAUTION
RISK OF ELECTRIC SHOCK DO NOT OPEN
CAUTION: TO REDUCE THE RISK OF ELECTRIC SHOCK DO NOT REMOVE COVER (OR BACK). NO USER SERVICIABLE PARTS INSIDE. REFER SERVICING TO QUALIFIED SERVICE PERSONNEL.

The exclamation point within the triangle is a warning sign alerting you of important instructions accompanying the product
IMPORTANT SAFETY INSTRUCTIONS:
- Read the instructions. All uses guidelines must be read before start device.
- Keep the instructions for future use.
- Attention, use and security guidelines must be respected.
- The device must not be used near water or be put in contact with moisture.
- Make sure has no liquid is spilled on device and device openings.
- Move device carefully, avoid shocks.
- Do not block the breakdown of the device outputs.
- Do not place the device near from a heat source (e.g. radiator). Do not expose it to the Sun.
- Plug the device as indicate on this information form.
- This device has a connection with overload protection (security device) decision-making. If the replacement of decision-making is required, please you send has an experienced or the device manufacturer technician.
- For cleaning the device, please follow the recommendations of the notice.
- The sector cord should be unplugged a long period of use.
- Device shall be repaired by a qualified person when:
a. the taken or the power cord is damaged,
b. objects have fallen into the apparatus or a liquid has been spilled into device,
c. device was exposes to the rain,
d. device does not work correctly without notable exterior change,
e. device fell and the subwoofer is broken.
- The user shall not try to maintain device beyond that which is described in this information form. The guarantee would negate.
Location of controls
- Dust Cover
- Speaker
- Dial Pointer with LED Indicator
- Headphone jack
- Power LED Indicator
- Power/Function Switch
- Mute Switch
- Volume Control Knob
- Tuning Knob
- FM Stereo indicator
- 45 RPM Record Adaptor
- Turntable Speed Selector
- Auto Stop Switch
- Tone Arm Rest/Holder
- Line Out Socket (L/R)
- FM Wire Antenna
- AC Power Cord

CAUTION: Usage of controls or adjustments or performance of procedures other than those specified herein may result in hazardous radiation exposure. This unit should not be adjusted or repaired by anyone except qualified service personnel.
Precautions for use
- Unpack all parts and remove protective material.
- Do not connect the unit to an AC outlet before checking the outlet's voltage and all other connections have been made.
- Do not cover any vents and make sure that there is a space of several inches around the unit for ventilation.
- To be completely disconnect the power input, the mains plug of apparatus shall be disconnect from the mains.
- The mains plug of apparatus should not be obstructed or should be easily accessed during intended use.
Listening to radio
MANUAL TUNING
- Switch on the unit by Power/Function Switch (6) and slide to Tuner position.
- Tune to desired radio station with Tuning knob (9)
- Adjust the Volume Control Knob (8) to desired volume level.
FM & FM-STEREO RECEPTION
- System was default in FM stereo mode, once stereo broadcasting signal had received, The FM Stereo LED indicator(10) will light up.
HINTS FOR BEST RECEPTION:-
- FM: THE RECEIVER HAS A BUILT-IN FM WIRE ANTENNA HANGING AT THE REAR CABINET. THIS WIRE SHOULD BE TOTALLY UNRAVELED AND EXTENDED FOR BEST RECEPTION.
Playing a record
- Place the record of your choice on the turntable. If required, do not forget to place the adaptor on the record spindle.
- Choose the desired playing speed using the speed selection switch between 33.3 and 45.
- Slide the Function switch (6) to Phono position.
- Release the tone arm lock.
- Raise the arm with your hand lightly.
- Place the stylus vertically over the first track of the record, the turntable will start turning automatically.
- Put down the stylus slowly on to the record to play.
- Adjust the volume to the desired level.
- When a record comes to the end, the turntable will stop automatically if the auto-stop switch is in the ON position. If the switch is in the off position then it will keep revolving until the tone is returned to the tone arm rest.
- Lift up the tone arm and put it on the rest when finished.
- Replace the protective cap on the stylus and close the tone arm lock.
- Turn off power at mains.


Amplifier connection (If required)
Whilst you can listen to your new turntable using the built in speakers you may wish to connect it to your existing Hi Fi system. Connect the audio plugs to the Line input on your mixer or amplifier using an RCA cable (not supplied)
- Red plug into R/H channel input.
- White plug into L/H channel input.
Using headphones (Not included)
Inserting the plug of your headphones into the Headphone jack(4) will enable you to listen in private.
READ THIS IMPORTANT INFORMATION BEFORE USING YOUR HEADPHONES.
- Avoid extended play at very high volume as it may impair your hearing.
- If you experience ringing in your ears, reduce the volume or shut off your unit.
- Keep the volume at a reasonable level even if your headset is an open-air type designed to allow you to hear outside sounds. Please note that excessively high volume may still block outside sounds.
Maintenance
Replacing the stylus
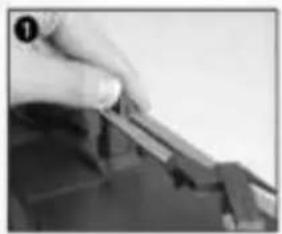
- Refer to the figures 1-8
natural_image
Close-up of a hand holding a small object, possibly a tool or component, with no visible text or symbols.push the arm lock to release the tone-arm.

natural_image
Close-up of hands using a tool to cut or sample material (no visible text or symbols)take off cap of the cartridge to expose the needle out.

natural_image
Close-up of hands holding a small electronic component (no visible text or symbols)separate the cartridge from the socket lightly.

natural_image
Close-up of hands assembling or adjusting a dark object with a tool (no visible text or symbols)take off the audio-line from the cartridges completely.

natural_image
Close-up of gloved hands assembling or adjusting a small electronic component (no visible text or symbols)
natural_image
Close-up of hands using a tool to cut or repair a small object (no visible text or symbols)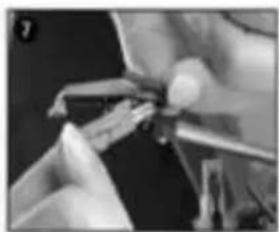
natural_image
Close-up of hands assembling or adjusting a mechanical component (no visible text or symbols)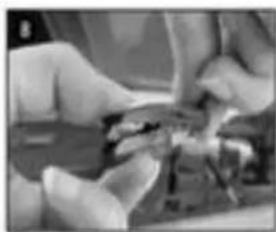
natural_image
Close-up of hands assembling or adjusting a mechanical component (no visible text or symbols)to fit a new one just in opposite deals, insert the audio-line accordingly, and install the cartridge to the socket lightly.
NOTE: Please exercise extreme care whilst performing this operation so as to avoid the tone arm and audio line wires from any damage.
NOTES
- We advise you to clean your records with an anti-static cloth to gain maximum enjoyment from them and to make them last.
- We would also point out that for the same reason your stylus should be replaced periodically (approximately every 250 hours)
- Dust the stylus from time to time using a very soft brush dipped in alcohol (brushing from back to front of the cartridge)
WHEN TRANSPORTING YOUR RECORD PLAYER DO NOT FORGET TO:
- Replace the protective cap on the stylus.
- Put the rest clip into the pick-up arm.
ALL RIGHTS RESERVED, COPYRIGHT DENVER ELECTRONICS A/S
DENVER®
www.denver-electronics.com


Electric and electronic equipment contains materials, components and substances that can be hazardous to your health and the environment, if the waste material (discarded electric and electronic equipment) is not handled correctly.
Electric and electronic equipment is marked with the crossed out trash can symbol, seen below. This symbol signifies that electric and electronic equipment should not be disposed of with other household waste, but should be disposed of separately.
All cities have established collection points, where electric and electronic equipment can either be submitted free of charge at recycling stations and other collection sites, or be collected from the households. Additional information is available at the technical department of your city.
Imported by:
DENVER ELECTRONICS A/S
Stavneagervej 22
DK-8250 Egaa
Denmark
www.facebook.com/denverelectronics
- CAUTION
- RISK OF ELECTRIC SHOCK DO NOT OPEN
- IMPORTANT SAFETY INSTRUCTIONS:
- Location of controls
- Precautions for use
- Listening to radio
- MANUAL TUNING
- FM & FM-STEREO RECEPTION
- HINTS FOR BEST RECEPTION:-
- Playing a record
- Amplifier connection (If required)
- Using headphones (Not included)
- READ THIS IMPORTANT INFORMATION BEFORE USING YOUR HEADPHONES.
- Maintenance
- Replacing the stylus
- NOTES
- DENVER®
Brand : DENVER
Model : VPR-130
Category : DJ Equipment