
AKI6000RVS - Range hood INVENTUM - Free user manual and instructions
Find the device manual for free AKI6000RVS INVENTUM in PDF.


| Product Type | Range hood |
| Brand | Inventum |
| Model | AKI6000RVS |
| Mounting Type | Wall-mounted |
| Width | 60 cm |
| Depth | 50 cm |
| Height | 35 cm (adjustable chimney) |
| Weight | 14 kg |
| Power Supply | 220-240 V ~ 50 Hz |
| Motor Power | 150 W |
| Lighting | 2 x 1.5 W LED |
| Number of Speeds | 3 speeds + intensive |
| Maximum Extraction Rate | 650 m³/h |
| Noise Level (max speed) | 65 dB(A) |
| Energy Efficiency Class | A |
| Grease Filter Type | Aluminium washable |
| Carbon Filter | Optional (not included) |
| Control Type | Electronic buttons |
| Duct Outlet Diameter | 150 mm |
| Grease Filter Cleaning | Monthly in dishwasher or hand wash |
| Carbon Filter Replacement | Every 3-6 months |
| Spare Parts Availability | Filters, bulbs, remote (if applicable) |
| Safety Features | Auto shut-off, motor thermal protection |
| Warranty | 2 years |
Frequently Asked Questions - AKI6000RVS INVENTUM
User questions about AKI6000RVS INVENTUM
0 question about this device. Answer the ones you know or ask your own.
Ask a new question about this device
Download the instructions for your Range hood in PDF format for free! Find your manual AKI6000RVS - INVENTUM and take your electronic device back in hand. On this page are published all the documents necessary for the use of your device. AKI6000RVS by INVENTUM.
USER MANUAL AKI6000RVS INVENTUM
- safety instructions page 17
- appliance description page 20
- before first use page 20
- controls page 21
- cleaning & maintenance page 21
- troubleshooting
- installation instructions
page 22
page 23
Guarantee & After sales service
page 26
HET VERVANGEN VAN DE LED LAMP
6 storingen


INSTALLATIE VAN DE AFZUIGKAP OP EEN AFVOER NAAR BUITEN
1 safety instructions
- Please read these instructions before operating the appliance and retain for future use.
- The appliance is intended solely for domestic use within the home. The appliance is suitable for extraction of air to the outside.
- Before plugging into a socket, check that the voltage in your home corresponds with the voltage printed on the bottom of the appliance.
- This appliance can be used by children aged 8 years and over, as well by people with reduced physical, sensory or mental capabilities, or lack of experience and knowledge, provided they are supervised and instructed in the safe use of the appliance and understand the hazards involved. Do not allow children to play with the appliance. Do not allow children to clean or maintain the appliance unless supervised.
- Life-threatening: danger of poisoning through backdrafting of combustion gasses!
- Never use the appliance to extract air while using a cooker that consumes air from the room, unless the room is sufficiently ventilated. Cooking appliances that consume air in the room (such as equipment that heats using gas, oil, wood or coal, geysers, hot water appliances) draw the combustion air out of the room and carry these gasses outside via the outlet (eg. chimney). In combination with an activated cooker hood, air is withdrawn from the kitchen and the adjacent rooms. This creates negative pressure if there is insufficient air supply. Poisonous gasses from the chimney or outlet channel are then backdrafted into the living area. Always provide adequate ventilation!
- The maximum permitted negative pressure is 4 Pa.
- Local regulations concerning the discharge of air have to be fulfilled.
- The appliance is not intended to be operated by means of an external timer or separate remote control system.
- In relation with electrical safety, the appliance shall not be cleaned with high-pressure cleaners or steam cleaners.
- Warning: Avoid the risk of electric shock; make sure the appliance is switched off before replacing the lighting or cleaning the appliance.
- Do not use the cooker hood if the grease filter has not been fitted properly!
- Do not lean against the cooker hood.
- Never use the cooker hood as a working surface unless this is indicated explicitly.
- If the cooker hood is used in combination with a gas hob ensure sufficient ventilation.
- The outlet should not be connected to a flue duct used by other appliances.
- Never flambé under a cooker hood and clean the filters on time. To prevent hot fat catching fire you should only deep fry under continuous supervision.
- The cooker hood should be cleaned regularly both on the outside as well as the inside (at least 1 x a month). Insufficient cleaning or a delay in the replacement of filters can cause fire hazard.
- The grease filters can become hot during use. After cooking wait at least 30 minutes before cleaning.
- Please note! Intensive use can lead to condensation on the cooker hood. Condensation is simple to remove with a dry cloth.
- Grease and oil are inflammable when overheated. Remain in the cooking area when preparing meals.
- Fire danger! There is a risk of fire if the instructions for cleaning or replacing grease filters and/or carbon filters are not followed.
- Fire danger! through grease deposits in the metal grease filter. Never work with open flame under the appliance (eg. flambéing). Always use the appliance with the metal grease filter. Clean the grease filter regularly.
- Fire danger! through overheated fat or oil. Never extinguish a fire with water; always use a fire blanket, lid or plate.
- The appliance may have sharp edges; please be careful during cleaning.
INSTALLATION
- This appliance should only be connected by a registered installer.
- Always follow the installation instructions in the installation manual (chapter 7) provided.
- Check the appliance for transport damage. Do not connect a damaged appliance.
- Faulty parts may only be replaced by original parts. The manufacturer can only guarantee that original parts meet safety requirements.
- If the connecting cable is damaged, it may only be replaced by the manufacturer, the manufacturer's service organisation or equivalently qualified persons, in order to avoid dangerous situations.
• Always use the original cable and plug to connect the appliance.
- The electrical connection must comply with national and local regulations.
- The wall plug socket and plug should always be accessible.
- If you want to make a fixed connection, make sure that an omnipolar switch with a contact separation of at least 3 mm is fitted in the supply cable.
- The appliance should not be connected to the mains via a multi-plug adapter or extension cable, as the safe use of the equipment cannot be guaranteed.
- Warning: Never open the appliance casing. The casing may only be opened by a service technician.
- Disconnect the appliance from the mains supply before starting any repair work.
- We advise to wear protective gloves when assembling the cooker hood because of the possible sharp edges.
- The distance between the lowest point of the cooker hood and the supported surface for the cooking pans gas hob should be at least 75 cm. With an electric, ceramic or induction hob this distance should at least be 65 cm.
- If the instructions of the gas hob specify a greater distance, this should be taken into account.
- Warning: failure to install screws or fixing devices in accordance with these instructions may result in electrical hazard.
- If the safety instructions and warnings are not followed, the manufacturer cannot be held responsible for any resulting damage.
- This appliance is intended to be used in household and similar applications such as:
- staff kitchen areas, in shops, offices and other working environments;
- farm houses and by clients in hotels, motels and other residential type environments;
- bed and breakfast type environments;
- catering and similar non-retail applications.
- Only use the appliance inside the home.
- If you decide to discontinue using the appliance because of a fault, we recommend you cut off the cable after removing the plug from the socket.

- Legislation requires that all electrical and electronic equipment must be collected for reuse and recycling. Electrical and electronic equipment marked with the symbol indicating separate collection of such equipment must be returned to a municipal waste collection point.
2 appliance description
- Controls
- Metal grease filters - 2
- Lighting (LED spots 2 x 3.0W)
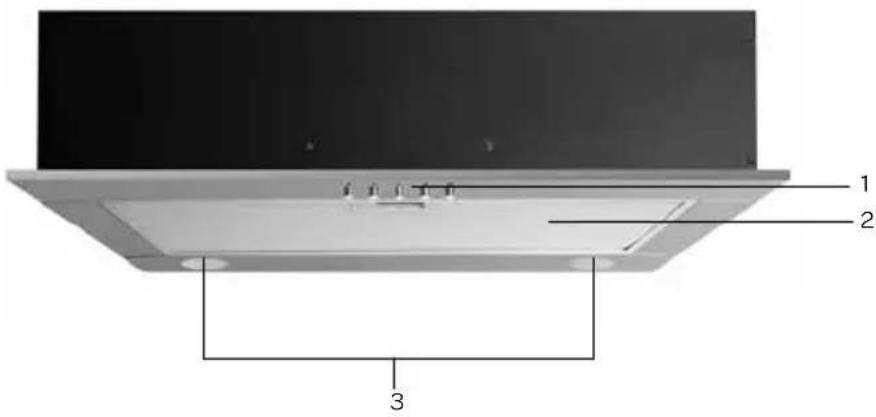
3 before the first use
Before you use the appliance for the first time, please do as follows: Carefully unpack the appliance and remove all the packaging material. Keep the material (plastic, polystyrene and cardboard) out of reach of children. Check the appliance after unpacking for any damage, possible from transportation. Place the appliance on a flat and stable surface.
This appliance should be installed and connected to the power supply by a recognized fitter who is familiar with, and works according to the correct safety regulations.
How to install the appliance, is instructed in the installation instructions (chapter 7).
The appliance must be connected with a properly installed fused socket. The power supply (AC) and voltage at the operating point must correspond with the details on the rating label of the appliance.
EXTRACTION SYSTEM
This cooker hood can be connected to a duct. Install the cooker hood according to the instructions.

VENT OUTSIDE - to a duct, the cooking vapours extracted by suction are carried outside, once the grease particles have been filtered. This is the best method.
4 controls

0

1

2

3

[Non-Text]
SWITCHING THE COOKER HOOD ON AND OFF
- Press on 0 to turn the motor off.
- Press on 1 and the motor runs at the lowest speed.
- Press on 2 and the motor runs at the middle speed.
- Press on 3 and the motor runs at the highest speed.
- Press on 🔍 to switch the lighting on. Press the same button again to switch to 0 to switch the lighting off.
Switch the lighting on if you need more light on your cooking appliance. It is recommended to operate the appliance a few minutes prior to cooking. Leave the appliance in operation for 5 to 10 minutes after the cooking is finished to remove all the smells from the kitchen.
5 cleaning & maintenance
Before performing any maintenance operation, disconnect the cooker hood from the mains power supply. Ensure that it is switched off and pull the plug or remove the connector fuse.
Clean the in- and outside of the cooker hood regularly. Clean the cooker hood with warm soapy water and a soft cloth. If your model is stainless steel, clean it with a stainless steel care product. Do not use any abrasive cleaning agents such as powder cleaners or cleaners that contain alcohol. Clean the controls only with a damp cloth.
Attention: failure to carry out the basic cleaning recommendations can cause fire risks.
GREASE FILTERS
A metal grease filter filters the fat particles in the air. Therefore the filter can get clogged, depending on the use. The metal grease filter does not have to be replaced, but should at least be cleaned once a month. You can clean it either by hand or in the dishwasher on a low temperature. Make sure the grease filters are competely dry before placing them back.
Do not use any abrasive cleaning agents.
Not cleaning the grease filters on time can cause fire risks.
Cleaning the grease filters in the dishwasher can cause discoloration. This has no effect on the operation.
REMOVING THE GREASE FILTERS
Switch off the electricity! Remove the plug from the socket. Pull the grease filter towards you and tilt it downwards at the front. Make sure you guide the grease filter with you other hand to prevent the grease filter from falling down on your cooking appliance.
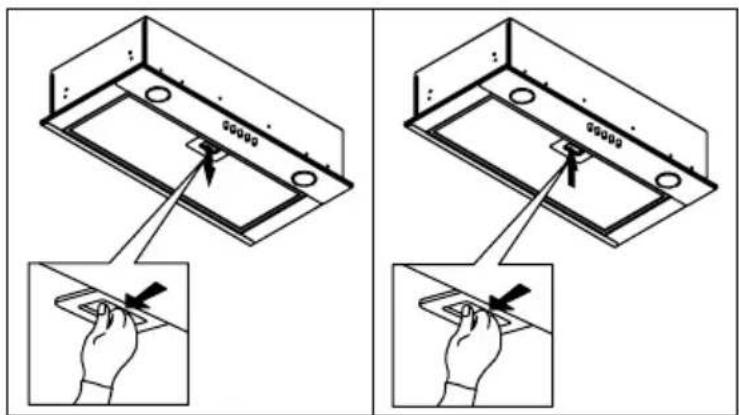
CHANGING A LED SPOT
When a LED spot of the cooker hood is broken, you can replace it yourself. Follow these steps:
- Unplug the appliance or remove the connector fuse.
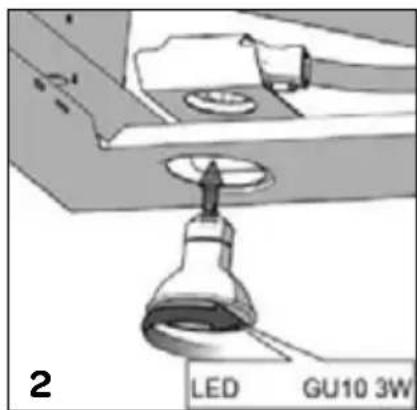
- Remove the grease filters and push the spot holder from the inside downwards - figure 1.
• Turn the broken LED clockwise out of the holder - figure 1. Replace the broken LED with a matching type (3.0 W, LED spot).
• Fit the new LED counter clockwise in the holder and release the holder - figure 2. It will automatically adjust to the right position. - Replace the grease filters and plug the appliance in.
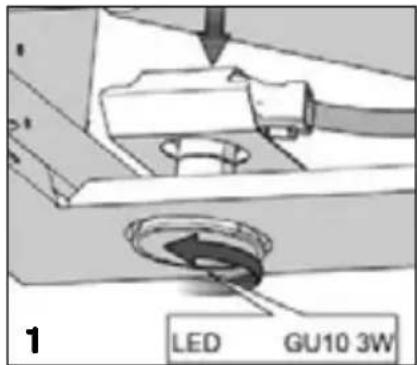

6 troubleshooting
What to do in case of a malfunction? In most cases, you will be able to correct these faults easily yourself. Please check the solutions below before contacting the Inventum service department.
The motor is not running
• Is it plugged in correctly?
• Is there a power outage?
- Check the electrical installation.
The performance of the cooker hood is not correct and makes more nois.
• Is the diameter of the exhaust-air pipe correct?
• Is the duct blocked?
• The diameter of the duct must be 120 mm. A smaller diameter can negatively influence the suction of the motor.
- Are the grease filters clean?
• Is there enough air supply to replace the extracted air?
7 installation instructions
Read these installation instructions carefully before starting the installation.
We advise to install the cooker hood with two persons.
- The minimum distance between the supporting surface for the cooking pans on the cooker and the lowest part of the hood must be:
- 65 cm for an electric, ceramic or induction cooker
- 75 cm for a gas hob
- If the cooker hood is to be fitted to an existing duct no other appliances, such as a geyser or heater, may be connected to that same duct.
• The shorter the duct, and the fewer the bends in it, the better the cooker hood will work.
• The connection pipe for the cooker hood has a diameter of 120 mm.

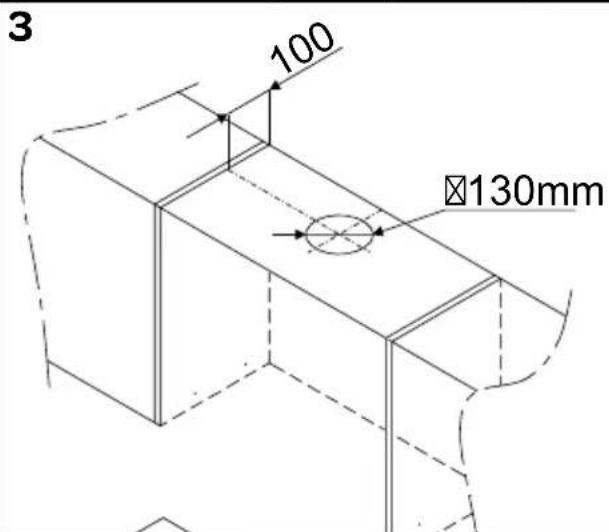



INSTALLING THE COOKER HOOD TO A DUCT
1 Remove the grease filters.
Hold the cooker hood in position on a minimum height of 65 cm above the cooker and mark the bottom of the cooker hood on the wall/side panel.
Define the middle of the cooker and mark this point at the height of the cooker hood to center it above the cooker.
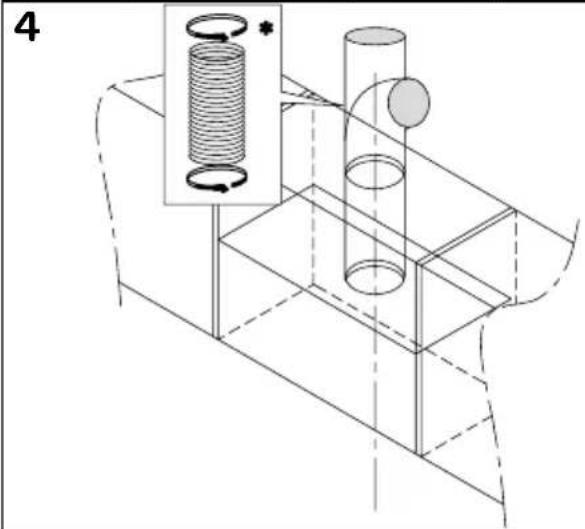
2 Connect the coupling ring for the exhaust-air pipe to the cooker hood. Press it on the exhaust opening and turn to fasten.
3 Mark the position for the exhaust-air pipe. Limit the number of bends and length of the exhaust-air pipe. The cooker hood will function better.
Saw the holes for the exhaust. The exhaust opening has a diameter of 120 mm. The hole for the exhaust must be 10 mm wider than the exhaust pipe itself (130 mm).
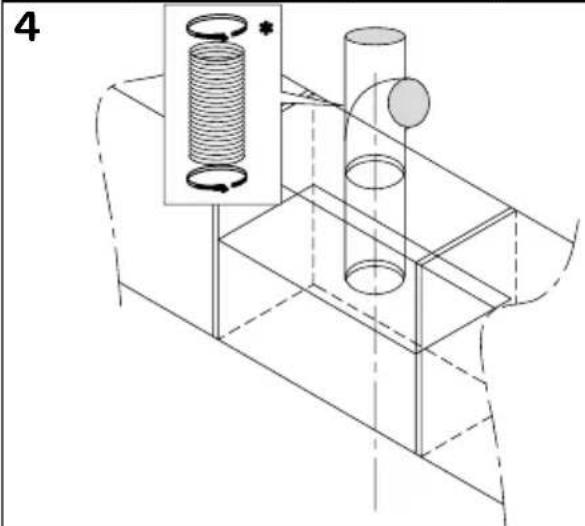
4 Fit the exhaust pipe at the top of the exhaust outlet and let it hang down.
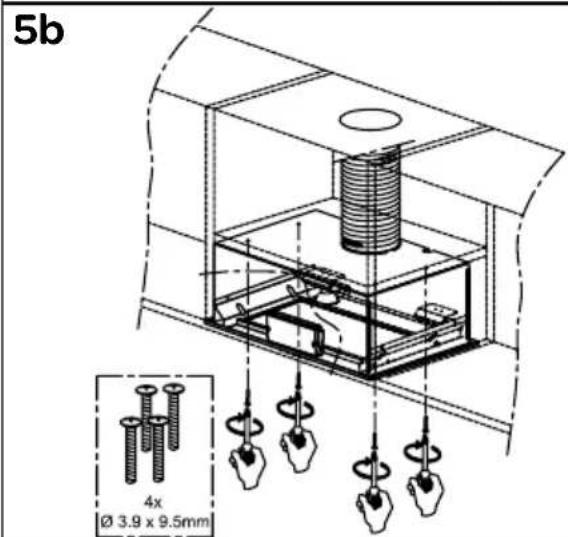
5 Decide in which way you want to mount the cooker hood - 5a or 5b.
5a The cooker hood can be mounted to the cabinet with screws through the holes in the side of the housing.
5b The cooker hood can be mounted to the cabinet with screws through the holes at the top of the housing.
Remove the cooker hood and drill the holes. Use a ∅3 mm drill. Drill the holes till a depth of 5 mm .
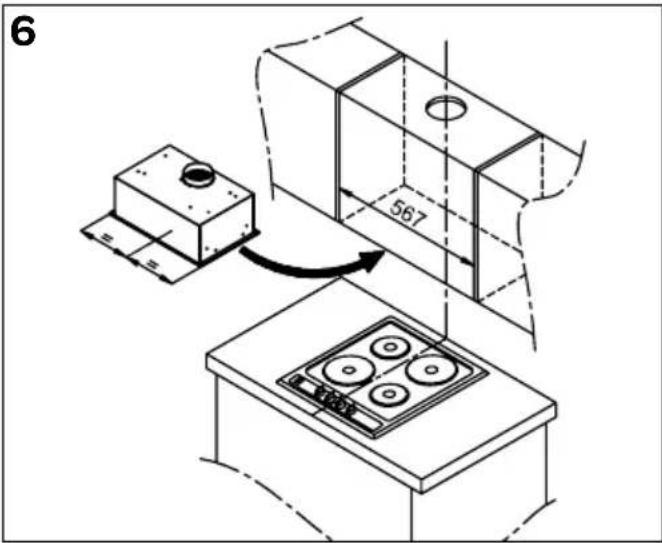
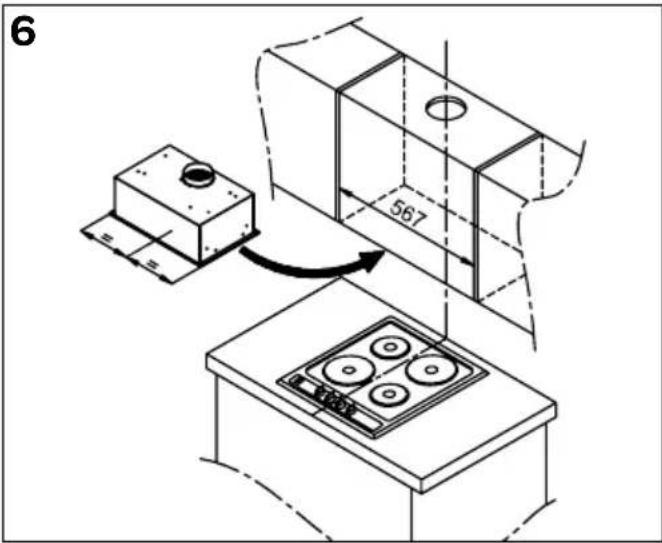
6 Fit the cooker hood inside the cabinet. When the access to the exhaust is blocked, fit the exhaust pipe to the cooker hood before placing the cooker hood inside the cabinet.
Attach the cooker hood to the cabinet with the screws.
Place the grease filters back.
Remove all the protective film before using the cooker hood.
ELECTRIC CONNECTION
Make sure the supply voltage ratings correspond with those stated on the rating plate. Plug the appliance in. The cooker hood is provided with a plug. Make sure the plug remains accessible. Place the socket, if necessary, out of sight behind the exhaust-air pipe.
Attention: if you want to make a fixed connection, ensure that a multi-pole switch with a distance between contacts of 3 mm is installed in the supply cable.
general terms and conditions of service and warranty
We do not need to remind you of the importance of service. After all, we develop our products to a standard so that you can enjoy them for many years, without any concerns. If, nevertheless, there is a problem, we believe you are entitled to a solution straight away. Hence our products come with an exchange service, on top of the rights and claims you are entitled to by law. By exchanging a product or part, we save you time, effort and costs.
2-year full manufacturer's warranty
- Customers enjoy a 2-year full manufacturer's warranty on all Inventum products. Within this period, a faulty product or part will always be exchanged for a new model, free of charge. In order to claim under the 2-year full manufacturer's warranty, you can either return the product to the shop you bought it from or contact the Inventum costumer service department via the form at www.inventum.eu/service-aanvraag.
- The 2-year warranty period starts from the date the product is bought.
- In order to claim under the warranty, you must produce a copy of the original receipt.
- The warranty applies only to normal domestic use of Inventum products within the Netherlands.
5-year Inventum warranty
- Inventum offers a 5-year warranty on most large domestic appliances and a selection of small domestic appliances. This 5-year Inventum warranty consists of a 2-year full manufacturer's warranty, extended by a further 3-year warranty. The only thing you need to do to qualify for the 3-year extended warranty is to register the product within 45 days of purchase. You can read more about registering the product in the following paragraph.
- In accordance with the 5-year Inventum warranty provisions, a faulty product or part will always be exchanged for a new model during the first 2 years under the warranty. During the 3rd to 5th year under the warranty, you will only pay the costs of exchange. The current costs of exchange are listed at www.inventum.eu/omruilkosten.
- In order to claim under the 5-year Inventum warranty, you can either return the product to the shop you bought it from or contact the Inventum costumer service department via the form at www.inventum.eu/service-aanvraag.
- The 5-year warranty period starts from the date the product is bought.
- In order to claim under the warranty, you must produce a copy of the original receipt.
- The warranty applies only to normal domestic use of Inventum products within the Netherlands.
Product registration
- The 3-year extended warranty is easy to obtain, free of charge, by registering the product within 45 days of purchase, via the website www.inventum.eu/garantie-registratie. If you did not register the product within 45 days of purchase, you can still do so up to 2 years after the purchase date. However, there will be a charge. The one-off registration charge is € 89 for each separate product. Registration is possible only for products that are subject to the 5-year Inventum warranty. Whether the product qualifies for the 5-year Inventum warranty is stated in the product user manual and in the product information sheet, on Inventum's website.
- The warranty period always starts from the date the product is bought. If the product is registered for the extended warranty at a later date, the warranty period still starts from the original date of purchase.
- The 3-year extended warranty can only be applied for if you are in the possession of a copy of the original receipt and the Inventum 5-year warranty certificate.
Large domestic appliances
- Breakdowns or faults in large domestic appliances (separate and built-in white goods) can be registered via the form at www.inventum.eu/service-aanvraag, by calling the Inventum costumer service department or in the store where you bought the device. The telephone number of the costumer service department can be found at www.inventum.eu.
- In the event of breakdowns or faults in large domestic appliances, Inventum will have the option to have a service engineer inspect the faulty device onsite at the customer in the Netherlands and to carry out repairs, there and then. The Inventum customer service department can also decide to have the device exchanged.
- If you suffer a breakdown or fault in a large domestic appliance during the first 2 years from the date of purchase, Inventum will not charge any costs for the exchange, call-out or for parts and labour.
- If you registered the product as described before at www.inventum.eu/garantie-registratie and you subsequently report a breakdown of a large domestic appliance in the 3rd to 5th year of the date of purchase, the 5-year Inventum warranty applies and the device will be repaired or exchanged, free of charge. In the event of a repair or exchange of the device, you only pay the costs of exchange. The current costs of exchange are listed at www.inventum.eu/omruilkosten. If you did not register the product, the 3-year extended warranty does not apply.
- When reporting a breakdown or fault, a service engineer will contact the customer within 1 working day in order to make an appointment. When the report is made in a weekend or during a public holiday, this will be the next working day.
- If you report a breakdown or fault via the form at www.inventum.eu/service-aanvraag, you will be kept informed of the progress via mobile messages and e-mail.
- The warranty period starts from the date the product is bought.
- In order to claim under the warranty, you must produce a copy of the original receipt and the Inventum 5-year warranty certificate.
- The warranty applies only to normal domestic use of Inventum products within the Netherlands.
Breakdowns or faults outside the warranty period
- Breakdowns or faults in small or large domestic appliances outside the warranty period, can be reported to the costumer services department via the form at www.inventum.eu/service-aanvraag or by calling the costumer services department.
- The costumer services department may ask you to send the product for inspection or repair. The costs of dispatch will be at your expense.
- The inspection to establish whether repair is possible involves a charge. You need to grant your permission for this, in advance.
- In the event of a large domestic appliance, Inventum, at your request, can send out a service engineer. In that case, you will be charged the call-out costs, as well as parts and labour.
- In the event of an instruction to repair, the repair costs must be paid in advance. In the event of a repair by a service engineer, the costs of the repair must be settled with the engineer onsite, preferably by means of PIN payment.
Warranty exclusions
- The following is excluded from the aforesaid warranties:
• normal wear and tear;
- improper use or misuse;
• insufficient maintenance;
- failure to comply with the operating and maintenance instructions;
- unprofessional installation or repairs by third parties or the customer himself;
• non-original parts used by the customer;
- use for commercial or business purposes;
- removal of the serial number and/or rating label.
-
In addition, the warranty does not apply to normal consumer goods, such as:
-
dough hooks, baking tins, (carbon) filters, etc.;
- batteries, bulbs, carbon filters, fat filters etc.;
• external connection cables; -
glass accessories and glass parts such as oven doors;
• and similar items. -
Transport damage not caused by Inventum is also excluded. Therefore, inspect your new device before starting to use it. If you detect any damage, you must report this to the store where you purchased the product within 5 working days, or to the Inventum customer service department via the form at www.inventum.eu/service-aanvraag. If transport damage is not reported within this period, Inventum does not accept any liability in this respect.
-
The following are excluded from warranty and/or replacement: faults, loss of and damage to the device as a result of an event that is normally insured under the home contents insurance.
Important to know
- The replacement or repair of a faulty product, or a part thereof, does not lead to an extension of the original warranty period.
- Parts that have been replaced, packaging material and exchanged devices are taken back by the service engineer and become the property of Inventum.
- If a complaint is unfounded, all costs arising from it will be at the customer's expense.
- Following expiry of the warranty period, all costs of repair or replacement, including administration costs, dispatch and call-out charges, will be charged to the customer.
- Inventum cannot be held liable for damage as a result of devices built in incorrectly.
- Inventum cannot be held liable for damage caused by external events, unless this liability arises from mandatory statutory provisions.
- These warranty and service provisions are governed by Dutch law. Disputes will be settled exclusively by the competent Dutch court.

klein huishoudelijk

witgoed vrijstaand

witgoed inbouw

twitter.com/inventum1908
facebook.com/inventum1908
youtube.com/inventum1908


- HET VERVANGEN VAN DE LED LAMP
- 6 STORINGEN
- INSTALLATIE VAN DE AFZUIGKAP OP EEN AFVOER NAAR BUITEN
- 1 SAFETY INSTRUCTIONS
- INSTALLATION
- 2 APPLIANCE DESCRIPTION
- 3 BEFORE THE FIRST USE
- EXTRACTION SYSTEM
- 4 CONTROLS
- SWITCHING THE COOKER HOOD ON AND OFF
- 5 CLEANING & MAINTENANCE
- GREASE FILTERS
- DO NOT USE ANY ABRASIVE CLEANING AGENTS
- REMOVING THE GREASE FILTERS
- CHANGING A LED SPOT
- 6 TROUBLESHOOTING
- THE MOTOR IS NOT RUNNING
- THE PERFORMANCE OF THE COOKER HOOD IS NOT CORRECT AND MAKES MORE NOIS
- 7 INSTALLATION INSTRUCTIONS
- READ THESE INSTALLATION INSTRUCTIONS CAREFULLY BEFORE STARTING THE INSTALLATION
- INSTALLING THE COOKER HOOD TO A DUCT
- ELECTRIC CONNECTION
- GENERAL TERMS AND CONDITIONS OF SERVICE AND WARRANTY
- 2-YEAR FULL MANUFACTURER'S WARRANTY
- 5-YEAR INVENTUM WARRANTY
- PRODUCT REGISTRATION
- LARGE DOMESTIC APPLIANCES
- BREAKDOWNS OR FAULTS OUTSIDE THE WARRANTY PERIOD
- WARRANTY EXCLUSIONS
- IMPORTANT TO KNOW
Brand : INVENTUM
Model : AKI6000RVS
Category : Range hood