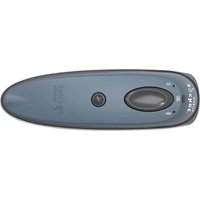
DuraScan D750 - Barcode Reader Socket Mobile - Free user manual and instructions
Find the device manual for free DuraScan D750 Socket Mobile in PDF.


| Product Type | Barcode Reader |
| Brand | Socket Mobile |
| Model | DuraScan D750 |
| Connectivity | Bluetooth 5.0 |
| Scan Engine | 2D Imager |
| Scanning Technology | CMOS |
| Supported Barcodes | 1D and 2D barcodes (QR, Data Matrix, PDF417, etc.) |
| Dimensions | Approx. 150 x 70 x 40 mm |
| Weight | About 200 g |
| Power Supply | Rechargeable Li-ion battery (3.7V, 2200 mAh) |
| Battery Life | Up to 8 hours of continuous scanning |
| Charging | Micro-USB or charging cradle |
| Operating Range | Up to 10 meters (30 feet) open air |
| Scan Rate | Up to 200 scans per second |
| Drop Resistance | 1.5 meters (5 feet) onto concrete |
| IP Rating | IP54 (dust and splash resistant) |
| Operating Temperature | 0°C to 50°C (32°F to 122°F) |
| Storage Temperature | -20°C to 60°C (-4°F to 140°F) |
| Maintenance | Clean lens with soft, dry cloth; avoid solvents |
| Safety | Class 1 Laser Product (eye safe per IEC 60825) |
| Spare Parts | Replacement batteries, charging cradles, USB cables |
| Repairability | Battery and cable replaceable by user; other components service by manufacturer |
| Warranty | 1 year limited warranty (extendable) |
| Package Contents | Barcode reader, USB cable, quick start guide, wrist strap |
Frequently Asked Questions - DuraScan D750 Socket Mobile
User questions about DuraScan D750 Socket Mobile
0 question about this device. Answer the ones you know or ask your own.
Ask a new question about this device
Download the instructions for your Barcode Reader in PDF format for free! Find your manual DuraScan D750 - Socket Mobile and take your electronic device back in hand. On this page are published all the documents necessary for the use of your device. DuraScan D750 by Socket Mobile.
USER MANUAL DuraScan D750 Socket Mobile
natural_image
Orange remote control device with black buttons and a 'Socket month' logo (no text or symbols on body)D750 USERGUIDE
DURASCAN®
Bluetooth® wireless technology
barcode scanner
Model D750
www.socketmobile.com
TABLE OF CONTENTS
Package Contents 4
Product Information 5
Scanner Setup 6
Charge the Battery 7
Optional Charging Accessories 8
Powering on/off 9
Scanning Barcodes 10
Bluetooth Connection Modes 11-12
Setup without software application (Basic Mode):
Android 13
Apple ^® 14
Windows 15
Setup with software (Application Mode):
Android 16
Apple 17-18
Windows 19-20
TABLE OF CONTENTS
Auto Mode (Charging Dock or Stand) 21
Unpairing Bluetooth Connection 22
Factory Reset 23
Restore Method 24
Bluetooth Reconnection 25
Status Indicators 26-29
Product Specifications 30-31
Helpful Resources 32
Safety, Compliance & Warranty 33-43
Battery Warning Statements 39-40
Command Barcodes 44-47

natural_image
Illustration of a remote control device with a button and label (no readable text or symbols beyond the label)DuraScan D750
natural_image
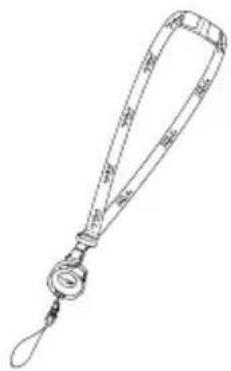
Line drawing of a lanyard with attached strap (no text or symbols)Lanyard

natural_image
Coiled black cable with a yellow connector and a USB port (no text or symbols visible)Charging Cable
Thank you for choosing Socket Mobile!
Let's get started!
© 2017 Socket Mobile, Inc. All rights reserved. Socket ^® , the Socket Mobile logo, SocketScan ^™ , DuraScan ^® , Battery Friendly ^® are registered trademarks or trademarks of Socket Mobile, Inc. Microsoft ^® is a registered trademark of Microsoft Corporation in the United States and other countries. Apple ^® , iPad ^® , iPad Mini ^® , iPhone ^® , iPod Touch ^® , and Mac iOS ^® are registered trademarks of Apple, Inc., registered in the U.S. and other countries. The Bluetooth ^® Technology word mark and logos are registered trademarks owned by the Bluetooth SIG, Inc. and any use of such marks by Socket Mobile, Inc. is under license. Other trademarks and trade names are those of their respective owners.

The D750 has a protection rating of IP54 for dust and water protection. It is also made with antimicrobial additives for protection against harmful microbes.
Socket Mobile's barcodes scanners can be wiped clean with a cloth dampened with isopropyl alcohol or water. Or, the barcode scanners can be wiped clean with a Sani-Cloth.
Warning: DO NOT IMMERSE IN WATER (scanner's mechanics could be damaged) DO NOT USE BLEACH FOR CLEANING (scanner's material property may be affected)
*Also used to display the on-screen keyboard in Basic Mode (iOS only).

Attach the Lanyard (optional)
- Detach the string loop of the tether from the lanyard.
- Feed the string loop through the eyelet.
- Pull tight so the string loop is secure.
- Reattach the string loop to the tether from the lanyard.

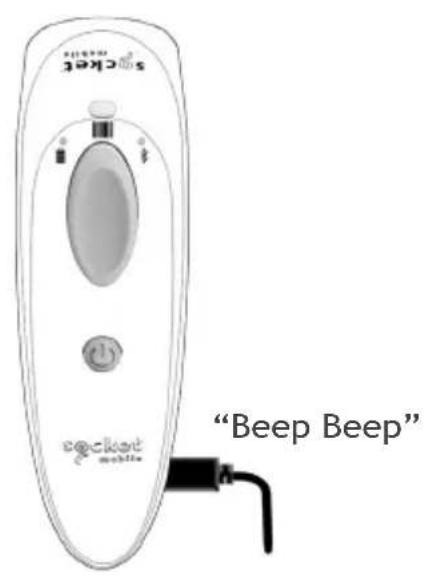
The scanner must be fully charged before first use. Please allow 8 hours uninterrupted charging for the initial battery charge.
Lift the rubber flap to access the power connector.
• Yellow/Amber Light = Charging
- Green Light = Fully charged

Important: Charging from a computer USB port is not reliable and not recommended.
OPTIONAL CHARGING ACCESSORIES
Available separately


natural_image
Line drawing of a handheld device with a circular base and handle (no text or symbols)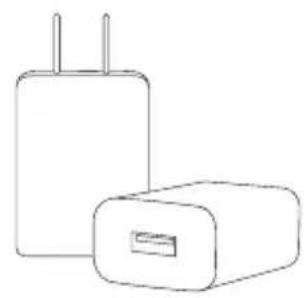
natural_image
Line drawing of two rectangular electronic devices with power leads (no text or symbols)Charging Cradle Charging Stand AC Power Supply
International Adapters available
For all optional accessories visit our Socket Store.

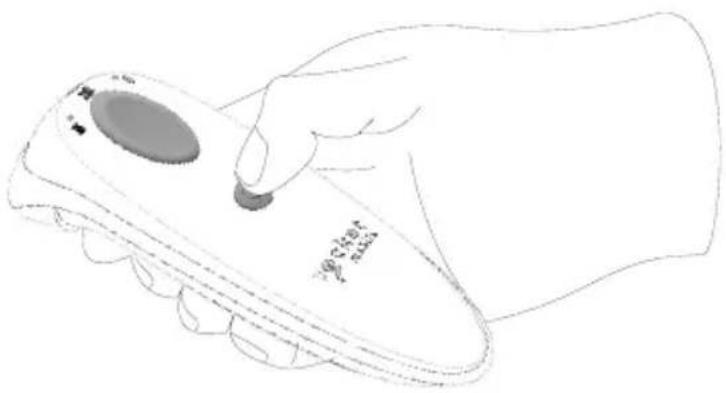
Powering On:
Press and hold down the small power button until the Battery light turns on and the scanner beeps twice (low-high).
natural_image
Line drawing of a hand holding a handheld device with a circular button and 'Polarizer' label (no other text or symbols)Powering Off/ Disconnecting:
Press and hold down the small power button until the scanner beeps twice (high-low) and lights turn off.
The scanner will power off automatically if device is not connected within 5 minutes. Scanner connected to a device will power off within 2 hours if idle/inactive.
1D Barcode
Aim the scan beam straight across the entire barcode.
2D Barcode
Aim at the center.


Scanning Barcodes
- Hold the scanner a few inches from the barcode.
- Aim, press and hold the trigger button.
By default, the scanner will beep, vibrate, and the scan indicator will flash green to confirm a successful scan.

Caution: Do not stare directly into the scanner light beam.
Connect your scanner using one of the following Bluetooth connection modes:
Bluetooth Connection Profiles

| Bluetooth Mode Description | |
| Basic Mode (HID) (Default)*Human Interface Device Profile | NO software installation requiredConnects to most devicesGood for barcodes containing small amounts of dataScanner interacts with host device like a keyboard |
| Application Mode (SPP)Serial Port Profile | For Android or WindowsSoftware installation is requiredMore efficient and reliable data communications for barcodes containing lots of dataIf you have an application that supports Socket Mobile Scanners this is the mode recommended |
| Application Mode (MFi-SPP)Apple Specific Serial Profile | For iOS DevicesMust use with an App developed to work with iOS devicesSoftware installation is requiredIf you have an iOS application that supports Socket Mobile Scanners this is the mode you want to use |
*By default, the scanner is set to Basic Mode (HID).
Operating System Connection Options
| Operating Systems (OS) | Devices | Bluetooth HID Support | Bluetooth SPP Support | Bluetooth Apple Serial Specific (MFi Mode) |
| Android | Android 4.0.3 & later | Yes Yes N/A | ||
| Apple iOS | iPod, iPhone, & iPad | Yes N/A Yes | ||
| Windows PC | Windows 7, 8, 10 Yes | Yes N/A | ||
| Mac OS | Mac OS X 10.4 to 10.XMac Books, Mac Mini, & iMac | Yes No N/A |
Note: To switch from one mode to the other you must remove the pairing information from both devices - host computer and the scanner. (see unpairing procedure on page 21)

Android: Connect Android Device in Basic Mode
In this mode the scanner functions and communicates similar to a keyboard. Therefore, scanner will work with Notes, and any other application that support an active cursor.
- Power on the scanner. Make sure the scanner is discoverable (unpaired) The Blue light blinks fast.
- Settings | Bluetooth.
- Make sure the device has Bluetooth "On" and scan for devices.
- In the list of found devices, select D750 [xxxxxx]. Tap Pair.
- The scanner will connect to the Android device.
- The scanner will beep once after it has connected.
*If you have trouble connecting or pairing with host device, turn host device's Bluetooth off/on, and/or perform factory reset to the scanner (see page 44).
Now you are ready to scan barcodes!
Made for iPod iPhone iPad
Apple: Connect to Apple iOS Device or Mac OS Device Basic Mode
In this mode the scanner functions and communicates similar to a keyboard. Therefore, scanner will work with Safari, Notes, and any other application that support an active cursor.
- Power on the scanner. Make sure the scanner is discoverable (unpaired). The Blue light blinks fast.
- Start a Bluetooth device search.
- Settings | Bluetooth: Turn on Bluetooth and search for device.
• Mac OS: Click System Preferences | Bluetooth. A Bluetooth device search will begin.
- In the device list, tap on D750 [xxxxxx]. Tap Pair.
- The scanner will connect to the Apple device.
- The scanner will beep once after it has connected.
Now you are ready to scan barcodes!
To use the virtual keyboard while the scanner is connected, double tap on the power button. See YouTube video for demonstration.

Windows: Connect Windows Device in Basic Mode
In this mode the scanner functions and communicates similar to a keyboard. Therefore, scanner will work with Notes, and any other application that support an active cursor.
- Turn Bluetooth on for your device. Go to Settings > Bluetooth. A Bluetooth Devices search will begin.
- Tap Socket D750[xxxxxx] in the list of Devices found. After a few seconds the “Not Paired” status will change to “Connected” or “Paired” and the scanner blue light will stop blinking and turn solid blue.
Now you are ready to scan barcodes!

Connect Android device in Application Mode using EZ Pair
Install Software
- Go to GooglePlay Store, search for "SocketScan".
- Download & install. Follow the on screen instructions.
Getting Started
- Follow the on screen instructions.
- Tap on screen the ON SCREEN button.
- Tap on screen the 2D SCANNER button.
- Scan the barcode on the device screen. Wait a few seconds. The scanner will beep 3 times indicating it has accepted the command to connect to your device.
- When notified of a pairing request, swipe the notification icon down, then tap Pairing request.
- On the next screen, tap Pair.
- The scanner will beep once to indicate connected state and is ready to scan barcodes. Tap Back to close Socket EZ Pair.
- If you are connecting a scanner which is not registered, a scanner registration icon will appear on top of the screen. Swipe the icon down to open the registration screen. Follow the instructions to register your Scanner. Socket Mobile highly recommends that all customers register their products for future updates, but registration is optional.
Now you are ready to scan barcodes!
Connect Apple iOS device in Application Mode
Please check with your scanner application vendor or visit www.socketmobile.com/appstore to confirm your scanner-enabled application supports the scanner.
If you are using the scanner with an Apple iOS device and a scanner-enabled Application that does not provide instructions how to connect your scanner, please use the following steps.
- Power on the scanner. Make sure the scanner is discoverable (unpaired). The Blue light should be blinking fast.
- To change the profile to Application Mode scan this barcode. The scanner will beep 3 times.
Use with iPad, iPod touch, and iPhones.

(Scanning this barcode changes the connection mode)
- Turn on Bluetooth on the Apple device. Go to Settings > Bluetooth. A Bluetooth Devices search will begin
(Continue on page 20)
- Tap Socket D750[xxxxxx] in the list of other devices found. After a few seconds the “Not Paired” status will change to “Connected” or “Paired” and the scanner blue LED will stop blinking and turn solid blue.
Note: The characters in brackets are the last 6 characters of the Bluetooth Address.
- Launch your scanner-enabled Application. The scanner will beep once indicating that it is connected to the appropriate application.
Now you are ready to scan barcodes!

Application Mode (SPP) for Windows or Android 8.0 and later
(Auto Connect - No configuration required for Application pairing)
-
Power on the scanner. Make sure the scanner is discoverable (unpaired). The Blue light should be blinking fast.
-
Scan the barcode to change the profile to Application Mode (SPP).
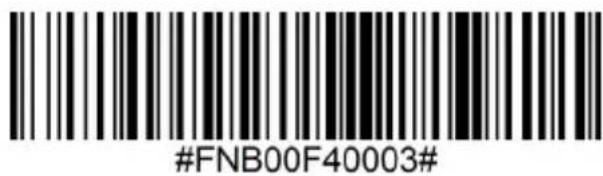
-
Turn on Bluetooth on the Android device. Go to Settings > Bluetooth. A Bluetooth Devices search will begin.
-
Tap Socket D750[xxxxxx] in the list of other devices found. After a few seconds the status will change to “Connected” and the LED will stop blinking and turn solid blue.
Note: The characters in brackets are the last 6 characters of the Bluetooth Address.
- Launch your scanner-enabled Application. The scanner will beep once indicating that it is connected to the appropriate application.
Now you are ready to scan barcodes!

Application Mode (SPP) for Windows or Android version 7.0 and lower
Configures scanner to Serial Port Profile.
Install Software
- Go to GooglePlay Store and search for "SocketScan".
- Download & install. Follow the on screen instructions.
Getting Started
- Follow the on screen instructions.
- Scan the barcode on the screen.
- Tap the ON SCREEN option.
-
Tap the 2D SCANNER option.
-
Scan the barcode on the device screen. Wait a few seconds. The scanner will beep 3 times indicating it has accepted the command to connect to your device.
-
When notified of a pairing request, select "Ok".
-
The scanner will beep once to indicate connected state and is ready to scan barcodes. Tap Back to close.
Now you are ready to scan barcodes!

Connect Windows PC in Application Mode
Note: Make sure you have administrative privileges.
- Download the latest SocketScan 10 software from Socket Mobile's support web page.
- Follow the on-screen instructions to install the software.
- In SocketScan 10 Settings, select an incoming Bluetooth serial COM port.
Note: If there is none please click Ports to create at least one new incoming COM port in Bluetooth settings.
- Click Finish.
Now you are ready to scan barcodes!

To pair the scanner with Windows PC using EZ Pair:
- Power on the scanner. Make sure the scanner is available to be connected to Bluetooth (unpaired).
- Launch SocketScan 10 and click on the SocketScan 10 icon in the task tray. In the pop-up menu, click Socket EZ Pair.
- Click 2D scanner accordingly.
- Scan the barcode that appears on the screen.
- The PC will automatically try to pair with the scanner. If prompted to allow the pairing, click Yes. If prompted for a passkey, enter 0000 (four zeroes).
- After the scanner connects, it will beep once. Close Socket EZ Pair. 6a. In Windows 10 if this step can not be done, open the Bluetooth settings and add and pair the scanner manually.
- If you are connecting a scanner which is not registered, a scanner registration icon will appear on top of the screen. Follow the instructions to register your scanner. Socket Mobile highly recommends that all customers register their products, but registration is optional.
- The task tray icon will change to indicate the status of the connection.
Now you are ready to scan barcodes.
If you have purchased the Socket Mobile Charging Dock or Stand, the D750 can both charge and scan stationary in Auto Mode.
- Scan command barcode to place your scanner in Auto Mode.
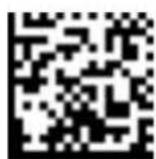
Note: Turn off host device's Bluetooth before scanning command barcode.
- Once the scanner is in Auto Mode, it will switch to automatic scanning when it detects power coming from the charging pins of the Charging Dock or Stand. Place a barcode in the scanners field of view and the scanner will automatically scan it.
Note: The scanner will not turn off when it's in Auto Mode and is in the Dock or Stand under AC power.
*Supported 2D Scanners: 7Qi, 7Xi, D740, D750, D760 and S740
Auto Mode (In the Charging Dock or Stand)
| Action Behavior | Notification | |||
| Beep Pattern Light Activity Vibrate | ||||
| Place Scanner in the Charging Dock or Stand | Scanner switches to Auto Mode | High-high tone confirms proper seating* | Battery Status Light is Disabled | None |
| Place a barcode in the Scanners Field of View | Read Bar Code | 1 Beep when Data successfully scanned | Green Light blinks (while scanning) | None |
Manual Mode (Not in the Charging Dock or Stand)
| Action Behavior | Notification | |||
| Beep Pattern Light Activity Vibrate | ||||
| Remove the Scanner from the Charging Dock or Stand and press the Scan button | Scanner switches to Manual Mode | None | Battery Status Light is Enabled | Enabled |
| Press the Scan button | Decode Bar Code | 1 Beep when Data successfully scanned | Green Light blinks (while scanning) | Vibrate when Data successfully scanned |

natural_image
Line drawing of two hands holding a small object, possibly a shoe or foot, with no visible text or symbols.Note: This procedure will put the scanner in discoverable mode.
Step 1: Unpairing the scanner: Delete the Bluetooth Pairing
If the scanner is paired with a device, unpair it before trying to connect to a different device.
a. Power on the scanner.
b. Press the trigger button then power button and hold both until you hear 3 beeps.
The scanner will unpair and automatically power off. The next time you power on the scanner, it will be discoverable.
Step 2: Remove or forget the scanner from the Bluetooth list on the host device.

Important: Both steps above must be done to complete the unpairing.
Factory Reset will restore the DuraScan to Factory Default settings (configured as shipped).
Follow the Factory Reset (button) sequence:
- Power ON the reader.

natural_image
Line drawing of a hand holding a white object with a circular opening, no text or symbols present- Press and hold the trigger button.

- Tap the power button once while continuing to press the trigger.

natural_image
Illustration of two hands holding a small object, possibly a foot or abstract form, with no visible text or symbols.- Keep holding the trigger button until you hear a beep (about 15 seconds).
When you release the trigger button you will hear 5 confirmation beeps.
The next time you power on the D750, it will take longer to start up. After it finishes powering on, it will have factory default settings (HID mode).
Note: If you follow this sequence but release the trigger button too early (before 15 seconds and the beep) the Factory Reset will fail.
NOTE: If your scanner remains in an unresponsive state after following the Factory Reset, use the Restore Method as a last resort.
The Restore Method should be the last attempt used to revive an unresponsive scanner. It will reinitialize the core hardware.
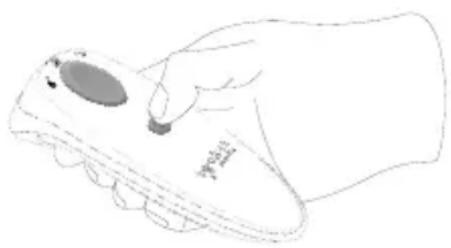
- Make sure your scanner is OFF.
- Press and hold the power button until the LED light goes on and off (about 15 seconds)
natural_image
Line drawing of a hand holding a small electronic device (no text or symbols visible)
natural_image
Line drawing of a smartphone and a remote control with wireless signal waves (no text or symbols)Automatic Reconnections
Each time you power on the scanner, it will automatically try to connect to the last device it was connected to.
• Make sure the device is in range with Bluetooth turned on.
- Pressing the trigger button will initiate the attempts to connect.
- If using Application Mode, make sure the Scanner-enabled Application is launched or running.
- If a connection is made, the blue light will stop blinking and turn solid.
- If a connection is not made after several attempts, the scanner will emit a long beep (and the blue light will turn off).
- Press the trigger button to re-initiate the connection process.
| Battery Charging when plugged into Power Supply | LED Activity Meaning | |
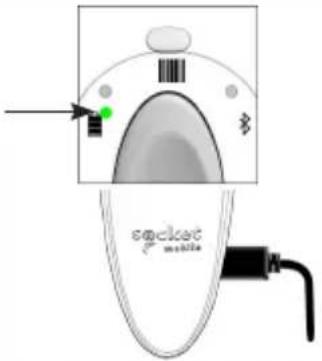 | Blinking Yellow Charging the battery | |
| Solid Green Battery is 100% full | ||
| Battery Status When not connected to power supply | LED Activity Meaning | |
 | Solid Green | Battery capacity from 100% to 25% |
| Solid Yellow | Battery capacity from 25% to 10% | |
| Solid Red | Warning - Battery capacity below 10% | |
| Blinking Red | Charge immediately! The battery level is critically low. Alternatively, if battery capacity is unknown battery status will blink red until the power is applied & scanner is fully charged. | |
| Bluetooth LED Activity Meaning | ||
Bluetooth  _ _ | Quick Blinking Blue (2 blinks every second) | Discoverable - waiting for a host Bluetooth connection. |
| Slow Blinking Blue (1 blink every second) | Scanner is attempting to connect to the last known host device. After 1 minute of blinking, scanner will stop searching. | |
| No Light - No Activity | Scanner has attempted to connect and failed. Press trigger button to try again. | |
| Solid Blue Scanner Connected | ||
| Scan/Read LED Activity Meaning | ||
 | Blink Green Once Good | Scan/Read |
| Blink Red Once Bad Scan/Read | ||
| Solid Red - for as long as power button is pressed | Power Button Pressed | |
| Quick Blinking Green (2 blinks every second) | Scanner is in bootloader mode during firmware upgrade. | |
| Beep Pattern Sound Meaning | ||
| Low-High Tone Power On | ||
| High-Low Tone Power Off | ||
| High-High Tone Power Supply detected and scanner started charging | ||
| 1 Low Beep Scanner has toggled on-screen keyboard or keyboard toggle feature is enabled (iOS devices only) | ||
| 1 Beep Scanner connected to device and is ready to scan barcodes | ||
| 1 Beep Data successfully scanned | ||
| 2 Beeps (same tone) | Scanner disconnected | |
| 1 Long Beep Scanner gave up searching for a host | ||
| 3 Beeps (escalating tone) | Scanner has been reconfigured (the command scanned successfully) | |
| 3 Beeps (escalating tone followed by long tone) | The command barcode did NOT work! (Verify if the command barcode used is valid for your scanner and try again) | |
| Vibrate Meaning | ||
| Vibrate Data successfully scanned | ||

Command Barcodes are available on pages 43-46 to modify the LED, beep, and vibrate settings.

If you are using a scanner-enabled application, typically the application provides settings for LED, beep, and vibrate settings.
Configuration Settings
| Time after powering on Scanner Bluetooth mode | |
| 0-5 minutes Discoverable and connectable | |
| 5 minutes If connection is not made, scanner powers off | |
| 2 hours If your scanner is connected but not used it will power off in 2 hours. When trigger button is pressed the timer is reset. | |
| Specifications D750 | |
| Dimensions (L x W x H) | 5.2" x 1.5" x 1.6" (132.2 x 37.1 x 40.1 mm) |
| Total Mass 3.8 oz (108 g) | |
| Antimicrobial | Antimicrobial additive in external surfaces |
| Battery 1400 mAh Lithium | - Ion Battery |
| Charge Time 8 Hours | |
| Battery Life - Per Full Charge | Standby time: over 30 hoursActive Scan Time: 70,000 scans within 9 hours (based on 2 scans every 1 second) or 14,000 scans within 16 hours (calculation based on 1 scan every 4 seconds)Note: Battery life varies depending on operating conditions. |
| Bluetooth Version | Class 2 Bluetooth v2.1 + EDR with 56 bit data encryption |
| Wireless Range 30 meters | (98 feet) line of sight |
| Scanner Type | 1D/2D Barcode Omni-directional Imager with highly visible light |
| Symbologies All major 1D and 2D barcodes | |
| SupportedLanguage Settings[in Basic Mode (HID)] | English, French, German, Spanish |
| Systems/BatteryCharging Requirement | USB Type 5V 1A |
| Ambient Light From 0 to 100 000 luxFrom pitch black to direct sun light | |
| OperatingTemperature | -4° to 122° F (-20° to 50°C) |
| Storage Temperature -40° to 158° F (-40° to 70°C) | |
| Relative Humidity 95% at 140° F (60°C) (non-condensing), 4 days | |
| Sealing IP54 (Ingress Protection rating for dust and water) EN60529 | |
| Drop Specifications Multiple 5 ft. drops to concrete | |
| Tumble Specification 250 cycles at 1.64 ft. (0.5 m) (500 drops),IEC60062-2-31 | |
Technical Support & Product Registration:
https://support.socketmobile.com
Phone: 800-279-1390 +1-510-933-3020 (worldwide)
Warranty Checker:
https://www.socketmobile.com/support/warranty-checker
Socket Mobile Developer Program:
Learn more at: http://www.socketmobile.com/developers
The User's Guide (full installation and usage instructions) and Command Barcodes (Advanced Scanner Configurations) can be download at:
https://www.socketmobile.com/support/downloads

WARNING: Failure to follow these safety instructions could result in fire or other injury or damage to the barcode scanners or other property.
Carrying and Handling the DuraScan barcode scanners: The Socket Mobile barcode scanner contains sensitive components. Do not disassemble, open, crush, bend, deform, puncture, shred, microwave, incinerate, paint, or insert foreign objects into this unit.
Do not attempt to disassemble the product. Should your unit need service, contact Socket Mobile technical support at https://support.socketmobile.com/
Changes or modifications of this product, not expressly approved by Socket Mobile may void the user's authority to use the equipment.
Do not charge the DuraScan barcode scanner using an AC adapter when operating the unit outdoors, or in the rain.
Operating Temperature - this product is designed for a maximum ambient temperature of 50^ degrees C or 122^ degrees F.
Pacemaker Disclaimer: For now, we do not have specific information on the effect(s) of vibration or devices with Bluetooth wireless technology on pacemakers.
Socket Mobile cannot provide any specific guidance.
Individuals who are concerned with using the barcode scanner should immediately turn the device off.
FCC ID: LUBD750

Federal Communication Commission Interference Statement
This equipment has been tested and found to comply with the limits for a Class B digital device, pursuant to Part 15 of the FCC Rules. These limits are designed to provide reasonable protection against harmful interference in a residential installation. This equipment generates, uses and can radiate radio frequency energy and, if not installed and used in accordance with the instructions, may cause harmful interference to radio communications. However, there is no guarantee that interference will not occur in a particular installation.
If this equipment does cause harmful interference to radio or television reception, which can be determined by turning the equipment off and on, the user is encouraged to try to correct the interference by one of the following measures:
- Reorient or relocate the receiving antenna.
- Increase the separation between the equipment and receiver.
- Connect the equipment into an outlet on a circuit different from that to which the receiver is connected.
- Consult the dealer or an experienced radio/TV technician for help.
FCC Caution: To assure continued compliance, any changes or modifications not expressly approved by the party responsible for compliance could void the user's authority to operate this equipment. (Example - use only shielded interface cables when connecting to computer or peripheral devices).
FCC Radiation Exposure Statement
This equipment complies with FCC RF radiation exposure limits set forth for an uncontrolled environment. This equipment should be installed and operated with a minimum distance of 20 centimeters between the radiator and your body. This device complies with Part 15 of the FCC Rules. Operation is subject to the following two conditions:
- This device may not cause harmful interference, and
- This device must accept any interference received, including interference that may cause undesired operation
IC ID: 2925A-D750

Industrie Canada
Industry Canada
This device complies with Industry Canada license exempt RSS standard(s). Operation is subject to the following two conditions: (1) this device may not cause interference, and (2) this device must accept any interference, including interference that may cause undesired operation of the device.
CE Marking & European Union Compliance

Products intended for sale within the European Union are marked with a CE Mark, which indicates compliance to applicable Directives and European Normes (EN), as follows. Amendments to these Directives or ENs are included: Normes (EN), as follows:
Applicable Directives:
- Bluetooth Products: R&TTE Directive 2014/53EW
• Low Voltage Directives: 2014/35/EU, and 2006/95/EC
• EMC Directive: 2004/108/EU
• Rotts Directive: 2011/65/EU
• WEEE Directive: 2012/19/EU
SAFETY: EN 60950-1: 2006/A11
:2009/A1
:2010/A12
:2011/A2:2013
Telec Marking Compliance
R211-161214

Products intended for sale within the country of Japan are marked with a Telec mark, which indicates compliance to applicable Radio Laws, Articles and Amendments.
This device contains a rechargeable Lithium-Ion battery.

Stop charging DuraScan barcode scanners if charging isn't completed within the normal specified time (approx. 8 hours).
Stop charging the battery if the DuraScan barcode scanner case becomes abnormally hot, or shows signs of odor, discoloration, deformation, or abnormal conditions is detected during use, charge, or storage.
Stop using the DuraScan barcode scanner if the enclosure is cracked, swollen or shows any other signs of mis-use. Discontinue immediately and promptly dispose of unit.
Your device contains a rechargeable Lithium-Ion battery which may present a risk of fire or chemical burn if mistreated. Do not charge or use the unit in a car or similar place where the inside temperature may be over 60 degrees C or 140 degrees F.
- Never throw the battery into a fire, as that could cause the battery to explode.
- Never short circuit the battery by bringing the terminals in contact with another metal object. This could cause personal injury, or fire, and could also damage the battery.
-
Never dispose of used batteries with other ordinary solid wastes. Batteries contain toxic substances.
-
Dispose of used batteries in accordance with the prevailing community regulations that apply to the disposal of batteries.
- Never expose this product or the battery to any liquids.
- Do not shock the battery by dropping it or throwing it.
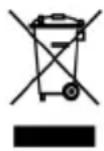
If this unit shows any type of damage, such as bulging, swelling or disfigurement, discontinue use and promptly dispose.
Product Disposal
Your device should not be placed in municipal waste. Please check local regulations for disposal of electronic products.

Caution: DO NOT STARE DIRECTLY INTO THE LED BEAM.
LED DEVICE:
The DuraScan D700 and D750 contain a LED-type scan engine.

For the Class 1 LED version of this engine, the following applies:
- Complies with IEC 60825-1:2001-08, and EN 60825-1:1994 + A1 + A2
- LED output is in the 630-670nm range (visible red).
- Class 1 LED devices are not considered to be hazardous when used for their intended purpose.
The following statement is required to comply with US and international regulations:
Caution: Use of controls, adjustments or performance of procedures other than those specified herein may result in hazardous LED light exposure.
CE MARKING AND EUROPEAN UNION COMPLIANCE
Testing for compliance to CE requirements was performed by an independent laboratory. The unit under test was found compliant with all the applicable Directives, 2004/108/EC and 2006/95/EC.
WASTE ELECTRICAL AND ELECTRONIC EQUIPMENT
The WEEE directive places an obligation on all EU-based manufacturers and importers to take-back electronic products at the end of their useful life.
RoHS STATEMENT OF COMPLIANCE
This product is compliant to Directive 2011/95/EC.
NON-MODIFICATION STATEMENT
Changes or modifications not expressly approved by the party responsible for compliance.
Socket Mobile Incorporated (Socket) warrants this product against defects in material and workmanship, under normal use and service, for one (1) year from the date of purchase. Product must be purchased new from a Socket Authorized Distributor or Reseller. Used products and products purchased through non-authorized channels are not eligible for this warranty support.
Warranty benefits are in addition to rights provided under local consumer laws. You may be required to furnish proof of purchase details when making a claim under this warranty.
Consumables such as batteries, removable cables, cases, straps, and chargers: 90 day coverage only
For more warranty information, please visit: https://www.socketmobile.com/support/downloads
Scan command barcode(s) to quickly configure the Scanner.

Make sure the scanner is not connected to a device before scanning a command barcode! See page 22 for unpairing instructions.
For a complete set of command barcodes, download the Command Barcodes Sheet: https://www.socketmobile.com/support/download
| Charging Stand Modes | |
| Auto Mode (Presentation Mode)Scan the barcode to enable Auto Mode.This will allow the scanner to automatically scan barcodes without pressing the scan button.*Only works when in Charging Stand. |  #FNB 41FBA50003# #FNB 41FBA50003# |
| Manual Mode - Normal (default)Scan the barcode to configure the scanner back to normal. It will be in manual scan mode even when placed in the stand or cradle. | 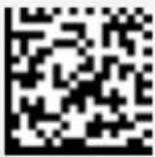 #FNB 41FBA50000# #FNB 41FBA50000# |

Important! Make sure the scanner is not connected to a host computer or device before scanning a command barcode!
| Bluetooth Connection Modes | |
| Basic Mode (HID)(default)Configures the Scanner to Human Interface Device (HID) mode as a Keyboard class device#FNB00F40001# |  |
| Application Mode (SPP)Changes the Scanner to Serial Port Profile (SPP) mode#FNB00F40000# |  |
| Application Mode (MFi-SPP)Changes the Scanner to MFi mode for Apple iOS Devices#FNB00F40002# |  |

Important! Make sure the Scanner is not connected to a host computer or device before scanning a command barcode!
| Beep Settings | |
| Beep after scanner Decodes Data ON (default) | |
| Enables scanner to beep to indicate successful scans. |  |
| #FNB0119E00010003 0078004B# | |
| Beep after scanner Decodes Data OFF | |
| Disables scanner from beeping to indicate successful scans. |  |
| #FNB01190E0001000 00078004B# | |
| Vibrate Settings | |
| Vibrate ON (default)Enables scanner to vibrate to indicate successful scans.#FNB01310001000100FA0000# |  |
| Vibrate OFFDisables scanner from vibrating to indicate successful scans.#FNB013100010000# |  |
| Factory Default | |
| Factory ResetRevert all settings tofactory defaults. The scannerwill power off after scanningthis barcode.#FNB00F0# | 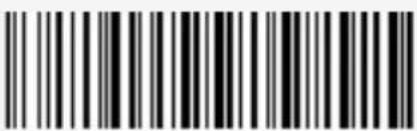 |
For more command codes go to: https://www.socketmobile.com/support/download
Extend Your Warranty...

Receive Priority Service and Personal Care.
You have 60 Days from purchase date to enroll in a SocketCare Service Program!
For detailed information visit:
https://www.socketmobile.com/socketcare
- Bluetooth® wireless technology
- Model D750
- TABLE OF CONTENTS
- Thank you for choosing Socket Mobile!
- Let's get started!
- Attach the Lanyard (optional)
- OPTIONAL CHARGING ACCESSORIES
- Charging Cradle Charging Stand AC Power Supply
- Powering On:
- Powering Off/ Disconnecting:
- 1D Barcode
- 2D Barcode
- Scanning Barcodes
- Android: Connect Android Device in Basic Mode
- Windows: Connect Windows Device in Basic Mode
- Connect Android device in Application Mode using EZ Pair
- Install Software
- Connect Apple iOS device in Application Mode
- Application Mode (SPP) for Windows or Android 8.0 and later
- Getting Started
- Connect Windows PC in Application Mode
- To pair the scanner with Windows PC using EZ Pair:
- Follow the Factory Reset (button) sequence:
- Automatic Reconnections
- Technical Support & Product Registration:
- Warranty Checker:
- Socket Mobile Developer Program:
- Federal Communication Commission Interference Statement
- FCC Radiation Exposure Statement
- CE Marking & European Union Compliance
- Applicable Directives:
- Telec Marking Compliance
- Product Disposal
- Extend Your Warranty...
Brand : Socket Mobile
Model : DuraScan D750
Category : Barcode Reader