D3145 - Phone GRUNDIG - Free user manual and instructions
Find the device manual for free D3145 GRUNDIG in PDF.

User questions about D3145 GRUNDIG
0 question about this device. Answer the ones you know or ask your own.
Ask a new question about this device
Download the instructions for your Phone in PDF format for free! Find your manual D3145 - GRUNDIG and take your electronic device back in hand. On this page are published all the documents necessary for the use of your device. D3145 by GRUNDIG.
USER MANUAL D3145 GRUNDIG
DIGITAL CORDLESS PHONE
D3140 - D3145
Overview
Introduction......4
Presentation of the telephone 5
The base....5
Handset keys 6
Navigator 6
Handset display 8
Menu structure....9
Quick reference 9
How to navigate among the menus 10
Call management 11
Make a call....11
Answering a call....11
Ending a call....11
Microphone mute function....11
Checking your voice mailbox....12
Calling an abbreviated number 12
Inserting a pause (in dialling)....12
Two outside calls....12
Call log 14
Calling Line Identification Presentation (CLIP) 14
Received / Missed call log 14
Dialled call log....15
Calling back a number in your call list....15
Making an entry in the phonebook from the list of calls....15
Deleting caller list record....15
Phonebook.... 16
Calling a contact from your phonebook 16
Adding a contact to the phonebook 16
Display a contact 16
Editing a contact....16
Deleting a contact / The entire phonebook 17
Directory capacity 17
Assigning a shortcut ...... 17
Using the multi-handset capabilities.... 18
Intercom Call 18
Answering an internal call....18
Managing an external and an internal call.... 18
Customising the handset.... 19
Select the ring tone (internal / external)....19
Handset ringer level....19
Activating / Deactivating the warning beeps....19
Modifying the language 19
Handset naming....19
Answer calls automatically.... 19
Key lock....19
Setting the date and time.... 20
Setting the time 20
Setting the date 20
Hour format (12H/24H) 20
Date format 20
Setting the alarm 20
Advanced settings 21
Association of other handsets with your base 21
Restoring the handset / base Default Settings 21
Deleting a handset 21
Modifying the dialing mode 21
Flash timing 22
Modifying Base master PIN code 22
Answering machine (Model D3145 only) 23
Enabling / Disabling the answering machine....23
Playing messages....23
Delete all old messages 24
Record a memo 24
Listening to a message while it is being recorded.... 24
Answering machine setup (Model D3145 only) 25
Modify the answering machine mode 25
Modifying the outgoing message (OGM) 25
Listening to your messages on the answering machine 25
Number of rings 25
Recording time of incoming messages 26
Remote access control 26
Modify the remote enquiry code 27
Message compression 27
Memory capacity of answering machine 27
Batteries safety precautions 28
General product care.... 28
Changing the batteries....28
Troubleshooting 29
Troubleshooting 29
INTRODUCTION
Dear Customer,
You have just acquired a new generation Grundig telephone. Thank you for placing your confidence in us.
This device has been manufactured with the utmost care. If you should have difficulties in operating it, we recommend that you consult this manual.
You can also find information on the following site:
www.grundig-ject.com
For your comfort and safety, we urge you to carefully read the paragraph « Recommendations and safety instructions » of the warranty card included in the pack.

The CE label confirms that the product complies with the 1999/5/EC regulations of the European Union Parliament regarding wireless systems and telecommunications.
The declaration of compliance may be looked up on the www.grundig-ject.com site or can be obtained from the following address:
X-GEM SAS
1 Power socket
2 Telephone socket
Paging button
3 - Short press: find handset (Paging)
- Long press: handset pairing mode
Handset keys
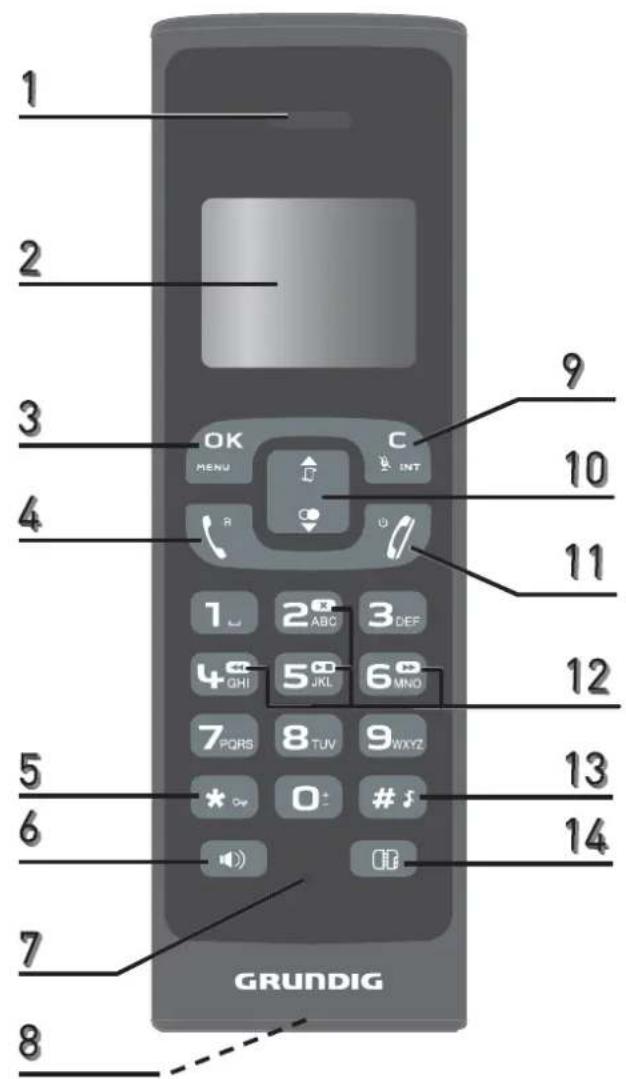
| 1 | Earpiece |
| 2 | Screen |
| 3 | Access to main menu / Validation key |
| 4 | Pick-up / R key: manage multiple calls |
| 5 | Activate / Deactivate keypad lock (long press from home screen) |
| 6 | Activate / Deactivate handsfree mode |
| 7 | Microphone |
| 8 | Handset charging contacts |
| 9 | C / Mute / INT Key :- Cancel the action- Return to previous menu- Activate / Deactivate the microphone (during a call)- Call an additional handset (from the home screen) |
| 10 | Browsing through the menus / Access to the call log (from home screen) |
| 11 | Hang up (during a call) / Return to previous menu / Switch handset on/off (press and hold) |
| 12 | Answering machine control keys (Model D3145 only) |
| 13 | Activate / Deactivate the silent mode (long press from home screen) |
| 14 | Access phonebook |
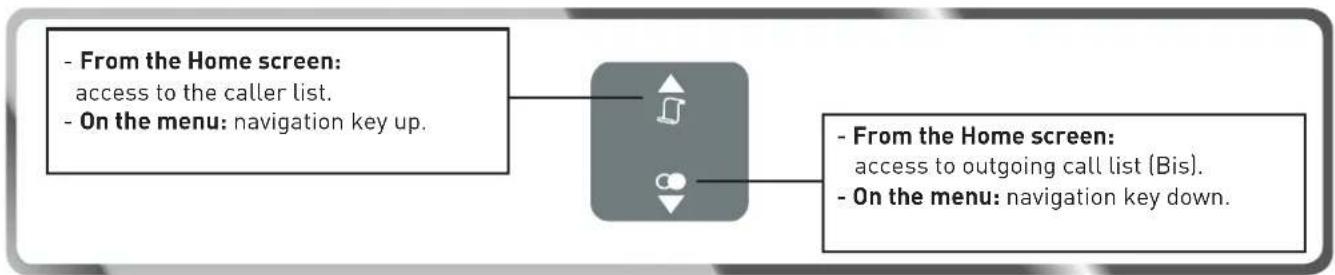
Navigator
flowchart
graph LR
    A["From the Home screen:<br>access to the caller list.<br>On the menu: navigation key up."] --> B["Switch icon"]
    C["From the Home screen:<br>access to outgoing call list (Bis).<br>On the menu: navigation key down."] --> B
Installing the phone
- Engage the front clips (A) of the support in the respective slots (B) of the base.
- Close the holder gently until rear clips (C) engage in the respective slots (D).
- Connect the power adapter cord to the socket on the bottom of the base.
- Connect the other end of the cable with the power wall socket.
- Plug the phone cable into the socket of your base.
- Connect the other end of the cable with the phone wall socket.
- Insert the batteries according to their polarities.
- Close the battery compartment.
- Place the handset in the base station to charge for 15 hours prior to first use
IMPORTANT
If your handset battery is empty leave the handset in the charging unit for at least 10 minutes. You will then be able to switch it on again.

flowchart
graph TD
    A["Step 1: Start"] --> B["Step 2: Close"]
    B --> C["Step 3: Close"]
    C --> D["Step 4: Close"]
    D --> E["Step 5: Close"]
    E --> F["Step 6: Close"]
    F --> G["Step 7: Close"]
    G --> H["Step 8: Close"]
    H --> I["Step 9: Close"]
    I --> J["End: 15h timer"]
Handset display
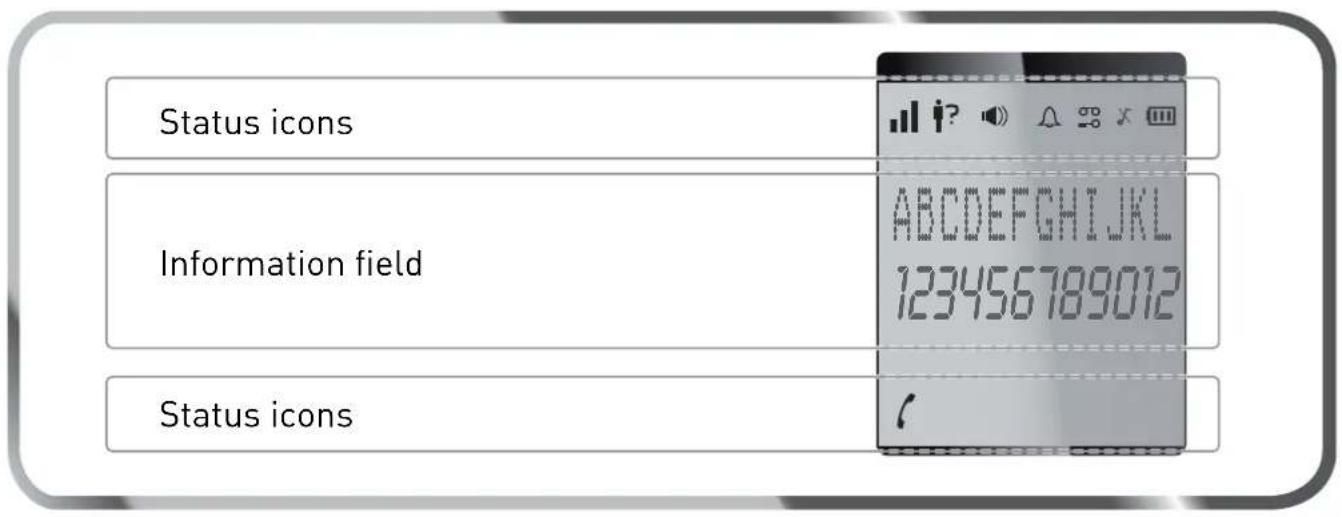
Status icons
 | Flashes when the handset is out of range or when the base is disconnected from power |  | Hands-free activated |
| [2TOZ] | External call | [083W] | Charging status iconFixed: battery is fullBlinks: charging in progressFixed: battery is low |
 | Missed call |  | Keypad locked |
 | New voice messages |  | Alarm set |
 | Silent mode activated |  | On: answering machine activatedBlinks: new message(s) on your answering machine |
Information field
| ABC... | In standby:the name and the number of the handsetIn the menu:the name of the menu /of the function | 123.. | In standby:date and timeDuring a call:- the caller's number- the duration of the call |
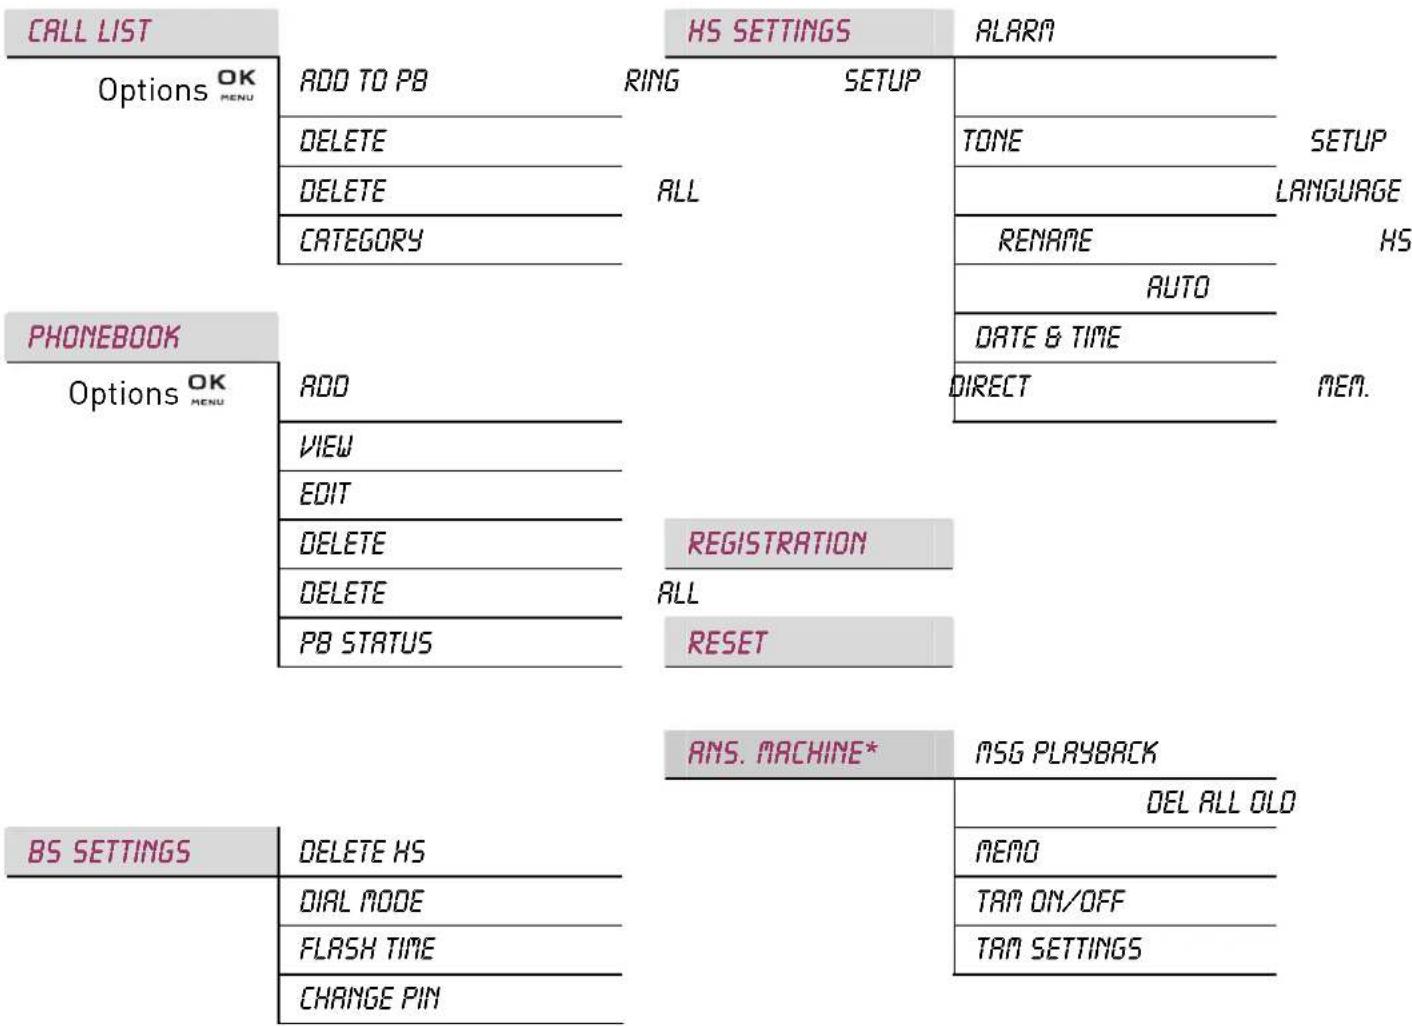
MENU STRUCTURE
Quick reference
other
| Category | Status | Value | | :--- | :--- | :--- | | CALL LIST | Options | OK | | CALL LIST | Options | MENU | | CALL LIST | Options | OK | | CALL LIST | Options | MENU | | CALL LIST | Options | NULL | | CALL LIST | Options | NULL | | CALL LIST | Options | NULL | | CALL LIST | Options | NULL | | CALL LIST | Options | NULL | | CALL LIST | Options | NULL | | CALL LIST | Options | NULL | | CALL LIST | Options | NULL | | CALL LIST | Options | NULL | | CALL LIST | Options | NULL | | CALL LIST | Options | NULL | | CALL LIST | Options | NULL | | CALL LIST | Options | NULL | | CALL T0 TO PB | Options | RING | | ALL | Options | RING | | ALL | Options | SETUP | | ALL | Options | SETUP | | ALL | Options | SETUP | | ALL | Options | SETUP | | ALL | Options | SETUP | | ALL | Options | SETUP | | ALL | Options | SETUP | | ALL | Options | SETUP | | ALL | Options | SETUP | | ALL | Options | SETUP | | ALL | Options | SETUP | | ALL | Options | SETUP | | ALL | Options | SETUP | | ALL | Options | SETUP | | ALL | Options | SETUP | | | ALL | Options | RENAME | | ALL | Options | AUTO | | ALL | Options | DATE & TIME | | ALL | Options | DATE & TIME | | ALL | Options | DIRECT | | ALL | Options | DIRECT | | ALL | Options | MEM. | | OPTION 1: ○ (OK) | Options | ROD | | OPTION 2: ○ (OK) | Options | VIEW | | OPTION 3: ○ (OK) | Options | EDIT | | OPTION 4: ○ (OK) | Options | DELETE | | OPTION 5: ○ (OK) | Options | DELETE | | OPTION 6: ○ (OK) | Options | PB STATUS | | OPTION 7: ○ (OK) | Options | RESET | | OPTION 8: ○ (OK) | Options | REGISTRATION | | OPTION 9: ○ (OK) | Options | RESET | | OPTION 10: ○ (OK) | Options | ANS. MACHINE* | | OPTION 11: ○ (OK) | Options | MSG PLAYBACK | | OPTION 12: ○ (OK) | Options | DEL ALL OLD | | OPTION 13: ○ (OK) | Options | MEMO | | OPTION 14: ○ (OK) | Options | TAM ON/OFF | | OPTION 15: ○ (OK) | Options | TAM SETTINGS | | OPTION 16: ○ (OK) | Options | CHANGE PIN | BS SETTINGS: - - - - - - - - - - - - - - - - - - - - - - - - - - - - - - - - - - - - - - - - - - - - - - - - - - - - - - - - - - - - - - - - - - - - - - - - - - - - - - - - - - - - - - - - - - - - - - - - - - - -* Model D3145 only
How to navigate among the menus
To navigate among the menus, use the keys: OK, C MENU, 12 INT, (▲) and (▼).
Step 1: access a menu
- Press OK MENU.
Step 2: select a menu / a sub-menu
- Select "the desired menu" use the keys ⚫ (▲) or ● (▼).
- Confirm by pressing the key OK MENU.
Step 3: select a function
- Select "the desired function" use the keys () or () .
- Confirm by pressing the key OK MENU.
- Modify the parameter.
- Confirm by pressing the key
Example: how to use the menu to change your handset ring tone.
Go to the menu "HS SETTINGS" → "RING SETUP".
Step 1: access a menu
- Press OK MENU.
Step 2: select a menu
- Select "HS SETTINGS" using the □ (▲) or ● (▼) key.
- Press OK MENU.
- Select "RING SETUP" using the ▲ or ▼ key.
- Press OK MENU.
- Select "INT. RING" (or "EXT. RING") using the ▲ or ▼.
- Press OK MENU.
Step 3: select a function
- 10 melodies are available: "MELODY 7"... "MELODY 10".
Select the desired melody using the ▲ or ▼ key.
- Press OK MENU key to confirm your selection.
CALL MANAGEMENT
Make a call
Ensure that the handset is switched on.
Hands-free mode:
- Press The second appear and you will hear the dial tone.
- Enter the phone number.
- OR -
- Enter the phone number.
- Press The cond appear.
Normal mode:
- Press R. The icon is displayed.
- Enter the phone number.
- OR -
- Enter the phone number.
- Press
Note!
During a phone call you can activate or deactivate the handset loudspeaker by pressing the key
Answering a call
When the phone rings, press the key to answer the call.
Note!
You can adjust the volume of your handset earpiece by pressing ▲ or ▼ key anytime during a conversation.
Ending a call
To end a call press
Microphone mute function
- Enable Mute function: press C _INT, "SECRECY ON" is displayed on the screen.
- Disable Mute function: press _INT , your conversation partner will be able to hear you again.
Checking your voice mailbox
If you have received a new voice mail message, the icon is displayed on the screen.
Note!
To use this feature you need to set up the voice mailbox, please refer to section "Assigning a shortcut" on page 17.
- Hold down the key 1 (or 2 or ).3
- Follow the instructions.
- Once you have consulted the messages, the icon 00 disappears.
Calling an abbreviated number
You can call the number you have assigned to one of the shortcut keys (1, 2 or 3).
Hold down the key on which the number was programmed, or . 3
The number is automatically dialled.
NOTE!
To change the phone numbers assigned to keys 1, 2 or 3, please refer to section "Assigning a shortcut", page 17.
Inserting a pause (in dialling)
You can insert a pause in dialling a phone number if you have to wait prior the continuation of the connection.
While dialling the number you want to call, press and hold the key #s to insert the pause.
The display shows a P' .
Two outside calls
Accepting a second call whilst being in another call
During a call, a beep is emitted by your operator to inform you that a second call is in the loop. On the display the number of this second caller is indicated.
Press then the key 2 to accept the second call.
Your first contact is put on hold and you can talk with the second caller.
Making a second call whilst being in another call
During a conversation, press then dial the number to be called.
The first call is put on hold and you can talk to the second caller.
Switching from one call to the other
To switch from one call to the other, press then the key 2
The call in process is then put on hold and you can talk to the other call.
Ending one of the two calls
To end one call and continue with the other, press then the key
The call in process is then ended finally and you can talk to the other call.
To set up a 3-way conference (2 caller and yourself)
During a conversation, press then the key 3
You can then talk with the 2 contacts at the same time.
To end the 3-way conference, press the red key
CALL LOG
Calling Line Identification Presentation (CLIP)
This CLIP phone stores and displays CLIP information provided by your local telephone company. If you have not subscribed to CLIP service or if the caller number is suppressed, the display shows unknown.
Note!
Display of numbers not available:
- OUT OF AREA: you are not in same area as your contact.
- WITHHELD: your contact does not want his number to be displayed.
Received / Missed call log
The list contains the numbers of the last 20 calls received.
- Press (▲) ☐. The most recent name or call number is displayed (depending on whether or not your contact is stored in your phonebook).
- Press the ▲ or ▼ key to go through the list.
Note!
If the number of this caller exceeds 11 digits and cannot be displayed on screen, press to view the complete number.
Category setting
This function allows you to define the category of calls to be displayed in the call log list.
- Press (▲)
- Press the ▲ or ▼ key to go through the list. Press OK MENU.
- Select "CATEGORY". Press OK MENU.
- Select "ALL CALLS" or "MISSED CALLS". Press OK MENU.
Consulting a missed call
When call(s) have been missed, the message "X NEW CALLS" is displayed on the screen (X is the number of missed calls).
-
Press . OK MENU
-
The most recent name or call number is displayed (depending on whether or not your contact is stored in your phonebook).
-
Press the ▲ or ▼ key to go through the list. Press OK MENU.
Note!
Missed calls are indicated by the icon 1 in the incoming call log.
Dialled call log
The dialled call log presents the calls you made (max. 10 calls).
To consult the list:
- Press briefly (▼) ●.
- The last dialled number is displayed.
Press the ▲ or ▼ key to consult the list of the last 10 numbers dialled.
Calling back a number in your call list
- Press the (▲) or (▼) ● key.
- Press the ▲ or ▼ key to go through the list.
- Select the number of the required partner and press

Making an entry in the phonebook from the list of calls
- Press the (▲) or (▼) ● key.
- Use ▲ or ▼ to select the desired caller number.
- Press OK MENU key, then select "ADD TO PB".
- Enter the name of the entry. Press OK MENU.
- Press OK MENU to validate the number.
- Choose a ring tone for the contact to be created. Press OK MENU.
Deleting caller list record
- Press the (▲) or (▼) ● key.
- Press ▲ or ▼ key to select a call record.
- Press OK MENU.
- Select "DELETE" (or "DELETE ALL" to delete the entire Caller list).
- Press OK MENU to confirm.
PHONEBOOK
You can store 80 phonebook entries (20 digits and 12 characters) in your phonebook.
Calling a contact from your phonebook
- Press 🔒 key to access to the contact list.
- Press ▲ or ▼ to go through the list.
- Once the contact to call is chosen, press

Adding a contact to the phonebook
- Go to the menu "PHONEBOOK" → "RDD".
- Enter the name of the entry. Press OK MENU.
- Enter the number. Press OK MENU.
- Choose a ring tone for the contact to be created. Press OK MENU.
Display a contact
- Go to the menu "PHONEBOOK".
- Choose the contact to be displayed with the ▲ or ▼. Press OK MENU.
- Select "VIEW".The number is displayed.
- Use keys ▲ or ▼ to display the name and the ring tone assigned to that contact.
Editing a contact
- Go to the menu "PHONEBOOK".
- Select the entry you want to edit using ▲ or ▼. Press OK MENU.
- Select "EDIT".
- You can now use the C key to delete the entire name or individual characters.
- Enter the new name and press OK MENU key.
- You can now use the _^INT key to delete the entire number or individual digits.
- Enter the new number and press OK MENU key.
- Choose a ring tone for the contact to be created. Press OK MENU.
Deleting a contact / The entire phonebook
- Go to the menu "PHONEBOOK".
- Select the entry you want to delete using ▲ or ▼. Press OK MENU.
- Select "DELETE" (or "DELETE ALL" to delete the entire phonebook list).
- To confirm the deletion of the entry. Press OK MENU.
Directory capacity
Your directory has a capacity of 80 contacts.
When the memory is full, the message "PB FULL" is displayed and you cannot add any new contact.
Assigning a shortcut
- Go to the menu "HS SETTINGS" → "DIRECT MEN." → "KEY 1" or "KEY 2" or "KEY 3".
- You can now use the OK MENU key to delete any assigned number (if necessary).
- Enter the new number and press OK MENU key.
USING THE MULTI-HANDSET CAPABILITIES
These functions are used for handset management when two or more handsets are registered on the same base.
Intercom Call
- Make sure your handset is in standby mode.
- Press the C _INT key.
If your installation has two handsets:
The second handset is directly called, and "CALLING HS X" appears on the screen (X is the number of the handset called).
If your telephone installation has more than two handsets:
- Select the desired handset using ▲ or ▼ (or select "RLL" if you want to call all handsets).
- Press OK MENU. The handset rings.
- Accept the call from the called handset.
- When you have finished your call, press 0 key.
Answering an internal call
- "CALL FR HS" followed by the calling handset number is displayed on the screen.
- Press to accept the call.
Managing an external and an internal call
Transferring an external call to another handset registered on same base
- During a call, press OK MENU.
- Select "INTERCOM", press OK MENU. The incoming call is put on hold.
- Enter the internal call number. When the user answers, you can announce the call.
- Press key to transfer the call.
NOTE!
If the called handset does not answer, press to take back the call.
Making conference calls (3-way conversation)
You can connect one external call to two handsets registered at the base station. To set up a telephone conference from an external call:
- During a call, press OK MENU.
- Select "INTERCOM", press OK MENU. The external user is put on hold.
- Enter the internal call number. Wait until the internal user answers.
- Press and hold ✝ until you hear a confirmation tone to start a three-way conference. "CONFERENCE" is displayed on the handset screen.
CUSTOMISING THE HANDSET
Select the ring tone (internal / external)
- Go to the menu "HS SETTINGS" → "RING SETUP" → "EXT. RING" (or "INT. RING").
- Select the ring tone of your choice using ▲ or ▼. Press OK MENU.
Handset ringer level
- Go to the menu "HS SETTINGS" → "RING SETUP" → "RING VOLUME".
- Use ▲ or ▼ to select the volume level then press OK MENU to confirm your selection.
Activating / Deactivating the warning beeps
- Go to the menu "HS SETTINGS" → "TONE SETUP" → "KEY TONE" or "BATTERY TONE" or "OUT OF RANGE".
- Change the status using the keys ▲ o ▼.
- Press OK MENU.
Modifying the language
- Go to the menu "HS SETTINGS" → "LANGUAGE".
- Use ▲ or ▼ to choose the desired language.
- Press OK MENU key to confirm your selection.
Handset naming
The default name of the handset is "HANDSET N" where N is the number of the registered handsets.
- Go to the menu "HS SETTINGS" → "RENAME HS".
- Use the keypad to enter the new name (up to 10 characters).
- Use C _INT key to delete wrong input if necessary. Press OK MENU
Answer calls automatically
This function allows you to take a call by simply taking the handset off its base.
- Go to the menu "HS SETTINGS" → "AUTO ANSWER".
- Change the status using the keys ▲ or ▼.
- Press OK MENU.
Key lock
- Hold down the key ✦ until the handset beeps and the icon ⚡ is displayed.
- To unlock the keypad, hold down the key ✦ until the handset beeps and the icon 🔍 disappears.
SETTING THE DATE AND TIME
Setting the time
- Go to the menu "HS SETTINGS" → "DATE & TIME" → "SET TIME".
- Current date is displayed.
- To keep the time, press OK MENU.
- To change it, enter the new time in the HH:MM (24 hours format).
- Press OK MENU.
Setting the date
- Go to the menu "HS SETTINGS" → "DATE & TIME" → "SET DATE".
- A screen displays the current date.
- To keep the date, press . OK MENU
- To change it, enter the new date in DD/MM/YY or MM/DD/YY format.
- Press OK MENU.
Note!
If you make a mistake while entering data, use keys ▲ or ▼.
Hour format (12H/24H)
- Go to the menu "HS SETTINGS" → "DATE & TIME" → "TIME FORMAT".
- Change the status using the keys ▲ or ▼.
- Press OK MENU.
Date format
- Go to the menu "HS SETTINGS" → "DATE & TIME" → "DATE FORMAT".
- Change the status using the keys ▲ or ▼. Press OK MENU.
Setting the alarm
- Go to the menu "HS SETTINGS" → "ALARM".
■ To deactivate the alarm, select "OFF".
■ To activate the alarm once, select "ON".
-
Press OK MENU.
-
Enter the time at which you would like the alarm clock to sound: "HH - MN".
- Press OK MENU. « SNOOZE » (repetition) is displayed on the screen. Press OK MENU.
■ "ON": to activate alarm repetition every 5 minutes.
■ "OFF": to deactivate alarm repetition.
The icon 🔒 is displayed on the screen. Your alarm is now set.
ADVANCED SETTINGS
Association of other handsets with your base
- Press and hold the pairing button on the base for 5 seconds (If no handset has been detected within a minute the pairing mode will stop and your base returns to standby).
- Go to the menu "REGISTRATION".
- Enter the 4 digit base master PIN code (default 0000). Press OK MENU.
- The screen will display the number of the handset that has been paired with the base.
Restoring the handset / base Default Settings
- Go to the menu "RESET".
- Enter the base master PIN code (default 0000).
- Press OK MENU. A screen displays a request to confirm.
- Press OK MENU.
Deleting a handset
- Go to the menu "BS SETTINGS" → "DELETE HS".
- Enter the base master PIN code (default 0000). Press OK MENU.
- Select the handset you want to delete using the ▲ or ▼ key then press OK MENU key.
Modifying the dialing mode
Most telephone systems use the tone dialling mode. You can, however, use the pulse dialling mode:
- Go to the menu "BS SETTINGS" → "DIAL MODE".
- Change the status using the keys ▲ or ▼.
- Press . OK MENU
Flash timing
If you connect your telephone to a private automatic branch exchange or use it in a foreign country, you may need to modify the flash duration in order to use your telephone correctly with regard to the following functionalities: outgoing 2nd call, incoming 2nd call, conference call.
Contact your administrator, who will supply the appropriate time period, and proceed to the new settings.
- Go to the menu "BS SETTINGS" → "FLASH TIME".
- Select the appropriate time period, press OK MENU.
| SHORT | Spain, United Kingdom, Italy, Switzerland, Austria, Netherlands, Poland, Belgium, Ireland, Hungary, Slovenia, Romania, Slovakia, Czech Republic and Sweden |
| MEDIUM | Germany, France, Greece, Portugal, Croatia, Serbia, Montenegro, Bosnia and Macedonia |
| LONG | Bulgaria |
Modifying Base master PIN code
Your base station code (default setting 0000) is required to access certain security functions.
This must contain 4 digits.
- Go to the menu "BS SETTINGS" → "CHANGE PIN".
- Enter your old code first, press OK MENU.
- Enter your new PIN code.
Each time a digit is entered the «--» is replaced by a «*». Press OK MENU. - Enter the new base code again, using the keypad. Press OK MENU.
- Press OK MENU key to confirm. You will hear a confirmation tone.
NOTE!
Carefully note your base station code. You will need it to change certain settings.
ANSWERING MACHINE (MODEL D3145 ONLY)
The answering machine function of your telephone has two operating modes:
- Basic answering machine: a message indicates that you are not available. Your caller cannot leave any messages.
- Recording answering machine: a message tells your correspondents that they can leave you a message.
Enabling / Disabling the answering machine
- Go to the menu "ANS. MACHINE" → "TRAM ON/OFF".
- Select "ON" or "OFF" using ▲ or ▼ to activate /deactivate your answering machine. Press OK MENU.
Note!
Each time you power on your base, the answering machine goes to its previous state.
Playing messages
If you have received new messages, the indicator light on the base will flash and the icon 😂 flashes on the handset.
- Go to the menu "ANS. MACHINE" → "MSG PLAYBACK".
- Press OK to play the messages. New messages are read first.
-
Press OK to access the various message options. The list of options is displayed on the screen:
-
STOP: stop reading the messages.
- NEXT: play the following message.
- PREVIOUS: return to previous message.
-
DELETE: delete the current message.
-
Press the key C to quit the menu.
- If there are no messages, the handset indicates "00--00 00--00".
While playing you can use the handset keys:
| Key | Action | Key | Action |
 | delete the current message. |  | - start playback of the messages.- stop playback of the messages. |
 | - 1 press: return to beginning of the message.- 2 presses: return to previous message. |  | play the following message. |
Delete all old messages
- Go to the menu "ANS. MACHINE" → "DEL ALL OLD".
- Press OK MENU, the massage "CONFIRM?" is displayed.
- Press OK to confirm the deletion of all old messages.
Record a memo
With this function you can leave a personal message on your answering machine. Until it has been listened to, it will be considered as a new message by the answering machine.
- Go to the menu "ANS. MACHINE" → "MEMO".
- Press OK to record the memo.
The message "RECORDING" is displayed. You can now record your memo.
- Press OK to stop the recording of the memo.
- The massage "PLAYING" is displayed and the memo you have just recorded is played.
Listening to a message while it is being recorded
While a caller is recording a message, "SCREENING P" is displayed on your handset screen.
Press the key OK MENU to listen to the message.
ANSWERING MACHINE SETUP (MODEL D3145 ONLY)
Modify the answering machine mode
- Go to the menu "ANS. MACHINE" → "TAM SETTINGS" → "ANSWER MODE".
- Select "ANS & REC" or "ANSWER ONLY" using the ▲ or ▼ key to activate or deactivate your answering machine, press OK MENU. A confirmation beep is issued.
Modifying the outgoing message (OGM)
Recording a personal outgoing message
- Go to the menu "ANS. MACHINE" → "TAM SETTINGS" → "OGM SETTINGS" → "ANS & REC" (or "ANSWER ONLY").
- Select "RECORD MESS" using the ▲ or ▼ key, press OK MENU.
- Record your message.
- At the end of your message, press OK MENU. A beep will confirm that your message is now being used.
If you make a mistake while recording the message, repeat the operations described above until you are satisfied with your message.
NOTE!
The recording of a new message will automatically replace the previous message.
NOTE!
The maximum recording duration for a message is 180 seconds. The recording start and end beeps are not part of your message.
Listening to your messages on the answering machine
- Go to the menu "ANS. MACHINE" → "TAM SETTINGS" → "OGM SETTINGS" → "ANS & REC" (or "ANSWER ONLY").
- Select "PLAYBACK" using the ▲ or ▼ key, press OK MENU.
- Your current messages on the answering machine will be played. Your handset will automatically return to the previous menu.
NOTE!
If you have not saved a personal message, the answering machine will automatically use the pre-recorded message.
Number of rings
This parameter enables you to set the number of times your telephone rings before the answering machine answers a call. The number of rings can be set between 2 and 8.
You can also select the "TIME SAVER" mode. The "TIME SAVER" mode automatically determines the number of rings: If there are no new messages on the answering machine, the number of rings will be 4, otherwise the number of rings will be 2.
- Go to the menu "ANS. MACHINE" → "TAM SETTINGS" → "ANSWER DELAY".
- In the list, select the desired number of rings (between 2 and 8) using the ▲ or ▼ key or the "TIME SAVER" mode, press OK MENU.
Recording time of incoming messages
Define the maximum time a caller has to leave their message.
- Go to the menu "ANS. MACHINE" → "TAM SETTINGS" → "RECORD TIME".
- Choose the desired recording time (60 5, 120 5, 180 5 or UNLIMITED) by using keys ▲ or ▼, then press OK MENU.
Remote access control
This function allows you to check your voice messages and change your settings of the answering machine even when you are not at home.
Activate / Deactivate remote access
- Go to the menu "ANS. MACHINE" → "TAM SETTINGS" → "REMOTE ACC".
- Use ▲ or ▼ to select "ON" or "OFF" setting.
- Press OK MENU key to confirm your selection. You will hear a confirmation tone.
NOTE!
By default, the remote enquiry function is activated. You should modify the remote enquiry code (0000 by default).
It can be modified from the "ANS. MACHINE" → "TAM SETTINGS" → "CHANGE PIN" menu (refer to the paragraph "Modify the remote enquiry code" page 27).
Remote access control
To remotely access your answering machine: dial your telephone number and wait for the answering machine to come on. When your outgoing message is played, press and enter your remote access code (0000 by default).
Note!
If no key is pressed for 5 seconds, the answering machine will stop automatically.
A beep will indicate access to the answering machine. You can carry out the following operations:
| Key | Action | Key | Action |
| 4 | - 1 press: return to beginning of the message.- 2 presses: return to previous message. | 2 | Delete the current message. |
| 5 | Start playback of the messages. | 9 | Switch OFF the answering machine. |
| 6 | Go to the next message. | 7 | Activate the answering machine. |
| 8 | Stop playing the messages. |
Modify the remote enquiry code
With the enquiry code you can make remote access to your messages of the answering machine secure from another telephone.
NOTE!
By default, the remote enquiry function is activated. You should modify the remote enquiry code (0000 by default).
- Go to the menu "ANS. MACHINE" → "TRAM SETTINGS" → "CHANGE PIN".
- Enter the remote enquiry code (0000 by default) using the keys on the keypad. Press OK MENU.
- Enter the new remote enquiry code, press OK MENU.
- Enter the new remote enquiry code a second time, press OK to confirm deletion.
A confirmation beep is issued.
Message compression
With this function, you can choose the compression level of messages recorded by your answering machine.
- A low compression level will reduce the capacity of the answering machine but will give better sound quality to recorded messages.
-
A high compression level will increase the capacity of the answering machine but will give a poorer sound quality to recorded messages.
-
Go to the menu "ANS. MACHINE" → "TAM SETTINGS" → "COMPRESSION".
-
Choose the desired compression level ("HIGH", "MIO" or "LOW") using keys ▲ or ▼.
-
Press OK MENU key to confirm your selection. You will hear a confirmation tone.
Memory capacity of answering machine
| Compression | Capacity | Recording quality |
| HIGH | 16 min | Standard quality |
| MID | 14 min Medium quality | |
| LOW | 7 min High quality |
NOTE!
When your answering machine reaches its maximum recording capacity, the answering machine switches to Answer only mode automatically.
When your answering machine reaches its maximum recording capacity, you cannot receive any new messages. The handset displays "TAN FULL".
BATTERIES SAFETY PRECAUTIONS
To avoid any risk of explosion:
■ Make sure you have inserted the batteries correctly.
- Use only with 1,2V 400mAh type or equivalent rechargeable batteries.
- Do not dispose of the batteries in a fire. The cell may explode.
- Check with local code for possible special disposal instructions.
- Do not burn, disassemble, mutilate or puncture. Like other batteries of this type, toxic materials could be released which can cause injury.
- To reduce the risk of fire or personal injury, use only the battery listed in the user's guide.
- Keep batteries out of the reach of children.
■ Remove batteries if storing over 30 days.
GENERAL PRODUCT CARE
To keep your telephone working and looking good, follow these guidelines:
- Avoid putting the phone near heating appliances and devices that generate electrical noise (for example, motors or fluorescent lamps).
- DO NOT expose to direct sunlight or moisture.
- Avoid dropping and other rough treatment to the phone.
- Clean with a soft cloth.
- Never use a strong cleaning agent or abrasive powder because this will damage the finish.
- Retain the original packaging in case you need to ship the phone at a later date.
Changing the batteries
Make sure the telephone is OFF before you replace batteries.
- Remove the batteries compartment door.
- Remove old batteries.
- Insert the new batteries.
- Put the batteries compartment door back on.
- Place handset in the base to charge
TROUBLESHOOTING
Causes of poor reception:
- Aluminium siding.
■ Foil backing on insulation.
■ Heating ducts and other metal construction can shield radio signals.
■ You are too close to appliances such as microwaves, stoves, computers, etc.
■ Atmospheric conditions, such as strong storms.
■ Base installed in the basement or lower floor of the house.
■ Handset batteries is low.
■ You are out of range of the base.
Troubleshooting
| Problem Solution | |
| No display | Make sure the batteries are properly installed and connected.Place the handset on the charger and fully charge the batteries (at least 15 hours). |
| Handset does not ring | Make sure the RINGER setting on the handset is programmed to ON.You may have added too many handsets to your phone line. Try disconnecting some of your phones and try again. |
| Not possible to make a call despite dial tone | Check that your handset is within range and move close to the base unit (approximately 50 meters indoors and up to 300 meters in open space).Check if the base unit is plugged into a wall socket that is shared with other household appliances. Unplug other device and try again. |
http://www.grundig-ject.com
AUS GUTEM
GRUND
GRUNDIG