WiFi USB Adapter - Network card / adapter Geovision - Free user manual and instructions
Find the device manual for free WiFi USB Adapter Geovision in PDF.


| Product Type | WiFi USB Adapter |
| Brand | Geovision |
| Model | WiFi USB Adapter |
| Dimensions (approx.) | 20 x 15 x 5 mm |
| Weight | 5 g |
| Power Source | USB 5V from computer |
| Wireless Standards | IEEE 802.11b/g/n |
| Frequency Band | 2.4 GHz |
| Maximum Data Rate | 150 Mbps |
| Security Protocols | WEP, WPA, WPA2 |
| Compatible OS | Windows, macOS, Linux |
| Main Functions | Adds WiFi connectivity to computers via USB |
| Maintenance | Keep dry, clean with soft cloth |
| Safety Precautions | Avoid liquids and extreme temperatures |
| Spare Parts / Repairability | Non-repairable; replace unit if faulty |
| General Information | Plug-and-play installation, LED indicator for connection status |
Frequently Asked Questions - WiFi USB Adapter Geovision
User questions about WiFi USB Adapter Geovision
0 question about this device. Answer the ones you know or ask your own.
Ask a new question about this device
Download the instructions for your Network card / adapter in PDF format for free! Find your manual WiFi USB Adapter - Geovision and take your electronic device back in hand. On this page are published all the documents necessary for the use of your device. WiFi USB Adapter by Geovision.
USER MANUAL WiFi USB Adapter Geovision
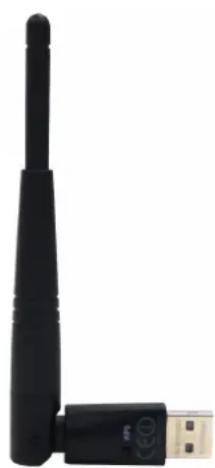
The WiFi USB Adaptor is designed to connect the GV IP devices to the wireless network. This product complies with IEEE 802.11 b/g/n (Draft 3.0) standards for wireless networking. The WiFi USB Adaptor is a plug-and-play device; you don't need to install any driver for the device to work.
Compatible GV IP Devices
The WiFi USB Adaptor is compatible with the following hardware and firmware.
GV-Video Server
• GV-VS04H, GV-VS04A (firmware V1.05 and later)
• GV-VS12 (firmware V1.05 and later)
• GV-VS11 (firmware V1.0 and later)
GV-Compact DVR
• GV-Compact DVR V2 (firmware V1.07 and later)
• GV-Compact DVR V3 4-CH (firmware V1.01 and later)
• GV-Compact DVR V3 8-CH (firmware V1.0 and later)
PN300, SQP133 (firmware V1.01 and later)
Packing List
- WiFi USB Adaptor
- Installation Guide
Overview
natural_image
Black wireless antenna with USB port, isolated on white background (no text or symbols visible)GV-Video Server and GV-Compact DVR
To configure the GV-Video Server or GV-Compact DVR to be connected to a wireless network, follow the steps below.
- Connect the WiFi USB Adaptor to the GV IP device.
- Set up WLAN Configuration on the GV IP device.
A. Start the Internet Explorer browser, and enter the IP address or the domain name of the IP device to access its Web interface.
B. From the left menu, select Network, select Wireless and select Client Mode. This page appears.
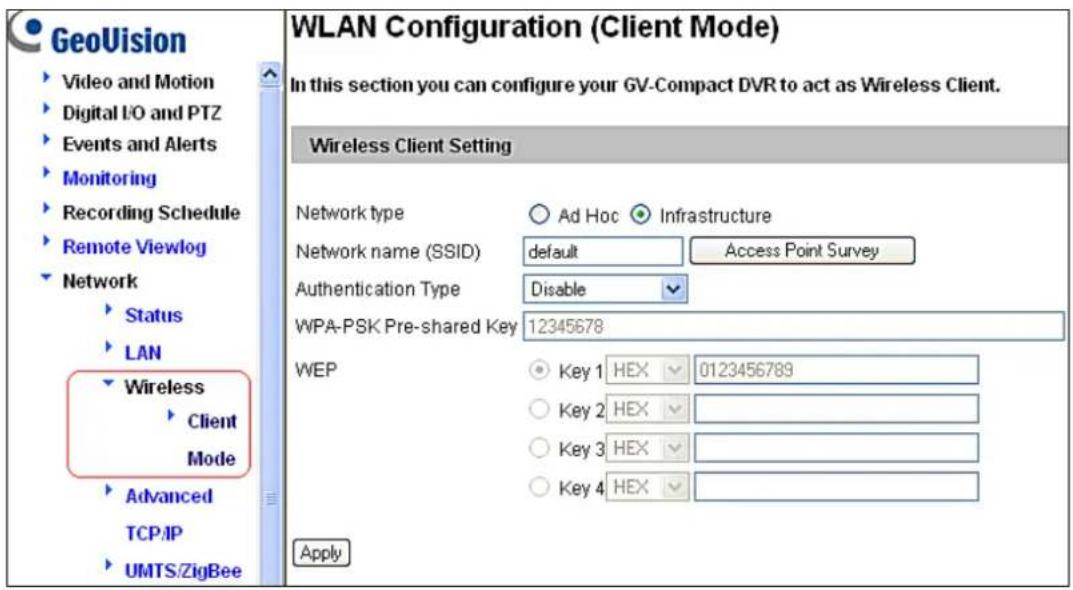
C. Select the network type Ad Hoc or Infrastructure. The default network type is Infrastructure.
■ Infrastructure: Via the Access Point to connect to the Internet. This mode further gives wireless access to the Internet or data sharing under a previously wired environment.
■ Ad-Hoc: A Peer-to-Peer mode. This mode connects to other computer with the WLAN card, and does not need the Access Point to connect to each other.
D. Enter the Network name (SSID) of the wireless LAN group or Access Point you are going to connect to. If you can't specify the network name, click Access Point Survey to detect all the available Access Points (Infrastructure mode) and wireless stations (AD-Hoc mode) within the range of your WLAN card.
a. Click Access Point Survey. This window appears.
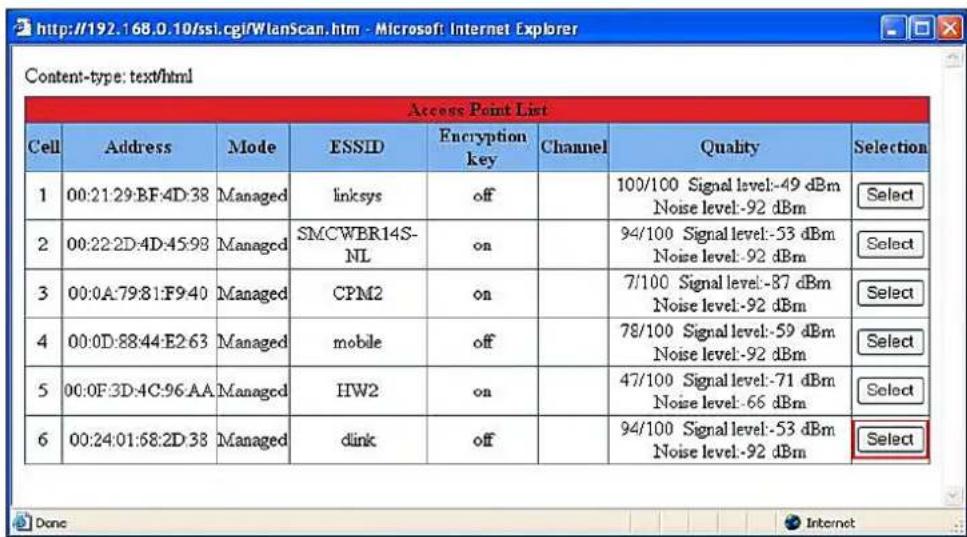
b. Click Select to select the router with which you want to associate.
E. Select the network authentication and data encryption in the Authentication Type drop-down list. Your encryption settings must match those used by the Access Points or wireless stations with which you want to associate.
■ Disabled: No authentication is needed within the wireless network.
■ WEP (Wired Equivalent Privacy): A type of data encryption. Type up to four WEP Keys in HEX or ASCII format. Note that if you use HEX format, only digits 0-9 and letters A-F, a-f are valid.
■ WPAPSK-TKIP and WPA2PSK-TKIP: Type WPA-PSK (Pre-Shared Key) for data encryption.
■ WPAPSK-AES and WPA2PSK-AES: Type WPA-PSK (Pre-Shared Key) for data encryption.
F. Click Apply.
- Enable Wireless mode on the GV IP device.
A. Select Network from the left menu, and select LAN. This page appears.
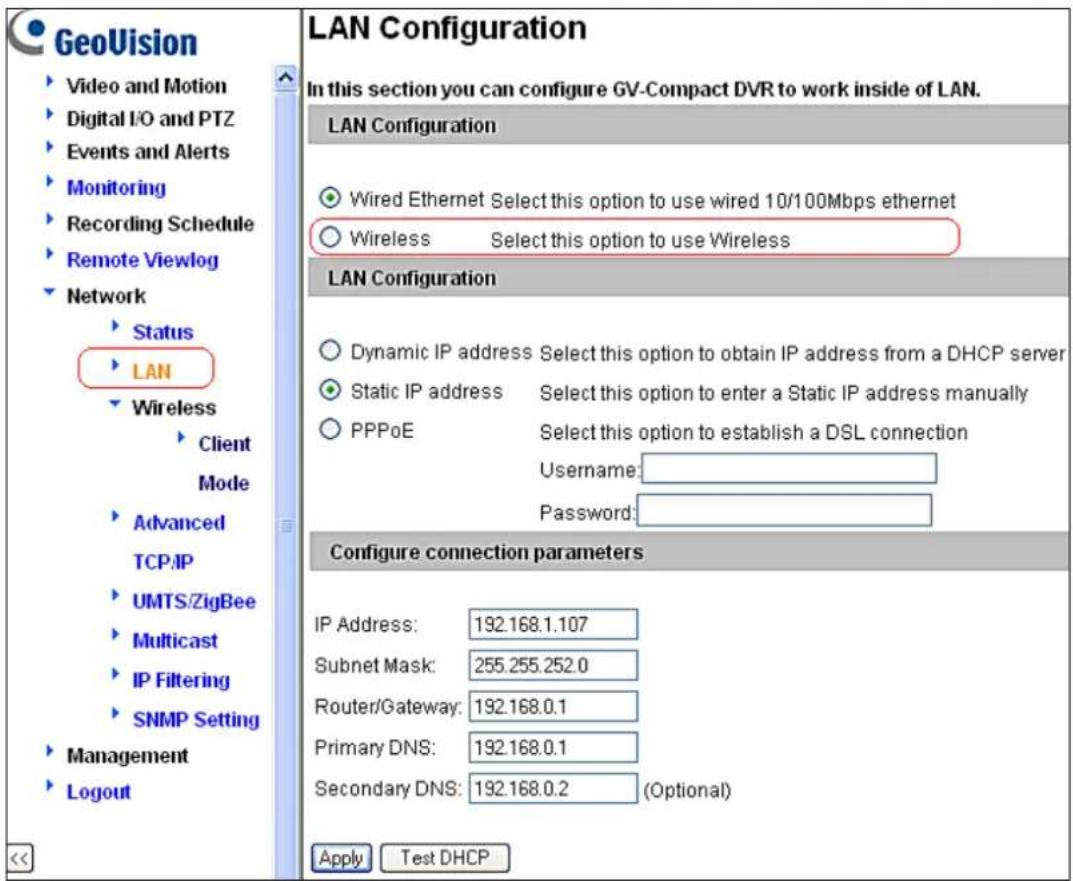
B. Select Wireless.
- Select Static IP address or Dynamic IP address for LAN configuration. The default setting is Static IP address.
■ Static IP address: Assign a static IP or fixed IP to the GV IP device.
■ Dynamic IP address: The network environment has a DHCP server that automatically assigns a dynamic IP address to the GV IP device. This option should only be enabled if you know which IP address the GV IP device will get from the DHCP server, or you have obtained a domain name from the DDNS service provider.
For users who select Static IP address:
A. Enter the GV IP device's TCP/IP and DNS parameters in the Configure connection parameters section.
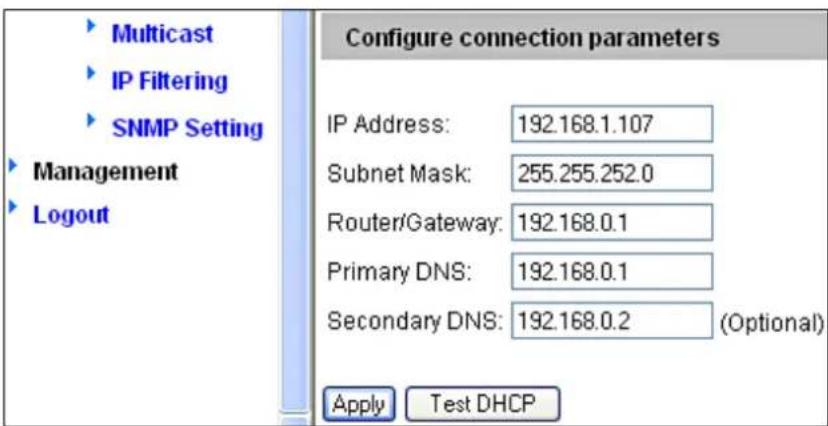
B. Click Apply. The configuration is complete, and wireless connection is established.
For users who select Dynamic IP address:
A. Select Dynamic IP address, and click Apply. The wireless connection is established.
B. Click Test DHCP to verify the setting. A window similar as the following example appears.
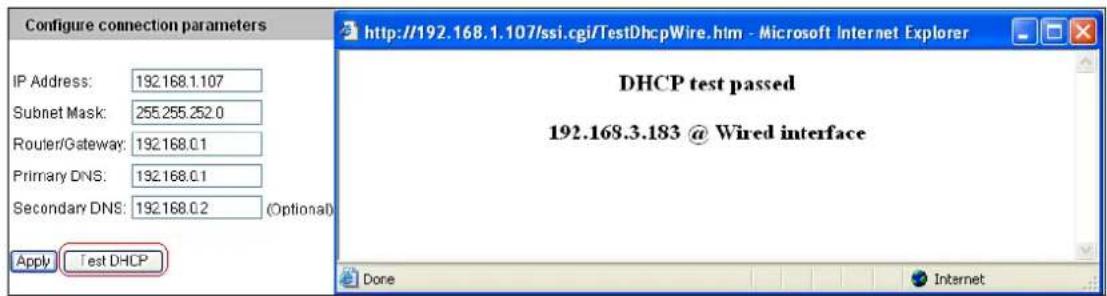
Note: If you select Dynamic IP Address, the IP address of the GV IP device assigned by DHCP Server may change.
- To detect the IP address, you can use the IP Device Utility on Software CD of the GV IP device.
- It is recommended to use DDNS service that redirects the ever-changing IP address to a domain name. You can find the DDNS settings in the Advanced TCP/IP option from the left menu, and instructions in the user's manual.
PN300 and SQP133
To configure the PN300 or SQP133 to be connected to a wireless network, follow the steps below.

- Select Network and select WLAN Setting. This window appears.
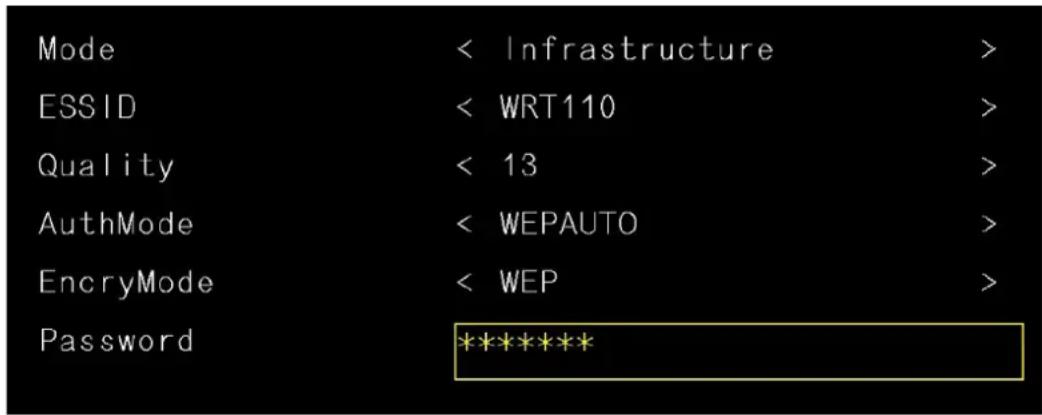
- Press the Search button to scan for available Access Points / wireless stations.
- Select an Access Point / wireless station in the ESSID field and complete the settings below.
■ ESSID: Shows the name of the Access Point. Press the left and right button to select an Access Point.
■ Quality: Shows the connection quality on a scale of 1 to 100 with 100 being the highest quality.
■ AuthMode: Select WEP Auto or WPAPSK according to the encryption setting of the Access Point.
■ EncryMode: Select the Encryption Mode according to the encryption setting of the Access Point.
■ Password: Type a password to match the Access Point. You can type up to 26 characters.
- Press OK to save the settings and connect to wireless LAN.
Specifications
| Network Standard | IEEE 802.11 b/g/n (Draft 3.0) |
| Chipset | Ralink RT3070 |
| Host Interface | USB 2.0 Backward Compatible(Standard-A Type connector) |
| Operating Frequency | 802.11b/g/n (2412 ~ 2484 MHz) |
| Dimensions (L x W x H) | 15 x 15 x 155 (mm) / 0.59 x 0.59 x 6.10 (in) |
Ordering Information
81-W150N00-P001
Brand : Geovision
Model : WiFi USB Adapter
Category : Network card / adapter