
IMC6020F - Microwave INVENTUM - Free user manual and instructions
Find the device manual for free IMC6020F INVENTUM in PDF.


| Product Type | Freestanding Microwave |
| Brand | Inventum |
| Model | IMC6020F |
| Capacity | 20 liters |
| Microwave Power | 800 W |
| Power Levels | 6 levels, including defrost |
| Control Type | Digital touch panel with LED display |
| Timer | Up to 95 minutes |
| Interior Light | Yes |
| Turntable | Glass turntable, 25 cm diameter |
| Child Lock | Yes |
| Auto Cook Programs | 8 preset programs (popcorn, potato, pizza, etc.) |
| Defrost Function | Weight-based defrost |
| Dimensions (W x H x D) | 455 x 260 x 350 mm |
| Weight | 10.5 kg |
| Power Supply | 230 V ~ 50 Hz |
| Power Consumption | 1150 W |
| Door Opening | Side hinge, push-button release |
| Cleaning | Wipe interior with damp cloth; avoid abrasive cleaners |
| Safety | Automatic shut-off, door interlock |
Frequently Asked Questions - IMC6020F INVENTUM
User questions about IMC6020F INVENTUM
0 question about this device. Answer the ones you know or ask your own.
Ask a new question about this device
Download the instructions for your Microwave in PDF format for free! Find your manual IMC6020F - INVENTUM and take your electronic device back in hand. On this page are published all the documents necessary for the use of your device. IMC6020F by INVENTUM.
USER MANUAL IMC6020F INVENTUM
natural_image
Exterior view of a black Inventum microwave oven with control panel and digital display (no text or symbols on main body)- safety instructions page 16
- appliance description page 20
- before first use page 20
- setting the clock page 21
- setting the kitchen timer
- cooking in the microwave
- grill or combination cooking
- quick start page 22
- defrosting page 22
-
auto menu page 22
-
multi-stage cooking page 23
- parental control page 23
- extra page 23
- cleaning & maintenance page 23
- problems & solutions page 24
- installation instructions page 24
- product fiche page 26
Guarantee & after sales Service page 29
1 safety instructions
- Please read these instructions before operating the appliance and retain for future use.
- The appliance is intended solely for domestic use within the home. Do not use corrosive chemicals or vapors in this appliance. This microwave is especially designed to heat. It is not designed for industrial or laboratory use.
- Do not attempt to operate this microwave with the door open since this can result in harmful exposure to microwave energy. It is important not to break or tamper with the safety interlocks.
- Do not place any object between the door of the microwave. Don't allow soil or cleaner residue to accumulate on the sealing surfaces.
- If the door or door seal are damaged, the microwave must not be operated until it has been repaired by a competent person.
- Warning: Liquids and other foods must not be heated in sealed containers since they are liable to explode.
- It is hazardous for anyone other than a competent person to carry out any service or repairs that involve the removal of the cover which gives protection against exposure to microwave energy.
- An electrical appliance is not a toy, and should therefore always be placed outside the reach of children. Children are not always able to understand potential risks. Teach children a responsible handling of electrical appliances.
- This appliance shall not be used by children from 0 to 8 years. This appliance can be used by children over the age of 8 and above if they are continuously supervised. This can be used by people with reduced physical, sensory or mental capabilities or lack of experience or knowledge, if they have been given supervision or instruction concerning use of the appliance in a safe way and understand the hazards involved. Keep the appliance and its cord out of reach of children aged less than 8 years.
- Cleaning and maintenance shall not be made by children.
• Children must not play with the appliance. - Only use utensils suitable for use in microwaves.
- The microwave should be cleaned regularly and any food deposits should
be removed.
- When heating food in plastic or paper containers, keep an eye on the microwave due to the possibility of ignition.
- When you see smoke, switch off and unplug the microwave. Keep the door closed in order to stifle any flames.
- Do not overcook the food.
- Do not use the microwave cavity for storage purposes. Do not store items, such as bread, cookies, etc. inside.
- Remove metal wire twisties and metal handles from paper or plastic containers/bags before placing them in the microwave.
- Install or locate this microwave only in accordance with the installation instructions.
- Eggs in the shell and whole hard-boiled eggs should not be heated in the microwave since they may burst, even after the microwave is shut off.
- Always carry out regular checks of the appliance and the power cord to ensure no damage is evident. Should there be any signs that the appliance or the power cord is damaged in the slightest degree, the entire appliance should be returned to the Customer Service Department. For your own safety, only use the accessories and spare parts from the manufacturer which are suitable for the appliance.
- Only use and store the appliance indoors.
- Do not use the microwave near water, in a wet basement/ garage or near a swimming pool.
- Attention! Avoid touching hot surfaces, especially the inside of the appliance.
- Do not cover any vents of the microwave.
- Do not let the cord hang over the edge of the table or counter and keep it away from the heated surface.
- Failure to maintain the microwave clean could lead to deterioration of the surface that could adversely affect the life of the appliance and possible result in a hazardous situation.
- The contents of feeding bottles and baby food jars shall be stirred or shakes and the temperature checked before consumption, in order to avoid burns.
- Attention: heating of beverages in the microwave can result in delayed eruptive boiling. Therefore always place a plastic or ceramic spoon in the cup. Be careful when handling the container.
- The appliance is not intended to be operated by means of an external timer or separate remote-control system.
• Always use the appliance on a secure, dry, level surface.
- Before plugging into a socket, check that the voltage in your home corresponds with the voltage printed on the bottom of the appliance.
- Never leave the appliance unattended when in use.
- For your own safety, only use the accessories and spare parts from the manufacturer which are suitable for the appliance.
- Never unplug it from the socket by pulling on the cable.
- Always ensure that your hands are dry before handling the plug, switch or power cord.
- Should you decide not to use the appliance anymore, make it inoperative by cutting the power cord after removing the plug from the socket. We also recommend making all potentially dangerous parts of the appliance harmless, particularly for children who might be tempted to play with it.
- Before moving the appliance, make sure it is switched of. Use both hands when moving the appliance.
- Never immerse any part of the main body, lid, power cord and plug in water or any other liquid to protect against electrical hazards.
- If the appliance is used for other purposes than intended, or is it not handled in accordance with the instruction manual, the full responsibility for any consequences will rest with the user. Any damages to the product or other things are not covered by the warranty.
- Be careful with the following materials if they can be used in the microwave oven:
- aluminium foil yes*
- paper yes**
- cling film yes
- aluminium tray no
- microwave dishes yes
- heatproof plastic yes
- unglazed pottery no
- metal cooking utensils no
- ovenproof glass and ceramics yes
- normal glass yes
- metallic twists no
- plate with metallic decoration no
- mercury thermometer no
- closed jar no***
- bottle with narrow neck no
- roasting bags yes
* By covering thinner parts of foods (such as chicken legs), you prevent them from cooking too quickly.
** Use undecorated kitchen paper to cover food and to absorb grease.
*** Remove the lid and make sure the jar is not heated too long. The jar may break.
• Legislation requires that all electrical and electronic equipment
must be collected for reuse and recycling. Electrical and electronic equipment marked with the symbol indicating separate collection of such equipment must be returned to a municipal waste collection point.
2 appliance description
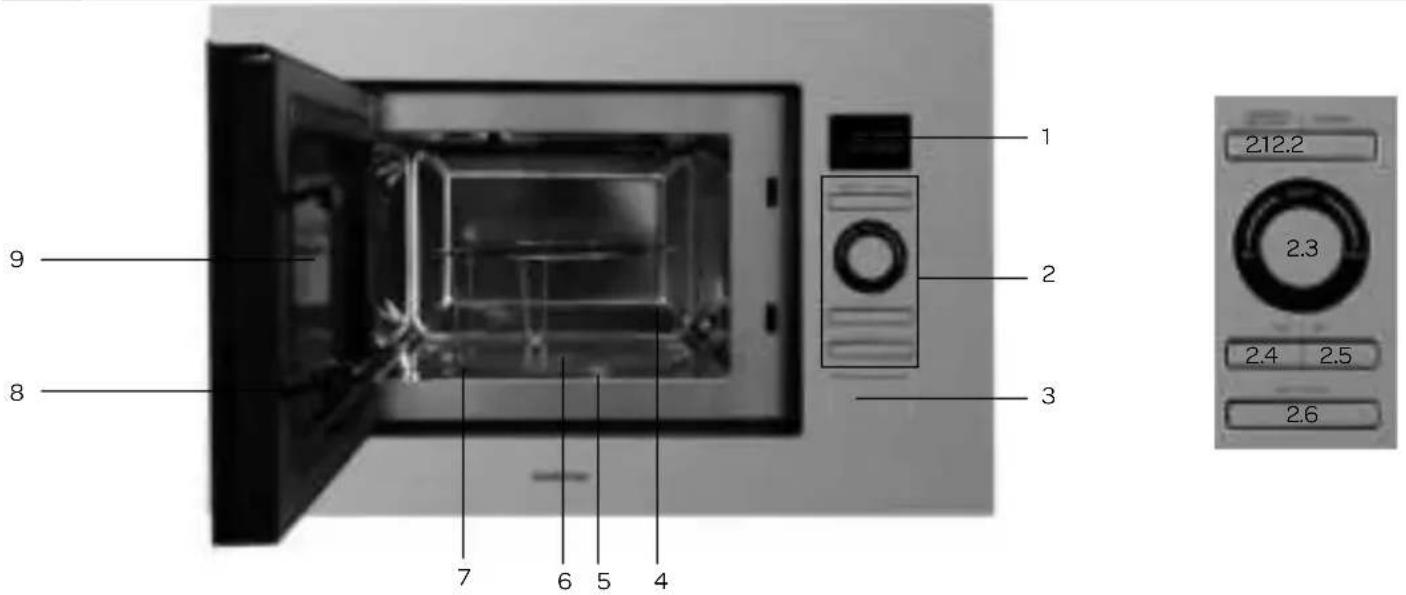
- Display
- Control panel
- Door open button
- Grill rack (only to be used in grill function)
- Turntable ring assembly
- Turntable shaft
- Glass tray
- Door with safety interlock system
- Observation window
2.1 Button for microwave/grill/combination setting
2.2 Button for defrost setting
2.3 Turn knob for adjusting or choosing auto menu
2.4 STOP/reset button
2.5 Button for time
2.6 START/+30 SEC-button
3 before first use
Before you use the appliance for the first time, please do as follows: Carefully unpack the appliance and remove all the packaging material. Keep the material (plastic bags and cardboard) out of reach of children. Check the appliance after unpacking for any damage, possible from transportation. Check that the voltage in your home corresponds with the voltage printed on the appliance and plug it in a socket. Follow the installation instructions in chapter 16 for installing the microwave.
Clean the microwave and the accessories with warm water and a mild detergent. Rinse well and dry thoroughly.
Using the microwave may cause interference to your radio or TV reception. Place the microwave oven therefore as far away from such devices as possible. Do not place the microwave near a heat source.
4 setting the clock
As soon as the microwave is plugged in, it will display 0:00 and the buzzer will ring once.
- Press the button CLOCK twice. The display shows 00:00.
- Turn 📋 to adjust the hour. The input should be between 0-23 (24 hour).
- Press the button CLOCK again and the minutes will flash.
- Turn to adjust the minutes. The input should be between - 0-59.
- Press the button CLOCK again to confirm the time. The colon ":" will blink.
- If the clock is not set, it would not function when powered. The display will show 0:00.
- If you press STOP during the process of setting the clock the microwave oven will return to the previous setting.
5 setting the kitchen timer
- Press the button CLOCK once. The display will show 00:00.
- Turn 📄 to adjust the correct cooking time. The maximum time is 95 minutes.
- Press the button START/+30 SEC. to confirm the setting.
- When the set time has ended, the buzzer will ring 5 times and the display will return to the current time.
6 cooking in the microwave
- Press the button MICROWAVE and the display will show P100. Press the button MICROWAVE/GRILL/COMBI repeatedly to change the power or use 📋 - P100-P80-P50-P30-P10.
- Press the button START/+30 SEC. to confirm the power.
- Turn to adjust the cooking time. The cooking time can be set from 0:05 to 95:00.
- Press the button START/+30 SEC. again to confirm the cooking time and start the microwave.
| Microwave power Application | |
| P10 = 80 Watt Softening | butter or ice cream |
| P30 = 240 Watt Soup, hotchpot or defrosting | |
| P50 = 400 Watt Hotchpot, fish | |
| P80 = 640 Watt Rice, fish, chicken, grounded meat | |
| P100 = 800 Watt Heating, milk, boiling water, vegetables, heating beverages |
The step quantities for adjusting the time are as follows:
0-1 minute : 5 seconds
1-5 minutes : 10 seconds
5-10 minutes : 30 seconds
10-30 minutes : 1 minute
30-95 minutes : 5 minutes
7 grill or combination cooking
- Press the button MICROWAVE/GRILL/COMBI and the display will show P100. Press the button MICROWAVE/GRILL/COMBI repeatedly to change the program or use 📋 - G, C-1 or C-2.
- Press the button START/+30 SEC. to confirm the program.
• Turn to set the right cooking time. The cooking time can be set from 0:05 to 95:00. - Press the button START/+30 SEC. again to start the program.
Extra: If half the grill time passes, the oven will ring twice. This is normal. For a better grilling result, you should turn the food over. Close the door and press START/+30 SEC. again to continue grilling.
| Combination settings | ||
Display Microwave Grill |  | |
| G | 100% | |
| C-1 | 450W | 450W |
| C-2 | 285W | 640W |
8
quick start
- Press the button START/+30 SEC. to cook with full power (800 Watt) for 30 seconds. Each press on the same button increases the time with 30 seconds. The maximum is 95 minutes.
or
- Press during the use of the microwave, grill or a combination the button START/+30 SEC. to increase the cooking time full power with 30 seconds.
When pressed repeatedly on the same button the time increases with 30 seconds.
Extra: This function does not work while defrosting or while using a auto menu.
9
defrosting
- Press the button DEFROST once to defrost by weight. The display shows dEF-1.
- Turn 📋 to select the weight of the food. The weight should be between 100 and 2000 gram.
- Press the button START/+30 SEC. to start defrosting.
- Press the button DEFROST twice to defrost by time. In the display appears dEF-2.
- Turn to select the desired defrosting time. The maximum time is 95 minutes.
- Press the button START/+30 SEC. to start defrosting.
10
auto menu
- Turn 🔔 to the right to select the desired menu and A1, A2, A3.....A8 will be displayed.
- Press the button START/+30 SEC. to confirm the menu.
- Turn 📋 to select the desired weight and the display will show g.
- Press the button START/+30 SEC. to start the menu.
Overview auto menu
| Menu Weight (g) Display | ||
| A1PIZZA | 200 g 200 | |
| 400 g 400 | ||
| A2MEAT | 250 g 250 | |
| 350 g 350 | ||
| 450 g 450 | ||
| A3VEGETABLES | 200 g 200 | |
| 300 g 300 | ||
| 400 g 400 | ||
| A4PASTA | 50 (with 450 ml. water) 50 | |
| 100 (with 800 ml. water) 100 | ||
| A5POTATO | 200 g 200 | |
| 400 g 400 | ||
| 600 g 600 | ||
| A6FISH | 250 g 250 | |
| 350 g 350 | ||
| 450 g 450 | ||
| 650 650 | ||
| A7BEVERAGE | 1 ( ± 120 ml) 1 | |
| 2 ( ± 240 ml) 2 | ||
| 3 ( ± 360 ml) 3 | ||
| A8POPCORN | 50 g 50 | |
| 100 g | 100 | |
11 multi-stage cooking
You can set a maximum of two stages at once with the microwave. If one stage is defrosting, it should be put as the first stage. The buzzer will ring once after each stage and when the next stage will begin.
Example: if you want to defrost the food for 5 minutes and then cook it with 80% microwave power for 7 minutes follow the next steps:
- Press the button DEFROST twice and the display shows dEF-2.
- Turn 📁 to adjust the defrosting time to 5 minutes.
- Press the button MICROWAVE/GRILL/COMBI and use 📋 to set the microwave power to 80% - P80.
- Press the button START/+30 SEC. to confirm the setting.
• Turn to adjust the cooking time to 7 minutes. - Press the button START/+30 SEC. to start cooking.
12 parental control
This microwave has parental control. You can block the control panel so your child can not accidentally activate the microwave.
Activating the lock-out:
Press the button STOP for 3 seconds. A long beep will sound and the indicator lights up. The display will show the current time when set.
De-activating the lock out:
To deactivate the lock out, press the button STOP for 3 seconds. A long beep will sound and the indicator turns off.
13 extra
- When using the microwave, press CLOCK to see the current time for 2-3 seconds.
- While using a function of the microwave, you can check the setting by the button MICROWAVE/GRILL/COMBI. The power or temperature will be displayed for 2-3 seconds.
- The buzzer will ring once when turning 📋 at the beginning.
- START/+30 SEC. must be pressed again to continue cooking after the door has been openend.
- When the program is set, but not activated within five minutes, the setting will be canceled and the current time will be displayed (when set)
- The buzzer will only sound once by sufficient pressing the button. If you do not press the button correctly there will be no soundsignal and the function will not activate.
- The buzzer will ring five times to remind you when the cooking has ended.
14 cleaning & maintenance
Before cleaning the microwave be sure to switch it off and unplug it. Leave the microwave to cool down completely.
Interior
Clean the inside of the appliance after every use. Use a damp cloth. For a thorough cleaning use warm soapy water and dry the interior.
Accessories
Clean the separate accessories such as the turntable, the roller stay and the grill rack with warm soapy water. These accessories can also be cleaned in the dishwasher. Thoroughly dry everything before using them again.
Exterior
Clean the exterior of the appliance with a damp cloth or sponge. If necessary use a mild detergent. Also clean the door and the door seal.
15 problems & solutions
Check the solutions below before contacting your supplier or our technical department in case of a problem.
| Problem Solution | |
| The microwave does not start Is the | power cord plugged in?Is the fuse or circuit breaker blown? |
| The microwave does not heat Did the door close correctly? Open the door and shut it well again. | |
| The turntable makes noise Clean the roller ring for the turntable and the bottom of the microwave oven. | |
| The food is not well defrosted | Has the power and time been set correctly? Did you stir or turn the food at least once whilst defrosting? |
16 installation instructions
- The safety during use can only be guaranteed when the hob is installed correctly and according to the regulations. The installer is responsible for any damage caused by a faulty installation.
- The electrical connection must be made by a qualified electricien. This person is aware of the national and local regulations the installation must comply with.
- The appliance falls under protection class I and can only be used in combination with a grounding conductor connection. The manufacturer accepts no responsibility for any malfunction or damage caused by incorrect electrical installations.
- The appliance must be connected to a fixed installation and the means of disconnecting it from the fixed installation must be installed according to the installation instructions.
- The connection cable must hang freely. Do not tie the power cable or pass it along sharp edges. It must be positioned so that it does not touch any of the hot parts of the microwave.
- The connection point, the wall socket and/or plug must always be accessible.
- The cabinet into which the microwave is fitted, must be heat resistant ( >75^ C).
- Ensure that the cabinet into which the microwave is installed is secure. For example, by mounting it to the adjoining elements.
- Damage caused by incorrect connection, incorrect use or incorrect fitting is not covered by the guarantee.
Attention: any change to the appliance's interior, including fitting and changing the power cable, must only be performed by a qualified electricien.
INSTALLATION DIMENSIONS
In the drawings below, all the dimensions are displayed in mm.

* not suitable for built-under
ELECTRICAL CONNECTION
Check that the voltage in your home corresponds with the voltage printed on the appliance.
These groups in the meter must be secured with at least 16 amps each. The connection cable must have a cross-section of at least 2.5mm^2 and must have a length of at least 1.5m . When the cable is too short, you have no room to already connect the oven and place it against the wall before plugging it in.
THE FITTING OF THE APPLIANCE
- Check that the cabinet and the space for the microwave meet the dimension and ventilation requirements.
- Read the instructions on the enclosed template for the bottom of the cabinet.
- Tape the template on the bottom of the cabinet. Make sure the centre line on the template is also the centre of the cabinet.
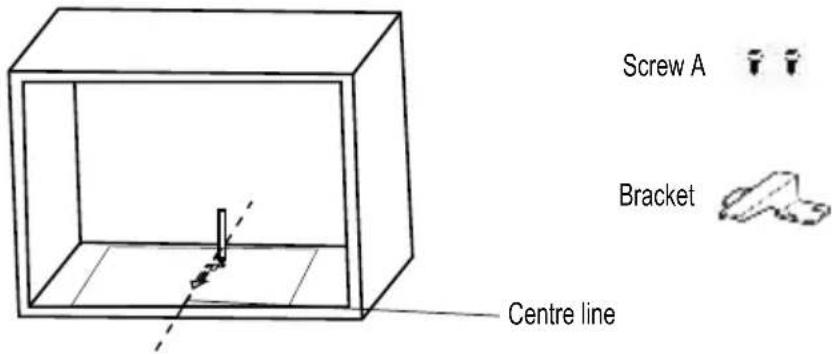
- Place the bracket on the assigned spot on the template and mount it with the screws. Now pull the template from the bracket.

- Slide the microwave in the cabinet. Check whether the microwave locks on to the bracket. Note: Make sure the cable is not stuck and does not lie on top of the microwave.

- Open the door of the microwave. Use the provided screw to fasten the microwave to the cabinet and place the plastic cap on the screw.

- Close the microwave door and plug the appliance in.
• The microwave is now ready for use.
17 product fiche
| Manufacturer INVENTUM | |
| Model number IMC6020F | |
| Type of appliance built-in microwave with grill | |
| Number of oven cavities 1 | |
| Heat source per oven cavity electric | |
| Execution | |
| Capacity 20 liter | |
| Turn table ∅ 245 mm | |
| Dimensions (wxdxh) in mm - internal 280 x 300 x 195 | |
| Technical specifications | |
| Dimensions (wxdxh) in mm 594 x 343,5 x 388 | |
| Nett weight in kg 15,4 | |
| Power consumption -microwave [W] 1250 watt | |
| Microwave power 800 watt | |
| Power consumption - grill [W] | 1000 watt |
| Rated voltage [V] / frequency [Hz] | 230V/50 |
Remark: on the rating label - which can be found on the inside of the appliance - you will find the technical specifications of the appliance.
garantie & service
guarantee & after sales service
- INVENTUM guarantees this product for a period of 2 years starting from the date of purchase. The warranty covers proven defects in material, manufacturing and functioning of components and includes material costs, travel- or shipping costs and labor.
- INVENTUM provides not only the 2 years standard warranty, but also gives 3 years extended warranty on spare parts and labor costs. We only bill the travel- or shipping costs. This way, the quality of your INVENTUM equipment is 5 years guaranteed.
- To qualify for the extended 5 year warranty, please register your appliance within 45 days of purchase on www.inventum.eu
• Why is registration important for you?
- You get a 5-year warranty
- All details of your appliance are known by Inventum. No need to search for your model number when you contact us.
- Inventum can provide a faster and better service when you contact our service center.
- Guarantee can only be given if proof of purchase (e.g. till receipt or copy) can be shown. Therefore keep it in a safe place. The guarantee period starts at the date of purchase.
• Guarantee is not valid in case of:
- normal wear;
- damage through misuse use or when the instructions were not followed correctly;
- lack of maintenance;
- not following the operation- and safety instructions;
- incompetent montage or repairs made by yourself or others;
- using accessories and spare parts which are not suitable for the appliance;
for assessment by our technical department.
• The guarantee is not valid for:
- normal wear - such as baking tray, grill rack and removal handles;
- normal wear and tear – such as glass breakage, scratches on the equipment, discoloration of plastic or painted parts; Insufficient or incorrect maintenance can cause discolouration of surfaces and rubbers and plastics can deteriorate fast. This is also not covered under warranty.
- (interchangeable) signal- and controllamps;
- defects and consequential damage caused by strong contamination and incorrect maintenance;
for assessment by our technical department.
Defects which do not significantly influence the value or operation of the device asre excluded by free repair and / or replacement.
Transport damage is not guaranteed. Therefore, check your new equipment before use. If any damage is found, please contact your supplier within 5 working days after purchase. From warranty and/or replacement are excluded: defects, loss and damage to the appliance due to an event that usually is insured under the home contents insurance.
To whom can you turn to?
On www.inventum.eu you will find - besides advice on how to use the appliance and cleaning tips - all the answers to your service related questions. Please check the website before contacting our service center.
You can register your service request quickly and easily online at www.inventum.eu. It is also possible to do this by telephone via the INVENTUM service organization. INVENTUM Service Organization: 0900-INVENTUM (0900-468 36 88) (just for Holland).
To provide the best possible service and to process your service request as soon as possible, we recommend that you always first contact INVENTUM before returning your device.
Following the advice of our service organization, please send your appliance, including a copy of the original, printed proof of purchase and description of the complaint, stamped to our service address:
Attn. Service department
Generatorstraat 17
3903 LH VEENENDAAL
Website: www.inventum.eu
THE NETHERLANDS
Helpdesk: 0900-468 36 88
(just for Holland)
These warranty conditions only apply to the Netherlands. For local warranty please contact your dealer.
In countries where INVENTUM has a distributor, you can turn to them if you need the INVENTUM service organization. In other countries, contact your dealer.
When the guarantee is no longer valid or when the period of guarantee has passed, we will charge any costs that flow out of an assessment and/or repairing.
On request we will supply a statement before repairing. Without requesting a statement, we assume that you, by sending the appliance, automatically order to repair the appliance.
A guarantee period of two months is valid for repairs done by our technical department and the used spare parts, counting from the repairdate. When a malfunction occurs within this period which directly flows out of the repairs and the used spare parts, the consumer has the right of repairs without any costs.
Modification and printing errors reserved. The latest version of the deposited guarantee conditions can be obtained through our service organization.

klein huishoudelijk

witgoed vrijstaand

witgoed inbouw

twitter.com/inventum1908
facebook.com/inventum1908
youtube.com/inventum1908


- safety instructions
- - roasting bags yes
- appliance description
- before first use
- setting the clock
- setting the kitchen timer
- cooking in the microwave
- grill or combination cooking
- 8
- quick start
- 9
- defrosting
- 10
- auto menu
- multi-stage cooking
- parental control
- Activating the lock-out:
- De-activating the lock out:
- extra
- cleaning & maintenance
- Interior
- Accessories
- Exterior
- problems & solutions
- installation instructions
- INSTALLATION DIMENSIONS
- ELECTRICAL CONNECTION
- THE FITTING OF THE APPLIANCE
- garantie & service
- guarantee & after sales service
- To whom can you turn to?
Brand : INVENTUM
Model : IMC6020F
Category : Microwave