
Optimo 9 - Air conditioner Argoclima - Free user manual and instructions
Find the device manual for free Optimo 9 Argoclima in PDF.

| Product Type | Portable Air Conditioner |
| Brand | Argoclima |
| Model | Optimo 9 |
| Cooling Capacity | 9000 BTU/h (approx. 2.6 kW) |
| Air Flow | 320 m³/h |
| Noise Level | ≤ 65 dB(A) |
| Power Supply | 220-240 V ~ 50 Hz |
| Power Consumption (Cooling) | 880 W |
| Refrigerant | R290 (flammable) |
| Dimensions (W x D x H) | 430 x 350 x 700 mm |
| Net Weight | 24 kg |
| Functions | Cooling, Dehumidification, Fan, Sleep Mode, Timer |
| Control Type | Electronic with Remote Control |
| Display | LED Touch Panel |
| Air Purification | Washable Filter (PM2.5) |
| Dehumidification Capacity | 1.2 L/h |
| Timer | 24-hour Programmable |
| Installation | Window Kit Included (sliding or sash) |
| Maintenance | Clean Filter Every 2 Weeks; Drain Condensate Manually or Continuous Drain |
| Safety Features | Auto Shut-off, Overheat Protection, Child Lock |
| Energy Efficiency | Class A (Cooling) |
| Included Accessories | Remote Control, Exhaust Hose, Window Kit, User Manual |
| Repairability Index | 6.5 / 10 (estimated) |
Frequently Asked Questions - Optimo 9 Argoclima
User questions about Optimo 9 Argoclima
0 question about this device. Answer the ones you know or ask your own.
Ask a new question about this device
Download the instructions for your Air conditioner in PDF format for free! Find your manual Optimo 9 - Argoclima and take your electronic device back in hand. On this page are published all the documents necessary for the use of your device. Optimo 9 by Argoclima.
USER MANUAL Optimo 9 Argoclima
natural_image
Line drawing of a rectangular electronic device with control panel and buttons (no text or symbols)MOVABLE AIR CONDITIONER • CLIMATIZZATORE PORTATILE
CLIMATISEUR MOBILE • MOBILES KLIMAGERÄT
PRODUCT IDENTIFICATION....2
CONTROL PANEL 3
BEFORE USING THE APPLIANCE 3
OPERATION 4
EG
OPERATION with remote control 5
EXHAUST HOSE KIT INSTALLATION 6
CARE AND CLEANING 6
USEFUL ADVICE/CONDENSATE DRAINAGE.... 7
DECLARATION OF CONFORMITY
This product is marked CE as it satisfies Directives:
- Low voltage no. 2006/95/CE. - Electromagnetic compatibility no. no. 89/336 EEC, 92/31 EEC and 93/68 EEC.
This declaration will become void in case of of misuse and/or non observance though partial of manufacturer's installation and/or operating instructions.

INFORMATION FOR CORRECT DISPOSAL OF THE PRODUCT IN ACCORDANCE WITH THE EUROPEAN DIRECTIVE 2002/96/EC
At the end of its working life this equipment must not be disposed of as an household waste. It must be taken to special local community waste collection centres or to add ealer providing this service. Disposing of an electrical and electronic equipment separately avoids possible negative effects on the environment and human health deriving from an inappropriate disposal and enables its components to be recovered and recycled to obtain significant savings in energy and resources. In order to underline the duty to dispose of this equipment separately, the product is marked with a crossed-out dustbin.
PRODUCT IDENTIFICATION
NOTE: OPEN the AIR OUTLET GRILLE BEFORE USING THE UNIT
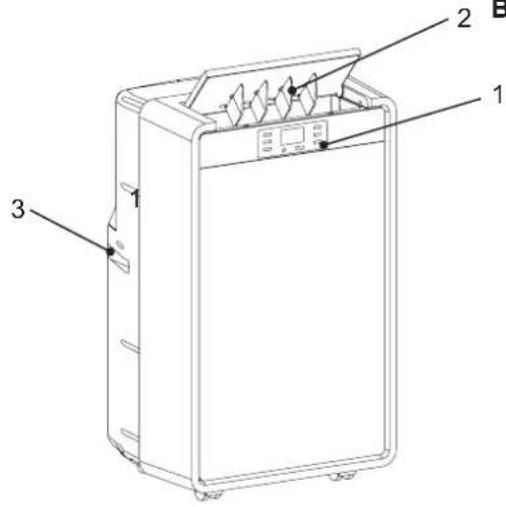

- Control panel
- Air outlet grille to be opened before using the unit
- Handle
- Connection for Hot air exhaust hose
- Return air grille
- Water outlet drain (for continuous drainage in cooling mode)
- Water outlet drain (for continuous drainage in dehumidifying only mode)
Operating limits:
Room Temperature:
ooling: MIN: 16°C D.B. / 12°C W.B.Co
MAX: 32°C D.B. / 24°C W.B.
Dehumidification: MIN: 10°C D.B / 80% R.H.
MAX: 32°C D.B. / 80% R.H.
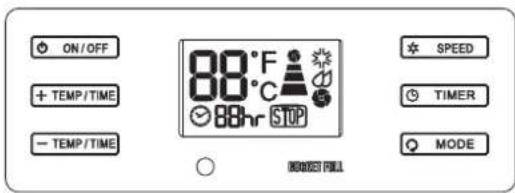
CONTROL PANEL
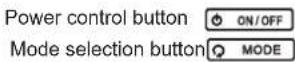
Indication symbols on LCD and panel buttons functions
Cooling / Dehumidification/ Fan modes symbols

High / Med / Low fan speed symbols
Fan speed slection button ✦ SPEED
Indicator of room temperature

Lamp for full water tank:

Display timer setting of auto switch on/off

EG
BEFORE USING THE APPLIANCE
- Check that the power supply at the location where the air conditioner is going to be used is 220-240V \~ 50Hz.
- Make sure that the electrical installation is suitable to supply continuously current necessary for the air conditioner in addition to that already used by other electric appliances (white goods, lighting). See the max electric input indicated on the name plate positioned on the air conditioner.
WARNING: ALWAYS OPEN the AIR OUTLET GRILLE BEFORE USING THE APPLIANCE
- The unit has to be connected according to the local electrical rules.
- Make sure that circuit breakers, fuses, etc, are of sufficient capacity to handle a start-up current of 20 A (generally less then 1 second).
- Do not install the air conditioner where it could be wetted by drops of water (i.e. in laundries).
- Make sure that the ON - OFF button switch on the control panel of the air conditioner is in OFF position.
- Before connecting the air conditioner to a power socket, make sure that the socket is provided with an earth connection in compliance with local codes.
- Never use the power plug as a mean to start or stop the air conditioner: always use the ON/OFF button switch on the air conditioner control panel.
- Do not move the air conditioner during operation, turn it off and disconnect the plug from the power supply. Verify and eventually discharge the condensate water, through the discharge tube located on the rear of the unit.
- WARNING! Do not stick anything into the air outlet of the air conditioner. This is very dangerous because the fan is rotating at high speed.
- WARNING! The air conditioner is provided with a time-guard system, which does not allow re-starting of compressor until after 3 minutes from a previous stop.
- Make sure that there are no obstacles around the unit affecting the free circulation of air. Do not block the air intake and outlet of the unit with curtains or other. Never put objects on the top of the unit. Make sure that the back of the unit is at least 10 cm from a wall.
• The manufacturer assumes no responsibilities if the safety regulations or local codes are not observed.

WARNING
- Always unplug the unit from the power socket before moving or cleaning it.
- If the power cord is damaged, it must be replaced by the manufacturer, its service agent or other qualified person to avoid a hazard.
- This appliance is not intended for use by persons (including children) with reduced physical, sensory or mental capabilities, or lack of experience and knowledge, unless they have been given supervision or instruction concerning use of the appliance by a person responsible for their safety.
WARNING: ALWAYS OPEN the AIR OUTLET GRILLE BEFORE USING THE APPLIANCE
OPERATION
COOLING
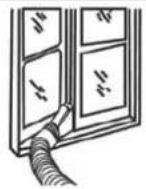
- Place the air conditioner as near as possible to the window. Connect exhaust hose kit to the back of the unit. Extend the flexible tube just enough to reach the outdoor, passing under the window shutters set ajar.
- In case there is a window sill towards the inside of the room, it might be better to use the supplied outlet nozzle. Insert the nozzle into the free end of the flexible tube.
- Open the window and lock one of the shutters. Place the outlet nozzle between the two shutters
- Avoid sharp bends or plies of the flexible tube.
- In case of porthole utilise make a 135 mm diameter hole in the window pane.
- Switch on the air conditioner pressing ON/OFF
- Select the cooling operation pressing MODE the indicator symbol turns.
- Press SPEED to select the fan speed (High, Medium, Low) to suit your desired comfort level.
• To stop the air conditioner press again ON/OFF

NOTE
The minimum temperature is 16°C and the maximum temperature is 32°C.
DEHUMIDIFICATION (DRY)
- When the air conditioner is in dehumidification mode, it doesn't cool the room.
- Press to start the air conditioner.
- Select dehumidification mode pressing ⚠ MODE, the indicator symbol turns.
- When you use the air conditioner in the dehumidification mode, you don't have to use the flexible tube.
- For maximum dehumidification efficiency leave the rear discharge outlet free to discharge directly into the room.
• Continuous drainage is then necessary.
• To stop the air conditioner press again ON/OFF

NOTE
Fan speed can't be adjusted in dehumidification mode; fan speed operates in "medium" speed. This function is recommended in autumn and winter. When you use this function in summer, please use the flexible tube.
FAN
- Press to start the air conditioner.
- Select fan mode pressing MODE, the indicator symbol turns.
• Air is circulated throughout the room without cooling
• To stop the air conditioner press again press again ON/OFF
NOTE
Unit does not need to be vented in fan mode. Fan speed control has 3 settings: Hgh, Medium, Low
LAMP FOR FULL TANK
Condensed water may accumulate in the unit. If the internal water tank becomes full, the warning lamp will shine and the unit will not operate until the unit has been drained (see the section on DRAINING).
TIMER Ⓤ TIMER
Auto turn off: with the unit in running mode, press timer touch control to select number of hours You would like the unit run in air conditioning mode, until automatically shuts off.
Auto turn on: with the unit in stand-by mode, press timer touch control to select number of hours after which You would like the unit automatically start running in air conditioning mode.
TIMER / Temp set controls
• Used to adjust timer and thermostat
- The temperature on default display is room temperature.
- In cooling mode, when one of these touch controls is pressed, the set temperature is displayed and may be adjusted. After 15 seconds the display goes back to room temperature. Temperature is adjustable only in cooling mode. The time is adjustable from 1 to 24 hours.
NOTE: by pressing both Timer and Temp set controls at the same time, the display will toggle between Celsius and Fahrenheit
OPERATION with remote control
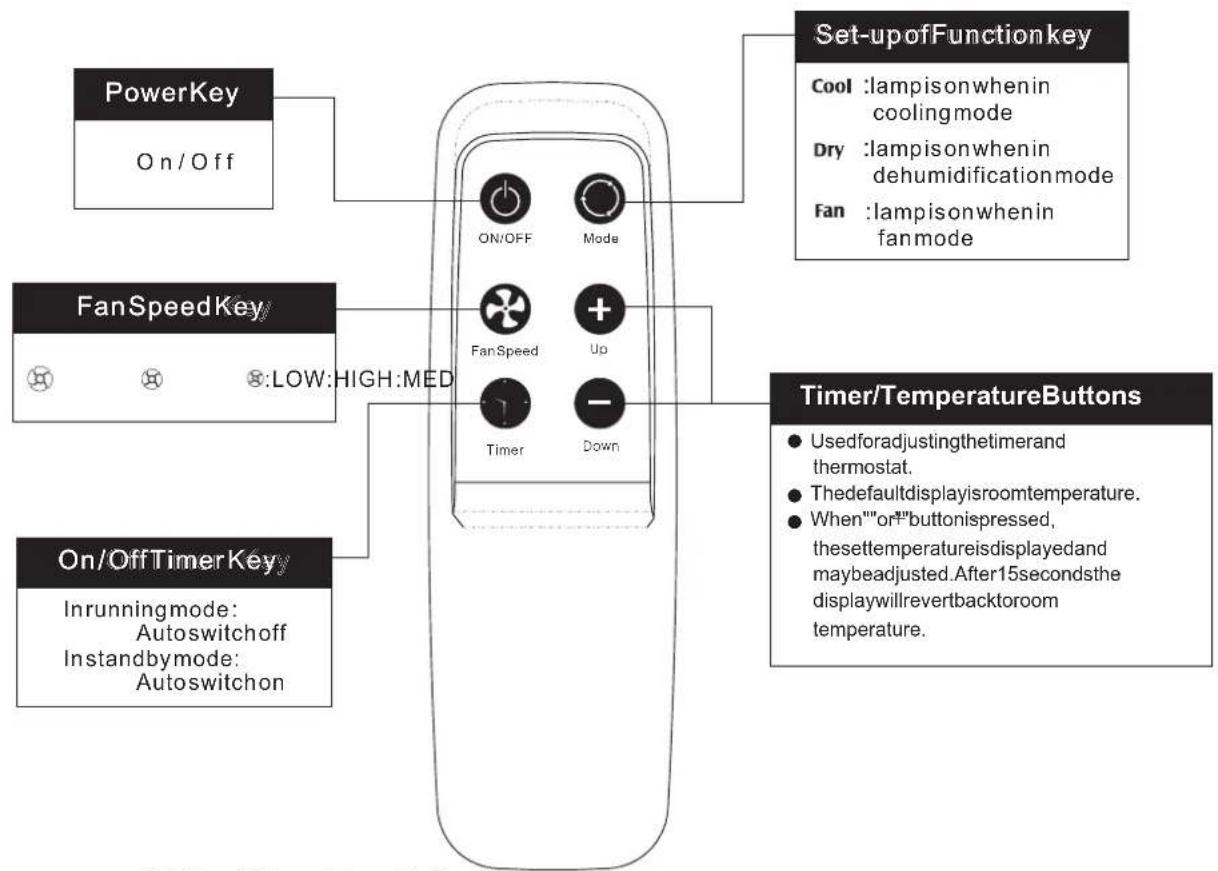
AirConditionerRemoteControl
The functionsworkthesameasyourairconditionertouch controls.
Batteries: Remove the cover on the back of the remote control and insert the batteries with the (+)and(-)polespointingintheproperdirection.

UseonlyAAAorIECR031.5Vbatteries.
Removethebatteriesiftheremotecontrollerisnotusedforamonthorlonger.
Donotdisposeofthebatteriesinafireastheymayexplode.

Information for correct disposal of the battery in accordance with the European Directive 2006/66/EC
Please replace battery when its electricity charge is used up: please do not eliminate this battery together with normal household waste. It must be taken to special local community waste collection centres or to a dealer providing this service. Disposing of a battery separately avoids possible negative effects on the environment and human health deriving from an inappropriate disposal and enables its components to be recovered and recycled to obtain significant savings in energy and resources. In order to underline the duty to dispose of this equipment separately, the battery is marked with a crossed-out dustbin.
EXHAUST HOSE KIT INSTALLATION
- Connect exhaust hose kit to the back of the unit and place the unit near the window. Extend the flexible tube just enough to reach the outdoor, passing under the window shutters set ajar.
- In case there is a window sill towards the inside of the room, it might be better to use the supplied outlet nozzle. Insert the nozzle into the free end of the flexible tube
- Open the window and lock one of the shutters. Place the outlet nozzle between the two shutters
- Avoid sharp bends or plies of the flexible tube.
EG
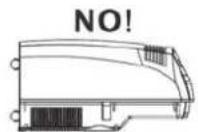
EXHAUST HOSE KIT
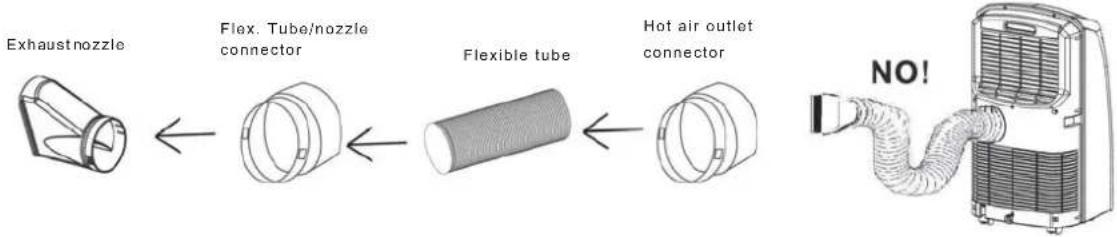
flowchart
graph LR
    A["Exhaust nozzle"] --> B["Flex. Tube/nozzle connector"]
    B --> C["Flexible tube"]
    C --> D["Hot air outlet connector"]
    D --> E["NO!"]
CARE AND CLEANING
WARNING! For safety's sake, be sure to turn the air conditioner OFF and also disconnect it from the power supply before cleaning it.
1. Cleaning of the Air Filters
The air filters must be checked at least once every two weeks operation. Operation with a dirty filter always causes a lower efficiency of the air conditioner and severe product damage. The filter can be removed from the rear side of the unit. Use a vacuum cleaner to remove light dust. If there is sticky dust on the filter, wash it with lukewarm soapy water, then rinse in clean, cold water and dry it before reinstallation.
2. Cleaning of Casing and Grille
To clean the air conditioner, wipe it with a clean soft cloth, lightly moisted. In case it is stained, moisten the cloth with soapy water. Never use solvents or harsh chemicals, nor very hot water. Do not pour water over the air conditioner to clean it: this will damage the internal components and cause an electric shock hazard.
3. Storage
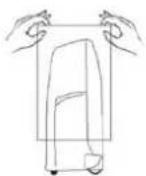
If you are not going to make use of the air conditioner for a long period, before storing it away clean the air filter. Always store the unit in the vertical position. Do not put heavy objects on top of the unit and protect it with a cloth or a plastic bag.
4. Transport
Preferably keep the air conditioner in the vertical position during transportation. If this is not possible, then lay it on one side; when at destination put the air conditioner back in the vertical position and wait at least 4 hours before using it for cooling.
5. For your safety care check periodically the conditions of the electric supply cable; in case you should notice any damage due to usage, call the nearest After Sale Service to get the cable replaced.

natural_image
Technical line drawing of a large air conditioner unit and its corresponding internal component (no text or symbols)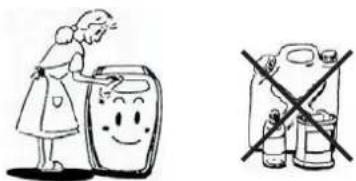

USEFUL ADVICE
If your air conditioner doesn't work properly, before requesting service, verify that:
- the plug is properly inserted into the power socket; batteries in the remote control are not exhausted.
- the circuit breaker is in the ON position and fuses have not blown, otherwise wait for 3 minutes and then start again;
- the air filter is not clogged, otherwise please clean it;
the flexible tube is correctly positioned without any sharp bends nor plies; - difference between room temperature and set temperature is over 1°C, otherwise please low the set temperature;
- you have correctly carried-out the instructions contained in this manual.
CONDENSATE DRAINAGE
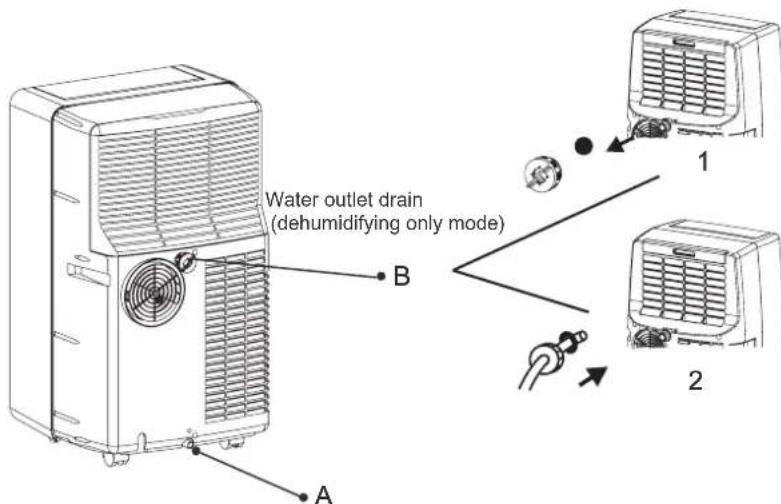
When the air conditioner works in dehumidifying mode, we suggest to set up the continuous drainage of condensate in order to obtain the maximum dehumidification efficiency.
To make continuous drainage when the air conditioners works in DEHUMIDIFYING mode switch off the unit and remove the main plug from the supply.
(1) Remove the plastic ring and the rubber plug from the drainpipe at the bottom rear of the air conditioner
(2) Connect a drain tube (25 mm inner diameter) on to the drain pipe: place the other end in a normal drain (2). Make sure that the tube is free from twists and bends. The tube must decline over its entire length.
Water outlet drain (in Cooling mode, only with very high humidity in the air)
DRAINING EXCESS WATER
When the air conditioner works in cooling mode, it doesn't need condensate draining, as condensate in usually vaporized, except for special conditions of very high humidity levels.
In these cases it may be necessary to set continuous drainage (A outlet) or empty the internal water container (A outlet). When the internal water container is full the warning lamp on the display lights. The unit will switch off automatically.
To empty the water container do the following action: put a container under the drain pipe as the bottom rear of the unit and remove the stopper and the rubber plug to allow the water container to drain. Replace the rubber plug onto the drainpipe and continue to use.
Every time you move the unit to another room or when you store it, discharge the condensate water container, through the drain pipe (A).

natural_image
Line drawing of a mechanical device with a base and mounting bracket (no text or symbols)
ATTENTION

The blinking of FULL BUCKET lamp, together with the stop of the air conditioner indicate that the condensate water tank is full.
F-GAS REGULATION (EC) no. 842/2006
Do not vent R410A into atmosphere: R410A is a fluorinated greenhouse gas, covered by Kyoto Protocol, with a Global Warming Potential (GWP) = 1975.
argoclima sp.A.
Via Varese, 90 - 21013 Gallarate - Va - Italy
Tel. +39 0331 755111 - Fax +39 0331 776240
www.argodima.com


- EG
- DECLARATION OF CONFORMITY
- INFORMATION FOR CORRECT DISPOSAL OF THE PRODUCT IN ACCORDANCE WITH THE EUROPEAN DIRECTIVE 2002/96/EC
- PRODUCT IDENTIFICATION
- Operating limits:
- CONTROL PANEL
- BEFORE USING THE APPLIANCE
- WARNING: ALWAYS OPEN the AIR OUTLET GRILLE BEFORE USING THE APPLIANCE
- WARNING
- OPERATION
- COOLING
- NOTE
- DEHUMIDIFICATION (DRY)
- FAN
- LAMP FOR FULL TANK
- TIMER Ⓤ TIMER
- TIMER / Temp set controls
- OPERATION with remote control
- AirConditionerRemoteControl
- Information for correct disposal of the battery in accordance with the European Directive 2006/66/EC
- EXHAUST HOSE KIT INSTALLATION
- CARE AND CLEANING
- Cleaning of the Air Filters
- Cleaning of Casing and Grille
- Storage
- Transport
- For your safety care check periodically the conditions of the electric supply cable; in case you should notice any damage due to usage, call the nearest After Sale Service to get the cable replaced.
- USEFUL ADVICE
- CONDENSATE DRAINAGE
- DRAINING EXCESS WATER
- F-GAS REGULATION (EC) no. 842/2006
Brand : Argoclima
Model : Optimo 9
Category : Air conditioner