
SoMo 650-M - Barcode Reader Socket Mobile - Free user manual and instructions
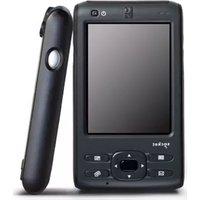
Find the device manual for free SoMo 650-M Socket Mobile in PDF.


| Product Type | Barcode Reader |
| Brand | Socket Mobile |
| Model | SoMo 650-M |
| Dimensions (Approx.) | 120 mm x 60 mm x 30 mm |
| Weight (Approx.) | 150 g |
| Power Source | Rechargeable Lithium-Ion battery or USB-powered |
| Battery Life (Typical) | Up to 8 hours of continuous scanning |
| Connectivity | Bluetooth or USB |
| Scan Technology | Imager (2D) or Laser (1D) |
| Supported Barcodes | UPC, EAN, Code 128, Code 39, Data Matrix, QR Code, PDF417 |
| Scan Range (Typical) | Up to 50 cm for 1D barcodes |
| Operating Temperature | 0°C to 50°C |
| Storage Temperature | -20°C to 60°C |
| Drop Resistance | 1.5 m onto concrete |
| Water/Dust Resistance | IP54 |
| Key Functions | Scan trigger, power button, LED indicator |
| Cleaning | Wipe with a soft, dry cloth; avoid solvents |
| Safety Certifications | CE, FCC |
| Spare Parts | Replacement battery, charging cable, trigger button |
| Repairability | Battery and trigger replaceable by user; other parts by authorized service center |
| General Information | Designed for mobile point-of-sale and inventory management |
Frequently Asked Questions - SoMo 650-M Socket Mobile
User questions about SoMo 650-M Socket Mobile
0 question about this device. Answer the ones you know or ask your own.
Ask a new question about this device
Download the instructions for your Barcode Reader in PDF format for free! Find your manual SoMo 650-M - Socket Mobile and take your electronic device back in hand. On this page are published all the documents necessary for the use of your device. SoMo 650-M by Socket Mobile.
USER MANUAL SoMo 650-M Socket Mobile
socket® Business Mobility Now!™
COPYRIGHT NOTICE
Copyright © 2008 Socket Mobile, Inc. All rights reserved.
Socket, the Socket logo, SoMo, SocketCare, SocketScan, Connect!Agent, and Wi-Fi Companion are trademarks or registered trademarks of Socket Mobile, Inc. Bluetooth and the Bluetooth logos are registered trademarks owned by Bluetooth SIG, Inc., U.S.A. and licensed to Socket Mobile, Inc. Wi-Fi and the Wi-Fi logo is a registered trademark of the Wi-Fi Alliance. All other brand and product names are trademarks of their respective holders.
The SoMo 650 includes technology licensed under European Community Registered Design Nos. 000745245-0001, 000745245-0002 and 000745245-0003.
Reproduction of the contents of this manual without the permission of Socket Mobile is expressly prohibited. Please be aware that the products described in this manual may change without notice.
Feel free to contact Socket Mobile at:
Socket Mobile, Inc.
39700 Eureka Drive
Newark, CA 94560-4808
USA
Other than the above, Socket Mobile can assume no responsibility for anything resulting from the application of information contained in this manual.
Please refrain from any applications of the SoMo 650 that are not described in this manual. Please refrain from disassembling the SoMo 650. Disassembly of this device will void the product warranty.
You can track new product releases, software updates and technical bulletins by visiting the Socket Mobile website at: www.socketmobile.com.
IMPORTANT SAFETY INSTRUCTIONS
Please read and follow these safety instructions before using your device for the first time, and save them for future reference.
- Keep away from extremely hot, cold or humid conditions.
- Avoid using in dusty environments.
- Do not allow the device to get wet.
- Avoid strong force, shock or vibrations.
- Do not open your device. Any attempts to open this device will void the warranty.
- Do not place objects on top of the device.
- Avoid removing the battery without turning off the device.
- Do not charge the device in extremely hot or cold conditions.
- Please only use the supplied USB synchronization cable.
- Please do not use other chargers or adapters, as these may damage your device.
- Do not remove SD/MMC or CF cards while they are being accessed.
- Do not use this device in damp, wet or rainy conditions.
- Do not insert metal objects into the sync/charging port of the SoMo.
- Keep the SoMo and its accessories away from children.
TABLE OF CONTENTS
COPYRIGHT NOTICE 2
IMPORTANT SAFETY INSTRUCTIONS 3
TABLE OF CONTENTS 4
1 | INTRODUCTION 6
Package Contents 6
SoMo 650 Configurations 7
System Compatibility Requirements 7
Additional Accessories 8
Product Registration 8
SocketCare™ Service Program 8
Hardware Features 9
Charging/Sync Cradle 12
About the Socket Software 12
About the Socket Software 13
2 | GETTING STARTED 14
Step 1: Install the Battery 14
Step 2: Charge the Battery 15
Step 3: Set up your SoMo 650 16
Step 4: Install ActiveSync on a Host PC 17
Step 5: Connect the SoMo to the Computer 18
3 | USING THE SOMO 650 21
Buttons 21
Hold switch 21
Stylus 22
Adding a USB Keyboard/Mouse 22
Start Menu 22
Online Help 22
Wireless Radio Manager 23
4 | WI-FI COMPANION 25
Turning on the Wi-Fi Radio 26
Main Screen of Wi-Fi Companion 28
Wi-Fi Status Icon 28
Wi-Fi Finder 29
Finding and Connecting to a WLAN 30
5 | SOCKETSCAN AND CONNECT!AGENT FOR CORDLESS BAR CODE SCANNERS 33
SocketScan Icons 34
Step 1: Prepare the Scanning Hardware 35
Step 2: Enable Cordless Scanning 35
Step 3: Connect Scanner to SoMo 36
Step 4: Start Application 37
Step 5: Scan Bar Codes 38
6 | SOCKETSCAN FOR PLUG-IN SCANNERS AND READERS 39
Step 1: Assign a Trigger Button 40
Step 2: Start SocketScan 40
Step 3: Insert the Card 41
Step 4: Start Application 42
Step 5: Scan or Read Data 43
APPENDICES
A | SPECIFICATIONS 45
B | CARE AND MAINTENANCE 47
C | RESETTING THE SOMO 650 48
D | UPGRADING THE ROM IMAGE 54
E | HOLD SWITCH UTILITY 58
F | TECHNICAL SUPPORT 61
LIMITED WARRANTY 62
DISCLAIMER 63
REGULATORY COMPLIANCE 66
1 | INTRODUCTION
Thank you for purchasing the SoMo 650 handheld computer. The SoMo 650 makes small- to mid-sized deployments possible and affordable for a wide range of mobile business applications, including sales force automation, inventory management, patient care, merchandising, and more. This durable, customizable device has premium features such as true business-class Bluetooth® and Wi-Fi® technology to keep you connected wherever you go.
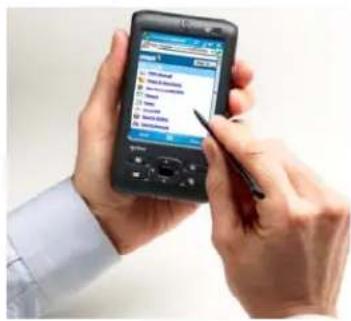
Pre-loaded with Socket device drivers and software utilities, the SoMo 650 can be deployed out of the box with a wide range of Socket data collection, network access or device connection peripherals to create a custom solution that meets your specific business requirements.
PACKAGE CONTENTS
• SoMo 650 handheld computer
• Lithium-ion battery
- Stylus
• USB sync/power cable
- AC adapter
• 2 rubber screw caps
- Quick Start Guide
• Getting Started CD with software and documentation
- Sync/charging cradle (SoMo 650-M only)
- Belt carrying case (SoMo 650-M only)
• 2.5mm to 3.5mm audio headset adapter (SoMo 650-M only)
• Audio headset with microphone (SoMo 650-M only)
SoMo 650 CONFIGURATIONS
| Configuration Windows Mobile version Region | Language Part Number | |||
| Standard - includes Bluetooth and Wi-Fi | 5.0 for Pocket PC | North America | English | 8560-00001 |
| EMEA | 8560-00002 | |||
| 6 Classic | North America | English | 8560-00003 | |
| Spanish | 8560-00006 | |||
| Brazilian Portuguese | 8560-00005 | |||
| EMEA | English | 8560-00004 | ||
| Spanish | 8560-00011 | |||
| German | 8560-00008 | |||
| French | 8560-00007 | |||
| Italian | 8560-00009 | |||
| Iberian Portuguese | 8560-00010 | |||
| DX - for direct exchange applications (Bluetooth & Wi-Fi removed) | 5.0 for Pocket PC | Not country specific | English | 8560-00012 |
| 6 Classic | Not country specific | English | 8560-00013 | |
| Rx - for healthcare applications (case features anti-bacterial additive) | 6 Classic | North America | English | 8560-00014 |
| EMEA | English | 8560-00015 | ||
SYSTEM COMPATIBILITY REQUIREMENTS
Before you start using your new SoMo 650, you should have a host computer ready for synchronization.
- For Windows Vista, the Windows Mobile Device Center is required. Download it free from the Microsoft website at www.microsoft.com/windowsmobile/devicecenter.mspx
- For Windows 2000/XP, Microsoft ^® ActiveSync ^® software version 4.2 or greater is required for Windows Mobile 5.0, and version 4.5 or greater is required for Windows Mobile 6.0/6.1. Download the latest version using the link in the Getting Started CD.
In order to install ActiveSync, your Windows 2000/XP computer must meet the following minimum requirements:
- Intel ^ Pentium ^ processor (minimum 233 MHz)
- 64 MB RAM
• 120 MB disk space - CD-ROM drive
- USB port
• SVGA (or compatible) graphics card supporting 256 colors - Microsoft ^® Internet Explorer 6.0
In order to install the Windows Mobile Device Center, your Windows Vista computer must have Windows Vista Ultimate, Enterprise, Business, Home Premium, Home Basic or Server "Longhorn"
ADDITIONAL ACCESSORIES
A variety of accessories can be purchases separately online, as well as replacements for items included with the SoMo 650. For more information, visit: www.socketmobile.com/products/accessories/
PRODUCT REGISTRATION
Socket highly recommends that all customers register their products. Registered users benefit from priority technical support and can choose to receive special offers for future products and upgrades and the latest new product information.
Register online at: www.socketmobile.com/support/support/new
SOCKETCARE™ SERVICE PROGRAM
SocketCare is an enhanced service program available for the SoMo 650 for an additional cost. It provides the following benefits (benefits vary with program level):
- Faster turnaround for product repair or replacement
- Faster response for technical support inquiries
• Accidental damage coverage - Exclusive telephone access to technical support
Standard SocketCare must be purchased within 90 days of your SoMo purchase, and premium SocketCare must be purchased at the same time as your SoMo purchase. For more information, please visit: www.socketmobile.com/support.
HARDWARE FEATURES
Front
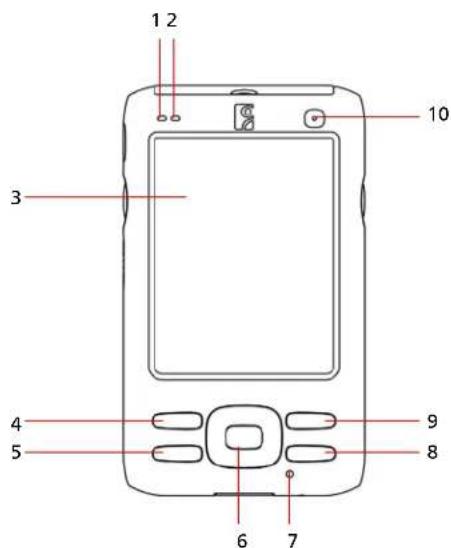
-
Wireless Status LED (Blue/Green) – indicates Bluetooth®, Wi-Fi®
-
Battery Status/Alarm LED (Red/Green)
-
3.5" TFT LCD touch screen
-
Calendar shortcut button
-
Messaging shortcut button
- 5-way navigation button
- Microphone
- Today shortcut button
- Contacts shortcut button
- Power button
SoMo 650 Status Indicator LEDs
| LED | LED Behavior | Meaning |
| Wireless Status LED | Flashing blue | Bluetooth radio is on |
| Flashing green Wi-Fi radio is on | ||
| Flashing blue and green | Bluetooth and Wi-Fi radios are on | |
| Battery Status/Alarm LED | Flashing red Alarm/Notification, including Low Battery Notification | |
| OFF Running on battery power | ||
| Solid red light when connected to charger | Charging | |
| Solid green light when connected to charger | Fully charged | |
Back

- Battery cover
- Battery cover release
- Speaker
Left
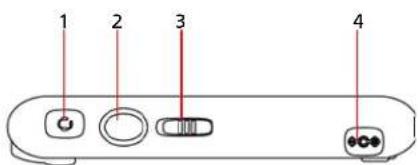
- Hands-free (headset/microphone) connector (lift rubber cover to access)
- Left programmable application button (launches Voice Notes by default)
- Hold switch (disables screen and all buttons)
- DC-in connector (lift rubber cover to access)
Right

natural_image
Simple line drawing of a rounded rectangular object with a circular hole and a red vertical line labeled '1' (no text or symbols beyond the number)- Right programmable application button (launches radio manager by default)
Top (with card slot cover open)
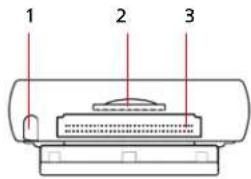
- Stylus holder and stylus
- SD (Secure Digital)/SDIO/MMC (MultiMedia Card) slot (lift rubber cover to access)
- CF (CompactFlash) slot (lift rubber cover to access)
Bottom

- USB synchronization/host cable connector
- Soft reset button
CHARGING/SYNC CRADLE
If your version of the SoMo 650 does not include a cradle, you can buy it separately at: www.socketmobile.com/products/accessories/
The cradle can act as a USB hub, featuring two USB ports that can be used to connect a keyboard, mouse or other USB device. It also features a spare battery charger that enables you to charge a spare battery while also powering/charging the SoMo 650 in the cradle.
Front
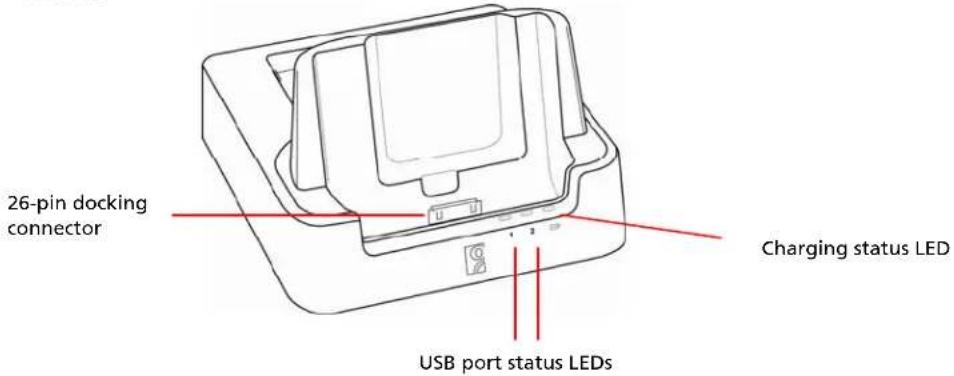
Back
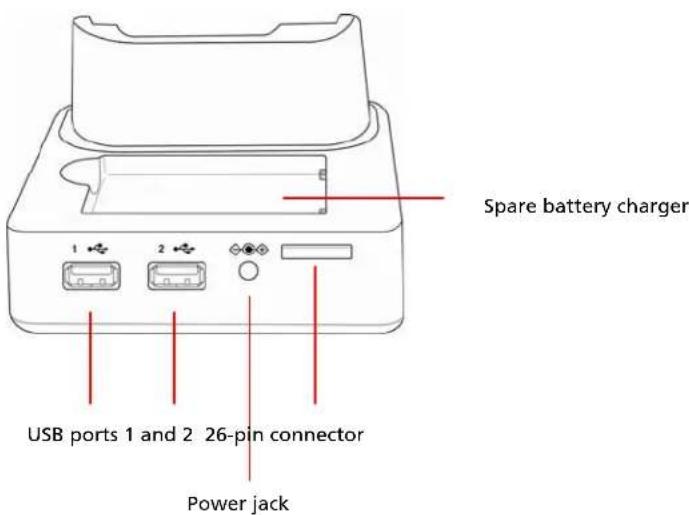
ABOUT THE SOCKET SOFTWARE
The Socket software listed below comes pre-loaded on the SoMo 650, along with any related device drivers. Except for Wi-Fi Companion, they all are designed for use with a Socket peripheral product, which must be purchased separately.
SocketScan™ enters bar code, RFID or magnetic stripe data directly from any Socket data collection peripheral into any open Windows program on the SoMo. It works with both plug-in and cordless data collection products from Socket.

SocketScan
Connect!Agent™ simplifies Bluetooth by automatically setting up and managing the wireless connection between the SoMo 650 and a Socket cordless bar code scanner, serial adapter or modem.
Wi-Fi Companion™ provides a rich graphical interface that makes it easy to monitor, set up and troubleshoot your Wi-Fi connection.
Modem Utilities enable you to configure your Socket modem for any country and adjust settings such as V.92 features like Modem-on-Hold.
Ethernet Utilities feature an auto-launch setting to help you save time when you connect your SoMo to a LAN network.
Serial Drivers enable out of the box compatibility with the Socket CF Serial I/O Card.
For software updates, please visit: www.socketmobile.com/support/downloads/
Note: This User's Guide does not cover how to use the Modem, Ethernet or Serial Utilities. For instructions, please refer to the manuals that came with your Socket peripherals.
2 | GETTING STARTED
STEP 1: INSTALL THE BATTERY
- Remove the battery cover of the SoMo 650. Press the release button on the bottom of the battery cover and use the thumb of your opposite hand to slide the battery cover off the SoMo.

natural_image
Close-up of hands holding a black smartphone with a small screen (no visible text or symbols)- Place the included battery into the battery compartment, so that the battery's bar code label is face up, near the bottom of the device.
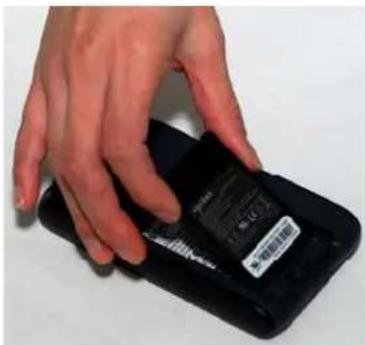
natural_image
Hand holding a black electronic device with a label, no visible text or symbols on the device itself- Replace the cover.
NOTE: After changing the battery, please make sure you fasten the battery cover.
CAUTION: RISK OF EXPLOSION IF BATTERY IS REPLACED BY AN INCORRECT TYPE. DISPOSE OF BATTERIES ACCORDING TO YOUR LOCAL REGULATIONS FOR BATTERY DISPOSAL.
STEP 2: CHARGE THE BATTERY
- Connect the AC adapter to the DC-in connector on the left side of the device, as shown below.

natural_image
Diagram showing a plug inserted into a power outlet connected to a mobile phone via cable (no text or symbols present)Alternatively, you can use the cradle, if included with your version of the SoMo 650.

- Plug the AC adapter into a suitable wall socket.

NOTE: The SoMo 650 should be charged for 4 hours before first use. Afterwards, charge the device as needed according to its battery level.

NOTE: While charging, the power LED will be red. When charging is complete, it will change to green.

NOTE: The charging cradle included with the SoMo 650-M has a compartment for charging an extra battery. You can charge an extra battery and the device simultaneously in the cradle.
STEP 3: SET UP YOUR SoMo 650

NOTE: Make sure the SoMo 650 is fully charged before proceeding.
- Slide the hold switch on the left side of your SoMo 650 up to the unlocked position.
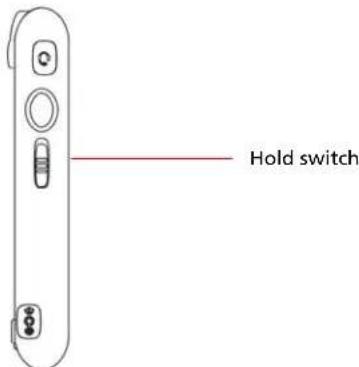

IMPORTANT! SLIDE THE SWITCH UP, OR THE DEVICE WILL NOT WORK!
- Turn on your SoMo 650 by pressing the small power button on the front (top right-hand corner).
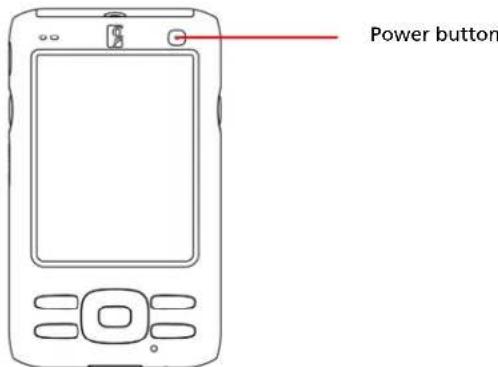
- Follow the onscreen instructions to set up your SoMo 650.
STEP 4: INSTALL ACTIVESYNC ON A HOST PC
NOTE: For Windows Vista, use the Windows Mobile Device Center, which you can download free from the Microsoft website at: www.microsoft.com/windowsmobile/en-us/help/synchronize/device-center.mspx
NOTE: Do not connect your SoMo 650 to your host computer until ActiveSync or the Windows Mobile Device Center has been installed.
NOTE: For Windows 2000/XP, ActiveSync version 4.2 or greater is required to connect to Windows Mobile 5.0, and version 4.5 or greater is required to connect to Windows Mobile 6.
- Close any programs running on your computer.
-
Insert the SoMo 650 Companion CD into the computer's CD-ROM drive. The CD's welcome page will appear.
-
Click Next.
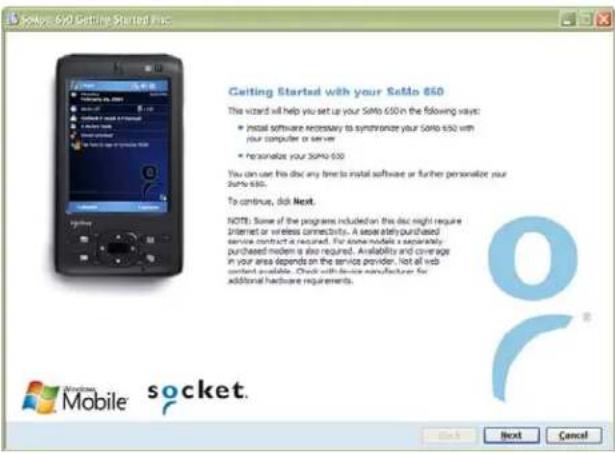
The welcome page may appear different for different SoMo versions.
-
Follow the instructions to install Microsoft ActiveSync.
-
After installation, the ActiveSync icon will appear on your computer's system tray (usually on the lower right-hand corner of the screen).

NOTE: Refer to the ActiveSync online Help for information on how to use the software. To restart this setup program, simply re-insert the CD into the CD-ROM drive.
STEP 5: CONNECT THE SOMO TO THE COMPUTER
Connect with the Sync Cable
Plug the USB sync cable into the connector on the bottom of your SoMo 650. Plug the other end of the USB sync cable into a suitable USB port on your computer. It is recommended that you also connect the AC adapter.

Connect with the Cradle
If your version of the SoMo 650 does not include a cradle, you can buy it separately at: www.socketmobile.com/products/accessories/
Insert the SoMo 650 into the cradle. Use the USB sync cable to connect the cradle to a host computer. It is recommended that you also connect the AC adapter into the cradle.
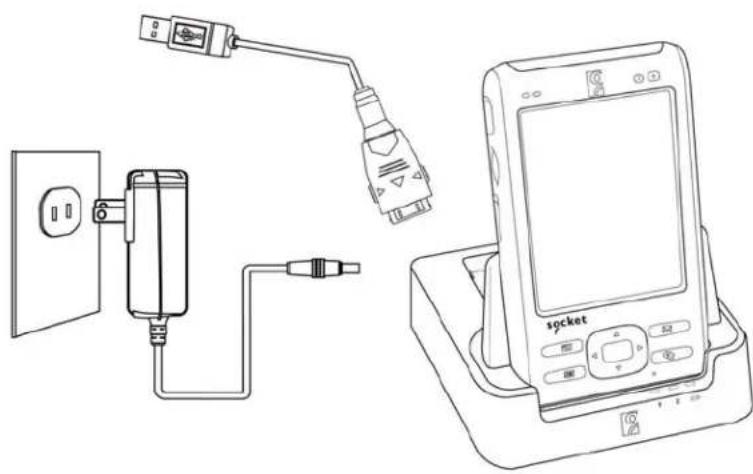
natural_image
Line drawing of a device setup with a plug, power outlet, and a portable electronic device labeled 'squet' (no text or symbols on components)STEP 6: SET UP YOUR DEVICE PARTNERSHIP
- Windows 2000/XP: When you connect your SoMo 650 to your computer for the first time, the New Partnership wizard will automatically appear on your computer screen.
Windows Vista: When you connect your SoMo 650 to your computer for the first time, the Windows Mobile Device Center will automatically start. Click Set up your device.

NOTE: If the New Partnership wizard does not automatically appear, open ActiveSync manually by clicking the Windows Start menu > All Programs > Microsoft ActiveSync.
-
Follow the setup wizard to set up the partnership. Once completed, the first synchronization will start automatically.
-
After the synchronization is complete, you will see that the Calendar, Contacts and Tasks on your SoMo 650 have been updated.
The next time you wish to use the Windows Mobile Device Center or ActiveSync, you just need to plug your SoMo 650 into your computer. The synchronization software will then open automatically and update your device.
3 | USING THE SoMo 650
This chapter explains how to use your SoMo 650 through its buttons, the hold switch, stylus, Start menu, online Help, and the Radio Manager.
BUTTONS
Your SoMo 650 has several buttons, as follows:
- Power button
- Left programmable application button (defaulted to Voice Notes default)
- Right programmable application button (defaulted to Radio Manager)
- Calendar shortcut button
- Contacts shortcut button
- 5-way navigation button
- Messaging shortcut button
- Today shortcut button
For more information on the position of these buttons, please refer to the diagrams in Chapter 1, "Introduction."
For more information on the soft reset button, please refer to Appendix B, "Resetting the SoMo 650"
HOLD SWITCH
The hold switch located on the left side can be used to prevent accidental input by disabling all buttons and the screen of the SoMo 650. Any applications or wireless connections running on the device will remain active. To put your device on hold, move the switch in the down position.

NOTE: The hold switch is not related to the software lock function accessible from the Today screen.

NOTE: When the hold switch is activated, by default, the screen will turn black, and the screen and all buttons on the
sides and front of the SoMo will be disabled, including the power button.

NOTE: To enhance your user experience, Socket has a Hold Switch Utility that enables you to configure the hold switch settings. For more information, please see Appendix D.
STYLUS
You can use the stylus in three ways.
- Tap an item: Use to select an option, similar to left-clicking a computer mouse.
- Tap and hold an item: Reveals a submenu, if available. Similar to right-clicking a computer mouse.
- Drag: Hold the stylus against the screen and drag to highlight multiple items, or to move the position of an item. Similar to left-clicking and dragging a computer mouse.
ADDING A USB KEYBOARD/MOUSE
If you are using the SoMo 650-M, you can enter information by docking the SoMo in the cradle and using the cradle's two USB ports to connect a keyboard and/or mouse.
START MENU
From the Start menu, you can access programs, settings and Help
topics. The Start menu can be accessed by tapping
ONLINE HELP
Your SoMo 650 contains online help files. These can be accessed in two main ways:
- Press > Help > Contents for a list of Help topics.
- To access Help for any particular application, open the
application and then tap > Help.
WIRELESS RADIO MANAGER
Windows Mobile 5.0
- Open the Socket Radio Manager. Press the button on the right side of the SoMo 650. Alternatively, tap the Wi-Fi and Bluetooth status line in the Today screen.
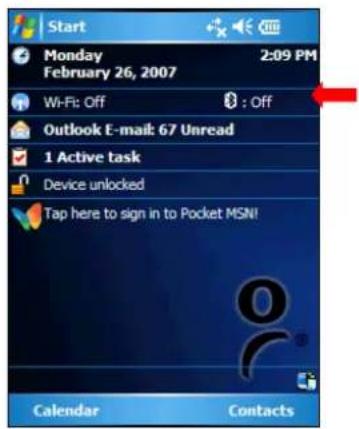
- In the Radio Manager, a red "x" appears on the Bluetooth or Wi-Fi button when the radio is off. Tap on the button to turn on the radio.


NOTE: Wi-Fi Companion software automatically launches after Wi-Fi is turned on.

NOTE: Flight mode turns off Bluetooth and Wi-Fi. When flight mode is disabled, the previously running wireless radio(s) will turn on again.
Windows Mobile 6
- Open the Microsoft Wireless Manager. Press the button on the right side of the SoMo 650. Alternatively, tap the Wi-Fi and Bluetooth status line in the Today screen.
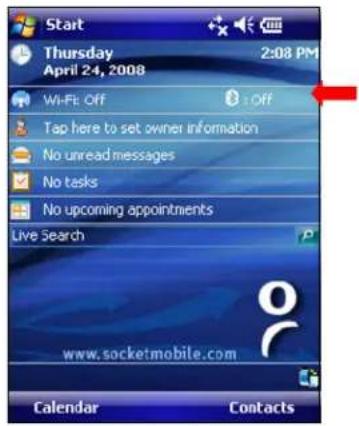
- In the Wireless Manager, an "x" appears next to the Wi-Fi or Bluetooth icon when the radio is off. Tap on the button to turn on the radio.


NOTE: Wi-Fi Companion software automatically launches after Wi-Fi is turned on.
4 | Wi-Fi COMPANION
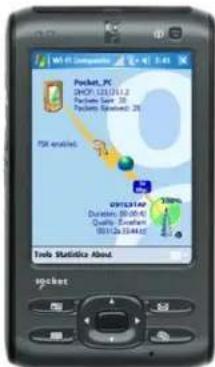
Wi-Fi Companion is a powerful and easy-to-use utility for managing Wi-Fi connections from your SoMo 650 mobile computer. Intuitive graphics display connection properties at a glance. Tap on icons to quickly perform a variety of networking tasks. For advanced users, the software also offers advanced diagnostic tools and connection statistics.
Wi-Fi Companion comes pre-loaded on the SoMo 650, providing you the best user experience with the mobile computer's built-in Wi-Fi radio.
ADDITIONAL DOCUMENTATION
This chapter covers basic instructions for using Wi-Fi Companion on the SoMo 650. For detailed instructions, please refer to the User's Guide available in the CD and online at: www.socketmobile.com/support/downloads/
USEFUL LINKS
Download software updates from: www.socketmobile.com/support/downloads/
To check which version of Wi-Fi Companion is installed in your SoMo, in the main screen of Wi-Fi Companion, tap About.
For information about Enhanced Wi-Fi Companion (e-WFC), which offers advanced business security and is Cisco Compatible Extensions (CCX) 4.0 certified, please visit: www.socketmobile.com/products/software/
TURNING ON THE WI-FI RADIO
Wi-Fi Companion automatically launches after you turn on the Wi-Fi radio.
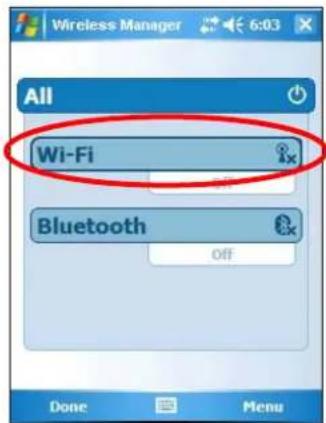
- Open the Radio Manager. Press the button on the right side of the SoMo 650. Alternatively, you can tap on the Wi-Fi and Bluetooth status line in the Today screen.

- In the radio manager, an "x" will appear on the Wi-Fi button to indicate that the Wi-Fi radio is off. Tap on the button to turn on the radio. The "x" will disappear.

Windows Mobile 5.0 Windows Mobile 6
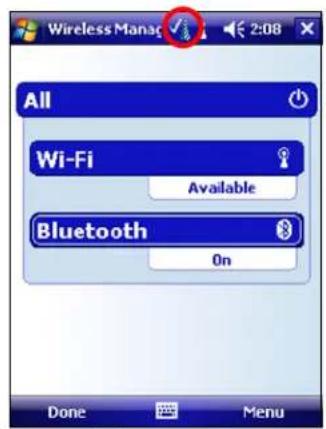
- The Wi-Fi status icon will appear at the top of the screen. The icon varies based on your connection status. Tap on the icon to view the main screen of Wi-Fi Companion. To view the different versions of the icon, please refer to the chart on the next page.

Windows Mobile 5.0 Windows Mobile 6

NOTE: If you tap Enable Flight Mode (Windows Mobile 5.0) or All (Windows Mobile 6), the Bluetooth and Wi-Fi radios will both be disabled. The manager will remember which wireless radio(s) were running, so when you later tap Disable Flight Mode or All, the same one(s) will turn on again.
MAIN SCREEN OF WI-FI COMPANION
The screen content varies depending on your connection status.

Wi-Fi STATUS ICON
The icon appears at the top of every screen when Wi-Fi Companion is running.
 | Associated or Connected. Number of bars indicates signal strength. |
| [Comand] | Networks available. |
 | Searching for networks. |
| [XO3C] | Networks out of range but configured. |
Wi-Fi FINDER
The Wi-Fi Finder displays a list of WLAN networks found in range. To access the Wi-Fi Finder, tap on the large tower icon in the bottom right corner of the main screen of Wi-Fi Companion.

Wi-Fi FINDER ICONS
 | Current connection |
 | Signal strength of strongest AP (access point)/ad hoc radio |
 | WEP encryption, WPA (PSK), WPA (TKIP), WPA2 or 802.1x |
 | No encryption |
 | Channel number |
 | Profile saved |
 | 802.11b, 802.11g |
FINDING AND CONNECTING TO A WLAN
Ask your network administrator for the necessary security settings for your WLAN. If the WLAN uses 802.1x, WPA or WPA2, you need to install authentication certificate(s) before you can connect. Refer to the Wi-Fi Companion User's Guide for instructions on the Socket certificate utility.
- In the main screen of Wi-Fi Companion, tap on the tower icon, or tap Tools | Wi-Fi Finder.

- Wi-Fi Finder will appear, listing WLANs detected in range. Tap on any WLAN in the list to view additional properties.

If desired, tap on the Type or Sort by drop-down menus to change how the list is displayed.
If your WLAN is not listed, tap Refresh at the bottom of the screen.
- If Wi-Fi Finder cannot find your WLAN because its SSID (network name) is hidden, tap New at the bottom of the screen.
A wizard will launch to help you create a profile for your network. Complete the wizard, entering the security settings obtained from your network administrator.
![Configure Wireless Network Network name: Connects to: The Internet This is a device-to-device (ad-hoc) connection 123 1 2 3 4 5 6 7 8 9 0 - = + Tab q w e r t y u i o p [ ] CAP a s d f g h j k l ; * Shift z x c v b n m , . / ← Ctrl äü ` \ Cancel Next](/content/2026/05/1030716/images/52a177ce4d28c6a77de9bd61d86fceef209582c6b50f8ace384991c36b78cc7a.jpg)
- If your WLAN does not have a profile (i.e., no folder icon is shown next to it), tap and hold your stylus on the WLAN in the list. In the pop-up menu, tap Get Connected.
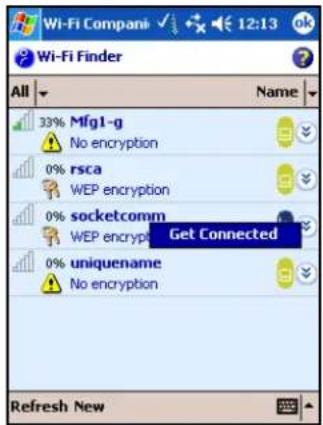
A wizard will launch to help you create a profile for the selected SSID. Complete the wizard, entering the security settings obtained from your network administrator.
- After a profile is saved, if the WLAN is in range, the SoMo will automatically try to connect to it.
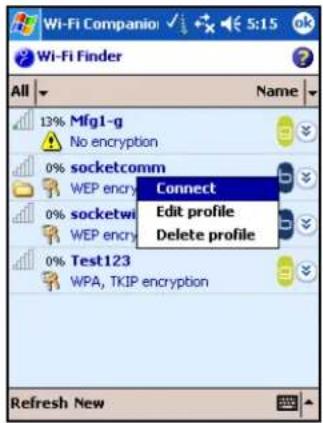
To connect to another network in the list, tap and hold your stylus on the WLAN. In the pop-up menu, tap Connect.
5 | SOCKETSCAN AND CONNECT!AGENT FOR CORDLESS BAR CODE SCANNERS
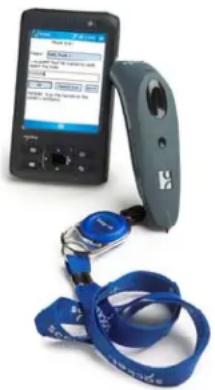
SocketScan software sends data from your Socket Cordless Hand Scanner Series 7 or Cordless Ring Scanner Series 9 into any application running on the SoMo 650. This lets you use Socket data collection peripherals without having to program custom applications. The software comes pre-loaded on the SoMo 650.
Connect!Agent software makes Bluetooth easy to use by automatically setting up and managing the connection between your CHS or CRS and the SoMo 650.
ADDITIONAL DOCUMENTATION
This chapter covers basic instructions for using SocketScan and Connect!Agent on the SoMo 650 with a Socket cordless bar code scanner. For detailed instructions, please refer to the User's Guide available in the CD and online at: www.socketmobile.com/support/downloads/datacollection/
USEFUL LINKS
Download software updates from: www.socketmobile.com/support/downloads/datacollection/. To check which version of SocketScan or Connect!Agent is installed in your SoMo, in the main screen of Wi-Fi Companion, tap About.
SocketScan Icons
The icon indicates whether SocketScan is connected to your Socket cordless bar code scanner and is ready to read data. The icon appears at the bottom of the Today screen.
| Icon | Meaning |
| [x8TW] | No Socket data collection device detected. |
 | Ready to scan bar codes with the Cordless Hand Scanner |
 | Ready to scan bar codes with the Cordless Ring Scanner. |
STEP 1: PREPARE THE SCANNING HARDWARE
Refer to your CHS or CRS manual for hardware preparation instructions. You will need to install and charge the battery/batteries. If using the CHS, you may also want to attach the tether. If using the CRS, you will also need to assemble the straps.
STEP 2: ENABLE CORDLESS SCANNING
-
Tap Start | Settings | System tab | Socket Scanner Settings.
-
Tap on the CS tab at the bottom of the screen. Check Enable Cordless Scanner support.

- Tap ok to save your changes.
STEP 3: CONNECT SCANNER TO SoMo
-
If using the CRS, put on the scanner. Refer to the CRS manual for instructions.
-
Turn on your bar code scanner. Refer to your scanner manual for instructions.
-
Tap Start | Programs | SocketScan folder | SocketScan. SocketScan will launch, running in the background.
-
Tap ok to exit the folder. Tap x to exit Programs.
-
The SocketScan icon 📋 will appear at the bottom of the Today screen. Tap on the icon. In the pop-up menu, tap Connect CS.

- Connect!Agent will begin searching for the scanner.
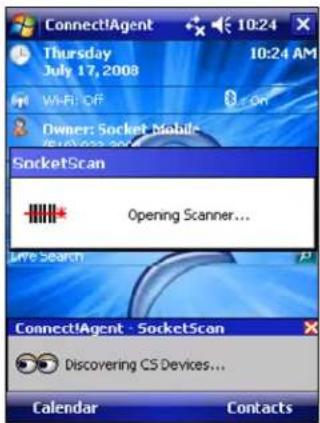
- After Connect!Agent finds the scanner, it will automatically connect, indicated by a beep. The SocketScan icon at the bottom of the Today screen will also change to indicate the connection.
STEP 4: START APPLICATION
-
Start the application that you want to enter data into (e.g., Excel Mobile). From the Today screen, tap Start | Programs and select your program.
-
Make sure a document, spreadsheet or form is open in your program.
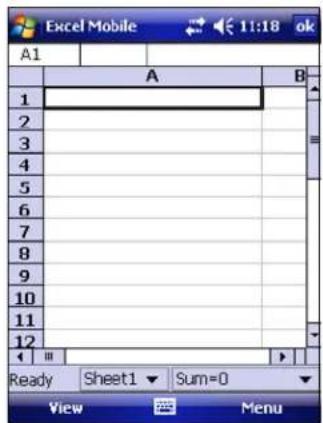
- Place the cursor where you want data from the next scan to be entered.
STEP 5: SCAN BAR CODES
- Press the trigger button to scan a bar code. Please refer to your scanner manual for the correct technique.

- When data is read, it should appear in your document.
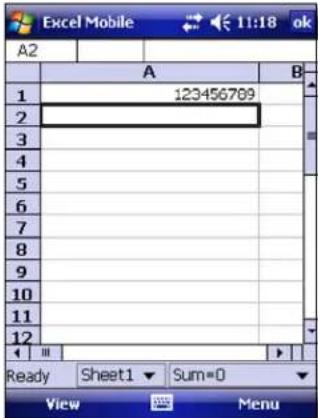
Depending on which scanner you have, it may also beep, or the LED may change colors to indicate a successful scan.
By default, the cursor automatically advances to the next cell or line, ready for the next scan/read.

NOTE: Wait for the "Good Scan" indication before you scan more data. If you try to scan too fast, the device can lock up until you stop scanning.

NOTE: If the data does not appear how you expect it and you are using Excel Mobile, check the cell formatting.
6 | SOCKETSCAN FOR PLUG-IN SCANNERS AND READERS
SocketScan software sends data from your Socket bar code scanner, RFID reader or magnetic stripe reader into any application running on the SoMo 650. This lets you use Socket data collection peripherals without having to program custom applications. The software comes pre-loaded on the SoMo 650.

This chapter contains generic instructions for using SocketScan on the SoMo 650 with these products:
- Secure Digital Scan Card Series 3
• CF Mag Stripe Reader Card Series 4 - CompactFlash Scan Card Series 5
• CF RFID Reader Card Series 6
For specific instructions, please refer to the User's Guide for your specific Socket data collection product, available in the installation CD that came with the data collection product as well as online at:
www.socketmobile.com/support/downloads/datacollection
STEP 1: ASSIGN A TRIGGER BUTTON
NOTE: This step is NOT required for the CF Mag Stripe Reader Card 4E.
NOTE: For the CF RFID Reader-Scan Card 6M/6P, multiple trigger buttons need to be assigned. Please refer to your RFID card manual for instructions.
-
Tap Start | Settings | Buttons.
-
From the Button list, tap to select a button to trigger your scanner. For best ergonomics, the left or right button is recommended. In the drop-down menu, select SocketScan. Tap ok.

STEP 2: START SOCKETSCAN
- Tap Start | Programs | SocketScan folder | SocketScan.

SocketScan
- A SocketScan icon should appear at the bottom of the Today screen indicating that no data collection device has been inserted.
STEP 3: INSERT THE CARD
- Open the slot cover at the top of the SoMo 650, then insert the card into the appropriate slot. Make sure the card is right side up. Do not insert the card upside-down or force the card in too hard.
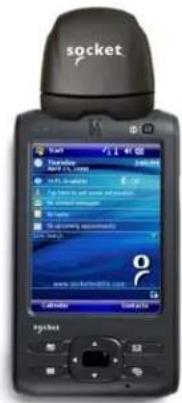
- When SocketScan is running, a SocketScan icon will appear at the bottom of the Today screen. Make sure the appropriate icon appears to indicate that your device is ready to collect data.
| Icon | Meaning |
| No Socket data collection device detected. | |
| Ready to scan bar codes with the Secure Digital Scan Card | |
| Ready to read magnetic stripe data with the CF Mag Stripe Reader Card | |
| Ready to scan bar codes with the CF Scan Card 5E/5M/5P or CF RFID Reader-Scan Card 6M/6P | |
| Ready to scan bar codes with the CF Scan Card 5X | |
| Ready to read RFID tags with the CF RFID Reader Card |

NOTE: If you insert the card before starting SocketScan, no icon will appear.
STEP 4: START APPLICATION
-
Start the application that you want to enter data into (e.g., Excel Mobile). From the Today screen, tap Start | Programs and select your program.
-
Make sure a document, spreadsheet or form is open in your program.

- Place the cursor where you want data from the next scan/read to be entered.
STEP 5: SCAN OR READ DATA
- Scanning/RFID: Press the trigger button to scan a bar code or read an RFID tag. Please refer to your scanner manual for the correct technique.

Mag Stripe: Swipe a magnetic stripe card through the slot, with the magnetic stripe facing the SoMo 650.
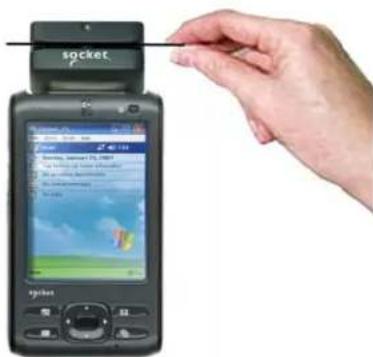
- When data is read, it should appear in your document.

Depending on which scanner/reader you have, it may also beep, or the LED may change colors to indicate a successful scan.
By default, the cursor automatically advances to the next cell or line, ready for the next scan/read.

NOTE: Wait for the "Good Scan" indication before you scan more data. If you try to scan too fast, the device can lock up until you stop scanning.

NOTE: If the data does not appear how you expect it and you are using Excel Mobile, check the cell formatting.
APPENDIX A
SPECIFICATIONS
| Processor | Intel PXA270@624MHz CPU |
| Memory SDRAM: 128MB | NAND Flash: 256MB |
| Display 65K colors TFT LCD, 3.5"16 bit-per-pixel240 (w) x 320 (L) resolution (QVGA size) portrait and landscape modes, default portrait mode.Glass analog resistive touch panelWhite LED backlight | |
| Audio Headset Jack: 2.5mm, 4-ring type, support for both Voice & Stereo music 0.5W speakerOmni-directional microphone | |
| Connectors SoMo 650 | DC-in (5V, 1A)USB synchronization/host cable connectorCradleDocking connectorDC-in (5V, 3A)USB synchronization cable connectorUSB connector x 2 (Type A) |
| Connectivity | Bluetooth: v2.0 + EDR Class 2IEEE® 802.11b/g |
| Mass Storage & Expansion Slots | User accessible SD/SDIO/MMC expansion slotCF I/O Type II expansion slot |
| USB | USB 1.1 support host/client (x2) (Cradle only) |
| Battery | Standard 1200 mAh, rechargeable, Lithium-ion battery pack. |
| Dimensions Height 127.6 mm | Width 74.5 mmDepth 18.5 mmWeight 179 g (including standard battery and stylus) |
| Operating Temperature | 0° to 40°C (32° to 120°F) |
| Storage Temperature | -25° to 75°C (-13° to 167°F) |
| Humidity | 95% non-condensing |
| Drop Specification | Multiple 1 meter drops to concrete covered with vinyl |
| ESD Specification | +/- 8kV air discharge, +/- 8kV direct discharge |
| Operating Systems Available | Microsoft® Windows Mobile® 5.0 for Pocket PCMicrosoft Windows Mobile 6 ClassicNote: If you have a SoMo 650 running Windows Mobile 5.0, an upgrade for Windows Mobile 6 is available. |
| Pre-Loaded Software | Programmable Home ScreenCalculatorMSN Messenger ClientWord MobileExcel MobilePowerPoint MobileIE MobileOutlook Mobile.NET Compact Framework v2.0Windows Media Player 10.2 MobileActiveSync Client v4.xSocket Wi-Fi CompanionTMSocket SocketScanTMSocket Connect!AgentTMSocket Modem UtilitiesSocket Ethernet UtilitiesSocket Serial I/O driversThe SoMo 650 running Windows Mobile 5.0 also includes the Socket Radio Manager. |
APPENDIX B
CARE AND MAINTENANCE

NOTE: For important safety and usage instructions, please refer to page 3.
Cleaning the SoMo:
- With the device switched off, clean the SoMo 650 by wiping it with a soft, clean cloth that is lint-free and slightly moistened. Do not allow the earpiece, microphone, speaker, card slots, sync/charging port or other metal surfaces to get wet.
- Do not wipe the SoMo with any corrosive liquid or coarse objects. This can damage the outer surface of the device.
Carrying or Storing the SoMo:
- Do not leave the SoMo in extremely high or low temperature environments.
- Remove the battery of the SoMo if it is not going to be used for a long period of time. Store the SoMo and its battery in a cool, dark, and dry place.
APPENDIX C
RESETTING THE SoMo 650
The SoMo 650 supports the three levels of reset defined by Microsoft for Windows Mobile powered devices:
- Soft Reset - sometimes called a "warm" reset
- Hard Reset - sometimes called a "cold" reset
- Clean Reset - sometimes called a "clean boot"
Each of these resets is designed to clear different levels of data storage and impact the hardware differently.
Additionally, removing the battery and any external sources of power from the SoMo 650 will result in the equivalent of a reset.
The following Table summarizes the system impact under these modes of operation:
| State of SoMo 650 After: | All Installed Applications and Registry Settings | Running Programs | Data Associated with Running Programs | Date and Time |
| Soft Reset No impact | Stopped | Lost | No impact | |
| Hard Reset No impact | Stopped Lost | Lost | ||
| Clean Reset Removed | Stopped Lost | Lost | ||
| Battery & external power removed for less than 5 minutes | No impact | Stopped Lost | No impact | |
| Battery & external power removed for more than 10 minutes | No impact | Stopped Lost | Lost |
Note: The SoMo 650 has a battery backup device that maintains the date and time if the battery and all external power sources are removed. If the SoMo 650 does not have a battery or external power source for more than 10 minutes, the date and time will be lost, and the battery backup device must be recharged for at least 10 minutes before it will properly maintain the date and time.
Soft Reset
A soft reset is like rebooting a computer. It is designed to stop all applications and clear out temporary data associated with running programs. No files are deleted. A soft reset is the lowest level of reset, (i.e., it clears the least amount of the device state).
It can also be used to stop application programs that are "hung" and do not respond to external input. Since Windows Mobile powered devices do not normally shut down an application after it is started, this is one way to stop all applications.
To perform a soft reset:
Using the tip of your stylus, lightly press the Soft Reset button inside the hole on the bottom of your SoMo 650 and then release.

Hard Reset
A hard reset is designed to clear all processor states, running programs, and user data. It also drives the hardware reset line to the processor, thereby clearing all system states, including the date and time. This reset should be used to remove the operating system from a "hung" or "frozen" state because of a fatal program or operating system error.
A hard reset will clear all user-installed settings, applications, and data from RAM (Random Access Memory). It is useful for clearing some states that are not normally cleared with a Soft Reset
To perform a hard reset:
-
Press and hold the Calendar and Contacts shortcut buttons on your SoMo 650.
-
While holding the two buttons, using the tip of your stylus, lightly press the Reset button inside the hole on the bottom of your SoMo 650.

Press the two shortcut buttons with the index and middle finger of one hand. Hold the stylus in your other hand to press the reset button and then release.
- Keep pressing the two buttons until a splash screen appears with the Socket logo and then disappears.
- After the Socket Splash Screen disappears, release the two buttons and follow the onscreen instructions.
Clean Reset
A clean reset is designed to revert the device to its factory default settings (or the latest service pack ROM update). All installed programs, data and registry settings will be cleared. A clean reset also drives the processor with a hardware reset, thus clearing all system states, including the date and time.

CAUTION: A CLEAN RESET IS MORE POWERFUL THAN A SOFT OR HARD RESET. IT WILL DELETE ALL USER APPLICATION FILES AND FOLDERS. WHEN YOU PERFORM A CLEAN RESET, FORMATS, PREFERENCES AND OTHER SETTINGS INCLUDING DATE AND TIME ARE RESTORED TO THEIR FACTORY DEFAULTS. ALL DATA, RECORDS AND ENTRIES, EXCEPT THOSE STORED IN ROM, WILL BE ERASED.

NOTE: If you set a security password on the SoMo 650 and forget it, a clean reset will remove the password setting.
To perform a clean reset:
- Press and hold the Left Programmable Application Button, the Calendar and Contacts shortcut buttons on your SoMo 650.

- While holding the three buttons, using the tip of your stylus, lightly press the Reset button inside the hole on the bottom of your SoMo 650 and then release.

It is recommended that you hold the SoMo 650 in your left hand. Press the left programmable action button with your left thumb and the two shortcut buttons with your left index and middle finger. Hold the stylus in your right hand to press the reset button.

- Keep pressing all three buttons until a splash screen appears with the Socket logo and then disappears.

- After the Socket Splash Screen disappears, release the three buttons and follow the onscreen instructions.
APPENDIX D
UPGRADING THE ROM IMAGE
You can purchase ROM image upgrades from the Socket website.
WARNING! You will lose all data files and applications during the upgrade process!
STEP 1: Power the Device
Make sure the battery has enough power or plug the SoMo 650 into an external power source using the charging cable/cradle.
STEP 2: Back up Data on the Device
If you have any data on the SoMo 650, please back it up before you run the update.
STEP 3: Transfer Files using a Memory Card
IMPORTANT! It is not recommended to transfer the files using ActiveSync or the Windows Mobile Device Center!
The directory SOMO650 containing the ROM image files must be moved to the SoMo 650 with a SD or CF memory card. Make sure your memory card has at least 40 MB of free space.
- On your PC, use My Computer or Windows Explorer to locate the directory SOMO650, which contains the upgrade files.

SOMO650
-
Copy the SOMO650 directory to your memory card. DO NOT change the name of the folder!
-
Insert the memory card into the SoMo 650.
54 | APPENDIX D: UPGRADING THE ROM IMAGE
STEP 4: Install the Files
- Press and hold the Right programmable application button, and the Calendar and Contacts shortcut buttons on your SoMo 650.
- While holding the three buttons, use the stylus to quickly press the Reset button inside the hole on the bottom of your SoMo 650. Keep holding the Right programmable application button.
Reset button
Calendar shortcut button

Right programmable application button
- An EBOOT screen will appear with a timer, counting down from 5 seconds.
IMPORTANT! Keep holding the Right programmable application button until the timer reaches 0 seconds! Otherwise the installation will be aborted.
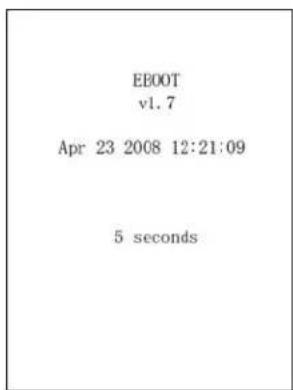
- The SoMo 650 will begin to download and update the ROM image.
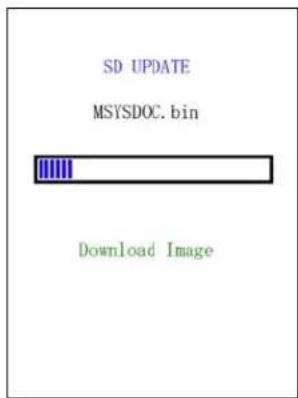
- After the installation reports, "Update completed!" the Socket splash screen will appear for about 30 seconds.

- The Windows Mobile splash screen will appear for about 30 seconds.
- The Windows Welcome wizard will prompt you to set up Windows Mobile. Follow the instructions on your screen.
- After setting up Windows Mobile, the Today screen will appear, and the SoMo 650 is ready to use.
APPENDIX E
HOLD SWITCH UTILITY
The Hold Switch Utility enables you to change the default behavior of the hold switch located on the left side of the SoMo 650 handheld computer. By default, when the hold switch is activated, the SoMo screen turns off.
NOTE: The Hold Switch Utility is included in SoMo ROM version 1.1.xx and later. Check your ROM version by tapping Start |.Settings | System tab | System Info.
NOTE: If your SoMo does not include the Hold Switch Utility, download it from: www.socketmobile.com/support/downloads Follow the installation instructions in the release notes.
NOTE: When the hold switch is activated, any connections or programs running on the SoMo will remain active.
NOTE: By default, the SoMo will automatically suspend according to settings chosen in the Power applet. To access the applet, tap Start | Settings | System tab | Power.
- Tap Start | Settings | System tab | Hold Switch.

- Use the utility to configure your settings.

- Leave screen enabled: Select to keep the screen on when the hold switch is activated. A dialog will report that the hold switch is activated. Tapping ok or deactivating the hold switch will close the dialog.

NOTE: When the SoMo is reset, this option is automatically re-enabled.

- Disable backlight: Select to keep the screen on but disable the backlight, recommended for conserving battery life.
- Disable auto-suspend: Select to keep the SoMo alive when the hold switch is activated, regardless of settings chosen in the Power applet.

NOTE: Use this option with caution to avoid accidental depletion of the SoMo battery.
- Launch program when switch is activated: Use the menu to select a program for the SoMo to automatically launch when the hold switch is activated (in the down position).
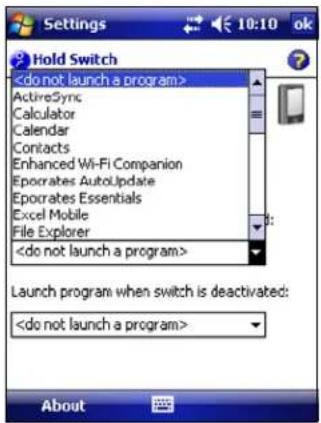
- Launch program when switch is deactivated: Use the menu to select a program for the SoMo to automatically launch when the hold switch is deactivated (in the up position).
- After entering your settings, tap ok.
APPENDIX F
TECHNICAL SUPPORT
If you have trouble installing or using the SoMo 650, Socket has different support options to help you.
Online Knowledge Base:
Search for articles, Frequently Asked Questions or Hot Topics any time, day or night. www.socketmobile.com/support/ Click FAQs
Online Requests:
Register your product and submit a question to our Technical Support Team. www.socketmobile.com/support/support/login.asp
By Phone:
You can reach our Tier 1 Technical Support by calling either of these numbers:
• USA & Canada Toll-Free: 800-279-1390
- Direct: +1-510-933-3020
LIMITED WARRANTY
Socket Mobile, Inc. (Socket) warrants this product against defects in material and workmanship, under normal use and service, for one (1) year from the date of purchase.
EXCLUDES: Consumables such as batteries, cables, cases, straps, and chargers (90 day coverage only).
An extended warranty is available separately for the SoMo. For more information, please visit: www.socketmobile.com/support
Incompatibility is not a defect covered by the Socket warranty. During the warranty period, Socket will, at its option, repair or replace the defective product at no charge when furnished with proof of retail purchase, provided that you deliver the product to Socket or to an authorized Socket Service Center.
The returned product must be accompanied by a return material authorization (RMA) number issued by Socket or by a Socket Authorized Service Center. If you ship the product, you must use the original container or equivalent and you must pay the shipping charges to Socket. Socket will pay surface shipping charges back to any location in the contiguous United States. This warranty applies only to the original retail purchaser and is not transferable.
Socket may, at its option, replace or repair the product with new or reconditioned parts and the returned product becomes Socket's property. Socket warrants the repaired or replaced products to be free from defects in material or workmanship for ninety (90) days after the return shipping date, or for the remainder of the original warranty period, whichever is greater.
This warranty does not cover the replacement of products damaged by abuse, accident, misuse or misapplication, nor as a result of service or modification other than by Socket. This warranty is void if you install batteries into the product that were not supplied by Socket.
SOCKET IS NOT RESPONSIBLE FOR INCIDENTAL OR CONSEQUENTIAL DAMAGES RESULTING FROM BREACH OF ANY EXPRESS OR IMPLIED WARRANTY, INCLUDING DAMAGE TO PROPERTY AND, TO THE EXTENT PERMITTED BY LAW, DAMAGES FOR PERSONAL INJURY. THIS WARRANTY IS IN LIEU OF ALL OTHER WARRANTIES INCLUDING IMPLIED WARRANTIES OF MERCHANTABILITY AND FITNESS FOR A PARTICULAR PURPOSE.
Some states do not allow limitation of implied warranties, or the exclusion or limitation of incidental or consequential damages, so that the above limitations or exclusions may not apply to you. This warranty
gives you specific legal rights and you may also have other rights which vary from state to state.
This product may contain fully tested, recycled parts, warranted as if new.
For warranty information, please visit: www.socketmobile.com/support
DISCLAIMER
EXCEPT TO THE EXTENT EXPRESSLY WARRANTED BY SOCKET COMMUNICATIONS, INC, THIS PRODUCT IS PROVIDED "AS IS" WITHOUT WARRANTY OF ANY KIND, EXPRESS OR IMPLIED, INCLUDING WITHOUT LIMITATION, THE IMPLIED WARRANTIES OF MERCHANTABILITY OR FITNESS FOR A PARTICULAR PURPOSE. EXCEPT TO THE EXTENT REQUIRED BY LAW, SOCKET DOES NOT ASSUME ANY PRODUCT LIABILITY ARISING OUT OF, OR IN CONNECTION WITH, THE APPLICATION OR USE OF ANY PRODUCT OR APPLICATION DESCRIBED HEREIN.
LIMITED SOFTWARE WARRANTY
LIMITED WARRANTY. SOCKET warrants that the original disk or CD ROM is free from defects for 90 days from the date of delivery of the SOFTWARE.
CUSTOMER REMEDIES. SOCKET'S entire liability and your exclusive remedy shall be, at SOCKET'S option, either (a) return of the price paid or (b) replacement of the SOFTWARE which does not meet SOCKET'S Limited Warranty and which is returned to SOCKET with a copy of your receipt. Any replacement SOFTWARE will be warranted for the remainder of the original warranty period or 30 days, whichever is longer. THESE REMEDIES ARE NOT AVAILABLE OUTSIDE OF THE UNITED STATES OF AMERICA.
NO OTHER WARRANTIES. SOCKET disclaims all other warranties, either express or implied, including but not limited to implied warranties of merchantability and fitness for a particular purpose, with respect to the SOFTWARE and the accompanying written materials. This limited warranty gives you specific legal rights. You may have others which vary from state to state.
NO LIABILITY FOR CONSEQUENTIAL DAMAGES. In no event shall SOCKET or its suppliers be liable for any damages whatsoever (including, without limitation, damages for loss of business profits, business interruption, loss of business information, or other pecuniary loss) arising out of the use of or inability to use the SOFTWARE, even if SOCKET has been advised of the possibility of such damages. Because some states do not allow the exclusion or limitation of liability for consequential or incidental damages, the above limitation may not apply to you.
EXPORT LAW ASSURANCES. You may not use or otherwise export or reexport the SOFTWARE except as authorized by United States law and laws of the jurisdiction in which the SOFTWARE was obtained. In particular, but without limitation, none of the SOFTWARE may be used or otherwise exported or reexported (a) into (or to a national or resident of) a United States embargoed country or (b) to anyone on the U.S. Treasury Department's list of Specially Designated Nationals or the U.S. Department of Commerce's Table of Denial Orders. By using the SOFTWARE, you represent and warrant that you are not located in, under control of, or a national or resident of any such country or on any such list.
GOVERNMENT END USERS. If the SOFTWARE is supplied to the U. S. Government, the SOFTWARE is classified as "restricted computer software" as defined in clause 52.227-19 of the FAR. The U. S.
Government's rights to the SOFTWARE are as provided in clause 52.227-19 of the FAR.
CONTROLLING LAW AND SEVERABILITY. This License shall be governed by the laws of the United States and the State of California. If for any reason a court of competent jurisdiction finds any provision, or portion thereof, to be unenforceable, the remainder of this License shall continue in full force and effect.
REGULATORY COMPLIANCE
FCC: Part 15, Class B
Industry Canada
CE: EN
Anatel
RoHS and WEEE compliant
Electrical Safety EN60950, UL, CUL
EMI / RFI
Wi-Fi Alliance Certification
Bluetooth Certification (BQB test), Bluetooth QD ID B012762
USB IF Test
Microsoft Windows Mobile 5.0 Logo Test Certification
Microsoft Windows Mobile 6 Logo Test Certification
EU/International: EN301 489-1, -17
EN61000-4-2: 1995, ESD ± 8kV air/±4kV contact
EN61000-4-3: 1997, radiated Immunity 3V/m
EN61000-4-4: 1995, EFT ± 0.5kV
EN61000-4-5: 1995, Surge ± 0.5kV
EN61000-4-6: 1
FCC Interference Statement (USA)
This equipment has been tested and found to comply with the limits for a Class B digital device, pursuant to Part 15 of the FCC Rules. These limits are designed to provide reasonable protection against harmful interference in a residential installation. This equipment generates, uses and can radiate radio frequency energy and, if not installed and used in accordance with the instructions, may cause harmful interference to radio communications. However, there is no guarantee that interference will not occur in a particular installation. If this equipment does cause harmful interference to radio or television reception, which can be determined by turning the equipment off and on, the user is encouraged to try to correct the interference by one of the following measures:
- Reorient or relocate the receiving antenna.
- Increase the separation between the equipment and receiver.
- Connect the equipment into an outlet on a circuit different from that to which the receiver is connected.
- Consult the dealer or an experienced radio/TV technician for help.
FCC Caution: Any changes or modifications not expressly approved by the party responsible for compliance could void the user's authority to operate this equipment.
This device complies with Part 15 of the FCC Rules. Operation is subject to the following two conditions: (1) This device may not cause harmful interference, and (2) this device must accept any interference received, including interference that may cause undesired operation.
IMPORTANT: RADIATION EXPOSURE STATEMENT THIS EQUIPMENT COMPLIES WITH FCC RADIATION EXPOSURE LIMITS SET FORTH FOR AN UNCONTROLLED ENVIRONMENT. END USERS MUST FOLLOW THE SPECIFIC OPERATING INSTRUCTIONS FOR SATISFYING RF EXPOSURE COMPLIANCE. TO MAINTAIN COMPLIANCE WITH FCC RF EXPOSURE COMPLIANCE REQUIREMENTS, PLEASE FOLLOW OPERATION INSTRUCTIONS AS DOCUMENTED IN THIS MANUAL.
This PDA has been tested and demonstrated compliance when Bluetooth and WLAN are transmitting simultaneously. This PDA must not be co-located or operating in conjunction with any other antenna or transmitter.
For body worn operation, this device has been tested and meets the FCC RF exposure guidelines when used with the Socket accessories supplied or designated for this product. Use of other accessories may not ensure compliance with FCC RF exposure guidelines."
Industry Canada Statement:
This device complies with RSS-210 of the Industry Canada Rules. Operation is subject to the following two conditions: (1) This device may not cause harmful interference, and (2) this device must accept any interference received, including interference that may cause undesired operation.
IMPORTANT: RADIATION EXPOSURE STATEMENT THIS EQUIPMENT COMPLIES WITH IC RADIATION EXPOSURE LIMITS SET FORTH FOR AN UNCONTROLLED ENVIRONMENT. END USERS MUST FOLLOW THE SPECIFIC OPERATING
INSTRUCTIONS FOR SATISFYING RF EXPOSURE COMPLIANCE. TO MAINTAIN COMPLIANCE WITH IC RF EXPOSURE COMPLIANCE REQUIREMENTS, PLEASE FOLLOW OPERATION INSTRUCTIONS AS DOCUMENTED IN THIS MANUAL.
European Union Notice:
Radio products with the CE marking comply with the R&TTE Directive (1999/5/EC), the EMC Directive (89/336/EEC) and the Low Voltage Directive (73/23/EEC) issued by the Commission of the European Community.
Compliance with these directives implies conformity to the following
European Norms:
• EN 60950 Product Safety
• EN 300 328 Technical requirement for radio equipment
• EN 301 489-1/-17 General EMC requirements for radio equipment
Brazil:
- COPYRIGHT NOTICE
- IMPORTANT SAFETY INSTRUCTIONS
- TABLE OF CONTENTS
- COPYRIGHT NOTICE 2
- IMPORTANT SAFETY INSTRUCTIONS 3
- TABLE OF CONTENTS 4
- | INTRODUCTION 6
- | GETTING STARTED 14
- | USING THE SOMO 650 21
- | WI-FI COMPANION 25
- | SOCKETSCAN AND CONNECT!AGENT FOR CORDLESS BAR CODE SCANNERS 33
- | SOCKETSCAN FOR PLUG-IN SCANNERS AND READERS 39
- APPENDICES
- | INTRODUCTION
- PACKAGE CONTENTS
- SYSTEM COMPATIBILITY REQUIREMENTS
- ADDITIONAL ACCESSORIES
- PRODUCT REGISTRATION
- SOCKETCARE™ SERVICE PROGRAM
- HARDWARE FEATURES
- Front
- Back
- Left
- Right
- Top (with card slot cover open)
- Bottom
- CHARGING/SYNC CRADLE
- ABOUT THE SOCKET SOFTWARE
- | GETTING STARTED
- STEP 1: INSTALL THE BATTERY
- STEP 2: CHARGE THE BATTERY
- STEP 3: SET UP YOUR SoMo 650
- STEP 4: INSTALL ACTIVESYNC ON A HOST PC
- STEP 5: CONNECT THE SOMO TO THE COMPUTER
- Connect with the Sync Cable
- Connect with the Cradle
- STEP 6: SET UP YOUR DEVICE PARTNERSHIP
- | USING THE SoMo 650
- BUTTONS
- HOLD SWITCH
- STYLUS
- ADDING A USB KEYBOARD/MOUSE
- START MENU
- ONLINE HELP
- WIRELESS RADIO MANAGER
- Windows Mobile 5.0
- Windows Mobile 6
- | Wi-Fi COMPANION
- ADDITIONAL DOCUMENTATION
- USEFUL LINKS
- TURNING ON THE WI-FI RADIO
- MAIN SCREEN OF WI-FI COMPANION
- Wi-Fi STATUS ICON
- Wi-Fi FINDER
- Wi-Fi FINDER ICONS
- FINDING AND CONNECTING TO A WLAN
- | SOCKETSCAN AND CONNECT!AGENT FOR CORDLESS BAR CODE SCANNERS
- SocketScan Icons
- STEP 1: PREPARE THE SCANNING HARDWARE
- STEP 2: ENABLE CORDLESS SCANNING
- STEP 3: CONNECT SCANNER TO SoMo
- STEP 4: START APPLICATION
- STEP 5: SCAN BAR CODES
- | SOCKETSCAN FOR PLUG-IN SCANNERS AND READERS
- STEP 1: ASSIGN A TRIGGER BUTTON
- STEP 2: START SOCKETSCAN
- STEP 3: INSERT THE CARD
- STEP 5: SCAN OR READ DATA
- APPENDIX A
- SPECIFICATIONS
- APPENDIX B
- CARE AND MAINTENANCE
- Cleaning the SoMo:
- Carrying or Storing the SoMo:
- APPENDIX C
- RESETTING THE SoMo 650
- Soft Reset
- To perform a soft reset:
- Hard Reset
- To perform a hard reset:
- Clean Reset
- To perform a clean reset:
- APPENDIX D
- UPGRADING THE ROM IMAGE
- STEP 1: Power the Device
- STEP 2: Back up Data on the Device
- STEP 3: Transfer Files using a Memory Card
- STEP 4: Install the Files
- APPENDIX E
- HOLD SWITCH UTILITY
- APPENDIX F
- TECHNICAL SUPPORT
- Online Knowledge Base:
- Online Requests:
- By Phone:
- LIMITED WARRANTY
- DISCLAIMER
- LIMITED SOFTWARE WARRANTY
- REGULATORY COMPLIANCE
- FCC Interference Statement (USA)
- Industry Canada Statement:
- European Union Notice:
- European Norms:
- Brazil:
Brand : Socket Mobile
Model : SoMo 650-M
Category : Barcode Reader