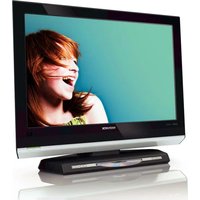
19MD358B - Television MAGNAVOX - Free user manual and instructions
Find the device manual for free 19MD358B MAGNAVOX in PDF.


| Product Type | 19-inch LCD TV with Built-in DVD Player |
| Screen Size | 19 inches (measured diagonally) |
| Aspect Ratio | 16:9 |
| Display Resolution | 1440 x 900 pixels |
| Brightness | 300 cd/m² (typical) |
| Response Time | 5 ms (typical, on/off) |
| Viewing Angles (V/H) | 160° / 160° (typical) |
| Sound Output | 3 W x 2 (RMS) |
| Sound Modes | Mono, Stereo, Virtual Surround |
| Power Consumption (Active) | 55 W |
| Standby Power Consumption | < 1 W |
| AC Input Voltage | 100-120 V, 60 Hz |
| Product Dimensions (H x W x D) | 15.62" x 18.34" x 6.85" |
| Net Weight | 12.43 lbs |
| Gross Weight (with packaging) | 14.77 lbs |
| Built-in DVD Player | Plays DVD, DVD±R/RW, CD, CD-RW, Picture CD, MP3 |
| Rear Connections | Antenna (75Ω), Component Video (Y Pb Pr) with Audio L/R, HDMI (v1.3a), SPDIF Out, PC VGA + Audio |
| Side Connections | Headphone (3.5mm), Composite Video + Audio L/R |
| Smart Picture Modes | Personal, Sports, Standard, Movie, Power Saver |
| Picture Formats | Automatic, 4:3, Movie Expand 14:9, Movie Expand 16:9, Super Zoom, 16:9 Subtitle, Wide Screen |
| Parental Control | V-Chip with US TV, Movie, and Canadian ratings locks; Channel lock |
| Screen Care | Clean with soft dry cloth; avoid harsh chemicals; prevent stationary images |
Frequently Asked Questions - 19MD358B MAGNAVOX
User questions about 19MD358B MAGNAVOX
0 question about this device. Answer the ones you know or ask your own.
Ask a new question about this device
Download the instructions for your Television in PDF format for free! Find your manual 19MD358B - MAGNAVOX and take your electronic device back in hand. On this page are published all the documents necessary for the use of your device. 19MD358B by MAGNAVOX.
USER MANUAL 19MD358B MAGNAVOX
Register your product and get support at
www.magnavox.com/usasupport
19MD358B

natural_image
Modern flat-screen TV displaying a smiling woman's face against a blue background (no text or symbols visible)EN USER MANUAL
EN: For further assistance, call the customer support service in your country.
• 1-800-705-2000
Return your Product Registration Card or register online at
www.magnavox.com/usasupport today to get the very most from your purchase.
Registering your model with MAGNAVOX makes you eligible for all of the valuable benefits listed below, so don't miss out. Complete and return your Product Registration Card at once, or register online at
www.magnavox.com/usasupport to ensure:
\*Proof of Purchase
Returning the enclosed card guarantees that your date of purchase will be on file, so no additional paperwork will be required from you to obtain warranty service.
\*Product Safety Notification
By registering your product, you'll receive notification directly from the manufacturer - in the rare case of a product recall or safety defect.
\*Additional Benefits
Registering your product guarantees that you'll receive all of the privileges to which you're entitled, including special money-saving offers.
MAGNAVOX
Congratulations on your purchase, and welcome to the "family!"
Dear MAGNAVOX product owner:
Thank you for your confidence in MAGNAVOX. You've selected one of the best-built, best-backed products available today. We'll do everything in our power to keep you happy with your purchase for many years to come.
As a member of the MAGNAVOX “family,” you’re entitled to protection by one of the most comprehensive warranties and outstanding service networks in the industry. What’s more, your purchase guarantees you’ll receive all the information and special offers for which you qualify, plus easy access to accessories from our convenient home shopping network.
Most importantly, you can count on our uncompromising commitment to your total satisfaction.
All of this is our way of saying welcome - and thanks for investing in a MAGNAVOX product.
P.S. To get the most from your MAGNAVOX purchase, be sure to complete and return your Product Registration Card at once or register online at:
www.magnavox.com/usasupport
Know these
safety symbols

CAUTION
RISK OF ELECTRIC SHOCK DO NOT OPEN

CAUTION: TO REDUCE THE RISK OF ELECTRIC SHOCK, DO NOT REMOVE COVER (OR BACK). NO USER-SERVICEABLE PARTS INSIDE. REFER SERVICING TO QUALIFIED SERVICE PERSONNEL.

This “bolt of lightning” indicates uninsulated material within your unit may cause an electrical shock. For the safety of everyone in your household,
please do not remove product covering.

The “exclamation point” calls attention to features for which you should read the
enclosed literature closely to prevent operating and maintenance problems.
WARNING: To reduce the risk of fire or electric shock, this apparatus should not be exposed to rain or moisture and objects filled with liquids, such as vases, should not be placed on this apparatus.
CAUTION: To prevent electric shock, match wide blade of plug to wide slot, fully insert.
Enter below the Serial No. which is located on the rear of the cabinet. Retain this information for future reference.
Model No.
Serial No. ____
Important safety instructions1.
Read before operating equipment
I. Read and keep these instructions.
2. Heed all warnings.
3. Follow all instructions.
4. Do not insert any strange object into the ventilation slots. This might lead to damage of the TV.
5. Do not use this apparatus near water.
6. Clean only with a dry cloth.
7. Do not block any of the ventilation openings.
Install in accordance with the manufacturers instructions.
8. Do not install near any heat sources such as radiators, heat registers, stoves, or other apparatus (including amplifiers) that produce heat.
9. Do not defeat the safety purpose of the polarized or grounding-type plug. A polarized plug has two blades with one wider than the other. A grounding type plug has two blades and third grounding prong. The wide blade or third prong are provided for your safety. When the provided plug does not fit into your outlet, consult an electrician for replacement of the obsolete outlet.
10. Protect the power cord from being walked on or pinched particularly at plugs, convenience receptacles, and the point where they exit from the apparatus.
II. Only use attachments/accessories specified by the manufacturer.
12 Use only with a cart, stand, tripod, bracket, or table specified by the manufacturer, or sold with the apparatus. When a cart is used, use caution when moving the cart/apparatus combination to avoid injury from tip-over.
-
Unplug this apparatus during lightning storms or when unused for long periods of time.
-
Refer all servicing to qualified service personnel. Servicing is required when the apparatus has been damaged in any way, such as power-supply cord or plug is damaged, liquid has been spilled or objects have fallen into apparatus, the apparatus has been exposed to rain or moisture, does not operate normally, or has been dropped.
-
This product may contain lead or mercury. Disposal of these materials may be regulated due to environmental considerations. For disposal or recycling information, please contact your local authorities or the Electronic Industries Alliance:www.eiae.org.
-
Damage Requiring Service - The appliance should be serviced by qualified service personnel when: A. The power supply cord or the plug has been damaged;
B. Objects have fallen, or liquid has been spilled into the appliance;
C. The appliance has been exposed to rain
D. The appliance does not appear to operate normally or exhibits a marked change in performance;
E. The appliance has been dropped, or the enclosure damaged.
- Tilt/Stability - All televisions must comply with recommended international global safety standards for tilt and stability properties of its cabinet design.
- Do not compromise these design standards by applying excessive pull force to the front, or top, of the cabinet which could ultimately overturn the product.
-
Also, do not endanger yourself, or children, by placing electronic equipment/toys on the top of the cabinet. Such items could unsuspectingly fall from the top of the set and cause product damage and/or personal injury.
-
Wall or Ceiling Mounting - The appliance should be mounted to a wall or ceiling only as recommended by the manufacturer.
-
Power Lines - An outdoor antenna should be located away from power lines.
-
Outdoor Antenna Grounding - If an outside antenna is connected to the receiver, be sure the antenna system is grounded so as to provide some protection against voltage surges and built up static charges.
Section 810 of the National Electric Code, ANSI/NFPA No. 70-1984, provides information with respect to proper grounding of the mast and supporting structure, grounding of the lead-in wire to an antenna discharge unit, size of grounding connectors, location of antenna-discharge unit, connection to grounding electrodes, and requirements for the grounding electrode. See Figure below.
-
Object and Liquid Entry - Care should be taken so that objects do not fall and liquids are not spilled into the enclosure through openings.
-
Battery Usage CAUTION - To prevent battery leakage that may result in bodily injury, property damage, or damage to the unit:
- Install all batteries correctly, with + and - aligned as marked on the unit.
- Do not mix batteries (old and new or carbon and alkaline, etc.).
- Remove batteries when the unit is not used for a long time.
Example of Antenna Grounding as per NEC - National Electric Code

ELECTRICSERVICEEQUIPMENT
ANTENNA L EAD I NWIRE
ANTENNA DISCHARGE UNIT (NEC SECTION 810-20)
GROUNDINGCONDUCTORS(NEC S ECTION810-21)
GROUNDCLAMPS
POWER SERVICE GROUNDING ELECTRODE SYSTEM (NEC ART 250, PART H)
Note to the CATV system installer: This reminder is provided to call the CATV system installer's attention to Article 820-40 of the NEC that provides guidelines for proper grounding and, in particular, specifies that the cable ground shall be connected to the grounding system of the building, as close to the point of cable entry as practical.
2008 © Koninklijke Philips Electronics N.V. All rights reserved. Specifications are subject to change without notice. Trademarks are the property of Koninklijke Philips Electronics N.V. or their respective owners.
Philips reserves the right to change products at any time without being obliged to adjust earlier supplies accordingly.
The material in this manual is believed adequate for the intended use of the system. If the product, or its individual modules or procedures, are used for purposes other than those specified herein, confirmation of their validity and suitability must be obtained. Philips warrants that the material itself does not infringe any United States patents. No further warranty is expressed or implied.
Philips can't be held responsible neither for any errors in the content of this document nor for any problems as a result of the content in this document. Errors reported to Philips will be adapted and published on the Philips support website as soon as possible.
Warranty
No components are user-serviceable. Do not open or remove covers to the inside of the product. Repairs may only be done by Philips Service Centers and official repair shops. Failure to do so shall void any warranty, stated or implied. Any operation expressly prohibited in this manual, any adjustments, or assembly procedures not recommended or authorised in this manual shall void the warranty.
Pixel characteristics
This LCD product has a high number of color pixels. Although it has effective pixels of 99,999% or more, black dots or bright points of light (red, green or blue) may appear constantly on the screen. This is a structural property of the display (within common industry standards) and is not a malfunction.
Federal Communications Commission Notice
This equipment has been tested and found to comply with the limits for a Class B digital device, pursuant to part 15 of the FCC Rules. These limits are designed to provide reasonable protection against harmful interference in a residential installation. This equipment generates, uses, and can radiate radio frequency energy and, if not installed and used in accordance with the instructions, may cause harmful interference to radio communications. However, there is no guarantee that interference will not occur in a particular installation. If this equipment does cause harmful interference to radio or television
reception, which can be determined by turning the equipment off and on, the user is encouraged to try to correct the interference by one or more of the following measures:
Reorient or relocate the receiving 1. antenna.
Increase the separation between the 2. equipment and the receiver.
Connect the equipment into an outlet 3. on a circuit different from that to which the receiver is connected.
Consult the dealer or an experienced 4. radio or television technician for help.
Modifications
The FCC requires the user to be notified that any changes or modifications made to this device that are not expressly approved by Philips Consumer Lifestyle may void the user's authority to operate the equipment.
Cables
Connections to this device must be made with shielded cables with metallic RFI/EMI connector hoods to maintain compliance with FCC Rules and Regulations.
Canadian notice
This Class B digital apparatus meets all requirements of the Canadian Interference-Causing Equipment Regulations.
Avis Canadien
Know these safety symbols:

CAUTION
RISK OF ELECTRIC SHOCK DO NOT OPEN
CAUTION: TO REDUCE THE RISK OF ELECTRIC SHOCK, DO NOT REMOVE COVER (OR BACK). NO USER-SERVICEABLE PARTS INSIDE. REFER SERVICING TO QUALIFIED SERVICE PERSONNEL.

This "bolt of lightning" indicates uninsulated material within your unit may cause an electrical shock. For the safety of everyone in your household, please do not remove product covering.
The exclamation point calls attention to features for which you should read the enclosed literature closely to prevent operating and maintenance problems.
If the TV is mounted on a swivel base or swivel arm, ensure no strain is placed on the power cord when the TV is swivelled. Strain on the power cord can loosen connections. This may cause arcing and result in fire.
Copyright

ENERGY STAR
As an ENERGY STAR ^® Partner, Magnavox has determined this product meets the ENERGY STAR ^® guidelines for energy efficiency. ENERGY STAR ^® is a U.S. registered mark. Using products with ENERGY STAR ^® label can save energy. Saving energy reduces air pollution and lowers utility.
DOLBY DIGITAL
Manufactured under license from Dolby Laboratories, 'Dolby' and the double-D symbol are trademarks of Dolby Laboratories.
Table of Contents
1. Important safety instructions ..... 2
2. Important....5
2.1 Product information 5
2.2 Screen care 5
2.3 Environmental care .... 5
2.4 Regulatory notices ....5
3. Your TV 6
3.1 TV overview 6
3.2 Remote control 7
4. Get started 8
4.1 Position the TV 8
4.2 Install the remote control batteries 8
4.3 Connect the antenna or cable 8
4.4 Connect the AC power cord ..... 10
4.5 Manage cables 10
4.6 Switch on the TV 10
5. Use your TV 11
5.1 Switch your TV on or to standby ..... 11
5.2 Watch TV 11
5.3 Watch channels from a cable receiver box ..... 12
5.4 Watch a DVD 12
6. Use more of your TV 13
6.1 Remote control overivew-TV 13
6.2 Remote control overview-DVD 14
6.3 Change picture and sound settings ..... 15
6.4 Use Smart mode 17
6.5 Create favorite channels list 18
6.6 Set the clock 18
6.7 Set the sleeptimer 18
6.8 Use parental control and rating locks ..... 19
6.9 Closed captions 22
6.10 Use your TV as a PC monitor 23
6.11 Select your TV in PC mode 23
7. Change your TV installation ..... 24
7.1 Select your menu language ..... 24
7.2 Autoprogramming 24
7.3 Return your settings to default values ..... 24
8. Connect devices 25
8.1 Connection overview 25
8.2 Select connection quality 25
8.3 Connect devices 27
9. Built-in DVD player ..... 29
9.1 Disc operations 29
9.2 Playable discs 29
9.3 Playing discs 30
9.4 Basic playback controls 30
9.5 Playing MP3/JPEG picture CD 32
9.6 OSD settings for DVD 33
10. Glossary 34
11. Trouble shooting ..... 35
12. Trouble shooting-DVD 36
13. Technical specifications ..... 37
14. Index....38
15. Warranty 40
Important2.
Congratulations on your purchase and welcome to Magnavox!
To fully benefit from the support that Magnavox offers, register your product at www.magnavox.com/usasupport.
Registering your model with Magnavox makes you eligible for all of the valuable benefits listed below, so don't miss out.
Complete and return your Product Registration Card at once, or register online at www.magnavox.com/usasupport to ensure:
• Proof of Purchase
Returning the enclosed card guarantees that your date of purchase will be on file, so no additional paperwork will be required from you to obtain warranty service.
• Product Safety Notification
By registering your product you'll receive notification - directly from the manufacturer - in the rare case of a product recall or safety defect.
- Additional Benefits of Product Ownership Registering your product guarantees that you'll receive all of the privileges to which you're entitled, including special money-saving offers.
Note: Specifications and information are subject to change without notice.
For further assistance, call the customer support service in your country. TO OBTAIN ASSISTANCE IN THE U.S.A., PUERTO • RICO, OR U.S. VIRGIN ISLANDS. Contact Magnavox Customer Care Center at: 1-800-705-2000
• TO OBTAIN ASSISTANCE IN CANADA. Contact Magnavox Customer Care Center at: 1-800-661-6162 (French Speaking) 1-800-705-2000 (English or Spanish Speaking)
Product information2.1
The model and serial number are on the rear of the TV and on the packaging.
This TV consumes minimal energy in standby mode to minimise environmental impact. The active power consumption is given on the type plate at the rear of the TV.
2.2 Screen care
Turn off and unplug the AC power cord before cleaning • the screen.
- Clean the screen with a soft, dry cloth. Do not use substances such as household cleaning agents as these may damage the screen.
To avoid deformations or color fading, wipe off water • droplets as soon as possible.
- Do not touch, push, rub or strike the screen with hard objects as this may damage the screen permanently.
- Where possible, avoid stationary images that remain on-screen for extended periods of time. If you must use stationary images, reduce the screen contrast and brightness to avoid screen damage.
2.3 Environmental care

Recycling
The packaging of this product is intended to be recycled. Contact your local authorities for information about how to recycle the packaging.

of life directives
Like all LCD products, this set contains a lamp with Mercury, please dispose of according to all Local, State and Federal laws.
Magnavox is paying a lot of attention to produce environmentally-friendly products in green focal areas. Your new TV contains materials which can be recycled and reused. At the end of its life, specialized companies can dismantle the discarded TV to concentrate the reusable materials and to minimize the amount of materials to be disposed off. Please ensure you dispose off your old TV according to local regulations.
Disposal of batteries
The batteries supplied do not contain the heavy metals mercury and cadmium. Nevertheless, in many areas batteries may not be disposed of with your household waste. Please ensure you dispose of batteries according to local regulations.
2.4 Regulatory notices
WARNING: To reduce the risk of fire or electric shock, this apparatus should not be exposed to rain or moisture. Objects filled with liquids, such as vases, should not be placed on this apparatus.
Your 3. TV
This section gives you an overview of commonly-used TV controls and functions.
TV overview3.1
Controls of TV and DVD

Power switch1.
Remote control sensor2.
Volume up/down3.
Menu4.
- Channel up/down
- Eject
- Stop
- Play and pause
Side connectors

natural_image
Line drawing of a computer monitor with various camera and remote control devices (no text or symbols)Use the TV side connectors to connect to mobile devices such as a camera or game console. You can also connect to the headphone.
Rear connectors

Use the TV rear connectors to connect to the antenna and permanent devices such as a high-definition disc player or DVD player.

Note
For more information about connections, see Section 8 Connect devices.
Remote control3.2
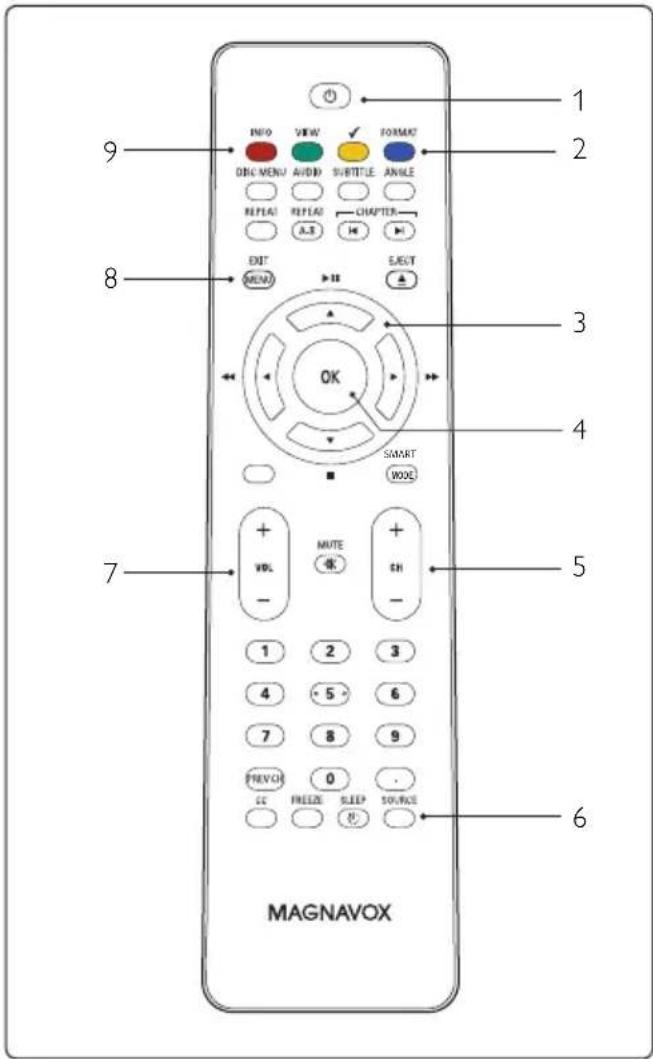
Standby / ON1.
Format2.
Cursor buttons3.
OK button4.
Channel selection5.
Source selection6.
Volume7.
Menu button8.
INFO button9.
For more information about the remote control, See Remote control overview. on page 13.
4. Get started
This section describes how to position and connect your TV, and how to perform your first-time installation.
4.1 Position the TV

WARNING
- Do not insert the power plug into the wall socket before all the connections are made.
• Large screen TVs are heavy. Two people are required to carry and handle the TV.
Wherever you decide to position your TV, ensure that you always have easy access to the AC power cord or plug to disconnect the TV from the power.
If the TV is mounted on a swivel base or swivel arm, ensure no strain is placed on the AC power cord when the TV is swivelled. Strain on the AC power cord can loosen connections. This may cause arcing and result in fire.
For ideal viewing conditions, position the TV where light does not fall directly on the screen.
The ideal viewing distance for watching TV is three times its screen size.
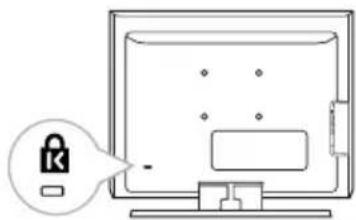
Kensington security slot
Your TV is equipped with a Kensington Security Slot at the back of the TV.
If you connect an anti-theft Kensington lock (not supplied), position the TV within reach of a permanent object that can be attached to the lock.
natural_image
Illustration of a computer monitor with a lock icon and a lock symbol, no text or labels presentInstall the remote control 4.2 batteries
natural_image
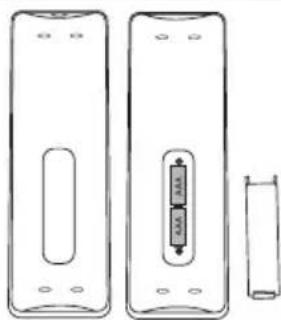
Line drawing of two rectangular electronic devices with internal components, one showing a slot and the other a separate outline (no text or symbols)Open the battery cover on the back of the 1. remote control.
Insert the 2 batteries supplied. Make sure the 2. + and - ends of the batteries line up correctly. (inside of case is marked).
Close the cover.3.
Connect the antenna or 4.3 cable
This section describes how to connect your TV to an antenna, cable, Direct Broadcast Satellite, and to a cable receiver box.
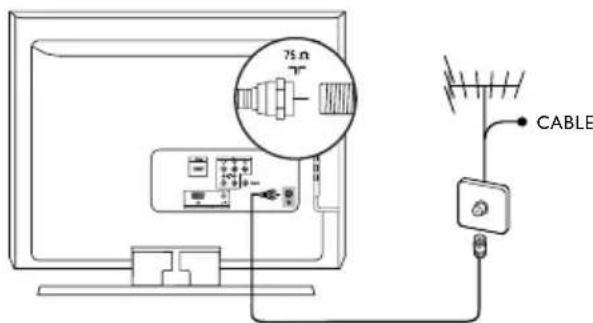
Connect to an antenna
Any DTV programs that are broadcast in your area can be received for free through an antenna connection.
Contact your local content provider or your local electronics retailer if you are unsure about what HDTV programs are available in your area.
Broadcasters are transitioning from analog to digital TV. This means that a given broadcaster can have channels available either in analog or in digital, or both analog and digital at the same time.
The TV has stereo sound if the broadcasting channel makes it available.
Connect to a cable
When your TV is connected to the cable socket, you may receive free digital and high definition programming (depending on your cable provider). Digital and high definition cable channels can be recognized by the format of the channel number. The channel number includes a dot “.” For example, 11.1, 46.30, 108.201. Contact your cable provider for more information.
Connect to a Direct Broadcast Satellite (DBS)
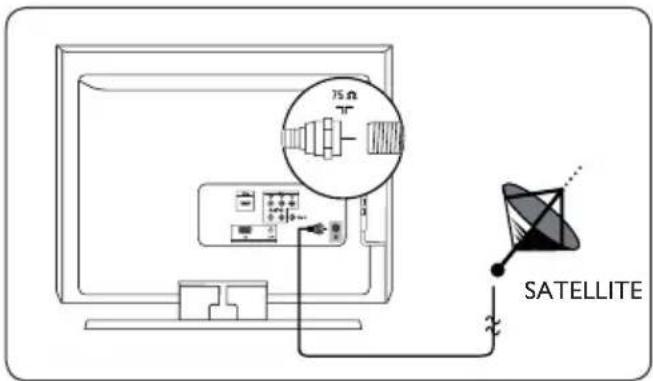
There are two main DBS systems: DirecTV and DishNetwork. These systems require a separate, proprietary set-top box to decode signals and send them to the TV. The set-top box contains a digital TV tuner for receiving off-air digital television broadcasts.
Contact your local DBS provider for more information about the connections and the TV channels.
Connect to a cable receiver box/satellite set-top box
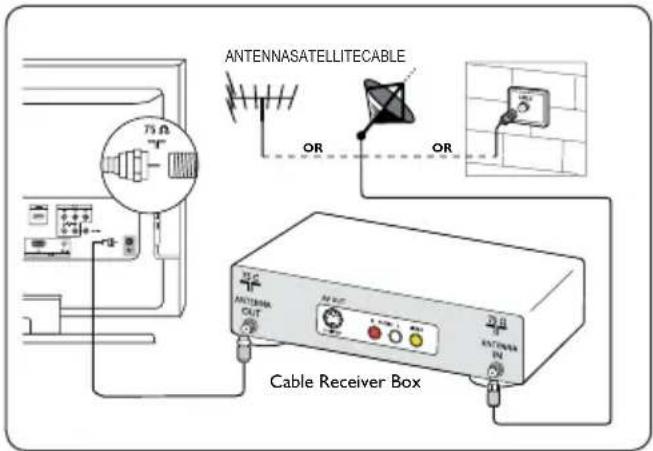
A cable receiver box or satellite set-top box can be connected to the TV through the following connections:
ANTENNA (75ohm)•
A/V (Composite Video and Audio)•
S-Video and Audio•
YPbPr (Component Video Input)•
HDMI•
Connect a cable receiver box/satellite set-top box through RF IN/OUT
If the TV is connected to a cable box or satellite set-top box via a coaxial connection, set the TV to channel 3 and 4, or the channel specified by the service provider.
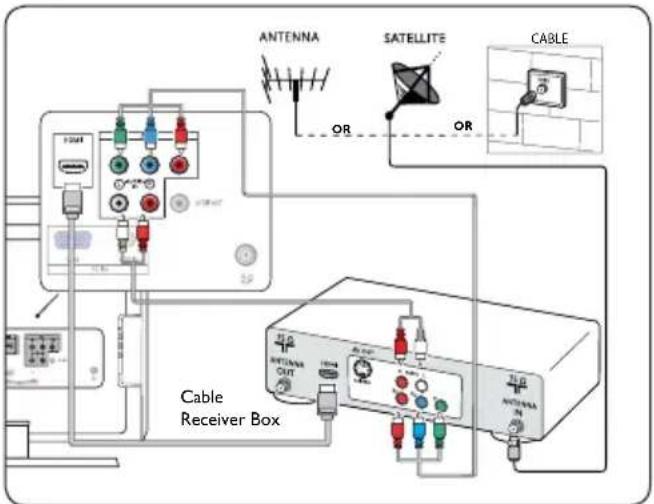
Connect a cable receiver box/satellite set-top box through component video input or HDMI
Connect the AC power cord4.4
WARNING:
Verify that your voltage corresponds with the voltage printed at the back of the TV. Do not insert the AC power cord if the voltage is different.
To connect the AC power cord

Locate the power connector at the back of the 1. TV. The location of the power connector varies according to TV model.
Insert the AC power cord fully into the TV 2. power connector.
Connect the AC power cord plug to the power 3. outlet. Ensuring that the cord is tightly secured at both ends.
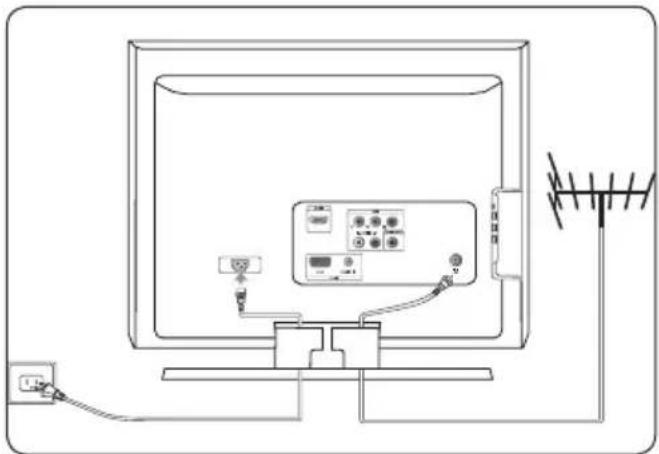
4.5 Manage cables
Route your AC power cord, antenna cable and all other device cables through the cable holder at the back of the TV. The holder helps keep your cables tidy and easily manageable.
natural_image
Line drawing of a TV mounted on a stand with an antenna and power outlet, showing no text or symbols.Switch on the TV4.6
Before you switch on the TV, check that the mains cord is properly connected. Press POWER button at the front side of the TV, or press power the remote control. The TV normally takes 10-15 seconds to start up and the following screen appears the first time you turn on the TV.
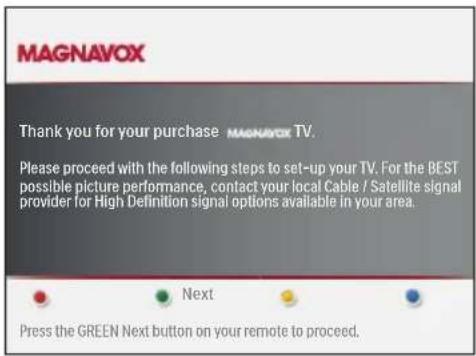
Follow the on-screen instructions to select your language and complete your TV setup. Installation takes approximately 10 minutes.
Note: If you connect your TV to a cable receiver box or satellite set-top box, you do not need to install channels. Press the red button on the remote control to exit the channel installation stage of the setup.
Use your TV 5.
This section helps you perform basic TV operations.
Switch your TV on or to standby5.1
To Switch the TV on
Press ⏻ POWER at the front of the TV. • If the standby indicator is off, press ⏻ POWER on the front of the TV.
If the standby indicator is on, press ⏻ on the remote control.

natural_image
Line drawing of a desktop computer monitor with a button labeled 'e' pointing to the screen (no text or symbols on the device itself)
To Switch to standby
Press ⏻ on the remote control.
To switch on from standby without the remote control.
Press ⏻ POWER at the front of the TV to switch the TV off.
Press ⏻ POWER again to switch the TV on.
Note
The TV is never powered off completely unless it is physically unplugged.
Watch TV5.2
Switch channels
Press a number (1 to 999) or press • CH/- on your remote control.
Press • PREMCH to the previously viewed TV channel.

Bote
You can also switch channels by pressing CH+/- on the top of the TV
Adjust volume
- Press VOL+ or VOL- on your remote control.
Press 2. MUTE on your remote control to mute the sound. Press MUTE again or press VOL - or + to restore the sound.

Note
You can also switch volume by pressing VOL +/- on the top of the TV
Watch channels from a cable receiver 5.3 box
Switch on the cable receiver box. 1.
The picture from your cable receiver box might appear automatically on your screen.
Use the remote control of your cable receiver 2. box to select channels.
If the picture does not appear
Press 1. SOURCE repeatedly to select the connected cable receiver box and wait a few seconds for the picture to appear.

Press 2. OK.
Use the remote control of your set-top box to 3. select channels.
Watch a DVD5.4
Insert a DVD disc in your player.1.
Press 2. Play > on the remote control of your player.
The picture from the player might appear automatically on your screen.
If the picture does not appear
Press 1. SOURCE repeatedly to select correct source and wait a few seconds for the picture to appear.
Press 2. OK.
Use more of your TV6.
This section describes the advanced features of your TV.
6.1 Remote control overivew-TV
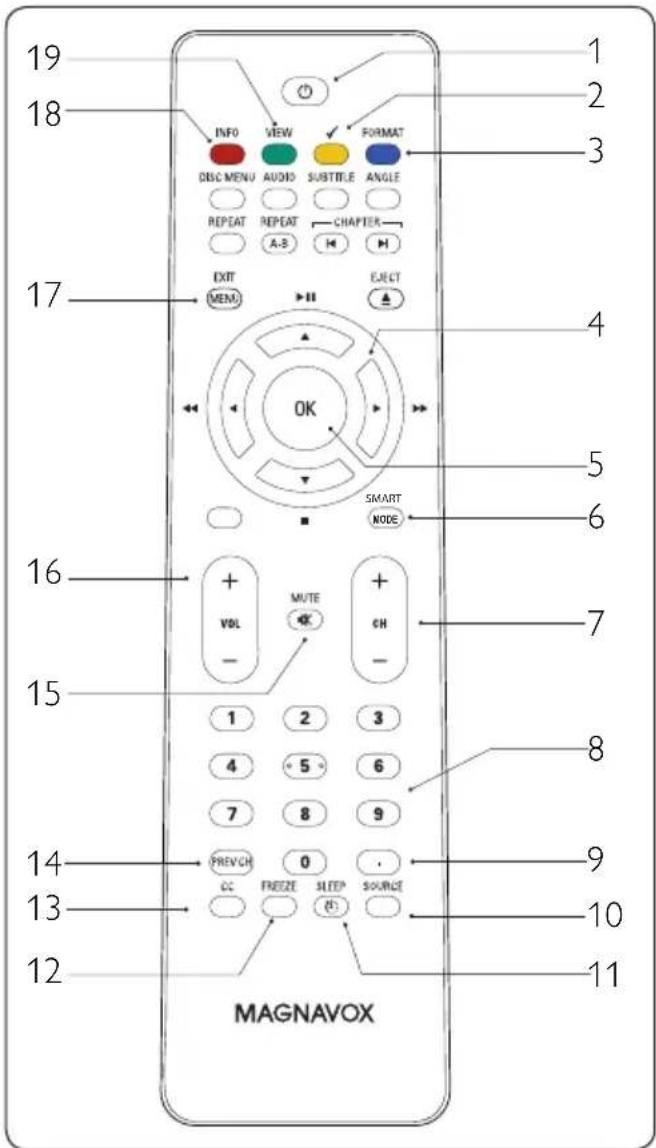
1. POWER
Switches the TV on from standby or back to standby.
- To add or remove a channel in the favorite list of TV channel
FORMAT3.
Selects a picture format. See Change Picture format on page 16.
To navigate through the menus.
OK5.
- To activates a setting.
- To display the list of channels stored (according to the selection made in the Installation mode (Antenna or Cable)
SMART MODE6.
Selects the among Personal, Sports, Standard, Movie, or Powers Saver settings.
7. CH +/-
Switches to the next or previous channel.
NUMBER BUTTONS 8.
Selects a channel, page or setting.
9. DOT
Uses the dot for digital channels.
SOURCE10.
Selects connected devices.
11. SLEEP
Press to set the TV to turn itself off within a certain time.
12. FREEZE
No function
13. CC (Close Captions)
To select CC on, Off or On during mute.
14. PREVIOUS CHANNEL
Returns to the previously-viewed channel.
15. MUTE
Mutes or restores sound.
16. VOLUME +/-
Increases or decreases volume.
17. MENU
Toggles the menu on or off.
18. INFO
Displays programme information, if available.
19. VIEW
To display a list of all channels marked as favorite (incl. subchannels).
6.2 Remote control overview-DVD
Press the "SOURCE" button repeatedly to select source DVD to activate DVD function. Make sure the source "DVD" is selected.

DISC1. MENU
Enter the disc contents menu.
- Switches on or off the playback control mode. (for VCD version 2.0 only)
2. AUDIO
Select the DVD audio language.
3. SUBTITLE
Select the the DVD subtitle language
4. ANGLE
Select a DVD camera angle.
5. Repeat
Select various repeat modes.
Repeat A-B6.
Repeat playback a specific section on a disc.
7. CHAPTER
Search or select previous chapter or track.
8. CHAPTER
Search or select next chapter or track.
9. ELECT
Eject the disc from the DVD player.
10. ▶FF
Forward/Quick forward/
11. STOP
Stop playback.
12. RWD
Backward/slow backward
13. ▶PLAY / PAUSE
Press the button once to start plyback. Press the button second time to pause playback temporarily.
Change 6.3 picture and sound settings
Change picture settings
This section describes how to adjust your picture settings.
Press 1. MENU on the remote control.

Press 2. or to select the Picture menu.
Press ▲ or ▼ to select the one of the picture settings, and press ▶ to enter the setting.
Press 4 or ▼ to adjust the setting, and press OK to confirm the change.
Press 5. Menu to exit.
| MAGNAVOX | |
| Settings | P |
| Picture | Contrast |
| Sound | Brightness |
| Features | Color |
| Parental control | Sharpness |
| Installation | Color temperature |
| Tint | |
| Dynamic contrast | |
| Picture format | |
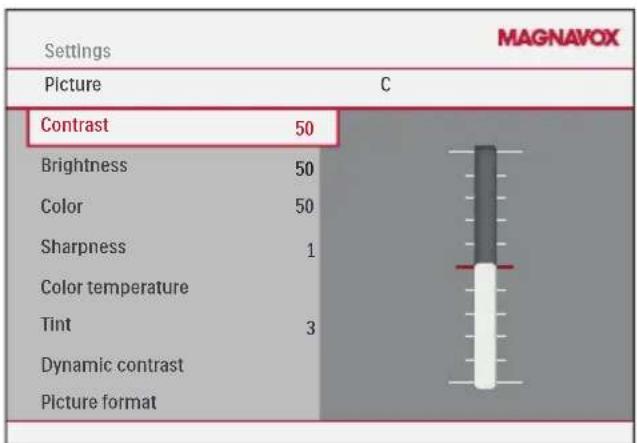
Summary of picture settings
The following picture settings can be configured. Depending on the format of the picture source, some picture settings might not be available.
Contrast• - Sets the level of white in the picture.
• Brightness - Sets the brightness of the picture.
• Color - Sets the level of saturation.
- Tint - Adjusts the color balance between red and green.
• Sharpness - Sets the sharpness of fine details.
• Color temperature - Sets the color temperature to normal, warm or cool.
• Dynamic contrast - Enhances contrast in the darker and the brighter picture areas as the image on the screen changes.
• Picture format - Changes the format of the picture.
Change picture format
Press 1. FORMAT to enter the Picture format menu.

Press 2. or to select a picture format.
• Automatic (Not for PC)
Enlarges the picture automatically to fill the screen. The subtitles remain visible.

natural_image
Simple diagram showing a landscape with a sun and mountains, enclosed by directional arrows (no text or symbols)• Super zoom (Not for HD and PC)
Removes the black bars on the side of 4:3 broadcasts with minimal distortion.

natural_image
Silhouette of a full moon over a mountain range with water below (no text or symbols)4:3• (Not for HD)
Displays the classic 4:3 format.

natural_image
Silhouette of a full moon over a mountain range under a twilight sky (no text or symbols)• Movie expand 14:9 (Not for HD)
Scales the classic 4:3 format to 14:9.

natural_image
Silhouette of a full moon over a mountain range with water below (no text or symbols)Movie expand 16:9 · (Not for HD)
Scales the classic 4:3 format to 16:9.
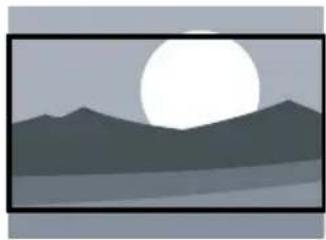
natural_image
Silhouette of a full moon over mountain silhouettes with water below (no text or symbols)16:9 subtitle (Not for PC)
Display 4:3 pictures using the full surface of the screen leaving the subtitles visible.

natural_image
Silhouette of a mountain range under a full moon, no text or symbols present- Wide screen
Stretches the classic 4:3 format to 16:9.

natural_image
Silhouette of a full moon over a mountain range with water below (no text or symbols)Adjust sound settings
This section describes how to adjust sound settings.
Press MENU on the remote control and press ▼ to select Sound.

Press 2. to enter the list.
Press 3. or ▼ to select one of the following settings:
Sound setting •
Changes the bass and treble of the sound. Select each bar to change a setting.
Sound mode•
Mono, Stereo, Virtual surround
Alternate audio•
This gives you the possibility to swap between Main and second audio program (SAP), when it is available in analog channel.
Digital audio language •
This gives you the possibility to swap between main and alternative language, when it is available in digital channel.
Automatic volume leveling•
Reduces sudden volume changes, for example, during commercials or when switching from one channel to another.
Select On or Off.

Tip:
• There are only two options Sound setting and Virtual surround in PC and DVD mode.
6.4 Use Smart mode
Press 1. SMART MODE to set your TV to predefined picture and sound setting.
- Select one of the following settings:
- Personal
The customized settings you defined by using the Picture menu.
- Sports
Vivid picture settings and clear sound for high action.
- Standard
For normal TV viewing.
- Movie
Brilliant picture settings for a cinematic experience.
• Power saver
Eco friendly settings for lower power consumption.
Create6.5 favorite channels list
This section describes how to use favorite channels list of your TV. Select channels from your list, and choose the channel which you want to add.
Create the list
Press the 1. Yellow button on the remote control. To add a channel in the favorite channels list.
Press the 2. Green button. The favorite channels list is shown.
Press the 3. Green button again to exit.
Note: remove the channel, press the Yellow button on the remote control repeatedly.
Select a channel of favorite channels list
Press the green button on the remote control. 1. to show all channels of your favorite list.
Press 2. or ▼ to highlight a channel.
- Press OK to confirm.

- Select channels that are not in a list by using the number buttons.
6.6 Set the clock
This section describes how set the time.
- Press MENU on the remote control and select Installation > Clock

Press 2.
to enter the list.
Press 2. or ▼ to set the time.
(hour/minute/AM or PM)
Press 4.
OK to confirm.
6.7 Set the sleeptimer
Sleeptimer switches the TV to standby after a defined period of time.
Press MENU on the remote control and select Features > Sleeptimer.

Press 2.
to enter the Sleeptimer bar.
Press 3.or ▼ to set the sleep time from zero to 180 minutes. If set to zero minutes, the Sleeptimer is switched off.
Press OK to activate the Sleeptimer.
(or press SLEEP button on the remote control)
Use 6.8 parental control and rating locks
Lock TV channels or connected devices with a four digit code to prevent children from watching unauthorised content.
Set or change your PIN
Press1. MENU on the remote control and select Parental control > Change PIN.
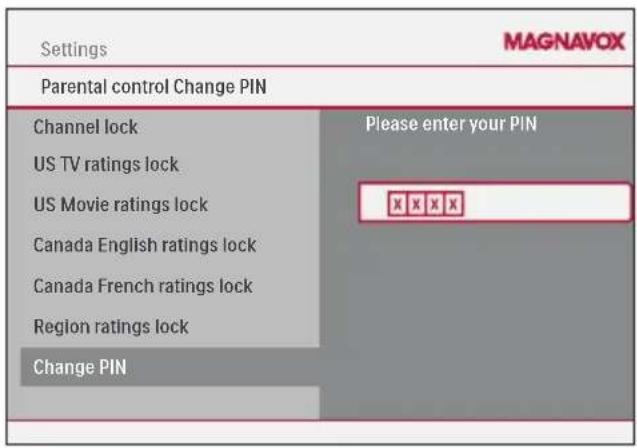
Enter a 4-digit PIN with the number buttons on 2. the remote control.
If you have a PIN, enter your current PIN.
If you do not have a PIN, enter the default code 0000.
If you have lost your PIN, enter master code • 0711.
Enter your new 4-digit PIN and then enter it 3. again to confirm.
A message appears to confirm that your PIN has been changed.
Press 4. MENU to exit.
To lock one or more channels and connected devices
- In the Parental control menu, select Channel lock.
- Enter your PIN.
Press 🔊 or ▼ to select the channel or device you want to lock or unlock.
- At each selection, press OK to lock or unlock the channel or device.
- An box with X indicates that the channel is locked.
- An empty box indicates that the channel is not locked.
Press 5. MENU to quit.

Use the TV ratings lock
Your TV is equipped with a V-chip that allows you to control access to individual programs based on their age rating and content rating. The program content advisory data are sent by the broadcaster or by the program provider.
If you are receiving channels through a set-top box or cable receiver box connected by HDMI, you cannot use the TV ratings lock. Your set-top box or cable receiver box must be connected through RF or AV connectors.
Press1. MENU on the remote control and select Parental control > US TV ratings lock.

- Enter your PIN.
If you do not have a PIN, set one as described in Set or change you PIN on the previous page.
Press 2. or ▼ and then press OK to lock or unlock one or more ratings.
Each rating has a box-graphic in front of it to indicate whether programs carrying that rating are currently locked:
- A box with X indicates that all items in the content ratings list are locked.
An empty box indicates that the item is not selected.
- A box with / indicates that some content ratings are deselected. For example, for rating TV-14, you can deselect one or more of the following content ratings: Dialog (D), Language (L), Sex (S), or Violence (V).
- When you select All, all items in the ratings list are locked.
When you select • None, programs with no rating and programs with a rating of None are locked.
When you lock a rating, all ratings in the • younger age categories are automatically locked.
Press 4. MENU to exit.
Summary of TV ratings
| Age rating Content rating | |
| All | None |
| None | None |
| TV-YAppropriate for children of all ages with themes and elements suitable for children aged 2-6. | None |
| TV-Y7Programs designed for children age 7 and older. | Fantasy Violence (FV) |
| TV-GPrograms suitable for all ages. These programs contain little or no violence, no strong language and little or no sexual dialog or situations. | None |
| TV-PGPrograms contain elements that some parents may find unsuitable for younger children and which may need parental guidance. The program may contain moderate violence, sexual dialog and/or situations and some strong language. | Dialog (D)Language (L)Sex (S)Violence (V) |
| TV-14Programs contain elements that may not be suitable for children under 14 years of age. These programs include one or more of the following: intense violence, intense sexual situations, suggestive dialog and strong language. | Dialog (D)Language (L)Sex (S)Violence (V) |
| Age rating Content rating | |
| TV-MAPrograms are designed to be viewed by adults and may be unsuitable for children under the age of 17. These programs may contain graphical violence, explicit sexual activity and/or crude or indecent language. | Language (L)Sex (S)Violence (V) |
Use the movie ratings lock
This section describes how to control viewing of movies based on their Motion Picture Association of America (MPAA) rating.
-
Press MENU on the remote control and select Parental control.
-
Select one of the menus for movie ratings lock.
• In the USA, select US Movie ratings lock.
• In Canada, select Canada English ratings lock or Canada French ratings lock.
- Enter your PIN.
If you do not have a PIN, set one as described in Set or change you PIN on the page 19
The following screen shows the ratings in US Movie ratings lock.
| Settings | MAGNAVOX | |
| Parental control | US Movie ratings lock | |
| Channel lock | □ ALL | |
| US TV ratings lock | □ NR | |
| US Movie ratings lock | □ G | |
| Canada English ratings lock | □ PG | |
| Canada French ratings lock | □ PG-13 | |
| Region ratings lock | □ R | |
| Change PIN | □ NC-17 | |
| □ X | ||
- Press ▲ or ▼, then press OK to lock or unlock one or more ratings.
Each rating has a box-graphic in front of it to indicate whether it is locked:
A box with • X indicates that the rating is locked
- An empty box indicates that the rating is not locked
When you lock a movie rating, all items for ages below that movie rating are automatically locked.
Press 5. MENU to exit.
Summary of US movie ratings
| Movie rating Description | |
| All All items in the ratings list are locked. | |
| NR Not rated. | |
| G Movies with a mild content, suitable for all ages. | |
| PG Movies for which parental guidance is recommended. They may contain a few racy or violent scenes or maybe some bad language. | |
| PG -13 Movies for which parental guidance may be recommended if under age 13. | |
| R Restricted. The movies usually contain offensive sex or bad language and may be unsuitable for children under the age of 17. Parental guidance or permission needed. | |
| NC-17 Even with parental permission, forbidden under age 17. More offensive sex, violence or bad language. | |
| X Movies which generally focus on sex, violence and/or bad language. Also known as pornography. | |
Summary of Canadian movie ratings.
| Movie rating | Description |
| C Programming | suitable for children under the age of 8 years. No profanity or sexual content of any level allowed. Minimal comedic violence. |
| C8+ Suitable for | children ages 8 and over. Low intensity violence and fantasy horror allowed. |
| G Movies with a | mild content, suitable for all ages. |
| PG Movies for which parental guidance is recommended. They may contain a few racy or violent scenes or maybe some bad language. | |
| 14+ Programming | intended for children ages 14 and over. May contain intense scenes of violence, strong profanity, and depictions of sexual activity within the context of a story. |
| 18+ Programming | intended for viewers ages 18 and over. May contain strong violence, language, and sexual activity. |
Summary of Canadian French movie ratings.
| Movie rating Description | |
| G Appropriate for all ages with little or no violence and little to no sexual content. | |
| 8 ans+ Appropriate for children 8 and up which may contain little violence, some foul language and/or little to no sexual content. | |
| 13 ans+ | Appropriate for children 13 and up, with moderate violence, language, and some sexual situations. Persons under 13 should be accompanied by an adult. |
| Movie rating | Description |
| 16 ans+ | Appropriate for children 16 and up, with strong violence, strong language, and strong sexual content. |
| 18 ans+ | Only to be viewed by adults and contains extreme violence and graphic sexual content/ pornography. |
Use the region rating lock
This section describes how to control access to digital programs based on downloaded region ratings.
Before you download a ratings table, ensure that regional ratings are broadcast.
- Press MENU on the remote control and select Parental control > Region ratings lock.

-
Enter your PIN.
-
If you do not have a PIN, set one as described in Set or change your PIN on page 19.
-
Press ▲ or ▼ and then press OK to lock or unlock one or more ratings.
-
Each rating has a box-graphic in front of it to indicate whether it is locked:
- A box with X indicates that the rating is locked
- An empty box indicates that the rating is not locked
- MENU to exit.
Closed captions6.9
The caption service displays transmitted CC-, T-, and CS- text. The caption text can be displayed permanently or only when the TV is muted. This section describes how to use the caption service.
Note
This television provides a display of television • closed captioning that conforms with the EIA-608 standard and in accordance with Sections 15.119 of the FCC rules.
If you connect your cable receiver box via • HDMI or component video input, you cannot select closed caption through the TV. You can select closed caption through the cable receiver box only.
The captions do not always use correct • spelling and grammar.
Not all TV programs and product commercials • include closed caption information. Refer to your area TV program listings for the TV channels and times of closed caption shows. The captioned programs are usually noted in the TV listings with service marks such as 'CC'.
Display captions
Press1. MENU on the remote control and select Features > Closed captions.
- Press ▲ or ▼ to select On, Off or On during mute, and press OK to confirm your choice.
- Press MENU to exit.
Select caption services
For information about the caption services see Summary of caption service on next page.
- Turn captions on as described in Display captions on this page.
Select a caption service for analog channels:2.
- Press MENU on the remote control and select Features > Caption service.
-
Press ▲ or ▼ to select one of the listed caption services and press OK to confirm your choice. Not all caption services are necessarily being used by a TV channel during the transmission of a closed caption program.
-
Select a caption service for digital channels:
-
Press MENU on the remote control and select Features > Digital caption service.
-
Press ▲ or ▼ to select one of the listed caption services and press OK to confirm your choice.
-
Press MENU to exit.
Summary of caption services
• CC-1, CC-2, CC-3, and CC-4
Dialog and descriptions for the action on the captioned TV program show on screen. Usually CC 1 is the most used. CC 2 can be used for alternate languages if they are being transmitted.
• T-1, T-2, T-3 and T-4
Often used for channel guide, schedules, bulletin board information for Closed Captions programs, news, weather information, or stock market reports.
• CS-1, CS-2, CS-3, CS-4, CS-5 and CS-6
Service 1 is designated as the Primary Caption Service. This service contains verbatim, or near-verbatim captions for the primary language being spoken in the accompanying program audio.
Service 2 is designated as the Secondary Language Service. This service contains captions in a secondary language which are translations of the captions in the Primary Caption Service. The other service subchannels are not pre-assigned. It is up to the discretion of the individual caption provider to utilize the remaining service channels.
Choose how digital captions are displayed
You can define the size, font, color, background and other characteristics of the caption text.
Press1. MENU on the remote control and select Features > Digital caption options.
- Press ▲ or ▼ to highlight an option for digital captions, and press OK to select the option.
- Press ▲ or ▼ to highlight a setting for the option, and press OK to confirm your choice.
- Press MENU to exit.
Use your TV as a PC monitor6.10
Using a VGA cable connects a PC to your TV as a PC monitor.
Caution
Before you connect your PC, set the PC monitor refresh rate to 60Hz.
Supported screen resolutions
The following screen resolutions are supported in PC mode:
Resolution Refresh rate
640 × 480 60Hz
800 × 600 60Hz
1024 × 768 60Hz
1280 × 768 60Hz
1440 × 900 60Hz
If necessary, you can adjust the picture position to the center of the screen with the cursor buttons.
Select your TV in 6.11 PC mode
Press1. MENU on the remote control and select Installation > Source
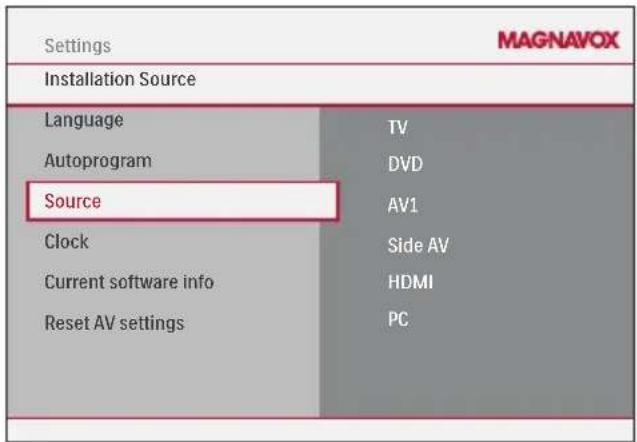
- Select PC and press OK to confirm your choice.
- If necessary, adjust the picture settings as described in Change picture settings on page 15.

- Set the picture format to 4:3 or Full screen in PC mode.
Press 4. MENU to exit.
Change your TV installation7.
The first time you switch on your TV you select the language for the TV menus and make basic choices for picture and sound settings. Use this chapter to reinstall the TV, to set preferences in the TV menus, or to tune new TV channels.
Select your menu 7.1 language
Press1. MENU on the remote control and select Installation > Language.

Select a language and press 2. OK to confirm your choice.
- Press ▶ to return to the Installation menu.
7.2 Autoprogramming
This section describes how to search for and store channels automatically. Before you tune channels, ensure that you are registered with your cable TV provider and that your equipment is correctly connected.
PressMENU on the remote control and select Installation > Autoprogram > Start Now.
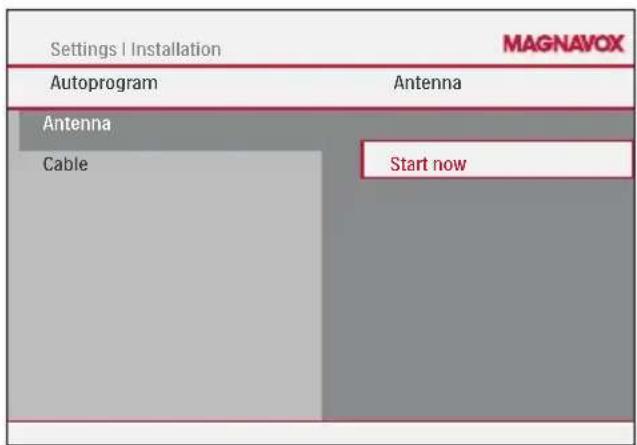
-
Select Cable or Antenna and press ▶.
-
When Antenna is selected, the TV detects antenna signals. It searches for NTSC and ATSC channels available in your area.
-
When Cable is selected, the TV detects signals supplied by cable. It searches for NTSC, ATSC, and QAM modulated channels available in your area.
-
Press OK to start the installation.
If you run Autoprogram when you have locked channels, a message appears asking to enter your PIN code. Enter your PIN code in order to complete the installation.
If you have forgotten your PIN, reset it as described in Set or change your PIN on page 19.
When autoprogramming is complete, this message appears "Channel search completed".
- Follow the on-screen instructions to complete the installation.
7.3 Return your settings to default values
This section describes how to return picture and sound settings to their default values. The channel installation settings are not affected.
Press1. MENU on the remote control and select Installation > Reset AV settings.

-
Press ▶ to highlight Start now, and press OK to reset the AV settings.
-
Press Menu to exit.
Connect devices8.
Connection 8.1 overview
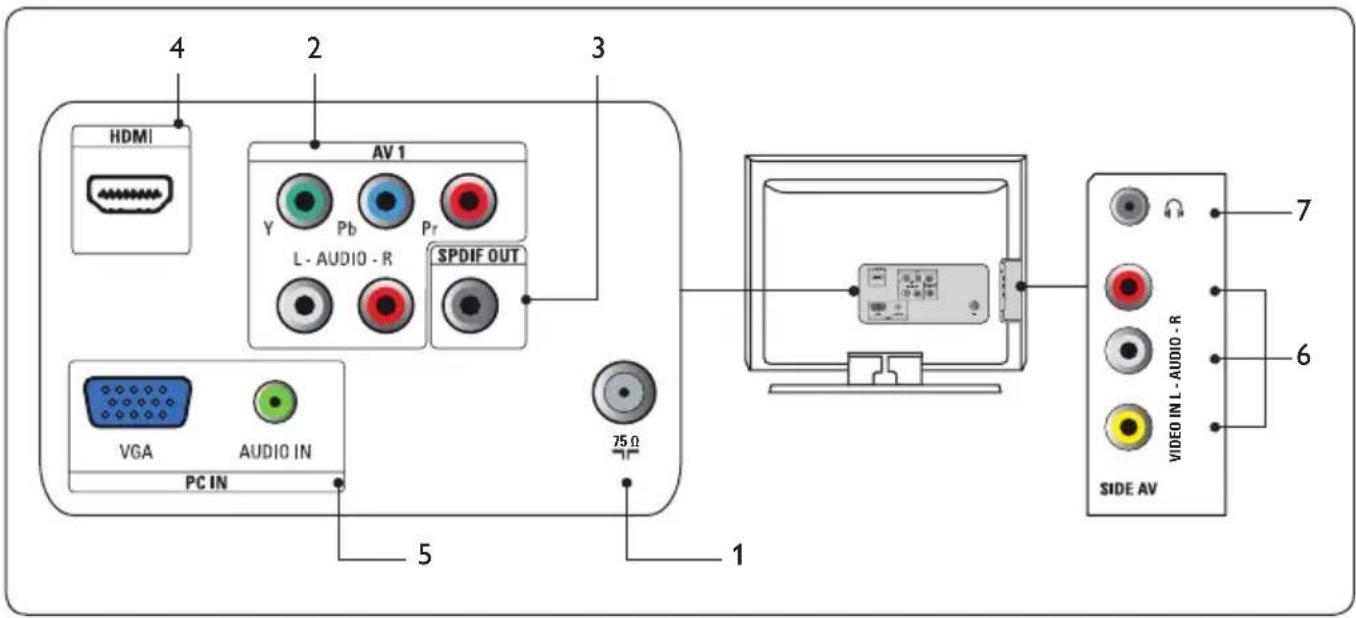
Rear connectors
Antenna input / 75 Ω
AV12.
Component video input. Y Pb Pr and Audio L/R connectors for DVD, digital receiver or game console, etc.
SPDIF Out3.
Digital audio out.
HDMI In 4.
HDMI in connector for Blu-ray Disc player, HD digital receiver or HD game console, etc.
PC In 5.
VGA, Audio connectors for PC.
Side connectors
6. Headphones
Stereo Mini Jack.
7. Video (Side)
Video input cinch connector to be used together with Audio L/R connectors for camcorder, game console, etc.
8.2 Select connection quality
This section describes how you can enhance your audio visual experience by connecting your devices with the best possible connectors.
HDMI - Highest quality

natural_image
Line drawing of two USB connectors with a coiled cable (no text or symbols)HDMI produces the best audio visual quality possible. Both audio and video signals are combined in one HDMI cable, providing an uncompressed, digital interface between your TV and HDMI devices. You must use HDMI to experience full high-definition video.
Tip
If the device only with a DVI connector, use a DVI-HDMI adaptor to connect your device to a HDMI connector at the back of the TV. You must connect a separate audio cable from the device to the AUDIO L/R at Side AV.
Component (Y Pb Pr) - Higher quality
Component (Y Pb Pr) video provides better picture quality than composite video connections. Though component video supports high-definition signals, picture quality is lower than HDMI and is analogue.
When connecting a component video cable, match the cable colours. Also connect a Audio L/R cable to the red and white Audio L/R input connectors at AV1.

natural_image
Illustration of a multi-pin audio cable with multiple connectors (no text or symbols)Component video cable - Red, Green, Blue

natural_image
Illustration of a coiled audio cable with two connectors (no text or symbols)Audio L/R cable - Red, White
Composite - Basic quality
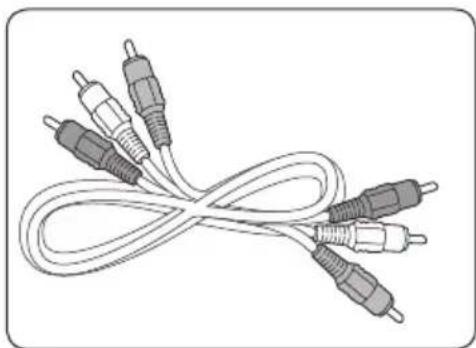
Composite video provides basic analogue connectivity, usually combining a (yellow) video cinch cable with (red and white) Audio L/R cinch cable. Match the cable colours when connecting to the composite Video and Audio L/R input connectors on the side of the TV.
natural_image
Line drawing of a multi-pin audio cable with multiple connectors (no text or symbols)Composite audio/video cable - yellow, red and white
8.3 Connect devices
This section describes how to connect a selection of devices with different connectors. Note that different types of connectors may be used to connect a device to your TV. The following sections describe examples only, other configurations are possible.
When connecting composite or component cables, match the cable colors to the connectors on the TV.
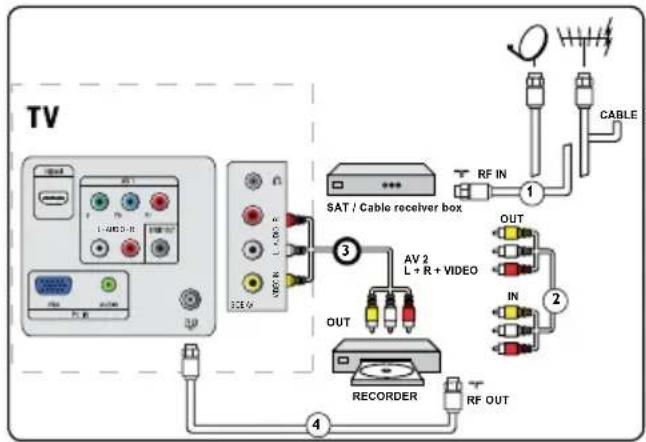
Connect a cable receiver box and a DVD player/recorder via composite connectors
Warning
Do not place your recorder too close to the screen because some recorders can be susceptible to signals.
flowchart
graph TD
    A["TV"] --> B["Sat / Cable receiver box"]
    B --> C["AV 2 L + R + VIDEO"]
    C --> D["RECORDER"]
    D --> E["RF OUT"]
    B --> F["CABLE"]
    B --> G["IN"]
    B --> H["OUT"]
    B --> I["SAT / Cable receiver box"]
    I --> J["RF IN"]
    I --> K["RF OUT"]
Connect a DVD recorder or VCR and a second A/V device via composite connectors.

Connect a cable receiver box, DVD player/ recorder and game console via HDMI

Connect a DVD player/recorder via HDMI-DVI and DIGITAL AUDIO OUT connectors

Connect a DVD player/recorder via component video output connectors (YPbPr) and analog audio
Selected TV models are capable of displaying 1080i, 720p and 480i/p DTV signals when connected to a DTV tuner cable receiver box. Select the output of the cable receiver box to either 1080i, 720p or 480i/p. A DTV signal must be available in your area.

Connect a digital home theatre amplifier
Warning
Due to legal requirements, it is possible that with certain copy protected PCM audio qualities from a accessory device connected to the HDMI input, the digital audio signal is muted.

Connect a PC

Built-in DVD player9.
OSD language
You can select your own preferred language setting to DVD OSD. (on screen display)
Press the "1. SOURCE" button to select source DVD function.


Note: Make sure the TV power is "ON".
Press 2. MENU to enter DVD menu.
- Use the ▲ or ▼ to select "Installation".
Press 4.▼◀▶ on the remote control to navigate in the menu. - Select a language and press OK to confirm.
- Press MENU to exit.


Tip: Set the picture format to 4:3 or 16:9 in DVD mode.
Other settings
For Picture, Sound, Parental control, Installation settings, you can take reference of page 13-24.
9.1 Disc operations
IMPORTANT!
• Depending on the DVD or VIDEO CD, some operations may be different or restricted.
- Do not put any objects other than disc in the disc player. Doing so may cause the disc player malfunction.
- If the inhibit icon (ø) appears on the TV screen when a button is pressed, it means the function is not available on the current disc or at the current time.
• DTS is not supported. Please press the AUDIO button to select alternatives.



DVD+R

DVD + RxWrsh



9.2 Playable discs
Your DVD player will play:
• Digital Versatile Discs (DVDs)
• Video CDs (VCDs)
• Super Video CDs (SVCDs)
• Digital Versatile Discs + Recordable (DVD+R/-R)
• Digital Versatile Discs + Rewritable (DVD+RW/-RW)
- Compact Discs (CDs)
- MP3 disc on CD-R (W)
– Picture (JPEG) files on CD-R (W)

Note: If you are having trouble playing a certain disc, remove the disc and try a different one.
Improper formatted disc will not play on this DVD Player.
Region codes

DVDs must be labeled for Region 1 in order to play on this DVD system.
Playing discs9.3
- Press the "SOURCE" button to select source DVD function. Make sure the TV power is "ON".
- Insert a disc into integrated DVD player. Make sure the label side is facing up. For double-sided discs, load the side you want to play facing down.
- Playback will start automatically. (Exclude MP3, JPEG) If the disc is locked by parental control, you must enter your four-digit password or default password to unlock this function.
- At any time, simply press STOP ■ to stop playback.
Note: If DVD playback can not eject the disc, please turn off the TV power; and turn on it after few seconds. Then the disc can be ejected smoothly. Using the disc menu
Depending on the disc, a menu may appear on the TV screen when you press DISC MENU.
To select a playback feature or item.
Use the ▲▼◀▶ on the remote control, then press PLAY ▶II or OK to activate playback.
To access the menu.
Press MENU on the remote control.
Basic playback controls9.4
Following operations described are based on the use of remote control.
Pausing playback
(DVD/SVCD/VCD/CD/MP3)
During playback, press 1. PAUSE▶II. Playback will pause and sound will be muted.
To return to normal playback, press 2. PLAY▶.
Resuming playback from the last stopped point (DVD)
Press PLAY▶ to resume playback.
Selecting track/chapter (DVD/SVCD/VCD/CD)
Press ⏻ briefly during playback to go to the next chapter/track.
Press 2 to go to the previous track (VCD/CD) or return to the beginning of the current chapter (DVD/SVCD).
Note: Whenever using built-in DVD player, you can press numerical buttons to select the chapter.
Subtitles
Press SUBTITLE repeatedly to select different subtitle languages.

Repeat
Press REPEAT continuously to choose a Repeat mode during playback.

For DVD
- C CHAPTER REPEAT ON:
to repeat playback of the current chapter. - TITLE REPEAT ON:
to repeat playback of the current track/title. - All REPEAT ALL:
to repeat playback of all the disc. - REPEAT OFF:
to cancel the repeat mode.
For VCD/CD
- I REPEAT CHAPTER/ONE:
to repeat playback of the current track/title. - All REPEAT ALL:
to repeat playback of all the disc and all the programmed tracks. - REPEAT OFF:
to cancel the repeat mode.
Repeat A-B (DVD/SVCD/VCD/CD)

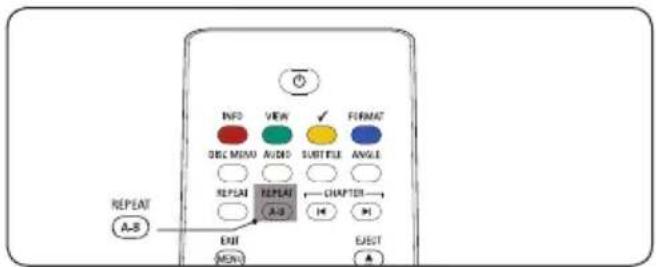
Press REPEAT A-B at your chosen starting point.1.
Press REPEAT A-B again at your chosen end 2. point.
The section A and B can be set only within the 3. same chapter/track.
The section will now repeat continuously.
To exit the sequence, press REPEAT A-B.4.
Forward/Reverse searching (DVD/SVCD/VCD)
Press 1/ during playback to select the required speed:
2X, 4X, 8X, 16X or 32X (backward or forward). Sound will be muted (DVD/VCD) or intermittent (CD).
To return to normal speed, press 2. PLAY▶II.
Special disc features
Playing a title (DVD) (When DVD disc is support)
Press 1. DISC MENU.
The disc title menu appears on the TV screen.
Use 2.▼◄►or numeric button (0-9) to select a play option.
Press 3. OK to confirm.
Camera angle (DVD)
Press ANGLE repeatedly to select different desired angle.
Changing the Audio language (DVD)
For DVD
Press AUDIO repeatedly to select different audio languages.
Changing the Audio channel
For VCD
Press AUDIO to select the available audio channels provided by the disc (STEREO, MONO LEFT, or MONO RIGHT).
Playing MP3/JPEG picture CD9.5
IMPORTANT!
You have to turn on your TV and set to the correct source DVD.
General operation
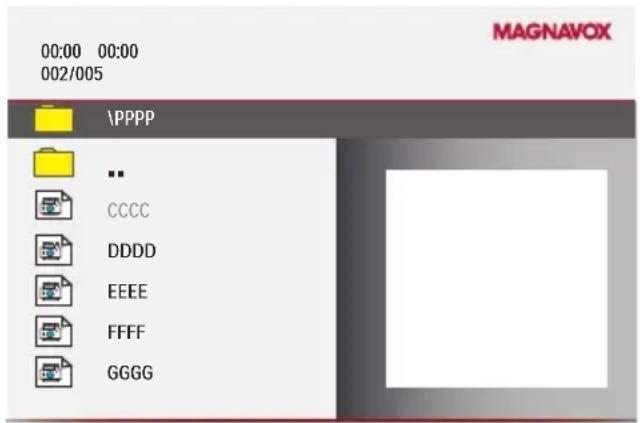
Insert an MP3/JPEG Picture CD disc.1.
The data disc menu appears on the TV screen.
Use 2.▼ or use the numeric button (0-9) to select the folder and press OK to open the folder.
- Press ▲ ▼ or use the numeric button (0-9) to highlight an option.
Press OK to confirm.
The playback will start from the selected file to the end of the folder.
- Press DISC MENU to file browser.
Special for JPEG picture CD
When pictures are in "Slide show", press STOP and the screen will enter in "Preview" mode.
Repeat (MP3/JPEG picture CD)
- Press REPEAT continuously to access different 'Play Mode'.
- Shuffle: keep to play all files irregularly and no repeats.
- Random: keep to play all files irregularly and files may be played repeatedly.
- ▶ Single: play a file only.
• REPEAT ONE: play a file repeatedly.
• REPEAT FOLDER: play all files in the folder. - REPEAT OFF: to cancel the repeat mode.
MP3

JPG
OSD settings for DVD9.6
Use the Disc rating lock
This allows you to limit access to individual programs base on disc rating.

Note: Make sure the source "DVD" is selected TV power is "ON".
Press1. MENU on the remote control and select Parental control > Disc rating lock.

Enter your PIN. 2.
-
If you do not have a PIN, set one as described in Set or change your PIN on page 19.
-
Press ▲ or ▼ and then press OK to lock or unlock one or more ratings.
-
Each rating has a box-graphic in front of it to indicate whether it is locked:
-
A box with X indicates that the rating is locked
-
An empty box indicates that the rating is not locked.
-
Press MENU to exit.
| Disc rating | Description |
| Kid safe | Kid safe. |
| G | All ages. |
| PG | Parental guidance. |
| PG-13 | Parental guidance less than 13 years old. |
| PG-R | Under 17 years old, parental guidance suggested. |
| R | Under 17 years old, parental guidance strongly suggested. |
| NC-17 | 17 years old and above. |
| Adult | Adult only. |
Use the Disc setup
This allows you to set disc function.
Press MENU on the remote control and select Disc setup.

• DVD output format - Sets DVD content format to 4:3 or 16:9.
- PBC - Sets the playback control function. Select On or Off.
- Last memory - Sets Last memory function. Select On or Off.
Glossary10.
| Aspect Ratio | The ratio between the width and height of the TV picture on the screen. In a normal TV set the aspect ratio is 4 to 3 (4:3). The new aspect ratio in HDTV is 16:9 which resembles the aspect ratio in a movie theatre (Widescreen). New TV systems support both 4:3 and 16:9 aspect ratio and can automatically switch between them. |
| Audio Video (A/V) A term | term often used when discussing a channel on a TV receiver or on video equipment, which has been especially designed to accept VCR audio-video signals. This channel automatically activates special circuitry within the TV set to prevent picture distortion and skewing. It is also used for audio-video processors, which handle both types of signals. |
| ATSC ATSC: Advanced | Television Systems Committee. Formed to establish technical standards for advanced television systems, including digital high definition television (HDTV). |
| CVBS | Composite Video Baseband Signal. In broadcast television this refers to the video signal, including the colour information and syncs. |
| Component Video Input (Y Pb Pr) | Component Video Input is a type of connection that uses a cinch-type connector to allow set top boxes or analog DVD players to connect a signal to the TV. By offering the cinch-type input (YPbPr) the primary colors, red, green and blue are connected from a set top box directly into the TV allowing for the signal to display on the screen. |
| DTV | Digital television. Generic term that refers to all digital television formats, including high-definition television (HDTV) and standard-definition television (SDTV). |
| DOLBY Digital | Dolby Digital - Six-channel digital audio standard that is part of the U.S. digital television standard; also called AC-3 or Digital 5.1. The channels consist of front left, front right, front center, surround or rear left, surround or rear right, and a separate subwoofer. |
| Digital Tuner A digital tuner serves as the decoder required to receive and display digital broadcasts. It can be included inside TV sets or via a cable receiver box. | |
| HDTV The generally agreed upon definition of HDTV is approximately twice the vertical and horizontal picture resolution of today's NTSC TV, which essentially makes the picture twice as sharp. HDTV also has a screen ratio of 16:9 as compared with most of today's TV screens, which have a screen ratio of 4:3. HDTV offers reduced motion artifacts (i.e. ghosting, dot crawl), and offers 5.1 independent channels of CD-quality stereo surround sound, (also referred to as AC-3). | |
| NTSC | National television system committee. The organization that developed the analog television standard currently in use in the U.S., Canada, and Japan. Now generally used to refer to that standard. The NTSC standard combines blue, red, and green signals modulated as an AM signal with an FM signal for audio. |
| Progressive Scan | In Progressive Scanning all the horizontal scan lines are scanned on to the screen at one time. The Digital TV and HDTV Standards accept both Interlaced Scan and Progressive Scan broadcast and display methods. |
| Resolution | Resolution: A measurement of the finest (smallest) detail that is visible in a video image. TV Resolutions may be expressed as number of pixels in an image; or more commonly, As Total Number of (horizontally scanned) Lines used to create the image. Standard Digital TV Resolutions: SDTV: 480i - The picture is 704x480 pixels, 480p - The picture is 704x480 pixels. HDTV: 720p - The picture is 1280x720 pixels, 1080i - The picture is 1920x1080 pixels, 1080p - The picture is 1920x1080 pixels. |
| SPDIF | SPDIF (Sony and Philips Digital Interconnect Format) is highly recommended for high quality digital sound output. |
11. Trouble shooting
| Symptoms Possible cause | What should you do | |
| No power or indicator light. The TV is not connected to the power. | 1. Press POWER at the front of the TV, or press on the remote control. | |
| 2. Ensure the AC power cord is connected tightly to the TV power connector and to the power socket outlet. | ||
| 3. Remove the AC power cord from the power socket outlet, wait 60 seconds and reconnect the AC power cord. | ||
| 4. Connect the TV to a different power socket outlet. | ||
| Error message on the screen with HDMI connection. | HDCP authentication fail. | 1. Ensure that your HDMI cable is certified. |
| 2. Press SOURCE on the remote control to switch to another source and then switch back to the HDMI source. | ||
| 3. Reset the accessory device and the TV.Turn on the TVSelect the HDMI channelTurn on the accessory device | ||
| 4. While the TV and the accessory device are powered on, unplug either end of the HDMI cable and then reinsert the cable. | ||
| No sound is detected from the PC. | Audio cable is not connected. | 2. Connect an audio cable to the PC AUDIO IN port on the TV. |
| 3. Press SOURCE on the remote control, and select the PC source. | ||
| TV does not respond to the remote control. | Batteries are installed incorrectly, or low battery power. | 1. Ensure the indicator light on the TV blinks when the remote control buttons are pressed. |
| 2. Ensure that you are using the remote control supplied with the TV. | ||
| 3. Ensure that the batteries of the remote control are inserted according to the illustration on the remote control and that the batteries do not need to be replaced. | ||
| 4. Remove the AC power cord from the power socket outlet, wait 60 seconds and reconnect the AC power cord. | ||
| The picture is distorted. It is stretched out, has short, fat, black bars on the side or top. | Broadcast video format. | 1. Press the FORMAT button on the remote control to select the best picture format. |
| 2. For some accessory devices, the picture format has to be set in the accessory device. | ||
| The picture is mostly red and green, or the picture is missing red when the TV is connected to an accessory device via component cables. | Insecure/incorrect connection. | 1. Ensure all the connections are made according to the color code. |
| 2. Push the component cables all the way into the YPbPr sockets on the TV. | ||
| No sound on the TV loudspeaker. | Volume level is set to zero. | 1. Increase the volume. |
| Sound is muted. 2. Press MUTE on the remote control. | ||
| Headphones are connected. | 3. Ensure the headphones are not plugged into the TV. | |
| Audio cable is not connected. | 4. For AV connection, ensure that the Audio L/R cable is connected as described in Connect devices on page 26. If you are using a component cable, ensure that you have not crossed the red audio cable with the red video cable. | |
| Accessory device audio output setting is incorrect. | 5. For HDMI connections, some accessory devices have an HDMI audio output setting that must be turned on for HDMI to HDMI connections. | |
| Bad picture quality with a coaxial connection. | Standard definition channels are not as clear as high definition channels. | 1. Connect the devices via component or HDMI cables. |
| No picture or sound. Incorrect channel 1. Ensure you have selected the correct channel. | ||
Trouble shooting-DVD12.
| Symptoms Items to check and actions to follow | |
| No picture 1. Refer to your TV's manual for | correct Video In channel selection. |
| 2. Change the TV channel until you see the DVD screen. | |
| 3. Check if the TV is switched on. | |
| Distorted picture Sometimes a small amount of picture distortion may appear depending on the disc being played back.This is not a malfunction. | |
| Completely distorted picture or black/white picture with DVD | 1. Make sure the disc is compatible with the DVD player. |
| 2. Ensure that the DVD player's TV Type is set to match that of the Disc and your TV. | |
| No sound or distorted sound 1. Adjust the volume of TV. | |
| Disc can't be played 1. The DVD+R/CD-R | must be finalized. |
| 2. Ensure the disc label is facing up. | |
| 3. Check if the disc is defective by trying another disc. | |
| 4. Region code incorrect. | |
| Picture freezes momentarily during playback | Check the disc for fingerprints/scratches and clean with a soft cloth wiping from centre to edge. |
| The player does not respond to the remote control | Aim the remote control directly at the sensor on the front of the player. |
| Reduce the distance to the player. | |
| Replace the batteries in the remote control. | |
| Re-insert the batteries with their polarities (+/- signs) as indicated. | |
| Player does not respond to some operating commands during play-back. | Operations may not be permitted by the disc. Refer to the instructions of the disc jacket. |
13. Technical specifications
| Model no. 19MD338B | |
| PICTURE/DISPLAY | |
| Aspect Ratio 16:9 | |
| Resolution 1440x900p | |
| Brightness 300 cd/m2 (typ.) | |
| Response Time (on/off) 5ms (typ.) | |
| Viewing Angles (V/H) 160 by 160 (typ.) | |
| SOUND ENHANCEMENT | |
| Sound output (RMS Watts) 3 W x 2 | |
| Sound modes Mono, Stereo, Virtual surround | |
| EASE OF USE | |
| Video formats Automatic, 4:3, | Movie Expand 14:9, Movie Expand 16:9, Super Zoom, 16:9 subtitle, Wide Screen, |
| Smart modes | Personal, Sports, Standard, Movie, Power saver |
| Playback disc of Built-in DVD player | Plays - DVD-DVD+R/RW, DVD-R/RW, CD, CD-RW, Picture CD, MP3 |
| CONNECTIONS | |
| Rear connectors | AV1: Component video input with Audio L/R (support 480i/p, 720p, 1080i) |
| HDMI (Ver 1.3a HDMI, support 480i/p, 720p, 1080i) | |
| SPDIF output (Digital audio out, support AC-3 & PCM) | |
| PC IN: VGA, PC Audio IN | |
| Side connectors | Headphone x 1 |
| Composite video input with audio L/R (support 480i) | |
| WEIGHT & DIMENSIONS | |
| Gross weight | 14.77 lbs |
| Net weight | 12.43 lbs |
| Box dimension (LxWxH) | 20.3" x 18" x 9" |
| Product dimension (HxWxD) | 15.62" x 18.34" x 6.85" |
| POWER | |
| Power consumption | 55W |
| Standby power consumption | <1W |
| Mains Power 100-120 V/60HZ | |
Index14.
A
AC power cord 10
Alternative 17
Antenna 6
Automatic 16
B
Batteries 8
Brightness 15
C
Cable 8
Cable receiver box 9
Care
Environment 5
Screen 5
Channel
Install 10
Channel lock 19
Clock 18
Connect devices 27
D
DBS 9
Dynamic contrast 15
F
Favorite list 18
H
HDMI cable 25
|
installation 8
L
Language 24
M
Manage cables 10
Model number 1
Movie expand 16
Movie ratings 20
Mute 13
0
Overview
Connection 25
Remote control -DVD 14
Remote control -TV 13
TV 6
P
Parental control 19
PC mode 23
Picture 15
PIN code 19
Position the TV 8
R
Rear connectors 25
Recycling 5
Registration Card 1
S
Screen resolutions 23
Sharpness 15
Side connectors 25
Sleeptimer 18
Sound 15
Super zoom 16
Switch on the TV 10
T
Technical specifications 37
Tint 15
Trouble shooting 35
V
V-chip 19
Volume 13
W
Warranty 40
Y
Y Pb Pr 28
15. Warranty
LIMITED WARRANTY
NINETY (90) DAY LABOR / ONE (I) YEAR PARTS
WARRANTY COVERAGE:
This warranty obligation is limited to the terms as set forth below.
WHO IS COVERED:
This product warranty is issued to the original purchaser or the person receiving the product as a gift against defects in materials and workmanship as based on the date of original purchase (“Warranty Period”) from an Authorized Dealer. The original sales receipt showing the product name and the purchase date from an authorized retailer is considered such proof.
WHAT IS COVERED:
This warranty covers new products if a defect in material or workmanship occurs and a valid claim is received by within the Warranty Period. At its option, the company will either (1) repair the product at no charge, using new or refurbished replacement parts, or (2) exchange the product with a product that is new or which has been manufactured from new, or serviceable used parts and is at least functionally equivalent or most comparable to the original product in current inventory, or (3) refund the original purchase price of the product. Replacement products or parts provided under this warranty are covered against defects in materials and workmanship from the date of the replacement or repair for ninety (90) days or for the remaining portion of the original product's warranty, whichever provides longer coverage for you. When a product or part is exchanged, any replacement item becomes your property and the replaced item becomes company property. When a refund is given, your product becomes company property.
Note: Any product sold and identified as refurbished or renewed carries a ninety (90) day limited warranty.
Replacement product can only be sent if all warranty requirements are met. Failure to follow all requirements can result in delay.
WHAT IS NOT COVERED - EXCLUSIONS AND LIMITATIONS:
This Limited Warranty applies only to new company manufactured products that can be identified by the trademark, trade name, or logo affixed to it. This Limited Warranty does not apply to any hardware product or any software, even if packaged or sold with the product, as manufacturers, suppliers, or publishers may provide a separate warranty for their own products packaged with the bundled product.
The company is not liable for any damage to or loss of any programs, data, or other information stored on any media contained within the product, or other additional product or part not covered by this warranty. Recovery or reinstallation of programs, data or other information is not covered under this Limited Warranty.
This warranty does not apply (a) to damage caused by accident, abuse, misuse, neglect, misapplication, or non-supplied product, (b) to damage caused by service performed by anyone other than company approved Authorized Service Location, (c) to a product
or a part that has been modified without written company permission, or (d) if any serial number has been removed or defaced, or (e) product, accessories or consumables sold "AS IS" without warranty of any kind by including refurbished product sold "AS IS" by some retailers.
This Limited Warranty does not cover:
- Shipping charges to return defective product.
- Labor charges for installation or setup of the product, adjustment of customer controls on the product, and installation or repair of antenna/signal source systems outside of the product.
- Product repair and/or part replacement because of improper installation or maintenance, connections to improper voltage supply, power line surge, lightning damage, retained images or screen markings resulting from viewing fixed stationary content for extended periods, product cosmetic appearance items due to normal wear and tear, unauthorized repair or other cause not within the control of the company.
- Damage or claims for products not being available for use, or for lost data or lost software.
- Damage from mishandled shipments or transit accidents when returning product.
- A product that requires modification or adaptation to enable it to operate in any country other than the country for which it was designed, manufactured, approved and/or authorized, or repair of products damaged by these modifications.
- A product used for commercial or institutional purposes (including but not limited to rental purposes).
- Product lost in shipment and no signature verification receipt can be provided.
- Failure to operate per Owner's Manual.
TO OBTAIN ASSISTANCE...
Contact the Customer Care Center at: 1-800-705-2000
REPAIR OR REPLACEMENT AS PROVIDED UNDER THIS WARRANTY IS THE EXCLUSIVE REMEDY FOR THE CONSUMER, WITH THE ISSUING COMPANY NOT LIABLE FOR ANY INCIDENTAL OR CONSEQUENTIAL DAMAGES FOR BREACH OF ANY EXPRESS OR IMPLIED WARRANTY ON THIS PRODUCT. EXCEPT TO THE EXTENT PROHIBITED BY APPLICABLE LAW, ANY IMPLIED WARRANTY OF MERCHANTABILITY OR FITNESS FOR A PARTICULAR PURPOSE ON THIS PRODUCT IS LIMITED IN DURATION TO THE DURATION OF THIS WARRANTY.
Some states do not allow the exclusions or limitation of incidental or consequential damages, or allow limitations on how long an implied warranty lasts, so the above limitations or exclusions may not apply to you.
This warranty gives you specific legal rights. You may have other rights which vary from state/province to state/province.
Funai Corporation Inc., Rutherford, NJ 07070
062408



- www.magnavox.com/usasupport
- Return your Product Registration Card or register online at
- www.magnavox.com/usasupport today to get the very most from your purchase.
- \*Proof of Purchase
- \*Product Safety Notification
- \*Additional Benefits
- MAGNAVOX
- Congratulations on your purchase, and welcome to the "family!"
- Dear MAGNAVOX product owner:
- P.S. To get the most from your MAGNAVOX purchase, be sure to complete and return your Product Registration Card at once or register online at:
- Know these
- safety symbols
- CAUTION
- Important safety instructions1.
- Read before operating equipment
- Warranty
- Pixel characteristics
- Federal Communications Commission Notice
- Modifications
- Cables
- Canadian notice
- Avis Canadien
- Know these safety symbols:
- Copyright
- ENERGY STAR
- DOLBY DIGITAL
- Table of Contents
- Important safety instructions ..... 2
- Important....5
- Your TV 6
- Get started 8
- Use your TV 11
- Use more of your TV 13
- Change your TV installation ..... 24
- Connect devices 25
- Built-in DVD player ..... 29
- Glossary 34
- Trouble shooting ..... 35
- Trouble shooting-DVD 36
- Technical specifications ..... 37
- Index....38
- Warranty 40
- Important2.
- Product information2.1
- Screen care
- Environmental care
- Recycling
- of life directives
- Disposal of batteries
- Regulatory notices
- Your 3. TV
- TV overview3.1
- Note
- Get started
- Position the TV
- WARNING
- Kensington security slot
- Install the remote control 4.2 batteries
- Connect the antenna or 4.3 cable
- Connect to an antenna
- Connect to a cable
- Connect to a Direct Broadcast Satellite (DBS)
- Connect to a cable receiver box/satellite set-top box
- Connect a cable receiver box/satellite set-top box through RF IN/OUT
- Connect a cable receiver box/satellite set-top box through component video input or HDMI
- Connect the AC power cord4.4
- WARNING:
- Manage cables
- Switch on the TV4.6
- Use your TV 5.
- Switch your TV on or to standby5.1
- To Switch the TV on
- To Switch to standby
- To switch on from standby without the remote control.
- Watch TV5.2
- Switch channels
- Bote
- Adjust volume
- Watch channels from a cable receiver 5.3 box
- If the picture does not appear
- Watch a DVD5.4
- Use more of your TV6.
- Remote control overivew-TV
- POWER
- FORMAT3.
- OK5.
- SMART MODE6.
- CH +/-
- NUMBER BUTTONS 8.
- DOT
- SOURCE10.
- SLEEP
- FREEZE
- CC (Close Captions)
- PREVIOUS CHANNEL
- MUTE
- VOLUME +/-
- MENU
- INFO
- VIEW
- Remote control overview-DVD
- DISC1. MENU
- AUDIO
- SUBTITLE
- ANGLE
- Repeat
- CHAPTER
- CHAPTER
- ELECT
- ▶FF
- STOP
- RWD
- ▶PLAY / PAUSE
- Change 6.3 picture and sound settings
- Change picture settings
- Summary of picture settings
- Change picture format
- • Automatic (Not for PC)
- • Super zoom (Not for HD and PC)
- 4:3• (Not for HD)
- • Movie expand 14:9 (Not for HD)
- Movie expand 16:9 · (Not for HD)
- 16:9 subtitle (Not for PC)
- - Wide screen
- Adjust sound settings
- Sound setting •
- Sound mode•
- Alternate audio•
- Digital audio language •
- Automatic volume leveling•
- Tip:
- Use Smart mode
- - Personal
- - Sports
- - Standard
- - Movie
- • Power saver
- Create6.5 favorite channels list
- Create the list
- Select a channel of favorite channels list
- Set the clock
- Set the sleeptimer
- Use 6.8 parental control and rating locks
- Set or change your PIN
- To lock one or more channels and connected devices
- Use the TV ratings lock
- Use the movie ratings lock
- Summary of US movie ratings
- Summary of Canadian movie ratings.
- Summary of Canadian French movie ratings.
- Use the region rating lock
- Closed captions6.9
- Display captions
- Select caption services
- Summary of caption services
- Choose how digital captions are displayed
- Use your TV as a PC monitor6.10
- Supported screen resolutions
- Select your TV in 6.11 PC mode
- Change your TV installation7.
- Select your menu 7.1 language
- Autoprogramming
- Return your settings to default values
- Connect devices8.
- Connection 8.1 overview
- Rear connectors
- Antenna input / 75 Ω
- AV12.
- SPDIF Out3.
- HDMI In 4.
- PC In 5.
- Side connectors
- Headphones
- Video (Side)
- Select connection quality
- HDMI - Highest quality
- Tip
- Component (Y Pb Pr) - Higher quality
- Composite - Basic quality
- Connect devices
- Connect a cable receiver box and a DVD player/recorder via composite connectors
- Built-in DVD player9.
- OSD language
- Other settings
- Disc operations
- IMPORTANT!
- Playable discs
- Region codes
- Playing discs9.3
- To select a playback feature or item.
- To access the menu.
- Basic playback controls9.4
- Pausing playback
- (DVD/SVCD/VCD/CD/MP3)
- Resuming playback from the last stopped point (DVD)
- Selecting track/chapter (DVD/SVCD/VCD/CD)
- Subtitles
- Repeat
- For DVD
- For VCD/CD
- Repeat A-B (DVD/SVCD/VCD/CD)
- Forward/Reverse searching (DVD/SVCD/VCD)
- Special disc features
- Playing a title (DVD) (When DVD disc is support)
- Press 1. DISC MENU.
- Camera angle (DVD)
- Changing the Audio language (DVD)
- Changing the Audio channel
- Playing MP3/JPEG picture CD9.5
- General operation
- Special for JPEG picture CD
- Repeat (MP3/JPEG picture CD)
- OSD settings for DVD9.6
- Use the Disc rating lock
- Use the Disc setup
- Glossary10.
- Trouble shooting
- Trouble shooting-DVD12.
- Technical specifications
- Index14.
- A
- B
- C
- D
- F
- H
- |
- L
- M
- 0
- P
- R
- S
- Warranty
- LIMITED WARRANTY
- NINETY (90) DAY LABOR / ONE (I) YEAR PARTS
- WARRANTY COVERAGE:
- WHO IS COVERED:
- WHAT IS COVERED:
- WHAT IS NOT COVERED - EXCLUSIONS AND LIMITATIONS:
- This Limited Warranty does not cover:
- TO OBTAIN ASSISTANCE...
Brand : MAGNAVOX
Model : 19MD358B
Category : Television