
MF 6601 N - Oven Meireles - Free user manual and instructions
Find the device manual for free MF 6601 N Meireles in PDF.


| Product Type | Built-in Electric Oven |
| Brand | Meireles |
| Model | MF 6601 N |
| Energy Source | Electric |
| Voltage | 220-240 V ~ 50/60 Hz |
| Total Power Consumption | Approximately 3000 W |
| External Dimensions (HxWxD) | 595 x 595 x 575 mm |
| Oven Capacity | Approximately 71 liters |
| Weight (net) | Approximately 35 kg |
| Cooking Modes | Conventional, Fan-assisted, Grill, Fan Grill, Defrost, Bottom Heat |
| Temperature Range | 50°C – 250°C |
| Timer | Yes, with end-of-cooking alarm |
| Display Type | Analog / Mechanical knobs |
| Interior Light | Yes |
| Oven Interior Coating | Enamel |
| Number of Oven Shelves | 2 |
| Cooling Fan | Yes, for cabinet protection |
| Safety Features | Child lock, cool-touch door, automatic switch-off |
| Cleaning Method | Manual cleaning with enamelled surfaces |
| Spare Parts Availability | Replacement parts (heating elements, thermostat, etc.) available through authorized service |
| Installation Type | Built-in under counter or in column |
| Warranty | 2 years (standard) |
Frequently Asked Questions - MF 6601 N Meireles
User questions about MF 6601 N Meireles
0 question about this device. Answer the ones you know or ask your own.
Ask a new question about this device
Download the instructions for your Oven in PDF format for free! Find your manual MF 6601 N - Meireles and take your electronic device back in hand. On this page are published all the documents necessary for the use of your device. MF 6601 N by Meireles.
USER MANUAL MF 6601 N Meireles
FAN/CONVENTIONAL OVEN
EINBAUBACKOFEN
BELÜFTET/STATISCH
natural_image
Technical line drawing of a mechanical assembly with no visible text or symbolsnatural_image
Diagram of a microwave oven with an open lid and internal tray, showing no text or symbols
natural_image
Simple line drawing of a tray with a dark object inside, no text or symbols presentnatural_image
Mechanical device with lever mechanism and paper plane, no visible text or symbols
natural_image
Diagram showing a light bulb being compressed into a mesh container with arrows indicating rotation (no text or symbols)RETIRAR AS GRELHAS LATERAIS DO FORNO
natural_image
Technical line drawing of a mechanical assembly with no visible text or symbolsnatural_image
Diagram showing a light bulb being compressed into a mesh container with arrows indicating rotation (no text or symbols)RETIRAR REJILLAS LATERALES DEL HORNO (MODELOS EV70 e LINHA SP)
We would like to thank you for choosing our product. This equipment is very easy to use. Please read this manual carefully before installing and using the oven, as it contains important instructions for the installation, usage and maintenance of this product.
This instruction manual should always accompany the product if it is transferred to another person.
GENERAL WARNINGS
CAUTION: The appliance and its accessible parts may become hot with
use. Care must be taken to avoid touching the heating elements.
Children under 8 years of age must be kept away from the oven, unless they are supervised.
WARNING: using fat or oil to cook in an oven can be dangerous and could cause a fire. Never attempt to extinguish a fire with water. Unplug the oven and place a cover or fire blanket over the flames.
WARNING: fire hazard: do not store containers or other items inside the oven
The oven gets hot during use, so care must be taken to avoid touching heating elements inside the oven.
Warning: Accessible parts can get hot during use. Small children must be kept away from the oven.
Do not use abrasive cleaning products or sharp metal scrapers to clean the glass in the oven's door, as they can scratch the surface and lead to the breakage of the glass.
This oven must not be steam cleaned.
Warning: Make sure that the oven is unplugged before replacing its internal light bulb to avoid the possibility of an electric shock.
This oven is not designed to be operated by an external timer or remote control systems.
This appliance may be used by children over 8 years of age, by people with limited physical, sensory or mental abilities and by people lacking in knowledge and experience, provided that they understand the risks involved and they are supervised or given instructions on how to use the oven safely.
The oven is not designed to be used by people (including children) with reduced physical or mental abilities, or by people lacking in knowledge or experience, unless they have been given training or instruction in its use by a person responsible for their safety. Children must be supervised to make sure that they do not play with the oven.
Children must be supervised to make sure that they do not play with the oven. Children must not perform cleaning or maintenance without supervision
ENVIRONMENTAL ADVICE
 | Do not dispose of the oven's packaging as waste. It can be recycled. Take it to a recycling site. |
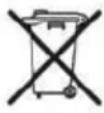 | This symbol on the product indicates that it should not be treated as domestic waste. Instead, it should be taken to a household waste recycling site for the recycling of its electrical and electro-mechanical parts. Ensuring that this product is disposed of appropriately will help to avoid possible negative environmental and public health consequences, which otherwise may be caused if the product is disposed of incorrectly. Contact your local council services, your local household waste recycling site or the store where you purchased the product to obtain more detailed information about its recycling. |
2 INSTALLATION INSTRUCTIONS
EN
2.1 ELECTRICAL CONNECTION
The oven is fitted with an electrical power supply cable and is designed to operate with alternating current at the voltage indicated on the plate showing the "oven's technical data", found on a label on the product. The electric cable's earth connector is yellow and green
2.2 CONNECTING THE CABLE TO THE POWER SUPPLY
The oven must be connected to the power supply by a technically qualified person with knowledge of current installation standards and regulations.

natural_image
Technical line drawing of a mechanical assembly with no visible text or symbolsBefore turning the oven on, make sure that the electrical connections and protection devices are suitable for the product's technical characteristics.
To connect the product to the electricity supply, an all-pole circuit breaker must be installed between the oven and the power supply, with a minimum gap between the contacts of 3mm. This circuit breaker should be appropriate for the load and correspond to current safety regulations.
The earth cable, identifiable by its green/yellow colours, must not run through the switch.
The manufacturer shall not be liable for any direct or indirect damage caused by incorrect installation or connection.
Therefore, all electrical installation and connection work must be carried out by specialist personnel and work must be done in compliance with current local and general regulations.
2.3 INSTALLATION AND ASSEMBLY
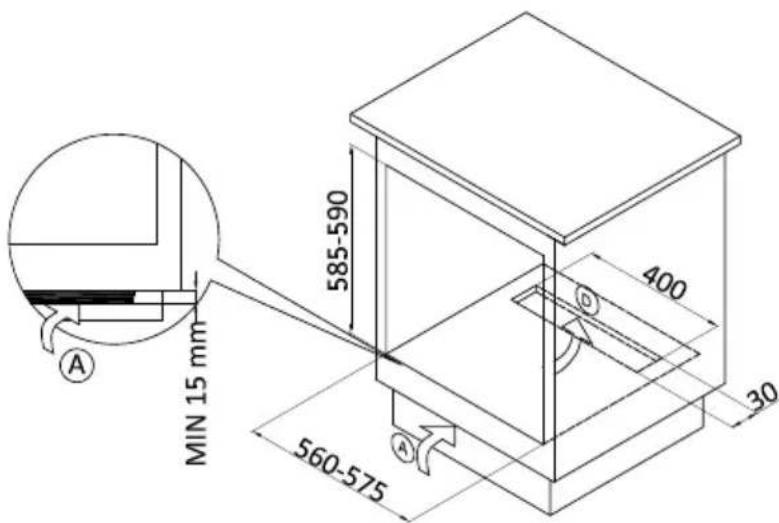
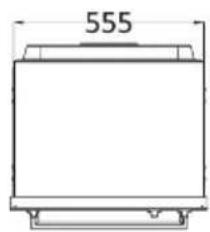
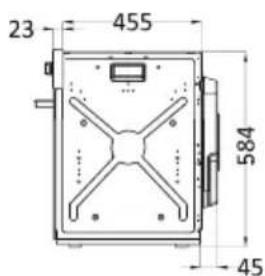
The dimensions of the furnaces are described in Figures section 10.
For proper operation of the oven must be respected directions and dimensions of the section shown in figures 10, including:
Fresh air of existence in the mobile footer as detail A
Minimum distance from the oven ceiling to the bottom of a plate located above as detail B Minimum distance oven door to the mobile port adjacent detail as C
Fresh air circulation detail as D
Enter the oven at the opening of the mobile supporting it on the base and pushing it until it touches
Open the oven door and secure the oven to the unit by applying the four screws
The electrical connection of the oven should be independent of any other connection
The materials of the furniture should be able to withstand temperatures up to 90 °C
We recommend the following precautions prior to using the oven:
- remove the protective film covering the oven's door glass (if present):
- heat the oven to its maximum temperature without food inside for around 45 minutes to eliminate unpleasant smells and smoke cause by manufacturing residue and the thermal insulation;
- carefully clean the inside of the oven with soap and water and rinse well with clean water
2.3 INSTALLATION AND ASSEMBLY
To ensure that the oven functions correctly, the dimensions shown in the figures in section 10 must be respected, specifically:
Fresh air inlet in the furniture's skirting board (figure reference A)
Distance from the top of the oven and the bottom of the board placed above it
(figure reference B). Distance between the oven's door and the door of the
adjacent furniture (figure reference C). Fresh air circulation (figure reference D)
The dimensions of the opening are shown on the figures in section 10 (585x560 mm).
Insert the oven into the opening in the furniture by supporting its base and pushing it
right to the back.
Open the door and fix the oven to the furniture using the four bolts supplied (see figure in section 10).
Furniture material must resist temperatures of up to 90irc C.
The oven's electrical connection must be made independently of any other connection.
We recommend the following precautions prior to using the oven:
- remove the protective film covering the oven's door glass (if present):
- heat the oven to its maximum temperature without food inside for around 45 minutes to eliminate unpleasant smells and smoke cause by manufacturing residue and the thermal insulation;
- carefully clean the inside of the oven with soap and water and rinse well with clean water
IMPORTANT: During use, the front of the oven heats up significantly. Care must be taken when touching these parts.
3
USAGE INSTRUCTIONS
EN
The control knob allows the following oven functions to be selected:
Conventional Oven:
 | The upper and lower heating elements are switched on. The thermostat can be used to regulate the temperature between 50°C and MAX. |
 | Only the lower heating element is switched on; the thermostat can be set to between 50°C and MAX. |
 | Only the upper heating element is switched on; the thermostat can be set to between 50°C and MAX. |
 | Only the grill heating element is switched on; the thermostat can be set to between 50°C and MAX. |
Fan Oven:
 | The oven light is on and all of the heating elements are off. The light always remains on while the oven is operating. |
 | The upper and lower heating elements are switched on. The thermostat can be used to regulate the temperature between 50°C and MAX. |
 | The upper and lower heating elements and fan motor are switched on. The thermostat can be used to regulate the temperature between 50°C and MAX. |
 | The lower heating element and fan motor are switched on. The thermostat can be used to regulate the temperature between 50°C and MAX (8 function model) |
 | Only the grill heating element is switched on; the thermostat can be set to between 50°C and MAX. |
 | Only the grill heating element and the fan motor are switched on; the thermostat can be set to between 50°C and MAX. |
 | DefrostingWhen the fan is switched on, it moves cold air around the inside of the oven, helping to defrost frozen products quickly. The thermostat control should be set to position (0). None of the electrical heating elements are switched on |
 | In this position, both the circular heating element and the fan are switched on. The thermostat can be used to regulate the temperature between 50°C and MAX.8 function model |

The thermostat can be adjusted to select the best temperature for what you are cooking
The oven door must be kept closed when using any of the oven functions
3.1 TIMER (models fitted with this feature)
To user the timer, the bell needs to be wound up by turning the knob once in a clockwise direction. Next, turn the knob backwards, anti-clockwise, to the desired cooking time (max. 120 minutes).
The bell will sound once this pre-set time is up. The timer bell does not disconnect the oven.
3.2 THERMOSTAT LIGHT INDICATOR (°C)
This lights up whenever the thermostat operates to stabilise the temperature inside the oven. It turns off when the oven has reached its pre-set temperature.
3.3 SAFETY THERMOSTAT
This device cuts off the electrical power supply to prevent excessive heating cause by the incorrect use of the product or a possible defect in its components. If this device trips due to incorrect use, just wait for the oven to cool down and it will be possible to use it again.
Conversely, if this device trips due to a defect in one of the components, call our Technical Assistance service.
4 COOKING INSTRUCTIONS
EN
4.1 ROASTING IN THE OVEN
The oven should be pre-heated to the desired temperature for the proper roasting of food. Only very thick cuts of meat should be placed in the oven when it is cold. To keep the oven's walls as clean as possible, never use dishes with low rims or the oven's tray as a roasting dish. Spitting fat and burnt sauces produce smoke. Use dishes with high rims, preferably earthenware, placed on a shelf in the middle of the oven. The table at the end of this manual provides information about adjusting the thermostat and cooking time. Cooking times can vary depending on the type of food, their texture and size. We are certain that once you have tried the oven out a few times, you will be able to make changes to the cooking times shown on the table.
Pre-heat the oven to the desired temperature before putting food inside.
| Never use the drip tray as a roasting dish.Doing this poses a fire risk due to the accumulation of burnt sauce in the base of the oven and the high temperatures inside. In addition, the burning sauce produces smoke and spits of fat.The oven shelf should be placed in the middle of the oven, with food items placed in dishes with high rims for roasting |  |
| The food type and thickness should be taken into account when inserting the shelf onto rails closer or further away from the grill.Whenever using the grill to cook food, position the tray underneath to catch any drips |  |
Some practical tips for saving electricity
The oven can be turned off a few minutes before the food is completely cooked; the residual temperature is sufficient to complete the cooking process.
Keep the oven door closed as much as possible; look through the glass in the oven's door to see how cooking is progressing - the oven light is always on).
4.2 USING THE GRILL
Before using the grill, the oven should first be heated up for 5 minutes.
When using the grill, infra-red heat is radiated from the top of the oven. It is used for cooking thin cuts of meat and toast. Cuts of meat and fish to be cooked under the grill must be lightly covered in oil and placed on the oven shelf. The distance between the grill element and the shelf can be adjusted by placing it on different guide rails inside the oven, in proportion to the thickness of the meat; the table shown later in the manual gives some examples of food cooking times and positions. Cooking times can vary according to the type of food, its texture and volume.
4.3 DEFROSTING (MODELS WITH THIS FUNCTION)
Defrosting is carried out as if at room temperature, with the advantage of being much quicker. The ten hours that it takes to defrost a kilo of meat in the fridge is reduced to around one hour. Place the packaged meat on a plate. Put this into the oven.
4.4 ELECTRONIC PROGRAMMER
(MANUAL MODE)
Manual mode, if the cooking time or cooking end time have been selected. The "Manual" symbol is displayed.
The time of day is shown on the 7 segment display, unless the timer has been activated.
AUTOMATIC MODE (AUTO):
If the cooking time or end of cooking time have been selected. The switch is set to automatic mode.
The "Auto" symbol is displayed during the cooking time, or until the end of the cooking time.
TIME
Set the time
When the electricity is connected "12:00" is shown on the display. Pressing any of the controls (+, - or SELECT) displays the "MAN" symbol, and it is possible to adjust the time in 5 second intervals by pressing - or +. The time can be adjusted later by pressing "SELECT" repeatedly until the symbol flashes and then adjusting the time as described above.
SENSORS (+) and (-)
Tapping these buttons increases or decreases the time by one minute
Pressing these buttons automatically increases or decreases the time adjustment speed. Pressing and holding for between 2 and 5 seconds (around 3 mins/s)
Pressing and holding for over 5 seconds (approx. 20 mins/s)
Within 5 seconds of selecting a function, the alarm volume may be adjusted using the SET (+) or SET (-) sensor.
SELECT sensor
Tapping the "select" sensor selects the next function. Pressing and holding "SELECT" does not cause any change in function. If "SELECT" is pressed for more than 10 seconds, an audio alarm sounds and SELECT mode ends automatically.
Alarm VOLUME sensor
The alarm volume can be changed by scrolling through the function sequences and selecting L1, L2 or L3 to change the alarm volume. Adjust using the sensor SET (+) or SET (-)
The alarm sounds at the selected volume.
L1 - low; L2 - medium; L3 - high
TIMER
To use this as a simple timer, touch SELECT repeatedly until the symbol flashes and set the desired time by pressing + or -. After around 5 seconds the symbol stops flashing and the time starts to count down. Press + or - to change the time or set to zero.
Press any of the controls to cancel the bell when the time runs out. The maximum time that can be set is 99 minutes.
COOKING TIME
Set the end of cooking time
To start cooking immediately and define the duration of cooking:
- Place the dishes to be cooked in the oven and select the designed function and temperature using the function and temperature knob.
- Press SELECT repeatedly until the * symbol flashes, and set the cooking time to within 5 seconds by pressing + or -.
The current time reappears after a few seconds and the "auto" symbol remains on. The remaining cooking time can be verified by pressing SELECT until the symbol is selected, and modified or set to zero by pressing + or -.
At the end of the cooking time, the bell sounds and the oven turn off automatically, the display shows 0.00 and flashes "MAN". Press any of the controls to deactivate the alarm and touch "Select" for manual re-programming.
The "MAN" symbol stops flashing and the oven can be re-used.
PROGRAM START TIME AND COOKING END TIME
To program the start time and end time
- Touch SELECT until the symbol > appears. Select the time by pressing + or - for 5 seconds,
- touch "select" again until the > symbol is selected and the cooking end time is displayed
- Place the dishes to be cooked in the oven and select the designed function and temperature using the function and thermostat knobs.
Cooking will start at the time calculated by deducting the cooking time from the end time. The current time reappears 5 seconds after the controls are released, and the AUTO and cooking time start symbols will remain on.
When the cooking time is complete, the audio alarm sounds and the oven turns off automatically. Press any of the controls to deactivate the alarm; touch "Select" for manual re-programming. The "MAN" symbol stops flashing and the oven can be re-used.
Set the cooking time to zero to cancel programming. CHILD
SAFETY
To prevent unwanted selections, a child safety function is fitted to the unit's function selector.
Child lock
The child lock function can be activated at any time of day and is displayed in manual mode. It operates independently of the cooking time and the end of cooking time and is executed automatically.
The child lock function can be activated by pressing the (+) sensor until the "xxxxx" symbol is displayed. All other functions are blocked from this moment onwards.
Cancellation: If a function such as cooking time expires, the alarm can be cancelled by touching any of the sensors, even if the child lock has been activated.
If any sensor is touched when the child lock is activated, an audio signal sounds and the child lock symbol flashes for two seconds.
Alarm signal VOLUME
The alarm volume can be changed by scrolling through the function sequences and selecting L1, L2 or L3 to change the alarm volume. Adjust using SET (+) or SET (-) on the touch pad. The audio will be played at the selected volume.
L1 - Low L2
- medium L3
- high
4.5 DIGITAL CLOCK
20:46


SETTING THE TIME
Press the buttons + and - at the same time. The point between the hour and minute indicators starts to flash. Set the time by pressing the buttons + and - at the same time. Pressing and holding for a short time allows faster adjustments to be made. Pressing and holding the + and - buttons for a short time, until the hour and the point between the hours and minutes starts to flash, allows the hours on the display to be adjusted.
SET THE MINUTE COUNTER
Press the + button. "0.00" will be displayed on the screen and the bell symbol will flash. The minute counted can be adjusted using the + and - buttons.
The bell symbol will remain on after 6 seconds have passed. The minute counter will start its countdown. The time increases in intervals of one minute and ten seconds, up to 99 minutes and 50 seconds. After this, the display will show one hour and 40 minutes and adjustments are made in 1 minute increments.
Note: to cancel the minute counter program, set the minute counter time to 0.00.
CANCEL THE BELL
When the minute counter reaches zero, the display will show the time of day. The bell symbol starts to flash and an alarm sounds. If not cancelled, the alarm sounds for seven minutes.
Press any button to cancel the alarm.
SOUND ADJUSTMENTS
The timer alarm volume can be adjusted as follows:
1) - press the (-) button to hear the sound that is currently set
2) - release the (-) button and press again to hear the next sound (a total of 3) available
3) - the sound will be set to the last one played
5 OVEN TIME TABLE
EN
| Food type | Shelf no. Temperature Time of oven °C minutes | ||
| ROASTS | |||
| Slow roasted meat 2 220 - 250 | Depending on | ||
| Fast roasted meat 2 225 - 250 50-60 | |||
| Wild birds (guinea fowl, duck, etc.) | 1 210-250 | 150-180 | |
| Poultry | 2 | 225-250 | 50-60 |
| Game | 1 | 200-225 | Depending on |
| Fish | 1 | 180-200 | 20-25 |
| CAKES | |||
| Christmas cake | On bottom | 160-200 | 60-70 |
| Plum-cake | On bottom | 170-180 | 90-100 |
| Orange cake | On bottom | 170-180 | 80-100 |
| Ladyfingers | 2 | 200 | 40-45 |
| Croissants | 2 | 215-230 | 35-40 |
| Barley dough | 2 | 215 | 30-40 |
| Sponge cake | 2 | 200-215 | 30-35 |
| Meringue | 1 | 140 | 60-80 |
| Dough for éclairs | 2 | 215-230 | 30 |
| Fruit tarts (puff pastry) | 2 | 250 | 30-35 |
| Fruit tarts (shortcrust pastry) | 2 | 230 | 20-30 |
6
GRILL TIME TABLE
EN
| Food type Kg | Shelf no. | Oven temperature | Pre-heating temperature in minutes | Time in minutes | |
| Beef ribs | 1 3 | 250 5 | 8-10 | ||
| Lamb ribs | 1 3 | 250 5 | 12-15 | ||
| Liver | 1 3 | 250 5 | 10-12 | ||
| Pieces of chopped meat | 1 3 | 250 5 | 12-15 | ||
| Beef heart | 1 3 | 250 5 | 12-15 | ||
| Rolled beef | 1 | 3 | 250 | 5 | 20-25 |
| Half chicken | -- | 3 | 250 | 5 | 20-25 |
| Fish fillets | -- | 3 | 250 | 5 | 12-15 |
| Stuffed tomatoes | -- | 3 | 250 | 5 | 10-12 |
7
MAINTENANCE AND CLEANING INSTRUCTIONS
EN
IMPORTANT: After each cleaning the oven must bind to the maximum temperature and for a time sufficient to evaporate moisture resulting from the cleaning.
This operation will increase the useful life of your oven, minimizing the likelihood of onset of corrosion by moisture.
General Cleaning
Clean the oven after each use to ensure that the enamelled parts remain shiny for a long time. Once the oven has cooled, fat deposits can be removed easily using a sponge or damp cloth with warm water and detergents, or maybe a specific product found at the supermarket. Do not use abrasive cloths or sponges, as these can irreparably damage the enamel. After use, wipe the stainless steel parts with clean water and rinse with a cloth or chamois leather. For persistent stains, use normal non-abrasive detergents, specific products for stainless steel or a little hot vinegar.
Cooking with fats or oils in an oven can be dangerous, as it can cause a fire. This is why the oven should be cleaned after each use.
Cleaning the oven door
To clean the oven door, the interior glass can be removed, cleaned and re-installed.
For safety reasons, follow the steps shown below to remove the oven door before removing the interior glass:

natural_image
Diagram of a mechanical device with a lever and paper plane, no visible text or symbols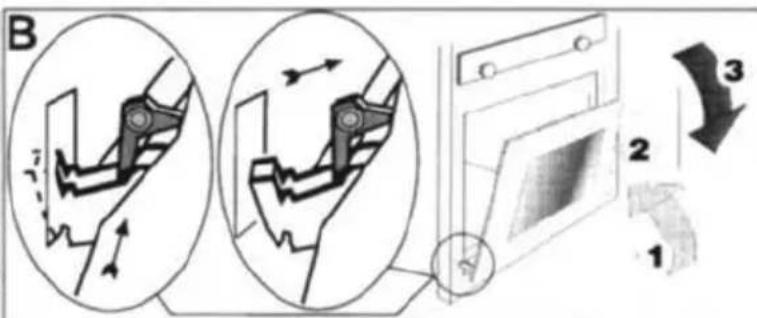
1 - Fully open the oven door
2 - Use your thumb and forefinger to raise the pivots of the hinges and turn them fully outwards (fig. A)
3 - Move the door to the closed position so that it rests on the pivots. This blocks the hinge's spring.
By continuing to close the oven door, the hinges can be unhooked from their respective connections, which are connected to the oven structure (sequences 1, 2 and 3 of fig. B).
To re-install the door, follow these instructions in reverse.
Removing and installing the interior glass
 | - Press tab (A).At the same time, remove the upper stops (B) |
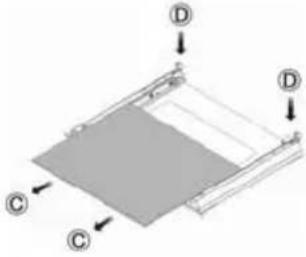 | - Move the interior glass (C) to release the lower stops (D)- Remove the glassOnly use hot water to clean the glass and avoid the use of abrasive cloths. |
 | - Fit the glass to the frame- Slide the glass until it fits into the grooves of the lower stops (D) |
 | - Install the upper stops (B) |
REPLACING THE OVEN LIGHT BULB
CAUTION: Disconnect the appliance from the power supply before changing the light bulb by turning off the protection device to avoid the possibility of an electric shock.
After disconnecting the oven's power supply, unscrew the bulb's glass protection and replace it with one that is suitable for high temperatures (300°C), with the following characteristics:
Voltage: 220 - 240 V
Power: 15 W / 25 W (depending on the model)
Fitting: E 14
Re-fit the glass protection and connect the appliance

natural_image
Diagram showing a light bulb being compressed into a mesh container with arrows indicating rotation (no text or symbols)REMOVING THE OVEN'S SIDE RAILS
These chrome plated side rails can be removed to facilitate cleaning. To do this, follow the instructions from 1 to 3 to remove the oven's side rails. To re-install, follow the instructions from 3 to 1.
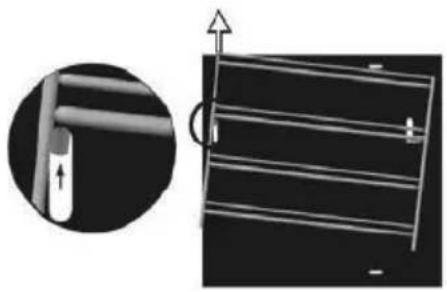 | 1. Raise the rail vertically and remove the pin fitted in the front groove at the side of the oven. |
 | 2. Move the rail in the indicated direction such that it slides along the groove in the side of the oven |
| 3. Raise the rail vertically and remove the pin fitted in the rear groove at the side of the oven. |
The stainless steel sliders that support the enamel roasting dishes can be removed and fitted to all three levels of side railings.
8
PRODUCT CONTROL
EN
The manufacturer certifies that this appliance has been subjected to the following inspections:
- Operation of electrical components.
- Dielectric strength.
- Resistance of the earthing circuit.
- Aesthetic inspection
Manufacturer's address: Rua D. Afonso Henriques, 235 - 4585 - 322 Gandra PRD Information from our instruction manuals can be found on our website www.meireles.pt
9 TECHNICAL CHARACTERISTICS
EN
| Power | |
| Grill resistor | 1500 W |
| Upper resistor | 1100 W |
| Lower resistor | 1500 W |
| Circular resistor | 2300 W |
| Fan | 18 W |
| Light bulb | 25 W |
10 FURNITURE / OVEN DIMENSIONS
EN




The manufacturer reserves the right to make changes to the appliances, provided that these changes do not affect operation or safety.
meireles
Product Information (Regulation UE 66/2014) Electric Oven - EN60350-1; UE65/2014)
| ModelWType of ovenWN° CavitiesWHeat SourceWV (L) Heat Source | V (L) | EC Conventional kWh | EC forced kWhWEnergetic Class | E EE EI | |||
| MF 1604 | E 60313Eléctric359 | 0,75W-WAW94,0 | |||||
| MF 2606 | EV60313Eléctric355 | 0,79W0,75WA | 96,0 | ||||
| MF 3606 | EV60313Eléctric355 | 0,77W0,74WAW94,8 | |||||
| MF 4609 | EV60313Eléctric355 | 0,77W0,74WAW94,8 | |||||
| MF 6601 | EV60313Eléctric355 | 0,77W0,74WAW94,8 | |||||
INHALTSVERZEICHNIS
natural_image
Technical line drawing of a mechanical assembly with no visible text or symbolsnatural_image
Diagram of a mechanical device with a lever and paper plane, no visible text or symbols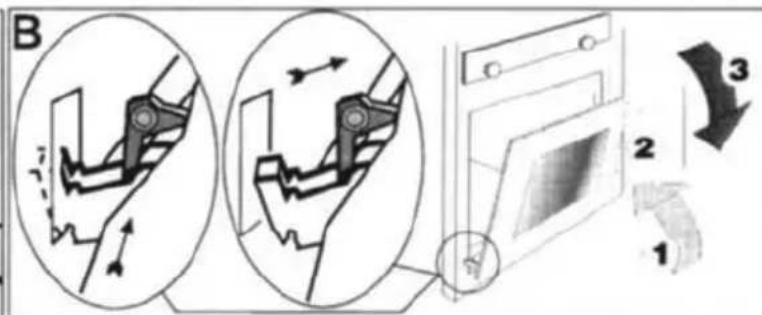
natural_image
Diagram of a light bulb being compressed into a mesh container with directional arrows (no text or symbols)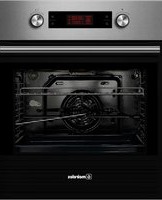
- FAN/CONVENTIONAL OVEN
- EINBAUBACKOFEN
- BELÜFTET/STATISCH
- RETIRAR AS GRELHAS LATERAIS DO FORNO
- GENERAL WARNINGS
- INSTALLATION INSTRUCTIONS
- ELECTRICAL CONNECTION
- CONNECTING THE CABLE TO THE POWER SUPPLY
- INSTALLATION AND ASSEMBLY
- USAGE INSTRUCTIONS
- TIMER (models fitted with this feature)
- THERMOSTAT LIGHT INDICATOR (°C)
- SAFETY THERMOSTAT
- COOKING INSTRUCTIONS
- ROASTING IN THE OVEN
- USING THE GRILL
- DEFROSTING (MODELS WITH THIS FUNCTION)
- ELECTRONIC PROGRAMMER
- (MANUAL MODE)
- AUTOMATIC MODE (AUTO):
- TIME
- SENSORS (+) and (-)
- SELECT sensor
- Alarm VOLUME sensor
- TIMER
- COOKING TIME
- PROGRAM START TIME AND COOKING END TIME
- SAFETY
- Child lock
- DIGITAL CLOCK
- SETTING THE TIME
- SET THE MINUTE COUNTER
- CANCEL THE BELL
- SOUND ADJUSTMENTS
- OVEN TIME TABLE
- MAINTENANCE AND CLEANING INSTRUCTIONS
- General Cleaning
- Cleaning the oven door
- REPLACING THE OVEN LIGHT BULB
- REMOVING THE OVEN'S SIDE RAILS
- TECHNICAL CHARACTERISTICS
- FURNITURE / OVEN DIMENSIONS
- meireles
- INHALTSVERZEICHNIS
Brand : Meireles
Model : MF 6601 N
Category : Oven