 — Automobile — Mode d'emploi PDF")
9-4X (2011) - Automobile SAAB - Free user manual and instructions
Find the device manual for free 9-4X (2011) SAAB in PDF.

| Product Type | Automobile |
| Brand | Saab |
| Model | 9-4X (2011) |
| Category | Mid-size Luxury SUV |
| Dimensions (L x W x H) | 190.6 in x 75.0 in x 66.5 in |
| Wheelbase | 110.5 in |
| Curb Weight | 4,100 - 4,400 lbs (depending on drivetrain) |
| Fuel Type | Gasoline (unleaded premium recommended) |
| Engine Options | 3.0L V6 (265 hp) or 2.8L turbo V6 (300 hp) |
| Transmission | 6-speed automatic |
| Drivetrain | Front-wheel drive or all-wheel drive |
| Seating Capacity | 5 passengers |
| Fuel Economy (EPA) | 16 city / 23 highway mpg (approx.) |
| Safety Features | Airbags (front, side, curtain), ABS, stability control, traction control |
| Maintenance Interval | Oil change every 5,000 miles or 6 months |
| Tire Pressure (recommended) | 33 psi front / 33 psi rear |
| Fuel Tank Capacity | 18.5 gallons |
| Spare Parts & Repairability | Parts available through Saab dealers or online; VIN required for exact fit |
Frequently Asked Questions - 9-4X (2011) SAAB
User questions about 9-4X (2011) SAAB
0 question about this device. Answer the ones you know or ask your own.
Ask a new question about this device
Download the instructions for your Automobile in PDF format for free! Find your manual 9-4X (2011) - SAAB and take your electronic device back in hand. On this page are published all the documents necessary for the use of your device. 9-4X (2011) by SAAB.
USER MANUAL 9-4X (2011) SAAB
VehicleSecurity......2-16
ExteriorMirrors......2-18
InteriorMirrors......2-21
Windows....2-21
Roof....2-25
SeatsandRestraints......3-1
HeadRestraints....3-2
FrontSeats......3-4
RearSeats......3-11
SafetyBelts....3-14
AirbagSystem......3-29
ChildRestraints......3-45
Storage....4-1
StorageCompartments......4-1
AdditionalStorageFeatures...4-3
RoofRackSystem......4-12
InstrumentsandControls....5-1
Controls....5-2
WarningLights, Gauges, and
Indicators......5-9
InformationDisplays......5-29
VehicleMessages......5-34
VehiclePersonalization.....5-42
UniversalRemoteSystem....5-48
Lighting....6-1
ExteriorLighting......6-1
InteriorLighting......6-6
LightingFeatures......6-7
InfotainmentSystem......7-1
Introduction......7-1
ClimateControls....8-1
ClimateControlSystems.....8-1
AirVents....8-6
Maintenance....8-7
DrivingandOperating......9-1
DrivingInformation......9-2
StartingandOperating......9-17
EngineExhaust......9-24
AutomaticTransmission......9-26
DriveSystems......9-30
Brakes....9-30
RideControlSystems......9-34
CruiseControl....9-39
ObjectDetectionSystems....9-41
Fuel....9-47
Towing....9-52
ConversionsandAdd-Ons...9-61
VehicleCare....10-1
GeneralInformation......10-3
VehicleChecks......10-4
HeadlampAiming......10-34
BulbReplacement......10-38
ElectricalSystem......10-44
WheelsandTires......10-52
JumpStarting......10-92
Towing....10-97
AppearanceCare......10-101
2011Saab9-4XOwnerManual
ServiceandMaintenance...11-1
GeneralInformation......11-1
ScheduledMaintenance.....11-3
RecommendedFluids.
Lubricants, and Parts.....11-4
MaintenanceRecords......11-7
TechnicalData......12-1
VehicleIdentification......12-1
VehicleData....12-2
CustomerInformation.....13-1
CustomerInformation......13-1
ReportingSafetyDefects.....13-9
VehicleDataRecordingand
Privacy....13-11
Index......i-1
SaabAutomobile, SaabCarsNorth America, SAAB, Saab9-4X, and the SaabEmblemareregistered trademarksof SaabAutomobile, AB.
Thismanualdescribesfeaturesthat mayormaynotbeonyourspecific vehicleeitherbecausetheyare optionsthatyoudidnotpurchaseor duetochangessubsequenttothe printingofthisownermanual. Pleaserefertothepurchase documentationrelatingtoyour specificvehicletoconfirmeeachof thefeaturesfoundonyourvehicle.
Keepthismanualinthevehiclefor quickreference.
CanadianVehicleOwners
Danger,Warnings, and Cautions
Warning messages found on vehicle labels and this manual describe hazards and what to avoid or reduce them.
Dangerindicatesahazardwitha highlevelofriskwhichwillresultin seriousinjuryordeath.
Warningor Caution indicates a hazard that could result in injury or death.

WARNING
These mean there is something that could hurt you or other people.
Notice: This mean there is something that could result in property or vehicle damage. This would not be recovered by the vehicle's warranty.

Acirclewithaslashthroughitisa safetysymbolwhichmeans"Do Not,"“Donotdothis,”or“Donotlet thishappen.”
Symbols
Thevehiclehascomponentsand labelsthatusesymbolsinsteadof text.Symbolsareshownalongwith thetextdescribingtheoperationor informationrelatingtoaspecific component,control,message,gauge,orindicator.
This symbol is shown when you need to see your own manual for additional instructions or information.
☐: This symbol is shown when you need to see a service manual for additional instructions or information.
VehicleSymbolChart
Herearesomeadditionalsymbols that may be found on the vehicle and what they mean. Form more information on the symbol, refer to the Index.
AirbagReadinessLight
AirConditioning
(ABS):AntilockBrakeSystem(ABS)
^1 :AudioSteeringWheelControls orOnStar ^®
(1):BrakeSystemWarningLight
- + : ChargingSystem
:CruiseControl
EngineCoolantTemperature
-ExteriorLamps
D:FogLamps
:FuelGauge
Fuses
ED:HeadlampHigh/Low-Beam Changer
LATCHSystemChild Restraints
:MalfunctionIndicatorLamp
:OilPressure
OutsidePowerFoldaway Mirrors
①:Power
Ω:RemoteVehicleStart
SafetyBeltReminders
(1):TirePressureMonitor
: TractionControl/Electronic StabilityProgram(ESP) ^®
:WindshieldWasherFluid
InBrief
InstrumentPanel
InstrumentPanel......1-2
InitialDriveInformation
InitialDriveInformation......1-4
RemoteKeylessEntry(RKE)
System......1-4
RemoteVehicleStart......1-5
DoorLocks......1-5
Liftgate....1-6
Windows....1-7
SeatAdjustment......1-7
MemoryFeatures......1-8
HeatedandVentilated
Seats......1-10
HeadRestraint
Adjustment......1-10
SafetyBelts....1-11
SensingSystemfor
PassengerAirbag......1-11
MirrorAdjustment......1-11
SteeringWheel
Adjustment......1-12
InteriorLighting......1-12
ExteriorLighting......1-13
WindshieldWiper/Washer....1-13
ClimateControls......1-15
VehicleFeatures
Radio(s)....1-15
SatelliteRadio....1-16
PortableAudioDevices.....1-17
Bluetooth ^® ......1-17
SteeringWheelControls.....1-17
CruiseControl....1-18
NavigationView......1-18
DriverInformation
Center(DIC)....1-19
RearVision
Camera(RVC)....1-19
UltrasonicParkingAssist....1-19
StorageCompartments.....1-19
PowerOutlets......1-20
UniversalRemoteSystem...1-20
PerformanceandMaintenance
TractionControl
System(TCS)....1-20
ElectronicStability
Program(ESP)......1-20
TirePressureMonitor......1-21
TireSealantand
CompressorKit......1-21
EngineOilLifeSystem.....1-21
DrivingforBetterFuel
Economy....1-22
RoadsideAssistance
Program....1-22
OnStar ^® 1-23
InstrumentPanel
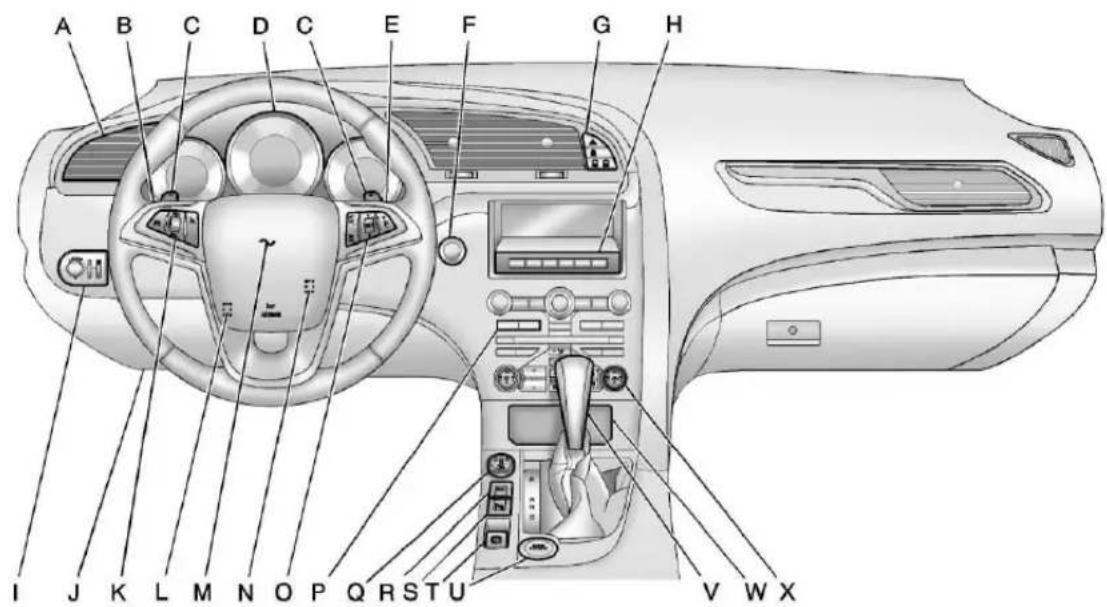
A. AirVentsonpage8-6.
B. TurnandLane-ChangeLever (OutofView). See Turnand Lane-ChangeSignalson page6-5.
DriverInformationCenter(DIC) Controls(OutofView). See DriverInformationCenter(DIC) onpage5-29.
C. TapShiftControls(IfEquipped).
See Manual Modeon
page9-28.
D. InstrumentClusteron page5-10.
E. WindshieldWiper/Washeron page5-3(OutofView).
RearWindowWiper/Washeron page5-5(OutofView).
F.NightPanelButton.See InstrumentPanelIllumination Controlonpage6-6.
G.HazardWarningFlasherson page6-5.
SafetyLocksonpage2-12.
PowerDoorLockson page2-11.
H. Infotainment Display.
1. Exterior Lamp Controlson page6-1.
Front Fog Lampsonpage6-5 (IfEquipped).
Instrument Panel Illumination Controlonpage6-6.
J. DataLinkConnector(DLC) (OutofView). See Malfunction IndicatorLamponpage5-18.
K. CruiseControlonpage9-39.
L. Steering Wheel Adjustment page5-2.
M.Hornonpage5-3.
N.AdjustablePedalControl (IfEquipped)(OutofView). SeeAdjustable Throttle and Brake Pedalonpage9-18.
O. Steering Wheel Controlson page5-2.
P. Infotainmentpage7-1.
Q. TractionControlSystem (TCS)/ElectronicStability Program(ESP)Button (IfEquipped). See Traction ControlSystem(TCS)on page9-34orElectronicStability Program(ESP)onpage9-36.
1-4InBrief
R.ECOButton(IfEquipped). SeeFuelEconomyModeon page9-29.
S.ParkAssistButton (IfEquipped).See Ultrasonic ParkingAssistonpage9-41.
T. Parking Brakeonpage9-31.
U.START/STOPButton.See IgnitionPositionsonpage9-18.
V.ShiftLever.SeeShiftingInto Parkonpage9-23.
W.PowerOutletsonpage5-8.
X.DualAutomaticClimateControl Systemonpage8-1. HeatedandVentilatedFront Seatsonpage3-10(If Equipped).
InitialDrive Information
Thissectionprovidesabrief overviewaboutsomeofthe importantfeaturesthatmayormay notbeonyourspecificvehicle.
Formoredetailedinformation, refer toeachofthefeatureswhichcanbe foundlaterinthisownermanual.
RemoteKeylessEntry (RKE)System
TheRemoteKeylessEntry(RKE) transmitterisusedtolockand unlockthedoorsfromupto60m (195ft)awayfromthevehicle.

Pressthekeyreleasebuttonnear thebottomofthetransmitterto removethekey. Thekeycanbe usedforthedriverdoorandthe glovebox.
:Presstounlockthedriverdoor oraldoorsdependingonthe vehiclepersonalizationsettings.
:Presstolockalldoors. Lockandunlockfeedbackcanbe personalized.See Vehicle Personalizationonpage5-42.
:Pressuntiltheliftgatebegins tomovetoopenorclosethepower liftgate.
:Pressandreleaseonetimeto locatethevehicle.
Pressandhold 📋 for threesecondstosoundthepanic alarm.
Press 🚙 againorstartthevehicle tocancelthepanicalarm.
SeeKeysonpage2-2andRemote KeylessEntry(RKE)System Operationonpage2-3.
RemoteVehicleStart
With this feature the engine can be started from outside of the vehicle.
StartingtheVehicle
-
Press on the RKE transmitter.
-
Withintwoseconds, press and hold Q until the turn signal lampsflash, or for at least twoseconds if the vehicle is not in view.
Whenthevehiclestarts, the parking lampswillturnonandremainonas longastheengineisrunning. The doorswillbelockedandtheclimate controlsystemmaycomeon.
Theenginewillcontinuetorunfor 10minutes.Repeatthestepsfora 10-minutetimeextension.Remote startcanbeextendedonlyonce.
CancelingaRemoteStart
Tocancelaremotestart,doanyof thefollowing:
- PressandholdQuntilthe parkinglampsturnoff.
• Turnonthehazardwarning flashers.
• Turnthevehicleonandthenoff.
See Remote Vehicle Starton page2-9.
DoorLocks
Tolockorunlockadoor, usethe RemoteKeylessEntry(RKE) transmitterfromtheoutside.
Frominsidethevehiclewiththe doorslocked, pullonceonthedoor handletounlockit, andasecond timetoopenitorusethepower doorlockswitch.
1-6InBrief

The powerdoorlockswitchison the instrument panel.
:Presstounlockthedoors.
:Presstolockthedoors.
SeePowerDoorLockson page2-11.
Liftgate
ManualLiftgateOperation
Forvehicleswithoutkeylessaccess, unlockthevehiclebeforeopening theliftgate.
Pressthetouchpadlocatedinthe handleoftheliftgate,above the licenseplate,andliftuptoopen.
Donotpressthetouchpadwhile closingtheliftgate. This will cause the liftgatetobeunlatched.
PowerLiftgateOperation
Onvehicleswithapowerliftgatethe switchislocatedonthedriverdoor. ThevehiclemustbeinP(Park)to usethepowerfeature.Thetaillamps flashwhenthepowerliftgate moves.
Choosethepowerliftgatemodeby turningthedialontheswitchuntil theindicatorlinesupwiththe desiredposition.Pressthecenter oftheswitch.
SeeLiftgateonpage2-12formore information.
Windows

natural_image
Close-up of a car interior panel with buttons and a handle (no visible text or symbols)DriverSideShown
Thepowerwindowcontrolsareoneachofthesidedoors.
The driverdoor also hasswitches that control the passenger and rear windows.
Operatetheswitchforthewindow bypassingtoopenandpullingto close.
Pushingorpullingtheswitchpartof thewaywillopenorclosethe windowaslongastheswitchis operated.SeePowerWindowson page2-22formoreinformation.
SeatAdjustment
ManualSeats

natural_image
3D illustration of a car seat with seatbelt and arrow indicating left side (no text or symbols)Toadjustamanualseat:
-
Pullthehandleatthefrontofthe seatcushion.
2.Movetheseatforwardor rearwardtoadjusttheseat position. -
Releasethehandletostopthe seatfrommoving.
- Trytomovetheseatback and forthobesureitislocked in place.
Toraiseorreclinetheseatback, use theleverontheoutboardsideof theseat.
See Seat Adjustment on page 3-4 and Reclining Seat backson page 3-8 form more information.
PowerSeats
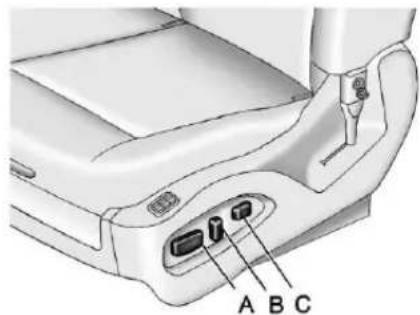
A.SeatPositionControl
B. Seatback Adjustment Control
C.LumbarAdjustmentControl
Toadjustapowerseat,ifequipped:
- Slidecontrol(A)forwardor rearward, andupordownto adjustthepowerseat. SeePowerSeatAdjustmenton page3-4.
- Raiseorreclinetheseatbackby tiltingthetopofthecontrol(B) forwardorrearward. SeeRecliningSeatbackson page3-8.
- Increaseordecreasethelumbar supportbypassingandholding thefrontorrearofcontrol(C). SeeLumbarAdjustmenton page3-7.
MemoryFeatures
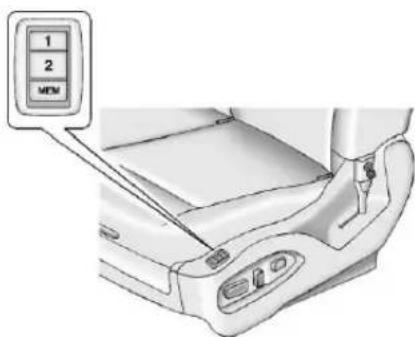
Onvehicleswiththememory feature, the "1" and "2" buttons on theoutboardsideofthedriverseat areusedtomanuallysaveand recallfeatures. Thesefeatures includethedriverseat and adjustablethrottleandbrakepedal positions, ifequipped. Italsomay includetheoutsidemirrorpositions, ifprogrammed. Thesemanually storedpositionsarereferredtoas ButtonMemorypositions.
Notallvehicleswiththememory featurewillhaveprogrammable outsidersmirrors.
The vehicle will also automatically saved a river seat, adjustable throttle and brake pedal positions, and the outside mirror position to the current driver Remote Keyless Entry (RKE) transmitter when the ignition is turned off. These automatically stored positions are referred to as RKEMemory positions.
StoringButtonMemoryPositions
TosavepositionsintoButton Memory:
- Adjust the driver seat, seat back recliner, adjustable pedals, and both outsidemirror to the desired driving positions.
- Pressandreleasethe MEM(Memory)button.
- Press "1" until abeepsounds.
- RepeatSteps1 through 3 fora seconddriver using "2."
TorecallthemanuallysavedButton Memorypositions, pressandhold "1" or "2." The driver seat, adjustable pedals, and outsidemirrorsmoveto the positionsstoredtothosebuttons when pressed. Releasing "1" or "2" beforethestoredpositionsare reachedstopstherecall.
To automatically recall RKEMemory positions, unlock the driver door with the RKE transmitter, and open the driver door. On vehicles with keyless access, opening the driver door when an RKE transmitter is present will activate the RKE Memory recall. If the driver door is already open, pressing the RKE transmitter button will also activate the RKEMemory recall. The driver seat, outside mirrors, and pedals will moveto the previously saved RKEMemory positions.
See "MemorySeats" under Power Seat Adjustment on page 3-4 for more information.
EasyExitDriverSeat
Thisfeaturemovestheseat rearwardallowingthedriver moreroomtoexitthevehicle.
Toactivate, placetheignitionin OFForACCESSORYandopenthe driverdoor. If the driverdoor is already open, placing the ignition in OFForACCESSORY will activate the easy exit driver seat.
Thisfeatureisturnedonoroffusing thevehiclepersonalizationmenu. See "EasyExitDriverSeat" under VehiclePersonalizationon page5-42formoreinformation.
HeatedandVentilatedSeats

Ifavailable, the buttons are on the climate control panel. To operate, the ignition must be on.
Press 📋or—toheattheseat.
Press 📋 or 📊 toventilatetheseat.
Pressthebuttononceforthe highestsetting.Witheachpressof thebutton,theseatwillchangeto thenextlowersetting,andthen to theoffsetting.Thelightsindicate threeforthehighestsettingandone forthelowest.
See Heated and Ventilated Front Seatson page 3-10 form more information.
HeadRestraint Adjustment
Donotdriveuntiltheheadrestraints forallooccupantsareinstalled and adjusted properly.
Toachieveacomfortableseating position,changetheseatback reclineangleaslittleasnecessary whilekeepingtheseatandthehead restraintheightintheproper position.
FormoreinformationseeHead Restraintsonpage3-2andSeat Adjustmentonpage3-4.
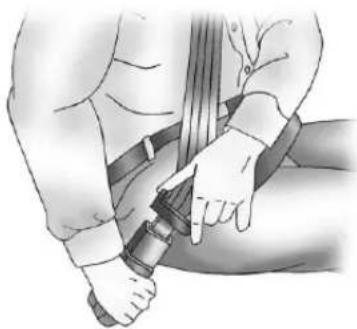
SafetyBelts
natural_image
Illustration of a person wearing a belt and adjusting a seatbelt (no text or symbols present)Refertothefollowingsectionsfor importantinformationonhowtouse safetybeltsproperly.
• SafetyBeltsonpage3-14.
• HowtoWearSafetyBelts Properlyonpage3-18.
• Lap-ShoulderBeltonpage3-23.
• LowerAnchorsandTethersfor Children(LATCHSystem)on page3-53.
SensingSystemfor PassengerAirbag
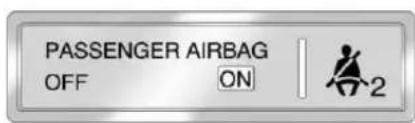
UnitedStates

Canada
Thepassengersensingsystemwill turnofftherightfrontpassenger frontalairbagandseat-mounted sideimpactairbagundercertain conditions. Thedriverairbagsand roof-railairbagsarenotaffectedby thepassengersensingsystem.
Thepassengerairbagstatus indicatorwillbevisibleonthe overheadconsolewhenthevehicle
isstarted.SeePassengerSensing Systemonpage3-38formore information.
MirrorAdjustment
Exterior

natural_image
Interior view of a car showing the dashboard and steering wheel (no text or symbols visible)Controlsfortheoutsidepower mirrorsarelocatedonthe driverdoor.
Toadjustthemirror:
- Movetheselectorswitch to L(left) or R(right) to choose the driver or passenger mirror.
1-12InBrief
- Pressthearrowsonthecontrol padtomoveeachmirrorinthe desireddirection.
- Adjusteachoutsidemirrorso thatalittleofthevehicleandthe areabehinditcanbeseen.
- Return these selectors switch to the center position.
SeePowerMirrorsonpage2-19.
Ifthevehiclehastheautomatic dimmingmirror,thedriveroutside mirrorautomaticallyadjustsforthe glareofheadlampsbehindyou.
SeeAutomaticDimmingRearview Mirroronpage2-21.
Interior
Adjusttheinsiderearviewmirror manually, bymovingitupanddown orsidetosideforaclearerview behindthevehicle.
The vehicle may have an automatic dimming inside rear view mirror. Automatic dimming reduces the glare from the headlamp so the vehicle behind you.
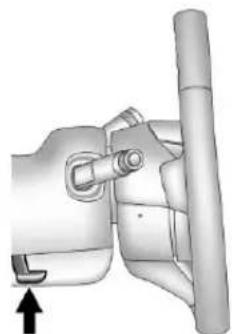
SteeringWheel Adjustment
natural_image
Mechanical assembly diagram showing a lever mechanism with a pull rod and directional arrow (no text or symbols)Theadjustmentleverislocatedon theleftsideofthesteeringcolumn.
Toadjustthesteeringwheel:
- Pulltheleverdown.
- Movethesteeringwheelupor downandinorouttoa comfortableposition.
- Pulltheleveruptolockthe steeringwheelinplace.
Donotadjustthesteeringwheel whiledriving.
InteriorLighting
DomeLamp
Thedomelampisontheoverhead console.
Tochangethedomelampsettings, pressthefollowing:
來:Turnsthelampoff,evenwhen adoorisopen.
:Thelampcomeson automaticallywhenadooris opened.
:Turnsthedomelampon.
ReadingLamps
Therearereadinglampsonthe overheadconsoleandovertherear passengerdoors. Theselamps comeonautomaticallywhenany doorisopened.
Tomanuallyturnthereadinglamps onoroff:
- Press or next to each overhead consolereading lamp.
• Pressthelamplensontherear passengerreadinglamps.
Formoreinformationoninterior lighting,see:
- InstrumentPanelIllumination Controlonpage6-6.
• CourtesyLampsonpage6-7.
ExteriorLighting
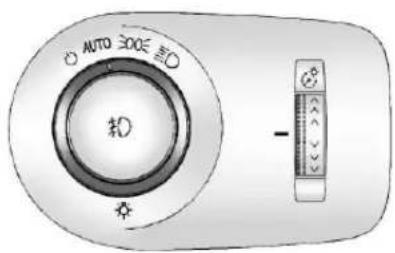
The exterior lamp control is located on the instrument panel to the left of the steering column.
Brieflyturntothispositionto turntheautomaticlightcontroloffor onagain.
AUTO: Automatically turn on the headlamps, parking lamps, taill lamps, instrument panell lights, and license plate lamps.
200: Turnsontheparkinglamps, taillamps, instrumentpanellights, andtaillamps.
D:Turnsontheheadlamps, parkinglamps, taillamps, instrument panellightsandlicenseplatelamps. A warningchimesoundsifthe driver'sdoorisopenedwhenthe ignitionisoffandtheheadlamps areon.
Formoreinformation,see:
- ExteriorLampControlson page6-1.
• DaytimeRunningLamps(DRL) onpage6-3.
• AutomaticHeadlampSystemon page6-3.
WindshieldWiper/Washer

Thewindshieldwiper/washerlever islocatedontherightsideofthe steeringcolumn.Withtheignitionin ACC/ACCESSORYorON/RUN/START,movethewindshieldwiper levertoselectthewiperspeed.
2:Useforfastwipes.
1:Useforslowwipes.
: Move the lever up to for adjustableintervalwipes, thenturn the bandupformorefrequent wipesordownforlessfrequent wipes. Ifthevehiclehas Rainsense™, seethefollowing Rainsenseinformation.
1-14InBrief
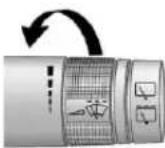
O:Usetoturnthewipersoff.
:Forasinglewipe,brieflymove thewiperleverdown.Forseveral wipes,holdthewiperleverdown.
WindshieldWasher
Pullthelevertowardyoutspray washerfluidonthewindshield.
See Windshield Wiper/Washeron page5-3 and Rear Window Wiper/Washeron page5-5, if equipped.
Rainsense™
ForvehicleswithRainsense:
Ψ:Movethewindshieldwiper leverto Ψ.Turnthe ▼band onthewiperlevertoadjustthe sensitivity.
• Turnthebandupformore sensitivitytomoisture.
• Turnthebanddownforless sensitivitytomoisture.
- Movethewindshieldwiperlever outofthe positionto deactivateRainsense.
RearWindowWiper/Washer
Therearwipercontrolsareonthe endofthewindshieldwiperlever.

natural_image
Close-up of a handheld electronic device with a screen and two buttons, no visible text or symbolsPresstheupperorlowerportionof thebuttontocontroltherearwiper andrearwiperdelay.
Thesystemturnsoffwhenthe buttonisreturnedtothemiddle position.
☐:Useforcontinuousrear windowwipes.
:Usetosetadelaybetween wipes.
:Pushthewindshieldwiper leverforwardtospraywasherfluid ontherearwindow.
See Windshield Wiper/Washeron page 5-3 and Rear Window Wiper/Washeron page 5-5.
ClimateControls
Theheating, cooling, and ventilation for the vehicle can be controlled with this system.

A.DriverandPassenger TemperatureControl
B.DriverandPassengerHeated and Ventilated Seats
C.AUTO(AutomaticOperation)
D. AirDeliveryModeControls
E.Defrost
F.AirConditioning
G.ZONE
H.FanControl
I. RearWindowDefogger
J.Recirculation
See DualAutomaticClimateControl Systemonpage8-1 and Rear ClimateControlSystemonpage8-5 (IfEquipped).
VehicleFeatures
Radio(s)
VOL/☐:Presstoturnthesystem onandoff.Turntoincreaseor decreasethevolume.
RADIO/BAND: Presstochoose betweenFM, AM, or XM™, ifequipped.
TUNE ▶/II: Turntoselectradio stations.
Presstoshowplayorpausetrack.
SEEK ◀◀◀:Presstoseekthe previousstationortrack.
SEEK ▶▶▶:Presstoseekthe nextstationortrack.
←BACK:Presstoexitormove backwardinamenu.
Buttons1-6:Presstosaveand selectfavoritestations
1-16InBrief
Formoreinformationaboutthese andotherradiofeatures,seethe separateinfotainmentsystem manual.
StoringaFavoriteStation
Stationsfromallbandscanbe storedinthefavoritelistsinany order.Uptosixstationscanbe storedineachfavoritepageandthe numberofavailablefavoritepages canbeset.
Tostorethestationtoapositionin thelist,pressthecorresponding numericbutton1-6untilthestation canbeheardagain.
SettingtheClock
Fordetailedinstructionsonsetting theclock,seeClock(DigitalClock) onpage5-7.
SettingtheTimeandDate
- PresstheCONFIGbutton.
- SelectTimeandDateSettings.
-
SelectSetTimeorSetDate.
-
TurntheMENU/SELECTknob toadjustthehighlightedvalue.
- PresstheMENU/SELECTknob toselectthenextvalue.
- Tosavethetimeordate andreturntotheTimeand DateSettingsmenu,press the ◆BACKbuttonatanytime orpresstheMENU/SELECT knobafteradjustingtheminutes oryear.
Settingthe12/24HourFormat
- PresstheCONFIGbutton.
- SelectTimeandDateSettings.
- Highlight12/24HourFormat.
- PresstheMENU/SELECTknob toselectthe12houror24hour displayformat.
SettingtheMonth&DayFormat
- PresstheCONFIGbutton.
- SelectTimeandDateSettings.
-
HighlightMonth&DayFormat.
-
PresstheMENU/SELECTknob toselectMM/DD(month/day) or DD/MM(day/month).
VehicleswithanXM™Satellite RadiotunerandavalidXMSatellite RadiosubscriptioncanreceiveXM programming.
XMSatelliteRadioService
XMisasatelliteradioservicebased inthe48contiguousUnitedStates and10Canadianprovinces.XM SatelliteRadiohasawidevarietyof programmingandcommercial-free music,coasttocoast,andin digital-qualitysound.Afees requiredtoreceivetheXMservice.
Formoreinformationreferto:
• www.xmradio.comorcall 1-800-929-2100(U.S.).
• www.xmradio.caorcall 1-877-438-9677(Canada).
Formoreinformation,seethe separateinfotainmentsystem manual.
PortableAudioDevices
Some vehicles have a 3.5 mm (1/8 in) auxiliary input and a USB port located in the center console. External devices such as Pods ^® , laptop computers, MP3 players, CD changers, and USB storage devices may be connected, depending on the audiosystem.
Formoreinformation,seethe separateinfotainmentsystem manual.
Bluetooth®
TheBluetooth® systemallowsusers withaBluetooth-enabledcellphone tomakeandreceivehands-free callsusingthevehicleaudio system,microphone,andcontrols.
TheBluetooth-enabledcellphone must be repaired with the in-vehicle Bluetooth system before it can be used in the vehicle. Not all phones will support all functions.
Seetheseparateinfotainment systemmanualformore information.
SteeringWheelControls

Forvehicleswithaudiosteering wheelcontrols, someaudiocontrols can be adjusted at theesteering wheel.
I: Press to interact with the availableBluetooth, OnStar, ornavigation system.
I: Press to silence the vehiclespeakersonly.Pressagain toturnthesoundon.Forvehicles withOnStarorBluetoothsystems, presstorejectanincomingcall, ortoendacurrentcall.
1-18InBrief
△ SRC ∇ : Turn △ or ∇ to select a radiobandoraudiosource.
Turn or toselectthenextor previousfavoriteradiostation, CD, DVDtrack/chapter(withnavigation), orMP3track.
PressSRCtochangebetween radioandCDorDVD.
+ ▷ -: Press + to increase or - to decrease the volume.
Formoreinformation,seeSteering WheelControlsonpage5-2.
CruiseControl

Thecruisecontrolbuttonsareon thesteeringwheel.
:Presstoturnthecruise control systemonandoff.
:Presstodisengagecruise controlwithouterasingtheset speedfrommemory.
RES/+:Movethethumbwheelup tomakethevehicleresumetoa previouslysetspeedorto accelerate.
SET/-:Movethethumbwheel downtosetaspeedandactivate cruisecontrol,ortomakethe vehicledecelerate.
See Cruise Control on page 9-39.
NavigationSystem
If the vehicle has an navigation system, there is a separate Infotainment System Manual that includes information on the radio, audioplayers, and navigation system.
Thenavigationsystemprovides detailedmapsofmostmajor freewaysandroads. Aftera destinationhasbeenset, the systemprovidesturn-by-turn instructionsforreachingthe destination. In addition, the system can helplocate a variety of point sof interest (POIs), such as banks, airports, restaurants, and more.
Seetheinfotainmentsystemmanual formoreinformation.
DriverInformation Center(DIC)
The DIC display is located in the center of the instrument panel cluster. It shows the status of many vehicle systems. The controls for the DIC are located on the return signallever.

A. SET/CLR: Presstosetorclear themenuitemwhenitis displayed.
B. △▽:Usethethumbwheelto scrollthroughtheitemsin eachmenu.
C. MENU: Presstogettothe Trip/FuelMenuandthe VehicleInformationMenu. Thisbuttonisalsousedto returntoorexitthelastscreen displayedontheDIC.
Formoreinformation,seeDriver InformationCenter(DIC)on page5-29.
RearVision Camera(RVC)
Ifavailable, therearvisioncamera displaysaviewoftheareabehind thevehiclewhenthevehicleis shiftedintoR(Reverse).The displaywillappearoneitherthe insiderearviewmirrorornavigation screen,ifequipped.
Tocleanthecameralens, located abovethelicenseplate, rinseitwith waterandwipeitwithasoftcloth.
SeeRearVisionCamera(RVC)on page9-43.
UltrasonicParkingAssist
Ifavailable, UltrasonicFrontand RearParkingAssist(UFRPA)uses sensoronthefrontandrear bumperstodetectobjectswhile parkingthevehicle.Itoperatesat speedslessthan8km/h(5mph). UFRPAusesaudiobeepstoprovide distanceandsysteminformation.
Keepthesensorsonthevehicle's frontandrearbumperscleanto ensureproperoperation.
See Ultrasonic Parking Assiston page 9-41 form more information.
StorageCompartments
The gloveboxisairconditioned and can be used to store items at lower temperature. Movetheslide control to open or closet the opening to adjust the airflow. See GloveBox on page 4-1 form more information.
PowerOutlets
Theaccessorypoweroutletscanbe usedtopluginelectricalequipment, suchasacellphoneorMP3player.
The vehicle has four accessory power outlets. The power outlets located below the climate control system, inside the center floor console, and on there are of the center floor console are powered while the vehicle is in ON/RUN/START or ACC/ACCESSORY mode, or until the driver door is opened within 10 minutes of turning off the vehicle.
The power outlet located in therear cargo area is powered at all times.
Opentheprotectivecovertousethe accessorypoweroutlet.
SeePowerOutletsonpage5-8.
UniversalRemoteSystem

natural_image
Front view of a device panel with three buttons (no text or symbols visible)This system provides a way to replace up three re-remote control transmitters used to activate devices such as a aged door openers, security systems, and home automation devices.
Readtheinstructionscompletely beforeattemptingtoprogramthe UniversalRemoteSystem.Because ofthestepsinvolved,itmaybe helpfultohaveanotherperson availabletoassistyouwith programmingtheUniversalRemote System.
See Universal Remote System on page 5-48.
Performance and Maintenance
TractionControl System(TCS)
Thetractioncontrolsystemlimits wheelspin. Thesystemturnson automatically every time the vehicle is started.
Toturnofftractioncontrol, press and releasetheTCS/ESPbutton locatedneartheshiftlever.
Formoreinformation,see Traction ControlSystem(TCS)on page9-34.
ElectronicStability Program(ESP)
The Electronic Stability Program (ESP) system assists with directional control of the vehicle, difficult driving conditions. Thesystem turnson automatically every time the vehicle is started.
Toturnoffbothtractioncontroland ESP, pressandholdtheTCS/ESP buttonlocatedneartheshiftlever.
Formoreinformation,seeElectronic StabilityProgram(ESP)on page9-36.
TirePressureMonitor
This vehicle may have a Tire Pressure Monitor System (TPMS).
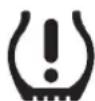
The TPMS warninglightalertsyou toasignificantlossinpressureof oneofthevehicle'stires. If the warninglightcomeson, stopas soonaspossibleandinflatethe tirestotherecommendedpressure
shownontheTireandLoading Informationlabel.SeeVehicleLoad Limitsonpage9-12.Thewarning lightwillremainonuntilthetire pressureiscorrected.
During cooler conditions, the low tire pressure warning light may appear when the vehicle is first started and then turn off. This maybe nearly indicator that the tire pressures are getting low and the tires need to be inflated to the proper pressure.
The TPMS does not replacenormal monthly tire maintenance. It is the driver's responsibility to maintain correct tire pressures.
See TirePressureMonitorSystem onpage 10-61.
TireSealantand CompressorKit
This vehicle may comewith a jack and spare tire or atire sealant and compressorkit. The kit can be used to temporarily sealsmall punctures in the read area of the tire.
See Tire Sealant and Compressor Kitonpage 10-77 for complete operating information.
If the vehicle camewith a jack and spare tire, see la Tire Goes Flaton page 10-75.
EngineOilLifeSystem
Theengineoillifesystemcalculates engineoillifebasedonvehicleuse anddisplaystheCHANGEENGINE OILSOONmessagewhenitistime tochangetheengineoilandfilter. Theoillifesystemshouldbereset to100%onlyfollowinganoil change.
ResettingtheOilLifeSystem
-
Using the DIC MENU button and thumbwheel on the turns signal lever, display OILLIFE REMAINING on the DIC. See Driver Information Center (DIC) on page 5-29 and Engine Oil Messages on page 5-37.
-
PresstheSET/CLRbuttonto resettheoillifeat100%. Becarefulnottoresettheoillife displayaccidentallyatanytime otherthanaftertheoilis changed. It cannot be reset accurately until then ex toil change.
Theoillifesystemcanalsobereset asfollows:
- Turntheignitiononwiththe engineoff.
- Fullypressandreleasethe acceleratorpedalthreetimes withinfiveseconds.
If the CHANGEENGINEOIL SOONmessageisnoton, the systemisreset.
SeeEngineOilLifeSystemon page10-14.
DrivingforBetterFuel Economy
Drivinghabitscanaffectfuel mileage. Herearesomedrivingtips togetthebestfueleconomy possible.
- Avoidfaststartsandaccelerate smoothly.
- Brakegraduallyandavoid abruptstops.
- Avoididlingtheengineforlong periodsoftime.
-
When road and weather conditions are appropriate, use cruise control.
• Alwaysfollowpostedspeed limitsordrivemoreslowlywhen conditionsrequire. -
Keepvehicletiresproperly inflated.
• Combineseveraltripsintoa singletrip. - Replacethevehicle'stireswith thesameTPCSpecnumber moldedintothetire'ssidewall nearthesize.
- Followrecommended scheduled maintenance.
Roadside Assistance Program
U.S.:1-800-852-9001.
TTYUsers(U.S.):1-866-612-0380.
Canada:1-800-567-4555.
AstheownerofanewSaab, you are automaticallyenrolledinthe RoadsideAssistanceprogram.
SeeRoadsideAssistanceProgram onpage 13-4 formoreinformation.
RoadsideServiceandOnStar
If you have an active On Star subscription, press the button and the current GPS location will be sent to an On Star Advisor who will assess your problem, contact Roadside Assistance, and relay you exact location to get the help you need.
OnStar®
For vehicles with an active On Star subscription, On Star uses several innovative technologies and live Advisor to provide a wider range of safety, security, navigation, diagnostics, and callingservices.
AutomaticCrashResponse
Inacrash, built-insensors can automatically alert an OnStar Advisor who is immediately connected to the vehicle to see if you need help.
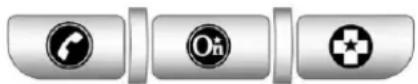
HowOnStarServiceWorks
:Pushthisbluebuttonto connecttoaspeciallytrained OnStarAdvisortoverifyyour accountinformationandtoanswer questions.
:Pushthisredemergency
buttontogetpriorityhelpfrom
speciallytrainedOnStarEmergency
Advisors.
:Pushthisbuttonforhands-free, voice-activatedcallingandtogive voicecommandsforHands-Free CallingandTurn-by-Turn Navigation.
AutomaticCrashResponse, EmergencyServices,CrisisAssist, StolenVehicleAssistance,Vehicle Diagnostics,RemoteDoorUnlock, RoadsideAssistance,Turn-by-Turn
Navigation, and Hands-Free Calling are available on most vehicles. Not all OnStarservices are available on all vehicles. Form more information, seethe OnStar Owner's Guide; visit www.onstar.com (U.S.) or www.onstar.ca (Canada); contact OnStarat1-888-4-ONSTAR (1-888-466-7827) or TTY
1-877-248-2080;orpushthe buttonospeakwithanOnStar Advisor24hoursaday,7days aweek.
ForafulldescriptionofOnStar servicesandsystemlimitations,see theOnStarOwner'sGuideinthe glovebox.
OnStarserviceissubjecttothe OnStarTermsandConditions includedintheOnStarGlove BoxKit.
OnStarservicerequireswireless communicationnetworksandthe GlobalPositioningSystem(GPS) satellitenetwork.NotallOnStar servicesareavailableeverywhere oronallvehiclesatalltimes.
1-24InBrief
OnStarservicecan'tworkunless thevehicleisinaplacewhere OnStarhasanagreementwitha wirelessserviceproviderforservice inthatarea,andthewireless serviceproviderhascoverage, networkcapacity,reception,and technologycompatiblewithOnStar service.Serviceinvolvinglocation informationaboutthevehiclecan't workunlessGPSsignalsare available,unobstructed,and compatiblewiththeOnStar hardware.Thevehiclehastohave aworkingelectricalsystemand adequatebatterypowerforthe OnStarequipmenttooperate. OnStarservicemaynotworkifthe OnStarequipmentisn'tproperly installedoryouhaven'tmaintained itandthevehicleisingoodworking orderandincompliancewithall governmentregulations.Ifyoutry toadd,connect,ormodifyany equipmentorsoftwareinthe vehicle,OnStarservicemaynot work.OtherproblemsOnStarcan't controlmaypreventservicetoyou,
suchashills,tallbuildings,tunnels, weather,electricalsystemdesign andarchitectureofthevehicle, damagetoimportantpartsofthe vehicleinacrash,orwirelessphone networkcongestionorjamming.
SeeRadioFrequencyStatementon page13-12forinformation regardingPart15oftheFederal CommunicationsCommission(FCC) rulesandIndustryCanada StandardsRSS-210/220/310.
OnStarSteeringWheel Controls
This vehicle may have a Talk/Mute button that can be used to interact with OnStarHands-Freecalling. See Steering Wheel Controlson page 5-2 form more information.
Onsomevehicles,theTalkbutton canbeusedtodialnumbersinto voicemailsystems,ortodialphone extensions.SeetheOnStarOwner's Guideformoreinformation.
YourResponsibility
Increase the volume of the radio if the OnStar Advisor cannot be heard.
IfthelightnexttotheOnStar buttonisred,thesystemmay notbefunctioningproperly.Push the buttonandrequestvehicle diagnosticcheck.Ifthelight appearsclear(nolightappears), yourOnStarsubscriptionhas expiredandallserviceshavebeen deactivated.Pushthe buttononto confirmthattheOnStarequipment isactive.
Keys, Doors and Windows
KeysandLocks
Keys......2-2
RemoteKeylessEntry(RKE)
System......2-3
RemoteKeylessEntry(RKE)
SystemOperation......2-3
RemoteVehicleStart......2-9
DoorLocks......2-10
PowerDoorLocks......2-11
SafetyLocks......2-12
Doors
Liftgate....2-12
VehicleSecurity
VehicleSecurity......2-16
Anti-theftAlarmSystem.....2-16
Immobilizer......2-17
ImmobilizerOperation......2-17
ExteriorMirrors
ConvexMirrors......2-18
PowerMirrors......2-19
FoldingMirrors......2-19
HeatedMirrors......2-20
AutomaticDimmingMirror...2-20
ParkTiltMirrors....2-20
InteriorMirrors
ManualRearviewMirror.....2-21
AutomaticDimmingRearview
Mirror....2-21
Windows
Windows......2-21
PowerWindows......2-22
SunVisors....2-24
Roof
Sunroof....2-25
KeysandLocks
Keys

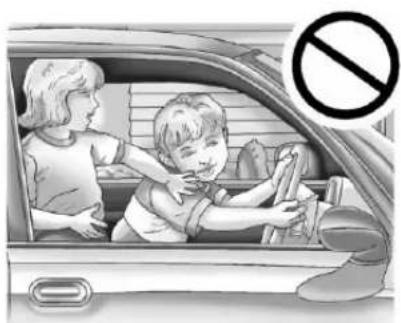
WARNING
Leavingchildreninavehiclewith theRemoteKeylessEntry(RKE) transmitterisdangerousformany reasons;childrenorotherscould bebadlyinjuredorevenkilled. Theycouldoperatethepower windowsorothercontrolsoreven makethevehiclemove.The windowswillfunctionwiththe RKEtransmitterinthevehicle andtheycouldbeseriously injuredorkilledifcaughtinthe pathofaclosingwindow.Donot leavetheRKEtransmitterina vehiclewithchildren.
natural_image
Illustration of a child cleaning a car window with an adult nearby, no text or symbols present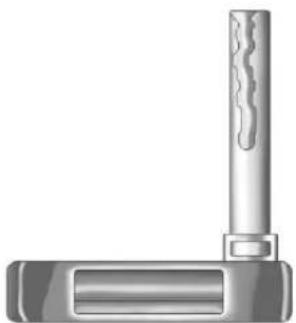
natural_image
Illustration of a cylindrical object with a textured top and rectangular base (no text or symbols)Thiskey, located inside the Remote KeylessEntry(RKE) transmitter, is used for the driver door and glovebox.

Toremovethekey, pressthebutton nearthebottomofthetransmitter, andpullthekeyout. Neverpullthe keyoutwithoutpressingthebutton.
Seeyourdealerifanewkeyis needed.
Notice: If the keys get locked in the vehicle, it may have to be damaged to get them out. Always carry as spare key.
ContactRoadsideAssistanceify you arelockedoutofthevehicle.See RoadsideAssistanceProgramon page13-4.
RemoteKeylessEntry (RKE)System
SeeRadioFrequencyStatementon page 13-12forinformation regardingPart15oftheFederal CommunicationsCommission(FCC) rulesandIndustryCanada StandardsRSS-210/220/310.
If thereisadecreaseintheRKE operatingrange:
- Checkthedistance. The transmitter may be too far from the vehicle.
- Checkthelocation. Other vehiclesorobjectsmaybe blockingthesignal.
- Checkthetransmitter'sbattery. See "BatteryReplacement" later inthissection.
- Ifthetransmitterisstillnot workingcorrectly,seeyour dealeroraqualifiedtechnician forservice.
RemoteKeylessEntry (RKE)SystemOperation
TheRKEtransmitterfunctionswill workupto60m(195ft)awayfrom thevehicle.
Keepinmindthatotherconditions, suchasthosepreviouslystated, canimpacttheperformanceofthe transmitter.
natural_image
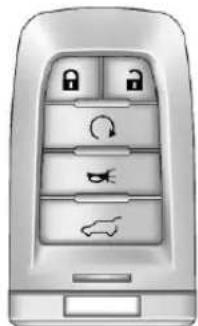
Close-up of a car's right-hand door with control buttons and scroll icons (no text or symbols)WithRemoteStartandPower LiftgateShown, WithoutSimilar
(Lock): Presstolockalldoors. Theturnsignalindicatorsmay flashand/orthehornmaysound toindicatelocking.See"Locking Feedback"underVehicle Personalizationonpage5-42.
If the driverdoor is open when pressed, all doors lock except the driver door, if enabled through the vehicle personalization. If the passenger door is open when pressed, all doors lock.


Pressing may also forearm the theft-deterrent system. See Anti-theft Alarm System on page 2-16.
(Unlock): Presstounlockthe driverdoororalldoors. See "Door UnlockOptions" under Vehicle Personalization on page 5-42. When remotely unlocking the vehicle at night the foglamps and back-up lampswill come on for about 20 second st olight your approach to the vehicle. The turn signal indicators may flash and orth e horn maysound to indicate unlocking. See "Unlock Feedback" under Vehicle Personalization on page 5-42.
Memoryseatpositionsmaybe recalledwhenunlockingthevehicle. See "MemoryRemoteRecall" under VehiclePersonalization on page5-42formoreinformation.
Pressing 📄willdisarmthe theft-deterrentsystem.See Anti-theftAlarmSystemon page2-16.
Q(RemoteStart):Forvehicles with this feature, press and then press and hold Q within twosecond st o start the engine from outside the vehicle using the RKE transmitter. See Remote Vehicle Start on page 2-9 for additional information.
(VehicleLocator/Panic Alarm): Pressandreleaseone timetolocatethevehicle. The exteriorlampsflashandthehorn chirps. Pressandhold for threesecondstosoundthepanic alarm. The hornsoundsand theturnsignallampsflashfor 30 seconds, or until ispressed againorthevehicleisstarted.
(RemoteLiftgateRelease): Pressuntiltheliftgatebeginsto movetoopenorclosethepower liftgate.
KeylessAccessOperation
Some vehicles havethe keyless access system that let you lock and unlock the doors and access the lift gate without removing the RKE transmitter from your pocket, purse, brief case, etc. The RKE transmitter must be within 1 m (3 ft) of the door being opened. If the vehicle has this feature, there will be body colored touch pad on the outside front door handles.
KeylessUnlocking
With the transmitter within 1 m(3ft), approach the frontdoor and pull the handle. If the transmitter is recognized, the door will unlock and open.
Enteringanydoorotherthanthe driverdoorwillalwayscauseallof thedoorstounlock. Thisisnot customizable.
Tocustomizewhichdoorsunlock whenthedriverdoorisopened,see "PassiveUnlock" under Vehicle Personalizationonpage5-42.
KeylessLocking
Ifthevehiclehasthekeyless accesssystem,thisfeatureallows youtoselectwhetherthedoors automaticallylockduringnormal vehicleexit.Whenthevehicleis turnedoffandalldoorsbecome closed,thevehiclewilldetermine howmanyRKEtransmittersremain inthevehicleinterior.Ifatleastone transmitterhasbeenremovedfrom theinteriorofthevehicle,thedoors willlockaftereightseconds.
Iftherearetwotransmittersinthe vehicleandoneisremoved,the otherwillbelockedin.Aperson approachingtheoutsideofthe lockedvehiclewithoutanaauthorized RKEtransmitterwillnotbeableto openthedor,evenwiththe transmitterinthevehicle.
Youmay temporarily disable the keylesslocking feature by pressing and holding the power door unlock button on the instrument panel for severalsecond with a door open.
Keylesslockingwillthenremain disableduntilthedoorlockswitch ispressed,oruntilthevehicleis turnedon.
Tocustomizewhetherthedoors automaticallylockwhenyouexit thevehicle,see"PassiveLocking" underVehiclePersonalizationon page5-42.
LockSensor
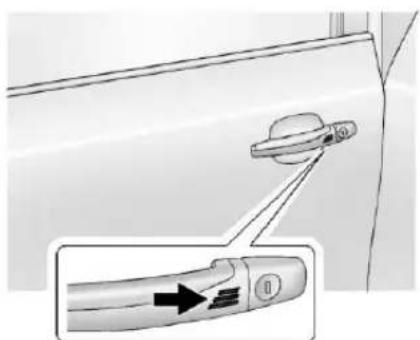
Whenalldoorsareclosedandthe ignitionisoff,thevehiclecanbe lockedbypassingthisareaonthe
doorhandle. This feature will be available for several minutes after the vehicle has been turned off.
KeylessLiftgateOpening
Pressthetouchpadontheliftgate handletoopentheliftgateifthe RKEtransmitteriswithinrange.
ProgrammingTransmittersto theVehicle
OnlyRKEtransmittersprogrammed tothevehiclewillwork.lfa transmitterislostorstolen,a replacementcanbepurchased and programmedthroughyourdealer. Thevehiclecanbereprogrammed sothatlostorstolentransmittersno longerwork.Eachvehiclecanhave uptoeighttransmittersmatched toit.
ProgrammingwithaRecognized Transmitter(KeylessAccess VehiclesOnly)
Anewtransmittercanbe programmedtothevehiclewhen thereisonerecognizedtransmitter.
2-6Keys, DoorsandWindows
Toprogram,thevehiclemustbeoff andalltransmitters,bothcurrently recognizedandnew,mustbe withyou.
-
Placetherecognized transmitter(s)inthecupholder.
-
Insert the vehicle key of thenew transmitter into the keylock cylinder located on the outside of the riverdoor and turn the key to the unlock position five times within 10 seconds.
TheDriverInformationCenter (DIC) displays READYTO LEARNELECTRONICKEY#2, 3,4,ETC.

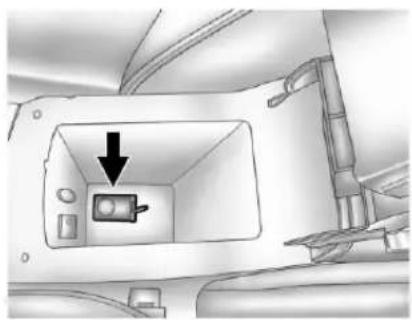
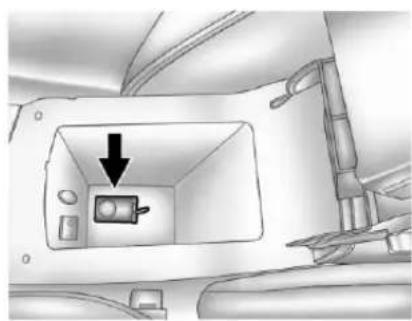
natural_image
Interior view of a vehicle cabin with a black arrow pointing to the interior space (no text or symbols visible)-
Placethenewtransmitterinto the transmitterpocket. The transmitterpocketisinsidethe centerconsolestoragearea locatedbetweenthedriverand frontpassengerseats. The storageareawillneedtobe openedandthestoragetray lifteduptoaccessthe transmitterpocket.
-
PresstheSTARTbutton. When the transmitter is learned the DIC display will show that it is ready to program then next transmitter.
-
Removethetransmitter from the transmitter pocket and press 🔒 on the transmitter.
Toprogramadditional transmitters,repeatSteps3 through5.
When all additional transmitters are programmed, press and hold the START button for 10 second to exit programming mode.
Programmingwithouta RecognizedTransmitter (KeylessAccessVehiclesOnly)
If there are not currently recognized transmitters available, follow this procedure to program up to eight transmitters. This feature is not available in Canada. This procedure will take approximately 30 minutes to complete. The vehicle must be off and all transmitters must be with you.
- Insert the vehicle key of the transmitter into the key lock cylinder located on the outside of the river door and turn the key to the unlock position five times within 10 seconds.
TheDriverInformationCenter (DIC) displays REMOTELEARN PENDING, PLEASEWAIT.
- Waitfor10minutesuntiltheDIC displaysPRESSENGINE STARTBUTTONTOLEARN andthenpresstheSTART button.
The DIC display will again show REMOTELEARNPENDING, PLEASEWAIT.
- RepeatStep2twoadditional times. Afterthethirdtimeall previouslyknowntransmitters willnolongerworkwiththe vehicle.Remainingtransmitters canberelearnedduringthenext steps.
The DIC display should now show READY FOR REMOTE#1.
natural_image
Interior view of a vehicle showing a black arrow pointing to a component inside a rectangular chamber (no text or symbols visible)- Placethenewtransmitter into the transmitter pocket. The transmitter pocket is inside the center console storage area located between the driver and front passenger seats. The storage area will need to be opened and the storage tray lifted up to access the transmitter pocket.
5.PresstheSTARTbutton.When thetransmitterislearnedthe DICdisplaywillshowthatitis readytoprogramthenext transmitter.
2-8Keys, DoorsandWindows
- Removethetransmitter from thetransmitterpocket and press 🔒 onthetransmitter.
Toprogramadditional transmitters,repeatSteps4 through6.
When all additional transmitters are programmed, press and hold the START button for 10 second to exit programming mode.
StartingtheVehiclewithaLow TransmitterBattery
Ifthetransmitterbatteryisweak,the DICmaydisplayNOREMOTE DETECTEDwhenyoutrytostart thevehicle.TheREPLACE BATTERYINREMOTEKEY messagemayalsodisplay.
Tostartthevehicle:
- Openthecenterconsolestorage area and the storagetray.
natural_image
Interior view of a vehicle cabin with a black arrow pointing to the interior space (no text or symbols visible)-
Placethetransmitterinthe transmitterpocket.
-
With the vehicle in P (Park) or N (Neutral), pressthebrake pedaland the START button.
Replacethetransmitterbattery as soon as possible.
BatteryReplacement
Notice: When replacing the battery, donottouchany of the circuitry on the transmitter. Static from your body could damage the transmitter.
Replace the battery if the REPLACE BATTERY IN REMOTE KEY messagedisplays in the DIC.
- Pressthebuttonnearthebottom ofthetransmitterandpullthe keyout.

natural_image
Technical illustration of a device with labeled components and wiring (no text or symbols)-
Usethekeybladetoseparate thetwohalvesofthetransmitter.
-
Removetheoldbattery.Donot useametalobject.
- Insertthenewbattery, positive sidefacingdown. Replace with a CR2032orequivalent battery.
- Snapthetransmitterback together.
RemoteVehicleStart
If available, this feature allows you to start the engine from outside the vehicle.
Ω(RemoteVehicleStart):This buttonwillbeontheRKE transmitterifthevehiclehas remotestart.
Vehicleswithanautomaticclimate controlsystemwillautomatically changetoaheatingorcooling modedependingontheoutside temperatureduringaremotestart. WhentheON/RUN/STARTignition modeisselected, theclimate controlsystemwillreturntoits settingfromwhenthevehiclewas lastturnedoff.
Lawsinsomelocalcommunities may restrict the use of remote starters. Forexample, somelaws may require a person using remote start to have the vehicle in view. Check local regulations for any requirements.
There are other conditions which can affect the performance of the transmitter. See Remote Keyless Entry (RKE) System on page 2-3 for additional information.
StartingtheEngineUsingRemote Start
- Press ☐ ontheRKEtransmitter.
- Withintwoseconds, pressand hold Q untiltheturnsignal lampsflash. This confirms the requesttoremotestartthe vehiclehasbeenreceived. If the vehicle'slampsarenotvisible, pressandhold Q foratleast twoseconds.
During theremotestartthe doorswillbelockedandthe parkinglampswillremainonas longastheengineisrunning.
Theenginewillshutoffafter 10minutesunlessatime extensionisdoneortheignition isputinON/RUN/START.
- Pressthebrakepedalandselect the ON/RUN/STARTignition modetodrivethevehicle.
ExtendingEngineRunTime
Fora10-minuteextension,repeat Steps1and2whiletheengineis stillrunning. Theremotestartcan onlybeextendedonce.
When theremotestartisextended, thesecond10-minuteperiodwill startimmediately.
Forexample, if the vehicle has been running for five minutes, and 10 minutes are added, the engine will run for total of 15 minutes.
2-10Keys, DoorsandWindows
Amaximumoftworemotestarts, oraremotestartwithanextension, areallowedbetweenignitioncycles.
The vehicle'signitionmustbe changedtoON/RUN/STARTand thenbacktoOFFbeforetheremote startprocedurecanbeusedagain.
ShuttingtheEngineOffAftera RemoteStart
Tocancelaremotestart,doanyof thefollowing.
- PressQuntiltheparkinglamps turnoff.
• Turnonthehazardwarning flashers. - Turnthevehicleonandthen backoff.
ConditionsinWhichRemoteStart WillNotWork
Theremotestartwillnotoperateif anyofthefollowingoccur.
- Theignitionisinanymodeother thanOFF.
• Thetransmitterisinthevehicle.
• Thehoodisnotclosed.
- Thehazardwarningflashers areon.
• Thereisanemissioncontrol systemmalfunction.
• Theenginecoolanttemperature istoohigh.
• Theoilpressureislow.
- Tworemotevehiclestartshave alreadybeenused.
• ThevehicleisnotinP(Park).
DoorLocks

WARNING
Unlockeddoorscanbe dangerous.
- Passengers, especially children, caneasilyopenthe doorsandfalloutofamoving vehicle. Thechanceofbeing thrownoutofthevehicleina crashisincreasedifthe (Continued)
WARNING(Continued)
doorsarenotlocked.So,all passengersshouldwear safetybeltsproperlyandthe doorsshouldbelocked wheneverthevehicleis driven.
- Youngchildrenwhogetinto unlockedvehiclesmaybe unabletogetout.Achildcan beovercomebyextremeheat andcansufferpermanent injuriesorevendeathfrom heatstroke.Alwayslockthe vehiclewheneverleavingit.
- Outsiderscaneasilyenter throughan unlockeddoor whenslowingorstoppingthe vehicle. Lockthedoorsto helppreventthisfrom happening.
Tolockorunlockadoor, usethe RemoteKeylessEntry(RKE) transmitterfromtheoutside.
Frominsidethevehiclewiththe doorslocked,pullonceonthedoor handleletounlockit,andasecond timetoopenit.
PowerDoorLocks

Thepowerdoorlockswitchison theinstrumentpanel.
(Unlock):Presstounlockthe doors.
(Lock):Presstolockthedoors.
LockoutDeterrent
Lockoutdeterrentdecreasesthe chanceesthatthekeysmaybe accidentallylockedinthevehicle.
Whendoorlockingisrequestedby pressing 📞ontheinstrumentpanel or 🔊ontheRKEtransmitterand thedriverdoorisopen,alldoors willlockandthedriverdoorwill immediatelyunlock. Thedriverdoor mustbeclosedwhen 🔊ispressed foralldoorstoremainlocked.
Thisfeaturecanbeprogrammedto providethelockoutdeterrentfeature onlywhentheignitionmodeisACC/ACCESSORY,orON/RUN/START. See"PowerDoorLocks"in Vehicle Personalizationonpage5-42.
DelayedLocking
Whenthisfeatureisenabled and thedoorsarelockedwiththepower lockswitchontheinstrumentpanel, threechimessoundtosignalthat thedelayedlockingfeatureisin use. Alldoorslockfiveseconds afterthelastdoorisclosed.
Whenthedelayedlockingfeature isinuse,pressing 📄onthe
instrumentpanelor 📄ontheRKE transmitterwilloverridethefeature andlockalldoorsimmediately.
Thisfeaturecanbeprogrammed by usingtheDriverInformationCenter (DIC). See "DelayedDoorLock" in VehiclePersonalization on page5-42. Thedelayedlocking featureisonlyavailable if "Unlocked DoorAnti-Lockout" is disabled.
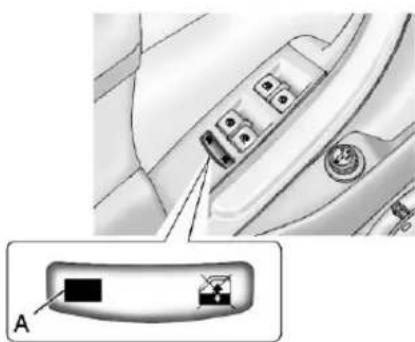
SafetyLocks

Thesafetylockswitchisonthe instrumentpanel.
Reardoorsafetylocksprevent passengersfromopeningtherear doorsfromtheinside.
Press 📄toactivatethesafetylocks. TheLED(A)comesonwhen activated.
Pressingthebuttonagain deactivatesthelockoutswitch.
Doors
Liftgate

WARNING
Exhaustgasescanenterthe vehicleifitisdrivenwiththe liftgate,trunk/hatchopen,orwith anyobjectsthatpassthroughthe sealbetweenthebodyandthe trunk/hatchorliftgate.Engine exhaustcontainscarbon monoxide(CO)whichcannotbe seenorsmelled.Itcancause unconsciousnessandevendeath.
If the vehicle must be driven with the lift gate, or trunk/hatch open:
- Closeallofthewindows.
• Fullyopentheairoutletson orundertheinstrument panel.
(Continued)
WARNING(Continued)
- AdjusttheClimateControl systemtoasettingthat bringsinonlyoutsideair andsetthefanspeedtothe highestsetting.See"Climate ControlSystems"inthe Index.
- If the vehicle is equipped with a power lift gate, disable the power lift gate function.
Formoreinformationabout carbonmonoxide,seeEngine Exhaustonpage9-24.
Notice: If you opentheliftgate without checking for overhead obstruction such as agarage door, you could damage the liftgate ortheliftgateglass. Always check to make sure the area above and behind the liftgate is clear before opening it.
ManualLiftgate
Forvehicles without keyless access, unlock the vehicle before opening the lift gate.
Pressthetouchpadlocatedinthe handleoftheliftgate,above the licenseplate,andliftuptoopen.
Donotpressthetouchpadwhile closingtheliftgate. This will cause the liftgatetobeunlatched.
Alwaysclosetheliftgatebefore driving.
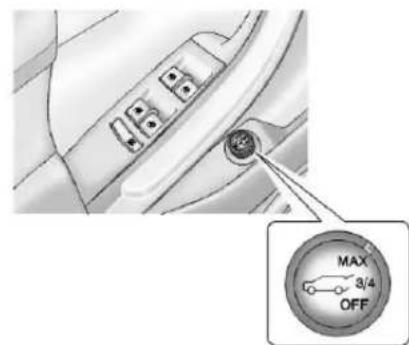
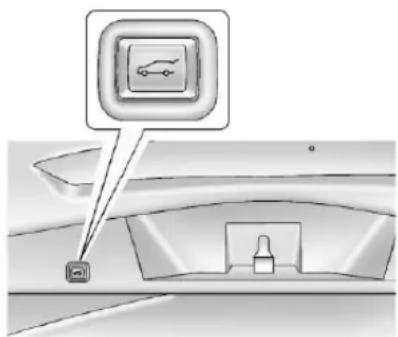
PowerLiftgate

Onvehicleswithapowerliftgate, theswitchisonthedriverdoor. The vehiclemustbeinP(Park)touse thepowerfeature. Thetaillamps flashwhenthepowerliftgate moves.
WARNING
Youorotherscouldbeinjuredif caughtinthepathofthepower liftgate. Makesurethereisnoone inthewayoftheliftgateasitis openingandclosing.
Choosethepowerliftgatemodeby turningthedialontheswitchuntil theindicatorlinesupwiththe desiredposition.
Thethreemodesare:
MAX: Theliftgateopenstothefull openheight.
3/4: Theliftgateopenstoareduced heightthatcanbesetbythevehicle operatorinarangeofapproximately three-quartersopentofullopen. Usethissettingtopreventthe liftgatefromopeningintooverhead obstructionssuchasagaragedoor orroofmountedcargoduringpower operation. Theliftgatecanstillbe manuallyopenedalltheway.
OFF: Theliftgateonlyoperates manuallyinthisposition.
Manualoperationofaliftgatethat alsohaspoweroperationrequires moreeffortthanwithastandard manualliftgate.
IneithertheMAXorthe3/4mode, theliftgatecanbepoweropened andclosedby:
- Pressing on the Remote KeylessEntry(RKE) transmitter until the lift gate startsmoving. See Remote KeylessEntry (RKE) SystemOperation page2-3.
- Pressing on the center of themodeswitchonthedriver door, with the driver door unlocked.
- Pressingthetouchpadswitch ontheliftgateoutsidehandle, withalldoorsunlocked,toopen theliftgate.
Pressandrelease on the liftgatenexttothelatchtoclosethe liftgate.
Pressinganyliftgatebutton,orthe touchpadswitchwhiletheliftgateis moving,stopsit.Pressingthebutton orRKEswitchagainreverse the direction.Thereisaminimum distancethatthepowerliftgatemust alreadybeopenforthesystemto holditopen.Ifmovementisstopped belowthatminimum,theliftgate closes.
Donotforcetheliftgateopenor closed during apowercycle.
The power lift gat e may be temporarily disabled under extreme temperatures or low battery conditions. If this occurs, the lift gate can still be operated manually.
Ifyoushiftthetransmissionoutof P(Park)whilethepowerfunctionis inprogress,theliftgatepower functionwillcontinuetocompletion. Ifyoushiftthetransmissionoutof P(Park)andacceleratebeforethe powerliftgatelatchisclosed,the liftgatemayreversetotheopen position.Cargocouldfalloutofthe vehicle.Alwaysmakesurethe powerliftgateisclosedandlatched beforeyoudriveaway.
If you power opentheliftgate and the lift gates support strut shavelost pressure, the turn signals flash and achimesounds. Thelift gate stays opent temporarily, then slowly closes. See your dealer for service before using the lift gate.
ObstacleDetectionFeatures
Iftheliftgateencountersanobstacle duringapoweropenorclosecycle, awarningchimewillsoundandthe liftgatewillautomaticallyreverse directiontothefullclosedoropen position. Afterremovingthe obstruction,thepowerliftgate operationcanbeusedagain. Iftheliftgateencountersmultiple obstaclesonthesamepowercycle, thepowerfunctionwilldeactivate. ThePOWERLIFTGATE UNAVAILABLEwarningmessagein theDriverInformationCenter(DIC) willdisplay. Afterremovingthe obstructions,theliftgatewillresume normalpoweroperation.
Thevehiclehaspinch sensors located on the side edges of the liftgate. If an object is caught between the liftgate and the body and presses against this sensor, the liftgate will be reversed direction and openfully. The liftgate will remain open until it is activated again or closed manually.
SettingthePowerLiftgate 3/4Mode
Tochangetheliftgatestopposition.
- Turntheliftgateswitchtoeither theMAX,orthe3/4mode positionandpoweropenthe liftgate.
- Stophtheliftgatemovementat thedesiredheightbypassing anyliftgateswitch. Manually adjusttheliftgatepositionif required.
- Pressandholdthebuttononthe liftgatenexttothelatchuntilthe turnsignalsflashandabeep soundstoindicatethatthenew settingisrecorded.
When power opened with the 3/4 mode selected, the lift gate stops at thenewset position.
If you donot receive the audible and visual feedback when setting the intermediate stop position, you are attempting to set the height below the 3/4 open height minimum (approximately 1.52 mor 5ft). Thelift gate cannot be set below that minimum and thenew setting will not be recorded.
ManualOperationofPower Liftgate
Tochangetheliftgatetomanual operation, turnthemodeswitchto theOFFposition.
With the power lift gated disabled and all of the doors unlocked, the lift gate can be manually opened and closed. The effort required to operate a power lift gate is greater than the effort required to operate a non-power lift gate.
Toopentheliftgate, pressthetouch padonthehandleontheoutsideof theliftgate, and liftthegateopen. To closetheliftgate, usethepullcupto lowertheliftgate and close. With the powerliftgatedisabled, theliftgate electriclatchwillstillpowerlatch oncecontactismadewith the striker. Alwaysclosetheliftgate beforedriving.
If the RKE button is pressed while power operation is disabled, the turn signals flash and the lift gate will not move.
Theliftgatehasanelectriclatch. Ifthebatteryisdisconnectedor haslowvoltage,theliftgatewillnot open.Theliftgatewillresume operationwhenthebatteryis reconnectedandcharged.
VehicleSecurity
This vehicle has the theft-deterrent features; however, they donot make it impossible to steal.
Anti-theftAlarmSystem
This vehicle has an anti-theftalarm system.
TheLEDlight, located on the instrument panel near the windshield, indicates the status of the system.
ArmingtheSystem
- Closealldoors, liftgate, andhood.
- Lockthevehicleusing the transmitterorthepowerdoor lockbutton. The LEDonthe instrumentpanelshouldcome onandstayonforabout 30 seconds.
- After 30 seconds, the alarm system will alarm, and the LED will begin to slowly flash indicating the alarm is operating.
Ifadoor, thehood, orliftgate is opened without first unlocking with the transmitter, the turn signals will flash and the horn will sound for about 30 seconds. The alarm system will then re-arm to monitor for then next unauthorized event.
Thetheft-deterrentalarmsystemwill notactivateifthedoorsarelocked withthekey.Youcanstartthe vehiclewitharecognizedtransmitter inthevehicleifthealarmhasbeen setoff.
DisarmingtheSystem
Todisarmthesystem, either unlock thedoorsusingthetransmitter, orstartthevehiclewitha recognizedtransmitterinthe vehicle.
Toavoidsettingoffthealarmby accident:
- Lockthevehiclewiththe transmitterafterallooccupants haveleftthevehicleandall doorsareclosed.
- Alwaysunlockadoorwiththe transmitter.Unlockingadoorany otherwaywillnotdisarmthe alarm.
If you set off the alarm by accident, turn off the alarm by pressing on the transmitter. The alarm will not stop if you try to unlock a door any other way.
HowtoDetectaTamper Condition
If ispressed and the horn chirps threetimes, an attempted break-in has occurred while the system was armed.
Ifthealarmhasbeenactivated,the THEFTATTEMPTEDmessagewill appearontheDIC.SeeKeyand LockMessagesonpage5-38for additionalinformation.
Immobilizer
SeeRadioFrequencyStatementon page 13-12forinformation regardingPart15oftheFederal CommunicationsCommission(FCC) rulesandIndustryCanada StandardsRSS-210/220/310.
ImmobilizerOperation
This vehicle has a passive theft-deterrent system.
Thesystemdoesnothavetobe manuallyarmedordisarmed.
The vehicle is automatically immobilized when the vehicle is turned off.
Theimmobilizationsystemis disarmedwhenthepushbuttonstart isactivatedtoentertheACC/ACCESSORYmodeortheON/RUN/STARTmodeandavalid transmitterispresentinthevehicle.

Thesecuritylight, located in the instrument panel cluster, comes on if there is a problem with arming or disarming the theft-deterrent system.
ThesystemhasoneormoreRKE transmittersmatchedtoan immobilizercontrolunitinyour vehicle.Onlyacorrectlymatched RKEtransmitterwillstartthe vehicle.Ifthetransmitterisever damaged,youmaynotbeableto startyourvehicle.
Whentryingtostartthevehicle, the securitylightcomesonbrieflywhen theignitionisturnedon.
If theenginedoesnotstartandthe securitylightstayson,thereisa problemwiththesystem.Turnthe ignitionoffandtryagain.
If the vehicle will not change ignition modes (ACC/ACCESSORY, ON/RUN/START, OFF), and the RKE transmitter appear stobe undamaged, try another transmitter. Or, you may try placing the transmitter in the transmitter pocket located in the center console. See "NOREMOTEDETECTED" under Key and Lock Messages on page 5-38.
Iftheignitionmodeswillnotchange withtheothertransmitter,your vehicleneedsservice.Iftheignition doeschangemodes,thefirst transmittermaybefaulty.
Seeyourdealerwhocanservice thetheft-deterrentsystemandhave anewRKEtransmitterprogrammed tothevehicle.
Itispossiblefortheimmobilizer systemtolearnneworreplacement RKEtransmitters.Uptoeight transmitterscanbeprogrammedfor thevehicle.Toprogramadditional transmitters,see"Programming TransmitterstotheVehicle"under RemoteKeylessEntry(RKE) SystemOperationonpage2-3.
Donotleavethekeyordevicethat disarmsordeactivatesthe theft-deterrentsysteminthevehicle.
ExteriorMirrors
ConvexMirrors

WARNING
Aconvexmirrorcanmakethings, likeothervehicles, lookfarther awaythantheyreallyare. If you cuttoosharplyintotherightlane, youcouldhitavehicleonthe right. Checktheinsidemirroror glanceoveryourshoulderbefore changinglanes.
Thepassengersidemirrorisconvex shaped. Aconvexmirror's surface is curvesomorecanbeseen from thedriverseat.
PowerMirrors
natural_image
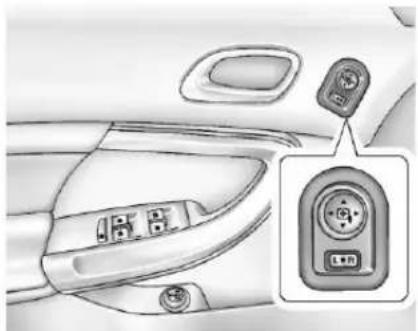
Interior view of a car showing the dashboard and rear vent with a close-up of the right vent (no text or symbols visible)Controlsfortheoutsidepower mirrorsarelocatedonthe driverdoor.
Toadjustthemirror:
-
Movetheselectorswitchto L(left)orR(right)tochoose the driverorpassengermirror.
-
Pressthearrowsonthecontrol padtomoveeachmirrorinthe desireddirection.
- Adjusteachoutsidemirrorso thatalittleofthevehicleandthe areabehinditcanbeseen.
- Return these selectors switch to the center position.
FoldingMirrors
ManualFoldawayMirrors
Vehicleswithmanualfoldmirrors arefoldedinwardtowardthevehicle topreventdamagewhengoing throughanautomaticcarwash. Pushthemirroroutwardtoreturnit totheoriginalposition.
PowerFoldawayMirrors

natural_image
Interior view of a car showing the dashboard and steering wheel (no text or symbols visible)Vehicleswithpowerfoldingmirrors havecontrolsonthedriverdoor.
Tofoldthemirrors:
-
With these selectors switch in the ● position, pressthedown arrowon the control pad. Both mirrors will automatically fold.
-
Pressthedownarrowagainto returnthemirrorstotheiroriginal position.
ResettingthePowerFoldaway Mirrors
Resetthepowerfoldawaymirrorsif:
• Themirrorsareaccidentally obstructedwhilefolding.
• They are accidentally manually folded/unfolded.
- Themirrorsdonotstayinthe unfoldedposition.
• Themirrorsvibrateatnormal drivingspeeds.
Foldandunfoldthemirrorsonetime usingthemirrorcontrolstoreset themtotheirnormalposition. Anoisemaybeheardduringthe resettingofthepowerfoldaway mirrors. Thissoundisnormalafter amanualfoldingoperation.
HeatedMirrors
(RearWindowDefogger): Presstoheatthemirrors.
See "RearWindowDefogger" under DualAutomaticClimateControl Systemonpage8-1formore information.
AutomaticDimming Mirror
If the vehicle has the automatic dimming mirror, the driver outside mirorautomatically adjusts for the glare of headlamps behind you.
ParkTiltMirrors
If the vehicle has the memory package, the outside mirror have aparktilt feature. This feature automatically tilts the outside mirrors to apre selected position when the vehicle is in R (Reverse). This allows the divertoview the curb for parallel parking.
The passenger and driver mirrors return to their original position when the vehicle is shifted out of R (Reverse), or the ignition is turned off to OFF/LOCK.
Thisfeaturecanbeturnedonor offthroughtheDriverInformation Center(DIC).See Vehicle Personalizationonpage5-42for moreinformation.
InteriorMirrors
ManualRearviewMirror
Holdtheinsiderearviewmirrorin thecenterandmoveitforaclearer viewbehindthevehicle.Adjustthe mirrortoavoidglarefromthe headlampsbehindyou.Pushthe tabforwardfordaytimeuseand pullitfornighttimeuse.
VehicleswithOnStarhavethree controlbuttonsatthebottomofthe mirror.Seeyourdealerformore informationonthesystemandhow tosubscribetoOnStar.Seethe OnStarOwner'sGuideformore informationabouttheservices OnStarprovides.
AutomaticDimming RearviewMirror
The vehicle may have an automatic dimming inside rear view mirror. Automatic dimming reduces the glare from the headlamp of the vehicle behind you.
VehicleswithOnStarhavethree controlbuttonsatthebottomofthe mirror.Seeyourdealerformore informationonthesystemandhow tosubscribetoOnStar.Seethe OnStarOwner'sGuideformore informationabouttheservices OnStarprovides.
CleaningtheMirror
Donotsprayglasscleanerdirectly onthemirror.Useasofttowel dampenedwithwater.
Windows

WARNING
Leavingchildren, helplessadults, orpetsinavehiclewiththe windowsclosedisdangerous. Theycanbeovercomebythe extremeheatandsuffer permanentinjuriesorevendeath fromheatstroke.Neverleavea child,ahelplessadult,orapet aloneinavehicle,especiallywith thewindowsclosedinwarmor hotweather.

natural_image
Interior view of a car with a child seated in the seat, no visible text or symbolsThe vehicle aerodynamics are designed to improve fueleconomy performance. This may result in pulsingsound when either rear window is down and the front windows are up. Toreducethe sound, openeither a front window or the sunroof (ifequipped).
PowerWindows
WARNING
Leavingchildreninavehiclewith theRKEtransmitterisdangerous formanyreasons;childrenor otherscouldbebadlyinjuredor evenkilled.Theycouldoperate thepowerwindowsorother controlsorevenmakethevehicle move.Thewindowswillfunction withtheRKEtransmitterin thevehicleandtheycouldbe seriouslyinjuredorkilledifcaught inthepathofaclosingwindow. DonotleavetheRKEtransmitter inavehiclewithchildren.
When there are children in the rearseat, usethewindowlockout button to prevent unintentional operation of the windows.
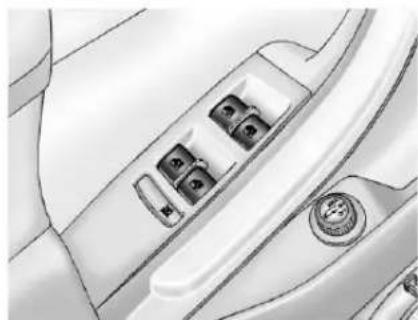
natural_image
Close-up of a car interior showing a switch and four buttons (no text or symbols visible)DriverSideShown
Thepowerwindowcontrolsareoneachofthesidedoors.
The driverdoor also hass switches that control the passenger and rear windows.
Thepowerwindows:
- Canbeoperatedwiththe ignitioninACC/ACCESSORYor ON/RUN/START.
- Canbeoperatedwithin 10minutesofswitchingthe ignitionoff.SeeRetained AccessoryPower(RAP)on page9-22.
- Willstopoperationwhenany doorisopened.
Operatetheswitchforthedesired windowbypassingtoopenand pullingtoclose.
Pushingorpullingtheswitchpartof thewaywillopenorclosethe windowaslongastheswitchis operated.
Express-Down/UpWindows
Windowsthathavetheexpress-down/upfeatureallowthewindows tobeloweredandraisedfully withoutholdingthewindowswitch. Presstehindowswitchfully andreleaseittoactivatethe express-downfeature.Pullthe windowswitchfullyupandrelease ittoactivatetheexpress-upfeature.
Theexpressmodecanbecanceled atanytimebybrieflypressingor pullingtheswitch.
ProgrammingthePower Windows
Programming the power windows may be necessary if the vehicle's battery has been disconnected or discharged.
Ifthewindowwillnotexpressup afterpowerhasbeenrestoredanda messageisdisplayedintheDriver InformationCenter:
- Closealldoors.
- PlacetheignitioninACC/ ACCESSORYorON/RUN/ START.
- From an impartial open position, closet how window and continue to pull the switch briefly after the window has fully closed.
ObstacleDetectionFeature
TheObstacleDetectionFeatureis partoftheexpress-upfeatureandis active:
- Inthemiddleandupperportions ofthewindowopening.
• Duringwindowupmovements. - InignitionOFFduringallwindow upmovementsandduring express-upwindowmovements inignitionON/RUN/START.
If there is something blocking the window during automatic closing, the window will be reversed direction for short distance. Weather conditions such as extreme cold and/orice may cause the window to auto-reverse. The window will return tonormal operation on the object or condition is removed.
2-24Keys, DoorsandWindows
Ifconditionspreventthewindow fromclosingandthewindow continuestoauto-reverse,itis possibletoclosethewindowwith theignitioninON/RUN/STARTby holdingthewindowswitchinthe partiallyorfullypulledupposition. Releaseoftheswitchfromthe partiallypulleduppositionwillcause thewindowtostop.Releaseofthe switchfromthefullypulledup positionwillactivatetheexpress-up andrelatedobstacledetection features.
Overload
If the windowsarerepeatedly operated withinashorttime, the windowoperationisdisabledfora shorttime.
WindowLockout
natural_image
Close-up of a car interior showing a hand holding a battery plug and a close-up of a device with a labeled component (no text or symbols visible)(WindowLockout): Therear windowlockoutswitchisonthe driverdoor. Thisfeatureprevents therearpassengerwindowsfrom operating, exceptfromthedriver position.
Press 📧toactivatetherear windowlockoutswitch.TheLED light(A)comesonwhenactivated.
Pressagaintodeactivatethe lockoutswitch.
SunVisors
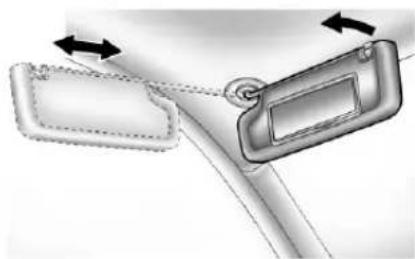
natural_image
Diagram showing two car door lockers with directional arrows indicating movement (no text or symbols)Pullthesunvisordowntoblock glare.Detachthesunvisorfromthe centermounttopivottotheside window,ortoextendalongtherod, ifavailable.
Roof
Sunroof
Dirtanddebrismaycollectonthe sunroofsealorinthetracksthat couldcauseanissuewithsunroof operationornoise.Itcouldalsoplug thewaterdrainagesystem. Periodicallyopenthesunroofand removeanyobstaclesorloose debris.Wipethesunroofsealand roofsealingareausingaclean cloth,mildsoap,andwater.Donot removegreasefromthesunroof.
Onvehicleswithasunroof,the switchesarelocatedonthe headlinerabovetherearviewmirror. TheignitionmustbeinON/RUN/ START,ACC/ACCESSORY,orin RetainedAccessoryPower(RAP)to operatethesunroof.Seelgnition Positionsonpage9-18and RetainedAccessoryPower(RAP) onpage9-22.
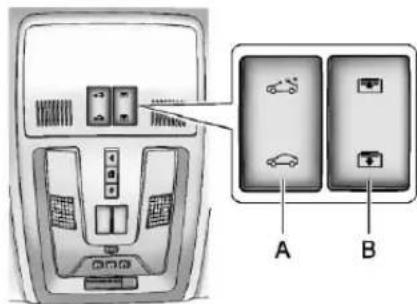
A. SunroofSwitch
B.SunshadeSwitch
Pressthebackofthesunroof switch(A)toopenthesunroof. Whentheswitchispressedtothe firststop,thesunroofwillopento theventposition.Presstheswitch tothesecondstoptoexpressopen thesunrooftoanautomatically adjustedcomfortposition.Pressthe switchtothesecondstopagainto opentheglassfurther,uptothefull openposition.Ifmoreventingis neededwhenthesunroofisopen,
adjustthesunrooftothecomfort positionoropenoneofthewindows slightly.
Pressthefrontoftheswitchtoclose thesunroof. Thefirststopwillclose thesunroofatadesiredpositionat normalspeed, andthesecondstop willexpressclosetheroof.
Donotkeepthesunroofopenfor longperiodsoftimewhilethe vehicleisnotinuse.Excessive debrismaycollectinthetracksand plugthewaterdrainingsystem.
Pressthebackofthesunshade switch(B)toopenthesunshade. Pressthefrontoftheswitchtothe firststoptoclosethesunshadetoa desiredpositionatanormalspeed. Presstheswitchforwardtothe secondstoptoexpressclosethe sunshade.
Fullyclosetheglassbeforefully closingthesunshade.
2-26Keys, DoorsandWindows
Express-open/Express-close
Pressandreleasethefrontorrear ofthesunroofswitch(A)to express-openorexpress-closethe sunroof.
Anti-PinchFeature
Ifanobjectisinthepathofthe sunroofwhenitisclosing,the anti-pinchfeaturedetectstheobject andstopsthesunrooffromclosing atthepointoftheobstruction.The sunroofthenreturnstothefull-open position.
Seatsand Restraints
HeadRestraints
HeadRestraints......3-2
ActiveHeadRestraints......3-3
FrontSeats
SeatAdjustment......3-4
PowerSeatAdjustment......3-4
LumbarAdjustment......3-7
ThighSupportAdjustment....3-7
RecliningSeatbacks......3-8
HeatedandVentilatedFront
Seats......3-10
RearSeats
RearSeats......3-11
HeatedRearSeats......3-13
RearSeat
Pass-ThroughDoor......3-13
SafetyBelts
SafetyBelts....3-14
HowtoWearSafetyBelts
Properly....3-18
Lap-ShoulderBelt......3-23
SafetyBeltUseDuring
Pregnancy....3-27
SafetyBeltExtender......3-28
SafetySystemCheck......3-28
SafetyBeltCare....3-28
ReplacingSafetyBeltSystem
PartsafteraCrash......3-29
AirbagSystem
AirbagSystem......3-29
WhereAretheAirbags?.....3-32
WhenShouldanAirbag
Inflate?......3-33
WhatMakesanAirbag
Inflate?......3-35
HowDoesanAirbag
Restrain?......3-35
WhatWillYouSeeafteran
AirbagInflates?......3-36
PassengerSensing
System....3-38
ServicingtheAirbag-Equipped
Vehicle....3-42
AddingEquipmenttothe
Airbag-EquippedVehicle...3-43
AirbagSystemCheck......3-44
ReplacingAirbagSystem
PartsafteraCrash......3-44
ChildRestraints
OlderChildren....3-45
InfantsandYoung
Children....3-47
ChildRestraintSystems.....3-50
WheretoPuttheRestraint...3-52
LowerAnchorsandTethers
forChildren(LATCH
System)....3-53
ReplacingLATCHSystem
PartsAfteraCrash......3-61
SecuringChildRestraints
(RearSeat)....3-62
SecuringChildRestraints
(FrontPassengerSeat)....3-64
3-2 Seats and Restraints
HeadRestraints
FrontSeats
The vehicle's frontseat have adjustable head restraints in all outboard seating positions.

WARNING
Withheadrestraintsthatarenot installedandadjustedproperly, thereisagreaterchancethat occupantswillsufferaneck/spinalinjuryinacrash.Donot driveuntiltheheadrestraintsfor allooccupantsareinstalledand adjustedproperly.

natural_image
Side profile illustration of a man in a car seat, showing head and torso (no text or symbols)Adjusttheheadrestraintsothatthe topoftherestraintisatthesame heightasthetopoftheoccupant's head. Thispositionreducesthe chanceofaneckinjuryinacrash.

natural_image
Top-down view of a car head panel with double-headed arrows indicating vertical motion (no text or symbols)Theheightoftheheadrestraintcan beadjusted. Toraiseorlowerthe headrestraint, pressthebutton locatedonthesideofthehead restraint, andpulluporpushthe headrestraintdown, andrelease thebutton. Pullandpushonthe headrestraintafterthebuttonis releasedtomakesurethatitis lockedinplace.
Thefrontseatoutboardhead restraintsarenotdesignedtobe removed.
RearSeats
Therearseatshaveadjustable headrestraintsintheoutboard seatingpositions.
Theheightoftheheadrestraintcan beadjusted.Pulltheheadrestraint uptoraiseit.Trytomovethehead restrainttomakesurethatitis lockedinplace.

natural_image
Mechanical assembly diagram showing a bracket with mounting holes and a black arrow indicating direction (no text or symbols)Tolowertheheadrestraint,press thebuttonlocatedonthetopofthe seatbackandpushthehead restraintdown.Trytomovethe
headrestraintafterthebuttonis releasedtomakesurethatitis lockedinplace.
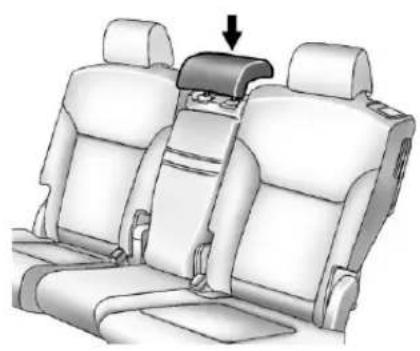
natural_image
Diagram of a car backseat with seatbelt and seat cover, showing no text or symbolsThecenterseatingpositionhasan integratedheadrestthatcanbe adjustedthesamewayasthe outboardheadrestraints.
If you are installing a child restraint in therearse at, see "Securinga Child Restraint Designed for the LATCH System" under Lower Anchors and Tethers for Children (LATCH System) on page 3-53.
ActiveHeadRestraints
The vehicle has an active head restraintsystem in the front seating positions. These automatically tilt forward to reduce risk of neck injury if the vehicle is hit from behind.
FrontSeats
SeatAdjustment

WARNING
Youcanlosecontrolofthe vehicleifyoutrytoadjusta manualdriverseatwhilethe vehicleismoving. Thesudden movementcouldstartleand confuseyou,ormakeyoupusha pedalwhenyoudonotwantto. Adjustthedriverseatonlywhen thevehicleisnotmoving.

natural_image
3D illustration of a car seat with seatbelt and seatbelt fastening arrows (no text or symbols)Toadjustamanualseat:
-
Pullthehandleatthefrontofthe seatcushion.
-
Movetheseatforwardor rearwardtoadjusttheseat position.
-
Releasethehandletostopthe seatfrommoving.
-
Trytomovetheseatback and forthobesureitislockedin place.
PowerSeatAdjustment
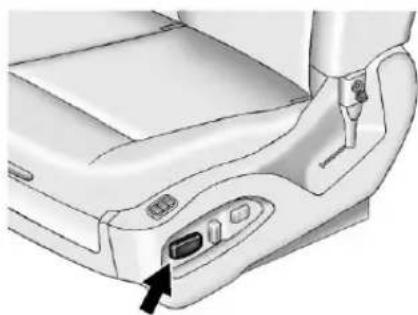
natural_image
Diagram of a car interior showing the dashboard and seat area with a black arrow pointing to the left side (no text or symbols present)Toadjustapowerseat:
- Movetheseatforwardor rearwardbyslidingthecontrol forwardorrearward.
- Raiseorlowerthefrontorrear partoftheseatcushionby movingthefrontorrearofthe controlupordown.
- Raiseorlowertheseatby movingthecontrolupordown.
Toadjusttheseatback,see RecliningSeatbacksonpage3-8.
Toadjustthelumbarsupport,see LumbarAdjustmentonpage3-7.
MemorySeats

Onvehicleswiththememory feature, the "1" and "2" buttons on theoutboardsideofthedriverseat areusedtomanuallysaveand recallfeatures. Thesefeatures includethedriverseatand
adjustablethrottleandbrakepedal positions, if equipped. Italsomay includetheoutsidemirrorpositions, if programmed. These manually stored positions are referred to as ButtonMemorypositions.
Notallvehicleswiththememory featurewillhaveprogrammable outsidersmirrors.
The vehicle will also automatically saved a river seat, adjustable throttle and brake pedal positions, and the outside mirror position to the current driver Remote Keyless Entry (RKE) transmitter when the ignition is turned off. These automatically stored positions are referred to as RKEMemory positions. See Remote Keyless Entry (RKE) System Operation on page 2-3 form more information on the RKE transmitter.
StoringButtonMemoryPositions
TosavepositionsintoButton Memory:
- Adjustthedriverseat, seatback recliner, adjustablepedals, and bothoutsidemirrorstothe desireddrivingpositions.
- Pressandreleasethe MEM(Memory)button.
- Press "1" until abeepsounds.
- RepeatSteps1 through3fora seconddriverusing "2."
RecallingButtonMemory Positions
TorecallthemanuallysavedButton Memorypositions,pressandhold "1" or "2." The driver seat, adjustable pedals,andoutsidemirrorsmoveto thepositionsstoredtothosebuttons when pressed. Releasing "1" or "2" beforethestoredpositionsare reachedstopstherecall.
3-6 Seats and Restraints
If something has blocked the driver seat and/or head adjustable pedals while recalling a memory position, there call may stop. Remove the obstruction; then press and hold the appropriatemanual control for the memory item that is not recalling for twoseconds. Try recalling the memory position again by pressing the appropriate memory button. If the memory position is still not recalling, see your dealer for service.
RecallingRKEMemoryPositions (MemoryRemoteRecall)
TheMemoryRemoteRecallfeature canrecallthedriverseat,adjustable pedals,andoutsidemirrorsto previouslystoredRKEMemory positionswhenenteringthevehicle.
Everytimetheignitionisplacedin OFForACCESSORY, thepositions ofthedriverseat, outsidemirrors, andadjustablepedalsare automaticallystoredtotheRKE transmitterthatwasusedtostart thevehicle. Thesepositionsare
calledRKEMemorypositionsand maybedifferentthanthepreviously mentionedButtonMemorypositions saved to the "1" or "2" buttons. To automaticallyrecallRKEMemory positions, unlockthedriverdoor withtheRKEtransmitter,andopen thedriverdoor.Onvehicleswith keylessaccess,openingthedriver doorwhenanRKEtransmitteris presentwillactivatetheRKE Memoryrecall.Ifthedriverdooris alreadyopen,pressingtheRKE transmitterbuttonwillalso activatetheRKEMemoryrecall. Thedriverseat,outsidemirrors,and pedalswillmovetothepreviously savedRKEMemorypositions.
Thisfeatureisturnedonoroffusing thevehiclepersonalizationmenu. See"MemoryRemoteRecall" underVehiclePersonalizationon page5-42formoreinformation.
Tostoprecallmovement,press oneofthememory,powermirror, orpowerseatcontrols,orthe adjustablepedalswitch,ifequipped.
Ifsomethinghasblockedthedriver seatand/ortheadadjustablepedals, ifequipped,whilerecallinga memoryposition,therecallmay stop.Removetheobstruction;then pressandholdtheappropriate manualcontrolforthememoryitem thatisnotrecallingfortwoseconds. Tryrecallingthememoryposition againbyopeningthedriverdoor andpressingtheRKEtransmitter button.Ifthememorypositionisstill notrecalling,seeyourdealerfor service.
EasyExitDriverSeat
Thisfeaturemovestheseat rearwardallowingthedriver moreroomtoexitthevehicle.
Toactivate, placetheignitionin OFForACCESSORYandopen thedriverdoor. If thedriverdooris already open, placing theignitionin OFForACCESSORYwill activate theeasyexitdriverseat.
Thisfeatureisturnedonoroffusing thevehiclepersonalizationmenu. See "EasyExitDriverSeat" under VehiclePersonalizationon page5-42formoreinformation.
Tostoprecallmovement,pressone ofthememory,powerseatcontrols, ortheadjustablepedalswitch, ifequipped.
If something has blocked the driver seat while recalling the exit position, there call may stop. Remove the obstruction; then press and hold the power seat control rearward for two seconds. Try recalling the exit position again. If the exit position is still not recalling, see your dealer for service.
LumbarAdjustment PowerLumbar

natural_image
Technical illustration of a mechanical device's side panel with a black arrow pointing to a button (no text or symbols present)Pressandholdthefrontorrearof thecontroltoincreaseordecrease lumbarsupport.Releasethecontrol whenteseatbackreachesthe desiredleveloflumbarsupport.
ThighSupport Adjustment
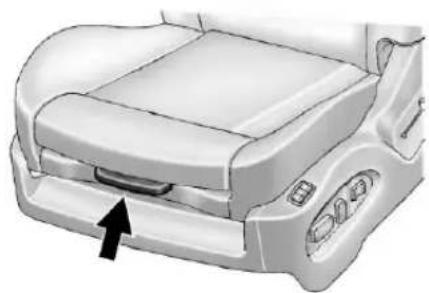
natural_image
Top-down view of a car interior showing the seat and dashboard (no text or symbols visible)Ifavailable,adjustthemanualleg extensionbypullinguponthelever, andthenpullingorpushingonthe supporttolengthenorshortenit. Releasethelevertolockitinplace.
3-8 Seats and Restraints
RecliningSeatbacks

WARNING
Sittinginareclinedpositionwhen thevehicleisinmotioncanbe dangerous.Evenwhenbuckled up,thesafetybeltscannotdo theirjobwhenreclinedlikethis.
Theshoulderbeltcannotdoits jobbecauseitwillnotbeagainst yourbody.Instead,itwillbein frontofyou.Inacrash,youcould gointoit,receivingneckorother injuries.
(Continued)
WARNING(Continued)
Thelapbeltcannotdoitsjob either.Inacrash,thebeltcould goupoveryourabdomen.The beltforceswouldbethere,notat yourpelvicbones.Thiscould causeseriousinternalinjuries.
Forproperprotectionwhenthe vehicleisinmotion,havethe seatbackupright.Thensitwell backintheseatandwearthe safetybeltproperly.

natural_image
Illustration of a person lying on their back with a string and a no-smoking symbol above (no text or labels)Donothaveaseatbackreclinedif thevehicleismoving.
ManualRecliningSeatbacks

WARNING
Youcanlosecontrolofthe vehicleifyoutrytoadjusta manualdriverseatwhilethe vehicleismoving. Thesudden movementcouldstartleand confuseyou,ormakeyoupusha pedalwhenyoudonotwantto. Adjustthedriverseatonlywhen thevehicleisnotmoving.

WARNING
Ifeitherseatbackisnotlocked, it couldmoveforwardinasudden stoporcrash. Thatcouldcause injurytothepersonsittingthere. Alwayspushandpullonthe seatbackstobesuretheyare locked.
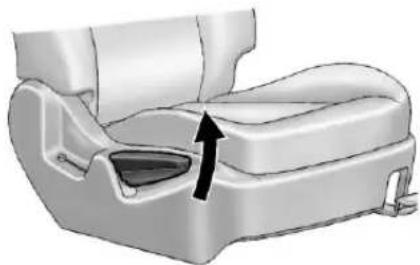
natural_image
3D illustration of a car seat with a black arrow pointing to the lower side of the seat (no text or symbols present)Toreclineamanualseatback:
- Liftthelever.
- Movetheseatbacktothe desiredposition, and then releasethelevertolockthe seatbackinplace.
- Pushandpullontheseatbackto makesureitislocked.
Toreturntheseatbacktotheupright position:
-
Lift the leverfully without applying pressure to the seatback, and these seatback will return to the upright position.
-
Pushandpullontheseatbackto makesureitislocked.
PowerRecliningSeatbacks

natural_image
Technical illustration of a mechanical device's side panel with control buttons and a black arrow pointing to a button (no text or symbols present)Toadjustapowerseatback, ifavailable:
• Tiltthetopofthecontrol rearwardtorecline.
- Tiltthetopofthecontrolforward toraise.
HeatedandVentilated FrontSeats

WARNING
If you cannot feel temperature change or paint to the skin, the seat theater may cause burns even at low temperatures. To reduce risk of burns, people with such a conditions should use care when using these seat theater, especially for long periods of time. Don't place anything on these that insulates against heat, such as a blanket, cushion, cover, or similar item. This may cause these seat theater to overheat. An overheated seat theater may cause a burn or may damage these seat.
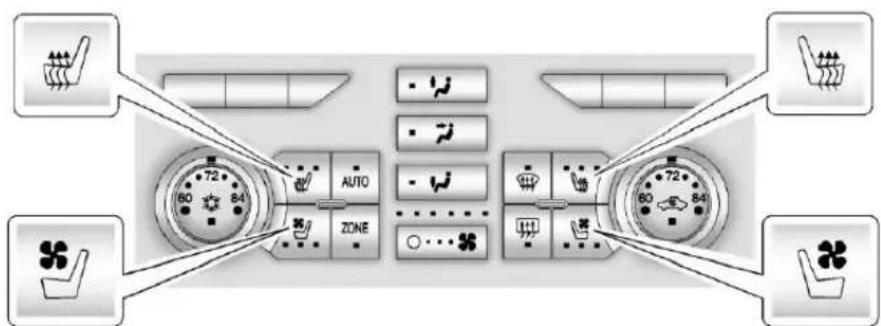
HeatedandVentilatedSeatButtonsShown, HeatedSeatButtonsSimilar
Ifavailable, the buttons are on the climate control panel. To operate, the ignition must be on.
Press 📋or—toheattheseat.
Press 📋 or 📋 toventilatetheseat.
Pressthebuttononceforthe highestsetting.Witheachpressof thebutton,theseatwillchangeto thenextlowersetting,andthento theoffsetting.Thelightsindicate threeforthehighestsettingandone forthelowest.
Thepassengerseatmaytake longertoheatup.
RemoteStartHeatedand VentilatedSeats
During aremotestart, the heatedor ventilated seats can be turned on automatically. They are canceled when the ignition is turned on. Press the button to set the heatedor ventilated seats after the vehicle is started.
Theheatedorventilatedseat indicatorlightsonthebuttondonot turnonduringaremotestart.
Thetemperatureperformanceofan unoccupiedseatmaybereduced. Thisisnormal.
Theheatedorventilatedseatswill notturnonduringaremotestart unlesstheyareenabledinthe vehiclepersonalizationmenu.See Remote Vehicle Startonpage 2-9 and"RemoteStartAutoHeated Seats"or"RemoteStartAutoSeat Cool"underVehiclePersonalization onpage 5-42formoreinformation.
RearSeats
SplitFoldingSeatbacks
With this feature, either side of the rearseatback can be folded down form more cargospace.
FoldingtheSeatbacks
Notice: Folding arearseat with the safety belts still fastened may caused damage to theseator the safety belts. Always unbuckle the safety belts and return them to their normal stowed position before folding arearseat.
Tofoldtheseatback:
-
Unbuckletherearsafetybelts andmovethefrontseatbacks totheuprightposition.See RecliningSeatbackson page3-8formoreinformation.
-
Makesurethatthereisnothing under,infrontof,orontheseat.

natural_image
3D rendering of a printer or printer with a labeled component (A) and an arrow pointing to its interior space (no text or symbols beyond label)A. SeatbackLockIndicator
-
Lift the lever on the top of the seat back. There are seat back lock indicator (A) extends when these seat back is unlocked.
-
Foldtheseatbackforward. The rearseatbacklockindicator(A) retractswhentheseatbackis locked.
Keeptheseatbackintheupright, lockedpositionwhennotinuse.
3-12 Seats and Restraints
RaisingtheSeatbacks

WARNING
Ifeitherseatbackisnotlocked, it couldmoveforwardinasudden stoporcrash. That could cause injury to the person sitting there. Always push and pull on the seat backstobesure they are locked.

WARNING
Asafetybeltthatisimproperly routed, not properly attached, ortwisted will not provide the protection needed in acrash. The person wearing the belt could be seriously injured. After raising the reseatback, always check to besure that the safety belts are properly routed and attached, and are not twisted.
Toraisetheseatback:
-
Lifttheleverontopofthe seatback.Raisetheseatback andreleasethelever.Therear seatbacklockindicator(A) extendswhentheseatbackis unlocked.
-
Pushtheseatbackrearwarduntil itlocksintheuprightposition. Therearseatbacklock indicator(A)retractswhenthe seatbackislockedinplace.
-
Makesuretherearsafety beltsarenottwistedorcaught betweentheseatcushion and theseatback.
RecliningtheSeatbacks
Toreclinetheseatback:
-
Liftandholdtheleverontopof theseatback. Therearseatback lockindicator(A) extends when theseatback is unlocked.
-
Tilttheseatbackrearward, and thenreleasetheleverwhen theseatbackisinthedesired position. Therearseatbacklock indicator(A)retractswhenthe seatbackislockedinplace.
HeatedRearSeats

WARNING
If you cannot feel temperature change or paint to the skin, the seat theater may cause burns even at low temperatures. See the Warning under Heated and Ventilated Front Seatson page 3-10.
Ifavailable, thebuttonsareonthe rearofthecenterconsole.

Withtheignitionon, press 📊or 🌐 toheattheleftorrightoutboardseat cushionandseatback.
Pressthebuttononceforthe highestsetting.Witheachpressof thebutton,theheatedseatchanges tothenextlowersetting,andthen theoffsetting.Threelightsindicate thehighestsetting,andonelight indicatesthelowest.
RearSeat Pass-ThroughDoor

natural_image
Interior view of a car seatbelt seat showing seatbelt insertion and seatbelt seating (no text or symbols)Thevehiclehasareseat pass-throughdoorinthecenterof therearseatback.Folddownthe centerarmrestandpushdownon thelatchtoopenthedoor.
SafetyBelts
Thissectionofthemanual describeshowtousesafetybelts properly. Italsodescribessome thingsnottodowithsafetybelts.

WARNING
Donotletanyoneridewherea safetybeltcannotbeworn properly.Inacrash,ifyouoryour passenger(s)arenotwearing safetybelts,theinjuriescanbe muchworse.Youcanhitthings insidethevehicleharderorbe ejectedfromthevehicle.You andyourpassenger(s)canbe seriouslyinjuredorkilled.Inthe samecrash,youmightnotbe, ifyouarebuckledup.Always fastenyoursafetybelt,andcheck thatyourpassenger(s)are restrainedproperlytoo.

WARNING
Itisextremelydangeroustoride inacargoarea,insideoroutside ofavehicle.Inacollision,people ridingintheseareasaremore likelytobeseriouslyinjuredor killed.Donotallowpeopletoride inanyareaofyourvehiclethatis notequippedwithseatsand safetybelts.Besureeveryonein thevehicleisinaseatandusing asafetybeltproperly.
This vehicle has indicators as a remindertobucklethesafetybelts. See SafetyBeltReminderson page 5-15 for additional information.
InmoststatesandinallCanadian provinces, the law requires wearing safetybelts. Here is why:
Youneverknowifyouwillbe inacrash.Ifyoudohaveacrash, youdonotknowifitwillbea seriousone.
Afewcrashesaremild, and some crashescanbesoseriousthateven buckledup, apersonwouldnot survive. But most crashes are in between. In many of them, people whobuckleupcansurvive and sometimes walk away. Without safety beltsthey could have been badly hurtorkilled.
Aftermorethan40yearsofsafety beltsinvehicles, thefactsareclear. Inmostcrashesbucklingupdoes matter...alot!
WhySafetyBeltsWork
Whenyourideinoronanything, yougoasfastasitgoes.

natural_image
Illustration of a small electric vehicle with wheels and roof, placed on a paved surface (no text or symbols)Takethesimplestvehicle. Suppose itisjustaseatonwheels.
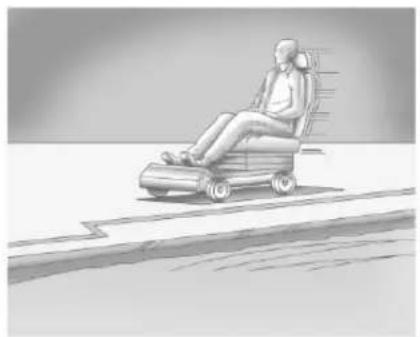
natural_image
Illustration of a person sitting in a mobility scooter on a paved surface (no text or symbols)Putsomeoneonit.Getituptospeed.Thenstopthe
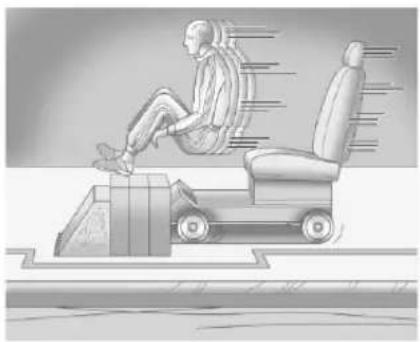
natural_image
Illustration of a person sitting on a mobility platform with motion lines indicating speed (no text or symbols)vehicle.Theriderdoesnotstop.
3-16SeatsandRestraints
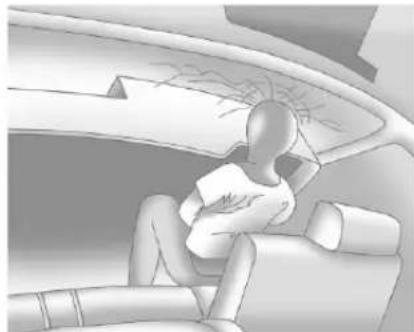
natural_image
Interior view of a car with a person sitting on the backrest, no visible text or symbolsThepersonkeepsgoinguntil stoppedbysomething.Inareal vehicle,itcouldbethewindshield...

natural_image
Interior view of a car showing two people seated in the seat, no visible text or symbolsortheinstrumentpanel...orthesafetybelts!

natural_image
Illustration of a person seated in a car, wearing a robotic arm (no text or symbols visible)Withsafetybelts, youslowdown asthevehicledoes. Yougetmore timetostop. Youstopovermore distance, and your strongest bones taketheforces. That is why safety belts makes such goodsense.
QuestionsandAnswersAbout SafetyBelts
Q: Willlbetrappedinthevehicle afteracrashiflamwearinga safetybelt?
A: You could be—whether you are wearing as safety belt not. But your chance of being conscious during and after an accident, so you can unbuckle and get out, is much greater if you are belted. And you can unbuckle as safety belt, even if you are upsidedown.
Q: If my vehicle has air bags, why should have to wear safety belts?
A: Airbagsaresupplemental systemsonly; sotheyworkwith safetybelts—notinsteadof them. Whetherornotanairbag isprovided, allooccupantsstill havetobuckleuptogetthe mostprotection. Thatistruenot onlyinfrontalcollisions, but especiallyinsideandother collisions.
Q: Iflamagooddriver, andl neverdrivefarfromhome, whyshouldlwearsafety belts?
A: You may bean excellent driver, but if you are in acrash—even on that is not your fault—you and your passenger(s) can be hurt. Being a good driver does not protect you from things beyond your control, such as baddrivers.
Mostaccidentsoccurwithin 40km(25mi)ofhome.
Andthegreatestnumber of seriousinjuriesanddeaths occuratspeedsoflessthan 65km/h(40mph).
Safetybeltsareforeveryone.
3-18 Seats and Restraints
HowtoWearSafetyBelts Properly
Thissectionisonlyforpeopleof adultsize.
Beawarethattherearespecial thingstoknowaboutsafetybelts andchildren.Andtherearedifferent rulesforsmallerchildrenand infants.Ifachildwillberidingin thevehicle,seeOlderChildrenon page3-45orInfantsandYoung Childrenonpage3-47.Followthose rulesforeveryone'sprotection.
Itisveryimportantforallooccupants tobuckleup.Statisticsshowthat unbeltedpeoplearehurtmoreoften incrashesthanthosewhoare wearingsafetybelts.
Occupantswhoarenotbuckledup canbethrownoutofthevehicleina crash. And they can strike others in the vehicle who are wearing safety belts.
First, before you or your passenger(s) wear safety belt, there is important information you should know.
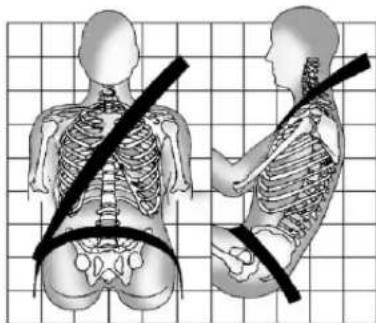
natural_image
Illustration of human torso and neck anatomy with a belt, shown from front and side views (no text or labels)Situpstraightandalwayskeepyour feetonthefloorinfrontofyou. The lappartofthebeltshouldbeworn lowandsnugonthehips, just
touchingthethighs.Inacrash,this appliesforcetothestrongpelvic bonesandyouwouldbelesslikely toslideunderthelapbelt.Ifyouslid underit,thebeltwouldapplyforce onyourabdomen.Thiscouldcause seriousorevenfatalinjuries.The shoulderbeltshouldgooverthe shoulderandacrossthechest. Thesepartsofthebodyarebest abletotakebeltrestrainingforces.
Theshoulderbeltlocksifthereisa suddenstoporcrash.
Q: Whatiswrongwiththis?

A: Theshoulderbeltistooloose. It will not give as much protection this way.
WARNING
Youcanbeseriouslyhurtifthe shoulderbeltistooloose.lna crash,youwouldmoveforward toomuch,whichcouldincrease injury.Theshoulderbeltshouldfit snuglyagainstyourbody.
Q:Whatiswrongwiththis?
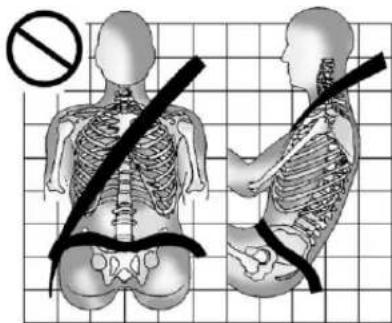
A: Thelapbeltistooloose. It will not given nearly a much protection this way.
3-20SeatsandRestraints

WARNING
Youcanbeseriouslyhurtifthe lapbeltistooloose.Inacrash, youcouldslideunderthelap beltandapplyforceonyour abdomen.Thiscouldcause seriousorevenfatalinjuries.The lapbeltshouldbewornlowand snugonthehips,justtouching thethighs.
Q: Whatiswrongwiththis?
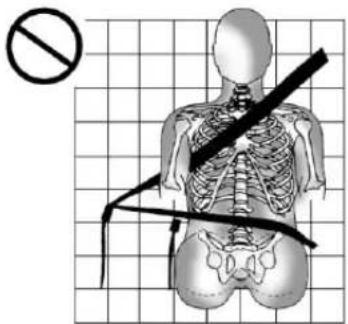
A: Thebeltisbuckledinthewrong buckle.

WARNING
Youcanbeseriouslyinjuredifthe beltisbuckledinthewrongplace likethis.Inacrash,thebeltwould goupoveryourabdomen.The beltforceswouldbethere,noton thepelvicbones.Thiscould causeseriousinternalinjuries. Alwaysbucklethebeltintothe bucklenearestyou.
Q: Whatiswrongwiththis?
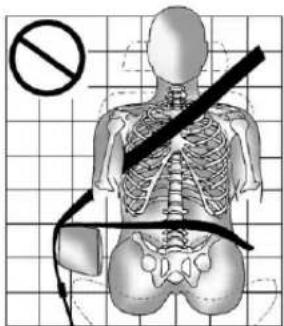
A: Thebeltisoveranarmrest.
WARNING
Youcanbeseriouslyinjuredifthe beltgoesoveranarmrestlike this.Thebeltwouldbemuchtoo high.Inacrash,youcanslide underthebelt.Thebeltforce wouldthenbeappliedonthe abdomen,notonthepelvic bones,andthatcouldcause seriousorfatalinjuries.Besure thebeltgoesunderthearmrests.
Q: Whatiswrongwiththis?

natural_image
Side-by-side anatomical illustrations of human torso and pelvis with surgical bandages, set against a grid background (no text or labels)A: Theshoulderbeltiswornunder thearm. It shouldbewornover theshoulderatalltimes.
3-22SeatsandRestraints

WARNING
Youcanbeseriouslyinjuredif youweartheshoulderbeltunder yourarm.Inacrash,yourbody wouldmovetoofarforward, whichwouldincreasethechance ofheadandneckinjury.Also,the beltwouldapplytoomuchforce totheribs,whicharenotas strongassshoulderbones.You couldalsoseverelyinjureinternal organslikeyourliverorspleen. Theshoulderbeltshouldgoover theshoulderandacrossthe chest.
Q: Whatiswrongwiththis?

A: Thebeltisbehindthebody.

WARNING
Youcanbeseriouslyinjured by notwearingthelap-shoulderbelt properly. Inacrash, you would not berestrained by the shoulder belt. Your body could movetoo far forward in increasing the chance of head and neck injury. You might also slide under the lap belt. The belt force would then be applied right on the abdomen. That could cause serious or fatal injuries. Theshoulder belt should go over the shoulder and across the chest.
Q: Whatiswrongwiththis?
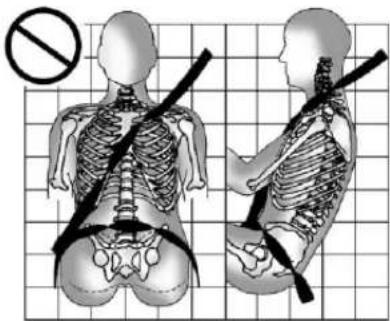
natural_image
Side-by-side illustrations of human skeletal positions with a no-smoking symbol, no text or labels presentA: Thebeltistwistedacross thebody.
WARNING
Youcanbeseriouslyinjuredbya twistedbelt.Inacrash,youwould nothavethefullwidthofthebelt tospreadimpactforces.Ifabelt istwisted,makeitstraightsoit canworkproperly,oraskyour dealertofixit.
Lap-ShoulderBelt
Allseatingpositionsinthevehicle havealap-shoulderbelt.
The following instructionsexplain howtowearalap-shoulderbelt properly.
-
Adjusttheseat, if theseatis adjustable, so you cansit up straight. Toseehow, see "Seats" in the Index.
-
Pickupthelatchplateandpull thebeltacrossyou.Donotletit gettwisted.
Thelap-shoulderbeltmaylockif youpullthebeltacrossyouvery quickly. If this happens, let the beltgobackslightlytounlockit. Then pullthebeltacrossyou moreslowly.
Iftheshoulderportionofa passengerbeltispulledoutall theway,thechildrestraint lockingfeaturemaybeengaged. Ifthishappens,letthebeltgo backallthewayandstartagain.
3-24SeatsandRestraints
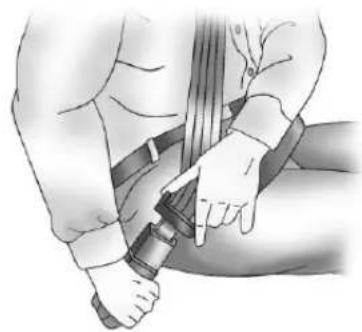
natural_image
Illustration of a person using a bandage device to grip the lower back (no text or symbols visible)- Pushthelatchplate into the buckle until it clicks.
Pulluponthelatchplateto makesureitissecure.Ifthebelt isnotlongenough,see Safety BeltExtenderonpage3-28.
Positionthereleasebuttonon thebucklesothatthesafetybelt couldbequicklyunbuckledif necessary.
- If equipped with a shoulder belt height adjuster, move it to the height that is right for you. See "Shoulder Belt Height Adjuster" later in this section for instructions on use and important safety information.
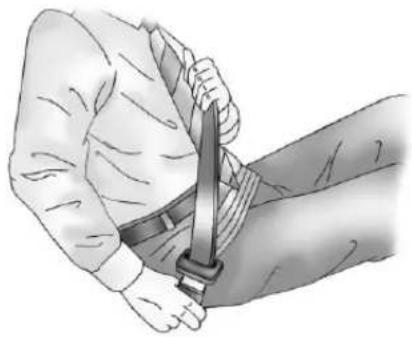
natural_image
Illustration of a person using a belt buckle to lift a wrist (no text or symbols present)- Tomakethelapparttight, pull upontheshoulderbelt.
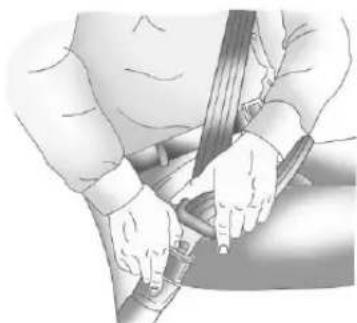
natural_image
Illustration of a person's shoulder and shoulders using a belt drive a car (no text or symbols visible)Tounlatchthebelt, pushthebutton onthebuckle.
Beforeadoorisclosed,besurethe safetybeltisoutoftheway.lfa doorisslammedagainstasafety belt,damagecanoccurtoboththe safetybeltandthevehicle.
ShoulderBeltHeightAdjuster
The vehicle has a shoulder belt height adjuster forth the driver and right front passenger seating positions.
Adjusttheheightsotheshoulder portionofthebeltisontheshoulder andnotfallingoffofit. Thebelt shouldbecloseto, but not contacting, theneck. Improper shoulderbeltheightadjustment could reduce the effectiveness of the safety belt in acrash. See How to Wear Safety Belts Properly on page 3-18.

natural_image
Mechanical component diagram showing a slot with labeled point A (no text or symbols beyond label)Movetheheightadjusteruptothe desiredpositionbypushingupon theheightadjuster.
Aftertheheightadjusterissettothe desiredposition,trytomoveitupor downwithoutpressingtherelease button(A)tomakesureithas lockedintoposition.Pressthe releasebuttontolowertheheight adjuster.
SafetyBeltPretensioners
This vehicle hassafetybelt pretensioners for the front and rear outboard occupants. Although the safety belt pretensioners cannot be seen, they are part of the safety belt assembly. They can help to target the safety belts during the early stages of a moderate to severe frontal and near frontal crash and will deploy in side, rear, and rollover events if the threshold conditions for pretensioner activation are met.
Pretensionersworkonlyonce.Ifthe pretensionersactivateinacrash, thepretensionersandprobably otherpartsofthevehicle'ssafety beltsystemwillneedtobereplaced. SeeReplacingSafetyBeltSystem PartsafteraCrashonpage3-29.
RearSafetyBeltComfort Guides
Thisvehiclemayhaverearshoulder beltcomfortguidesfortheoutboard passengerpositionsintherearseat. Ifnot,theyareavailablethrough yourdealer.Theguidesmay provideaddedsafetybeltcomfort forolderchildrenwhohave outgrownboosterseatsandfor someadults.Wheninstalledona shoulderbelt,andproperlyadjusted, thecomfortguidepositionsthebelt awayfromtheneckandhead.
Hereishowtoinstallacomfort guidetothesafetybelt:
- Removetheguidefromits storagepocketonthesideof theseat.
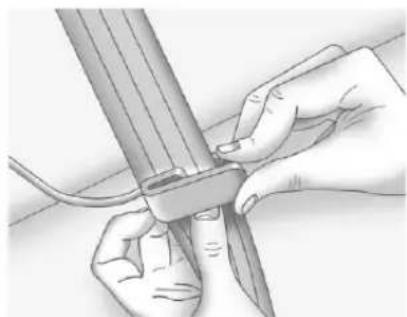
natural_image
Illustration of hands using a tool to cut or adjust a cylindrical object (no text or symbols visible)- Placetheguideoverthebelt, andinsertthetwoedgesofthe beltintotheslotsoftheguide.
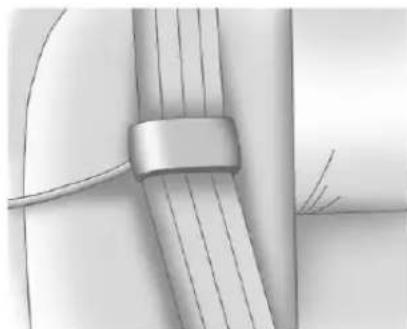
natural_image
Close-up of a metallic cable with a strap, showing internal wire routing (no text or symbols)- Besurethatthebeltisnot twistedanditiesflat. The elasticcordmustbeunderthe beltandtheguideontop.
WARNING
Asafetybeltthatisnotproperly wornmaynotprovidethe protectionneededinacrash. The personwearingthebeltcouldbe seriouslyinjured. Theshoulder beltshouldgooverthesthoulder andacrossthechest. Theseparts ofthebodyarebestabletotake beltrestrainingforces.
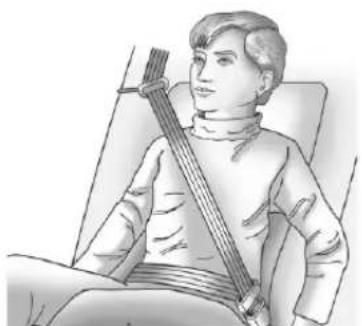
natural_image
Illustration of a person seated in a chair holding a stringed instrument (no text or symbols visible)- Buckle, position, and release the safety beltas described previously in this section. Make sure that the shoulder portion of the belt is on the shoulder and not falling off of it. The belt should be closeto, but not contacting, then eck.
Toremoveandstorethecomfort guide,squeezethebeltedges togethersothatthesafetybeltcan beremovedfromtheguide.Slide theguidebackintoitsstorage pocketlocatedonthesideof theseat.
SafetyBeltUseDuring Pregnancy
Safetybeltsworkforeveryone, includingpregnantwomen.Likeall occupants,theyaremorelikelyto beseriouslyinjurediftheydonot wearsafetybelts.
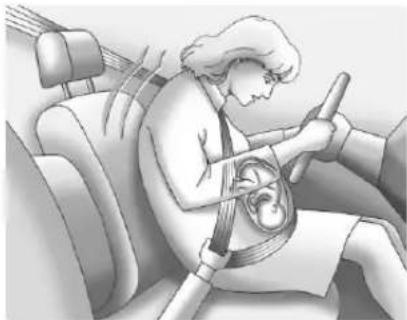
natural_image
Illustration of a person wearing a seatbelt inside a car, with no visible text or symbolsApregnantwomanshouldweara lap-shoulderbelt, and the lap portions should bewornaslowas possible, belowtherounding, throughout the pregnancy.
The best way to protect the fetus is to protect them other. When as safety belt is worn properly, it is more likely that the fetus will not be hurt in a crash. For pregnant women, as for anyone, the key to makingsafety belt is effective is wearing them properly.
SafetyBeltExtender
If the vehicle's safety belt will fasten around you, you should use it.
Butifasafetybeltisnotlong enough,yourdealerwillorderyou anextender.Whenyougointo orderit,taketheheaviestcoatyou willwear,sotheextenderwillbe longenoughforyou.Tohelpavoid personalinjury,donotletsomeone elseuseit,anduseitonlyforthe seatismadetofit.Theextender hasbeendesignedforadults.Never useitforsecuringchildseats.To wearit,attachittotheregularsafety belt.Formoreinformation,seethe instructionsheetthatcomeswith theextender.
SafetySystemCheck
Nowandthen, check that the safety belt reminder light, safety belts, buckles, latch plates, retractors, and anchorages are working properly. Look for any other loose or damaged safety belts system parts that might keep safety belts system from doing its job. See your dealer to have it repaired. Tornor frayed safety belts may not protect you in a crash. They can ripart under impact forces. Ifabeltistorno frayed, get anewoneright away.
Makesurethesafetybeltreminder lightisworking.SeeSafetyBelt Remindersonpage5-15formore information.
Keepsafetybeltscleananddry. See SafetyBeltCareonpage3-28.
SafetyBeltCare
Keepbeltscleananddry.

WARNING
Donotbleachordyesafetybelts. It may severely weaken them. In a crash, they might not be able to provide adequate protection. Cleans safety belt only with mild soap and lukewarm water.
ReplacingSafetyBelt SystemPartsaftera Crash

WARNING
Acrashcandamagethesafety beltsysteminthevehicle. Adamagedsafetybeltsystem maynotproperlyprotectthe personusingit,resultingin seriousinjuryorevendeathina crash. Tohelpmakesurethe safetybeltsystemsareworking properlyafteracrash,havethem inspectedandanynecessary replacementsmadeassoonas possible.
Afteraminorcrash, replacement of safetybeltsmaynotbenecessary. Butthesafetybeltasembliesthat were used during any crash may have been stressed or damaged. Seeyourdealertohavethesafety beltassemblies inspected or replaced.
Newpartsandrepairsmaybe necessaryevenifthesafetybelt systemwasnotbeingusedatthe timeofthecrash.
Havethesafetybeltpretensioners checkedifthevehiclehasbeenina crash,oriftheairbagreadinesslight staysonafteryoustartthevehicle orwhileyouaredriving.SeeAirbag ReadinessLightonpage5-16.
AirbagSystem
The vehicle hasthe following airbags:
• Afrontalairbagforthedriver.
- Afrontalairbagfortherightfront passenger.
- Aseat-mountedsideimpact airbagforthedriver.
- Aseat-mountedsideimpact airbagfortherightfront passenger.
- Aroof-railairbagforthedriver and the passenger seated directly behind the driver.
- Aroof-railairbagfortheright frontpassengerandthe passengerseateddirectly behindtherightfrontpassenger.
Alloftheairbagsinthevehiclewill havethewordAIRBAGembossed inthetrimoronanattachedlabel nearthedeploymentopening.
3-30 Seats and Restraints
Forfrontalairbags, theword AIRBAG will appear on the middle part of the steering wheel for the driver and the instrument panel for the right front passenger.
Withseat-mountedsideimpact airbags, thewordAIRBAGwill appearonthesideoftheseatback closesttothedoor.
Withroof-railairbags, theword AIRBAG will appear along the trim.
Evenifyoudonothavearightfront passengerseatinthevehiclethere isstillanactivefrontalairbaginthe rightsideoftheinstrumentpanel. Donotplacecargoinfrontofthis airbag.
WARNING
Besurethatcargoisnotnearan airbag.Inacrash,aninflating airbagmightforcethatobject towardaperson.Thiscould causesevereinjuryoreven death.Secureobjectsawayfrom theareainwhichanairbagwould inflate.Formoreinformation,see WhereAretheAirbags?on page3-32andVehicleLoad Limitsonpage9-12.
Airbagsaredesignedtosupplement theprotectionprovidedbysafety belts. Eventhoughtoday'sairbags arealsodesignedtohelpreduce theriskofinjuryfromtheforceofan inflatingbag,allairbagsmustinflate veryquicklytodotheirjob.
Herearethemostimportantthings toknowabouttheairbagsystem:
WARNING
Youcanbeseverelyinjuredor killedinacrashifyouarenot wearingasafetybelt—evenif thevehiclehasairbags.Airbags aredesignedtoworkwithsafety belts,butdonotreplacethem. Also,airbagsarenotdesignedto deployineverycrash.Insome crashessafetybeltsaretheonly restraint.SeeWhenShouldan AirbagInflate?onpage3-33.
Wearingasafetybeltduringa crashhelpsreduceyourchance ofhittingthingsinsidethevehicle orbeingejectedfromit.Airbags are“supplementalrestraints”to thesafetybelts.Everyoneinthe vehicleshouldwearasafetybelt properly—whetherornotthereis anairbagforthatperson.
WARNING
Airbagsinflatewithgreatforce, fasterthantheblinkofaney. Anyonewhoisupagainst,orvery closeto,anyairbagwhenit inflatescanbeseriouslyinjured orkilled.Donotsitunnecessarily closetoanyairbag,asyouwould beifyouweresittingontheedge oftheseatorleaningforward. Safetybeltshelpkeepyouin positionbeforeandduringa crash.Alwayswearasafetybelt, evenwithairbags. Thedriver shouldsitasfarbackaspossible whilestillmaintainingcontrol of thevehicle.
Occupantsshouldnotleanonor sleepagainsthedoororside windowsinseatingpositionswith seat-mountedsideimpactairbags and/orroof-railairbags.
WARNING
Childrenwhoareupagainst, orverycloseto,anyairbag whenitinflatescanbeseriously injuredorkilled.Airbagsplus lap-shoulderbeltsofferprotection foradultsandolderchildren,but notforyoungchildrenandinfants. Neitherthevehicle'ssafetybelt systemnoritsairbagsystemis designedforthem.Young childrenandinfantsneedthe protectionthatachildrestraint systemcanprovide.Always securechildrenproperlyinthe vehicle.Toreadhow,seeOlder Childrenonpage3-45orInfants andYoungChildrenon page3-47.

Thereisanairbagreadinesslight ontheinstrumentpanelcluster, whichshowstheairbagsymbol. Thesystemcheckstheairbag electricalsystemformalfunctions. Thelighttellsyouifthereisan electricalproblem.SeeAirbag ReadinessLightonpage5-16for moreinformation.
3-32SeatsandRestraints
WhereAretheAirbags?
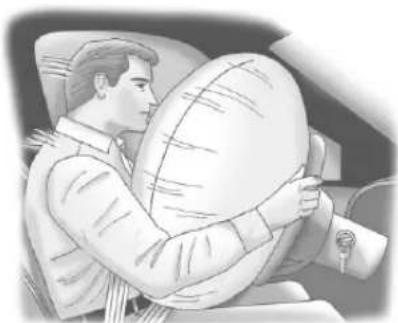
natural_image
Illustration of a person inside a car holding a large circular object, no text or symbols visibleThedriverfrontalairbagisinthe middleofthesteeringwheel.

natural_image
Illustration of a person sitting in a chair, viewed from behind (no text or symbols present)Therightfrontpassengerfrontal airbagisintheinstrumentpanelon thepassengerside.

natural_image
Illustration of a man sitting in a car, holding a seatbelt (no text or symbols visible)DriverSideShown, Passenger SideSimilar
Theseat-mountedsideimpact airbagsforthedriverandrightfront passengerareinthesideofthe seatbacksclosesttothedoor.

natural_image
Illustration of two people driving a car, one seated and one standing, with no visible text or symbolsDriverSideShown, Passenger SideSimilar
Theroof-railairbagsforthedriver, rightfrontpassenger,andsecond rowoutboardpassengersareinthe ceilingabovethesidewindows.
WARNING
If something is between an occupant and an airbag, the airbag might not inflate properly or might force the object into (Continued)
WARNING(Continued)
thatpersoncausingsevereinjury orevendeath. Thepathofan inflatingairbagmustbekept clear. Donotputanything betweenanoccupantandan airbag, anddonotattachorput anythingonthesteeringwheel huboronornearanyother airbagcovering.
Donotuseseataccessoriesthat blocktheinflationpathofa seat-mountedsideimpactairbag.
Neversecureanythingtotheroof ofvehiclewithroof-railairbags byroutingaropeortie-down throughanydoororwindow opening. If youdo, the pathofan inflatingroof-railairbagwillbe blocked.
WhenShouldanAirbag Inflate?
Frontalairbagsaredesignedto inflateinmoderatetoseverefrontal ornear-frontalcrashestohelp reducethepotentialforsevere injuriesmainlytothedriver'sorright frontpassenger'sheadandchest. However,theyareonlydesignedto inflateiftheimpactexceedsa predetermineddeployment threshold.Deploymentthresholds areusedtopredicthowseverea crashislikelytobeintimeforthe airbagstoinflateandhelprestrain theoccupants.
Whether the frontal air bags willor should deploy is not based on how fast your vehicle is traveling. It depends largely on what you hit, the direction of the impact, and how quickly your vehicles slows down.
Frontalairbagsmayinflateat differentcrashspeeds. Forexample:
3-34SeatsandRestraints
- If the vehicle hits stationary object, the air bags could inflate at different crash speed than if the vehicle hits moving object.
- Ifthevehiclehitsanobjectthat deforms,theairbagscould inflateatadifferentcrashspeed thanifthevehiclehitsanobject thatdoesnotdeform.
- Ifthevehiclehitsanarrowobject (likeapole), theairbags could inflate at different crash speed than if the vehicle hits a wide object (likeawall).
- Ifthevehiclegoesintoanobject atanangle, theairbags could inflate at different crash speed than if the vehiclegoes straight into the object.
Thresholdscanalsovarywith specificvehicledesign.
Frontalairbagsarenotintendedto inflateduringvehiclerollovers, rear impacts, orinmanysideimpacts.
Inaddition, the vehicle has dual-stage frontal airbags. Dual-stage airbags adjust the restraint according to crash severity. The vehicle has electronic frontal sensors, which help the sensing system distinguish between a moderate frontal impact and more severe frontal impact. Form moderate frontal impacts, dual-stage airbags inflate at level less than full deployment. Form more severe frontal impacts, full deployment occurs.
The vehicle has seat-mounted side impact and roof-rail air bags. See Airbag System on page 3-29. Seat-mounted side impact and roof-rail air bags are intended to inflate in moderate to severe side
crashes. In addition, the seroof-rail airbags are intended to inflate during a rollover. Seat-mounted side impact and roof-rail air bags will inflate if the crash severity is above the system's designed threshold level. The threshold level can vary with specific vehicle design.
Seat-mountedsideimpactairbags arenotintendedtoinflateinfrontal impacts, near-frontalimpacts, rollovers, orrearimpacts. Roof-rail airbags are not intended to inflate in rearimpacts. Aseat-mounted side impactairbag is intended to deploy on the side of the vehicle that is struck. Both roof-rail air bags will deploy when either side of the vehicle is struck, or if these sensing system predict that the vehicle is about to rollover, or in a severe frontal impact.
Inanyparticularcrash, no one cansaywhetheranairbag should have inflated simply because of the damage to a vehicle or because of what therepair cost were. For frontal air bags, inflation is determined by what the vehicle hits, the angle of the impact, and how quickly the vehicles slows down. For seat-mounted side impact and roof-rail air bags, deployment is determined by the location and severity of the side impact. In a rollover event, roof-rail air bag deployment is determined by the direction of the roll.
WhatMakesanAirbag Inflate?
Inadeploymentevent,thesensing systemsendsanelectricalsignal triggeringareleaseofgasfromthe inflator.Gasfromtheinflatorfillsthe airbagcausingthebagtobreakout ofthecoveranddeploy.Theinflator, theairbag,andrelatedhardwareare allpartoftheairbagmodule.
Frontalairbagmodulesarelocated insidethesteeringwheel and instrumentpanel. For vehicles with seat-mounted side impact airbags, there are airbag modules in the side of the front seat back close to the door. For vehicles with roof-rail airbags, there are airbag modules in the ceiling of the vehicle, near the sidewindow sthathave occupant seating positions.
HowDoesanAirbag Restrain?
Inmoderatetoseverefrontalor nearfrontalcollisions, evenbelted occupantscancontactthesteering wheelortheinstrumentpanel. In moderatetoseveresidecollisions, evenbeltedoccupantscancontact theinsideofthevehicle.
Airbagssupplementtheprotection providedbysafetybelts.Frontal airbagsdistributetheforceofthe impactmoreevenlyoverthe occupant'supperbody,stopping theoccupantmoregradually. Seat-mountedsideimpactand roof-railairbagsdistributetheforce oftheimpactmoreevenlyoverthe occupant'supperbody.
Rollovercapableroof-railairbags aredesignedtohelpcontainthe headandchestofoccupantsinthe outboardseatingpositionsinthe firstandsecondrows. Therollover capableroof-railairbagsare designedtohelpreducetheriskof fullorpartialejectioninrollover events,althoughnosystemcan preventallsuchejections.
Butairbagswouldnothelpinmany typesofcollisions,primarily becausetheoccupant'smotionis nottowardthoseairbags.SeeWhen ShouldanAirbagInflate?on page3-33formoreinformation.
Airbagsshouldneverberegarded asanythingmorethanasupplement tosafetybelts.
WhatWillYouSeeafter anAirbagInflates?
Afterthefrontalairbagsand seat-mountedsideimpactairbags inflate,theyquicklydeflate,so quicklythatsomepeoplemaynot evenrealizeanairbaginflated. Roof-railairbagsmaystillbeatleast partiallyinflatedforsometimeafter theydeploy.Somecomponentsof theairbagmodulemaybehotfor severalminutes.Forlocationofthe airbagmodules,seeWhatMakes anAirbagInflate?onpage3-35.
Thepartsoftheairbagthatcome intocontactwithyoumaybewarm, butnottoohottotouch. Theremay besomesmokeanddustcoming fromtheventsinthedeflated airbags. Airbaginflationdoesnot preventthedriverfromseeingoutof thewindshieldorbeingabletosteer thevehicle, nordoesitprevent peoplefromleavingthevehicle.

WARNING
Whenanairbaginflates, there maybedustintheair. This dust could cause breathing problems for people with a history of asthma or other breathing trouble. To avoid this, everyone in the vehicles should get out as soon as it is safetodoso. If you have breathing problems but cannot get out of the vehicle after an air bag inflates, then get fresh hair by opening a window or a door. If you experience breathing problems following an air bag deployment, you should seek medical attention.
The vehicle has a safe feature that may automatically unlock the doors, turn on the interior lamps and hazard warning flashers, and should the fuel system after the air bags inflate.
Youcanlockthedoors,turnoffthe interiorlampsandhazardwarning flashersbyusingthecontrolsfor thosefeatures.

WARNING
Acrashsevereenoughtoinflate theairbagsmayhavealso damagedimportantfunctionsin thevehicle,suchasthefuel system,brakeandsteering systems,etc.Evenifthevehicle appearstobedrivableaftera moderatecrash,theremaybe concealeddamagethatcould makeitdifficulttosafelyoperate thevehicle.
Usecautionifyoushouldattempt torestarttheengineafteracrash hasoccurred.
Inmanycrashessevereenoughto inflatetheairbag, windshieldsare brokenbyvehicledeformation. Additionalwindshieldbreakage mayalsooccurfromtherightfront passengerairbag.
- Airbagsaredesignedtoinflate onlyonce. Afteranairbag inflates, youwillneedsomenew partsfortheairbagsystem. Ifyoudonotgetthem, the airbagsystemwillnotbethere tohelpprotectyouinanother crash. A newsystemwillinclude airbagmodulesandpossibly otherparts. Theservicemanual foryourvehiclecoverstheneed toreplaceotherparts.
- Thevehiclehasacrashsensing anddiagnosticmodulewhich recordsinformationaftera crash.SeeVehicleData RecordingandPrivacyon page13-11andEventData Recordersonpage13-11.
- Letonlyqualifiedtechnicians workontheairbagsystems. Improperservicecanmeanthat anairbagsystemwillnotwork properly.Seeyourdealerfor service.
3-38SeatsandRestraints
PassengerSensing System
Thevehiclehasapassenger sensingsystemfortherightfront passengerposition. Thepassenger airbagstatusindicatorwillbevisible ontheoverheadconsolewhenthe vehicleisstarted.

UnitedStates
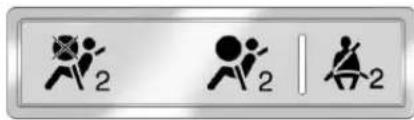
Canada
ThewordsONandOFF,orthe symbolforonandoff,arevisible duringthesystemcheck.Ifyouare usingremotestart,ifequipped,to startthevehiclefromadistance, youmaynotseethesystemcheck. Whenthesystemcheckis complete,eitherthewordONor OFF,orthesymbolforonoroff,will bevisible.SeePassengerAirbag StatusIndicatoronpage5-17.
Thepassengersensingsystem turnsofftherightfrontpassenger frontalairbagandseat-mounted sideimpactairbagundercertain conditions. Thedriverairbagsand thereof-railairbagsarenotaffected bythepassengersensingsystem.
Thepassengersensingsystem workswithsensorsthatarepartof therightfrontpassengerseat.
Thesensorsaredesignedtodetect thepresenceofaproperlyseated occupantanddetermineiftheright frontpassengerfrontalairbag and seat-mountedsideimpactairbag shouldbeenabled(mayinflate) ornot.
According to accident statistics, children are safer when properly secured in a rearseatin the correct child restraint for their weight and size.
Werecommendthatchildrenbe securedinarearseat,including: aninfantorachildridingina rear-facingchildrestraint;achild ridinginaforward-facingchildseat; anolderchildridinginabooster seat;andchildren,whoarelarge enough,usingsafetybelts.
Alabelonthesunvisorsays, "Neverputarear-facingchildseatin thefront." Thisisbecausetheriskto therear-facingchildissogreat, iftheairbagdeploys.

WARNING
Achildinarear-facingchild restraintcanbeseriously injuredorkillediftheright frontpassengerairbaginflates. Thisisbecausethebackofthe rear-facingchildrestraintwould beveryclosetotheinflating airbag.Achildinaforward-facing childrestraintcanbeseriously injuredorkillediftherightfront passengerairbaginflatesandthe passengerseatisinaforward position.
(Continued)
WARNING(Continued)
Evenifthepassengersensing systemhasturnedofftheright frontpassengerfrontalairbag andseat-mountedsideimpact airbag(ifequipped),nosystemis fail-safe.Noonecanguarantee thatanairbagwillnotdeploy undersomeunusual circumstance,eventough theairbag(s)areoff.
Securerear-facingchildrestraints inarearseat, even if the airbag(s) are off. If you secure a forward-facing child restraint in therightfrontseat, always move thefrontpassenger seat as far backasitwill go. It is better to secure the child restraint in earseat.
Thepassengersensingsystemis designedtoturnofftherightfront passengerairbagandseat-mounted sideimpactairbagif:
• Therightfrontpassengerseatis unoccupied.
- Thesystemdeterminesthatan infantispresentinarear-facing infantseat.
- Thesystemdeterminesthata smallchilddispresentinachild restraint.
- Thesystemdeterminesthata smallchilddispresentina boosterseat.
- Arightfrontpassengertakes his/herweightoffoftheseatfor aperiodoftime.
- Therightfrontpassengerseatis occupied byasmallerperson, suchasachildwhohas outgrownchildrestraints.
- Or, if there is a critical problem with the air bagsystem or the passengersensingsystem.
Whenthepassengersensing systemhasturnedofftheright frontpassengerfrontalairbagand seat-mountedsideimpactairbag, theoffindicatorwilllightandstaylit toremindyouthattheairbagsare off.SeePassengerAirbagStatus Indicatoronpage5-17.
Thepassengersensingsystemis designedtoturnon(mayinflate)the rightfrontpassengerfrontalairbag andseat-mountedsideimpact airbaganytimethesystemsenses thatapersonofadultsizeissitting properlyintherightfront passengerseat.
Whenthepassengersensing systemhasallowedtheairbagsto beenabled,theonindicatorwilllight andstaylittoremindyouthatthe airbagsareactive.
Forsomechildrenwhohave outgrownchildrestraintsandfor verysmalladults,thepassenger
sensingsystemmayormaynotturn offtherightfrontpassengerfrontal airbagandseat-mountedside impactairbag,dependingupon theperson'sseatingposture andbodybuild.Everyoneinthe vehiclewhohasoutgrownchild restraintsshouldwearasafetybelt properly—whetherornotthereis anairbagforthatperson.

WARNING
If the airbag readiness light ever comes on and stay on, it means that something may be wrong with the air bags system. To help avoid injury to your self for others, have the vehicles serviced right away. See Airbag Readiness Lighton page 5-16 form more information, including important safety information.
IftheOnIndicatorisLitfora ChildRestraint
Ifachildrestrainthasbeeninstalled andtheonindicatorislit:
- Turnthevehicleoff.
- Removethechildrestraint from the vehicle.
-
Remove any additional items from these seats such as blankets, cushions, seat covers, seat heaters, or seat massagers.
-
Reinstall the child restraint following the directions provided by the child restraint manufacturer and refer to "Securing a Child Restraint in the Right Front Seat Position" under Securing Child Restraints (Rear Seat) on page 3-62 or Securing Child Restraints (Front Passenger Seat) on page 3-64.
-
If, afterreinstalling the child restraint and restarting the vehicle, the on indicator is still lit, turn the vehicle off. Then slightly reclin the vehicle seat back and adjust these at cushion, if adjustable, to make sure that the vehicle seat back is not pushing the child restraint into these at cushion.
Alsomakesurethechild restraintisnottrappedunderthe vehicleheadrestraint.Ifthis happens,adjustthehead restraint.SeeHeadRestraints onpage3-2.
6.Restartthevehicle.
Iftheonindicatorisstillit, securethechildrestraintina rearseatpositioninthevehicle, andcheckwithyourdealer.
IftheOffIndicatorisLitforan Adult-SizeOccupant

natural_image
Interior view of a car showing a person seated in the driver's seat, with steering wheel and dashboard visible (no text or symbols)Ifapersonofadult-sizeissittingin therightfrontpassengerseat,but theoffindicatorislit,itcouldbe becausethatpersonisnotsitting properlyintheseat.Iffthishappens,
usethefollowingstepstoallowthe systemtodetectthatpersonand enabletherightfrontpassenger frontalairbagandseat-mounted sideimpactairbag:
-
Turnthevehicleoff.
-
Remove any additional material from these seat, such as blankets, cushions, seat covers, seat heaters, or seat massagers.
-
Placetheseatbackinthefully uprightposition.
-
Havethepersonsituprightin theseat, centeredontheseat cushion, with legscomfortably extended.
-
Restartthevehicleandhavethe personremaininthispositionfor twotothreeminutesaftertheon indicatorislit.
AdditionalFactorsAffecting SystemOperation
Safetybeltshelpkeepthe passengerinpositionontheseat duringvehiclemaneuversand braking,whichhelpsthepassenger sensingsystemmaintainthe passengerairbagstatus.See "SafetyBelts"and"Child Restraints"intheIndexfor additionalinformationaboutthe importanceofproperrestraintuse.
Athicklayerofadditionalmaterial, suchasablanketorcushion, oraftermarketequipmentsuch asseatcovers,seatheaters,and seatmassagerscanaffecthow wellthepassengersingsystem operates.Werecommendthat younotuseseatcoversorother
aftermarketequipmentexceptwhen approvedbySaabforyourspecific vehicle.SeeAddingEquipmentto theAirbag-EquippedVehicleon page3-43formoreinformation aboutmodificationthatcanaffect howthesystemoperates.

WARNING
Stowingofarticlesunderthe passengerseatorbetweenthe passengerseatcushionand seatbackmayinterferewiththe properoperationofthepassenger sensingsystem.
Servicingthe Airbag-EquippedVehicle
Airbags affect how the vehicle should be serviced. There are parts of the air bagsystem in several places around the vehicle. Your dealer and the servicemanual have information about servicing the vehicle and the air bags system.

WARNING
Forupto10secondsafterthe ignitionisturnedoffandthe batteryisdisconnected,anairbag canstillinflateduringimproper service.Youcanbeinjuredifyou areclosetoanairbagwhenit inflates.Avoidyellowconnectors. Theyareprobablypartofthe airbagsystem.Besuretofollow properserviceprocedures,and makesurethepersonperforming workforyouisqualifiedtodoso.
AddingEquipmenttothe Airbag-EquippedVehicle
Q: Isthereanythinglmightadd toorchangeaboutthevehicle thatcouldkeeptheairbags fromworkingproperly?
A: Yes. If you add things that changethe vehicle's frame, bumpersystem, height, frontend or sidesheet metal, they may keep the air bags system from working properly. Changing or moving any part of the front seats, safety belts, the airbag sensing and diagnostic module, steering wheel, instrument panel, roof-rail air bag modules, ceiling headliner or pillargarnish trim, overhead console, front sensors, side impacts sensors, rolloversensormodule, airbag wiring, or cargorestraints system and conveniencenet can affect the operation of the airbag system.
Inaddition, the vehicle has a passengersensingsystem for the right front passenger position, which includes sensors that are part of the passenger seat. The passengersensing system may not operate properly if the original seat trim is replaced with non-Saab covers, upholsteryortrim, or with Saab covers, upholsteryortrim designed for different vehicle. Any object, such as an aftermarket seat theaterora comfortenhancing pador device, installed underorontop of these at fabric, could also interfer with the operation of the passengersensingsystem. This could either prevent proper deployment of the passenger airbag(s) or prevent the passengersensingsystem from properly turning off the passenger airbag(s). See Passenger Sensing System on page 3-38.
If you have questions, call Customer Assistance. The phonenumbers and addresses for Customer Assistance are in Step Two of the Customer Satisfaction Procedure in this manual. See Customer Satisfaction Procedure on page 13-1.
If the vehicle has rollover roof-rail air bags, see Different Size Tires and Wheelson page 10-71 for additional important information.
Q: Because have adisability, I haveto get my vehicle modified. How can find out whether this will affect my air bagsystem?
A: If you have questions, call Customer Assistance. The phonenumbers and addresses for Customer Assistance are in Step Two of the Customer Satisfaction Procedure in this manual. See Customer Satisfaction Procedure on page 13-1.
Inaddition, your dealer and the servicemanual have information about the location of the airbag sensors, sensing and diagnostic module and airbag wiring.
AirbagSystemCheck
Theairbagsystemdoesnotneed regularly scheduled maintenance or replacement. Makesuretheairbag readinesslightisworking. See AirbagReadinessLighton page 5-16 formoreinformation.
Notice:Ifanairbagcoveringis damaged, opened, or broken, the airbag may not work properly. Donotopenor break the airbag coverings. If there are any opened or broken airbag covers, havethe airbag covering and/or airbag modulere placed. For the location of the airbag modules, see What Makes an Airbag Inflate? on page 3-35. See your dealer for service.
ReplacingAirbagSystem PartsafteraCrash

WARNING
Acrashcandamagethe airbagsystemsinthevehicle. Adamagedairbagsystem maynotworkproperly and maynotprotectyouandyour passenger(s)inacrash,resulting inseriousinjuryorevendeath. Tohelpmakesuretheairbag systemsareworkingproperly afteracrash,havethem inspectedandanynecessary replacementsmadeassoonas possible.
Ifanairbaginflates,youwillneed toreplaceairbagsystemparts. Seeyourdealerforservice.
If the airbagreadinesslightstayson after the vehicle is started or comes on when you are driving, the airbag system may not work properly. Have the vehicles serviced right away. See Airbag Readiness Lighton page 5-16 form more information.
ChildRestraints OlderChildren

natural_image
Illustration of two individuals seated, one with a ponytail and the other holding a string (no text or symbols present)Olderchildrenwhohaveoutgrown boosterseatsshouldwearthe vehiclesafetybelts.
Themanufacturer'sinstructionsthat comewiththeboosterseatstatethe weightandheightlimitationsforthat booster.Useaboosterseatwitha lap-shoulderbeltuntilthechild passesthefittestbelow:
- Sitallthewaybackontheseat. Dothekneesbendattheseat edge?Ifyes,continue.Ifno, returntotheboosterseat.
- Bucklethelap-shoulderbelt. Doestheshoulderbeltreston theshoulder?Ifyes,continue. Ifno,tryusingtherearsafety beltcomfortguide.See“Rear SafetyBeltComfortGuides” underLap-ShoulderBelton page3-23formoreinformation. Iftheshoulderbeltstilldoesnot restontheshoulder,thenreturn totheboosterseat.
3-46SeatsandRestraints
- Doesthelapbeltfitlowand snugonthehips,touchingthe thighs?Ifyes,continue.Ifno, returntotheboosterseat.
- Canpropersafetybeltfitbe maintainedforthelengthofthe trip?Ifyes,continue.Ifno, returntotheboosterseat.
Q:Whatistheproperwayto wearsafetybelts?
A: Anolderchildshouldwearalap-shoulderbeltandgettheadditionalrestraintashoulderbeltcanprovide. Theshoulderbeltshouldnotcrossthefaceorneck. Thelapbeltshouldfitsnuglybelowthehips, justtouchingthetopofthethighs.Thisappliesbeltforcetothechild'spelvicbonesinacrash.Itshouldneverbewornovertheabdomen,whichcouldcausesevereorevenfatalinternalinjuriesinacrash.
Alsosee"RearSafetyBeltComfort Guides" under Lap-ShoulderBelton page 3-23.
According to accident statistics, children and infants are safer when properly restrained in a child restraint system or infant restraint system secured in a rearseating position.
Inacrash, children who are not buckled up can strike other people who are buckled up, or can be thrown out of the vehicle. Older children need to use safety belts properly.

WARNING
Neverdothis.
Neverallowtwochildrentowear thesamesafetybelt. Thesafety belt cannot properly spread the impactforces. Inacrash, the two
(Continued)
WARNING(Continued)
childrencanbecrushedtogether andseriouslyinjured.Asafety beltmustbeusedbyonlyone personatatime.
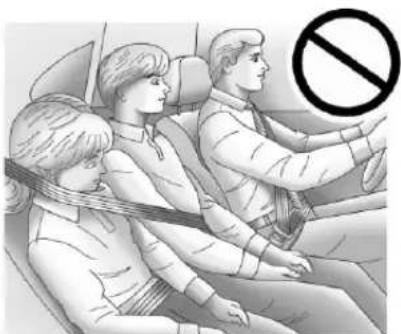
natural_image
Illustration of three people seated in a car, one wearing a seatbelt, with a no-smoking symbol overlay (no text or symbols present)WARNING
Neverdothis.
Neverallowachildtowearthe safetybeltwiththeshoulderbelt behindtheirback.Achildcanbe seriouslyinjuredbynotwearing thelap-shoulderbeltproperly.Ina crash,thechildwouldnotbe restrainedbytheshoulderbelt. Thechildcouldmovetoofar forwardincreasingthechance of headandneckinjury.Thechild mightalsoslideunderthelap belt.Thebeltforcewouldthenbe appliedrightontheabdomen. Thatcouldcauseseriosorfatal injuries.Theshoulderbeltshould goovertheshoulderandacross thechest.
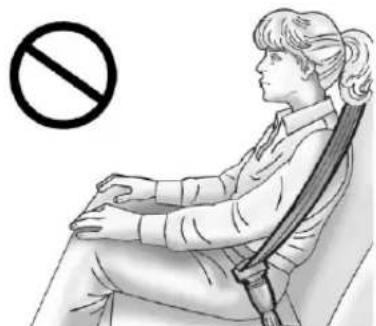
natural_image
Illustration of a person sitting in a chair with a no-smoking symbol (no text or labels present)InfantsandYoung Children
Everyoneinavehicleneeds protection! Thisincludesinfants andallotherchildren. Neither the distancetravelednortheage and sizeofthetravelerchangesthe need,foreveryone,tousesafety restraints. Infact,thelawinevery stateintheUnitedStatesandin everyCanadianprovincesays childrenuptosomeagemustbe restrainedwhileinavehicle.
WARNING
Childrencanbeseriouslyinjured orstrangledifashoulderbeltis wrappedaroundtheirneckand thesafetybeltcontinuesto tighten.Neverleavechildren unattendedinvehicleandnever allowchildrentoplaywiththe safetybelts.
Airbagspluslap-shoulderbeltsoffer protectionforadultsandolder children,butnotforyoungchildren andinfants.Neitherthevehicle's safetybeltsystemnoritsairbag systemisdesignedforthem.Every timeinfantsandyoungchildrenride invehicles,theyshouldhavethe protectionprovidedbyappropriate childrestraints.
Childrenwhoarenotrestrained properly can strike other people, or can be thrown out of the vehicle.
3-48SeatsandRestraints

WARNING
Neverdothis.
Neverholdaninfantorachild whileridinginavehicle.Dueto crashforces,aninfantorachild willbecomesoheavyitisnot possibletoholditduringacrash. Forexample,inacrashatonly 40km/h(25mph),a5.5kg(12lb) infantwillsuddenlybecomea 110kg(240lb)forceonaperson's arms.Aninfantshouldbe securedinanappropriate restraint.

natural_image
Illustration of a woman reclining with a baby, no text or symbols present
WARNING
Neverdothis.
Childrenwhoareupagainst, orverycloseto,anyairbagwhen itinflatescanbeseriouslyinjured orkilled.Neverputarear-facing childrestraintintherightfront seat.Securearear-facingchild restraintinarearseat.Itisalso
(Continued)
WARNING(Continued)
bettertosecureaforward-facing childrestraintinarearseat. If you must secure a forward-facing childrestraintintherightfront seat, always movethefront passenger seat as far back as it will go.
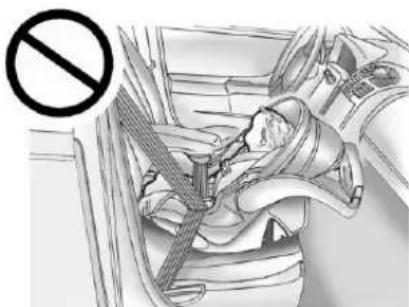
natural_image
Interior view of a car showing a person seated in a seatbelt, with a no-smoking symbol overlaid (no text or labels present)Q: Whatarethedifferenttypes of add-onchildrestraints?
A: Add-onchildrestraints, which are purchased by the vehicle owner, are available in four basic types. Selection of particular restraint should take into consideration not only the child's weight, height, and age but also whether or not the restraint will be compatible with themotor vehicle in which it will be used.
Formostbasictypesofchild restraints,therearemany differentmodelsavailable.When purchasingachildrestraint,be sureitisdesignedtobeusedin amotorvehicle.Ifitis,the restraintwillhavealabelsaying thatitmeetsfederalmotor vehiclesafetystandards.
Therestraintmanufacturer's instructionsthatcomewiththe restraintstatetheweightand
heightlimitationsforaparticular childrestraint. In addition, there are many kind so frestraints available for children with special needs.

WARNING
Toreducetheriskofneck and headinjury during acrash, infants need completes support. This is because an infant's neck is not fully developed and its head weighssomuch compared with therestofits body. In acrash, an infant in arear-facing child restraint settles into the restraint, sothecrash forces can be distributed across the strongest part of an infant's body, the back and shoulders. Infants should always be secured in rear-facing child restraints.

WARNING
Ayoungchild'shipbonesarestill sosmallthatthevehicle'sregular safetybeltmaynotremainlowon thehipbones,asitshould. Instead,itmaysettleuparound thechild'sabdomen.Inacrash, thebeltwouldapplyforceona bodyareathatisunprotected by anybonystructure.Thisalone couldcauseseriousorfatal injuries.Toreducetheriskof seriousorfatalinjuriesduringa crash,youngchildrenshould alwaysbesecuredinappropriate childrestraints.
3-50 Seats and Restraints
ChildRestraintSystems
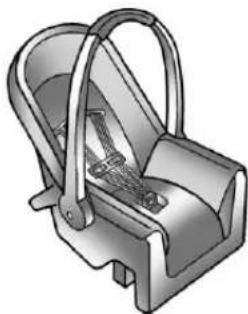
natural_image
3D illustration of a mechanical device with handle and internal components (no text or symbols)(A)Rear-FacingInfantSeat
Arear-facinginfantseat(A) providesrestraintwiththeseating surfaceagainstthebackofthe infant.
The harnesssystemholdstheinfant inplaceand,inacrash,actsto keeptheinfantpositionedinthe restraint.

natural_image
Illustration of a car seat with straps and seats (no text or symbols)(B)Forward-FacingChildSeat
Aforward-facingchildseat(B) provides restraint for the child's body with the harness.

natural_image
3D rendered models of car seat and seat components (no text or symbols)(C)BoosterSeats
Aboosterseat(C)isachildestraint designedtoimprovethefitofthe vehicle'ssafetybeltsystem. Aboosterseatcanalsohelpa childtoseeoutthewindow.
SecuringanAdd-OnChild RestraintintheVehicle

WARNING
Achildcanbeseriouslyinjured orkilledinacrashifthechild restraintisnotproperlysecured in the vehicle. Secure the child restraint properly in the vehicle using the vehicles safety beltor LATCH system, following the instruction that camewith that child restraint and the instructions in this manual.
To help reduce the chance of injury, the child restraint must be secured in the vehicle. Child restraint systems must be secured in vehicle seats by lap belts or the lap belt portion of lap - shoulder belt, or by
theLATCHsystem.SeeLower AnchorsandTethersforChildren (LATCHSystem)onpage3-53for moreinformation.Childrencanbe endangeredinacrashifthechild restraintisnotproperlysecured in thevehicle.
Whensecuringanadd-onchild restraint, refertotheinstructions that comewiththerestraint which maybeontherestraintitselforina booklet, or both, and to this manual. The child restraint instructions are important, so if they are not available, obtain are replacement copy from the manufacturer.
Keepinmindthatanunsecured childrestraintcanmovearoundina collisionorsuddenstopandinjure peopleinthevehicle.Besureto properlysecureanychildrestraintin thevehicle—evenwhennochild isinit.
InsomeareasoftheUnitedStates andCanada,CertifiedChild PassengerSafetyTechnicians (CPSTs)areavailabletoinspect anddemonstratehowtocorrectly useandinstallchildrestraints. IntheU.S.,refertotheNational HighwayTrafficSafety Administration(NHTSA)website tolocatethenearestchildsafety seatinspectionstation.ForCPST availabilityinCanada,checkwith TransportCanadaortheProvincial MinistryofTransportationoffice.
SecuringtheChildWithinthe ChildRestraint

WARNING
Achildcanbeseriouslyinjured orkilledinacrashifthechild isnotproperlysecuredinthe childrestraint.Securethechild properlyfollowingtheinstructions thatcamewiththatchildrestraint.
WheretoPutthe Restraint
According to accident statistics, children and infants are safer when properly restrained in a child restraintsystemor infant restraint system secured in a rearseating position.
Werecommendthatchildrenand childrestraintsbesecuredinarear seat,including:aninfantorachild ridinginarear-facingchildrestraint; achildridinginaforward-facing childseat;anolderchildridingina boosterseat;andchildren,whoare largeenough,usingsafetybelts.
Alabelonyoursunvisorsays, "Neverputarear-facingchildseat inthefront." Thisisbecausetherisk totherear-facingchildissogreat, iftheairbagdeploys.
WARNING
Achildinarear-facingchild restraintcanbeseriously injuredorkillediftherightfront passengerairbaginflates. This isbecausethebackofthe rear-facingchildrestraintwould beveryclosetotheinflating airbag.Achildinaforward-facing childrestraintcanbeseriously injuredorkillediftherightfront passengerairbaginflatesandthe passengerseatisinaforward position.
Evenifthepassengersensing systemhasturnedofftheright frontpassengerfrontalairbag,no systemisfail-safe.Noonecan guaranteeethatanairbagwill notdeployundersomeunusual circumstance,eventhoughitis turnedoff.
(Continued)
WARNING(Continued)
Securerear-facingchild restraintsinarearseat,evenif theairbagisoff.Ifyousecurea forward-facingchildrestraintin therightfrontseat,alwaysmove thefrontpassengerseatasfar backasitwillgo.Itisbetterto securethechildrestraintina rearseat.
See Passenger Sensing System on page 3-38 for additional information.
Whensecuringachildrestraint inarearseatingposition,studythe instructionsthatcamewithyour childrestrainttomakesureitis compatiblewiththisvehicle.
If the vehicle does not have a rearse at that will accommodate arear-facing child restraint, we recommend that rear-facing child restraints not be transported in the vehicle, even if the air bag is off.
Childrestraintsandboosterseats varyconsiderablyinsize, and some mayfitincertainseatingpositions betterthanothers. Alwaysmake surethechildrestraintisproperly secured.
Dependingonwhereyouplacethe childrestraintandthesizeofthe childrestraint,youmaynotbe abletoaccessadjacentsafetybelt assembliesorLATCHanchorsfor additionalpassengersorchild restraints.Adjacentseating
positionsshouldnotbeusedifthe childrestraintpreventsaccesstoor interfereswiththeroutingofthe safetybelt.
Whereveryouinstallachild restraint,besuretosecurethechild restraintproperly.
Keepinmindthatanunsecured childrestraintcanmovearoundina collisionorsuddenstopandinjure peopleinthevehicle.Besureto properlysecureanychildrestraintin yourvehicle—evenwhennochild isinit.
LowerAnchorsand TethersforChildren (LATCHSystem)
TheLATCHsystemholdsachild restraintduringdrivingorinacrash. Thissystemisdesignedtomake installationofachildrestrainteasier. TheLATCHsystemusesanchorsin thevehicleandattachmentsonthe childrestraintthataremadeforuse withtheLATCHsystem.
MakesurethataLATCH-compatible childrestraintisproperlyinstalled usingtheanchors,orusethe vehicle'ssafetybeltstosecurethe restraint,followingtheinstructions thatcamewiththatrestraint,and alsotheinstructionsinthismanual.
3-54SeatsandRestraints
Wheninstallingachildrestraint withatoptether,youmustalsouse eithertheloweranchorsorthe safetybeltstoproperlysecurethe childrestraint.Achildrestraintmust neverbeinstalledusingonlythetop tetherandanchor.
InordertousetheLATCHsystem inyourvehicle,youneeda childrestraintthathasLATCH attachments.Thechildrestraint manufacturerwillprovideyouwith instructionsonhowtousethechild restraintanditsattachments.The followingexplainshowtoattacha childrestraintwiththese attachmentsinyourvehicle.
Notallvehicleseatingpositionson childrestraintshaveloweranchors andattachmentsortoptether anchorsandattachments.
LowerAnchors
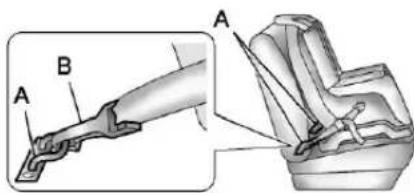
Loweranchors(A)aremetal barsbuiltintothevehicle.There aretwoloweranchorsforeach LATCHseatingpositionthatwill accommodateachildrestraintwith lowerattachments(B).
TopTetherAnchor
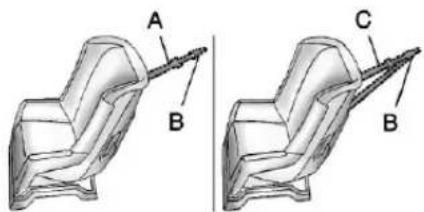
Atoptether(A,C)anchorsthetop ofthechildrestrainttothevehicle. Atoptetheranchorisbuiltinto thevehicle. Thetoptether attachment(B)onthechildrestraint connectstothetoptetheranchorin thevehicleinordertoreducethe forwardmovementandrotationof thechildrestraintduringdrivingorin acrash.
Yourchildrestraintmayhave asingletether(A)oradual tether(C).Eitherwillhaveasingle attachment(B)tosecurethetop tethertotheanchor.
Somechildrestraintsthathavea toptetheraredesignedforusewith orwithoutthetoptetherbeing attached.Othersrequirethetop tetheralwaystobeattached. InCanada,thelawrequiresthat forward-facingchildrestraintshave atoptether,andthatthetetherbe attached.Besuretoreadandfollow theinstructionsforyourchild restraint.
LowerAnchorandTopTether AnchorLocations

natural_image
Simple line drawing of a boat hull with two side seats and three top oars (no text or symbols)RearSeat
(TopTetherAnchor): Seating positions with toptetheranchors.
⑦(LowerAnchor): Seating positions with twoloweranchors.
Toassistyouinlocatingthelower anchors, each seating position with loweranchorshastwolabels, near the creasebetween theseatback and theseatcushion.

Toassistyouinlocatingthetop tetheranchors, theoptetheranchor symbolislocatedonthecover.
3-56SeatsandRestraints
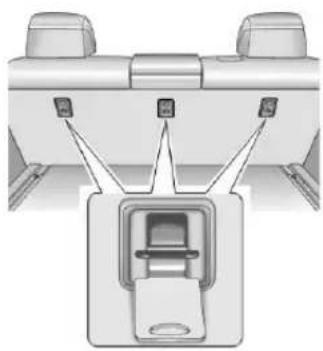
natural_image
Diagram of a vehicle seat assembly with two top tabs and a side-mounted device (no text or labels)TopTetherAnchors
Thetoptetheranchorsforeachrear seatingpositionarelocatedunder thecovers,onthebackoftherear seatback.Besuretouseananchor locatedonthesamesideofthe vehicleastheseatingposition wherethechildrestraintwillbe placed.
Donotsecureachildrestraintina positionwithoutatoptetheranchor ifanationalorlocallawrequires thatthetoptetherbeattached,orif theinstructionsthatcomewiththe childrestraintsaythatthetoptether mustbeattached.
According to accident statistics, children and infants are safer when properly restrained in a child restraintsystemor infant restraint system secured in a rearseating position. See Where to Put the Restrainton page 3-52 for additional information.
SecuringaChildRestraint DesignedfortheLATCH System

WARNING
IfaLATCH-typechildrestraintis notattachedtoanchors, thechild restraintwillnotbeabletoprotect thechildcorrectly. Inacrash, the childcouldbeseriouslyinjuredor killed. InstallaLATCH-typechild restraintproperlyusingthe anchors, orusethevehiclesafety beltstosecuretherestraint, followingtheinstructionsthat camewiththechildrestraintand theinstructionsinthismanual.
WARNING
Donotattachmorethanonechild restrainttoasingleanchor. Attachingmorethanonechild restrainttoasingleanchor could causetheanchororattachment tocomelooseorevenbreak duringacrash.Achildorothers couldbeinjured.Toreducethe riskofseriousorfatalinjuries duringacrash,attachonlyone childrestraintperanchor.
WARNING
Childrencanbeseriouslyinjured orstrangledifashoulderbeltis wrappedaroundtheirneckand thesafetybeltcontinuesto tighten.Buckleanyunusedsafety beltsbehindthechildrestraintso (Continued)
WARNING(Continued)
childrencannotreachthem.Pull theshoulderbeltallthewayout oftheretractortosetthelock, ifthevehiclehasone,afterthe childrestrainthasbeeninstalled.
Notice: DonotlettheLATCH attachmentsrubagainstthe vehicle'ssafetybelts. This may damage these parts. If necessary, move buckledsafetybeltsto avoid rubbing the LATCH attachments.
Donotfoldtheemptyrearseat withasafetybeltbuckled. This coulddamagethesafetybeltor theseat. Unbuckleandreturnthe safetybelttoitsstowedposition, beforefoldingtheseat.
Makesuretoattachthechild restraintattheproperanchor location.
This system is designed to make installation of child restraint easier. When using lower anchors, donot us the vehicle's safety belts. Instead use the vehicle's anchors and child restraint attachment to secure therestrants. Some restraints also use another vehicle anchort secure at optether.
- Attachandtightenthelower attachmentstothelower anchors. If the child restraint does nothavelower attachmentsorthedesired seating positiondoes nothave lower anchors, secure the child restraint with the toptether and the safety belts. Refertoyour child restraint manufacturer instructions and the instructions in this manual.
1.1. Findtheloweranchors forthedesiredseating position.
3-58SeatsandRestraints
1.2. Putthechildrestraint on theseat.
Fortheoutboardrear seatingpositions,ifthe headrestraintinterferes withtheproperinstallation ofthechildrestraint,the headrestraintmaybe removed.See"Head RestraintRemovaland Reinstallation"attheendof thissection.
1.3. Attachandtightenthelower attachmentsonthechild restrainttothelower anchors.
- If the child restraint manufacturer recommend that the toptether be attached, attach and tighten the toptetherto the toptether anchor, if equipped. Referto the child restraint instructions and the following steps:
2.1. Findthetoptetheranchor andopenitscoverto exposetheanchor.
2.2. Route, attach, and tighten the toptether according to your child restraint instructions and the following instructions:

natural_image
Line drawing of a seated car seat with a rope tied to the seat (no text or symbols)- If you are using adual tether in therear outboard seating position within adjustable head restraint, routethedual tether around the head restraint.

natural_image
Technical line drawing of a mechanical component or assembly (no text or symbols)- If you are using adual tether in therear outboard seating position and the head restraint has been removed, routethedual tether over these at back.

natural_image
Line drawing of a seated car seat with a head-mounted device (no text or symbols)- If you are using a single tether in therear outboard seating position with an adjustable head restraint, routethesingletether under the head restraint and in between the head restraint posts.

natural_image
Technical line drawing of a mechanical assembly with a tool inserted into a component (no text or symbols)- If you are using a single tether in therear outboard seating position and the head restraint has been removed, routethesingle tether over these at back.

natural_image
Pure mechanical component diagram without any text, numbers, or symbols- If you are using adual tether in therear center seating position, lower the adjustable headrest down to its stowed position and routethedual tether over the headrest.
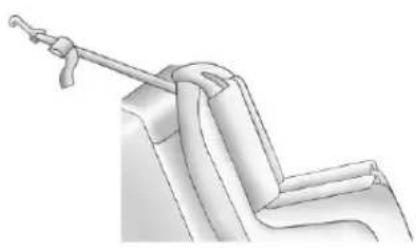
natural_image
Technical illustration of a mechanical clamp or bracket assembly (no text or symbols)- If you are using a single tether in therear center seating position, lower the adjustable head rest down to its stowed position and routethesingle tether over the headrest.
- Beforeplacingachildinthe childrestraint,makesureitis securelyheldinplace.Tocheck, graspthechildrestraintatthe LATCHpathandattempt tomoveitside-to-sideand back-and-forth.Thereshouldbe nomorethan2.5cm(1in)of movementforproperinstallation.
HeadRestraintRemovaland Reinstallation
Therearoutboardheadrestraints canberemovediftheyinterferewith theproperinstallationofthechild restraint.Theheadrestintherear centerseatingpositionisnot removableandshouldbelowered tothestowedpositionforchild restraintinstallation.
Toremovetheheadrestraint:
- Partiallyfoldtheseatback forward.SeeRearSeatson page3-11foradditional information.

natural_image
Mechanical assembly diagram showing a lever mechanism with two arrows pointing to specific components (no text or symbols present)-
Pressbothbuttonsonthehead restraintpostsatthesametime, andpulluponthehead restraint.
-
Storetheheadrestraintinthe cargoareaofthevehicle.
-
Whenthechildrestraintis removed, reinstallthehead restraintbeforetheseating positionisused.
WARNING
Withheadrestraintsthatarenot installedandadjustedproperly, thereisagreaterchancethat occupantswillsufferaneck/spinalinjuryinacrash.Donot driveuntiltheheadrestraintsfor allooccupantsareinstalledand adjustedproperly.
Toreinstalltheheadrestraint:

natural_image
Mechanical assembly diagram showing a lever mechanism with labeled parts A, including a top component and a close-up inset (no text or symbols beyond labels)-
Insert the head restraint posts into the holes in the top of the seat back. Thenotches (A) on the post must faceth driver side of the vehicle.
-
Pushtheheadrestraintdown. If necessary, press the height adjustment release button to further lower the head restraint. See Head Restraintson page 3-2.
-
Trytomovetheheadrestraint to make sure that it is locked in place.
ReplacingLATCHSystem PartsAfteraCrash
WARNING
AcrashcandamagetheLATCH systeminthevehicle.Adamaged LATCHsystemmaynotproperly securethechildrestraint, resultinginseriousinjuryoreven deathinacrash.Tohelpmake suretheLATCHsystemis workingproperlyafteracrash, seeyourdealertohavethe systeminspectedandany necessaryreplacementsmade assoonaspossible.
IfthevehiclehastheLATCHsystem anditwasbeingusedduringa crash,newLATCHsystemparts maybeneeded.
Newpartsandrepairsmaybe necessaryeveniftheLATCH systemwasnotbeingusedatthe timeofthecrash.
SecuringChildRestraints (RearSeat)
Whensecuringachildrestraintina rearseatingposition,studythe instructionsthatcamewiththe childrestrainttomakesureitis compatiblewiththisvehicle.
If the child restraint has the LATCH system, see Lower Anchors and Tethers for Children (LATCH System) on page 3-53 for how and where to install the child restraint using LATCH. If a child restraint is secured in the vehicle using a safety belt and it uses to optether, see Lower Anchors and Tethers for Children (LATCH System) on page 3-53 for optether anchor locations.
Donotsecureachildseatina positionwithoutatoptetheranchor ifanationalorlocallawrequires thatthetoptetherbeanchored,orif theinstructionsthatcomewiththe childrestraintsaythatthetopstrap mustbeanchored.
InCanada, the law requires that forward-facing child restraints have to optether, and that the tether be attached.
If the child restraint does not have the LATCH system, you will be using the safety belt to secure the child restraint in this position. Besure to follow the instructions that camewith the child restraint. Secure the child in the child restraint when and asthe instruction say.
If more than one child restraint need to be installed in there are seat, besuretoread Where to Put the Restrainton page 3-52.
- Put the child restraint on theseat.
If the head restraint interferes with the proper installation of the child restraint, the head restraint may be removed. See "Head RestraintRemovaland Reinstallation" under Lower Anchors and Tethers for Children (LATCHSystem) on page 3-53.
- Pickup the latch plate, and run the lap and shoulder portions of the vehicle's safety belt through or around therestraint. The child restraint instructions will show you how.

natural_image
Illustration of a person's arm fastening a car seatbelt (no text or symbols)- Pushthelatchplate into the buckle until it clicks.
Positionthereleasebuttonon thebucklesothatthesafetybelt couldbequicklyunbuckledif necessary.

natural_image
Illustration of a person using a belt switch inside a vehicle seatbelt (no text or symbols)- Pull the shoulder belt all the way out of theretractor to set the lock. When theretractor lock is set, the belt can be tightened but not pulled out of theretractor.
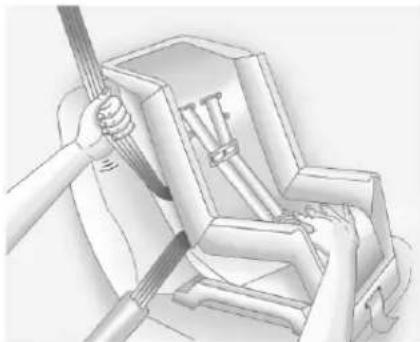
natural_image
Illustration of a hand using a tool to lift a mechanical component (no text or symbols visible)- Totightenthebelt, pushdown onthechildrestraint, pullthe shoulderportionofthebelt to tightenthelapportionofthebelt, andfeedtheshoulderbeltback intotheretractor. Wheninstalling aforward-facingchildrestraint, it maybehelpfultouseyourknee topushdownonthechild restraintasyoutightenthebelt.
Trytopullthebeltoutofthe retractortomakesurethe retractorislocked.Ifthe retractorisnotlocked,repeat Steps4and5.
3-64SeatsandRestraints
- If the child restraint has a top tether, follow the child restraint manufacturer's instructions regarding the use of the top tether. See Lower Anchors and Tethers for Children (LATCH System) on page 3-53 form more information.
- Beforeplacingachildinthe childrestraint, makesureitis securelyheldinplace. To check, graspthechildrestraintatthe safetybeltpathandattemptto moveitsidetosideandback andforth. Whenthechild restraintisproperlyinstalled, thereshouldbenomorethan 2.5cm(1in)ofmovement.
Toremovethechildrestraint, unbucklethevehiclesafetybeltand letitreturntothestowedposition. Ifthetoptetherisattachedtoatop tetheranchor, disconnect it. If the headrestraint was removed, reinstallitbeforetheseating position is used. See "Head RestraintRemovaland Reinstallation" under Lower Anchors and Tethers for Children (LATCHSystem) on page 3-53 for additional information on installing the headrestraint properly.
SecuringChildRestraints (FrontPassengerSeat)
Thisvehiclehasairbags. Arear seatisasaferplacetosecurea forward-facingchildrestraint. See Where to Put the Restrainton page 3-52.
Inaddition, the vehicle has a passengersensingsystem which is designed to turn off the right front passenger frontal air bag under certain conditions. See Passenger Sensing System on page 3-38 and Passenger Airbag Status Indicator on page 5-17 form more information, including importants safety information.
Alabelonthesunvisorsays, "Neverputarear-facingchildseatin thefront." Thisisbecausetheriskto therear-facingchildissogreat, iftheairbagdeploys.

WARNING
Achildinarear-facingchild restraintcanbeseriously injuredorkillediftherightfront passengerairbaginflates. Thisisbecausethebackofthe rear-facingchildrestraintwould beveryclosetotheinflating airbag.Achildinaforward-facing childrestraintcanbeseriously injuredorkillediftherightfront passengerairbaginflatesandthe passengerseatisinaforward position.
(Continued)
WARNING(Continued)
Evenifthepassengersensing systemhasturnedofftheright frontpassengerfrontalairbag, no systemisfail-safe. Noonecan guaranteeethatanairbagwillnot deployundersomeunusual circumstance, eventhoughitis turnedoff.
Securerear-facingchild restraintsinarearseat,even iftheairbagisoff.Ifyousecurea forward-facingchildrestraintin therightfrontseat,alwaysmove thefrontpassengerseatasfar backasitwillgo.Itisbetterto securethechildrestraintina rearseat.
See Passenger Sensing System on page 3-38 for additional information.
Ifthevehicledoesnothavea rearseatthatwillaccommodate arear-facingchildrestraint,a rear-facingchildrestraintshould notbeinstalledinthevehicle,even iftheairbagisoff.
If the child restraint has the LATCH system, see Lower Anchors and Tethers for Children (LATCH System) on page 3-53 for how and where to install the child restraint using LATCH. If a child restraint is secured using safety belt and it uses at option, see Lower Anchors and Tethers for Children (LATCH System) on page 3-53 for toptether anchor locations.
Donotsecureachildseatina positionwithoutatoptetheranchor ifanationalorlocallawrequires thatthetoptetherbeanchored, orif theinstructionsthatcomewiththe childrestraintsaythatthetopstrap mustbeanchored.
3-66SeatsandRestraints
InCanada, the law requires that forward-facing child restraints have adopted, and that the tether be attached.
Youwillbeusingthelap-shoulder belttosecurethechildrestraintin thisposition.Followtheinstructions thatcamewiththechildrestraint.
-
Movetheseatasfarbackasit willgobeforesecuringthe forward-facingchildrestraint. Whenthepassengersensing systemhasturnedofftheright frontpassengerfrontalairbag andseat-mountedsideimpact airbag,theoffindicatoronthe passengerairbagstatus indicatorshouldlightandstay litwhenyoustartthevehicle. SeePassengerAirbagStatus Indicatoronpage5-17.
-
Putthechildrestraint on theseat.
-
Pickup the latch plate, and run the lap and shoulder portions of the vehicle's safety belt through or around therestraint. The child restraint instructions will show you how.
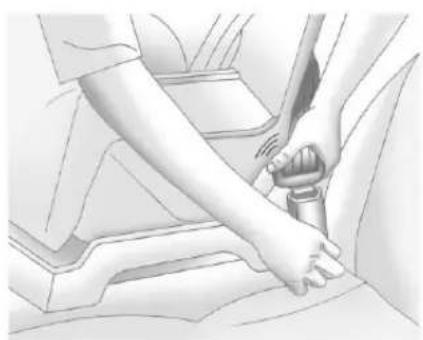
natural_image
Illustration of a person's seatbelt being adjusted for a key (no text or symbols present)- Pushthelatchplate into the buckle until it clicks.
Positionthereleasebuttonon thebuckle,sothatthesafety beltcouldbequicklyunbuckled ifnecessary.
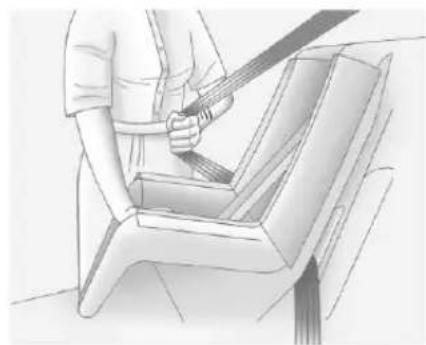
natural_image
Illustration of a person using a seatbelt to lift a passenger seat (no text or symbols present)- Pulltheshoulderbeltalltheway outoftheretractortosetthe lock. Whentheretractorlockis set, thebeltcanbetightenedbut notpulledoutoftheretractor.

natural_image
Illustration of a hand using a tool to lift or install a mechanical component (no text or symbols visible)- Totightenthebelt, pushdown onthechildrestraint, pullthe shoulderportionofthebelt to tightenthelapportionofthebelt, andfeedtheshoulderbeltback intotheretractor. Wheninstalling aforward-facingchildrestraint, it maybehelpfultouseyourknee topushdownonthechild restraintasyoutightenthebelt.
Trytopullthebeltoutofthe retractortomakesurethe retractorislocked.Ifthe retractorisnotlocked,repeat Steps5and6.
Ifthevehicledoesnothavea rearseatandthechildrestraint hasatoptether,followthe childrestraintmanufacturer's instructionsregardingthe useofthetoptether.SeeLower AnchorsandTethersfor Children(LATCHSystem)on page3-53formoreinformation.
- Before placing a child in the child restraint, makes sure it is securely held in place. To check, grasp the child restraint at the safety belpath and attempt to move its diet side and back and forth. When the child restraint is properly installed, there should be more than 2.5cm (1in) of movement.
If the air bags are off, the off indicator in the passenger air bag status indicator will come on and stay on when the vehicle is started.
Ifachildrestrainhasbeeninstalled andtheonindicatorislit,see "lfthe OnIndicatorisLitforaChild Restraint"underPassengerSensing Systemonpage3-38formore information.
Toremovethechildrestraint, unbucklethevehiclesafetybeltand letitreturntothestowedposition.
3-68SeatsandRestraints
NOTES
Storage
StorageCompartments
GloveBox......4-1
Cupholders......4-2
FrontStorage......4-2
ArmrestStorage......4-2
CenterConsoleStorage.....4-2
AdditionalStorageFeatures
CargoCover......4-3
CargoTie-Downs......4-5
CargoManagement
System......4-5
CargoNet......4-9
ConvenienceNet......4-11
FirstAidKit......4-11
RoofRackSystem
RoofRackSystem......4-12
Storage Compartments
GloveBox
Liftthegloveboxhandleupto openit.
The gloveboxisairconditioned and can be used to store items at a lower temperature. The vehicle air conditioning must be turned on for the maximum cool air to enter the glovebox.
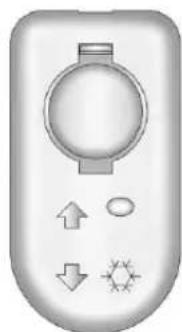
natural_image
Simple grayscale icon of a remote control with control knob, directional arrows, and starburst symbol (no text or labels)Movetheslidecontroltoopenor closetheopening.Closetheglove boxtokeepcoldairfromentering thevehicle.
4-2Storage
Cupholders

natural_image
3D rendering of a car interior with a black arrow pointing to a component (no text or symbols visible)This vehicle has a cupholder equipped with a divider that can be adjusted to accommodate large containers or small containers.
Forlargecontainers, pushthe buttonomoveasidethedivider andmakethecupholderdeeper. For smallcontainers, pushdownonthe topedgeofthedividertolockit backinplacetomakethecupholder shorter.
FrontStorage
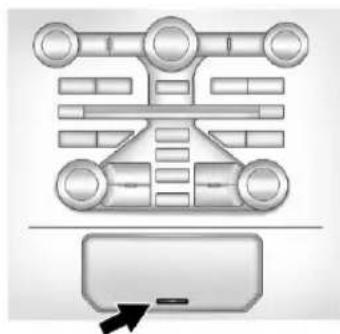
natural_image
Pure electrical circuit lines without any symbolsPushthebuttononthedoortoopen thestorageareainfrontoftheshift lever.
ArmrestStorage
Pulltherearseatarmrestforwardto accessthecupholders.

natural_image
Interior view of a car seatbelt with a black arrow pointing to the seat area (no text or symbols visible)Forvehicleswithrearamrest storage,pullthelevertoaccessthe storagearea.
CenterConsoleStorage
Thecenterconsolehasanarmrest andstoragearea.
Thearmrestcanbeadjustedtoa forward,middle,orrearward position.
Movethearmresttothefull rearwardpositiontoaccessthe buttonsandopenthestoragearea.
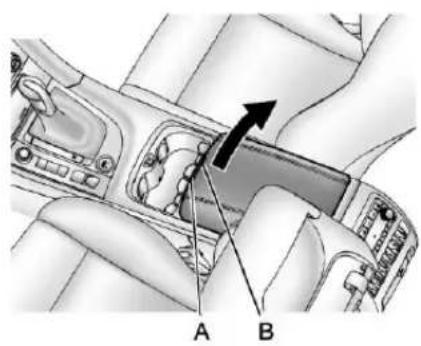
The storage area has an upper storagetray and a lower main storage. Push the button (A) to access the upper storagetray and the button (B) to access the lower main storage.
ThereisanAccessoryPowerOutlet (APO) and Input Jacks for auxiliary audiodevices. Formore information, seetheseparate infotainment system manual.
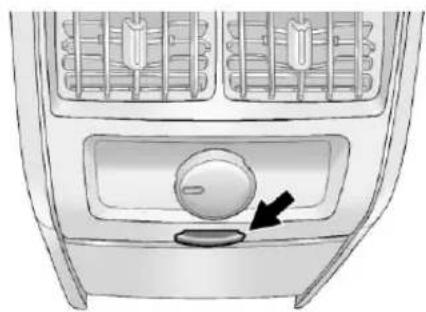
natural_image
Diagram of a car air vent with a dial indicator and arrow pointing to the bottom panel (no text or symbols present)Pushthebuttontoopenthestorage areallocatedattherearofthe centerconsole.
AdditionalStorage Features
CargoCover
Forvehicleswiththedualposition cargocover, itcanbeusedtocover itemsinthecargoareaofthe vehicle.
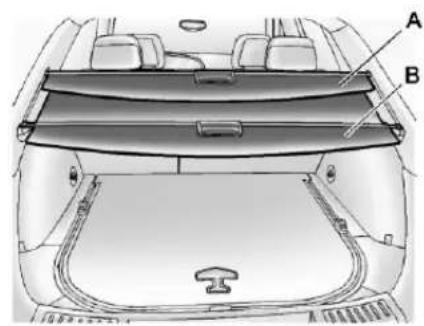
Theshadecanbesetintwo positions.Itcanbesetinahalfway open(A)positionforloadingobjects
4-4Storage
intotherearcompartment,orthe lower(B)positiontoconcealobjects intherearcompartment.
InstalltheCargoCover
- Hold the cartridges that the pull-out shade face there are of the vehicle.
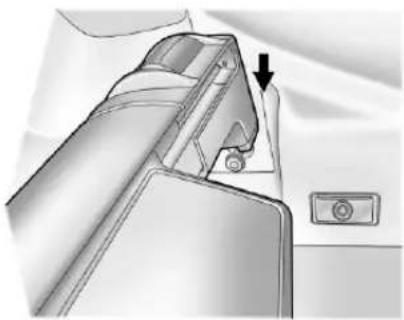
natural_image
Mechanical assembly diagram showing a bracket with a black arrow indicating a specific part (no text or symbols present)-
Alignthecartridgeoverthepins onthetrimpanelsofthevehicle.
-
Pushdownonthecartridge snapitintoplace.
-
Unrolltheshadetowardtherear ofthevehicle.
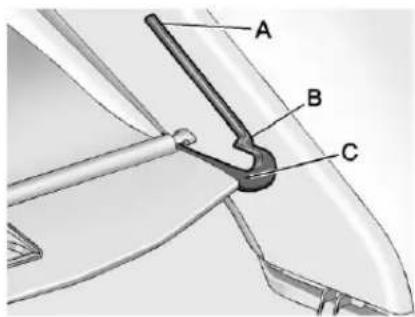
- Inserttheshadepinsinthe channels(C)onbothsides.
6.Slidetheshadetothelower(B) position,orthehalfwayopen(A) position.
RemovetheCargoCover
- Removethecoverfromthe channelsandcarefullyrollit backup.

natural_image
3D rendered diagram of a curved surface with an arrow indicating direction (no text or symbols)2.Slidethebuttononthetopto releasethecartridge.
- Pulluptoremovethecartridge from thepins.
WARNING
Animproperlystoredcargocover couldbethrownaboutthevehicle duringacollisionorsudden maneuver.Someonecouldbe injured.Ifthecoversremoved, alwaysstoreitintheproper storagelocation.Whenitis replaced,alwaysbesurethatitis securelyreattached.
CargoTie-Downs
Forvehiclesequippedwithcargo tie-downs,thefourtie-downsare locatedintherearcompartmentof thevehicle.Usethetie-downsto securesmallloads.
CargoManagement System
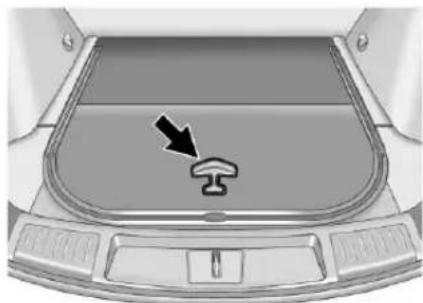
natural_image
Top-down view of a car's front bumper with a black arrow pointing to the lid area (no text or symbols)Toopenthecargomanagement system, pullthehandleandliftup.
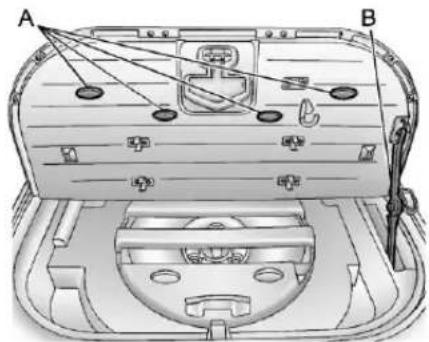
natural_image
Technical diagram of a vehicle engine compartment with labeled parts A and B, showing internal components and wiring (no text or symbols beyond labels)Aproprod(B)lockstoholdthe coverupwhenopened.
Fourhooks(A)arelocatedonthe insidecoverandcanbeusedfor storingitems.
Theremaybeadditionalstorage compartmentsoneachsideofthe cargomanagementsystem.Liftthe paneluptoopen.

natural_image
Mechanical linkage diagram showing a lever with a circular head and an arrow indicating motion (no text or symbols present)Presstheredpushbuttononthe proprodtoclosethecover.
RearStorageArea
WARNING
Animproperlylatchedandclosed cargocover,orcagocoverleftin theopenposition,couldbe thrownaboutthevehicleduringa crashorsuddenmaneuver. Someonecouldbeinjured.Be suretoreturnthecovertothe closedpositionandlatchbefore driving.Ifthecoversremoved, alwaysstoreitoutsideofthe vehicle.Whenitisreplaced, alwaysbesurethatitissecurely reattached.
Toaccesstherearstorageareaof thecargomanagementsystem,and thetiresealantandcompressorkit:
- Removethecargocover, ifequipped.
- Openthecargomanagement systemcover.

natural_image
Mechanical linkage diagram showing a lever with a black arrow pointing to the pivot point (no text or symbols present)- Releasetheproprodfromthe insidecoverbyslidingthered clipdown.
Unhooktheproprodfromthe pinontheinsidecover.Storethe unhookedproprodbyfoldingit intothecargomanagement compartment.
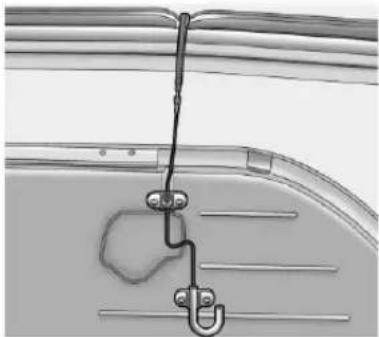
natural_image
Close-up of a mechanical component with a hanging hook and mounting bracket (no text or symbols visible)- Storethecargomanagement systemcoverbyhookingitonto theweatherstrip.
U-Rail

natural_image
3D diagram of a car interior frame with internal structural framework and an arrow indicating direction (no text or symbols)Forvehicleswithau-railsystem, thefencecanbemovedtodifferent positionsontheu-railtrackto securecargo.

Pushbothadapterbuttonstomove
theadapters(B)onthestraightpart
oftheu-rail.
Tomovethefencearoundtheu-rail, disconnectoneside:
-
Unlockbyturningthelatch(A) to align 🔒 with the arrow on the adapter(B).
-
Pushtheadaptorbuttontomove theadapters(B)tothedesired position.
4-8Storage
- Reinstall the fence and lock both latches(A) by turning to align with the arrow on the adapter(B).

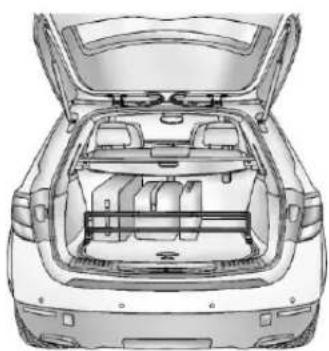
natural_image
Technical line drawing of a car rear open cab showing internal compartments and structural components (no text or symbols)Usethefencetosecureitemsin place.
RemovingtheFence
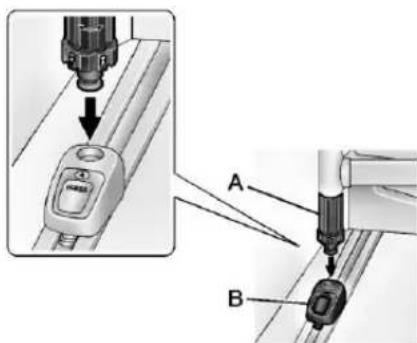
Unlockbyturningbothlatches(A)to align with the arrow on the adapter(B).Liftandremovethe fence.
InstallingtheFence

Insertthefenceintoheadapters andlockbothlatches(A)byturning toalign 🔒 with the arrow on the adapter(B).
StoringtheFence
- Liftthecargomanagement systemcover.
- Releasethecoverfromtheprop rodasdescribedinprevious steps.
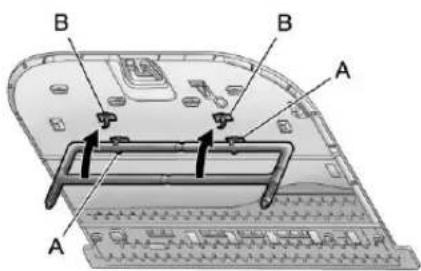
- Insert the top of the gate into the lowertwoclips(A).
- Flipthebottomofthegateup and insertitintotheuppertwo clips(B).
CargoNet
WARNING
Donotstackitemshigherthan theupperendofthecargonetor hanganythingfromthenet.Avoid itemsthathavesharpedgesor thatapplyexcessiveforcetothe net.Ifitemsarenotproperly stored,damagetothenetcould occuranditemscanbethrown aboutthevehicle.Youorothers couldbeinjured.Alwaysstore itemsbehindthenet.
Forvehiclesequippedwithacargo net,itcanbeusedtostorelight loads,keepingthemfromfalling overorbeingthrownintothecabin duringheavybraking.
Thenetshouldnotbeoverloadedor usedtostoreheavyloads.
Therearefouopeningsinthe headliner:twolocatedbehindthe frontseatsandtwobehindtherear seats.
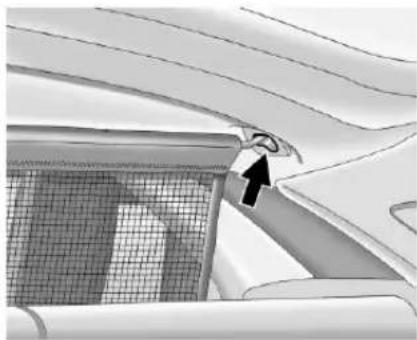
natural_image
Close-up of a car's window with a black arrow pointing to the door (no visible text or symbols)- Insertthetopcornersofthe cargonetintothelargeopening intheheadlinerandsecureby slidingthemintothesmall opening.
- Therearseatbacksshouldbe foldedownwhenthenetis installedintheheadliner openinglocatedbehindthefront seats.
4-10Storage

natural_image
Side view illustration of a car showing the engine compartment and dashboard (no text or symbols)-
Mountthecargonettotherear seatetherslocatedontheback ofthefoldeddownrearseats andpullonthestrapstotighten thenet.
-
Whenthenetisinstalledinthe headlineropeninglocated behindtherearseats, therear seatbacksshouldbeupright.
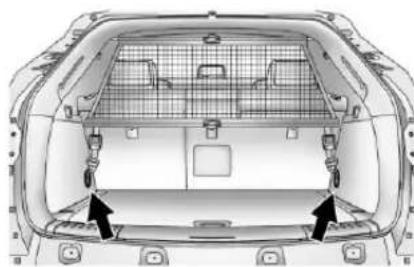
natural_image
Top-down technical illustration of a car backrest with visible structural grid and two black arrows indicating parts (no text or symbols)- Mountthecargonettothecargo tie-downslocatedonthelower sidepanels.

natural_image
Diagram of a mechanical component with a grid structure and directional arrow (no text or symbols)- Pullonthestrapstotighten thenet.
CargoNetStorage
Thecargonetcanberemovedfrom thevehicleandstoredinthecargo managementsystem.
- Disconnectthenetfromtheroof openingsandthetethers.
- Presstheredbuttononthe centerofthenettofolditinhalf.
- Rollupthecargonet, storing it into the attached vinylbag.
- Openthecargomanagement systemcover.
- For vehicles with an inflator kit, store the cargonet in the available spacenext to the kit.
ConvenienceNet
This vehicle may have a conveniencenetlocated in therear of the vehicle. Attachitothecargo tie-downsforstoringsmallloads.
Donotusethenettostoreheavy loads.
FirstAidKit
Ifthevehiclehasafirstaidandtool kit,itislocatedinthestoragebin behindthesparetire.
Thekitincludes:
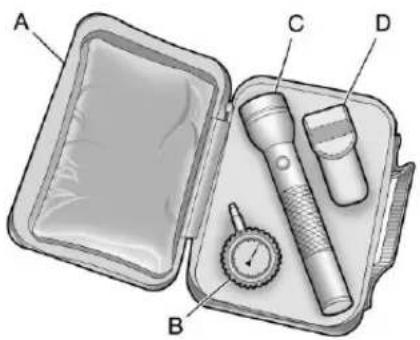
A.FirstAidKit
B. TirePressureGauge
C. Flashlight
D.Multi-PurposeToolSet
Thetirepressuregaugehasareset buttoninthegaugestem. After takingapressurereading, pressthe buttontoresetthegaugetozero.
RoofRackSystem

WARNING
If something is carried on top of the vehicle that is longer or wider than the or off track—like paneling, plywood, or amattress—the wind can catch it while the vehicle is being driven. The item being carried could be violently torn off, and this could cause a collision and damage the vehicle. Never carries something longer or wider than the or off track on top of the vehicle unless using a Saab certified accessory carrier.
Forvehicleswitharoofrack,the rackcanbeusedtoloaditems. Forroofracksthatdonothave crossrailsincluded,Saabcertified crossrailscanbepurchasedasan accessory.Seeyourdealerfor additionalinformation.
Notice: Loading cargo on the roof rack that weigh more than 100kg (220lbs) or hang so over the rear or sides of the vehicle may damage the vehicle. Load cargo so that it rest sevenly between the cross rails, makingsure to fast encargose securely.
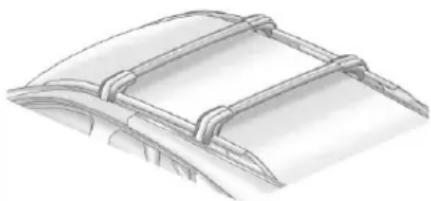
natural_image
Technical line drawing of a car roof structure with horizontal bracing (no text or symbols)Topreventdamageorlossofcargo whendriving,checktomakesure crossrailsandcargoaresecurely
fastened. Loading cargoontheroof rackwillmakethe vehicle's center of gravity higher. Avoid high speeds, sudden starts, sharp turns, sudden braking, or abrupt maneuvers; otherwise it may result in loss of control. If driving for a long distance, on rough roads, or high speeds, occasionally stop the vehicle to make sure the cargoremains in its place. Donot exceed them maximum vehicle capacity when loading the vehicle. Form more information on vehicle capacity and loading, see Vehicle Load Limit on page 9-12.
Instruments and Controls
Controls
SteeringWheelAdjustment...5-2
SteeringWheelControls.....5-2
Horn....5-3
WindshieldWiper/Washer.....5-3
RearWindowWiper/
Washer....5-5
HeadlampWasher......5-6
Compass....5-6
Clock(DigitalClock)......5-7
PowerOutlets......5-8
WarningLights, Gauges, and Indicators
WarningLights, Gauges, and
Indicators......5-9
InstrumentCluster......5-10
Speedometer....5-12
Odometer....5-12
Tachometer....5-12
FuelGauge....5-12
FuelEconomyGauge......5-13
TurboGauge......5-14
EngineCoolant Temperature Gauge....5-14
SafetyBeltReminders......5-15
AirbagReadinessLight.....5-16
PassengerAirbagStatus Indicator....5-17
ChargingSystemLight.....5-18
Malfunction IndicatorLamp......5-18
BrakeSystemWarning Light....5-22
ElectricParkingBrake Light....5-22
AntilockBrakeSystem(ABS) WarningLight....5-23
TractionOffLight......5-24
ElectronicStabilityProgram (ESP)OffLight....5-24
ElectronicStabilityProgram (ESP)/TractionControl SystemIndicatorLight.....5-25
TirePressureLight......5-25
EngineOilPressureLight....5-26
FuelEconomyLight......5-27
LowFuelWarningLight.....5-27
SecurityLight......5-27
High-BeamOnLight.....5-28
AdaptiveForwardLighting (AFL)Light....5-28
FrontFogLampLight......5-28
LampsOnReminder......5-29
CruiseControlLight......5-29
InformationDisplays
DriverInformation
Center(DIC)......5-29
VehicleMessages
VehicleMessages......5-34
BatteryVoltageandCharging Messages....5-34
BrakeSystemMessages....5-34
CompassMessages......5-35
CruiseControlMessages....5-35
DoorAjarMessages......5-35
EngineCoolingSystem Messages......5-36
EngineOilMessages......5-37
EnginePowerMessages....5-37
FuelSystemMessages.....5-38
KeyandLockMessages.....5-38
LampMessages......5-38
ObjectDetectionSystem Messages....5-39
5-2 InstrumentsandControls
RideControlSystem
Messages......5-39
AirbagSystemMessages....5-40
SafetyBeltMessages.....5-40
Anti-theftAlarmSystem
Messages......5-40
ServiceVehicleMessages...5-40
StartingtheVehicle
Messages......5-40
TireMessages......5-41
TransmissionMessages.....5-41
VehicleReminder
Messages......5-42
WasherFluidMessages.....5-42
VehiclePersonalization
VehiclePersonalization.....5-42
UniversalRemoteSystem
UniversalRemoteSystem...5-48
UniversalRemoteSystem
Programming......5-48
UniversalRemoteSystem
Operation......5-51
Controls
SteeringWheel Adjustment

natural_image
Mechanical assembly diagram showing a lever mechanism with a pull arrow (no text or symbols)Theadjustmentleverislocatedon theleftsideofthesteeringcolumn.
Toadjustthesteeringwheel:
-
Pulltheleverdown.
-
Movethesteeringwheelup ordownandinorouttoa comfortableposition.
-
Pulltheleveruptolockthe steeringwheelinplace.
Donotadjustthesteeringwheel whiledriving.
SteeringWheelControls
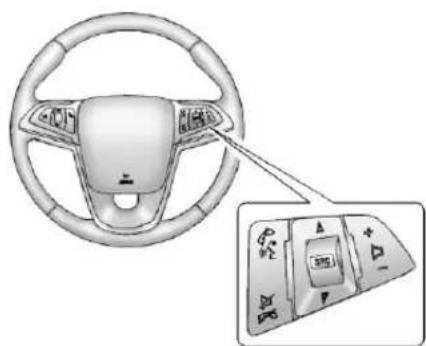
Forvehicleswithaudiosteering wheelcontrols, someaudiocontrols canbeadjustedatthesteering wheel.
^1 (Push to Talk): For vehicles withaBluetooth ^ , OnStar ^ , ornavigationsystem, pressto interactwiththosesystems. See theOnStarOwner'sGuideorthe separateinfotainmentsystem manualformoreinformation.
☑ / ☑ (Mute/End Call): Press to silencethevehiclespeakersonly. Pressagaintoturnthesoundon. ForvehicleswithBluetooth,OnStar, ornavigationsystems,pressto rejectanincomingcall,orenda currentcall.
△ SRC ∇ (Rotary Control): Turn toselectanaudiosource.
Turn or toselectthenextor previousfavoriteradiostation, CD, DVDtrack/chapter(withnavigation), orMP3track.
PressSRCtochangebetween radioandCDorDVD.
+ □ - (Volume): Press + to increase the volume. Press-to decrease the volume.
Horn
Pressnearthehornsymbolsor pressonthesteeringwheelpadto soundthehorn.
WindshieldWiper/Washer

Thewindshieldwiper/washerlever islocatedontherightsideofthe steeringcolumn.Withtheignitionin ACC/ACCESSORYorON/RUN/START,movethewindshieldwiper levertoselectthewiperspeed.
2:Useforfastwipes.
1:Useforslowwipes.
(AdjustableIntervalWipes): Movetheleverupto ♦for adjustableintervalwipes,then turnthe ▼bandupformore frequentwipesordownforless frequentwipes.Ifthevehiclehas Rainsense™,seethefollowing Rainsenseinformation.

○(Off):Usetoturnthewipersoff. (Mist):Forasinglewipe,briefly movethewiperleverdown.For severalwipes,holdthewiper leverdown.
Clearsnowandicefromthewiper bladesbeforeusingthem.Iffrozen tothewindshield,carefullyloosenor thawthem.Damagedbladesshould bereplaced.SeeWiperBlade Replacementonpage 10-32.
Heavysnoworicecanoverloadthe wipermotor.
WipeParking
IftheignitionisturnedtoLOCK/OFFwhilethewipersareon1,2, or ☐,theywillimmediatelystop.
If the windshield wiper lever is then moved to off before the river door is opened or within 10 minutes, the wipers will restart and move to the base of the wind shield.
IftheignitionisturnedtoLOCK/OFFwhilethewipersareperforming wipesduetowindshieldwashing, thewiperscontinuetorununtilthey reachthebaseofthewindshield.
Rainsense™
ForvehicleswithRainsense,a sensorlocatednearthetopcenter ofthewindshielddetectsthe amountofwateronthewindshield andautomaticallycontrolsthe frequencyofthewindshieldwiper.
Keepthisareaofthewindshield clearofdebristoallowforbest systemperformance.
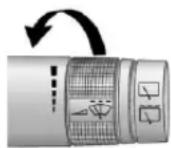
(RainsenseWipeSensitivity Control): Movethewindshield wiperleverto Turnthe bandonthewiperlevertoadjust the sensitivity.
• Turnthebandupformore sensitivitytomoisture.
• Turnthebanddownforless sensitivitytomoisture.
- Movethewindshieldwiper leveroutofthe positionto deactivateRainsense.
WiperArmAssemblyProtection
When using an automatic car wash, movethewindshieldwiperleverto the off position. This disable the automatic Rainsense windshield wipers and/or rearwiper.
WithRainsense, if the transmission is in N(Neutral) and the vehicle speed is very slow, the wipers will automatically stop the base of the windshield.
Thewiperoperationsreturnto normalwhentetransmissionisno longerinN(Neutral)orthevehicle speedhasincreased.
WindshieldWasher
Pullthelevertowardyoutspray washerfluidonthewindshield. The spraycontinuesuntiltheleveris released. Thewiperswillrunafew times.See WasherFluidon page 10-26forinformationon fillingthewindshieldwasherfluid reservoir.

WARNING
Infreezingweather, donotuse the washer until the windshield is warmed. Otherwisethewasher fluid can form mice on the windshield, blocking your vision.
RearWindow Wiper/Washer
Therearwipercontrolsareonthe endofthewindshieldwiperlever.

natural_image
Close-up of a handheld electronic device with a screen and ports, no visible text or symbolsPresstheupperorlowerportionof thebuttontocontroltherearwiper andrearwiperdelay.
Thesystemturnsoffwhenthe buttonisreturnedtothemiddle position.
(RearWiper):Usefor continuousrearwindowwipes.
(RearWiperDelay):Usetoset adelaybetweenwipes.
(RearWasher): Push the windshieldwiperleverforwardto spraywasherfluidontherear window. The lever automatically returnsto its original position when released.
5-6 InstrumentsandControls
ReverseGearWipes
Iftherearwipercontrolisoff, the rearwiperwillautomaticallyoperate continuouslywhentheshiftlever isinR(Reverse), andthefront windshieldwiperisperforminglow orhighspeedwipes. Iftherear wipercontrolisoff, the shiftlever isinR(Reverse), andthefront windshieldwiperisperforming intervalwipes, thentherearwiper automaticallyperformsinterval wipes.
Thisfeaturecanbechanged. See VehiclePersonalization on page5-42.
Thewindshieldwasherreservoiris usedforthewindshieldandtherear window.Checkthefluidlevelinthe reservoirrifeitherwasherisnot working.SeeWasherFluidon page10-26.
HeadlampWasher
Forvehicleswithheadlamp washers, they are located to the side of the headlamps.
Theheadlampsmustbeoninorder tousetheheadlampwashers.Ifthe headlampsarenoton,onlythe windshieldwillbewashed.
Pullthewiperlevertowardyou andholdbrieflytoactivate.The headlampwasherswillsprayonce, pause,andsprayagain.The headlampwasherwillsprayagain afterfivewindshieldwashcycles.
See WasherFluidonpage 10-26 for information on filling the windshield washerfluid.
Compass
The vehicle may have a compass display on the Driver Information Center (DIC). The compass receives its heading and other information from the Global Positioning System (GPS) antenna, Electronic Stability Program (ESP), and vehicle speed information.
AvoidcoveringtheGPSantenna forlongperiodsoftimewithobjects thatmayinterferewiththeantenna's abilitytoreceiveasatellitesignal.
Seetheinfotainmentsystemmanual forthelocationofthevehicle's antenna. Thecompasssystemis designedtooperateforacertain numberofmilesordegreesofturn beforeneedingasignalfromthe GPSsatellites. Whenthecompass displayshowsCAL, drivethe vehicleforashortdistanceinan openareawhereitcanreceivea GPSsignal. Thecompasssystem willautomaticallydeterminewhena GPSsignalisrestoredandprovide aheadingagain. See Compass Messagesonpage5-35formore informationonthemessagesthat maybedisplayedforthecompass.
Clock(DigitalClock)
Theinfotainmentsystemcontrols areusedtoaccessthetimeand datesettingsthroughthemenu system.Seetheseparate infotainmentsystemmanualfor informationabouthowtousethe menusystemorhowtooperate thedigitalclockforthenavigation system.
Toturnthedigitalclockonoroff:
- PresstheCONFIGbutton.
- SelectTimeandDateSettings.
- SelectClockDisplayed.
- PressMENU/SELECTtoturn theclockonoroff.
SettingtheTimeandDate
- PresstheCONFIGbutton.
- SelectTimeandDateSettings.
- SelectSetTimeorSetDate.
- TurntheMENU/SELECTknobto adjustthehighlightedvalue.
5.PresstheMENU/SELECTknob toselectthenextvalue. - Tosavethetimeordate andreturntotheTimeand DateSettingsmenu, press the ◆BACKbuttonatanytime orpresstheMENU/SELECT knobafteradjustingtheminutes oryear.
Settingthe12/24HourFormat
- PresstheCONFIGbutton.
- SelectTimeandDateSettings.
- Highlight12/24HourFormat.
- PresstheMENU/SELECTknob toselectthe12houror24hour displayformat.
SettingtheMonth&Day Format
- PresstheCONFIGbutton.
- SelectTimeandDateSettings.
- HighlightMonth&DayFormat.
- PresstheMENU/SELECTknob toselectMM/DD(month/day) or DD/MM(day/month).
The vehicle has four accessory power outlets. The power outlets located below the climate control system, inside the center floor console, and on there are of the center floor console are powered while the vehicle is in ON/RUN/START or ACC/ACCESSORY mode, or until the driver door is opened within 10 minutes of turning off the vehicle.
The power outlet located in therear cargo area is powered at all times.
Thereisasmallcapthatmustbe removedtoaccesstheaccessory poweroutlet.Whennotusingthe outletbesuretocoveritwiththe protectivecap.
Notice:Leavingelectrical equipmentpluggedinforan extendedperiodoftimewhile thevehicleisoffwilldrainthe
battery.Powerisalwayssupplied totherearcargooutlet.Always unplugelectricalequipmentwhen notinuseanddonotplugin equipmentthatexceedsthe maximum20ampererating.
Certainaccessorypowerplugs may not be compatible with the accessorypoweroutletand could overload vehicle or adapterfuses. If a problem is experienced, see your dealer.
Whenaddingelectricalequipment, besuretofollowtheproper installationinstructionsincluded withtheequipment.SeeAdd-On ElectricalEquipmentonpage9-61.
Notice:Hangingheavy equipmentfromthepower outletcancausedamagenot coveredbythevehiclewarranty. Thepoweroutletsaredesigned foraccessorypowerplugsonly, suchascellphonechargecords.
WarningLights, Gauges,and Indicators
Warninglightsandgaugescan signalthatsomethingiswrong beforeitbecomesseriouslyenough tocauseanexpensiverepairor replacement.Payingattentiontothe warninglightsandgaugescould preventinjury.
Warninglightscomeonwhenthere couldbeaproblemwithvehicle function. Somewarninglightscome onbrieflywhentheengineisstarted toindicatetheyareworking.
Gaugescanindicatewhenthere couldbeaproblemwithvehicle function.Oftengaugesandwarning lightsworktogethertoindicatea problemwiththevehicle.
Whenoneofthewarninglights comesonandstaysonwhile driving,orwhenoneofthegauges showstheremaybeaproblem, checkthesectionthatexplainswhat todo.Followthismanual'sadvice. Waitingtodorepairscanbecostly andevendangerous.
InstrumentCluster

EnglishShown, MetricSimilar

EnglishTurboShown, MetricTurboSimilar
Speedometer
Thespeedometershowsthe vehicle'sspeedineitherkilometers perhour(km/h)ormilesper hour(mph).
Odometer
Theodometershowshowfarthe vehiclehasbeendriven,ineither kilometersormiles.
Thisvehiclehasatamper-resistant odometer.Ifthevehicleneedsa newodometerinstalled,thenew oneissettothemileageoftheold odometer.Ifthisisnotpossible,itis setatzeroandalabelisputonthe driverdoortoshowtheoldmileage reading.
Tachometer
Thetachometerdisplaythe enginespeedinrevolutionsper minute(rpm).
Notice: If the engine is operated with the tachometer in the shaded warning area, the vehicle could be damaged, and the damages would not be covered by the vehicle warranty. Donot operate the engine with the tachometer in the shaded warning area.
FuelGauge
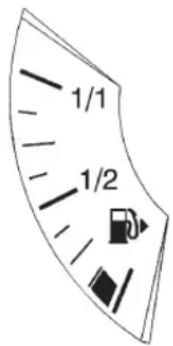
Whentheignitionison, the fuel gaugetells you about how much fuel you have left tinyourtank.
Anarrowonthefuelgauge indicatesthesideofthevehicle thefueldoorison.
Whentheindicatornearseempty, the lowfuellightwillcomeon. Youstill havealittlefuelleft, butyoushould getmoresoon.
Herearefourthingsthatsome ownersaskabout.Noneofthese showaproblemwithyourfuel gauge:
- Attheservicestation, the fuel pumpshutsoffbeforethegauge readsfull.
- Ittakesalittlemoreorless fueltofillupthanthegauge indicated. Forexample, the gaugemayhaveindicatedthe tankwashalffull, butitactually tookalittlemoreorlessthan halfthetank'scapacitytofill thetank.
• Thegaugemovesalittlewhen youturnacornerorspeedup. - Thegaugetakesafewseconds tostabilizeaftertheignitionis turnedon,andwillgobackto emptywhenyouturnthe ignitionoff.
FuelEconomyGauge

Metric
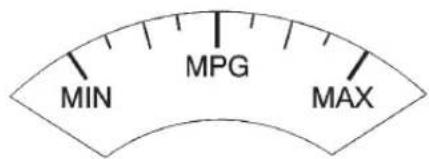
English
Thegaugeshowsthefuelusage thatthevehicleiscurrently achievinginMPGandinliters per100kilometers(l/100km).
MIN/20: Iswhentheleastefficient fueleconomyusuallyoccursduring accelerationorwhenidling.
MAX/I/100: Iswhenthebestfuel economyisbeingachieved.
Thisgaugemovesoftenasitisan instantaneouscalculationbasedon currentdrivingconditions.
TurboGauge

Forvehicleswithaturbogauge, it indicateswhenthevehicleisusing turbopower.
Whentheneedleisatrestatthe leftofthegauge,turboisnot beingused.
Astheacceleratorpedalispressed, theneedlemaymovetotheright. Thisisnormalandmeansthatthe vehicleisusingturbopower.Under normalconditionstheneedlewillnot displayareadinginthered.
Oncethedrivereasesoffthe acceleratorpedalorthe transmissionshifts,theneedle movesbackintotheleftareaof thegauge.
EngineCoolant TemperatureGauge
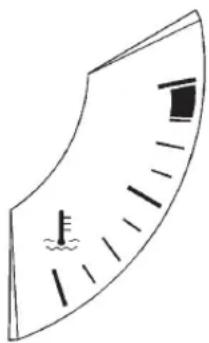
natural_image
Simple line drawing of a curved scale with tick marks and symbols (no text or labels)Thisgaugemeasures the temperature of the vehicle's engine.
If the indicator needlemoves into the shaded area, the engine is too hot. A temperature indicator light will turn on.
If you have been operating your vehicle under normal driving conditions, and the temperature indicator light comes on, you should pulloff heroad, stop your vehicle and turn off the engine as soon as possible.
SafetyBeltReminders DriverSafetyBeltReminder Light
Thereisadriversafetybelt reminderlightontheinstrument panelcluster.
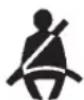
Whenthevehicleisstartedthislight flashesandachimecomesonto reminddriverstofastentheirsafety belt.Thenthelightstaysonsolid untilthebeltisbuckled.
Thiscyclemaycontinue several times if the driver remains or becomes unbuckledduring driving while the vehicle is moving.
Ifthedriversafetybeltisalready buckled, neitherthelightnorchime comeson.
PassengerSafetyBelt ReminderLight
Whenthevehicleisstartedthislight flashesandachimemaycomeon toremindthefrontpassengerto fastentheirsafetybelt. Thenthe lightstaysonsoliduntilthebeltis buckled.
Thiscycle may continue several times if the passenger remains or becomes unbuckled while the vehicle is moving.
If the passengers safety belt is buckled, neither the chimen or the light comes on.
Thefrontpassengersafetybelt reminderlightandchimemayturn onifanobjectisputontheseat suchasabriefcase,handbag, grocerybag,laptop,orother electronicdevice.Toturnoffthe reminderlightand/orchime,remove theobjectfromtheseatorbuckle thesafetybelt.
SecondRowPassengerBelt ReminderLight

Whentheengineisstartedandthe Trip/Fueldisplayischosen,three graysafetybeltsymbolscomeon andstayonforseveralsecondson thetopoftheDriverinformation Center(DIC)toremindpassengers tofastentheirsafetybelts.
If the Vehicle Information is selected, a full pages creend displays at start-up the three safety belt symbols.
Oncethepassengersafetybeltis buckled, the correspondingsafety beltsymbolintheDICturnsgreen. Therearenoseatpositionsensors intheseat,norasafetybelt remindersensorpad.Ifasafety beltisnotinitiallybuckled,the clustercontinuestoshowthe graysafetybelticon.
While the vehicle is moving, if a second row passenger how as previously buckled becomes unbuckled, a full screen warning displays with the corresponding safety belt indicator flashing red. Achimemaysound.
Acknowledgewarningmessagesby pressinganyoftheDICbuttons.
AirbagReadinessLight
Thislightshowsifthereisan electricalproblem. Thesystem checkincludestheairbagsensor, thepretensioners,theairbag modules,thewiring,andthecrash sensinganddiagnosticmodule. Formoreinformationontheairbag system,seeAirbagSystemon page3-29.

Theairbagreadinesslightcomeson andstaysonforseveralseconds whenthevehicleisstarted.Then thelightgoesout.
WARNING
If the airbagreadinesslightstays on after the vehicle is started or comes on while driving, it means the air bagsystem might not be working properly. The airbags in the vehicle might not inflate a crash, or they could even inflate without acrash. To help avoid injury, have the vehicles serviced right away.
PassengerAirbagStatus Indicator
Thevehiclehasapassenger sensingsystem.SeePassenger SensingSystemonpage3-38for importantsafetyinformation.The overheadconsolehasapassenger airbagstatusindicator.
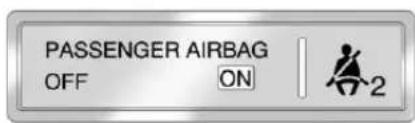
UnitedStates

Canada
Whenthevehicleisstarted,the passengerairbagstatusindicator willlightONandOFF,orthesymbol foronandoff,forseveralseconds asasystemcheck.Ifyouareusing remotestart,ifequipped,tostart thevehiclefromadistanceyou maynotseethesystemcheck.
Then, afterseveralmoreseconds, thestatusindicatorwilllighteither ONorOFF, oreithertheonoroff symboltoletyouknowthestatusof therightfrontpassengerfrontaland seat-mountedsideimpactairbag.
IfthewordONortheonsymbolis litonthepassengerairbagstatus indicator, itmeansthattheright frontpassengerfrontalairbagand seat-mountedsideimpactairbag areenabled (mayinflate).
IfthewordOFFortheoffsymbol islitonthepassengerairbag statusindicator, itmeansthatthe passengersensingsystemhas turnedofftherightfrontpassenger frontalandseat-mountedside impactairbag.
If,afterseveralseconds,bothstatus indicatorlightsremainon,orifthere arenolightsatall,theremaybea problemwiththelightsorthe passengersensingsystem.See yourdealerforservice.

WARNING
If the airbagreadiness light ever comes on and stay on, it means that something may be wrong with the air bags system. To help avoid injury to yourself for others, have the vehicles serviced right away. See Airbag Readiness Lighton page 5-16 form more information, including important safety information.
ChargingSystemLight

Thechargingsystemlightcomeson brieflywhentheignitionisturned on,buttheengineisnotrunning,as achecktoshowthelightisworking. Thelightturnsoffwhentheengine isstarted.Ifitdoesnot,havethe vehicleservicedbyyourdealer. Ifthelightstayson,orcomeson whiledriving,theremaybea problemwiththeelectricalcharging system.Haveitcheckedbyyour dealer.Drivingwhilethislightison coulddrainthebattery.
Whenthislightcomeson, the DriverInformationCenter(DIC) alsodisplaysamessage.
SeeBatteryVoltageandCharging Messagesonpage5-34.
Ifashortdistancemustbedriven withthelighton,besuretoturnoff allaccessories,suchastheradio andairconditioner.
Malfunction IndicatorLamp
AcomputersystemcalledOBDII (On-BoardDiagnostics-Second Generation) monitors operation of the fuel, ignition, and emission control systems. It ensures that emissions are at acceptable levels for the life of the vehicle, helping to produce a cleaner environment.

Thislightshouldcomeonwhenthe ignitionison,buttheengineisnot running,asachecktoshowitis working.Ifitdoesnot,havethe vehicleservicedbyyourdealer.
Ifthemalfunctionindicatorlamp comesonandstaysonwhilethe engineisrunning,thisindicatesthat thereisanOBDIIproblemand serviceisrequired.
Malfunctionsoftenareindicated by thesystembeforeanyproblemis apparent. Beingawareofthelight canpreventmoreseriousdamage tothevehicle. Thissystemassists theservicetechnicianincorrectly diagnosinganymalfunction.
Notice: If the vehicle is continually driven with this light on, the emission control might not work as well, the vehicle fuel economy might not be as good, and the engine might not run as smoothly. This could lead to costly repair that might not be covered by the vehicle warranty.
Notice: Modificationsmadetothe engine, transmission, exhaust, intake, orfuelsystemofthe vehicleorthereplacementofthe originaltireswithotherthan thoseofthesameTire PerformanceCriteria(TPC)can affectthevehicle'semission controlsandcancausethislight tocomeon.Modificationsto thesesystemscouldleadto costlyrepairsnotcoveredbythe vehiclewarranty.Thiscouldalso resultinafailuretopassa requiredEmissionInspection/ Maintenancetest.See AccessoriesandModificationson page10-3.
Thislightcomesonduringa malfunctioninoneoftwoways:
LightFlashing: Amisfirecondition has been detected. Amisfire increases vehicle emissions and could damage the emission control system on the vehicle. Diagnosis and servicemight berequired.
Topreventmoreseriousdamageto thevehicle:
- Reducevehiclespeed.
- Avoidhardaccelerations.
- Avoidsteepuphillgrades.
- Iftowingatrailer, reducethe amountofcargobeinghauled assoonasitispossible.
Ifthelightcontinuestoflash,when itissafetodoso,stopthevehicle. Findasafeplacetoparkthe vehicle.Turnthevehicleoff,waitat least10seconds,andrestartthe engine.Ifthelightisstillflashing, followthepreviousstepsandsee yourdealerforserviceassoonas possible.
LightOnSteady: Anemission controlsystemmalfunctionhas beendetectedonthevehicle. Diagnosisandservicemightbe required.
The following maycorrectan emissionssystemmalfunction:
- Makesurethefuelcapisfully installed.SeeFillingtheTankon page9-50.Thediagnostic systemcandetermineifthe fuelcaphasbeenleftoffor improperlyinstalled.Alooseor missingfuelcapallowsfuelto evaporateintotheatmosphere. Afewdrivingtripswiththecap properlyinstalledshouldturnthe lightoff.
- Makesuretheelectricalsystem isnotwet. Thesystemcouldbe wetifthevehiclewasdriven throughadeeppuddleofwater. Theconditionisusually correctedwhentheelectrical systemdriesout.Afewdriving tripsshouldturnthelightoff.
- Makesuretofuelthevehicle withqualityfuel.Poorfuelquality causestheenginenottorunas efficientlyasdesignedandcan cause:stallingafterstart-up, stallingwhenthevehicleis changedintogear,misfiring, hesitationonacceleration, orstumblingonacceleration. Theseconditionsmightgoaway oncetheengineiswarmedup.
Ifoneormoreoftheseconditions occurs, changethefuelbrandused. Itwillrequireatleastonefulltankof theproperfueltoturnthelightoff.
SeeRecommendedFuelon page9-48.
If none of the above havemade the light turnoff, your dealer can check the vehicle. The dealer has the propertestequipment and diagnostictoolstofixany mechanicalorelectrical problems that might have developed.
EmissionsInspection and MaintenancePrograms
Somestate/provincial and local governments may have program to inspect the vehicle emission control equipment. For the inspection, the emission system test equipment is connected to the vehicle's Data Link Connector (DLC).
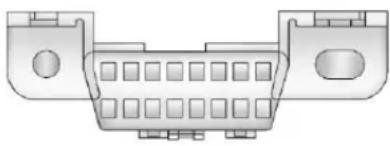
natural_image
Technical line drawing of a connector housing (no text or symbols)The DLC is under the instrument panel to the left of the steering wheel. Se your dealer if assistance is needed.
The vehicle may not pass inspection if:
- Themalfunctionindicatorlampis onwiththeengine running, orif the light does not come on when the ignition is turned to ON/RUN while the engine is off.
- Thecriticalemissioncontrol systemshavenotbeen completelydiagnosedbythe system. Thiscanhappenif thebatteryhasrecentlybeen replacedorifthebatteryhasrun down. Thediagnosticsystem evaluatescriticalemission controlsystemsduring normaldriving. Thiscantake severaldaysofroutinedriving. Ifthishasbeendoneandthe vehiclestilldoesnotpassthe inspection,yourdealercan preparethevehiclefor inspection.
BrakeSystemWarning Light
The vehicle brakesystem consists of two hydraulics circuits. If one circuit is not working, there are remaining circuit can still work to stop the vehicle. Fornormal braking performance, both circuits need to be working.
If the warning light comes on, there is a brake problem. Havethe brake system inspected right away.

MetricEnglish
Thebrakeindicatorlightshould comeonbrieflyastheengineis started. If it does not come on have the vehicles serviced by your dealer.
WARNING
Thebrakesystemmightnotbe workingproperlyifthebrake systemwarninglightison. Drivingwiththebrakesystem warninglightoncanleadtoa crash.Ifthelightisstillonafter thevehiclehasbeenpulledoff theroadandcarefullystopped, havethevehicletowedfor service.
Ifthelightcomesonwhiledriving, a chimesounds. Pullofftheroadand stop. Thepedalmightbeharderto pushorgoclosertothefloor. Itmightalsotakelongertostop. Ifthelightisstillon, havethe vehicletowedforservice. See TowingtheVehicleonpage 10-97.
ElectricParkingBrake Light


MetricEnglish
ForvehicleswiththeElectric ParkingBrake(EPB), thislight shouldcomeonbrieflyasthe engineisstarted. If it does not come on, havethevehicleserviced by your dealer.
Theparkingbrakestatuslight comesonwhenthebrakeis applied. If the light continues flashing after the parking brake is released, or while driving, there is a problem with the Electric Parking Brakesystem. ASERVICE PARKINGBRAKE messagemay alsodisplay in the Driver Information Center (DIC). See Brake System Messages on page 5-34 form more information.
Ifthelightdoesnotcomeon, orremainsflashing,seeyourdealer.

ForvehicleswiththeEPB,the brakewarninglightshouldcomeon brieflywhentheengineisstarted. Ifitdoesnotcomeon,havethe vehicleservicedbyyourdealer.
If this light comes on, there is a problem with asystem on the vehicle that is causing the parking brakes system to work at a reduced level. The vehicle can still be driven, but should be takento a dealer as soon as possible. See Parking Brake on page 9-31 form more information.
AntilockBrakeSystem (ABS)WarningLight

ForvehicleswiththeAntilockBrake System(ABS), thislightcomeson brieflywhentheengineisstarted.
Ifthelightdoesnotcomeon,haveit fixedsoitwillbereadytowarnif thereisaproblem.
IftheABSlightcomesonandstays onwhiledriving,stopassoonas possibleandturntheignitionoff.
Starttheengineagaintoresetthe system.Ifthelightstaysonafter drivingataspeedabove20km/h (13mph),seeyourdealerfor service.Achimemayalsosound whenthelightcomesonsteady.
Iftheregularbrakesystemwarning lightisnoton,thevehiclestillhas brakes,butnotantilockbrakes. Iftheregularbrakesystemwarning lightisalsoon,thevehicledoesnot haveantilockbrakesandthereisa problemwiththeregularbrakes. SeeBrakeSystemWarningLighton page5-22.
SeeBrakeSystemMessageson page5-34forallbrake-relatedDIC messages.
TractionOffLight

Thislightcomesonbrieflywhile startingtheengine.Ifitdoesnot, havethevehicleservicedbyyour dealer.Ifthesystemisworking normally,theindicatorlighthen turnsoff.
Thetractionofflightcomesonwhen theTractionControlSystem(TCS) hasbeenturnedoffbypassingand releasingthetractioncontrolbutton.
ThislightandtheStabiliTrakOff lightcomeonwhenStabiliTrakis turnedoff.
If the TractionControlSystem(TCS) is off, wheelspin is not limited. Adjustdriving accordingly.
See TractionControlSystem(TCS) onpage9-34andElectronic StabilityProgram(ESP)on page9-36formoreinformation.
ElectronicStability Program(ESP)OffLight
Thislightcomesonwhenthe StabiliTraksystemisturnedoffby pressingtheStabiliTrak/TCSbutton. IftheTractionControlSystem(TCS) isoff, wheelspinisnotlimited.
When the Electronic Stability Program(ESP) is off, the system does not assist in controlling the vehicle. Adjust driving accordingly.
Thewarninglightgoesoffwhen tractioncontrolandtheStabiliTrak systemareenabled.
See TractionControlSystem(TCS) onpage9-34andElectronic StabilityProgram(ESP)on page9-36formoreinformation.
ElectronicStability Program(ESP)/Traction ControlSystemIndicator Light
TheStabiliTraksystemorthe TractionControlSystem(TCS) indicator/warninglightcomeon brieflywhentheengineisstarted.
Ifthelightdoesnotcomeon, have the vehicleservicedbythe dealer. Ifthesystemisworkingnormally, the indicatorlightturnsoff.
Ifthelightisonandnotflashing,the TCS,andpotentiallytheStabiliTrak systemhavebeendisabled.ADIC messagemaydisplay.Checkthe DICmessagestodeterminewhich feature(s)isnolongerfunctioning andwhetherthevehiclerequires service.
If the indicator/warning lightison and flashing, the TCSand/or the Stabili Traksystemis actively working.
See TractionControlSystem(TCS) onpage9-34andElectronic StabilityProgram(ESP)on page9-36formoreinformation.
TirePressureLight

ForvehicleswiththeTirePressure MonitorSystem(TPMS), thislight comesonbrieflywhentheengine isstarted. Itprovidesinformation abouttirepressuresandtheTPMS.
WhentheLightisOnSteady
This indicates that one or more of the tires are significantly underinflated.
Atirepressuremessagecan accompanythelight.See Tire Messagesonpage5-41formore information.Stopassoonas possible, andinflatethetiresto thepressurevalueshownonthe TireandLoadingInformationlabel. See TirePressureonpage10-59 formoreinformation.
WhentheLightFlashesFirstand ThenisOnSteady
This indicates that therem maybe a problem with the TPMS. The light flashes for about a minute and stay on steady for the remainder of the ignition cycle. This sequence repeats with every ignition cycle. See Tire Pressure Monitor Operation on page 10-63 for more information.
EngineOilPressureLight
WARNING
Donotkeepdrivingiftheoil pressureislow.Theenginecan becomesohotthatitcatchesfire. Someonecouldbeburned.Check theoilassoonaspossibleand havethevehicleserviced.
Notice:Lackofproperengineoil maintenancecandamagethe engine.Therepairswouldnotbe coveredbythevehiclewarranty. Alwaysfollowthemaintenance scheduleforchangingengineoil.

The oil pressure light should come on briefly asthe engine is started. If it does not come on havethe vehicles serviced by your dealer.
Ifthelightcomesonandstayson, it meansthatoilisnotflowingthrough theengineproperly. Thevehicle couldbelowonoilandmighthave someothersystemproblem.See yourdealer.
FuelEconomyLight
eco
Forvehicleswiththefueleconomy modelight, it comes on when the eco(economy) switch, located next to the shift lever, is pressed. Press the switch againtoturnoff the light and exit the fuels aver mode. See Driving for Better Fuel Economy on page 1-22 form more information.
LowFuelWarningLight

Thislightislocatednearthefuel gaugeandcomesonbrieflywhen theignitionisturnedonasacheck toshowitisworking.
Italsocomesonwhenthefueltank islowonfuel. Thelightturnsoff whenfuelisadded. If it does not, havethevehicleserviced.
SecurityLight

Thislightflasheswhenthesecurity systemisactivated.
Formoreinformation, see Vehicle Security on page 2-16.
High-BeamOnLight

Thislightcomesonwhenthe high-beamheadlampsareinuse.
SeeHeadlampHigh/Low-Beam Changeronpage6-2formore information.
AdaptiveForward Lighting(AFL)Light
The Adaptive Forward Lighting System(AFL) pivotstheheadlamps horizontally to provide greater road illumination while turning. AFL will operate when the vehicles speed is greater than 3 mph (2 km/h). This light comes on solid when there is a problem with the system. It flashes when the system is switching between lighting modes.
FrontFogLampLight

Thefoglamplightcomesonwhen thefoglampsareinuse.
Thelightgoesoutwhenthefog lampsareturnedoff.SeeFrontFog Lampsonpage6-5formore information.
LampsOnReminder
Forvehicleswiththelampson reminderlight, it comes on when the lights are in use.
CruiseControlLight
Thecruisecontrolllightiswhite whenever thecruisecontrolisset, and turnsgreenwhenthecruise controlisactive.
Thelightturnsoffwhenthecruise controlisturnedoff.See Cruise Controlonpage9-39formore information.
InformationDisplays
DriverInformation Center(DIC)
TheDICdisplaysinformationabout thevehicle.Italsodisplayswarning messagesifasystemproblemis detected.See VehicleMessageson page5-34formoreinformation. AllmessagesappearintheDIC displaylocatedinthecenterofthe instrumentpanelcluster.
The vehicle may also have features that can be customized through the control sontheradio. See Vehicle Personalization on page 5-42 for more information.
The DIC displays an indicator when the Rainsensewipers are reactive.
5-30InstrumentsandControls
DICOperationandDisplays
The DIChasdifferentdisplays whichcanbeaccessedbyusing the DICbuttonsontheturnsignal leverlocatedontheleftsideofthe steeringwheel. The DICdisplays trip,fuel,vehiclesysteminformation, and warningmessagesifasystem problemisdetected.
ThebottomoftheDICdisplay showswhatpositiontheshift leverisinandtheodometer. The directionthevehicleisdrivingwill beshownonthetopofthedisplay.
DICButtons

A. SET/CLR(Set/Clear): Usethis buttonosetorclearthemenu itemwhenitisdisplayed.
B. △▽(Thumbwheel):Usethe thumbwheelscrollthrough theitemsineachmenu.Asmall markerwillmoveupordown thesideofthedisplayasyou scrollthroughtheitems.This showswhereeachitemisin themenu.
C.MENU:Pressthisbuttontoget totheTrip/FuelInformation MenuandtheVehicle InformationMenu.
Trip/FuellInformation Menultems
PresstheMENUbuttononthe turnsignalleveruntilTrip/Fuel InformationMenuisdisplayed. Usethethumbwheeltoscroll throughthefollowingmenuitems:
• DigitalSpeedometer
- Trip
- FuelRange
• AverageFuelEconomyor
AverageFuelEconomyand
InstantaneousFuelEconomy
• AverageVehicleSpeed
- Navigation
• SpeedandCurveAssist
• DistancetoDestination
- BlankDisplay
DigitalSpeedometer
Thespeedometershowshowfast thevehicleismovingineither kilometersperhour(km/h)ormiles perhour(mph). Thespeedometer cannotbereset.
Trip
The Trip display shows the current distance traveled, neither kilometers (km) or miles (mi), since the tripometer was last reset. The tripometer can be reset to zero by pressing the trip preset stem or the SET/CLR button while the trip odometer display is showing.
FuelRange
TheFuelRangedisplayshowsthe approximatedistancethevehicle canbedrivenwithoutrefueling. Thefuelrangeestimateisbased onanaverageofthevehicle'sfuel economyoverrecentdrivinghistory andtheamountoffuelremainingin thefueltank.Fuelrangecannotbe reset.
AverageFuelEconomyor AverageFuelEconomyand InstantaneousFuelEconomy
TheAverageFuelEconomydisplay showstheapproximateaverage litersper100kilometers(L/100km) ormilespergallon(mpg).This numberiscalculatedbasedonthe numberofL/100km(mpg)recorded sincethelasttimethismenuitem wasreset.TheAverageFuel Economycanberesetbypassing SET/CLRwhiletheAverageFuel Economydisplayisshowing.
The Instantaneous Fuel Economy displayshowsthe current fuel economyineither liters per 100 kilometers (L/100km)ormiles pergallon (mpg). This number reflectsonlythefueleconomythat the vehiclehasrightnowand changesfrequentlyasdriving conditionschange.Unlikeaverage economy,thisdisplaycannot be reset.
AverageVehicleSpeed
TheAverageVehicleSpeeddisplay showstheaveragespeedofthe vehicleinkilometersperhour(km/h) ormilesperhour(mph). This averageiscalculatedbasedonthe variousvehiclespeedsrecorded sincethelastresetofthisvalue. Theaveragespeedcanberesetby pressingtheSET/CLRbuttonwhile theAverageVehicleSpeeddisplay isshowing.
Navigation
ThisdisplayisusedfortheOnStar orNavigationSystemTurn-by-Turn guidance.SeetheOnStarOwner's Guideortheinfotainmentsystem manual,ifthevehiclehas navigation,formoreinformation.
5-32 InstrumentsandControls
SpeedandCurveAssist
Thisdisplaywillshowthespeed limitortheadadvisedspeedas determinedbytheinformation providedbythenavigationsystem. Themapdatabaseloadedinthe navigationsystemmayneedtobe updatedperiodicallytodisplay accurateinformation.See"Maps"in theinfotainmentsystemmanualfor informationonupdatingthemap database.
DistancetoDestination
Thisdisplaywillshowthevehicle distancewithestimatedtimeof arrivaltodestination. Thevaluecan beclearedorresetbypassing theSET/CLRbutton.Movethe thumbwheelupordowntoincrease ordecreasethedestinationvalue.
BlankDisplay
Thisdisplayshowsnoinformation.
VehicleInformationMenu Items
PresstheMENUbuttononthe turnsignalleveruntilVehicle InformationMenuisdisplayed. Usethethumbwheeltoscroll throughthefollowingmenuitems:
- Unit
- BatteryVoltage
- OilLifeRemaining
- TirePressure
- SpeedWarning
- BlankDisplay
Unit
Movethethumbwheelupordown toswitchbetweenmetricorEnglish whentheUnitdisplayisactive. PressSET/CLRtoconfirmthe setting.Thiswillchangethe displayontheclusterandDIC toeithermetricorEnglish measurements.
BatteryVoltage
Thisdisplay, available on some vehicles, show the current battery voltage. If the voltage is in the normal range, the value will display. Forexample, the display may read BATTERY VOLTAGE 15.0 VOLTS. The vehicle's charging system regulates voltage based on the state of the battery. The battery voltage can fluctuate while viewing this information on the DIC. This is normal. See Charging System Light on page 5-18 for more information. If there is a problem with the battery charging system, the DIC will display a message. See Battery Voltage and Charging Messages on page 5-34.
InstrumentsandControls5-33
OilLifeRemaining
Thisdisplayshowsanestimate of the oil's remaining usefull life. If 99% OILLIFEREMAINING is displayed, that means 99% of the current oil if eremains.
Whentheremainingoillifeislow, theCHANGEENGINEOILSOON messagewillappearonthedisplay. SeeEngineOilMessageson page5-37.Theoilshouldbe changedassoonaspossible. SeeEngineOilonpage10-10. Inadditiontotheengineoillife systemmonitoringtheoillife, additionalmaintenanceis recommendedintheMaintenance Scheduleinthismanual. SeeScheduledMaintenanceon page11-3formoreinformation.
Remember, the Oil Lifedisplay must beresetaftereachoilchange. It will not reset itself. Also, be careful not to reset the Oil Life display accidentally at any time other than when the oil has just been changed. It cannot bereset accurately until then to il change. To reset the engine oil lifesystem, press the SET/CLR button while the Oil lifedisplay is active. See Engine Oil Life System page 10-14.
TirePressure
Thedisplaywillshowvehiclewith theapproximatepressuresofall fourtires. Tirepressureisdisplayed ineitherkilopascal(kPa)orin poundspersquareinch(psi). See TirePressureMonitorSystem onpage 10-61 and TirePressure MonitorOperationonpage 10-63 formoreinformation.
SpeedWarning
SpeedWarningallowsthedriverto setaspeedthattheydonotwant toexceed.TosettheSpeed Warning,pressSET/CLRwhen SpeedWarningisdisplayed.After selectingON,usethethumbwheel toincreaseordecreasethedesired speedlimit.Thevaluecanbeset from0-250km/h(0-160mph). PressSET/CLRtoconfirm.Ifthe selectedspeedlimitisexceeded, apop-upwarningisdisplayed withachime.
BlankDisplay
Thisdisplayshowsnoinformation.
Compass
The vehicle may have a compass display in the Driver Information Center (DIC). See Compassion page 5-6.
VehicleMessages
MessagesdisplayedontheDIC indicatethestatusofthevehicle orsomeactionthatmaybeneeded tocorrectacondition.Multiple messagesmaydisplayoneafter theother.
Themessagesthatdonot requireimmediateactioncan beacknowledgedandcleared bypassingSET/CLR.The messagesthatrequireimmediate actioncannotbecleareduntilthat actionisperformed.Allmessages shouldbetakenseriously and clearingthemessagesdoesnot correcttheproblem.
BatteryVoltageand ChargingMessages
BATTERYSAVERACTIVE
Thismessagedisplayswhen thevehiclehasdetectedthatthe batteryvoltageisdroppingbeyond areasonablepoint.Thebattery saversystemstartsreducingcertain featuresofthevehiclethatyoumay beabletonotice.Atthepointthat featuresaredisabled,thismessage isdisplayed.Itmeansthatthe vehicleistryingtosavethecharge inthebattery.Turnoffunnecessary accessoriestoallowthebatteryto recharge.
LOWBATTERY
Thismessageisdisplayedwhenthe batteryvoltageislow.SeeBattery onpage10-30formoreinformation.
SERVICEBATTERY CHARGINGSYSTEM
Thismessageisdisplayed whenthereisafaultinthebattery chargingsystem. Takethevehicleto yourdealerforservice.
BrakeSystemMessages
BRAKEFLUIDLOW
Thismessageisdisplayedwhenthe brakefluidlevelislow.SeeBrake Fluidonpage10-28.
BRAKESOVERHEATED
Thismessageisdisplayedwhenthe brakesarebecomingoverheated. Youmayseethiswhendrivingon hills.Shifttoalowergear.
Threedasheswillbedisplayedifthe compassneedsservice.Seeyour dealerforservice.
CruiseControlMessages
APPLYBRAKEBEFORE CRUISE
If this messaged displays when attempting to activate cruise control, apply the brake pedaland try again.
CRUISESETTOXXX
Thismessagedisplayswhenthe cruisecontrolissetandshowsthe speeditwassetto.SeeCruise Controlonpage9-39formore information.
DoorAjarMessages
DOOROPEN
Adooropensymbolwillbe displayedontheDICshowing whichdoorisopen.Ifthevehicle hasbeenshiftedoutofP(Park), aDOOROPENmessagewillalso bedisplayed.Closethedoor completely.
HOODOPEN
Thismessagewilldisplayalongwith ahoodopensymbolwhenthehood isopen.Closethehoodcompletely.
POWERLIFTGATE UNAVAILABLE
Thismessage will display if the power lift gate encounters multiple obstacles on the same power cycle. After removing the obstructions, the lift gate will resumen normal power operation.
REARACCESSOPEN
Thismessagewilldisplayalongwith asymbolwhenthelftgateisopen. Closethelftgatecompletely.
EngineCoolingSystem Messages
A/COFFDUETOHIGH ENGINETEMP
Thismessagedisplayswhen theenginecoolantbecomes hotterthanthenormaloperating temperature.Toavoidadded strainonahotengine,the airconditioningcompressor automaticallyturnsoff.When thecoolanttemperaturereturns tonormal,theairconditioning compressorturnsbackon.You cancontinuetodrivethevehicle.
If this message continues to appear, havethesystem repaired by your dealer as soon as possible to avoid damage to the engine.
COOLANTLEVELLOWADD COOLANT
Thismessage will display if the coolant is slow. See Engine Coolant on page 10-20.
ENGINE OVERHEATED—IDLE ENGINE
Thismessagedisplayswhenthe enginecoolanttemperatureistoo hot.Stopandallowthevehicleto idleuntilcoolsdown.
ENGINE OVERHEATED—STOP ENGINE
Thismessagedisplaysanda continuouschimesoundsifthe enginecoolingsystemreaches unsafetemperaturesforoperation. Stopandturnoffthevehicleas soonasitissafetodosotoavoid severedamage. Thismessage clearswhentheenginehascooled toasafeoperatingtemperature.
HIGHCOOLANT TEMPERATURE
Thismessagedisplaysifthecoolant temperatureishot.SeeEngine Overheatingonpage10-24.
EngineOilMessages CHANGEENGINEOILSOON
Thismessagedisplayswhenthe engineoilneedstobechanged. Whenyouchangetheengineoil,be suretoresettheOilLifeSystem. SeeEngineOilLifeSystemon page 10-14andDriverInformation Center(DIC)onpage5-29for informationonhowtoresetthe system.SeeEngineOilon page 10-10andScheduled Maintenanceonpage 11-3for moreinformation.
ENGINEOILHOT, IDLE ENGINE
Thismessagedisplayswhenthe engineoiltemperatureistoohot. Stopandallowthevehicletoidle untiltcoolsdown.
ENGINEOILLOW—ADDOIL
Thismessagedisplayswhenthe engineoillevelistoolow.Checkthe oillevel.SeeEngineOilon page10-10.
OILPRESSURELOW—STOP ENGINE
Thismessagedisplaysiflowoil pressurelevelsoccur. Stopthe vehicleassoonassafelypossible anddonotoperateituntilthecause ofthelowoilpressurehasbeen corrected. Checktheoilassoonas possibleandhavethevehicle servicedbyyourdealer.
EnginePowerMessages ENGINEPOWERISREDUCED
Thismessagedisplayswhenthe vehicle'senginepowerisreduced. Reducedenginepowercanaffect thevehicle'sabilitytoaccelerate. Ifthismessageison,butthere isnoreductioninperformance, proceedtoyourdestination.The performancemaybereducedthe nexttimethevehicleisdriven.The vehiclemaybedrivenatareduced speedwhilethismessageison,but maximumaccelerationandspeed maybereduced.Anytimethis messagestayson,thevehicle shouldbetakentoyourdealerfor serviceassoonaspossible.
FuelSystemMessages
FUELLEVELLOW
Thismessagedisplayswhenthe vehicleislowonfuel.Refuelas soonaspossible.
TIGHTENGASCAP
Thismessagedisplayswhenthe fuelcapisnotontight.Tightenthe fuelcap.
KeyandLockMessages
NOREMOTEDETECTED
Thismessagedisplayswhentrying tostartthevehicleifanRKE transmitterisnotdetected. The transmitterbatterymaybeweak. See "StartingtheVehiclewithaLow TransmitterBattery" under Remote KeylessEntry(RKE)System Operationonpage2-3.
NOREMOTEPRESSBRAKE TORESTART
Thismessageisdisplayedifthe remoteisnolongerdetectedinthe vehicle.Pressthebrakepedalto restartthevehicle.
NUMBEROFKEYS PROGRAMMED
Thismessagedisplayswhen programmingnewkeystothe vehicle.
REMOTELEFTINVEHICLE
Thismessagedisplayswhen leavingthevehiclewiththeRKE transmitterstillinside.
REPLACEBATTERYIN REMOTEKEY
Thismessagedisplayswhenthe batteryintheRKEtransmitterneeds tobereplaced.
LampMessages
AFL(ADAPTIVEFORWARD LIGHTING)LAMPSNEED SERVICE
Thismessagedisplayswhenthe AdaptiveForwardLighting(AFL) systemisdisabledandneeds service.Seeyourdealer.See AdaptiveForwardLighting(AFL)on page6-4formoreinformation.
AUTOMATICLIGHT CONTROLON
Thismessageisdisplayedwhenthe exteriorlampcontrolisinAUTOand thelightshaveturnedon.See AutomaticHeadlampSystemon page6-3.
AUTOMATICLIGHT CONTROLOFF
Thismessageisdisplayedwhen theexteriorlampcontrolisinAUTO andthelightshaveturnedoff.See AutomaticHeadlampSystemon page6-3.
XXXTURNINDICATOR FAILURE
Whenoneoftheturnsignalsis out, thismessagedisplaysto showwhichbulbneedstobe replaced. SeeBulbReplacementon page 10-38 and ReplacementBulbs onpage 10-43 formoreinformation onturnsignalbulbreplacement.
TURNSIGNALON
Thismessageisdisplayedifthe turnsignalhasbeenlefton.Turnoff theturnsignal.
ObjectDetectionSystem Messages
PARKASSISTOFF
Thismessageisdisplayedwhenthe parkassistsystemhasbeenturned off.SeeUltrasonicParkingAssist onpage9-41.
SERVICEPARKASSIST
Thismessageisdisplayedifthere isaproblemwiththeparkassist system. Takethevehicletoyour dealerforservice.
RideControlSystem Messages
COMFORTMODEON
Thismessagedisplayswhen ComfortModehasbeenactivated. See SelectiveRideControlon page9-37formoreinformation.
SERVICEREARAXLE
Thismessagedisplayswhenthere isaproblemwiththeAll-Wheel Drive(AWD)System.Seeyour dealerforservice.
SERVICEESP
Thismessagedisplaysifthereisa problemwiththeElectronicStability Program(ESP).SeeElectronic StabilityProgram(ESP)on page9-36.
SERVICESUSPENSION SYSTEM
Thismessagedisplaysifthereisa problemwiththeselectiveride control.SeeSelectiveRideControl onpage9-37.
SERVICETRACTION CONTROL
Thismessagedisplayswhenthere isaproblemwiththeTraction ControlSystem(TCS).See Traction ControlSystem(TCS)on page9-34.
SPORTMODEON
ThismessagedisplayswhenSport Modehasbeenactivated.See SelectiveRideControlonpage9-37 andManualModeonpage9-28for moreinformation.
AirbagSystemMessages SERVICEAIRBAG
Thismessagedisplaysifthereisa problemwiththeairbagsystem. Takethevehicletoyourdealerfor service.
SafetyBeltMessages
BUCKLESEATBELT
Thismessagedisplaysasa reminderwhenthesafetybelt isnotbuckled.
Anti-theftAlarmSystem Messages
THEFTATTEMPTED
Thismessagedisplaysifthevehicle detectsatampercondition.
ServiceVehicleMessages SERVICEACSYSTEM
Thismessageisdisplayedifthereis aproblemwiththeairconditioning system. Takethevehicletoyour dealerforservice.
SERVICEPOWERSTEERING
Thismessageisdisplayedifthereis aproblemwiththepowersteering system. Takethevehicletoyour dealerforservice.
SERVICEVEHICLES OON
Thismessageisdisplayedifthereis aproblemwiththevehicle. Takethe vehicletoyourdealerforservice.
StartingtheVehicle Messages
PRESSBRAKETOSTART VEHICLE
Thismessageisdisplayedwhen attemptingtostartthevehicle withoutfirstpressingthebrake pedal.
SERVICEKEYLESSSTART SYSTEM
Thismessageisdisplayedifthereis aproblemwiththepushbuttonstart system. Takethevehicletoyour dealerforservice.
TireMessages
SERVICETIREMONITOR SYSTEM
Thismessagedisplaysifthereis aproblemwiththeTirePressure MonitorSystem(TPMS).See Tire PressureMonitorOperationon page 10-63formoreinformation.
TIRELEARNINGACTIVE
Thismessagedisplayswhenthe systemislearningnewtires.See TirePressureMonitorOperationon page 10-63formoreinformation.
TIRELOWADDAIRTOTIRE
Thismessagedisplayswhenthe pressureinoneormoreofthetires islow.
ThismessagealsodisplaysLEFT FRONT,RIGHTFRONT,LEFT REAR,orRIGHTREARtoindicate thelocationofthelowtire.
Thelowtirepressurewarninglight will alsocomeon. See Tire PressureLightonpage5-25.
Ifatirepressuremessageappears ontheDIC,stopassoonasyou can.Inflatethetiresbyaddingair untilthetirepressureisequalto thevaluesshownontheTireand LoadingInformationlabel.See Tires onpage 10-52,VehicleLoadLimits onpage9-12,and TirePressureon page 10-59.
You can receive more than one tire pressure message at time. The DIC also shows the tire pressure values. See Driver Information Center (DIC) on page 5-29.
TransmissionMessages SERVICETRANSMISSION
Thismessagedisplaysifthereisa problemwiththetransmission.See yourdealer.
SHIFTDENIED
Thismessagedisplayswhenusing theDriverShiftControl(DSC)and attemptingtoshifttoagearnot appropriateforthevehiclespeed
andenginerevolutionsper minute(rpm).SeeManualModeon page9-28formoreinformation.
SHIFTTOPARK
Thismessagedisplayswhenthe transmissionneedstobeshiftedto P(Park). Thismayappearwhen attemptingtoremovethekeyfrom thevehicleifthevehicleisnotin P(Park).
TRANSMISSIONHOT—IDLE ENGINE
Thismessagedisplaysandachime soundsifthetransmissionfluidin thevehiclegetshot.Drivingwiththe transmissionfluidtemperaturehigh cancausedamagetothevehicle. Stopthevehicleandletitidleto allowthetransmissiontocool.This messageclearswhenthefluid temperaturereachesasafelevel.
VehicleReminder Messages
ICEPOSSIBLEDRIVE WITHCARE
Thismessageisdisplayed wheniceconditionsarepossible.
TURNWIPERCONTROLTO INTERMITTENTFIRST
Thismessageisdisplayedwhen attemptingtoadjusttheintermittent wiperspeedwithoutintermittent selectedonthewipercontrol. SeeWindshieldWiper/Washeron page5-3.
WasherFluidMessages
WASHERFLUIDLOWADD FLUID
Thismessagedisplayswhenthe washerfluidlevelislow. For informationonfillingthewasher fluid, see WasherFluidon page 10-26.
Vehicle Personalization
The audiosystem controls are used to access the personalization menus for customizing vehicle features. Not all features are available one every vehicle. Only the features available on particular vehicle will be displayed on that vehicle.
CONFIG(Configuration):Press toaccesstheConfiguration SettingsMenu.
MENU/SELECTKnob:Pressthe centerofthisknobtoenterthe menusandselectmenuitems. Turntheknobtoscrollthroughthe menus.
←BACK:Presstoexitormove backwardinamenu.
EnteringthePersonalization Menus
- PressCONFIGtoaccessthe ConfigurationSettingsmenu.
- TurntheMENU/SELECTknobto highlightVehicleSettings.
- PressthecenteroftheMENU/SELECTknobtoselectthe VehicleSettingsmenu.
The followinglistofmenuitemswill beavailable:
• ClimateandAirQuality
• ComfortandConvenience
- Language
- Lighting
- PowerDoorLocks
- RemoteLocking, Unlocking, Starting
• ReturntoFactorySettings
TurntheMENU/SELECTknobto highlightthemenu.Presstheknob toselectit.Eachofthemenusis detailedinthefollowinginformation.
ClimateandAirQuality
SelecttheClimateandAirQuality menuandthefollowingwillbe displayed:
- AutoFanSpeed
• AirQualitySensor - RemoteStartAutoSeatCool
• RemoteStartAutoHeatedSeats - AutoDefog
- AutoRearDefog
AutoFanSpeed
Thiswillallowyoutoselectthe automaticfanspeed. Thisfeature setstheclimatecontrolfanspeedto maintaintheinteriortemperature.
PresstheMENU/SELECTknob whenAutoFanSpeedishhighlighted toopenthemenu.Turntheknobto highlightHigh,Medium,orLow. Presstheknobtoconfirmthe selectionandmovebacktothe lastmenu.
AirQualitySensor
This will allow you to select whether the system will operate at high or low sensitivity. Only vehicles with the dual zone climate control will have this option.
PresstheMENU/SELECTknob whenAirQualitySensoris highlightedtoopenthemenu. TurntheknobtohighlightHighor LowSensitivity.Presstheknobto confirmtheselectionandmove backtothelastmenu.
RemoteStartAutoSeatCool
Whenon, this feature will turn the vented seatson when using remote starton warmdays.
PresstheMENU/SELECTknob whenRemoteStartAutoSeatCool ishighlighted.Turntheknobto selectOnorOff.Presstheknobto confirmandgobacktothe lastmenu.
RemoteStartAutoHeatedSeats
Whenon, this feature will turn the heated seat on when using remote start on cold days.
PresstheMENU/SELECTknob whenRemoteStartAutoHeated Seatsishhighlighted.Turntheknob toselectOnorOff.Presstheknob toconfirmandgobacktothe lastmenu.
AutoDefog
This will allow you to turn the auto defogonoroff.
PresstheMENU/SELECTknob whenAutoDefogishhighlightedto openthemenu.Turntheknobto highlightOnorOff.Presstheknob toconfirmtheselectionandmove backtothelastmenu.
AutoRearDefog
Thiswillallowyoutoturntheauto reardefogonoroff.
PresstheMENU/SELECT knobwhenAutoRearDefogis highlightedtoopenthemenu. TurntheknobtohighlightOnor Off.Presstheknobtoconfirmthe selectionandmovebacktothe lastmenu.
ComfortandConvenience
SelecttheComfortand Conveniencemenuandthe followingwillbedisplayed:
- EasyExitDriverSeat
- ChimeVolume
- ReverseTiltMirror
• AutoWipeinReverseGear
EasyExitDriverSeat
Thisallowsyoutoturntheeasyexit driverseatfeatureonoroff.When on,thisfeaturewillmovethedriver seatrearwarduponturningthe ignitionoffandopeningthedriver door.Thismaybeperformedto makeiteasiertoexitthevehicle. SeePowerSeatAdjustmenton page3-4formoreinformation.
PresstheMENU/SELECTknob whenEasyExitDriverSeatis highlighted.Turntheknobtoselect OnorOff.Presstheknobtoconfirm andgobacktothelastmenu.
ChimeVolume
Thisallowstheselectionofthe chimevolumelevel.
PresstheMENU/SELECTknob whenChimeVolumeishhighlighted. TurntheknobtoselectNormalor High.Presstheknobtoconfirmand gobacktothelastmenu.
ReverseTiltMirror
Thisallowsyoutoturnthereverse tiltmirrorfeatureonoroff.When on,boththedriverandpassenger mirrorswilltiltdownwardwhen vehicleisshiftedtoR(Reverse)to improvevisibilityofthegroundnear therearwheels.Theywillreturn totheirpreviousdrivingposition whenthevehicleisshiftedoutof R(Reverse),theignitionisturned toOFF,orthevehicleisleftin R(Reverse).
PresstheMENU/SELECTknob whenReverseTiltMirroris highlighted.Turntheknobtoselect Driver&PassengerorOff.Press theknobtoconfirmandgobackto thelastmenu.
AutoWipeinReverseGear
Whenon, and the front windshield wipers are on, therear window wiper will turn on automatically when the vehicle is shifted into R (Reverse).
PresstheMENU/SELECTknob whenAutoWipeinReverseGearis highlighted.Turntheknobtoselect OnorOff.Presstheknobtoconfirm andgobacktothelastmenu.
Language
SelecttheLanguagemenuandthe followingwillbedisplayed:
- English
- French
- Spanish
TurntheMENU/SELECTknobto selectthelanguage.Presstheknob toconfirmandgobacktothe lastmenu.
Lighting
SelecttheLightingmenuandthe followingwillbedisplayed:
- VehicleLocatorLights
- ExitLighting
VehicleLocatorLights
Thisallowsthevehiclelocatorlights tobeturnedonoroff.
PresstheMENU/SELECTknob whenVehicleLocatorLightsis highlighted.Turntheknobtoselect OnorOff.Presstheknobtoconfirm andgobacktothelastmenu.
ExitLighting
This allow these selection of how long the exterior lamps stay on when leaving the vehicle when it is dark outside.
PresstheMENU/SELECTknob whenExitLightingishhighlighted. TurntheknobtoselectOff, 30Seconds, 1Minute, or2Minutes. Presstheknobtoconfirmandgo backtothelastmenu.
PowerDoorLocks
SelectPowerDoorLocksandthe followingwillbedisplayed:
- UnlockedDoorAntiLockOut
- AutoDoorUnlock
- DelayedDoorLock
UnlockedDoorAntiLockOut
Whenon, thisfeaturewillkeepthe driverdoorfromlockingwhenthe doorisopen. If Offisselected, the DelayedDoorLockmenuwillbe available and the doorwilllockas programmed through this menu.
PresstheMENU/SELECTknob whenUnlockedDoorAntiLockOut ishighlighted.Turntheknobto selectOnorOff.Presstheknobto confirmandgobacktothe lastmenu.
AutoDoorUnlock
This allows selection of which of the doors will automatically unlock when the vehicle is shifted into P(Park).
PresstheMENU/SELECTknob whenAutoDoorUnlockis highlighted.Turntheknobto selectAllDoors,DriverDoor, orOff.Presstheknobtoconfirm andgobacktothelastmenu.
DelayedDoorLock
Whenon, thisfeaturewilldelay thelockingofthedoorsuntil fiveseconsafterthelastdooris closed. Youwillhearthreechimes tosignaldelayedlockingisinuse. Pressingeitherthepowerlock buttonorthelockbuttonontheRKE transmittertwicewilloverridethe delayedlockingfeatureand immediatelylockallofthedoors.
PresstheMENU/SELECTknob whenDelayedDoorLockis highlighted.Turntheknobto selectOnorOff.Presstheknob toconfirmandgobacktothe lastmenu.
RemoteLock/Unlock/Start
SelectRemoteLock/Unlock/Start and the following will be displayed:
- UnlockFeedback(Lights)
- LockingFeedback
- DoorUnlockOptions
• PassiveDoorLock
• PassiveDoorUnlock
• MemoryRemoteRecall - RemoteLeftinVehicleReminder
UnlockFeedback(Lights)
Whenon, the exterior lampswill flash when unlocking the vehicle with the RKE transmitter.
PresstheMENU/SELECTknob whenUnlockFeedback(Lights)is highlighted.Turntheknobtoselect FlashLightsorOff.Presstheknob toconfirmandgobacktothe lastmenu.
LockingFeedback
This allows selection of what type of feedback is given when locking the vehicle with the RKE transmitter.
PresstheMENU/SELECT knobwhenLockingFeedback ishighlighted.Turntheknobto selectLightsandHorn,Lights Only,HornOnly,orOff.Pressthe knobtoconfirmandgobacktothe lastmenu.
DoorUnlockOptions
This allows selection of which doors will unlock when pressing the unlock button on the RKE transmitter.
PresstheMENU/SELECTknob whenDoorUnlockOptionsis highlighted.Turntheknobtoselect AllDoorsorDriverDoorOnly.When settoDriverDoorOnly,thedriver doorwillunlockthefirsttimethe unlockbuttonispressedandall doorswillunlockwhenthebutton ispressedasecondtime.When settoAllDoors,allofthedoors willunlockatthefirstpressofthe unlockbutton.Presstheknobto confirmandgobacktothe lastmenu.
PassiveDoorLock
Ifthevehiclehasthekeyless accesssystem,whenenabled, thisfeatureallowsthedoorsto lockafterseveralsecondsifall doorsareclosedandatleastone RKEtransmitterhasbeenremoved fromtheinteriorofthevehicle. Itdoesnotmatterhowfarawaythat thetransmitterisfromthevehicle. Thisfeaturecanalsobeconfigured tochirpthehornwhenthedoorsare passivelylocked.
PresstheMENU/SELECTknob whenPassiveDoorLockis highlighted.Turntheknobto selectOnWithChirp,On,orOff. Presstheknobtoconfirmandgo backtothelastmenu.
PassiveDoorUnlock
If the vehicle has the key less access system, this feature allows you to select which doors will automatically unlock when you opened a driver door with the RKE transmitter present.
PresstheMENU/SELECTknob whenPassiveDoorUnlockis highlighted.Turntheknobtoselect AllDoorsorDriverDoor.Pressthe knobtoconfirmandgobacktothe lastmenu.
MemoryRemoteRecall
ThisallowstheMemoryRemote Recallfeaturetobeturnedonoroff.
PresstheMENU/SELECTknob whenMemoryRemoteRecallis highlighted.Turntheknobtoselect OnorOff.Presstheknobtoconfirm andgobacktothelastmenu.
RemoteLeftinVehicleReminder
ThisallowstheRemoteLeftIn Vehiclereminderfeaturetobe turnedonoroff.Ifon,thehorn willchirpifaremoteisleftinthe vehicle.
PresstheMENU/SELECTknob whenRemoteLeftInVehicleis highlighted.Turntheknobtoselect OnorOff.Presstheknobtoconfirm andgobacktothelastmenu.
ReturntoFactorySettings
SelectReturntoFactorySettings toreturnallofthevehicle personalizationtothedefault settings.Turntheknobtoselect YesorNo.Presstheknobto confirmandgobacktothe lastmenu.
UniversalRemote System
SeeRadioFrequencyStatementon page 13-12forinformation regardingPart15oftheFederal CommunicationsCommission(FCC) rulesandIndustryCanada StandardsRSS-210/220/310.
UniversalRemoteSystem Programming
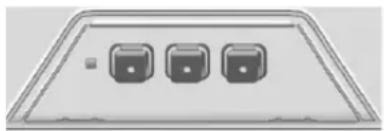
natural_image
Front view of a rectangular electronic device with three buttons (no text or symbols visible)If the vehicle has this feature, you will seethese buttons with one LED indicator next to them in the overhead console.
This system provides a way to replace up to three remote control transmitters used to activate devices such as a aged door openers, security systems, and home automation devices.
DonotusetheUniversalRemote systemwithanygaragedooropener thatdoesnothavethestopand reversefeature. Thisincludes anygaragedooropenermodel manufacturedbeforeApril1,1982.
Readtheinstructionscompletely beforeattemptingtoprogramthe UniversalRemotesystem.Because ofthestepsinvolved,itmaybe helpfultohaveanotherperson availabletoassistwithprogramming theUniversalRemotesystem.
Keeptheoriginalhand-held transmitterforuseinothervehicles aswellasforfutureUniversal Remotesystemprogramming.Itis alsorecommendedthatuponthe saleofthevehicle,theprogrammed UniversalRemotesystembuttons beerasedforsecuritypurposes. See“ErasingUniversalRemote SystemButtons”laterinthis section.
When programmingagaragedoor, parkoutsideofthegarage.Park directlyinlinewithandfacingthe garagedooropenermotor-header gatemotor-head.Besurethat peopleandobjectsareclearof thegaragedoororgatebeing programmed.
It is recommended that an new battery be installed in the hand-held transmitter for quicker and more accurate transmission of the radio-frequency signal.
ProgrammingtheUniversal RemoteSystem
Forquestionsorhelpprogramming theUniversalRemotesystem, call1-800-355-3515orgoto www.homelink.com.
Programmingagaragedooropener involvestime-sensitive actions, so readtheentireprocedurebefore starting. Otherwise, the device will timeout and the procedure will have to be repeated.
Toprogramuptothreedevices:
-
Hold the end of the hand-held transmitter about 3 to 8 cm (1 to 3 in) away from the Universal Remotesystem buttons while keeping the indicator light in view. The hand-held transmitter was supplied by the manufacturer of the garaged door opener receiver (motor-head unit).
-
Atthesametime, press and hold both the hand-held transmitter button and one of the three Universal Remote system button to be used to operate the agaragedoor. Donot releasethe Universal Remote system button or the hand-held transmitter button until the indicator light changes from a slowly to a rapidly flashing light. You now may release both buttons.
Someentrygatesandgarage dooropenersmayrequire substitutionofStep2withthe procedurenotedin"Gate OperatorandCanadian Programming"laterinthis section.
-
Pressandholdforfiveseconds thenewlytrainedUniversal Remotesystembutton(the buttonselectedinStep2)while observingtheindicatorlightand garagedooractivation.
-
Iftheindicatorlightstayson continuouslyorthegarage doorstartstomovewhen theUniversalRemote systembuttonispressed andreleased,thenthe programmingiscomplete. Thereisnoneedto continueprogramming Steps4through6.
- IftheUniversalRemote systemindicatorlightblinks rapidlyfortwoseconds, thenturnstoaconstant lightandthegaragedoor doesnotmove,continue withprogrammingSteps4 through6.
Itmaybehelpfultohave anotherpersonassistwith theremainingSteps4 through6.

"Learn" or "Smart" Buttons
- AfterSteps1 through 3 have been completed, locatethe "Learn" or "Smart" button inside the garage on the agaragedoor opener receiver (motor-head unit). Thename and color of the button may vary by manufacturer.
-
Firmlypressandreleasethe "Learn" or "Smart" button. After youpressthisbutton, youwill have30secondstocomplete Step6.
-
Immediately return to the vehicle. Firmly press and hold fortwosecondsthe Universal Remotesystembutton, selected in Step2 to control the garage door, and then release it. If the garagedoordoes not move or the lamponthegaragedoor opener receiver (motor-head unit) does not flash, press and hold the same button a second time for two seconds, and then release it. Again, if the door does not move or the garage door lamp does not flash, press and hold the same button a third time for two seconds, and then release.
TheUniversalRemotesystem shouldnowactivatethe garagedoor.
Toprogramtheremainingtwo UniversalRemotesystembuttons, beginwithStep1 of "Programming theUniversalRemoteSystem."
GateOperatorandCanadian Programming
If you have questions or need help programming the Universal Remote system, call 1-800-355-3515 orgo to www.homelink.com.
Canadianradio-frequencylaws requiretransmittersignalstotime outorquitafterseveralsecondsof transmission. This may not belong enoughfortheUniversalRemote systemtopickupthesignalduring programming. Similarly, some U.S. gateoperatorsaremanufacturedto timeoutinthesamemanner.
If you live in Canada, or you are having difficulty programming agate operator or aged door opener by using the "Programming the Universal Remote System" procedures, regardless of where you live, replace Step 2 under "Programming the Universal Remote System" with the following:
Continuetopressandholdthe UniversalRemotesystembutton whileyoupressandreleaseevery twoseconds(cycle)thehand-held transmitterbuttonuntilthe frequencysignalhasbeen successfullyacceptedbythe UniversalRemotesystem.The UniversalRemotesystemindicator lightwillflashslowlyatfirstandthen rapidly.ProceedwithStep3under "ProgrammingtheUniversalRemote System"tocomplete.
UniversalRemoteSystem Operation
UsingtheUniversalRemote System
Pressandholdtheappropriate UniversalRemotesystembutton foratleasthalfofasecond. The indicatorlightwillcomeonwhile thesignalisbeingtransmitted.
ErasingUniversalRemote SystemButtons
Allprogrammedbuttonsshouldbe erasedwhenthevehicleissoldor theleaseends.
Toeraseallprogrammedbuttons ontheUniversalRemotesystem device:
-
Pressandholldownthe twooutsidebuttonsuntilthe indicatorlightbeginstoflash. Thisshouldtakeabout 10seconds.
-
Releasebothbuttons.
5-52 InstrumentsandControls
ReprogrammingaSingle UniversalRemoteSystem Button
Toreprogramanyofthethree UniversalRemotesystembuttons:
- Pressandholdthedesired UniversalRemotesystem button.Donotreleasethe button.
- The indicator light will begin to flash after 20 seconds. Without releasing the button, proceed with Step1 of these section "ProgrammingtheUniversal Remote System."
If you have questions or need help programming the Universal Remote system, call 1-800-355-3515orgo to www.homelink.com. You may also call the customer assistance phonenumber under Customer Assistance Offices on page 13-3.
Lighting
ExteriorLighting
ExteriorLampControls......6-1
HeadlampHigh/Low-Beam
Changer....6-2
Flash-to-Pass......6-2
DaytimeRunning
Lamps(DRL)....6-3
AutomaticHeadlamp
System......6-3
AdaptiveForward
Lighting(AFL)......6-4
HazardWarningFlashers.....6-5
TurnandLane-Change
Signals......6-5
FrontFogLamps......6-5
InteriorLighting
InstrumentPanelIllumination
Control....6-6
CargoLamp......6-7
CourtesyLamps......6-7
DomeLamps......6-7
ReadingLamps......6-7
LightingFeatures
EntryLighting......6-7
ExitLighting......6-7
BatteryLoadManagement....6-8
ExteriorLighting
ExteriorLampControls

The exterior lamp control is located on the instrument panel to the left of the steering column.
Itcontrolsthefollowingsystems:
- Headlamps
- Taillamps
- ParkingLamps
- LicensePlateLamps
- InstrumentPanelLights
- FogLamps
6-2Lighting
The exterior lamps control has four positions:
(Off): Brieflyturntothisposition toturntheautomaticlightcontroloff oronagain.
AUTO(Automatic): Turnsthe headlampsonautomaticallyat normalbrightness, togetherwiththe following:
- ParkingLamps
- Taillamps
- LicensePlateLamps
- InstrumentPanelLights
≥ 00 (ParkingLamps):Turnsthe parkinglampsontogetherwiththe following: - Taillamps
- LicensePlateLamps
- InstrumentPanelLights
ID(Headlamps):Turnsthe headlampsontogetherwiththe lampslistedbelow.Awarningchime soundsifthedriverdoorisopened whentheignitionswitchisoffand theheadlampsareon.
- ParkingLamps
- Taillamps
- LicensePlateLamps
• InstrumentPanelLights
D(FrontFogLamps):For vehicleswithfoglamps,pressto turnthelampsonoroff.
SeeFrontFogLampsonpage6-5.
HeadlampHigh/Low-BeamChanger
Pushtheturnsignal/lanechange leverawayfromyoutoturnthehigh beamson.
Pullthelevertowardyoutoreturnto lowbeams.

This indicator light turn on the instrument panel cluster when the high-beam headlamps are on.
Flash-to-Pass
Theflash-to-passfeatureworkswith thelowbeamsorDaytimeRunning Lamps(DRL)onoroff.
Toflashthehighbeams, pull the turnsignal/lanechangeleverallthe waytowardyou, thenreleaseit.
DaytimeRunning Lamps(DRL)
DaytimeRunningLamps(DRL)can makeiteasierforotherstoseethe frontofyourvehicleduringtheday.
Alightsensorontopofthe instrumentpanelmakestheDRL work,sobesureitisnotcovered.
The DRL system makes the low-beam headlamps come on at areduced brightness for vehicles with High Intensity Discharge (HID) headlamps, the DRL lightswill come on when the following conditions are met:
• TheignitionisintheON/RUNmode.
• Theexteriorlampcontrolis inAUTO.
• Theengineisrunning.
WhentheDRLareon,onlythe low-beamheadlamps,atareduced levelofbrightness,willbeon.The headlamps,taillamps,sidemarker, instrumentpanel,andotherlamps willnotbeon.
Theheadlampsautomatically changefromDRLtotheregular headlampsdependingonthe darknessofthesurroundings. The otherlampsthatcomeonwiththe headlampswillalsocomeon.
Whenitisbrightenoughoutside, theheadlampsgooffandtheDRL comeon.
ToturntheDRLofforonagain,turn theexteriorlampcontroltotheoff positionandthenrelease.
AutomaticHeadlamp System

natural_image
Diagram of a car interior showing a mesh grille and a door with an arrow pointing to a component (no text or symbols present)Thisfeatureautomaticallyturnsthe lampsonandoff.Alightsensoron topoftheinstrumentpanelmakes theautomaticheadlampsystem work,sobesureitisnotcovered.
With the automatic headlamp system, the following will happen:
- Whenitisdarkenoughoutside, andtheexteriorlampcontrolis intheAUTOposition,the DaytimeRunningLamps(DRL) gooff,andtheheadlampsand parkinglampscomeon.The otherlampsthatcomeonwith theheadlampsalsocomeon.
6-4Lighting
- Whenitisbrightenoughoutside, theheadlampsgooff, and the DRLcomeon, aslongasthe exteriorlampcontrolisinthe AUTOposition. See Exterior LampControlsonpage6-1.
Ifthevehicleisstartedinadark garage,theautomaticheadlamp systemcomesonimmediately. Ifitislightoutsidewhenthe vehicleleavesthegarage,there isaslightdelaybeforethe automaticheadlampsystem changestotheDRL.Duringthat delay,theinstrumentpanelcluster maynotbeasbrightasusual.Make suretheinstrumentpanelbrightness controlisinfullbrightposition.See InstrumentPanelIllumination Controlonpage6-6formore information.
The vehicle can be idled with the lamp soff, even when it is dark outside. After starting the vehicle, turn the exterior lamps control to off, then release it. The lamp will remain off until the control is turned to off again.
The automaticheadlampsystem alsoprovides exterior illumination as youleavethe vehicle. If the automaticheadlampsystem has turned on the lamps when the ignition is turned off, the lamps remain on until one of the following occurs:
- The exterior lamp control is moved from ⏻to the parking lamp position.
- Thedelaytimeselectedhas elapsed.
See Vehicle Personalization on page 5-42 to select the delay time. You can also select the delay time.
If the ignition is turned off with the exterior lamps control in the parking lampor head lampposition, the delay will not occur. Thelampswill turnoff as soon as the control is turned off.
Theregularheadlampsystem should be turned on when needed.
AdaptiveForward Lighting(AFL)
For vehicles with up level headlamps, the Adaptive Forward Lighting System (AFL) adjust the headlamp stop provide greater road illumination in various driving conditions.
ToenableAFL,settheexterior lampcontroltotheAUTOposition. MovingthecontroloutoftheAUTO positionwilldeactivatethesystem. AFLwilloperatewhenthevehicle speedisgreaterthan3km/h (2mph).AFLwillnotoperatewhen thetransmissionisinR(Reverse). AFLisnotimmediatelyoperable afterstartingthevehicle;drivinga shortdistanceisrequiredto calibratetheAFL.SeeExterior LampControlsonpage6-1.
CurveLighting
Thelightbeampivotsbasedonthe steeringwheelpositionandvehicle speedofatleast10km/h(6mph).
Theheadlampsshineatanangle of upto15degreestotherightorleft ofthedirectionoftravel.
HazardWarningFlashers

△(HazardWarningFlashers): Pressthisbuttonontheinstrument panel,tomakethefrontandre turnsignallampsflashonandoff. Thiswarnsothersthatyouare havingtrouble.Pressagaintoturn theflashersoff.
TurnandLane-Change Signals
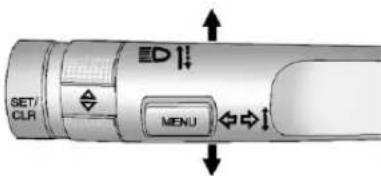
Anarrowontheinstrumentpanel clusterwillflashinthedirectionof theturnorlanechange.
Movetheleverallthewayupor downtosignalaturn.
Raiseorlowertheleveruntilthe arrowstartstoflashtosignalalane change. Theturnsignaflashes threetimes.
Theleverreturnstoitsstarting positionwhenitisreleased.
Ifaftersignalingaturnorlane changethearrowflashesrapidlyor doesnotcomeon,asignalbulb maybeburnedout.
Havethebulbsreplaced.Ifthebulb isnotburnedout,checkthefuse. SeeFusesandCircuitBreakerson page 10-44formoreinformation.
FrontFogLamps
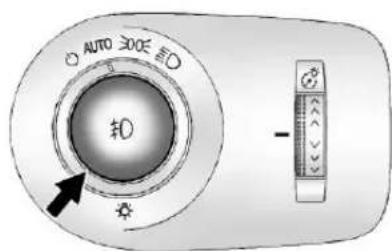
Thefrontfoglampbuttonislocated ontheexteriorlampcontrol,onthe outboardsideofthesteeringwheel.
Theignitionandthelow-beam headlampsmustbeontoturnon thefoglamps.
6-6Lighting
0(FrontFogLamps):Pressto turnthefoglampsonoroff.An indicatorlightontheinstrument panelclustercomesonwhenthe foglampsareon.
Thefoglampscomeontogether withtheparkinglamps.
Somelocalitieshavelawsthat requiretheheadlampstobeon alongwiththefoglamps.
InteriorLighting
InstrumentPanel IlluminationControl

Thisfeaturecontrolsthebrightness oftheinstrumentpanellights.
(InstrumentPanel Brightness): Turnthethumbwheel upordowntobrightenordimthe instrumentpanellights.
NightPanel

Thenightpanelfeaturereduces the interiorlightingduringnighttime driving.
Pressthenightpanelbutton,onthe instrumentpaneltotherightofthe steeringwheel,toturnitonoroff. Whenthefeatureison,thevehicle displays,instrumentpanelcenter stackarea,andclusterlightingis reduced.Thespeedometerisnot affected.Allbuttonbacklightingis reduced,butcanstillbeadjusted withtheinstrumentpanel illuminationcontrol.
CargoLamp
Thecargolampislocatedoverthe rearcompartmentandiscontrolled bythedomelamp.SeeDome Lampsonpage6-7.
CourtesyLamps
The courtesylampscomeon automatically when any door is opened and the domelampisin the door position.
DomeLamps
Thedomelampislocatedinthe overheadconsole.
Tochangethedomelampsettings, pressthefollowing:
(DomeLampOverride):Turns thelampoff,evenwhenadoor isopen.
(Door): Thelampcomeson automaticallywhenadooris opened.
※(On):Turnsthedomelampon.
ReadingLamps
Therearereadinglampslocated on the overheadconsole and over the rearpassengerdoors. Theselamps comeon automatically when any door is opened.
Tomanuallyturnthereadinglamps onoroff:
- Press 🚗 or 🚗 nexttoeach overheadconsolereadinglamp.
• Pressthelamplensontherear passengerreadinglamps.
LightingFeatures
EntryLighting
Theheadlamps, taillamps, license platelamps, back-uplamps, dome lamps, and most of the interior lights turnon briefly, when ispressed on the Remote Keyless Entry (RKE) transmitter, or when the door handle ispulled. After about 30 seconds the exterior lampsturnoff, and then thedome and remaining interior lights dim to off. The entry lighting can be manually turned off, by changing the ignition out of the off position, or bypassing on the RKE transmitter.
Thisfeaturecanbechanged. See VehiclePersonalizationon page5-42.
ExitLighting
Theheadlamps, taillamps, parking lamps, back-uplamps, and license platelamps come on at night, or in areas with limited lighting, when a
6-8Lighting
doorisopened after the ignition is turned off. Thedomelamps also come on when a door is opened after the ignition is changed to the off position.
The exterior lights and domelamp remain on after the door is closed for a set amount of time, then automatically turn off.
The exterior lightsturnoff immediately by turning the exterior lamps control to off.
Thisfeaturecanbechanged.See VehiclePersonalization on page5-42.
BatteryLoad Management
The vehicle has Electric Power Management (EPM) that estimates the battery's temperature and state of charge. It then adjusts the voltage for best performance and extended life of the battery.
Whenthebattery'sstateofcharge islow,thevoltageisraisedslightly toquicklybringthechargebackup. Whenthestateofchargeishigh, thevoltageisloweredslightlyto preventovercharging.Ifthevehicle hasavoltmetergaugeoravoltage displayontheDriverInformation Center(DIC),youmayseethe voltagemoveupordown.This is normal.Ifthereisaproblem,an alertwillbedisplayed.
The battery can be discharged at idle if the electrical loads are very high. This is true for all vehicles. This because the generator (alternator) may not be spinning fast enough that lidetoproduce all of the power needed for very high electrical loads.
Ahighelectricalloadoccurswhen severalofthefollowingareon,such as:headlamps,highbeams,fog lamps,rearwindowdefogger, climatecontrolfanathighspeed, heatedseats,enginecoolingfans, trailerloads,andloadspluggedinto accessorypoweroutlets.
EPMworkstoppreventexcessive dischargeofthebattery.Itdoesthis bybalancingthegenerator'soutput andthevehicle'selectricalneeds. Itcanincreaseengineidlespeedto generatemorepowerwhenever needed.Itcantemporarilyreduce thepowerdemandsofsome accessories.
Normally, these actions occur in steps or levels, without being noticeable. In rare cases at the highest level of corrective action, this action may be notice able to the driver. If so, a DIC message might be displayed, such as BATTERY SAVERACTIVE, BATTERY VOLTAGELOW, or LOWBATTERY. If one of these messages displays, it is recommended that the driver reduce the electrical loads as much as possible. See Driver Information Center (DIC) on page 5-29.
Infotainment System
Introduction Infotainment....7-1
Introduction
Infotainment
Yourvehiclehasaninfotainment system.Formoreinformation,see theseeparateinfotainmentsystem manual.
7-2InfotainmentSystem
NOTES
ClimateControls
ClimateControlSystems
DualAutomaticClimateControl
System......8-1
RearClimateControl
System......8-5
AirVents
AirVents....8-6
Maintenance
PassengerCompartmentAir
Filter......8-7
ClimateControlSystems
DualAutomaticClimateControlSystem
Theheating, cooling, and ventilation for the vehicle can be controlled with this system.
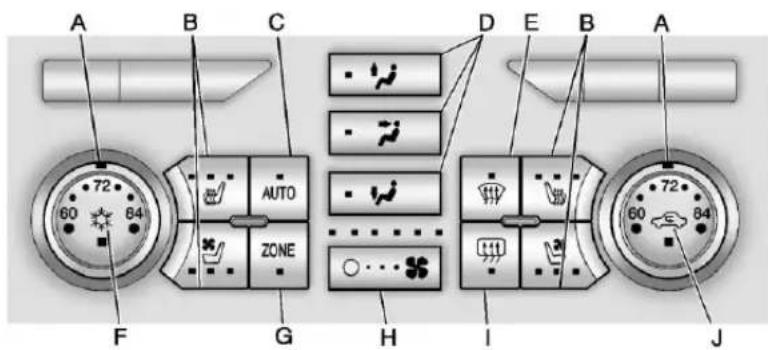
A.DriverandPassenger TemperatureControl
B.DriverandPassengerHeated and Ventilated Seats
C. AUTO(AutomaticOperation)
D. AirDeliveryModeControls
E.Defrost
F. AirConditioning
G.ZONE
H.FanControl
I. RearWindowDefogger
J. Recirculation
AutomaticOperation
Thesystemautomatically controls the fanspeed, airdelivery, air conditioning, and recirculation in ordertoheatorcoolthevehicleto the desired temperature.
Whentheindicatorlightison, the systemisinfullautomaticoperation. Iftheairdeliverymodeorfan settingismanuallyadjusted, the autoindicatorturnsoffanddisplays willshowtheselectedsettings.
Toplacethesystemin automaticmode:
- PressAUTO.
- Set the temperature. Allow the system timetostabilize. Then adjust the temperature as needed for best comfort.
Englishunitscanbechangedto metricunitsthroughtheDriver InformationCenter(DIC).See VehiclePersonalizationon page5-42.
DriverandPassenger
TemperatureControl: The temperature can be adjusted separately forth the driver and the passenger. Turn the knob clockwise or counterclockwisetoincrease or decrease the temperature.
ZONE: Presstolinkallclimate zonesettingstothedriversettings. TheZONEindicatorlightturnsoff. Whenthepassengersettingsare adjusted, theZONEindicatorlight ison.
ManualOperation
○ ... ❄ (Fan Control): Press to increase or decrease the fanspeed. Pressing the button cancels automatic operation and the system goes in to manual mode. Press AUTO return to automatic operation.
AirDeliveryModeControls:
Presstochangethedirectionofthe airflow. Thecurrentmodeappears inthedisplayscreen. Changingthe modecancelstheautomatic
operationandthesystemgoesinto manualmode.PressAUTOto returntoautomaticoperation.
Tochangethecurrentmode, press oneoracombinationofthebuttons indicated:
(Vent):Airisdirectedtothe instrumentpaneloutlets.
♂ / ♂ (Bi-Level): Air is divided between the instrument panel outlets and the floor outlets.
J / J / J (Tri-Level): Air is divided between the windshield, instrument panel, and floor outlets.
(Floor):Airisdirectedtothe flooroutlets.
/ (Defog): Clears the windows offogormoisture.Airisdirected to the windshieldandflooroutlets.
^2 (Upper):Airisdirectedtothe windshieldoutlets.
/ (Hi-Level): Air is divided between the windshield and instrument panel outlets.
(Defrost): Presstoclearthe windshieldoffogorfrostmore quickly. Airisdirectedtothe windshield.
(AirConditioning): Pressto turntheautomaticairconditioning onoroff. If the fanisturned off for the outside temperature falls below freezing, the air conditioner will not run.
Press AUTO toreturnto automatic operation and the air conditioner runs as needed. When the indicator light is on, the air conditionerruns automatically to cool the air inside the vehicle ort dry the air needed to defog the wind shield faster.
(Recirculation): Presstoturn onrecirculation. Anindicatorlight comeson. Airisrecirculated to quicklycooltheinsideofthevehicle orpreventoutsideairandodors fromentering.
AutomaticAirRecirculation: WhentheAUTOindicatorlight is on, theairisautomatically recirculated as needed to help quickly cool the inside of the vehicle.
Theclimatecontrolsystemmay haveasensortodetectairpollution. Inautorecirculationcontrol,theAir QualityControlsystemmayoperate. ToadjustthesensitivityoftheAir QualityControl,see“Climateand AirQuality”underVehicle Personalizationonpage5-42.
AutoDefog: The climate control system may have as sensor to automatically detect high humidity inside the vehicle. When high humidity is detected, the climate control system may adjust to outside air supply and turn on the air conditioner. If the climate control system does not detect possible window fogging, it returnstonormal operation. To turn Auto Defog for on, see "Climate and Air Quality" under Vehicle Personalization on page 5-42.
RearWindowDefogger
(ttt)(RearWindowDefogger): Presstoturntherearwindow defoggeronoroff.
Therearwindowdefoggerturnsoff automaticallyafterabout 10minutes.Ifturnedonagainit runsforaboutfiveminutesbefore turningoff.Athigherspeeds,the rearwindowdefoggermaystayon continuously.
Therearwindowdefoggercanbe settoautomaticoperation;see "ClimateandAirQuality" under VehiclePersonalizationon page5-42.Whenautoreardefogis selected,therearwindowdefogger turnsonautomaticallywhenthe interiortemperatureiscoldandthe outsidetemperatureisabout4°C (40°F)andbelow.Theautorear defoggerturnsoffautomatically afterabout10minutes.Athigher speeds,therearwindowdefogger maystayoncontinuously.
8-4ClimateControls
Theheatedoutsiderearviewmirrors turnonwhentherearwindow defoggerbuttonisonandhelpto clearfogorfrostfromthesurfaceof themirrors.SeeHeatedMirrorson page2-20.
Notice: Donottrytoclearfrost orothermaterialfromtheinside ofthefrontwindshieldandrear windowwitharazorbladeor anythingelsethatissharp. This maydamagetherearwindow defoggergridandaffectyour radio'sabilitytopickupstations clearly. Therepairswouldn'tbe coveredbyyourwarranty.
HeatedandVentilatedSeats: Presstoheatorventilatetheseat. See HeatedandVentilatedFront Seatsonpage3-10.
RemoteStartClimateControl Operation: For vehicles with the remote vehicle start feature, the climate control system may run when the vehicle is started remotely. Thesystem use sthedriver's previous setting to heater cool the inside of the vehicle. See Remote Vehicle Start on page 2-9.
Therearwindowdefoggerturnson ifitiscoldoutside.
Sensor
Thesolarsensorlocatedontopof theinstrumentpanelnearthe windshield,monitorsthesolarheat.
Theclimatecontrolsystemusesthe sensorinformationtoadjustthe temperature,fanspeed, recirculation,andairdeliverymode forbestcomfort.
If the sensor discovered, the automatic climate control system may not work properly.
RearClimateControlSystem
For vehicles with therearheat and air conditioning controls, they are integrated with therearse a audio controls located in the center console.

RearClimateControlwithRearSeatAudioControls
A.FanControl
B. AirDeliveryModeControl
C. TemperatureControl
ZONE: Whentherearclimate controlisturnedonfromtherear, theZONEindicatorlightwillturnon.
PresstheZONEbuttononthefront climatecontrolsystemtoturnoffthe rearblowerandmatchtherear settingstothefront.TheZONE indicatorlightandrearclimate controldisplaywillturnoff.
Therearclimatecontrolcanbe turnedoffbypassing ♂-
IndependentMode: Thismode directsrearseatingairflow accordingtothesettingsof therearcontrols.
Thefrontclimatecontrolsystem mustbeonfortherearclimate controltowork.Toturnontherear climatecontrolfromrearseating, pressanyrearclimatecontrol button.
Therearclimatecontrolwillnot workifthefrontclimatecontrol systemisindefrost.
AutomaticOperation
AUTO:Press √untiltheAUTO settingisselectedtocontroltherear temperature,airdelivery,andfan speedautomatically.
ManualOperation
-/+ (Fan Control): Press thesebuttonsontherearseat audiocontrolpaneltoincreaseor decreasetheairflow.Pressing+ whenthesystemisoffwillturnthe systemon.Theairdeliverymode remainsinitsprevioussetting.
-/+ (TemperatureControl): Press thesebuttonstoadjustthe temperatureoftheairflowinginto thepassengerarea.Press+for warmerairandpress-for coolerair.
(AirDeliveryModeControl): Pressthemodebuttontochange thedirectionoftheairflow.Multiple presseswillcyclethroughthe deliveryselections.
AirVents
Movetheslidingknobontheair outletsupanddownorleftandright todirecttheairflow. Usethe thumbwheelsneartheairoutletsto openorcloseofftheairflow.
OperationTips
- Clearawayanyice, snow, orleavesfromairinletsatthe baseofthewindshieldthatcould blocktheflowofairintothe vehicle.
- Keepthepathunderthefront seatsclearofobjectstohelp circulatetheairinsidethe vehiclemoreeffectively.
- Useofnon-Saabapprovedhood deflectorscanadverselyaffect theperformanceofthesystem. Checkwithyourdealerbefore addingequipmenttotheoutside ofthevehicle.
Maintenance
PassengerCompartment AirFilter
The filter removes dust, pollen, and other airborne irritants from outside airthatispulled into the vehicle.
Thefiltersshouldbereplacedaspart ofroutinescheduledmaintenance. Tofindoutwhattypeoffiltertouse, seeMaintenanceReplacement Partsonpage11-6.
- Openthegloveboxcompletely andremovethefourscrews alongtheupperportionofthe glovebox.
- Whenreleased, lowertheupper portionoftheglovebox.
- Locatetheservicedoorforthe passengercompartmentairfilter.
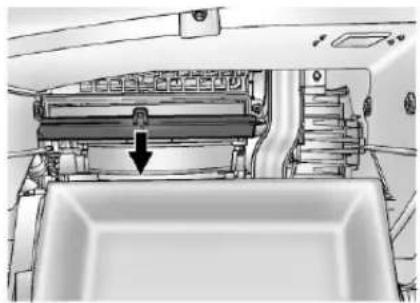
natural_image
Technical line drawing of a mechanical device with a downward arrow indicating a component (no text or symbols present)- Releasethetwolatchesholding theservicedoor. Lowerthe servicedoor.

natural_image
Technical line drawing of a mechanical assembly with two arrows pointing to components (no text or symbols present)- Removetheoldairfilter.
- Installthenewairfilter.
- Closetheservicedoorand latches.
- Reinstall the upper portion of the glovebox.
Seeyourdealerifadditional assistanceisneeded.
8-8ClimateControls
NOTES
Driving and Operating
DrivingInformation
DefensiveDriving......9-2
DrunkDriving....9-2
ControlofaVehicle......9-3
Braking....9-4
Steering....9-5
Off-RoadRecovery......9-6
LossofControl....9-6
DrivingonWetRoads......9-7
HighwayHypnosis......9-8
HillandMountainRoads.....9-8
WinterDriving....9-9
IftheVehicleIsStuck......9-11
VehicleLoadLimits......9-12
StartingandOperating
NewVehicleBreak-In.....9-17
Adjustable Throttle and Brake Pedal....9-18
IgnitionPositions......9-18
StartingtheGasoline Engine....9-20
EngineHeater....9-22
RetainedAccessory Power(RAP)....9-22
ShiftingIntoPark......9-23
ShiftingoutofPark......9-24
ParkingoverThings ThatBurn....9-24
EngineExhaust
EngineExhaust......9-24
RunningtheVehicleWhile Parked....9-25
AutomaticTransmission
AutomaticTransmission.....9-26
ManualMode......9-28
FuelEconomyMode......9-29
DriveSystems
All-WheelDrive......9-30
Brakes
AntilockBrake System(ABS)....9-30
ParkingBrake......9-31
BrakeAssist....9-33
HillStartAssist(HSA).....9-34
RideControlSystems
TractionControl System(TCS)....9-34
ElectronicStability Program(ESP)....9-36
Limited-SlipRearAxle.....9-37
SelectiveRideControl.....9-37
CruiseControl
CruiseControl......9-39
ObjectDetectionSystems
UltrasonicParkingAssist....9-41
RearVision Camera(RVC)....9-43
Fuel
Fuel....9-47 RecommendedFuel....9-48
GasolineSpecifications(U.S. andCanadaOnly)....9-48
CaliforniaFuel Requirements......9-48
FuelsinForeignCountries...9-49
FuelAdditives......9-49
FillingtheTank......9-50
FillingaPortableFuel Container....9-51
9-2DrivingandOperating
Towing
GeneralTowing
Information......9-52
DrivingCharacteristicsand
TowingTips......9-52
TrailerTowing....9-56
TowingEquipment......9-59
TrailerSway
Control(TSC)......9-61
ConversionsandAdd-Ons
Add-On Electrical
Equipment....9-61
DrivingInformation
DefensiveDriving
Defensivedrivingmeans"always expecttheunexpected."Thefirst stepindrivingdefensivelyistowear thesafetybelt.See SafetyBeltson page3-14.

WARNING
Assumethatotherroadusers (pedestrians, bicyclists, and other drivers) are going to be careless and make mistakes. Anticipate what they might do and beready. In addition:
- Allowenoughfollowing distancebetweenyouand thedriverinfrontofyou.
- Focusonthetaskofdriving.
(Continued)
WARNING(Continued)
Driverdistractioncancause collisionsresultingininjuryor possibledeath. Thesesimple defensivedrivingtechniques couldsaveyourlife.
DrunkDriving

WARNING
Drinkingandthendrivingis verydangerous.Yourreflexes, perceptions,attentiveness,and judgmentcanbeaffectedbyevenasmallamountofalcohol.You canhaveaserious—oreven fatal—collisionifyoudriveafter drinking.
Donotdrinkanddriveorridewith adriverwhohasbeendrinking. Ridehomeinacab;orifyouare withagroup,designateadriver whowillnotdrink.
Death and injury associated with drinking and driving is a global tragedy.
Alcohol affects four things that anyone need st drive a vehicle: judgment, muscular coordination, vision, and attentiveness.
Policerecordsshowthat almost40percentofallmotor vehicle-relateddeathsinvolve alcohol.Inmostcases,these deathsaretheresultofsomeone whowasdrinkinganddriving. Inrecentyears,morethan 17,000annualmotorvehicle-related deathshavebeenassociatedwith theuseofalcohol,withabout 250,000peopleinjured.
Forpersonsunder21,itisagainst thelawineveryU.S.statetodrink alcohol.Therearegoodmedical, psychological,anddevelopmental reasonsfortheselaws.
Theobviouswaytoeliminatethe leadinghighwaysafetyproblemis forpeoplenevertodrinkalcohol andthendrive.
Medicalresearchshowsthat alcoholinaperson'ssystemcan makecrashinjuriesworse, especiallyinjuriestothebrain, spinalcord,orheart. Thismeans thatwhenanyonewhohasbeen drinking—driverorpassenger—is inacrash,thatperson'schanceof beingkilledorpermanentlydisabled ishigherthanifthepersonhadnot beendrinking.
ControlofaVehicle
The following three systems help to control the vehicle while driving—brakes, steering, and accelerator. Attimes, as when driving on snow or ice, it is easy to ask more of those control systems than the tires and road can provide. Meaning, you can lose control of the vehicle. See Traction Control System (TCS) on page 9-34 and Electronic Stability Program (ESP) on page 9-36.
Adding non-dealer accessories can affect vehicle performance. See Accessories and Modifications on page 10-3.
Braking
SeeBrakeSystemWarningLighton page5-22.
Brakingactioninvolvesperception timeandreactiontime.Decidingto pushthebrakepedalisperception time.Actuallydoingitis reactiontime.
Averagereactiontimeisabout three-fourthsofasecond. But that is only an average. It might be less with one driver and as long as two or three seconds more with another. Age, physical condition, alertness, coordination, and eyesightall play apart. Sodo alcohol, drugs, and frustration. Bute even in three-fourth sofa second, a vehicle moving at 100 km/h (60 mph) travels 20 m (66 ft). That could be a lot of distance in an emergency, so keeping enough space between the vehicle and others is important.
And, of course, actual stopping distances vary greatly with the surface of the road, whether it is pavement or gravel; the condition of the road, whether it is wet, dry, or icy; tire tread; the condition of the brakes; the weight of the vehicle; and the amount of brake force applied.
Avoidneedlessheavy braking. Somepeopledrivein spurts—heavyacceleration followedbyheavybraking—rather thankeepingpacewithtraffic. This isamistake. Thebrakesmightnot havetimetocoolbetweenhard stops. Thebrakeswillwearout muchfasterwithalotofheavy braking. Keepingpacewiththe trafficandallowingrealisticfollowing distanceseliminatesalotof unnecessarybraking. Thatmeans betterbrakingandlongerbrakelife.
Iftheengineeverstopswhilethe vehicleisbeingdriven,brake normallybutdonotpumpthe brakes.Ifthebrakesarepumped, thepedalcouldgethardertopush down.Iftheenginestops,therewill stillbesomepowerbrakeassistbut itwillbeusedwhenthebrakeis applied.Oncethepowerassistis usedup,itcantakelongertostop andthebrakepedalwillbeharder topush.
Adding non-dealer accessories can affect vehicle performance. See Accessories and Modifications on page 10-3.
Steering
PowerSteering
Ifpowersteeringassistislost because the engine stops the powersteeringsystem is not functioning, the vehicle can be steered but it will take more effort.
SteeringTips
Itisimportanttotakecurvesata reasonablespeed.
Tractioninacurvedependsonthe conditionofthetiresandtheroad surface,theangleatwhichthe curveisbanked,andvehiclespeed. Whileinacurve,speedistheone factorthatcanbecontrolled.
Ifthereisaneedtoreducespeed, doitbeforeenteringthecurve, whilethefrontwheelsarestraight.
Trytoadjustthespeedsoyoucan drivethroughthecurve.Maintaina reasonable,steadyspeed.Waitto accelerateuntiloutofthecurve,and thenaccelerategentlyintothe straightaway.
SteeringinEmergencies
Therearetimeswhensteeringcan bemoreeffectivethanbraking. For example, youcomeoverahilland findatruckstoppedinyourlane, oracarsuddenlypullsoutfrom nowhere, orachilddartsoutfrom betweenparkedcarsandstopsright infrontofyou. Theseproblemscan beavoidedbybraking—if youcan stopintime. But sometimesyou cannotstopintimebecausethere isnoroom. Thatisthetimefor evasiveaction—steeringaround theproblem.
The vehicle can perform very well in emergencies like these. First apply the brakes. See Braking on page 9-4. It is better to remove as much speed as possible from a collision. Then steer around the problem, to the left or right depending on the space available.

natural_image
Black-and-white illustration of a person driving a car, showing steering wheel and dashboard (no text or symbols)Anemergencylikethisrequires closeattentionandaquickdecision. Ifholdingthesteeringwheelatthe recommended9and3o'clock positions, itcanbeturnedafull 180degreesveryquicklywithout removingeitherhand. Butyouhave toactfast, steerquickly, andjustas quicklystraightentthewheelonce youhaveavoidedtheobject.
The fact that such a emergency situations are always possible, a good reason to practice defensive driving at all times and wears safety belts properly.
Off-RoadRecovery
The vehicle's right wheels candrop off the edge of far oad onto the shoulder while driving.

natural_image
Diagram of two cars driving on a road with directional arrows indicating flow (no text or symbols)If the level of the shoulder is only slightly below the pavement, recovery should be fairly easy. Ease off the accelerator and then, if there is nothing in the way, steer
sothatthevehiclestraddlesthe edgeofthepavement. Turnthe steeringwheel8to13cm(3to 5in),aboutone-eighthturn, untiltherightfronttirecontacts thepavementedge. Thenturnthe steeringwheeltogostraightdown theroadway.
LossofControl
Letusreviewwhatdrivingexperts sayaboutwhathappenswhenthe threecontrolsystems—brakes, steering,andacceleration—donot haveenoughfrictionwherethetires meettheroadtodowwhatthedriver hasasked.
Inanyemergency, donotgiveup. Keeptryingtosteerandconstantly seekanescaperouteorareaof lessdanger.
Skidding
Inaskid, adrivercanlosecontrol of the vehicle. Defensivedrivers avoid most kids by taking reasonable caresuited to existing conditions, and by not overdriving those conditions. But kids are always possible.
Thethreetypesofskidscorrespond tothevehicle'sthreecontrol systems.Inthebrakingskid,the wheelsarenotrolling.Inthe steeringorcorneringskid,toomuch speedorsteeringinacurvecauses tirestoslipandlosecorneringforce. Andintheaccelerationskid,too muchthrottlecausesthedriving wheelstospin.
Ifthevehiclestartstoslide,ease yourfootofftheacceleratorpedal andquicklysteerthewayyou wantthevehicletogo.Ifyoustart steeringquicklyenough,thevehicle maystraightenout.Alwaysbeready forasecondskidifitoccurs.
Ofcourse, tractionisreducedwhen water, snow, ice, gravel, or other materialisontheroad. Forsafety, slowdown and adjust your driving to these conditions. It is important to slowdown nonslippery surfaces because stopping distance is longer and vehicle control more limited.
Whiledrivingonasurfacewith reducedtraction,trytoavoid suddensteering,acceleration, orbraking,includingreducing vehiclespeedbyshiftingtoalower gear.Anysuddenchangescould causethetirestoslide.Youmight notrealizethesurfaceisslippery untilthevehicleisskidding.Learnto recognizewarningclues—suchas enoughwater,ice,orpackedsnow ontheroadtomakeamirrored surface—andslowdownwhenyou haveanydoubt.
Remember: Antilockbrakeshelp avoidonlythebrakingskid.
DrivingonWetRoads
Rainandwetroadscanreduce vehicletraction and affect your ability to stop and accelerate. Always drives slower in the set types of driving conditions and avoid driving through large puddles and deep-standing or flowing water.

WARNING
Wetbrakescancausecrashes. Theymightnotworkaswellina quickstopandcouldcause pullingtooneside.Youcould losecontrolofthevehicle.
(Continued)
WARNING(Continued)
Afterdrivingthroughalarge puddleofwateroracar/vehicle wash, lightlyapplythebrake pedaluntilthebrakeswork normally.
Flowingorrushingwatercreates strongforces.Drivingthrough flowingwatercouldcausethe vehicletobecarriedaway.Ifthis happens,youandothervehicle occupantscoulddrown.Donot ignorepolicewarningsandbe verycautiousabouttryingtodrive throughflowingwater.
Hydroplaning
Hydroplaningisdangerous.Water canbuildupunderthevehicle's tiressotheyactuallyrideonthe water.Thiscanhappeniftheroadis wetenoughandyouaregoingfast enough.Whenthevehicleis hydroplaning,ithaslittleorno contactwiththeroad.
Thereisnohardandfastruleabout hydroplaning. Thebestadviceisto slowdownwhentheroadiswet.
OtherRainyWeatherTips
Besidesslowingdown,otherwet weatherdrivingtipsinclude:
- Allowextrafollowingdistance.
- Passwithcaution.
-
Keepwindshieldwiping equipmentingoodshape.
-
Keepthewindshieldwasherfluid reservoirfilled.
- Havegoodtireswithproper treaddepth.See Tireson page10-52.
- Turnoffcruisecontrol.
HighwayHypnosis
Alwaysbealertandpayattentionto yoursurroundingswhiledriving. Ifyoubecometiredorsleepy,finda safeplacetoparkthevehicle andrest.
Otherdrivingtipsinclude:
- Keepthevehiclewellventilated.
- Keepinteriortemperaturecool.
- Keepyoureyesmoving—scan theroadaheadandtothesides.
- Checktherearviewmirrorand vehicleinstrumentsoften.
HillandMountainRoads
Drivingonsteephillsorthrough mountainsisdifferentthandriving onflatorrollingterrain. Tipsfor drivingintheseconditionsinclude:
- Keepthevehicleservicedandin goodshape.
- Checkallfluidlevelsandbrakes, tires,coolingsystem,and transmission.
- Shifttoalowergearwhengoing downsteeporlonghills.

WARNING
If you donot shift down, the brakes could get so hot that they would not work well. You would then have poor braking over no going down a hill. You could crash. Shift downtolet the engine assist the brakes on a steep downhill slope.
WARNING
CoastingdownhillinN(Neutral) orwiththeignitionoffis dangerous. Thebrakeswillhave todoalltheworkofslowingdown andtheycouldgetsohotthat theywouldnotworkwell. You wouldthenhavepoorbrakingor evennonegoingdownahill. You couldcrash.Alwayshavethe engineerunningandthevehicle ingearwhengoingdownhill.
- Stayinyourownlane.Donot swingwideorcutacrossthe centeroftheroad.Driveat speedsthatletyoustayinyour ownlane.
- Topofhills: Bealert—somethingcouldbeinyour lane(stalledcar, accident).
- Payattentiontospecialroad signs(fallingrocksarea,winding roads,longgrades,passingor no-passingzones)andtake appropriateaction.
WinterDriving
DrivingonSnoworIce
Drivecarefullywhenthereissnow oricebetweenthetiresandthe road,creatinglesstractionorgrip. Weticecanoccuratabout0°C (32°F)whenfreezingrainbeginsto fall,resultinginevenlesstraction. Avoiddrivingonweticeorin freezingrainuntilroadscanbe treatedwithsaltorsand.
Drivewithcaution,whatever the condition.Accelerategently so tractionisnotlost.Acceleratingtoo quicklycausesthewheelstospin andmakesthesurfaceunderthe tiresslick,sothereisevenless traction.
Trynottobreakthefragiletraction. If you accelerate atetoofast, the drive wheels will spin and polish the surface under the tire seven more.
TheAntilockBrake System(ABS) onpage9-30improvesvehicle stabilityduringhardstopson slipperyroads,butapplythebrakes soonerthanwhenondrypavement.
Allowgreaterfollowingdistanceon anyslipperyroadandwatchfor slipperyspots. Icypatchescan occuronotherwiseclearroadsin shadedareas. Thesurfaceofa curveoranoverpasscanremainicy whenthesurroundingroadsare clear. Avoidsuddensteering maneuversandbrakingwhile once.
Turnoffcruise control on slippery surfaces.
BlizzardConditions
Beingstuckinsnowcanbea seriousssituation.Staywiththe vehicleunlesssthereishelpnearby. Ifpossible,usetheRoadside AssistanceProgramonpage13-4. Togethelpandkeepeveryonein thevehiclesafe:
• Turnonthehazardwarning flashers.
- Tiearedclothtoanoutside mirror.

WARNING
Snowcantrapengineexhaust underthevehicle. This may cause exhaust gas to get inside. Engine exhaust contains Carbon Monoxide (CO) which cannot be seen or smelled. It can cause unconsciousness and even death.
(Continued)
WARNING(Continued)
Ifthevehicleisstuckinthesnow:
- Clearawaysnowfromaround thebaseofyourvehicle, especiallyanythatisblocking theexhaustpipe.
- Checkagainfromtimeto timetobesuresnowdoes notcollectthere.
- Openawindowabout5cm (2in)onthesideofthe vehiclethatisawayfromthe windtobringinfreshair.
- Fullyopentheairoutletson orundertheinstrument panel.
- Adjusttheclimatecontrol systemtoasettingthat circulatestheairinsidethe vehicleandsetthefanspeed tothehighestsetting.See ClimateControlSysteminthe Index.
(Continued)
WARNING(Continued)
Formoreinformationabout carbonmonoxide,seeEngine Exhaustonpage9-24.
Snowcantrapexhaustgases underyourvehicle. This can causedeadlyCO(Carbon Monoxide)gastogetinside.CO couldovercomeyouandkillyou. Youcannotseeitorsmellit,so youmightnotknowitisinyour vehicle.Clearawaysnowfrom aroundthebaseofyourvehicle, especiallyanythatisblockingthe exhaust.
Runtheengineforshortperiods onlyasneededtokeepwarm,but becareful.
Tosavefuel, runtheengineforonly shortperiodsasneededtowarm thevehicleandthenshuttheengine offandclosethewindowmostof thewaytosaveheat.Repeatthis untilhelparrivesbutonlywhenyou feelreallyuncomfortablefromthe cold.Movingabouttokeepwarm alsohelps.
Ifittakessometimeforhelpto arrive,nowandthenwhenyourun theengine,pushtheaccelerator pedalslightlysotheengineruns fasterthantheidlespeed.This keepsthebatterychargedtorestart thevehicleandtosignalforhelp withtheheadlamps.Dothisaslittle aspossibletosavefuel.
IftheVehiclesStuck
Slowlyandcautiouslyspinthe wheelstofreethevehiclewhen stuckinsand,mud,ice,orsnow.
Ifstucktooseverelyforthetraction systemtofreethevehicle,turnthe tractionsystemoffandusethe rockingmethod.

WARNING
If the vehicle's stresspinathigh speed, they can explode, and you or others could be injured. The vehicle can overheat, causing an engine compartment fire or other damage. Spin the wheels as little as possible and avoid going above 55 km/h (35 mph).
Forinformationaboutusingtire chainsonthevehicle,see Tire Chainsonpage10-75.
RockingtheVehicletoGet itOut
Turnthesteeringwheelleftand righttocleartheareaaroundthe frontwheels.Turnoffanytraction system.Shiftbackandforth betweenR(Reverse)andaforward gear,spinningthewheelsaslittleas possible.Topreventtransmission wear,waituntilthewheelsstop spinningbeforeshiftinggears. Releasetheacceleratorpedalwhile shifting,andpresslightlyonthe acceleratorpedalwhenthe transmissionisingear.Slowly spinningthewheelsintheforward andreversedirectionscausesa rockingmotionthatcouldfreethe vehicle.Ifthatdoesnotgetthe vehicleoutafterafewtries,itmight needtobetowedout.Ifthevehicle doesneedtobetowedout,see TowingtheVehicleonpage 10-97.
9-12DrivingandOperating
VehicleLoadLimits
Itisveryimportanttoknowhow muchweightthevehiclecan carry. Thisweightiscalledthe vehiclecapacityweightand includestheweightofall occupants, cargoandall nonfactory-installedoptions. Twolabelsonthevehicleshow howmuchweightitmay properlycarry, the Tire and LoadingInformationlabel and the Certificationlabel.
WARNING
Donotloadthevehicleany heavierthantheGross VehicleWeightRating (GVWR), oreitherthe maximumfrontorrearGross AxleWeightRating(GAWR). Thiscancausesystemsto breakandchangethewaythe vehiclehandles. Thiscould causelossofcontrolanda crash. Overloadingcanalso shortenthelifeofthevehicle.
TireandLoadingInformation Label

LabelExample
Avehicle-specific Tire and Loading Information label is attached to the vehicle's center pillar (B-pillar). With the driver door open, the label is attached near the door lock post.
The Tire and Loading Information label shows the number of occupant seating positions (A), and the maximum vehicle capacity weight (B) in kilograms and pounds.
The Tire and Loading Information label also shows the tiresize of the original equipment tires (C) and the recommended cold tire inflation pressures (D). Formore information on tires and inflation see Tires on page 10-52 and Tire Pressure on page 10-59.
Thereisalsoimportantloading informationontheCertification label.IttellsyoutheGross VehicleWeightRating(GVWR) andtheGrossAxleWeight Rating(GAWR)forthefrontand rearaxle.See“Certification Label”laterinthissection.
StepsforDeterminingCorrect LoadLimit
-
Locatethatement "Thecombinedweight of occupants and cargoshould never exceed XXXkgor XXXlbs" on your vehicle's placard.
-
Determinethecombined weightofthedriverand passengersthatwillbe ridinginyourvehicle.
-
Subtract the combined weight of the driver and passengers from XXXkg or XXXlbs.
-
Theresultingfigureequals theavailableamountofcargo andluggageloadcapacity. Forexample, ifthe "XXX" amountequals1400lbs and therewillbefive150lb passengersinyourvehicle, theamountofavailablecargo andluggageloadcapacity is650lbs(1400-750 (5x150)=650lbs).
-
Determinethecombined weightofluggageandcargo beingloadedonthevehicle. Thatweightmaynotsafely exceedtheavailablecargo andluggageloadcapacity calculatedinStep4.
9-14DrivingandOperating
- If your vehicle will betowing a trailer, the load from your trailer will be transferred to your vehicle. Consult this manual to determine how this reduces the available cargo and luggage load capacity of your vehicle.
See Trailer Towing on page 9-56 for important information on towing at trailer, towingsafety rules and trailering tips.

Example1
A. VehicleCapacityWeightfor Example1=453kg (1,000lbs).
B. SubtractOccupantWeight @68kg(150lbs)×2= 136kg(300lbs).
C. Available Occupant and Cargo Weight=317kg (700lbs).

Example2
A. VehicleCapacityWeightfor Example2=453kg (1,000lbs).
B. SubtractOccupantWeight @68kg(150lbs)×5=340kg(750lbs).
C. Available Cargo Weight=113kg(250lbs).

Example3
A. VehicleCapacityWeightfor Example3=453kg (1,000lbs).
B. SubtractOccupantWeight @91kg(200lbs)×5=453kg(1,000lbs).
C. Available Cargo Weight=0kg(0lbs).
Refertothevehicle's Tire and Loading Information label for specific information about the vehicle's capacity weight and seating positions. The combined weight of the driver, passengers, and cargoshould never exceed the vehicle's capacity weight.
CertificationLabel

LabelExample
Avehicle-specific Certification/Tirelabelisattachedtothe centerb-pillar. Thelabelshows
thesizeofthevehicle'soriginal tiresandtheinflationpressures neededtoobtainthegross weightcapacityofthevehicle. ThisiscalledGrossVehicle WeightRating(GVWR).The GVWRincludesthweweight of thevehicle,allocupants,fuel, andcargo.
The Certification/Tirelabel also tells you the maximum weights for the front and rear axles, called Gross Axle Weight Rating (GAWR). To find the actual load on the front and rear axles, you need to go to a weigh station and weigh the vehicle. Your dealer can help you with this. Besuret spread out the load equally on both sides of the centerline.
NeverexceedtheGVWRforthe vehicle,ortheGAWRforeither thefrontorrearaxle.
9-16DrivingandOperating
If the vehicle is carrying a heavy load, it should be spread out. See "Steps for Determining Correct Load Limit" earlier in this section.

WARNING
Donotloadthevehicleany heavierthantheGross VehicleWeightRating (GVWR), oreitherthe maximumfrontorrearGross AxleWeightRating(GAWR). Thiscancausesystemsto breakandchangethewaythe vehiclehandles. Thiscould causelossofcontrolanda crash. Overloadingcanalso shortenthelifeofthevehicle.
Yourwarrantydoesnotcover partsorcomponentsthatfail becauseofoverloading.
Thelabelwillhelpyoudecide howmuchcargoandinstalled equipmentyourvehiclecan carry.
Usingheaviersuspension componentstogetadded durabilitymightnotchange yourweightratings.Askyour dealertohelpyouloadyour vehicletherightway.
If you put things inside your vehicle—likesuit cases, tools, packages, or anything else—they will go as fast as the vehicle goes. If you havet to stop or turn quickly, or if there is a crash, they will keep going.

WARNING
Thingsinsidethevehiclecan strikeandinjurepeopleina suddenstoporturn,orina crash.
- Putthingsinthecargo areaofthevehicle.Inthe cargoarea,putthemas farforwardaspossible. Trytospreadtheweight evenly.
(Continued)
WARNING(Continued)
- Neverstackheavier things,likesuitcases, insidethevehiclesothat someofthemareabove thetopsoftheseats.
- Donotleavean unsecuredchildrestraint inthevehicle.
- Securelooseitemsinthe vehicle.
- Donotleaveaseatfolded downunlessneeded.
Starting and Operating
NewVehicleBreak-In
Notice: The vehicle does not need an elaborate break-in. But it will perform better in the long run if you follow these guidelines:
- Donotdriveatanyone constantspeed, fastorslow, forthefirst805km(500mi). Donotmakefull-throttle starts. Avoiddownshifting to brakeorslowthevehicle.
- Duringthefirst1000km (600mi), avoidusingmore thanmoderateacceleration inlowergearsandavoid vehiclespeedsabove 110km/h(68mph).
- Between the first 1000 km (600 mi) and 5000 km (3,000 mi), heavy acceleration in lower gears
canbeused.Vehiclespeeds above110km/h(68mph) shouldbelimitedto fiveminutesperuse.
- Avoidmakinghardstopsfor thefirst322km(200mi)or so.Duringthistimethenew brakeliningsarenotyet brokenin.Hardstopswith newliningscanmean prematurewearandearlier replacement.Followthis breaking-inguidelineevery timeyougetnewbrake linings.
- Donottowatrailerduring break-in.SeeDriving CharacteristicsandTowing Tipsonpage9-52forthe trailertowingcapabilitiesof yourvehicleandmore information.
Followingbreak-in, enginespeed and load can be gradually increased.
Adjustable Throttle and Brake Pedal
If the vehicle has this feature, the position of the thethrottle and brake pedals can be adjusted.
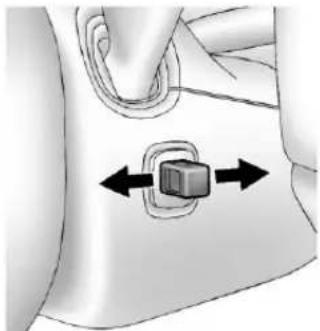
natural_image
Medical illustration showing a device with bidirectional arrows indicating movement or force (no text or symbols present)Theswitchusedtoadjustthe pedalsislocatedontherightside ofthesteeringcolumn,belowthe wiperstalk.Pulltheswitchtoward youtomovethepedalsfurtherfrom thefloor,orpushtheswitchaway fromyoutomovethepedalscloser tothefloor.
Adjustthethrottleandbrakepedals whilethevehicleisinP(Park) withoutpressingonthepedals. Thepedalscannotbeadjusted whilethevehicleisinR(Reverse) orwhencruisecontrolisengaged. Thethrottleandbrakepedalscan alsobeadjustedwhiledriving.
IgnitionPositions

natural_image
Interior view of a car gear shift control panel with no visible text or symbolsThe vehicle has an electronic keylessignition with pushbutton start.
Pressingthebuttoncyclesitthrough threemodes,ACC/ACCESSORY, ON/RUN/START,andSTOPPING THEENGINE/OFF.
If the push button start is not working, the vehicle may be near a strong radio antenna signal causing interference to the key less entry system. See Driver Information Center (DIC) on page 5-29 for more information.
ToshiftoutofP(Park), the vehicle must be in ON/RUN and the brake pedal must be applied.
STOPPINGTHEENGINE/OFF (NoLEDLights):Whenthe vehicleisstopped,presstheengine START/STOPbuttononcetoturn theengineoff.Ifthevehicleisin P(Park),theignitionwillturnoff,
andRetainedAccessoryPower (RAP)willremainactive.See RetainedAccessoryPower(RAP) onpage9-22formoreinformation. IfthevehicleisnotinP(Park), theignitionwillreturntoACC/ ACCESSORYanddisplaythe messageSHIFTTOPARKinthe DriverInformationCenter(DIC). SeeDriverInformationCenter(DIC) onpage5-29formoreinformation. Whenthevehicleisshiftedinto P(Park),theignitionsystemwill switchtoOFF.Inanemergency, ifthevehiclemustbeshutoffwhile driving:
- Brakeusing a firmand steady pressure. Donotpump the brakes repeatedly. This may deplete power assist, requiring increased brake pedal force.
2.ShiftthevehicletoN(Neutral). Thiscanbedonewhilethe vehicleismoving.Aftershifting toN(Neutral),firmlyapplythe brakesandsteerthevehicletoa safelocation.
3. Cometoacompletestop, shift toP(Park), and turn the ignition to OFF. On vehicles with an automatic transmission, the shift lever must be in P(Park) to turn the ignition to the OFF position.
4. Settheparkingbrake. See ParkingBrakeonpage9-31.
WARNING
Turningoffthevehiclewhile movingmaycauselossofpower assistinthebrakeandsteering systemsanddisabletheairbags. Whiledriving,onlyshutthe vehicleoffinanemergency.
- Incaseofemergencytheengine canbeswitchedoffwhilethe vehicleisrunning:pushthe Start/Stopbuttontwicewithin fiveseconds,orholdthe buttondownformorethan twoseconds.Whentheengine isnotrunning,considerably moreforceisneededtobrake andsteer.
ACC/ACCESSORY(AmberLED
Light): Thismodeallowsyouto usesomeelectricalaccessories whentheengineisoff.
Withtheignitionoff,pressingthe buttononetimewithoutthebrake pedalappliedwillplacetheignition systeminACC/ACCESSORY.
Theignitionwillswitchfrom ACC/ACCESSORYtoOFFafter 10minutestopreventbattery rundown.
ON/RUN/START(GreenLED
Light): Thismodeisfordrivingand starting.Withtheignitionoff,and thebrakepedalapplied,pressing thebuttononcewillplacethe ignitionsysteminON/RUN/START. Onceenginecrankingbegins, releasethebutton.Enginecranking willcontinueuntiltheenginestarts. SeeStartingtheGasolineEngine onpage9-20formoreinformation. Theignitionwillthenremainin ON/RUN.
StartingtheGasoline Engine
Toplacethetransmissioninthe propergear:
MovetheshiftlevertoP(Park)or N(Neutral).Torestarttheengine whenthevehicleisalreadymoving, useN(Neutral).
Notice: Donottrytoshiftto P(Park) if the vehicle is moving. If you do, you could damage the transmission. Shift to P(Park) only when the vehicle is stopped.
TheRKEtransmittermustbeinside thevehiclefortheignitiontowork.
Cellphonechargerscaninterfere withtheoperationofthekeyless accesssystem.Batterychargers shouldnotbepluggedinwhen startingorturningofftheengine.
Tostartthevehicle:
StartingProcedure
-
With the brake pedal applied, pressthe START button located on the center console.
-
Whentheenginebegins cranking, let goofthebutton and theenginecranksautomatically until starts.
If the transmitter is not in the vehicle or something is interfering with the transmitter, the Driver Information Center (DIC) will display NO REMOTE DETECTED. See Driver Information Center (DIC) on page 5-29 form more information.
IfthebatteryintheRKE transmitterneedsreplacing,the DICdisplaysREPLACE BATTERYINREMOTEKEY. Thevehiclecanstillbedriven.
SeeRemoteKeylessEntry (RKE)SystemOperationon page2-3formoreinformation.
-
Donotracetheengine immediately after starting it. Operatetheengine and transmissionently until the oil warmsupandlubricates all moving parts.
-
If the engine does not start and no DIC message is displayed, wait 15 seconds before trying to go into the ranking motor cooldown.
If theenginedoesnotstartafter fiveto10seconds,especiallyin verycoldweather(below 0°For-18°C),itcouldbe floodedwithtoomuchgasoline. Trypushingtheaccelerator pedalallthewaytothefloor whilecrankingforupto 15seconds.
Notice:Crankingtheenginefor longperiodsoftime,bypassing theSTARTbuttonimmediately aftercrankinghasended,can overheatanddamagethe crankingmotor,anddrainthe battery.Waitatleast15seconds betweeneachtry,toallowthe crankingmotortocooldown.
Whentheenginestarts, let goof the accelerator. If the vehicle starts briefly but then stops again, do the something. This clear the extra gasoline from the engine.
Thevehiclehasa Computer-ControlledCranking System. Thisfeatureassistsin startingtheengineandprotects components. Oncecrankinghas beeninitiated, theenginecontinues
crankingforafewsecondsoruntil thevehiclestarts.Iftheenginedoes notstart,crankingautomatically stopsafter15secondstopprevent crankingmotordamage.Toprevent geardamage,thissystemalso preventscrankingiftheengineis alreadyrunning.
Notice:Theengineisdesigned toworkwiththeelectronicsin thevehicle.Ifyouaddelectrical partsoraccessories,youcould changethewaytheengine operates.Beforeaddingelectrical equipment,checkwithyour dealer.Ifyoudonot,theengine mightnotperformproperly.Any resultingdamagewouldnotbe coveredbythevehiclewarranty.
EngineHeater
Theenginecoolantheater, ifavailable, canhelpincoldweather conditionsatorbelow-18°C(0°F) foreasierstartingandbetterfuel economyduringenginewarm-up. Pluginthecoolantheateratleast fourhoursbeforestartingthe vehicle. Aninternalthermostatin theplugendofthecordwillprevent enginecoolantheateroperationat temperaturesabove-18°C(0°F).
ToUsetheEngineCoolant Heater
- Turnofftheengine.
- Openthehood and unwrap the electrical cord. The cord is located near the air cleaner.
- Plugitintoanormal, grounded 110-voltACoutlet.
WARNING
Pluggingthecordintoan ungroundedoutletcouldcausean electricalshock.Also,thewrong kindofextensioncordcould overheatandcauseafire.You couldbeseriouslyinjured.Plug thecordintoaproperlygrounded three-prong110-voltACoutlet. Ifthecordwillnotreach,usea heavy-dutythree-prongextension cordratedforatleast15amps.
- Before starting the engine, be suretounplugandstorethe cordasitwasbeforetokeepit awayfrommovingengineparts. If you donotit could be damaged.
Thelengthoftimetheheatershould remainpluggedindependson severalfactors.Askadealerinthe areawhereyouwillbeparkingthe vehicleforthebestadviceonthis.
RetainedAccessory Power(RAP)
Theseaccessoriescanbeused aftertheengineisturnedoff:
• Audiosystem(upto10minutes ordriverdoorisopened).
• Powerwindows,sunroof (ifequipped),andpoweroutlets (upto10minutesoranydoor isopened).
ShiftingIntoPark

WARNING
Itcanbedangeroustogetoutof thevehicleiftheshiftleverisnot fullyinP(Park)withtheparking brakefirmlyset. Thevehiclecan roll. If you have left the engine running, the vehicle can move suddenly. You or others could be injured. Tobesure the vehicle will not move, even when you are on fairly level ground, use the steps that follow.
- Holdthebrakepedaldownand settheparkingbrake.
See Parking Brakeonpage9-31 formoreinformation.
2.MovetheshiftleverintoP(Park) bypushingtheleveralltheway towardthefrontofthevehicle. - Turntheignitionoff.
LeavingtheVehiclewiththe EngineRunning

WARNING
Itcanbedangeroustoleavethe vehiclewiththeengine running. The vehiclecouldmovesuddenly iftheshiftleverisnotfully in P(Park)withtheparkingbrake firmlyset.And,ifyouleavethe vehiclewiththeengine running, itcouldoverheatandevencatch fire.Youorotherscouldbe injured.Donotleavethevehicle withtheengine running.
If you havetoleavethe vehicle with the engineer running, besure the vehicle is in P (Park) and the parking brake is firmly set before you leave it. After you have moved the shift lever into P (Park), hold down there regular brake pedal. See if you can mov the shift lever away from P (Park) without first pulling it
towardyou.Ifyoucan,itmeansthat theshiftleverwasnotfullylocked intoP(Park).
TorqueLock
Torquelockiswhentheweight ofthevehicleputstoomuch forceontheparkingpawlinthe transmission. This happens when parkingonahillandshifting the transmission into P(Park) is not done properly and then it is difficult to shift out of P(Park). Toprevent torque lock, set the parking brake and thenshift into P(Park). To find out how, see "Shifting Into P(Park)" listed previously.
Iftorquelockdoesoccur,your vehiclemayneedtobepushed uphillbyanothervehicletorelieve theparkingpawlpressure,soyou canshiftoutofP(Park).
If you are towing a trailer and parking on a hill, see Driving Characteristics and Towing Tips on page 9-52.
ShiftingoutofPark
This vehicle is equipped with an automatic transmission shift lock control system. Theshiftlock control is designed to prevent movement of the shift lever out of P (Park), unless the ignition is in ON/RUN and the brake pedal is applied
Theshiftlockcontrolisalways functionalexceptinthecaseof anunchargedorlowvoltage(less than9-volt)battery.
If the vehicle has an uncharged battery or a battery with low voltage, trcharging or jump starting the battery. See Jump Starting on page 10-92.
ToshiftoutofP(Park):
- Applythebrakepedal.
- TurntheignitiontoON/RUN.
- Presstheshiftleverbutton.
- Movetheshiftlevertothe desiredposition.
If you still are unable to shift out of P(Park):
- Fullyreleasetheshiftlever button.
- Holdthebrakepedaldownand presstheshiftleverbutton again.
- Movetheshiftlevertothe desiredposition.
If you still cannot movetheshift lever from P (Park), consult your dealer or professional to owing service.
ParkingoverThings ThatBurn

WARNING
Thingsthatcanburncouldtouch hotexhaustpartsunderthe vehicleandignite.Donotpark overpapers,leaves,drygrass, orotherthingsthatcanburn.
EngineExhaust

WARNING
Engineexhaustcontainscarbon monoxide(CO)whichcannot be seenorsmelled.ExposuretoCO cancauseunconsciousness and evendeath.
Exhaustmayenterthevehicleif:
- The vehicleidlesinareas with poor ventilation (parking garages, tunnels, deep snow that may block under body airflowortail pipes).
• Theexhaustsmellsor soundsstrangeordifferent.
• Theexhaustsystemleaks duetocorrosionordamage. - Thevehicleexhaustsystem has been modified, damaged or improperly repaired.
(Continued)
WARNING(Continued)
- Thereareholesoropenings inthevehiclebodyfrom damageoraftermarket modificationsthatarenot completelysealed.
Ifunusualfumesaredetectedor ifitissuspectedthatexhaustis comingintothevehicle:
- Driveitonlywiththewindows completelydown. - Havethevehiclerepaired immediately.
Neverparkthevehiclewiththe engineerunninginanenclosed areasuchasagarageora buildingthathasnofreshair ventilation.
RunningtheVehicle WhileParked
Itisbetternottoparkwiththe enginerunning.Butifyoueverhave to,herearesomethingstoknow.
WARNING
Idlingvehicleinanenclosed areawithpoorventilationis dangerous.Engineexhaustmay enterthevehicle.Engineexhaust containsCarbonMonoxide(CO) whichcannotbeseenorsmelled. Itcancauseunconsciousness andevendeath.Neverrunthe engineinanenclosedareathat hasnofreshairventilation.For moreinformation,seeEngine Exhaustonpage9-24.
WARNING
Itcanbedangeroustogetoutof thevehicleiftheautomatic transmissionshiftleverisnotfully inP(Park)withtheparkingbrake firmlyset.Thevehiclecanroll. Donotleavethevehiclewhenthe engineisrunningunlessyou haveto.Ifyouhaveleftthe enginerunning,thevehiclecan movesuddenly.Youorothers couldbeinjured.Tobesurethe vehiclewillnotmove,evenwhen youareonfairlylevelground, alwayssettheparkingbrakeand movetheshiftlevertoP(Park).
Followtheproperstepstobesure thevehiclewillnotmove.See ShiftingIntoParkonpage9-23.
Ifparkingonahillandpullinga trailer, seeDrivingCharacteristics and TowingTipsonpage9-52.
Automatic Transmission
Theshiftleverislocatedonthe centerconsolebetweenthefront seats.

natural_image
Interior view of a car gear shift control panel with no visible text or symbolsThereareseveraldifferentpositions fortheshiftlever.
P(Park): This position lock the wheels. It is the best position to use when you start the engine because the vehicle cannot move easily.
CAUTION
It is dangerous to get out of the vehicle if the shift lever is not fully in P (Park) with the parking brake firmly set. The vehicle can roll.
Donotleavethevehiclewhen theengineisrunningunlessyou haveto.Ifyouhaveleftthe engineerunning,thevehiclecan movesuddenly.Youorothers couldbeinjured.Tobesurethe vehiclewillnotmove,evenwhen youareonfairlylevelground, alwayssettheparkingbrakeand movetheshiftlevertoP(Park). SeeShiftingIntoParkon page9-23.Ifyouarepullinga trailer,seeDrivingCharacteristics and TowingTipsonpage9-52.
Makesuretheshiftleverisfullyin P(Park)beforestartingtheengine. Thevehiclehasanautomatic transmissionshiftlockcontrol system.Youmustfullyapplythe regularbrakesfirstandthenpress theshiftleverbuttonbeforeyoucan shiftfromP(Park)whentheignition keyisinON/RUN.Ifyoucannot shiftoutofP(Park),easepressure ontheshiftleverandpushtheshift leverallthewayintoP(Park)as youmaintainbrakeapplication. Thenpresstheshiftleverbutton andmovetheshiftleverinto anothergear.See Shiftingoutof Parkonpage9-24.
Notice: ShiftingtoR(Reverse) while the vehicle is moving forward could damage the transmission. There pairs would not be recovered by the vehicle warranty. Shift to R(Reverse) only after the vehicle is stopped.
R(Reverse):Usethisgearto backup.
Atlowvehiclespeeds, R(Reverse) canbeusedtorockthevehicle backandforthtogetoutofsnow, ice,orsandwithoutdamagingthe transmission.Seelfthe VehicleIs Stuckonpage9-11foradditional information.
N(Neutral): In this position, the engined does not connect with the wheels. Torestart when the vehicle is already moving, use N(Neutral) only. You can also use N(Neutral) when the vehicle is being towed.
CAUTION
Shifting into a drive gear while the engine is running at high speed is dangerous. Unless your foot is firmly on the brake pedal, the vehicle could move very rapidly. You could close control and hit people or objects. Donot shift into a drive gear while the engine is running at high speed.
Notice: ShiftingoutofP(Park) or N(Neutral) with the engine running at high speed may damage the transmission. The repairs would not be covered by the vehicle warranty. Besure the engine is not running at high speed when shifting the vehicle.
D(Drive): This position is for normal driving. It provides the best fueleconomy. If you need more power for passing, and you are:
- Goinglessthan55km/h (35mph), pushtheaccelerator pedalabouthalfwaydown.
- Goingabout55km/h(35mph)or more,pushtheacceleratorall thewaydown.
Thetransmissionwillshiftdown toalowergearandhavemore power.
Downshiftingthetransmissionin slipperyroadconditionscouldresult inskidding;seeSkiddingunder LossofControlonpage9-6
Notice: Spinningthetires or holding the vehicle in one place on a hill using only the accelerator, along may damage the transmission. If you are stuck, don't spin the tires. When stopping on a hill, use the brakes to hold the vehicle in place.
ManualMode
DriverShiftControl(DSC)
Notice: If you drivethe vehicle at a high rpm without up shifting while using Driver Shift Control (DSC), you could damage the vehicle. Always up shift when necessary while using DSC.
DSCallowsyoutoshiftan automatictransmissionsimilar toamanualtransmission.Touse theDSCfeature:
-
Movetheshiftleverto theleftfromD(Drive)to M(ManualMode).
-
Presstheshiftleverforward(+) toupshiftorrearward(-) to downshift.
AnMwillbedisplayedin theDIC.

natural_image
Interior view of a car dashboard with steering wheel, dashboard controls, and air vent (no text or symbols visible)TousetheDSCfeaturewiththetap shiftcontrols(ifequipped):
-
Movetheshiftlevertotheleft from D(Drive) to M(ManualMode).
-
Thetapshiftcontrolsareonthe backofthesteeringwheel. Tap theleftcontrol(-)todownshift, andtherightcontrol(+)to upshift.

Thetachometerdisplayonthe instrumentpanelclusterwillshow whichgearthevehicleisin.The numberindicatestherequested gearrangewhenmovingtheshift leverforwardorrearward.See Tachometeronpage5-12formore information.
While using the DSC feature, the vehicle will have firmer, quicker shifting. You can us this for sport driving when climbing or descending hills, to stay in gear longer, ort downward form more powerorengine braking.
The transmission will only allow youtoshiftintogears appropriate for the vehicles speed and engine revolutions per minute (rpm). The transmission will not automatically shift to then next lower gear if the engineer misto high, norto the nexthighergear when the maximum engineer misreached.
Ifshiftingispreventedforany reason,thecurrentlyselectedgear willflashmultipletimes,indicating thatthetransmissionhasnotshifted gears.
While in the DSC mode, the transmission will automatically downshift when the vehicle comes to stop. This will allow more power during take-off.
When accelerating the vehicle from astopinsnowy and icy conditions, you may want to shift into second gear. Higher gear ratio allows you to gain more traction on slippery surfaces.
FuelEconomyMode
The vehicle may have a fuel economy. When engaged, fueleconomymode can improve the vehicle's fuel economy.

natural_image
Interior view of a car gear shift control panel with a hand cursor pointing to the mode (no text or symbols visible)Pressingtheecobuttonbytheshift leverwillengagefueleconomy mode.Whenactivated,theecolight intheinstrumentclusterwillcome on.SeeFuelEconomyLighton page5-27.Pressingthebuttona secondtimewillturnfueleconomy modeoff.
Whenfueleconomymodeison:
• Thetransmissionwillupshift sooner, anddownshiftlater.
- Thetorqueconverterwilllockup sooner, andstayonlonger.
• Thegaspedalwillbeless sensitive.
• Thevehicle'scomputerswill moreaggressivelyshutofffuel totheengineunderdeceleration.
- Theengineoperatesatlower rpm'sinfueleconomymode, whichcanincreasenoiseand vibration. Thisisnormal.
DriveSystems
All-WheelDrive
Vehicleswiththisfeaturealways sendenginepowertoallfour wheels.Itisfullyautomatic,and adjustsitselfasneededforroad conditions.
When using a compact spare tire on an AWD vehicle, the system automatically detects the compact spare and disables AWD. Torestore AWD operation and prevent excessive wear on the system, replace the compact spare with a full-sizetire as soon as possible. See Compact Spare Tire on page 10-92 form more information.
Brakes
AntilockBrake System(ABS)
ThisvehiclehastheAntilock BrakeSystem(ABS),anadvanced electronicbrakingsystemmathelps preventabrakingskid.
Whentheengineisstartedandthe vehiclebeginstodriveaway,ABS checksitself.Amomentarymotoror clickingnoisemightbeheardwhile thistestisgoingon,anditmight evenbenoticedthatthebrake pedalmovesalittle.Thisisnormal.

If there is a problem with ABS, this warning light stays on. See Antilock Brake System (ABS) Warning Light on page 5-23.
Ifdrivingsafelyonawetroad and itbecomesnecessarytoslamon thebrakesandcontinuebraking toavoidasuddenobstacle,a computersensesthatthewheels areslowingdown.Ifoneofthe wheelsisabouttostoprolling,the computerwillseparatelyworkthe brakesateachwheel.
ABScanchangethebrakepressure toeachwheel, asrequired, faster thananydrivercould. Thiscanhelp thedriversteeraroundtheobstacle whilebrakinghard.
Asthebrakesareapplied, the computerkeepsreceivingupdates onwheelspeedandcontrols brakingpressureaccordingly.
Remember:ABSdoesnotchange thetimeneededtogetafootupto thebrakepedaloralwaysdecrease stoppingdistance.Ifyougettoo closetothevehicleinfrontofyou, therewillnotbeenoughtimeto applythebrakesifthatvehicle suddenlyslowsorstops.Always leaveenoughroomupaheadto stop,evenwithABS.
UsingABS
Donotpumpthebrakes.Justhold thebrakepedaldownfirmlyandlet ABSwork.YoumightheartheABS pumpormotoroperatingandfeel thebrakepedalpulsate,butthisis normal.
BrakinginEmergencies
ABSallowsthedrivertosteerand brakeatthesametime.Inmany emergencies,steeringcanhelp morethaneventheverybest braking.
ParkingBrake
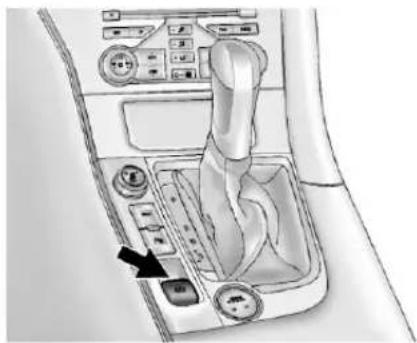
natural_image
Interior view of a car gear shift control panel with no visible text or symbolsThevehiclehasanElectricParking Brake(EPB).Theswitchforthe EPBisinthecenterconsole.The EPBcanalwaysbeactivated, eveniftheignitionisOFF.To avoiddrainingthebattery,donot operatetheEPBtoooftenwithout theenginerunning.
9-32DrivingandOperating
Thesystemhasaparkingbrake statuslightandaparkingbrake warninglight.SeeBrakeSystem WarningLightonpage5-22.There arealsothreeDriverInformation Center(DIC)messages.SeeDriver InformationCenter(DIC)on page5-29formoreinformation. Incaseofinsufficientelectrical power,theEPBcannotbeapplied orreleased.
Beforeleavingthevehicle, check theparkingbrakestatuslightto ensuretheparkingbrakeisapplied.
EPBApply
TheEPBcanbeappliedanytime thevehicleisstopped.TheEPBis appliedbymomentarilyliftingupon theEPBswitch.Oncefullyapplied, theparkingbrakestatuslightwillbe on.Whilethebrakeisbeingapplied, thestatuslightwillflashuntilfull applyisreached.Ifthelightdoes notcomeon,orremainsflashing,
youneedtohavethevehicle serviced.Donotdrivethevehicle iftheparkingbrakestatuslightis flashing.Seeyourdealer.See BrakeSystemWarningLighton page5-22formoreinformation.
IftheEPBisappliedwhilethe vehicleisinmotion,achimewill sound,andtheDICmessage RELEASEPARKINGBRAKE willbedisplayed.Thevehiclewill decelerateaslongastheswitchis heldintheupposition.Releasing theEPBswitchduringthe decelerationwillreleasetheparking brake.Iftheswitchisheldintheup positionuntilthevehiclecomestoa stop,theEPBwillremainapplied.
Iftheparkingbrakestatuslight flashescontinuously,theEPBis onlypartiallyappliedorreleased, orthereisaproblemwiththeEPB. TheDICmessageSERVICE PARKINGBRAKEwillbedisplayed.
If this light flashes continuously, releasethe EP Band attempt to apply it again. If this light continues to flash, donot driv the vehicle. Se your dealer.
Iftheparkingbrakewarninglightis on,theEPBhasdetectedanerror inanothersystemandisoperating withreducedfunctionality.Toapply theEPBwhenthislightison,liftup ontheEPBswitchandholditinthe upposition.Fullapplicationofthe parkingbrakebytheEPBsystem maytakealongerperiodoftime thannormalwhenthislightison. Continuetoholdtheswitchuntilthe parkingbrakestatuslightremains on.Iftheparkingbrakewarninglight ison,seeyourdealer.
If the EPB fail to apply, there are wheel should be blocked to prevent vehicle movement.
EPBRelease
ToreleasetheEPB, placethe ignitionintheON/RUNposition, applyandholdthebrakepedal, andpushdownmomentarily on theEPBswitch. If you attempt to releasetheEPBwithoutthebrake pedalapplied, achimewillsound, andtheDICmessageSTEPON BRAKETORELEASEPARK BRAKEwillbedisplayed. TheEPB isreleasedwhentheparkingbrake statuslightisoff.
Iftheparkingbrakewarninglightis on,theEPBhasdetectedanerror inanothersystemandisoperating withreducedfunctionality.To releasetheEPBwhenthislightis on,pushdownontheEPBswitch andholditinthedownposition. EPBreleasemaytakealonger periodoftimethannormalwhen thislightison.Continuetoholdthe switchuntiltheparkingbrakestatus lightisoff.Ifthelightison,seeyour dealer.
Notice: Driving with the parking brake on can overheat the brake system and cause premature wear ordamagetobrakesystem parts. Makes sure that the parking brake is fully released and the brakewarning light is off before driving.
AutomaticEPBRelease
TheEPBwillautomaticallyreleaseif thevehicleisrunning,placedinto gear,andanattemptismadeto driveaway.Avoidrapidacceleration whentheEPBisapplied,to preserveparkingbrakelininglife.
If you are towing a trailer and parking on a hill, see Driving Characteristics and Towing Tips on page 9-52 form more information.
BrakeAssist
This vehicle has a brake assist feature designed to assist the driver instopping or decreasing vehicle speed in emergency driving conditions. This feature uses the stability system hydraulic brake control module to supplement the power brakes system under conditions where the driver has quickly and forcefully applied the brake pedal in an attempt to quickly stoporslow down the vehicle. The stability system hydraulic brake control module increases brake pressure at each corner of the vehicle until the ABS activates. Minor brake pedal pulsation or pedal movement during this time is normal and the drivers should continueto apply the brake pedal asthedriving situation dictates. The brake assist feature will automatically disengag when the brake pedal is released or brake pedal pressure is quickly decreased.
HillStartAssist(HSA)
ThisvehiclehasaHillStartAssist (HSA)feature, which maybe useful when the vehicle is stopped on a grade. This feature is designed to prevent the vehicle from rolling, either forward or rearward, during vehicle drive off. After the driver completely stops and holds the vehicle in a complete stand still on a grade, HSA will be automatically activated. During the transition period between when the driver releases the brake pedal and starts to accelerate the drive off on a grade, HSA hold the braking pressure to ensure that there is nor rolling. The brakes will automatically release when the accelerator pedal is applied within the two-second window. It will not activate if the vehicle is in a drive gear and facing downhill if the vehicle is facing uphill and in R (Reverse).
RideControlSystems
TractionControl System(TCS)
The vehicle may have a Traction Control System (TCS) that limits wheelspin. On a front-wheel-drive vehicle, the system operates if its sense that one or both of the front wheels are spinning or beginning to lose traction. On all-Wheel-Drive (AWD) vehicle, the system will operate if its sense that any of the wheels are spinning or beginning to lose traction. Whenthish happens, the system brake the spinning wheel(s) and/or reduces engine power limit wheelspin.
Thesystemmaybeheardorfelt whileitisworking,butthisis normal.
TCSautomaticallycomeson wheneverthevehicleisstarted. Tolimitwheelspin,especiallyin slipperyroadconditions,thesystem shouldalwaysbelefton.But,TCS canbeturnedoffifneeded.
TCS/ESPLight
flashestoindicate that the traction control system is active.
If thereisaproblemdetected with TCS, SERVICETRACTION CONTROL is displayed on the Driver Information Center (DIC). See Ride Control System Messages on page 5-39. Whenthismessage is displayed and comes on and stay on, the vehicle is safet drive but the system is not operational. Drivings should be adjusted accordingly.
If comesonandstayson,reset thesystemby:
- Stoppingthevehicle.
- Turning the engine off and waiting 15 seconds.
3.Startingtheengine.
If 📄stillcomesonandstayson,the vehicleneedsservice.
Notice: Donotrepeatedlybrake oraccelerateheavilywhenTCSis off. The vehicle's driveline could be damaged.

natural_image
Interior view of a car gear shift control panel with no visible text or symbolsTCS/ESPButton
TCScanbeturnedonandoff bypassingandreleasingthe TCS/ESPbutton.

TCSOffLight
When TCSisturnedoff, comes on and the system will not limit wheelspin. Drivingshouldbe
adjustedaccordingly.Pressand releasetheTCS/ESPbuttonagain toturnthesystembackon.
When TCSisturnedoffonAWD vehicles, thesystemmaystillmake noise. This is normal and necessary with AWD hardware.
Itmaybenecessarytoturnthe systemoffifthevehiclegetsstuck insand,mudorsnowandrocking thevehicleisrequired.Seelfthe VehicleIsStuckonpage9-11for moreinformation.SeealsoWinter Drivingonpage9-9forinformation onusingTCSwhendrivinginsnowy oricyconditions.
Addingaccessoriescanaffectthe vehicleperformance.See AccessoriesandModificationson page10-3formoreinformation.
ElectronicStability Program(ESP)
The vehicle may have a vehicle stability enhancement system called Electronic Stability Program (ESP). It is an advanced computer-controlled system that assists with directional control of the vehicle in difficult driving conditions.
ESPactivateswhenthecomputer sensesadifferencebetweenthe intendedpathandthedirectionthe vehicleisactuallytraveling.ESP selectivelyappliesbrakingpressure atanyoneofthevehiclebrakesto helpsteerthevehicleinthe intendeddirection.
ESPcomesonautomatically wheneverthevehicleisstarted. Toassistwithdirectionalcontrol of thevehicle,thesystemshould alwaysbelefton.

TCS/ESPLight
WhentheESPsystem activates, flashesonthe instrumentpanel. This also occurs when traction control is activated. Anoisem maybe heardor vibration may be felt in the brake pedal. This is normal. Continuet osteer the vehicle in the intended direction.
Ifthereisaproblemdetectedwith ESP,SERVICEESPisdisplayedon theDriverInformationCenter(DIC). SeeRideControlSystemMessages onpage5-39.Whenthismessage isdisplayedand comesonand stayson,thevehicleissafetodrive butthesystemisnotoperational. Drivingshouldbeadjusted accordingly.
If ≈ comesonandstayson,reset thesystemby:
-
Stoppingthevehicle.
-
Turning the engine off and waiting 15 seconds.
3.Startingtheengine.
If 📋stillcomesonandstayson, thevehicleneedsservice.
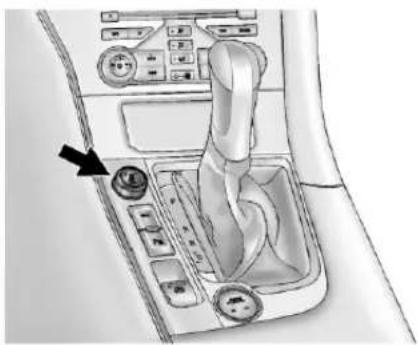
natural_image
Interior view of a car dashboard with control panel and gear shift (no text or symbols visible)TCS/ESPButton
ESPcanbeturnedonandoffby pressingandholdingtheTCS/ESP button.

OFF

ESPOffLightTCSOffLight
WhenESPisturnedoff, &and comeontheinstrumentpanel. Thesystemwillnotassistwith
directional control of the vehicle or limit wheel spin. Drivings should be adjusted accordingly.
Ifcruisecontrolisbeingusedwhen ESPactivates,cruisecontrolwill automaticallydisengage.Pressthe cruisecontrolbuttontoreengage whenroadconditionsallow.See CruiseControlonpage9-39for moreinformation.
Limited-SlipRearAxle
Vehicleswithalimited-sliprearaxle cangivemoretractiononsnow, mud,ice,sand,ogravel.When tractionislow,thisfeatureallows thedrivewheelwiththemost tractiontomovethevehicle.The limited-sliprearaxlealsogivesthe driverenhancedcontrolwhen corneringhardorcompletinga maneuver,suchasalanechange.
SelectiveRideControl TCS/ESPButton
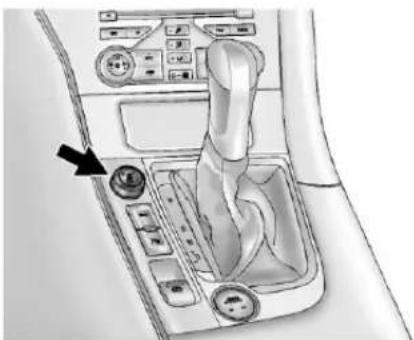
natural_image
Interior view of a car gear shift control panel with no visible text or symbols2.8LV6Engine
The vehicle may have a ride control system called Selective Ride Control. Thesuspension setting can be changed at any time by turning the TCS/ESP button to S(Sport) or C(Comfort). Turning the TCS/ESP button to the S(Sport) position will provide as if ter and firmersuspension. Turning the TCS/ESP button to the C(Comfort)
9-38DrivingandOperating
positionwillprovideasmoother suspension.Changeswilloccurin thetransmissionpatterns,steering, andsuspension.
3.0LV6Engine
The vehicle may have a ride control system called Selective Ride Control. Thesuspension setting can be changed at any time by turning the TCS/ESP button to S(Sport) or C(Comfort). Turning the TCS/ESP button to the S(Sport) position will provide as porty shift pattern in the transmission but will not affect the suspension. Turning the TCS/ESP button to the C(Comfort) position will provide anormalsuspension. Changes will occur only in the transmission shift patterns and not insteeringorsuspension.
TheS(Sport)andC(Comfort) modescanbechangeindependent oftheshiftleverposition.
WhenintheSportMode,thevehicle willstillshiftautomatically.The transmissionmayremaininagear longerthanitwouldinthenormal drivingmodebasedonbraking, throttleinput,andvehicelateral acceleration.SPORTMODEONwill bedisplayedintheDIC.SeeRide ControlSystemMessageson page 5-39. The word "Sport" will displaybelowtheodometer.The gearpositionwillalsobeindicated inthetachometer.
WithinSportModethereisafurther performancefeaturecalled PerformanceModeLiftFoot(PMLF) Mode. Thefeatureisactivated automaticallywhensportsoriented drivingisdetected, basedon corneringandon/offthrottle application.PMLFallowsthe transmissiontoholdthecurrent gearinsteadofupshiftingwhenthe throttleislifted.
If the shift lever is moved to the left from the Drive position, the vehicle will enter the Manual Mode. See Manual Mode on page 9-28 under "Automatic Transmission" form more information.
If there is a problem detected with Selective Ride Control, SERVICE SUSPENSION SYSTEM displays on the DIC. See Ride Control System Messages on page 5-39. Drivings should be adjusted accordingly.
CruiseControl
Withcruisecontrol, the vehicle can maintain as speed of about 40 km/h (25 mph) or more without keeping your foot on the accelerator. Cruise control does not work at speeds below 40 km/h (25 mph).
If the brakes are applied, the cruise control is turned off.
If the vehicle has an Electronic Stability Program (ESP) or Traction Control System (TCS) and begins to limit wheel-spin while using cruise control, the cruise control automatically disengages. See Electronic Stability Program (ESP) on page 9-36 or Traction Control System (TCS) on page 9-34. When road conditions allow you to use it again, the cruise control can be turned back on.
WARNING
Cruisecontrolcanbedangerous whereyoucannotdrivesafelyat asteadyspeed.So,donotuse thecruisecontrolonwinding roadsorinheavytraffic.
Cruisecontrolcanbedangerous onslipperyroads. Onsuchroads, fastchangesintiretraction can cause excessivewheel slip, and you could lose control. Donotuse cruise control onslipperyroads.

Thecruisecontrolbuttonsareon thesteeringwheel.
On/Off): Presstoturnthe cruisecontrolsystemonandoff.
(Cancel): Presstodisengage cruisecontrolwithouterasingthe setspeedfrommemory.
RES/+(Resume/Accelerate): Movethethumbwheeluptomake thevehicleresumetoapreviously setspeedortoaccelerate.
SET/-(Set/Coast):Movethe thumbwheeldowntosetaspeed andactivatecruisecontrol,orto makethevehicledecelerate.
SettingCruiseControl
If the cruise button is on when not in use, it could get bumped and go into cruise when not desired. Keep the cruise button turned off when cruise control is not being used.
Tosetaspeed:
- Press ☑toturnthecruise controlsystemon.
- Gettothespeeddesired.
- Movethethumbwheeldown towardSET/-andreleaseit. Thedesiredsetspeedbriefly appearsintheinstrumentpanel cluster.
- Take your foot off the accelerator pedal.
ResumingaSetSpeed
If the cruise control lissetata desired speed and then the brakes are applied orth e cancel button is pressed, the cruise control is disengaged without erasing the set speed from memory.
Oncethevehiclereachesabout 40km/h(25mph)ormore,move thethumbwheeluptowardRES/+ briefly. Thevehiclereturnstothe speedselectedpreviouslyandstays there.
IncreasingSpeedWhileUsing CruiseControl
If the cruise control system is already activated:
- Movethenthumbwheeluptoward RES/+andholdituntilthe vehicleacceleratestothe desiredspeed,andthen releaseit.
- Toincreasethespeedinsmall amounts, movethethumbwheel uptowardRES/+briefly and thenreleaseit. Each timethesis done, the vehiclegoes about 1.6km/h (1mph) faster.
ReducingSpeedWhileUsing CruiseControl
If the cruise control system is already activated:
- Movethethumbwheeldown towardSET/-andholduntilthe desiredlowerspeedisreached, thenreleaseit.
- Toslowdowninsmallamounts, movethethumbwheeldown towardSET/-brieflyandthen releaseit. Eachtimethisis done, the vehiclegoes about 1.6km/h(1mph)slower.
PassingAnotherVehicleWhile UsingCruiseControl
Use the accelerator pedal to increasethe vehicle's speed. When you take your foot off the pedal, the vehicle will slow down to the previous set cruises speed.
UsingCruiseControlonHills
Howwellthecruisecontrolworks onhillsdependsuponthevehicle speed,load,andthesteepness of thehills.Whengingupsteephills, youmighthavetosteponthe acceleratorpedaltomaintain thevehiclespeed.Whenging downhill,youmighthavetobrakeor shifttoalowergeartomaintainthe vehicle'sspeed.Whenthebrakes areappliedthecruisecontrolis disengaged.
EndingCruiseControl
Therearethreewaystoendcruise control:
- Todisengagethecruisecontrol, steplightlyonthebrakepedal. Theindicatorlightwillgooff.
- Press
- Press ☉toturnthecruise controlsystemoffcompletely. Thecruisecontrolcannot be resumed.
ErasingSpeedMemory
Thecruisecontrolsetspeedis erasedfrommemoryif dispressed orifthevehicleisturnedoff.
ObjectDetection Systems
UltrasonicParkingAssist
ForvehicleswiththeUltrasonic FrontandRearParkingAssist (UFRPA)system,itassiststhe driverwithparkingandavoiding objects.UFRPAoperatesat speedslessthan8km/h(5mph). Thesensorsonthefrontand rearbumperdetectobjectsupto 1.2m(4ft)infrontofthevehicle, 2.5m(8ft)behindthevehicle,and atleast25.4cm(10in)offthe ground.

WARNING
The Ultrasonic Front and Rear Parking Assist (UFRPA) system does not replaced rivervision. It cannot detect:
- Objectsthatarebelowthe bumper,underneaththe vehicle,oriftheyaretoo closeorfarfromthevehicle.
• Children, pedestrians, bicyclists, orpets.
If you donot use proper care before moving forward and while backing; vehicle damage, injury, or death could occur. Even with UFRPA, always check in front of the vehicle before moving forward and behind the vehicle before backing up. While moving forward and backing, besure to look for objects and check the vehicle mirrors.
HowtheSystemWorks
Whenthevehicleisshiftedinto R(Reverse),thefrontandrear sensorsautomaticallyturnon. Afterthevehicleisshiftedoutof R(Reverse),therearsensorsturn offandthefrontsensorsstayon untilthevehicleisaboveacertain speed. Thefrontsensorsmayalso be turnedonbypassingthepark assistbuttonlocatednexttothe shiftleverwithoutshiftinginto R(Reverse)whilethevehicleis travelingatalowspeed.See "TurningtheSystemOnandOff" laterinthissection.
WhenthevehicleisinN(Neutral), thesystemmaybeactive. Ifthe vehicleisinacarwash, thesensors may detect objects in the carwash. See "Turning the System On and Off" later in this section to turn the system off.
High-tonedbeepsheardfromthe frontspeakersareforobjects detectednearthefrontbumper.
Low-tonedbeepsheardfromthe rearspeakersareforobjects detectedneartherearbumper.
Whenanobjectisdetected, high-or low-tonedbeepsareheard. Asthe vehiclegetsclosertoanobject, the timebetweenthebeepsbecomes shorter. Whenthedistanceisless than30cm(11.8in), beepingis continuous. Thedistancemaybe lessduringwarmerorhumid weather.
PARKASSISTOFFdisplaysonthe DriverInformationCenter(DIC)to indicate that UFRPAisoff. The messagedisappearsafterashort periodoftime.
TurningtheSystemOnandOff
TheUFRPAsystemcanbe turned on and off bypassing the park assist button located next to the shiftlever.
TheLEDnexttotheparkassist buttonlightsupwhenthesystemis onandturnsoffwhenithasbeen disabled.
WhentheSystemDoesNot SeemtoWorkProperly
UFRPAdefaultstotheonsetting eachtimethevehicleisstarted;if UFRPAdoesnotturnonandthe lightontheparkassistbuttonisoff, thesystemmaynotbeworking properly.Oneofthefollowing messagesmayappearontheDIC.
SERVICEPARKASSIST: If this message occurs, takethe vehicle to your dealer to repairs the system.
PARKASSISTOFF: Thismessage canoccurunderthefollowing conditions:
• Thedriverhasdisabledthe system.
- Theultrasonicsensorsarenot clean.Keepthevehicle's bumpersfreeofmud,dirt,snow, ice,andslush.Forcleaning instructions,seeExteriorCare onpage10-101.
- Atrailerwasattachedtothe vehicle,oranobjectwas hangingoutoftheliftgateduring thelastdrivecycle.Oncethe attachedobjectisremoved, UFRPAwillreturntonormal operation.
• Anobjectisattachedtothefront ofthevehicle.
- Atowbarisattachedtothe vehicle.
• Thevehicle'sbumperis damaged. Takethevehicleto yourdealertorepairthesystem.
- Otherconditionsmayaffect systemperformance,suchas vibrationsfromajackhammeror thecompressionofairbrakeson averylargetruck.
If the system is still disabled, after driving forward at least 25 km/h (15 mph), take the vehicle to your dealer.
RearVision Camera(RVC)
The vehicle may have a Rear Vision Camera (RVC) system. Read this entire section before using it.
TheRVCsystemcanassistthe driverwhenbackingupby displayingaviewoftheareabehind thevehicle.

WARNING
TheRearVisionCamera(RVC) systemdoesnotreplacedriver vision.RVCdoesnot:
- Detectobjectsthatare outsidethecamera'sfieldof view, belowthebumper, orunderneaththevehicle.
- Detectchildren, pedestrians, bicyclists, orpets.
Donotbackthevehiclebyonly lookingattheRVCscreen,oruse thescreenduringlonger,higher speedbackingmaneuversor wheretherecouldbecross-traffic. Yourjudgeddistancesusingthe screenwilldifferfromactual distances.
If you donot use proper care before backing up, you could hit a vehicle, child, pedestrian, bicyclist, or pet, resulting in vehicle damage, injury, or death.
(Continued)
WARNING(Continued)
Eventhoughthevehiclehas the RVCsystem,alwayscheck carefullybeforebackingupby checkingbehindandaroundthe vehicle.
VehiclesWithoutaNavigation System
Whenthevehicleisonandthe drivershiftsintoR(Reverse),the videoimageautomaticallyappears ontheinsiderearviewmirror.Once thedrivershiftsoutofR(Reverse), thevideoimageautomatically disappearsfromtheinsiderearview mirror.
TurningtheRearVisionCamera SystemOfferOn
ToturnofftheRVCsystem,press andhold ⏻,locatedontheinside rearviewmirror,untiltheleft indicatorlightturnsoff.TheRVC displayisnowdisabled.
ToturntheRVCsystemonagain, pressandhold ⏻ until the left indicator light illuminates. The RVC system display is now enabled and the display will appear in the mirror normally.
VehiclesWithaNavigation System
Animageappearsonthenavigation screenwiththemessage"Check SurroundingsforSafety"whenthe vehicleisshiftedintoR(Reverse). Thenavigationscreengoestothe previoussscreenafterapproximately 10secondsoncethevehicleis shiftedoutofR(Reverse).
Tocancelthedelay,dooneofthe following:
- Pressahardkeyonthe navigationsystem.
- ShiftintoP(Park).
- Reachavehiclespeedof 8km/h(5mph).
TurningtheRearVisionCamera SystemOnorOff
Toturntherearvisioncamera systemonoroff:
- ShiftintoP(Park).
- PresstheCONFIGbutton.
- SelectDisplay.

- SelectCamera.Whena checkmarkappearsnexttothe Cameraoption,theRVCsystem ison.
Symbols
Thenavigationsystemmayhavea featurethatletsthedriverview symbolsonthenavigationscreen whileusingtherearvisioncamera. The UltrasonicFrontandRear ParkingAssist(UFRPA)system mustnotdisabledtousethe cautionsymbols.Theerrormessage "RearParkingAssistSymbols Unavailable"maydisplayifUFRPA hasbeendisabledandthesymbols havebeenturnedon.See UltrasonicParkingAssiston page9-41.
Thesymbolsappearandmaycover anobjectwhenviewingthe navigationscreenwhenanobjectis detectedbytheUFRPAsystem.
Toturnthesymbolsonoroff:
- ShiftintoP(Park).
2.PresstheCONFIGbutton. - SelectDisplay.
- SelectSymbols. When a checkmarkappearsnexttothe Symbolsoption, symbolswill appear.
Guidelines
TheRVCsystemhasaguideline overlaythatcanhelpthedriveralign thevehiclewhenbackingintoa parkingspot.
Toturntheguidelinesonoroff:
- ShiftintoP(Park).
2.PresstheCONFIGbutton. - SelectDisplay.
- SelectGuidelines. When a checkmarkappearsnexttothe Guidelinesoption, guidelineswill appear.
RearVisionCameraError Messages
SERVICEREARVISIONCAMERA SYSTEM: Thismessagecan displaywhenthesystemisnot receivinginformationitrequiresfrom othervehiclesystems.
Ifanyotherproblemocursorifa problempersists,seeyourdealer.
RearVisionCameraLocation

Thecameraislocatedabovethe licenseplate.
Theareadisplayedbythecamerais limited.
Itdoesnotdisplayobjectsthatare closetoeithercornerorunderthe bumperandcanvarydependingon vehicleorientationorroad conditions. Thedistanceofthe imagethatappearsonthescreenis differentfromtheactualdistance.
The following illustrations show the field of view that the camera provides.
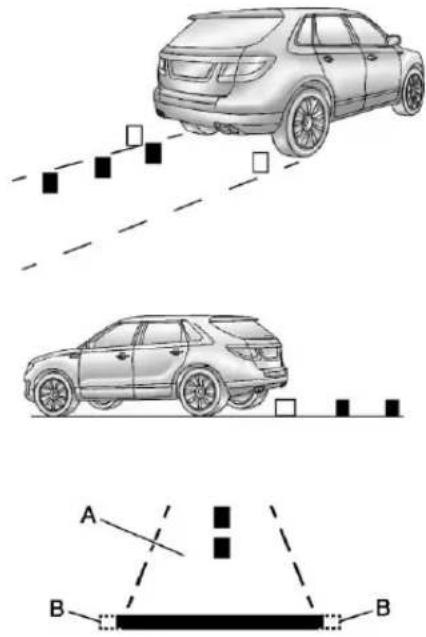
A.Viewdisplayedbythecamera. B.Corneroftherearbumper.
WhentheSystemDoesNot SeemtoWorkProperly
Therearvisioncamerasystemmay notworkproperlyordisplayaclear imageif:
- TheRVCisturnedoff.See "TurningtheRearVisionCamera SystemOnorOff"earlierinthis section.
- Itisdark.
- Thesunorthebeamof headlampsisshiningdirectly intothecameralens.
- Ice, snow, mud, or anything else builds upon the cameralens. Cleanthelens, rinseit with water, and wipe it with asoft cloth.
- Thebackofthevehicleisinan accident. Theposition and mountingangleofthecamera canchangeorthecameracan beaffected. Besuretohavethe cameraanditspositionand mountinganglecheckedatyour dealer.
Fuel
Useoftherecommendedfuelisan importantpartoftheproper maintenanceofthisvehicle.Tohelp keeptheenginecleanandmaintain optimumvehicleperformance,we recommendtheuseofgasoline advertisedasTOPTIERDetergent Gasoline.
LookfortheTOPTIERlabelonthe fuelpumptoensuregasolinemeets enhanceddetergencystandards developedbyautocompanies.Alist ofmarketersprovidingTOPTIER DetergentGasolinecanbefoundat www.toptiergas.com.

Ifthevehiclehasthe3.0LV6engine (VINCodeY),useregularunleaded gasolinewithapostedoctanerating of87orhigher.Iftheoctanerating islessthan87,anaudibleknocking noise,commonlyreferredtoas sparkknock,mightbeheardwhen driving.Ifthisoccurs,usea gasolineratedat87octaneor higherassoonaspossible.Ifheavy knockingisheardwhenusing gasolineratedat87octaneor higher,theengineneedsservice.
Ifthevehiclehasthe2.8LV6engine (VINCode6),usepremium unleadedgasolinewithaposted octaneratingof91orhigher.For bestperformance,usepremium unleadedgasolinewithaposted octaneratingof93.Inan emergency,youcanuserregular unleadedgasolinewithanoctane ratingof87orhigher.If87octane fuelisused,donotperformany aggressivedrivingmaneuverssuch aswideopenthrottleapplications.
Youmightalsohearaudiblespark knockduringacceleration. Refillthe tankwithpremiumfuelassoonas possibletoavoiddamagingthe engine. If heavyknockingisheard when using gasolinerated at 91 octaneorhigher, the engine needsservice.
GasolineSpecifications (U.S.andCanadaOnly)
Ataminimum, gasolines should meet ASTM specification D4814 in the United States or CAN/CGSB-3.5 or 3.511 in Canada. Some gasolines contain an octane-enhancing additive called methylcyclopentadienylmanganese tricarbonyl (MMT). Were recommend against the use of gasolines containing MMT. See Fuel Additives on page 9-49 for additional information.
CaliforniaFuel Requirements
Ifthevehicleiscertifiedtomeet CaliforniaEmissionsStandards,itis designedtooperateonfuelsthat meetCaliforniaspecifications.See theunderhoodemissioncontrol label.Ifthisfuelisnotavailablein statesadoptingCaliforniaEmissions Standards,thevehiclewilloperate satisfactorilyonfuelsmeeting federalspecifications,butemission controlsystemperformancemight beaffected.Themalfunction indicatorlampcouldturnonandthe vehiclemightfailasmog-checktest. SeeMalfunctionIndicatorLampon page5-18.Ifthisoccurs,returnto yourauthorizeddealerfordiagnosis. Ifitisdeterminedthatthecondition iscausedbythetypeoffuelused, repairsmightnotbecoveredbythe vehiclewarranty.
FuelsinForeign Countries
Neveruseleadedgasolineorany otherfuelnotrecommendedinthe previousstextonfuel.Costlyrepairs causedbyuseofimproperfuel wouldnotbecoveredbythevehicle warranty.
Tocheckthefuelavailability, askan autoclub, or contact a major oil company that does business in the country where you will be driving.
FuelAdditives
Toprovidecleanerair, allgasolines intheUnitedStatesarenow requiredtocontainadditivesthat helppreventengineandfuelsystem depositsfromforming, allowingthe emissioncontrolsystemtowork properly. Inmostcases, nothing shouldhavetobeaddedtothefuel. However, somegasolinescontain onlytheminimumamountof additiverequiredtomeetU.S. EnvironmentalProtectionAgency
regulations.Tohelpkeepfuel injectorsandintakevalvesclean andavoidproblemsduetodirty injectorsorvalves,lookforgasoline thatisadvertisedasTOPTIER DetergentGasoline.Lookforthe TOPTIERlabelonthefuelpumpto ensuregasolinemeetsenhanced detergencystandardsdevelopedby theautocompanies.Alistof marketersprovidingTOPTIER DetergentGasolinecanbefoundat www.toptiergas.com.
Gasolinescontainingoxygenates, suchasethersandethanol,and reformulatedgasolinesmightbe availableinyourarea.We recommendthatyouusethese gasolines,iftheycomplywiththe specificationsdescribedearlier. However,E85(85%ethanol)and otherfuelscontainingmorethan 10%ethanolmustnotbeusedin vehiclesthatwerenotdesignedfor thosefuels.
Notice: This vehicle was not designed for fuel that contains methanol. Donotuse fuel containing methanol. It can corrodemetal parts in the fuel system and also damage plastic and rubber parts. That damage would not be covered under the vehicle warranty.
Somegasolinesthatare notreformulatedforlow emissionscancontainan octane-enhancingadditivecalled methylcyclopentadienylmanganese tricarbonyl(MMT);asktheattendant whereyoubuygasolinewhetherthe fuelcontainsMMT.Werecommend againsttheuseofsuchgasolines. FuelscontainingMMTcanreduce sparkpluglifeandaffectemission controlsystemperformance.The malfunctionindicatorlampmight turnon.Ifthisoccurs,returntoyour dealerforservice.
FillingtheTank

WARNING
Fuelvaporburnsviolentlyanda fuelfirecancausebadinjuries. Tohelpavoidinjuriestoyouand others,readandfollowallthe instructionsonthefuelpump island.Turnofftheenginewhen refueling.Donotsmokenearfuel orwhenrefuelingthevehicle.Do notusecellularphones.Keep sparks,flames,andsmoking materialsawayfromfuel.Donot leavethefuelpumpunattended whenrefuelingthevehicle.Thisis againstthelawinsomeplaces. Donotre-enterthevehiclewhile pumpingfuel.Keepchildrenaway fromthefuelpump;neverlet childrenpumpfuel.
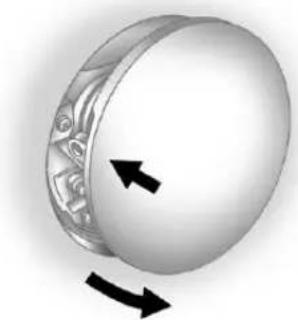
natural_image
Close-up of a metallic circular object with decorative patterns and two black arrows indicating rotation or movement (no text or symbols)Thetetheredfuelcapislocated behindahingedfueldooronthe passengersideofthevehicle.
Toopenthefueldoor, pushthe rearwardcenteredgeinandrelease anditwillopen.
Toremovethefuelcap, turnit slowlycounterclockwise.
Whilerefueling,hangthetethered fuelcapfromthehookonthe fueldoor.
Whenreinstallingthecap, turnitclockwiseuntilitclicks once, otherwisethemalfunction
indicatorlampcouldturnon.See MalfunctionIndicatorLampon page5-18.

WARNING
Fuelcansprayoutonyouifyou openthefuelcaptooquickly. Ifyouspillfuelandthen somethingignitesit,youcouldbe badlyburned.Thisspraycan happenifthetankisnearlyfull, andismorelikelyinhotweather. Openthefuelcapslowlyandwait foranyhissnoisetostop.Then unscrewthecapalltheway.
Becarefulnottospillfuel.Donot topofforoverfillthetankandwaita fewsecondsafteryouhavefinished pumpingbeforeremovingthe nozzle.Cleanfuelfrompainted surfacesassoonaspossible.See ExteriorCareonpage 10-101.
When replacing the fuel cap, turn it clockwise until click once. Make sure the cap is fully installed. The
diagnosticsystemcandetermineif thefuelcaphasbeenleftoffor improperlyinstalled. Thiswould allowfueltoevaporateintothe atmosphere.SeeMalfunction IndicatorLamponpage5-18.

WARNING
Ifafirestartswhileyouare refueling, donotremovethe nozzle. Shutofftheflowoffuelby shuttingoffthepumporby notifyingthestationattendant. Leavetheareaimmediately.
Notice: Ifanewfuelcapis needed, besuretogetheright typeofcapfromyourdealer. The wrongtypeoffuelcapmightnot fitproperly, mightcausethe malfunctionindicatorlampto light, and coulddamagethefuel tankandemissionssystem. See MalfunctionIndicatorLampon page5-18.
FillingaPortableFuel Container

WARNING
Neverfillaportablefuelcontainer whileitisinthevehicle.Static electricitydischargefromthe containercanignitethefuel vapor.Youcanbebadlyburned andthevehicledamagedifthis occurs.Tohelpavoidinjurytoyou andothers:
- Dispensefuelonlyinto approvedcontainers.
- Donotfillacontainerwhileit isinsideavehicle,ina vehicle'strunk,pickupbed, oronanysurfaceotherthan theground.
(Continued)
WARNING(Continued)
- Bringthefillnozzleincontact withtheinsideofthefill openingbeforeoperatingthe nozzle.Contactshouldbe maintaineduntilthefillingis complete.
- Donotsmokewhile pumpingfuel.
- Donotuseacellularphone whilepumpingfuel.
Towing
GeneralTowing Information
Onlyusetowingequipmentthathas beendesignedforthevehicle.
Contactyourdealerortrailering dealerforassistancewithpreparing thevehiclefortowingatraler.
Seethefollowingtrailertowing informationinthissection:
- Forinformationondrivingwhile towingatrailer,see"Driving Characteristicsand TowingTips."
- Formaximumvehicleandtrailer weights,see"TrailerTowing."
- Forinformationonequipmentto towatrailer,see“Towing Equipment.”
Forinformationontowingadisabled vehicle,see Towingthe Vehicleon page 10-97.Forinformationon towingthevehiclebehindanother vehiclesuchasamotorhome,see RecreationalVehicle Towingon page 10-97.
DrivingCharacteristics and TowingTips

WARNING
Thedrivercanlosecontrolwhen pullingatrailerifthecorrect equipmentisnotusedorthe vehicleisnotdrivenproperly. Forexample,ifthetraileristoo heavy,thebrakesmaynotwork well—orevenatall.Thedriver andpassengerscouldbe seriouslyinjured.Thevehiclemay alsobedamaged;theresulting repairswouldnotbecoveredby thevehiclewarranty.Pullatrailer onlyifallthestepsinthissection havebeenfollowed.Askyour dealerforadviceandinformation abouttowingatrailerwiththe vehicle.
The vehicle cantowatailer when equipped with the proper trailer towing equipment. Fortrailing capacity, see Trailer Towing on page 9-56. Trailering changes handling, acceleration, braking, durability and fuele economy. With the added weight, the engine, transmission, wheel assemblies and tires are forced to work harder and under greater loads. The trailer also addswind resistance, increasing the pulling requirements. Forsafe trailering, correctly set the proper trailering equipment.
The following information has important trailering tips and rules for your safety and that of your passengers. Read this section carefully before pulling at a trailer.
PullingaTrailer
Herearesomeimportantpoints:
- Therearemanylaws, including speedlimitrestrictionsthatapply totrailering. Checkforlegal requirements.
- Donottowatraileratallduring thefirst1600km(1,000mi) thenewvehicleisdriven. Theengine,axleorotherparts couldbedamaged.
-
Duringthefirst800km(500mi) thatatraileristowed, donot driveover80km/h(50mph) and donotmakestartsatfullthrottle. This reduces wearonthe vehicle.
-
ThevehiclecantowinD(Drive). Usealowergearifthe transmissionshiftstoooften.
- DonotusetheFuelSaverMode whentowing.
- Obeyspeedlimitrestrictions. Donotdrivefasterthanthe maximumpostedspeedfor trailers,ornomorethan90km/h (55mph),toreducewearonthe vehicle.
DrivingwithaTrailer
Towingatrailerrequiressexperience. Getfamiliarwithhandlingand brakingwiththeaddedtrailer weight. Thevehicleisnowlonger andnotasresponsiveasthe vehicleisbyitself.
Checkalltrailerhitchpartsand attachments,safetychains, electricalconnectors,lamps,tires andmirroradjustments.Ifthetrailer haselectricbrakes,startthevehicle andtrailermovingandthenapply thetrailerbrakecontrollerbyhand tobesurethebrakesareworking.
Duringthetrip, checkregularlytobe surethattheloadissecure, and the lampsandtrailerbrakesareworking properly.
TowingwithaStabilityControl System
Whentowing,thesoundofthe stabilitycontrolsystemmightbe heard. Thesystemisreactingtothe vehiclemovementcausedbythe trailer,whichmainlyoccursduring cornering. Thisisnormalwhen towingheaviertrailers.
FollowingDistance
Stayatleasttwiceasfarbehindthe vehicleaheadasyouwouldwhen drivingthevehiclewithoutatrailer. Thiscanhelptoavoidsituations thatrequireheavybrakingand suddenturns.
Passing
Morepassingdistanceisneeded whentowingatrailer.Because the rigislonger,itisnecessarytogo fartherbeyondthepassedvehicle beforereturningtothelane.
BackingUp
Holdthebottomofthesteering wheelwithonehand.Tomovethe trailertotheleft,movethathandto theleft.Tomovethetrailertotheright,moveyourhandtotheright. Alwaysbackupslowlyand, ifpossible,havesomeone guideyou.
MakingTurns
Notice: Making very sharp turns while trailering could cause the trailertocome in contact with the vehicle. The vehicle could be damaged. Avoid making very sharp turns while trailering.
Whenturningwithatrailer,make widerturnsthannormalsothe trailerwillnotstrikesoftshoulders, curbs,roadsigns,treesorother objects.Usetheturnsignalwellin advanceandavoidjerkyorsudden maneuvers.
TurnSignalswhenTowinga Trailer
The turnsignal indicators on the instrument panelflash whenever signaling aturnorlane change. Properly hooked up, the trailer lamps also flash, telling other driver the vehicle is turning, changing lanes or stopping.
Whentowingatraler, thearrowson theinstrumentpanelflashforturns evenifthebulbsonthetrailerare burnedout. Checkoccasionally to besurethetrailerbulbsarestill working.
DrivingonGrades
Reducespeedandshifttoa lowergearbeforestartingdowna longorsteepdowngrade.Ifthe transmissionisnotshifteddown, thebrakesmighthavetobeused somuchthattheywouldgethotand nolongerworkwell.
The vehicle cantowin D(Drive). Use alower gear if the transmission shift too often.
Whentowingathighaltitudeon steepuphillgrades,enginecoolant boilsatalowertemperaturethanat normalaltitudes.Iftheengineis turnedoffimmediatelyaftertowing athighaltitudeonsteepuphill grades,thevehiclecouldshow signssimilartoengineoverheating. Toavoidthis,lettheengineerun whileparked,preferablyonlevel ground,withthetransmissionin P(Park)forafewminutesbefore turningtheengineoff.Ifthe overheatwarningcomeson,see EngineOverheatingonpage 10-24.
ParkingonHills

WARNING
Parkingthevehicleonahillwith thetrailerattachedcanbe dangerous.Ifsomethinggoes wrong,therigcouldstarttomove. People can be injured,and both the vehicle and the trailer can be damaged.When possible,always parktherigonaflatsurface.
Ifparkingtherigonahill:
- Pressthebrakepedal, butdo notshiftintoP(Park)yet. Turn thewheelsintothecurbif facing downhillorintotrafficifacing uphill.
- Havesomeoneplacechocks underthetrailerwheels.
-
Whenthewheelchocksarein place, releasethebrakepedal untilthechocksabsorbtheload.
-
Reapplythebrakepedal. Then apply the parking brake and shift into P(Park).
-
Releasethebrakepedal.
LeavingAfterParkingonaHill
-
Apply and hold the brake pedal while you:
-
Starttheengine.
-
Shiftintoagear.
• Releasetheparkingbrake. -
Letuponthebrakepedal.
- Driveslowlyuntilthetraileris clearofthechocks.
- Stopandhavesomeonepickup andstorethechocks.
MaintenancewhenTrailer Towing
Thevehicleneedsservicemore oftenwhenpullingatrailer.See theMaintenanceSchedulefor moreinformation.Thingsthat areespeciallyimportantintrailer
operationareautomatic transmissionfluid,engineoil, axlelubricant,belts,coolingsystem andbrakesystem.Inspectthese beforeandduringthetrip.
Checkperiodicallytoseethatall hitchnutsandboltsaretight.
EngineCoolingwhenTrailer Towing
Thecoolingsystemmaytemporarily overheatduringsevereoperating conditions.SeeEngineOverheating onpage 10-24.
TrailerTowing
Beforepullingatrailer,thereare threeimportantconsiderationsthat havetodowithweight:
• Theweightofthetrailer
• Theweightofthetrailertongue
- Thetotalweightonthevehicle's tires
WeightoftheTrailer
Howheavycanatrailersafelybe?
Itdependsonhowtherigisused. Forexample, speed, altitude, road grades, outsidetemperature and howmuchthevehicleisusedtopull atrailerareallimportant.Itcan dependonanyspecialequipment onthevehicle, and theamountof tongueweightthevehiclecancarry. See "WeightoftheTrailerTongue" laterinthissectionformore information.
Maximum trailerweightiscalculated assumingonlythedriverisinthe towvehicleandithasallthe requiredtraileringequipment. Theweightofadditionaloptional equipment,passengersandcargoin thetowvehiclemustbesubtracted fromthemaximumtrailerweight.
Usethefollowingcharttodeterminehowmuchthevehiclecanweigh,baseduponthevehiclemodelandoptions.
| VehicleMaximumTrailerWeightGCWR* | ||
| 2.8LEngine,AWD1588kg(3,500lbs)3725kg(8,212lbs) | ||
| 3.0LEngine,FWD1134kg(2,500lbs)3187kg(7,025lbs) | ||
| 3.0LEngine,FWDwithTraileringPackage1588kg(3,500lbs)3640kg(8,025lbs) | ||
| 3.0LEngine,AWD1134kg(2,500lbs)3271kg(7,212lbs) | ||
| 3.0LEngine,AWDwithTraileringPackage1588kg(3,500lbs)3725kg(8,212lbs) | ||
| *TheGrossCombinationWeightRating(GCWR)isthetotalallowableweightofthecompletelyloadedvehicleand trailerincludinganypassengers,cargo,equipmentandconversions.TheGCWRforthevehicleshouldnotbe exceeded. | ||
Askyourdealerfortrailering informationoradvice.See CustomerAssistanceOfficeson page 13-3formoreinformation.
Weightofthe TrailerTongue
Thetongueload(A)ofanytraileris animportantweighttomeasure becauseitaffectsthetotalgross weightofthevehicle.TheGross
VehicleWeight(GVW)includesthe curbweightofthevehicle,any cargocarriedinit,andthepeople whowillberidinginthevehicle. Iftherearealotofoptions, equipment,passengersorcargoin thevehicle,itwillreducethetongue weightthevehiclecancarry,which willalsoreducethetrailerweightthe
vehiclecantow.Iftowingatrailer, thetongueloadmustbeaddedto theGVWbecausethevehiclewill becarryingthatweight,too.See VehicleLoadLimitsonpage9-12 formoreinformationaboutthe vehicle'smaximumloadcapacity.
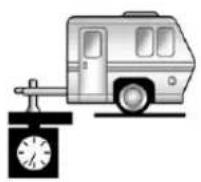
A
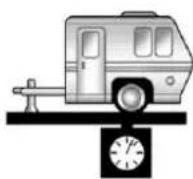
B
lfaweight-carryinghitchora weight-distributinghitchisbeing used, thetrailertongue(A) should weigh 10-15 percent of the total loaded trailerweight(B).
Afterloadingthetrailer, weigh thetrailer and thenthetongue, separately, to see if the weights are proper. If they are not, adjustments might be made by moving some items around in the trailer.
Traileringmaybelimitedbythe vehicle'sabilitytocarrytongue weight. Tongueweightcannotcause thevehicletoexceedtheGVWR
(GrossVehicleWeightRating)or theRGAWR(RearGrossAxle WeightRating).Theeffectof additionalweightmayreducethe traileringcapacitymorethanthe totaloftheadditionalweight.
Considerthefollowingexample:
Avehiclemodelbaseweightis 2495kg(5,500lbs);1270kg (2,800lbs)atthefrontaxleand 1225kg(2,700lbs)attherearaxle. IthasaGVWRof3266kg (7,200lbs),aRGAWRof1814kg (4,000lbs)andaGCWR(Gross CombinationWeightRating)of 6350kg(14,000lbs).Thetrailer ratingsshouldbe:
6350 kg (14,000 lbs) GCWR 2495 kg (-5,500 lbs) Vehicle Weight 3855 kg (8,500 lbs) Trailer Rating
Expecttongueweighttobeatleast 10percentoftrailerweight(386kg (850lbs))andbecausetheweightis
appliedwellbehindtherearaxle, theeffectontherearaxleisgreater thanjusttheweightitself,asmuch as1.5timesasmuch. Theweightat therearaxlecouldbe386kg (850lbs)X1.5=578kg(1,275lbs). Sincetheraraxlealreadyweighs 1225kg(2,700lbs),adding578kg (1,275lbs)bringsthetotalto 1803kg(3,975lbs). Thisisvery closeto,butwithinthelimitfor RGAWRaswell. Thevehicleisset totrailerupto3856kg(8,500lbs).
Ifthevehiclehasmanyoptionsand thereisafrontseatpassengerand tworearseatpassengerswithsome luggageandgearinthevehicleas well.136kg(300lbs)couldbe addedtothefrontaxleweightand 181kg(400lbs)totherearaxle weight.Thevehiclenowweighs:
1270 kg (2,800 lbs) + 136 kg (300 lbs) Front 1225 kg (2,700 lbs) + 181 kg (400 lbs) Rear 2812 kg (6,200 lbs) Total
Weightisstillbelow3266kg (7,200lbs)andyoumightthink 318additionalkilograms(700lbs) shouldbesubtractedfromthe traileringcapacitytostaywithin GCWRlimits.Themaximumtrailer wouldonlybe3538kg(7,800lbs). Youmaygofurtherandthinkthe tongueweightshouldbelimitedto lessthan454kg(1,000lbs)toavoid exceedingGVWR.Buttheeffect ontherearaxlemuststillbe considered.Becausetherearaxle nowweighs1406kg(3,100lbs), 408kg(900lbs)canbeputon therearaxlewithoutexceeding RGAWR.Theeffectoftongue weightisabout1.5timestheactual weight.Dividingthe408kg(900lbs) by1.5leavesonly272kg(600lbs) oftongueweightthatcanbe handled.Sincetongueweightis usuallyatleast10percentoftotal loadedtrailerweight,expectthat thelargesttrailerthevehiclecan properlyhandleis2722kg (6,000lbs).
It is important that the vehicle does not exceed any of its ratings—GCWR, GVWR, RGAWR, Maximum Trailer Rating or Tongue Weight. The only way to be sure it is not exceeding any of these ratings. It is at least one vehicle and trailer.
TotalWeightontheVehicle's Tires
Besurethevehicle'stiresare inflatedtotheupperlimitforcold tires. Thesenumberscanbefound ontheCertificationlabelorsee VehicleLoadLimitsonpage9-12 formoreinformation.Makesurenot togoovertheGVWlimitforthe vehicle,ortheGAWR,includingthe weightofthetrailertongue.Ifusing aweightdistributinghitch,make surenottogoovertherearaxle limitbeforeapplyingtheweight distributionspringbars.
TowingEquipment
Hitches
It is important to have the correct hit equipment. Crosswinds, large trucksgoing by and roughroads are afew reasons why therighthitch is needed.
- Therearbumperonthevehicle isnotintendedforhitches.Do notattachrentalhitchesorother bumper-typehitchestoit.Use onlyaframe-mountedhitchthat doesnotattachtothebumper.
- Willanyholesbemadeinthe bodyofthevehiclewhenthe trailerhitchisinstalled?Ifthere are,thenbesuretosealthe holeslaterwhenthehitchis removed.Iftheholesarenot sealed,dirt,water,anddeadly carbonmonoxide(CO)fromthe exhaustcangetintothevehicle. SeeEngineExhauston page9-24.
HitchCover

natural_image
Side profile illustration of a modern sedan car (no text or symbols visible)The vehicle may have a hitchcover. Toremovethe hitchcover:
- Turnthefastenersonthelower tabs90degrees counterclockwise.
- Lifttheloweredgeofthecover about45degrees.
- Pull the cover downward to disengage the upper attachments.
Toreinstallthehitchcover:
- Holdthecoverata45degree angletothevehicleandpush theuppertabsinthehitchcover intotheslotsinthefascia.
- Movethebottomofthecover forwarduntilthelowertabsline upwiththelowerfasciaslots.
- Snapthehitchcoverintoplace bypushingtheuppercorners forward.
- Turnthefastenersonthelower tabs90degreesclockwiseto lockthecoverinplace.
SafetyChains
Alwaysattachchainsbetweenthe vehicleandthetrailer.Crossthe safetychainsunderthetongueof thetrailertohelppreventthetongue fromcontactingtheroadifit becomesseparatedfromthehitch. Alwaysleavejustenoughslackso therigcanturn.Neverallowsafety chainstodragontheground.
TrailerBrakes
Aloaded trailer that weighs more than 450 kg (1,000 lbs) need to have its own brakes system that is adequate forth the weight of the trailer. Besuretoread and follow the instructions forth the trailer brakes so they are installed, adjusted and maintained properly.
Because the vehicle has anti-lock brakes, donottap into the vehicle's brakesystem. If you do, both brake systems will not work well, or at all.
TrailerWiringHarness
Alloftheelectricalcircuitsrequired forthetrailerlightingsystemcanbe accessedataconnectormountedto theframe,behindtherearbumper cover.
TrailerSway Control(TSC)
ThevehiclehasaTrailerSway Control(TSC)featureaspartofthe ElectronicStabilityProgram(ESP) system.IfTSCdetectsthatthe trailerisswaying,thevehiclebrakes areautomaticallyapplied.
When TSCisapplyingthebrakes, the TCS/ESPindicatorlightflashes to notify the drivertoreducespeed. See Electronic Stability Program (ESP) Off Lightonpage 5-24. If the trailer continues on way, ESP will reduce engine torquetohelpslow the vehicle.
TSCwillnotfunctionifESPis turnedoff.
Conversionsand Add-Ons
Add-On Electrical Equipment
Notice: Donotaddanything electrical to the vehicle unless you check with your dealer first. Some electricalequipment can damage the vehicle and the damage would not be recovered by the vehicle's warranty. Some add-onelectricalequipment can keep other components from working asthey should.
Add-onequipmentcandrainthe vehicle's 12-voltbattery, even if the vehicle is not operating.
The vehicle has an air bags system. Before attempting to add anything electrical to the vehicle, see Servicing the Airbag-Equipped Vehicle on page 3-42 and Adding Equipment to the Airbag-Equipped Vehicle on page 3-43.
9-62DrivingandOperating
NOTES
VehicleCare
GeneralInformation
GeneralInformation......10-3
CaliforniaProposition 65Warning......10-3
CaliforniaPerchlorate MaterialsRequirements....10-3
Accessories and Modifications....10-3
VehicleChecks
DoingYourOwn ServiceWork......10-4
Hood....10-5
EngineCompartment Overview......10-6
EngineCover......10-10
EngineOil....10-10
EngineOilLifeSystem.....10-14
AutomaticTransmission Fluid....10-16
EngineAirCleaner/Filter....10-16
CoolingSystem....10-19 EngineCoolant....10-20 EngineOverheating....10-24 PowerSteeringFluid....10-26 WasherFluid....10-26 Brakes....10-27 BrakeFluid....10-28 Battery....10-30 All-WheelDrive....10-30 StarterSwitchCheck....10-31 ParkBrakeandP(Park) MechanismCheck....10-32 WiperBlade Replacement....10-32
HeadlampAiming
HeadlampAiming......10-34
BulbReplacement
BulbReplacement......10-38
HalogenBulbs......10-38
Headlamps......10-38
TaillampsandTurnSignal Lamps.....10-40
Back-UpLamps......10-42
LicensePlateLamp......10-42
ReplacementBulbs.....10-43
ElectricalSystem
ElectricalSystem Overload.....10-44
FusesandCircuit Breakers.....10-44
EngineCompartmentFuse Block....10-45
InstrumentPanelFuse Block......10-47
RearCompartmentFuse Block....10-49
WheelsandTires
Tires....10-52
TireSidewallLabeling.....10-53
TireDesignations......10-55
TireTerminologyand
Definitions......10-56
TirePressure......10-59
TirePressureforHigh-Speed Operation....10-61
TirePressureMonitor
System......10-61
TirePressureMonitor
Operation......10-63
TireInspection......10-67
TireRotation.....10-67
WhenItIsTimeforNew
Tires....10-68
BuyingNewTires......10-69
DifferentSizeTiresand
Wheels....10-71
UniformTireQuality
Grading....10-72
WheelAlignmentandTire
Balance....10-74
WheelReplacement......10-74
TireChains......10-75
IfaTireGoesFlat......10-75
TireSealantand
CompressorKit......10-77
StoringtheTireSealantand
CompressorKit......10-85
TireChanging......10-85
CompactSpareTire.....10-92
JumpStarting
JumpStarting......10-92
Towing
TowingtheVehicle......10-97
Recreational Vehicle
Towing....10-97
AppearanceCare
ExteriorCare......10-101
InteriorCare....10-105
FloorMats......10-108
GeneralInformation
Forserviceandpartsneeds,visit yourdealer.Youwillreceive genuinepartsandtrainedand supportedservicepeople.
CaliforniaProposition 65Warning
Mostmotorvehicles, including this one, contain and/or emit chemicals known to the State of California cause cancer and birth defect or other reproductive harm. Engine exhaust, many parts and systems, many fluids, and some component wear by-products contain and/or emittheschemicals.
CaliforniaPerchlorate MaterialsRequirements
Certain types of automotive applications, such as airbag initiators, seat belt pretensioners, and lithium batteries contained in Remote Keyless Entry transmitters, may contain perchloratematerials. Special handling may be necessary. For additional information, see www.dtsc.ca.gov/hazardous waste/perchlorate.
Accessories and Modifications
Adding non-dealer accessories or making modification to the vehicle can affect vehicle performance and safety, including such things as airbags, braking, stability, ride and handling, emission systems, aerodynamics, durability, and electronics systems like antilock brakes, traction control, and stability control. These accessories or modifications could deven cause malfunctionordamagenotcovered by the vehicle warranty.
Damagetovehiclecomponents resultingfrommodificationsorthe installationoruseofnon-company certifiedparts,includingcontrol moduleorsoftwaremodifications,is notcoveredunderthetermsofthe vehiclewarrantyandmayaffect remainingwarrantycoveragefor affectedparts.
Accessoriesfromyourdealer aredesignedtocomplement andfunctionwithothersystems onthevehicle.Yourdealercan accessorizethevehicleusing genuineaccessories.Whenyou gotoyourdealerandaskfor accessories,youwillknowthat company-trainedandsupported servicetechnicianswillperformthe workusinggenuineaccessories.
VehicleChecks
DoingYourOwn ServiceWork

WARNING
Youcanbeinjuredandthe vehiclecouldbedamagedifyou trytodoserviceworkonavehicle withoutknowingenoughaboutit.
- Besureyouhavesufficient knowledge,experience, theproperreplacement parts,andtoolsbefore attemptinganyvehicle maintenancetask.
(Continued)
WARNING(Continued)
- Besuretousetheproper nuts, bolts, and other fasteners. Metricand English fastenerscanbeeasily confused. If the wrong fasteners are used, parts can later break or falloff. You could be hurt.
If doing some of your own service work, us the proper service manual. It tells you much more about how to servic the vehicle than this manual can.
Thisvehiclehasanairbagsystem. Beforeattemptingtodayourown servicework,seeAirbagSystem Checkonpage3-44.
Keeparecordwithallpartsreceipts andlistthemileageandthedateof anyserviceworkperformed.
Hood
Toopenthehood:
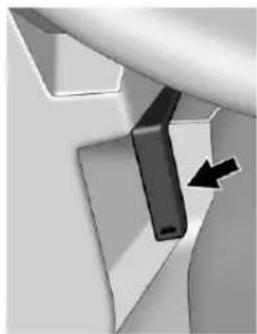
natural_image
Close-up of a mechanical component with a black arrow pointing to a specific part (no visible text or symbols)- Pullthereleasehandlewiththe abovesymbolonit.Itislocated belowtheinstrumentpanelto theleftofthesteeringwheel.

natural_image
Top-down view of a car's front dashboard and steering wheel (no text or symbols visible)-
Movethesecondaryhood releaselevertotherightto releasethestriker. Theleveris locatednearthemiddle of thehood.
-
Liftthehood. Beforeclosingthehood, besureall thefillercapsareonproperly.
EngineCompartmentOverview

2.8LV6Engine
A. EngineAirCleaner/Filteron page 10-16.
B. PowerSteeringReservoir and Cap. See PowerSteeringFluid on page 10-26.
C. EngineOilFillCap. SeeEngine Oilonpage10-10.
D. EngineOilDipstick.SeeEngine Oilonpage10-10.
E.BrakeMasterCylinder
Reservoir.SeeBrakeson
page10-27.
F.Battery(OutofView).See Batteryonpage10-30.
G. EngineCoolantSurgeTankand PressureCap.SeeEngine Coolantonpage 10-20.
H. RemotePositive(+)Terminal. See Jump Startingon page 10-92.
I. RemoteNegative(−)Terminal (OutofView). See Jump Startingonpage 10-92.
J.EngineCompartmentFuse Blockonpage10-45.
K. Windshield Washer Fluid Reservoir. See Washer Fluid on page 10-26.
10-8VehicleCare
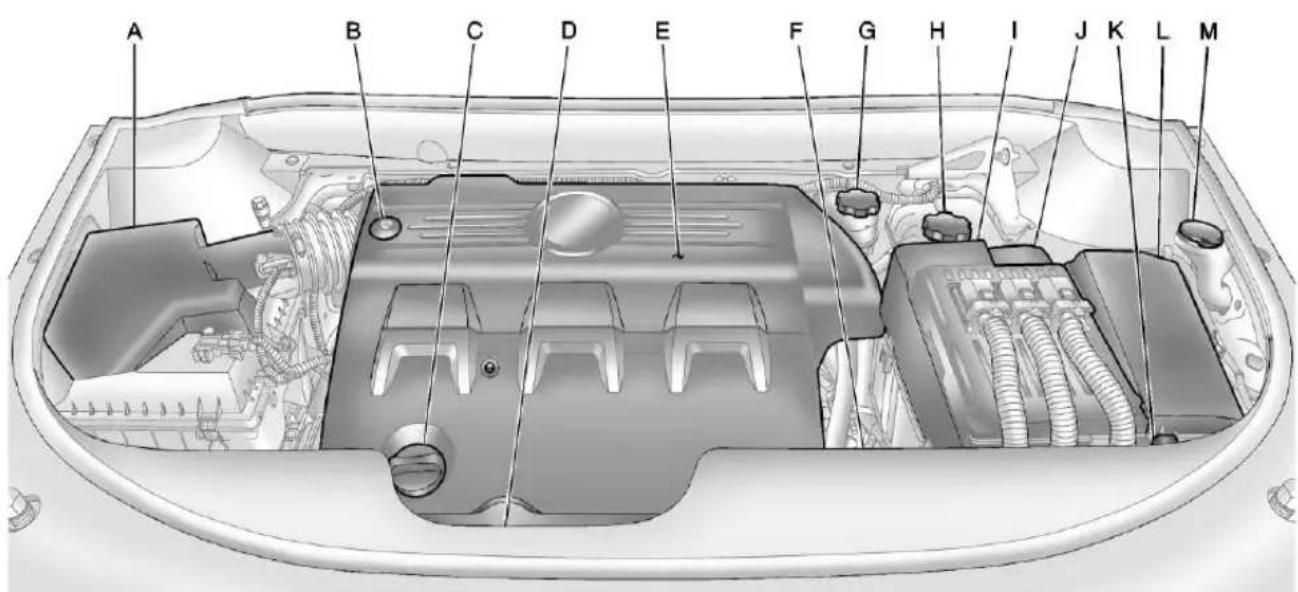
3.0LV6Engine
A. EngineAirCleaner/Filteron page 10-16.
B. PowerSteeringReservoir and Cap(UnderEngineCover). See PowerSteeringFluidon page 10-26.
C. EngineOilFillCap. SeeEngine Oilonpage10-10.
D. EngineOilDipstick
(OutofView). See EngineOil
onpage 10-10.
E. Engine Coveronpage 10-10.
F. TransmissionFluidCapand Dipstick(OutofView). See Automatic TransmissionFluid onpage 10-16.
G.BrakeMasterCylinder
Reservoir.SeeBrakeson
page10-27.
H. EngineCoolantSurgeTankand PressureCap.SeeEngine Coolantonpage10-20.
I. Battery(OutofView). See Batteryonpage 10-30.
J.RemotePositive(+)Terminal. See Jump Starting on page 10-92.
K.RemoteNegative(-)Terminal (OutofView).See Jump Startingonpage 10-92.
L.EngineCompartmentFuse Blockonpage10-45.
M. Windshield Washer Fluid
Reservoir. See Washer Fluid on page 10-26.
EngineCover EngineCover(3.0LV6)

A.OilFillCap
B. EngineCoverBolt
C. EngineCover
Toremove:
-
Removetheoilfillcap(A).
-
Removetheenginecover bolt(B).
-
Raisetheenginecover(C) to releaseitfromtheretainers.
-
Liftandremovetheengine cover.
-
ReverseSteps1 through 4 to reinstall the engine cover.
EngineOil
Toensureproperengine performanceandlonglife,careful attentionmustbepaidtoengineoil. Followingthesesimple,but importantstepswillhelpprotect yourinvestment:
- Alwaysuseengineoilapproved totheproperspecificationandof theproperviscositygrade.See "SelectingtheRightEngineOil" inthissection.
- Checktheengineoillevel regularlyandmaintainthe properoillevel.See"Checking EngineOil"and"WhentoAdd EngineOil"inthissection.
- Changetheengineoilatthe appropriatetime.SeeEngineOil LifeSystemonpage10-14.
- Always dispose of engine oil properly. See "What to Dow with Used Oil" in this section.
CheckingEngineOil
Itisagoodideatochecktheengine oillevelateachfuelfill. Inorderto getanaccuratereading, the vehicle must be on level ground. The engine oildipstick handle is yellow loop. See Engine Compartment Overview page 10-6 for the location of the engine oildipstick.
Obtaininganaccurateoillevel readingisessential:
- If the engine has been running recently, turn off the engine and allow several minutes for the oil to drain back into the oil pan. Checking the oil level too soon after engines hutoff will not provide an accurate oil level reading.
- Pulloutthedipstickandcleanit withapapertowelorcloth, then pushitbackinalltheway. Removeitagain, keepingthetip down, andcheckthelevel.
WhentoAddEngineOil

If the oil is below the cross-hatched area at the tip of the dipstick, add 1L(1qt) of there recommended oil and then recheck the level. See "Selecting the Right Engine Oil" in this section for an explanation of what kind of oil to use Forengine oil crank case capacity, see Capacities and Specifications on page 12-2.
Notice: Donotaddtoomuchoil. Oil levels above or below the acceptable operating range shown on the dipstick are harmful to the engine. If you find that you have an oil level above the operating range, i.e., the engine has some oil that the oil level gets above the cross-hatched area that shows the proper operating range, the engine could be damaged. You should drain out the excess oil limit driving of the vehicle and seek as service professional to remove the excess amount of oil.
SeeEngineCompartmentOverview onpage10-6forthelocationofthe engineoilfillcap.
Addenoughoiltoputthelevel somewhereintheproperoperating range.Pushthedipstickalltheway backinwhenthrough.
SelectingtheRightEngineOil
Selectingtherightengineoil dependsonboththeperooil specificationandviscositygrade:
Specification
Use and ask forengine oil with the dexos ^™ certification mark. Oils meeting therequirements of the vehicles should havethed dexos certification mark on the container. This certification mark indicates that the oil has been approved to the dexos specification.

dexos™
This vehicle was filled at the factory with dexos-approved engine oil.
Notice: Use only engine oil that is approved to the dexos specification or an equivalent engine oil of the appropriate viscosity grade. Engine oils approved to the dexos specification will show the dexos symbol on the container. Failure tous there recommended engine oil equivalent can result in enginedamagenot covered by the vehicle warranty. If you are unsure whether the oil is approved to the dexos specification, ask your service provider.
UseofSubstituteEngineOilsif dexosisunavailablefortop-uponly: Engineoilnotmeetingthedexos specificationorequivalents should notbeusedforanoilchange.Inthe eventthatdexos-approvedengine oilisnotavailableformaintaining properoillevel,however,youmay
usesubstituteengineoildisplaying theAPIStarburstsymbolandof SAE5W-30viscositygrade. Extensiveuseofoilsthatdonot meetthedexosspecification, however, mayresultinreduced performanceundercertain circumstances.
Maintaining the proper oil level is very important. However, if you use as substitute oil for any reason, we recommend that you perform a complete oil change back to dexos as soon as possible to protect the engine and maintain engine peak performance.
ViscosityGrade
SAE5W-30 isthebestviscosity gradeforthevehicle.Donot useotherviscosityoilssuchas SAE10W-30,10W-40,or20W-50.
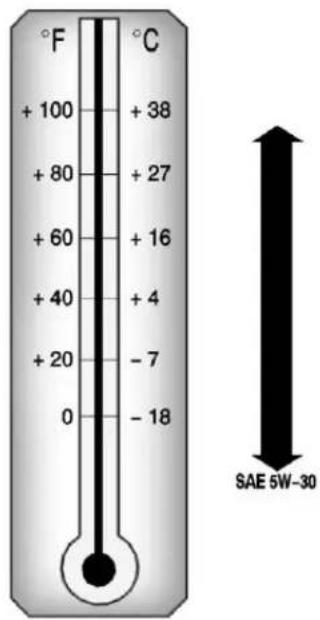
ColdTemperatureOperation:Inan areaofextremecold,wherethe temperaturefallsbelow-29°C (-20°F),anSAE0W-30oilshould beused.Anoilofthisviscosity gradewillprovideeasiercold startingfortheengineatextremely lowtemperatures.Whenselecting anoiloftheappropriateviscosity grade,besuretoalwaysselectan oilthatmeetstherequired specification,dexos.See "Specification"earlierinthis sectionformoreinformation.
EngineOilAdditives/Engine OilFlushes
Donotaddanythingtotheoil. The recommended oil with the dexos specification and displaying the dexos certification mark are all that is needed for good performance and engine protection.
Engineoilsystemflushesarenot recommendedandcouldcause enginedamagenotcoveredbythe vehiclewarranty.
WhattoDowithUsedOil
Usedengineoilcontainscertain elementsthatcanbeunhealthyfor yourskinandcouldevencause cancer.Donotletusedoilstayon yourskinforverylong.Cleanyour skinandnailswithsoapandwater, oragoodhandcleaner.Washor properlydisposeofclothingorrags containingusedengineoil.Seethe manufacturer'swarningsaboutthe useanddisposalofoilproducts.
Usedoilcanbeathreattothe environment. If you change your own oil, besuretodrainallthe oil from the filter before disposal. Never dispose of oil by putting it in the trash or pouring it on the ground, intosewers, or intostreams or bodies of water. Recycle it by taking it to a placethat collects used oil.
EngineOilLifeSystem
WhentoChangeEngineOil
This vehicle has a computer system that indicates when to change the engine oil and filter. This is based on a combination of factors which include engine revolutions, engine temperature, and miles driven. Based on driving conditions, the mileage at which an oil change is indicated can vary considerably. For the oil if system to work properly, the system must be set every time the oil is changed.
Whenthesystemhascalculated thatoillifehasbeendiminished, itindicatesthatanoilchangeis necessary.ACHANGEENGINE OILSOONmessagecomeson.See EngineOilMessagesonpage5-37. Changetheoilassoonaspossible withinthenext1000km(600mi). Itispossiblethat,ifdrivingunder thebestconditions,theoillife systemmightindicatethatanoil changeisnotnecessaryforup toayear.Theengineoiland filtermustbechangedatleast onceayearandatthistimethe systemmustbereset.
Yourdealerhastrainedservice peoplewhowillperformthiswork andresetthesystem.Itisalso importanttochecktheoilregularly overthecourseofanoildrain intervalandkeepitattheproper level.
If the system is ever reset accidentally, the oil must be changed at 5000 km (3,000 mi) sincethelastol change. Rememberto reset the oil lifesystem whenever the oil is changed.
HowtoResettheEngineOil LifeSystem
Resetthesystemwheneverthe engineoilischangedsothatthe systemcancalculatethenext engineoilchange.Toresetthe system:
-
Using the DIC MENU button and thumbwheel on the turn signal lever, display OILLIFE REMAINING on the DIC. See Driver Information Center (DIC) on page 5-29 and Engine Oil Messages on page 5-37.
-
PresstheSET/CLRbuttonto resettheoillifeat100%. Becarefulnottoresettheoillife displayaccidentallyatanytime otherthanaftertheoilis changed. It cannot be reset accurately until then ex toil change.
Theoillifesystemcanalsobereset asfollows:
- Turntheignitiononwiththe engineoff.
- Fullypressandreleasethe acceleratorpedalthreetimes withinfiveseconds.
IftheCHANGEENGINEOIL SOONmessageisnoton, the systemisreset.
Thesystemisresetwhenthe CHANGEENGINEOILSOON messageisoff.
If the CHANGE ENGINE OIL SOON message comes back on when the vehicle is started, the engine oil life system has not been reset. Repeat the procedure.
AutomaticTransmission Fluid
HowtoCheckAutomatic TransmissionFluid
Itisnotnecessarytocheck thetransmissionfluidlevel. Atransmissionfluidleakisthe onlyreasonforfluidloss.Ifaleak occurs,takethevehicletoyour dealerservicedepartmentandhave itrepairedassoonaspossible.
Thereisaspecialprocedurefor checkingandchangingthe transmissionfluid.Becausethis procedureisdifficult,youshould havethisdoneatyourdealer servicedepartment.Contactyour dealerforadditionalinformation.
Changethefluidandfilteratthe intervalslistedinScheduled Maintenanceonpage11-3,andbe suretousethefluidlistedin RecommendedFluidsand Lubricantsonpage11-4.
EngineAirCleaner/Filter
SeeEngineCompartmentOverview onpage10-6forthelocationofthe engineaircleaner/filter.
WhentoInspecttheEngineAir Cleaner/Filter
Inspecttheaircleaner/filteratthe scheduledmaintenanceintervals andreplaceitatthefirstoilchange aftereach80000km(50,000mi) interval.SeeScheduled Maintenanceonpage 11-3formore information.Ifdrivingindusty/dirty conditions,inspectthefilterateach engineoilchange.
HowtoInspecttheEngineAir Cleaner/Filter
Toinspecttheaircleaner/filter, removethefilterfromthevehicle andlightlyshakethefiltertorelease loosedustanddirt. If thefilter remainscoveredwithdirt, anew filterisrequired. Neveruse compressedairtocleanthefilter.
Toinspectorreplacetheengineair cleaner/filter:
- Openthehood. See Hoodon page 10-5.
- Locatetheairfilterhousing on thefrontofthepassengerside oftheenginecompartment. See EngineCompartmentOverview onpage 10-6.

A.AirDuctClamp
B. ElectricalConnectors
C.RetainingClips
- Disconnect the outletduct by loosening the air duct clamp(A).
-
Disconnect the electrical connectors(B).
-
Lifttheretainingclips(C)onthe airfilterhousing.
- Turnandtiltthecoverslightly upwardandslidethecoveraway fromtheoutsideedgeofvehicle. Removetheairfilter.

natural_image
Technical diagram of a mechanical assembly with labeled parts A and B, showing internal components and spring-like features (no text or symbols beyond labels)A.CoverCutOuts
B. AirFilterTabs
10-18VehicleCare
- Toinstalltheairfilter, placethe filterinsidetheboxwhere the pleatsfitinbetweenthetabs locatedinsidethelowerbox. Ensure that the covercut outs(A) on both sides match the airfilterabs(B) on both sides.
-
Replacetheaircleanercoverby insertingthetabsappropriately intotheslots. Lowerthecoverto meetthebottomofthebox. Placetheretainingclipsonthe retentionfeaturesandclip closed.
-
Retightentheairductclamp.
- Reconnecttheelectrical connectors.

WARNING
Operatingtheenginewiththeair cleaner/filteroffcancauseyou orotherstobeburned.Theair cleanernotonlycleanstheair;it helpstostopflamesiftheengine backfires.Usecautionwhen workingontheengineanddonot drivewiththeaircleaner/filteroff.
Notice: If the aircleaner/filter is off, dirtcaneasilygetinto the engine, which could damage it. Always havethe aircleaner/filter in place when you are driving.
Notice: Installinganair cleanerdifferentthantheone recommendedinMaintenance ReplacementPartsmaycause enginedamagenotcoveredby thevehiclewarranty.
Cooling System
When it is safe to lift the hood:
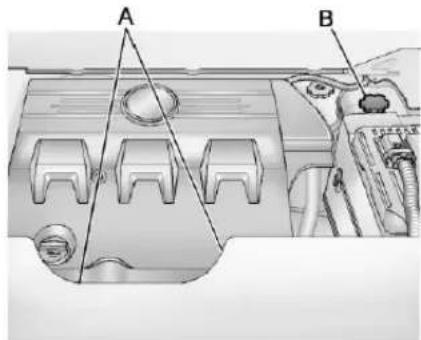
3.0 L V6 Engine Shown, 2.8 L V6 Engine Similar
A. Engine Cooling Fans
B. Engine Coolant Surge Tank and Pressure Cap
{ WARNING
An electric engine cooling fan under the hood can start up even when the engine is not running and can cause injury. Keep hands, clothing, and tools away from any underhood electric fan.
If the coolant inside the coolant surge tank is boiling, do not do anything else until it cools down. The vehicle should be parked on a level surface.
The coolant level should be between the MIN and MAX lines. If it is not, the vehicle may have a leak at the radiator hoses, heater hoses, radiator, water pump, or somewhere else in the cooling system.
{ WARNING
Heater and radiator hoses, and other engine parts, can be very hot. Do not touch them. If you do, you can be burned.
Do not run the engine if there is a leak. If you run the engine, it could lose all coolant. That could cause an engine fire, and you could be burned. Get any leak fixed before you drive the vehicle.
Ifthereseemstobenoleak, withtheengineon, checkto seeiftheelectricenginecooling fansarerunning. Iftheengineis overheating, thefansshouldbe running. Ifitisnot, thevehicle needsservice. Turnofftheengine.
Notice: Using coolantother than DEX-COOL ^® can cause premature engine, heater core, or radiator corrosion. In addition, the engine coolant could require changing sooner, at 50000 km (30,000 mi) or 24 months, whichever occurs first. Any repairs would not be covered by the vehicle warranty. Always use DEX-COOL (silicate-free) coolant in the vehicle.
EngineCoolant
Thecoolingsysteminthevehicle isfilledwithDEX-COOL ^® engine coolant. Thiscoolantisdesignedto remaininthevehiclefor5yearsor 240000km(150,000mi),whichever occursfirst.
The following explain the cooling system and how to check and add coolant when it is slow. If there is a problem with engine overheating, see Engine Overheating on page 10-24
WhattoUse

WARNING
Addingonlyplainwaterorsome otherliquidtothecoolingsystem canbedangerous. Plainwater andotherliquids, canboilbefore thepropercoolantmixturewill. Thecoolantwarningsystemis setforthepropercoolantmixture. Withplainwaterorthewrong mixture, theenginecouldgettoo hotbutyouwouldnotgetthe overheatwarning. Theengine couldcatchfireandyouor otherscouldbeburned. Usea 50/50mixtureofclean,drinkable waterandDEX-COOLcoolant.
Usea50/50mixtureofclean, drinkablewaterandDEX-COOL coolant. If using this mixture, nothingelseneedstobeaded. This mixture:
• Givesfreezingprotectiondown to -37^(-34^) , outside temperature.
• Givesboilingprotectionupto 129°C(265°F), engine temperature.
- Protectsagainstrustand corrosion.
• Willnotdamagealuminumparts.
• Helpskeep the proper engine temperature.
Notice: If an improper coolant mixture is used, the engine could overheat and be badly damaged. Therepair cost would not be covered by the vehicle warranty. To much water in them mixture can freeze and crack the engine, radiator, heater core, and other parts.
Neverdisposeofenginecoolantby puttingitinthetrash,pourington theground,orintosewers,streams, orbodiesofwater.Havethecoolant changedbyanauthorizedservice center,familiarwithlegal requirementsregardingused coolantdisposal.Thiswillhelp protecttheenvironmentandyour health.
CheckingCoolant
The vehicle must be on a level surface when checking the coolant level.
Checktoseeifcoolantisvisiblein thecoolantsurgetank.Ifthecoolant insidethecoolantsurgetankis boiling,donotdoanythingelseuntil itcoolsdown.Ifcoolantisvisible butthecoolantlevelisnotatthe indicatedmark,adda50/50mixture ofclean,drinkablewaterand DEX-COOLcoolantatthecoolant surgetank,butbesurethecooling systemiscoolbeforethisisdone. SeeEngineOverheatingon page 10-24formoreinformation.
Thecoolantsurgetankislocatedin theenginecompartmentonthe driversideofthevehicle.See EngineCompartmentOverviewon page 10-6formoreinformationon location.
HowtoAddCoolanttothe CoolantSurgeTank
Notice: This vehicle has a specific coolant fill procedure. Failure to follow this procedure could cause the engine to overheat and be severely damaged.
Ifnoproblemisfound, check toseeifcoolantisvisibleinthe coolantsurgetank.Ifcoolantis visiblebutthecoolantlevelisnot attheindicatedlevelmark,adda 50/50mixtureofclean,drinkable waterandDEX-COOLcoolantat thecoolantsurgetank,butbesure thecoolingsystem,includingthe coolantsurgetankpressurecap,is coolbeforeyoudoit.
WARNING
Steamandscaldingliquidsfroma hotcoolingsystemcanblowout andburnyoubadly. They are underpressure, andify outurn thecoolantsurgetankpressure cap—even a little—they can come out at high speed. Never turn the cap when the cooling system, including the coolant surgetank pressure cap, ishot. Wait for the cooling system and coolantsurgetank pressure cap to cool if you ever havet to turn the pressure cap.
WARNING
Addingonlyplainwaterorsome otherliquidtothecoolingsystem canbedangerous. Plainwater andotherliquids, canboilbefore thepropercoolantmixturewill. Thecoolantwarningsystemisset forthepropercoolantmixture. Withplainwaterorthewrong mixture, theenginecouldgettoo hotbutyouwouldnotgetthe overheatwarning. Theengine couldcatchfireandyouor otherscouldbeburned. Usea 50/50mixtureofclean,drinkable waterandDEX-COOLcoolant.
Notice:Incoldweather,water canfreezeandcracktheengine, radiator,heatercoreandother parts.Usetherecommended coolantandthepropercoolant mixture.

WARNING
Youcanbeburnedifyouspill coolantonhotengineparts. Coolantcontainsethyleneglycol anditwillburniftheengineparts arehotenough.Donotspill coolantonahotengine.

natural_image
Mechanical assembly diagram showing a gear-like component with an arrow indicating direction (no text or symbols present)2.8LV6Engine3.0LV6Engine

natural_image
Mechanical assembly diagram showing a valve mounted on a vehicle engine (no text or symbols visible)- Removethecoolantsurgetank pressurecapwhenthecooling system, including the coolant surgetank pressurecap and upperradiator hose, is no longerhot.
Turnthepressurecapslowly counterclockwiseabout one-quarterofaturn.Ifyou hearahiss,waitforthattostop. Thiswillallowanypressure stilllefttobeventedoutthe dischargehose.
10-24VehicleCare
- Keep turning the pressure cap slowly and remove it.
- Fill the coolants surgetank with the proper DEX-COOL coolant mixture to the indicated level mark.
- With the coolantsurgetank pressure capoff, start the engine and let it run until you can feel the upper radiator hose getting hot. Watch out for the engine cooling fan(s).
Bythistime, the coolant level inside the coolantsurgetank may be lower. If the level is lower, add more of the proper DEX-COOL coolant mixture to the coolant surgetank until the level reaches the indicated level mark. - Replacethepressurecap. Besurethepressurecapis hand-tight.
Checkthelevelinthecoolantsurge tankwhenthecoolingsystemhas cooleddown.Ifthecoolantisnotat theproperlevel,repeatSteps1 through3andreinstallthepressure cap.Ifthecoolantstillisnotatthe properlevelwhenthesystemcools downagain,seeyourdealer.
EngineOverheating
The vehicle has an indicator to warn of engine overheating.
Thereisanenginecoolant temperaturewarninglightonthe instrumentpanel.SeeEngine CoolantTemperatureGaugeon page5-14.
The decision may be made not to lift the hood when this warning appears, but instead gets service help right away. See Roadside Assistance Program on page 13-4.
If the decisionismadetoliftthe hood, makesurethevehicleis parkedonalevelsurface.
Thenchecktoseeiftheengine coolingfansarerunning.Ifthe engineisoverheating,bothfans shouldberunning.Iftheyarenot, donotcontinuetoruntheengine andhavethevehicleserviced.
Notice: Enginedamage from running the engine without coolant is not covered by the warranty.
Notice: If the engine catches fire because of being driven with no coolant, the vehicle can be badly damaged. The costly repairs would not be recovered by the vehicle warranty.
IfSteamIsComingfromthe EngineCompartment

WARNING
Steamfromanoverheatedengine canburnyoubadly,evenify you justopenthehood.Stayaway fromtheengineifyouseeorhear steamcomingfromit.Justturnit offandgeteveryoneawayfrom thevehicleuntilcoolsdown. Waituntilthereisnosignof steamorcoolantbeforeyou openthehood.
If you keep driving when the engine is overheated, the liquids init can catch fire. You or others could be badly burned. Stop the engine if to overheats, and get out of the vehicle until the engine is cool.
IfNoSteamIsComingfrom theEngineCompartment
Ifanengineoverheatwarningis displayedbutnosteamcanbeseen orheard,theproblemmaynotbe tooserious.Sometimesheengine cangetalittletoohotwhenthe vehicle:
• Climbsalonghillonahotday.
- Stopsafterhigh-speeddriving.
• Idlesforlongperiodsintraffic.
- Towsatraler.
If the overheat warning displays with nosignofsteam:
- Turntheairconditioningoff.
-
Turntheheaterontothehighest temperature and tothehighest fanspeed. Openthewindowsas necessary.
-
In heavy traffic, let the engine idle in N (Neutral) while stopped. If it is a fast to do so, pulloff the road, shift to P (Park) or N (Neutral) and let the engine idle.
If the temperature overheat gauge isn longer in the overheat zone or an overheat warning nolonger displays, the vehicle can be driven. Continuetodrivethe vehicles slow for about 10 minutes. Keep as safe vehicle distance from the vehicle in front of you. If the warning does not comeback, continued drive normally.
If the warning continues, pullover, stop, and park the vehicle right away.
Ifthereisnosignofsteam,idle theengineforthreeminutes whileparked.Ifthewarningis stilldisplayed,turnofftheengine untilcoolsdown.
PowerSteeringFluid
SeeEngineCompartmentOverview onpage10-6forreservoirlocation.
WhentoCheckPowerSteering Fluid
Itisnotnecessarytoregularly checkpowersteeringfluidunless aleakissuspectedinthesystem oranunusualnoiseisheard.Afluid lossinthissystemcouldindicatea problem.Havethesysteminspected andrepaired.
HowtoCheckPowerSteering Fluid
Tocheckthepowersteeringfluid:
- Turntheengineoffandletthe enginecompartmentcooldown.
- Removetheenginecover, ifrequired.SeeEngineCoveron page10-10.
- Wipethecapandthetopofthe reservoirclean.
- Unscrewthecapandwipethe dipstickwithacleanrag.
- Replacethecapandcompletely tightenit.
- Removethecapagainandlook atthefluidlevelonthedipstick.
ThelevelshouldbewithintheHOT mark.Ifnecessary,addonlyenough fluidtobringthelevelwithin themark.
WhattoUse
Todeterminewhatkindoffluidto use,seeRecommendedFluidsand Lubricantsonpage11-4.Always usetheproperfluid.
WasherFluid
WhattoUse
When windshieldwasherfluidis needed, besuretoreadthe manufacturer's instructions before use. If operating the vehicle in an areawherethetemperature may fall below freezing, use a fluid that has sufficient protection against freezing.
AddingWasherFluid
The WASHERFLUIDLOWADD FLUIDmessageappear on the Driver Information Center(DIC) when the fluid level is slow.

Openthecapwiththewasher symbolonit.Addwasherfluid uptothefillmark.SeeEngine CompartmentOverviewon page 10-6forreservoirlocation.
Notice
- When using concentrated washer fluid, follow the manufacturer's instructions for adding water.
- Donotmixwaterwith ready-to-usewasherfluid. Watercancausethesolution tofreezeanddamagethe washerfluidtankandother partsofthewashersystem. Also,waterdoesnotcleanas wellaswasherfluid.
- Fillthewasherfluidtankonly three-quartersfullwhenitis verycold. This allows for fluidexpansioniffreezing occurs, which could damage the tank if it is completely full.
- Donotuseenginecoolant (antifreeze)inthewindshield washer.ltcandamagethe windshieldwashersystem andpaint.
Brakes
This vehicle has disc brakes. Discbrakepadshave built-in wear indicator that make a high-pitched warnings sound when the brake pads are worn and new pads are needed. Thesound can come and goor be heard all the time the vehicle is moving, except when applying the brake pedal firmly.

WARNING
Thebrakewearwarningsound meansthatsoonthebrakeswill notworkwell.Thatcouldleadto acrash.Whenthebrakewear warningsoundisheard,havethe vehicleserviced.
Notice:Continuingtodrivewith worn-outbrakepadscouldresult incostlybrakerepair.
Somedrivingconditionsorclimates cancauseabrakesquealwhenthe brakesarefirstappliedorlightly applied. Thisdoesnotmean somethingiswrongwiththebrakes.
Properlytorquedwheelnutsare necessarytohelppreventbrake pulsation. Whentiresarerotated, inspectbrakepadsforwear and evenlytightenwheelnutsinthe propersequencetotorque specificationsin Capacitiesand Specificationsonpage 12-2.
Brakeliningsshouldalwaysbe replacedascompleteaxlesets.
BrakePedalTravel
Seeyourdealerifthebrakepedal doesnotreturntonormalheight, orifthereisarapidincreasein pedaltravel. Thiscouldbeasign thatbrakeservicemightbe required.
BrakeAdjustment
Everytimethebrakesareapplied, withorwithoutthevehiclemoving, thebrakesadjustforwear.
ReplacingBrakeSystemParts
Thebrakingsystemonavehicleis complex. Its manypartshavetobe of top quality and workwell together if the vehicle is to have really good braking. The vehicle was designed and tested with top quality brake parts. When part so the braking system are replaced, besure to get new, approved replacement parts. If this is not done, the brakes might not work properly. Forexample, installing disc brake pad that are wrong for the vehicle, can change the balance between the front and rear brakes—for the worse. The braking performance expected can change in many other ways if the wrong replacement brake parts are installed.
BrakeFluid
Thebrakemastercylinderreservoir is filled with DOT3brakefluidas indicated on the reservoir cap. See Engine Compartment Overview page 10-6 forthelocation of the reservoir.
Thereareonlytworeasonswhythe brakefluidlevelinthereservoir mightgodown:
- Thebrakefluidlevelgoesdown becauseofnormalbrakelining wear.Whennewliningsare installed,thefluidlevelgoes backup.
- Afluidleakinthebrake hydraulicsystemcanalsocause alowfluidlevel. Havethebrake hydraulicsystemfixed, since a leakmeansthatsoonerolater thebrakeswillnotworkwell.
Donottopoffthebrakefluid. Addingfluiddoesnotcorrectaleak. Iffluidisaddedwhenthelinings areworn,therewillbetoomuch fluidwhennewbrakeliningsare installed.Addorremovebrakefluid, asnecessary,onlywhenworkis doneonthebrakehydraulicsystem.

WARNING
Iftoomuchbrakefluidisadded, itcanspillontheengine and burn,iftheengineishotenough. Youorotherscouldbeburned, andthevehiclecouldbe damaged.Addbrakefluidonly whenworkisdoneonthebrake hydraulicsystem.
Whenthebrakefluidfallstoalow level,thebrakewarninglightcomes on.SeeBrakeSystemWarning Lightonpage5-22.
WhattoAdd
UseonlynewDOT3brakefluid fromasealedcontainer.See RecommendedFluidsand Lubricantsonpage11-4.
Alwayscleanthebrakefluid reservoircapandtheareaaround thecapbeforeremovingit. This helpskeepdirtfromenteringthe reservoir.

WARNING
Withthewrongkindoffluidin thebrakehydraulicsystem, the brakesmightnotworkwell. This could cause acrash. Always use the properbrakefluid.
Notice
- Usingthewrongfluidcan badlydamagebrake hydraulicsystemparts. For example, justafewdropsof mineral-basedoil, such as engineoil, inthebrake hydraulicsystemcan damagebrakehydraulic systempartssobadlythat theywillhavetobereplaced. Donotletsomeoneputin thewrongkindoffluid.
- Ifbrakefluidisspilledonthe vehicle'spaintedsurfaces, thepaintfinishcanbe damaged.Becarefulnotto spillbrakefluidonthe vehicle.Ifyoudo,washitoff immediately.
Battery
Refertothereplacementnumber shownontheoriginalbatterylabel whenanewbatteryisneeded.See EngineCompartmentOverviewon page10-6forbatterylocation.

DANGER
Batteryposts,terminals,and relatedaccessoriescontainlead andleadcompounds,chemicals knowntotheStateofCaliforniato causecancerandreproductive harm.Washhandsafterhandling.
VehicleStorage

WARNING
Batterieshaveacidthatcanburn youandgasthatcanexplode. Youcanbebadlyhurtifyouare notcareful.See Jump Startingon page 10-92fortipsonworking aroundabatterywithout gettinghurt.
InfrequentUsage:Removethe black,negative(-)cablefromthe batterytokeepthebatteryfrom runningdown.
ExtendedStorage:Removethe black,negative(−)cablefromthe batteryoruseabatterytrickle charger.
All-WheelDrive
TransferCase
WhentoCheckandChange Lubricant
RefertotheMaintenanceSchedule todeterminehowoftentocheckthe lubricantandwhentochangeit. SeeScheduledMaintenanceon page11-3.
HowtoCheckLubricant

natural_image
Technical illustration of a mechanical assembly with labeled parts A and B, showing internal components without any text or symbols.A. FillPlug B. DrainPlug
Togetanaccuratereading, the vehicles should be on a level surface.
If the level is below the bottom of the filler plughole, located on the transfercase, some lubricant needs to be added. Addenough lubricant torais the level to the bottom of the filler plughole. A fluid loss could indicate a problem; check and have it repaired, if needed.
WhattoUse
RefertotheMaintenanceSchedule todeterminewhatkindoflubricant touse.SeeRecommendedFluids and Lubricantsonpage 11-4.
StarterSwitchCheck

WARNING
Whenyouaredoingthis inspection,thevehiclecould movesuddenly.Ifthevehicle moves,youorotherscouldbe injured.
-
Before starting this check, be sure there is enough room around the vehicle.
-
Firmly apply both the parking brake and theregular brake. See Parking Brake on page 9-31.
Donotusetheaccelerator pedal, and bereadytoturnoff theengineimmediatelyifit starts.
- Trytostarttheengineineach gear. The vehicles should start only in P(Park) or N(Neutral). If the vehicle starts in any other position, contact your dealer for service.
ParkBrakeandP(Park) MechanismCheck

WARNING
Whenyouaredoingthischeck, thevehiclecouldbegintomove. Youorotherscouldbeinjured andpropertycouldbedamaged. Makesurethereisroominfront ofthevehicleincaseitbeginsto roll.Bereadytoapplytheregular brakeatonceshouldthevehicle begintomove.
Parkonafairlysteephill, with the vehiclefacingdownhill. Keeping yourfootontheregularbrake, set theparkingbrake.
- Tochecktheparkingbrake's holdingability:Withtheengine runningandthetransmissionin N(Neutral),slowlyremovefoot pressurefromtheregularbrake pedal.Dothisuntilthevehicleis heldbytheparkingbrakeonly.
- TochecktheP(Park) mechanism'sholdingability: Withtheengine running, shiftto P(Park). Then releasethe parkingbrake followed by the regularbrake.
Contactyourdealerifserviceis required.
WiperBladeReplacement
Windshieldwiperbladesshouldbe inspectedforwearorcracking.See ScheduledMaintenanceon page11-3formoreinformation.
Itisagoodideatocleanorreplace thewiperbladeassemblya regularbasisorwhenworn. For properwindshieldwiperblade lengthandtype, seeMaintenance ReplacementPartsonpage11-6.
Notice: Allowing the wiper blade armtotouch the windshield when nowiperblade is installed could damage the windshield. Any damage that occurs would not be covered by your warranty. Donot allow the wiper blade arm to touch the windshield.
FrontWiperBlade Replacement
Toreplacethewiperblade assembly:
- Pull the windshield wiper assembly away from the windshield.

natural_image
Technical illustration of a mechanical component with an arrow indicating a process or assembly (no text or symbols present)- Pressthebuttoninthemiddleof thewiperarmconnector, and pullthewiperbladeawayfrom thearmconnector.
- Removethewiperblade.
- ReverseSteps1 through 3 for wiperbladereplacement.
RearWiperBladeReplacement
Therearwiperbladeandwiperarm haveacoverforprotection. The covermustberemovedbeforethe wiperbladecanbereplaced.
Toremovethecover:
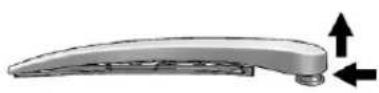
1.Slideaplastictoolunderthe coverandpushupwardto unlock.
2.Slidethecovertowardthewiper bladetiptounhookitfromthe bladeassembly.
3. Removethecover.
4. Afterreplacingthewiperblade, thecoverhooksmustslideinto thebladeassemblyslots andlock.
Toremovethewiperblade:
- Liftthewiperarmawayfromthe windshield.
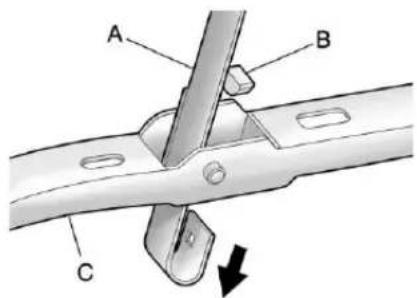
A.WiperArm
B.ReleaseLever
C.BladeAssembly
10-34VehicleCare
- Push therelease lever (B) to disengage the hook and push the wiper arm (A) out of the blade assembly (C).
- Pushthenewbladeassembly securelyonthewiperarmuntil thereleaseleverclicksinto place.
- Replacethewipercover.
HeadlampAiming
Theheadlampaimingsystemhas beenpresetatthefactory.
If the vehicle is damaged in an accident, the aim of the headlamps can be affected and adjustment could be necessary.
It is recommended that a dealer adjust the headlamps. Tore-aim the headlamps yourself, use the following procedure.
The vehicles should be properly prepared as follows:
• The vehicles should be placed so the headlamps are 7.6m (25ft) from light colored wall.
• The vehicle must have all four tireson levelsurface which is level all the way to the wall.
- The vehicles should be placed so it is perpendicular to the wall or other flatsurface.
• The vehicles should not have any snow, ice, ormudonit.
- The vehicles should be fully assembled and all other work stopped while headlampaiming is being performed.
• The vehicles should be normally loaded with a full tank of fuel and one person or 75 kg (160 lbs) sitting on the driver seat.
• Tiressshouldbeproperlyinflated.
Headlampaimingisdonewiththe vehicle'slow-beamheadlamps.The high-beamheadlampswillbe correctlyaimedifthelow-beam headlampsareaimedproperly.
Toadjusttheverticalaim:
- Openthehood. See Hoodon page 10-5 form more information.

natural_image
Diagram of a vehicle's rearview system with a circular component and directional arrow (no text or labels)BaseVehicle(Halogen Headlamps)
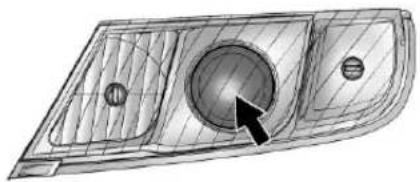
natural_image
Technical line drawing of a car front bumper with a circular vent and arrow indicator (no text or symbols)UplevelVehicle(HIDHeadlamps)
- Locatetheaimpointatthe centerinnerprojector condensinglensofthelow-beam headlamp(nottheouterlens).
- Measure the distance from the ground to the aim dot on the low-beam headlamp. Record the distance.
10-36VehicleCare

- Atthewallmeasurefromthe groundupward(A)tothe recordeddistancefrom Step3andmarkit.
- Drawortapeahorizontalline(B) onthewallthewidthofthe vehicleattheheightofthemark inStep4.
Notice: Donotcoveraheadlamp toimprovebeamcut-offwhen aiming. Coveringaheadlampmay causeexcessiveheatbuild-up whichmaycausedamagetothe headlamp.
- Turnonthelow-beam headlampsandplaceapiece of cardboardorequivalentinfront oftheheadlampnotbeing adjusted. Thisallowsonlythe beamoflightfromtheheadlamp beingadjustedtobeseenonthe flatsurface.

- Locatetheverticalheadlamp aimingscrews, which are under the hoodneareachheadlamp assembly.
Forthevehicleequippedwitha baselevellamp(halogenbulb), therewillbeonevertical headlampaimingscrew(V1). Theaimingscrew(V1) is adjusted from the engine compartmentside of the beautycover.
Forthevehicleequippedwithan uplevelheadlamp(HID),there willbetwoverticalheadlamp aimingscrews(V1andV2).The aimingscrew(V2)isadjusted throughtheaccessholeinthe beautycover.
Theadjustmentscrewcanbe turnedwitha6mmhexkey.
- For the base vehicle, turn the verticalaimingscrew (V1) until the headlamp beam is aimed to the horizontal tap line. Turn it clockwise or counterclockwiseto raise or lower the angle of the beam.
Fortheuplevelvehicle,turnthe verticalaimingscrews(V1and V2)simultaneouslyuntilthe headlampbeamisaimedtothe horizontaltapeline.Turnthem clockwiseorcounterclockwiseto raiseorlowertheangle of thebeam.

- Makesure that the light from the headlamp is positioned at the bottom edge of the horizontal tap line. Thelamp on the left (A) show the correct headlamp aim. Thelamp on the right (B) show the incorrect headlamp aim.
10.RepeatSteps7through9for theoppositeheadlamp.
BulbReplacement
Forthepropertyofreplacement bulbs,seeReplacementBulbson page10-43.
Foranybulb-changingprocedure notlistedinthissection,contact yourdealer.
HalogenBulbs

WARNING
Halogenbulbshavepressurized gasinsideandcanburstifyou droporscratchthebulb. Youor otherscouldbeinjured. Besure toreadandfollowtheinstructions onthebulbpackage.
Headlamps

BaseHeadlampAssembly(Driver SideShown, PassengerSide Similar)
A. TurnSignalLamp
B.Low-BeamHeadlamp/Daytime RunningLamp(DRL)
C. High-BeamHeadlamp
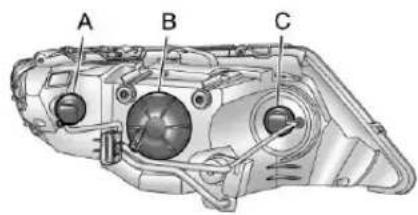
UplevelHeadlampAssembly (DriverSideShown, Passenger SideSimilar)
A. TurnSignalLamp
B. High/Low-BeamHeadlamp
C.DaytimeRunningLamp(DRL)
Low-BeamHeadlamps/Daytime RunningLamps(DRL)(Base)
- Removetheprotectivecapfrom thebackoftheheadlamp assembly.
- Disconnect the electrical connector.
- Removethebulbsocketfrom theheadlampassembly.
- Replacethebulbinthebulb socket.
- Install the bulb socket in the head lamp assembly.
- Connecttheelectricalconnector.
- Install the protective capin the back of the head lamp assembly.
High-BeamHeadlamps(Base)
- Disconnect the electrical connector forthelow-beam/Daytime Running Lamp (DRL) from the back of the headlamp assembly.
- Removethebulbsocketfrom theheadlampassembly.
- Replacethebulbinthebulb socket.
- Install the bulb socket in the headlamp assembly.
- Connect the electrical connector.
High/Low-BeamHeadlamps (Uplevel)
The high/low-beam headlampson the up level are High Intensity Discharge (HID) and should be replaced at the dealer.
DaytimeRunningLamp(DRL) (Uplevel)
ToreplacetheDaytime
RunningLamp:
- Disconnect the electrical connector for the DRL bulb replacement from the back of the head lamp assembly.
- RemovetheDRLbulbsocket fromtheheadlampassembly.
- Replacethebulbinthebulb socket.
- Install the bulb socket in the head lamp assembly.
- Connect the electrical connector.
FrontTurnSignalLamp (BaseandUplevel)
Toreplacethefrontturn signallamp:
- Removetheturnsignallamp bulbsocketfromtheheadlamp assembly.
- Removetheturnsignallamp bulbfromthesocket.
- Replacethebulbinthebulb socket.
- Install the bulb socket in the head lamp assembly.
TaillampsandTurnSignal Lamps

A. Stoplamp
B. TurnSignalLamp
Toreplaceoneofthesebulbs:
- Openthelfitgate.SeeLiftgate onpage2-12.

natural_image
Technical illustration of a mechanical component with labeled parts A and B, showing internal structure and part motion arrow (no text or symbols beyond labels)A. TaillampAssembly
B. TaillampCover
- Removethetaillampcover(B) fromthelampassembly(A) by pullingrearwardtounfastenit fromthetabsandclips.
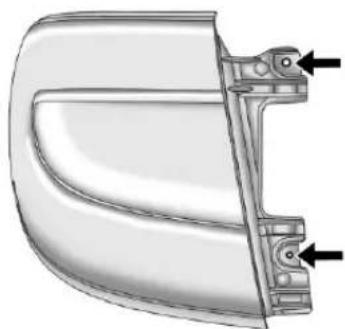
natural_image
Technical illustration of a mechanical component with two arrows pointing to features (no text or symbols)- Removethetwoscrewsfromthe taillampassembly.
- Pullthetaillampassembly straightbacktoremove.

A. Stoplamp
B. TurnSignalLamp
-
Turntheturnstoplamp(A)or turnsignallamp(B)bulbsocket counterclockwisetoremoveit fromthetaillampassembly.
-
Pullthebulbstraightoutfrom thesocket.
- Pressanewbulbintothe socket, insertitintothetaillamp assembly, and turnthebulb socketclockwise.
- Reinstallthetaillampassembly andtightenthescrews.
- Reinstallthetaillampcoverby snappingitintoplace.
Back-UpLamps

natural_image
Technical line drawing of a mechanical component with internal cavities and a central sphere (no text or symbols)Toreplaceoneofthesebulbs:
- Openthelfitgate. See Liftgate on page 2-12.
- Removethetoptrimpanelfrom theliftgatetogainaccessto thebulb.

natural_image
Technical diagram of a mechanical component with an arrow pointing to a circular component (no text or symbols present)- Turntheback-upbulbsocket counterclockwisetoremoveit fromthetaillampassembly.
- Pullthebulbstraightoutfrom thesocket.
- Pressanewbulbintothe socket, insertitintothetaillamp assembly, and turnthe bulb socketclockwise until clicks.
- Reinstallthetoptrimpanel into the lift gate by locking it into place.
LicensePlateLamp
Toreplaceoneofthesebulbs:
- Openthelfitgate. See Liftgate on page 2-12 form more information.

natural_image
Diagram showing two views of a mechanical component with arrows indicating direction (no text or symbols)PassengerSideShown,Driver SideSimilar
- Pushtheleftendofthelamp assemblytowardtheright.
- Turnthelampassemblydownto removeitfromtheliftgate.

A.BulbSocket
B.Bulb
C.LampAssembly
-
Turnthebulbsocket(A) counterclockwisetoremoveit fromthelampassembly(C).
-
Pullthebulb(B) straightout of the bulbsocket.
-
Pushthereplacementbulb straightintothebulbsocketand turnthebulbsocketclockwiseto installitintothelampassembly.
- Turnthelampassemblyintothe liftgateengagingtheclipside first.
- Pushonthelampsideopposite theclipuntilthelampassembly locksintoplace.
ReplacementBulbs
| ExteriorLamp | Bulb Number |
| Back-UpLamp912 | |
| BaseLevel Headlamp High-beam | H9 |
| ExteriorLamp | Bulb Number |
| BaseLevel Headlamp Low-beam/Daytime Running Lamp(DRL) | H11 |
| DaytimeRunning Lamp(DRL)for UplevelSystem | W21/5WLL (T-20) |
| LicensePlateLampW5W | |
| Stoplamp/Taillamp/ TurnSignalRear | 7440 |
| TurnSignalFront (Amber) | 7443NA |
Forreplacementbulbsnotlisted here,contactyourdealer.
ElectricalSystem
ElectricalSystem Overload
The vehicle has fuses and circuit breaker stop protect against electrical system overload.
Whenthecurrentelectricalloadis tooheavy, the circuitbreakeropens and closes, protecting the circuit until the current load return to normal or the problem is fixed.
This greatly reduces the chance of circuit overload and fire caused by electrical problems.
Fusesandcircuitbreakersprotect thefollowinginthevehicle:
- HeadlampWiring
• WindshieldWiperMotor
• PowerWindowsandOther PowerAccessories
Replaceabadfusewithanewone oftheidenticalsizeandrating.
Ifthereisaproblemontheroad andafuseneedstobereplaced, thesameamperagefusecanbe borrowed.Choosesomefeatureof thevehiclethatisnotneededtouse andreplaceitassoonaspossible.
HeadlampWiring
Anelectricaloverloadmaycause thelampstogoonandoff, orin somecasestoremainoff. Havethe headlampwiringcheckedrightaway ifthelampsgoonandoffor remainoff.
WindshieldWipers
Ifthewipermotoroverheatsdueto heavysnoworice, the windshield wiperswillstopuntilthemotorcools and will then restart.
Although the circuit is protected from electrical overload, overload dueto heavysnow oricemay cause wiper linkaged damage. Always clear rice and heavysnow from the windshield before using the windshield wipers.
If the overload is caused by an electrical problem and not snow or ice, besuretogetit fixed.
FusesandCircuit Breakers
Thewiringcircuitsinthevehicleare protectedfromshortcircuitsbya combinationoffusesandcircuit breakers. Thisgreatlyreducesthe chanceofdamagecausedby electricalproblems.
Tocheckafuse, lookatthe silver-coloredbandinsidethefuse. Ifthebandisbrokenormelted, replacethefuse. Besuretoreplace abadfusewithanewoneofthe identicalsizeandrating.
Fusesofthesameamperage canbetemporarilyborrowedfrom anotherfuselocation,ifafusegoes out.Replacethefuseassoonas youcan.
To identify and check fuses, circuit breakers, and relays, see Engine Compartment Fuse Block on page 10-45 and Rear Compartment Fuse Block on page 10-49.
EngineCompartment FuseBlock
Toremovethefuseblockcover, presstheclipsonthecoverandlift itstraightup.
Notice: Spilling liquidon any electrical component on the vehicle may damage it. Always keep the cover on any electrical component.
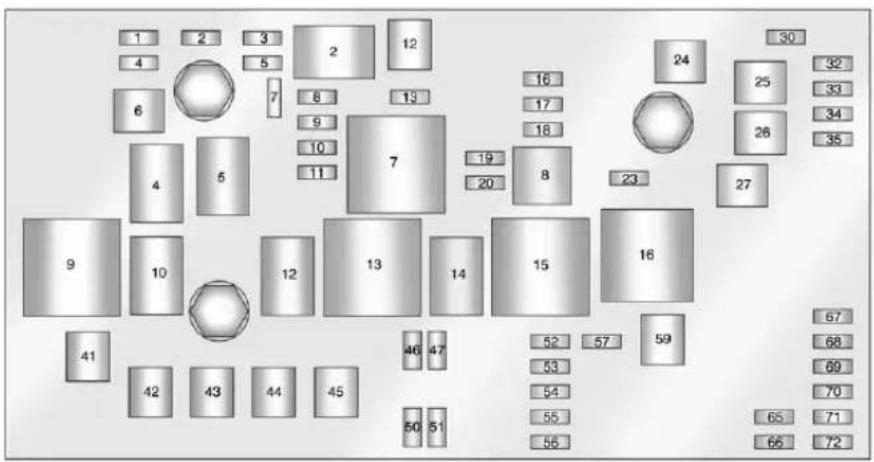
EngineCompartmentFuseBlock
The vehicle may not be equipped with allothefuses, relays, and feature shown.
| J-Case Fuses | Usage |
| 6Wiper | |
| 12Vacu | umPump |
| J-Case Fuses | Usage |
| 24 | AntilockBrake SystemPump |
| 25 | RearElectrical Center1 |
| 26 | RearElectrical Center2 |
| 27NotUsed | |
| 41CoolingFan2(LF1) | |
| 42Starter | |
| 43NotUsed | |
| 44NotUsed | |
| 45CoolingFan1(LF1) | |
| 59 | Secondary AIRPump |
| MiniFusesUsage | |
| 1 | EngineControlModuleBattery |
| 2 | TransmissionControlModuleBattery |
| 3 | MassAirFlowSensor |
| 4AfterboilPump | |
| MiniFusesUsage | |
| 5 | EngineControlModuleRunCrank |
| 7 | Post-CatalyticConverterO2Sensor |
| 8 | Pre-CatalyticConverterO2Sensor |
| 9 | EngineControlModulePowertrain |
| 10 | FuelInjectors-Even |
| 11 | FuelInjectors-Odd |
| 13 | Washer |
| 16 | InstrumentPanelCluster/MalfunctionIndicatorLamp/Ignition |
| 17 | AirQualitySensor |
| 18 | HeadampWasher |
| 19 | TransmissionControlModuleRunCrank |
| MiniFusesUsage | |
| 20 | RearElectrical CenterRunCrank |
| 23HeaterMotor | |
| 30SwitchBackLight | |
| 32 | BatterySense (RegulatedVoltage Control) |
| 33 | AdaptiveForward Lighting/Adaptive HeadlampLeveling Module |
| 34 | BodyControl Module7 |
| 35 | ElectronicBrake ControlModule |
| 46 | Low-Beam Headlamp-Right |
| 47 | Low-Beam Headlamp-Left |
| 50FrontFogLamps | |
| 51Horn | |
| 52 | FuelSystemControl Module |
| 53HeadlampLevel | |
| 54 | SensingDiagnostic ModuleIgnition |
| 55 | High-Beam Headlamp-Right |
| 56 | High-Beam Headlamp-Left |
| 57 | IgnitionSteering ColumnLock |
| 65 | TrailerRight Stoplamp |
| 66Trailer | LeftStoplamp |
| 67Spare | |
| 68Spare | |
| 69Spare | |
| 70Spare | |
| 71Spare | |
| 72Spare | |
| MiniRelaysUsage | |
| 7Powertrain | |
| 9CoolingFan2(LF1) | |
| 13CoolingFan1(LF1) | |
| 15Run/Crank | |
| 16 | Secondary AIRPump |
| Micro Relays | Usage |
| 2VacuumPump | |
| 4WiperControl | |
| 5WiperSpeed | |
| 10Starter | |
| 12CoolFan3(LF1) | |
| 14LowBeam/HID | |
| UMicro Relays | Usage |
| 8HeadlampWasher | |
InstrumentPanelFuse Block
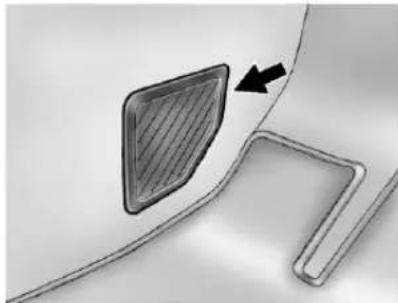
natural_image
Diagram showing a meshed rectangular component with an arrow pointing to it, next to a curved rectangular structure (no text or symbols)Theinstrumentpanelfuseblock islocatedinthecenterconsole betweenthedriverandpassenger seats.Toaccessthefuses,open thefusepaneldoorfromthe passengersidebypullingitout.
Toreinstallthedoor, pushthedoor back into its original allocation.
The vehicle may not be equipped with all of the fuses, relays and feature shown.
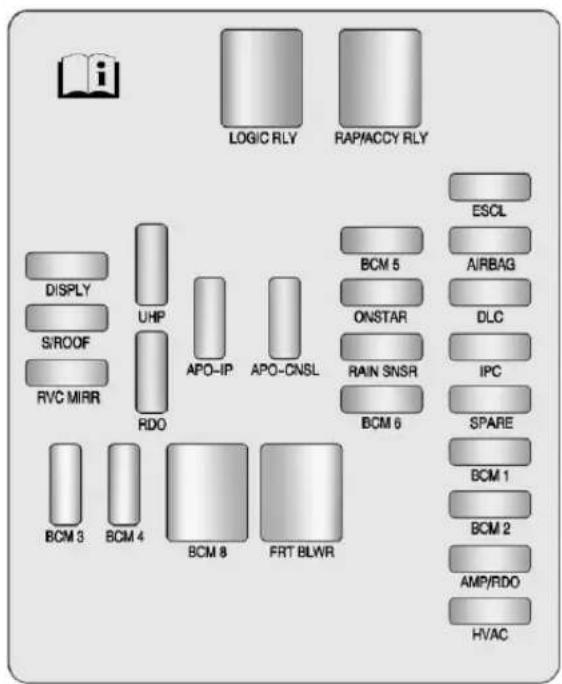
InstrumentPanelFuseBlock
| MiniFusesUsage | |
| DISPLYDisplay | |
| S/ROOFSunRoof | |
| RVCMIRR | RearVisionCameraMirror |
| UHP | UniversalHandsfreePhone |
| RDORadio | |
| APO-IP | AuxiliaryPowerOutlet-InstrumentPanel |
| APO-CNSL | AuxiliaryPowerOutlet-FloorConsole |
| BCM3 | BodyControlModule3 |
| BCM4 | BodyControlModule4 |
| BCM5 | BodyControlModule5 |
| ONSTAR | OnStar®System(IfEquipped) |
| RAINSNSRRainSensor | |
| BCM6 | BodyControlModule6 |
| ESCL | ElectronicSteeringColumnLock |
| AIRBAG | SensingandDiagnosticModule |
| DLC | DataLinkConnection |
| IPC | InstrumentPanelCluster |
| SPARENot | Used |
| BCM1 | BodyControlModule1 |
| BCM2 | BodyControlModule2 |
| MiniFusesUsage | |
| AMP/RDOAmplifier/Radio | |
| HVAC | HeatingVentilation &AirConditioning |
| J—Case Fuses | Usage |
| BCM8 | BodyControl Module8 |
| FRTBLWRFrontBlower | |
| RelaysUsage | |
| LOGICRLYLogisticsRelay | |
| RAP/ACCYRLY | RetainedAccessoryPower/AccessoryRelay |
RearCompartmentFuse Block
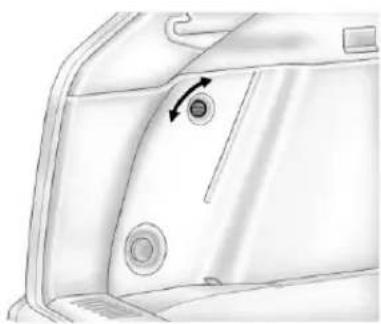
natural_image
Technical line drawing of a mechanical component with a circular feature and directional arrow (no text or symbols)Therearcompartmentfuseblockis locatedinthecargoarea,onthe driversideofthevehiclebehindthe lowertrimpanel.Toopen,turnthe latchwithaflatbladedtoolandpull thetrimpanelfromtheedgestofold itdown.
The vehicle may not be equipped with allothefuses, relays, and feature shown.

flowchart
graph TD
    A["ROOM 1"] --> B["ROOM 2"]
    B --> C["ROOM 3"]
    C --> D["ROOM 4"]
    D --> E["ROOM 5"]
    E --> F["ROOM 6"]
    F --> G["ROOM 7"]
    G --> H["ROOM 8"]
    H --> I["ROOM 9"]
    I --> J["ROOM 10"]
    J --> K["ROOM 11"]
    K --> L["ROOM 12"]
    L --> M["ROOM 13"]
    M --> N["ROOM 14"]
    N --> O["ROOM 15"]
    O --> P["ROOM 16"]
    P --> Q["ROOM 17"]
    Q --> R["ROOM 18"]
    R --> S["ROOM 19"]
    S --> T["ROOM 20"]
    T --> U["ROOM 21"]
    U --> V["ROOM 22"]
    V --> W["ROOM 23"]
    W --> X["ROOM 24"]
    X --> Y["ROOM 25"]
    Y --> Z["ROOM 26"]
    Z --> AA["ROOM 27"]
    AA --> AB["ROOM 28"]
    AB --> AC["ROOM 29"]
    AC --> AD["ROOM 30"]
    AD --> AE["ROOM 31"]
    AE --> AF["ROOM 32"]
    AF --> AG["ROOM 33"]
    AG --> AH["ROOM 34"]
    AH --> AI["ROOM 35"]
    AI --> AJ["ROOM 36"]
    AJ --> AK["ROOM 37"]
    AK --> AL["ROOM 38"]
    AL --> AM["ROOM 39"]
    AM --> AN["ROOM 40"]
    AN --> AO["ROOM 41"]
    AO --> AP["ROOM 42"]
    AP --> AQ["ROOM 43"]
    AQ --> AR["ROOM 44"]
    AR --> AS["ROOM 45"]
RearCompartmentFuseBlock
| FusesUsage | |
| SPARE FUSES | SpareFuses |
| AOSMDL | AutomaticOccupant SensingModule |
| SPARENotUsed | |
| SPARENotUsed | |
| SPARENotUsed | |
| PASSDR WDOSW | PassengerDoor WindowSwitch |
| DRV PWRSEAT | DriverPowerSeat |
| PASSDR PWRSEAT | Passenger/Driver PowerSeats |
| MDLTRLRT | TrailerModule |
| RPAMDL | RearParkingAssist Module |
| RDMRear | DriveModule |
| PRK LPSTRLR | TrailerParkLamps |
| FUEL PUMP | FuelPump |
| FusesUsage | |
| *SECSecurity | |
| INFOTMNTInfotainment | |
| *TRLREXPTrailerExport | |
| WPRREARRearWiper | |
| MIRWDOMDL | MirrorWindowModule |
| VICS | VehicleInformationCommunicationsSystem(Export) |
| CNSTRVENT | CanisterVent |
| LGMLOGIC | LiftGateModuleLogic |
| CAMERARearVisionCamera | |
| FRTVENTSEAT | FrontVentilatedSeats |
| TRLRMDLTrailerModule | |
| SADSMDL | SemiActiveDampingSystemModule |
| RRHTDSEAT | RearHeatedSeats |
| FRTHTDSEAT | FrontHeatedSeats |
| THEFTHORN | TheftHorn |
| *LGATELiftgate | |
| SHUNTShunt | |
| REARDEFOG | RearDefog |
| *BCMTHEFT | BodyControlModuleTheft |
| *TRLR2Trailer2 | |
| UGDO | UniversalGarageDoorOpener |
| RTWDORightWindow | |
| FusesUsage | |
| PRKBRKMDL | ParkBrakeModule |
| SPARENotUsed | |
| LTWDOLeftWindow | |
| IGN/THEFT1 | Ignition/Theft1 |
| LGATEMDL | LiftgateModule |
| IGN/THEFT2 | Ignition/Theft2 |
| SPARENotUsed | |
| HTDMIRHeatedMirror | |
| AUXPWR | AuxiliaryPowerOutlet |
| RelaysUsage | |
| SPARENotUsed | |
| *FUEL PUMP | FuelPump |
| WPR CONTRL | WiperControl |
| *RUNRLYRunRelay | |
| LOGIC | LogisticRelay (Export) |
| DEFOG REAR | RearWindow Defogger |
*-Denotesup-levelcontent.
WheelsandTires
Tires
EverynewSaabvehiclehas high-qualitytiresmadebya leadingtiremanufacturer. Seethewarrantymanualfor informationregardingthetire warrantyandwheretoget service.Foradditional informationrefertothe tiremanufacturer.

WARNING
- Poorlymaintained and improperly used tires are dangerous.
• Overloadingthetirescan causeoverheatingasaresult oftoomuchflexing.There couldbeablowoutanda seriouscrash.See Vehicle LoadLimitsonpage9-12.
(Continued)
WARNING(Continued)
- Underinflatedtiresposethe samedangerasoverloaded tires. Theresultingcrash couldcauseseriousinjury. Checkalltiresfrequentlyto maintaintherecommended pressure. Tirepressure shouldbecheckedwhenthe tiresarecold.
• Overinflatedtiresaremore likelytobecut, punctured, orbrokenbyasudden impact—suchaswhen hittingapothole. Keeptires attherecommended pressure. - Wornoroldtirescancausea crash. If the treadis badly worn, replace them.
- Replaceanytiresthathave beendamagedbyimpacts withpotholes,curbs,etc.
(Continued)
WARNING(Continued)
- Improperlyrepairedtirescan causeacrash. Only the dealeroranauthorized tire servicecentershouldrepair, replace, dismount, and mountthetires.
- Donotspinthetiresin excessof55km/h(35mph) onslipperysurfacesuch assnow,mud,ice,etc. Excessivespinningmay causethetirestoexplode.
See TirePressurefor High-SpeedOperationon page 10-61 for inflation pressure adjustment for high-speed driving.
TireSidewallLabeling
Usefulinformationaboutatireis moldedintoitssidewall. The exampleshowatypical passengervehicletireanda compactsparetiresidewall.

Passenger(P-Metric)TireExample
(A)TireSize:Thetiresizeisa combinationoflettersand numbersusedtodefinea particulartire'swidth,height,aspectratio,constructiontype,
andservicedescription.Seethe "TireSize"illustrationalterinthis sectionformoredetail.
(B)TPCSpec(Tire PerformanceCriteria Specification):Original equipmenttiresdesignedto specifictreperformancecriteria haveaTPCspecificationcode moldedontothesidewall.TPC specificationsmeetorexceedall federalsafetyguidelines.
(C)DOT(Departmentof Transportation): The DepartmentofTransportation (DOT)codeindicatesthat thetireisincompliance withtheU.S.Departmentof TransportationMotorVehicle SafetyStandards.
(D) TireIdentificationNumber (TIN): The letters and numbers following the DOT (Department of Transportation) code are the TireIdentificationNumber (TIN). The TIN shows the manufacturer and plant code, tiresize, and datethetire was manufactured. The TIN is molded on both sides of the tire, although only ones idemay havethedate of manufacture.
(E)TirePlyMaterial : Thetype ofcordandnumberofpliesin thesidewallandunderthetread.
(F)UniformTireQuality Grading(UTQG): Tire manufacturersarerequired to gradetiresbasedonthree performancefactors:treadwear, traction,andtemperature resistance.Formoreinformation see Uniform Tire Quality Gradingonpage 10-72.
(G)MaximumColdInflation LoadLimit :Maximumload thatcanbecarriedandthe maximumpressureneededto supportthatload.
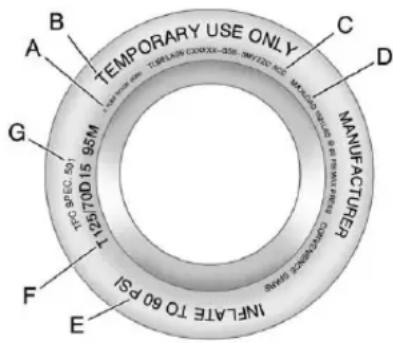
CompactSpareTireExample
(A)TirePlyMaterial: Thetype ofcordandnumberofpliesin thesidewallandunderthetread.
(B)TemporaryUseOnly : Thecompactsparetireor temporaryusetirehasatread lifeofapproximately5000km (3,000mi)andshouldnotbe drivenatspeedsover105km/h (65mph).Thecompactspare tireisforemergencyusewhen aregularroadtirehaslostair andgoneflat.Ifthevehicle hasacompactsparetire, seeCompactSpare Tireon page10-92andIfaTireGoes Flatonpage10-75.
(C) TireIdentificationNumber (TIN): The letters and numbers following the DOT (Department of Transportation) code are the TireIdentificationNumber (TIN).
The TIN show the manufacturer and plant code, tiresize, and datethe tire was manufactured. The TIN is molded on both sides of the tire, although only ones idemay havethedate of manufacture.
(D)MaximumColdInflation LoadLimit :Maximumload thatcanbecarriedandthe maximumpressureneededto supportthatload.
(E) Tire Inflation : The temporary usetire or compact spare tires hould be inflated to 420kPa (60 psi). Formore information on tire pressure and inflation see Tire Pressure on page 10-59.
(F)TireSize: A combination of letters and numbers define a tire's width, height, aspect ratio, construction type, and service description. The letter Tasthe first character in the tiresize mean the tire is for temporary use only.
(G)TPCSpec(Tire PerformanceCriteria Specification):Original equipmenttiresdesignedto specificireperformancecriteria haveaTPCspecificationcode moldedontothesidewall.TPC specificationsmeetorexceed allfederalsafetyguidelines.
TireDesignations
TireSize
The following is an example of atypical passenger vehicle tiresize.

(A)Passenger(P-Metric)Tire: TheUnitedStatesversionofa metrictriesizingsystem. The letterPasthefirstcharacterin thetiresizemeansapassenger vehicletireengineeredto standardssetbytheU.S.Tire andRimAssociation.
(B)TireWidth : Thethree-digit numberindicatesthetiresection widthinmillimetersfrom sidewalltosidewall.
(C)AspectRatio :Atwo-digit numberthatindicatesthetire height-to-widthmeasurements. Forexample,ifthetiresize aspectratiois60,asshownin itemCoftheillustration,itwould meanthathetire'ssidewallis 60percentashhighasitiswide.
(D)ConstructionCode :A lettercodeisusedtoindicate thetypeofplyconstructionin thetire.TheletterRmeans radialplyconstruction;the letterDmeansdiagonalorbias plyconstruction;andtheletterB meansbelted-biasply construction.
(E)RimDiameter:Diameter of the wheelin inches.
(F)ServiceDescription :These charactersrepresenttheload indexandspeedratingofthe tire. Theloadindexrepresents theloadcarryingcapacityatire iscertifiedtocarry. Thespeed ratingisthemaximumspeeda tireiscertifiedtocarryaload.
TireTerminology and Definitions
AirPressure:Theamount ofairinsidethetirepressing outwardoneachsquareinch ofthetire.Airpressureis expressedinkPa(kilopascal) orpsi(poundspersquareinch).
AccessoryWeight : The combinedweightofoptional accessories. Some examples of optional accessories are automatic transmission, power steering, power brakes, power windows, power seats, and air conditioning.
AspectRatio :Therelationship ofatire'sheighttoitswidth.
Belt: Arubbercoatedlayerof cordsthatislocatedbetween thepliesandthetread. Cords maybemadefromsteelorother reinforcingmaterials.
Bead: Thetirebead contains steelwireswrapped by steel cordsthathold the tire onto therim.
BiasPlyTire :Apneumatictire inwhichthepliesarelaid at alternateangleslessthan 90degreestothecenterline ofthetread.
ColdTirePressure :The amountofairpressureinatire, measuredinkPa(kilopascal) orpsi(poundspersquareinch) beforeatirehasbuiltupheat fromdriving.See TirePressure onpage 10-59.
CurbWeight : The weight of a motor vehicle with standard and optionalequipment including the maximum capacity off fuel, oil, and coolant, but without passengers and cargo.
DOTMarkings: Acode molded into the sidewall of atiresignifying that the tire is incompliance with the U.S. Department of Transportation (DOT) Motor Vehicle Safety Standards. The DOT code includes the Tire Identification Number (TIN), analphanumeric designator which can also identify the tire manufacturer, production plant, brand, and date of production.
GVWR: Gross Vehicle Weight Rating. See Vehicle Load Limits on page 9-12.
GAWRFRT : GrossAxleWeight Ratingforthefrontaxle. See VehicleLoadLimitson page9-12.
GAWRRR :GrossAxleWeight Ratingfortherearaxle.See VehicleLoadLimitson page9-12.
IntendedOutboardSidewall : Thesideofanasymmetricaltire, thatmustalwaysfaceoutward whenmountedonavehicle.
Kilopascal(kPa) : Thematic unitforairpressure.
LightTruck(LT-Metric)Tire : Atireusedonlightdutytrucks andsomemultipurpose passengervehicles.
LoadIndex : Anassigned numberranging from 1 to 279 that correspond stotheload carrying capacity of atire.
Maximum Inflation Pressure : Themaximum air pressure to which acoldtire can be inflated. Themaximum air pressure is molded onto the sidewall.
MaximumLoadRating : Theloadratingforatireatthe maximumpermissibleinflation pressureforthattire.
MaximumLoadedVehicle Weight: Thesumofcurb weight, accessoryweight, vehiclecapacityweight, and productionoptionsweight.
NormalOccupantWeight : The numberofoccupantsavehicle isdesignedtoseatmultipliedby 68kg(150lbs). See Vehicle LoadLimitsonpage9-12.
OccupantDistribution : Designatedseatingpositions.
OutwardFacingSidewall :The sideofanasymmetricaltirethat hasaparticularsidethatfaces outwardwhenmountedona vehicle. Thesideofthetire thatcontainsawhitewall, bearswhitelettering,orbears manufacturer,brand,and/or modelnamemoldingthatis higherordeeperthanthesame moldingsontheothersidewall ofthetire.
Passenger(P-Metric)Tire: Atireusedonpassengercars andsomelightdutytrucksand multipurposevehicles.
Recommended Inflation Pressure: Vehicle manufacturer's recommended tireinflation pressureasshown on the tire placard. See Tire Pressure on page 10-59 and Vehicle Load Limit on page 9-12.
RadialPlyTire :Apneumatic tireinwhichtheplycordsthat extendtothebeadsarelaidat 90degreestothecenterlineof thetread.
Rim: Ametalsupportforatire anduponwhichthetirebeads areseated.
Sidewall: Theportionofatire betweenthetreadandthebead.
SpeedRating :An alphanumericcodeassigned toatireindicatingthemaximum speedatwhichatirecan operate.
Traction: Thefrictionbetween thetireandtheroadsurface. Theamountofgripprovided.
Tread: The portion of atire that comes into contact with theroad.
TreadwearIndicators : Narrow bands, sometimes called wear bars, that show acrossthetread of atire when only 1.6mm (1/16in) oft read remains. See When It Is Time for New Tires on page 10-68.
UTQGS(UniformTire QualityGradingStandards) : Atireinformationsystem thatprovidesconsumerswith ratingsforatire'straction, temperature,andtreadwear. Ratingsaredeterminedby tiremanufacturersusing governmenttestingprocedures. Theratingsaremoldedinto thesidewallofthetire.See Uniform TireQuality Gradingonpage 10-72.
VehicleCapacityWeight : Thenumberofdesignated seatingpositionsmultipliedby 68kg(150lbs)plustherated cargoload.See VehicleLoad Limitsonpage9-12.
VehicleMaximumLoadonthe
Tire: Loadonanindividualtire duetocurbweight, accessory weight, occupantweight, and cargoweight.
VehiclePlacard :Alabel permanentlyattachedtoa vehicleshowingthevehicle capacityweightandthe originalequipmenttiresize andrecommendedinflation pressure.See“TireandLoading InformationLabel”under Vehicle LoadLimitsonpage9-12.
TirePressure
Tiresneedthecorrectamountof airpressuretooperate effectively.
Notice: Neithertire underinflation nor overinflation is good. Underinflated tires, ortires that donothaveenoughair, can result in:
- Tireoverloading and overheating which could lead to a blowout.
• Prematureor irregularwear. - Poorhandling.
- Reducedfueleconomy.
Overinflatedtires, ortiresthat havetoomuchair, can resultin:
- Unusualwear.
- Poorhandling.
- Roughride.
- Needlessdamagefrom roadhazards.
The Tire and Loading Information label on the vehicle indicates the original equipment tires and the correct cold tire inflation pressures. There recommended pressure is the minimum air pressure needed to support the vehicle's maximum load carrying capacity.
For additional information regarding how much weight the vehicle can carry, and an example of the Tire and Loading Information label, see Vehicle Load Limit on page 9-12. How the vehicle is loaded affects vehicle handling and ride comfort. Never load the vehicle with more weight than it was designed to carry.
WhentoCheck
Checkthetiresonceamonthor more. Donotforgetthecompact spare tire, if the vehicle has one. The compact spa should beat 420kPa (60psi). For additional information regarding the compact spare tire, see Compact Spare Tire on page 10-92.
HowtoCheck
Useagoodqualitypocket-type gaugetochecktirepressure. Propertireinflationcannotbe determinedbylookingatthetire. Checkthetireinflationpressure whenthetiresarecold,meaning thevehiclehasnotbeendriven foratleastthreehoursorno morethan1.6km(1mi).
Removethevalvecapfromthe tirevalvestem.Pressthetire gaugefirmlyontothevalveto getapressuremeasurement.
If the cold tire inflation pressure match est here recommended pressure on the Tire and Loading Information label, no further adjustment is necessary. If the inflation pressure is slow, add air until there recommended pressure is reached. If the inflation pressure is high, press on themetal stem in the center of the tire valvetorelease air.
Re-checkthetirepressurewith thetiregauge.
Return the valve capson the valvestem stop prevent leaks and keep out dirt and moisture.
TirePressurefor High-SpeedOperation

WARNING
Drivingathighspeeds, 160km/h (100mph) or higher, puts an additional strainontires. Sustained high-speed driving causes excessive heat buildup and can cause sudden tire failure. You could have acrash and you others could be killed. Some high-speed rated tires require inflation pressure adjustment for high-speed operation. When speed limits and road conditions are such that vehicle can be driven at high speeds, makes sure the tires aerated for high-speed operation, in excellent condition, and set to the correct cold tire inflation pressure for the vehicle load.
VehicleswithP235/65R18, P235/55R20, or 235/55R20 size tires require inflation pressure adjustment when driving the vehicle at speed of 160 km/h (100 mph) or higher. Set the cold inflation pressure to maximum inflation pressures shown on the tires sidewall, or 260 kPa (38 psi), whichever is lower. Return the tire to the recommended cold tire inflation pressure when high-speed driving has ended. See Vehicle Load Limits on page 9-12 and Tire Pressure on page 10-59.
Themaximumloadandinflation pressureismoldedonthetire sidewall,insmallletters,near therimflange.Itwillread somethinglikethis:Maximumload 690kg(1521lbs)300kPa(44psi) Max.Press.
TirePressureMonitor System
The TirePressureMonitorSystem (TPMS) uses radio and sensor technology to check tire pressure levels. The TPMS sensors monitor the air pressure in your tires and transmit tire pressurereading stoa receiver located in the vehicle.
Eachtire, including the spare (if provided), should be checked monthly when cold and inflated to the inflation pressurerecommended by the vehicle manufacturer on the vehicle placardortire inflation pressure label. (If your vehicle has tires of different sizing thanthesize indicated on the vehicle placardor tire inflation pressure label, you should determinethe propertire inflation pressure forthosetires.)
Asanadded safety feature, your vehicle has been equipped with a tire pressure monitoringsystem (TPMS) that illuminates alowtire pressure telltale when none or more of your tires is significantly under-inflated.
Accordingly, whenthelowtire pressuretelltaleilluminates, you shouldstopandcheckyourtires as soonaspossible, and inflate themtotheproperpressure. Driving on asignificantly under-inflated tire causesthetiretooverheatandcan leadtotirefailure. Under-inflation alsoreducesfuelefficiency and tirereadlife, and may affect the vehicle's handling and stopping ability.
PleasenotethattheTPMSis notasubstituteforpropertire maintenance, anditisthedriver's responsibility to maintain incorrect tire pressure, even if under-inflation has not reached the level to trigger illumination of the TPMSlow tire pressure telltale.
Yourvehiclehasalsobeen equippedwithaTPMSmalfunction indicatortoindicatewhenthe systemisnotoperatingproperly. TheTPMSmalfunctionindicatoris combinedwiththelowtirepressure telltale.Whenthesystemdetectsa malfunction,thetelltalewillflashfor approximatelyoneminuteandthen remaincontinuouslyilluminated. Thissequencewillcontinueupon subsequentvehiclestart-upsas longasthemalfunctionexists.
Whenthemalfunctionindicator isilluminated, thesystemmay notbeabletodetectorsignallow tirepressureasintended. TPMS malfunctionsmayoccurforvariety ofreasons, includingtheinstallation ofreplacementoralternatetiresor wheelsonthevehiclethatprevent theTPMSfromfunctioningproperly.
AlwayschecktheTPMSmalfunction telltaleafterreplacingoneormore tiresorwheelsonyourvehicleto ensurethatthereplacementor alternatetiresandwheelsallow theTPMStocontinuetofunction properly.
See TirePressureMonitor Operationonpage 10-63 for additional information.
FederalCommunications Commission(FCC)and IndustryCanada
See Radio Frequency Statement on page 13-12 for information regarding Part 15 of the Federal Communications Commission (FCC) rules and Industry Canada Standards RSS-210/220/310.
TirePressureMonitor Operation
This vehicle may have a Tire Pressure Monitor System (TPMS). The TPMS is designed to warn the driver when alow tire pressure condition exists. TPMS sensors are mounted on to each tire and wheel assembly, excluding the spare tire and wheel assembly. The TPMS sensors monitor the air pressure in the tires and transmit the tire pressurereading to are receiver located in the vehicle.
When alow tire pressure condition is detected, the TPMS illuminates the low tire pressure warning light located on the instrument cluster. If the warning light comes on, stop as soon as possible and inflate the tire rest there recommended pressures shown on the tire loading information label. See Vehicle Load Limitson page 9-12.
Amessagetocheckthepressure displaysintheDriverInformation Center(DIC).Thelowtirepressure warninglightandtheDICwarning messagecomeonateachignition cycleuntilthetiresareinflatedto thecorrectinflationpressure.Using theDIC,tirepressurelevelscanbe viewed.Foradditionalinformation anddetailsabouttheDICoperation anddisplaysseeDriverInformation Center(DIC)onpage5-29.
Thelowtirepressurewarninglight maycomeonincoolweatherwhen thevehicleisfirststarted,andthen turnoffasthevehicleisdriven. Thiscouldbeanearlyindicatorthat theairpressureisgettinglowand needstobeinflatedtotheproper pressure.
ATireandLoadingInformation labelshowsthesizeoftheoriginal equipmenttiresandthecorrect inflationpressureforthetireswhen theyarecold.See VehicleLoad Limitsonpage9-12,foranexample ofthe TireandLoadingInformation labelanditslocation.Alsosee Tire Pressureonpage 10-59.
The TPMScanwarnabouta lowtirepressureconditionbut itdoesnotreplacenormaltire maintenance. See TireInspection onpage 10-67, TireRotationon page 10-67 and Tireson page 10-52.
Notice:Tiresealantmaterialsare notallthesame.Anon-approved tiresealantcoulddamagethe TPMSsensors.TPMSsensor damagecausedbyusingan incorrecttiresealantisnot coveredbythevehicle warranty.Alwaysuseonlythe Saab-approvedtiresealant availablethroughyourdealer orincludedinthevehicle.
Factory-installed Tire Inflator Kits usea Saab approved liquid tire sealant. Using non-approved tire sealant could damage the TPMS sensors. See Tire Sealant and Compressor Kit on page 10-77 for information regarding the inflator kit materials and instructions.
TPMSMalfunctionLightand Message
The TPMS will not function properly if one or more of the TPMS sensors are missing in operable. When the system detects a malfunction, the low tire pressure warning light flashes for about one minute and then stay on for their remainder of the ignition cycle. ADIC warning message also displays. The malfunction light and DIC warning message come on at each ignition cycle until the problem is corrected. Some of the condition that can cause the set to come on are:
- Oneoftheroadtireshasbeen replacedwiththesparetire. Thesparetiredoesnothavea TPMSsensor. Themalfunction lightandtheDICmessage shouldgooffaftertheroad tireisreplacedandthesensor matchingprocessisperformed successfully. See "TPMSSensor MatchingProcess" laterinthis section.
- TheTPMSsensormatching processwasnotdoneor notcompletedsuccessfully afterrotatingthetires. The malfunctionlightandtheDIC messages should gooffafter successfullycompleting the sensormatchingprocess.See "TPMSSensorMatching Process"laterinthissection.
-
OneormoreTPMSsensors are missingordamaged. The malfunctionlightandtheDIC messages should go off when the TPMSsensors are installed and the sensormatching process is performed successfully. See your dealer for service.
-
Replacementtiresorwheelsdo notmatchtheoriginalequipment tiresorwheels.Tiresandwheels otherthanthoserecommended couldpreventtheTPMSfrom functioningproperly.SeeBuying NewTiresonpage10-69.
- Operatingelectronicdevicesor beingnearfacilitiesusingradio wavefrequenciiessimilartothe TPMScouldcausetheTPMS sensorstomalfunction.
If the TPMS is not functioning properly, it cannot detectorsignala lowtirecondition. Se your dealer for service if the TPMS malfunction light and DIC message come on and stay on.
TPMSSensorMatching Process
EachTPMSsensorhasaunique identificationcode. Theidentification codeneedstobematchedtoa newtire/wheelpositionafterrotating thevehicle'stiresorreplacing oneormoreoftheTPMSsensors. Also,theTPMSsensormatching processshouldbeperformedafter replacingasparetirewitharoad tirecontainingtheTPMSsensor. ThemalfunctionlightandtheDIC messageshouldgooffatthenext ignitioncycle. Thesensorsare matchedtothetire/wheelpositions, usingaTPMSrelearntool, inthe followingorder:driversidefronttire, passengersidefronttire, passenger sidereartire, anddriversiderear. Seeyourdealerforserviceorto purchasearelearntool.
10-66VehicleCare
There are two minutes to match the first tire/wheel position, and five minutes overall to match all four tire/wheel positions. If it takes longer, them matching process stops and must be restarted.
The TPMSsensormatching processis:
- Settheparkingbrake.
- Placethevehiclepowermodein START. See Ignition Positions on page 9-18.
- Select the vehicle information menu using themenubutton.
- Select the tire pressurescreen using the up/downthumbwheel.
-
PressandholdSET/CLRto beginthesensormatching process.
-
PressSET/CLRtoconfirm selection. The hornsoundstwice to signalthereceiverisin relearnmode and TIRE LEARNINGACTIVE message display on the DIC screen.
- Startwiththedriverside fronttire.
- Placetherelearntoolagainst thetiresidewall, nearthevalve stem. Thenpressthebuttonto activatetheTPMSsensor. Ahornchirpconfirmsthatthe sensoridentificationcodehas beenmatchedtothistireand wheelposition.
-
Proceed to the passengers side front tire, and repeat the procedure in Step 8.
-
Proceed to the passengerside reartire, and repeat the procedure in Step 8.
- Proceed to the drivers siderear tire, and repeat the procedure in Step 8. The hornsounds twotimesto indicate the sensor identification code has been matched to the driver sidereartire, and the TPMS sensormatching process is no longer active. The TIRE LEARNING ACTIVE message on the DIC displayscreen goes off.
- PressSTOPtoturnthe ignitionoff.
- Setallfourtirestothe recommendedairpressure levelasindicatedontheTire andLoadingInformationlabel.
TireInspection
Werecommendthatthetires, includingthesparetire,ifthe vehiclehasone,beinspected forsignsofwearordamageat leastonceamonth.
Replacethetireif:
• Theindicatorsatthreeor moreplacesaroundthetire canbeseen.
- Thereiscordorfabric showingthroughthetire's rubber.
- Thetreadorsidewallis cracked, cut, orsnagged deepenoughtoshowcord orfabric.
- Thetirehasabump, bulge, orsplit.
- Thetirehasapuncture, cut, orotherdamagethatcannot berepairedwellbecauseof thesizeorlocationofthe damage.
TireRotation
Tiresshouldberotatedevery 12000km(7,500mi).See ScheduledMaintenanceon page 11-3.
Tiresarerotatedtoachievea uniformwearforalltires. The firstrotationisthemost important.
Anytimeunusualwearis noticed, rotatethetiresas soonaspossibleandcheckthe wheelalignment.Alsocheckfor damagedtiresorwheels.Also checkfordamagedtiresor wheels.SeeWhenItIsTimefor NewTiresonpage10-68and WheelReplacementon page 10-74.

flowchart
graph TD
    A["Vehicle 1"] --> B["Vehicle 2"]
    B --> C["Vehicle 3"]
    C --> D["Vehicle 4"]
    D --> A
    A --> B
    B --> C
    C --> D
    D --> A
Usethisrotationpatternwhen rotatingthetires.
Donotincludethecompact sparetireinthetirerotation.
Adjustthefrontandreartires totherecommendedinflation pressureontheTireand LoadingInformationlabelafter thetireshavebeenrotated. See TirePressureonpage10-59 and VehicleLoadLimitson page9-12.
Resetthe TirePressureMonitor System.See TirePressure MonitorOperation on page 10-63.
Makecertainthatallwheel nutsareproperlytightened. See "WheelNutTorque" under CapacitiesandSpecificationson page 12-2.
WARNING
Rustordirtonawheel,oronthe partstowhichitisfastened,can makewheelnutsbecomeloose aftertime. Thewheelcouldcome offandcauseanaccident.When changingawheel,removeany rustordirtfromplaceswherethe wheelattachestothevehicle.In anemergency,aclothorapaper towelcanbeused;however,use ascpraperorwirebrushlaterto removeallrustordirt.
Lightlycoatthecenterofthe wheelhubwithwheelbearing greaseafterawheelchange ortirerotationtoprevent corrosionorrustbuild-up. Donotgetgreaseontheflat wheelmountingsurfaceoron thewheelnutsorbolts.
WhenItIsTimeforNew Tires
Factors such as maintenance, temperatures, drivingspeeds, vehicleloading, and road conditions affect the wear rate of the tires.

natural_image
Diagram of interlocking cylindrical structures with directional arrows indicating movement or force (no text or symbols)Treadwearindicatorsareonewayto tellwhenitistimefornewtires. Treadwearindicatorsappearwhen thetireshaveonly1.6mm(1/16in) orlessoftreadremaining.See Tire Inspectiononpage 10-67and Tire Rotationonpage 10-67formore information.
Therubberintiresagesovertime. Thisalsoappliesforthesparetire, ifthevehiclehasone,evenifitis neverused.Multipleconditions includingtemperatures,loading conditions,andinflationpressure maintenanceaffecthowfastaging takesplace.Tireswilltypically needtobereplacedduetowear beforetheymayneedtobe replacedduetoage.Consult thetiremanufacturerformore informationonwhentires shouldbereplaced.
VehicleStorage
Tiresagewhenstorednormally mountedonaparkedvehicle.Park avehiclethatwillbestoredforat leastamonthinacool,dry,clean areaawayfromdirectsunlightto slowaging.Thisareashouldbe freeofgrease,gasoline,orother substancesthatcandeteriorate rubber.
Parkingforanextendedperiodcan causeflatspotsonthetiresthat mayresultinvibrationswhile driving. Whenstoringavehiclefor atleastamonth,removethetiresor raisethevehicletoreducethe weightfromthetires.
BuyingNewTires
Theoriginalequipmenttires havebeendevelopedand matchedspecificallyforthis vehicleandweredesignedto meetTirePerformanceCriteria Specification(TPCSpec) systemrating.When replacementtiresareneeded, Saabstronglyrecommends buyingtireswiththesameTPC Specrating.
TheTPCSpecsystem considersoveradozen criticalspecification that impact the overall performance of the vehicle, including brake system performance, ride and handling, traction control, and tire pressure monitoring performance. The TPCSpec number is molded onto the tire's sidewall near the tiresize. If the tires have an all-season tread design, the TPCSpec number will be followed by MS form mud and snow. See Tire Sidewall Labeling on page 10-53 for additional information.
Saabrecommendsreplacingall thetiresatthesametime. Uniformtreaddepthonalltires willhelptomaintainthe performanceofthevehicle. Brakingandhandling performancemaybeadversely affectedifallthetiresarenot replacedatthesametime.See TireInspectiononpage10-67 and TireRotationonpage10-67 forinformationonpropertire rotation.
WARNING
Tirescouldexplodeduring improperservice.Attemptingto mountordismountatirecould causeinjuryordeath.Onlyyour dealerorauthorizedtireservice centershouldmountordismount thetires.
WARNING
Mixingtiresofdifferentsizes, brands,ortypesmaycause lossofcontrolofthevehicle, resultinginacrashorother vehicledamage. Usethe correctsize,brand,andtype oftiresonallwheels.
WARNING
Usingbias-plytiresonthe vehiclemaycausethewheel rimflangestodevelopcracks aftermanymilesofdriving. Atireand/orwheelcouldfail suddenlyandcauseacrash. Useonlyradial-plytireswith thewheelsonthevehicle.
If the vehicle tires must be replaced with atire that does not have a TPCSpec number, makes sure they are the same size, load range, speed rating, and construction (radial) as the original tires.
Vehiclesthathaveatire pressuremonitoringsystem couldgiveaninaccurate low-pressurewarningif non-TPCSpecratedtiresare installed.See TirePressure MonitorSystemonpage10-61.
The Tire and Loading Information label indicates the originalequipment tires on the vehicle. See Vehicle Load Limits on page 9-12 forthelabel location and more information about the Tire and Loading Information label.
DifferentSizeTiresand Wheels
Ifwheelsortiresareinstalledthat areadifferentsizethantheoriginal equipmentwheelsandtires,vehicle performance,includingitsbraking, rideandhandlingcharacteristics, stability,andresistancetorollover maybeaffected.Ifthevehiclehas electronicsystemssuchasantilock brakes,rolloverairbags,traction control,andelectronicstability control,theperformanceofthese systemscanalsobearaffected.
WARNING
If differentsizedwheelsareused, theremaynotbeanacceptable levelofperformanceandsafety iftiresnotrecommendedfor thosewheelsareselected. This increasesthechanceofacrash andseriousinjury. OnlyuseSaab specificwheelandtiresystems developedforthevehicle, and havethemproperlyinstalledbya Saabcertifiedtechnician.
SeeBuyingNewTireson page 10-69 and Accessories and Modifications on page 10-3 for additional information.
UniformTireQuality Grading
Qualitygradescanbefound whereapplicableonthetire sidewallbetweentreadshoulder andmaximumsectionwidth. Forexample:
Treadwear200TractionAA TemperatureA
The following information relates to the system developed by the United States National Highway Traffic Safety Administration (NHTSA), which gradestires by treadwear, traction, and temperature performance. This applies only to vehicle less sold in the United States. The grades are molded on the sidewall of most passenger cartires.
TheUniformTireQuality Grading(UTQG)system doesnotapplytodeep tread, winter-typesnowtires, space-saver, ortemporaryuse sparetires, tireswithnominal rimdiametersof10to12inches (25to30cm), ortosome limited-productiontires.
While the tires available on Saabpassengers and light trucks may vary with respect to these grades, they must also conform to federal safety requirements and additional Tire Performance Criteria (TPC) standards.
All Passenger Car Tires Must Conform to Federal Safety Requirements In Addition To These Grades.
Treadwear
Thetreadweargradeisa comparativeratingbasedon thewearrateofthetirewhen testedundercontrolled conditionsonaspecified governmenttestcourse. Forexample, atiregraded 150wouldwearoneandahalf (1½)timesaswellonthe governmentcourseasatire graded100. Therelative performanceoftiresdepends upontheactualconditionsof theiruse, however, and may departsignificantlyfromthe normduetovariationsin drivinghabits, servicepractices anddifferencesinroad characteristicsandclimate.
Traction-AA,A,B,C
Thetractiongrades, from highest to lowest, are AA, A, B, and C. Those grades represent the tire's ability to stop on wet pavement as measured under controlled conditions on specified government tests surfaces of asphalt and concrete. At remarked C may have poor traction performance. Warning: The traction grade assigned to that histire is based on straight-ahead braking traction tests, and does not include acceleration, cornering, hydroplaning, or peak traction characteristics.
Temperature-A,B,C
Thetemperaturegrades areA(thehighest),B,andC, representing the tire's resistance to the generation of heat and its ability to dissipate heat when tested under controlled condition as specified indoor laboratory test wheel. Sustained hightemperature can cause thematerial of the tire to degenerate and reduce tire life, and excessive temperature can lead to sudden tire failure.
ThegradeCcorrespondstoa levelofperformancewhichall passengercartiresmustmeet undertheFederalMotorSafety StandardNo.109.GradesB andArepresenthigherlevelsof performanceonthelaboratory testwheelthanthemminimum requiredbylaw.Warning:The temperaturegradeforthistire isestablishedforatirethat isproperlyinflatedandnot overloaded.Excessivespeed, underinflation,orexcessive loading,eitherseparatelyorin combination,cancauseheat buildupandpossibletirefailure.
WheelAlignmentandTire Balance
Thetiresandwheelswerealigned andbalancedatthefactoryto providethelongesttirelifeandbest overallperformance.Adjustmentsto wheelalignmentandtirebalancing willnotbenecessaryonaregular basis.However,checkthe alignmentifthereisunusualtire wearorifthevehicleispullingto onesideortheother.Ifthevehicle vibrateswhendrivingonasmooth road,thetiresandwheelsmight needtoberebalanced.Seeyour dealerforproperdiagnosis.
WheelReplacement
Replaceanywheelthatisbent, cracked,orbadlyrustedor corroded.Ifwheelnutskeep comingloose,thewheel,wheel bolts,andwheelnutsshouldbe replaced.Ifthewheelleaksair, replaceit.Somealuminumwheels canberepaired.Seeyourdealerif anyoftheseconditionsexist.
Yourdealerwillknowthekindof wheelthatisneeded.
Eachnewwheelshouldhavethe sameload-carryingcapacity, diameter,width, offset, and be mountedthesamewayasthe oneitreplaces.
Replacewheels, wheelbolts, wheelnuts, or Tire Pressure Monitor System (TPMS) sensors with new originalequipment parts.

WARNING
Using the wrong replacement wheels, wheel bolts, or wheel nutscan be dangerous. It could affect the braking and handling of the vehicle. Tirescan lose air, and cause loss of control, causing a crash. Always use the correct wheel, wheel bolts, and wheel nuts for replacement.
Notice: The wrong wheel can also cause problems with bearing life, brake cooling, speedometer or odometer calibration, headlampaim, bumper height, vehicle ground clearance, and tire or tire chain clearance to the body and chassis.
SeelfaTireGoesFlaton page10-75formoreinformation.
UsedReplacementWheels

WARNING
Replacingawheelwithaused oneisdangerous.Howithas beenusedorhowfarithasbeen drivenmaybeunknown.Itcould failsuddenlyandcauseacrash. Whenreplacingwheels,usea neworiginalequipmentwheel.
TireChains

WARNING
Donotusetirechains. Thereis notenoughclearance. Tirechains usedonavehiclewithoutthe properamountofclearancecan causedamagetothebrakes, (Continue
WARNING(Continued)
suspension, orothervehicle parts. The areadamaged by the tirechains could cause loss of control and crash.
Useanothertypeoftraction deviceonlyifitsmanufacturer recommendsitforthevehicle's tiresizecombination and roadconditions.Followthat manufacturer'sinstructions.To avoidvehicledamage,drive slowandreadjustorremovethe tractiondeviceifitcontactsthe vehicle.Donotspinthewheels. Iftractiondevicesareused,install themonthefronttires.
IfaTireGoesFlat
Itisunusualforatiretoblowout, especiallyifthetiresaremaintained properly.SeeTires.Ifairgoesoutof atire,itismuchmorelikelytoleak outslowly.Butifthereisevera blowout,hereareafewtipsabout whattoexpectandwhattodo:
Ifafronttirefails, theflattire createsadragthatpullsthevehicle towardthatside. Takeyourfootoff theacceleratorpedalandgripthe steeringwheelfirmly. Steerto maintainlaneposition, and then gentlybraketoastop, welloffthe road, if possible.
Arearblowout, particularlyona curve, actsmuchlikeaskid and may require the same correction as used in askid. Stoppressing the accelerator pedalandsteerto straightenthe vehicle. It maybe very bumpy and noisy. Gently braketoastop, wellofftheroad, if possible.

WARNING
Drivingonaflattirewillcause permanentdamagetothetire. Re-inflatingatireafterithas beendrivenonwhileseverely underinflatedorflatmaycausea blowoutandaseriouscrash. Neverattempttore-inflateatire thathasbeendrivenonwhile severelyunderinflatedorflat. Haveyourdealeroranauthorized tireservicecenterrepairor replacetheflattireassoonas possible.

WARNING
Liftingvehicleandgetting underittodomainaintenanceor repairsidangerouswithoutthe appropriatesafetyequipmentand training.Ifajackisprovidedwith thevehicle,itisdesignedonlyfor changingaflattire.Ifitisusedfor anythingelse,youorotherscould bebadlyinjuredorkilledifthe vehicleslipsoffthejack.Ifajack isprovidedwiththevehicle,only useitforchangingaflattire.
Ifatiregoesflat, avoidfurthertire andwheeldamagebydrivingslowly toalevelplace, wellofftheroad, ifpossible. Turnonthehazard warningflashers.SeeHazard WarningFlashersonpage6-5.

WARNING
Changingatirecanbe dangerous. Thevehiclecan slipoffthejackandrollover orfallcausinginjuryordeath. Findalevelplacetochangethe tire. Tohelppreventthevehicle frommoving:
- Settheparkingbrakefirmly.
- Putanautomatic transmission in P(Park) or anual transmission in 1(First) or R(Reverse).
- Turnofftheengine and do not restart while the vehicle is raised.
- Donotallowpassengersto remaininthevehicle.
- Placewheelblockson bothsidesofthetireatthe oppositecornerofthetire beingchanged.
This vehicle may comewith a jack and spare tire or atire sealant and compressor kit. Tousethe jacking equipment to change aspare tire safely, follow the instructions below. Thensee Tire Changing on page 10-85. Touset the tire sealant and compressor kit, see Tire Sealant and Compressor Kit on page 10-77.
Whenthevehiclehasaflattire(B), usethefollowingexampleasa guidetoassistyouintheplacement ofwheelblocks(A).

A. WheelBlock
B.FlatTire
The following information explains how to repair or change atire.
TireSealantand CompressorKit

WARNING
Idlingvehicleinanenclosed areawithpoorventilationis dangerous.Engineexhaustmay enterthevehicle.Engineexhaust containsCarbonMonoxide(CO) whichcannotbeseenorsmelled. Itcancauseunconsciousness andevendeath.Neverrunthe engineinanenclosedareathat hasnofreshairventilation.For moreinformation,seeEngine Exhaustonpage9-24.

WARNING
Overinflatingatirecouldcause thetiretoruptureandyouor otherscouldbeinjured.Be suretoreadandfollowthetire sealantandcompressorkit instructionsandinflatethetireto itsrecommendedpressure.Do notexceedtherecommended pressure.

WARNING
Storingthetiresealantand compressorkitorother equipmentinthepassenger compartmentofthevehiclecould causeinjury.Inasuddenstopor collision,looseequipmentcould strikesomeone.Storethetire sealantandcompressorkit initsoriginalallocation.
If this vehicle has atire sealant and compressorkit, theremay not be a spare tire, tire changing equipment, and some vehicle theremay not be placet to store atire.
Thetiresealantandcompressor canbeusedtotemporarilyseal puncturesupto6mm(¼in)inthe treadareaofthetire.Itcanalsobe usedtoinflateanunderinflatedtire.
If the tire has been separated from the wheel, has damaged sidewalls, or has a large puncture, the tire is to severely damaged for the tire sealant and compressorkittobe effective. See Roadside Assistance Program on page 13-4.
Readandfollowallofthetire sealantandcompressorkit instructions.
Thekitincludes:
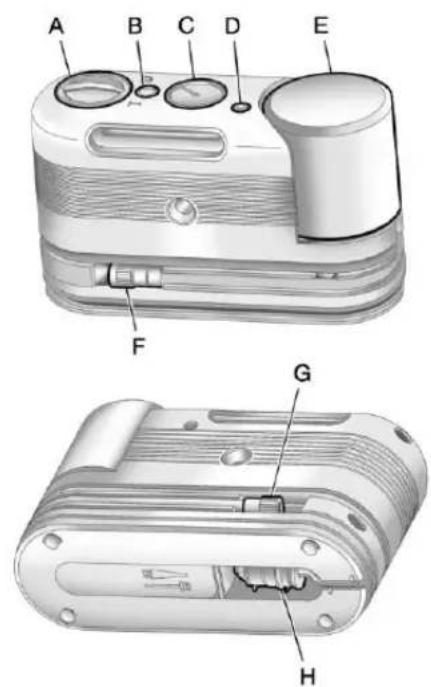
A. SelectorSwitch (Sealant/AirorAirOnly)
B. On/OffButton
C. Pressure Gauge
D. PressureDeflationButton (Ifequipped)
E. Tire Sealant Canister
F.Sealant/AirHose(Clear)
G.AirOnlyHose(Black)
H.PowerPlug
TireSealant
Readandfollowthesafehandling instructionsonthelabeladheredto thesealantcanister.
Checkthetiresealantexpiration dateonthesealantcanister. The sealantcanistersshouldbereplaced beforeitsexpirationdate.
Replacementsealantcanistersare availableatyourlocaldealer.See "RemovalandInstallationofthe SealantCanister"following.
Thereisonlyenoughsealanttoseal onetire. Afterusage, thesealant canisterandsealant/airhose assemblymustbereplaced. See "RemovalandInstallationofthe SealantCanister" following.
UsingtheTireSealantand CompressorKittoTemporarily SealandInflatea PuncturedTire
Followthedirectionscloselyfor correctsealantusage.

When using the tiresealant and compressorkit during cold temperatures, warm the kitina
heatedenvironmentforfiveminutes. Thiswillhelptoinflatethetire faster.
Ifatiregoesflat, avoidfurthertire andwheeldamagebydrivingslowly toalevelplace. Turnonthehazard warningflashers.SeeHazard WarningFlashersonpage6-5.
Seelfa Tire Goes Flaton page 10-75 for other important safety warnings.
Donotremoveanyobjectsthat havepenetratedthetire.
-
Removethetiresealantand compressorkitfromitsstorage location. See Storingthe Tire SealantandCompressorKiton page 10-85.
-
Unwrapthesealant/airhose(F) and the power plug(H).
-
Placethekitontheground. Makesurethetirevalvestemis positionedclosetotheground sothehosewillreachit.
-
Removethevalvestemcap from the flattire by turning it counterclockwise.
-
Attachthesealant/airhose(F) ontothetirevalvestem. Turnit clockwise until it isight.
6.Plugthepowerplug(H)intothe accessorypoweroutletinthe vehicle.Unplugallitemsfrom otheraccessorypoweroutlets. SeePowerOutletsonpage5-8.
If the vehicle has an accessory power outlet, donot us the cigarette lighter.
If the vehicle only has a cigarette lighter, us the cigarette lighter.
Donotpinchthepowerplug cordinthedoororwindow.
-
Start the vehicle. The vehicle must berunning while using the air compressor.
-
Turntheselectorswitch(A) counterclockwisetotheSealant +Airposition.
-
Presstheon/offbutton(B) to turnthetiresealant and compressorkiton.
Thecompressorwillinject sealantandairintothetire.
Thepressuregauge(C)will initiallyshowahighpressure whilethecompressorpushesthe sealantintothetire.Oncethe sealantiscompletelydispersed intothetire,thepressurewill quicklydropandstarttorise againasthetireinflateswith aironly.
- Inflatethetiretothe recommendedinflation pressureusingthepressure gauge(C).Therecommended inflationpressurecanbefound ontheTireandLoading Informationlabel.SeeTire Pressureonpage 10-59.
The pressure gauge (C) may read higher than the actual tire pressure while the compressor is on. Turn the compressor off to get an accurate pressure reading. The compressorm may be turned on/off until the correct pressure is reached.
Notice: If there recommended pressure cannot be reached after approximately 25 minutes, the vehicle should not be driven farther. The tire is too severely damaged and the tire sealant and compressor kit cannot inflate the tire. Removethe power plug from
theaccessorypoweroutletand unscrewtheinflatinghosefrom thetirevalve.SeeRoadside AssistanceProgramon page13-4.
- Presstheon/offbutton(B) to turnthetiresealant and compressorkitoff.
Thetireisnotsealed and will continuetoleakair until the vehicle is driven and the sealant is distributed in the tire; therefore, Steps 12 through 18 must be done immediately after Step 11.
Becarefulwhilehandlingthe tiresealantandcompressorkit asitcouldbewarmafter usage.
-
Unplugthepowerplug(H) from theaccessorypoweroutletin thevehicle.
-
Turnthesealant/airhose(F) counterclockwisetoremoveit fromthetirevalvestem.
-
Replacethetirevalve stemcap.
-
Replacethesealant/air hose(F), and the power plug (H) back in their original location.
- If the flattire was able to inflatetotherecommended inflation pressure, remove the maximum speed label from the sealant canister (E) and place itinahighly visible location. Donot exceed the speed on this label until the damaged tire is repaired or replaced.
10-82VehicleCare
- Return the equipment to its original storage location in the vehicle.
- Immediately drivethe vehicle 8km(5mi) todistributethe sealantinthetire.
- Stopatasafelocation and checkthetirepressure. Refer toSteps1 through 1 under "UsingtheTireSealantand CompressorKitwithoutSealant toInflateaTire(Not Punctured)."
If the tire pressure has fallen more than 68kPa (10 psi) below there recommended inflation pressure, stop driving the vehicle. The tire is too severely damaged and the tire sealant cannot sealthetire. See Roadside Assistance Program on page 13-4.
If the tire pressure has not dropped more than 68 kPa (10 psi) from there recommended inflation pressure, inflate the tire to there recommended inflation pressure.
-
Wipeoffanysealantfromthe wheel, tire, and vehicle.
-
Disposeoftheusedsealant canister(E)andsealant/air hose(F)assemblyatalocal dealerorinaccordancewith localstatecodesandpractices.
- Replaceitwithanewcanister availablefromyourdealer.
- After temporarily sealing atire using the tresealant and compressorkit, takethe vehicle to an authorized dealer with a 161 km (100 mi) of driving to havethetirerepaired or replaced.
Using the Tire Sealant and Compressor Kit without Sealant to Inflatea Tire (Not Punctured)
Tousetheaircompressortoinflate atirewithaironlyandnotsealant:

Ifatiregoesflat, avoidfurthertire andwheeldamagebydrivingslowly toalevelplace. Turnonthehazard warningflashers.SeeHazard WarningFlashersonpage6-5.
SeelfaTireGoesFlaton page10-75forotherimportant safetywarnings.
- Removethetiresealantand compressorkitfromitsstorage location. See Storingthe Tire SealantandCompressorKiton page 10-85.
- Unwraptheaironlyhose(G) and the power plug(H).
- Placethekitontheground. Makesurethetirevalvestemis positionedclosetotheground sothehosewillreachit.
- Removethetirevalvestemcap from the flattire by turning it counterclockwise.
- Attach the aironly hose (G) onto the treval vestem by turning it clockwise until it isight.
6.Plugthepowerplug(H)intothe accessorypoweroutletinthe vehicle.Unplugallitemsfrom otheraccessorypoweroutlets. SeePowerOutletsonpage5-8.
If the vehicle has an accessory power outlet, donot us the cigarette lighter.
If the vehicle only has a cigarette lighter, us the cigarette lighter.
Donotpinchthepowerplug cordinthedoororwindow.
- Startthevehicle. The vehicle must berunning while using the aircompressor.
- Turntheselectorswitch(A) clockwise the Air Only position.
9.Presstheon/off(B)button to turn the compressor on.
Thecompressorwillinflatethe tirewithaironly.
- Inflatethetiretothe recommendedinflation pressureusingthepressure gauge(C).Therecommended inflationpressurecanbe foundontheTireandLoading Informationlabel.SeeTire Pressureonpage 10-59.
The pressure gauge(C) may read higher than the actual tire pressure while the compressor is on. Turn the compressor off to get an accuratereading. The compressorm may be turned on/off until the correct pressure is reached.
If you inflate the tire higher than there recommended pressure you can adjust the excess pressure by pressing the pressure deflation button (D), if equipped, until the proper pressurereading is reached. This option is only functional when using the air only hose (G).
- Presstheon/offbutton(B) to turnthetiresealant and compressorkitoff.
Becarefulwhilehandlingthe tiresealantandcompressor kitasitcouldbewarmafter usage.
-
Unplugthepowerplug(H) from theaccessorypoweroutletin thevehicle.
-
Disconnect the aironlyhose (G) from the trevalvestem by turning it counterclockwise, and replacethetirevalvestem cap.
-
Replacetheaironlyhose(G) and the power plug(H) and cordback in their original locations.
-
Placetheequipmentinthe originalstoragelocationinthe vehicle.
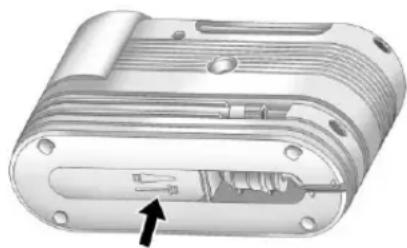
natural_image
Cross-sectional diagram of a mechanical device showing internal components and a highlighted section (no text or symbols)Thetiresealantandcompressorkit hasanaccessoryadapterlocatedin acompartmentonthebottomofits housingthatmaybeusedtoinflate airmattresses,balls,etc.
RemovalandInstallationofthe SealantCanister
- Unwrapthesealanthose.
- Pressthecanisterrelease button.
- Pullupandremovethecanister.
- Replace with an ewcanister which is available from your dealer.
- Pushthenewcanisterinto place.
StoringtheTireSealant andCompressorKit

natural_image
3D illustration of a toolbox with an arrow pointing to the interior (no text or symbols)Thisvehiclemayhaveatire sealantandcompressorkitin placeofajackorsparetire.Itis locatedinafoamcontainerinthe rearcompartmentstoragearea. Ifthevehiclehasacargocover, seeCargoManagementSystemon page4-5forinstructionsonhowto accessthetiresealantand compressorkit.
TireChanging
RemovingtheSpareTireand Tools
Toaccessthesparetireandtools:
- Openthelfitgate.SeeLiftgate onpage2-12.

natural_image
Top-down view of a car's front bumper with a black arrow pointing to the lid area (no text or symbols)- Lift the handle and pull up on the floor.
Theproprodlocksintoplace whenopen.
10-86VehicleCare

natural_image
Top-down technical illustration of a car's rear engine compartment with a black arrow indicating the component (no text or symbols present)- Removethesparetirecover.4. Removethenutretainingthe sparetire.

natural_image
Top-down view of a circular mechanical component with a black arrow pointing to a small feature (no text or symbols visible)- Removethecompactsparetire. SeeCompactSpare Tireon page 10-92 formoreinformation.

-
Removethewingnut(D).
-
Removetheextension(A), jack(B) and wheelwrench(C) and placethemnearthetire being changed.
RemovingtheFlatTireand InstallingtheSpareTire
Takeoffthewheelcoverorcenter cap,ifthevehiclehasone,toreach thewheelbolts.
- Doasafetycheckbefore proceeding. Seelfa Tire Goes Flatonpage 10-75 form more information.
- Turnthewheelwrench counterclockwisetoloosenand removethewheelnutcaps. Donottrytoremoveplasticcaps from the cover or center cap.
- Pull the cover or center cap away from the wheel. Store the wheel cover in the cargo area until you have the flattire repaired or replaced.
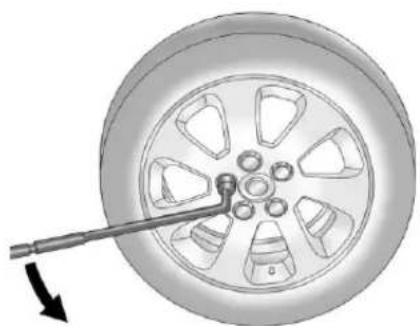
natural_image
Mechanical assembly diagram showing a wheel with a tool inserted, no text or symbols present- Turnthewheelwrench counterclockwisetoloosenall thewheelnuts, butdonot removethemyet.
- Placethejackneartheflattire. Notice: Makesurethatthejack liftheadisinthecorrectposition oryoumaydamageyourvehicle. Therepairswouldnotbecovered byyourwarranty.
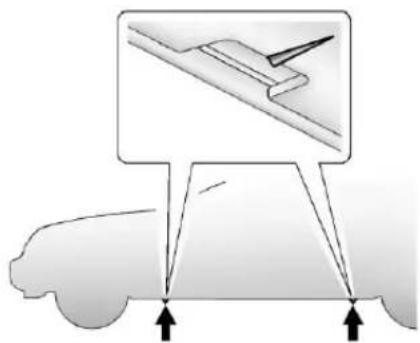
natural_image
Diagram showing a car with an airplane wing and directional arrows indicating motion or force (no text or symbols)- Position the jack lifthead at the jack location nearest the flattire. The jacking location is indicated by a V-shaped notch in the plastic molding. The jack must not be used in any other position.

natural_image
Illustration of mechanical components including a wheel, gear, and tools with motion arrows (no text or symbols)- Insert the hooked end of the extension handle through the jack and the flat end through the wheel wrench.

WARNING
Gettingundervehiclewhenit isjackedupisdangerous.Ifthe vehicleslipsoffthejack,you couldbebadlyinjuredorkilled. Nevergetundervehiclewhen itissupportedonlybyajack.

WARNING
Raisingthevehiclewiththe jackimproperlypositionedcan damagethevehicleandeven makethevehiclefall. To help avoidpersonalinjuryandvehicle damage, besuretofitthejacklift headintotheproperlocation beforeraisingthevehicle.

WARNING
Liftingvehicleandgetting underittodomaintenanceor repairsidangerouswithoutthe appropriatesafetyequipmentand training.Ifajackisprovidedwith thevehicle,itisdesignedonlyfor changingaflattire.Ifitisusedfor anythingelse,youorotherscould bebadlyinjuredorkilledifthe vehicleslipsoffthejack.Ifajack isprovidedwiththevehicle,only useitforchangingaflattire.
- Turntheextensionwiththe wheelwrenchclockwisetoraise thejackliftheaduntilthejack justfitsunderthevehicle.

natural_image
Mechanical assembly diagram showing pipe connection and two prohibition symbols (no text or labels)- Raisethevehiclebyturningthe wheelwrenchclockwiseuntilthe slotsinthejackheadfitintothe metalflangelocatedbehindthe triangleontheplasticmoulding.
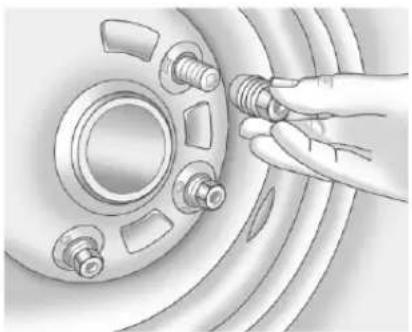
natural_image
Illustration of a hand adjusting a car wheel rim with bolts (no text or symbols)- Remove allofthewheelnuts.
- Removetheflattire.
WARNING
Rustordirtonawheel,oronthe partstowhichitisfastened,can makewheelnutsbecomeloose aftertime.Thewheelcouldcome offandcauseanaccident.When changingawheel,removeany rustordirtfromplaceswherethe wheelattachestothevehicle.In anemergency,aclothorapaper towelcanbeused;however,use ascaperorwirebrushlaterto removeallrustordirt.

natural_image
Illustration of a hand cleaning a car brake disc with a cloth (no text or symbols)- Remove any rustordirt from the wheel bolts, mounting surfaces, and spare wheel.
- Placethecompactsparetire onthewheel-mountingsurface.
WARNING
Neveruseoilorgreaseonbolts ornutsbecausethenutsmight comeloose. Thevehicle'swheel couldfalloff,causingacrash.
10-90VehicleCare
- Reinstallthewheelnuts. Tighteneachnutbyhanduntil thewheelisheldagainst thehub.
- Lowerthevehiclebyturning thejackhandle counterclockwise.

WARNING
Wheelnutsthatareimproperlyor incorrectlytightenedcancause thewheelstobecomelooseor comeoff. Thewheelnutsshould beightenedwithatorquewrench tothepropertorquespecification afterreplacing. Followthetorque specificationsuppliedbythe aftermarketmanufacturerwhen usingaccessorylockingwheel nuts.SeeCapacitiesand Specificationsonpage12-2for originalequipmentwheelnut torquespecifications.
Notice: Improperlytightened wheelnutscanleadtobrake pulsationandrotordamage. To avoidexpensivebrakerepairs, evenlytightenthewheelnutsin thepropersequenceandtothe propertorquespecification.See CapacitiesandSpecificationson page12-2forthewheelnut torquespecification.
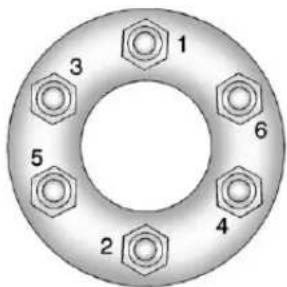
-
Tightenthewheelnutsfirmly in acrisscrosssequence, as shown.
-
Lowerthejackallthewayand removethejackfromunderthe vehicle.
- Tightenthewheelnutsfirmly withthewheelwrench.
When reinstalling the wheel cover or center cap on the full-sizetire, tighten all five plastic cap shand snug with the aid of the wheel wrench and tightent hem with the wheel wrench an additional one-quarter of turn.
Notice: Wheelcoverswillnotfit onthevehicle'scompactspare. If youtrytoputawheelcoveron thecompactspare, thecoveror the spare could bedamaged.
StoringaFlatorSpareTire andTools
WARNING
Storingajack, atire, or other equipment in the passenger compartment of the vehicle could cause injury. In sudden stop or collision, loose equipment could strike someone. Store all these in the proper place.
Tostoretheflatorsparetire and tools:
- Openthelfitgate. See Liftgate on page 2-12 form more information.
-
Putbackalltoolsastheywere storedintherearstorage compartmentandputthe compartmentcoverbackon. Formoreinformation,see "StoringtheCompactSpareTire andTools"nextinthissection.
-
Installthecargocover. For moreinformation, see Cargo ManagementSystemon page4-5.
- Placethetire, lying flat, in the rear storage compartment.
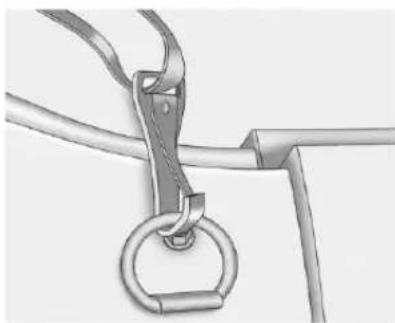
natural_image
Close-up of a metal clamp securing a ring-shaped object between two pipes (no text or symbols visible)- Attachthestraptothecargo tie-downintherearofthe vehicle.

natural_image
Technical illustration of a car engine compartment with a tire and directional arrows indicating components (no text or symbols)- Routethestrapthrough the wheel,asshown.
- Attachthestraptotheother cargotie-downintherearof thevehicle.
- Tightenthestrap.
Thecompactspareisfortemporary useonly.Replacehecompact spare tirewithafull-sizetireas soonasyoucan.
CompactSpareTire

WARNING
Drivingwithmorethanone compactsparetireatatime couldresultinlossofbraking andhandling. Thiscouldleadto acrashandyouorotherscould beinjured. Useonlyonecompact sparetireatatime.
If this vehicle has a compact spare tire, it was fully inflated when the vehicle was new; however, it can lose air after time. Check the inflation pressureregularly. It should be 420 kPa (60 psi).
Afterinstallingthecompactspare onthevehicle,stopassoon aspossibleandmakesurethe sparetireiscorrectlyinflated. Thecompactspareismadeto performwellatspeedsupto 105km/h(65mph)fordistancesup to5000km(3,000mi),soyoucan finishyourtripandhavethefull-size
tirerepairedorreplacedatyour convenience.Ofcourse,itisbestto replacethesparewithafull-sizetire assoonaspossible.Thesparetire willlastlongerandbeingood shapeincaseitisneededagain.
Notice: Whenthecompact spareisinstalled, donottake the vehicle through an automatic car wash with guiderails. The compact spare can get caught on therails which candamagethe tire, wheeland other part of the vehicle.
Donotusethecompactspareon othervehicles.
Donotmixthecompactsparetire orwheelwithotherwheelsortires. Theywillnotfit.Keepthesparetire anditswheeltogether.
Notice: Tirechains will not fit the compact spare. Using them candamagethe vehicle and can damage the chain too. Donot usetire chains on the compact spare.
JumpStarting
Formoreinformationaboutthe vehiclebattery,seeBatteryon page10-30.
Ifthevehiclebatteryhasrun down,youmaywanttouseanother vehicleandsomejumpercablesto startyourvehicle.Besuretouse thefollowingstepstodoitsafely.

WARNING
Batteriescanhurtyou. They can be dangerous because:
• Theycontainacidthatcan burnyou.
• Theycontaingasthatcan explodeorignite.
• Theycontainenough electricitytoburnyou.
If you donot follow these steps exactly, some oral of these things can hurt you.
Notice: Ignoring the seven steps could result in costly damage to the vehicle that would not be covered by the warranty.
Trying to start the vehicle by pushing or pulling it will not work, and it could damage the vehicle.
- Check the other vehicle. It must have a 12-volt battery with a negative ground system.
Notice: Only use a vehicle that has a 12-voltsystem with an negative ground for jump starting. If the other vehicle does not have a 12-voltsystem with a negative ground, both vehicles can be damaged.
2.Getthevehiclescloseenough sothejumpercablescanreach, butbesurethevehiclesare nottouchingeachother.Ifthey are,itcouldcauseaground connectionyoudonotwant. Youwouldnotbeabletostart yourvehicle,andthebad groundingcoulddamagethe electricalsystems.
To avoid the possibility of the vehicles rolling, set the parking brake firmly on both vehicles involved in the jump start procedure. Put the transmission in P (Park) before setting the parking brake.
Notice: Iftheradioorother accessories are left on during the jump starting procedure, they could be damaged. There pairs would not be recovered by the warranty. Always turn off the radio and other accessories when jump starting the vehicle.
-
Turnofftheignitiononboth vehicles. Unplugunnecessary accessoriespluggedintothe cigarettelighterortheaccessory poweroutlet. Turnofftheradio andalllampsthatarenot needed. Thiswillavoidsparks, helpingsavebothbatteriesand theradio.
-
Openthehoodonthe othervehicleandlocatethe positive(+)andnegative(-) terminallocationsonthat vehicle.
Openthehoodonyourvehicle and findtheremotepositive(+) and remotenegative(-)jump startingterminals.

Yourvehicleisequippedwitha remotepositive(+)terminal(A) andaremotenegative(-) terminal(B).Theremote positive(+)terminalislocatedin theenginecompartmentonthe driversideofthevehicle,above therearofthebattery.The remotenegative(-)terminal isastudlocatedintheengine compartmentonthedriverside ofthevehicle,onthefronttie bar.SeeEngineCompartment Overviewonpage10-6formore informationonlocation.
Touncovertheremote positive(+)terminal,liftopenthe accesspanelonthebattery coverindicatedbythe(+)sign.
WARNING
Anelectricfancanstartupeven whentheengineisnotrunning andcaninjureyou.Keephands, clothingandtoolsawayfromany underhoodelectricfan.
WARNING
Usinganopenflameneara batterycancausebatterygasto explode.Peoplehavebeenhurt doingthis,andsomehavebeen blinded.Useaflashlightifyou needmorelight.
Besurethebatteryhasenough water. Youdonotneedtoadd watertothebatteryinstalledin
(Continued)
WARNING(Continued)
yournewvehicle.Butifabattery hasfillercaps,besuretheright amountoffluidisthere.Ifitislow, addwatertotakecareofthat first.Ifyoudonot,explosivegas couldbepresent.
Batteryfluidcontainsacidthat canburnyou.Donotgetiton you.Ifyouaccidentallygetitin youreyesoronyourskin,flush theplacewithwaterandget medicalhelpimmediately.
WARNING
Fansorothermovingengine partscaninjureyoubadly.Keep yourhandsawayfrommoving partsoncetheengineisrunning.
- Check that the jumpercables do not have loose or missing insulation. If they do, you could get ashock. The vehicles could also be damaged.
Beforeyouconnectthecables, herearesomebasicthingsyou shouldknow.Positive(+)willgo topositive(+)ortoaremote positive(+)terminalifthevehicle hasone.Negative(-)willgotoa heavy, unpaintedmetalengine partortoaremotenegative(-) terminalifthevehiclehasone.
Donotconnectpositive(+)to negative(-)oryouwillgeta shortthatwoulddamagethe batteryandmaybeotherparts. Donotconnectthenegative(-) cabletothenegative(-)terminal onthedeadbatterybecausethis cancausesparks.
-
Connecttheredpositive(+) cabletothepositive(+)terminal onthevehiclewiththedead battery. Usearemote positive(+)terminalifthe vehiclehasone.
-
Donotlettheotherend touchmetal. Connectitto thepositive(+)terminalofthe goodbattery. Usearemote positive(+)terminalifthe vehiclehasone.
-
Now connect the black negative (-) cable to the negative (-) terminal of the good battery. Use a remote negative (-) terminal if the vehicle has one.
Donotlettheotherendtouch anythinguntilthenextstep.The otherendofthenegative(-) cabledoesnotgotothedead battery.Itgoestoaheavy, unpaintedmetalenginepartor toaremotenegative(-)terminal onthevehiclewiththedead battery.
- Connect the other end of the negative (-) cable away from the dead battery, but not near engine part that move. The electrical connection is just as good there, and the chance of sparks getting back to the battery is much less.
Yourvehiclehasaremote(-) terminalforthispurpose.
-
Now start the vehicle with the good battery and run the engine for awhile.
-
Trytostartthevehiclethat hadthedeadbattery.Ifitwill notstartafterafewtries,it probablyneedsservice.
Notice: If the jumpercables are connected or removed in the wrong order, electrical shorting may occur and damage the vehicle. There pairs would not be covered by the vehicle warranty. Always connect and remove the jumpercables in the correct order, makingsure that the cables donottouche achother or other metal.
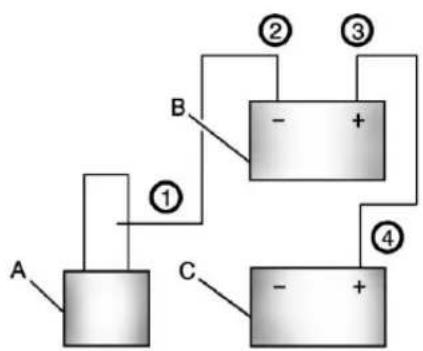
flowchart
graph TD
    A["Component A"] -->|①| B["Component B"]
    B -->|②| C["Component C"]
    B -->|③| D["Component D"]
    C -->|④| E["Component E"]
JumperCableRemoval
A. Heavy, Unpainted Metal Engine Partor Remote Negative(-) Terminal
B. GoodBatteryorRemote Positive(+)andRemote Negative(-)Terminals
C. DeadBatteryorRemote Positive(+)Terminal
Todisconnectthejumpercables frombothvehicles,dothefollowing:
- Disconnecttheblack negative(-)cablefromthe vehiclethathadthedead battery.
2.Disconnecttheblack negative(-)cablefromthe vehiclewiththegoodbattery. - Disconnecttheredpositive(+) cablefromthevehiclewiththe goodbattery.
- Disconnecttheredpositive(+) cablefromtheothervehicle.
- Closetheaccesspanelonthe batterycover, if applicable.
Towing
TowingtheVehicle
Notice: To avoid damage, the disabled vehicles should be towed with all four wheels off the ground. Care must be taken with vehicle sthathave low ground clearance and/or speciale equipment. Always flat bed on a car carrier.
Consultyourdealerora professionaltowingserviceif thedisabledvehiclemustbe towed.SeeRoadsideAssistance Programonpage13-4.
Totowthevehiclebehindanother vehicleforrecreationalpurposes, suchasbehindamotorhome,see "RecreationalVehicleTowing"in thissection.
Recreational Vehicle Towing
Recreationalvehicletowingmeans towingthevehiclebehindanother vehicle—suchasamotorhome. Thetwomostcommontypesof recreationalvehicletowingare knownasdinghytowinganddolly towing.Dinghytowingistowingthe vehiclewithallfourwheelsonthe ground.Dollytowingistowingthe vehiclewithtwowwheelsonthe groundandtwowheelsupona deviceknownasadolly.
Herearesomeimportantthingsto considerbeforerecreationalvehicle towing:
- Whatisthetowingcapacity ofthetowingvehicle?Be suretoreadthetow vehiclemanufacturer's recommendations.
- Whatisthedistancethatwillbe travelled?Somevehicleshave restrictionsonhowfarandhow longtheycantow.
- Isthepropertowingequipment goingtobeused? Seeyour dealerortraileringprofessional foradditionaladviceand equipmentrecommendations.
- Isthevehiclereadytobe towed?Justaspreparingthe vehicleforalongtrip,makesure thevehicleispreparedtobe towed.
DinghyTowing
Front-wheel-drive and all-wheel-drive vehicles maybe dinghytowed from the front. These vehicle scan also be towed by placing them on a platform trailer with all four wheel so off the ground. For that towing options, see "Dolly Towing" following in this section.
Vehicleswitha2.8LV6enginecan bedinghytowedonlyforservice andarerestrictedtoamaximum distanceof100km(60miles)and nottoexceed80km/h(50mph).
Vehicleswiththe3.0LV6engine canbedinghytowedwithout distancerestrictions.
Notice: If 105km/h (65mph) is exceeded whiletowing the vehicle, it could be damaged. Never exceed 105km/h (65mph) whiletowing the vehicle.
Forvehiclesbeingdinghytowed, thevehicleshouldberunatthe beginningofeachdayandateach RVfuelstopforaboutfiveminutes. Thiswillensureproperlubricationof transmissioncomponents.
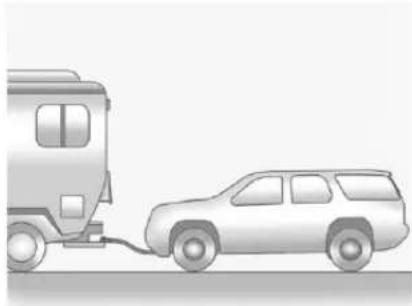
natural_image
Illustration of a car being connected to a bus, no text or symbols presentTotowthevehiclefromthefront withallfourwheelsontheground:
- Position the vehicle that will be towed and secure it to the towing vehicle.
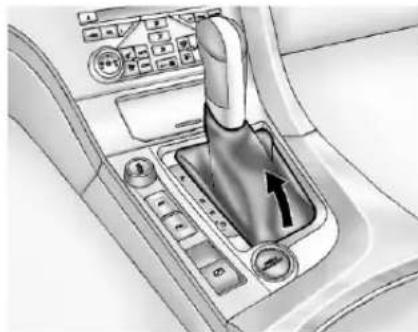
natural_image
Interior view of a car gear shift lever with control buttons and a hand inserting a component (no text or symbols visible)- Removetheshiftleverbootby pullingupontherearofthetrim plate.

natural_image
3D mechanical component diagram showing a pin inserted into a housing with an arrow pointing to a small hole (no text or symbols present)- Useasmallscrewdriverortool topressandholdthemanual releasebuttononthefrontright.
- PutthevehicleinN(Neutral).
Notice: If the vehicle is towed without performing each of the steps listed under "Dinghy Towing," the automatic transmission could be damaged. Besure to follow all step so the dinghy towing procedure prior to and after towing the vehicle.
Oncethedestinationhasbeen reached:
- ShiftthevehicletoP(Park).
- Reinstalltheshiftleverboot by inserting the frontedge and pressing therearofthetrim plate until its snaps in to place.
- Start the engine and let it idle for more than three minutes before driving the vehicle.
Notice: Toomuchortoo littlefluidcandamagethe transmission. Besurethatthe transmissionfluidisattheproper levelbeforetowingwithallfour wheelsontheground.
Notice: Donottowavehicle with the front drivewheel son the ground if one of the front tires is a compact spare tire. Towing with twodifferent tiresizes on the front of the vehicle can cause severed damage to the transmission.
DollyTowing (All-Wheel-DriveVehicles)
All-wheel-drive vehicles should not be towed with twowheels on the ground. Toproperly to these vehicles, they should be placed on a platform trailer with all four wheels off of the ground ordering hytowed from the front. See Dinghy Towing earlier in this section.
DollyTowing
(Front-Wheel-DriveVehicles)
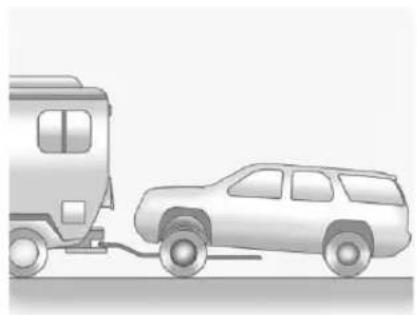
natural_image
Illustration of a car being charged with a bus (no text or symbols)Totowthevehiclefromthefront withtherearwheelsontheground, dothefollowing:
-
Putthefrontwheelsonadolly.
2.MovetheshiftlevertoP(Park). See Shifting Into Park on page 9-23. -
Settheparkingbrake.
- Secure the vehicle to the dolly.
- Followthedollymanufacturer's instructions for preparing the vehicle and dolly fortowing.
- Releasetheparkingbrake.
TowingtheVehiclefrom theRear

natural_image
Illustration of a bus connected to a car with a no-smoking symbol (no text or labels)
natural_image
Illustration of a car being stopped by a van, with no visible text or symbolsNotice:Towingthevehiclefrom therearcoulddamageit.Also, repairswouldnotbecoveredby thevehiclewarranty.Neverhave thevehicletowedfromtherear.
AppearanceCare
ExteriorCare
CleaningExterior Lamps/Lenses
Useonlylukewarmorcoldwater, a softcloth, and acar washing soap to clean exterior lamps and lenses. Follow instructions under "Washing the Vehicle" later in this section.
FinishCare
Occasionalwaxingormildpolishing ofthevehiclebyhandmaybe necessarytoremoveresiduefrom thepaintfinish.Approvedcleaning productscanbeobtainedfromyour dealer.
If the vehicle has a basecoat/ clearcoat paint finish, the clearcoat gives more depth and glosstothecoloredbasecoat.
Alwaysusewaxesandpolishesthat arenon-abrasiveandmadefora basecoat/clearcoatpaintfinish.
Notice: Machine compounding or aggressive polishing on a basecoat/clearcoat paint finish may damage it. Use only non-abrasivewaxes and polishes that are made for abasecoat/clearcoat paint finish on the vehicle.
Foreignmaterialssuchascalcium chlorideandothersalts, icemelting agents, roadoilandtar, treesap, birddroppings, chemicalsfrom industrialchimneys, etc., can damagethevehicle'sfinishifthey remainonpaintedsurfaces. Wash thevehicleassoonaspossible. Ifnecessary, usenon-abrasive cleanersthataremarkedsafefor paintedsurfacestoremoveforeign matter.
Exteriorpaintedsurfacesare subjecttoaging, weather, and chemicalfalloutthatcantaketheir tolloveraperiodofyears. To keep the paintfinishlookingnew, keep the vehiclegaragedorcovered whenever possible.
Protecting Exterior Bright Metal Parts
Brightmetalpartsshouldbe cleanedregularlytokeeptheir luster.Washwithwateroruse chromepolishonchromeor stainlesssteeltrim,ifnecessary.
Usespecialcarewithaluminum trim.Toavoiddamagingprotective trim,neveruseautoorchrome polish,steam,orcausticsoap tocleanaluminum.Acoatingof wax,rubbedtohighpolish,is recommendedforallbright metalparts.
WashingtheVehicle
Topreservethevehicle'sfinish, keepitcleanbywashingitoften.
Donotwashthevehiclein directsunlightanduseacar washingsoap.
Notice: Donotusecleaning agentsthatarepetroleumbased orthatcontainacidorabrasives, astheycandamagethepaint, metal, orplasticonthevehicle. Approvedcleaningproducts canbeobtainedfromyour dealer.Followallmanufacturer directionsregardingcorrect productusage,necessarysafety precautions,andappropriate disposalofanyvehiclecare product.Certaincleanerscontain chemicalsthatcandamagethe emblemsornameplatesonthe vehicle.Checkthecleaning productlabel.lfitstatesthatit
shouldnotbeusedonplastic parts, donotuseitonthevehicle ordamagemayoccurandit wouldnotbecoveredbythe warranty.
Rinsethevehiclewell, before washing and after, to remove all cleaning agents completely. If they are allowed today on the surface, they could stain.
Drythefinishwithasoft, clean chamoisoranall-cottontowelto avoidsurfacescratchesandwater spotting.
Highpressurecarwashescould causewatertoenterthevehicle. Avoidusinghighpressurewashes closerthan30cm(12in)tothe surfaceofthevehicle.Useofpower washersexceeding8,274kPa (1,200psi)canresultindamageor removalofpaintanddecals.
Notice: Conveyorsystemson some automatic car washescould damage the vehicle. Theremay not been enough clearance for the undercarriage. Check with the car wash manager before using the automatic car wash.
Weatherstrips
Siliconegreaseonweatherstrips willmakethemlastlonger,seal better,andnotstickorsqueak. Applysiliconegreasewithaclean cloth.Duringverycold,damp weatherfrequentapplicationmay berequired.SeeRecommended FluidsandLubricantsonpage11-4.
WheelsandTrim—Aluminum
The vehicle may have aluminum wheels.
Keepthewheelscleanusinga soft,cleanclothwithmildsoapand water.Rinsewithcleanwater.After rinsingthoroughly,drywithasoft, cleantowel.Awaxmaythenbe applied.
Notice: Trimmaybedamaged if the vehicle is not washed after driving on roadsthath have been sprayed with magnesium, calcium, or sodium chloride. These chlorides are used on roads for condition such as ice and dust. Always wash the vehicle with soap and water after exposure.
Notice: Donotusestrongsoaps, chemicals, abrasivepolishes, cleaners, brushes, orcleaners that contain acidonaluminum, because surface could be damaged. Therepair would not be recovered by the vehicle warranty. Use only approved cleanersonaluminum wheels.
Notice: Neverdrive vehicle through an automatic car wash that uses a silicone car bidetire cleaning brushes, asthiscould caused damage. There pairs would not be recovered by the vehicle warranty.
WindshieldandWiperBlades
Cleantheoutsideofthewindshield withglasscleaner.
Cleantherubberbladesusinga lint-freeclothorpapertowelsoaked withwindshieldwasherfluid oramilddetergent.Washthe windshieldthoroughlywhen cleaningtheblades.Bugs,road grime,sap,andabuildupofvehicle wash/waxtreatmentsmaycause wiperstreaking.Replaceewiper bladesiftheyarewornordamaged.
Wiperscanbedamagedby:
• Extremedustyconditions
- Sandandsalt
- Heatandsun
- Snowandice, without proper removal
Tires
Useastiffbrushwithtirecleanerto cleanthetires.
Notice: Using petroleum-based tiredressing product on the vehicle may damage the paint finish and/or tires. When applying atiredressing, always swipe off any overspray from all painted surfaces on the vehicle.
SheetMetalDamage
If the vehicle is damaged and requires sheet metal repair or replacement, makes sure the body repair shop applies anti-corrosion material to parts repaired or replaced to restore corrosion protection.
Original manufacturer replacement partswill providethe corrosion protectionwhile maintaining the vehicle warranty.
FinishDamage
Anystonechips, fractures, or deep scratches in the finish should be repaired right away. Bare metal will corrode quickly and may develop intomajor repair expense.
Minorchipsandscratchescanbe repairedwithtouch-upmaterials availablefromyourdealer. Larger areasoffinishdamagecanbe correctedinyourdealer'sbody and paintshop.
UnderbodyMaintenance
Chemicalsusedforiceandsnow removalanddustcontrolcancollect ontheunderbody. If these are not removed, corrosion and trust can develop on the underbody parts such as fuellines, frame, floorpan, and exhaust system event though they have corrosion protection.
Atleasteveryspring, flushthese materials from the underbody with plainwater. Clean any areas where mud and debriscancollect. Dirt packed in close areas of the frame should be loosened before being flushed. Your dealer or an under body car washings system can do this.
ChemicalPaintSpotting
Somewatherandatmospheric conditionscancreateachemical fallout.Airbornepollutantscanfall uponandattackpaintedsurfaceson thevehicle.Thisdamagecantake twoforms:blotchy,ring-shaped discolorations,andsmall,irregular darkspotsetchedintothepaint surface.
InteriorCare
The interior will continuetolook its best if it is cleaned often. Dust and dirt can accumulate on the upholstery and caused damage to the carpet, fabric, leather, and plastics surfaces. Stain should be removed quickly as extreme heat could cause them to set rapidly.
Lightercoloredinteriorsmay require more frequent cleaning. Newspapers and garments that can transfer color to home furnishings can also transfer color to the interior.
Removedustfromsmallbuttons andknobswithasmallbrushwith softbristles.
Yourdealerhasproductsfor cleaningtheinterior.Whencleaning theinterior,onlyusecleaners specificallydesignedforthe surfacesthatarebeingcleaned. Permanentdamagecanresult fromusingcleanersonsurfacesfor whichtheywerenotintended.Apply thecleanerdirectlytothecleaning clothtopreventover-spray.Remove anyaccidentalover-sprayfrom othersurfacesimmediately.
Notice: Using abrasive cleaners when cleaning glass surfaces on the vehicle, could scratch the glass and/or caused damage to therear window defogger. When cleaning the glass on the vehicle, use only as soft cloth and glass cleaner.
Cleanerscancontainsolventsthat canbecomeconcentratedinthe interior.Beforeusingcleaners, readandadheretoallsafety instructionsonthelabel.While cleaningtheinterior,maintain adequateventilationbyopening thedoorsandwindows.
Donotcleantheinteriorusingthe followingcleanersortechniques:
- Neveruseaknifeoranyother sharpobjecttoremoveasoil fromanyinteriorsurface.
- Neveruseastiffbrush.Itcan causedamage.
- Neverapplyheavypressureor rubaggressivelywithacleaning cloth. Useofheavypressurecan damagetheinterioranddoes notimprovetheeffectiveness of soilremoval.
10-106VehicleCare
- Avoidlaundrydetergents ordishwashingsoapswith degreasers. Usingtoomuch soapwillleavearesiduethat leavesstreaksandattractsdirt. Forliquidcleaners, about 20dropsper3.78L(1gal)of waterisagoodguide. Useonly mild,neutral-pHsoaps.
- Donotheavilysaturatethe upholsterywhilecleaning.
- Cleanersthatcontainsolvents candamagetheinterior.
Fabric/Carpet
Useavacuumcleanerwithasoft brushattachmenttoremovedust andloosedirt.Acanistervacuum withrotatingbrushesinthenozzle mayonlybeusedonfloorcarpet andcarpetedfloormats.Forsoils, alwaystrytoremovethemfirstwith plainwaterorclubsoda.Before cleaning,gentlyremoveasmuchof thesoilaspossibleusingoneofthe followingtechniques:
- Forliquids:gentlyblotthe remainingsoilwithapaper towel.Allowthesoiltoabsorb intothepapertoweluntilno morecanberemoved.
- Forsoliddrysoils:removeas muchaspossibleandthen vacuum.
Toclean:
- Saturatealint-free, cleanwhite clothwithwaterorclubsoda.
- Remove excess moisture.
3.Startontheoutsideedgeofthe soilandgentlyrubtowardthe center.Continuecleaning,using acleanareaoftheclotheach timeitbecomessoiled. - Continuetogentlyrub the soiledarea.
- If the soil is not completely removed, use a mild soap solution and repeat the cleaning process with plain water.
Ifanyofthesoilremains, a commercialfabriccleanerorspot liftermaybenecessary.Testasmall hiddenareaforcolorfastnessbefore usingacommercialupholstery cleanerorspotlifter.Ifthelocally cleanedareagivesanyimpression thataringformationmayresult, cleantheentiresurface.
Apapertowelcanbeusedtoblot excessmoisturefromthefabricor carpetafterthecleaningprocess.
Leather
Leather, and lighter colored leather in particular, will need more frequent cleaning to prevent the buildup of dust, dirt, and colorstransferred from other items so that these do not become permanent stains.
Toremovedust, asoftcloth dampened with water can be used. If a more thorough cleaning is necessary, asoft cloth dampened with a mild soapsolution can be used. Your dealer has approved leather cleaner available that provides superior cleaning performance when used regularly on finished automotive leathers. Allow the athertodrynaturally.
Donotuseheat,steam,spotlifters orspotremovers,orshoepolish onleather.Manycommercialleather cleanersandcoatingsthataresold topreserveandprotectleather maypermanentlychangethe appearanceandfeeloftheleather andarenotrecommended.Donot usesiliconeorwax-basedproducts, orthosecontainingorganicsolvents tocleantheinteriorbecausethey canaltertheppearanceby increasingtheglossina non-uniformmanner.
InstrumentPanel, Vinyl, and OtherPlasticSurfaces
Toremovedust, asoftcloth dampenedwithwatercanbe used. Ifamorethoroughcleaning isnecessary, acleansoftcloth dampenedwithamildsoapsolution canbeusedtogentlyremovedust anddirt. Neverusespotliftersor removersonplasticsurfaces. Manycommercialcleanersand coatingsthataresoldtopreserve andprotectsoftplasticsurfaces maypermanentlychangethe appearanceandfeeloftheinterior andarenotrecommended. Donot usesiliconeorwax-basedproducts, orthosecontainingorganicsolvents tocleantheinteriorbecausethey canaltertheappearanceby increasingtheglossina non-uniformmanner.
Some commercial products may increase gloss on the instrument panel. The increase in gloss may cause annoying reflections in the windshield and even make it difficult to seethrough the windshield under certain conditions.
CareofSafetyBelts
Keepbeltscleananddry.

WARNING
Donotbleachordyesafetybelts. Itmayseverelyweakenthem. In acrash, they might not be able to provide adequate protection. Cleansafetybeltsonly with mild soap and lukewarmwater.
FloorMats

WARNING
Ifafloormatisthewrongsizeor isnotproperlyinstalled, itcan interferewiththeaccelerator pedaland/orbrakepedal. Interferencewiththepedalscan causeunintendedacceleration and/orincreasedstopping distancewhichcancauseacrash andinjury. Makesurethefloor matdoesnotinterferewiththe acceleratororbrakepedal.
Usethefollowingguidelinesfor properfloormatusage.
- Theoriginalequipmentfloor matsweredesignedforyour vehicle.Ifthefloormatsneed replacing,itisrecommended thatcertifiedfloormatsbe purchased.Non-certifiedfloor matsmaynotfitproperlyand mayinterferewiththe acceleratororbrakepedal. Alwayscheckthatthefloormats donotinterferewiththepedals.
- Usethefloormatwiththe correctsideup.Donotturn itover.
- Donotplaceanythingontopof theriversidefloormat.
• Useonlyasinglefloormaton thedriverside. - Donotplaceonefloormaton topofanother.
RemovingandReplacingthe FloorMats
Thedriversidefloormatisheldin placebytwobutton-typeretainers. Thepassengersidefloormatisheld inplacebyonebutton-typeretainer.

natural_image
Interior view of a car showing dashboard, steering wheel, and dashboard lift (no text or symbols)-
Pullupontherearofthefloor mattounlockeachretainerand remove.
-
Reinstallbyliningupthefloor matretaineropeningsoverthe carpetretainersandsnapping intoposition.
- Makesurethefloormatis properlysecured and verify that it does not interfere with the accelerator or brake pedal.
10-110VehicleCare
NOTES
Service and Maintenance
GeneralInformation
GeneralInformation......11-1
ScheduledMaintenance
ScheduledMaintenance.....11-3
RecommendedFluids, Lubricants,andParts
RecommendedFluidsand
Lubricants....11-4
MaintenanceReplacement
Parts......11-6
MaintenanceRecords
MaintenanceRecords.....11-7
GeneralInformation
Notice: Maintenance intervals, checks, inspections, recommended fluids, and lubricants are necessary to keep this vehicle in good working condition. Damage caused by failure to follows scheduled maintenance might not be covered by the vehicle warranty.
Asthevehicleowner,youare responsibleforthescheduled maintenanceinthissection.We recommendhavingyourdealer performtheseservices.Proper vehiclemaintenancehelpsto keepthevehicleingoodworking condition,improvesfueleconomy, andreducesvehicleemissionsfor betterairquality.
Becauseofallthedifferentways peopleusevehicles,maintenance needsvary.Thevehiclemightneed morefrequentchecksandservices. Pleasereadtheinformationunder ScheduledMaintenance.Tokeep thevehicleingoodcondition,see yourdealer.
Themaintenancescheduleisfor vehiclesthat:
- Carrypassengersandcargo withinrecommendedlimitson the Tire and Loading Information label. See Vehicle Load Limits on page 9-12.
- Aredrivenonreasonableroad surfaceswithinlegaldriving limits.
- Usetherecommendedfuel. SeeRecommendedFuelon page9-48.
11-2ServiceandMaintenance

WARNING
Performingmaintenancework canbedangerous.Somejobs cancauseseriousinjury.Perform maintenanceworkonlyifyou havetherequiredknow-howand thepropertoolsandequipment. Ifindoubt,seeyourdealerto haveaqualifiedtechniciandothe work.SeeDoingYourOwn ServiceWorkonpage10-4.
Atyourdealer,youcanbecertain thatyouwillreceivethehighest levelofserviceavailable.Your dealerhasspeciallytrained servicetechnicians,usesgenuine replacementparts,aswellas, up-to-datetoolsandequipmentto ensurefastandaccurate diagnostics.
The proper replacement parts, fluids, and lubricant stouse are listed in Recommended Fluids and Lubricantson page 11-4 and Maintenance Replacement Partson page 11-6. Were recommend the use of genuine parts from your dealer.
RotationofNewTires
Tomaintainride, handling, and performance of the vehicle, it is important that the first rotation service for new tires be performed. Tires should be rotated every 12000 km/7,500 mi. See Tire Rotation on page 10-67.
Scheduled Maintenance
WhentheChangeEngineOil SoonMessageDisplays
Changeengineoilandfilter.See EngineOilonpage10-10.An EmissionControlService.
WhentheCHANGEENGINEOIL SOONmessagedisplays, serviceis requiredforthevehicleassoonas possible, withinthenext1000km/600miles. Ifdrivingunderthebest conditions, theengineoillifesystem mightnotindicatetheneedfor vehicleserviceformorethanayear.
Theengineoilandfiltermustbe changedatleastonceayearand theoillifesystemmustbereset. Yourdealerhastrainedservice technicianswhowillperformthis workandresetthesystem.Ifthe engineoilifesystemisreset accidentally,servicethevehicle within5000km/3,000milessince thelastservice.Resettheoilife systemwhenevertheoilischanged. SeeEngineOilLifeSystemon page10-14.
WarrantyandServiceBooklet
PleaserefertotheSaabWarranty andServiceBookletforthe completescheduledmaintenance chartandrequirements.
RecommendedFluids,Lubricants,andParts
RecommendedFluidsandLubricants
| UsageFluid/Lubricant | |
| EngineOil | Theenginerequiresengineoilapprovedtothedexossspecification.Oils meetingthisspecificationcanbeidentifiedwiththedexoscertification mark.Lookforanduseonlyanengineoilthatdisplaysthedexos certificationmarkoftheproperviscositygrade.SeeEngineOilon page10-10. |
| EngineCoolant | 50/50mixtureofclean,drinkablewateranduseonlyDEX-COOLCoolant.SeeEngineCoolantonpage10-20. |
| HydraulicBrakeSystemDOT3HydraulicBrakeFluid(PartNo.88863461). | |
| WindshieldWasherOptikleen | ^ WasherSolvent. |
| HydraulicPowerSteeringSystemDEXRON | ^ -VIAutomaticTransmissionFluid. |
| AutomaticTransmission(3.0LV6Engine) | DEXRON ^ -VIAutomaticTransmissionFluid. |
| AutomaticTransmission(2.8LV6Engine) | AW-1AutomaticTransmissionFluid(PartNo.119256039). |
| ChassisLubrication | ChassisLubricant(PartNo.12377985)orlubricantmeetingrequirements ofNLGI#2,CategoryLBorGC-LB. |
| KeyLockCylindersMulti-PurposeLubricant,Superlube(PartNo.12346241). | |
| HoodLatchAssembly,Secondary Latch,Pivots,SpringAnchor,and ReleasePawl | LubriplateLubricantAerosol(PartNo.12346293)orlubricantmeeting requirementsofNLGI#2,CategoryLBorGC-LB. |
| Hood,Door,andFoldingSeatHingesMulti-PurposeLubricant,Superlube(PartNo.12346241). | |
| PowerLiftgateActuatorBallJointMulti-PurposeLubricant(PartNo.89021668). | |
| WeatherstripConditioning | WeatherstripLubricant(PartNo.3634770)orDielectricSiliconeGrease (PartNo.12345579). |
MaintenanceReplacementParts
Replacementpartsidentifiedbelowbyname, partnumber, orspecification can be obtained from your dealer.
| PartPartNumber | |
| EngineAirCleaner/Filter20897358 | |
| EngineOilFilter | |
| 2.8LV6Engine12593333 | |
| 3.0LV6Engine89017524 | |
| PassengerCompartmentAirFilterElement13271191 | |
| SparkPlugs | |
| 2.8LV6Engine12622561 | |
| 3.0LV6Engine12622561 | |
| WiperBlades | |
| DriverSide-65.0cm(25.6in)25979378 | |
| PassengerSide-42.5cm(16.7in)25979379 | |
| Rear-30.0cm(11.8in)20825882 | |
MaintenanceRecords
After the scheduled services are performed, record the date, odometer reading, who performed the service, and the type of services performed in the boxes provided. Retain all maintain an uncereceits.
MaintenanceRecord
| Date | Odometer Reading | ServicedByServices | Performed |
11-8ServiceandMaintenance
MaintenanceRecord(cont.)
| Date | Odometer Reading | ServicedByServices | Performed |
11-10ServiceandMaintenance
MaintenanceRecord(cont.)
| Date | Odometer Reading | ServicedByServices | Performed |
TechnicalData
VehicleIdentification
VehicleIdentification
Number(VIN)......12-1
ServicePartsIdentification
Label.....12-1
VehicleData
Capacitiesand
Specifications......12-2
EngineDriveBeltRouting...12-4
VehicleIdentification
VehicleIdentification Number(VIN)

Thislegalidentifierisinthefront corneroftheinstrumentpanel, on theleftsideofthevehicle.Itcanbe seenthroughthewindshieldfrom outside. TheVINalsoappearson theVehicleCertificationandService Partslabelsandcertificatesoftitle andregistration.
Engineldentification
TheeighthcharacterintheVINis theenginecode. Thiscode identifiesthevehicle'sengine, specifications,andreplacement parts.See"EngineSpecifications" underCapacitiesandSpecifications onpage12-2forthevehicle's enginecode.
ServiceParts IdentificationLabel
Thislabel, ontheinsideoftherear sidecargomanagementcover, has the following information:
• VehicleIdentification Number(VIN).
- Modeldesignation.
- Paintinformation.
• Productionoptionsandspecial equipment.
Donotremovethislabelfromthe vehicle.
VehicleData
CapacitiesandSpecifications
| Application | Capacities | |
| MetricEnglish | ||
| AirConditioningRefrigerantR134a | Fortheairconditioningsystemrefrigerantcharge amount,seetherefrigerantlabellocatedunderthe hood.Seeyourdealerformoreinformation. | |
| EngineCoolingSystem | ||
| 2.8LV6Engine12.8L13.5qt | ||
| 3.0LV6Engine11.7L12.3qt | ||
| EngineOilwithFilter | ||
| 2.8LV6Engine5.7L6.0qt | ||
| 3.0LV6Engine5.7L6.0qt | ||
| FuelTank | 79.5L | 21.0gal |
| TransmissionFluid | ||
| 2.8LV66-SpeedAutomatic(TransmissionRequiresNo FluidReplacement) | — | — |
| 3.0LV66-SpeedAutomatic*(DrainandRefill) | 9.0L9.5qt | |
| WheelNutTorque150N•m110ftlb | ||
| *See Automatic Transmission Fluid on page 10-16 for information on checking fluid level. | ||
| Allcapacitiesareapproximate.Whenadding,besuretofilltotheapproximatelevel,asrecommendedinthis manual.Recheckfluidlevelafterfilling. | ||
EngineSpecifications
| EngineVINCodeTransmissionSparkPlugGap | |||
| 2.8LV6(LAU)6Automatic1.10mm(0.043in) | |||
| 3.0LV6(LF1) | Y | Automatic1.10mm(0.043in) | |
12-4 TechnicalData
EngineDriveBeltRouting

natural_image
Abstract diagram of interconnected spheres with connecting lines, no text or symbols present2.8L,3.0LV6Engines
Customer Information
CustomerInformation
CustomerSatisfaction
Procedure....13-1
CustomerAssistance
Offices....13-3
CustomerAssistanceforText
Telephone(TTY)Users.....13-4
Roadside Assistance
Program....13-4
SchedulingService
Appointments......13-6
Courtesy Transportation
Program....13-7
CollisionDamageRepair....13-7
ReportingSafetyDefects
Reporting Safety Defect to the United States
Government......13-9
Reporting Safety Defect to the Canadian
Government......13-10
ReportingSafetyDefects
toSaab....13-10
VehicleDataRecordingand Privacy
VehicleDataRecordingand
Privacy....13-11
EventDataRecorders.....13-11
OnStar ^® 13-12
NavigationView......13-12
RadioFrequency
Identification(RFID)......13-12
RadioFrequency
Statement......13-12
CustomerInformation
CustomerSatisfaction Procedure
Yoursatisfactionandgoodwillare importanttoyourdealerandto Saab.Normally,anyconcerns withthesalestransactionorthe operationofthevehiclewillbe resolvedbyyourdealersalesor servicedepartments.Sometimes, however,despitethebestintentions ofallconcerned,misunderstandings canoccur.Ifyourconcernhasnot beenresolvedoyoursatisfaction, thefollowingstepsshouldbetaken:
STEPONE: Discuss your concern with a member of dealership management. Normally, concerns can be quickly resolved at that level. If them matter has already been reviewed with the sales, service, or parts manager, contact the owner of your dealership or the general manager.
13-2 Customer Information
STEPTWO: If after contacting a member of dealership management, it appears your concern cannot be resolved by your dealership without further help, in the U.S., call 1-800-955-9007. In Canada, contact Saab Customer Assistance Centre at 1-877-919-SAAB.
Weencourageyoutocallthe toll-freenumberinordertogivethe inquirypromptattention.Havethe followinginformationavailableto givetheCustomerAssistance representative:
- VehicleIdentification Number(VIN). This is available from the vehicleregistration or title, or the plate at the top of the instrument panel and visible through the windshield.
• Dealershipnameandlocation.
• Vehicledeliverydate and presentmileage.
When contacting Saab, remember that your concern will likely be resolved at a dealer facility. That is why wesuggest following Step One first.
STEPTHREE—U.S.Owners:
Both Saabandyourdealerare committedtomakingsureyouare completely satisfied with thenew vehicle. However, if you continueto remain unsatisfied after following the procedure outlined in Steps One and Two, you can file with the Better Business Bureau (BBB) AutoLine Program to enforce your rights.
TheBBBAutoLineProgramisan out-of-courtprogramadministered bytheCouncilofBetterBusiness Bureaustosettleautomotive disputesregardingvehiclerepairsor theinterpretationoftheNewVehicle LimitedWarranty.Althoughyoumay berequiredtoresorttothisinformal disputeresolutionprogrampriorto filingacourtaction,useofthe programisfreeofchargeandyour casewillgenerallybeheardwithin
40days.Ifyoudonotagreewiththe decisiongiveninyourcase,you mayrejectitandproceedwithany othervenueforreliefavailable toyou.
YoumaycontacttheBBBAuto LineProgramusingthetoll-free telephonenumberorwritethemat thefollowingaddress:
BBBAutoLineProgram CouncilofBetterBusiness Bureaus,Inc.
4200WilsonBoulevard Suite800
Arlington, VA22203-1838
Telephone:1-800-955-5100 www.dr.bbb.org/goauto
Thisprogramisavailableinall 50statesandtheDistrictof Columbia. Eligibilityislimitedby vehicleage,mileage,andother factors.Saabreservestherightto changeeligibilitylimitationsand/or discontinueitsparticipationinthis program.
STEPTHREE—Canadian
Owners: Intheeventthatyoudo notfeelyourconcernshavebeen addressedafterfollowingthe procedureoutlinedinStepsOne andTwo,Saabwantsyoutobe awareofitsparticipationina no-chargeMediation/Arbitration Program.Saabhascommittedto bindingarbitrationofownerdisputes involvingfactory-relatedvehicle serviceclaims.Theprogram providesforthereviewofthefacts involvedbyanimpartialthirdparty arbiter,andmayincludeaninformal hearingbeforethearbiter.The programisdesignedsothatthe entiredisputesettlementprocess, fromthetimeyoufileyourcomplaint tothefinaldecision,shouldbe completedinapproximately 70days.Webelieveourimpartial programoffersadvantagesover courtsinmostjurisdictionsbecause itisinformal,quick,andfreeof charge.
For further information concerning eligibility in the Canadian Motor Vehicle Arbitration Plan (CAMVAP), call toll-free 1-800-207-0685, or call Saab Customer Assistance Centre, 1-877-919-SAAB, or writeto:
Mediation/ArbitrationProgram IFSVehicleDistributorsULC 2400SouthServiceRoadWest Oakville,OntarioL6L5M9
The inquiry should be accompanied by the Vehicle Identification Number(VIN).
CustomerAssistance Offices
Saabencouragescustomerstocall thetoll-freenumberforassistance. However,ifacustomerwishesto writeore-mailSaab,refertothe addressesbelow.
UnitedStates
SaabCustomerAssistanceCenter
P.O.Box33166
Detroit, MI48232-5166
www.saabusa.com
1-800-955-9007
RoadsideAssistance:
1-800-852-9001
Canada
IFSVehicleDistributorsULC
2400SouthServiceRoadWest
Oakville,OntarioL6L5M9
CustomerService@saabcac.com
1-877-919-SAAB
RoadsideAssistance:
1-800-567-4555
Overseas
PleasecontactthelocalSaab
BusinessUnit.
CustomerAssistancefor TextTelephone(TTY) Users
Toassistcustomerswhoaredeaf, hardofhearing,orspeech-impaired andwhouseTextTelephones (TTYs),SaabhasTTYequipment availableatitsCustomerAssistance Center.AnyTTYusercan communicatewithSaabbydialing: 1-866-612-0380.TTYusersin Canadacandial1-877-919-SAAB.
Roadside Assistance Program
For U.S.-purchased vehicles, call 1-800-852-9001.
For Canadian-purchased vehicles, call 1-800-567-4555.
Serviceisavailable24hoursaday, 365daysayear.
CallingforAssistance
WhencallingRoadsideAssistance, havethefollowinginformation ready:
- Yourname,homeaddress,and hometelephonenumber.
• Telephonenumberofyour location. - Locationofthevehicle.
• Model, year, color, and license platenumberofthevehicle. - Odometerreading, Vehicle IdentificationNumber(VIN), and deliverydateofthevehicle.
• Descriptionoftheproblem.
Coverage
Servicesareprovidedupto4years/80000km(50,000mi),whichever comesfirst.
IntheU.S.,anyonedrivingthe vehicleiscovered.InCanada,a persondrivingthevehiclewithout permissionfromtheownerisnot covered.
RoadsideAssistanceisnotapartof theNewVehicleLimitedWarranty. Saabreservestherighttomake anychangesordiscontinuethe RoadsideAssistanceprogramat anytimewithoutnotification.
Saabreservestherighttolimit servicesorpaymenttoanowneror driveriftheydecidetheclaimsare madetoooften,orthesametypeof claimismademanytimes.
ServicesProvided
• EmergencyFuelDelivery: Deliveryofenoughfuelforthe vehicletogettothenearest servicestation.
- Lock-OutService:Serviceto unlockthevehicleifyouare lockedout.Aremoteunlock maybeavailableifyyouhave OnStar®.Forsecurityreasons, thedrivermustpresent identificationbeforethis serviceisgiven.
- EmergencyTowFromaPublic RoadorHighway:Towtothe nearestSaabdealerforwarranty service,orifthevehiclewasina crashandcannotbedriven. Assistanceisalsogivenwhen thevehicleisstuckinsand, mud,orsnow.
- FlatTireChange:Serviceto changeaflattirewiththespare tire. Thesparetire, ifequipped, mustbeingoodconditionand properlyinflated. Itistheowner's responsibilityfortherepairor replacementofthetireifitis notcoveredbythewarranty.
-
BatteryJumpStart:Serviceto jumpstartadeadbattery.
-
TripRoutingService:Detailed mapsofNorthAmericaare providedwhenrequestedeither withthemostdirectrouteorthe mostscenicroute.Additional travelinformationisalso available.Allowthreeweeks fordelivery.
- TriplInterruptionBenefitsand Assistance:Ifyourtripis interruptedduetoawarranty failure,incidentalexpenses maybereimbursedduringthe 4years/80000km(50,000mi) Powertrainwarrantyperiod. Itemsconsideredarehotel, meals,andrentalcar.
ServicesNotIncludedin RoadsideAssistance
- Impoundtowingcausedby violationofanylaws.
- Legalfines.
- Mounting, dismounting, or changing of snowtires, chains, or other traction devices.
- Towingorservicesforvehicles drivenonanon-publicroador highway.
ServicesSpecificto Canadian-PurchasedVehicles
- Fueldelivery:Reimbursement isapproximately\$5Canadian. Propaneandotherfuelsarenot providedthroughthisservice.
- Lock-OutService: Vehicle registration is required.
13-6 Customer Information
- TripRoutingService:Detailed mapsofNorthAmericaare providedwhenrequestedeither withthemostdirectrouteorthe mostscenicroute.Thereisasix requestlimitperyear.Additional travelinformationisalso available.Allowthreeweeks fordelivery.
- TriplInterruptionBenefitsand Assistance:Mustbeover 250♦kilometresfromwhereyour tripwasstartedtoqualify.Saab requirespre-authorization, originaldetailedreceipts,anda copyoftherepairorders.Once authorizationhasbeenreceived, theRoadsideAssistanceadvisor willhelpyoumakearrangements andexplainhowtoreceive payment.
- AlternativeService: If assistance cannot be provided rightaway, the Roadside Assistance advisor may give you permission to get local emergency road service. You will receive payment, upto \$100, aftersending the original receipt to Roadside Assistance. Mechanical failures maybe covered, however any cost for parts and labor for repairs not covered by the warranty are the owner responsibility.
SchedulingService Appointments
Whenthevehiclerequireswarranty service,contactyourdealerand requestanappointment.By schedulingaserviceappointment andadvisingtheserviceconsultant ofyourtransportationneeds,your dealercanhelpminimizeyour inconvenience.
If the vehicle cannot be scheduled into the serviced department immediately, keep driving it until it can be scheduled for service, unless, of course, the problem is safety related. If it is, please call your dealership, let them know this, and ask for instructions.
If your dealer requests you to bring the vehicle for service, you are urged todos to easily in the work day as possible to allow for the same-day repair.
Courtesy Transportation Program
During the warranty coverage period, alternatetransportation and/or reimbursement of certain transportation expenses will be available under the Courtesy Transportation Program if your vehiclerequires warranty repairs. Several transportation options are available. See your dealer form more information. Courtesy transportation is not part of, or included in, the coverage provided by IFS Vehicle Distributors ULCSaabwarranty. IFS Vehicle Distributors ULC reservest herighttomake any changesordiscontinuethe Courtesy Transportation Program at any time without notification.
CollisionDamageRepair
If the vehicle is involved in a collision and it is damaged, havethedamagerepaired by a qualified technician using the proper equipment and quality replacement parts. Poorly performed collision repairs diminish the vehicular resale value, and safety performance can be compromised in subsequent collisions.
CollisionParts
GenuineSaabCollisionpartsare newpartsmadewiththesame materialsandconstructionmethods asthepartswithwhichthevehicle wasoriginallybuilt.GenuineSaab Collisionpartsarethebestchoiceto ensurethatthevehicle'sdesigned appearance,durability,andsafety arepreserved.TheuseofGenuine Saabpartscanhelpmaintainthe SaabNewVehicleLimitedWarranty.
Recycled originalequipment parts may also be used for repair. These parts are typically removed from
vehiclesthatweretotallossesin priorcrashes.Inmostcases,the partsbeingrecycledarefrom undamagedsectionsofthevehicle. ArecycledoriginalequipmentSaab partmaybeanacceptablechoiceto maintainthevehicle'soriginally designedappearanceandsafety performance;however,thehistoryof thesepartsisnotknown.Suchparts arenotcoveredbytheSaabNew VehicleLimitedWarranty,andany relatedfailuresarenotcoveredby thatwarranty.
Aftermarketcollisionpartsare alsoavailable. Thesearemadeby companiesotherthanSaaband maynothavebeentestedforthe vehicle.Asaresult,theseparts mayfitpoorly,exhibitpremature durability/corrosionproblems, andmaynotperformproperly in subsequentcollisions.Aftermarket partsarenotcoveredbytheSaab NewVehicleLimitedWarranty,and anyvehiclefailurerelatedtosuch partsisnotcoveredbythat warranty.
RepairFacility
Saabalsorecommendsthatyou chooseacollisionrepairfacilitythat meetsyourneedsbeforeyouever needcollisionrepairs. Yourdealer mayhaveacollisionrepaircenter withSaab-trainedtechniciansand state-of-the-artequipment,orbe abletorecommendacollision repaircenterthathasSaab-trained techniciansandcomparable equipment.
InsuringtheVehicle
Protect your investment in the Saab vehicle with comprehensive and collision insurance coverage. There are significant differences in the quality of coverage afforded by various insurance policy terms. Many insurance policies provide reduced protection to the Saab vehicle by limiting compensation for damagerepairs by using aftermarket collision parts. Some insurance companies will not specify aftermarket collision parts.
When purchasing insurance, we recommend that you ensure that the vehicle will berepaired with Saab originalequipment collision parts. If such insurance coverage is not available from your current insurance carrier, considers switching to another insurance carrier.
Ifthevehicleisleased,theleasing companymayrequireyoutohave insurancethatensuresrepairswith GenuineSaabOriginalEquipment Manufacturer(OEM)partsor GenuineManufacturerreplacement parts.Readtheleasecarefully,as youmaybechargedattheendof theleaseforpoorqualityrepairs.
IfaCrashOccurs
Iftherehasbeenaninjury, call emergencyservicesforhelp. Donot leavethesceneofacrashuntilall mattershavebeentakencareof. Movethevehicleonlyifitsposition putsyouindanger, or you are instructed to move it by a police officer.
Giveonlythenecessaryinformation topoliceandotherpartiesinvolved inthecrash.
Foremergencytowing, see Roadside Assistance Program on page 13-4.
Gatherthefollowinginformation:
- Drivename, address, and telephonenumber.
• Driverlicensenumber. - Ownername, address, and telephonenumber.
• Vehiclelicenseplatenumber.
• Vehiclemake, model, and modelyear.
• VehicleIdentification Number(VIN).
• Insurancecompanyandpolicy number. - Generaldescriptionofthe damagetotheothervehicle.
Choose areputablerepairfacility that uses quality replacement parts. See "Collision Parts" earlier in this section.
If the airbag has inflated, see What Will You See after an Airbag Inflates? on page 3-36.
ManagingtheVehicleDamage RepairProcess
Intheeventthatthevehiclerequires damagerepairs, Saabrecommends thatyoutakeanactiveroleinits repair. If you have apre-determined repair facility of choice, takethe vehicle there, or have it towed there. Specify to the facility that any required replacement collision parts be originalequipment parts, either new Genuine Saab parts or recycled original Saab parts. Remember, recycled partswill not recovered by the Saab vehicle warranty.
Insurancepaysthebillfortherepair, butyoumustlivewiththerepair. Dependingonyourpolicylimits, yourinsurancecompanymay initiallyvaluetherepairusing aftermarketparts.Discussthiswith therepairprofessional,andinsist onGenuineSaabparts.Remember, ifthevehicleisleased,youmay beobligatedtohavethevehicle repairedwithGenuineSaabparts, evenifyourinsurancecoverage doesnotpaythefullcost.
Ifanotherparty'sinsurance companyispayingfortherepairs, youarenotobligatedtoaccepta repairvaluationbasedonthat insurancecompany'scollision policyrepairlimits,asyouhaveno contractuallimitswiththatcompany. Insuchcases,youcanhavecontrol oftherepairandpartschoicesas longasthecoststayswithin reasonablelimits.
Reporting Safety Defects
ReportingSafetyDefects totheUnitedStates Government
If you believe that your vehicle has a defect which could cause acrash or could cause injury or death, you should immediately inform the National Highway Traffic Safety Administration (NHTSA) in addition to notifying Saab.
IfNHTSAreceivessimilar complaints, it may open an investigation, and if it find that asafety defect exists in a group of vehicles, it may order a recall and remedycampaign. However, NHTSA cannot become involved in individual problems between you, your dealer, or Saab.
13-10 Customer Information
TocontactNHTSA,youmay calltheVehicleSafetyHotline toll-freeat1-888-327-4236 (TTY:1-800-424-9153);goto http://www.safercar.gov;or writeto:
Administrator, NHTSA 1200 New Jersey Avenue, S.E. Washington, D.C. 20590
Youcanalsoobtainother informationaboutmotor vehiclesafetyfrom http://www.safercar.gov.
ReportingSafetyDefects totheCanadian Government
IfyouliveinCanada, and you believethatthevehiclehasasafety defect, notify Transport Canada immediately, and notify IFS Vehicle Distributors ULC. Call Transport Canada at 1-800-333-0510 or writeto:
TransportCanada RoadSafetyBranch 80rueNoel Gatineau, QCJ8Z0A1
ReportingSafetyDefects toSaab
InadditiontonotifyingNHTSA (orTransportCanada)ina situationlikethis, notifySaab.
Call1-800-955-9007, orwrite:
SaabCustomerAssistanceCenter P.O.Box33166 Detroit,MI48232-5166
InCanada, call 1-877-919-SAAB, orwrite:
IFSVehicleDistributorsULC 2400SouthServiceRoadWest Oakville,OntarioL6L5M9
VehicleData Recordingand Privacy
This Saabvehicle has a number of sophisticated computer that record information about the vehicle's performance and how it is driven. Fore example, the vehicle uses computer module monitor and control engine and transmission performance, to monitor the conditions for air bag deployment and deploy air bags in acrash, and, if so equipped, to provide antilock braking to help the driver control the vehicle. These modules may store data about how you operate the vehicle, such as rate of fuel consumption or averages speed. These modules may also retain the owner's personal preferences, such as radiopre-sets, seat positions, and temperature settings.
EventDataRecorders
ThisvehiclehasanEventData Recorder(EDR). Themainpurpose of an EDRistorecord, incertain crashnearcrash-likesituations, such as an airbag deploymentor hitting a road obstacle, data that will assist in understanding how a vehicle's systems performed. The EDR is designed to record data related to vehicledynamics and safety systems for a short period of time, typically 30 seconds or less. The EDR in this vehicle is designed to record such data as:
• Howvarious systems in the vehicle were operating.
- Whetherornotthedriverand passengersafetybeltswere buckled/fastened.
- Howfar, ifatall, thedriver was pressing the accelerator and/or brake pedal.
• Howfastthevehiclewas traveling.
This data can help provide better understanding of the circumstances in which crashes and injuries occur.
Important: EDRdataisrecorded bythevehicleonlyifanon-trivial crashesituationoccurs;nodatais recordedbytheEDRundernormal drivingconditionsandnopersonal data(e.g.,name,gender,age,and crashlocation)isrecorded. However,otherparties,suchaslaw enforcement,couldcombinethe EDRdatawiththetypeof personallyidentifyingdataroutinely acquiredduringacrash investigation.
ToreaddatarecordedbyanEDR, specialequipmentisrequired, and accesstothevehicleortheEDRis needed. Inadditiontothevehicle manufacturer, otherparties, such as lawenforcement, that havethe specialequipment, can read the informationiftheyhaveaccessto thevehicleortheEDR.
Saabwillnotaccessthisdataor shareitwithothersexcept:withthe consentofthevehicleowner, ifthevehicleisleased, withthe consentofthelessee;inresponse toanofficialrequestbypoliceor similargovernmentoffice;aspartof Saab'sdefenseoflitigationthrough thediscoveryprocess;or, as requiredbylaw.DatathatSaab collectsorreceivesmayalsobe usedforSaabresearchneedsor maybemadeavailabletoothersfor researchpurposes,whereaneedis shownandthedataisnottiedtoa specificvehicleorvehicleowner.
OnStar®
Ifthevehicleisequippedwithan activeOnStarsystem,thatsystem mayalsorecorddataincrashor nearcrash-likesituations.The OnStarTermsandConditions providesinformationondata collectionanduseandisavailable intheOnStargloveboxkit,at www.onstar.com(U.S.)or
www.onstar.ca(Canada),orby pressingthe On button and speakingtoanadvisor.
NavigationSystem
If the vehicle has an navigation system, use of the system may result in the storage of destinations, addresses, telephonenumber, and other trip information. Referto the navigationsystem operating manual for information on stored data and for deletion instructions.
RadioFrequency Identification(RFID)
RFIDtechnologyisusedinsome vehiclesforfunctionssuchastire pressuremonitoringandignition systemsecurity,aswellasin connectionwithconveniences suchaskeyfobsforremotedoor locking/unlockingandstarting,and in-vehicletransmittersforgarage dooropeners.RFIDtechnologyin Saabvehiclesdoesnotuseor
recordpersonalinformationorlink withanyotherSaabsystem containingpersonalinformation.
RadioFrequency Statement
This vehiclehassystemsthat operateonaradiofrequencythat complywithPart15oftheFederal CommunicationsCommission(FCC) rulesandwithIndustryCanada StandardsRSS-210/220/310.
Operationissubjecttothefollowing twoconditions:
- Thedevicemaynotcause interference.
- The device must accept any interference received, including interference that may cause undesired operation of the device.
Changesormodificationstoanyof thesesystemsbyotherthanan authorizedservicefacilitycouldvoid authorizationtousethisequipment.
A
Accessoriesand
Modifications......10-3
AccessoryPower......9-22
AdaptiveForward
Lighting(AFL)....6-4
AdaptiveForwardLighting
(AFL)Light......5-28
Add-On Electrical
Equipment......9-61
Adjustable Throttle and
BrakePedal....9-18
Adjustments
Lumbar, FrontSeats......3-7
ThighSupport....3-7
AirCleaner/Filter,Engine.....10-16
AirFilter, Passenger
Compartment......8-7
AirVents....8-6
Airbag
AddingEquipmenttothe
Vehicle....3-43
AirbagSystem
Check....3-44
HowDoesanAirbag
Restrain?......3-35
PassengerSensing
System......3-38
WhatMakesanAirbag
Inflate?......3-35
WhatWillYouSeeAfter
anAirbagInflates?......3-36
WhenShouldanAirbag
Inflate?......3-33
WhereAretheAirbags?.....3-32
Airbags
PassengerStatus
Indicator....5-17
ReadinessLight......5-16
ServicingAirbag-Equipped
Vehicles....3-42
SystemCheck....3-29
AlarmSystem
Anti-Theft....2-16
All-WheelDrive......10-30,9-30
Anti-Theft
AlarmSystem......2-16
AlarmSystemMessages.....5-40
AntilockBrake
System(ABS)....9-30
WarningLight....5-23
AppearanceCare
Exterior.....10-101
Interior......10-105
ArmrestStorage......4-2
AssistanceProgram,
Roadside....13-4
Automatic
DimmingMirrors......2-20
HeadlampSystem......6-3
AutomaticTransmission......9-26
Fluid....10-16
ManualMode....9-28
B
Battery....10-30
JumpStarting.....10-92
LoadManagement......6-8
VoltageandCharging
Messages......5-34
BladeReplacement,
Wiper....10-32
i-2INDEX
Brake
PedalandAdjustable
Throttle....9-18
BrakeSystemWarning
Light....5-22
Brakes....10-27
Antilock....9-30
Assist....9-33
Fluid....10-28
Parking....9-31
SystemMessages......5-34
Braking....9-4
Break-In, NewVehicle......9-17
BulbReplacement......10-43
Back-UpLamps......10-42
HalogenBulbs......10-38
HeadlampAiming......10-34
Headlamps....10-38
LicensePlateLamps......10-42
TaillampsandTurn
SignalLamps.....10-40
BuyingNewTires......10-69
C
Calibration....5-6
California
FuelRequirements......9-48
PerchlorateMaterials
Requirements......10-3
Warning......10-3
Camera,RearVision......9-43
CanadianVehicleOwners......iii
Capacitiesand
Specifications......12-2
CarbonMonoxide
EngineExhaust......9-24
Liftgate....2-12
WinterDriving....9-9
Cargo
Cover......4-3
ManagementSystem......4-5
Tie-Downs....4-5
CargoLamp......6-7
CargoNet......4-9
Cautions, Danger, and
Warnings......iii
CenterConsoleStorage......4-2
Chains,Tire....10-75
ChargingSystemLight......5-18
Check
EngineLight....5-18
ChildRestraints
InfantsandYoung
Children....3-47
LowerAnchorsand
TethersforChildren......3-53
OlderChildren......3-45
Securing....3-62,3-64
Systems....3-50
CircuitBreakers.....10-44
Cleaning
ExteriorCare......10-101
InteriorCare....10-105
ClimateControlSystems
DualAutomatic....8-1
Rear....8-5
Clock....5-7
Cluster,Instrument......5-10
CollisionDamageRepair.....13-7
CompactSpareTire.....10-92
Compass....5-6
Messages......5-35
CompressorKit, Tire
Sealant....10-77
ControlofaVehicle....9-3
ConvenienceNet......4-11
ConvexMirrors......2-18
Coolant
Engine....10-20
Engine Temperature
Gauge....5-14
CoolingSystem......10-19
EngineMessages......5-36
CourtesyLamps......6-7
Courtesy Transportation
Program....13-7
Cover
Cargo....4-3
Engine....10-10
CruiseControl....9-39
Light....5-29
Messages......5-35
Cupholders......4-2
CustomerAssistance......13-4
Offices....13-3
TextTelephone(TTY)
Users......13-4
CustomerSatisfaction
Procedure....13-1
D
DamageRepair,Collision.....13-7
Danger,Warnings, and
Cautions......iii
DataRecorders,Event......13-11
DaytimeRunning
Lamps(DRL)....6-3
DefensiveDriving......9-2
DomeLamps......6-7
Door
AjarMessages......5-35
Locks....2-10
PowerLocks......2-11
RearSeatPass-Through.....3-13
DriveBeltRouting,Engine.....12-4
DriveSystems
All-WheelDrive.....10-30,9-30
DriverInformation
Center(DIC)......5-29
Driving
Characteristicsand
TowingTips....9-52
Defensive....9-2
Driving(cont.)
Drunk....9-2
ForBetterFuelEconomy.....1-22
HighwayHypnosis......9-8
HillandMountainRoads......9-8
IftheVehicleisStuck......9-11
LossofControl......9-6
Off-RoadRecovery......9-6
VehicleLoadLimits......9-12
WetRoads 9-7
Winter....9-9
DualAutomaticClimate
ControlSystem......8-1
E
ECOButton....9-29
EconomyMode
Fuel....9-29
ElectricParkingBrake
Light....5-22
Electrical Equipment,
Add-On 9-61
i-4INDEX
ElectricalSystem
EngineCompartment
FuseBlock......10-45
FusesandCircuit
Breakers.....10-44
InstrumentPanelFuse
Block....10-47
Overload....10-44
RearCompartmentFuse
Block....10-49
ElectronicStability
Program(ESP)......1-20,9-36
ElectronicStabilityProgram
(ESP)OffLight....5-24
ElectronicStabilityProgram
(ESP)/TractionControl
SystemIndicatorLight.....5-25
Engine
AirCleaner/Filter.....10-16
CheckandServiceEngine
SoonLight....5-18
CompartmentOverview......10-6
Coolant....10-20
Engine(cont.)
CoolantTemperature
Gauge....5-14
CoolingSystem......10-19
CoolingSystem
Messages......5-36
Cover......10-10
DriveBeltRouting......12-4
Exhaust....9-24
GasolineStarting......9-20
Heater....9-22
Overheating......10-24
PowerMessages......5-37
PressureLight......5-26
RunningWhileParked......9-25
EngineOil
LifeSystem......10-14
Messages......5-37
EntryLighting......6-7
Equipment, Towing......9-59
EventDataRecorders.....13-11
ExitLighting......6-7
Extender, Safety Belt......3-28
ExteriorLampControls......6-1
F
Features
Memory....1-8
Filter,
EngineAirCleaner......10-16
FirstAidKit....4-11
Flash-to-Pass......6-2
Flashers,HazardWarning......6-5
FlatTire....10-75
Changing....10-85
FloorMats....10-108
Fluid
AutomaticTransmission....10-16
Brakes....10-28
PowerSteering......10-26
Washer....10-26
FogLamps
Front......6-5
FoldingMirrors....2-19
FrontFogLamp
Light....5-28
FrontSeats
Adjustment....3-4
HeatedandVentilated......3-10
FrontStorage......4-2
Fuel....9-47
Additives......9-49
EconomyLight....5-27
FillingaPortableFuel
Container....9-51
FillingtheTank....9-50
FuelsinForeignCountries....9-49
GasolineSpecifications.....9-48
Gauge....5-12
LowFuelWarningLight.....5-27
Recommended......9-48
Requirements, California.....9-48
SystemMessages......5-38
FuelEconomy
Driving....1-22
FuelEconomyGauge......5-13
FuelEconomyMode......9-29
Fuses
EngineCompartment
FuseBlock......10-45
FusesandCircuit
Breakers.....10-44
InstrumentPanelFuse
Block....10-47
RearCompartmentFuse
Block....10-49
G
GarageDoorOpener......5-48
Programming......5-48
Gasoline
Specifications....9-48
GasolineEngine, Starting.....9-20
Gauge
Turbo....5-14
Gauges
EngineCoolant
Temperature......5-14
Fuel....5-12
FuelEconomy....5-13
Odometer....5-12
Speedometer 5-12
Tachometer....5-12
WarningLightsand
Indicators......5-9
GeneralInformation
ServiceandMaintenance.....11-1
Towing....9-52
VehicleCare....10-3
GloveBox....4-1
H
HalogenBulbs....10-38
HazardWarningFlashers.....6-5
HeadRestraints....3-2
Active....3-3
Headlamps....10-38
AdaptiveForward
Lighting(AFL)......6-4
Aiming....10-34
Automatic....6-3
BulbReplacement......10-38
DaytimeRunning
Lamps(DRL)....6-3
Flash-to-Pass......6-2
High-BeamOnLight......5-28
High/LowBeamChanger .....6-2
LampsOnReminder......5-29
Washer 5-6
Heated
RearSeats......3-13
HeatedandVentilated
FrontSeats......3-10
HeatedMirrors....2-20
Heater
Engine....9-22
i-6INDEX
High-BeamOnLight......5-28
High-SpeedOperation......10-61
HighwayHypnosis......9-8
HillandMountainRoads......9-8
HillStartAssist(HSA)......9-34
Hood....10-5
Horn....5-3
HowtoWearSafetyBelts
Properly....3-18
|
IgnitionPositions....9-18
Immobilizer......2-17
IndicatorLight
ElectronicStability
Program(ESP)/Traction
ControlSystem......5-25
InfantsandYoungChildren,
Restraints....3-47
Infotainment....7-1
InstrumentCluster......5-10
Introduction......iii
J
JumpStarting.....10-92
K
KeyandLockMessages......5-38
KeylessEntry
Remote(RKE)System......2-3
Keys......2-2
L
Labeling, TireSidewall.....10-53
LampMessages......5-38
Lamps
Cargo....6-7
Courtesy......6-7
DaytimeRunning(DRL)......6-3
Dome....6-7
ExteriorControls......6-1
FrontFog......6-5
LicensePlate......10-42
MalfunctionIndicator......5-18
OnReminder......5-29
Reading......6-7
TaillampsandTurn
Signal.....10-40
Lap-ShoulderBelt......3-23
LATCHSystem
ReplacingPartsAftera
Crash....3-61
LATCH, LowerAnchorsand
TethersforChildren......3-53
Liftgate
CarbonMonoxide......2-12
Light
AdaptiveForwardLighting
(AFL)Light......5-28
ElectronicStability
Program(ESP)Off......5-24
Lighting
AdaptiveForward......6-4
Entry......6-7
Exit......6-7
IlluminationControl......6-6
Lights
AirbagReadiness......5-16
AntilockBrakeSystem
(ABS)Warning......5-23
BrakeSystemWarning......5-22
ChargingSystem......5-18
CruiseControl....5-29
Lights(cont.)
ElectricParkingBrake......5-22
EngineOilPressure......5-26
Flash-to-Pass......6-2
FrontFogLamp......5-28
FuelEconomy......5-27
High-BeamOn....5-28
High/LowBeamChanger.....6-2
LowFuelWarning......5-27
SafetyBeltReminders......5-15
Security......5-27
TirePressure....5-25
TractionOff....5-24
Limited-SlipRearAxle......9-37
Locks
Door....2-10
PowerDoor......2-11
Safety....2-12
LossofControl....9-6
LowFuelWarningLight.....5-27
LowerAnchorsandTethers
forChildren(LATCH
System)....3-53
LumbarAdjustment......3-7
FrontSeats......3-7
M
Maintenance
Records......11-7
MaintenanceSchedule
RecommendedFluidsand
Lubricants....11-4
ScheduledMaintenance.....11-3
MalfunctionIndicatorLamp....5-18
ManualMode....9-28
MemoryFeatures......1-8
Messages
AirbagSystem......5-40
Anti-TheftAlarmSystem.....5-40
BatteryVoltageand
Charging....5-34
BrakeSystem......5-34
Compass......5-35
DoorAjar....5-35
EngineCoolingSystem......5-36
EngineOil....5-37
EnginePower......5-37
FuelSystem......5-38
KeyandLock....5-38
Messages(cont.)
Lamp....5-38
ObjectDetectionSystem.....5-39
RideControlSystem......5-39
SafetyBelt......5-40
ServiceVehicle......5-40
StartingtheVehicle......5-40
Tire....5-41
Transmission......5-41
Vehicle....5-34
VehicleReminder......5-42
WasherFluid....5-42
Mirrors
AutomaticDimming......2-20
AutomaticDimming
Rearview....2-21
Convex....2-18
Folding....2-19
Heated....2-20
ManualRearview......2-21
ParkTilt....2-20
Power......2-19
MonitorSystem,
TirePressure.....10-61
i-8INDEX
N
Navigation
VehicleDataRecording and Privacy......13-12
Net
Cargo....4-9
Net, Convenience......4-11
NewVehicleBreak-In......9-17
O
ObjectDetectionSystem
Messages......5-39
Odometer....5-12
Off-Road
Recovery....9-6
Oil
Engine....10-10
EngineOilLifeSystem.....10-14
Messages......5-37
PressureLight......5-26
OlderChildren, Restraints.....3-45
OnStar® System......1-23
Outlets
Power....5-8
Overheating,Engine......10-24
P
Park
ShiftingInto....9-23
ShiftingOutof......9-24
ParkTiltMirrors....2-20
Parking
Assist,Ultrasonic....9-41
Brake....9-31
BrakeandP(Park)
MechanismCheck......10-32
OverThingsThatBurn......9-24
PassengerAirbagStatus
Indicator....5-17
PassengerCompartment
AirFilter....8-7
PassengerSensingSystem...3-38
PerchlorateMaterials
Requirements, California.....10-3
Personalization
Vehicle....5-42
Power
DoorLocks......2-11
Mirrors....2-19
Outlets....5-8
RetainedAccessory(RAP)...9-22
Power(cont.)
SeatAdjustment......3-4
SteeringFluid......10-26
Windows....2-22
Pregnancy,
UsingSafetyBelts......3-27
Privacy
RadioFrequency
Identification(RFID)......13-12
Program
CourtesyTransportation.....13-7
Proposition65Warning,
California....10-3
R
RadioFrequency
Identification(RFID)......13-12
Statement......13-12
ReadingLamps......6-7
RearAxle
Limited-Slip....9-37
RearClimateControl
System......8-5
RearSeat
Pass-ThroughDoor......3-13
RearSeats......3-11
Heated....3-13
RearVisionCamera(RVC)....9-43
RearWindowWasher/Wiper....5-5
RearviewMirror
AutomaticDimming......2-21
RearviewMirrors......2-21
RecliningSeatbacks......3-8
Recommended
Fuel....9-48
RecommendedFluidsand
Lubricants....11-4
Records
Maintenance....11-7
Recreational Vehicle
Towing....10-97
RemoteKeylessEntry(RKE)
System......2-3
RemoteVehicleStart......2-9
ReplacementBulbs......10-43
ReplacementParts
Airbags....3-44
Maintenance....11-6
ReplacingAirbagSystem.....3-44
ReplacingLATCHSystem
PartsAfteraCrash......3-61
ReplacingSafetyBelt
SystemPartsAftera
Crash....3-29
ReportingSafetyDefects
CanadianGovernment.....13-10
U.S.Government......13-9
ReportingSafetyDefects
toSaab....13-10
Restraints
WheretoPut....3-52
RetainedAccessory
Power(RAP)......9-22
RideControlSystems
LimitedSlipRearAxle......9-37
Messages......5-39
Selective....9-37
Roads
Driving,Wet....9-7
Roadside Assistance
Program....13-4
Roof
Sunroof....2-25
RoofRackSystem......4-12
Rotation, Tires......10-67
Routing,EngineDriveBelt.....12-4
RunningtheVehicleWhile
Parked....9-25
S
SafetyBelts 3-14
Care....3-28
Extender....3-28
HowtoWearSafetyBelts
Properly....3-18
Lap-ShoulderBelt......3-23
Messages......5-40
Reminders....5-15
ReplacingAfteraCrash.....3-29
UseDuringPregnancy......3-27
SafetyDefects
ReportingtoSaab......13-10
SafetyDefectsReporting
CanadianGovernment.....13-10
U.S.Government......13-9
SafetyLocks......2-12
SafetySystemCheck......3-28
ScheduledMaintenance......11-3
i-10INDEX
SchedulingAppointments.....13-6
SealantKit, Tire......10-77
Seats
Adjustment, Front......3-4
HeadRestraints......3-2
HeatedandVentilated Front....3-10
Heated,Rear....3-13
LumbarAdjustment, Front.....3-7
PowerAdjustment, Front.....3-4
Rear....3-11
RecliningSeatbacks......3-8
SecuringChild
Restraints....3-62,3-64
Security
Light....5-27
Vehicle....2-16
SelectiveRideControl......9-37
Service
Accessoriesand
Modifications......10-3
DoingYourOwnWork......10-4
EngineSoonLight......5-18
MaintenanceRecords......11-7
Service(cont.)
Maintenance, General Information....11-1
PartsIdentificationLabel.....12-1
SchedulingAppointments.....13-6
VehicleMessages......5-40
ServicingtheAirbag......3-42
Shifting
IntoPark....9-23
OutofPark....9-24
Signals, Turnand
Lane-Change......6-5
SpareTire
Compact....10-92
Specificationsand
Capacities....12-2
Speedometer....5-12
StabilityProgram
Electronic....1-20
StartAssist,Hills......9-34
StartVehicle, Remote......2-9
StarterSwitchCheck......10-31
StartingtheGasoline
Engine....9-20
StartingtheVehicle
Messages 5-40
Steering....9-5
Fluid,Power......10-26
WheelAdjustment......5-2
WheelControls....5-2
StorageAreas
Armrest....4-2
CargoCover 4-3
CargoManagement System....4-5
CenterConsole......4-2
ConvenienceNet......4-11
Front......4-2
GloveBox....4-1
RoofRackSystem......4-12
StoringtheTireSealant andCompressorKit......10-85
StuckVehicle....9-11
SunVisors....2-24
Sunroof 2-25
Symbols...... iv
System
Infotainment....7-1
RoofRack......4-12
T
Tachometer....5-12
Taillamps
TurnSignalLamps......10-40
TextTelephone(TTY)Users...13-4
Theft-DeterrentSystems.....2-17
Immobilizer......2-17
ThighSupportAdjustment.....3-7
Throttle,Adjustable......9-18
Time....5-7
Tires
BuyingNewTires......10-69
Chains....10-75
Changing....10-85
CompactSpare......10-92
Designations......10-55
DifferentSize.....10-71
IfaTireGoesFlat......10-75
InflationMonitorSystem....10-63
Inspection......10-67
Messages......5-41
Pressure....10-61
PressureLight......5-25
Tires(cont.)
PressureMonitor
System......10-61
Rotation.....10-67
Sealantand
CompressorKit......10-77
SealantandCompressor
Kit,Storing......10-85
SidewallLabeling......10-53
Terminology and
Definitions......10-56
UniformTireQuality
Grading....10-72
WheelAlignmentand
TireBalance......10-74
WheelReplacement......10-74
WhenItIsTimefor
NewTires....10-68
Towing
DrivingCharacteristics......9-52
Equipment......9-59
GeneralInformation......9-52
Recreational Vehicle.....10-97
Towing(cont.)
Trailer....9-56
TrailerSwayControl(TSC)...9-61
Vehicle 10-97
Traction
ControlSystem(TCS)......9-34
Limited-SlipRearAxle......9-37
OffLight 5-24
SelectiveRideControl......9-37
Trailer
SwayControl(TSC)......9-61
TrailerTowing....9-56
Transmission
Automatic....9-26
Fluid, Automatic....10-16
Messages......5-41
TransportationProgram,
Courtesy 13-7
TurboGauge......5-14
TurnandLane-Change
Signals......6-5
i-12INDEX
U
UltrasonicParkingAssist.....9-41
UniformTireQuality
Grading....10-72
UniversalRemoteSystem.....5-48
Operation......5-51
Programming......5-48
UsingthisManual......iii
V
Vehicle
CanadianOwners......iii
Control....9-3
Identification
Number(VIN)......12-1
LoadLimits....9-12
Messages......5-34
Personalization......5-42
ReminderMessages......5-42
RemoteStart....2-9
Security......2-16
Towing....10-97
VehicleCare
StoringtheTireSealant andCompressorKit.....10-85
TirePressure......10-59
VehicleIdentification
ServicePartsIdentification Label....12-1
Ventilation,Air......8-6
Visors....2-24
W
Warning
BrakeSystemLight......5-22
WarningLights, Gauges, and Indicators....5-9
Warnings......iii CautionsandDanger......iii HazardFlashers......6-5
WasherFluid....10-26
WasherFluidMessages.....5-42
Washer, Headlamps.....5-6
Wheels
AlignmentandTire
Balance....10-74
DifferentSize......10-71
Replacement......10-74
WhenItIsTimeforNew
Tires....10-68
WheretoPuttheRestraint....3-52
Windows....2-21
Power....2-22
Windshield
Wiper/Washer....5-3
Winter
Driving....9-9
WiperBladeReplacement....10-32
Wipers
RearWasher....5-5
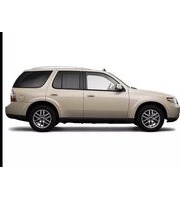

- 2011Saab9-4XOwnerManual
- CanadianVehicleOwners
- Danger,Warnings, and Cautions
- WARNING
- Symbols
- VehicleSymbolChart
- D:FogLamps
- InBrief
- InstrumentPanel
- InitialDriveInformation
- VehicleFeatures
- PerformanceandMaintenance
- 1-4InBrief
- InitialDrive Information
- RemoteKeylessEntry (RKE)System
- RemoteVehicleStart
- StartingtheVehicle
- CancelingaRemoteStart
- DoorLocks
- 1-6InBrief
- Liftgate
- ManualLiftgateOperation
- DriverSideShown
- PowerSeats
- MemoryFeatures
- StoringButtonMemoryPositions
- EasyExitDriverSeat
- HeadRestraint Adjustment
- SafetyBelts
- SensingSystemfor PassengerAirbag
- Canada
- MirrorAdjustment
- 1-12InBrief
- Interior
- SteeringWheel Adjustment
- InteriorLighting
- DomeLamp
- ReadingLamps
- 1-14InBrief
- WindshieldWasher
- Rainsense™
- RearWindowWiper/Washer
- ClimateControls
- Radio(s)
- 1-16InBrief
- StoringaFavoriteStation
- SettingtheClock
- SettingtheTimeandDate
- Settingthe12/24HourFormat
- SettingtheMonth&DayFormat
- XMSatelliteRadioService
- PortableAudioDevices
- Bluetooth®
- SteeringWheelControls
- 1-18InBrief
- CruiseControl
- NavigationSystem
- DriverInformation Center(DIC)
- RearVision Camera(RVC)
- UltrasonicParkingAssist
- StorageCompartments
- PowerOutlets
- UniversalRemoteSystem
- Performance and Maintenance
- TractionControl System(TCS)
- ElectronicStability Program(ESP)
- TirePressureMonitor
- TireSealantand CompressorKit
- EngineOilLifeSystem
- ResettingtheOilLifeSystem
- DrivingforBetterFuel Economy
- Roadside Assistance Program
- RoadsideServiceandOnStar
- OnStar®
- AutomaticCrashResponse
- HowOnStarServiceWorks
- 1-24InBrief
- OnStarSteeringWheel Controls
- YourResponsibility
- Keys, Doors and Windows
- KeysandLocks
- Doors
- VehicleSecurity
- ExteriorMirrors
- InteriorMirrors
- Windows
- Roof
- Keys
- Notice: If the keys get locked in the vehicle, it may have to be damaged to get them out. Always carry as spare key.
- RemoteKeylessEntry (RKE)SystemOperation
- KeylessAccessOperation
- KeylessUnlocking
- KeylessLocking
- KeylessLiftgateOpening
- ProgrammingTransmittersto theVehicle
- ProgrammingwithaRecognized Transmitter(KeylessAccess VehiclesOnly)
- 2-6Keys, DoorsandWindows
- Programmingwithouta RecognizedTransmitter (KeylessAccessVehiclesOnly)
- 2-8Keys, DoorsandWindows
- StartingtheVehiclewithaLow TransmitterBattery
- BatteryReplacement
- StartingtheEngineUsingRemote Start
- ExtendingEngineRunTime
- 2-10Keys, DoorsandWindows
- ShuttingtheEngineOffAftera RemoteStart
- ConditionsinWhichRemoteStart WillNotWork
- WARNING(Continued)
- LockoutDeterrent
- DelayedLocking
- ManualLiftgate
- ObstacleDetectionFeatures
- SettingthePowerLiftgate 3/4Mode
- ManualOperationofPower Liftgate
- Anti-theftAlarmSystem
- ArmingtheSystem
- DisarmingtheSystem
- HowtoDetectaTamper Condition
- Immobilizer
- ImmobilizerOperation
- ConvexMirrors
- PowerMirrors
- FoldingMirrors
- ManualFoldawayMirrors
- PowerFoldawayMirrors
- ResettingthePowerFoldaway Mirrors
- HeatedMirrors
- AutomaticDimming Mirror
- ParkTiltMirrors
- ManualRearviewMirror
- AutomaticDimming RearviewMirror
- CleaningtheMirror
- PowerWindows
- Express-Down/UpWindows
- ProgrammingthePower Windows
- ObstacleDetectionFeature
- 2-24Keys, DoorsandWindows
- Overload
- Sunroof
- 2-26Keys, DoorsandWindows
- Express-open/Express-close
- Anti-PinchFeature
- Seatsand Restraints
- HeadRestraints
- FrontSeats
- RearSeats
- AirbagSystem
- ChildRestraints
- 3-2 Seats and Restraints
- ActiveHeadRestraints
- SeatAdjustment
- PowerSeatAdjustment
- RecallingButtonMemory Positions
- 3-6 Seats and Restraints
- RecallingRKEMemoryPositions (MemoryRemoteRecall)
- LumbarAdjustment PowerLumbar
- ThighSupport Adjustment
- 3-8 Seats and Restraints
- RecliningSeatbacks
- ManualRecliningSeatbacks
- PowerRecliningSeatbacks
- HeatedandVentilated FrontSeats
- RemoteStartHeatedand VentilatedSeats
- SplitFoldingSeatbacks
- FoldingtheSeatbacks
- 3-12 Seats and Restraints
- RaisingtheSeatbacks
- Toraisetheseatback:
- RecliningtheSeatbacks
- Toreclinetheseatback:
- HeatedRearSeats
- RearSeat Pass-ThroughDoor
- WhySafetyBeltsWork
- 3-16SeatsandRestraints
- QuestionsandAnswersAbout SafetyBelts
- Q: Willlbetrappedinthevehicle afteracrashiflamwearinga safetybelt?
- Q: If my vehicle has air bags, why should have to wear safety belts?
- Q: Iflamagooddriver, andl neverdrivefarfromhome, whyshouldlwearsafety belts?
- 3-18 Seats and Restraints
- HowtoWearSafetyBelts Properly
- 3-20SeatsandRestraints
- Q: Whatiswrongwiththis?
- 3-22SeatsandRestraints
- Lap-ShoulderBelt
- 3-24SeatsandRestraints
- ShoulderBeltHeightAdjuster
- SafetyBeltPretensioners
- RearSafetyBeltComfort Guides
- SafetyBeltUseDuring Pregnancy
- SafetyBeltExtender
- SafetySystemCheck
- SafetyBeltCare
- ReplacingSafetyBelt SystemPartsaftera Crash
- 3-30 Seats and Restraints
- 3-32SeatsandRestraints
- WhereAretheAirbags?
- WhenShouldanAirbag Inflate?
- 3-34SeatsandRestraints
- WhatMakesanAirbag Inflate?
- HowDoesanAirbag Restrain?
- WhatWillYouSeeafter anAirbagInflates?
- 3-38SeatsandRestraints
- PassengerSensing System
- IftheOnIndicatorisLitfora ChildRestraint
- IftheOffIndicatorisLitforan Adult-SizeOccupant
- AdditionalFactorsAffecting SystemOperation
- Servicingthe Airbag-EquippedVehicle
- AddingEquipmenttothe Airbag-EquippedVehicle
- AirbagSystemCheck
- ReplacingAirbagSystem PartsafteraCrash
- ChildRestraints OlderChildren
- 3-46SeatsandRestraints
- Q:Whatistheproperwayto wearsafetybelts?
- InfantsandYoung Children
- 3-48SeatsandRestraints
- Q: Whatarethedifferenttypes of add-onchildrestraints?
- 3-50 Seats and Restraints
- SecuringanAdd-OnChild RestraintintheVehicle
- SecuringtheChildWithinthe ChildRestraint
- WheretoPutthe Restraint
- LowerAnchorsand TethersforChildren (LATCHSystem)
- 3-54SeatsandRestraints
- 3-56SeatsandRestraints
- SecuringaChildRestraint DesignedfortheLATCH System
- 3-58SeatsandRestraints
- HeadRestraintRemovaland Reinstallation
- ReplacingLATCHSystem PartsAfteraCrash
- SecuringChildRestraints (RearSeat)
- 3-64SeatsandRestraints
- SecuringChildRestraints (FrontPassengerSeat)
- 3-66SeatsandRestraints
- 3-68SeatsandRestraints
- NOTES
- Storage
- AdditionalStorageFeatures
- RoofRackSystem
- Storage Compartments
- GloveBox
- 4-2Storage
- ArmrestStorage
- CenterConsoleStorage
- AdditionalStorage Features
- CargoCover
- 4-4Storage
- InstalltheCargoCover
- RemovetheCargoCover
- CargoTie-Downs
- CargoManagement System
- RearStorageArea
- 4-8Storage
- StoringtheFence
- CargoNet
- 4-10Storage
- CargoNetStorage
- ConvenienceNet
- FirstAidKit
- Instruments and Controls
- Controls
- WarningLights, Gauges, and Indicators
- InformationDisplays
- VehicleMessages
- 5-2 InstrumentsandControls
- VehiclePersonalization
- Horn
- WindshieldWiper/Washer
- WipeParking
- WiperArmAssemblyProtection
- RearWindow Wiper/Washer
- 5-6 InstrumentsandControls
- ReverseGearWipes
- HeadlampWasher
- Compass
- Clock(DigitalClock)
- SettingtheMonth&Day Format
- WarningLights, Gauges,and Indicators
- Speedometer
- Odometer
- Tachometer
- FuelGauge
- English
- TurboGauge
- EngineCoolant TemperatureGauge
- SafetyBeltReminders DriverSafetyBeltReminder Light
- PassengerSafetyBelt ReminderLight
- SecondRowPassengerBelt ReminderLight
- AirbagReadinessLight
- PassengerAirbagStatus Indicator
- ChargingSystemLight
- Malfunction IndicatorLamp
- EmissionsInspection and MaintenancePrograms
- BrakeSystemWarning Light
- MetricEnglish
- ElectricParkingBrake Light
- AntilockBrakeSystem (ABS)WarningLight
- TractionOffLight
- ElectronicStability Program(ESP)OffLight
- ElectronicStability Program(ESP)/Traction ControlSystemIndicator Light
- TirePressureLight
- WhentheLightisOnSteady
- WhentheLightFlashesFirstand ThenisOnSteady
- EngineOilPressureLight
- FuelEconomyLight
- eco
- LowFuelWarningLight
- SecurityLight
- High-BeamOnLight
- AdaptiveForward Lighting(AFL)Light
- FrontFogLampLight
- LampsOnReminder
- CruiseControlLight
- 5-30InstrumentsandControls
- DICOperationandDisplays
- DICButtons
- Trip/FuellInformation Menultems
- DigitalSpeedometer
- Trip
- FuelRange
- AverageFuelEconomyor AverageFuelEconomyand InstantaneousFuelEconomy
- AverageVehicleSpeed
- Navigation
- 5-32 InstrumentsandControls
- SpeedandCurveAssist
- DistancetoDestination
- BlankDisplay
- VehicleInformationMenu Items
- Unit
- BatteryVoltage
- InstrumentsandControls5-33
- OilLifeRemaining
- TirePressure
- SpeedWarning
- BatteryVoltageand ChargingMessages
- BATTERYSAVERACTIVE
- LOWBATTERY
- SERVICEBATTERY CHARGINGSYSTEM
- BrakeSystemMessages
- BRAKEFLUIDLOW
- BRAKESOVERHEATED
- CruiseControlMessages
- APPLYBRAKEBEFORE CRUISE
- CRUISESETTOXXX
- DoorAjarMessages
- DOOROPEN
- HOODOPEN
- POWERLIFTGATE UNAVAILABLE
- REARACCESSOPEN
- EngineCoolingSystem Messages
- A/COFFDUETOHIGH ENGINETEMP
- COOLANTLEVELLOWADD COOLANT
- ENGINE OVERHEATED—IDLE ENGINE
- ENGINE OVERHEATED—STOP ENGINE
- HIGHCOOLANT TEMPERATURE
- EngineOilMessages CHANGEENGINEOILSOON
- ENGINEOILHOT, IDLE ENGINE
- ENGINEOILLOW—ADDOIL
- OILPRESSURELOW—STOP ENGINE
- EnginePowerMessages ENGINEPOWERISREDUCED
- FuelSystemMessages
- FUELLEVELLOW
- TIGHTENGASCAP
- KeyandLockMessages
- NOREMOTEDETECTED
- NOREMOTEPRESSBRAKE TORESTART
- NUMBEROFKEYS PROGRAMMED
- REMOTELEFTINVEHICLE
- REPLACEBATTERYIN REMOTEKEY
- LampMessages
- AFL(ADAPTIVEFORWARD LIGHTING)LAMPSNEED SERVICE
- AUTOMATICLIGHT CONTROLON
- AUTOMATICLIGHT CONTROLOFF
- XXXTURNINDICATOR FAILURE
- TURNSIGNALON
- ObjectDetectionSystem Messages
- PARKASSISTOFF
- SERVICEPARKASSIST
- RideControlSystem Messages
- COMFORTMODEON
- SERVICEREARAXLE
- SERVICEESP
- SERVICESUSPENSION SYSTEM
- SERVICETRACTION CONTROL
- SPORTMODEON
- AirbagSystemMessages SERVICEAIRBAG
- SafetyBeltMessages
- BUCKLESEATBELT
- Anti-theftAlarmSystem Messages
- THEFTATTEMPTED
- ServiceVehicleMessages SERVICEACSYSTEM
- SERVICEPOWERSTEERING
- SERVICEVEHICLES OON
- StartingtheVehicle Messages
- PRESSBRAKETOSTART VEHICLE
- SERVICEKEYLESSSTART SYSTEM
- TireMessages
- SERVICETIREMONITOR SYSTEM
- TIRELEARNINGACTIVE
- TIRELOWADDAIRTOTIRE
- TransmissionMessages SERVICETRANSMISSION
- SHIFTDENIED
- SHIFTTOPARK
- TRANSMISSIONHOT—IDLE ENGINE
- VehicleReminder Messages
- ICEPOSSIBLEDRIVE WITHCARE
- TURNWIPERCONTROLTO INTERMITTENTFIRST
- WasherFluidMessages
- WASHERFLUIDLOWADD FLUID
- Vehicle Personalization
- EnteringthePersonalization Menus
- ClimateandAirQuality
- AutoFanSpeed
- AirQualitySensor
- RemoteStartAutoSeatCool
- RemoteStartAutoHeatedSeats
- AutoDefog
- AutoRearDefog
- ComfortandConvenience
- ChimeVolume
- ReverseTiltMirror
- AutoWipeinReverseGear
- Language
- Lighting
- VehicleLocatorLights
- ExitLighting
- PowerDoorLocks
- UnlockedDoorAntiLockOut
- AutoDoorUnlock
- DelayedDoorLock
- RemoteLock/Unlock/Start
- UnlockFeedback(Lights)
- LockingFeedback
- DoorUnlockOptions
- PassiveDoorLock
- PassiveDoorUnlock
- MemoryRemoteRecall
- RemoteLeftinVehicleReminder
- ReturntoFactorySettings
- UniversalRemote System
- UniversalRemoteSystem Programming
- ProgrammingtheUniversal RemoteSystem
- "Learn" or "Smart" Buttons
- GateOperatorandCanadian Programming
- UniversalRemoteSystem Operation
- UsingtheUniversalRemote System
- ErasingUniversalRemote SystemButtons
- 5-52 InstrumentsandControls
- ReprogrammingaSingle UniversalRemoteSystem Button
- ExteriorLighting
- LightingFeatures
- ExteriorLampControls
- 6-2Lighting
- D(FrontFogLamps):For vehicleswithfoglamps,pressto turnthelampsonoroff.
- HeadlampHigh/Low-BeamChanger
- Flash-to-Pass
- DaytimeRunning Lamps(DRL)
- AutomaticHeadlamp System
- 6-4Lighting
- AdaptiveForward Lighting(AFL)
- CurveLighting
- 6-6Lighting
- 0(FrontFogLamps):Pressto turnthefoglampsonoroff.An indicatorlightontheinstrument panelclustercomesonwhenthe foglampsareon.
- InstrumentPanel IlluminationControl
- CargoLamp
- CourtesyLamps
- DomeLamps
- EntryLighting
- 6-8Lighting
- BatteryLoad Management
- Infotainment System
- Introduction
- Infotainment
- 7-2InfotainmentSystem
- ClimateControlSystems
- AirVents
- Maintenance
- DualAutomaticClimateControlSystem
- AutomaticOperation
- DriverandPassenger
- ManualOperation
- AirDeliveryModeControls:
- RearWindowDefogger
- 8-4ClimateControls
- Sensor
- RearClimateControlSystem
- OperationTips
- PassengerCompartment AirFilter
- 8-8ClimateControls
- Driving and Operating
- DrivingInformation
- StartingandOperating
- EngineExhaust
- AutomaticTransmission
- DriveSystems
- Brakes
- RideControlSystems
- ObjectDetectionSystems
- Fuel
- 9-2DrivingandOperating
- Towing
- ConversionsandAdd-Ons
- DefensiveDriving
- DrunkDriving
- ControlofaVehicle
- Braking
- Steering
- PowerSteering
- SteeringTips
- SteeringinEmergencies
- Off-RoadRecovery
- LossofControl
- Skidding
- DrivingonWetRoads
- Hydroplaning
- OtherRainyWeatherTips
- HighwayHypnosis
- HillandMountainRoads
- WinterDriving
- DrivingonSnoworIce
- BlizzardConditions
- IftheVehiclesStuck
- RockingtheVehicletoGet itOut
- 9-12DrivingandOperating
- VehicleLoadLimits
- LabelExample
- StepsforDeterminingCorrect LoadLimit
- 9-14DrivingandOperating
- Example1
- Example2
- Example3
- CertificationLabel
- 9-16DrivingandOperating
- Starting and Operating
- NewVehicleBreak-In
- Adjustable Throttle and Brake Pedal
- IgnitionPositions
- ACC/ACCESSORY(AmberLED
- ON/RUN/START(GreenLED
- StartingtheGasoline Engine
- StartingProcedure
- EngineHeater
- ToUsetheEngineCoolant Heater
- RetainedAccessory Power(RAP)
- ShiftingIntoPark
- LeavingtheVehiclewiththe EngineRunning
- TorqueLock
- ShiftingoutofPark
- ParkingoverThings ThatBurn
- RunningtheVehicle WhileParked
- Automatic Transmission
- CAUTION
- ManualMode
- DriverShiftControl(DSC)
- FuelEconomyMode
- All-WheelDrive
- AntilockBrake System(ABS)
- UsingABS
- BrakinginEmergencies
- ParkingBrake
- 9-32DrivingandOperating
- EPBApply
- EPBRelease
- AutomaticEPBRelease
- BrakeAssist
- HillStartAssist(HSA)
- TCS/ESPLight
- ESPOffLightTCSOffLight
- Limited-SlipRearAxle
- SelectiveRideControl TCS/ESPButton
- 2.8LV6Engine
- 9-38DrivingandOperating
- 3.0LV6Engine
- SettingCruiseControl
- ResumingaSetSpeed
- IncreasingSpeedWhileUsing CruiseControl
- ReducingSpeedWhileUsing CruiseControl
- PassingAnotherVehicleWhile UsingCruiseControl
- UsingCruiseControlonHills
- EndingCruiseControl
- ErasingSpeedMemory
- ObjectDetection Systems
- HowtheSystemWorks
- TurningtheSystemOnandOff
- WhentheSystemDoesNot SeemtoWorkProperly
- VehiclesWithoutaNavigation System
- TurningtheRearVisionCamera SystemOfferOn
- VehiclesWithaNavigation System
- TurningtheRearVisionCamera SystemOnorOff
- Guidelines
- RearVisionCameraError Messages
- GasolineSpecifications (U.S.andCanadaOnly)
- CaliforniaFuel Requirements
- FuelsinForeign Countries
- FuelAdditives
- FillingtheTank
- FillingaPortableFuel Container
- GeneralTowing Information
- DrivingCharacteristics and TowingTips
- PullingaTrailer
- DrivingwithaTrailer
- TowingwithaStabilityControl System
- FollowingDistance
- Passing
- BackingUp
- MakingTurns
- TurnSignalswhenTowinga Trailer
- DrivingonGrades
- ParkingonHills
- Ifparkingtherigonahill:
- LeavingAfterParkingonaHill
- MaintenancewhenTrailer Towing
- EngineCoolingwhenTrailer Towing
- TrailerTowing
- WeightoftheTrailer
- Weightofthe TrailerTongue
- TotalWeightontheVehicle's Tires
- TowingEquipment
- Hitches
- HitchCover
- SafetyChains
- TrailerBrakes
- TrailerWiringHarness
- TrailerSway Control(TSC)
- Conversionsand Add-Ons
- Add-On Electrical Equipment
- 9-62DrivingandOperating
- VehicleCare
- GeneralInformation
- VehicleChecks
- HeadlampAiming
- BulbReplacement
- ElectricalSystem
- WheelsandTires
- JumpStarting
- AppearanceCare
- CaliforniaProposition 65Warning
- CaliforniaPerchlorate MaterialsRequirements
- Accessories and Modifications
- DoingYourOwn ServiceWork
- Hood
- EngineCompartmentOverview
- 10-8VehicleCare
- EngineCover EngineCover(3.0LV6)
- EngineOil
- CheckingEngineOil
- WhentoAddEngineOil
- SelectingtheRightEngineOil
- Specification
- dexos™
- ViscosityGrade
- EngineOilAdditives/Engine OilFlushes
- WhattoDowithUsedOil
- WhentoChangeEngineOil
- HowtoResettheEngineOil LifeSystem
- AutomaticTransmission Fluid
- HowtoCheckAutomatic TransmissionFluid
- EngineAirCleaner/Filter
- WhentoInspecttheEngineAir Cleaner/Filter
- HowtoInspecttheEngineAir Cleaner/Filter
- 10-18VehicleCare
- Cooling System
- { WARNING
- EngineCoolant
- WhattoUse
- CheckingCoolant
- HowtoAddCoolanttothe CoolantSurgeTank
- 10-24VehicleCare
- EngineOverheating
- IfSteamIsComingfromthe EngineCompartment
- IfNoSteamIsComingfrom theEngineCompartment
- PowerSteeringFluid
- WhentoCheckPowerSteering Fluid
- HowtoCheckPowerSteering Fluid
- WasherFluid
- AddingWasherFluid
- Notice
- BrakePedalTravel
- BrakeAdjustment
- ReplacingBrakeSystemParts
- BrakeFluid
- WhattoAdd
- Battery
- DANGER
- VehicleStorage
- TransferCase
- WhentoCheckandChange Lubricant
- StarterSwitchCheck
- ParkBrakeandP(Park) MechanismCheck
- WiperBladeReplacement
- FrontWiperBlade Replacement
- RearWiperBladeReplacement
- Toremovethewiperblade:
- 10-34VehicleCare
- UplevelVehicle(HIDHeadlamps)
- 10-36VehicleCare
- HalogenBulbs
- BaseHeadlampAssembly(Driver SideShown, PassengerSide Similar)
- UplevelHeadlampAssembly (DriverSideShown, Passenger SideSimilar)
- Low-BeamHeadlamps/Daytime RunningLamps(DRL)(Base)
- High-BeamHeadlamps(Base)
- High/Low-BeamHeadlamps (Uplevel)
- DaytimeRunningLamp(DRL) (Uplevel)
- FrontTurnSignalLamp (BaseandUplevel)
- TaillampsandTurnSignal Lamps
- Back-UpLamps
- LicensePlateLamp
- ElectricalSystem Overload
- HeadlampWiring
- WindshieldWipers
- FusesandCircuit Breakers
- EngineCompartment FuseBlock
- InstrumentPanelFuse Block
- Tires
- TireSidewallLabeling
- TireDesignations
- TireSize
- TireTerminology and Definitions
- VehicleMaximumLoadonthe
- Overinflatedtires, ortiresthat havetoomuchair, can resultin:
- WhentoCheck
- HowtoCheck
- TirePressurefor High-SpeedOperation
- TirePressureMonitor System
- FederalCommunications Commission(FCC)and IndustryCanada
- TirePressureMonitor Operation
- TPMSMalfunctionLightand Message
- TPMSSensorMatching Process
- 10-66VehicleCare
- TireInspection
- TireRotation
- WhenItIsTimeforNew Tires
- BuyingNewTires
- DifferentSizeTiresand Wheels
- UniformTireQuality Grading
- Treadwear200TractionAA TemperatureA
- Treadwear
- Traction-AA,A,B,C
- Temperature-A,B,C
- WheelAlignmentandTire Balance
- WheelReplacement
- UsedReplacementWheels
- TireChains
- IfaTireGoesFlat
- TireSealant
- UsingtheTireSealantand CompressorKittoTemporarily SealandInflatea PuncturedTire
- theaccessorypoweroutletand unscrewtheinflatinghosefrom thetirevalve.SeeRoadside AssistanceProgramon page13-4.
- 10-82VehicleCare
- RemovalandInstallationofthe SealantCanister
- StoringtheTireSealant andCompressorKit
- TireChanging
- RemovingtheSpareTireand Tools
- 10-86VehicleCare
- RemovingtheFlatTireand InstallingtheSpareTire
- 10-90VehicleCare
- StoringaFlatorSpareTire andTools
- CompactSpareTire
- TowingtheVehicle
- Recreational Vehicle Towing
- DinghyTowing
- DollyTowing (All-Wheel-DriveVehicles)
- ExteriorCare
- CleaningExterior Lamps/Lenses
- FinishCare
- Protecting Exterior Bright Metal Parts
- WashingtheVehicle
- Weatherstrips
- WheelsandTrim—Aluminum
- WindshieldandWiperBlades
- SheetMetalDamage
- FinishDamage
- UnderbodyMaintenance
- ChemicalPaintSpotting
- InteriorCare
- 10-106VehicleCare
- Fabric/Carpet
- Toclean:
- Leather
- InstrumentPanel, Vinyl, and OtherPlasticSurfaces
- CareofSafetyBelts
- FloorMats
- RemovingandReplacingthe FloorMats
- Service and Maintenance
- 11-2ServiceandMaintenance
- RotationofNewTires
- Scheduled Maintenance
- WhentheChangeEngineOil SoonMessageDisplays
- WarrantyandServiceBooklet
- RecommendedFluids,Lubricants,andParts
- MaintenanceReplacementParts
- MaintenanceRecords
- 11-8ServiceandMaintenance
- 11-10ServiceandMaintenance
- TechnicalData
- VehicleIdentification
- VehicleData
- VehicleIdentification Number(VIN)
- Engineldentification
- ServiceParts IdentificationLabel
- 12-4 TechnicalData
- Customer Information
- CustomerInformation
- ReportingSafetyDefects
- VehicleDataRecordingand Privacy
- CustomerSatisfaction Procedure
- 13-2 Customer Information
- STEPTHREE—U.S.Owners:
- STEPTHREE—Canadian
- CustomerAssistance Offices
- UnitedStates
- Overseas
- CustomerAssistancefor TextTelephone(TTY) Users
- CallingforAssistance
- Coverage
- ServicesProvided
- ServicesNotIncludedin RoadsideAssistance
- ServicesSpecificto Canadian-PurchasedVehicles
- 13-6 Customer Information
- SchedulingService Appointments
- Courtesy Transportation Program
- CollisionDamageRepair
- CollisionParts
- RepairFacility
- InsuringtheVehicle
- IfaCrashOccurs
- ManagingtheVehicleDamage RepairProcess
- Reporting Safety Defects
- ReportingSafetyDefects totheUnitedStates Government
- 13-10 Customer Information
- ReportingSafetyDefects totheCanadian Government
- ReportingSafetyDefects toSaab
- VehicleData Recordingand Privacy
- EventDataRecorders
- RadioFrequency Identification(RFID)
- RadioFrequency Statement
- A
- B
- i-2INDEX
- Brake
- BrakeSystemWarning
- Brakes....10-27
- Braking....9-4
- Break-In, NewVehicle......9-17
- BulbReplacement......10-43
- BuyingNewTires......10-69
- C
- California
- Capacitiesand
- CarbonMonoxide
- Cargo
- Cautions, Danger, and
- Check
- LowerAnchorsand
- Cleaning
- CompressorKit, Tire
- D
- E
- i-4INDEX
- F
- G
- H
- i-6INDEX
- |
- J
- K
- L
- M
- i-8INDEX
- N
- O
- P
- R
- S
- i-10INDEX
- T
- i-12INDEX
- U
- V
- W
Brand : SAAB
Model : 9-4X (2011)
Category : Automobile