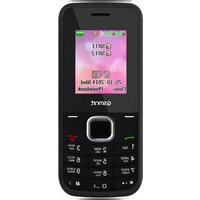
F180 - Smartphone GIGABYTE - Free user manual and instructions
Find the device manual for free F180 GIGABYTE in PDF.


| Type of product | Smartphone |
| Brand | Gigabyte |
| Model | F180 |
| Dimensions (H x W x D) | 110 x 60 x 12 mm |
| Weight | 120 g |
| Power supply | Li-Ion 1000 mAh battery |
| Display | 3.2 inches TFT, 320x480 pixels |
| Operating system | Android 2.3 Gingerbread |
| Processor | Single-core 800 MHz |
| RAM | 256 MB |
| Storage | 512 MB internal, microSD up to 32 GB |
| Camera | 3.15 MP rear, VGA front |
| Connectivity | GSM 850/900/1800/1900, Bluetooth 2.1, Wi-Fi 802.11 b/g, microUSB 2.0 |
| Main functions | Calls, SMS, MMS, Email, Internet browsing, Camera, Video player, Music player, FM radio, GPS |
| Care and cleaning | Wipe with a soft dry cloth. Do not use harsh chemicals or immerse in water. |
| Safety | Avoid exposure to extreme temperatures. Do not disassemble. Use only approved chargers. |
| Spare parts and repairability | Battery and back cover replaceable. Screen and other parts may require professional service. |
| General information | Released in 2011. Available in black and white. |
Frequently Asked Questions - F180 GIGABYTE
User questions about F180 GIGABYTE
0 question about this device. Answer the ones you know or ask your own.
Ask a new question about this device
Download the instructions for your Smartphone in PDF format for free! Find your manual F180 - GIGABYTE and take your electronic device back in hand. On this page are published all the documents necessary for the use of your device. F180 by GIGABYTE.
USER MANUAL F180 GIGABYTE
GSmart F180
Copyright
All mobile products by GIGA-BYTE COMMUNICATIONS INC. mentioned in this document, including the device, accessories, software, text, music, and pictures, are owned by, or authorized by original manufacturers to GIGA-BYTE COMMUNICATIONS INC. Reproduction, transfer, distribution, or storage of part or all of the contents in this document in any form without the prior written permission of GIGA-BYTE COMMUNICATIONS INC. is prohibited.
GIGA-BYTE COMMUNICATIONS INC.
General Information
This section contains important information on safe and efficient operation. Please read this information before using the device. Ignorance of the following notices may lead to violations of the law.
● Before using the device, please make sure you have fully charged the battery.
- Do NOT remove the battery from the device during charging.
● Before inserting SIM card into the device, make sure that the device is switched off.
- Do NOT attempt to dissemble the device on your own. This should be done by an authorized person.
- Use the device in accordance to instructions when in public facilities.
- In some countries, it is a violation against the law to record phone conversations. Always ask permission of the other party when you are going to record a conversation.
- To protect your ears, turn down the volume before you use stereo headsets or other audio devices.
- To avoid damaging the touch screen and the device, do NOT apply excessive pressure on them, and remove the device from your pants' pocket before you sit down. It is also recommended that you only use the stylus or your finger to interact with the touch screen. It is not covered by the warranty that you crack the touch screen because of the improper usage.
- When you use the device for a long time, such as talking on the phone, browsing online, or charging the battery, the device may become warm. In most cases, this condition is normal.
- Refer servicing to the provider, or an authorized technician under the following conditions: 1. The device has been damaged. 2. When you follow the instructions to use your device, it does not operate normally. 3. The device has been exposed to water. 4. Liquid has been spilled or an object has fallen onto the device.
- Do Not push unauthorized objects into slots and openings in your device.
- The device should be placed away from heat sources such as stoves, radiators, heat registers, or other products that produce heat.
- Condensation may form on or within your device, when you move your device between environments with very different temperature and/or humidity ranges. To avoid damaging your device, make the moisture to evaporate before you use the device.
- To avoid damaging your device, do Not put your device on an unstable table, stand, bracket, or other places.
- Before you clean your device, unplug it, please. Use a damp cloth for cleaning, but do Not use water, liquid cleaners, or aerosol cleaners to clean the touch screen.
Table of Contents
| Copyright | 1 |
| General Information | 2 |
| 1. Getting Started 4 | |
| 1.1 Your Phone | 4 |
| 1.2 Installing or uninstalling the SIM Card, Battery, and Memory Card | 4 |
| 1.3 Charging the Battery | 5 |
| 1.4 Turning the Phone On or Off | 6 |
| 1.5 Lock/Unlock | 6 |
| 1.6 Stand-by Screen Display Explanation | 6 |
| 1.7 Main Menu Explanation | 7 |
| 1.8 Text Input | 7 |
| 1.9 Contacts | 7 |
| 2. Phone Functions & Messages | 8 |
| 2.1 Make and answer a call | 8 |
| 2.2 Call history | 8 |
| 2.3 Message | 8 |
| 3. Multimedia Applications | 10 |
| 3.1 Camera | 10 |
| 3.2 Music | 10 |
| 4. Managing Your Phone | 11 |
| 4.1 Managing Basic Settings | 11 |
| 4.2 Protecting Your Phone | 11 |
| 4.3 Reset Your Phone | 12 |
| 5. Specifications | 13 |
1. Getting Started
1.1 Your Phone
This section introduces you to the hardware of the device.

| No | items | No | Items |
| 1 | Flashlight | 8 | Keypad |
| 2 | Receiver | 9 | MIC |
| 3 | Screen | 10 | Earphone Jack |
| 4 | Selection keys | 11 | Micro-USB connector |
| 5 | Scroll key | 12 | 8MP Camera |
| 6 | Call key | 13 | Speaker |
| 7 | End/ Power key | 14 | Battery Cover |
1.2 Installing or uninstalling the SIM Card, Battery, and Memory Card
SIM card
The SIM card contains your phone number, memory storage, and details of network service.
To install the SIM card
There are two slots for SIM cards. Upper slot is for SIM1, lower slot is for SIM2.
- To install the SIM1 card: The gold contact is facing down and the cut-off corner is facing toward the outside. Slide the SIM card into the slot and push it to the end.
- To install the SIM2 card: Open the SIM card holder. The gold contact is facing up and the cut-off corner is facing toward the outside. Slide the SIM card into the slot and close the holder.

To install the SIM1 card
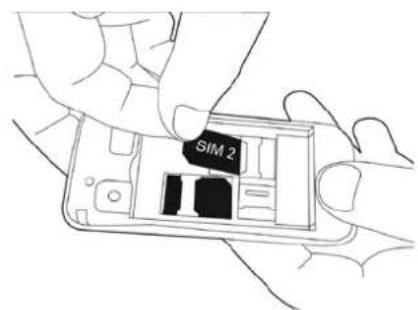
To install the SIM2 card
Gsmart
To remove the SIM card
(1) Please turn off your phone and remove battery first.
(2) Use your finger to slide the SIM1 card out of card slot.
(3) Open the SIM2 card holder and use your finger to slide the SIM2 card out of card slot.
Battery
Your phone comes with a rechargeable battery. Battery life varies depending on the network and the type of connections attached to your phone.
To install the battery
Make sure the contact of the battery is close to connectors in the battery slot.
To remove the battery
Use your fingertip to lift the battery, and then remove it.
To replace the back cover
(1) Insert the cover into the slot from the bottom.
(2) Then, press all around back cover fully until hearing clicks.

natural_image
Line drawing of two hands holding a smartphone with 'GSMRT' branding (no additional text or symbols)Memory card
You may need a microSD card to store photos, music, videos and other data.
To install the memory card
(1) Insert the memory card with the gold contact facing down.
(2) Push the memory card until into slot bottom.

natural_image
Line drawing of a hand holding a smartphone with a grid of black blocks inside (no text or symbols)To remove the memory card
Use your finger to slide the SIM card out of card slot.
1.3 Charging the Battery
When you take your phone out of box for the first time, the battery isn't at full power. Please charge the battery fully before using.
(1) Connect the USB cable to the AC adapter, and then, connect to the device via the USB cable.
(2) Plug the AC adapter to a socket to start the charge.
(3) For phone's safety, please only use the original charger that comes with your device. Any possible damage caused by using non-original charger or any other equipment will not be under GIGABYTE Communications Inc.'s responsibility.
Gsmart

NOTE:
To ensure safety, do not remove the battery from the phone while the AC adapter is connected or while it is being charged.
1.4 Turning the Phone on or off
To turn on or off your phone
Press and hold the power button for several seconds.
1.5 Lock/Unlock
You can lock the keypad to avoid keys being accidentally pressed when it is in Stand-by. When the keypad is locked, you can still answer any incoming calls.
Lock/Unlock the keypad
- Tap Menu key and 📋 to lock keypad.
- Tap Unlock key and 📋 to unlock keypad.
- To set the keypad to lock automatically after a defined length of time when the device is not being used, select Menu > Settings > Security > Auto keypad lock to set the time.
1.6 Stand-by Screen Display Explanation
| Icon | Description |
 | Battery power level |
 | Level of network reception |
 | Alarm has been turned on. |
 | Meeting mode has been turned on |
 | Silent mode has been turned on. |
 | Indicates you have missed calls that haven't been reviewed yet. |
 | You have received a new message. |
 | Earphone has been plugged in. |
 | Bluetooth is activated. |
Gsmart
1.7 Main Menu Explanation
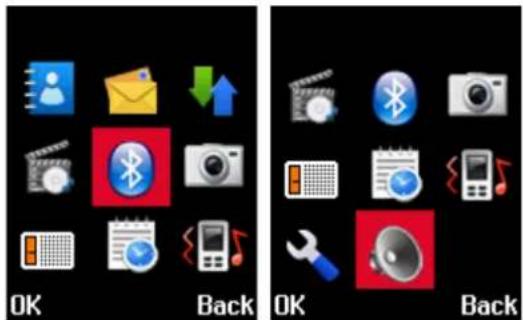
This Phone has 11 main function menus. At the stand-by screen press Menu key in the lower center of the display for direct access.
1.8 Text Input
This Phone provides input methods for English, Symbols and Numeric.
Switching the Input Method
To change to uppercase, lowercase, or switch to Number mode, press #2.
Write text
Press a number key, 2-9, repeatedly until the desired character is displayed. The available characters depend on the selected writing language.
If the next character you want is located on the same key as the present one, wait until the cursor appears, and enter the character.
To insert common punctuation marks and special characters, press 1 repeatedly. To access the list of special characters, press *. To insert a space, press 0.
1.9 Contacts
You can save names and phone numbers in the device memory or on the SIM card.
Add a contact
(1) Select Menu > Phonebook > Options > New.
(2) Tap Scroll key, then select each field to fill out the contact information.
(3) Tap Save to save it.
NOTE:
The SIM card contact can't add caller ringtone to contact information.
Search for a contact
(1) Select Menu > Phonebook
(2) Select Names, and scroll through the list of contacts, or enter the first letters of the name.
Delete a contact
(1) Select Menu > Phonebook
(2) Select a contact that you want to delete it.
(3) Tap Options > Delete
(4) Tap OK to confirm.
Modify Contact Details
(1) Select Menu > Phonebook
(2) Select a contact that you want to edit it.
(3) Tap Options > Edit
(4) Tap field to edit the contact information.
(5) Tap Options > Save to save it.
2. Phone Functions
2.1 Make and answer a call
Make a call
(1) Enter the phone number, including the country and area code if necessary, and press the call key.
(2) Then select SIM1 or SIM2 to make the phone call.
Make a call from Phonebook
(1) Select Menu > Phonebook.
(2) Select the contact to call.
(3) Press the call key.
(4) Then select SIM1 or SIM2 to make the phone call.
Answer an incoming call
Press the call key.
Reject a call
Press the end key.
Ending a call
Press the end key.
Key Functions during a Call
- Press Menu to open the Call options menu.
- Press Scroll Key to turn on/ off speaker.
2.2 Call history
Missed Calls
This function records the last 20 calls you missed. If there are multiple calls from the same number, then that entry there will have a number inside parentheses beside it showing the number of calls.
Delete a missed call
(1) Select Menu > Call logs > Missed calls.
(2) Select one of missed call that you want to delete it.
(3) Tap Options > Delete.
(4) Tap OK to confirm it.
Call Time
This calculates the duration of your last call, all of your outgoing calls, all of your received calls and total call time. You can use these times as a reference for managing your call costs.
Reset all of call times
(1) Select Menu > Call logs > Call timers.
(2) Select Options > SIM1 reset all/ SIM2 reset all.
(3) Tap OK to delete it.
2.3 Message
By using this Phone, you can receive and send text messages using Short Message Service (SMS) and Multimedia Message Service (MMS).
To Send SMS Message
(1) Select Menu > Message > Write message > New SMS.
(2) Enter phone number or select a contact from phonebook.
(3) Enter your message in text filed.
(4) Select Options > Send.
(5) Then select SIM1 or SIM2 to send a message.
Gsmart
To send MMS Message
(1) Select Menu > Message > Write message > New MMS.
(2) Edit Message Content:
- Editing the Recipient. You can choose to add telephone numbers or contact to increase the number of recipients.
- Editing the Theme.
- Add Text/ Photo/ Music/ Attachment.
After editing is completed, you can press Options > Send to send the MMS message.
3. Multimedia Applications
3.1 Camera
Your phone is equipped with a 0.3MP camera to take photos and videos.
Camera Function
At the stand-by screen, press Menu > Camera to activate the camera function
Taking a photo
(1) Select Menu > Camera.
(2) Tap scroll key to take a picture.
(3) Press the scroll key up/ down for Zoom in/ out.
(4) Press the scroll key right/ left to adjust some settings
| Icon | Function |
| Switch to Camera and Video function. | |
| Photo Size: 480 x 640/ 120 x 160/ 240 x 320 | |
| Brightness | |
| Contrast | |
| Exposure bias | |
| Burst shooting: Disable/ 3 shots/ 6 shots | |
| White Balance: Auto/ Incandescence/ Fluorescent/ Sunny day/ Cloud | |
| Self-Timer: Disable /3 sec /10sec | |
| Monochrome mode: General/ B&W/ Blue/ Green/ Yellow/ Red/ Sepia/ Negative |
Recording a video
(1) Select Menu > Multimedia > Video recorder.
(2) Tap Scroll key to start to record, tap again to pause recording.
(3) Tap Stop key to save the video.
3.2 Music
You have to copy your audio files to the storage card before playing music, because the music player only plays audio files saved in the storage card of your phone. Tap Menu > Multimedia > Music.
- Player screen: At the player screen, below the dynamic display in the middle of the LCD are emulated buttons that indicate the current playback status:
| Icon | Function |
| Pause/Play | |
| Previous Song/Next Song |
4. Managing Your Phone
4.1 Managing Basic Settings
Date and Time
You can set up the date and the time on your phone.
To set up the date and time
(1) Tap Menu > Settings > Phone settings > Date & time.
(2) Select Set time/date.
(3) Select Time format.
(4) Select Date format.
(5) Select auto/manual update time.
Alarms
You can set up to 3 alarms for different times.
To set the alarm
(1) Tap Menu > Tools > Alarm.
(2) Select one of alarm from alarm and press the select key to turn on/ off the alarm.
(3) Select and press one of alarm from alarm list to edit.
(4) Set alarm content:
● Message: to edit the alarm name.
● Time: the time to activate the alarm.
- Snooze: to silence the alarm for the snooze period.
- Ringtone: the notice type of the alarm when active.
- Repeat mode: which days you wish the alarm to ring on.
(5) Select OK to finish the setting.
NOTE:
The Phone's Alarm function will operate even if the Phone is turned off as long as it has sufficient battery power! If you turn off the Phone at night, the alarms that you have set will still wake you up in the morning.
Calendar
Calendar can help you keep track of meetings to attend, friends and relatives' birthday, important anniversaries or dates. Have everything prepared in advance and be the one everyone can rely on.
Add a new event
Tap Menu > Tools > Calendar > Options > Add new schedule.
4.2 Protecting Your Phone
You can protect your phone from unauthorized users in a few different ways.
Set up PIN Protection
(1) Select Menu> Settings > Security.
(2) Select PIN > SIM1/ SIM2 > PIN lock.
(3) Enter your password, then tap OK.
(4) If you want to disable screen lock security, please tap Menu> Settings > PIN lock. Enter your password to disable it.
Set up Password Protection
(1) Select Menu> Settings > Security.
(2) Select Phone lock.
(3) Input phone password, then tap OK.
(4) If you want to disable screen lock security, please tap Menu> Settings > Phone lock. Enter your password to disable it.
Gsmart
4.3 Reset Your Phone
With Clean Boot, you can reset your phone to its factory defaults. When you reset your phone, the data stored in your phone may be erased.
(1) Tap Menu > Settings > Phone settings > Restore factory settings.
(2) Input phone password, then tap OK.
(3) Tap OK to reset your phone.
NOTE:
Before resetting your device, please remember to back up all your data and information.
- Specifications
| Display | |
| Size 1.8" | |
| Resolutions | 128 x 160 pixels |
| Size | |
| Dimensions | 110 x 47 x 15 mm (L x W x H) |
| Weight 90 grams with battery | |
| Power | |
| Battery Li-ion pack | 1,800 mAh |
| Power Adapter AC input | 100-240V, 50/60Hz, 0.3A max. |
| DC output 5V, 1A | |
| Standby time | Up to 500 hours (It may vary depending on the availability of local networks and the individual usage.) |
| Talk time | Up to 12 hours (It may vary depending on the availability of local networks and the individual usage.) |
| Radio Band & Standard | |
| GSM/GPRS/EDGE | 850/ 900/ 1800/ 1900MHz |
| Connectivity | |
| USB | Micro USB |
| Audio Jack | 3.5 mm stereo audio jack |
| Digital Camera | |
| Rear Camera VGA | Color Camera |
| External Memory | |
| Memory Card | microSD supports up to 16GB |
| Temperature | |
| Operating 0°C to 40°C | |
| SIM Card Slot | |
| Dual SIM card slot. | |
NOTE:
- Specifications are subject to change without the prior notice. They may vary in some regions also.
If this document is modified, please download the latest version on GSmart official website. www.gigabytecm.com




- GSmart F180
- Copyright
- General Information
- Getting Started
- Your Phone
- Installing or uninstalling the SIM Card, Battery, and Memory Card
- SIM card
- To install the SIM card
- Gsmart
- To remove the SIM card
- Battery
- To install the battery
- To remove the battery
- To replace the back cover
- Memory card
- To install the memory card
- To remove the memory card
- Charging the Battery
- NOTE:
- Turning the Phone on or off
- To turn on or off your phone
- Lock/Unlock
- Lock/Unlock the keypad
- Stand-by Screen Display Explanation
- Main Menu Explanation
- Text Input
- Switching the Input Method
- Write text
- Contacts
- Add a contact
- Search for a contact
- Delete a contact
- Modify Contact Details
- Phone Functions
- Make and answer a call
- Make a call
- Make a call from Phonebook
- Answer an incoming call
- Reject a call
- Ending a call
- Key Functions during a Call
- Call history
- Missed Calls
- Delete a missed call
- Call Time
- Reset all of call times
- Message
- To Send SMS Message
- To send MMS Message
- Multimedia Applications
- Camera
- Camera Function
- Taking a photo
- Recording a video
- Music
- Managing Your Phone
- Managing Basic Settings
- Date and Time
- To set up the date and time
- Alarms
- To set the alarm
- Calendar
- Add a new event
- Protecting Your Phone
- Set up PIN Protection
- Set up Password Protection
- Reset Your Phone
Brand : GIGABYTE
Model : F180
Category : Smartphone