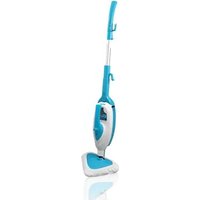
PSTMP20 - Steam cleaner Pyle - Free user manual and instructions
Find the device manual for free PSTMP20 Pyle in PDF.


| Product Type | Steam Cleaner |
| Model | PSTMP20 |
| Brand | Pyle |
| Dimensions (L x W x H) | 12.6 x 7.9 x 10.2 inches |
| Weight | 4.2 lbs |
| Power Supply | AC 120V, 60Hz |
| Power Consumption | 1500 W |
| Water Tank Capacity | 16.9 fl oz (500 ml) |
| Heating Time | 25 seconds |
| Steam Output | Continuous steam up to 30 g/min |
| Steam Temperature | Up to 212°F (100°C) |
| Steam Pressure | 3 bar |
| Operating Time | Up to 20 minutes |
| Cord Length | 15 feet |
| Included Accessories | Microfiber pad, measuring cup, funnel, scrubbing brush, window squeegee, extension hose, nozzle |
| Cleaning Modes | Steam only, adjustable steam flow |
| Safety Features | Automatic shut-off, pressure relief valve, lockable trigger |
| Material | ABS plastic, stainless steel boiler |
| Maintenance | Descale every 3 months; clean nozzle regularly |
| Warranty | 1 year limited |
| Suitable Surfaces | Tile, grout, linoleum, hardwood (sealed), carpet (with attachment), countertops, stoves, upholstery |
Frequently Asked Questions - PSTMP20 Pyle
User questions about PSTMP20 Pyle
0 question about this device. Answer the ones you know or ask your own.
Ask a new question about this device
Download the instructions for your Steam cleaner in PDF format for free! Find your manual PSTMP20 - Pyle and take your electronic device back in hand. On this page are published all the documents necessary for the use of your device. PSTMP20 by Pyle.
USER MANUAL PSTMP20 Pyle
natural_image
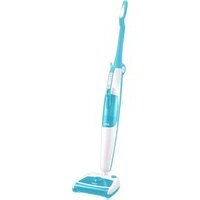
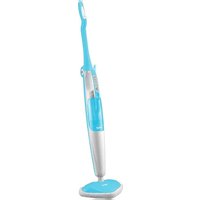
Blue and white electric vacuum cleaner with vertical arm and handle (no text or symbols visible)PSTMH20 2-in-1 Multi-Purpose & Multi-Surface Steam Floor Mop with Detachable Handheld Steamer
INTRODUCTION
Thank you for choosing Pyle for your household cleaning needs. Our steamer products use the active power of steam without the use of chemicals; making it a green product that is safe for the ecosystem. You have begun the first step into transforming your house into a green, environmentally safe home. Our Pyle steam products are a modern way of cleaning that is efficient and far more sanitary than conventional methods. With the power of germ killing steam, dirt and grime can be eliminated in a matter of seconds. The tiny hot vapor molecules penetrate porous surfaces being cleaned, expanding and forcing dirt, debris, and bacteria to the surface. When used correctly, our steamers can kill dust mites and certain types of bacteria pathogens such as salmonella and E-coli on contact.
Since you do not need chemicals in order to use our products, not only will you see the savings in your wallet, but you have provided a safer place for you and your family to live in. We encourage you to improve your way of life, better the environment, and spend time enjoying your clean chemical free floor.
SAFETY GUIDELINES
is for indoor domestic use only. Any commercial use will void warranty. It is designed for sanitizing and cleaning an array of surfaces such as windows, ceramic tile, carpet, grout and more.
Safety Instructions:
WARNING: BE SURE TO READ AND FOLLOW ALL SAFETY INSTRUCTIONS
BEFORE USING YOUR STEAMER. PROPER CARE AND MAINTENANCE WILL
HELP TO EXPAND THE LIFE OF YOUR STEAMER.
When using an electrical appliance, basic precautions should always be followed. To reduce the risk of fire, electric shock, or injury: Be sure to unplug the electrical cord when appliance is not in use and while servicing. Do not leave the steamer unattended while young children, pets or infirm persons are around.
Children should be supervised and cautioned that the steamer is not a toy and
should not be played with. Do not direct steam towards people, pets, electrical appliances, or electrical outlets. Do not immerse the steamer in water or other liquids. Do not handle steamer with wet hands. Do not pull power cord to disconnect appliance from socket or use cord as a handle. Be sure to keep cord away from heat, water, and sharp edges. Do not use if cord or plug is damaged. Do not use extension cords or outlets with inadequate current carrying capacity. Do not use steamer on any steam sensitive material such as velvet, leather, wax polished furniture or floors, synthetic and other delicate fabrics. Do not use on unsealed hardwood floors. By doing so, you may remove the sheen from the steam. It is recommended to test an isolated area with the steam mop before proceeding. As a precaution, you should check the manual made by the floor manufacturer for proper care instructions.
Never put cleaning detergents or chemicals into the steamer as it will make the
product unsafe and damage the unit. Use only manufacturer's recommended accessories. Stop using steamer if circuit breaker activates. Beware of risk of shock.
Wear proper shoes when operating your steamer. Open-toed shoes, slippers or bare feet may cause you to slip and fall or cause hot steam on your feet. Allow your steamer to cool down before storing in a cool, dry place. Pure Clean Handheld Steam Birdie
CONTENTS
IMPORTANT SAFEGUARDS
KEY FEATURES
ACCESSORIES
HOW TO ASSEMBLE THE STEAM MOP
HOW TO USE THE MOP
HAND-HELD STEAMER
HOW TO TAKE OFF THE HAND-HELD STEAMER
HOW TO ASSEMBLE THE ACCESSORIES
AFTER USE
CLEANING AND MAINTENANCE
TROUBLESHOOTING GUIDE
IMPORTANT SAFEGUARDS
PLEASE READ CAREFULLY FAILURE TO FOLLOW THE PRODUCT INSTRUCTION WILL VOID YOUR WARRANTY.
READ ALL INSTRUCTIONS BEFORE USING THIS STEAM CLEANER.
When using an electric appliance, basic precautions should always be followed, including the following :
WARNING
-
Verify that the main voltage indicated on the product corresponds with the voltage of your electric outlet Rating Voltage: AC110-120V 50/60Hz 1500W 450ml
-
To provide continued protection against risk of electric shock connect to properly grounded outlets only.
-
This product is designed for domestic use only.
-
Do not use outdoors.
-
Do not leave the unit unattended while plugged in. Unplug the electrical cord when not in use and before servicing.
-
Do not allow to be used as a toy. Close attention is necessary when used near children, pets or plants.
-
This appliance is not intended for use by persons (including children) with reduced physical, sensory or mental capabilities, or lack of experience and knowledge, unless they are under supervision or had instruction concerning use of the appliance by a person responsible for their safety.
-
Young children should be supervised to ensure that they do not play with the appliance.
-
Never direct steam towards people, animals or plants.
-
Do not immerse the unit into water or other liquids.
-
Do not use with damaged cord or plug. If the unit is not working as it should, has been dropped, damaged, left outdoors, or immersed in water, return it to the distributor. If the supply cord is damaged, it must
be replaced by the manufacturer or a similarly qualified person to avoid hazard.
-
Do not pull or carry by the cord, use the cord as a handle, close a door on the cord, or pull the cord around sharp edges or corners. Keep the cord away from heated surfaces.
-
Never force the plug into an outlet.
-
Do not use extension cords or outlets with inadequate current carrying capacity.
-
Unplug after each use. To safely unplug, grasp the plug and gently pull, do not un-plug by pulling on the cord..
-
Do not handle plug or unit with wet hands or operate without shoes.
-
Do not insert any objects into openings. Do not use with any opening blocked.
-
Do not use without floor cloth in place.
-
Do not use without water in the water tank.
-
When using on stairs use extra caution.
-
Store your unit indoors in a cool, dry area.
-
Keep your work area well lit.
-
Never put hot water or any other liquids such as aromatic, alcoholic, or detergent products into the unit water tank. This will make the operation unsafe and damage the unit.
-
Always keep the output for the steam clear. Avoid placing the steam opening on soft surfaces which may block the flow of steam. Keep the openings free from lint, hair and other potential obstructions to ensure proper flow.
-
Use only as directed in this manual. Use only manufacturer's recommended accessories. Use of attachments not provided or sold by the manufacturer or authorized resellers may cause fire, electric shock or injury.
-
The liquid or steam should not be directed towards equipment containing electrical components, such as the interior of ovens.
-
Do not expose to rain.
-
Stop using the Mop if there is leakage of water and contact a qualified technician.
-
Do not use the unit in enclosed spaces that are filled with flammable, explosive or toxic vapor such as paint thinner, oil-based paint or certain moth proofing substances.
-
Do not use on leather, wax polished furniture or floors, unsealed hardwood or unsealed parquet floors, synthetic fabrics, velvet or other delicate steam-sensitive materials.
-
Do not use for space heating purposes.
-
Unplug appliance from outlet before servicing
-
Do not touch hot surface.
-
Do not let cord hang over edge of table or counter, or touch hot
surfaces.
- Do not place on or near a hot gas of electric burner, or in a heated oven.
- To disconnect the unit, turn the power switch to 'off' position, then remove plug from wall outlet.
- Do not use appliance for other than intended use.
- Care should be taken when using appliance due to emission of steam.
WARNING DANGER OF SCALDING
HOUSEHOLD USE ONLY
Commercial use of this unit voids the manufacturer's warranty.
Key Features
Key Features

Accessories


HOW TO ASSEMBLE THE STEAM MOP
WARNING
Please make sure that the unit is unplugged from an electrical outlet.
1) Attach the mop head to the main body as follows: insert the swivel joint into designated hole in the main body, and then use the screw to fix well. Make sure that the mop head is securely locked in place before usage.(Fig.1)
2) Insert the extension handle into the designated opening in the main body until it gets locked in place by the extension handle lock button. (Fig.2)
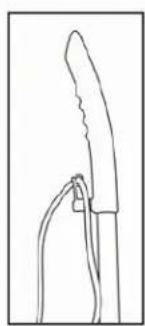
3) Insert the power supply cord into the cord holder located at the top of the extension handle as illustrated in Fig. 3 and then insert to power supply cord into the upper cord wrap as illustrated in Fig. 4 4) Place the microfiber cloth on the bottom of the mop head and make sure all the loops on the cloth are aligned with the gripping hooks on the bottom of the mop head (Refer to Fig. 5), then press the cloth against the mop head so the loops on the cloth catch the gripping strips on the mop head and hold the pieces together.
NOTICE:
Never use the carpet glider on surfaces that are prone to scratching.
Caution:
Never assemble or remove the accessories while the unit is in operation.

natural_image
Technical line drawing of a vacuum cleaner with base and top views (no text or symbols)Fig.1

Fig.2

natural_image
Line drawing of a bent pipe or tube with a circular opening, no text or symbols presentFig.3
natural_image
Line drawing of a pair of scissors cutting a piece of paper (no text or symbols)Fig.4

natural_image
Technical line drawing of a mechanical component with a base and top assembly (no text or symbols)Fig.5
HOW TO USETHE STEAM MOP PLEASE READ BEFORE USE
The unit is designed to thoroughly clean floor surfaces, such as marble, ceramic, carpet, stone, linoleum, sealed hardwood floor and parquet. Not all floors types are suitable for steam cleaning.
On surfaces that have been treated with wax, the wax may be removed by the heat and steam action. Do not use on unsealed flooring or let unit stand on any wood or heat sensitive floor for an extended period of time. This could cause the wood grain to rise.
When using on vinyl, linoleum or any other heat sensitive floors, use extra caution. Too much heat can melt down glue in the flooring. When using the appliance on laminated floor, the laminated floor should have been laid professionally and not have any gaps or cracks in which humidity could enter.
Test the unit on a small isolated area of your flooring prior to over-a use on any floor surface.
Always check the use and care instructions of your flooring manufacturer before using the unit.
If any doubt, please consult a specialist. Only use the carpet glider on carpeting & rugs. Use of the carpet glider on other floor surfaces will cause streaking and can possibly scratch the surface.
Fill the Water tank with water.
Make sure that the unit is unplugged
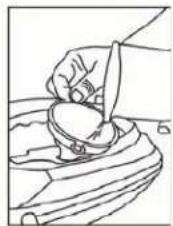
Turn the Water Tank cap counter-clockwise to the open "off" position and remove the cap as illustrated in Fig. 1a, 1b&lc, 1d.

1a

1b

1c
natural_image
Line drawing of a hand holding a small object over a curved surface (no text or symbols)1d
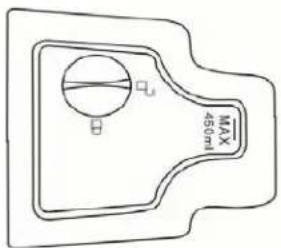
Hold the mop at a 45 angle as illustrated in fig.1 d, and add water in the tank up to the MAX level by using the measuring cup. Do not overfill. The maximum tank capacity is 450ml.
Replace the Water Tank cap and turn clockwise approximately 90 to the 'CLOSE' position until the cap is tightened securely.

HAND-HELD STEAMER
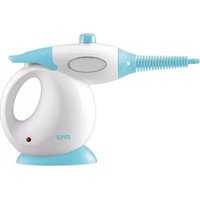
The Hand-Held Steamer is an ideal portable cleaner. It is there for you to detach and use on work surfaces kitchen, countertops, sinks, bathrooms, windows, mirrors, tiles and spot cleaning on floor carpets and rugs. Use it with an attachment - Jet Nozzle or Nylon brush to spray away dirt, grease, mold and more.
HOW TO TAKEOFF THE HAND-HELD STEAMER IN THE STEAM MOP
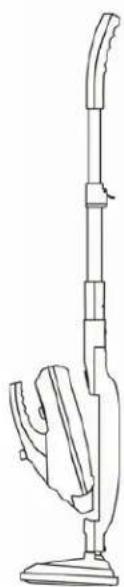
Make sure that the unit is unplugged 1) Remove the power supply cord from the upper cord wrap and cord holder, turn the lower cord wrap to release the cord and remove the power supply cord from its channel. As illustrated in Fig. 1a & 1b. 2) Unlock the button on the extension hose, And take out the hand-held steamer. As illustrated in Fig. 2

natural_image
Line drawing of a vacuum cleaner with handle and base (no text or symbols)Fig. 2
HOW TO ASSEMBLE THE ACCESSORIES OF HAND-HELD STEAMER
- Insert the designated end of the extension hose into designated hole in the main unit (as illustrated in Fig. 1a, 1b & 1C)

As illustrated in fig.1a, 1b, 1c. make sure that extension hose is securely locked into place before usage.
The installation of strap:

Window Cleaning Tool
- Loosen up the drawstring on the coral cloth and install the coral cloth onto the designated hooks on the window cleaning tool frame and pull up the drawstring to secure the coral cloth in place. NOTE: Do not cover the squeegee blade. Make sure to hook up the coral cloth to all hooks on the cleaning tool frame so it doesn't slip or fall from the frame during use (as illustrated in Fig. 2a, 2b & 2c

Attach the window cleaning tool to the extension hose as follows: aligning the lock button on the extension hose with the designated hole on the window cleaning tool frame and the push in the extension hose until its locks in place(as illustrated in Fig.3a&3b)

natural_image
Technical line drawings of a mechanical tool, showing two views (Fig. 3a and Fig. 3b) with no visible text or symbols.Garment Steamer
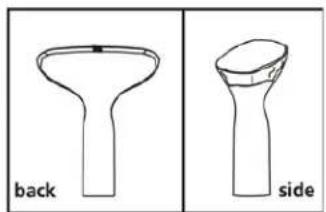
- Install the microfiber cloth to the garment steamer tool(as illustrated in Fig.4a,4b,4c.)

Fig. 4a

Fig. 4b
natural_image
Two line drawings of a funnel-shaped object labeled 'back' and 'side', showing different angles (no text or symbols on the objects themselves)Fig. 4c
- Attach the garment steaming tool to the extension hose as follows: Aligning the lock button on the extension hose with the designated hole on the garment steaming tool frame and then push the extension hose until it locks in place (as illustrated in Fig. 5a)

natural_image
Line drawing of two laboratory pipettes with a directional arrow indicating motion (no text or symbols)Fig. 5a
Duster
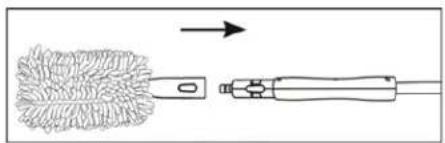
- Install the cleaning Coral Cloth onto the Duster Frame (as illustrated in Fig. 6a & 6b)

Fig. 6a

natural_image
Illustration of a textured brush or brush with a handle, no text or symbols presentFig. 6b
- Attach the Duster Frame to the extension hose as follows:
Aligning the lock button on the extension hose with the designated hole on the Duster Frame and then Push in the Extension Hose until it locks in place(as illustrated in Fig.7a&7b).
natural_image
Diagram showing a brush applying material to a tool, with an arrow indicating direction (no text or symbols present)Fig. 7a

natural_image
Line drawing of a hand holding a textured brush or tool, no text or symbols presentFig. 7b
Table Cleaner
- Attached the main steamer to the square brush ,until it locks in place(as illustrated in Fig.8a&8b), then place the square cloth on the bottom of square head and make sure all the loops on the cloth are aligned with the gripping hooks and the bottom of square head (Refer to Fig. 8c).

Fig. 8a

Fig. 8b

natural_image
Technical line drawing of a mechanical component with an upward arrow indicating motion (no text or symbols)Fig. 8c
Note : Press the two buttons on the square brush to take of the main steamer.
Straight Nozzle
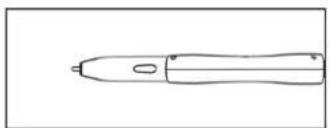
- To attach the straight nozzle: Insert the straight nozzle into designed hole in the extension Hose, as illustrated in Fig.9a&9b. Until it gets locked in place.

natural_image
Diagram showing two types of electrical probes with one pointing to a terminal block (no text or symbols present)Fig. 9a
natural_image
Simple line drawing of a pen or stylus (no text or symbols)Fig. 9b
Round Brush
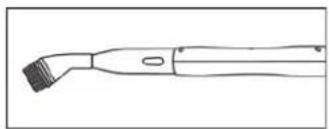
- Attach the round brush by screwing it onto the straight nozzle that connected to the extension hose, as illustrated in Fig. 1 0a &1 0b.

natural_image
Diagram of a handheld tool with an arrow indicating direction, no text or symbols presentFig. 10a
natural_image
Line drawing of a handheld electric shaver tool (no text or symbols)Fig. 10b
Bend Nozzle
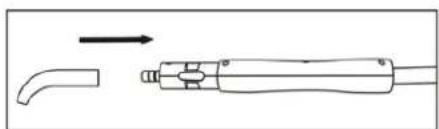
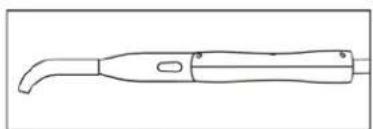
- Attach the bended nozzle by screwing it onto the straight nozzle that connected to the extension hose, as illustrated in Fig.11a&11b.
natural_image
Diagram of a dental tool with a curved blade and a handle, showing an arrow indicating direction (no text or symbols)Fig. 11a
natural_image
Line drawing of a dental tool with a curved handle and handle (no text or symbols)Fig. 11b
Note:
- After assembly each accessories, add water in the tank up to the MAX level by using the measuring cup
- Turn the knob of the water tank in "Lock diagram" position. Then you can open the power switch(Min to Max), choose the temperature from 'MIN' to 'MAX'.
AFTER USE
1) Unplug power cord from outlet
2) Allow mop pad to cool down and carefully remove cleaning cloth from mop head, as cleaning cloth could still be hot.
3) Any water remaining in the water tank should be emptied prior to appliance storage.
Always empty the water tank at the end of each use
4) Let any water (remained as a product of condensation) drain from the steam opening prior to storing the appliance.
5) Wrap power cord around upper and lower cord wrap
6) Wipe all surfaces of the unit with a soft cloth. Store in a protected dry area.
7) Please store the unit in a cool and dry place when not in use. Do not leave it exposed to sunlight or rain.
8) Upright storage of the unit with a wet mop pad may result in the formation of white marks on your floor. To remove the white marks, clean area with vinegar. Make sure to remove the map pad before storage.
CLEANING AND MAINTENANCE
BE SURE THAT THE UNIT IS DISCONNECTED FROM THE POWER OUTLET WHEN PERFORMING CLEANING.
Drain the remaining water in the tank and clean it after every use. Please use detergent to clean the accessories (Jet Nozzle and Round Brush) when they are dirty, then wash them with clean water and dry them in air.
How to decalcify the water tank interior:
To clean calcium deposits that build up inside the water tank, add one or two tablespoons of white vinegar to a full water tank, close the water tank cap and shake the contents. DO NOT TURN THE STEAMER ON.
Let it sit for a few hours. Then, empty the water tank and refill with clean water and empty until it rinses clear.
WARNINGI
DO NOT IMMERSE UNIT IN WATER.
Cleaning procedure to remove lime scale
If your unit begins to produce steam more slowly than usual or stops producing steam you may need to remove lime scale. Lime scale can develop over time on the metal parts and greatly affect the mop performance. We recommend removing lime scale on a regular basis, at least once a month, especially in areas with hard water. The frequency of lime scale removal depends upon the hardness of your tap water and how often you use the steam mop. The unit uses tap water. however, in areas with extremely hard water bottle water should be used. To remove lime scale from the unit please follow these procedures By using cleaning solution
1) Prepare a solution of 1/3 white vinegar and 2/3 tap water and add to the water tank.
2) Secure and position the unit to ensure steam released is aimed away from the floor or surrounding objects and surfaces. Plug the unit in, turn the unit ON by Pressing the Power switch and allow the unit to produce steam until the vinegar/water solution is used up.
3) Repeat the above procedure as many times as necessary until a normal steam flow rate is achieved.
4) Fill the Water Tank with fresh water and rinse out
5) Fill the Water Tank with fresh water, attach to the unit and release steam through the system until the Water Tanks is empty.


- INTRODUCTION
- SAFETY GUIDELINES
- WARNING: BE SURE TO READ AND FOLLOW ALL SAFETY INSTRUCTIONS
- BEFORE USING YOUR STEAMER. PROPER CARE AND MAINTENANCE WILL
- HELP TO EXPAND THE LIFE OF YOUR STEAMER.
- WARNING
- HOW TO ASSEMBLE THE STEAM MOP
- NOTICE:
- HOW TO USETHE STEAM MOP PLEASE READ BEFORE USE
- HAND-HELD STEAMER
- HOW TO TAKEOFF THE HAND-HELD STEAMER IN THE STEAM MOP
- HOW TO ASSEMBLE THE ACCESSORIES OF HAND-HELD STEAMER
- Window Cleaning Tool
- Garment Steamer
- Duster
- Table Cleaner
- Straight Nozzle
- Round Brush
- Bend Nozzle
- Note:
- AFTER USE
- CLEANING AND MAINTENANCE
- WARNINGI
Brand : Pyle
Model : PSTMP20
Category : Steam cleaner