Cloud Office Protection - Software Panda - Free user manual and instructions
Find the device manual for free Cloud Office Protection Panda in PDF.

| Product Type | Security Software |
| Brand | Panda |
| Model | Cloud Office Protection |
| Compatibility | Windows 10/11, macOS, Linux |
| License Type | Subscription (1 year) |
| Number of Devices | 1 device |
| Main Functions | Real-time antivirus, firewall, ransomware protection, cloud backup, identity protection |
| Update Frequency | Automatic daily updates |
| System Requirements | 2 GHz processor, 4 GB RAM, 500 MB free disk space |
| Installation Method | Download from official website |
| Language Support | Multiple languages |
| Support | 24/7 online support |
| Cloud Backup | Yes, included |
| Encryption | AES-256 |
| Maintenance | Automatic updates, periodic scanning |
| Safety Features | Real-time protection, phishing filter, exploit prevention |
Frequently Asked Questions - Cloud Office Protection Panda
User questions about Cloud Office Protection Panda
0 question about this device. Answer the ones you know or ask your own.
Ask a new question about this device
Download the instructions for your Software in PDF format for free! Find your manual Cloud Office Protection - Panda and take your electronic device back in hand. On this page are published all the documents necessary for the use of your device. Cloud Office Protection by Panda.
USER MANUAL Cloud Office Protection Panda
Panda Managed Office Protection
Web console walkthrough
@
PANDA SECURITY
Panda Managed Office Protection
Web console walkthrough
March 2009
Contents
- Web console walkthrough ....4
- The console in detail ....8
2.1. Centralized security management....8
- Installing the protection locally or remotely ....8
■ Administering centralized security policies....12 - Creating groups of computers and assigning security policies remotely....27
■ Local or remote installation of the protection with predefined security policies....29
2.2. Centralized security monitoring ....30
- Consolidated network dashboard ....30
■ Centralized monitoring of licenses: contracted, used and free....30
■ Monitoring the security status of the network....33 - Filtering of computers and analysis of the security status....34
- Exporting the computers' status to file ....36
■ Centralized monitoring of detections....37
■ Quick search for detections and firewall events....39 - Exporting information on detections and firewall events to file....42
2.3. Consolidated reports....43
■ Consolidated executive report about network detection activities and license status 43
- High-level consolidated and detailed report of clients' network security status....47
■ High-level consolidated and detailed report of firewall detections and events 49
2.4. Users and centralized administration profiles....51
2.5. In-depth malware audits. Panda Malware Radar ....53
1. Web console waltkthrough
To start the evaluation of the administration and monitoring console, let's first take a look at the console itself. To do this, follow the steps below:
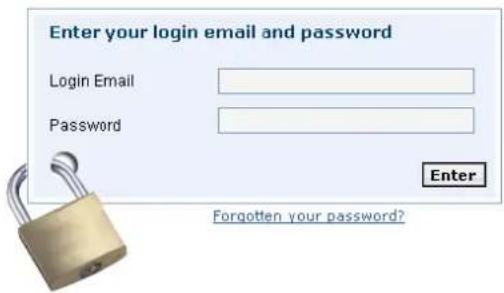
- Go to the console.
https://managedprotection.pandasecurity.com
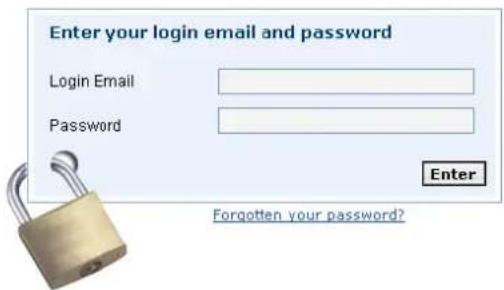
- Enter the credentials (login email and password) that you received in the welcome email.
Once you are logged in, take a quick look through the various sections of the console. You will see that the features and options are accessible and easy-to-use. We will briefly explain them in this section.
For more details on how to manage and monitor the security of your network with Panda Managed Office Protection, continue reading the next section, where we explain in detail all the sections and options available to ensure you enjoy all the benefits of remote, centralized management of your network security.
- Centralized security management functions accessible through the Settings section, enabling the installation of the protection, administration of security policies and the application of these policies to groups of workstations, laptops or servers.
Services Audits - Malware Radar
- Centralized monitoring of the security status of workstations, laptops or servers, and of detections and firewall events.
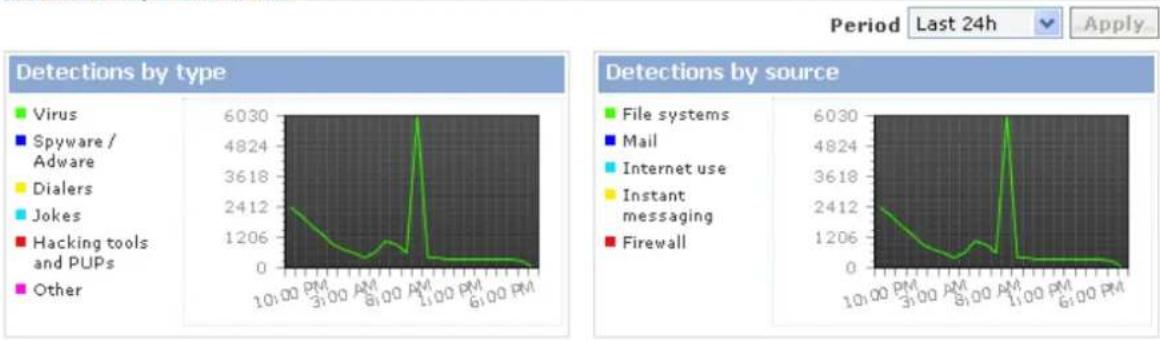
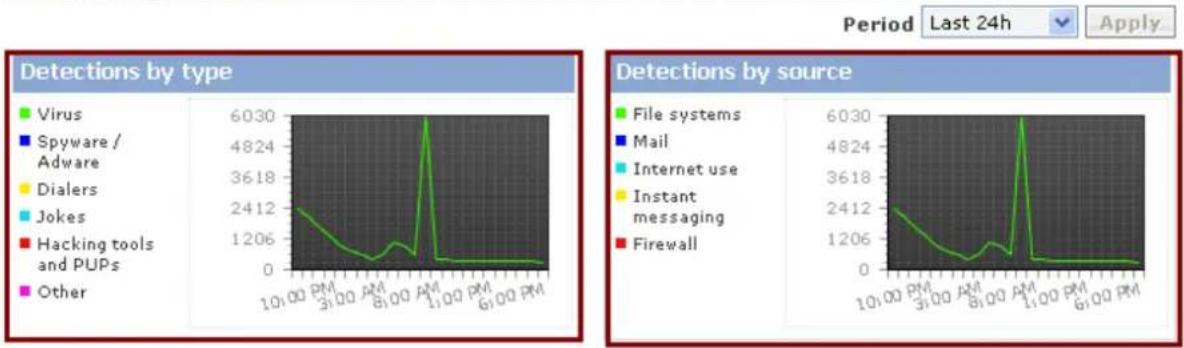
This is accessible through the main dashboard in the Status section. The dashboard graphs represent detections (by type) in the selected period.
The Monitoring section, accessible through the View list of detections link, offers you a detailed view of security events involving both the antivirus and firewall.

Status
Status
Licenses
Valid until: 10/18/2011 - Contracted: 26 (Free: 15 | Used: 11)
Antivirus protection
line
| Detection Type | Peak Value | | -------------------------- | ---------- | | Virus | 6030 | | Spyware / Adware | 2412 | | Dialers | 1206 | | Jokes | 3618 | | Hacking tools and PUPs | 6030 | | Other | 6030 | | Detection Source | Peak Value | | -------------------------- | ---------- | | File systems | 2412 | | Mail | 1206 | | Internet use | 3618 | | Instant messaging | 6030 | | Firewall | 6030 |
The Computer section lets you centrally monitor your network's status in detail.

Computers
Computers
From the corporate Quarantine section you can monitor and manage suspicious files detected on your IT resources.

Quarantine
Quarantine
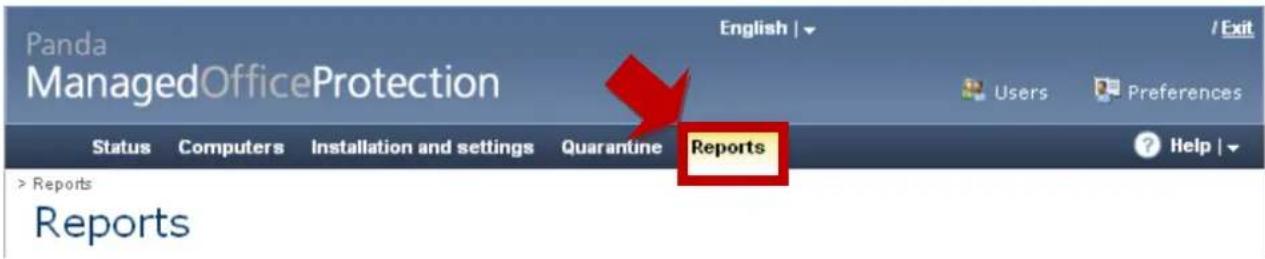
- In the Reports section you can configure executive reports on the status of your IT resources and of detections made, with high-level statistics and graphics as well as details. These reports can be exported into different formats, such as CVS, XML, plain text, PDF, HTML and Excel, allowing this data to be used in other business processes.
- Finally, in the Users section you can create or edit users with access to the administration and monitoring console, with different profiles and privileges.

2. The console in detail
In this section we'll take a more detailed look at the monitoring and management options in the console. So, start by following the steps below:
Log in to the console.
2.1. Centralized security management
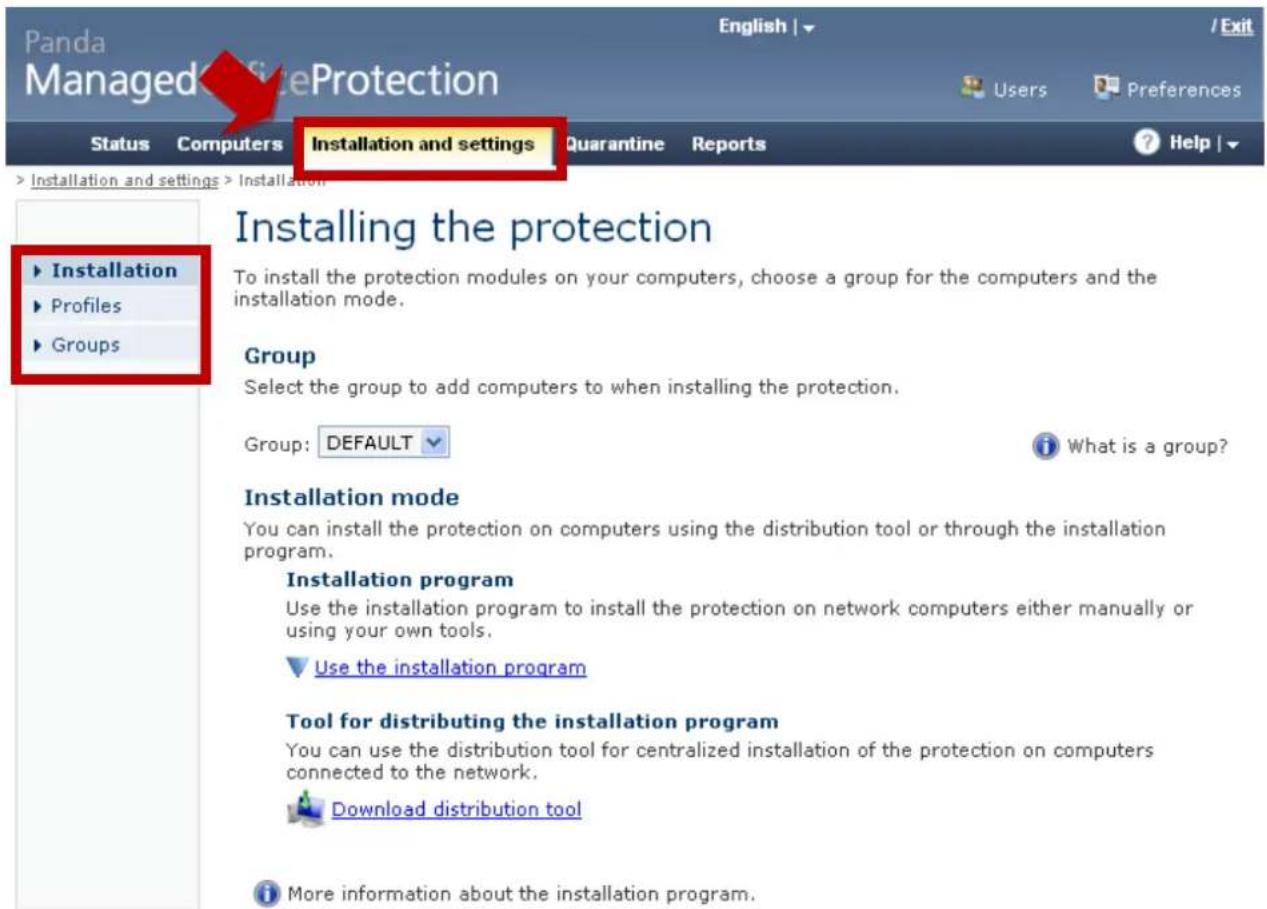
The security management functions are accessible through the Settings section, enabling the installation of the protection, administration of security policies and the application of these policies to groups of workstations or servers.
- Installing the protection locally or remotely
There are three ways of installing the protection, each adapting to different security management scenarios.
- The protection can be installed using the installation package, either manually or through external distribution systems such as ActiveDirectory, SMS or Tivoli. To do this from the console, administrators can download the installation package in MSI format.
Installation program
Use the installation program to install the protection on network computers either manually or using your own tools.
Use the installation program

You can download the installation program and run it on each of the PCs you want to protect.
Download installation program

If you want, you can send the link for accessing the installation program to your network users by email so that can execute it from their workstation.
- Direct link: https://betamanagedprotection.pandasecurity.com/PartnerConsole/v1/Customers/Administration/Installer/GetAgent.aspx?CUST={10000000-0000-0000-0000-000000000003}&GROUP=DEFAULT
- Send via email: Send via email
Tool for distributing the installation program
You can use the distribution tool for centralized installation of the protection on computers connected to the network.

Download distribution tool
- It can be done remotely, with the administrator sending the user an email with the URL from which to automatically download the installation package, and then run it locally.
Installation program
Use the installation program to install the protection on network computers either manually or using your own tools.
Use the installation program

You can download the installation program and run it on each of the PCs you want to protect.
Download installation program

If you want, you can send the link for accessing the installation program to your network users by email so that the can execute it from their workstation.
- Direct link: https://betamanagedprotection.pandasecurity.com/PartnerConsole/v1/Customers/Administration/Install/Inaller/GetAgent.aspx?CUST={10000000-0000-0000-0000-00000000003}&GROUP=DEFAULT
-
Send via email: Send via email
-
The administrator or service provider can download the distribution tool to remotely install the protection on computers. The distribution tool allows the protection to be distributed:
-
By network domains.
- By computers.
- By IP range.
Installation program
Use the installation program to install the protection on network computers either manually or using your own tools.
Use the installation program
You can download the installation program and run it on each of the PCs you want to protect.
Download installation program
If you want, you can send the link for accessing the installation program to your network users by email so that the can execute it from their workstation.
- Direct link: https://betamanagedprotection.pandasecurity.com/PartnerConsole/v1/Customers/Administration/Install/Installer/GetAgent.aspx?CUST={10000000-0000-0000-0000-000000000003}&GROUP=DEFAULT
- Send via email: Send via email
Tool for distributing the installation program
You can use the distribution tool for centralized installation of the protection on computers connected to the network.
Download distribution tool
Once you download and install the distribution tool, you can launch the program used to distribute the protection:
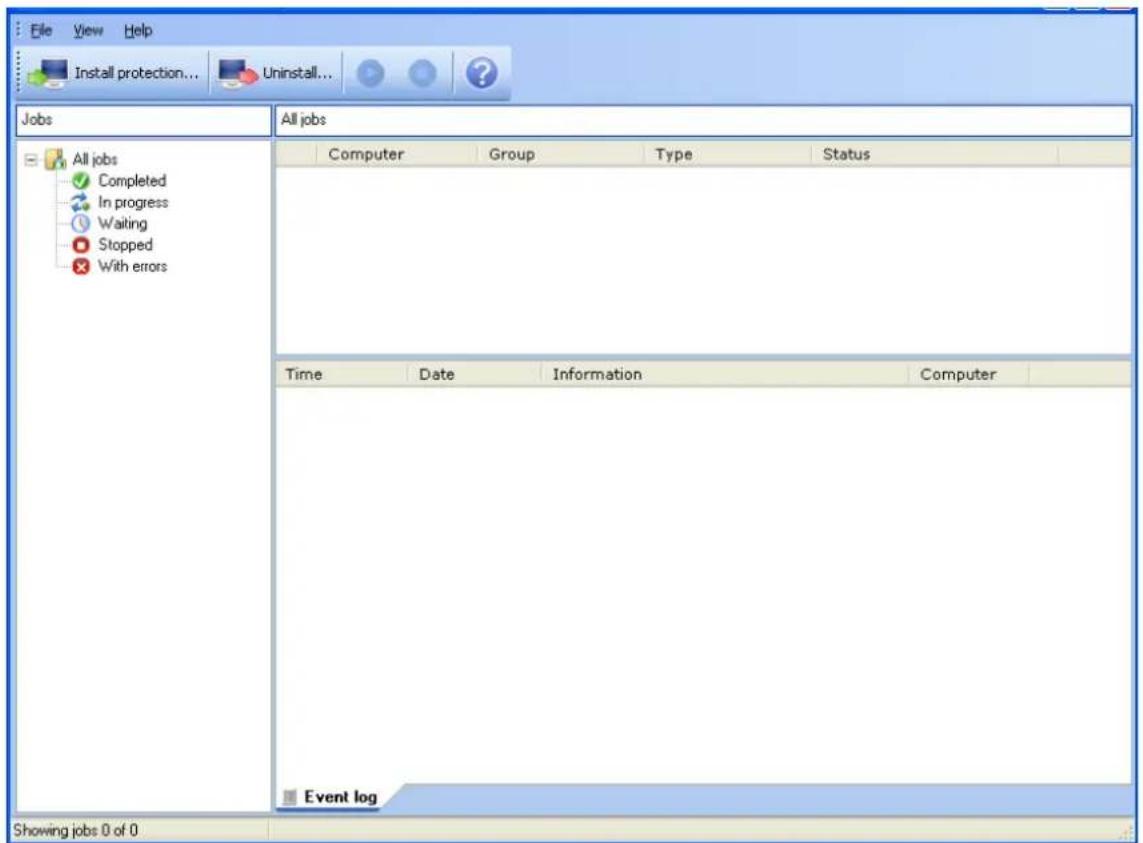
Select Install protection to start installing the protection, which can be distributed either by domain by IP, by IP ranges or by computer names:
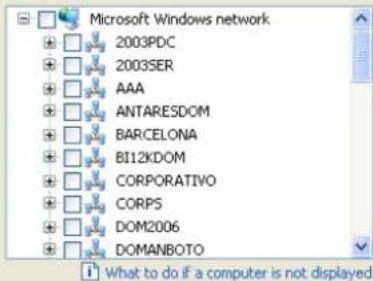
Choose the computer selection mode
By domain
Install the protection by selecting computers from the network domain tree
○ By IP address or computer name
Install the protection selecting computers by specifying their IP address, IP range or network name
For correct installation, check that all computers meet the following requirements:
- Microsoft Windows NT, Windows 2000 Workstation, Windows XP Workstation or Windows Vista, Microsoft Windows 2003 Windows 2000 Server or 2008.
- Not have any firewall enabled.
- Have the "print and file sharing" option enabled.
Step 1 - (Optional) Specify the group to include computers in:
DEFAULT
Step 2 - Select the computers to install the protection on from the tree:
Step 3 - (Optional) Enter a user name and password with administrator privileges on selected computers:
User:
Password:
Help
Install Cancel
Choose the computer selection mode
By domain
Install the protection by selecting computers from the network domain tree
By IP address or computer name
Install the protection selecting computers by specifying their IP address, IP range or network name
For correct installation, check that all computers meet the following requirements:
- Microsoft Windows NT, Windows 2000 Workstation, Windows
XP Workstation or Windows Vista, Microsoft Windows 2003
Windows 2000 Server or 2008. - Not have any firewall enabled.
- Have the "print and file sharing" option enabled.
Step 1 - (Optional) Specify the group to include computers in:
DEFAULT
Step 2 - Add to the list the names, individual IP addresses or ranges of IP addresses of the computers that you want to install the protection on separated by commas:
Example: 127.0.0.1, COMPUTER01, 192.0.17.1-192.0.17.128
Step 3 - (Optional) Enter a user name and password with administrator privileges on selected computers;
User:
Password:
Help
Install
Cancel
To use the distribution tool you must be either the administrator of the computers' domain or log in to the computers using credentials with administrator privileges.
■ Administering centralized security policies
Through the Settings section you can determine the security policies to apply to the protected computers. These security policies are grouped in security profiles which can be assigned to one or more groups.
The Profiles menu lets you create credit security profiles.
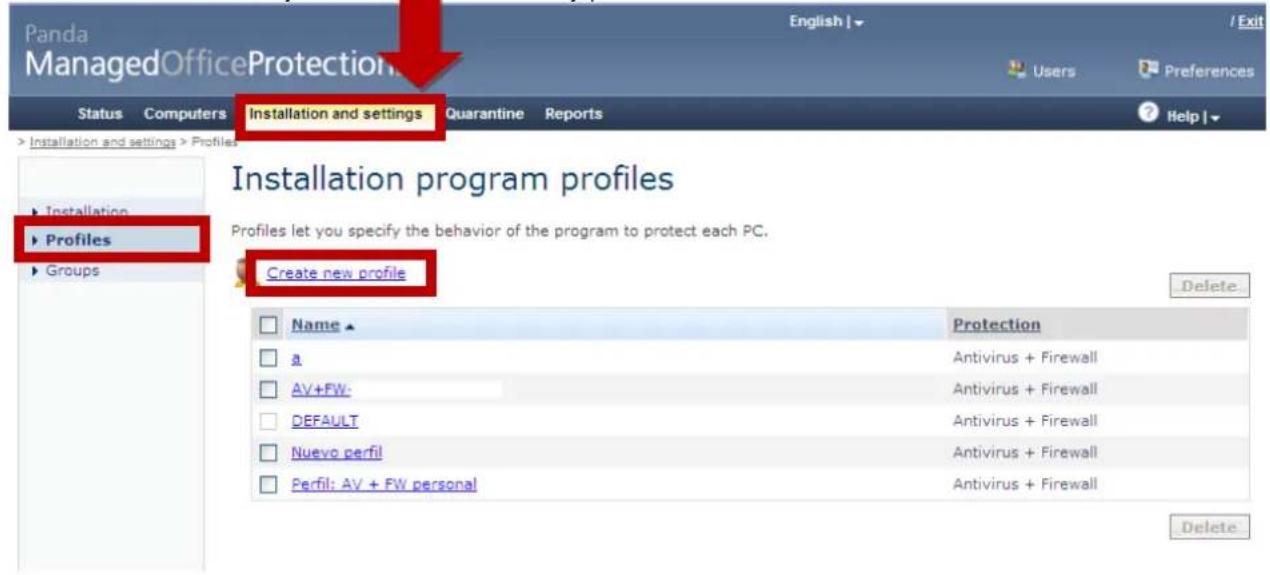
For each security profile, you can define certain general aspects, such as the protection (antivirus and/or firewall), the protection language, automatic updates, sending of suspicious items to Panda Security for analysis, scheduling of on-demand scans and warning management (if they are to be viewed on the user's computer or sent by email, allowing the administrator to take corrective action and reduce the risk of infections or attacks).
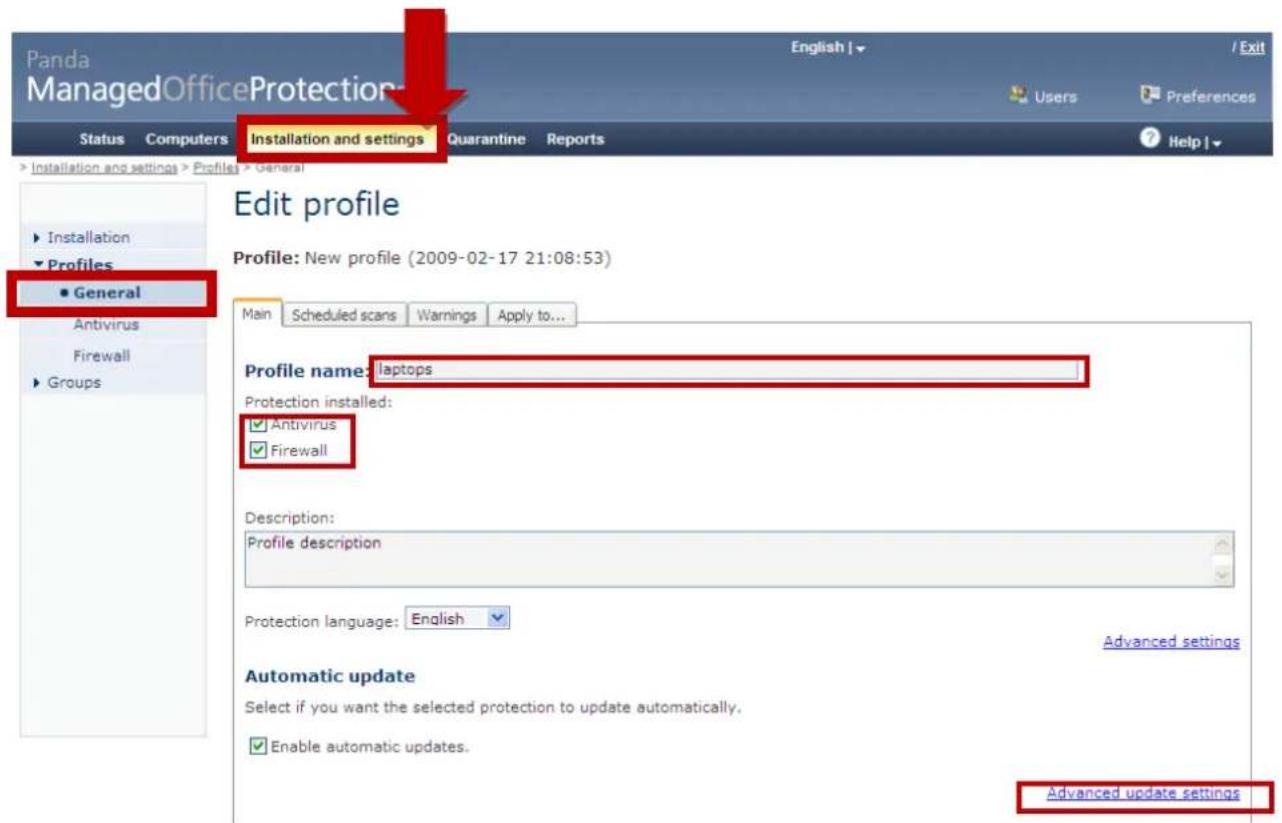
Go to Create new profile. Write the name of the new security policy profile and make any modifications you want.
First you must decide if the computers to which the new profile will apply will have the antivirus and/or firewall protection.
Bear in mind that if you decide to disable installation of the firewall, the firewall policies that you may configure later will not apply to these computers.
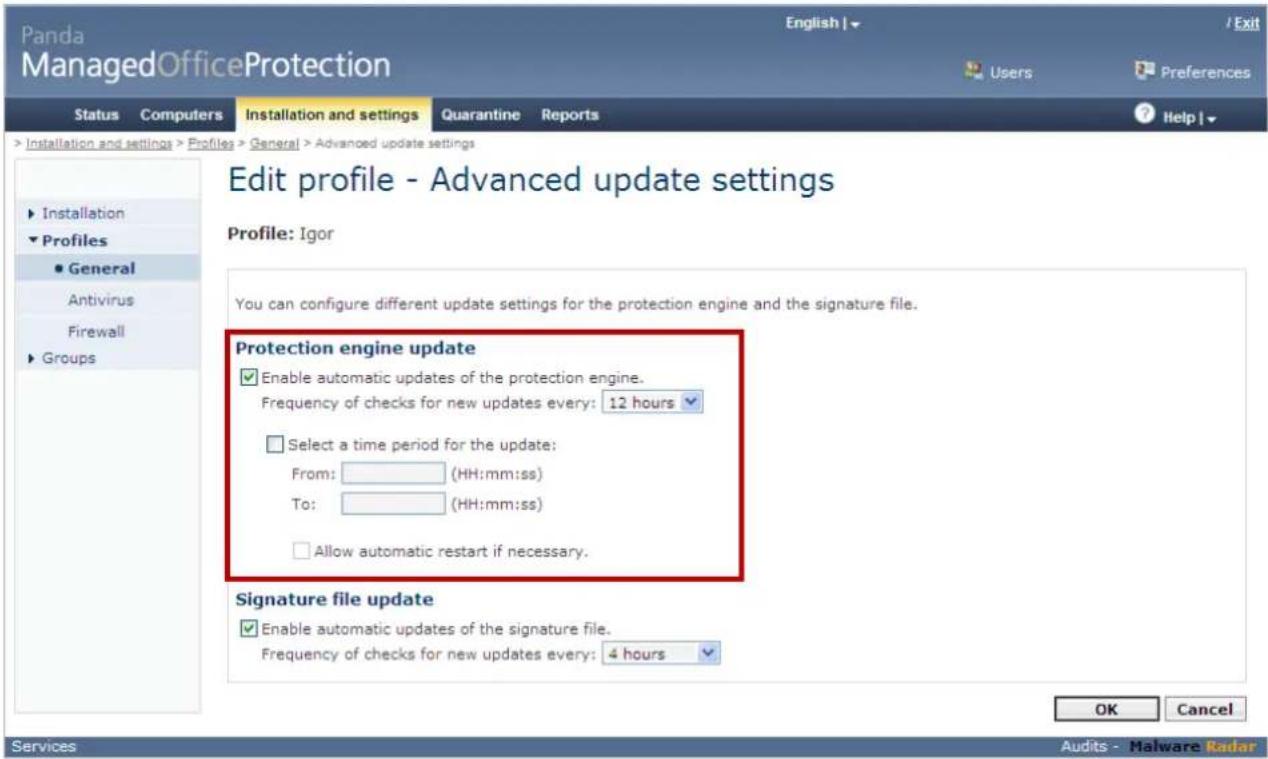
If you go to the Advanced update settings section, you can configure the update rules for the computers. This section is useful, for example, when defining server profiles, as you can determine at any time when to apply software updates by enabling or disabling them. This gives you complete control over when to apply software changes on computers dedicated to providing a service.
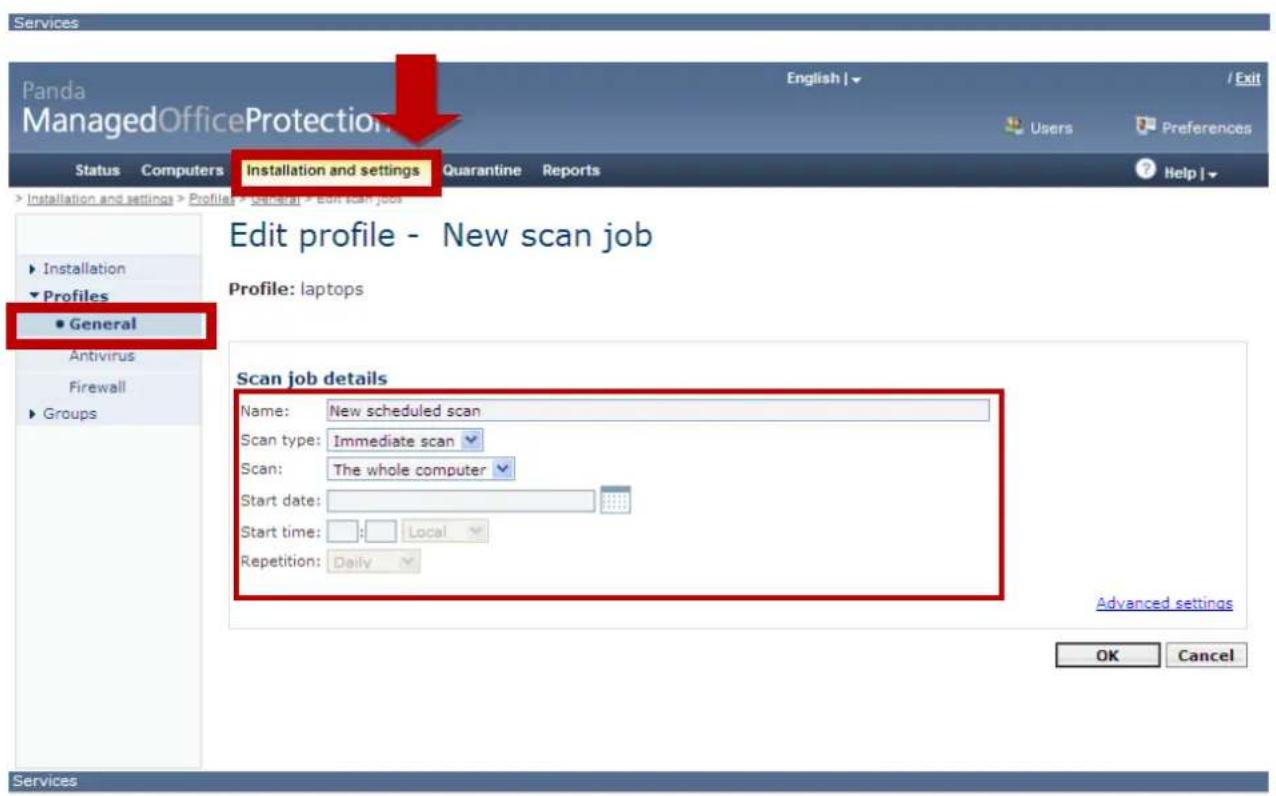
In the Scheduled scans section you can schedule The on-demand scans to be run on computers to which the profile applies.
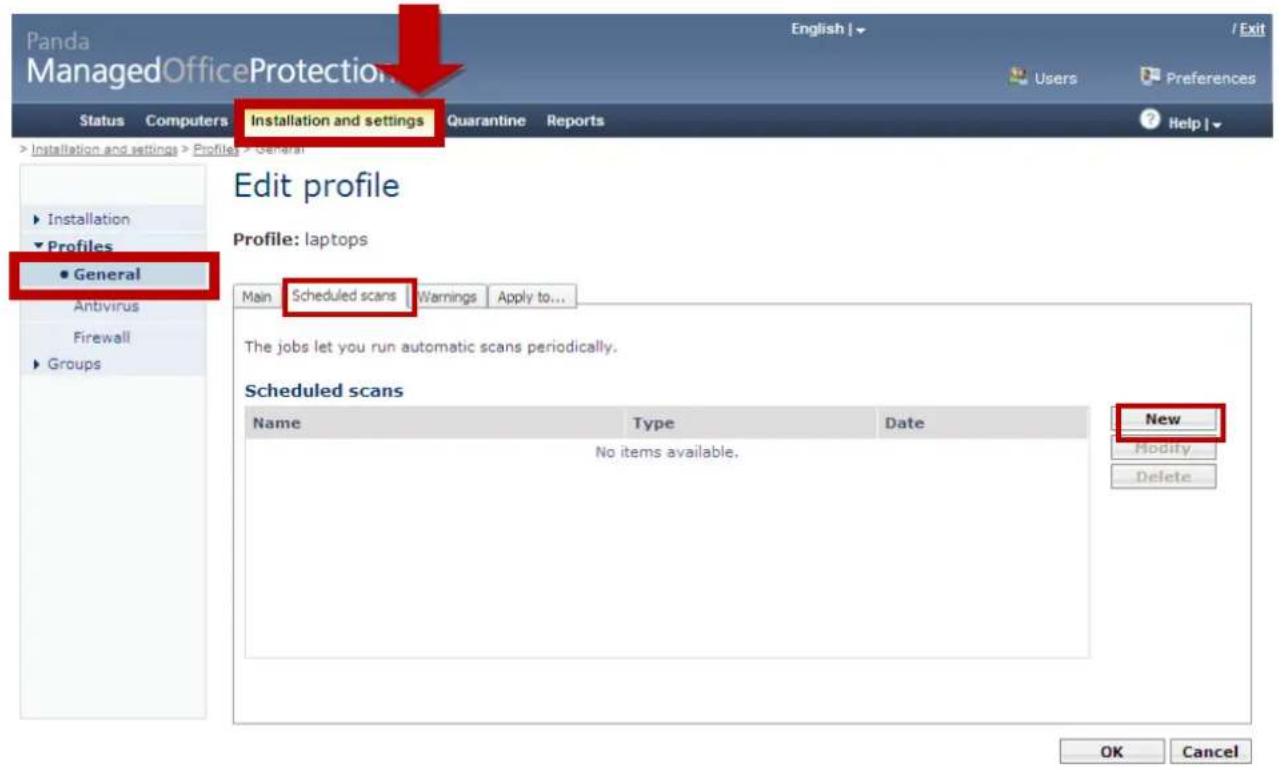
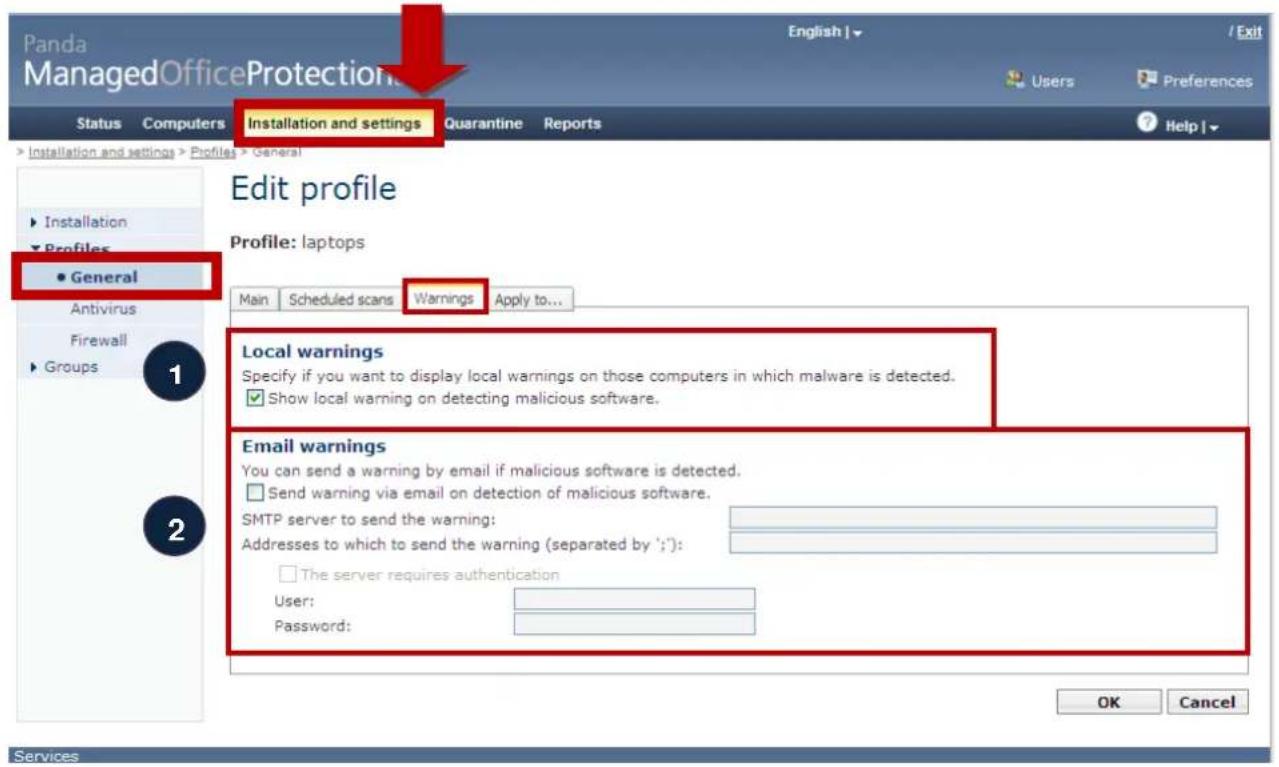
The Warnings section lets you configure the following:
- If you want the local protection to display a warning whenever a detection occurs or if you would rather that the end-user is not notified.
- If you want to be informed via email, which can be sent to one or more people, whenever there is a detection in order to take corrective action.
This email can be sent through a SMTP server with authentication.
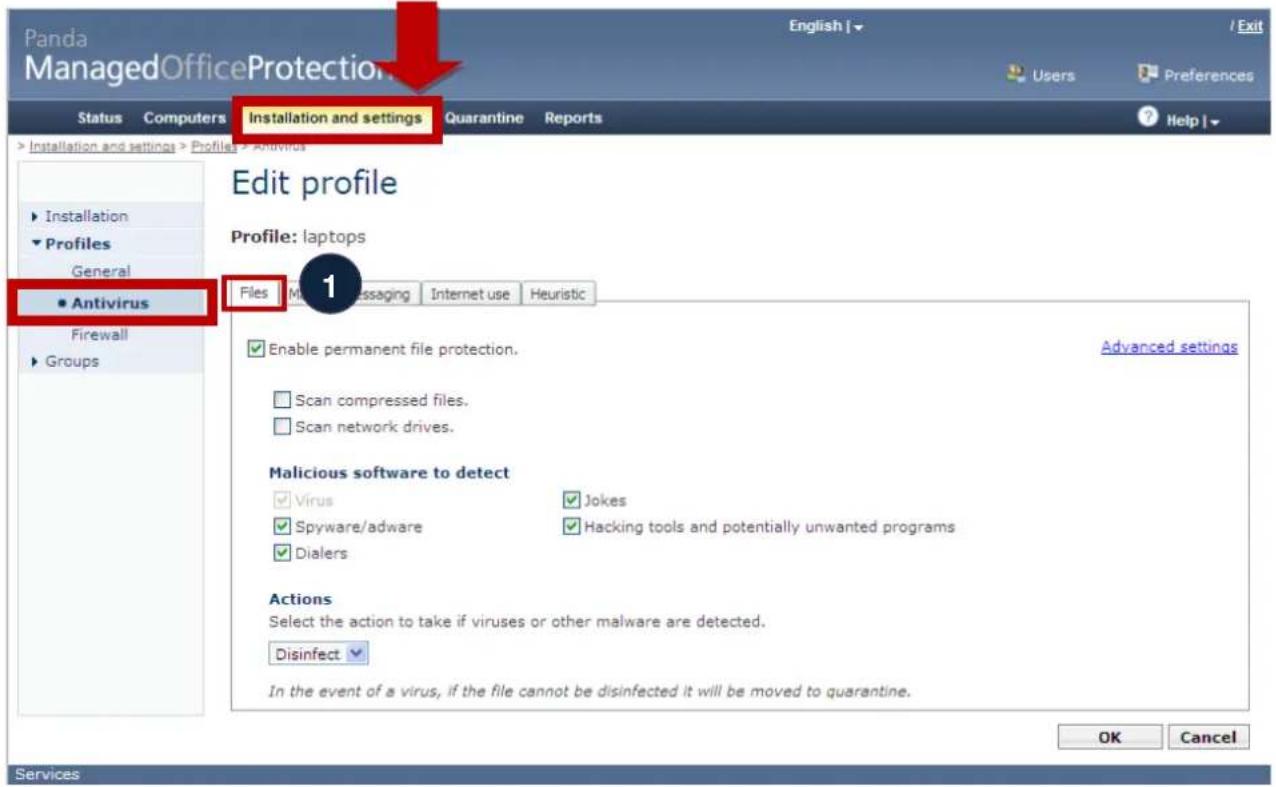
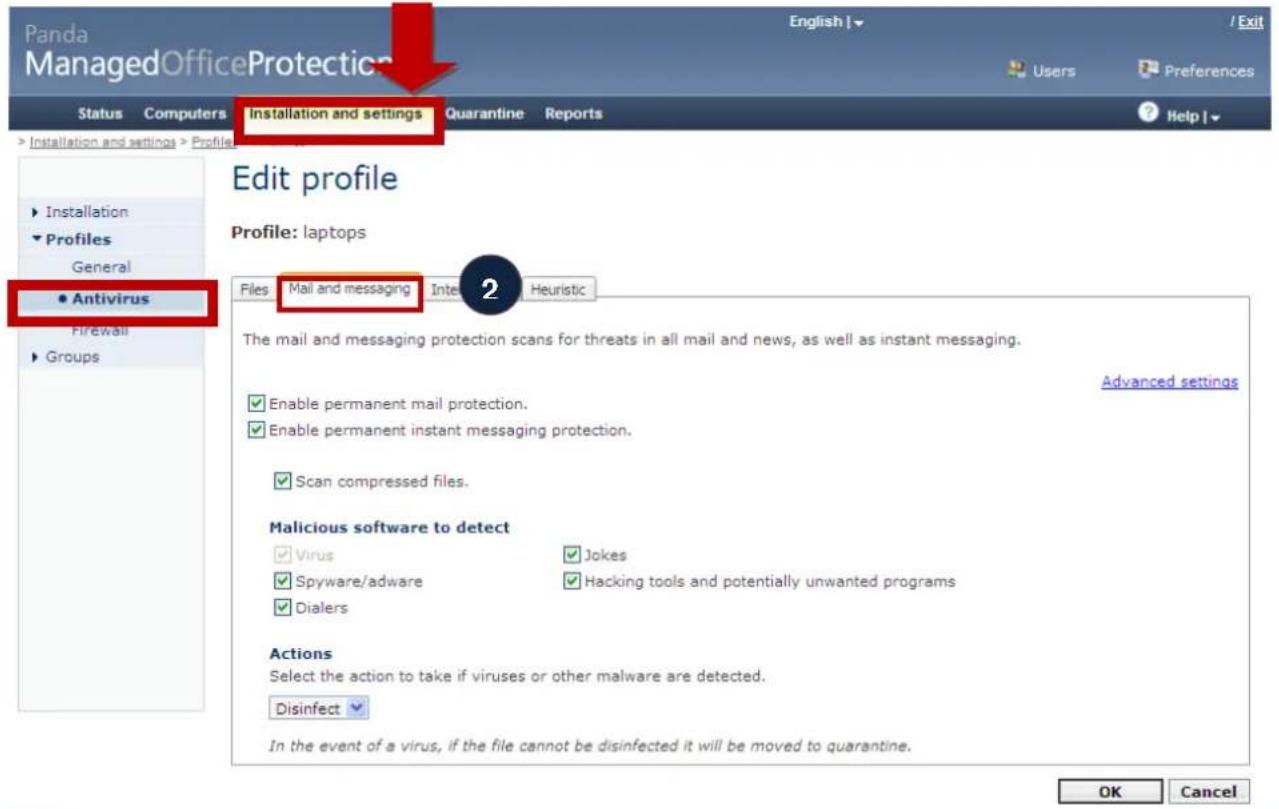
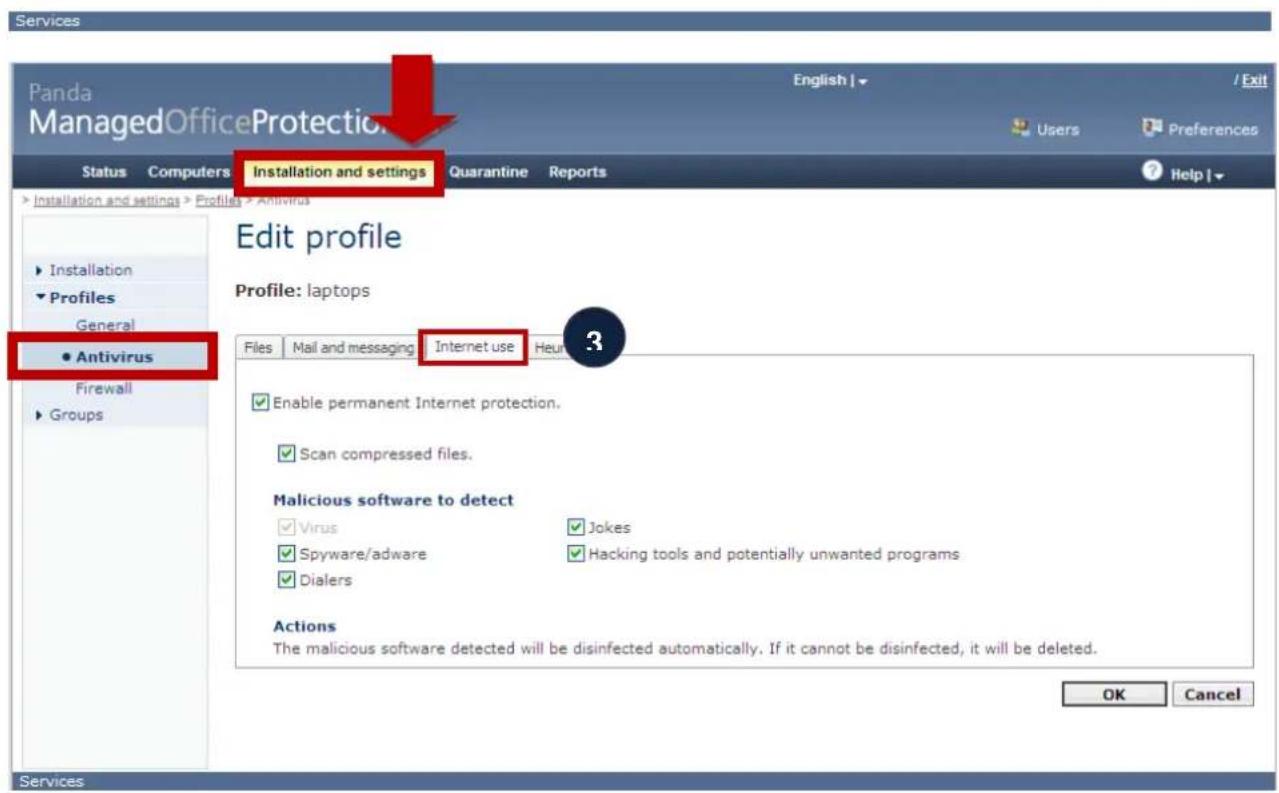
For each security profile, you can now configure functions related with the antivirus. Select Antivirus and establish the protection levels for each malware entry point:
- Files
- Mail and instant messaging
- Internet
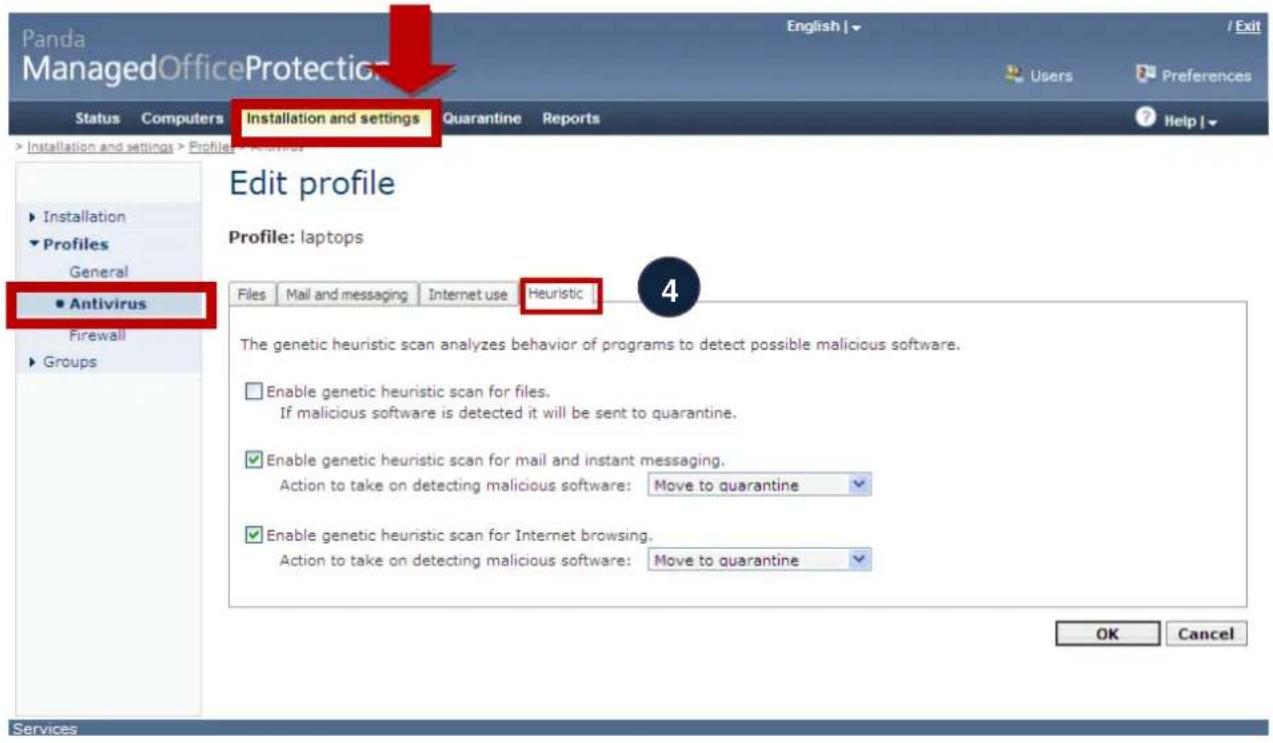
- You can also configure the proactive protection (Generic Heuristic Engine).
For each security profile, you can now configure functions related with the firewall. Select Firewall in the menu on the left.
Bear in mind that the firewall protection will only be installed if in the General settings section you have opted to include this protection in the profile. If you have disabled it, this configuration will not apply.
In this section you must first establish whether firewall policies are managed centrally by the administrator or locally by the user.
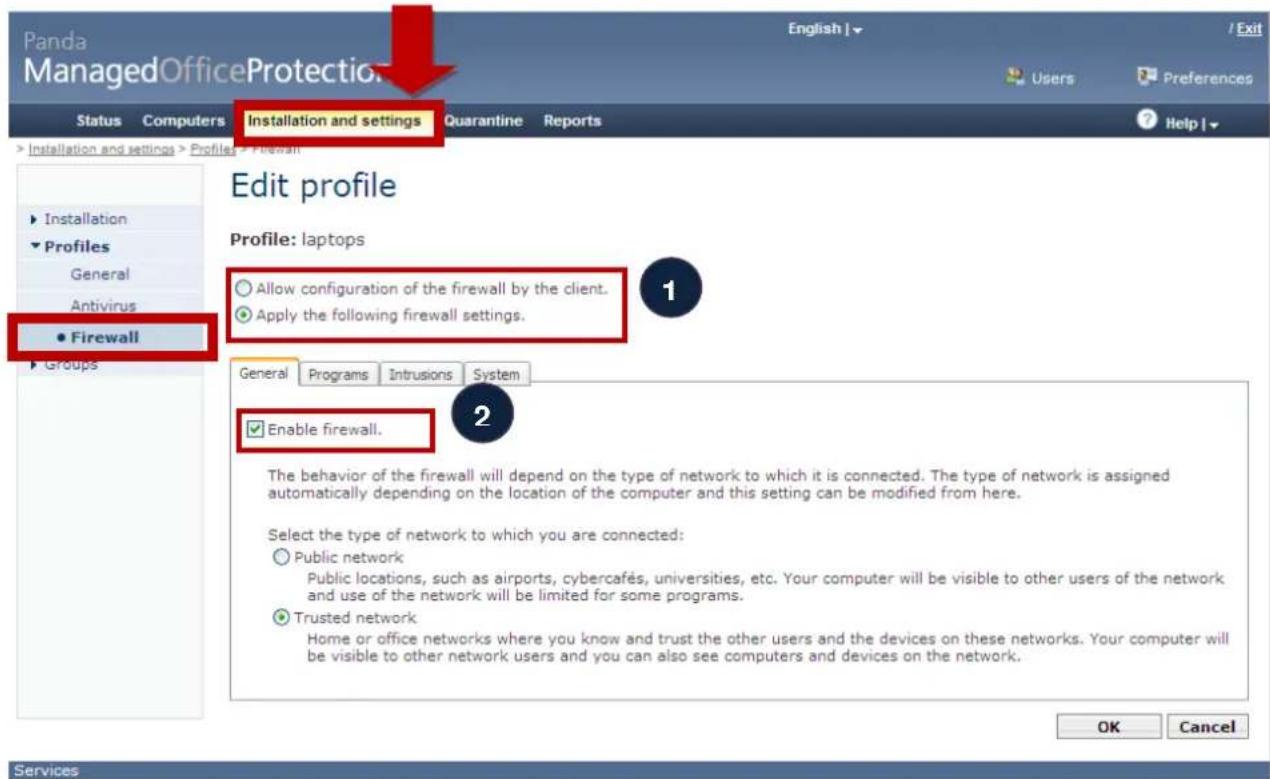
You can also decide if the firewall protection will be installed on computers with this profile and disable the firewall temporarily, using the Enable firewall checkbox (2).
If the firewall is managed centrally by the administrator, you must determine whether the profile applies to computers within the corporate network or outside of it. In the case of the latter, the firewall rules will be stricter.
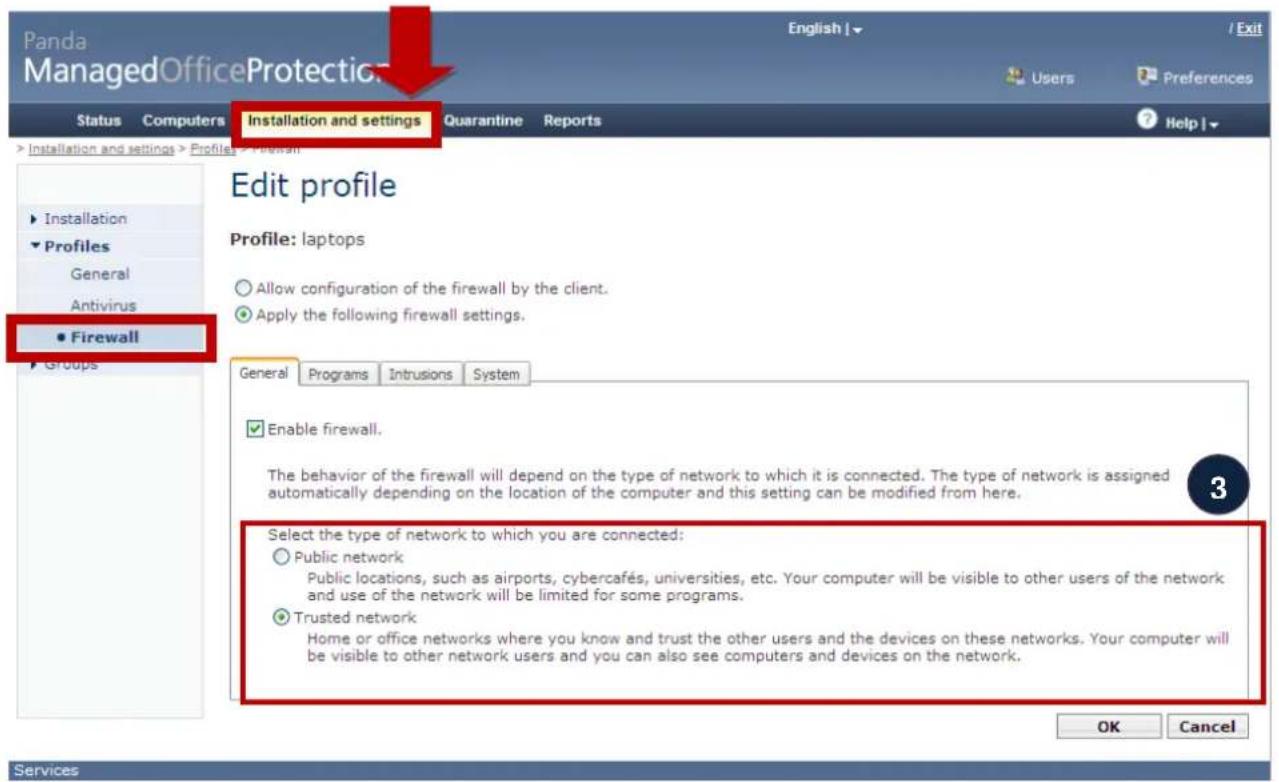
Bear in mind that the firewall can automatically determine when it is in a public or private network and will apply the corresponding firewall rules that you will configure in this section for the profile. This is useful particularly for mobile computers, which continually switch from public to private networks and vice versa. In a public network, the firewall rules are much stricter than on a private network.
You can then add firewall rules at the following levels:
- Firewall rules at specific application level.
- Firewall rules at generic (system) application level.
- Panda also includes a network-level protection, which is fundamental for detecting intruders in computers at this level, and for protecting against network viruses or worms.
Both at application and system levels, the administrator and the company's IT security manager, can add specific rules for denying or allowing inbound/outbound traffic for a specific application or protocol.
The order in which rules defined by Panda or by the user are applied is as follows:
- Users' system rules
- Panda's system rules
- Users' application rules
- Panda's application rules
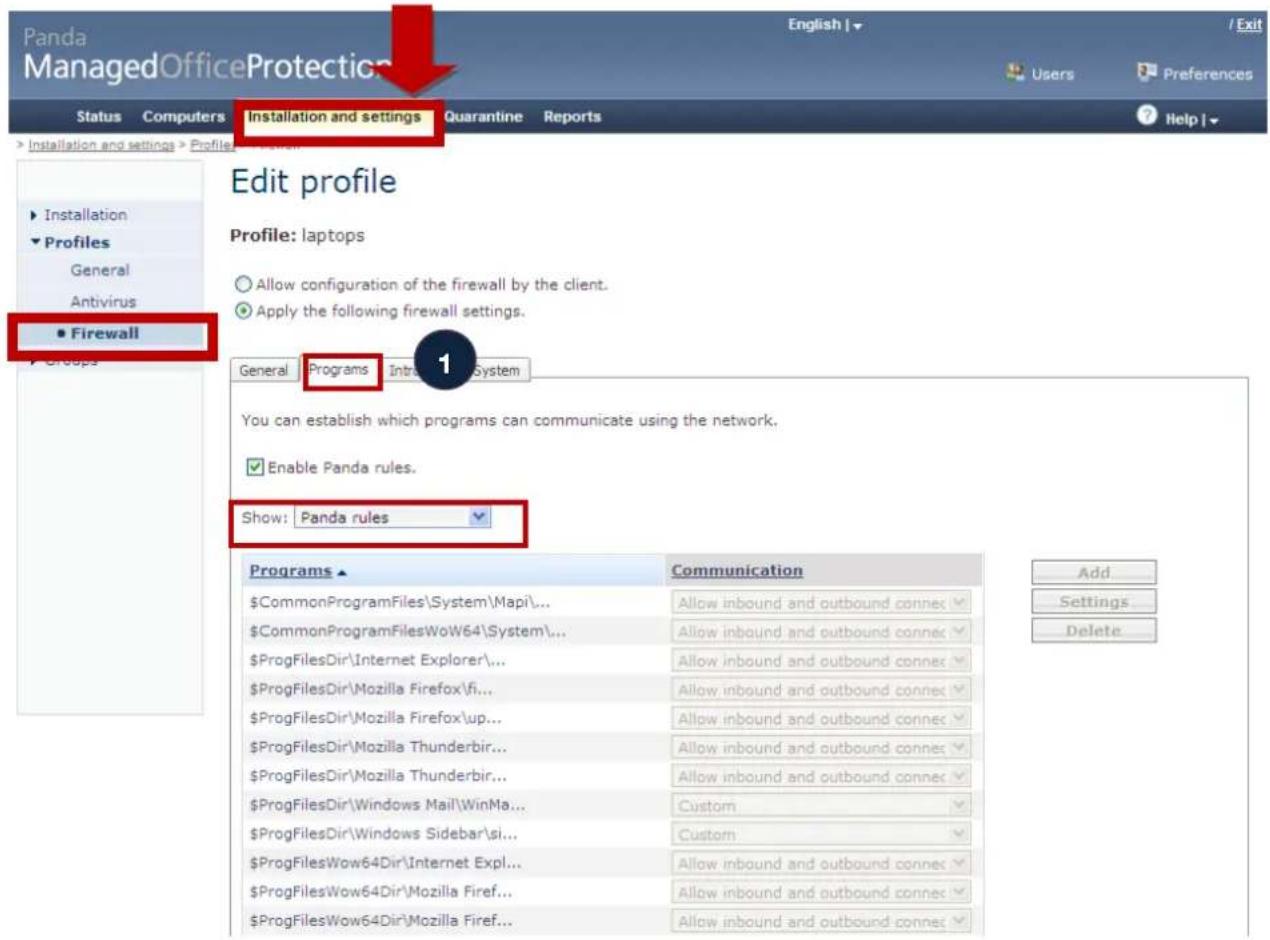
At application level, you can see the rules that Panda Security applies and maintains through the automatic updates.
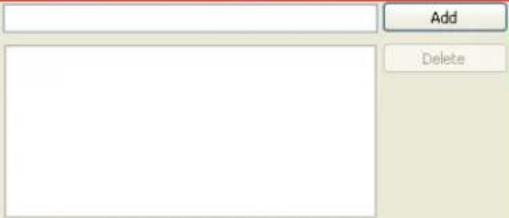
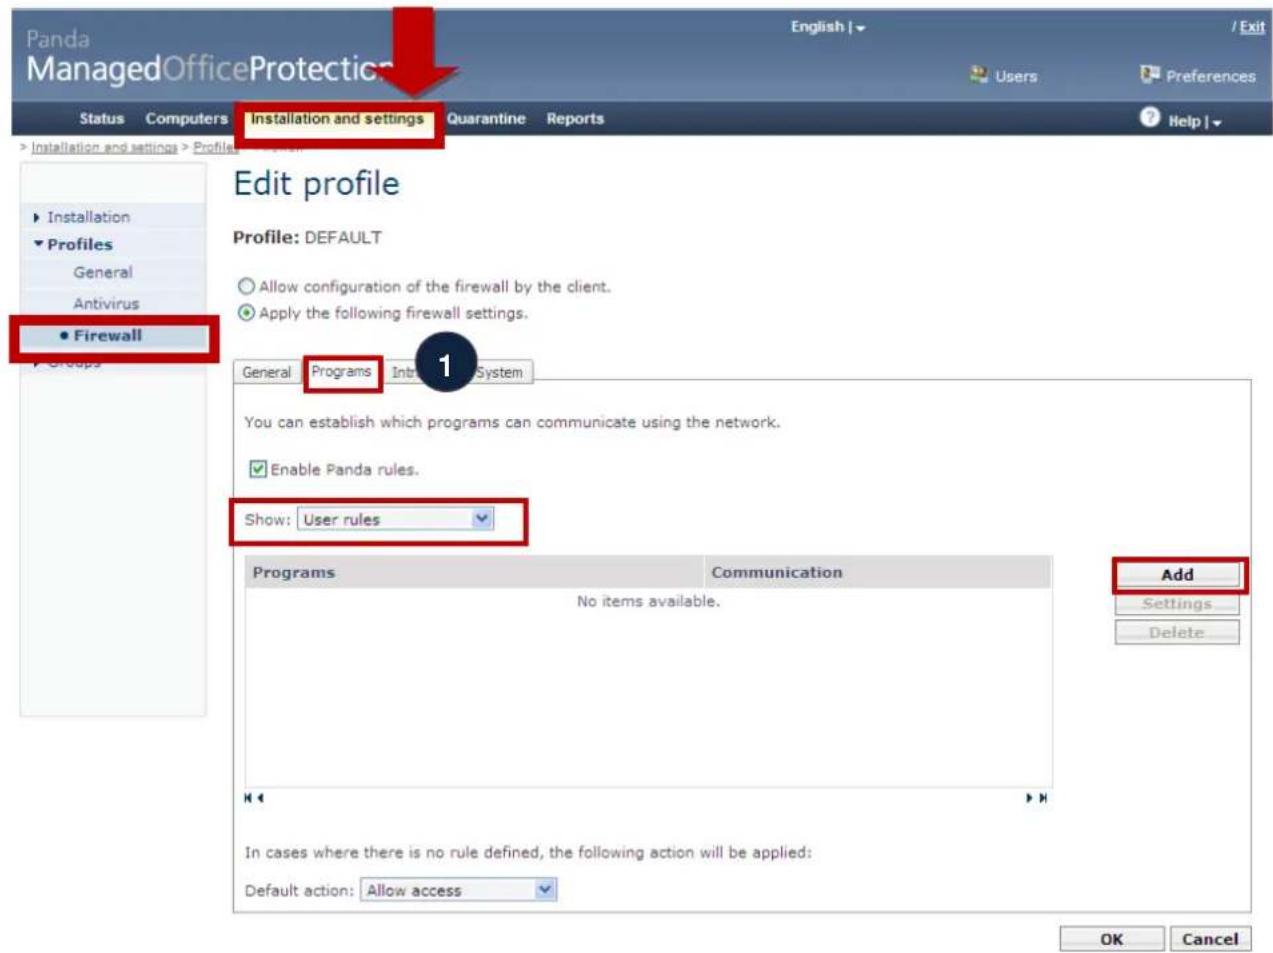
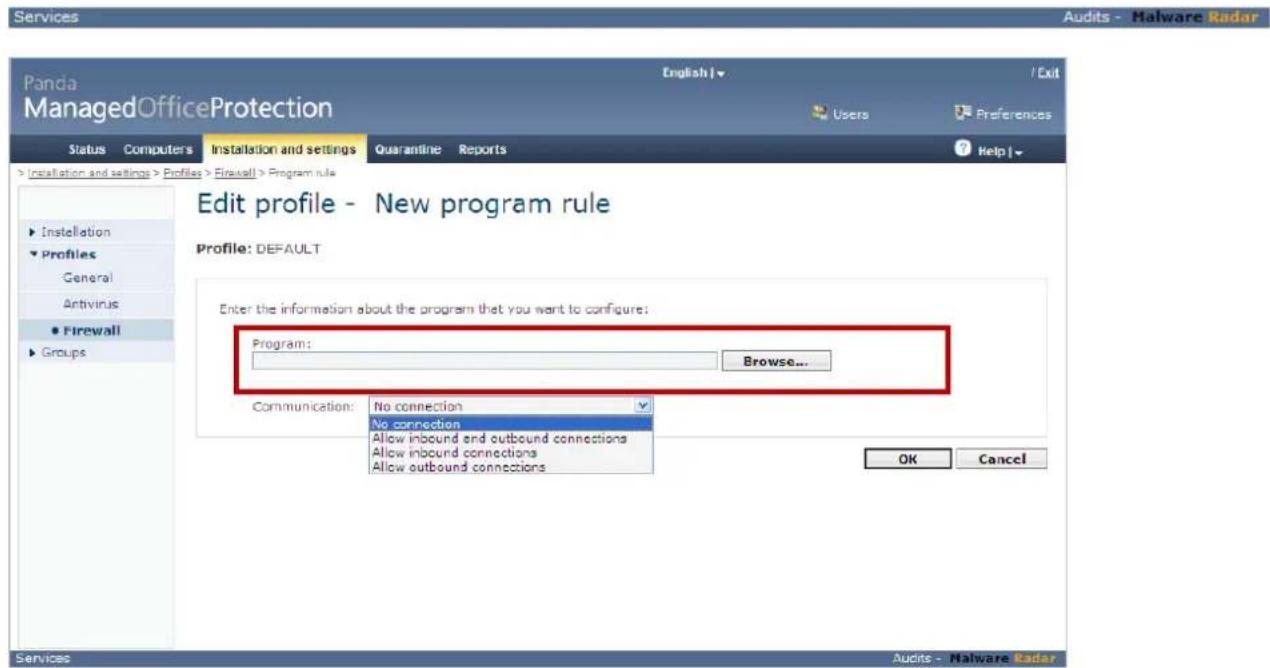
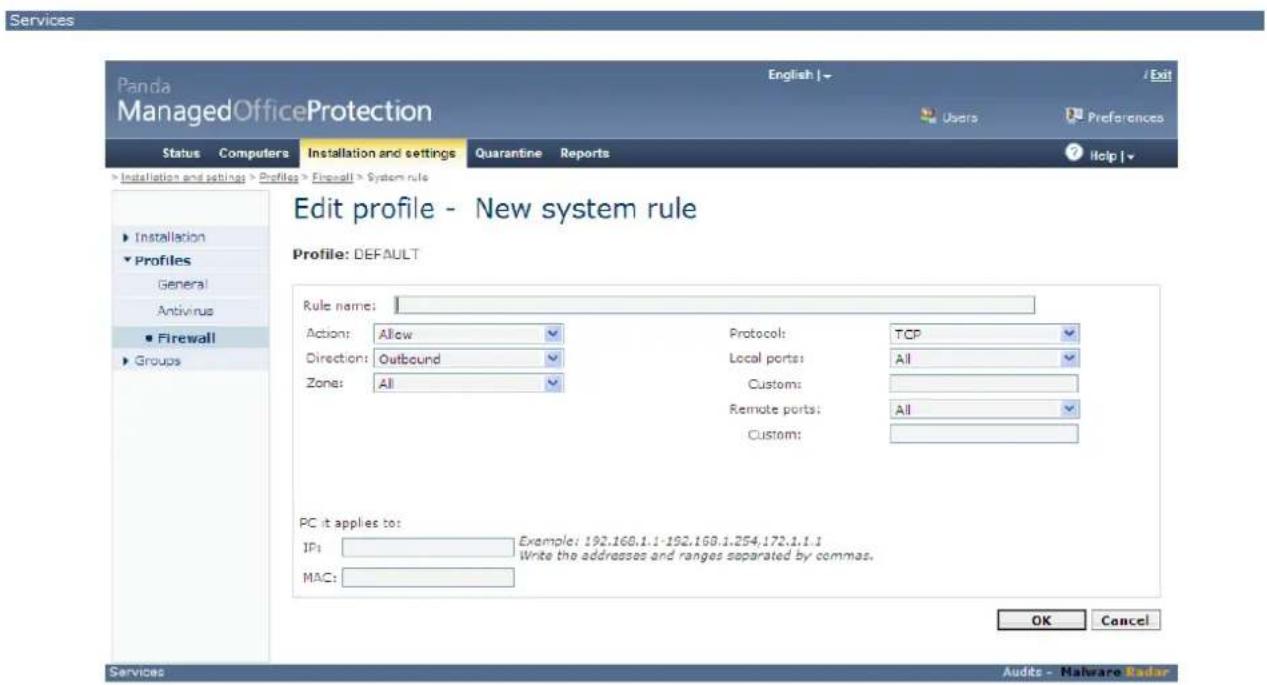
You can also add your own application rules by selecting User rules and defining them in the screen that appears after clicking Add.
You can see the system-level Panda rules in the System section.
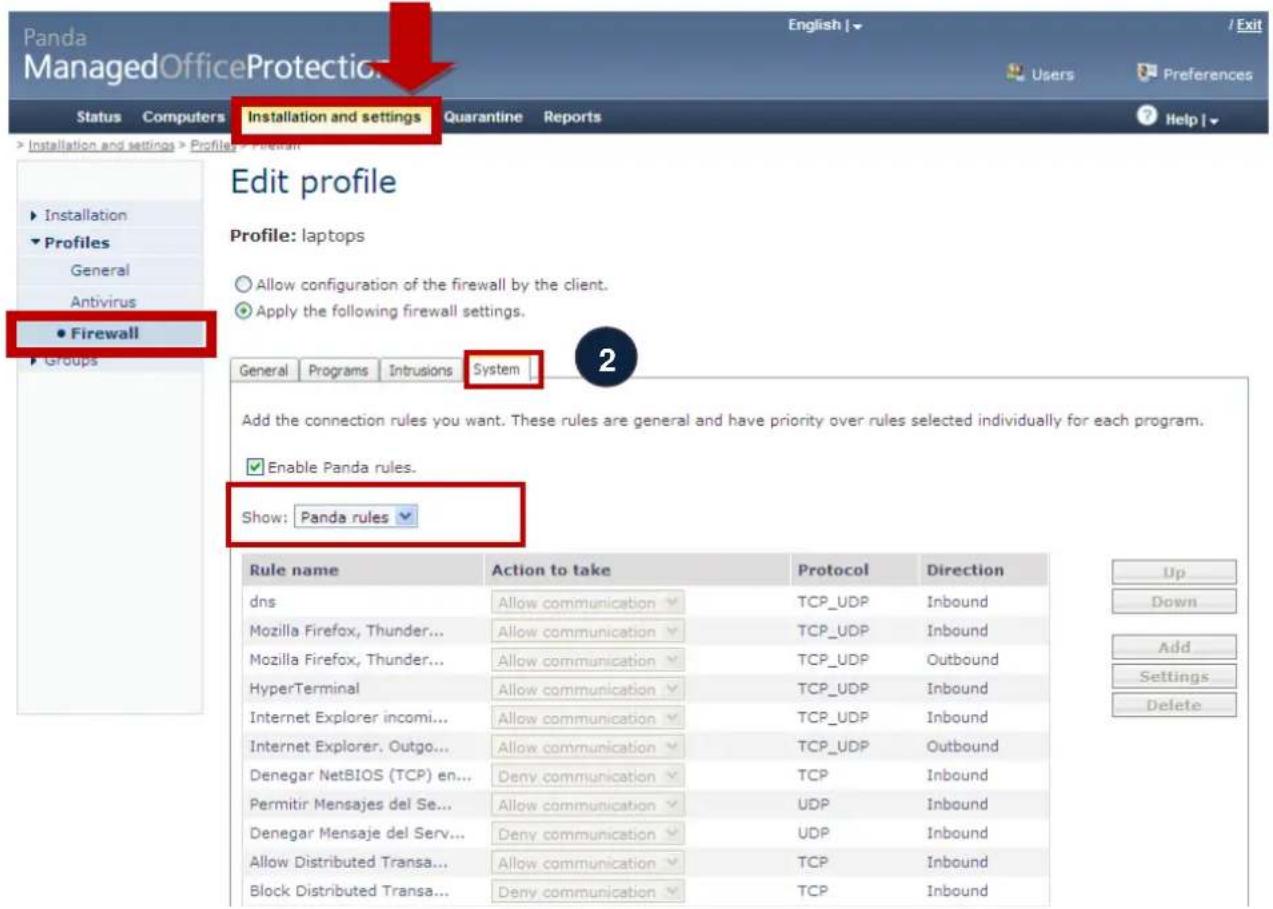
To configure a user rule, select User rule in the drop-down menu and click Add.

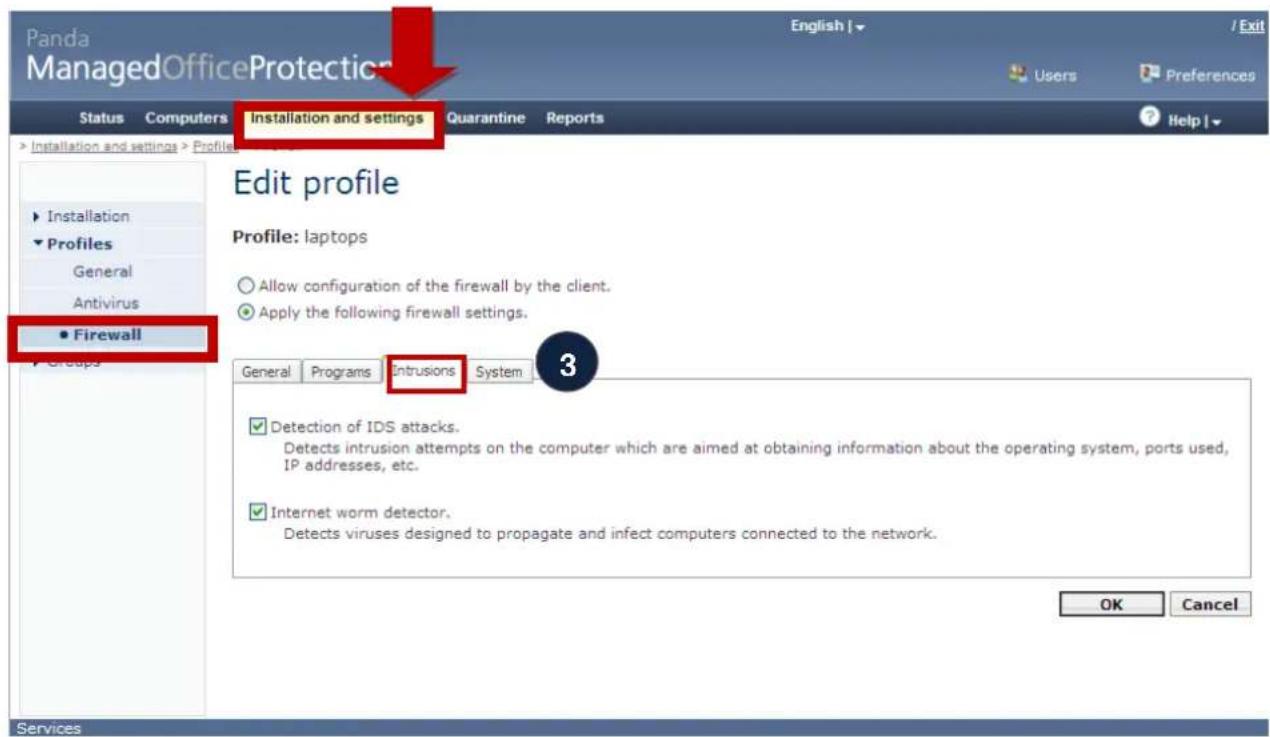
Finally, Panda Security also offers, maintains and updates intrusion detection rules, which are enabled by default but can be disabled by the administrator. It is not advisable to disable them, especially the detection of network worms.
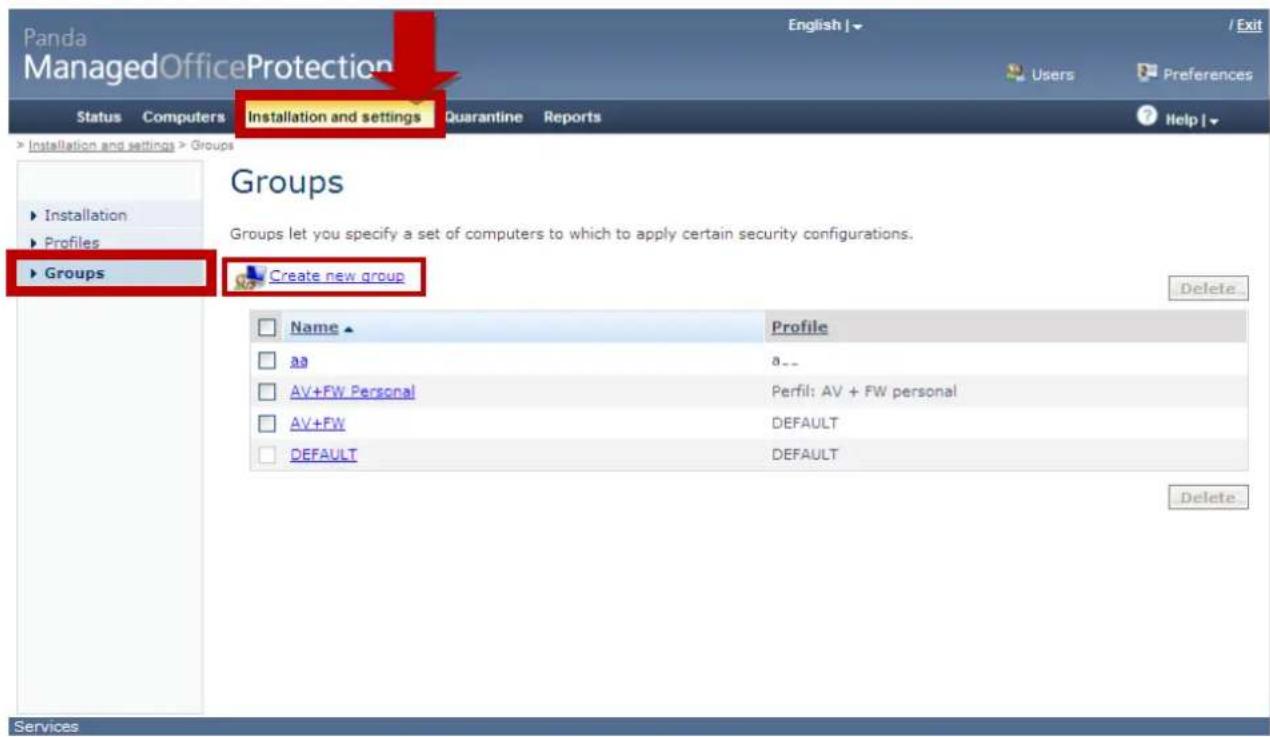
Creating groups of computers and assigning security policies remotely
Once you have finished creating security policies, they have to be assigned to the computers which are protected and managed. To do this, create groups of computers so that the various security policies can be applied to different groups on the local network.
Select the Groups option from the menu on the left. Click Create new group.
Once you are in the section for creating a new group, assign it a name and a security policy profile (you can edit this profile from the shortcut to the right: Go to profile management) and select the group of computers in which you have installed the protection and which will share the security policies in the profile associated to the group you're now creating.

Select Assign. The computers will be assigned to this group and will have the security policies defined for this profile.
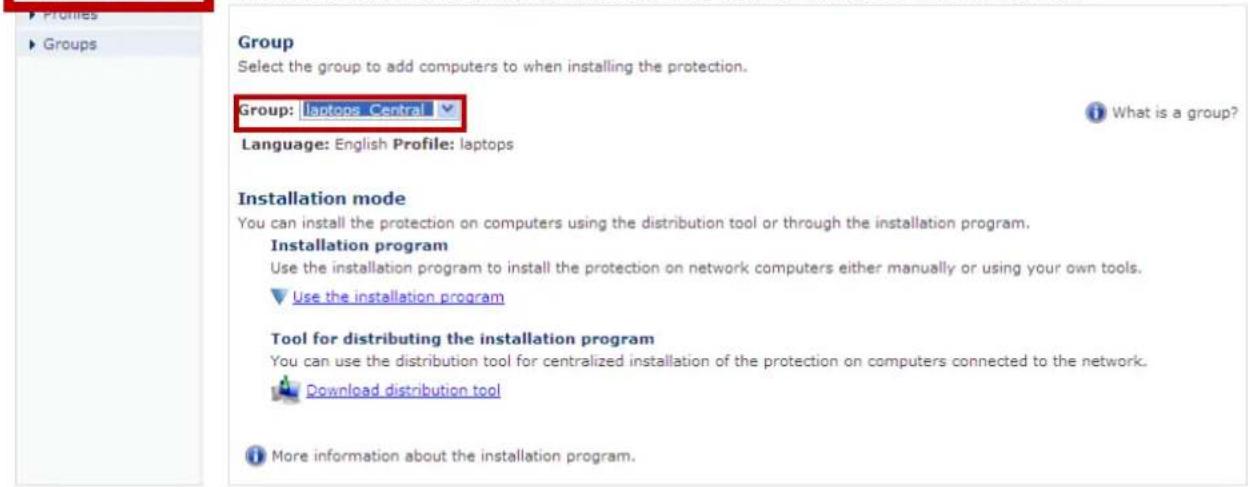
Local or remote installation of the protection with predefined security policies
If you want to install the protection on a new computer belonging to a newly created group and therefore assign security policies that you have just created in the profile, go to the option Installation in the menu on the left.
Then select the group you have created in the drop-down menu and distribute the installation packet with any of the three methods described in previous sections:
- Via an email with a link to the installation packet.
- By downloading the installation packet and then deploying it with any network tools you have or manually.
- Using the remote distribution tool.

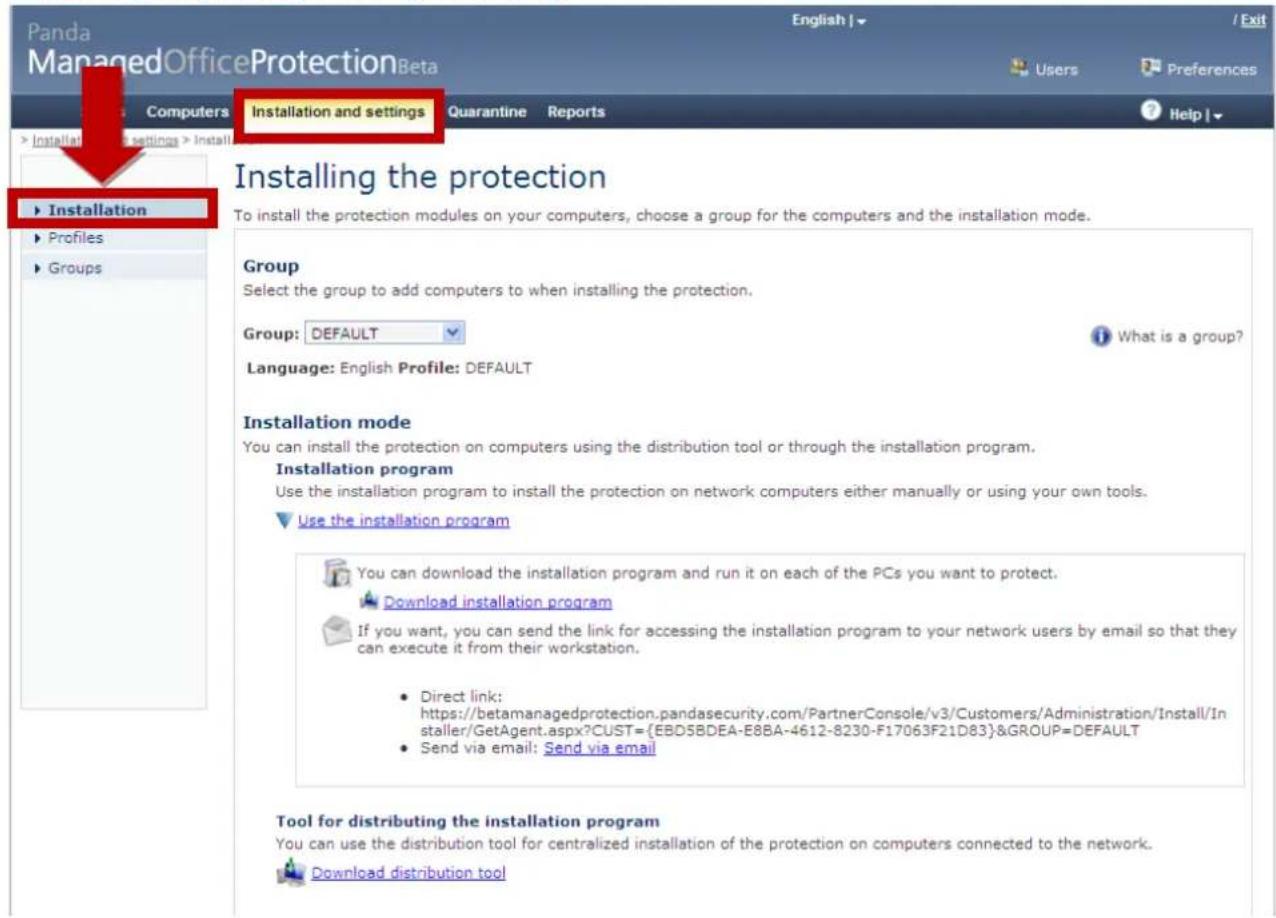
Installation and settings > Installation
Installing the protection
▶ Installation To install the protection modules on your computers, choose a group for the computers and the installation mode.
Services
2.2. Centralized security monitoring
- Consolidated network dashboard
Once you have accessed the Panda Managed Office Protection console, go to the Status section, where you will see the malware detection history at-a-glance, broken down by type and by source over the corresponding periods:

Status
Status
Licenses
Valid until: 10/18/2011 - Contracted: 26 (Free: 15 | Used: 11)
Antivirus protection
line
| Detection Type | Peak Value | | -------------------------- | ---------- | | Virus | 6030 | | Spyware / Adware | 2412 | | Dialers | 1206 | | Jokes | 3618 | | Hacking tools and PUPs | 4824 | | Other | 6030 | | Detection Source | Peak Value | | -------------------------- | ---------- | | File systems | 2412 | | Mail | 1206 | | Internet use | 3618 | | Instant messaging | 4824 | | Firewall | 6030 |View list of detections
- Centralized monitoring of licenses: contracted, used and free
You can also check the status of your licenses; the type of licenses and the number of licenses for workstations and servers that you have used and how many you still have, as well as the date on which they have to be renewed to maintain your protection.
Details of all maintenance contracts with active licenses are displayed in the console, as well as all licenses available and used at any time.
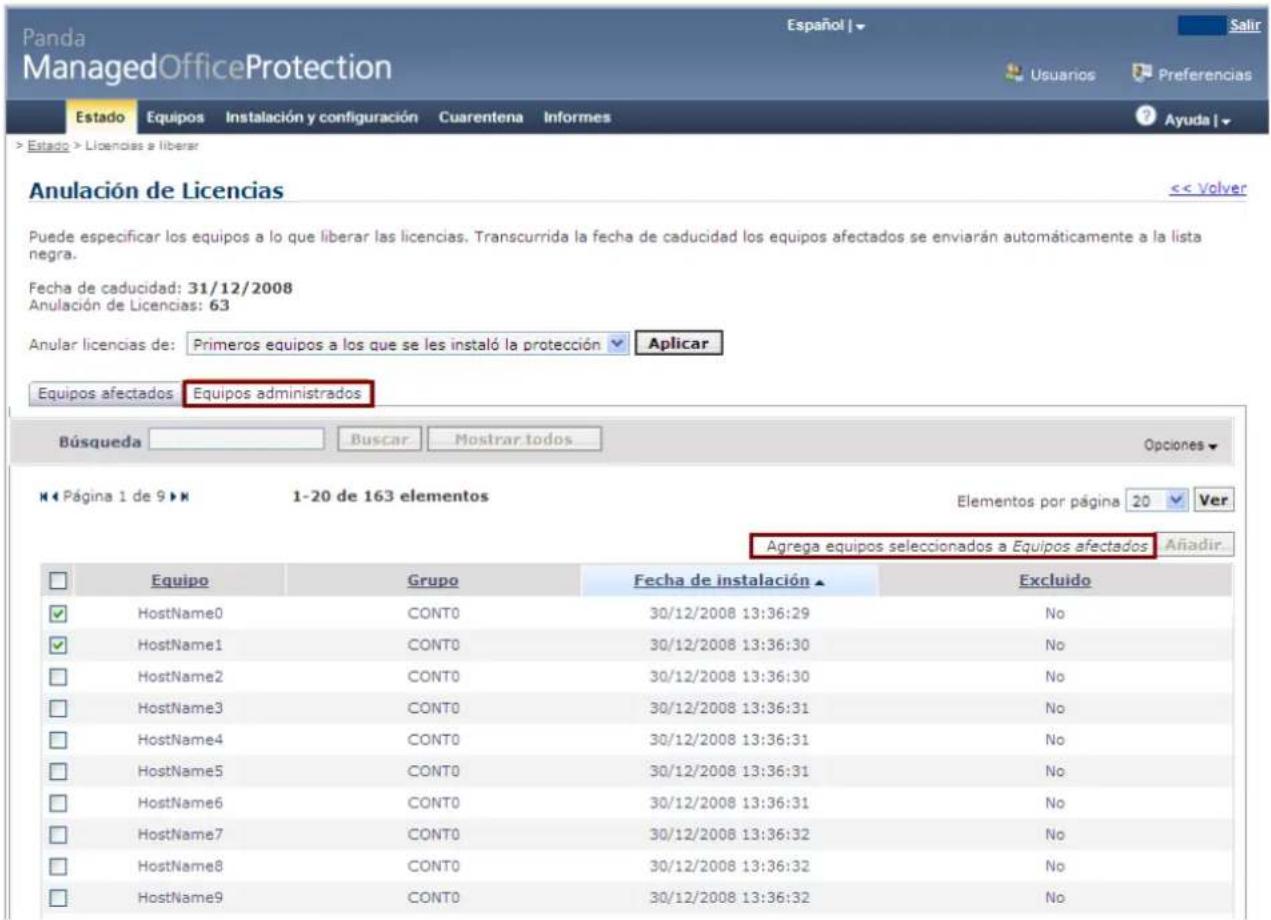
When there are 30 days remaining before expiry of any of the maintenance contracts, a section will appear where clients can select computers that will be affected by license expiry. An initial list appears which can then be edited using lists of the last or first computers protected by PMOP. This preliminary list can then be modified including or excluding computers manually, with filters by installation date, group, name or IP address.
![Panda ManagedOfficeProtection Status Computers Installation and settings Quarantine Reports Status Status Notifications (1)_Notificación de prueba_1 (1) Notificación de prueba_5 The license period expired 20 days ago. In 20 day(s) your [ ]Select licenses to release... Licenses Contracted: 228 (Free: 2 | Used: 226) 76 Expiry date:12/31/2008 Days until expiry date:-20 76 Expiry date:1/30/2009 Days until expiry date:10 View more... Antivirus protection Detections by type Virus Spyware / Adware Dialers Jokes Hacking tools and PUPs Other Period Last 24h Apply Detections by source File systems Mail Internet use Instant messaging Firewall View list of detections](/content/2026/05/1027184/images/bf076db69aa1d5620f2028d5090f875aa73ef8b16bc2db614d94148f578d598d.jpg)
To see details of licenses, select View more.
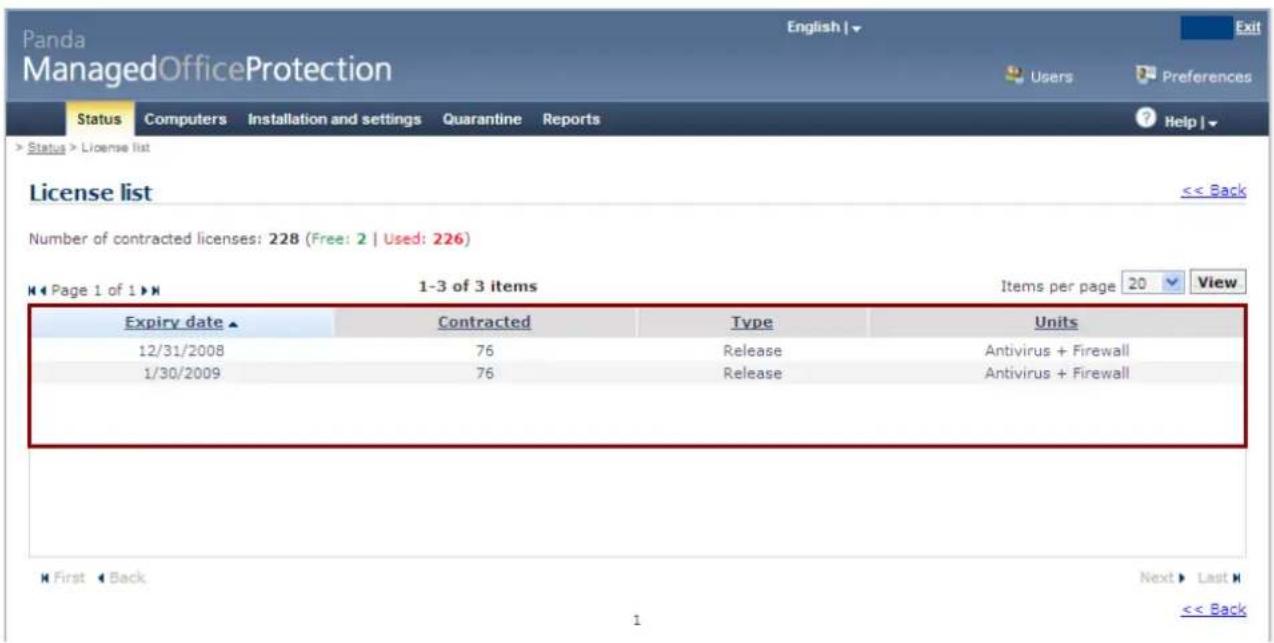
Here you can see the computers affected by maintenance contract expiry. There is a preliminary list of computers that will cease to have licenses. The list comprises the first and last computers to be protected. It can be edited manually in the Managed computers section.
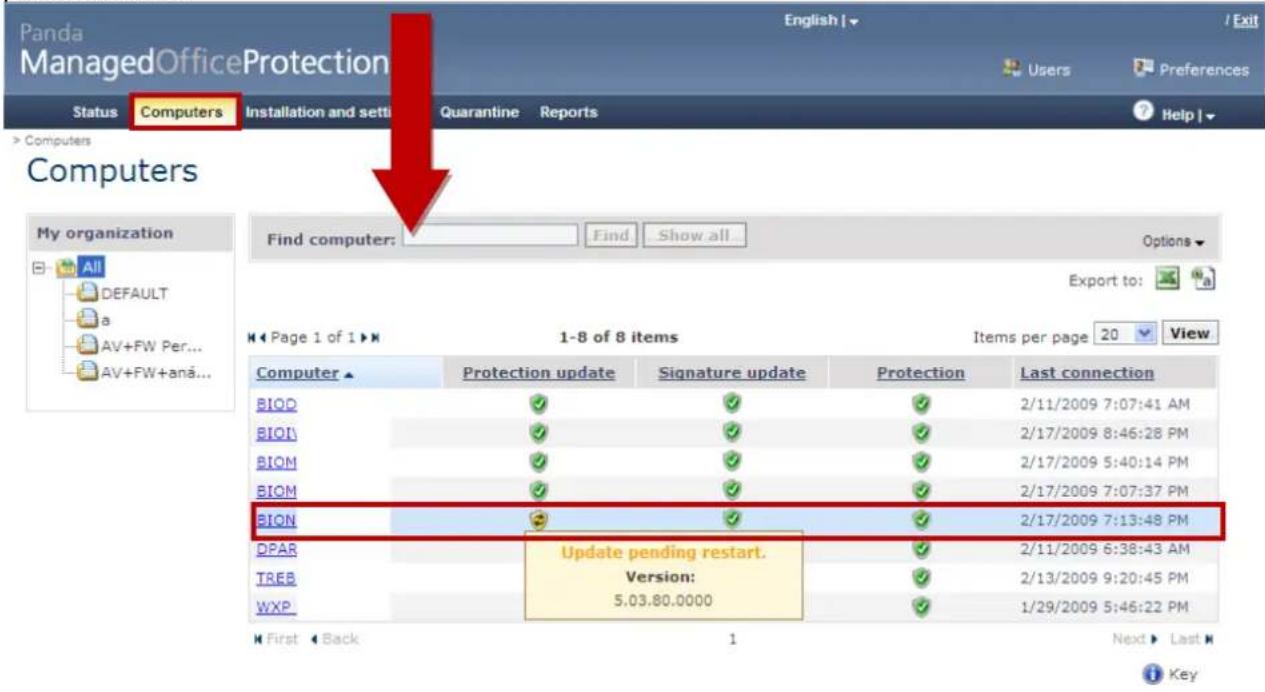
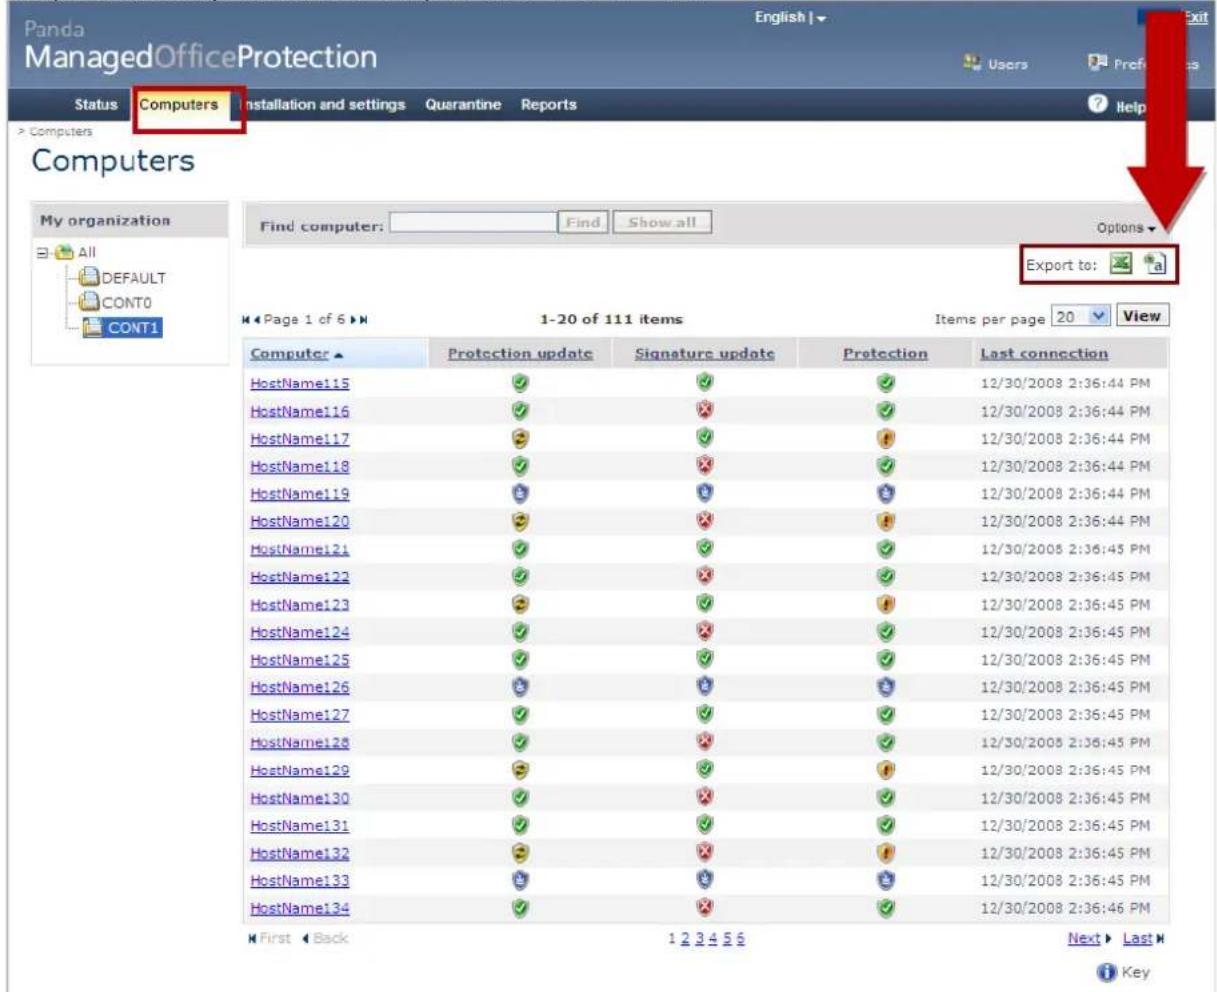
■ Monitoring the security status of the network
In the Protection section you can check the status of the protection, with a straightforward view of all the computers on your network with the protection installed.
For each computer or server there is a graphic view of the update status of the signature file and of the protection itself.
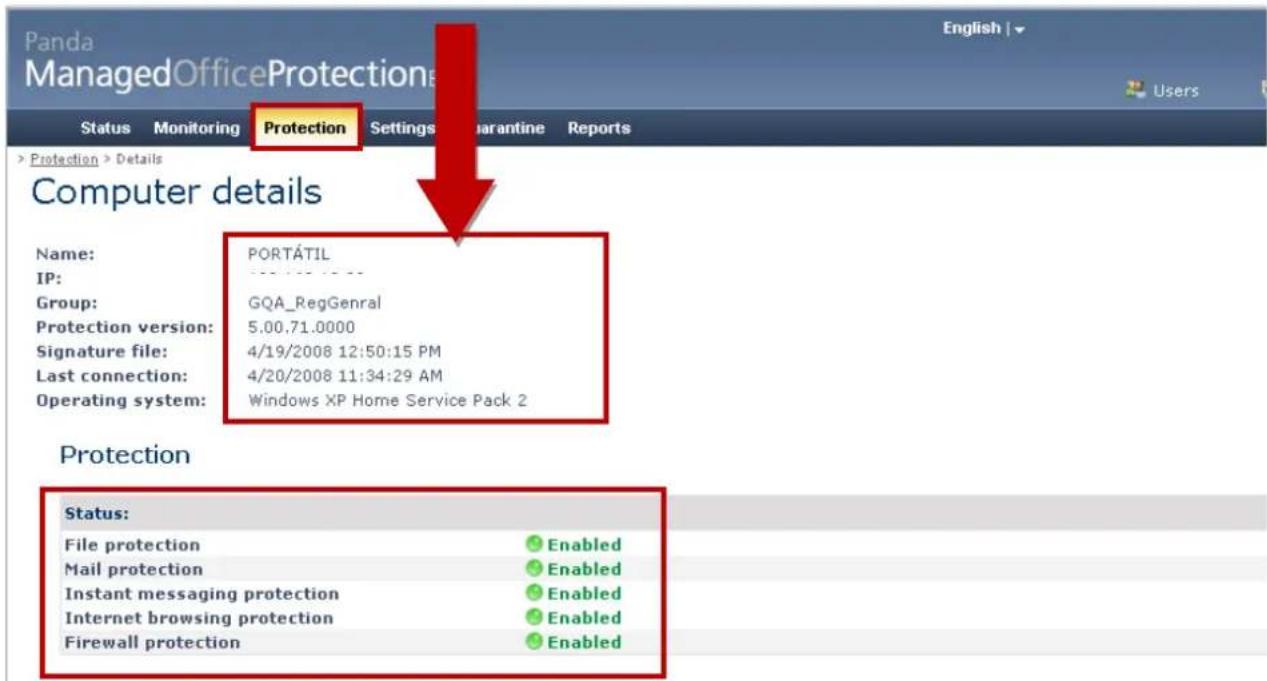
By selecting one of the protected computers, you will be able to access detailed information about the protection, with information regarding:
√ Name and IP of the computer.
√ Group to which it belongs and associated security policies.
√ Protection version.
√ Signature file date.
√ Date of last connection.
√ Information on the operating system installed on the computer.
√ Details of the different protections included in the product:
■ File protection.
- Mail protection.
- Internet protection.
- Instant messaging protection.
- Firewall protection.
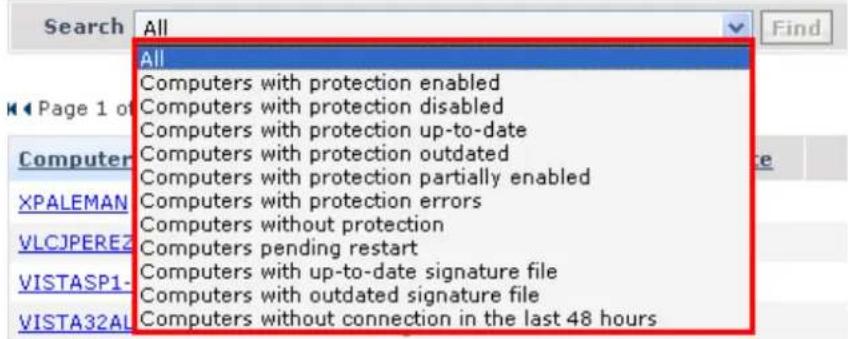
- Filtering of computers and analysis of the security status
When an administrator manages numerous computers, it could become more difficult to locate a specific computer. That's why there are filters for:
- The computer status
- Computer name
- IP address
From the Find computer field you can search for the Name or IP address, or use the Options field to search for computers by Status.
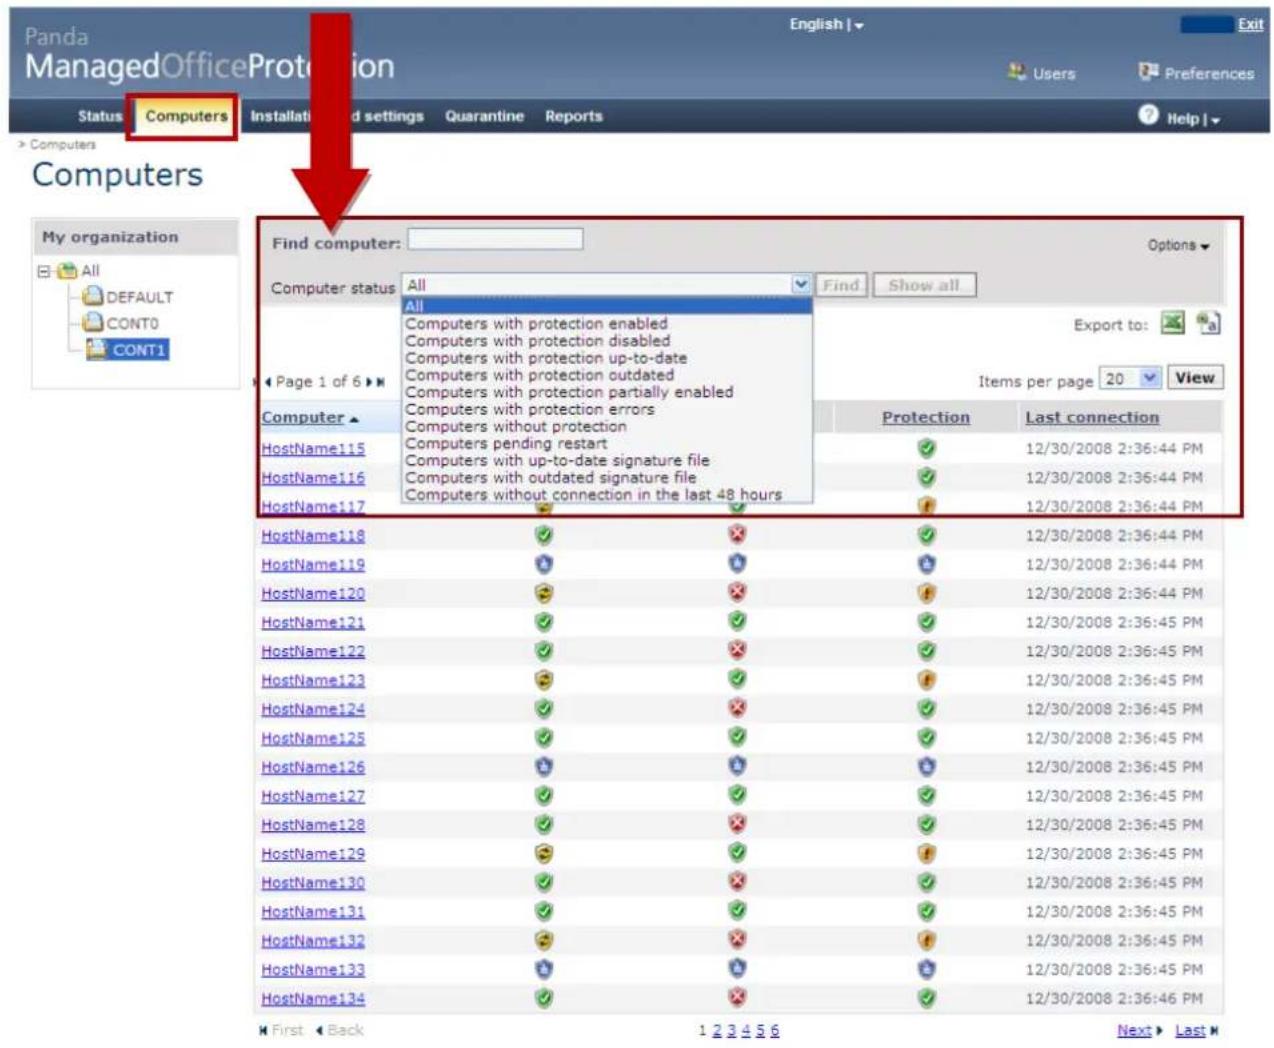
There is a filter that allows you to quickly search for computers with the protection disabled, outdated, pending restart, etc.
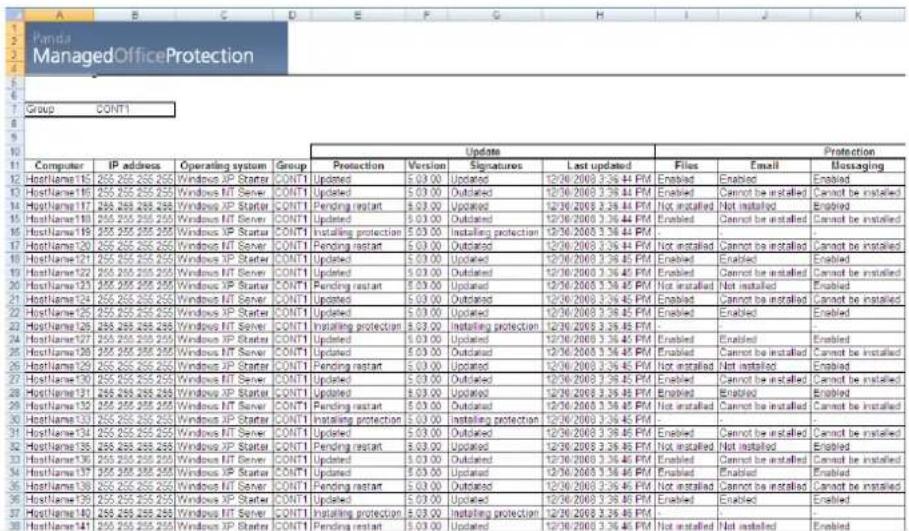
- Exporting the computers' status to file
It is possible to export the list of computers to Excel or CVS.
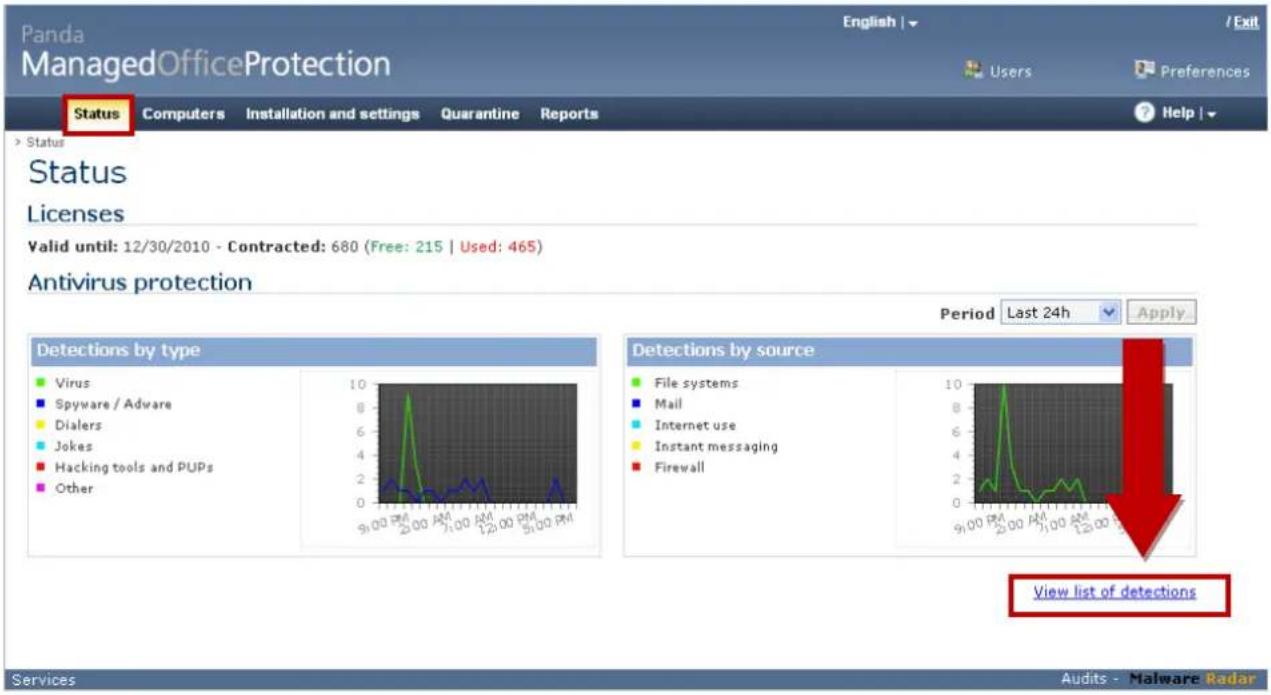
- Centralized monitoring of detections
In the Status section, click View list of detections to go to the section for monitoring detections. In this section you can analyze in detail any detections on the network in which the protection is installed.
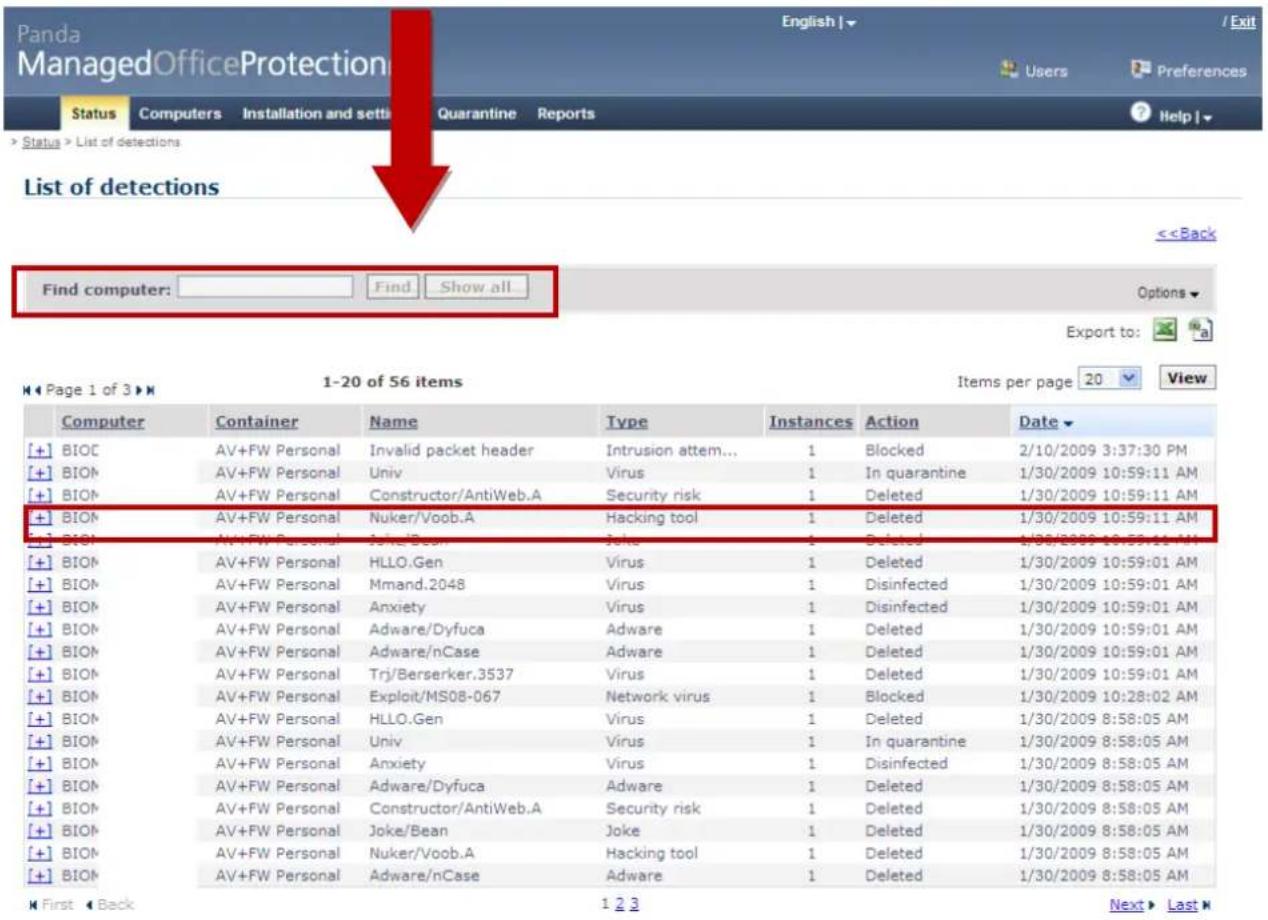
Detection details
<2.3. Consolidated reports
The reports offer rapid and straightforward information about the most important aspects of the protection. These reports can be exported into different formats, such as CVS, XML, plain text, PDF, HTML and Excel, allowing this data to be used in other business processes and printed out from the console. Reports
No report was generated
1.- Select the report to generate. 2.- Specify the content and scope of the report. 3.- Click "Generate report". There are three types of reports:Type of report:
Executive Status Detection What information is included in each report? Consolidated executive report about network detection activities and license status This report contains: 1. Information about the licenses 2. Information about the status of the computers protectedReport scope:
All groups in the organization Data obtained from 02/16/2009 21:00 to 02/17/2009 21:16 Protection status| Protection installed | |||
 | Computers | ||
| Antivirus + Firewall | 8 | (100%) | |
| Antivirus | 0 | (0%) | |
| Firewall | 0 | (0%) | |
| Total | 8 | ||
| Protection update | |||
 | Computers | ||
| Updated | 7 | (87.50%) | |
| Updated - pending restart | 1 | (12.50%) | |
| Not updated | 0 | (0%) | |
| Installing protection | 0 | (0%) | |
| Total | 8 | ||
| Signature file update | |||
 | Computers | ||
| Updated | 8 | (100%) | |
| Not updated | 0 | (0%) | |
| No update needed | 0 | (0%) | |
| Installing protection | 0 | (0%) | |
| Total | 8 | ||
3. High-level information about the detections in the selected period
Detections
Malicious software detected
Virus 0 (0%) ■ Spyware / Adware 0 (0%) Dialers 0 (0%) ■ Jokes 0 (0%) ■ Hacking tools and PUPs 0 (0%) ■ Other 0 (0%) Total 0Blocked attacks
- Invalid packet header 0 (0%) ■ IP spoofing 0 (0%) Port scan 0 (0%) ■ Wrong TCP flags combination 0 (0%) DoS attack 0 (0%) ■ LAND Attack 0 (0%) ■ Attacks by fragmentation 0 (0%) ■ DHCP, DNS or WINS unrequested 0 (0%) ■ Other 0 (0%) Total 04. Top 10 detections and Top 10 computers infected
Top 10 computers with malicious software detected Computer Group Detections Top 10 computers with blocked attacks Computer Group Blocked attacks In the Executive reports you can choose to see information about detections in: √ Last 24 hours. Graph and details are displayed. √ Last 7 days. Graph and details are displayed. √ Last month. The graph for the last month is displayed although the summary and details correspond to the last seven days.Period:
Last 24 hours Last 24 hours Last 7 days Last month You can choose to omit information about the licenses. This option is useful for resellers using the client consults manage clients by groups of computers.Content:
 License status  Protection status  Detections  What content does each report include? You can also choose to get information about one group or several groups.Report scope:
My organization High-level consolidated and detailed report of clients' network security status
This report contains:
1. High-level report about the number of computers protected and the number of computers without connection in the selected period. Panda Managed Office Protection Status Report 02/27/2009 19:44Summary information
| Number of computers: | 465 |
| Computers without connection in last 7 days: | 81 |
Summary graph
Signature files:
■ Updated 451 ■ Not updated 14 ■ Not necessary 0 Protection:
■ Updated 448 - Updated - pending restart 10 ■ Not updated 4 ■ Installing protection 3 3. Details of each computer's protection status and 'health': if there is an error or if they require intervention. Detail information| Computer | Group | Protection | Signatures | Protections | Last connection |
| A2 | DEFAULT | 01/20/2009 19:53 | |||
| A5 | DEFAULT | 02/24/2009 09:15 | |||
| AC | DEFAULT | 02/19/2009 12:25 | |||
| AC | DEFAULT | 02/27/2009 19:32 | |||
| AC | DEFAULT | 02/27/2009 18:09 | |||
| AC | DEFAULT | 02/03/2009 21:09 | |||
| AC | DEFAULT | 02/27/2009 15:51 | |||
| AC | DEFAULT | 02/27/2009 19:24 | |||
| AC | DEFAULT | 02/26/2009 23:30 | |||
| AC | DEFAULT | 02/27/2009 19:33 | |||
| AC03 | DEFAULT | 02/27/2009 19:38 | |||
| AE | DEFAULT | 02/27/2009 17:18 |