
E450 SIM - Telephone GIGASET - Free user manual and instructions
Find the device manual for free E450 SIM GIGASET in PDF.


| Product Type | Cordless DECT Phone with SIM Card Slot |
| Brand | Gigaset |
| Model | E450 SIM |
| Dimensions (Base Station) | Approx. 150 mm x 130 mm x 60 mm |
| Dimensions (Handset) | Approx. 160 mm x 50 mm x 30 mm |
| Weight (Handset) | Approx. 120 g |
| Power Supply | AC adapter 230V, 50Hz; DC 5V/600mA; Rechargeable battery NiMH 2x AAA |
| Display | Color TFT, 1.8 inch, 128x160 pixels |
| Key Functions | Phonebook (up to 100 entries), Caller ID, Call Waiting, SMS, Alarm, Calculator |
| SIM Card Support | 1 x standard SIM, GSM 900/1800 MHz |
| Network Compatibility | DECT (6.0) for cordless calls, GSM for mobile calls |
| Range (Indoor) | Up to 50 m |
| Range (Outdoor) | Up to 300 m |
| Battery Life (Standby) | Up to 200 hours |
| Battery Life (Talk Time) | Up to 15 hours |
| Maintenance | Clean with a soft, dry cloth; avoid liquids and abrasives |
| Safety | SAR value: < 2.0 W/kg; use only approved accessories |
| Spare Parts | Replacement batteries (NiMH AAA), charging cradle, power adapter |
| Reparability | Parts available via Gigaset service; user-replaceable batteries |
| General Information | Manufacturer: Gigaset Communications GmbH; Made in China |
Frequently Asked Questions - E450 SIM GIGASET
User questions about E450 SIM GIGASET
0 question about this device. Answer the ones you know or ask your own.
Ask a new question about this device
Download the instructions for your Telephone in PDF format for free! Find your manual E450 SIM - GIGASET and take your electronic device back in hand. On this page are published all the documents necessary for the use of your device. E450 SIM by GIGASET.
USER MANUAL E450 SIM GIGASET
natural_image
Black Siemens 3.0 phone on a black base with wooden chopsticks in the background (no visible text or symbols on device body)Issued by
Gigaset Communications GmbH
Schlavenhorst 66, D-46395 Bocholt
Gigaset Communications GmbH is a trademark licensee of Siemens AG
© Gigaset Communications GmbH 2008
All rights reserved.
Subject to availability. Rights of modifications reserved.
www.gigaset.com
Gigaset E450 SIM
Gigaset
natural_image
3D rendered image of a mechanical component with a curved top and two small circular features (no text or symbols)* Gigaset Communications GmbH is a trademark licensee of Siemens AG.
natural_image
Diagram showing a device with an attached cable and a close-up view of its internal components (no text or symbols)natural_image
3D rendering of a flip phone with black arrows indicating compression or disassembly (no text or symbols)natural_image
3D diagram of a mechanical component with labeled parts, showing internal structure and an arrow indicating direction (no text or symbols present)natural_image
Diagram of a mechanical component with rotational arrows indicating motion (no text or symbols)natural_image
Plain gray rectangular shape with rounded corners and a small horizontal line at the bottom (no text or symbols)natural_image
Black Siemens 3rd telephone with keypad and control buttons (no visible text or symbols beyond branding)natural_image
Siemens mobile phone with control panel and keypad (no visible text or symbols on device body)natural_image
Black Siemens 3D mobile phone with keypad and control panel (no visible text or symbols beyond branding)Gigaset-Repeater
Gigaset M34 USB
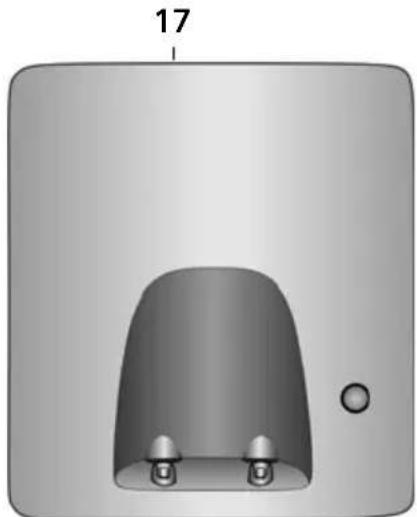
Base station at a glance
natural_image
3D rendered object resembling a lampshade or connector with two base screws and a small sphere, labeled '17' at top (no text or symbols on the object itself)1 Display in idle status
2 Battery pack charge status
(flat to full)
flashes: battery pack almost flat
flashes: battery pack charging
3 Display keys (page 12)
4 Message key
Access to calls and message lists; Flashes: new message or new call.
5 End call key, On/Off key
End call, cancel function, go back one menu level (press briefly), back to idle status (press and hold), activate/deactivate handset (press and hold in idle status)
6 Hash key
Key lock on/off (press and hold in idle status), Toggle between upper/lower case and digits
7 Call-by-call list key
Open call-by-call list
8 Connection socket for headset
9 Microphone
10 Recall key
- Confer (Flash)
- Insert a dialling pause (press and hold)
11 Star key
Ringtones on/off (press and hold), Open table of special characters
12 Key 1
Select network mailbox (press and hold)
13 Talk key
Answer a call, open last number redial list (press briefly), start dialling (press and hold)
14 Handsfree key
Switch between earpiece and handsfree mode;
Lights up: handsfree activated;
Flashes: incoming call
15 Control key (page 13)
16 Signal strength
( high to low )
D>>> flashes: no reception
17 SIM card reader
Contents
Contents
Safety precautions 4
Gigaset E450 SIM – more than just a telephone ..... 5
First Steps 5
Pack contents 5
Installing the base station 5
Setting up the handset for use ..... 6
Menu tree 9
Making calls 11
Making an external call 11
Ending a call 11
Answering a call 11
Calling Line Identification ..... 11
Handsfree operation 12
Muting 12
Operating the handset ..... 12
Control key 12
Display keys 13
Returning to idle status 13
Menu guidance 13
Correcting incorrect entries ..... 14
Network services 15
Setting functions for the next call ... 15
Setting functions for all subsequent calls .... 15
Functions during a call 15
Activating/deactivating network mailbox 16
Using the directory and lists ... 17
Directory/call-by-call list 17
Transferring SIM card entries ..... 19
Last number redial list 21
Opening lists with the message key . 22
Making cost-effective calls .... 23
Linking call-by-call numbers with one number 23
Automatic network provider code (preselection) 23
SMS (text messages) ..... 25
Writing/sending an SMS 25
Receiving an SMS 27
Notification by SMS 29
SMS mailboxes 29
Setting SMS centre 31
SMS info services 31
SMS to a PABX 32
Activating/deactivating the
SMS function 32
SMS troubleshooting 33
Using several handsets ..... 34
Registering handsets 34
De-registering handsets .... 35
Locating a handset ("paging") ..... 35
Changing the base station ..... 35
Making internal calls 35
Linking internal callers to an external call 36
Changing the name of a handset .... 37
Changing a handset's internal number 37
Using a handset as a room monitor . . 37
Handset settings ..... 39
Changing the display language ..... 39
Setting the display 39
Setting the screen picture ..... 39
Setting display illumination 40
Activating/deactivating auto answer . 40
Adjusting the loudspeaker volume . . . 40
Changing ringtones 40
Activating/deactivating first ring muting 41
Activating/deactivating advisory tones 41
Setting the alarm clock 42
Restoring the handset default settings 42
Base station settings .....43
Protecting against unauthorised access 43
Activating/deactivating the wait melody 43
Repeater support 43
Restoring default settings to base station 43
Connecting the base station to the PABX 44
Dialling modes and flash time ..... 44
Setting pauses 44
Switching temporarily to tone dialling (DTMF) 44
Appendix 45
Care 45
Contact with liquid 45
Questions and answers 45
Service (Customer Care) 46
Specifications 46
Guarantee Certificate 47
Notes on the operating instructions ..... 48
Symbols used 48
Example: menu input 49
Example: multiple line input ..... 49
Writing and editing a text message . . 50
Accessories 52
Index 54
Safety precautions
Caution:
Read the safety precautions and the user guide before use.
Explain their contents to your children, and the potential hazards associated with using the telephone.
Only use the mains adapter supplied, as indicated on the underside of the base station.

Fit only the approved rechargeable battery pack! Never use a conventional (non-rechargeable) battery pack as this could damage your health and cause injury. Use the battery pack as directed in this user guide (page 46).

The operation of medical appliances may be affected. Be aware of the technical conditions in your particular environment, e.g. doctor's surgery.

The handset may cause an unpleasant humming noise in hearing aids.

Do not install the base in bathrooms or shower rooms. The base is not splash proof (page 45).

Do not use the phone in environments with a potential explosion hazard, e.g. auto paint shops.

If you give your Gigaset to someone else, make sure you also give them the user guide.

All electrical and electronic products should be disposed of separately from the municipal waste stream via designated collection facilities appointed by the government or the local authorities.
This crossed-out wheeled bin symbol on the product means the product is covered by the European Directive 2002/96/EC.
The correct disposal and separate collection of your old appliance will help prevent potential negative consequences for the environment and human health. It is a precondition for reuse and recycling of used electrical and electronic equipment.
For more detailed information about disposal of your old appliance, please contact your city office, waste disposal service or the shop where you purchased the product
Note:
Not all of the functions described in this user guide are available in all countries.
Gigaset E450 SIM – more than just a telephone
Your phone not only enables you to send and receive text messages over the fixed network and store up to 150 telephone numbers (page 17) – it can do a whole lot more:
◆You can designate important people as VIPs so you can tell important calls from the ringtone (page 17).
◆You can store anniversaries (page 19) in your phone and it will remind you of them in advance.
◆Select frequently used phone numbers at the press of a single key (page 17).
◆View missed calls on your phone (page 22).
Have fun using your new telephone!
First Steps
Pack contents
◆one Gigaset E450 SIM base station,
◆one Gigaset E45 handset,
◆one mains adapter,
◆one phone cord,
◆one battery pack,
◆one battery cover,
◆one bayonet lock ring,
◆one belt clip,
◆one headset socket cover,
◆one SIM card reader
◆one user guide.
Gigaset E450 SIM – more than just a telephone
Installing the base station
The base station is designed for use in closed, dry rooms with a temperature range of +5 °C to +45 °C.
Set up the base station at a central point in the apartment or house.
Please note:
◆Never expose the telephone to heat sources, direct sunlight, other electrical appliances.
◆Protect your Gigaset from moisture, dust, corrosive liquids and vapours.
Range and reception strength
Range:
◆Up to 300 m in the open
◆Up to 50 m in buildings
Reception strength:
The display shows the quality of the radio contact between the base station and handset:
◆ Good to poor: >>> >>> >>> >>>
◆ No reception: □>>> flashes
First Steps
Connecting the base station
▶ First connect the mains adapter and then the phone jack as shown below-and place the cables in the cable recesses.
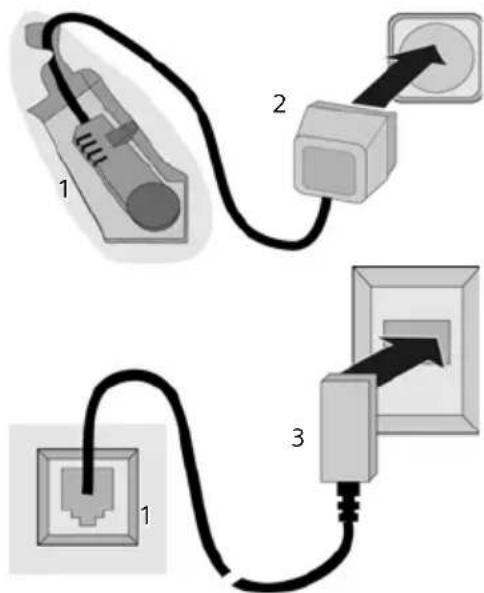
1 Underside of the base station (detailed view)
2 Mains adapter 230 V
3 Phone jack with phone cord
Please note:
◆The mains adapter must be always connected, as the phone will not operate without mains connection.
◆If you buy a replacement phone cord from a store, ensure that the phone jack is connected correctly.
Correct phone jack assignment
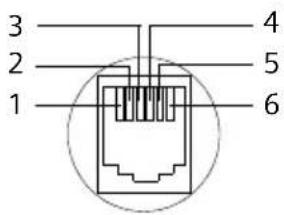
1 unused
2 unused
3 a
4 b
5 unused
6 unused
Setting up the handset for use
Fitting the battery pack
Caution:
Use only the rechargeable battery pack recommended by Gigaset Communications GmbH * (page 46). Never use a conventional (non-rechargeable) battery pack, as this may cause significant damage to health and property. For example, the outer casing of the battery pack could be destroyed or the battery pack could explode. The phone could also malfunction or be damaged as a result of using batteries that are not of the recommended type.
* Gigaset Communications GmbH is a trademark licensee of Siemens AG.
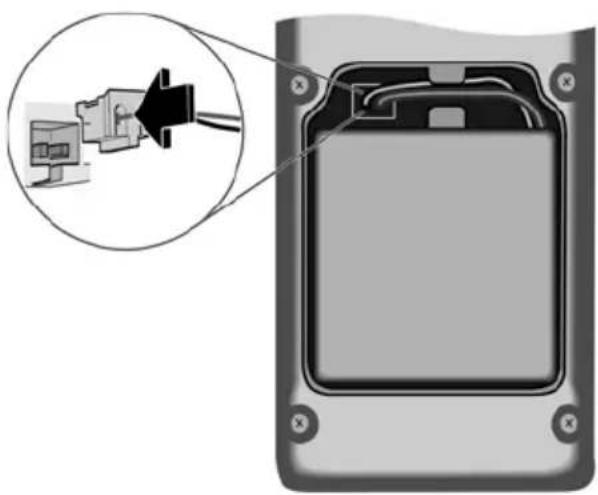
▶ Insert the plug into the socket as shown in the enlarged view.
▶ Insert the battery pack.
▶ Place the cords in the cord routing.
natural_image
Diagram of an electronic device showing internal components and wiring, with a magnified inset highlighting the connector (no text or symbols present)Closing the battery cover
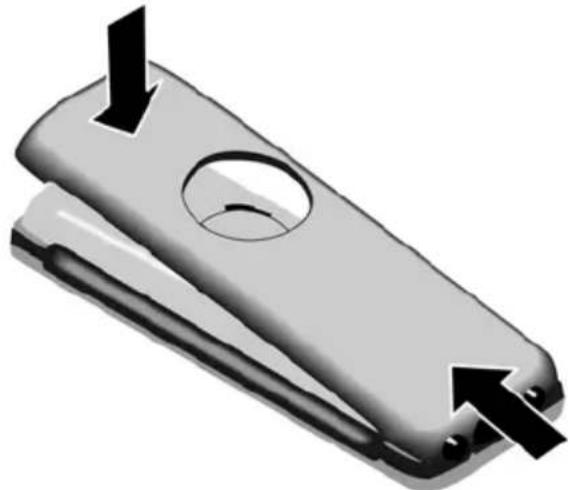
▶ Hold the battery cover at a slight angle and introduce the two lower lugs into the casing first. Then close the cover so that it clicks into place.
natural_image
3D rendering of a flip phone with black arrows indicating compression or disassembly (no text or symbols)Locking the battery cover
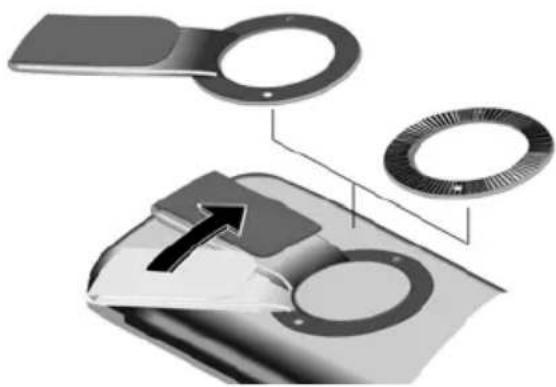
Insert the catches on the lock ring or belt clip into the notches in the casing and make sure that the arrow markings on the casing are facing those on the bottom of the ring. Turn the lock ring or belt clip clockwise to the end stop. When both holes are horizontally aligned with the upper edge of the handset the lock ring is closed.
natural_image
Exploded view diagram of a mechanical component showing internal parts and an arrow indicating direction (no text or symbols)Opening the battery cover
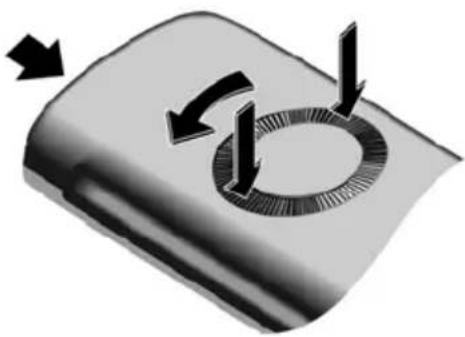
Position both thumbs on the lock ring and at the same time turn the lock ring or belt clip anticlockwise and remove.
natural_image
Diagram of a mechanical component with circular features and directional arrows, no text or symbols present▶ Insert a coin into the cavity at the top of the battery cover and twist it until the cover opens.
Placing the handset in the base station and registering
▶ Place the handset in the base with its display facing upwards.
The handset registers automatically. Registration takes around 1 minute. During this time Registr.Procedure appears in the display and the name of the base station flashes, e.g. Base 1. The handset will be assigned the lowest unassigned internal number (1–6).
This will appear in the display when registration is complete, e.g. INT 1. This means that the number 1 has been assigned. If the internal numbers 1–6 are already assigned to other units, the number 6 is overwritten.
Notes:
- Automatic registration is only possible while no-one is making calls using the base station.
– Each key press interrupts the automatic registration. - If automatic registration does not work the handset will have to be registered manually (page 34).
- You can change the name of the handset (page 37).
First Steps
Leave the handset in the base station to charge the battery pack.
Notes:
- If the handset has switched itself off because the battery pack is flat and is then placed in the base station, it will switch itself on automatically.
- The handset must only be placed in the designated base.
For questions and problems see page 45.
Headset socket
You can connect the following types of headset (with jack connector): HAMA Plantronics M40, MX100 and MX150.
If you do not connect a headset, please insert the cover supplied for the headset socket to guarantee the unit is still splash proof.
Initial charging and discharging of the battery pack
If the handset is activated, the flashing battery icon ☐ in the top right of the display indicates that the battery pack is being charged.
During handset operation, the battery icon indicates the charge status of the battery pack (page 1). The correct charge status can only be displayed if the battery pack is first fully charged and discharged.
▶ To do this, leave the handset in the base station continuously for ten hours. Your handset need not be switched on for it to charge.
▶ Afterwards, remove the handset from the base station and do not put it back again until the battery pack is fully discharged.
Note:
After the initial charge and discharge you may replace your handset in the base station after every call.
Please remember:
◆Always repeat the charging and discharging procedure if you remove the battery pack from the handset and insert it again.
◆The battery pack may warm up as it is charging. This is not dangerous.
◆After a time the charge capacity of the battery pack will decrease for technical reasons.
▶ Set the date and the time, for example to ensure the correct time of incoming calls is recorded.
Setting the date and time
▶ If you have not yet set the date and time, press the display key Time to open the input field.
To change the time, open the input field via:
→ → Date/Time
▶ Change multiple line input:
Date:
Enter day, month and year in 6-digit format.
Time:
Enter hours and minutes with 4 digits, e.g. 0 + 7 nPZY pqs 1 a.o 5 KA jol for 07:15 a.m.
Save Press the display key.
Once the phone is registered and the time set, the idle display looks as shown here (example):
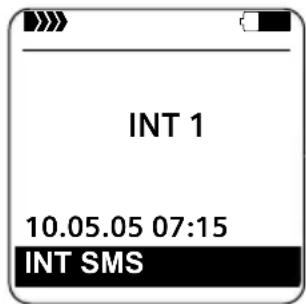
Your phone is now ready for use.
Instead of scrolling to locate a menu function, you can select a menu function faster by opening the menu and keying in the digit combination ("shortcut").
Example: 5 KA 2 AB 1 1 for "Set ringtone for external calls".
With the telephone in idle status, press ⬆ (open main menu):
1 SMS
You have activated an SMS mailbox (general or private) without a PIN
| 1-1 New SMS (page 25) |
| 1-2 Incoming 0 (page 28) |
| 1-3 Outgoing 0 (page 26) |
You have activated an SMS mailbox with a PIN or 2-3 mailboxes
| 1-1 | Mailbox | 1-1-1 | New SMS | (page 25)(page 28)(page 26) |
| 1-1-2 | Incoming 0 | |||
| 1-1-3 | Outgoing 0 | |||
| 1-2 to 1-4 | Mailbox 1 Mailbox 2 Mailbox 3 | 1-2-1 to 1-4-1 | New SMS (page 25) | |
| 1-2-2 to 1-4-2 | Incoming 0 (page 28) | |||
| 1-2-3 to 1-4-3 | Outgoing 0 (page 26) |
| 1-5 SMS Service (page 31) | ||||
| 1-6 | Settings | 1-6-1 | Service Centres | (page 31)(page 29)(page 29)(page 29)(page 26)(page 25) |
| 1-6-2 | SMS Mailboxes | |||
| 1-6-3 | Notify Number | |||
| 1-6-4 | Notify Type | |||
| 1-6-5 | Status Report | |||
| 1-6-6 | Subscribe to SMS | |||
2
Sel. Services

| 2-2 Network Mailbox (page 16) | |||
| 2-6 | All Calls | 2-6-1 | Call Divert(page 15) |
| 2-6-3 Call Waiting (page 15) | |||
| 2-6-4 Fixed | Destin. Call (page 15) | ||
3
Alarm Clock

4 Add. Features

| 4-3 Room Monitor (page 38) | |
| 4-4 | SIM Card Transfer (page 19) |
5 Settings

| 5-1 Date/Time | ||||
| 5-2 | Audio Settings | 5-2-1 | Ringer Settings | (page 40)(page 41) |
| 5-2-2 | Advisory Tones | |||
| 5-3 | Display | 5-3-1 | Screen Picture | (page 39)(page 39) |
| 5-3-2 | Colour Scheme | |||
| 5-3-3 | Contrast | (page 39)(page 40) | ||
| 5-3-4 | Backlight | |||
| 5-4 | Handset | 5-4-1 | Language | (page 39)(page 40)(page 35) |
| 5-4-2 | Auto Answer | |||
| 5-4-3 Register H/Set (page 34) | ||||
| 5-4-4 | Select Base | |||
| 5-4-5 Reset | Handset (page 42) | |||
| 5-4-7 Area Codes (page 20) | ||||
| 5-5 | Base | 5-5-2 | Music on hold | (page 43)(page 43)(page 36,(page 23)(page 22) |
| 5-5-3 System PIN (page 43) | ||||
| 5-5-4 | Base Reset | |||
| 5-5-5 | Add. Features | |||
| 5-5-6 | Preselection | |||
| 5-5-7 | Calls List Type | |||
| 5-6 | Voice Mail | 5-6-1 | Set Key 1 | (page 36) |
Making calls
Making an external call
External calls are calls using the public telephone network.


Enter the number and press the talk key.
Or:


Press and hold the talk key and then enter the number.
You can cancel the dialling operation with the end call key 🔒.
You are shown the duration of the call while the call is in progress.
Notes:
- Dialling using the directory, call-by-call list (page 1, page 17) or calls list (page 22) saves time re-entering numbers and network provider prefixes ("call-by-call numbers").
Ending a call

Press the end call key.
Answering a call
The handset indicates an incoming call in three ways: by ringing, by a display on the screen and by the flashing handsfree key ☐.
You can accept the call by:
▶ Pressing the talk key ↗.
▶ Pressing the Accept display key.
▶ Pressing the handsfree key 📋.
If the handset is in the base station and the Auto Answer function is activated (page 40), the handset will take a call automatically when you lift it off the base station.
If the ringtone is intrusive, press the display key Silence. You can take the call as long as it is displayed on the screen.
Calling Line Identification
When you receive a call, the caller's number is displayed on the screen if the following conditions are met:
◆Your network provider supports CLIP, CLI.
- CLI (Calling Line Identification): number of the caller is transmitted.
- CLIP (Calling Line Identification Presentation): number of the caller is indicated.
◆You have arranged CLIP with your network provider.
◆The caller has arranged CLI with the network provider.
Call display with CLIP/CLI
If the number of the caller is stored in your directory, you will see their name.
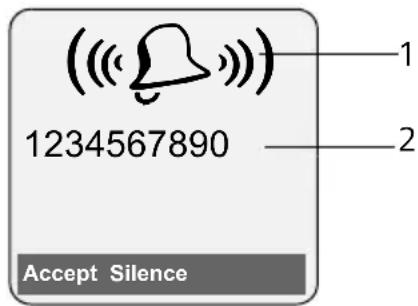
1 Ring symbol
2 Number or name of caller
The following is displayed in place of the number:
◆External, if no number is transmitted.
◆Withheld, if the caller has withheld Calling Line Identification (page 15).
◆Unavailable, if the caller has not arranged Calling Line Identification.
Handsfree operation
In handsfree mode, instead of holding the handset to your ear you can put it down e.g. on the table in front of you to allow others to participate in the call.
Activating/deactivating handsfree
Activating while dialling


Enter the number and press the handsfree key.
▶ You should inform your caller before you use the handsfree function so that they know someone else is listening.
Switching between earpiece and handsfree mode

Press the handsfree key.
During a call switch handsfree on or off. If you wish to place the handset in the base station during a call:
▶ Press and hold the handsfree key ☐ while placing the handset in the base station. If handsfree key ☐ does not light up, press the key again.
For how to adjust the volume, see page 40.
Muting
You can deactivate the microphone in your handset during an external call. The other party hears a wait melody.

Press the control key on the left to mute the handset.

Press the display key to reactivate the microphone.
You can switch the wait melody on and off (page 43).
Operating the handset
Activating/deactivating the handset

Press and hold the end call key. You will hear the confirmation beep.
Activating/deactivating the keypad lock

Press and hold the hash key.
You will hear the confirmation beep. The icon → appears in the display when the keypad lock is activated.
The keypad lock is deactivated automatically if someone calls you. It is re-activated when the call is finished.
Control key
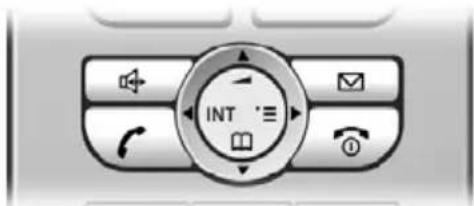
In the description below, the side of the control key (up, down, right, left) which you have to press in the different operating situations is marked in black, e.g. for "press right on the control key".
The control key has a number of different functions:
When the handset is in idle status

Open the directory.

Open main menu.

Open list of handsets.

Set the ringtones on the handset (page 40).
In the main menu and in input fields
You can use the control key to move the cursor up ⏻, down ⏻, right ⏻ or left ⏻.
In lists and submenus
/ Scroll up/down line by line.
Open submenu or confirm selection.
Go back one menu level, or cancel.
During an external call
Open the directory.
Initiate an internal consultation call.
Adjust loudspeaker volume for earpiece and handsfree mode.
Display keys
The function of the display keys changes depending on the particular operating situation. Example:
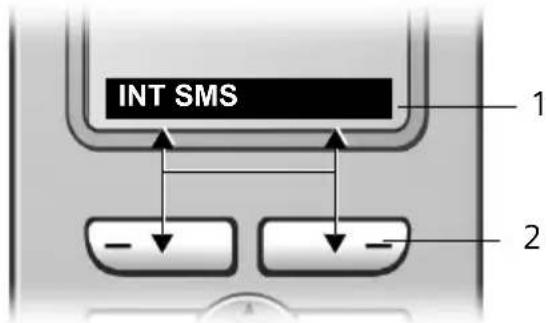
1 The display keys' current functions are shown in the bottom display line.
2 Display keys
The most important display symbols are:
Menu Open the main menu.
Options Open a context-dependent menu.
Delete key: deletes one character at a time from right to left.
Go back one menu level or cancel operation.
→ ☐ Copy number into directory.
→→ Open the last number redial list.
Returning to idle status
You can revert to idle status from anywhere in the menu as follows:
▶ Press and hold the end call key 📞. Or:
▶ Do not press any key: after 2 minutes the display will automatically revert to idle status.
Changes that you have not confirmed or saved by pressing OK, Yes, Save, Send or Save Entry OK will be lost.
An example of the display in idle status is shown on page 1.
Menu guidance
Your telephone's functions are accessed using a menu that has a number of levels.
Main menu (first menu level)
▶ Press ⬇ with the handset in idle status to open the main menu.
The main menu functions are shown in the display as a list with icon and name.
To access a function, i.e. open the corresponding submenu (next menu level):
▶ Navigate to the function using the control key ⏻. Press the display key OK.
Submenus
The functions in the submenus are displayed as lists.
To access a function:
▶ Scroll to the function with the control key 🔊 and press OK.
Or:
▶ Enter the corresponding digit combination (page 9).
Pressing briefly on the end call key 📞 returns you to the previous menu level / cancels the operation.
Correcting incorrect entries
You can correct incorrect characters in the text by navigating to the incorrect entry using the control key. You can then:
◆ press ◀C to delete the character to the left of the cursor,
◆insert characters to the left of the cursor,
◆overwrite the character (flashing) when entering the time and date etc.
You will find examples of symbols used, menu entries and multiple line input in the appendix to this user guide, page 48.
Network services
Network services are functions that your network provider makes available to you. You have to request these services from your network provider.
▶ If you require assistance, please contact your network provider.
Setting functions for the next call
You have the following options:


Withhold No.


Enter
Press
number.
talk
key.
Setting functions for all subsequent calls
If you have completed one of the following procedures, a code is sent.
▶ After confirmation from the telephone network, press the end call key 📞.
You can set the following features:
General call diversion


All Calls

Call Divert
▶ Change multiple line input:
When:
All Calls / No Answer / When Busy dialling.
Call No.:
Press the display key Edit. Enter number to which call is to be diverted, and press Save Entry OK.
Status:
Activating/deactivating call diversion.
▶ Press the display key Send.
Activating/deactivating call waiting


All Calls

Call Waiting
Status:
Activating/deactivating.
Send
Press the display key.
Fixed destination call


All Calls

Fixed Destin. Call
▶ Change multiple line input:
Number:
Press display key Edit. Enter number and press Save Entry OK.
Status:
Activating/deactivating fixed destination call.
▶ Press the display key Send.
Functions during a call
Consultation
During a call:
Ext.Call Press the display key.

Enter number.
You have the following options:
◆Toggling:
▶ Use 🔒 to toggle between the participants.
End the call with one participant:
▶ Use 🔒 to switch to the caller. Then: Options End Active Call.
◆Conference call:
▶ Press the display key Conf.
End the conference call (toggle):
▶ Press EndConf.
◆End call with both participants:
▶ Press the end call key 📞.
Network services
Accepting a waiting call
Accept Press the display key.
You have the option of toggling or holding a conference call.
Note:
Without CLIP a waiting call is only announced with a beep.
Accept call waiting
Options → Accept waiting call
Reject call waiting
Options → Reject waiting call
Favour call waiting
Options → Favour waiting call
Divert call
You toggle or you initiate a consultation.
Options → Call Transfer
Activating/deactivating network mailbox
→ → Network Mailbox
Status: Activating/deactivating.
Send Press the display key.
Press the end call key.
Using the directory and lists
The options are:
◆Directory,
◆Call-by-Call list,
◆Last number redial list,
◆SMS list,
◆Calls list.
You can store a maximum of 150 entries in the directory and call-by-call list (the actual number depends on the size of the individual entries).
You create the directory and call-by-call list for your own individual handset. You can also send lists/entries to other handsets (page 18).
Directory/call-by-call list
In the directory, you can store numbers and the associated names.
▶ With the handset in idle status, open the directory by pressing the ⬆ key.
In the call-by-call list, you can store prefixes of network providers (so-called "call-by-call numbers").
▶ Open the call-by-call list in idle status by pressing the ➕ key.
Length of entries
Number: max. 32 digits Name: max. 16 characters
Note:
For quick access to a number from the directory or the call-by-call list (quick dial), you can assign the number to a key.
Storing a number in the directory
→ New Entry
▶ Change multiple line input:
Number : Enter number.
Name : Enter name.
Annivers.:
Enter anniversary if required (page 19).
Speed Dial:
Select key for quick dial.
▶ Save changes.
Storing a number in the call-by-call list
→ New Entry
▶ Change multiple line input:
Number :
Enter number.
Name :
Enter name.
Selecting entries in the directory and call-by-call list
/
Open directory or call-by-call list.
You have the following options:
◆ Use ⏻ to scroll through the entries until the required name is selected.
◆Enter the first character of the name, or scroll to the entry with ⏻ if required.
Dialling with the directory/call-by-call list
/ → (select entry)
Press the talk key. The number is dialled.
Managing entries in the directory/call-by-call lists
/ → (select entry)
Viewing an entry
View Press the display key. The entry is displayed. Back with OK.
Editing entries
View Edit Press display keys one after the other.
▶ Carry out changes and save.
Using other functions


(select entry)

Options
(open menu)
The following functions can be selected with ⏻:
Display Number
Edit or add to a stored number. Then dial or call up further functions by pressing Options.
Edit Entry
Edit selected entry.
Delete Entry
Delete selected entry.
VIP Entry (directory only)
Mark a directory entry as VIP
(Very Important Person) and assign it a particular ringtone. You can then identify VIP calls by their ringtones.
Requirement: Calling Line Identification (page 11).
Copy Entry
Send a single entry to a handset (page 18).
Delete List
Delete all entries in the directory/call-by-call list.
Copy List
Send complete list to a handset (page 18).
Available Memory
Display the available entries in the directory and call-by-call list (page 17).
Using quick dial keys
▶ Press and hold the required quick dial key (page 17).
Sending the directory/call-by-call list to another handset
Requirements:
◆The sending and receiving handsets must both be registered to the same base station.
◆The other handset and base station can send and receive directory entries.


(select entry)

Options
(open menu)

Copy Entry / Copy List

Enter the internal number of the receiver handset. You see Copying entry.

/ No
Press the display key.
A successful transfer is confirmed by a message and confirmation tone on the receiver handset.
Please remember:
◆Entries with identical numbers are not overwritten on the receiver handset.
◆The transfer is cancelled if the phone rings or if the memory of the receiver handset is full.
Adding a displayed number to the directory
Numbers that appear in a list, e.g. the calls list or the last number redial list, in a text message or displayed during a call can be added to the directory.
A number is displayed:

→ Copy to Directory
▶ Complete the entry, see page 17.
Copying a number from the directory
There are many operating situations in which you can open the directory, e.g. to copy a number. Your handset need not be in idle status.
▶ Depending on the operating situation, open the directory with 🔊 or 📄 or Menu Directory.
Select an entry (page 17).
Storing anniversaries in the directory
You can store an anniversary for every number in the directory and specify a time when you will receive a reminder call on the anniversary.
→ (Select entry; page 17)
View Edit
Press display keys one after the other.

Scroll to the Annivers.: line.
Edit Press the display key.
▶ Change multiple line input:
Date:
Enter the day/month in 4-digit format.
Time:
Enter the hour/minute for the reminder call in 4-digit format.
Prompt:
Select the type of signal for the reminder and press OK.
▶ Save changes (page 49).
Note:
Reminder calls require a time stamp. If you select a visual signal, then a time stamp is not required and is automatically set to 00.00.
Deleting anniversaries
→ (Select entry; page 17)
View Edit
Press display keys one after the other.

Scroll to the Annivers.: line.
Edit Delete Save
Press display keys one after the other.
Reminder call on an anniversary
A reminder call is signalled on the handset using the selected ring tone.
Silence Press the display key to stop the reminder call.
Transferring SIM card entries
There is a SIM card reader integrated in the base station. Insert the SIM card as shown.


natural_image
Simple grayscale gradient shape with no text or symbolsAn incoming call interrupts all other operations, including the operation of the SIM card.
However, it is possible to make an outgoing call and continue using the SIM card at the same time.
Caution:
◆Never insert any metallic objects (such as coins or knife blades) in the SIM card slot as otherwise the electrical safety cannot be guaranteed.
◆Avoid touching the contact surfaces on the SIM card.
◆Inserting the SIM card wrongly might damage it.
◆Do not remove the SIM card during data transmission.
You can copy entries from SIM cards to the directory and vice versa. If the SIM card is PIN-protected you will be prompted to enter the PIN.
If the SIM card is blocked (e.g. as the result of several wrong PIN entries), you must first insert the SIM card in your mobile phone and unblock it with the super PIN (PUK).

→ ★ → SIM Card Transfer
Note:
In order to transfer phone numbers between SIM card and phone, it is essential that your dialling code (country and area code) is stored on the phone.
Some of these numbers are already pre-set.

→ ↗ → Handset → Area Codes
Check that the (pre)set dialling code is correct.
Change multiple line input:

Select/change input field.

Navigate in the input field.

If necessary, delete number: press the display key.

Enter number.
Save
Press the display key.
Example:
Area Codes
International code:
00 - 30
Local area code:
[ ]
◄C Save
When copying fixed network phone numbers and mobile phone numbers, conversion for usage on the SIM card and/or your Gigaset handset occurs automatically.
Service numbers cannot be copied from the SIM card to your Gigaset directory!
If you have still not inserted the SIM card you will be prompted to do so. You have the following options:
All entries from SIM
Transfer all entries from the SIM card to the directory.
Entry from SIM
Transfer a selected entry from the SIM card to the directory.
All entries to SIM
Transfer all entries from the directory to the SIM card.
Entry to SIM
Transfer a selected entry from the directory to the SIM card.
Start transferring the data from a list by pressing the display key Copy or OK.
Start transferring the data from a single entry by pressing the display key Copy.
Data transfer
SIM card → directory
◆Names are abbreviated to 16 characters
◆Entries are copied in alphabetic order. Please note that approx. 125 entries are copied (check the entry up to which your list has been transferred).
◆Numbers are converted:
$$ + 3 0 \rightarrow 0 $$
$$ + \rightarrow 0 0 $$
Note:
Data is only transferred to the handset from which the connection to the SIM card has been established.
The process only takes place in handsets of the same family.
To transfer to another handset within the family, send your directory entries in the usual way.
Data transfer
Directory → SIM card
◆Names stay the same
◆Entries are copied in alphabetic order
◆Numbers are converted:
$$ 0 \rightarrow + 3 0 $$
$$ 0 0 \rightarrow + $$
You can find more questions and answers about SIM cards at www.gigaset.com/gigasetsimcard.
Last number redial list
The last number redial list contains the ten numbers last dialled with the handset (max. 32 numbers). If one of the numbers is in the directory, then the corresponding name will be displayed.
Manual last number redial

Press the key briefly.

Select entry.

Press the talk key again. The number is dialled.
When displaying a name, you can have the respective phone number displayed by using the display key View.
Managing entries in the last number redial list

Press the key briefly.

Select entry.
Options
Open menu.
The following functions can be selected with ⏻:
Display Number (as in the directory, page 18)
Copy to Directory
Copy an entry to the directory (page 18).
Delete Entry (as in the directory, page 18)
Delete List (as in the directory, page 18)
Opening lists with the message key
You can use the message key ☑ to open the following lists:
◆SMS list
If several mailboxes are set up (page 29), several lists are displayed.
◆Network mailbox
If your network provider supports this function and the network mailbox is configured for fast access (page 38).
◆Calls list
An advisory tone sounds as soon as a new entry appears on a list. The ☑ key flashes (it goes off when the key is pressed). In idle status, the displays show an icon for the new message.
Icon New message...
| ∞ | ... in network mailbox |
| ☐) | ... in calls list |
| ☒ | ... in SMS list |
The number of new entries is shown beneath the corresponding icon.
Only the lists that contain messages are shown (exception: network mailbox). Lists with new messages are shown first and identified in bold. The number of new or old messages contained are each shown in brackets.
Select the list with ⏻. To open, press OK.
SMS incoming message list
All received SMS messages are saved in the incoming message list, see page 28.
Calls list
Requirement: Calling Line Identification (CLIP, page 11)
Depending on the type of list set, the calls list contains
◆accepted calls ( √
◆missed calls
The numbers of the last 30 incoming calls are stored.
Multiple missed calls from the same number are only stored once (the last call).
Setting list type for calls list
→ Base → Calls List Type
Missed Calls / All Calls
Select and press OK (√= o n)
Press and hold (idle status).
The entries in the calls list are retained when you change the list type.
List entry
New messages are at the top.
Example of list entries:
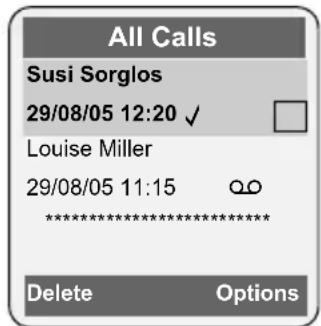
◆List type (in header)
◆Status of entry
Bold: new entry
◆Number or name of caller
You can add the number of the caller to the directory (page 18).
◆Date and time of call (if set, page 8)
◆Type of entry:
- accepted calls ( √
- missed calls
Pressing the display key Delete deletes the marked entry.
After pressing the display key Options you can select more functions with 🔊:
Copy to Directory
Add a number to the directory.
Delete List
Delete complete list.
When you leave the calls list all entries are set to the status "old", i.e. the next time you call the list up they will no longer be shown in bold.
Making cost-effective calls
Sign up with a network provider who offers particularly low-cost call rates (call-by-call). You can manage the numbers in the call-by-call list.
Linking call-by-call numbers with one number
You can insert the dialling code of a network provider in front of the number ("linking").

Open call-by-call list.

Select entry (call-by-call number).
Options
Press the display key.
Display Number
Select and press OK.

Enter number or select number from the directory (page 19).

Press talk key. Both numbers are dialled.
Automatic network provider code (preselection)
You can specify a call-by-call number (preselection number), which is automatically placed in front of numbers according to two lists.
◆ The list "with preselection" contains the "rule" for dialling code numbers or the first digits of dialling code numbers with which you wish the preselection number to be used.
◆ The list "without preselection" contains the "exception to the rule".
Example:
You have entered 08 for "with preselection". Now all numbers that start with 08 will be dialled with preselection.
However, if you require, for example, that 081 is still dialled without preselection, enter 081 for "without preselection".
When dialling, after pressing the talk/handsfree key the first digits of the dialled number are compared with both lists:
◆The preselection number is not inserted in front if the dialled number
- matches no entry in either list
– matches an entry in the list "without preselection"
◆The preselection number is inserted in front if the first digits of the dialled number match with only one entry in the list "with preselection".
Storing preselection numbers

→ Base → Preselection
→ Preselect No.
Enter or edit preselection number (call-by-call number).
▶ Save changes (page 49).

Press and hold (idle status).
Saving/editing entries in the preselection lists
Each of the two lists can contain 20 entries, each with 6 digits.
Numbers may be prefixed according to the country in the "with preselection" list. This means, for example, that all national calls or calls into the mobile phone network will automatically be linked to the preselection number which you have previously stored.






Select entry.

Press the display key.

Enter or edit first digits of number.
▶ Save changes (page 49).

Press and hold (idle status).
Temporarily cancelling preselection

(press and hold)

Options
→ Aut Preselct off
Permanently deactivating preselection
▶ Delete the preselection number (page 23).
SMS (text messages)
Your unit is supplied ready for you to send text messages immediately.
Requirements:
◆Calling Line Identification (page 11) is enabled for your phone connection.
◆Your network provider supports SMS in the fixed network (information on this can be obtained from your network provider).
◆You are registered with your service provider to send and receive text messages.
Text messages are exchanged between SMS centres that are operated by service providers. You must enter the SMS centre in the unit through which you wish to send and receive. You can receive SMS from every SMS centre that is entered if you have registered with your service provider.
Your text messages are sent via the Service Centr. that is entered as the send service centre. However, you can activate any other SMS centre as the active send service centre to send a current message (page 31).
If no SMS Service Centre is entered, the SMS menu only consists of the entry Settings. Enter an SMS Service Centre (page 31).
◆Entering text, see page 50.
◆Writing using the predictive text tool EATONI, see page 50.
Rules
◆An SMS can be up to 612 characters long.
◆If there are more than 160 characters or a lot of image data, the text message is sent as a linked SMS (up to 4 messages with 153 characters each).
Please remember:
◆Each incoming SMS is signalled by a single ring (ringtone as for external calls). If you accept such an SMS "call" on the first ring, the SMS will be lost. To prevent this ringing, suppress the first ringtone for all external calls (page 41).
◆If your phone is connected to a PABX, please read page 32.
◆To receive text messages you must be registered with your service provider.
Registering with the registration wizard
The first time you press the display key SMS you will be asked if you wish to register automatically with all entered SMS centres (see page 31). Confirm with OK. You can now receive text messages from any of the SMS centres whose number you have entered.
You can call up automatic registration thereafter via the menu:

The registration wizard does not support setting up personal mailboxes (page 29).
Writing/sending an SMS
Writing an SMS

Mailbox 2 Select mailbox if necessary and press OK.
Enter mailbox PIN if necessary and press OK.
New SMS Select and press OK.
Write an SMS.
Options Press the display key.
Send Select and press OK.
SMS Select and press OK.
SMS (text messages)
Sending an SMS



Select number with area code (even if you are in that area) from the directory or call-by-call list or enter it directly. For SMS to an SMS mailbox: put the mailbox ID at the end of the number.
Options Press the display key.
Send Select. The SMS is sent.
Notes:
- If you are interrupted by an external call while writing an SMS, the text is automatically saved in the draft message list.
- If the memory is full, or if the SMS function on the base is being used by another handset, this cancels the operation. An appropriate message appears in the display. Delete SMS messages you no longer require or send the SMS later.
Setting input language
▶ You are writing an SMS (page 25).
Options Press the display key.
Select Language
Select and press OK.

Select input language and press OK.

Press the end call key briefly to return to the text panel.
The input language setting only applies to the current SMS.
SMS status report
Requirement: Your service provider supports this feature.
If you have activated the status report, you will receive a message with a confirmation text after you have sent your SMS.
Activating/deactivating the status report


→ Settings
Status Report
Select and press OK (√= o n )
Reading/deleting a status report
▶ Open the incoming message list (page 28) and then:

Select SMS with the status State OK or State not OK.
Read
Press the display key.
Or:
Delete
Press the display key. The text message is deleted.
Draft message list
In the draft message list, you can save, edit later and send an SMS.
Saving an SMS in the draft message list
▶ You are writing an SMS (page 25).
Options Press the display key.
Save Entry Select and press OK.
Opening the draft message list


(Mailbox, mailbox PIN)
→Outgoing (3)
The first list entry is displayed, e.g.:
1234567890 21.09.05 09:45
Reading or deleting individual SMS
▶ Open the draft message list and then:

Select SMS.
Read
Press the display key. The entry will be displayed. Scroll line by line using 🔊.
Or:
Delete Press the display key. The text message is deleted.
Writing/editing an SMS
▶ You are reading an SMS in the draft message list.
Options Open menu.
You have the following options:
New SMS
Write and then send a new SMS (page 26) or save.
Edit
Edit the text of the saved SMS and then send (page 26).
Character Set
Text is shown in the selected character set.
Deleting draft message list
▶ Open the draft message list and then:
Options Open menu.
Delete all
Select, press OK and confirm with Yes. The list is cleared.

Press and hold (idle status).
Sending an SMS to an e-mail address
If your service provider supports the SMS to e-mail service, then you can also send your text messages to e-mail addresses.
The e-mail address must be written at the beginning of the text. You must send the SMS to the e-mail service of your SMS send centre.

→ 📋 → (Mailbox, mailbox PIN)
→ New SMS

Enter the e-mail address. End with a space or colon (depending on the service provider).
Enter the SMS text.
Options Press the display key.
Send Select and press
OK.
Select and press OK. If the number of the e-mail service is not entered (page 31), enter the number of the e-mail service.
Options Press the display key.
Send Select and press OK.
Sending an SMS as a fax
You can also send an SMS to a fax machine.
Requirement: Your service provider supports this feature.
▶ You are writing an SMS (page 25).
Options Press the display key.
Send Select and press OK.
Fax Select and press OK.
Select number from the directory or enter directly. Enter the number with dialling code (even when you are in the same area).
Press the display key.
Send Select and press OK.
Receiving an SMS
All received text messages are saved in the incoming message list. Linked text messages are displayed as one message. If this is too long or has not transferred completely, it will be split into individual messages. Since an SMS remains in the list even after it has been read, you should regularly delete SMS messages from the list.
The display tells you if the message memory is full.
▶ Deleting text messages you no longer require (page 28).
Incoming message list
The incoming message list contains:
◆all received text messages, starting with the most recent.
◆messages that could not be sent on account of an error.
New text messages are signalled on all Gigaset E45 handsets by the ☑ icon in the display, the flashing message key ☑ and an advisory tone.
Opening the incoming message list with the ☑ key

Press.
Select mailbox if necessary and enter mailbox PIN.
The incoming message list is displayed as follows (example):
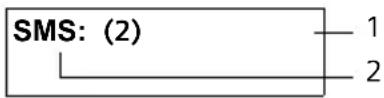
1 bold: number of new entries
not bold: number of read entries
2 name of mailbox, here: general mailbox
Open list with OK.
An entry in the list is displayed e.g as follows:
1234567890 21.09.05 09:45
Opening the incoming message list via the SMS menu

→ 📋 → (Mailbox, mailbox PIN)
→ Incoming (2)
Reading or deleting individual SMS messages
▶ Open the incoming message list.
▶ Continue as described at "Reading or deleting individual SMS", page 26.
A new message which you have read acquires the status Old.
Deleting incoming message list
All new and old SMS in the list are deleted.
▶ Open the incoming message list.
Options
Open menu.
▶ To continue, see "Deleting draft message list", page 27.
Replying to or forwarding text messages
▶ Read the SMS (page 28):
Options Press the display key.
You have the following options:
Reply
Write and send a reply SMS directly (page 25).
Edit
Edit the text in the SMS and then send it (page 25). Attachments (e.g. pictures, melodies) are not sent.
Forwarding an SMS
▶ You are reading an SMS (page 28):
Options
Press the display key.
Forward
Select and press OK. To continue see page 25.
Attachments are forwarded. If a service provider does not permit the forwarding of attachments:
▶ Select Edit to forward the SMS without attachments.
▶ Confirm the prompt New SMS will not contain picture/ melody. Continue? with Yes.
Adding a number to the directory
Adding the sender's number
▶ Open incoming message list and select entry (page 28).
Options
Press the display key. Continue see page 18.
Notes:
- You can create a special directory for text messages within your main directory by putting a star (*) before the names.
- An attached mail box identifier is added to the directory.
Copying/selecting numbers from an SMS text
▶ Read SMS (page 28) and scroll to the telephone number.
The digits are reverse-highlighted.
→ ☐ Press the display key. Continue see page 18.
Or:
Press the talk key to dial the number.
If you wish to use the number to send an SMS:
▶ Save the number with the area code (dialling code) in the directory.
Changing the character set
▶ Read the SMS (page 28):
Options Press the display key.
Character Set
Text is shown in the selected character set.
Notification by SMS
You can be notified by SMS about missed calls.
Requirement: For missed calls, the caller's number (CLI) must have been transmitted.
Notification is sent to your mobile phone or another phone with SMS functionality.
You only need to set the phone number to which notification should be sent (notification number) and the notification type.
Storing the notification number
→ Settings → Notify Number Enter the number to which the SMS should be sent.
Options Press the display key.
Save Entry Select and press OK.
Press and hold (idle status).
Caution:
Do not enter your own fixed network number for the notification of missed calls. This can lead to chargeable endless looping.
Setting the notification type
→ Settings → Notify Type
▶ Change multiple line input if necessary:
Missed Calls:
Set On if you want SMS notification.
▶ Save changes (page 49).
SMS mailboxes
The General Mailbox is the default setting. Anyone can access this mailbox and it cannot be protected by a PIN. You can also set up three personal mailboxes and protect these with a PIN. Each mailbox is identified by a name and a "Mailbox ID" (a kind of extension number).
Please note:
◆If you operate a number of devices (base stations) with SMS functionality on a single phone line, then each SMS mailbox ID may only occur once. In this case you must also change the preset ID of the general mailbox ("0").
◆You can only use personal mailboxes if your service provider supports such a function. You can tell that this is supported by the fact that a star (*) is added to the number of a (preset) SMS centre.
◆If you have forgotten your mailbox PIN, you can reset it by restoring the base station's factory settings. This will delete all messages from all mailboxes.
Setting up and changing a personal mailbox
Setting up a personal mailbox


→ Settings

SMS Mailboxes

Select a mail box,
e.g. Mailbox 2, and press OK.
▶ Change multiple line input:
On/Off:
Activate or deactivate mailbox.
ID:
Select mailbox ID (0–9). You can only select the available numbers.
Protection:
Activate/deactivate PIN protection.
PIN
Enter 4-digit PIN, if necessary.
▶ Save changes (page 49).
Active mailboxes are marked with the mailbox list. They are shown in the SMS list and can, if necessary, be displayed by pressing the message key.
Deactivating a mailbox
▶ Set On/Off: to Off. Confirm message with Yes if necessary.
All SMS saved in this mailbox will be deleted.
Deactivating PIN protection
▶ Set Protection: to Off.
The mailbox PIN is reset to "0000".
Changing the name of a mailbox


→ Settings → SMS Mailboxes

(Select mailbox)

Press the display key.

Enter new name.

Press the display key.

Press and hold (idle status).
Changing a mailbox's PIN and ID


→ Settings → SMS Mailboxes

(Select mailbox)

Enter mailbox PIN if necessary und press OK.

Set ID:, Protection: and PIN (page 30).
Sending a text message to a personal mailbox
To send a text message to a personal mailbox, the sender must know your ID and enter it after your number.
▶ You can send your SMS contact an SMS via your personal mailbox.
Your SMS contact will receive your SMS number with current ID and can save it in their directory. If the ID is invalid, the SMS will not be delivered.
Setting SMS centre
Entering/changing SMS centres
▶ You should find out about the services and special functions offered by your service provider before you make a new application and/or before you delete pre-configured call numbers.

→ 📧 → Settings → Service Centres

Select SMS centre (e.g. Service Centr. 1) and press OK.
▶ Change multiple line input:
Active Send:
Select Yes if the text messages are to be sent via the SMS centre. For the SMS centres 2 to 4, the setting only applies to the next SMS.
SMS:
Press the display key Edit. Enter the number of the SMS service and insert a star if your service provider supports personal mailboxes.
E-mail:
Press the display key Edit. Enter the number of the email service.
▶ Save changes (page 49).
Note:
Ask your service provider for details of how you should enter service numbers if you wish to use personal mailboxes (requirement: your service provider supports this function).
Sending an SMS through another SMS centre
▶ Activate the SMS centre (2 to 4) as send centre.
▶ Send the SMS.
This setting only applies to the SMS that is being sent next. Afterwards, the setting automatically changes back to Service Centr. 1.
SMS info services
You can have your service provider send you certain information (e.g. weather forecast or lottery numbers) via SMS. Up to 10 info services can be stored. You can obtain information about the info services available and their costs from your service provider.
Setting up/ordering an info service
Setting up an info centre
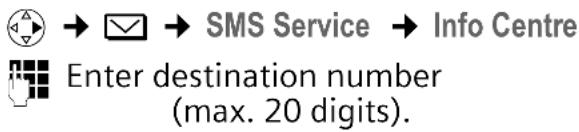
Save Entry Select and press OK.
Ordering an info service
→ SMS Service → Ordering
Select info service.
Send Press the display key.
Setting up an info service
▶ Select info service (see above). Now:
Edit Press the display key.
Enter code and designation, if necessary.
Changing an info service
▶ Select info service (see above). Now:
View Edit
Press display keys one after the other.
Change code and designation, if necessary.
Deleting an info service
▶ Select info service (see above). Now:
Options Open menu.
Delete Entry
Select and press OK.
Setting up/ordering an info service
Ordering an info service


SMS Service

Select info service.
Send
Press the display key.
Setting up an info service
▶ Select info service (see above). Now:
View
Press the display key.
Edit
Press the display key.

If necessary, enter code, designation and destination number.
Save
Press the display key.
Changing the entry of an info service
▶ Select info service (see above). Now:
View
Press the display key.
Edit
Press the display key.

If necessary, change code, designation or destination number.
Save
Press the display key.
Deleting an info service
▶ Select info service (see above). Now:
Options
Open menu.
Delete Entry
Select and press OK.
SMS to a PABX
◆You can only receive an SMS when the Calling Line Identification is forwarded to the extension of the PABX (CLIP). The CLIP of the phone number for the SMS centre is evaluated in your Gigaset.
◆If required, you must prefix the number for the SMS centre with the access code (depending on your PABX).
If in doubt, test your PABX e.g. by sending a text message to your own number: once with and once without the access code.
◆When you send SMS messages, your sender number may be sent without your extension number. In this case the recipient cannot reply to you directly.
Sending and receiving SMS on ISDN PABXs is only possible via the MSN number assigned to your base station.
Activating/deactivating the SMS function
When you switch off you cannot send or receive any SMS with your phone.
The settings which you have made for sending and receiving SMS (e.g. the call numbers of the SMS centres) and the entries in the incoming and draft message lists are saved when you switch off your phone.

Open
menu.


Enter the digits.
0 +
OK
Deactivate the SMS function.
Or:
1∞
OK
Activate SMS function (default settings).
SMS troubleshooting
Errors when sending
| EO | Calling Line Identification permanently withheld (CLIR) or Calling Line Identification not activated. |
| FE | Error occurred during SMS transfer. |
| FD | Connection to SMS centre failed, see self-help. |
Self-help with errors
The following table lists error situations and possible causes and provides notes on troubleshooting.
You cannot send messages.
-
You have not requested the CLIP service (Calling Line Identification Presentation). ▶ Ask your service provider to enable this service.
-
Text message transmission has been interrupted (e.g. by a call). ▶ Re-send the text message.
-
Feature is not supported by network provider.
-
No number or an invalid number is entered for the SMS centre activated as the send centre. ▶ Enter the number (page 31).
You receive a message whose text is incomplete.
-
Your phone memory is full. ▶ Delete old messages (page 28).
-
The provider has not yet sent the rest of the message.
You have stopped receiving messages.
-
You have changed the ID of your mailbox. ▶ Tell your SMS contacts your new ID or undo the change (page 30).
-
You have not activated your mailbox. ▶ Activate your mailbox (page 30).
-
Call diversion is activated with When: All Calls or the call diversion All Calls is activated for the network mailbox. ▶ Change your call diversion.
The message is played back.
-
The "display call number" service is not activated. ▶ Have your service provider enable this service (there is a charge for this).
-
Mobile phone operator and network SMS service provider have not agreed on a cooperation. ▶ Obtain information from your network SMS service provider.
-
Your terminal is recorded in the records of your SMS provider as having no fixed network SMS functionality, i.e. you are no longer registered with the provider. ▶ Start the registration wizard for automatic registration (see page 25). – Register the terminal (again) for SMS reception.
Messages are only received during the day.
- The terminal is stored in your SMS provider's database as having no fixed network SMS functionality, i.e. you are no longer registered with the provider. ▶ Start the registration wizard for automatic registration (see page 25). ▶ Register the terminal (again) for SMS reception (see above).
Using several handsets
Registering handsets
You can register up to a total of six handsets on your base station.
A Gigaset E45 handset can be registered on up to four base stations.
Automatic registration Gigaset E45 to Gigaset E450 SIM
Important: The handset must not already be registered to any base station.
Registering the handset to the Gigaset E450 SIM base station occurs automatically.
▶ Place the handset in the base with its display facing forward.
Registration takes around 1 minute. During this process, Regstr.Procedure appears in the display and the name of the base station flashes e.g. Base 1. When the handset has registered, its screen displays its internal number, e.g. Báon 2 for internal number 2. The handset is assigned the lowest available internal number (1-6). If all internal numbers 1-6 have been assigned, number 6 is overwritten, provided the handset with the internal number 6 is in idle status.
Notes:
– Automatic registration is not possible when the base station on which you wish to register the handset is being used to make a call.
– Each key press interrupts the automatic registration.
- If automatic registration does not work, you will have to register the handset manually.
- You can change the name of the handset (page 37).
Manual registration Gigaset E45 to Gigaset E450 SIM
You must activate manual registration of the handset at both the handset and the base station.
After it has registered, the handset returns to idle status. The internal number of the handset appears in the display, e.g.
Báση 1. If it does not, repeat the procedure.
On the handset
→ Handset → Register H/Set
Select base station, e.g. Base 1 and press OK.
Enter the system PIN of the base station (the default is 0000) and press OK. The screen will display, e.g. Base 1.
On the base station
▶ Within 60 secs. press and hold the registration/paging key next to the charging cradle on the base station (approx. 3 secs.).
Registering other handsets
You can register other Gigaset handsets and handsets for other devices with GAP functionality as follows.
On the handset
▶ Start to register the handset as described in its user guide.
On the base station
▶ Within 60 secs. press and hold the registration/paging key next to the charging cradle on the base station (approx. 3 secs.).
De-registering handsets
You can de-register any registered handset from any registered Gigaset E45 handset.

Open list of internal users.
The handset you are currently using is indicated by <.

Select the internal user you wish to de-register.
Options Open menu.
De-reg. H/Set No.
Select and press OK.

Enter current System PIN and press OK.

Press the display key.
Locating a handset ("paging")
You can locate your handset using the base station.
▶ Press the registration/paging key on the base station briefly.
▶ All handsets will ring at the same time ("paging"), even if the ringers are switched off.
Ending paging
▶ Briefly press the registration/paging key on the base station or press the talk key 📄 on the handset.
Changing the base station
If your handset is registered to more than one base station, you can set it to a particular base station or to the base station that has the best reception (Best Base).

→ Handset → Select Base

Select one of the registered base stations or Best Base and press OK.
Making internal calls
Internal calls to other handsets registered on the same base station are free.
Calling a specific handset

Initiate internal call.

Enter the number of the handset.
Or:

Initiate internal call.

Select
handset.

Press the talk key.
Calling all handsets ("group call")

Initiate internal call.

Press the star key. All handsets are called.
Ending a call

Press the end call key.
Transferring a call to another handset
You can transfer an external call to another handset (connect).

Open list of handsets.
The external caller hears the wait melody if activated (see page 43).

Select a handset or Call All and press OK.
When the internal participant answers:
▶ If necessary announce the external call.

Press the end call key.
The external call is transferred to the other handset.
If the internal participant does not answer or is busy, press the display key End, to return to the external call.
When diverting a call you can also press the end call key 📞 before the internal participant lifts the receiver.
Using several handsets
Then, if the internal participant does not answer or is busy, the call will automatically return to you (the display will show Recall).
Internal consultation calls
When you are speaking to an external participant you can simultaneously call an internal participant for consultation.

Open list of handsets.
The external caller hears the wait melody if activated (see page 43).

Select handset and press

Ending an enquiry call
End Press the display key.
You are reconnected with the external caller.
Accepting/rejecting call waiting
If you get an external call while conducting an internal call, you will hear the call waiting tone (short tone). The caller's number will appear in the display if phone number identification is enabled.
Ending an internal call, accepting an external call
Accept Press the display key.
The internal call is ended. You are connected to the external caller.
Rejecting external call
Reject Press the display key.
The call waiting tone is turned off. You remain connected with the internal participant. The ringtone can still be heard at other registered handsets.
Linking internal callers to an external call
Important: The Listening In function must be activated.
You are conducting an external call. An internal caller can listen in on this call and take part in the conversation. All the participants are made aware of the 'listening-in' by a signal tone.
Activating/deactivating internal listening in

→ Base → Add. Features
→ Listening In

Press and hold (idle status).
Internal listening in
The line is engaged with an external call. Your screen will display information to that effect You want to listen in to the existing external call.

Press and hold the talk key.
You are linked into the call. All participants hear a signal tone. During this time, this handset will not display any information or messages and no selection can be made from this handset.
Ending listening in

Press the end call key.
All participants hear a signal tone.
If the first internal participant presses the end call key 🔒, the handset that has 'listened-in' remains connected to the external caller.
Changing the name of a handset
The names "INT 1", "INT 2" etc. are assigned automatically at registration. You can change these names. The name must be no more than 10 characters. The changed name is displayed in every handset's list.

Open list of handsets. Your own handset is indicated by <.

Select handset.

Press the display key.

Enter name.

Press the display key.
Changing a handset's internal number
A handset is automatically assigned the lowest unassigned number when it is registered. If all the numbers have been assigned, number 6 is overwritten, provided the handset is in idle status. You can change the internal number of all registered handsets (1–6).

Open list of handsets. Your own handset is indicated by <.

Open menu.
Edit H/Set No.
Select and press OK. The list of handsets is displayed.

The current number flashes. Select a handset.

Enter the new internal number(1–6). The handset's old number is overwritten.

Press the display key to save the input.

Press and hold (idle status).
You will hear the error tone (descending tone sequence) if you assign an internal number twice.
▶ Repeat the process with an unused number.
Using a handset as a room monitor
If the room monitor is activated, a previously stored destination number is called as soon as a set noise level is reached. You can store an internal or external number in your handset as the destination number.
The room monitor call to an external number stops after approx. 90 seconds. The room monitor call to an internal number (handset) stops after approx. 3 minutes (depending on the base station). While the room monitor is activated, all keys are locked except the end call key. The handset's speaker is muted.
When the room monitor is activated, incoming calls to the handset are indicated without a ringtone and are only shown on the screen. The display and keypad are not illuminated and advisory tones are also turned off.
If you accept an incoming call, the room monitor mode is suspended for the duration of the call, but the function remains activated.
If you switch off the handset, the room monitor mode is deactivated. You must reactivate the function after switching on the handset again.
Caution!
- You should always check the operation of the room monitor before use. For example, test its sensitivity. Check the connection if you are diverting the room monitor to an outside number.
- When the function is switched on the handset's operating time is severely reduced. If necessary, place the handset in the charging cradle. This ensures that the battery pack does not run down.
- Ideally the handset should be positioned 1 to 2 metres away from the baby. The microphone must be directed towards the baby.
– The connection to which the room monitor is diverted must not be blocked by an activated answering machine.
Activating the room monitor and entering the number to be called

→ ★ → Room Monitor
▶ Change multiple line input:
Room M.:
Select On to activate.
Call to:
Press the display key Edit and enter destination number.
External number: select number from the directory or enter directly. Only the last 4 digits are displayed.
Internal number: delete any stored external number. Eowt. (select handset or Call All, if all registered handsets are to be called) OK.
Store number with Save Entry OK.
Level:
Set noise level sensitivity (Low or High).
▶ Save changes (page 49).
The function is now activated. With ⬆, you can move directly to settings.
Changing previously set external destination number

→ ★ → Room Monitor

Scroll to the Call to: line.
Edit Press the display key.
◀ C Delete existing number.
▶ Enter number as described in "Activating the room monitor and entering the number to be called" (page 38).
▶ Save changes (page 49).
Changing previously set internal destination number

→ ★ → Room Monitor

Scroll to the Call to: line.
Edit Press the display key.
Yes Press the display key to confirm the prompt.
▶ Enter number as described in "Activating the room monitor and entering the number to be called" (page 38).
▶ Save changes (page 49).
Deactivating the room monitor remotely
Important: The phone must support touch tone dialling and the room monitor should be set for an external destination number.
▶ Take the call from the room monitor and press keys 🔒 #.
The room monitor function will deactivate after the call ends. There will be no further room monitor calls. The other room monitor settings on the handset (e.g. no ring-tone) will however remain activated until you press the display key OFF on the handset.
To reactivate the room function with the same phone number:
▶ Turn on the activation again and save (page 38) with Save.
Handset settings
Your handset is preconfigured, but you can change these settings to suit your individual requirements.
Changing the display language
You can view the display texts in different languages.

→ ↗ → Handset → Language
The current language is indicated by √

Select a language and press OK.

Press and hold (idle status).
If you accidentally choose a language you do not understand:

5 KA jkl 4 GHI ghi 1 oo
Press keys one after the other.

Select the correct language and press OK.
Setting the display
You have a choice of four colour schemes and several different contrasts.

→ ↗ → Display
Colour Scheme
Select and press OK.

Select a colour scheme and press OK (≠current colour).

Press briefly.
Contrast Select and press
OK.

Select contrast.

Press the display key.

Press and hold (idle status).
Setting the screen picture
You can display a screen picture (picture or digital clock) when the handset is in idle status. This will replace the idle status display. It may conceal the date, time and name.
The screen picture is not displayed in certain situations, e.g. during a call or when the handset has been deregistered.
If a screen picture has been activated, the menu item Screen Picture is marked with √.

→ ↗ → Display → Screen Picture
The current setting is displayed.
▶ Change multiple line input:
Activation:
Select On (screen picture is displayed) or Off (no screen picture).
Selection:
Change screen picture if necessary (see below).
▶ Save changes.
If the screen picture conceals the display, press the end call key briefly to show the idle display with time and date.
Changing the screen picture

→ ↻ → Display → Screen Picture

Scroll to the picture line.
View Press the display key.
The active screen picture is displayed

Select
plotkre/nd
press OK.
▶ Save changes.
Setting display illumination
Depending on whether or not the handset is in the charging cradle you can set different levels of display illumination. If the charging cradle is switched on, the display is permanently dimmed.

→ ↗ → Display → Backlight
The current setting is displayed.
▶ Change multiple line input:
In Charger
Select On or Off.
without Charger
Select On or Off.
Save Press the display key.

Press and hold (idle status).
Note:
When the display illumination is switched on, the standby time of the handset is reduced to approx. 30 hours.
Activating/deactivating auto answer
If you have activated this function, when you get a call you can simply lift the handset out of the charging cradle without having to press the talk key ☐.

→ Handset
Auto Answer

Select and press OK (√) = o
Press and hold (idle status).
Adjusting the loudspeaker volume
You can set the loudspeaker volume for handsfree speaking to five different levels and the earpiece volume to three different levels. You can only make these adjustments during an external call.
The handsfree volume can only be adjusted when this function is set.
You are conducting an external call.

Open menu.

Select volume.
Save Press display key if necessary to save the setting permanently.
If ⬆ is assigned a different function, e.g. when toggling (page 15):
Options Open menu.
Volume Select and press OK.
Configure setting (see above).
Changing ringtones
Volume:
You can choose between five volumes (1–5; e.g. volume 2 = □□□/□) and the "Crescendo" ring (6; volume increases with each ring =

◆ Ringtones:
You can choose between 15 different melodies.
You can configure the following functions with different ringtones:
◆ Ext. Calls : for external calls
◆ Internal Calls : for internal calls
◆ All: the same for all functions
Settings for individual functions
n Set the volume and melody depending on the type of signalling required.

→ → Audio Settings →
Ringer Settings

Set, e.g. select Ext. Calls and press OK.
▶ Change multiple line input:
Set volume (1–6).
Scroll to the next line.
Select melody.
Save Press the display key to save the setting.
In idle status, you can also open the menu Ringer Settings by pressing ⏻ briefly.
Settings for all functions to ring the same


Audio Settings

briefly.
Ringer Settings → All
▶ Set volume and ringtone (see "Settings for individual functions").

Press the display key to confirm the prompt.

Press and hold (idle status).
Activating/deactivating the ringtone
You can deactivate the ringtone on your handset before you answer a call or when the handset is in idle status; the ringtone can be deactivated permanently or just for the current call. The ringtone cannot be re-activated while an external call is in progress.
Deactivating the ringtone permanently

Press the star key and hold until you can no longer hear the ringtone.
The ✉ icon appears in the display.
Re-activating the ringtone

Press and hold the star key.
Deactivating the ringtone for the current call

Press the display key.
Activating/deactivating the alert tone
In place of a ringtone you can activate an alert tone. When you get a call, you will hear a short tone ("Beep") instead of the ringtone.

Press and hold the star key and within 3 seconds:

Press the display key. A call is now signalled by one brief alert tone. You will now see in the display.
Activating/deactivating first ring muting

Open menu.


Press keys.

OK First ring audible.
Or:


First ring muted.
Activating/deactivating advisory tones
Your handset uses ‘advisory tones’ to tell you about different activities and statuses. The following advisory tones can be activated and deactivated independently of each other:
◆Key beep: Each key press is acknowledged.
◆Acknowledge tones:
- Confirmation tone (ascending tone sequence): at the end of an entry/ setting and when an SMS or a new entry arrives in calls list
- Error beep (descending tone sequence): when you make an incorrect entry
- Menu end tone: when scrolling at the end of a menu
◆Battery low beep: the battery pack requires charging.


→ Audio Settings
→ Advisory Tones
▶ Change multiple line input:
Key Tones:
Select On or Off.
Confirm.:
Select On or Off.
Handset settings
Battery:
Select On, Off or In Call. The battery warning tone is activated/deactivated or only sounds during a call.
▶ Save changes (page 49).
You cannot deactivate the confirmation tone for placing the handset in the base station.
Setting the alarm clock
Requirement: The date and time have already been set (page 8).
Activating/deactivating and setting the alarm clock

▶ Change multiple line input:
Alarm Clock: Select On or Off.
Time: Enter the wake-up mat.
Melody: Select melody.
Volume: Set the volume (1-6). ▶ Save changes (page 49).
You will see the icon 📋.
A wake-up call with the selected ringer melody is signalled on the handset. The wake up call sounds for 60 seconds. The display shows Alarm Clock. If no key is pressed the wake-up call is repeated twice at five minute intervals and then switched off.
During a call, the wake-up call is signalled by a short tone.
Deactivating the wake-up call/repeating after a pause (slumber mode)
Requirement: A wake-up call is sounding.
OFF Press the display key. The wake-up call is deactivated.
or
Snooze Press the display key or any key. The wake-up call is deactivated and then repeated after 5 minutes. After the second repetition the wake-up call is deactivated completely.
Restoring the handset default settings
You can reset any individual settings and changes that you have made. This will not affect entries in the directory, call-by-call list, calls list, or SMS lists or the handset's registration to the base station.
→ Handset → Reset Handset
Yes Press the display key.
Press and hold (idle status).
Cancel the restoring process by pressing 📞 or the display key No.
Base station settings
The base station settings are carried out using a registered Gigaset E45 handset.
Protecting against unauthorised access
Protect the system settings of the base station with a PIN known only to yourself. The system PIN must now be entered when, for example, registering/de-registering a handset to/from the base station or when restoring the default settings.
Changing the system PIN
You can change the 4-digit system PIN set on the base station (default setting: 0000) to a 4-digit PIN known only to yourself.
Caution:
Memorise the new system PIN well! If you forget it, the phone will require specialist attention. If this happens, contact the Hotline (page 46).

→ Base → System PIN

Enter current System PIN and press OK.

Enter new system PIN. For security the PIN is shown as four stars (****).

Scroll to the next line, re-enter new system PIN and press OK.

Press and hold (idle status).
Activating/deactivating the wait melody
→ Base → Music on hold
Press OK to activate or deactivate the wait melody (☑ on).
Repeater support
With a repeater you can increase the range and reception strength of your base station. First you must activate the repeater mode. This will terminate any calls currently running through the base station.
Requirement: A repeater is registered.
→ Base → Add. Features → Repeater Mode
Yes Press the display key.
When repeater mode is active, the menu item is marked with √
Restoring default settings to base station
When resetting, the handsets remain registered. The following settings are not reset:
◆System PIN
◆Setting "First ringtone suppressed"
◆SMS info services
→ Base → Base Reset Enter the system PIN and press OK.
Yes Press the display key.
Cancel the restoring process by pressing 📞 or the display key No.
Connecting the base station to the PABX
The following settings are only needed when your PABX requires them. Please refer to the user guide for your PABX.
You cannot send or receive SMS on PABXs that do not support Calling Line Identification.
Dialling modes and flash time
The current setting is indicated by √
Changing the dialling mode
The following dialling modes can be selected:
◆Tone dialling (DTMF),
◆Pulse dialling (DP).
→ Base → Add. Features → Dialling Mode
Select dialling mode (= on) and press OK.
Press and hold (idle status).
Setting the flash time
→ Base → Add. Features → Recall
Select flash time (= on) and press OK.
Press and hold (idle status).
Setting pauses
Changing pause after line seizure
You can change the length of pause that is inserted between pressing the talk key
and sending the number.
Open menu.
5 Kλ jkl 5 Kλ jkl 9 ZEYX wxyz 1∞ 6 MNOΩ mno
Press keys.
Enter digit for the pause
length (1 = 1 sec.; 2 = 3 secs.;
3 = 7 secs.) and press OK.
Changing the pause after the recall key
You can change the length of the pause if your PABX requires this (refer to the user guide for your PABX).
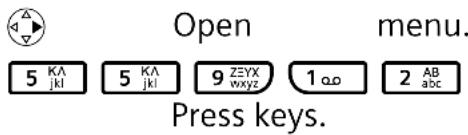
Enter a digit for the length
of the pause (1 = 800 ms ;
2 = 1600 ms; 3 = 3200 ms)
and press OK.
Changing the dialling pause
Enter a digit for the length of the pause (1 = 1 sec.;
2 = 2 secs.; 3 = 3 secs.;
4 = 6 secs.) and press OK.
To insert a dialling pause: press ☐ for 2 seconds. A P appears in the display.
Switching temporarily to tone dialling (DTMF)
If your PABX still operates with dial pulsing (DP), but you need tone dialling (DTMF) for a connection (e.g. to listen to the network mailbox) you must switch to tone dialling for the call.
Requirement: You are conducting a call or have already dialled an external number.
Options Open menu.
Tone Dialing
Select and press OK.
Tone dialling is now activated for this call only.
Appendix
Care
▶ Wipe the base station and handset with a damp cloth (do not use solvent) or an antistatic cloth.
Never use a dry cloth. This can cause static.
Contact with liquid

Your handset is splash proof.
If it comes into contact with water, knock the water out of the microphone opening and remove any water on the handset with an absorbent cloth. Your handset is ready for use.
If your handset comes into contact with a larger amount of liquid take the following steps:
- Do not switch the handset on under any circumstances!
- Remove the battery pack immediately.
- Remove the headset socket cover.
- Hold the handset horizontally with the open battery compartment facing down.
- Hold the handset vertically. Tilt the handset backwards and forwards slightly, giving it a gentle shake each time.
- Dab all parts dry and then leave the handset for at least 72 hours with the battery compartment open and the keypad facing down in a dry, warm place (not in a microwave, oven or similar).
When it has fully dried out, you will normally be able to use it again.
Questions and answers
If you have any queries about the use of your telephone, you can contact us at any time at www.gigaset.com/customercare. The table below contains a list of common problems and possible solutions.
The display is blank.
-
The handset is not switched on.
▶ Press and hold the end call key 🔒. -
The battery pack is flat.
▶ Charge/replace the battery pack (page 8).
The handset does not respond to a key press.
The keypad lock is activated.
▶ Press and hold the hash key # r (page 12).
"Base station x" is flashing in the display.
- The handset is outside the range of the base station.
▶ Reduce the distance between handset/base station.
- The handset has been de-registered.
▶ Register the handset (page 34).
- The base station is not switched on.
▶ Check the base station mains adapter (page 6).
Base Search is flashing in the display.
The handset is set for Best Base and no base station is switched on or within range.
▶ Reduce the distance between handset/base station.
▶ Check the base station mains adapter (page 6).
Handset does not ring.
-
The ringtone is switched off. ▶ Activate the ringtone (page 41).
-
Call diversion set to All Calls. ▶ Switch off Call Diversion (page 15).
You cannot hear a ringtone/dialling tone.
Base station's phone cord has been replaced.
▶ When purchasing a new cord, ensure that it has the correct pin connections (page 6).
| The other party cannot hear you.You have pressed the (INT) key. The hand-set is "muted".►Switch on the microphone again (page 12). |
| The incoming call number is not displayed although CLIP is set.Phone number identification is not enabled.►Caller should ask network provider to activate phone number identification (CLI). |
| You hear an error tone when keying an input (a descending sequence of tones).Action has failed/invalid input.►Repeat the operation.Watch the display and refer to the operating instructions if necessary. |
| You cannot listen to messages on the net-work mailbox.Your phone system is set for pulse dialling.►Set your phone system to tone dialling. |
Service (Customer Care)
We offer you support that is fast and tailored to your specific needs!
Our Online Support on the Internet can be reached any time from anywhere.
www.gigaset.com/customercare It provides you with 24/7 support for all our products. It also provides a list of FAQs and answers plus user guides and current software updates (if available for the product) for you to download.
You will also find frequently asked questions and answers in the appendix of this user guide.
For fast and dependable assistance with any repairs or guarantee/warranty claims, contact our Customer Care Line.
Greece 801 1000 500 (0,026 Euro)
Please have your proof of purchase ready when calling.
Replacement or repair services are not offered in countries where our product is not sold by authorised dealers.
Authorisation
This device is designed for the analogic telephone connection in the greek telephone net.
Gigaset Communications GmbH hereby declares that the phone described in this user guide is in compliance with the essential requirements and other relevant provisions of European Directive 1999/5/EC (R&TTE).
If you require a copy of the original, visit the website:
www.gigaset.com/docs.
CE 0682
Specifications
Recommended battery pack
(Valid at the time of going to press)
Nickel-metal-hydride (NiMH):
V30145-K1310-X382
The handset is supplied with the recommended battery pack.
Handset operating times/charging times
| Capacity | 620 mAh |
| Standby time Approx. 160 hours (6 days) | |
| Calling time Approx. 12 hours | |
| Charging time approx. 6 hours | |
The operating and charging times apply only when using the recommended battery pack.
Note:
When the display illumination is switched on, the standby time of the handset is reduced to approx. 30 hours.
Base station power consumption
In standby mode: approx. 2 watt
During a call: approx. 3 watt.
General specifications
| DECT standard is supported | |
| GAP standard is supported | |
| No. of channels 60 | duplex channels |
| Radio frequency range 1880–1900 | MHz |
| Duplex method Time multiplex, 10 ms frame length | |
| Channel grid 1728 | kHz |
| Bit rate 1152 kbit/s | |
| Modulation GFSK | |
| Language code 32 | kbit/s |
| Transmission power | 10 mW, average power per channel |
| Range up to 300 m | outdoors, up to 50 m indoors |
| Base station power supply 230 | V ~/50 Hz |
| Environmental conditions for operation | +5 °C to +45 °C; 20 % to 75 % relative humidity |
| Dialling mode DTM | F (tone dialling)/ DP (dial pulsing) |
| Base station dimensions | 122 x 109 x 73 mm (L x W x H) |
| Handset dimensions | 143 x 51 x 25 mm (L x W x H) |
| Base station weight | 122 g |
| Weight of handset with battery pack | 133 g |
Guarantee Certificate
Without prejudice to any claim the user (customer) may have in relation to the dealer, the customer shall be granted a manufacturer's Guarantee under the conditions set out below:
◆In the case of new devices and their components exhibiting defects resulting from manufacturing and/or material faults within 24 months of purchase, Gigaset Communications shall, at its own option and free of charge, either replace the device with another device reflecting the current state of the art, or repair the said device. In respect of parts subject to wear and tear (e.g., batteries, keypads, casings), this warranty shall be valid for six months from the date of purchase.
◆This Guarantee shall be invalid if the equipment defect is attributable to improper treatment and/or failure to comply with information contained in the user manuals.
◆This Guarantee shall not extend to services performed by the authorised dealer or the customer themselves (e.g. installation, configuration, software downloads). User manuals and any software supplied on a separate data medium shall be excluded from the Guarantee.
◆The purchase receipt, together with the date of purchase, shall be required as evidence for invoking the Guarantee. Claims under the Guarantee must be submitted within two months of the Guarantee default becoming evident.
◆Ownership of devices or components replaced by and returned to Gigaset Communications shall vest in Gigaset Communications.
◆This Guarantee shall apply to new devices purchased in the European Union. The Guarantee is issued by Gigaset Communications GmbH, Schlavenhorst 66, D-46395 Bocholt, Germany.
◆Any claims that differ from or extend beyond these mentioned in this manufacturer's warranty shall be excluded, except from cases expressly specified in the applicable law. (In no event shall Gigaset Communications be liable for any loss of business, profits or data, additional software loaded by the customer or other information. The customer shall also bear the responsibility for the creation of backup copies of their files. The limitation of liability
Notes on the operating instructions
shall not apply if and to the extent liability is mandatory under the applicable law, e.g. according to product liability law or in the event of intentional misconduct, severe negligence, personal injury, damage to parts of the human body or to personal health, or in case of violations of conventional obligations. However, the claims for damages related to violation of conventional obligations shall be limited to predictable damages, representative of such conventions, as long as there is no intention or severe negligence, personal injury, damage to parts of the human body or to personal health, according to the product liability law.)
◆The duration of the Guarantee shall not be extended by services rendered under the terms of the Guarantee.
◆Insofar as no Guarantee default exists, Gigaset Communications reserves the right to charge the customer for replacement or repair.
◆The above provisions do not imply a change in the burden of proof to the detriment of the customer.
To invoke this Guarantee, please contact the Gigaset Communications telephone service. The relevant number is to be found in the accompanying user guide.
Notes on the operating instructions
This section explains the meaning of certain symbols and typographical conventions that are used in this user guide.
Symbols used
Copy Entry / Copy List (example) Select one of the two menu functions specified.
Enter digits or letters.
Save The display keys' current functions are shown reverse highlighted in the bottom display line. Press the display key below to launch the function.
Press the top or the bottom of the control key: scroll up or down.
Press the right or left of the control key: e.g. select setting.
r / 0 + / * △ etc. Press the corresponding key on the handset.
Example: menu input
In the user guides, the steps you need to perform are shown in abbreviated form. This is illustrated below using the example of "Setting the contrast for the display". The things you have to do are explained in the boxes.

→ → Display
▶ With the handset in idle status, press on the right of the control key to open the main menu.
▶ Select the 🔒 icon using the control key – press the control key at the top or bottom.
In the display header, Settings is displayed.
▶ Press the OK display key to confirm the function Settings.
The Settings submenu is displayed.
▶ Press the bottom of the control key repeatedly until Display is selected.
▶ Press the OK display key to confirm the selection
Contrast Select and press OK.
▶ Press the bottom of the control key repeatedly until Contrast is selected.
▶ Press the OK display key to confirm the selection

Select contrast and press
OK.
▶ Press on the right or left of the control key to select the contrast.
▶ Press the Save display key to confirm the selection

Press and hold (idle status).
▶ Press and hold the end call key until the handset returns to idle status.
Example: multiple line input
There are many situations in which you can change the settings of a display or enter data in several lines.
In this user guide symbols are used to guide you step by step through multiple line input. This is illustrated below using the example of "Setting the date and time". The things you have to do are explained in the boxes.
You will see the following display (example):
Date/Time
Date:
[10.06.05]
Time:
11:11
Save
Date:
Enter day, month and year in 6-digit format.
The second line is marked with [ ] to show it is active.
▶ Enter the date using the digit keys.
Time:
Enter hours/minutes in 4-digit format.
▶ Press the ⬆ key.
The fourth line is marked with [ ] to show it is active.
▶ Enter the date using the digit keys.
▶ Save changes.
▶ Press the Save display key.
▶ Then press and hold the 🔒 key.
The handset changes to idle status.
Writing and editing a text message
The following rules apply when writing a text message:
◆ Control the cursor with ◀ △ △ ▲ △ ▼.
◆Characters are added to the left of the cursor.
◆Press the star key ☐ * △ to show the table of special characters.
◆The first letter of the name of directory entries is automatically capitalised, followed by lower case letters.
Entering special characters
You can call up the table of special characters when writing an SMS using the * △ key. Select the required character and insert it with Insert.
Writing an SMS/name (without predictive text)
Press the hash key #→ briefly to switch from "Abc" mode to "123" and from "123" to "abc" and from "abc" to "Abc" (upper case: 1st letter upper case, all others lower case). Press the hash key #→ before entering the letter.
The following applies when writing an SMS:
◆The display shows whether upper case, lower case or digits is selected. "Abc", "abc" or "123" appears at the top right of the display.
When you press a key and hold it, the characters of that key appear in the bottom display line and are highlighted one after the other. When you release the key the highlighted character is inserted into the input field.
Writing an SMS (with predictive text)
EATONI predictive text helps you when you are writing an SMS.
Each key between 0 + and 9 Z=YX wxyz is assigned several letters and characters (see the character set tables, page 50). These appear in a selection line immediately under the text panel (above the display keys) as soon as you press a key. The letter you are most likely looking for is reverse-highlighted and is at the beginning of the selection line. It is copied into the text panel.
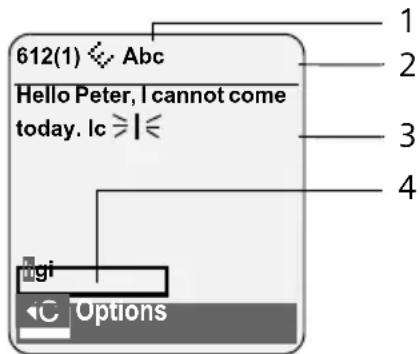
1 SMS text
2 Selection line
3 EATONI is activated
4 Upper/lower case or digits
If this letter is the one you want, confirm it by pressing the next key. If it is not the one you want, briefly press the hash key #\~ repeatedly until the required letter is reverse-highlighted on the display line and copied into the text panel.
If you press and hold the hash key #→ you switch from "Abc" mode to "123" and from "123" to "abc" and from "abc" to "Abc".
Deactivating/activating predictive text
Requirement: You are writing an SMS.
Options Press the display key.
Predictive Text
Select and press OK (√) = o n ) .

Press the end call key briefly to return to the text panel. Enter the text.
Order of directory entries
The directory entries are usually sorted in alphabetical order. Spaces and digits take first priority. The sort order is as follows:
- Space
- Digits (0–9)
- Letters (alphabetical)
- Other characters
To get round the alphabetical order of the entries, insert a space or a digit in front of the name. These entries will then move to the beginning of the directory. Names which you have preceded with an asterisk will move to the end of the directory.
Accessories
Gigaset Handsets
Turn your Gigaset into a cordless telephone system:
Gigaset Handset E45
◆Dust and splash proof casing
◆Illuminated colour display (4096 colours)
◆Illuminated keypad
◆Handsfree operation
◆Polyphonic ringer melodies
◆Directory for around 250 entries
◆SMS (CLIP must be enabled)
◆Headset socket
◆Room monitor
www.gigaset.com/gigasets45
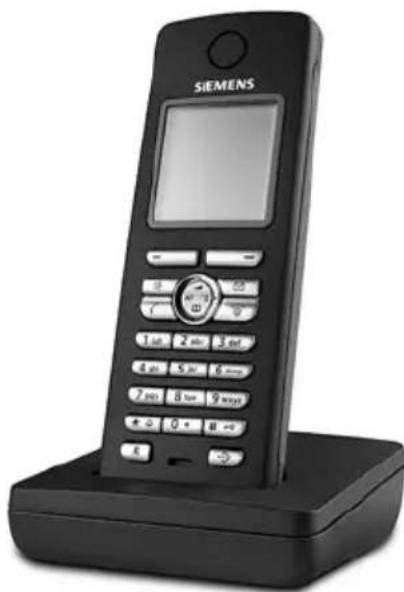
natural_image
Black Siemens mobile phone with control panel and keypad (no visible text or symbols on device body)Gigaset Handset S45
◆Illuminated colour display (4096 colours)
◆Illuminated keypad
◆Handsfree operation
◆Polyphonic ringer melodies
◆Directory for around 150 entries
◆SMS (CLIP must be enabled)
◆Headset socket
◆Room monitor
www.gigaset.com/gigasets45
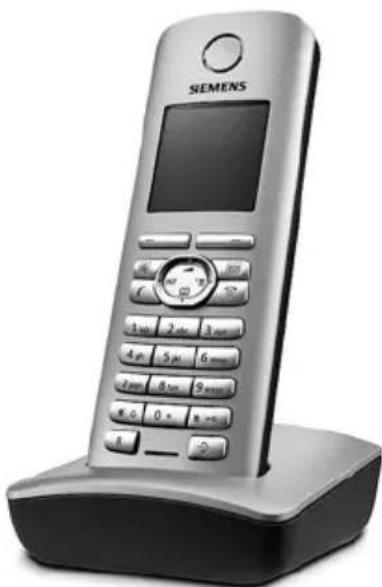
natural_image
Silver Siemens 3rd-century mobile phone with keypad and control buttons (no visible text or symbols beyond branding)Gigaset handset SL55
◆Illuminated graphical colour display (65k colours)
◆Illuminated keypad
◆Handsfree operation
◆Polyphonic ringer melodies
◆Directory for around 250 entries
◆Picture CLIP
◆SMS (CLIP must be enabled)
◆Voice dialling
◆PC interface, e.g. for managing directory entries, ringtones and screen savers
◆Headset socket
www.gigaset.com/gigasetsl55
Gigaset repeater
The Gigaset repeater can be used to increase the reception range of your Gigaset handset to the base station.
www.gigaset.com/gigasetrepeater
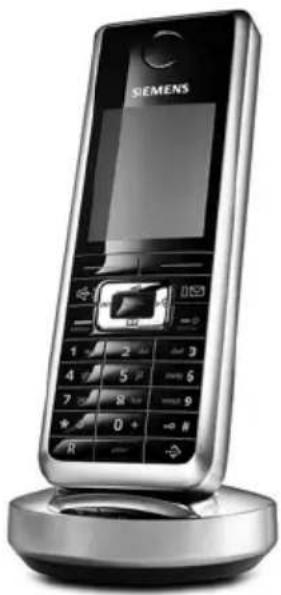
natural_image
Black Siemens 3D mobile phone with keypad and control panel (no visible text or symbols beyond branding)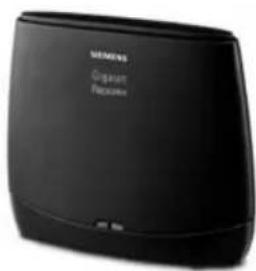
Voice and data adapter Gigaset M34 USB
Use the Gigaset M34 USB for wireless connections between your PC and your Gigaset. Then you can:
◆Make low-cost calls via the Internet (ADSL) on your Gigaset handset (Voice-over-IP)
◆Enjoy wireless surfing on the Internet from your PC (ISDN)
◆Write, send and receive text messages on your PC
◆Have Internet messages (e.g. weather, share prices) displayed on your handset
◆Send and receive texts from messenger services (IMS)
◆Operate your PC remotely via the handset (e.g. operating the Windows Media Player)
www.gigaset.com/gigasetm34usb

All accessories and batteries are available from your mobile phone retailer.

Only use original accessories. This will avoid possible health risks and damage, and also ensure that all the relevant regulations are complied with.
Index
A
Access protection 43
Accessories 52
Acknowledge tones....41
Activating
advisory tones 41
auto answer....40
handset....12
internal listening in .... 36
keypad lock 12
muting ringtone....41
room monitor 38
Activating/deactivating network mailbox 16
Adjusting
loudspeaker volume....40
Advisory tones 41
Alarm clock....42
Alert tone 41
Anniversary....19
storing in directory....19
Auto answer 11,40
Automatic network provider code ... 23
B
Base station
changing 35
connecting and setting up ..... 5
connecting to PABX 44
range 5
restoring to factory settings ..... 43
setting....43
system PIN....43
Battery pack
charging 8
display....8
icon....8
inserting 6
recommended battery pack ..... 46
tone 41
Best base station....35
Birthday, see Anniversary
C
Call
answering 11
caller listening in. . . . . . . . . . . . . . . . . . . . . 36
disconnecting (toggle) .....15
ending .....11
external .....11
forwarding .....16
forwarding (connecting) .....35
internal. 35
transferring (connecting)....37
Call acceptance .....40
Call diversion .....15
Call duration .....11
Call history....21
Call protection .....15
Call waiting
accepting/rejecting .....16
activating/deactivating .....15
favouring waiting call .....16
internal call....36
Callback....15
Call-by-call list .....17
key.... 1
Call-by-call numbers....17, 23
Calling
external .....11
Calling back a caller .....16
Calling Line Identification. .....11
Cancelling (operation) .....13
Care of the telephone....45
Changing
destination number. . . . . . . . . . . . . . . . 38
dialling mode .....44
display language. . . . . . . . . . . . . . . . . . . . . 39
internal number of a handset....37
name of handset. . . . . . . . . . . . . . . . . . . 37
pause time .....44
ringtone....40
system PIN ....43
Changing PIN....43
Changing system PIN .....43
Character set table, see Special characters
Charge status display 8
CLI, CLIP....11
Conference call .....15
Confirmation beep . . . . . . . . . . . . . . . . . . . . 41
Connecting, base station to PABX 44
Consultation 15
Consultation (internal) .....36
Control key 1, 12
Correcting incorrect input ..... 14
Customer Care 46
D
Deactivating
advisory tones 41
auto answer....40
handset....12
internal listening in 36
keypad lock 12
muting ringtone....41
room monitor 38
Delete key....13
Deleting
characters 14
De-registering (handset) ..... 35
Dialling
call-by-call list 17
directory 17
with quick dial .... 18
Dialling mode 44
Dialling pause....44
entering 1
Directory....17
copying number from text ..... 19
managing entries....17
opening....12, 13
order of entries 51
saving entry....17
sending entry/list to handset ..... 18
storing anniversary 19
storing number of sender (SMS) . . . 28
using to enter numbers ..... 19
Disconnecting waiting caller (toggle). 15
Display
changing display language.....39
contrast....39
illumination....40
in idle status 13
keys....1,13
memory 18
number
(CLI/CLIP)....11
screen picture 39
setting....39
wrong language....39
Display keys 13
E-mail address .....27
End call key .....1, 11
Ending, call 11
Ending, see Deactivate
Entry
saving, changing (preselection) . . . .24
selecting (menu)....49
selecting from directory.....17
Error beep ....41
Example
menu input. 49
multiple line entry. . . . . . . . . . . . . . . . 49
F
Fast access
assigning key 1....1
Fax (SMS) 27
Flash time 44
G
Group call 35
H
Handset
activating/deactivating .....12
advisory tones .....41
changing internal number. . . . . . . .37
changing name....37
changing number . . . . . . . . . . . . . . . . . 37
changing to best reception .....35
changing to different base station....35
contact with liquid .....45
de-registering . . . . . . . . . . . . . . . . . 34, 35
display illumination....40
display language. . . . . . . . . . . . . . . . . . . 39
forwarding call ....35
idle status....13
list .....12, 13
loudspeaker volume .....40
muting....12
paging 35
reception strength. 5
registering 34
registering on another base station .....35
Index
restoring to factory settings ..... 42
screen picture 39
setup....6
using room monitor . . . . . . . . . . 37
using several handsets ..... 34
Handset charging times. 46
Handset operating time....46
in room monitor mode ..... 37
Handset settings 39
Handsfree key....1
Handsfree talking 12
Hash key....1, 12
Headset socket 8
Hearing aids 4
|
Icon
alarm clock 42
battery pack....8
display....13
keypad lock 12
new SMS 28
ringtone 41
Idle status (display) ..... 13
Idle status, returning to ..... 13
Incoming message list (SMS) ..... 27
Incorrect input (correction) ..... 14
Info services (SMS) 31
Input language (SMS) ..... 26
Internal
consultation 36
listening in....36
making calls....35
Internal call....35
call waiting 36
K
Key 1 (fast access)....1
Keypad lock 12
Keys
assigning directory entry ..... 17
call-by-call key ..... 1
cancel key 13
control key....1, 12
delete key 13
display keys....1, 13
end call key 1, 11
fast access .... 1
handsfree key 1
hash key 1, 12
menu key .....13
message key.... 1
On/Off key 1
quick dial .....17, 18
recall key 1
star key. 1, 41
talk key. 1, 11
L
Language, display....39
Last number redial .....21
Linking, see SMS
Liquid 45
List
call history . . . . . . . . . . . . . . . . . . . . . . . . . . . . . 21
call-by-call list .....17
handsets.....12, 13
missed calls 22
Listening in to call ....36
Lock
activating/deactivating keypad lock....12
Loudspeaker volume. 40
M
Mailbox ID, see SMS
Mailboxes, see SMS
Mains adapter 4
Making calls
answering a call .....11
external .....11
internal. 35
Making cost-effective calls .....23
Manual last number redial .....21
Medical appliances....4
Memory....18
Menu
back one menu level....13
end tone. . . . . . . . . . . . . . . . . . . . . . . . . . . . . . . . . . . . . . . . . . . . . . 41
key....13
menu guidance....13
menu input. . . . . . . . . . . . . . . . . . . . . . . . . . . . . . . . . . . . . . . . 49
opening .....12, 13
overview. 9
Message key
opening lists....22
Message list
opening list. . . . . . . . . . . . . . . . . . . . . . . . . . . . . . . . . . . . . . . . . 28
Messages
key.... 1
Microphone 1
Missed call 22
Multiple line entry....49
Muting 12
first ring 41
Muting handset....12
N
Name
of a handset. 37
Network provider (number list) ..... 17
Network provider code, rautomatic....23
Network services....15
Notification via SMS 29
Number
adding to directory....18, 19
as destination for room monitor . . . 38
copying from an SMS text.....29
copying from directory ..... 19
display calling number (CLIP)....11
entry using directory ..... 19
fixed destination call ..... 15
saving in directory ..... 17
Number list
network provider ..... 17
0
On/Off key 1
Order of entries in directory. . . . . . . 51
P
PABX
connecting base station ..... 44
pause times....44
setting dialling mode ..... 44
setting flash time....44
SMS....32
switching to touch tone dialling . . . 44
Pack contents 5
Paging 35
Paging, handset 35
Parallel call, see Parallel ringing
Parallel ringing 15
Pause 44
Phone jack assignment ..... 6
Placing 7
Power consumption. 47
Predictive text....50
Preselection....23
suppressing .....24
Protecting phone from access.....43
Pulse dialling .....44
Q
Questions and answers. . . . . . . . . . . . . 45
Quick dial....17
R
Range 5
Recall key. 1
pause after....44
Reception booster, see Repeater
Reception strength.... 5
Registering (handset)....34
Reminder call....19
Repeater 43
Ringtone
changing 40
muting....41
setting 12
setting melody .....40
setting volume .....40, 43
Room monitor .....37
S
Screen picture ....39
Searching in directory....17
Sending
directory entry to handset.....18
Sensitivity (room monitor) .....38
Service....46
Setting
display illumination....40
screen picture....39
Setting date 8
Setting melody....40
Setting time 8
Setting up, base station 5
Setup
handset 6
Shortcut. 9
Signal beep, see Advisory tones
SIM card reader .....1, 19
Slumber mode .....42
SMS....25
changing mailbox....30
deleting .....26
draft message list .....26
Index
forwarding 28
info services 31
input language 26
linked 25
mailbox ID 29
mailboxes 29
notification number ..... 29
notification type 29
notification via SMS ..... 29
PIN protection .... 30
reading 26
receiving 27
registration wizard 25
replying to and forwarding ..... 28
rules 25
self help with error messages ..... 33
sending as fax 27
sending to a personal mailbox .... 30
sending to e-mail address.....27
status report 26
storing number 28
to a PABX 32
troubleshooting....33
SMS centre
changing number 31
setting....31
Sound, see Ringtone
Special characters 50
Special functions....44
Specifications 46
Star key....1,41
Suppressing
preselection....24
Switching (service provider)....16
Switching service provider....16
System settings 43
T
Talk key....1, 11
Text message, see SMS
Toggling 15
Touch tone dialling 44
Troubleshooting 45
Troubleshooting (SMS) 33
U
Unknown 11
Unknown caller....11
V
VIP (directory entry) .....18
Volume
earpiece....40
handset loudspeaker....40
loudspeaker ....40
ringtone....40, 43
setting 40
W
Wait melody....12, 43
Warning beep, see Advisory tones
Writing (SMS)....25
Writing, editing ext....50
- Gigaset-Repeater
- Gigaset M34 USB
- Contents
- Connecting the base station to the PABX 44
- Appendix 45
- Notes on the operating instructions ..... 48
- Accessories 52
- Safety precautions
- Caution:
- Note:
- Gigaset E450 SIM – more than just a telephone
- First Steps
- Pack contents
- Installing the base station
- Please note:
- Range and reception strength
- Range:
- Reception strength:
- Connecting the base station
- Setting up the handset for use
- Fitting the battery pack
- Closing the battery cover
- Locking the battery cover
- Opening the battery cover
- Placing the handset in the base station and registering
- Notes:
- Headset socket
- Initial charging and discharging of the battery pack
- Please remember:
- Setting the date and time
- Date:
- Time:
- Making calls
- Making an external call
- Ending a call
- Answering a call
- Calling Line Identification
- Call display with CLIP/CLI
- Handsfree operation
- Activating/deactivating handsfree
- Activating while dialling
- Switching between earpiece and handsfree mode
- Muting
- Operating the handset
- Activating/deactivating the handset
- Activating/deactivating the keypad lock
- Control key
- When the handset is in idle status
- In the main menu and in input fields
- In lists and submenus
- During an external call
- Display keys
- Returning to idle status
- Menu guidance
- Main menu (first menu level)
- Submenus
- Correcting incorrect entries
- Network services
- Setting functions for the next call
- Setting functions for all subsequent calls
- General call diversion
- Activating/deactivating call waiting
- Fixed destination call
- Functions during a call
- Consultation
- Accepting a waiting call
- Accept call waiting
- Reject call waiting
- Favour call waiting
- Divert call
- Activating/deactivating network mailbox
- Using the directory and lists
- Directory/call-by-call list
- Length of entries
- Storing a number in the directory
- Storing a number in the call-by-call list
- Selecting entries in the directory and call-by-call list
- Dialling with the directory/call-by-call list
- Managing entries in the directory/call-by-call lists
- Viewing an entry
- Editing entries
- Using other functions
- Using quick dial keys
- Sending the directory/call-by-call list to another handset
- Requirements:
- Adding a displayed number to the directory
- Copying a number from the directory
- Storing anniversaries in the directory
- Deleting anniversaries
- Reminder call on an anniversary
- Transferring SIM card entries
- Example:
- Area Codes
- Last number redial list
- Manual last number redial
- Managing entries in the last number redial list
- Opening lists with the message key
- SMS incoming message list
- Calls list
- Setting list type for calls list
- List entry
- Delete List
- Making cost-effective calls
- Linking call-by-call numbers with one number
- Options
- Automatic network provider code (preselection)
- Storing preselection numbers
- Saving/editing entries in the preselection lists
- Temporarily cancelling preselection
- Permanently deactivating preselection
- SMS (text messages)
- Rules
- Registering with the registration wizard
- Writing/sending an SMS
- Writing an SMS
- Sending an SMS
- Setting input language
- SMS status report
- Activating/deactivating the status report
- Reading/deleting a status report
- Draft message list
- Saving an SMS in the draft message list
- Opening the draft message list
- Reading or deleting individual SMS
- Writing/editing an SMS
- Deleting draft message list
- Sending an SMS to an e-mail address
- Sending an SMS as a fax
- Receiving an SMS
- Incoming message list
- Opening the incoming message list with the ☑ key
- Opening the incoming message list via the SMS menu
- Reading or deleting individual SMS messages
- Deleting incoming message list
- Replying to or forwarding text messages
- Options Press the display key.
- Reply
- Edit
- Forwarding an SMS
- Forward
- Adding a number to the directory
- Adding the sender's number
- Copying/selecting numbers from an SMS text
- Changing the character set
- Notification by SMS
- Storing the notification number
- Setting the notification type
- SMS mailboxes
- Setting up and changing a personal mailbox
- Setting up a personal mailbox
- Deactivating a mailbox
- Deactivating PIN protection
- Changing the name of a mailbox
- Changing a mailbox's PIN and ID
- Sending a text message to a personal mailbox
- Setting SMS centre
- Entering/changing SMS centres
- Active Send:
- SMS:
- E-mail:
- Sending an SMS through another SMS centre
- SMS info services
- Setting up/ordering an info service
- Setting up an info centre
- Ordering an info service
- Setting up an info service
- Changing an info service
- Deleting an info service
- Changing the entry of an info service
- SMS to a PABX
- Activating/deactivating the SMS function
- SMS troubleshooting
- Self-help with errors
- Using several handsets
- Registering handsets
- Automatic registration Gigaset E45 to Gigaset E450 SIM
- Manual registration Gigaset E45 to Gigaset E450 SIM
- On the handset
- On the base station
- Registering other handsets
- De-registering handsets
- Locating a handset ("paging")
- Ending paging
- Changing the base station
- Making internal calls
- Calling a specific handset
- Calling all handsets ("group call")
- Transferring a call to another handset
- Internal consultation calls
- Ending an enquiry call
- Accepting/rejecting call waiting
- Ending an internal call, accepting an external call
- Rejecting external call
- Linking internal callers to an external call
- Activating/deactivating internal listening in
- Internal listening in
- Ending listening in
- Changing the name of a handset
- Changing a handset's internal number
- Using a handset as a room monitor
- Caution!
- Activating the room monitor and entering the number to be called
- Changing previously set external destination number
- Changing previously set internal destination number
- Deactivating the room monitor remotely
- Handset settings
- Changing the display language
- Setting the display
- Setting the screen picture
- Changing the screen picture
- Setting display illumination
- Activating/deactivating auto answer
- Adjusting the loudspeaker volume
- Changing ringtones
- Settings for individual functions
- Settings for all functions to ring the same
- Activating/deactivating the ringtone
- Deactivating the ringtone permanently
- Re-activating the ringtone
- Deactivating the ringtone for the current call
- Activating/deactivating the alert tone
- Activating/deactivating first ring muting
- Activating/deactivating advisory tones
- Battery:
- Setting the alarm clock
- Activating/deactivating and setting the alarm clock
- Deactivating the wake-up call/repeating after a pause (slumber mode)
- Restoring the handset default settings
- Base station settings
- Protecting against unauthorised access
- Changing the system PIN
- Activating/deactivating the wait melody
- Repeater support
- Restoring default settings to base station
- Connecting the base station to the PABX
- Dialling modes and flash time
- Changing the dialling mode
- Setting the flash time
- Setting pauses
- Changing pause after line seizure
- Changing the pause after the recall key
- Changing the dialling pause
- Switching temporarily to tone dialling (DTMF)
- Appendix
- Care
- Contact with liquid
- Questions and answers
- The display is blank.
- The handset does not respond to a key press.
- "Base station x" is flashing in the display.
- Base Search is flashing in the display.
- Handset does not ring.
- You cannot hear a ringtone/dialling tone.
- Service (Customer Care)
- Authorisation
- Specifications
- Recommended battery pack
- Handset operating times/charging times
- Base station power consumption
- Guarantee Certificate
- Notes on the operating instructions
- Symbols used
- Example: menu input
- Contrast Select and press OK.
- Example: multiple line input
- Date/Time
- Writing and editing a text message
- Entering special characters
- Writing an SMS/name (without predictive text)
- Writing an SMS (with predictive text)
- Deactivating/activating predictive text
- Order of directory entries
- Accessories
- Gigaset Handsets
- Gigaset Handset E45
- Gigaset Handset S45
- Gigaset handset SL55
- Gigaset repeater
- Voice and data adapter Gigaset M34 USB
- Index
- A
- B
- C
- D
- F
- G
- H
- |
- K
- L
- M
- N
- 0
- P
- Q
- R
- S
- T
- U
- V
- W
Brand : GIGASET
Model : E450 SIM
Category : Telephone