
RC100 - Radio RCA - Free user manual and instructions
Find the device manual for free RC100 RCA in PDF.


| Product Type | Clock Radio |
| Brand | RCA |
| Model | RC100 |
| Power Supply | AC 120V ~ 60Hz |
| Power Consumption | 3 Watts |
| Radio Bands | AM/FM |
| Tuning | Manual tuning knob |
| Display | Digital LED with AM/PM indicators |
| Alarm | Wake to radio or alarm tone; snooze 9 minutes |
| Sleep Timer | Adjustable up to 1 hour 59 minutes (default 59 min) |
| Battery Backup | 9V alkaline battery (not included) for time/alarm memory |
| Built-in AFC | Yes, on FM band |
| AM Antenna | Built-in ferrite rod |
| Power Cord | Polarized plug, 120V |
| Safety Class | Class II (double insulation) |
| Controls | Volume, Tuning, Band (AM/FM), Time Set, Alarm Set, Sleep, Snooze/Sleep Off |
| Warranty | 12 months limited |
| Country of Origin | China |
| Recommended Battery Type | Alkaline NEDA 1604A / IEC 6LR61 (9V) |
Frequently Asked Questions - RC100 RCA
User questions about RC100 RCA
0 question about this device. Answer the ones you know or ask your own.
Ask a new question about this device
Download the instructions for your Radio in PDF format for free! Find your manual RC100 - RCA and take your electronic device back in hand. On this page are published all the documents necessary for the use of your device. RC100 by RCA.
USER MANUAL RC100 RCA
IMPORTANT SAFETY INSTRUCTIONS
PLEASE READ AND SAVE THIS FOR FUTURE REFERENCE
two blades and a third grounding prong. The wide blade or the third prong is provided for your safety. If the provided plug does not fit into your outlet, consult an electrician for replacement of the obsolete outlet.
- Protect the power card from being walked on or pinned particularly a plugs, convenience receptacles, and the point where they exit from the apparatus.
- Only use attachments/accessories specified by the manufacturer.
- Use only with
the cart, stand, tripod, bracket, or table specified by the manufacturer, or sold with the apparatus. Portable Cart Warning When a cart is used, use caution when moving the carbapparatus combination to avoid injury from tiu-eye.
• Urplug this apparatus during lightning storms or when unused for long periods of time. - Refer all servicing to qualified service personnel. Servicing is required when the apparatus has been damaged in any way, such as power-supply cord or plug a damaged, liquid has been spilled or objects have fallen into the apparatus, the apparatus has been
exposed to rain or moisture, does not operate normally, or has been dropped.
ADDITIONAL SAFETY INFORMATION
- Apparatus shall not be exposed to dripping or toileaving and no objects filled with liquids, such as vases, shall be placed on the apparatus.
- Always leave sufficient space around the product for ventilation. Do not place product in or on a bed, rug, in a bookcase or cabinet that may prevent air flow through vent openings.
- Do not place lighted candles, cigarettes, cigars, etc. on the product.
- Connect power cord only to AC power source as marked on the product.
- Care should be taken so that objects do not fall into the product.
- Do not attempt to disassemble
the cabinet. This product does not contain customer serviceable components.
- The marking information is located at the bottom of apparatus.
- To be completely disconnect the power input, the mains plug of apparatus shall be disconnected from the mains.
- Mairs plug is a disconnect device. The mains plug should not be obstructed OR should be easily accrowed during intended use.
- The ventilation should not be
impeded by covering the ventilation openings with items such as
newspaper, table-cloths, curtains etc. • No naked flame sources, such as fighted cannled, should be plated
- Attention should be drawn to the environmental aspects of battery disposal.
- The use of apparatus in moderate climates.

This is class II equipment designed with double or reinforced insulation so it does not require a safety connection to electrical earth (US: ground).
Plugging in for power AC OUTLET POWER SUPPLY: 120 V\~60 Vb
120 V = 60 Hz
The AC power plug is polarized (one blade is wider than the other) and only fl is into AC power outlets one way if the plug will
not go into the outlet completely, turn the plug over and try to insert it the other way. It is still does not fit, contact a qualified electrician to change the outlet, or use a different one. Do not attempt to bypass this safety feature.
Important battery
precautions
• Any battery may present a risk of flare, explosion, or chemical burn if abused. Do not try to charge a battery that is not intended to be recharged, do not incinerate, and do not puncture.
- Non-rechargeable batteries, such as alkaline batteries, may look if loft in your product for a long period of time. Remove the batteries from the product if you are not going to use it for a month or more.
- If your product uses more than one battery, do not mix types and make sure they are inserted correctly. Mixing types or inserting incorrectly may cause them to leak.
- Discard any leaky or deformed battery immediately. They may cause skin burns or other personal injury.
• Please help to protect the environment by recycling or disposing of batteries according to federal, state, and local regulations.
WARNING: The battery (battery or batteries or battery pack) shall not be exposed to excessive heat such as sunshine, fire or the like.
Ecology
Help protect the environment - we recommend that you dispose of used batteries by putting them into specially designed receptacles.
FCC Information
Note: This equipment has been tested and found to comply with the limits for a Class 6 digital device, pursuant to Part 15 of FCC Rules. These limits are designed to provide reasonable protection against harmful interference in a residential installation. This equipment generates, uses, and can radiate radio frequency energy and, if not installed and used in accordance with the instructions, may cause harmful interference to radio communications.
However, there is no guarantee that interference will not occur in a particular installation. If this equipment does cause harmful interference to radio or television reception, which can be determined by turning the equipment off and on, the user is encouraged to try to correct the interference by one or more of the following measures: - Remain or relocate the receiving antenna. - Increase the separation between the equipment and receiver. - Connect the equipment into an outlet on a circuit efficient from that to which the receiver is connected. - Consult the dealer or an experienced radio/TV technician for help.
Changes or modifications not expressly approved by Audicem could visit the user's authority to operate the equipment.
Electrical power information Power Supply: 120 V - 60 Hz Power Consumption: 3 Watts
Before you begin
Refer to the "Clock" section and follow the instructions to set the clock.
Battery back-up operation • This clock radio is equipped with a memory holding system that can
A history holding system that can be processed with a 3-bark alkaline battery (not included). The power failure protection circuit will not operate unless battery is installed.
- When thermal power cord power is interrupted, or AC line cord is unplugged, the batteries will power the clock ratio to keep track of time and alarm settings connected into alarm.
- When the battery backup functions, the digital display will not light, however, the function of alarm still occurs during the power interruption if remaining battery power is adequate.
- Normal operation will resume after AC power is restored so you will not have to reset the time or the alarm.
To install the battery:
- Remove battery compartment door (located at the bottom of the radio) by applying thumb pressure to the laser battery door and then lift the door out and off the cabinet.
- Connect a 5-watt alkaliene battery (not included) to the connector plug.
- Replace the compartment door.
Power failure indicator When AC power is interrupted (disconnected) for a short period of time, both time and alarm settings will change (unless batteries are installed). After AC power is restored (recommended), the Digital Display will blink to indicate that power was interrupted and you should re-adjust the time and alarm settings.
Alkaline (NEDA 1904A/ IEC SURE1) battery in recommended. Carbon zinc battery must be used but memory holding time will be substantially reduced. Memory holding time for a fresh alkaline battery is approximately 8 hours (if radio of alarm are not operated) which should take care of short, nuisance type AC power failures. To preserve battery life, the unit should remain plugged into an AC outlet. As the battery gets older, its voltage drops and memory may be lost. Be sure to replace the battery periodically. Battery should be removed if the unit will be stone for more than one month. Leaky battery can badly damage the clock radio.
General controls
Right view
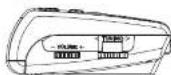
Top view
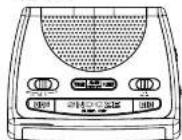
- - VOLUME + To adjust volume - TUNING To adjust radio frequency
- ONOFF/RADIO(WAKE) ALARM(WAKE) - To turn radio on or off, to change wake mode (radio alarm) - TIME - To adjust the clock time - ALARM SET - To activate the wake settings - SLEEP - To activate sleep function - AM/FM - To select radio band - HRS - To adjust hour when setting clock, wake and sleep modes - MIN - To adjust the minute value when setting clock, wake and sleep modes - SNOOZE/SLEEP OFF - To curet the wake alarm or wake radio temporarily (9 minutes); to cancel sleep function
Clock
Setting clock
-
Press and hold TIME.
-
Press HRS or MIN to set the clark
• AM indicator lights when the time is
- PM indicator lights when the time is set in PM
- To save and exit the clock setting, release TIME,
Radio
Selecting radio mode
Side=ON/OFF/RADIO(WAKE)
ALARM(WAKE) TO ON TO SWITCH ON psdia. Slide to OFF to switch off psia
Switching band
Side the band switch AM/FM to select FM or AM band.
Tuning the radio
Rotate the TUNING knob on the right of the unit to adjust the radio frequency with reference to the tuning dial scale.
Built-in AFC
The Built in Automatic Frequency Control (AFC) works only on FM. It helps reducing drift on FM reception and keeping the radio locked in on the FM station to which it is tuned.
When tuning in FM stations, you may notice that the station you are tuning can be well-tuned on two or three nearby points on the dial. Always tune carefully at the loudest and cleanest point.
AM antenna A built-in ferrite rod antenna eliminates the need for an outside antenna for AM reception. Rotating the unit slightly may improve reception of distant AM stations.
Wake function
Setting wake time
- To set time for alarm, press and
held ALARM SET/UFF and p HRS or MIN simultaneously.
- To save and exit the alarm setting
release ALARM SET/OFF.
Selecting wake source
You may be woken up by radio or
- Set a wake time (see above
instructions).
- Slide ON/OFF/RADIO(WAKE)
ALARM(WAKE) to RADIO or ALARM to select a wasting mode
(by radio or alarm).
- Your last tuned radio station will be
the wake source if wake by radio is selected.
Turning off the wake
alarm or radio
• To silence the wake function
Momentarily:
SNOOZE/SLEEP OFF on the toy of
the unit. The wake alarm or radio
will be switched off temporarily.
The alarm or radio will be on again when the suppress period (9 minutes)
is over.
Squeeze function can be used
repeated up to 2 hours. After this, the alarm will turn off until the
the alarm will turn off after the next alarm conditions are met.
• To turn off the wake alarm or
radio:
Press ALARM SET/OFF. The wake
Storm of radio will activate again. The next day unless you switch off
the Wake function.
• To disable the wake function
completely:
Side ONION/RADIO(WAKE) ALARM(WAKE) to OFF
Sleep function
Set sleep time manually
in sleep function, the unit will turn off
To set the sleep mode:
- Press and hold SLEEP and press
MIN simultaneously to adjust the
sleep time. The time range is from 201 to 1:56. The default time
than 50 to 150, (the default line is 59 minutes.)
• The radio will be switched on
To cancel the sleep mode:
• Press SNOOZE/SLEEP OFF to cancel
the sleep mode and turn off the unit
Warranty information
12 Month Limited Warranty
Applies to RCA Clock Radios
AUDIOVOX ACCESSORIES CORP. (the
Company) warrants to the original retail
purchaser of this product that should this product or any part referred under
this product of any part is too, rather normal use and conditions. be proven
defective in material or workmanship
within 12 months from the date of
original purchase, such as exactly. Will be repaired or replaced with reconditioned
product (at the Company's option)
without charge for parts and repair
labor.
To obtain repair or replacement
within the terms of the Warranty, the product is to be delivered with proof.
of warranty coverage (e.g. dated bill
of sale), specification of detect(s),
transportation prepaid, to the Company at the address shown below.
This Warranty does not extend to the
climination of externally generated
static or noise, to correction of
an emerging problems, loss-micrisrupts of broadcast or internet service, to costs
incurred for installation, removal or
reinstallation of product, to corruptions
caused by computer viruses, spyware or other malware to loss of media fles
data or content, or to damage to tapes,
discs, removable memory devices or
cards, speakers, accessories, computers,
computer peripherals, other items
players, home networks or vehicle
electrical systems.
This Warranty does not apply to any
product or part thereof which, in the
opinion of the Company, has suffared or been damaged through alteration.
- been damaged through interliver, improper installation, mishandling.
misuse, neglect, accident, or by removal
or defacement of the factory serial
Numberbar code labels: THE EXTENT OF THE COMPANY'S LIABILITY UNDER
THIS WARRANTY IS LIMITED TO THE
REPAIR OR REPLACEMENT PROVIDED
ABOVE AND, IN NO EVENT, SHALL THE COMPANY'S LIABILITY EXCEED THE
COMPANY'S LIABILITY: EXCEED THE PURCHASE PRICE PAID BY PURCHASER
FOR THE PRODUCT.
This Warranty is in lieu of all other.
express warranties or liabilities. ANY
IMPLIED WARRANTIES, INCLUDING ANY IMPLIED WARRANTY OF
MERCHANTABILITY, SHALL BE LIMIT
TO THE DURATION OF THIS WRITTEN
WARRANTY. ANY ACTION FOR BREACH
OF ANY WARRANTY HEREUNDER INCLUDING ANY IMPLIED WARRANTY
OF MERCHANTABILITY MUST BE
BROUGHT WITHIN A PERIOD OF 24
MONTHS FROM DATE OF ORIGINAL PURCHASE IN NO CASE SHALL THE
POMEGRANATE IN NO CASE SHALL THE COMPANY BE LIABLE FOR ANY
CONSEQUENTIAL OR INCIDENTAL
DAMAGES FOR BREACH OF THIS OR
ANY OTHER WARRANTY. No phrase of representative is authorized to assume
for the Company any liability other than
expressed herein in connection with the sale of this report.
Some states do not allow limitations on
how long an implied warranty lasts or
the exclusion of limitation of incidental or consequential duration so the above.
limitations or exclusions may not apply
to you. This Warranty gives you specific
legal rights and you may also have other rights which vary from state to
other rights which vary from state to state.
- 2017年1月1日
Recommendations before returning
your product for a warranty claim:
any remotes, memory cards, cables,
etc. which were originally provided
with the product. However DO NOT
return any non-ovables batteries, even if batteries were included
with the original purchase. We
recommend using the original
cotton and packing materials. Ship to the address shown below.
• Note that product will be returned
with factory default settings.
Consumer will be responsible to
Restore any personal preference settings.
Audiovox Electronics Corp.
Attn: Service Department.
150 Marcus Blvd. Happalaure N.Y. 11788
1.800-545-4994
For Canada Customers, please ship to:
Audiovox Return Centre
DO Gance 6585 Kennedy Road
Units, Door 16.
Mississuaga, Ontario
LST 345
Illustrations contained within this
publication are for representation only
and subject to change.
The descriptions and characteristics
green in this document are given as
a general indication and not as a quarantee. In order to provide the
highest quality product possible,
we reserve the right to make any
Improvement of modification without prior notice.
PRO-TOUCE.
Mvl. http://store.audiownk.com in find the best.
accepting the your products.

v 2011 Auditor Accessories Corporation
111 Congressional Blvd, Suite 350
chist * Posterior
Pruced in China
Brand : RCA
Model : RC100
Category : Radio