Receiver Box - Receiver PRO-JECT - Free user manual and instructions
Find the device manual for free Receiver Box PRO-JECT in PDF.

| Product Type | Integrated Stereo Receiver |
| Brand | Pro-Ject |
| Model | Receiver Box |
| Power Output | 2 x 50W (8 ohms, RMS) |
| Frequency Response | 20 Hz - 20 kHz (+/- 0.5 dB) |
| Total Harmonic Distortion | < 0.05% |
| Signal-to-Noise Ratio | > 90 dB |
| Inputs | 4x Line (RCA), 1x Phono (MM), 1x Digital Optical, 1x Digital Coaxial |
| Outputs | Speaker terminals (A/B), Pre-out, Headphone (3.5mm), Rec out |
| Supported Impedance | 4 - 16 ohms |
| Dimensions (W x D x H) | 206 x 200 x 72 mm |
| Weight | 2.8 kg |
| Power Consumption | 120W (max), < 0.5W standby |
| Power Supply | AC 230V/50Hz or 115V/60Hz (selectable) |
| Remote Control | Included (IR) |
| Phono Stage | Built-in, switchable MM/MC |
| FM Tuner | No (pure amplifier) |
| Bluetooth | Optional (via external module) |
| Finish | Black or Silver aluminum |
| Maintenance | Clean with soft dry cloth; avoid liquids and direct sunlight |
| Safety | Do not expose to water; disconnect before cleaning; no user-serviceable parts inside |
| Repairability | Spare parts available through authorized service centers; contact Pro-Ject |
| Warranty | 2 years (depending on region) |
Frequently Asked Questions - Receiver Box PRO-JECT
User questions about Receiver Box PRO-JECT
0 question about this device. Answer the ones you know or ask your own.
Ask a new question about this device
Download the instructions for your Receiver in PDF format for free! Find your manual Receiver Box - PRO-JECT and take your electronic device back in hand. On this page are published all the documents necessary for the use of your device. Receiver Box by PRO-JECT.
USER MANUAL Receiver Box PRO-JECT
Pro-Ject AUDIO SYSTEMS
INSTRUCTIONS FOR USE Pro-Ject Receiver Box
Dear music lover,
thank you for purchasing a PRO-JECT AUDIO receiver.
In order to achieve maximum performance and reliability you should study these instructions for use carefully.

Warning of a hazard for the user, the unit or possible misuse.

Important notice.
Help to protect the environment
If you are not going to use the receiver for an extended period of time, e.g. vacation, we suggest to disconnect it from the AC mains. Please be certain that the receiver is in standby-mode prior to unplugging the power supply from the AC mains.
Connectors

text_image
SN: IN 1 IN 2 75 Ohm FM Ant. R L Power - 20V
Make all connections whilst the receiver is disconnected from the power supply.

Take care to connect the left and right channels correctly. The right channel is usually marked red, the left channel black or white.
Inputs
Line level sources such as CD player, TV-set or MP3-player can be connected to the input sockets marked IN 1 or IN 2.
Antenna input
Connects any antenna cable with a co-axial DIN-plug / US-model F-plug.
Connection to the speakers
The output terminals accept loudspeaker cables terminated with 4mm ∅ Banana plugs, spades connectors or naked wire.

Only connect one loudspeaker with an impedance not less than 4 Ohm per channel.
Mains power connection
The unit is supplied with a power supply suitable for your country's mains supply. Check the label before connecting to ensure compliance with the mains rating in your house. Connect the low voltage plug from the power supply to the Power 20V = socket before connecting the power supply to the mains.
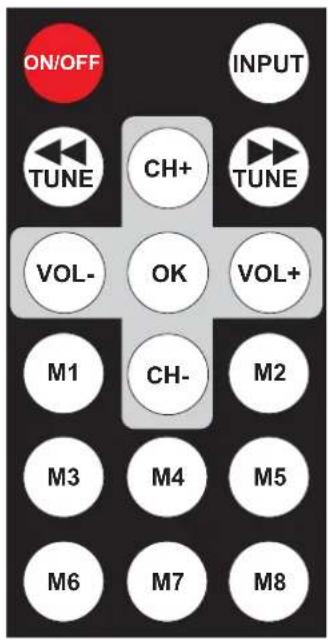
Remote control
text_image
ON/OFF INPUT TUNE CH+ TUNE VOL- OK VOL+ M1 CH- M2 M3 M4 M5 M6 M7 M8Stand-By

short press turns the unit on, long press takes it back into standby. Powered on, a short press activates and deactivates mute
Volume


adjust the sound volume
Selecting an input

selects the inputs
Selecting the tuning mode
OK Pressing (min. 3 seconds) selects the tuning modes manual program search (MANUAL) and automatic program search (AUTO) in turns.
Manual program search - the display shows MANUAL

decreases,

increases the reception frequency in 50kHz steps.
Automatic program search - the display shows AUTO

starts the automatic frequency scan downwards,

starts the scan upwards.
Program selection from memory - the display shows MEMORY

tivate the memory function. Pressing

access the presets 1 - 8 directly.


select -memory function has to be activated- the memory positions 9 - 99.
Saving a program in the memory list
Tune to the frequency to be stored. Press OK twice in rapid succession. The display will show STORE.

will select the next memory position up the list,

selects the next memory position down the list.
The memory positions 1 - 8 can be selected directly by pressing

OK Press once again

Saving a program to a particular memory position overwrites any program already stored at that position. The memory retains its contents through a power off/on cycle.
Using the Pro-Ject Receiver Box

text_image
87.90 MANUAL Receiver BoxTurning on/off
Press the rotary selector to switch the receiver on. After power is on the display will briefly show the Pro-Ject logo before changing to the regular display of the input selected.
Press and hold the rotary selector for a few seconds to switch the unit off. The display will show POWER OFF and STANDBY.
While switching off, the unit saves the settings for input, volume and mute, to be set automatically after next power on.
Input selector
After the unit is powered on, pressing the rotary selector selects the IN1 and IN2 inputs in turn. The display will show the volume level and the selected input: TUNER, IN1 or IN2.
The optional input expander Pro-Ject Switch Box provides three more inputs. For further details please see the user guide of the Pro-Ject Switch Box.
Volume
Adjust the volume (95 steps) to the desired level using the rotary selector. The display will show the volume level set. -95dB indicates min., 00dB max..
Mute

text_image
ON/OFF While the unit is powered on, activates and deactivates muteDimming the display

text_image
After pressing VOL- or VOL+ on the remote control, TUNE or TUNE set the brightness of the display. Available settings: DIM MIN, DIM 1 - DIM 4 and DIM MAX. The display will show the selected setting.Display - input tuner
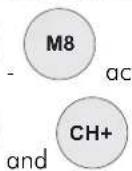
text_image
A B C 87.90 MANUAL D EA Signal strength meter
B Stereo reception
F Mono reception

C Fine tuning meter
D Tuning mode. The rotary selector toggles between the tuning modes
E Tuned frequency
Manual program search
Press the rotary selector repeatedly until the display shows MANUAL. By rotating the rotary selector the reception frequency will be increased or decreased in 50kHz steps. The tuner is correctly adjusted for a stereo broadcast when
A the largest number of bars are shown (signal strength meter) and
B two loudspeaker symbols are shown (F one loudspeaker symbol shows mono reception)
C the vertical bar is centred in the fine tuning display
Automatic program search
Press the rotary selector repeatedly until the display shows AUTO. Rotating the rotary selector clockwise starts the automatic frequency scan upwards, anticlockwise starts it downwards. The maximum signal strength will be adjusted automatically for each program found.
Program selection from memory
Press the rotary selector repeatedly until the display shows MEMORY. Rotating the rotary selector clockwise will select the program with the next memory position up the list, anticlockwise will select the program with the next memory position down the list. The program's memory position is shown to the right of MEMORY in the display.
Saving a program in the memory list
The memory of the Pro-Ject Receiver Box can store up to 99 programs. Tune to the frequency of the program to be stored. Press the rotary selector twice in rapid succession. The display will show STORE. Rotating the rotary selector clockwise will select the next memory position up the list, anticlockwise will select the next memory position down the list. Press once on the rotary selector to store the program at that position. The display shows STORED.

Saving a program to a particular memory position overwrites any program already stored at that position. The memory retains its contents through a power off/on cycle.
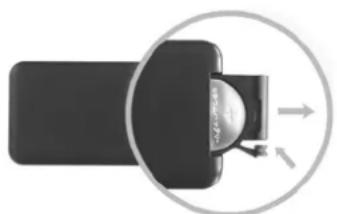
Replacing batteries
Proceed as follows:
- Unlock and slide open the battery case cover
- Replace the battery.
Make sure the battery is the right way round!
- Close the battery case cover
Battery type: 1 x CR2032 / 3V or 1 x CR2025 / 3V
natural_image
Diagram of a device with a circular arrow indicating direction, showing internal components (no text or symbols)
Do not dispose the batteries as ordinary domestic refuse. Please dispose your exhausted batteries at the appropriate collection sites - usually located at supermarkets and drugstores.
Technical specifications Pro-Ject Receiver Box
Power output: 2 x 20W/30W at 8ohms/4ohms (both channels driven)
Tuning range FM-band: 87,5 - 108,5MHz (50kHz steps)
Programmable presets: 99
THD tuner: 0,05% / Δf 75kHz and f mod 1kHz
Stereo separation: 30dB / Δf 75kHz and f mod 1kHz
Sensitivity: 7dB/μV mono, 17dB/μV stereo /75 ohms
Frequency response: 20Hz - 20kHz (±0,2dB)
Channel separation: > 40dB at 20kHz
Noise floor: > -100dB (A weighted)
THD amplifier: < 0,05% at 10W
Gain: 22dB
Line-level inputs: 1 pair RCA/Phono sockets, 3-pole 3,5mm co-axial jack
Input impedance: 20kohms
Antenna input: 1 x co-axial DIN-socket (75 ohms) / US-model F-socket
Outboard power supply: 20V/3A DC (peak 7A DC), suitable for your country's mains supply
Power consumption: 20V/3A DC
Replacement battery remote control: 1 x CR2032 / 3V or 1 x CR2025 / 3V
Dimensions W x H x D (D with sockets): 103 x 36 x 103 (122)mm
Weight: 670g without power supply
Service
Should you encounter a problem which you are not able to alleviate or identify, please contact your dealer for further advice. Only when the problem cannot be resolved there should the unit be sent to the responsible distributor in your country.
Warranty

The manufacturer accepts no responsibility for damage caused by not adhering to these instructions for use. Modification or change to any part of the product by unauthorized persons release the manufacturer from any liability over and above the lawful rights of the customer.
PRO-JECT is a Registered Trademark of H. Lichtenegger.
This guide was produced by: Audio Trade GmbH
Copyright © 2010. All rights reserved.
The information was correct at the time of going to press. The manufacturer reserves the right to make changes to the technical specification without prior notice as deemed necessary to uphold the ongoing process of technical development.