
G370 - Scissors PHILIPS - Free user manual and instructions
Find the device manual for free G370 PHILIPS in PDF.


| Product Type | Scissors |
| Brand | Philips |
| Model | G370 |
| Blade Material | Stainless steel |
| Handle Material | Plastic with rubberised grip |
| Blade Length | Approximately 12 cm |
| Total Length | Approximately 22 cm |
| Weight | Approximately 75 g |
| Usage | General purpose cutting (paper, fabric, etc.) |
| Safety Feature | Protective cap for blades |
| Care Instructions | Wipe clean with a dry cloth; avoid moisture |
| Sharpening | Periodic sharpening recommended |
| Warranty | 1 year limited warranty |
| Country of Origin | China |
Frequently Asked Questions - G370 PHILIPS
User questions about G370 PHILIPS
0 question about this device. Answer the ones you know or ask your own.
Ask a new question about this device
Download the instructions for your Scissors in PDF format for free! Find your manual G370 - PHILIPS and take your electronic device back in hand. On this page are published all the documents necessary for the use of your device. G370 by PHILIPS.
USER MANUAL G370 PHILIPS
natural_image
Product photo of a white hairbrush tool with multiple accessories and a base tray (no visible text or symbols)G390, G380, G370
Rechargeable
Cordless
IMPORTANT SAFETY INSTRUCTIONS
When using an electrical appliance, basic safety precautions should always be followed, including the following:
Read all instructions before using this appliance.
DANGER
To reduce the risk of electric shock:
- Do not reach for a Groomer that has fallen into water. Unplug immediately.
- Do not use while bathing or in a shower.
- Do not place or store Groomer where it can fall or be pulled into a tub or sink. Do not place in or drop into water or other liquid.
- Always unplug this Groomer from the electrical outlet immediately after using, except when Groomer is (re)charging.
- Unplug Groomer before cleaning.
- When discarding Groomer, unplug Groomer to remove rechargeable battery. See Battery Removal Instructions.
WARNING
To reduce the risk of burns, fire, electric shock or injury to persons:
- Close supervision is necessary when this appliance is used by, on, or near children or invalids.
- Use this Groomer for its intended household use as described in this manual. Do not use attachments not recommended by Philips Electronics North America Corporation.
- Never operate this Groomer if it has a damaged cord or plug, if it is not working properly, if it has been dropped, damaged, or dropped into water. Return the Groomer to the Philips Norelco Service Location for examination and repair.
- Keep the Groomer, cord and any attachments away from heated surfaces.
- Never drop or insert any object into any opening.
- Do not operate, charge or plug in Groomer outdoors or where aerosol (spray) products are being used or where oxygen is being administered.
- Do not use this Groomer with a damaged or broken cutter, cutting unit, or shaving foil as injury may occur.
- Always attach plug to Groomer first, then to outlet. To disconnect, turn on/off switch to "OFF" position (switch is down), then remove plug from outlet.
- To prevent possible damage to the cord, do not wrap cord around the Groomer.
- Never put Groomer in direct sunlight or store at a temperature above 140^ F.
- This Groomer is for use on human hair only. Do not use this Groomer for any other purpose.
- Always store your Groomer, attachments and power plug in a moisture-free area. Make sure the cord is disconnected from the Groomer.
SAVETHESE INSTRUCTIONS
IMPORTANT: YOUR GROOMER CONTAINS A NICKEL-CADMIUM RECHARGE-ABLE BATTERY.
See Battery Removal Instructions.
IMPORTANT:The power plug contains a transformer. Do not cut off the power plug to replace it with another plug as this will cause a hazardous condition.
Put It To The Test
Like many new products, your Philips Norelco All in 1 Grooming System may take a little getting used to. If you are using an electric Groomer for the first time, or if you've been using a different brand, take the time to acquaint yourself with your new Grooming System.
Your All in 1 Grooming System features the unique AccuControl System combined with adjustable Length Settings to make trimming facial hairs or hair clipping goof proof.
Throw your scissors away and put your new All in 1 Grooming System to the test. We guarantee precise, professional results or Philips Norelco will refund you the full purchase price.
Features
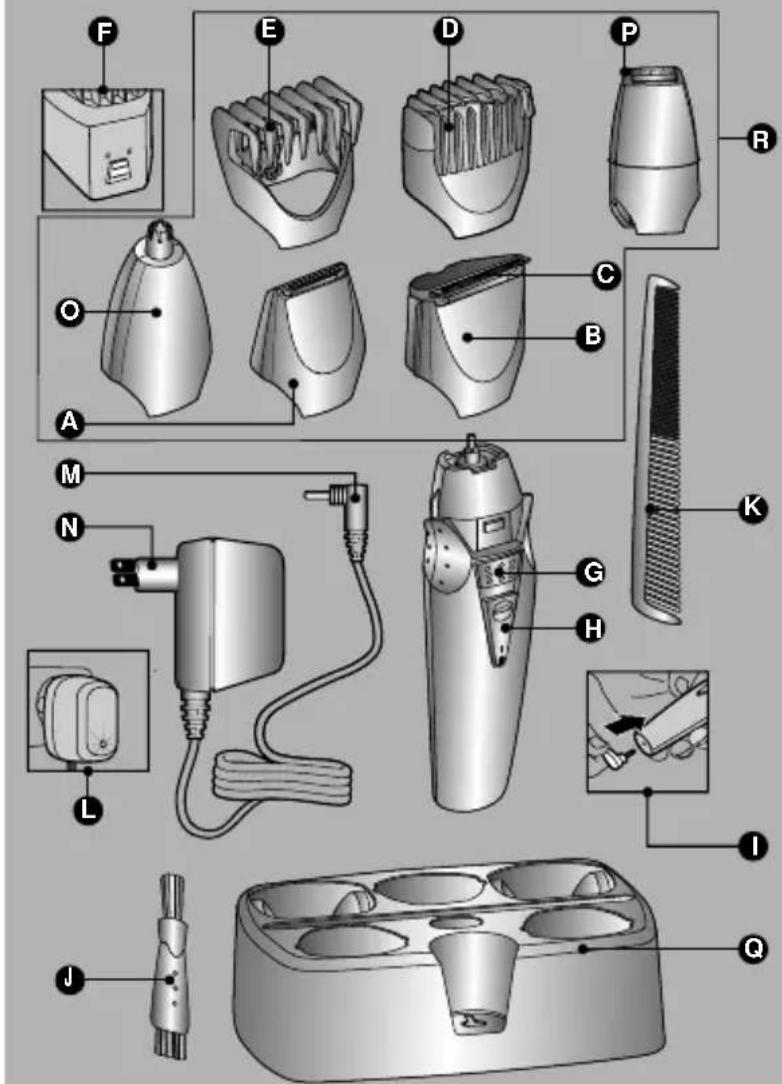
fig. 1
A Precision Trimmer Attachment
B Full Width Trimmer Attachment
C Lifetime Self-Sharpening 3-Dimensional Rounded Stainless Steel Cutter Blades
D AccuControl Beard & Moustache Trimmer Guide Comb
E Hair Clipping Comb
F 9 Position Hair Length Selector
G Release Button
H On/Off Slide Switch
I Socket for appliance plug
J Cleaning Brush
K Styling Comb
L LED Charging Indicator Light on Adaptor
M Appliance Plug
N Charging Plug
O Nose, Ear, Eyebrow Trimmer Attachment
P Mini Shaver
Q Store & Charge Stand
R Rinsable Attachments
Pouch (models G390 and G380 only)
Full Two-Year Warranty
60-Day Money-Back Guarantee
To Charge/Recharge
▶ Fully charge Groomer before using for the first time or after non-use for a long period of time.
▶ Battery performance is best if you recharge only when the battery is (almost) completely empty.
- Charging or recharging at temperatures below 40°F or higher than 95°F adversely affects lifespan of the battery.
- Continuously recharging Groomer will reduce lifespan of battery.
1 Be certain Groomer is OFF.
2 You may charge the Groomer:
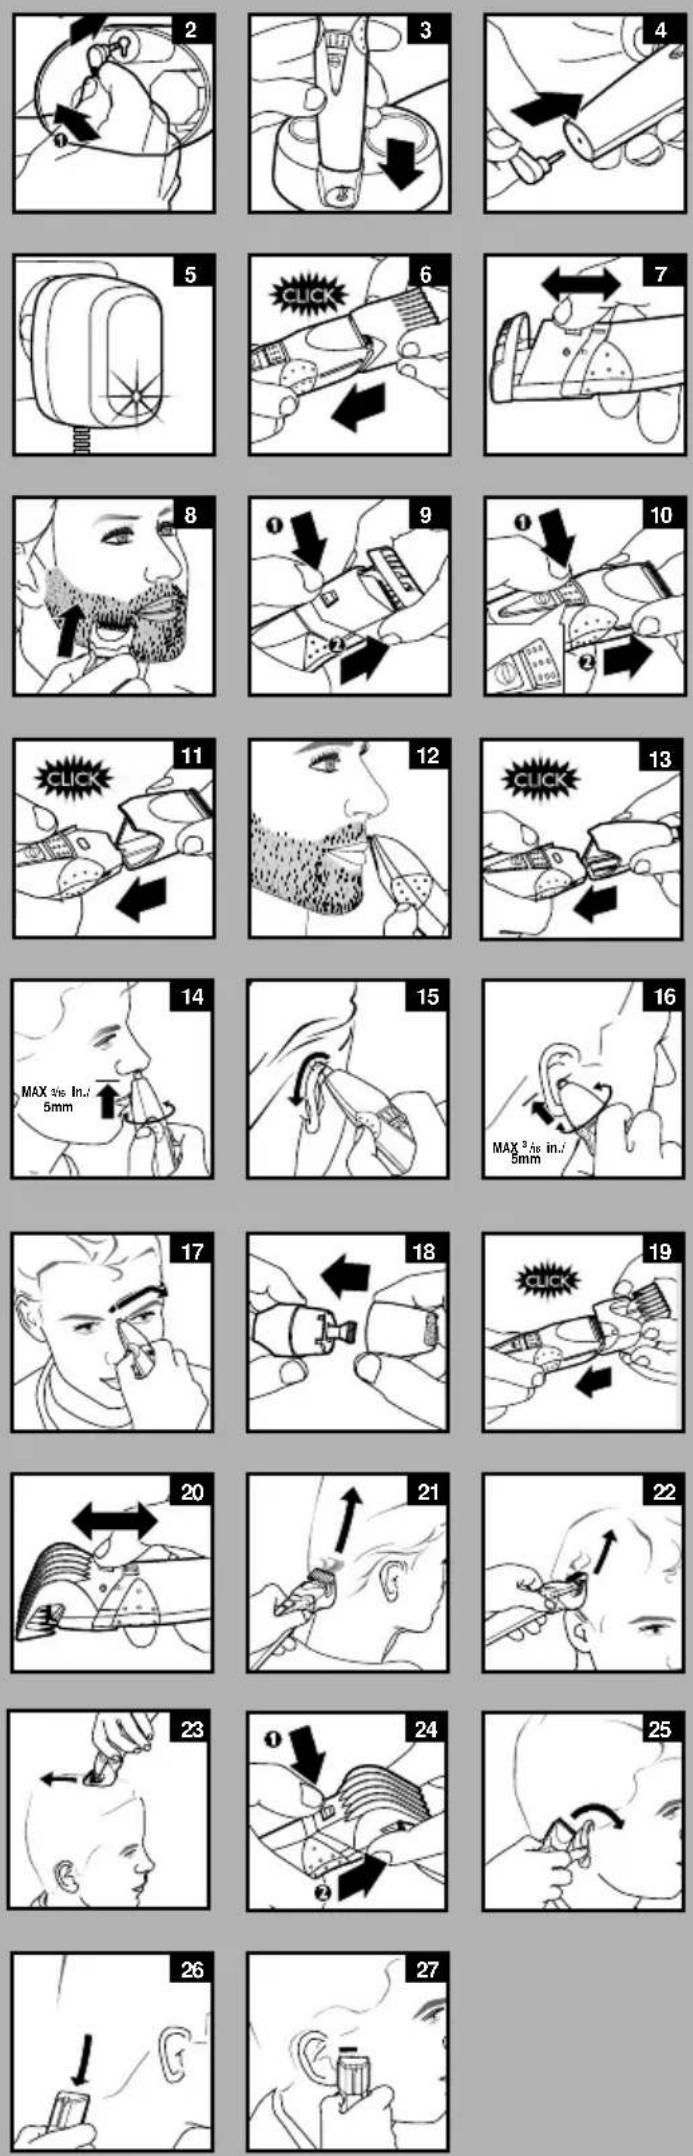
In the charging stand by inserting the appliance plug into the socket located in the bottom of the charging stand (fig. 2). Place the Groomer directly on the charging pin in the stand (fig. 3).
▶ By inserting the appliance plug directly into the Groomer (fig. 4).
3 Plug charging plug into any 120V AC outlet. Use only the cord provided.
4 After a few moments, the green Charging Indicator Light on the power plug will light to indicate the Groomer is charging (fig. 5).
- It will take approximately 10 hours to fully charge the Groomer for a cordless trimming time of up to 35 minutes.
- Disconnect the cord and unplug from electrical outlet.
Optimizethe working life of the battery
▶ After the Groomer has been charged for the first time, do not recharge the Groomer between trimming sessions. Continue using it until the battery is completely empty.
▶ Do not charge for more than 24 hours.
▶ Do not keep cord permanently plugged in.
- Discharge/run down the battery completely twice a yearby letting the motor run until it stops.
If the Groomer hasn't been used for a long period of time, it must be recharged for a full 10 hours.
Cordless Trimming
Charge according to directions. Unplug Personal Groomer from outlet.
2 Slide ON/OFF switch ON to begin trimming.
3 If the battery is empty and you want to trim your beard, charge the Groomer for at least 3 hours and you will have enough power for one use (10 minutes).
AccuControl System
The unique Philips Norelco AccuControl System puts you in complete control while trimming your facial hairs with no prior experience needed. The flexing Guide Comb adjusts automatically to hug the contours of your face for a trim that is both even and accurate. And, it's easy to maneuver over those hard-to-reach areas such as the throat and chin. The Hair Length Selector allows you to choose among 9 preset hair lengths and clicks into position so you can control the exact hair length you desire or vary the length of your facial hair. The Hair Clipping Comb also features 9 preset hair lengths and clicks into position so you can control the exact hair length you desire. The Philips Norelco All in 1 Grooming System for professional, goof-proof results every time or your money back.
Trimming
▶ Make sure hair is clean and dry.
▶ Always comb the hair with the styling comb in the direction of growth before you start trimming.
Do not move the Groomer too fast. Make smooth and gentle movements.
Trimming your Beard & Moustache with AccuControl Guide CombAttachment
▶ Use this Groomer for its intended household use as described in this manual.
- Make sure that the Groomer is fully charged before you start trimming. This Groomer will not operate while cord is connected to electrical outlet.
1 Put the AccuControl comb on the full width trimmer attachment until you hear it click into place (fig. 6). The AccuControl comb will not work with the smaller neckline and sideburntrimmer, ormini shaverattachments.
2 Press the Hair Length Selector and slide it to the desired trimming length setting. The selected setting number will appear in the window to the left of the Hair Length Selector (fig.7). See Table 1 for settings.
If you are trimming for the first time, start by using the AccuControl comb at the maximum trimming length setting (#9) to prevent accidentally trimming hairs too short. As you become familiar with the settings, adjust Hair Length Selector to desired trimming length. Selector will "click" into position at each setting.
3 Switch the Groomer ON.
4 To trim in the most effective way, move the Groomer against the direction of hair growth. Make sure the surface of the Guide Comb always stays in contact with the skin (fig. 8).
NOTE: Since all hairs do not grow in the same direction, you may want to try different trimming directions (i.e., upwards, downwards, or across). Practice is best for optimum results.
If a lot of hair has accumulated in the Guide Comb, remove the comb and blow and/or shake the hair out of the comb. You can also use the cleaning brush provided to remove hair from the comb area.
▶ REMEMBER: You must reset the hair length selector back to your desired setting every time you replace the guide comb on the appliance.
Table 1. Beard Trimmer
| Setting | Remaining hair length (in.) /(mm) | |
| 1 | Stubble | .08 in/2mm |
| 2 | Closely Cropped | .16 in/4mm |
| 3 | Short | .24 in/6mm |
| 4 | Medium Short | .31 in/8mm |
| 5 | Medium | .39 in/10mm |
| 6 | Medium Long | .47 in/12mm |
| 7 | Long | .55 in/14mm |
| 8 | Extra Long | .63 in/16mm |
| 9 | Longest | .71 in/18mm |
The remaining hair length corresponds with the smallest distance between the cutting blade and the spot where the comb is in contact with the skin.
- Cutting without the comb attachment or setting the AccuControl guide comb to #1 position will result in a stubble beard look.
Beard Trimming Without AccuControl Guide Comb
Remove AccuControl guide comb if you are:
▶ Defining hair lines
▶ Trimming nape of neck
▶ Removing single, unwanted hairs
1 Be certain the Groomer is in the OFF position.
2 Remove the AccuControl comb attachment by pressing and sliding the Hair Length Selector upwards (fig. 9).
Never pull off the AccuControl comb attachment by grasping the flexible top portion. Always pull off by the bottom part of attachment.
3 Switch the Groomer on.
4 Make well-controlled movements. Touch the hair/skin lightly with the Groomer.
Defining Beard, Moustache and Sideburns
1 Be certain the Groomer is in the OFFposition.
2 Remove the AccuControl comb attachment by pressing and sliding the Hair Length Selector upwards (fig. 9).
3 Detach the full width trimmer attachment by pushing the release button (fig. 10).
4 Put the precision trimmer attachment on the Groomer (fig. 11). You will hear a click.
▶ Hold the Groomer upright when you use the precision trimmer attachment (fig. 12).
Using Nose, Ear & Eyebrow Trimmer Attachment
1 Be certain the Groomer is in the OFF position.
2 To attach or remove nose, ear, eyebrow trimmer (or change attachments):
▶ Remove the AccuControl comb attachment (fig.9).
Remove the full width trimmer attachment by pushing the release button (fig. 10).
Put the nose, ear, eyebrow attachment on the Groomer (fig. 13). You will hear a click.
Trimming Nose Hair
▶ Make sure nasal passages are clean.
1 Place nose, ear and eyebrow attachment on Groomer.
2 Switch the Groomer on and insert the tip of the attachment into one nostril (fig. 14).
CAUTION: Do Not insert the tip more than 3/16 in./5mm into your nostril.
3 Slowly move the tip in and out while turning it around at the same time in order to remove unwanted hair. For best results, make sure the side of the tip is firm against skin. This will reduce the tickling effect that can occur during trimming of nose hair.
4 Turn off Groomer. Rinse attachment clean after each use.
Trimming Ear Hair
- Clean outer area of ear and ear canal. Make sure it is free of wax.
▶ Nose, ear and eyebrow attachment should be on the Groomer.
1 Switch the Groomer on and move the tip softly around the edge of ear to remove hairs extending beyond the outer ear (fig. 15).
2 Carefully insert the tip into outer ear canal.
CAUTION: Do not insert the tip further than 3/16 in./5mm into the ear as this could cause damage to the eardrum (fig. 16).
3 Turn off Groomer. Rinse attachment clean after each use.
Trimming Eyebrow
▶ Nose, ear and eyebrow attachment should be on Groomer.
1 Switch the Groomer on and use the tip to cut individual eyebrow hairs.
The Groomer can be used for clipping single long hairs.
2 Put the Groomer at the root of the hair and move it along the edge of the eyebrow from the base of the nose towards the outer tip of the eyebrow in the direction of hair growth (fig. 17).
IMPORTANT: Do not use the Groomer to define or trim the entire eyebrow. Do not try to trim your eyelashes. Be careful not to get too close to your eyelashes and eyes!
3 Turn off Groomer. Rinse attachment clean after each use.
Shaving With Mini Shaver Attachment
1 Put the mini shaver attachment on the groomer (fig. 18).
2 Use the narrow mini shaver to shave along contoured edges to remove any stubble while creating a smooth, well-defined beard line.
Before using the mini shaver, always check it for wear and damage. If the mini shaver shows signs of wear or damage, do not use it as injury may occur. Do not use the mini shaver until it has been replaced.
Gently press the mini shaver onto the skin. Do not press too hard.
Hair Clipping
- Make sure that the appliance is fully charged before you start clipping hair. The appliance will not operate while cord is connected to electrical outlet.
Before you start clipping, make sure that the head of the person whose hair you are cutting is at the same level as your chest so that all parts of his/her head are clearly visible and within easy reach.
▶ Only use the appliance on dry hair.
▶ Do not use on freshly washed hair.
▶ Before you begin, comb the hair in the direction of growth.
▶ To achieve optimal clipping results, always move the appliance slowly through the hair against the direction of hair growth.
Clipping with hair comb attachment
1 Put the hair clipper comb on the full width trimmer attachment and push until you hear it 'click' into place (fig. 19).
2 Press the Hair Length Selector and slide it to the desired setting. See Table 2.
3 The setting selected will appear in the window to the left of the Hair Length Selector (fig. 20).
When you are clipping for the first time, start at the maximum clipping length setting (#9) to familiarize yourself with the appliance and prevent accidentally trimming hairs too short. As you become familiar with the settings, adjust the Hair Length Selector to desired trimming length. Selector will 'click' into position at each setting.
Table 2. Hair clipper
| Setting | Remaining hair length (in)/(mm) |
| 1 | .16 in./4mm |
| 2 | .24 in./6mm |
| 3 | .31 in./8mm |
| 4 | .39 in./10mm |
| 5 | .47 in./12mm |
| 6 | .55 in./14mm |
| 7 | .63 in./16mm |
| 8 | .71 in./18mm |
| 9 | .79 in./20mm |
4 Make sure that the flat part of the comb is always in full contact with the scalp to obtain an even result (fig. 21-22).
5 Move the appliance slowly over the crown from different directions to achieve an even result (fig. 23).
6 Always move the appliance against the direction of hair growth.
7 Make overlapping passes over the head to ensure that all hair that should be cut has been cut.
8 Turn the Groomer off and remove the hair comb often to blow and/or shake out hair that has accumulated.
▶ REMEMBER: You must reset the hair length selector back to your desired setting every time you replace the hair clipping comb on the appliance.
Contouring without the hair clipping comb attachment
1 Remove the hair comb by pressing and sliding the Hair Length Selector upwards (fig. 24).
Be careful when you are clipping without comb attachment as when the appliance is turned on it will trim every hair it touches.
2 Tilt the appliance in such a way that only one edge of the trimming attachment touches the hair ends when you shape the contours around the ears (fig. 25).
3 To contour the nape of the neck or hairline, turn the appliance and hold it with the trimming attachment pointing downwards (fig. 26).
4 To contour the sideburns, turn the appliance and hold it with the trimming attachment pointing downwards (fig. 27).
Cleaning
- Do not use water or a moist cloth to clean the Groomer.
▶ Always switch Groomer OFF before cleaning. - Do not use abrasive, scourers or liquids such as alcohol, benzene, bleach or acetone to clean the Groomer and attachments.
▶ Never clean, replace or remove Groomer attachments with motor ON.
▶ Do not apply pressure to cutters. - Do not touch cutters with hard objects as this may damage them.
- Do not use while bathing, showering or immerse the Groomer in water or other liquids as damage to Groomer may occur.
During Use:
If cut hairs have accumulated in the Guide Comb area, remove hairs by shaking, blowing or using cleaning brush provided. Remember to adjust the trimming length back to your selected setting when you replace the guide comb on Groomer.
After Each Use:
Make sure the Groomer is switched OFF and disconnected from the electrical outlet.
2 Remove any attachment.
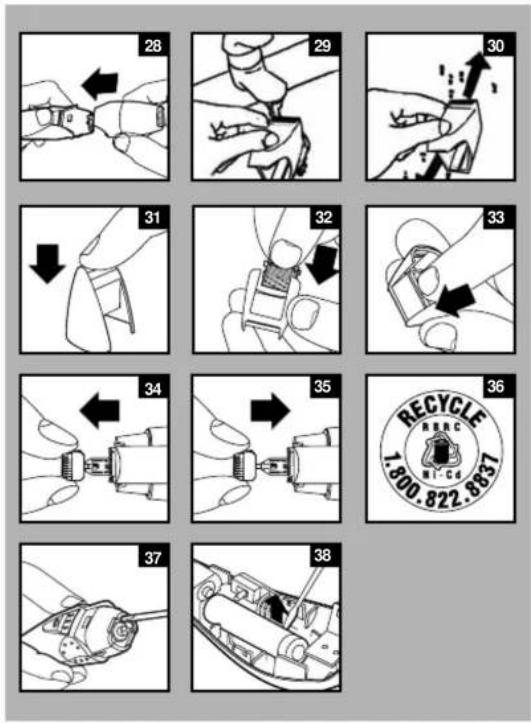
3 Also separate the top part of the mini shaver attachment from its body (fig. 28).
4 Blow and/or shake out any hair that may have accumulated in the attachment.
The shaving foil is very delicate and should not be handled.
▶ If foil becomes damaged, replace it. Do not apply pressure to shaving foil.
5 Do not clean the foil with the brush, as this may cause damage.
6 Place the attachment back on the Groomer or place it in the storage stand.
Rinsable Attachments
▶ If preferred your Groomer trimming attachments (See Features Ⓡ) can also be rinsed clean after each use.
1 Remove any attachment from groomer and rinse attachment only thoroughly under warm tap water (fig.29).
Never rinse attachments that are still attached to the Groomer.
2 Shake excess water from attachment (fig. 30) and allow to dry thoroughly.
Do not use a towel to air dry the mini shaver as damage to the shaving foil could occur.
3 Place the attachment back on the Groomer or place it in the storage stand.
This Groomer has no other user-serviceable parts. Any other service should be performed by the Philips Norelco Service Location.
Storage
▶ Be sure Groomer is turned OFF. Remove cord from outlet and Groomer before storing in a safe, dry location where it will not be crushed, banged, or subject to damage.
- Store the Groomer and attachments in the storage stand to prevent damage.
- Do not wrap cord around Groomer or stand when storing.
- Store cord in a safe location where it will not be cut or damaged.
- Do not place or store Groomer where it can fall or be pulled into a tub or sink, water or other liquid while plugged in.
Replacing Trimmer Cutting Unit
If your cutters become damaged or worn, do not continue using the Groomer. Cutters should be replaced immediately by the Philips Norelco Service Location.
Replacing Trimmer Cutting Unit
If your cutters become damaged or worn, do not continue using the Groomer. Cutters should be replaced immediately by the Philips Norelco Service Location.
Replacing The Mini Shaver Foil
If the shaving foil is worn or damaged, do not continue using the appliance. Replace the shaving foil immediately.
A worn or damaged shaving foil should only be replaced with an original Philips shaving foil, which is available at the Philips Norelco Service Location.
1 Remove the detachable shaving head by pulling it from the appliance (fig. 28).
2 Remove the shaving foil by pushing it out of the shaving head (fig.31).
3 Place the new shaving foil carefully in the shaving head (fig. 32).
4 When the shaving foil is properly positioned, push it into its end position with your finger (fig. 33).
Replacing The Mini Shaver Cutter
If the mini shaver cutter is worn or damaged, do not continue using the appliance. Replace the mini foil cutter and the shaving foil immediately.
A worn or damaged mini shaver cutter should only be replaced with an original Philips cutter, which is available at the Philips Norelco Service Location.
Remove the detachable shaving head by pulling it from the appliance (fig. 28).
2 Remove the old mini shaver cutter by pulling it from the appliance (fig. 34).
3 Make sure that the spring within the driving unit does not get lost.
4 Insert the new mini shaver cutter carefully into the driving unit (fig. 35).
5 When the mini shaver cutter is properly positioned, push it into its end position with your finger.
6 Replace the detachable shaving head on the appliance or place it in the storage stand.
Assistance
For assistance, call toll free:
1-800-243-3050
or visit our website:
www.philips.com/norelco
Information is available 24 hours a day, 7 days a week.
Battery Removal
This Philips Norelco Groomer contains a rechargeable Nickel-Cadmium battery, which must be disposed of properly (fig. 36).
▶ Battery should only be removed when Groomer is to be discarded.
- All servicing or battery replacement should be performed by the Philips Norelco Service Location.
For assistance, call toll free: 1-800-243-3050 or visit our website: www.philips.com/norelco.
1 Unplug electrical cord from outlet and Groomer before dismantling Groomer.
2 Allow the Groomer to run until the batteries are completely empty/depleted. Turn Groomer off.
3 Insert a narrow, flat blade screwdriver in the groove next to the shaft at the top of the Groomer (fig. 37).
4 Turn the screwdriver to separate the two housing halves.
5 Lift the battery out of the housing using the screwdriver (fig. 38).
6 Twist and bend the battery connections until they break.
7 Remove the battery from the Groomer.
8 Do not attempt to replace battery. Insulate battery ends by covering with tape and/or place battery in a small plastic bag. Discard Groomer.
9 Contact your local town or city officials for battery disposal information or call 1-800-8-BATTERY or www.rbrc.com for drop-off locations.
60-DAY MONEY-BACK GUARANTEE
If you are not fully satisfied with your Philips Norelco Groomer, send the product back and we'll refund you the full purchase price.
The Groomer must be shipped prepaid by insured mail, insurance prepaid, and have the sales receipt, indicating purchase price and the date of purchase, enclosed. The Groomer must be postmarked no later than 60 days after the date of purchase. Philips Norelco reserves the right to verify the purchase price of the Groomer and limit refunds not to exceed suggested retail price.
Send dated sales receipt, your complete name and address as indicated below, and the Groomer, prepaid to:
Philips Domestic Appliances and Personal Care Company A Division of Philips Electronics North America Corporation 450 North Medinah Road, Dock 16 Roselle, IL 60172-2329
Please allow 4-6 weeks for delivery of check. (Please Print)
Name ____
Address
City
State ____ Zip ____
Daytime Telephone No. (____)
E-mail Address: ____
REASON FOR RETURNING:
Full Two-Year Warranty
Philips Electronics North America Corporation warrants each new Philips Norelco product, Models G390, G380, G370, against defects in materials or workmanship for a period of two years (cutters for up to five years) from the date of purchase, and agrees to repair or replace any defective product without charge.
IMPORTANT: This warranty does not cover damage resulting from accident, misuse or abuse, lack of reasonable care, the affixing of any attachment not provided with the product or loss of parts or subjecting the product to any but the specific voltage.* Use of unauthorized replacement parts will void this warranty.
PHILIPS ELECTRONICS NORTH AMERICA CORPORATION WILL NOT PAY FOR WARRANTY SERVICE PERFORMED BY A NON-AUTHORIZED REPAIR SERVICE AND WILL NOT REIMBURSE THE CONSUMER FOR DAMAGE RESULTING FROM WARRANTY SERVICE PERFORMED BY A NON-AUTHORIZED REPAIR SERVICE.
NO RESPONSIBILITY IS ASSUMED FOR ANY SPECIAL, INCIDENTAL OR CONSEQUENTIAL DAMAGES.
In order to obtain warranty service, simply ship the product postage prepaid to the Philips Norelco Service Location (information available online at www.philips.com/norelco or at 1-800-243-3050). It is suggested that for your protection you return shipments of product by insured mail, insurance prepaid. Damage occurring during shipment is not covered by this warranty. NOTE: No other warranty, written or oral, is authorized by Philips Electronics North America Corporation. This warranty gives you specific legal rights, and you may also have other rights which vary from state to state. Some states do not allow the exclusion or limitation of incidental or consequential damages, so the above exclusion and limitations may not apply to you.
* Read enclosed instructions carefully.
Manufactured for:
Philips Domestic Appliances and Personal Care Company
A Division of Philips Electronics North America Corporation
1010 Washington Blvd., Stamford, CT 06912-0015

This symbol on the product's nameplate means it is listed by Underwriters' Laboratories, Inc.
Norelco is a Registered Trademark of Philips Electronics
North America Corporation.
AccuControl is a Trademark of Philips Electronics North America Corporation.
PHILIPS is a Registered Trademark of Koninklijke Philips Electronics N.V.
- IMPORTANT SAFETY INSTRUCTIONS
- DANGER
- WARNING
- SAVETHESE INSTRUCTIONS
- Put It To The Test
- Features
- To Charge/Recharge
- Optimizethe working life of the battery
- Cordless Trimming
- AccuControl System
- Trimming
- Trimming your Beard & Moustache with AccuControl Guide CombAttachment
- Beard Trimming Without AccuControl Guide Comb
- Defining Beard, Moustache and Sideburns
- Using Nose, Ear & Eyebrow Trimmer Attachment
- Trimming Nose Hair
- CAUTION: Do Not insert the tip more than 3/16 in./5mm into your nostril.
- Trimming Ear Hair
- CAUTION: Do not insert the tip further than 3/16 in./5mm into the ear as this could cause damage to the eardrum (fig. 16).
- Trimming Eyebrow
- IMPORTANT: Do not use the Groomer to define or trim the entire eyebrow. Do not try to trim your eyelashes. Be careful not to get too close to your eyelashes and eyes!
- Shaving With Mini Shaver Attachment
- Hair Clipping
- Clipping with hair comb attachment
- Contouring without the hair clipping comb attachment
- Cleaning
- During Use:
- After Each Use:
- Rinsable Attachments
- Storage
- Replacing Trimmer Cutting Unit
- Replacing The Mini Shaver Foil
- Replacing The Mini Shaver Cutter
- Assistance
- Battery Removal
- 60-DAY MONEY-BACK GUARANTEE
- Full Two-Year Warranty
Brand : PHILIPS
Model : G370
Category : Scissors