
AV500 Nano - Powerline Adapter Edimax - Free user manual and instructions
Find the device manual for free AV500 Nano Edimax in PDF.


| Product Type | Powerline Adapter |
| Brand | Edimax |
| Model | AV500 Nano |
| Data Rate | Up to 500 Mbps |
| Standard | HomePlug AV, IEEE 802.3, IEEE 802.3u |
| Ports | 1 x 10/100 Ethernet port |
| Security | 128-bit AES encryption with Group button |
| LED Indicators | Power, PLC, LAN, WLAN, WPS |
| Buttons | Group button, WPS/Reset button |
| System Requirements | Windows XP/Vista/7/8, Ethernet port, CD-ROM drive |
| Package Contents | HP-5101Wn unit, Ethernet cable, CD-ROM, Quick Installation Guide |
| Dimensions | Approx. 60 x 45 x 30 mm (estimated) |
| Weight | Approx. 100 g (estimated) |
| Power Supply | 100-240 V AC, 50-60 Hz (built-in) |
| Operating Temperature | 0°C to 40°C |
| Operating Humidity | 10% to 90% non-condensing |
| Range | Up to 300 meters in household electrical wiring |
| Management | Web browser (http://edimax.setup), Powerline Utility software |
| Certifications | FCC, CE, R&TTE |
| Warranty | Limited warranty (refer to manual) |
Frequently Asked Questions - AV500 Nano Edimax
User questions about AV500 Nano Edimax
0 question about this device. Answer the ones you know or ask your own.
Ask a new question about this device
Download the instructions for your Powerline Adapter in PDF format for free! Find your manual AV500 Nano - Edimax and take your electronic device back in hand. On this page are published all the documents necessary for the use of your device. AV500 Nano by Edimax.
USER MANUAL AV500 Nano Edimax
Copyright © Edimax Technology Co., Ltd. all rights reserved. No part of this publicaon may be reproduced, transmied, transcribed, stored in a retrieval system, or translated into any language or computer language, in any form or by any means, electronic, mechanical, magnec, opcal, chemical, manual or otherwise, without the prior written permission from Edimax Technology Co., Ltd.
Edimax Technology Co., Ltd. makes no representaons or warranes, either expressed or implied, with respect to the contents hereof and specifically disclaims any warranes, merchantability, or tness for any parcular purpose. Any soware described in this manual is sold or licensed as is. Should the programs prove defecve following their purchase, the buyer (and not this company, its distributor, or its dealer) assumes the enre cost of all necessary servicing, repair, and any incidental or consequential damages resulting from any defect in the soware. Edimax Technology Co., Ltd. reserves the right to revise this publicaon and to make changes from me to me in the contents hereof without the obligaon to nofy any person of such revision or changes.
The product you have purchased and the setup screen may appear slightly dierent from those shown in this QIG. For more informaon about this product, please refer to the user manual on the CD-ROM. The soware and specicaons are subject to change without noce. Please visit our website www.edimax.com for updates. All brand and product names menoned in this manual are trademarks and/or registered trademarks of their respective holders.
Edimax Technology Co., Ltd.
Add: No. 3, Wu-Chuan 3rd Rd., Wu-Ku Industrial Park, New Taipei City, Taiwan Tel: +886-2-77396888 Email: sales@edimax.com.tw
Noce According to GNU General Public License Version 2
This product includes soware that is subject to the GNU General Public License version 2. The program is free soware and distributed without any warranty of the author. We oer, valid for at least three years, to give you, for a charge no more than the costs of physically performing source distribuon, a complete machine-readable copy of the corresponding source code.
CONTENTS
I. PRODUCT INFORMATION......5
I-1. Package Contents....5
I-2. Hardware ....5
I-3. LED Status 6
I-4. Safety Informaon ....7
I-5. System Requirements For Powerline Utility Soware....7
II. CREATING A POWERLINE NETWORK 8
II-1. Hardware Installaon ....8
II-2. iQ Setup 10
II-3. WPS Setup....15
II-4. Connecng to your HP-5101Wn....16
II-5. Leaving a Powerline Network ....18
II-6. Reseng the Wireless Extender....18
III. BROWSER BASED CONFIGURATION INTERFACE.... 19
III-1. Home....21
III-2. iQ Setup 23
III-3. Basic Seng....24
III-3-1. Security 26
III-3-1-1. Disable 27
III-3-1-1-1. 802.1x Authencaon .....27
III-3-1-2. WEP....28
III-3-1-2. WPA Pre-shared Key....29
III-3-1-3. WPA Radius....30
III-4. WPS Seng....32
III-5. Wireless Advanced....34
III-5-1. MAC Filtering....36
III-6. System Utility 38
III-6-1. Time Seng....41
III-6-2. Scheduling Setng 42
II-7. Conguraon Tool....45
III-7-1. Diagnosis....47
III-7-2. Firmware Upgrade 48
III-7-3. Reboot....49
IV. POWERLINE UTILITY SOFTWARE 50
IV-1. Installaon 50
IV-1.1 Win 8....50
IV-1.2 Win XP/Vista / 7 ....59
IV-2. Using the Utility Soware....65
IV-2-1. Main Tab....65
IV-2-2. Diagnoscs Tab....66
IV-2-3. About Tab 67
V. APPENDIX....68
V-1. Conguring your IP address....68
V-1-1. How to Congure Your Computer to Use a Dynamic IP Address....68
V-1-1-1. Windows XP....69
V-1-1-2. Windows Vista....70
V-1-1-3. Windows 7....72
IV-1-1-4. Windows 8....74
V-1-2. How to Modify the IP Address of Your PC or Macintosh 80
V-1-2-1. Windows XP....80
V-1-2-2. Windows Vista....81
V-1-2-3. Windows 7....82
V-1-2-4. Windows 8....84
V-1-3. How to Find Your Network Security Key....90
V-1-3-1. Windows 7 & Windows Vista....90
V-1-3-2. Windows 8....92
V-1-3-3. Mac 95
V-1-4. How to Find Your Router's IP Address....98
V-1-4-1. Windows XP, Vista & 7....98
V-1-4-2. Windows 8....99
V-1-4-3. Mac 101
V-2. Troubleshoong....103
V-3. Glossary 105
I. PRODUCT INFORMATION
Before you start using this product, please check if there is anything missing in the package, and contact your dealer to claim the missing items(s):
I-1. Package Contents
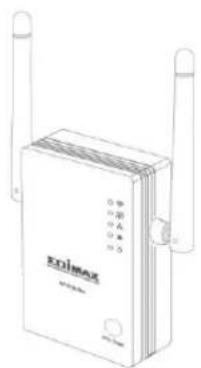
HP-5101Wn
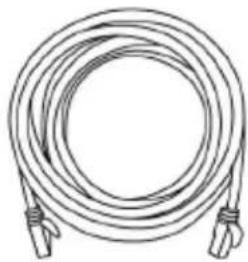
natural_image
Line drawing of a coiled cable with two connectors (no text or symbols)Ethernet
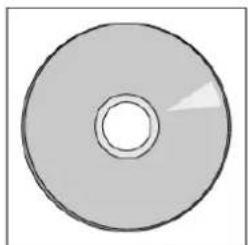
natural_image
Simple line drawing of a CD or DVD disc (no text or symbols)CD-ROM
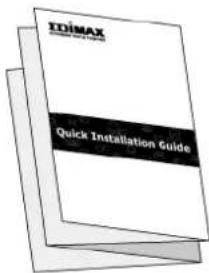
Quick Installaon Guide
I-2. Hardware
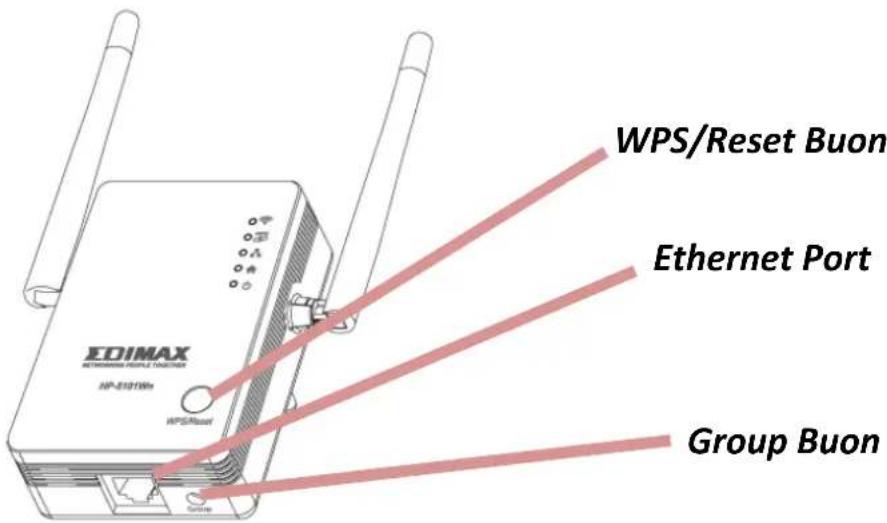
| Item | Descripon |
| Ethernet Port | Connects HP-5101Wn to a computer or other network device via Ethernet cable. |
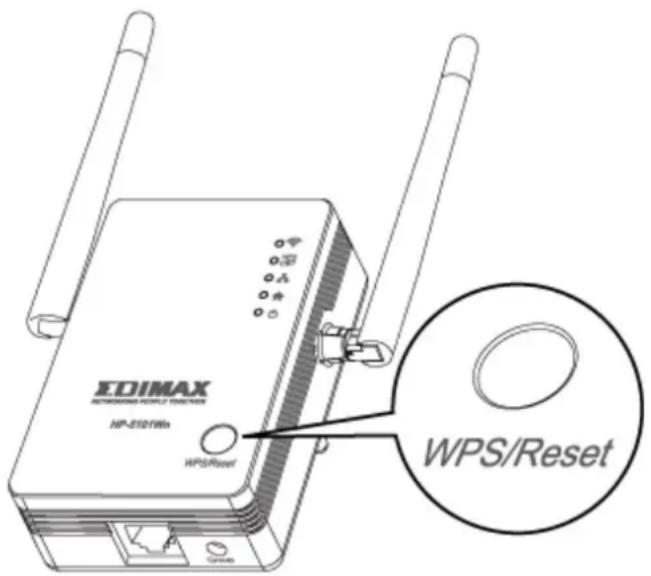
| WPS/Reset Buon | Resets the HP-5101Wn to factory default sengs or starts the WPS funcon.Reset:Press for over 10 seconds.WPS:Press for 2–5 seconds. |
| Group Buon | Groups the HP-5101Wn with other Powerline devices to establish an encrypted Powerline network. Press for less than 3 seconds to join/establish a network, and 5–8 seconds to leave a Powerline network. |
I-3. LED Status
| LED | Color | LED Status | Descripon |
WLAN | Green | Flashing | Wireless acvity (transming or receiving data). |
| O | No wireless acvity. | ||
WPS | Green | On | WPS conncon established (LED remains on for one minute aer the conncon is made). |
| Flashing | WPS in progress (waing for another WPS device's conncon). | ||
| O | No WPS in progress. | ||
LAN | Green | On | LAN port connected. |
| Flashing | LAN acvity (transferring or receiving data). | ||
| O | LAN port not connected. | ||
PLC | Green & Yellow Flashing | Green with slow yellow ashing | Detectng Powerline conncon. |
| Green with rapid yellow ashing | Powerline acvity (transferring or receiving data). | ||
| O | No Powerline conncon detected. | ||
Power | Green | On | HP-5101Wn is on. |
| Flashing every 15 seconds | The HP-5101Wn is in power-saving mode. | ||
| O | HP-5101Wn is o. |
I-4. Safety Informaon
In order to ensure the safe operaon of the device and its users, please read and act in accordance with the following safety instrucons.
- The wireless extender is designed for indoor use only; do not place the wireless extender outdoors.
- Do not place the wireless extender in or near hot/humid places, such as a kitchen or bathroom.
- Do not pull any connected cable with force; carefully disconnect it from the wireless extender.
- The device contains small parts which are a danger to small children under 3 years old. Please keep the wireless extender out of reach of children.
- Do not place the wireless extender on paper, cloth, or other ammable materials. The wireless extender will become hot during use.
- There are no user-serviceable parts inside the wireless extender. If you experience problems with the wireless extender, please contact your dealer of purchase and ask for help.
- The wireless extender is an electrical device and as such, if it becomes wet for any reason, do not aempt to touch it without switching the power supply o. Contact an experienced electrical technician for further help.
- If you smell burning or see smoke coming from the wireless extender then unplug the extender immediately, as far as it is safely possible to do so. Call your dealer of purchase for help.
I-5. System Requirements For Powerline Utility Soware
| Operang System | Utility supports Windows XP/Vista/7/8 |
| CPU | Intel Penum III 1.0GHz (or above) |
| RAM | 256MB (or above) |
| Free Disk Space | 100MB (or above) |
| Network Interface | Ethernet port (100Mbps or above) and an Ethernet cable |
II. CREATING A POWERLINE NETWORK

A minimum of two Powerline devices are required to establish a Powerline network.

For best performance, plug Powerline adapters directly into standard wall sockets. Avoid using mul-socket adapters.

It may be convenient to install and congregate your Powerline adapters in the same room, and then relocate the HP-5101Wn to its preferred locaon aer setup is complete.
II-1. Hardware Installaon
- Connect one Powerline adapter to your router via Ethernet cable and plug it into a power socket. The power and LAN LEDs should display on.
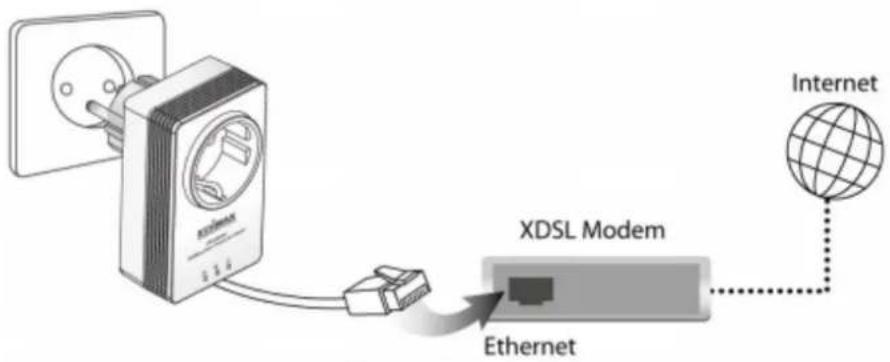
flowchart
graph TD
    A["AC Power"] --> B["Switch"]
    B --> C["XDSL Modem"]
    C --> D["Internet"]
    C --> E["Ethernet"]
- Plug another Powerline adapter (HP-5101Wn) into a power socket, and conrm the power LED is on.
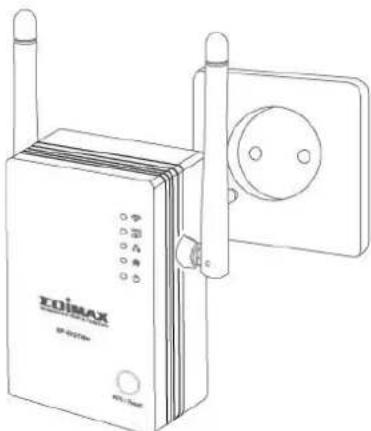
natural_image
Line drawing of a wireless device with attached electrical outlet (no text or symbols)-
The PLC LED on both Powerline adapters should indicate rst that they are detectcng a Powerline conncon, and then that a Powerline conncon is established. See LED Status for HP-5101Wn LEDs.
-
Press the “Group” buon button on each Powerline adapter for less than 3 seconds, within 2 minutes of each other. The adapters will automacally group together and generate an encrypted network.
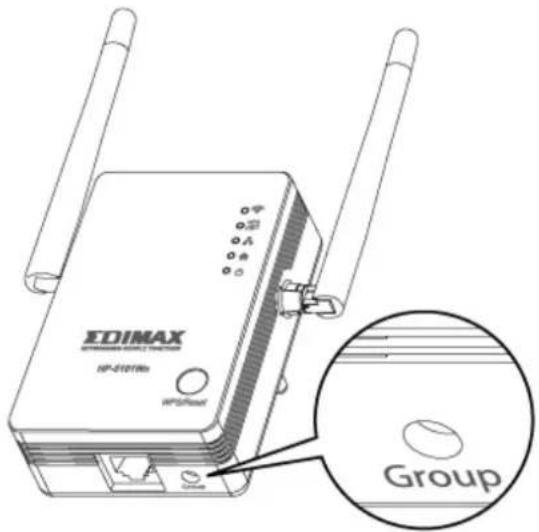
You can now setup the HP-5101Wn's Wi-Fi using either II-2. iQ Setup or II-3. WPS Setup.
II-2. iQ Setup
- Use a Wi-Fi device (e.g. computer, tablet, smartphone) to search for a Wi-Fi network with the SSID "Edimax.Setup" and connect to it.

natural_image
Illustration of a tablet and a laptop with wireless signal waves (no text or symbols)- Open a web browser and if you do not automacally arrive at the "Get Started" screen shown below, enter the URL hp://edimax.setup. Select your language from the drop down menu and click "Get Started" to begin the setup process.
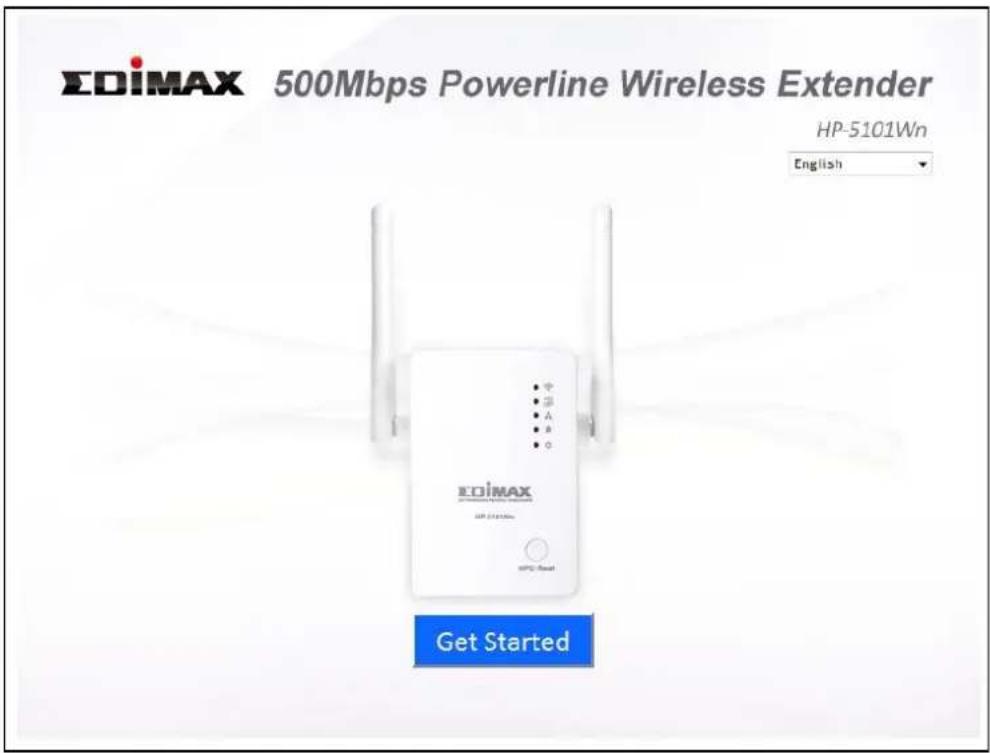

If you cannot access hp://edimax.setup, please make sure your computer is set to use a dynamic IP address. If you are unsure, see V-1. Conquiring your IP address.
- Select "Obtain an IP address automacally" and then click "NEXT".
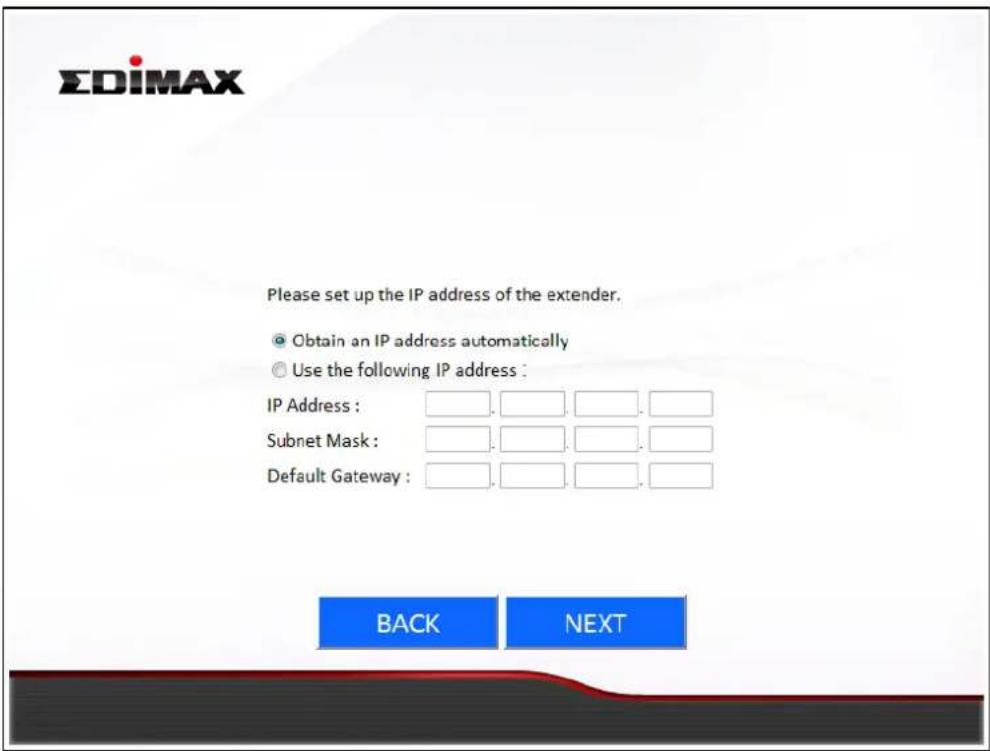

Advanced users who need to specify an IP address for the HP-5101Wn, select "Use the following IP address".
- Please wait a moment.
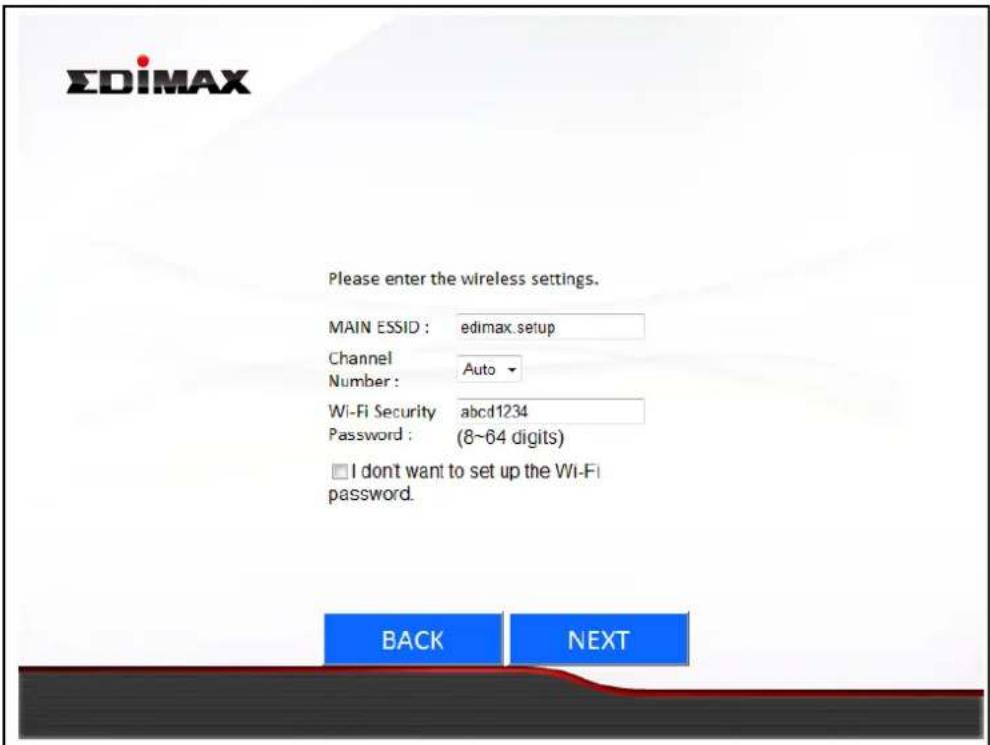
- Please enter a “MAIN ESSID” – this is a name to identify the HP-5101Wn’s Wi-Fi network, which you will connect to from your wireless device. Then select a channel number (“Auto” is recommended) and enter a “Wi-Fi Security Password” between 8–64 characters, which is the password used to connect to the HP-5101Wn’s Wi-Fi network. Click “Next” to connue.

Please do not forget your Wi-Fi password. If you do not wish to use a Wi-Fi password, check the box labeled "I don't want to set up the Wi-Fi password".
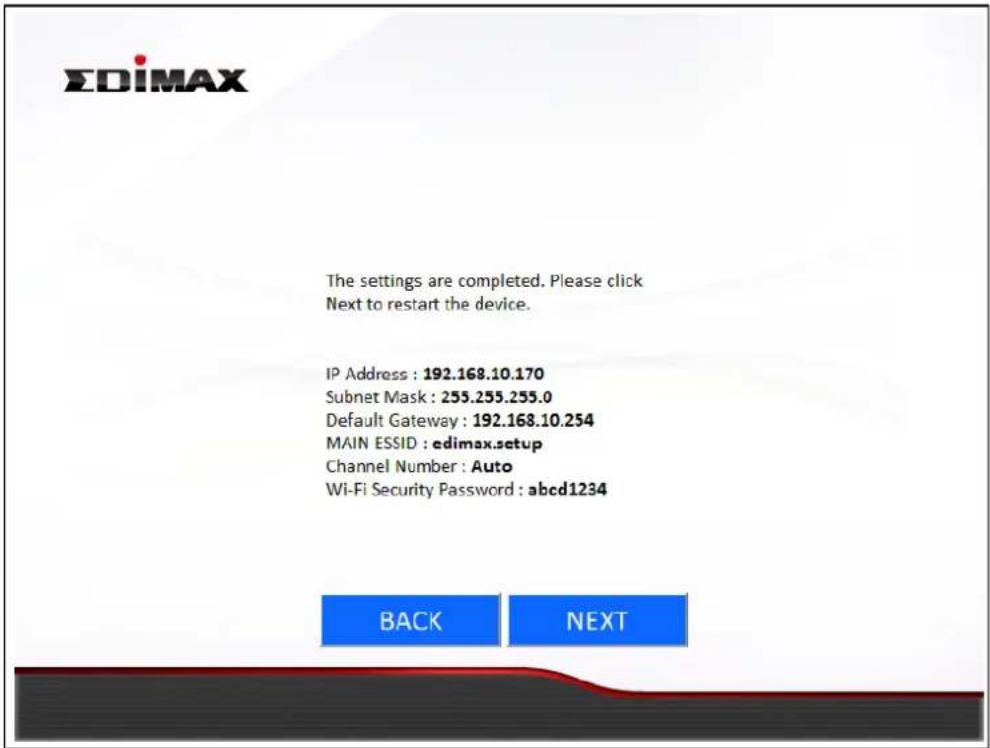
- A summary of your HP-5101Wn's Wi-Fi sengs will be displayed, as shown below. Click "NEXT" to connue and restart your HP-5101Wn.
- Please wait while the HP-5101Wn restarts.

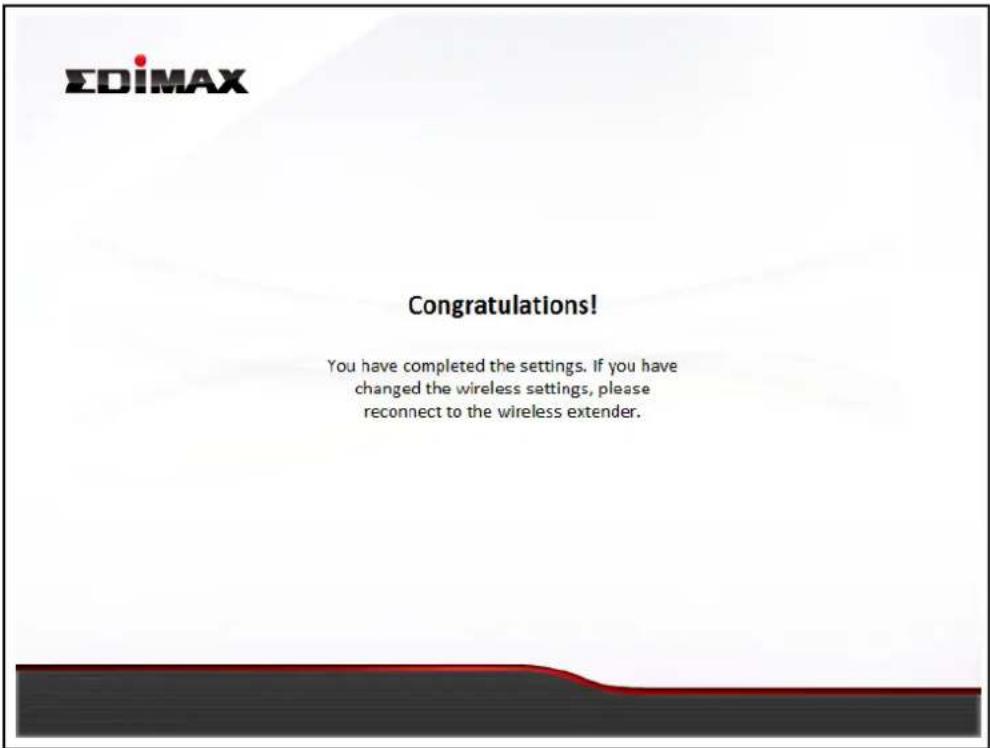
- When the HP-5101Wn has restarted, the following “Congratulaons” screen will be displayed, indicang that wireless setup is complete. Your HP-5101Wn’s Wi-Fi should now be acve and ready for use. If you need, you can relocate the HP-5101Wn to any power socket within 300m without additional conguraon.
Refer to II-4. Connecng to your HP-5101Wn for help with connecng a Wi-Fi device to the extender's Wi-Fi.
II-3. WPS Setup
If your wireless router/access point supports WPS (Wi-Fi Protected Setup) then you can use this method to set up your HP-5101Wn's Wi-Fi network. WPS is an alternate to II-2. iQ Setup. The HP-5101Wn's Wi-Fi settings (including SSID) will be the same as your existing router/access point.
- Press the WPS buon (oen the WPS/Reset buon) on your router/access point to acvate WPS.

Please check the instrucons for your wireless router/access point for how long you need to hold down its WPS buon to acvate WPS. Take care not to hold the WPS buon for too long – this may result in inadvertently reseng the extender or router/access point.
- Within two minutes, press and hold the WPS buon for 2–5 seconds on the HP-5101Wn to acvate its WPS. The HP-5101Wn's WPS LED should ash to indicate a WPS conncon is in progress.
- The devices will establish a conncon. The HP-5101Wn's WPS LED should display on to indicate a successful conncon. You can now connect to the HP-5101Wn's wireless network with a Wi-Fi device, as described in II-4. Connecng to your HP-5101Wn.
II-4. Connecng to your HP-5101Wn

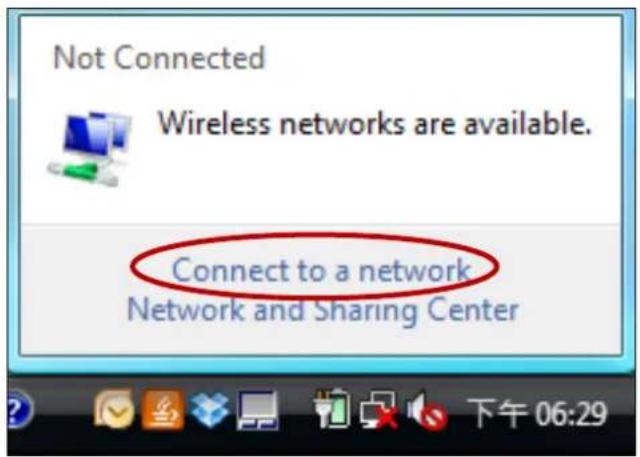
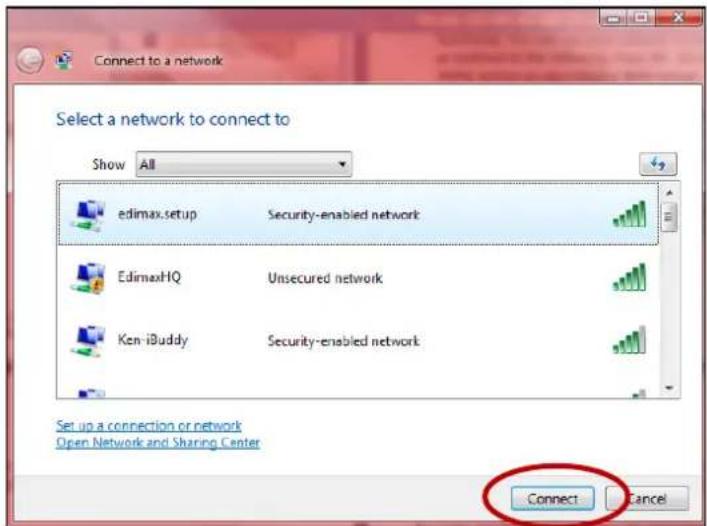
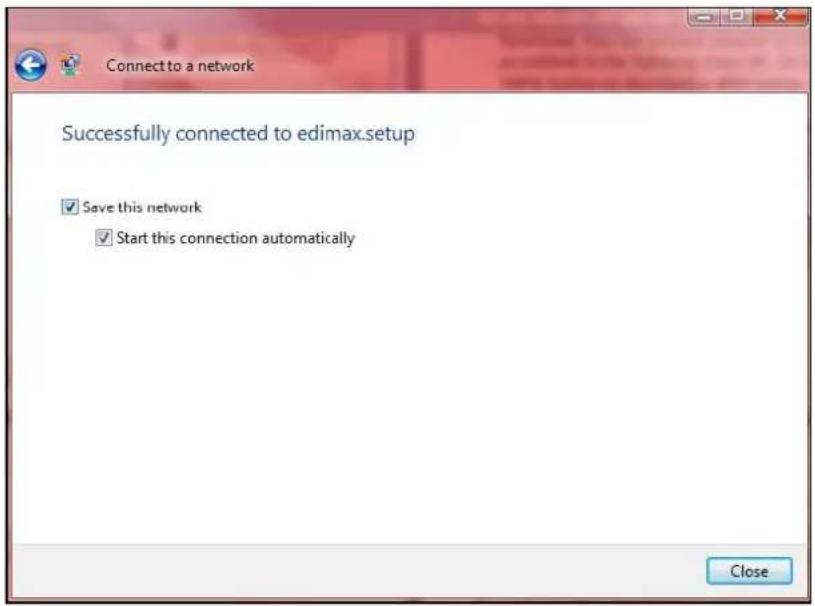
The following steps 9-11 are an example of how to connect to a Wi-Fi network using Windows Vista. If you are using a dierent version of Windows, the process may vary slightly – please connect to a Wi-Fi network in the usual manner for operang system.
- Click the network icon (icon, or icon) in the system tray and select "Connect to a network".
- Search for the SSID of your Wi-Fi network, click it and then click "Connect". If you set a password for your network, you will then be prompted to enter it.
-
Aer correctly entering your password, you will be successfully connected to your Wi-Fi network.
-
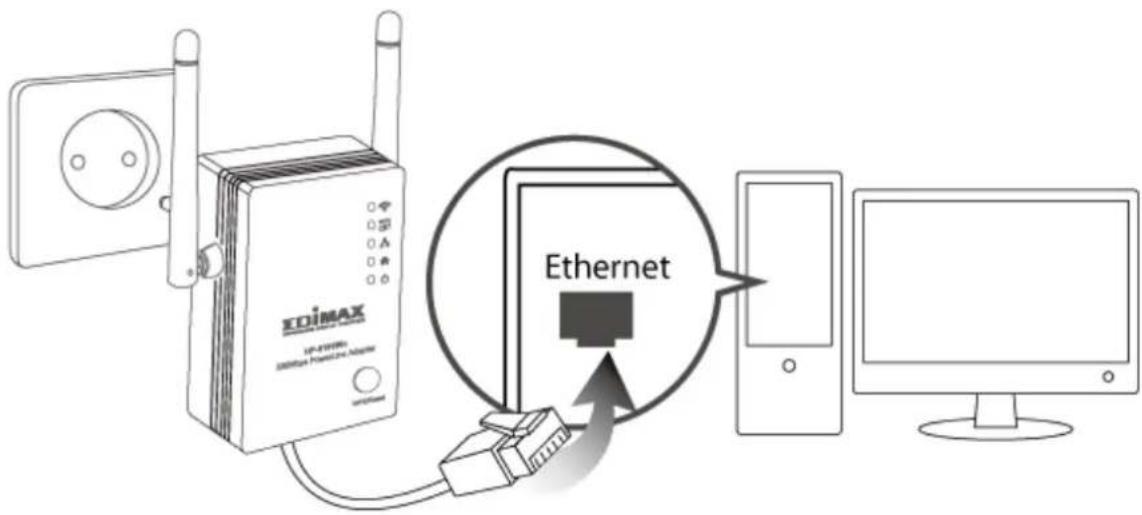
You can also use the Ethernet port on the underside of the HP-5101Wn to connect a computer or other device via Ethernet cable.
II-5. Leaving a Powerline Network
Press the Group/Reset button on the wireless extender for 5–8 seconds to leave a Powerline network that the extender is connected to. The extender will be disconnected/ungrouped from its network and ready to reconnect to any Powerline network.
II-6. Reseng the Wireless Extender
If you experience a problem with your HP-5101Wn you can reset the device back to its factory default sengs. This resets all sengs back to default.
Press and hold the WPS/Reset buon for at least 10 seconds. The HP-5101Wn will re-initialize and the power LED ( ) will display on when the extender is ready (see LED Status).
III. BROWSER BASED CONFIGURATION INTERFACE
Once you have setup the wireless extender as detailed in II. CREATING A POWERLINE NETWORK or the included QIG, you can further congregate the sengs of the wireless extender or run iQ Setup again using the browser based conguraon interface.
To access the browser based conguraon interface, enter
hp://edimax.setup into the URL bar of a web browser on a computer which is connected to the extender's Wi-Fi network. You will be prompted for a username and password. The default username is "admin" and the default password is "1234".

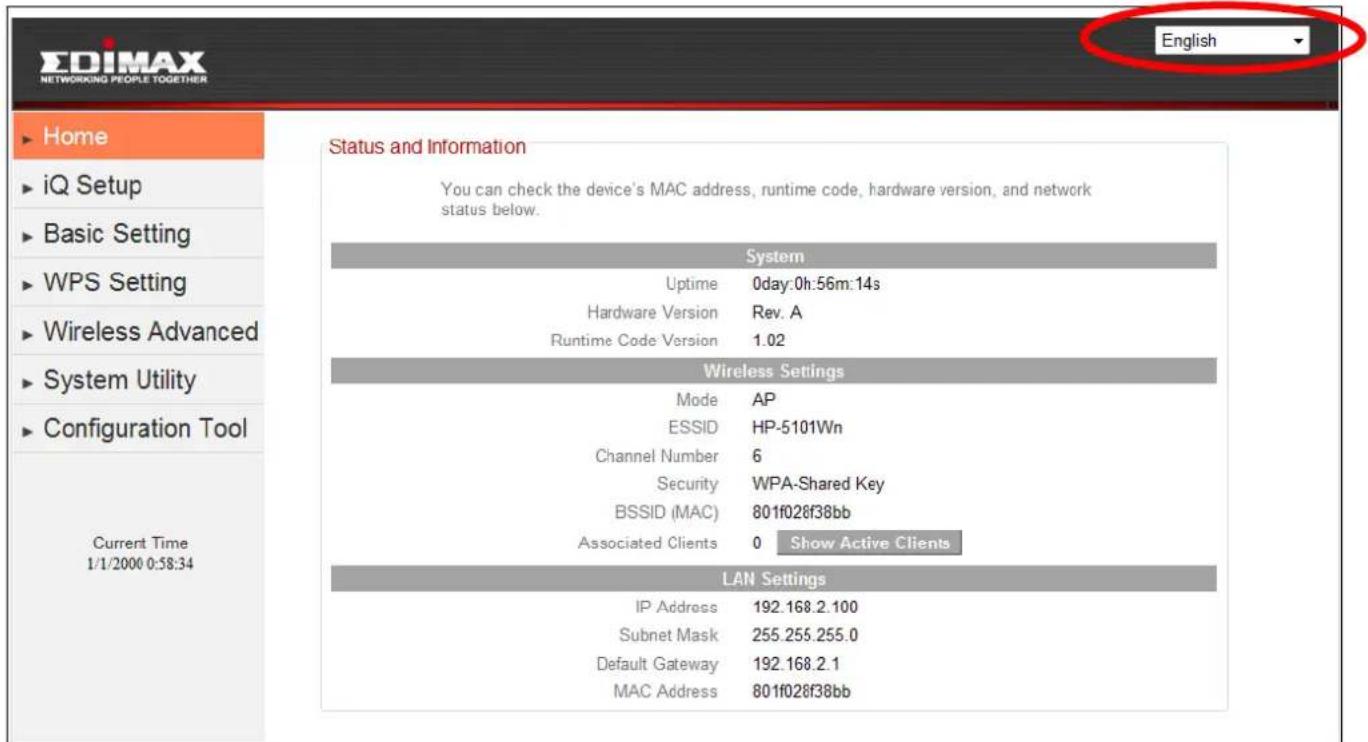
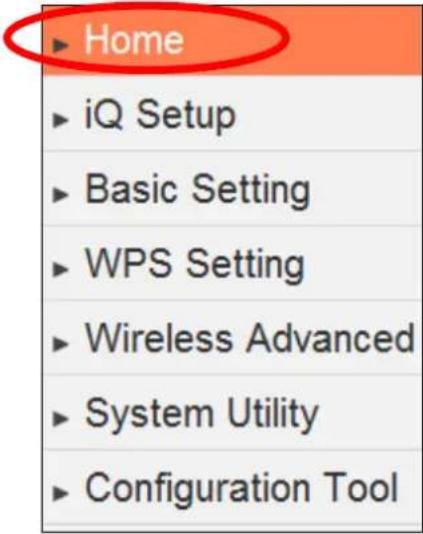
You will arrive the at Home page, use the menu on the le side of the screen to navigate. You can also change the language using the drop down menu in the top right corner.
- III-1. Home
- III-2. iQ Setup
- III-3. Basic Setng
- III-4. WPS Setng
- III-5. Wireless Advanced
- III-6. System Utility
- III-7. Conguraon Tool
III-1. Home
The Home page shows the basic status and informaon of the wireless extender.
Status and Information
You can check the device's MAC address, runtime code, hardware version, and network status below.
System
Uptime 0day:0h:56m:14s
Hardware Version Rev. A
Runtime Code Version 1.02
Wireless Settings
Mode AP
ESSID HP-5101Wn
Channel Number 6
Security WPA-Shared Key
BSSID (MAC) 801f028f38bb
Associated Clients 0
Show Active Clients
LAN Settings
IP Address 192.168.2.100
Subnet Mask 255.255.255.0
Default Gateway 192.168.2.1
MAC Address 801f028f38bb

The screenshots shown in this manual are examples. The informaon you see on your screen will be unique to your conguraon.
| System | |
| Upme | Displays the total passed me since the device was turnedon. |
| Hardware Version | Displays the hardware version. |
| Runme Code Version | Displays the current rmware version. |
| Wireless Conguraon | |
| Mode | Displays the current wireless operang mode. |
| ESSID | Displays the current ESSID (the name used to identify the wireless extender). |
| Channel Number | Displays the current wireless channel number. |
| Security | Displays the current wireless security/encrypon type. |
| BSSID (MAC) | Displays the device's MAC address. A MAC address is a unique, xed ID for this device which cannot be modified. |
| Associated Clients | Displays the number of clients connected to the wireless extender. Click the "Show Acve Clients" buon to display acve clients in a new window (see below for full descripon):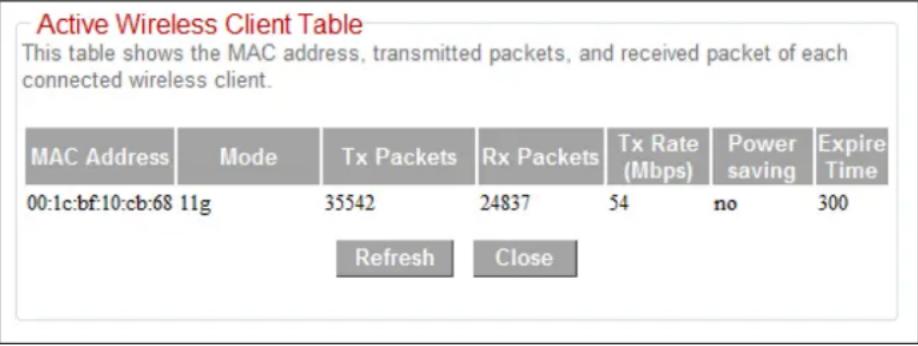 |
| LAN Sengs | |
| IP Address | Displays the IP address of this device. |
| Subnet Mask | Displays the subnet mask of the IP address. |
| Default Gateway | Displays the IP address of the default gateway. |
| MAC address | Displays the MAC address of the LAN interface. |
| Acve Wireless Client Table | |
| MAC Address | Displays the MAC address of the wireless client. |
| Mode | Displays the transmission mode (802.11b, 802.11n or 802.11g). |
| Tx Packet | Tx (transmission) packet counter. |
| Rx Packet | Rx (received) packet counter. |
| Tx Rate (Mbps) | Transmission rate is displayed here in Mbps. |
| Power Saving | “Yes” or “No” is displayed here according to whether power saving feature is acve. |
| Expired Time (s) | If the wireless client is idle for longer than the expiredme, the access point will disassociate with it. When the wireless client becomes acve, it will have to re-associate with the access point. |
III-2. iQ Setup
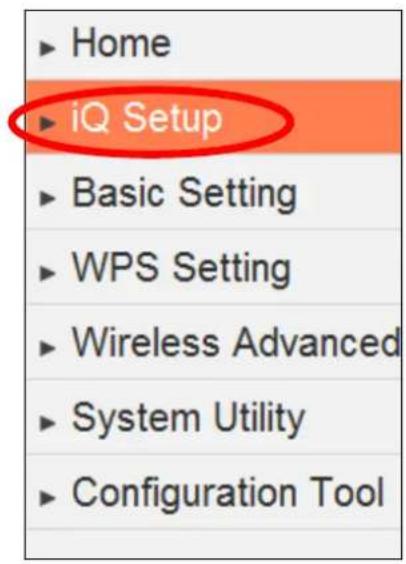
To perform iQ Setup again and congregate the Wi-Fi networks which the extender will connect to, select "iQ Setup".
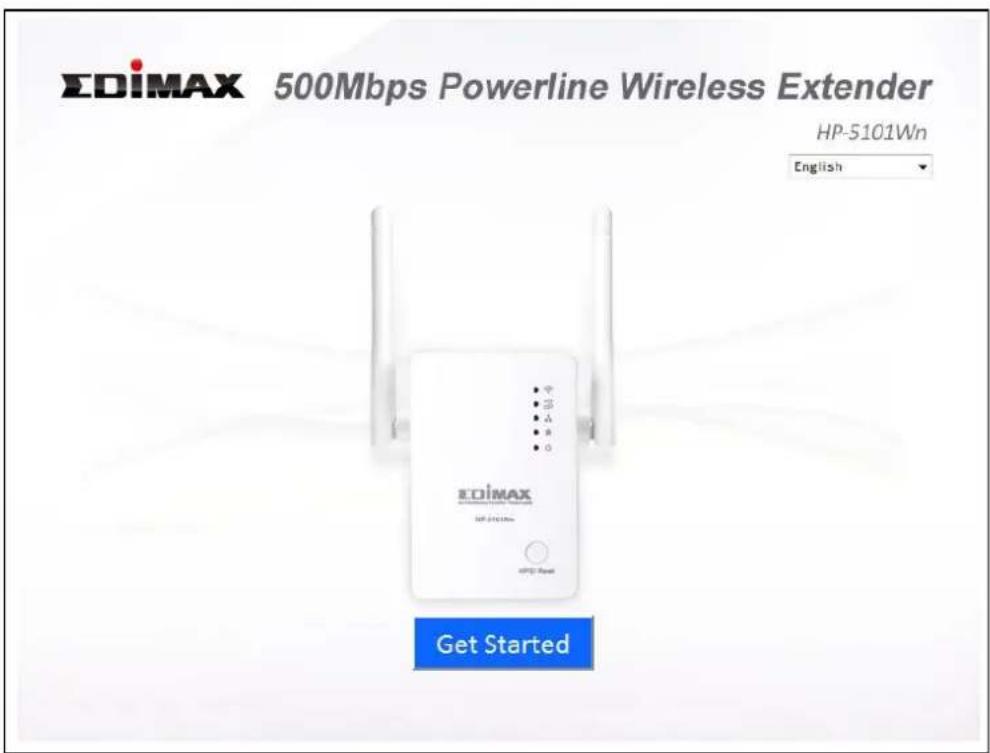
You will see the screen below. Please click "Get Started" to begin iQ Setup and refer back to II. iQ Setup onwards for further guidance.
III-3. Basic Seng
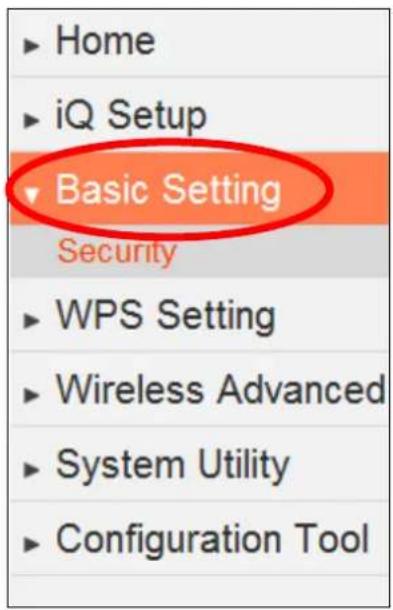
The “Basic Seng” page enables you to congregate the ESSID, channel number and other basic parameters of the wireless extender.
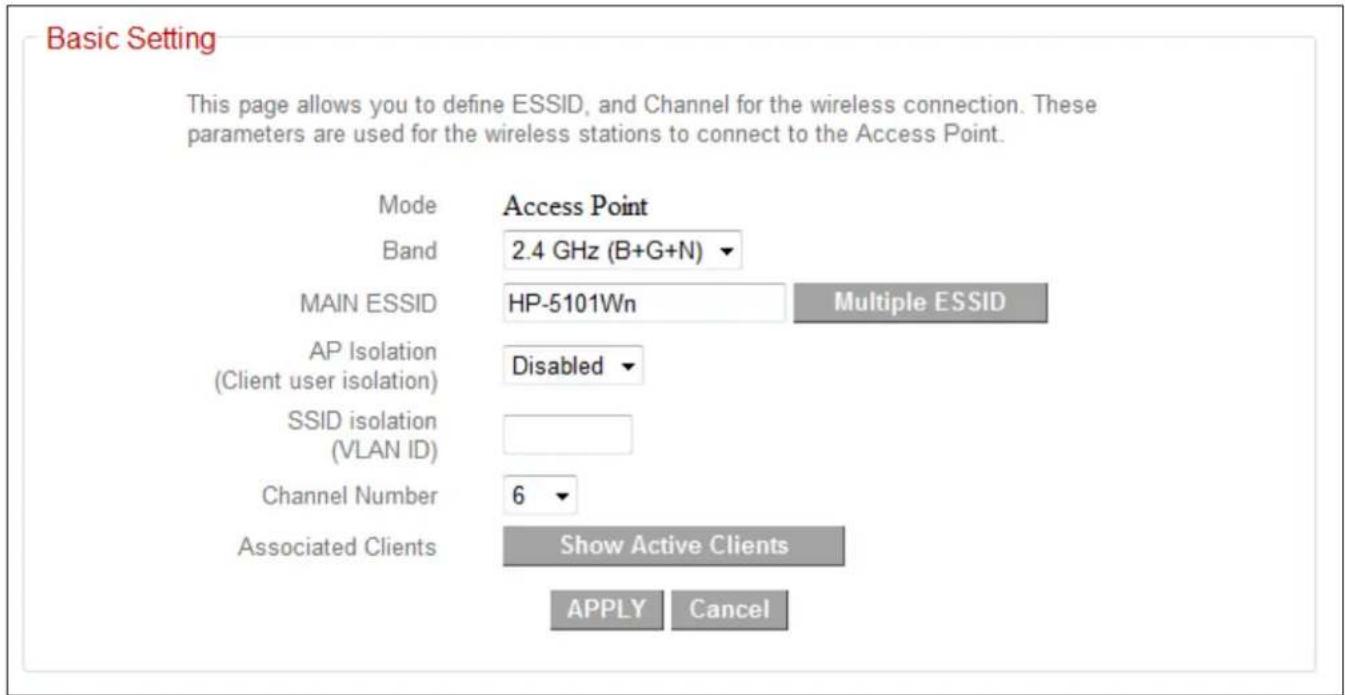
| Mode | The extender’s mode cannot be congured – the default mode is “Access Point”. The device acts as a wireless access point to a wired Ethernet network. Wireless clients can connect to the extender and exchange data with devices connected to the network. |
| Band | Select the wireless band you wish to use for the access point. The extender uses the 2.4GHz frequency band – select which wireless standard or combinaon of standards to use. Only wireless clients of the sameband(s) will be able to connect. |
| MAIN ESSID | Specify an ESSID (the name used to identify the access point) of up to up to 32 alphanumeric characters.Please note that the ESSID is case sensitive. |
| AP Isolaon | When this is set to “Enabled”, wireless clients connected to this device will be able to access the Internet, but will not be able to communicate with each other. This applies to clients connected to the MAIN ESSID only. |
| SSID Isolaon | When the access point uses mulple SSIDs and this is set to “Enabled”, then wireless clients connected to the same SSID will be able to communicate with each other, but will not be able to communicate with other wireless clients connected to another of this access point’s SSIDs. You can input a numeric VLAD ID value between 1 – 4094 for the MAIN ESSID. |
| Channel Number | Select a channel number for the wireless extender. |
| Associated Clients | Click the “Show Acve Clients” buon and a new window will appear which displays informaon about wireless clients connected to this access point. Click the “Refresh” buon in the new window to refresh the list. |
Click "APPLY" to save the changes. The following message will appear:
Settings saved successfully!
Click CONTINUE to continue other configuring settings, or click APPLY to restart the system and make the changes take effect.
CONTINUE
APPLY
Click “CONTINUE” to save the changes and connue conguring other sengs, or click “APPLY” to restart the system and make the changes take eect.
III-3-1. Security
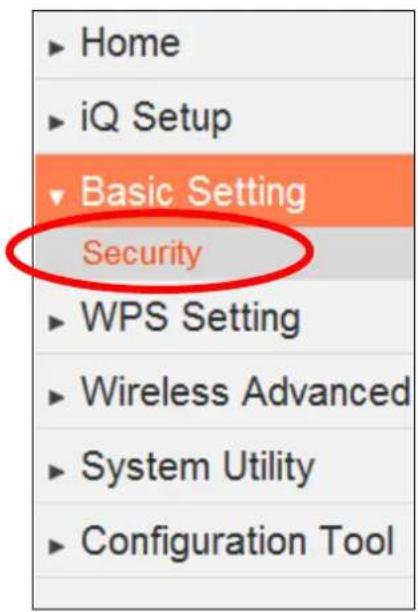
The wireless extender provides a variety of wireless security opons (data encrypon) which can be congured on this page.
It is important to congregate security to prevent intruders from accessing your local network and causing damage to computers and servers. Use complicated, hard-to-guess security keys which include combinaons of leers and numbers and change your security key regularly.
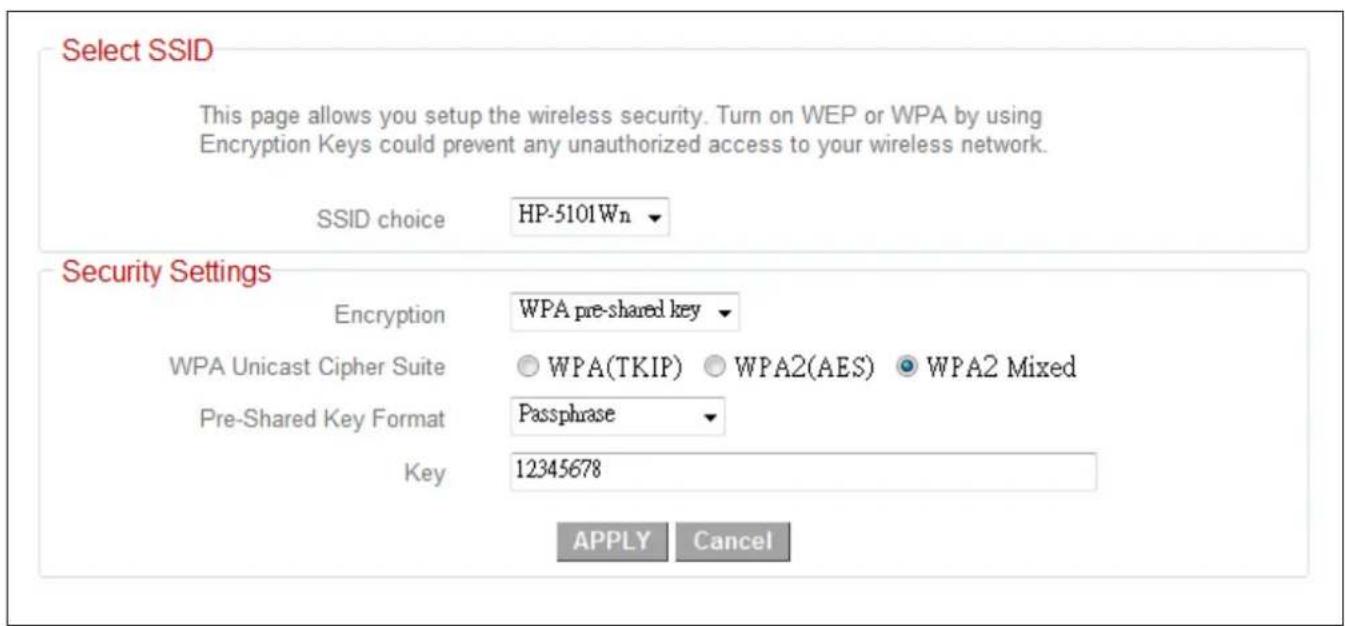
| SSID choice | Select which SSID’s security sengs to congure. |
| Encrypon | Select an encrypon type from the drop down menu and refer to the appropriate secon (following) for more details. |

WPA pre-shared key oers the highest level of security and is the recommended encrypon type.
III-3-1-1. Disable
Select "Disable" to disable wireless encrypon for the network. This is not recommended - anyone within range can connect to the device's SSID.
| Enable 802.1xAuthencaon | Check this box to enable 802.1x user authencaon.See below. |
III-3-1-1-1. 802.1x Authencaon
If you select “Disable” or “WEP” as your encrypon type, you can check the “Enable 802.1x Authencaon” box to enable 802.1x authencaon based on a RADIUS user authencaon server.
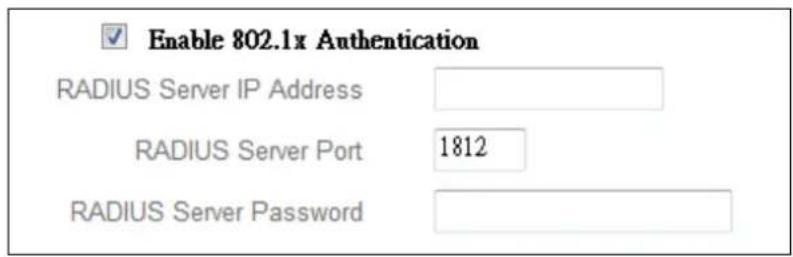
| RADIUS Server IP Address | Enter the IP address of the RADIUS authencaon server here. |
| RADIUS Server Port | Enter the port number of the RADIUS authencaon server here. Default value is 1812. |
| RADIUS Server Password | Enter the password of the RADIUS authencaon server here. |
Click "APPLY" to save the changes. The following message will appear:
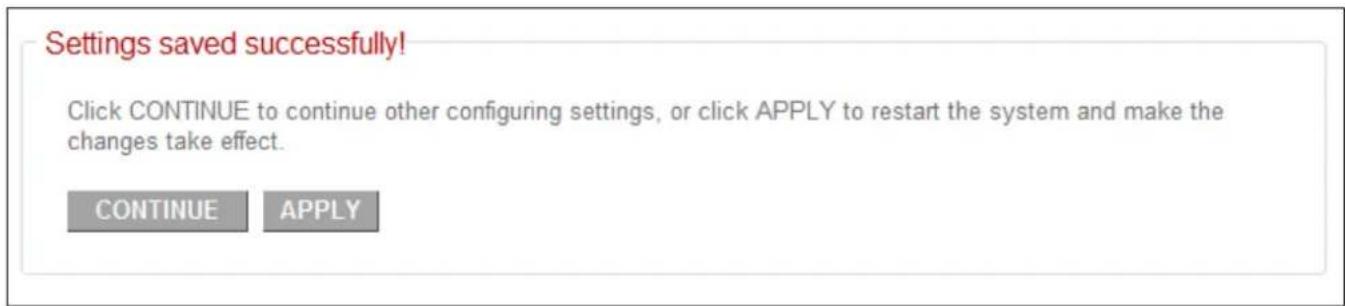
Click "CONTINUE" to save the changes and connue conguring other settings, or click "APPLY" to restart the system and make the changes take eect.
III-3-1-2. WEP
Wired Equivalent Privacy (WEP) is a basic encrypon type.

WPA encrypon is recommended – though some legacy wireless devices may only support WEP. WEP supports data rates up to a maximum 54Mbps.
Security Settings
Encryption
WEP
Key Length
64-bit
Key Format
HEX (10 Characters)
Default Key
Key 1
Key
************************

Enable 802.1x Authentication
APPLY
Cancel
| Key Length | Select “64-bit” or “128-bit” key length. “128-bit” is safer than “64-bit” but will reduce some data transfer performance. |
| Key Format | Select “ASCII” or “Hex” key format. The key length will also be displayed here - ASCII and Hex keys vary in length depending on “Key Length” (above)". |
| Default Key | The value for “Default Key” is “Key 1” and cannot be modied. |
| Encrypon Key 1 to 4 | Enter WEP key here, the number of characters must be the same as the number displayed in the “Key Format” eld. For “ASCII” key format, you can use any alphanumerical characters (0-9, a-z, and A-Z). For “Hex” format, you can use the characters 0-9, a-f, and A-F. |
| Enable 802.1x Authencaon | Check this box to enable 802.1x user authencaon.See III-1-1-1. Enable 802.1x Authencaon. |
Click "APPLY" to save the changes. The following message will appear:
Settings saved successfully!
Click CONTINUE to continue other configuring settings, or click APPLY to restart the system and make the changes take effect.
CONTINUE
APPLY
Click "CONTINUE" to save the changes and connue conguring other seings, or click "APPLY" to restart the system and make the changes take eect.
III-3-1-2. WPA Pre-shared Key
WPA pre-shared key is the recommended and most secure encrypon type.
Security Settings
Encryption
WPA Unicast Cipher Suite
Pre-Shared Key Format
WPA pre-shared key ▼
WPA(TKIP)
WPA2(AES)
WPA2 Mixed
Passphrase
Key
APPLY
Cancel
| WPA Unicast Cipher Suite | Select from WPA (TKIP), WPA2 (AES) or WPA2 Mixed. AES is safer than TKIP, but not supported by all wireless clients. WPA2(AES) or WPA2 is recommended if supported by your wireless client. Mixed is recommended if your client does not support AES. |
| Pre-shared Key Format | Select the pre-shared key format from “Passphrase” (8 to 63 alphanumerical characters) or “Hex (64 characters 0 to 9 and a to f.) |
| Pre-shared Key | Please enter the key according to the key format you selected above. For security reasons, it’s best to use a complex, hard-to-guess key. |

TKIP supports a maximum data rate of 54Mbps.
Click "APPLY" to save the changes. The following message will appear:
Settings saved successfully!
Click CONTINUE to continue other configuring settings, or click APPLY to restart the system and make the changes take effect.
CONTINUE
APPLY
Click "CONTINUE" to save the changes and connue conguring other sengs, or click "APPLY" to restart the system and make the changes take eect.
III-3-1-3. WPA Radius
WPA RADIUS is a combinaon of WPA encrypon and RADIUS user authencaon. If you have a RADIUS authencaon server, you can authenticate the identity of every wireless client against a user database.
Security Settings
Encryption
WPA Unicast Cipher Suite
RADIUS Server IP Address
RADIUS Server Port
RADIUS Server Password
WPA RADIUS

WPA(TKIP)
WPA2(AES)
WPA2 Mixed

1812
APPLY
Cancel
| WPA Unicast Cipher Suite | Select from WPA (TKIP), WPA2 (AES) or WPA2 Mixed. AES is safer than TKIP, but not supported by all wireless clients. WPA2(AES) or WPA2 is recommended if supported by your wireless client. Mixed is recommended if your client does not support AES. |
| RADIUS Server IP address | Enter the IP address of the RADIUS authencaon server here. |
| RADIUS Server Port | Enter the port number of the RADIUS authencaon server here. Default value is 1812. |
| RADIUS Server Password | Enter the password of the RADIUS authencaon server here. |
Click "APPLY" to save the changes. The following message will appear:
Settings saved successfully!
Click CONTINUE to continue other configuring settings, or click APPLY to restart the system and make the changes take effect.
CONTINUE
APPLY
Click "CONTINUE" to save the changes and connue conguring other sengs, or click "APPLY" to restart the system and make the changes take eect.
III-4. WPS Seng
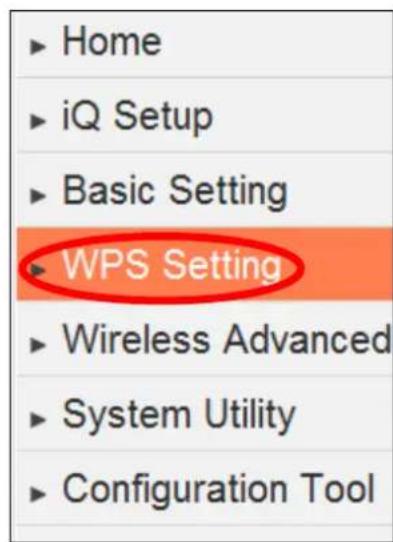
WPS (Wi-Fi Protected Setup) is a simple way to establish conncons between WPS compatible devices. WPS devices feature a WPS funcon which can be acvated by pushing a WPS buon on the device or from within the device's firmware/conguraon interface. When WPS is acvated in the correct manner and at the correct me for two compatible devices, they will automacally connect.
By default, the WPS Sengs page displays sengs for WPS between your extender and a wireless client. For WPS Setup between your extender and router/access point, please refer back to (II-3. WPS Setup).
WPS (Wi-Fi Protected Setup) Settings
This page allows you to configure WPS (Wi-Fi Protected Setup) settings. WPS allows wireless clients to connect to this device automatically.
Enable WPS
Wi-Fi Protected Setup Information :
WPS Status : Configured
Device PIN Code : 29406036
SSID : HP-5101Wn
Authentication Mode : WPA-Shared Key
Passphrase Key : ¥******
Device Configuration :
Config Mode : Registrar
Configure via Push Button : Start PBC
Input Client PIN Code :
Send PIN
The wireless extender supports two types of WPS for wireless clients: PBC (Push Buon Conguraon) and PIN code. For PBC you can acvate WPS on the wireless extender by clicking the “Start PBC” buon on the screen.

Click the "Start PBC" buon to acvate WPS – do not push the WPS/Reset buon on the extender.
PIN code setup varies slightly in that it requires you to manually enter a PIN code into each device via the WPS Sengs before acvang WPS.
| WPS Status | Displays “Congured” or “unCongured” depending on whether WPS Sengs for the extender have been congured or not, either manually or using the WPS buon. |
| Device PIN Code | This is the WPS PIN code of the wireless extender for use with other WPS-enabled wireless devices. |
| SSID | Displays the current SSID (the name used to identify the wireless extender). |
| Authencaon Mode | Displays the current wireless security/encrypon type. |
| Passphrase Key | Shows the WPA passphrase here, though all characters will be replaced by asterisks for security reasons. If encrypon is not set on the access point, this eld will be blank. |
| Cong Mode | The conguraon mode of the extender's WPS seng is displayed here. “Registrar” means the device acts as an access point for a wireless client to connect to and the wireless client(s) will follow the extender's wireless sengs. “Enrollee” means the device acts a wireless client and will follow the sengs of the wireless router/access point. |
| Congure via Push Buon | Click “Start PBC” to acvate WPS on the extender. |
| Input Client PIN Code | Input the wireless client's PIN code here and click “Start PIN” to acvate PIN code WPS. Refer to your wireless client's documentaon if you are unsure of its PIN code. |
The WPS LED ( ) will ash slowly to indicate WPS is acve. WPS will remain acve for two minutes. Within two minutes, acvate WPS on your client device (refer to client device's user manual for guidance on how to do so) in order to establish a conncon. The WPS LED ( ) will display ON to indicate a successful conncon, and will remain ON for 5 minutes (see I-3. LED Status).
III-5. Wireless Advanced
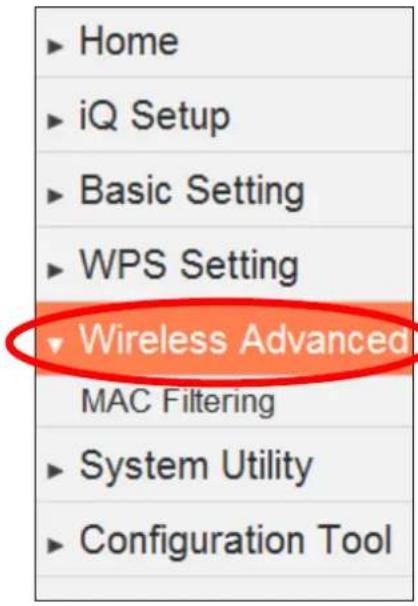
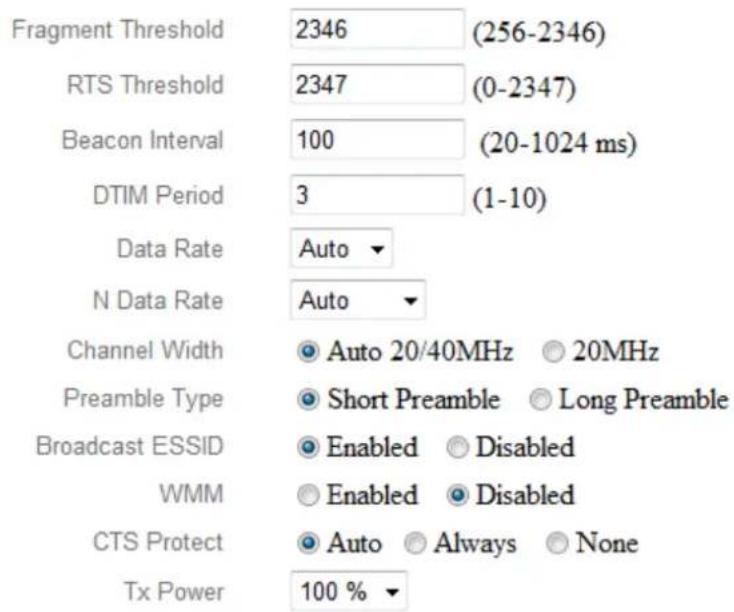
In “Advanced Seng” you can congregate the advanced features of the wireless extender. Please do not modify these sengs unless you know what eect the changes will have on your access point; advanced sengs are for experienced users only.

Changing these sengs can adversely act the performance of your wireless extender.
Wireless Advanced
These settings are only for more technical advanced users who have sufficient knowledge about wireless LAN. These settings should not be changed unless you know what effects the changes will have.
APPLY
Cancel
| Fragment Threshold | Set the fragment threshold of the wireless radio. The default value is “2346”. |
| RTS Threshold | Set the RTS threshold of the wireless radio. The default value is “2347”. |
| Beacon Interval | Set the beacon interval of the wireless radio. The default value is “100”. |
| DTIM Period | Set the DTIM period of wireless radio. The default value is “3”. |
| Data Rate | Set the wireless data transfer rate. The default value is “Auto”. |
| N Data Rate | Set the data rate of 802.11n. The default value is “Auto”. |
| Channel Width | Select wireless channel width. |
| Preamble Type | Set the wireless radio preamble type. |
| Broadcast ESSID | Set if the access point will broadcast its own ESSID. To hide the ESSID of your extender select “Disable” - only users who know the ESSID of your access point will be able to connect. |
| WMM | WMM (Wi-Fi Mulmedia) technology can improve the performance of certain network applicaons, such as audio/video streaming, network telephony (VoIP), and others. When WMM is enabled, the extender will prioritize dierent kinds of data and give higher priority to applicaons which require instant responses. This improves the performance of such network applicaons. |
| CTS Protect | Enabling this seng will reduce the chance of radio signal collisions between 802.11b and 802.11g wireless access points. It’s recommended to set this opon to “Auto”. |
| TX Power | Set the power output of the wireless radio. Seng a lower power output, provided it is sll sucient for your range requirements, can potentially improve security since malicious/unknown users in distant areas will not be able to access your signal. |
Click "APPLY" to save the changes. The following message will appear:
Settings saved successfully!
Click CONTINUE to continue other configuring settings, or click APPLY to restart the system and make the changes take effect.
CONTINUE
APPLY
Click "CONTINUE" to save the changes and connue conguring other sengs, or click "APPLY" to restart the system and make the changes take eect.
III-5-1. MAC Filtering
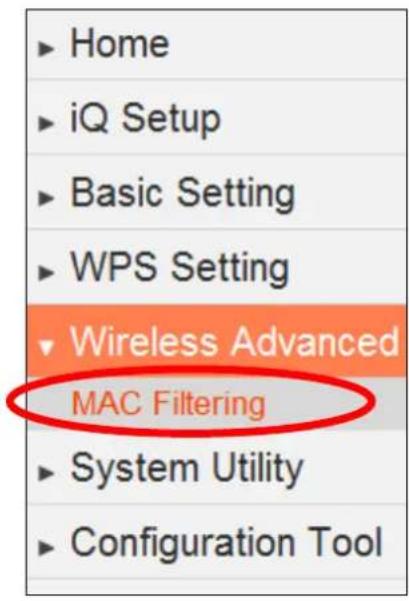
The MAC Itering feature allows you to denote a list of wireless devices permitted to connect to this access point, idened by their unique MAC address. When a device which is not listed as a permied MAC address aempts to connect to the extender, it will be denied.

Check the box "Enable Wireless Access Control" box to enables MAC address Itering.
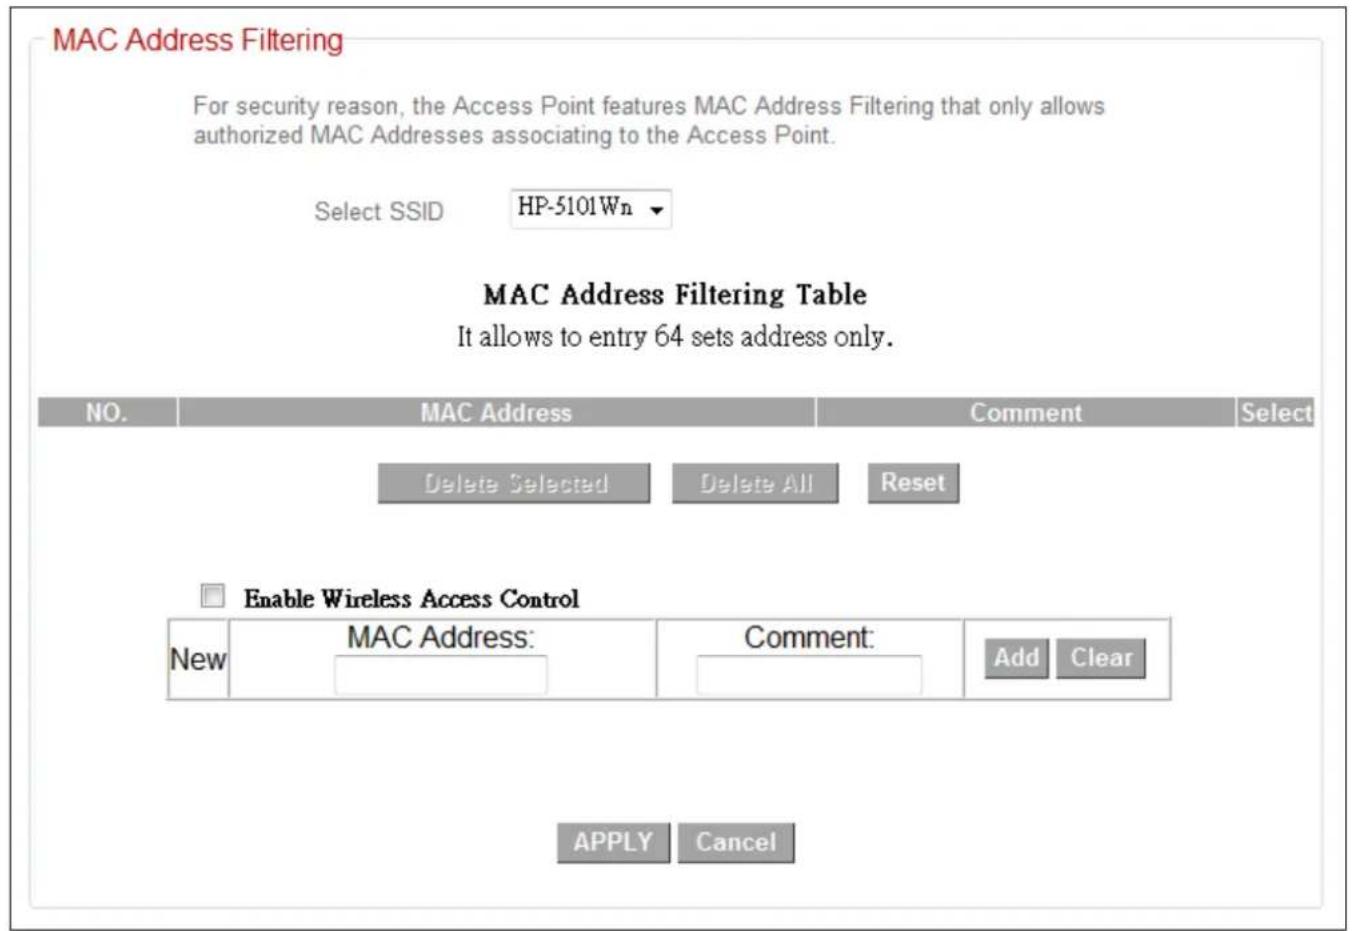
| Select SSID | Select which SSID to conjure. |
MAC Address Filtering Table:
| Select | Check this box to select MAC address(es). |
| Delete Selected | Click this buon to delete selected MAC address(es). |
| Delete All | Delete all MAC addresses in the table. |
| Reset | Uncheck all selected MAC address entries. |
| Enable Wireless Access Control | Check this box to enable MAC address ltering. |
| MAC address | Enter a MAC address permied to connect to the extender. Only enter characters 0 to 9 or a to f. |
| Comment | Enter an oponal comment associated with the specied MAC address for reference/idencaon, consisng of up to 16 alphanumerical characters. |
| Add | Add the MAC address entry to the list. |
| Clear | Remove all characters in the “MAC address” and “Comments” elds. |
Click "APPLY" to save the changes. The following message will appear:
Settings saved successfully!
Click CONTINUE to continue other configuring settings, or click APPLY to restart the system and make the changes take effect.
CONTINUE
APPLY
Click "CONTINUE" to save the changes and connue conguring other sengs, or click "APPLY" to restart the system and make the changes take eect.
III-6. System Utility
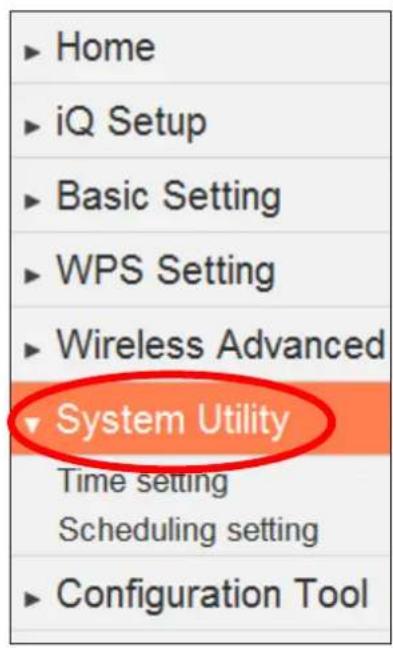
In "System Ulity" you can congregate the extender's administrave password and manage the extender's IP and DHCP sengs.
Administrator
If you wish to customize the login information for your Access Point, please enter the new user name and password in the following columns. If you want to set up a DHCP server, you need to assign this device an unique IP address.
Password Settings :
Current Password :
New Password :
Re-Enter Password :

natural_image
Three horizontal rectangular bars with no text or symbolsYou can change the password used to login to the browser-based conguraon interface here. It is advised to do so for security purposes.
| Current Password | Enter your current password. The default password is 1234. |
| New Password | Enter your desired new password here. You can use any combinaon of leers, numbers and symbols up to 20 characters. |
| Re-Enter Password | Conrm your new password. |
Management IP :
Obtain an IP address automatically
Use the following IP address
IP Address : 192.168.10.1
Subnet Mask : 255.255.255.0
Gateway Address : 192.168.2.1
DHCP Server :
You can modify the IP address of the extender, enabling it to become a part of your local area network. To do so, input the IP address, subnet mask and gateway address into the corresponding elds.
| IP Address | Specify an IP address here. This IP address will be assigned to your extender, and will replace the default IP address 192.168.10.1. |
| Subnet Mask | Input the subnet mask of the new IP address. |
| Gateway Address | Input the network’s gateway IP address. |
| DHCP Server | Select “Enabled” if you wish to use the DHCP funcon of the extender, as detailed below. |

Please write down and remember the new IP address you assigned to the wireless extender. If you forget this IP address
you may not be able to connect to the browser-based conguraon interface in the future.

For stac IP users, the wireless extender needs to have an IP address in the same subnet as your network, in order that you can access the browser based conguraon interface.
For example, if your stac IP is 192.168.9.2 then you need to assign the wireless extender an IP address in the range 192.168.9.x where x = 3–254. Each network device has a unique IP address.

To ensure that you assign a correct IP address to the wireless extender, you can also check the IP address of your router.
Please refer to V-1-4. How to Find your Router's IP Address.
Your ISP can also provide you with such informaon as IP address, subnet mask and gateway address.

If you are unable to connect to the browser based conguraon interface using hp://edimax.setup, it is possible that you assigned an incorrect IP address to the extender. In this case you can reset the wireless extender back to its default IP address. See II-4. Reseng The Wireless Extender.
The extender can be congured to act as a DHCP server for your network. By default DHCP is disabled. Enable DHCP by selecng “Enable” in the eld “DHCP Server”.
| Default Gateway | Specify the IP address of the default gateway of your network here. |
| Domain Name Server IP | Input the IP address of the domain name server (DNS). |
| Start IP | Input the start address of the IP range. |
| End IP | Input the end address of the IP range. |
| Domain Name | Input the domain name for your network (oponal). |
| Lease Time | Choose a lease me (the duraon that every computer can keep a speciC IP address) of every IP address assigned by the extender. |
Click "APPLY" to save the changes. The following message will appear:
Settings saved successfully!
Click CONTINUE to continue other configuring settings, or click APPLY to restart the system and make the changes take effect.
CONTINUE
APPLY
Click "CONTINUE" to save the changes and connue conguring other sengs, or click "APPLY" to restart the system and make the changes take eect.
III-6-1. Time Seng
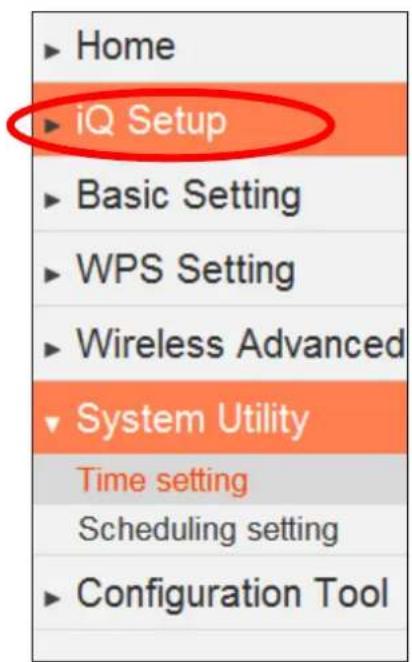
You can congregate the me sengs of your wireless extender here. The date and me of the device can be congregate manually or can be synchronized with a me server.
Time setting
Set the time zone of device system by synchronizing with time server, this information is used for scheduling configuration.
Time Zone
(GMT)Greenwich Mean Time: Dublin, Edinburgh, Lisbon, London
Time Server Address
asia.pool.ntp.org-Asia
211.39.136.4
(Manual IP Setting)
Daylight Savings
Enable Function
January 1 To January 1
APPLY
Cancel
| Time Zone | Select the me zone of your country/ region. If your country/region is not listed, please select another country/region whose me zone is the same as yours. |
| Time Server Address | The extender supports NTP (Network Time Protocol) for automac me and date setup. Input the host name or IP address of the IP server manually. |
| Daylight Savings | If your country/region uses daylight saving me, please check the “Enable Funcon” box and select the start and end date. |
Click "APPLY" to save the changes. The following message will appear:
Settings saved successfully!
Click CONTINUE to continue other configuring settings, or click APPLY to restart the system and make the changes take effect.
CONTINUE
APPLY
Click "CONTINUE" to save the changes and connue conguring other sengs, or click "APPLY" to restart the system and make the changes take eect.
III-6-2. Scheduling Seng
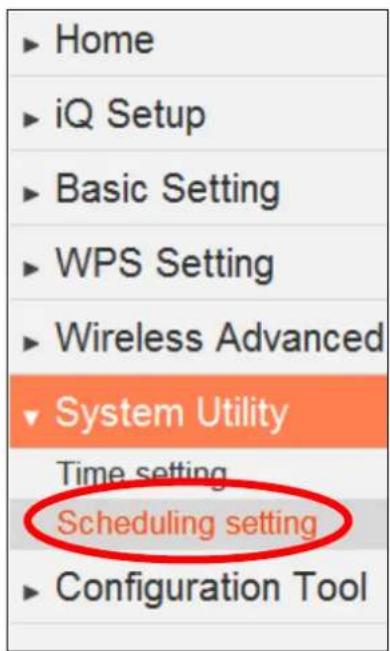
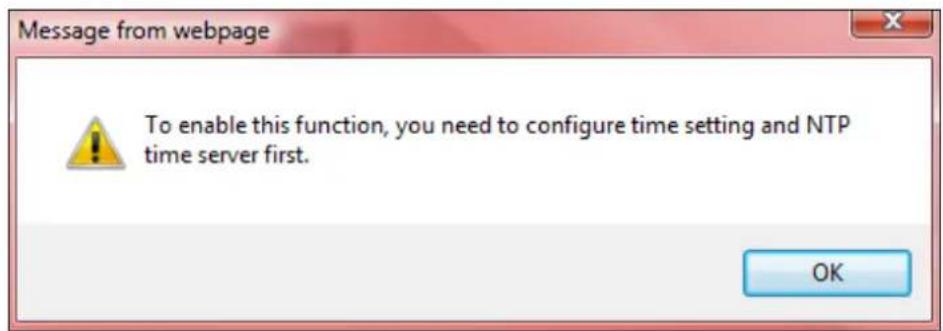
The wireless extender includes a scheduling funcon, where power saving funcons and an automac reboot can be automated for specific mes. By default, scheduling setng is disabled. Please select "Enable" if you wish to connue.
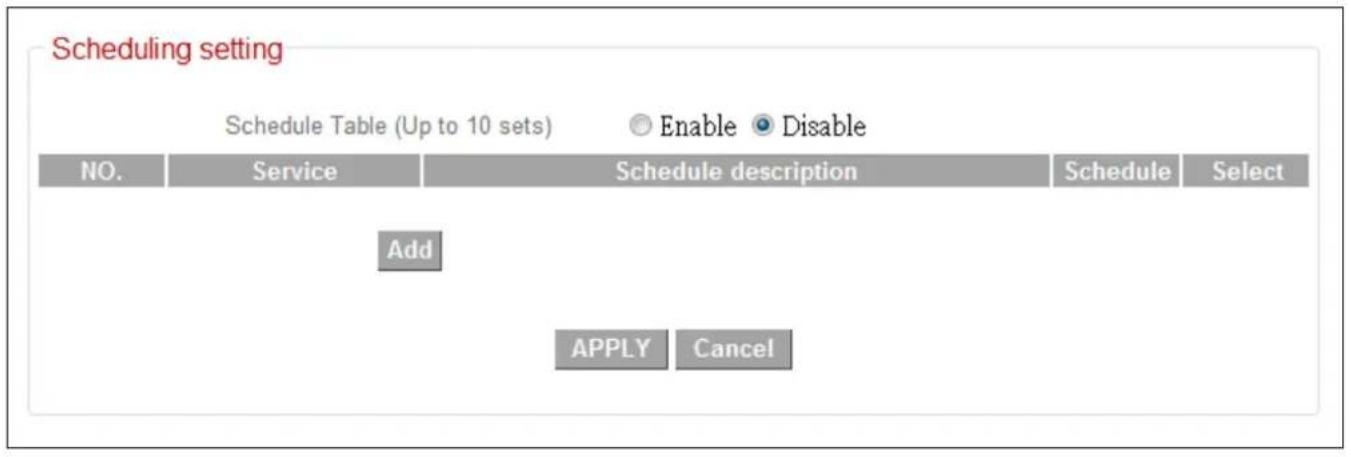
Click "Add" to open a new window and create a new scheduled event.

Ensure that you have correctly congured the me sengs of your wireless extender before enabling the scheduling funcon.
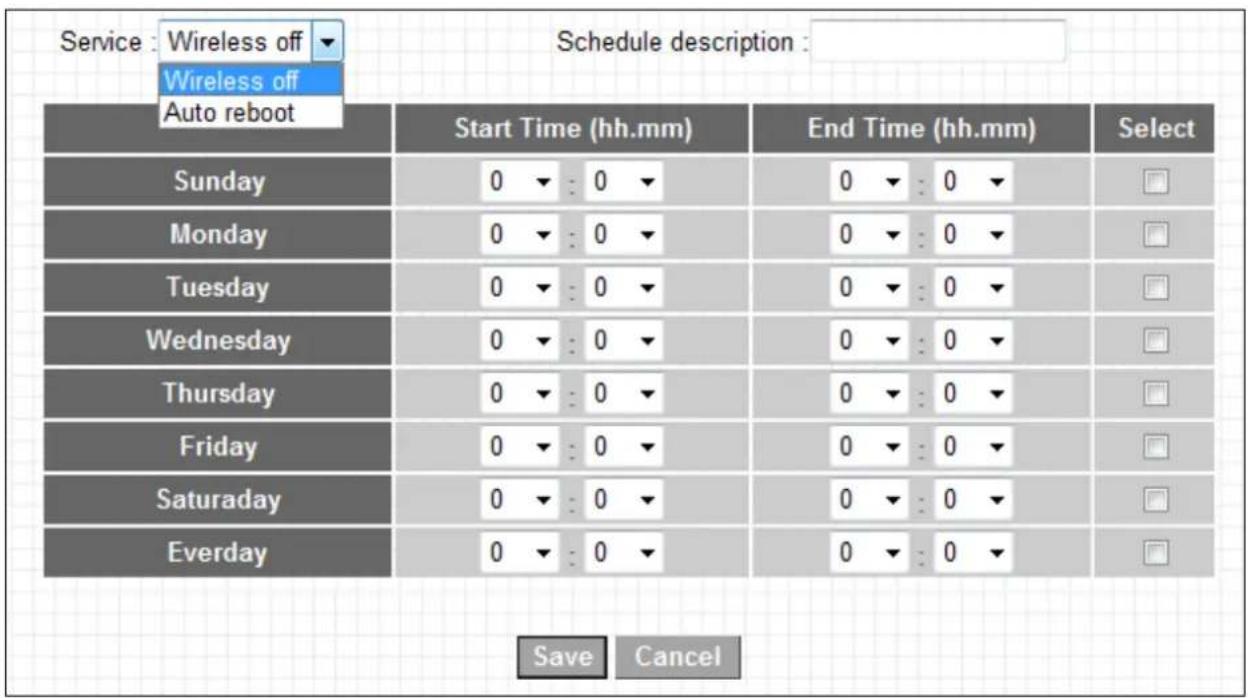
| Service | Select the type of event to be scheduled. “Wireless off” will switch o wireless and “Auto reboot” will restart the device. |
| Schedule Descripon | Assign the event an oponal name or descripon for reference. |
| Start Time | Specify a start me (hh.mm) for the event on one or more specied days. |
| End Time | Specify an end me (hh.mm) for the event, for a specic day or to recur every day. |
| Select | Check the box to select and conrm your event. |
Click "Save" to save your scheduled event and then click "OK".
Schedule rule saved successfully! Please click "OK" to replace web page
OK
The scheduled event should now be listed. Up to 10 events can be scheduled.
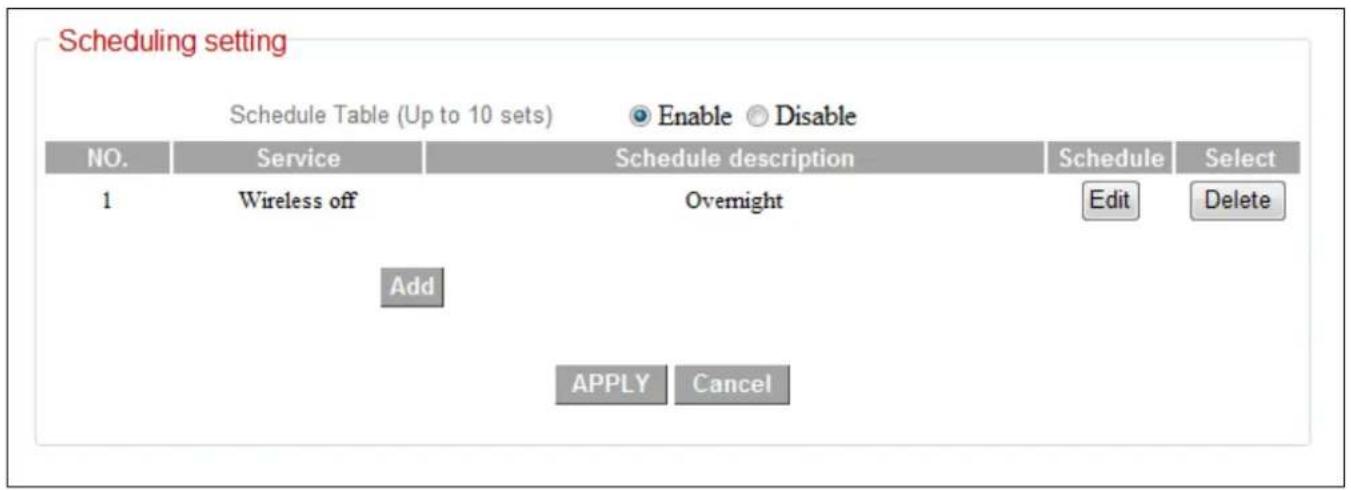
| Edit | Select the type of event to be scheduled. “Wireless o” will switch o wireless and “Auto reboot” will restart the device. |
| Delete | Assign the event an oponal name or descripon for reference. |
Click "APPLY" to save the changes. The following message will appear:
Settings saved successfully!
Click CONTINUE to continue other configuring settings, or click APPLY to restart the system and make the changes take effect.
CONTINUE
APPLY
Click "CONTINUE" to save the changes and connue conguring other sengs, or click "APPLY" to restart the system and make the changes take eect.
II-7. Conguraon Tool
Home
▶ iQ Setup
▶ Basic Setting
▶ WPS Setting
▶ Wireless Advanced
▶ System Utility
Configuration Tool
Diagnosis
Firmware upgrade
Reboot
On the conguraon tool page you can backup the extender's current sengs, restore the sengs to a previously saved version or reset the extender back to it's original, factory default state.
Configuration Tool
Use the "Backup Settings" tool to save the device's current configurations to a file named "config.bin". You can then use the "Restore Settings" tool to restore the saved configuration to the device. Alternatively, you can use the "Restore to Factory Defaults" tool to restore the device to original factory settings.
Backup Settings :
Restore Settings :
Restore to Factory Defaults :
Save
Reset
Browse...
Upload

Restoring sengs to the factory default will restore all__sengs, conguraons and passwords back to the factory default.

You can also reset the device to factory defaults by pressing and holding the Reset/WPS buon for at least 10 seconds.
See II-3. Resetng The Wireless Extender.
| Backup Sengs | Click “Save” to save the current sengs of the extender as a cong.bin le to your specied locaon. |
| Restore Sengs | Click the browse buon to locate a previously saved cong.bin le and then click “Upload” to upload the le and replace your current sengs. |
| Restore to Factory Defaults | Click “Reset” to restore sengs to the factory default.A pop-up window will appear and ask you to conrm,please click “Ok” and the extender will restart. A status bar will indicate the progress of the restart. |
III-7-1. Diagnosis
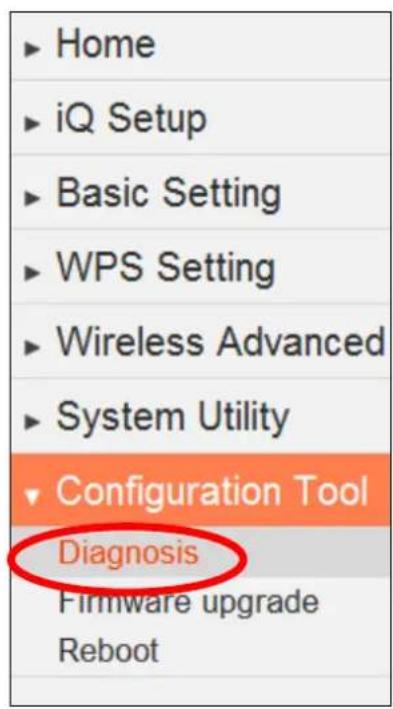
Using the diagnosis tool, you can ping a specific IP address and automacally reboot the device if there is no response.
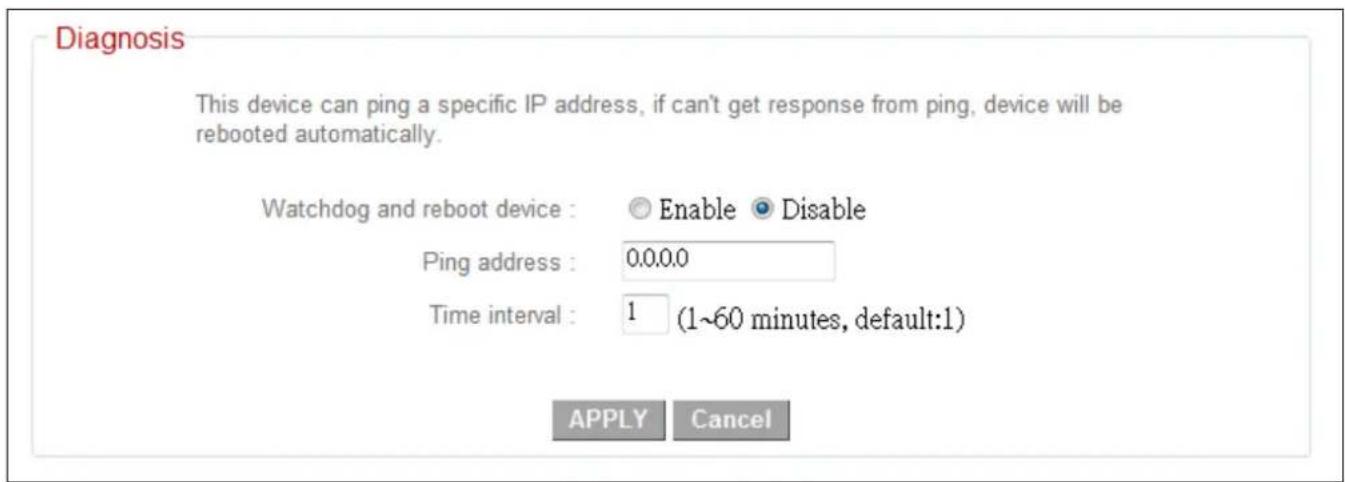
| Watchdog and reboot device | Select “Enable” or “Disable” for the automac reboot funcon. |
| Ping address | Specify the IP address to ping. |
| Time interval | Specify the frequency of the ping as a me interval, in minutes. Enter a value from 1-60. |
III-7-2. Firmware Upgrade
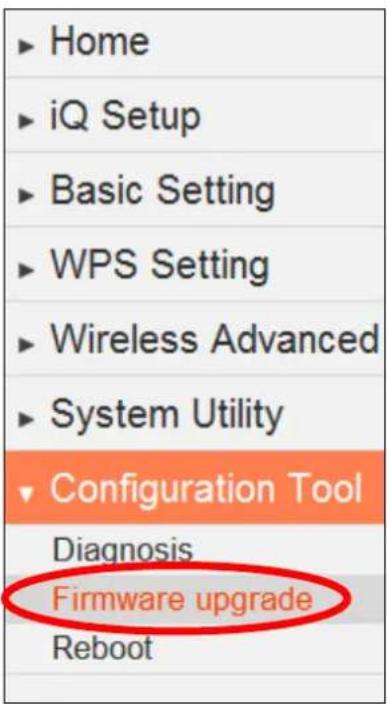
The wireless extender's rmware upgrade feature allows you to upgrade the system rmware to a more recent version. You can download the latest rmware from the Edimax website.
Do not switch o or disconnect the access point during a rmware upgrade, as this could damage the device.

It is recommended that you use a wired Ethernet conneccon to upload the rmware le.

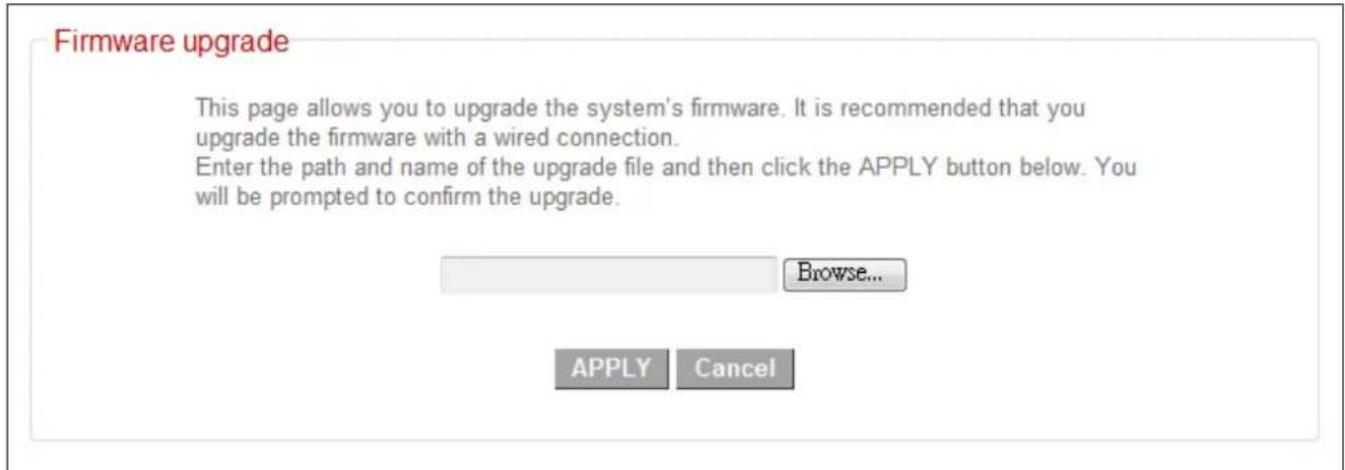
| Browse | Click “Browse” to open a window and locate the rmware le. |
| CANCEL | Click “CANCEL” to cancel and clear the selected le from the “Browse” box. |
| APPLY | Click “APPLY” to upgrade to the selected rmware le.A pop up window will ask you to conrm, and inform you that the device may not respond for up to a minute aer the upgrade. Please click “OK”. A status bar will show the progress of the upgrade. |
III-7-3. Reboot
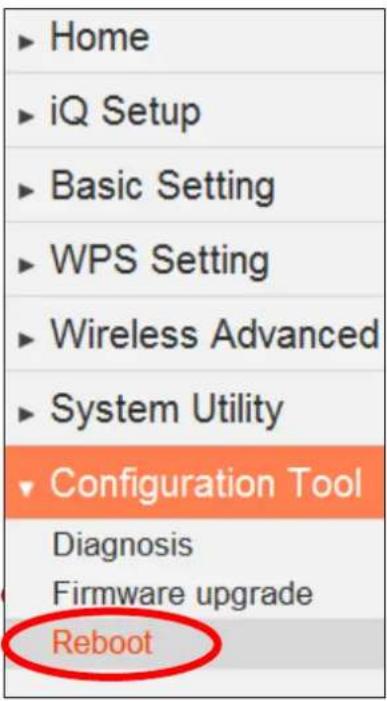
If the wireless extender malfuncons or is not responding, then it is recommended that you reset the device. This feature is useful if the locaon of the access point is not convenient to physically use the hardware reset buon.
A system reboot will restart the device without aecng exisng sengs.
If the wireless extender is sll not responding aer a reset, then switch o the device by disconnectg the power supply and wait for 10 seconds before reconnectg the power.

Reboot
In the event that the system stops responding correctly or stops functioning, you can perform a reset. Your settings will not be changed. Click the APPLY button below to reset the device. You will be asked to confirm the reset.
APPLY
| APPLY | Click “APPLY” to reboot the system. You will be asked to conrm, and informed that the reboot may take a while. A status bar will indicate the progress.. |
IV. POWERLINE UTILITY SOFTWARE
The included CD-ROM contains Powerline ulity soware, which enables you to manage and congregate your Powerline network in more detail. The ulity enables you to manage all connected Powerline adapters.
IV-1. Installaon

Before installang the ulity soware, please uninstall any exisng Powerline ulity soware you may already have.
To install the ulity soware, insert the CD into your CD-ROM drive and the setup wizard should begin automacally. If not, please manually locate and open the "AutoRun.exe" le in the CD.
Files Currently on the Disc (8)

Adobe
File Folder

Utility
File Folder

Autorun
File Folder

Win 8
File Folder

Manual
File Folder

AutoRun.exe
Shortcut
1.83 KB

QIG
File Folder

AutoRun.inf
Setup Information
37 bytes
IV-1.1 Win 8
Step 1 Before installing the ulity soware, make sure that no other powerline ulity is installed on your computer. If any other ulity soware is installed, uninstall it and reboot the computer.
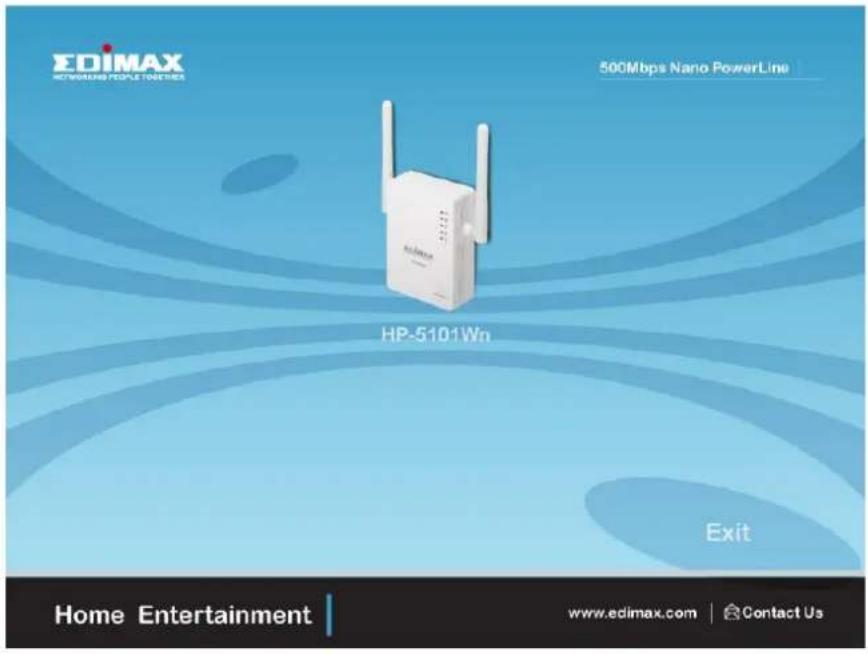
Step 2 Insert the CD into your CD-ROM drive. When the following EZmax Wizard appears, select your model.
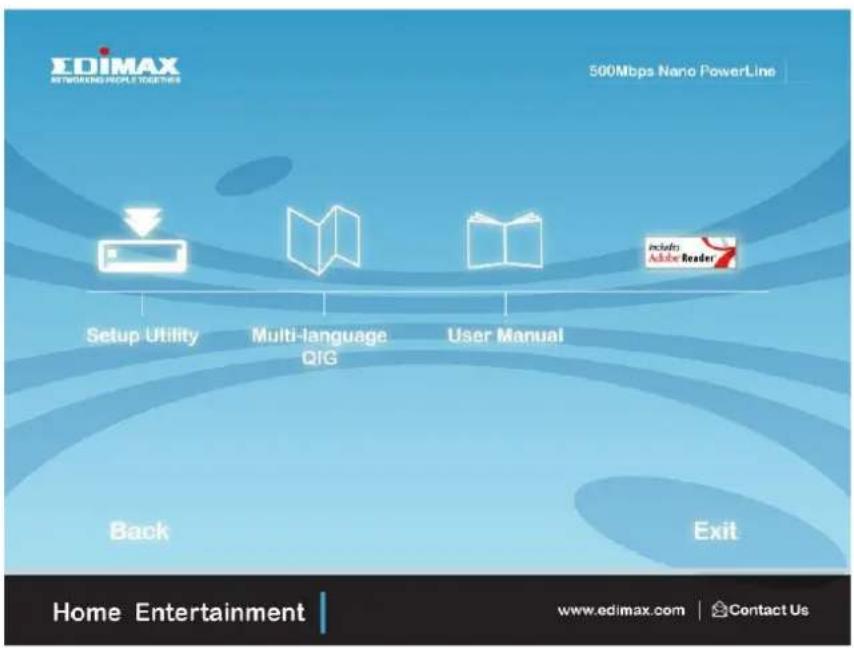
Step 3 Then click "Setup Ulity".
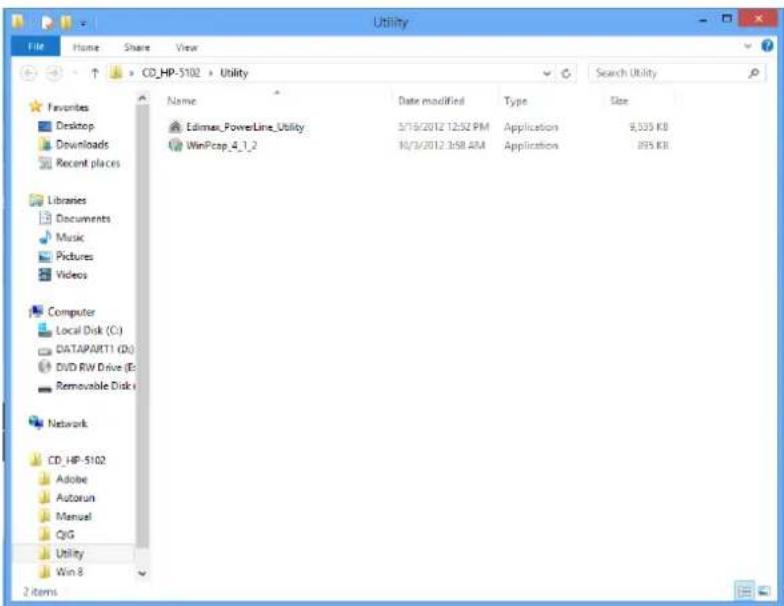
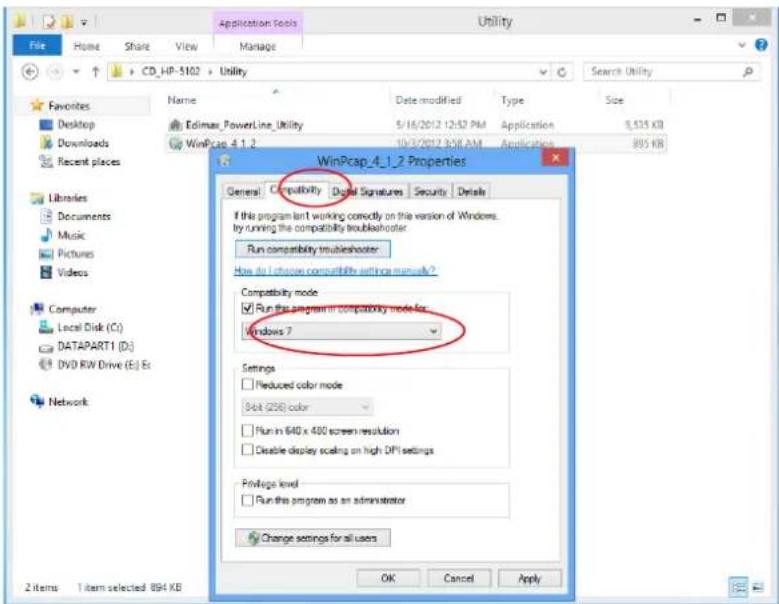
Step 4 Click right buon on WinPCap4.1.2 then click "Properes".
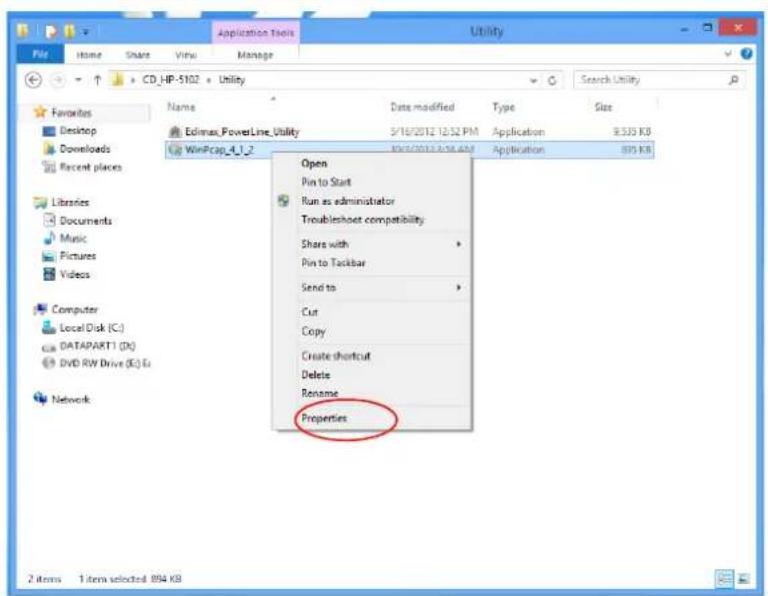
Step 5 Click Compatibility tab and check "Run this program in compatibility mode for:", then select Windows 7, then click "Apply".
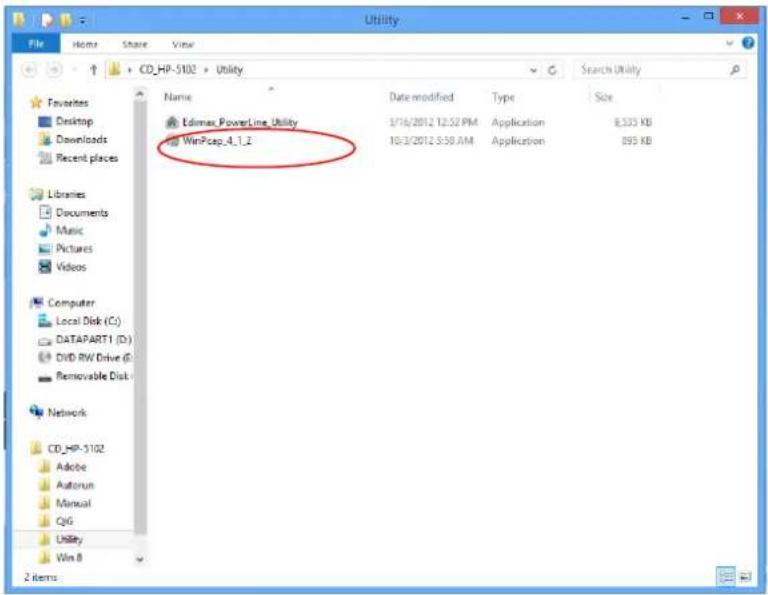
Step 6 Then click "WinPcap_4_1_2". The wizard will guide you through the setup process.
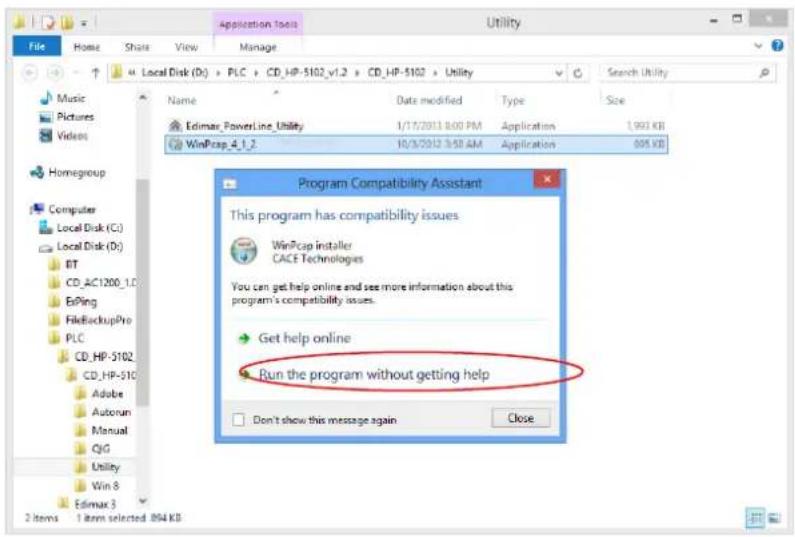
Step 7 When the following WinPcap Compatibility Assistant appears, select Run the program without geng help.
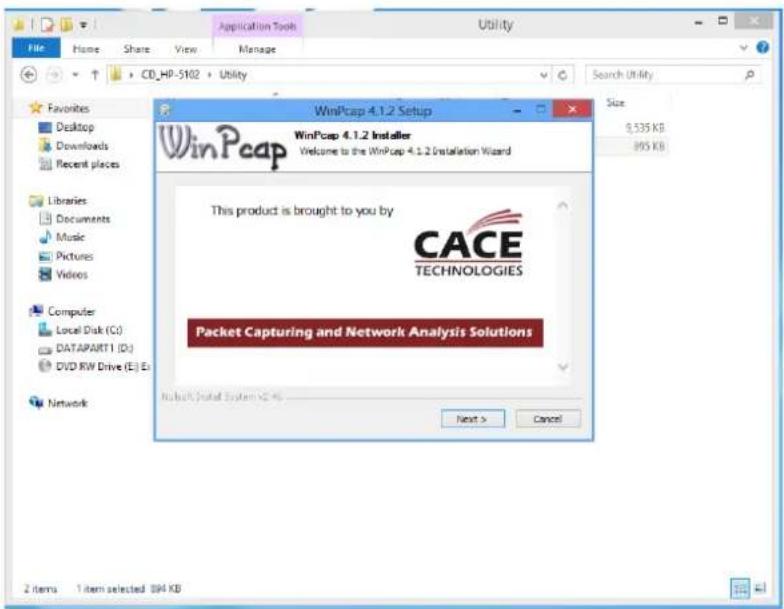
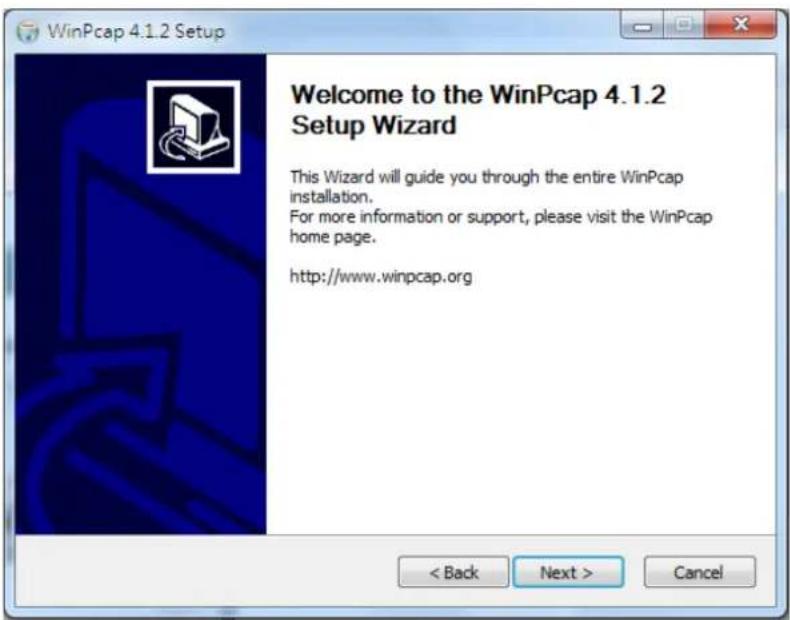
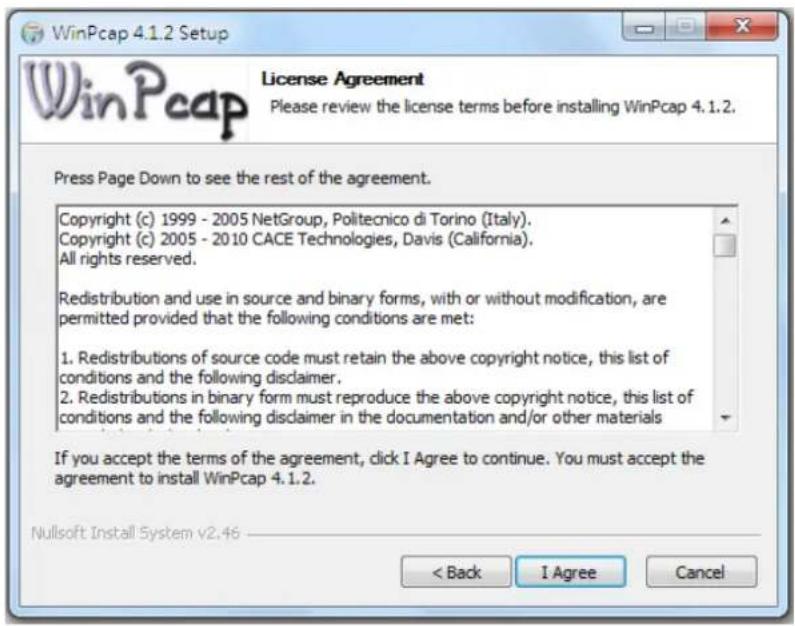
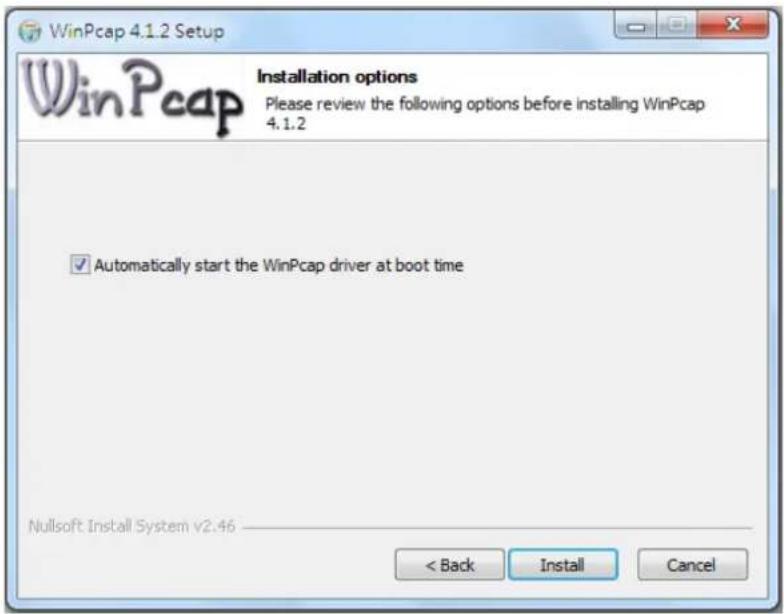
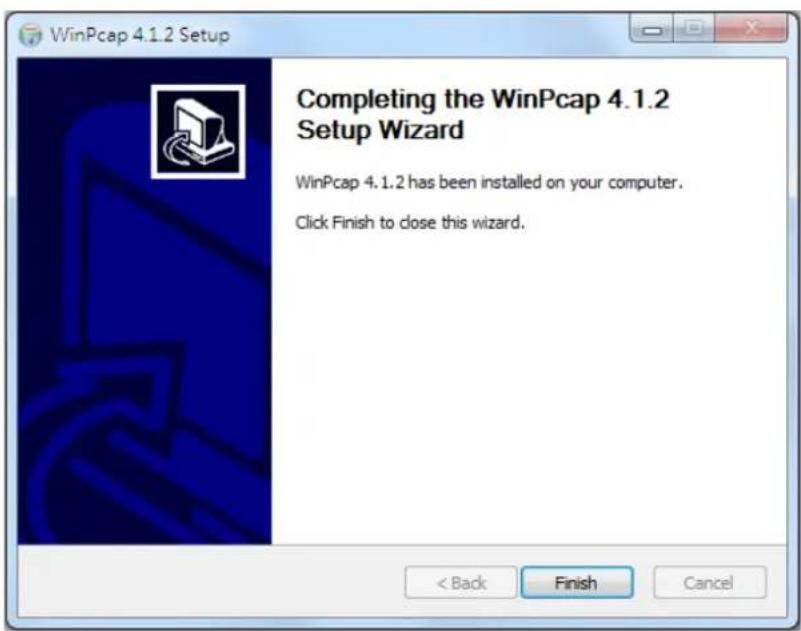
Step 8 Aer the installaon is complete, click "Finish".
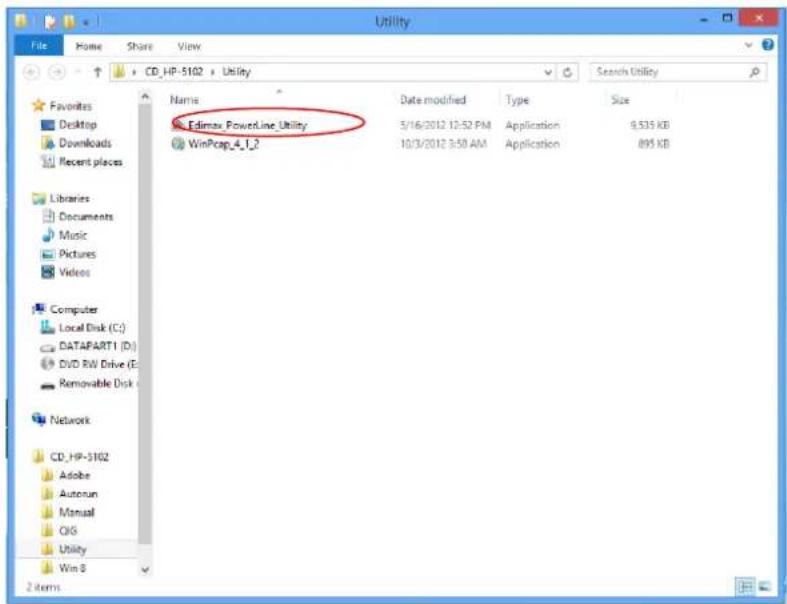
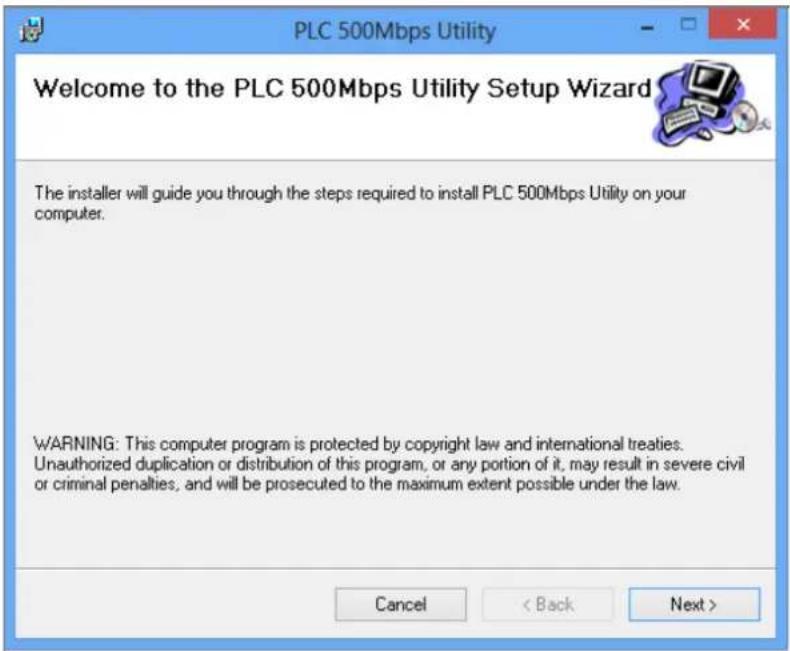
Step 9 Click the "Edimax PowerLine Ulity", the "PLC 500Mbps Ulity" appears, click "Next" to connue.
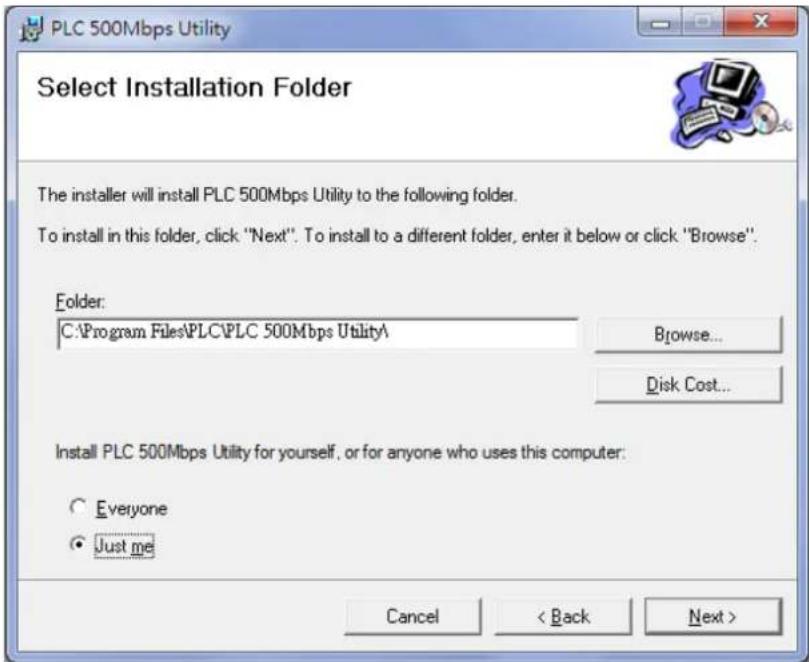
Step 10 Select where you want to install the ulity soware, and then click "Next".
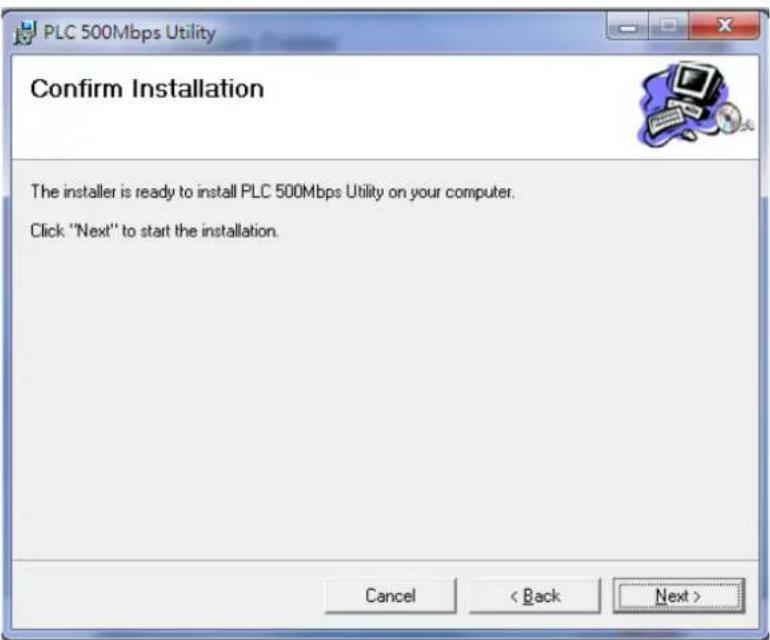
Step 11 Aer the installaon is complete, click "Close".
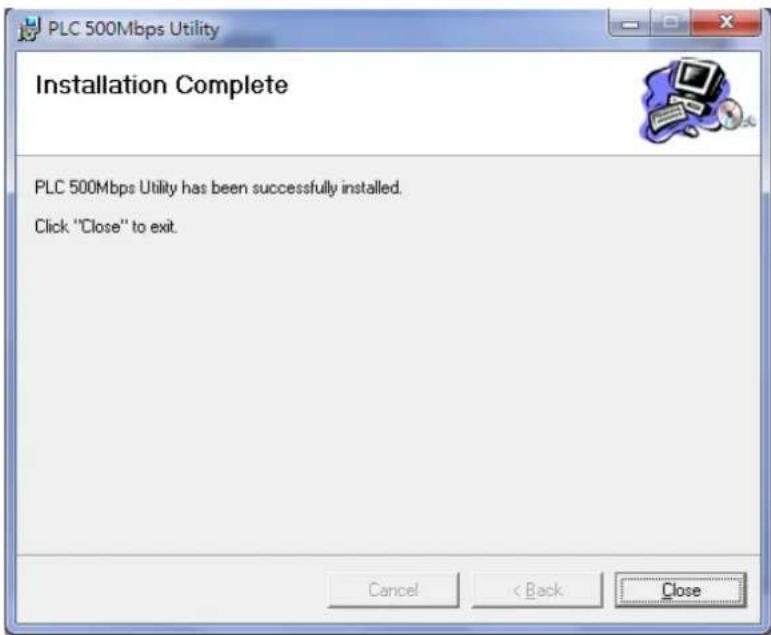
Step 12 An icon will appear on your desktop. Click the icon to open the utility soware.
Note: You can manage all the connected powerline adapters with the ulity soware. However, installing the ulity soware is oponal.
IV-1.2 Win XP/Vista / 7
Step 1 Before installing the ulity soware, make sure that no other powerline ulity is installed on your computer. If any other ulity soware is installed, uninstall it and reboot the computer.
Step 2 Insert the CD into your CD-ROM drive. When the following EZmax Wizard appears, select your model.
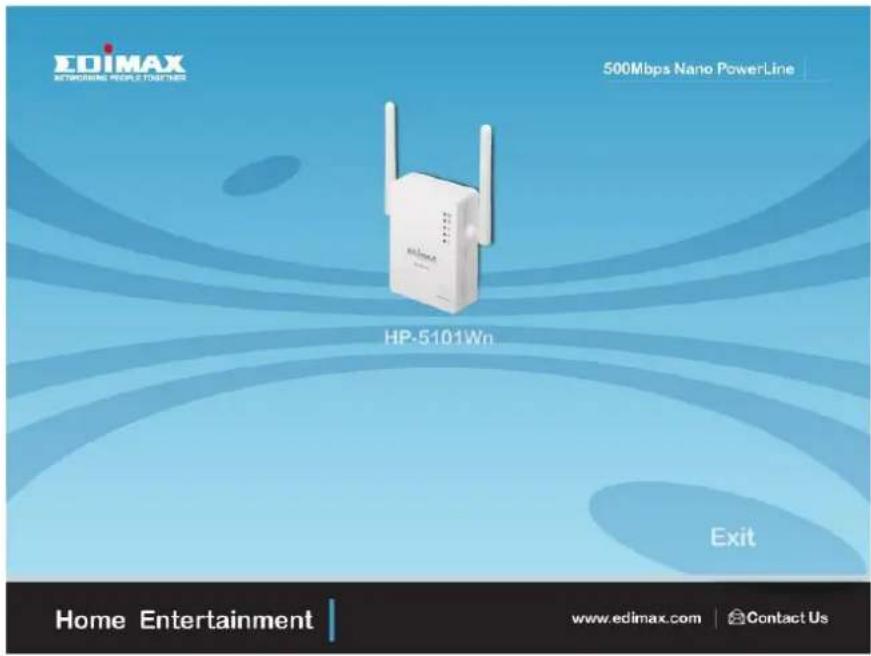
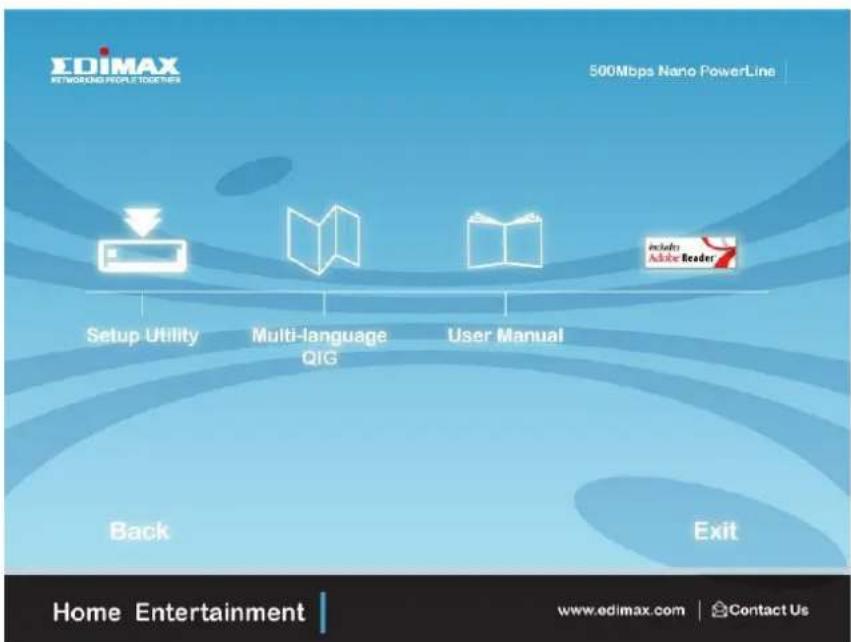
Step 3 Then click "Setup Ulity".
Step 4 If you have not installed WinPcap version 4.1.2 (or higher) on your computer before. The wizard will guide you through the setup process.
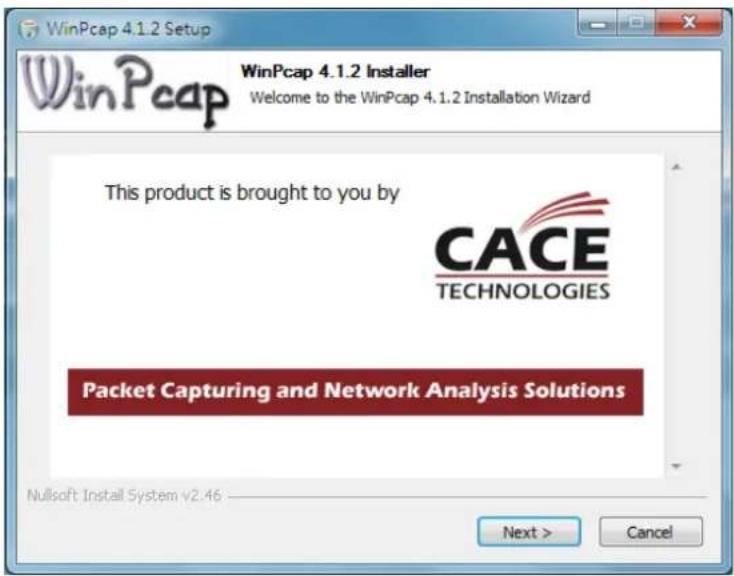
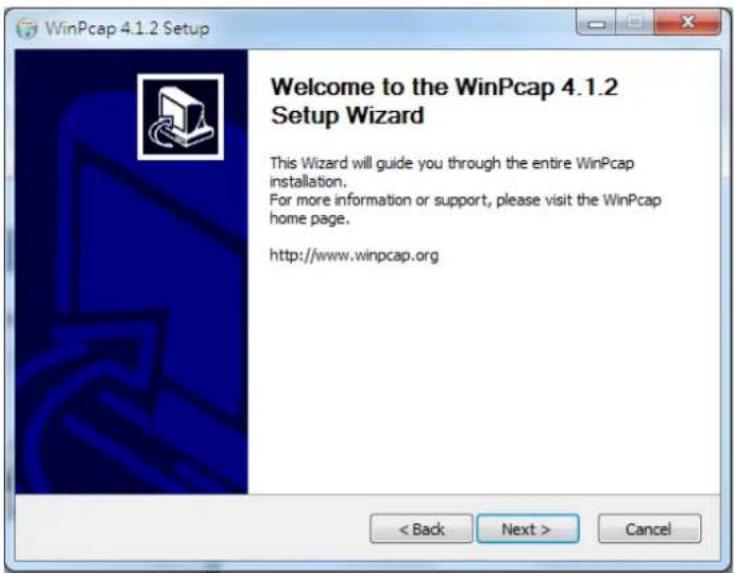
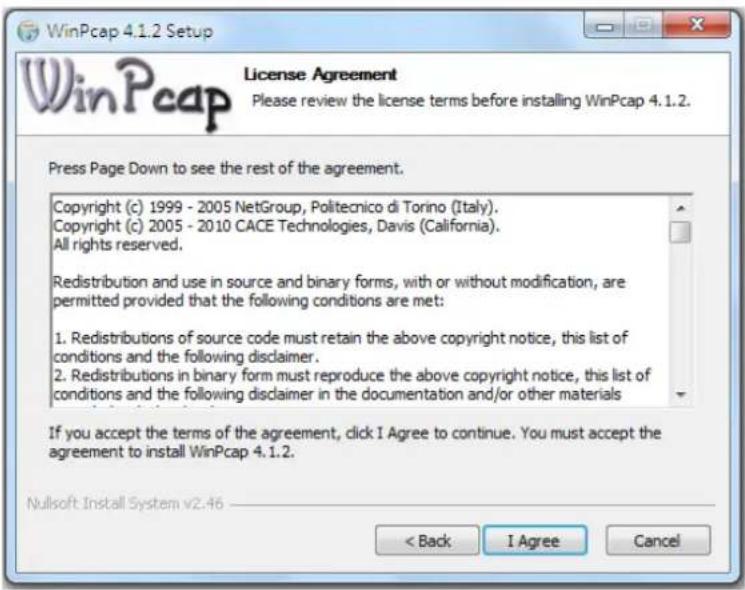
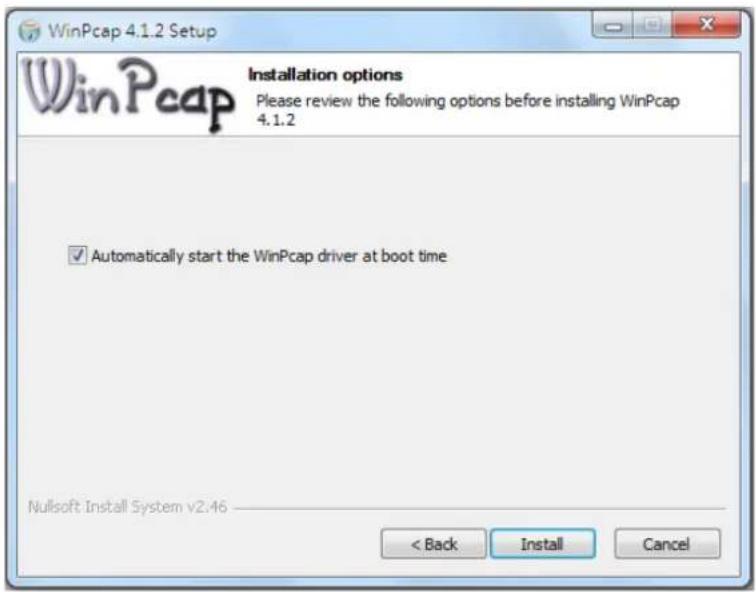
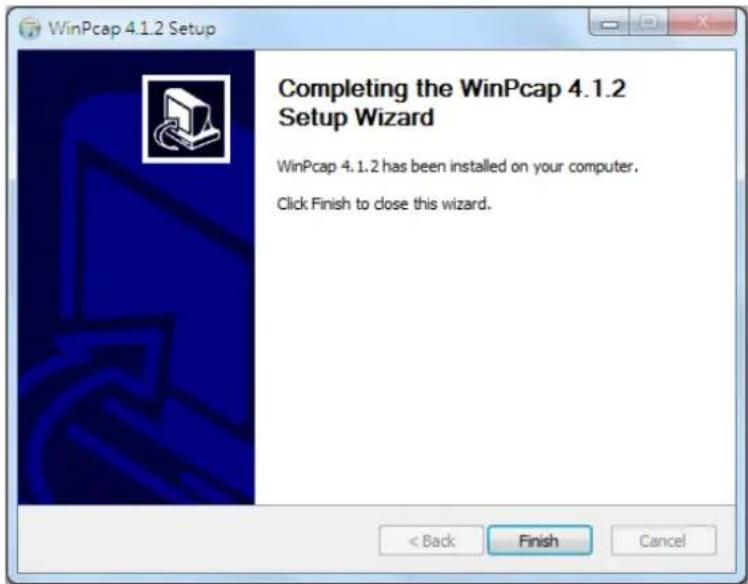
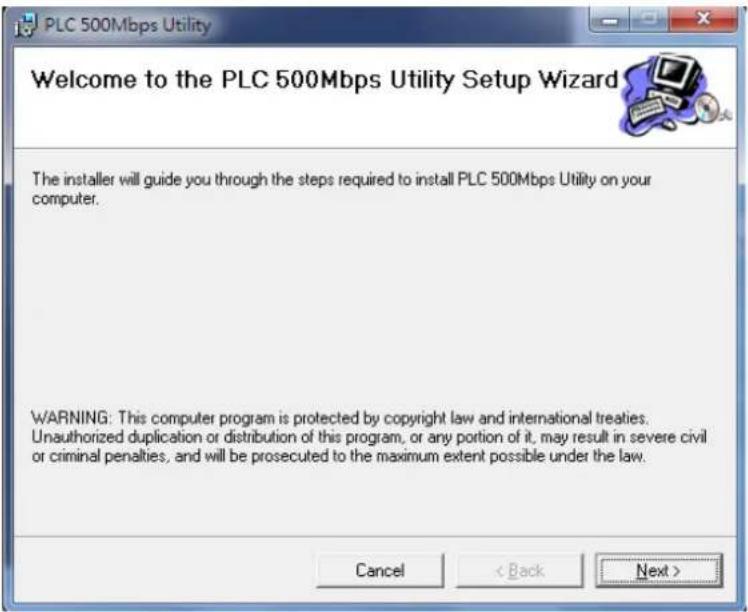
Step 5 When the “Edimax PowerLine Ulity” setup wizard appears, click “Next” to connue.
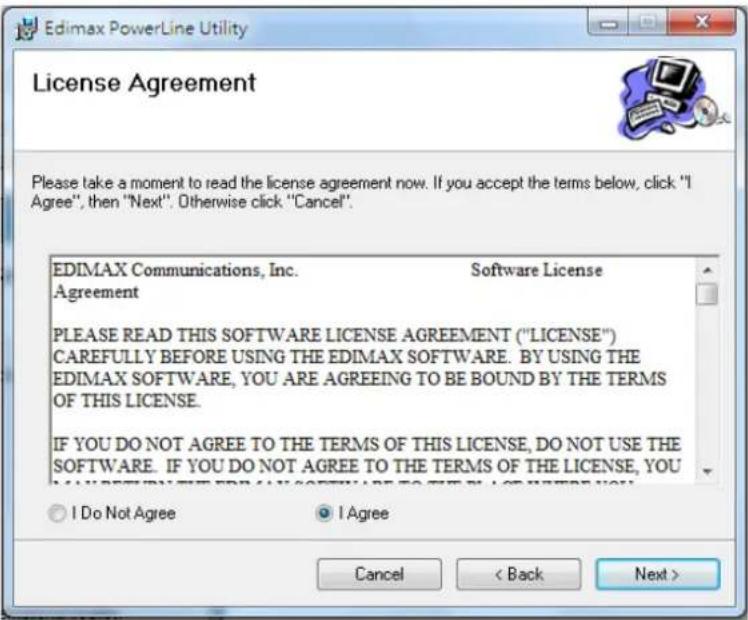
Step 6 In the “License Agreement” screen, please select “I Agree” and then click “Next” to connue.
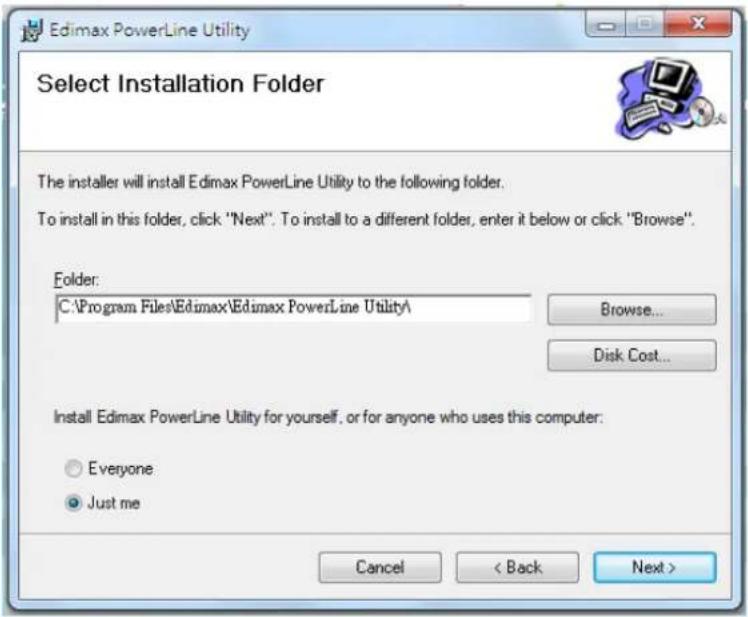
Step 7 Select where you want to install the ulity soware, and then click "Next".
Step 8 If you conrm to install the ulity, click "Next".
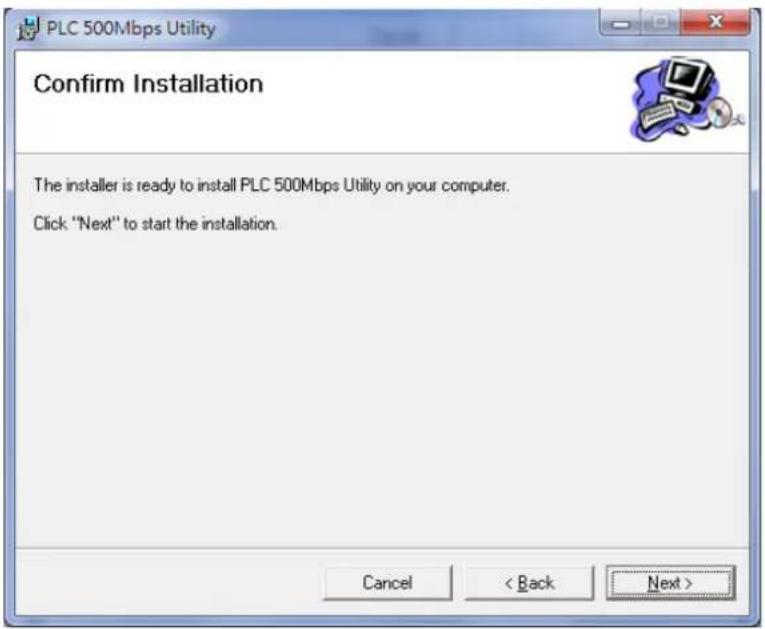
Step 9 Aer the installaon is complete, click "Close".
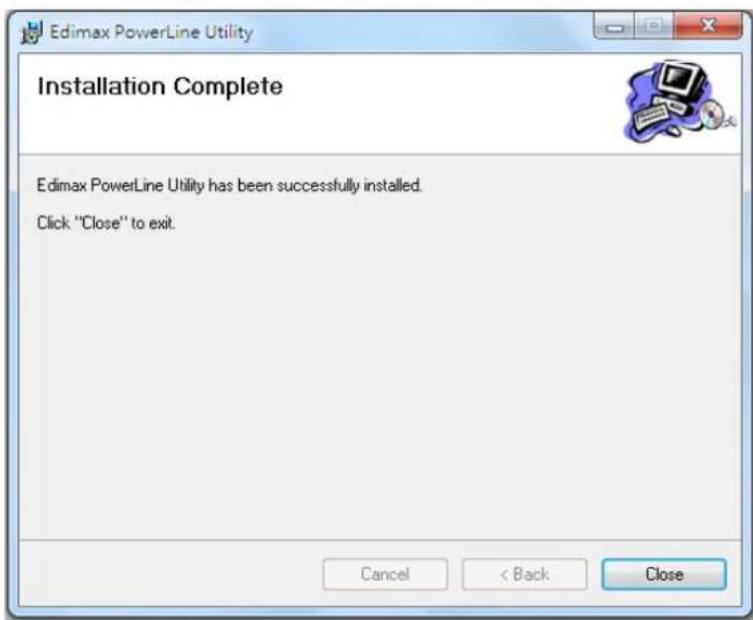
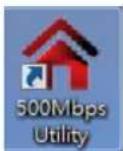
Step 10 An icon will appear on your desktop. Click the icon to open the utility soware.
Note: You can manage all the connected powerline adapters with the ulity soware. However, installing the ulity soware is oponal.
IV-2. Using the Ulity Soware
IV-2-1. Main Tab
The “Main” tab provides a list of powerline adapters connected to the network. The upper panel displays local powerline adapters. The lower panel displays remote powerline adapters in the network.
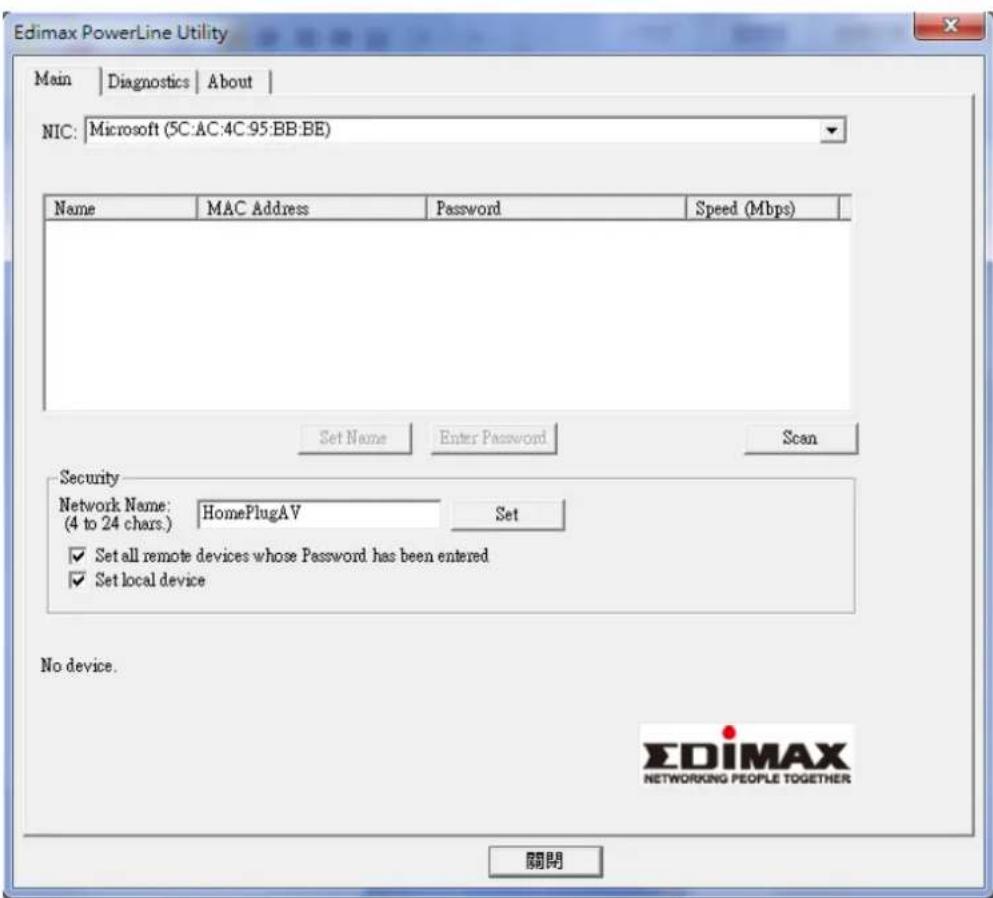
| Set Name | Select a device and click “Set Name” to rename the device. |
| Enter Password | By default, this column is blank. Select a device and click “Enter Password” to set up a password for the device. |
| Scan | Click “Scan” and the utility software will perform an immediate scan of other remote powerline adapters. By default, the utility automatically scans every few seconds. |
IV-2-2. Diagnoscs Tab
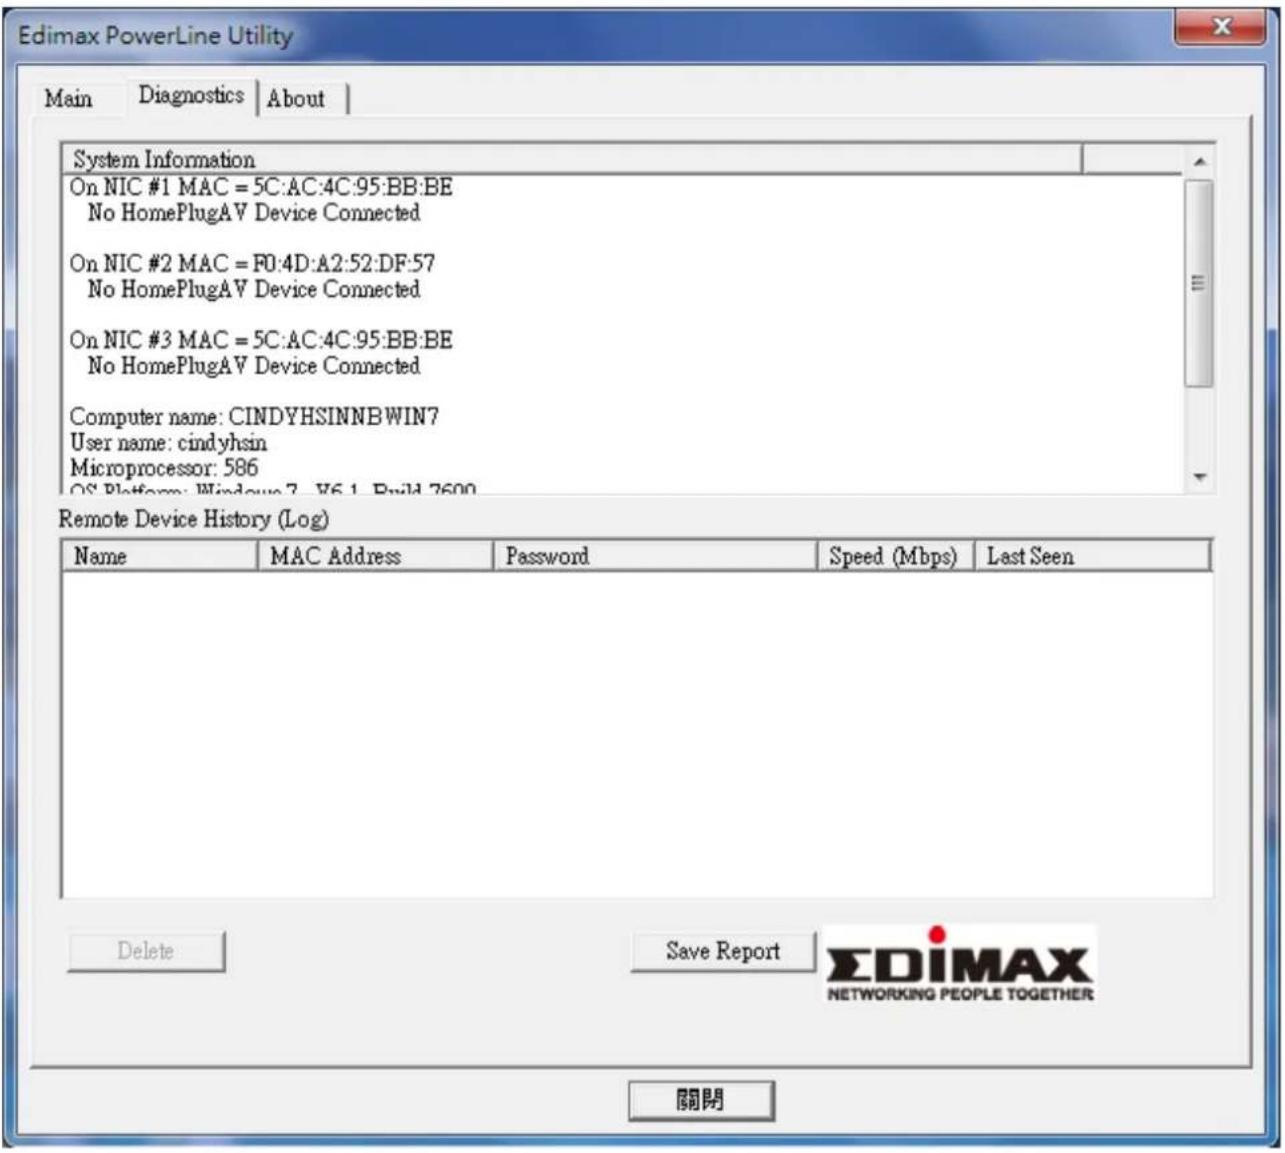
The “Diagnoscs” tab displays the system informaon and history of all remote devices.
The upper panel displays technical data concerning the soware and hardware on the host computer and the lower panel displays the history of all remote devices.
IV-2-3. About Tab
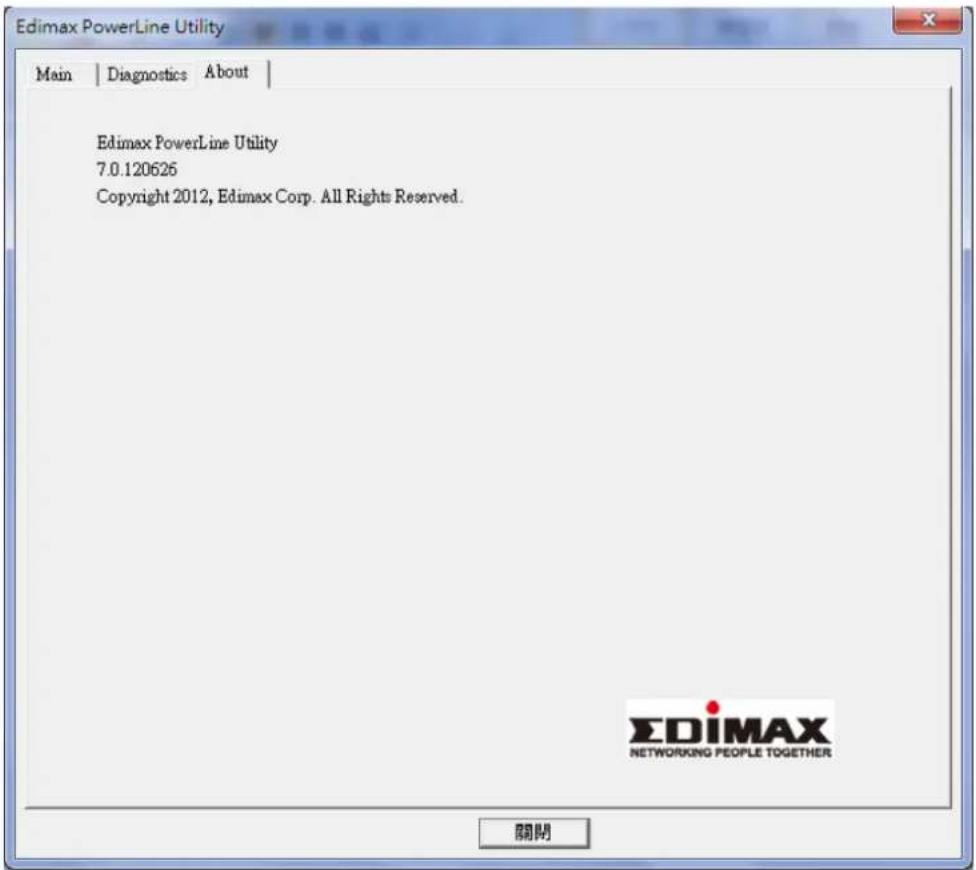
The “About” tab contains some basic informaon about the soware. You can also enable or disable the autoscan funcon under “Preferences”.
V. APPENDIX
V-1. Conguring your IP address
Before you use the wireless extender, please make sure your computer is set to use a dynamic IP address. This means your computer can obtain an IP address automacally from a DHCP server. This is a simple procedure, which is explained step by step in V-1-1. How to congregate your computer to use a dynamic IP address.

Stac IP users, please make a note of your stac IP before you change it or switch to a dynamic IP address.
Unfortunately, not all networks support DHCP capability. In this case, you need to use a stac IP address for the wireless extender and your PC or Macintosh. The wireless extender uses the default IP address 192.168.10.1, which may not be in the same IP address subnet of your network; meaning you are unable to access the browser based conguraon interface. So, you need to modify the IP address of your PC or Macintosh to 192.168.10.x (x = 2 - 254) in order to access the browser-based conguraon interface.
The procedure for doing so varies across dierent operang systems; please follow the guide appropriate for your operang system in IV-1-2. How to modify the IP address of your PC or Macintosh.

Note: For guidance on how to assign a new IP address to the wireless extender, so that it is within the same IP address subnet of your network, please refer to III-6. System Ulity. In cases where you need to modify the IP of your PC or Macintosh in order to access the browser based conguraon interface, if the default IP of the wireless extender remains unchanged, you may need to repeat this process and modify the IP of your PC or Macintosh every me you wish to conjure the wireless extender.
V-1-1. How to Congure Your Computer to Use a Dynamic IP Address
Please follow the instrucons appropriate for your operang system.
V-1-1-1. Windows XP
- Click the “Start” buon (it should be located in the lower-le corner of your computer), then click “Control Panel”. Double-click the “Network and Internet Connecons” icon, click “Network Connecons”, and then double-click “Local Area Connecon”. The “Local Area Connecon Status” window will then appear, click “Properes”.
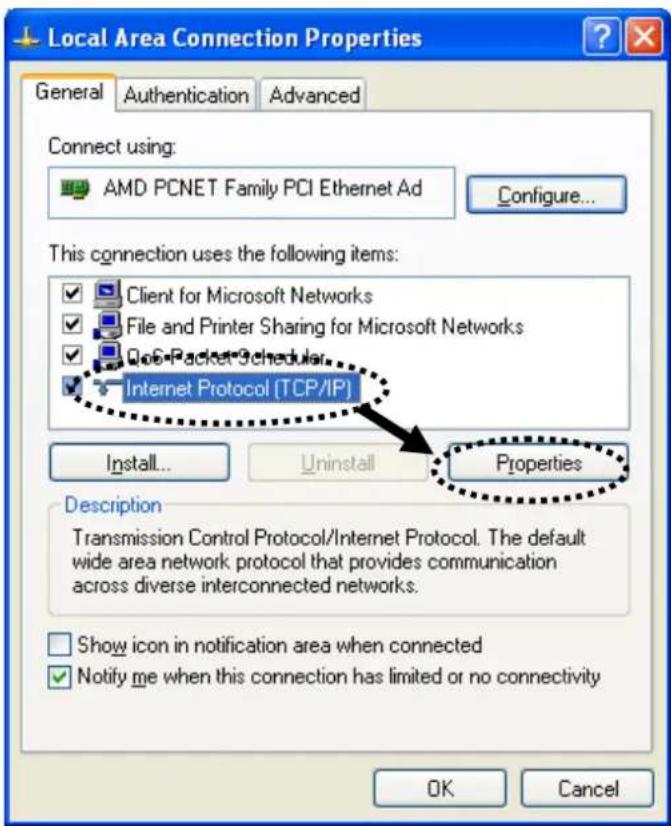
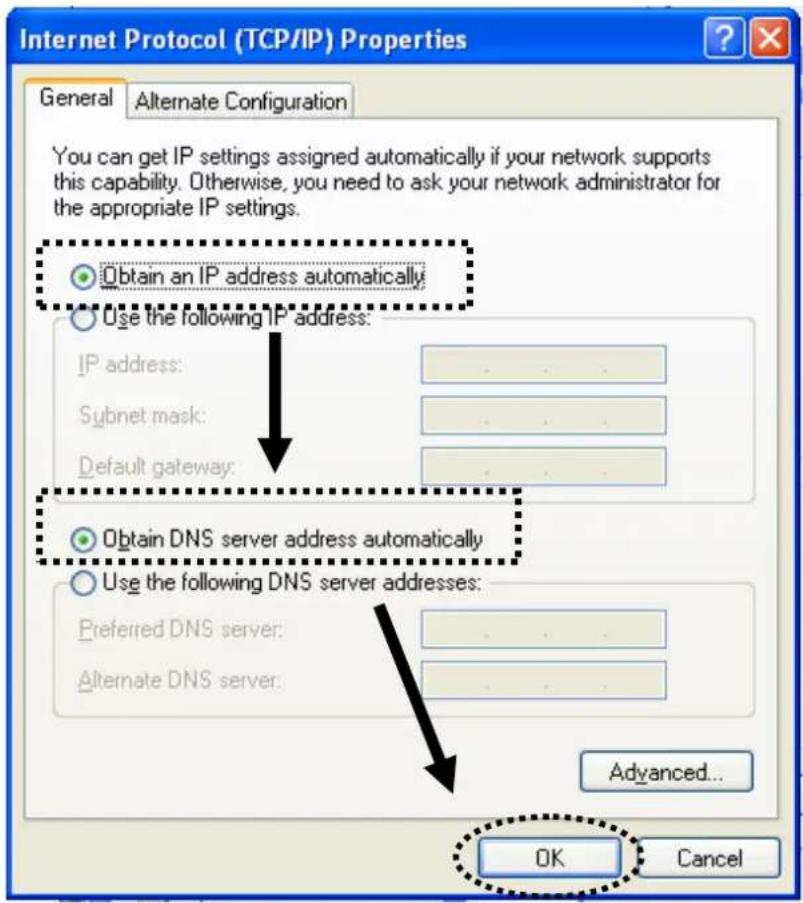
- Select "Obtain an IP address automacally" and "Obtain DNS server address automacally", then click "OK".
V-1-1-2. Windows Vista
- Click the “Start” buon (it should be located in the lower-le corner of your computer), then click “Control Panel”. Click “View Network Status and Tasks”, then click “Manage Network Connecons”. Right-click “Local Area Network”, then select “Properes”. The “Local Area Connecon Properes” window will then appear, select “Internet Protocol Version 4 (TCP / IPv4)”, and then click “Properes”.
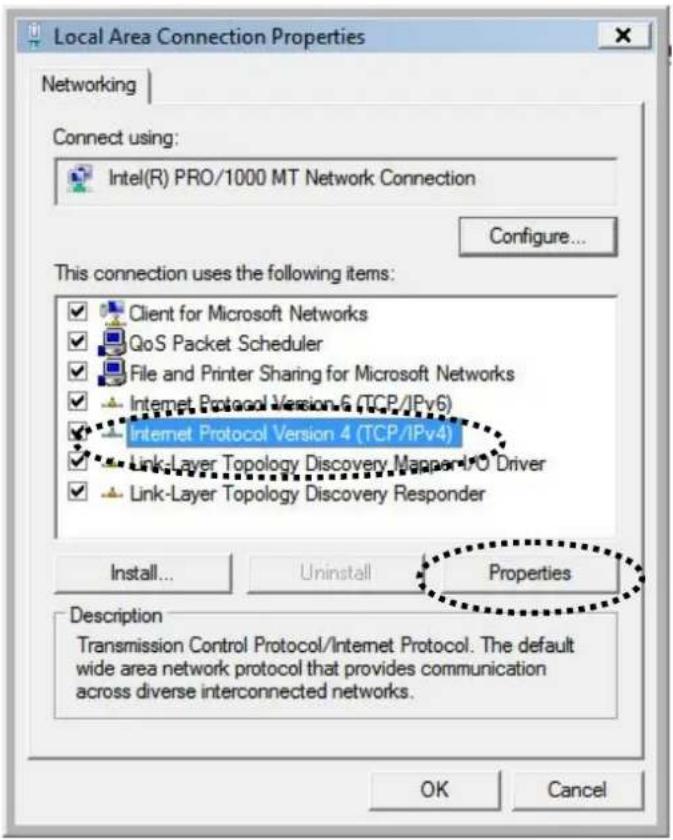
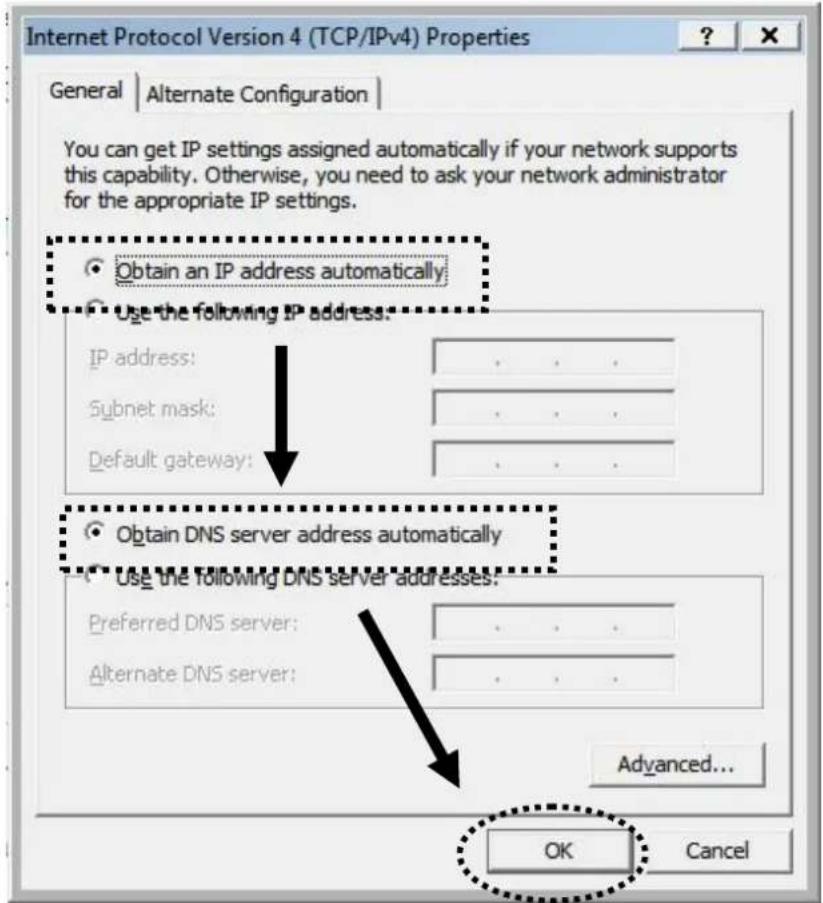
- Select "Obtain an IP address automacally" and "Obtain DNS server address automacally", then click "OK".
V-1-1-3. Windows 7
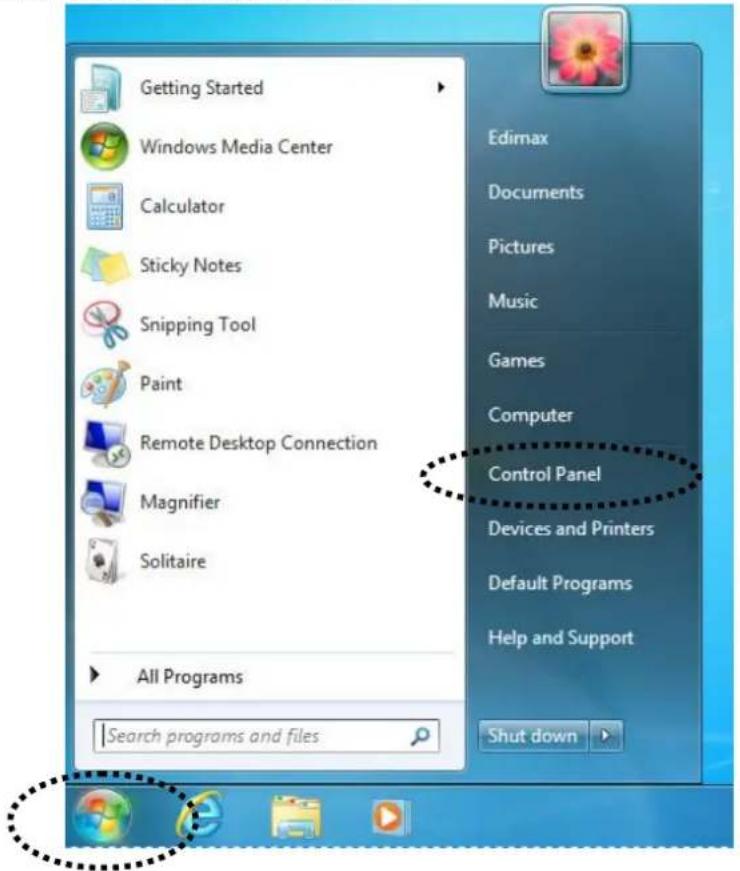
- Click the "Start" buon (it should be located in the lower-le corner of your computer), then click "Control Panel".
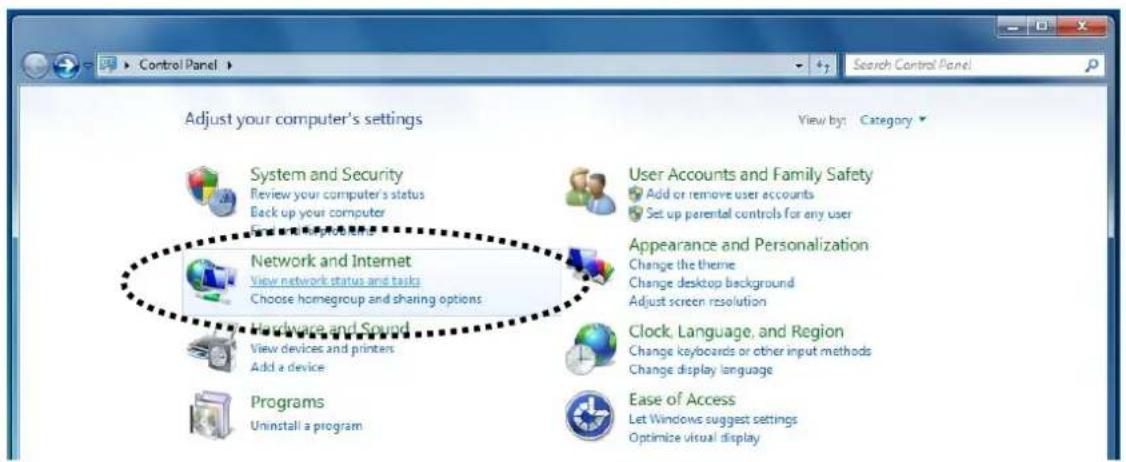
- Under "Network and Internet" click "View network status and tasks".
- Click "Local Area Connecon".
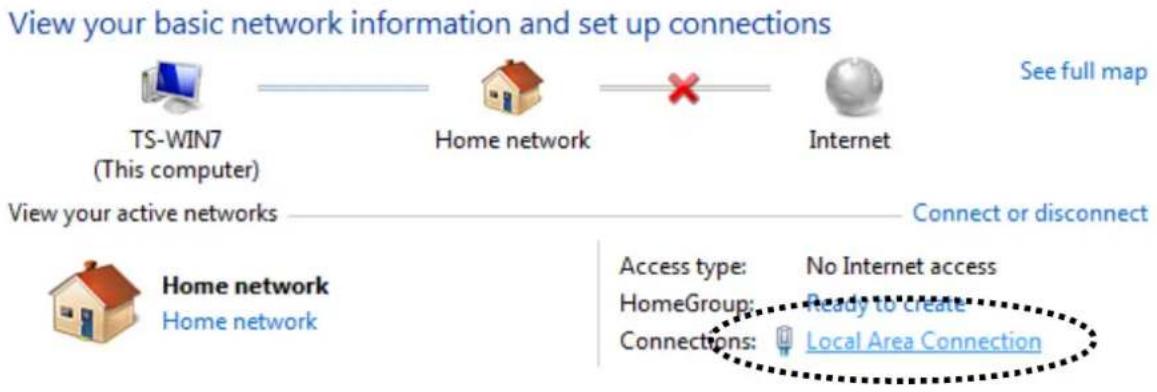
flowchart
graph LR
    A["TS-WIN7 (This computer)"] --> B["Home network"]
    B --> C["Internet"]
    D["Home network"] --> E["Access type: No Internet access"]
    D --> F["HomeGroup: Ready to create"]
    D --> G["Connections: Local Area Connection"]
- Click "Properes".
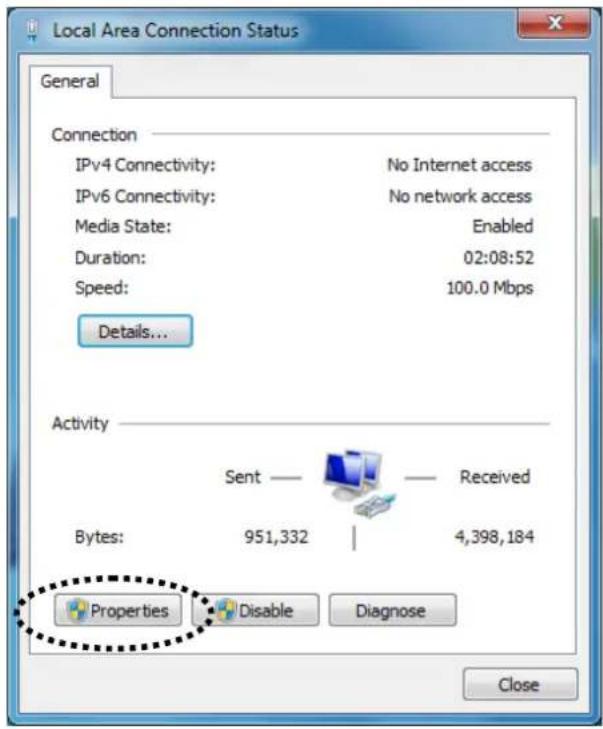
- Select "Internet Protocol Version 4 (TCP/IPv6) and then click "Properes".
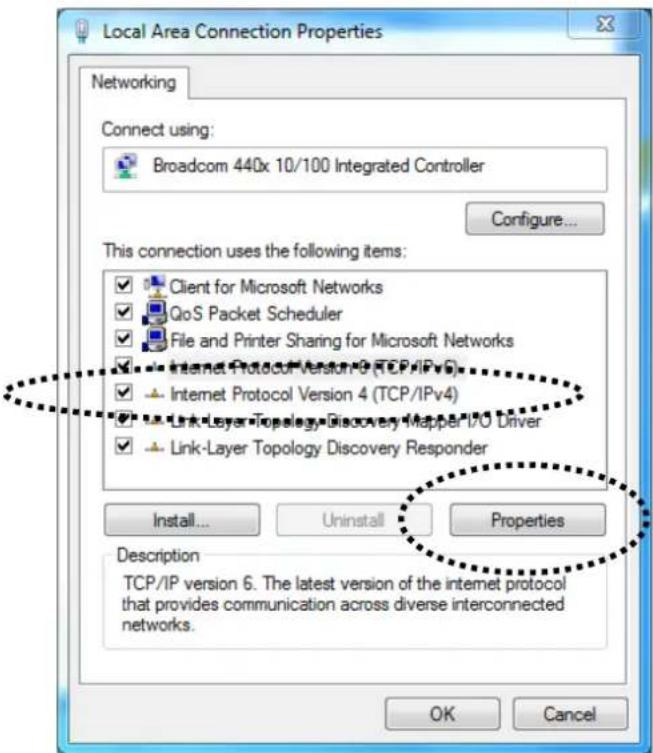
- Select "Obtain an IP address automacally" and "Obtain DNS server address automacally", then click "OK".
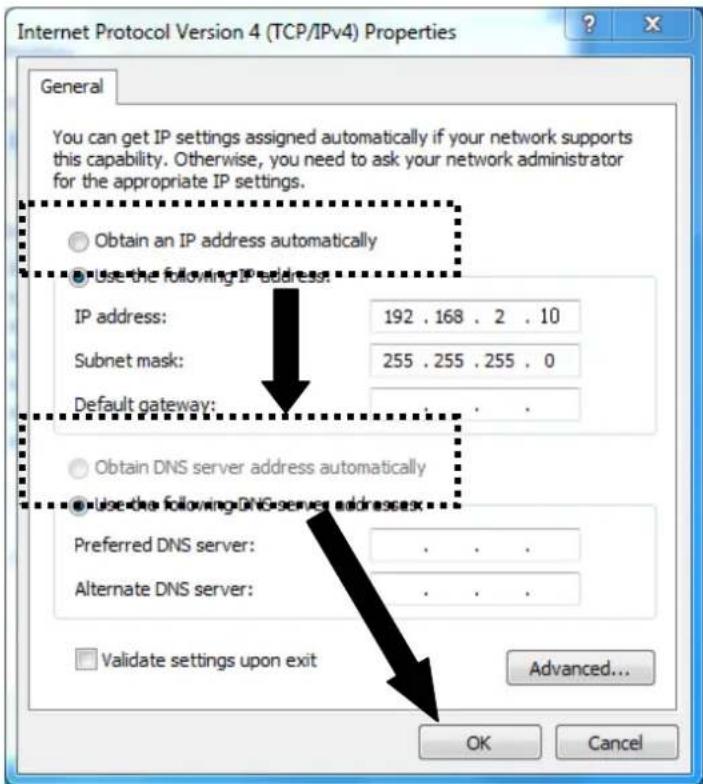
IV-1-1-4. Windows 8
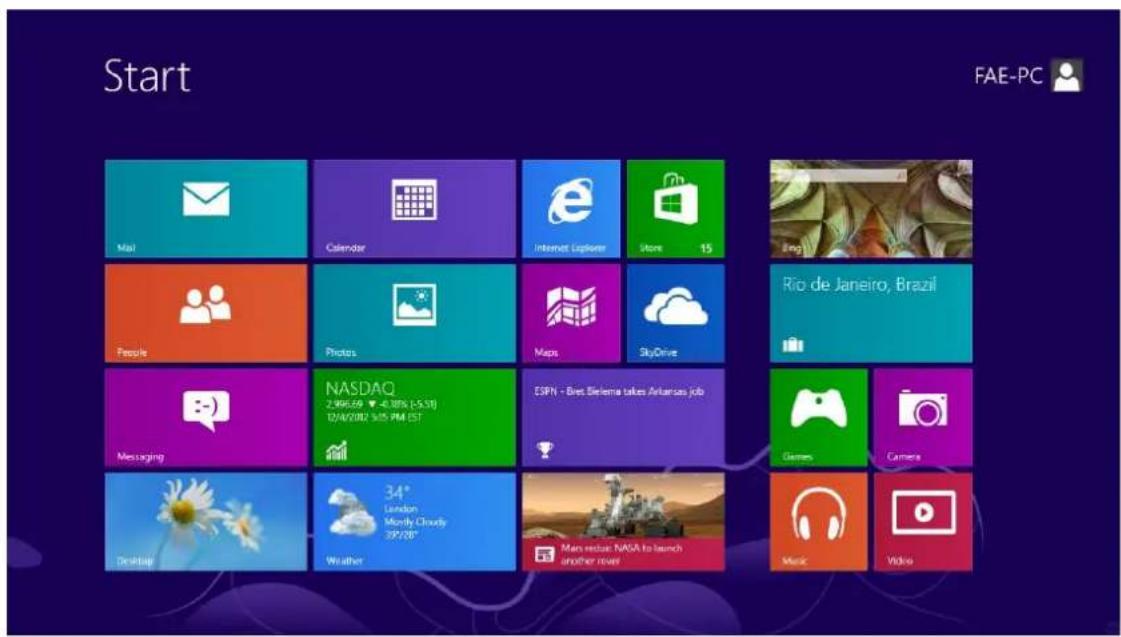
- From the Windows 8 Start screen, you need to switch to desktop mode. Move your cursor to the boom le of the screen and click.
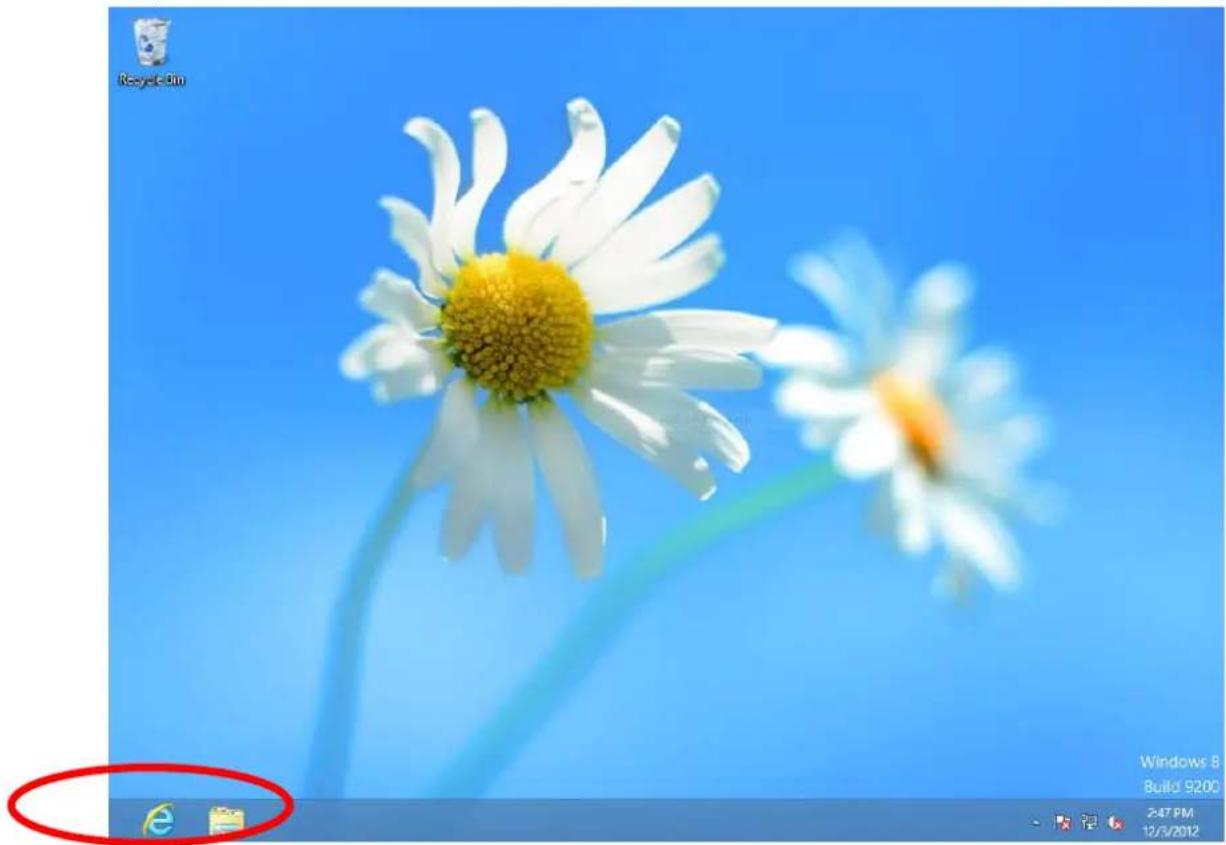
- In desktop mode, click the File Explorer icon in the bottom le of the screen, as shown below.
natural_image
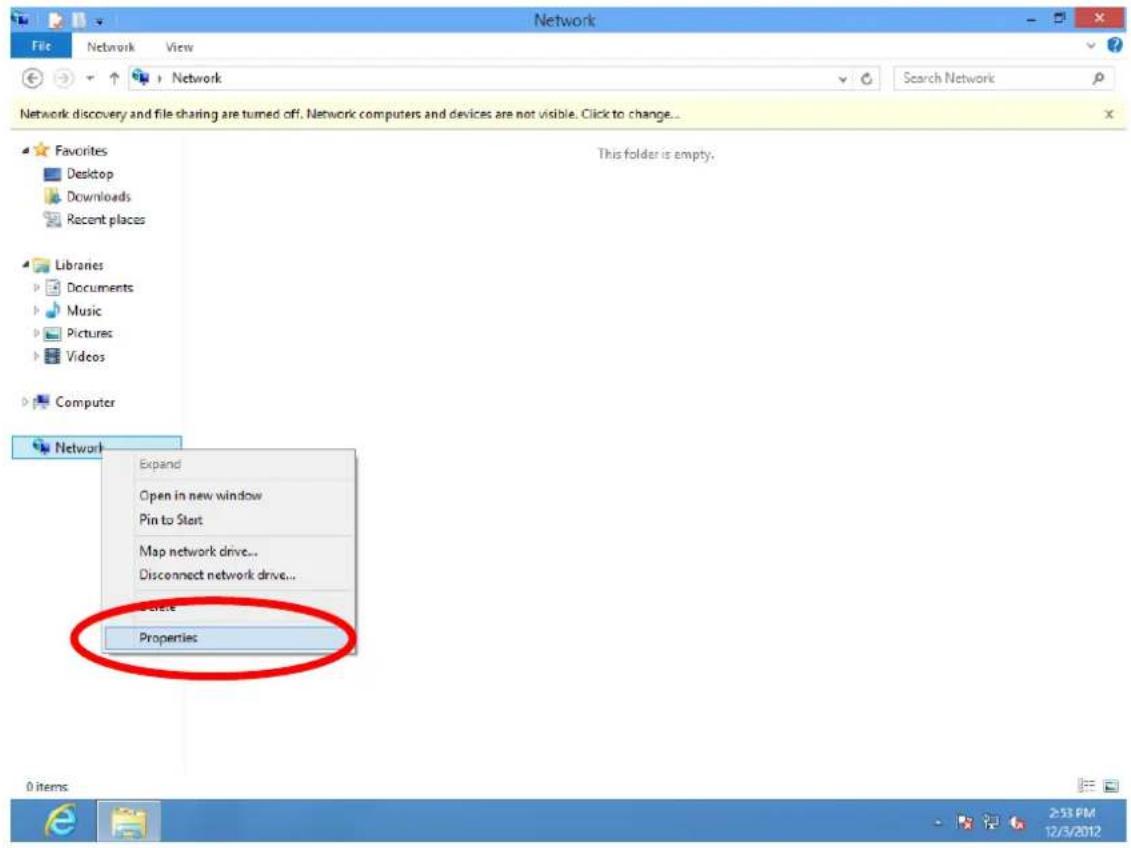
Close-up of white daisies against a blue sky, with no visible text or symbols on the daisies or background.- Right click "Network" and then select "Properes".
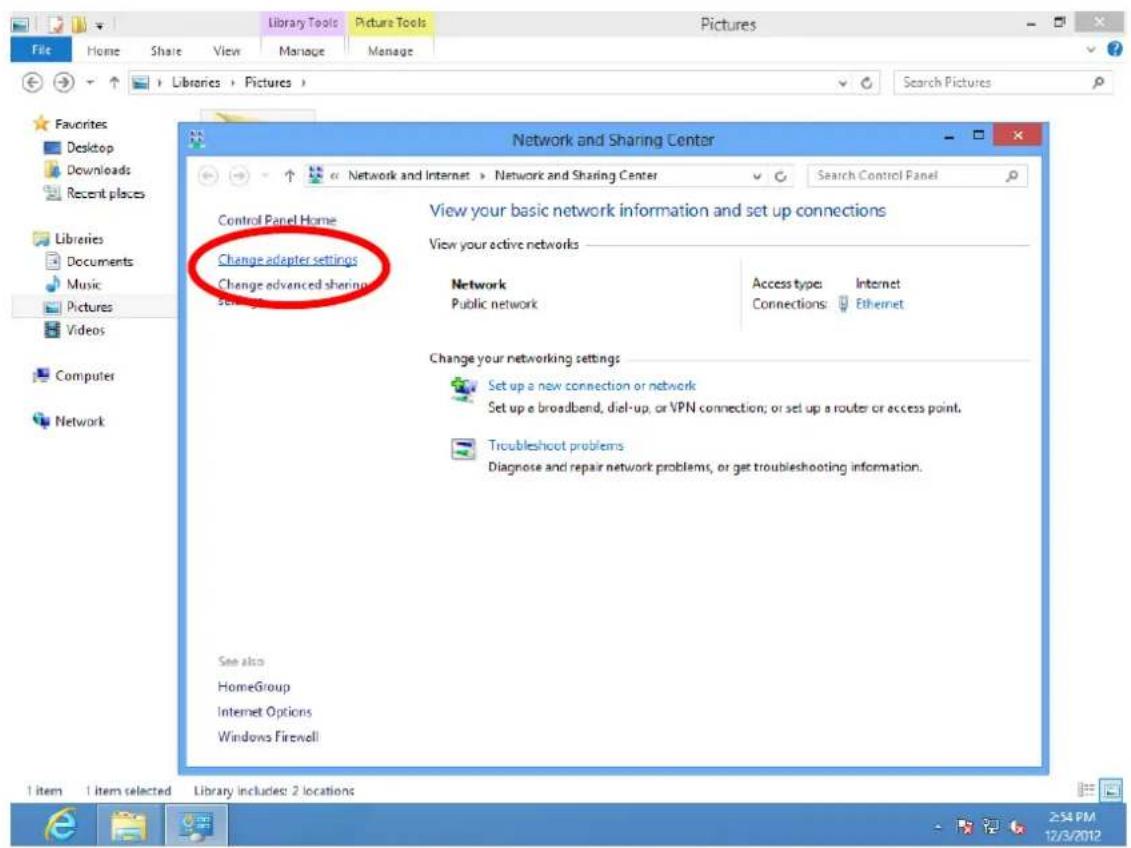
- In the window that opens, select "Change adapter sengs" from the le side.
- Choose your conncon and right click, then select "Properes".
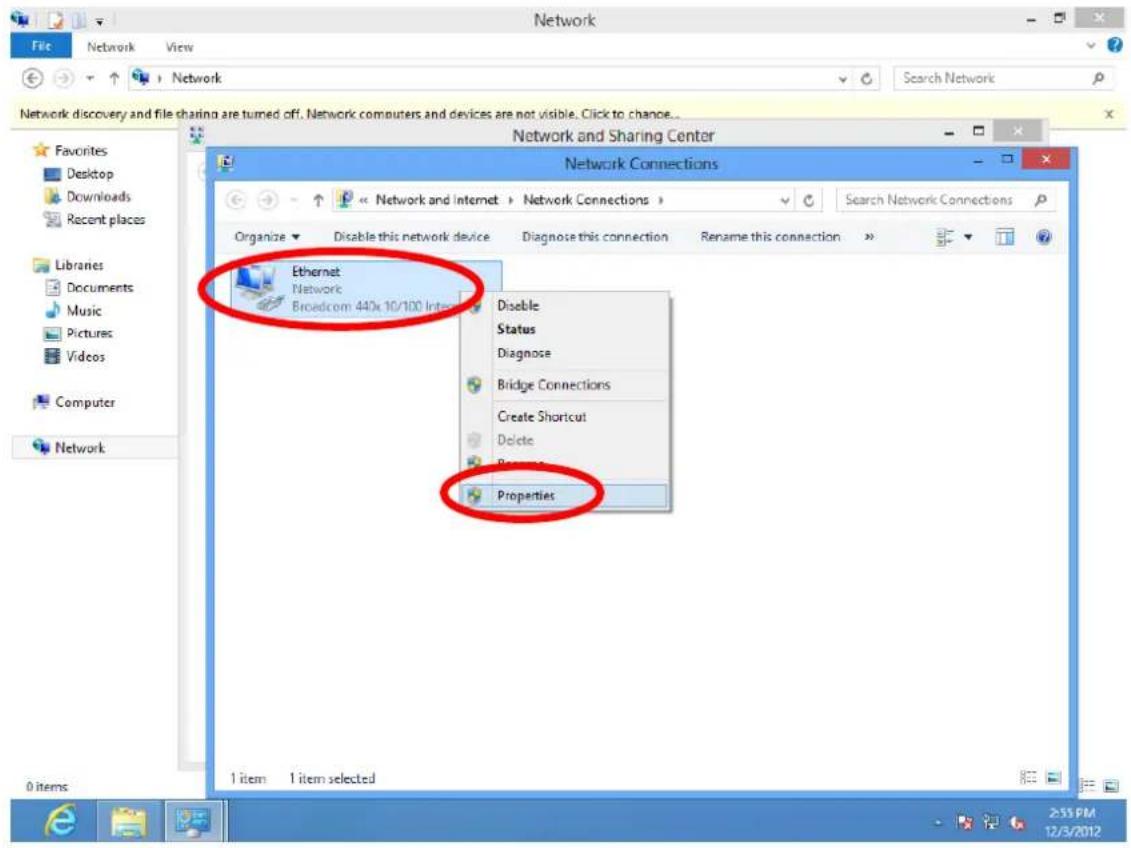
- Select "Internet Protocol Version 4 (TCP/IPv6) and then click "Properes".
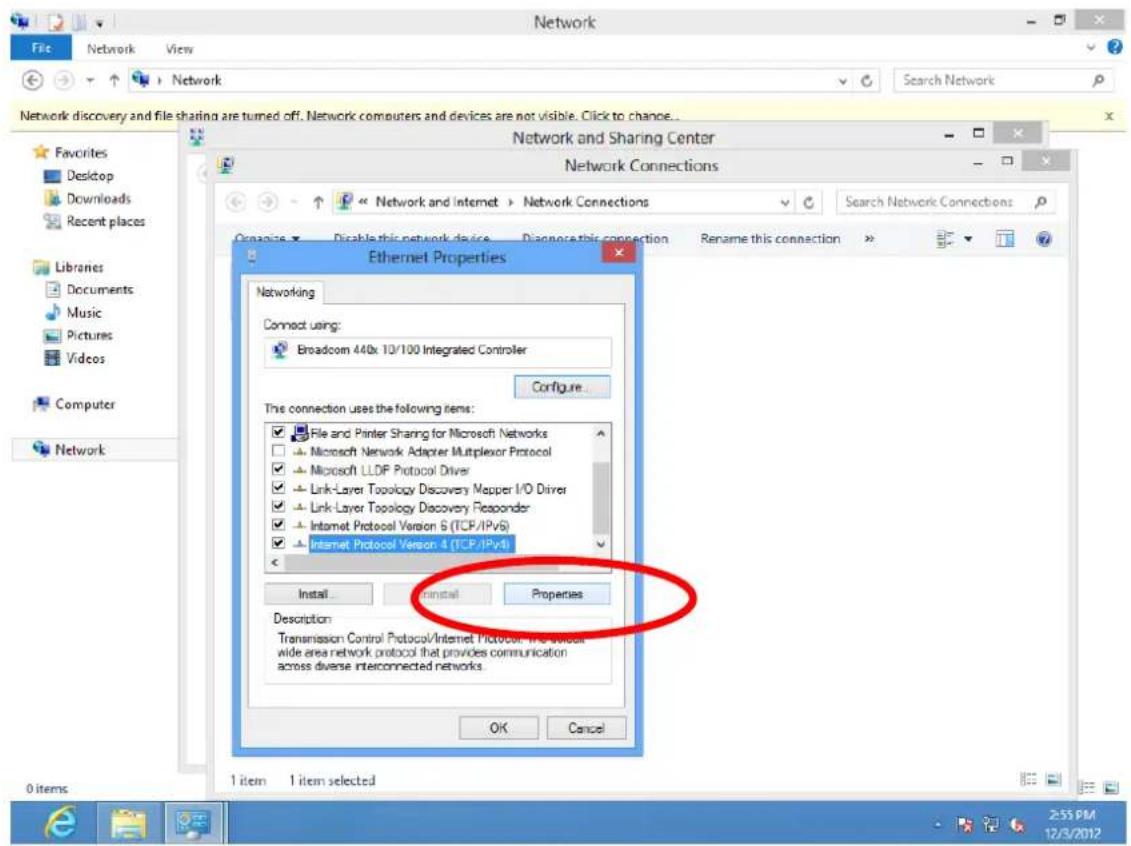
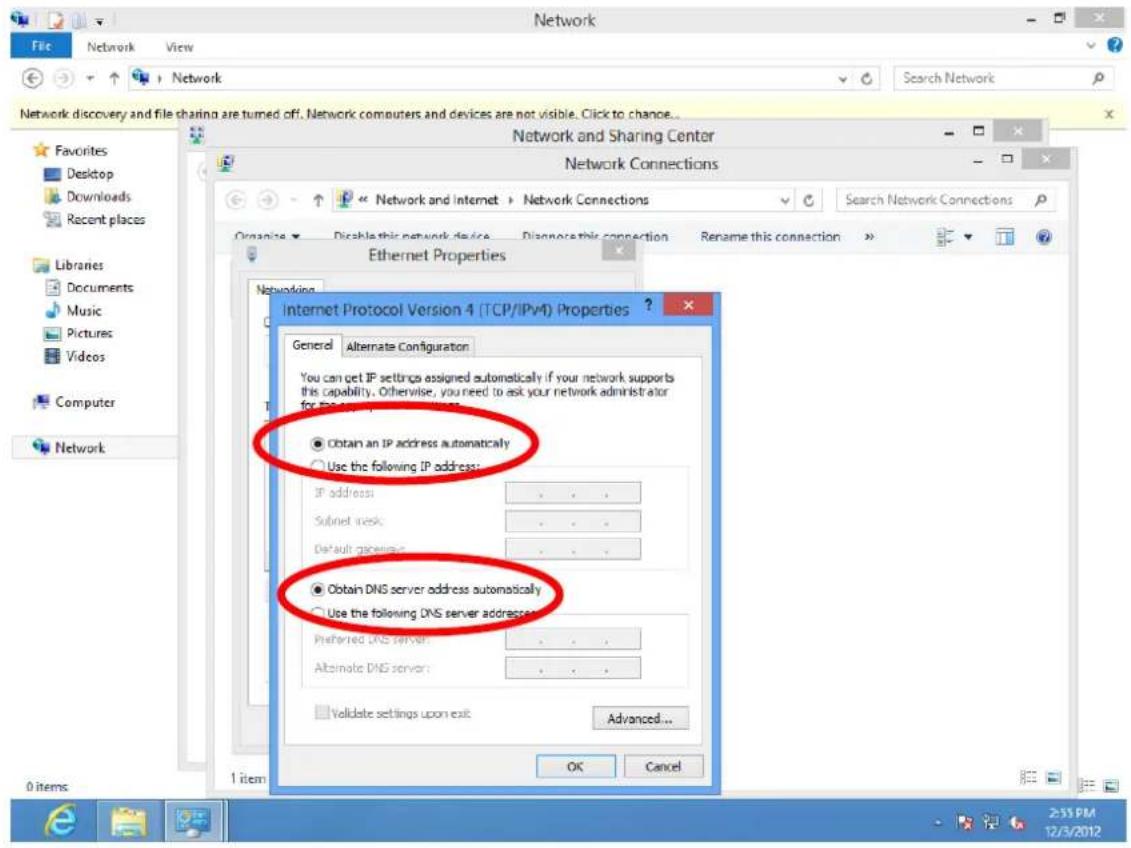
- Select "Obtain an IP address automatically" and "Obtain DNS server address automacally", then click "OK".
V-1-1-5. Mac OS

Note: Please ensure that your wireless extender is switched on and connected to your Macintosh via Ethernet cable before you begin.
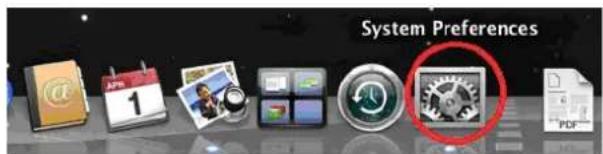
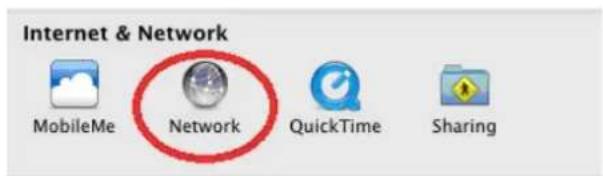
- Have your Macintosh computer operate as usual, and click on "System Preferences".
- In System Preferences, click on "Network".
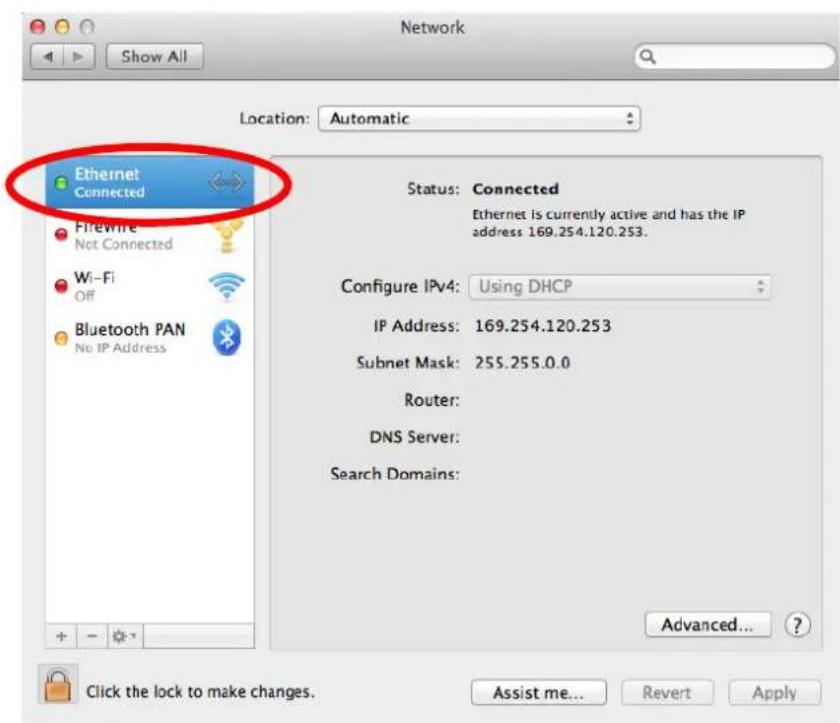
- Here you will see all of your network conneccons. Network Preferences will now display an Ethernet adapter, as shown below. The status of “Ethernet” should be “Connected”.
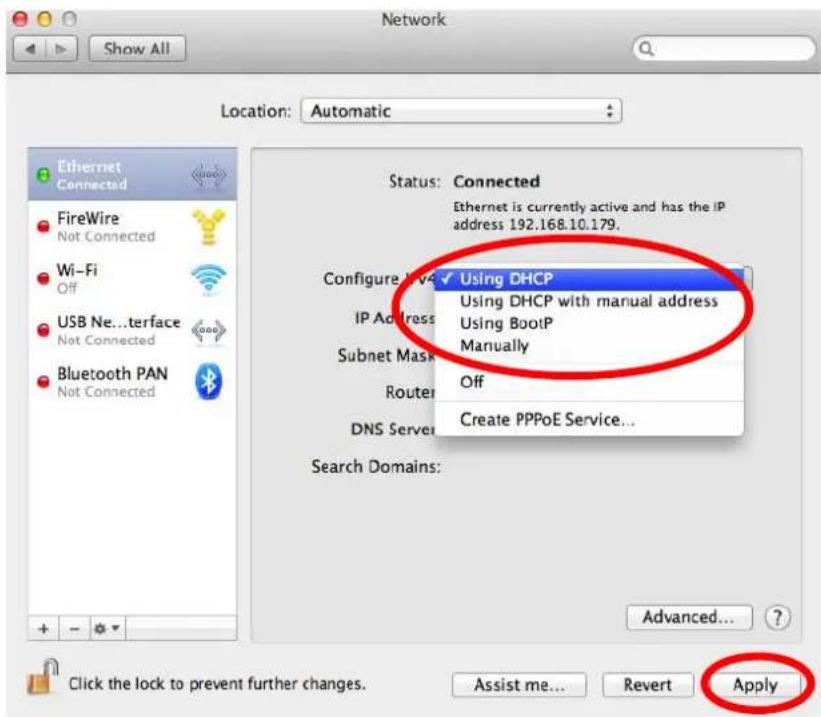
- Click on “Ethernet” in the le panel and then click the drop down arrow for the menu labeled “Congure IPv4” in the right panel. From the drop down menu, select “Using DHCP” and then click “Apply”.
V-1-2. How to Modify the IP Address of Your PC or Macintosh
Please follow the instrucons appropriate for your operang system. In the following examples we use the IP address 192.168.10.20 though you can use any IP address in the range 192.168.9.x (x = 3 - 254) in order to access the browser based conguraon interface.

Note: Please make a note of your stac IP before you change it. This is for your convenience if you wish to modify the IP address of the wireless extender in future. To modify the IP address of the wireless extender, please refer to III-6. System Ulity.
V-1-2-1. Windows XP
- Click the “Start” buon (it should be located in the lower-le corner of your computer), then click “Control Panel”. Double-click the “Network and Internet Connecons” icon, click “Network Connecons”, and then double-click “Local Area Connecon”. The “Local Area Connecon Status” window will then appear, click “Properes”.
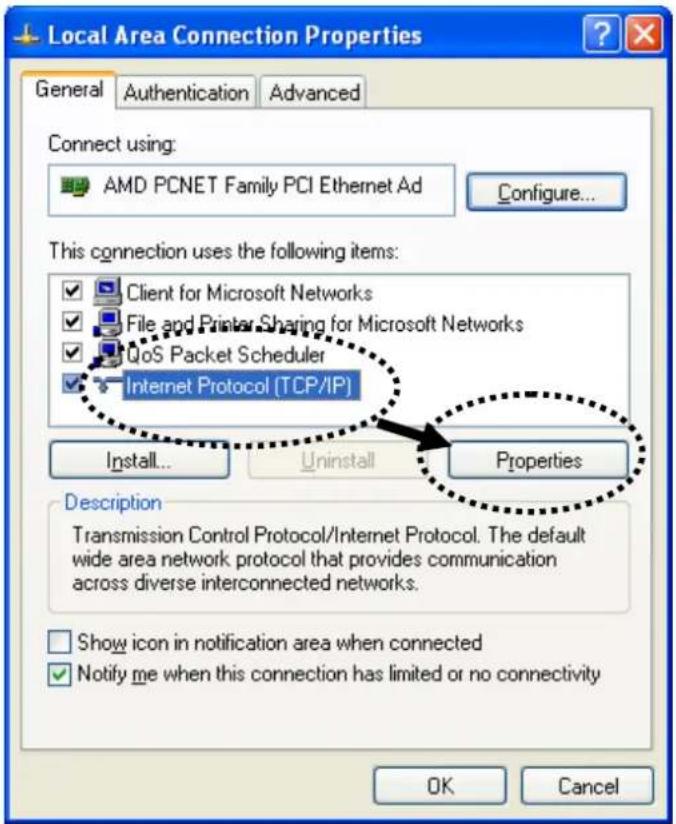
- Select "Use the following IP address", then input the following values:

Note: Your exisng stac IP address will be displayed in the "IP address" eld before you replace it. Please make a note of this IP address, subnet mask, default gateway and DNS server addresses.
IP address: 192.168.10.20
Subnet Mask: 255.255.255.0
Click 'OK' when nished.
V-1-2-2. Windows Vista
- Click the “Start” buon (it should be located in the lower-le corner of your computer), then click “Control Panel”. Click “View Network Status and Tasks”, then click “Manage Network Connecons”. Right-click “Local Area Network”, then select “Properes”. The “Local Area Connecon Properes” window will then appear, select “Internet Protocol Version 4 (TCP / IPv4)”, and then click “Properes”.
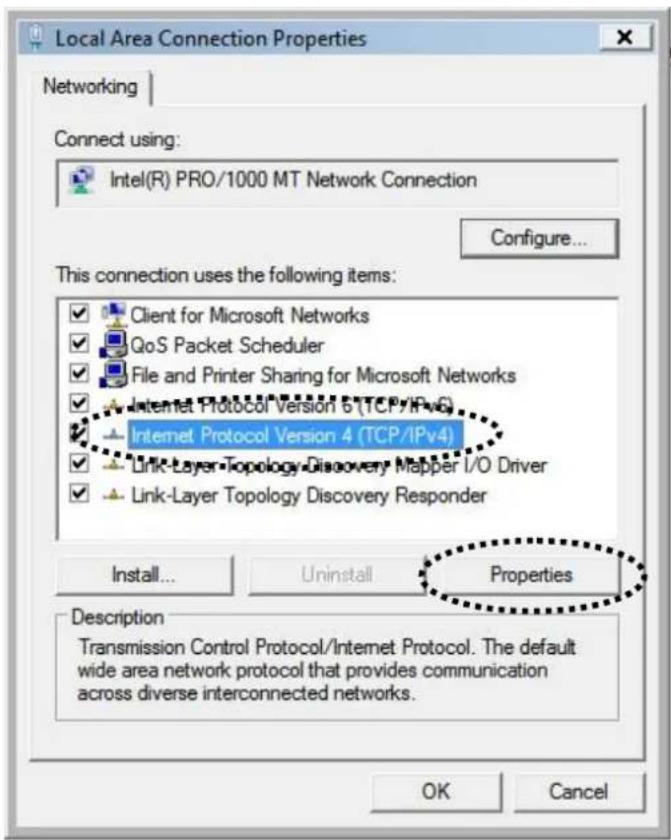
- Select "Use the following IP address", then input the following values:

Note: Your exisng stac IP address will be displayed in the "IP address" eld before you replace it. Please make a note of this IP address, subnet mask, default gateway and DNS server addresses.
IP address: 192.168.10.20
Subnet Mask: 255.255.255.0
Click 'OK' when nished.
V-1-2-3. Windows 7
- Click the "Start" buon (it should be located in the lower-le corner of your computer), then click "Control Panel".
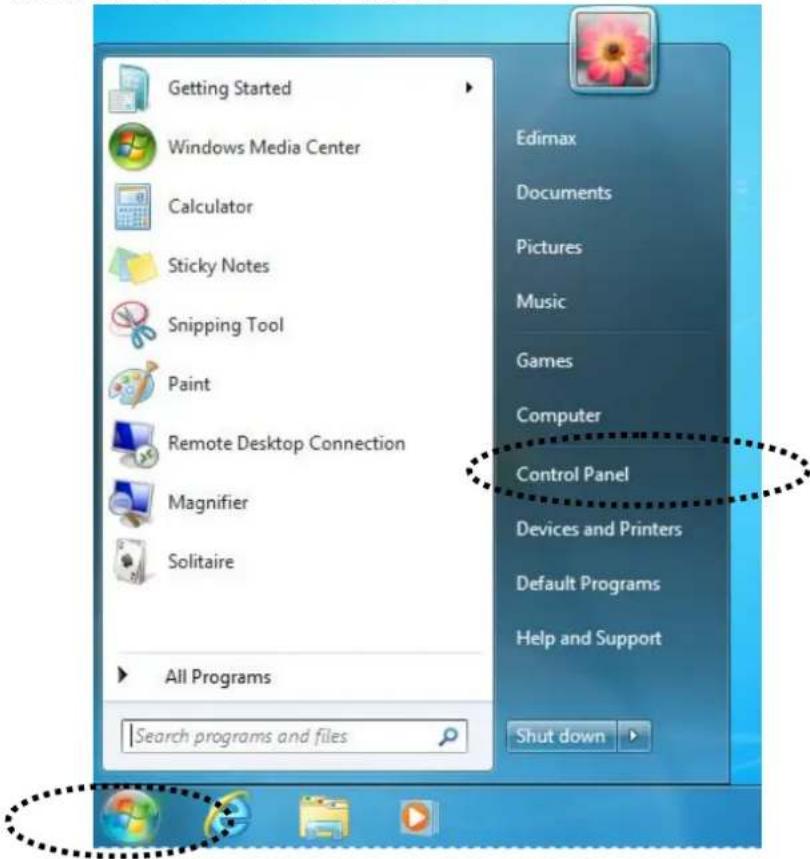
- Under "Network and Internet" click "View network status and tasks".
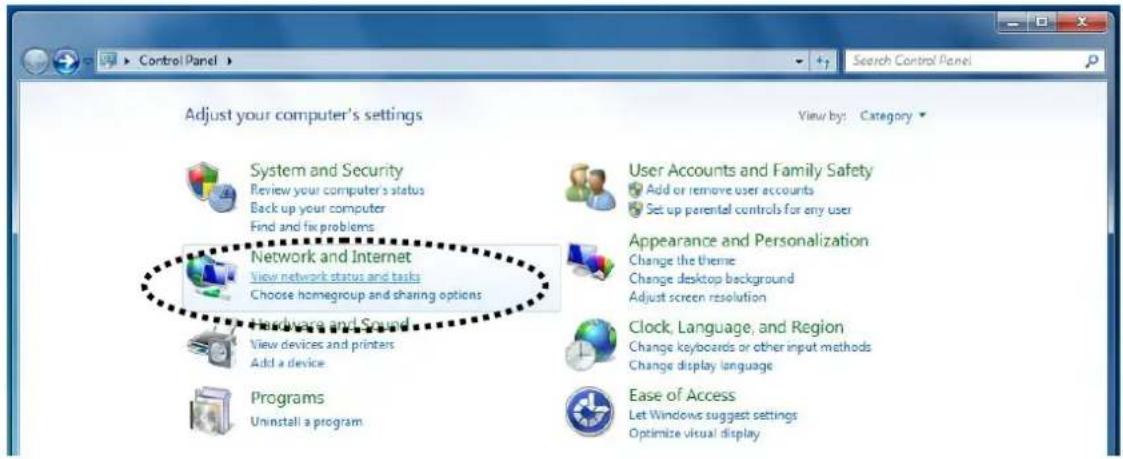
3. Click "Local Area Connecon".
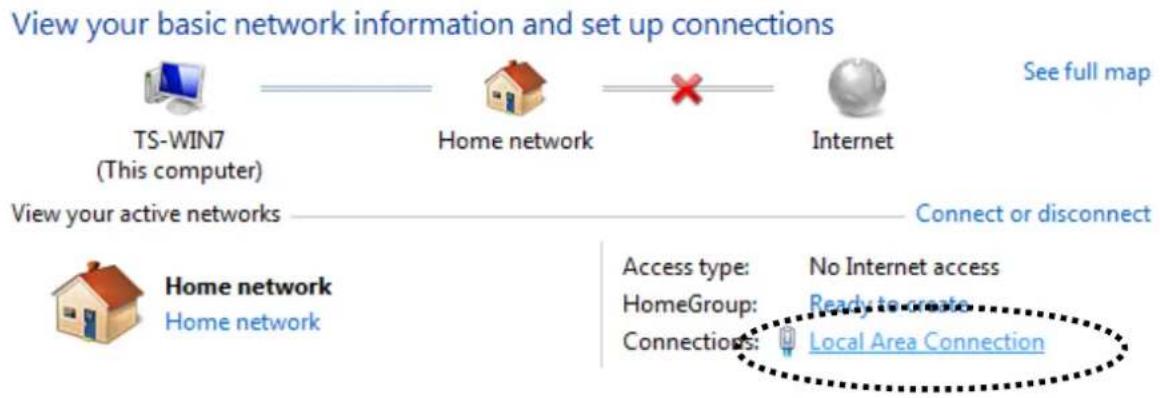
flowchart
graph LR
    A["TS-WIN7 (This computer)"] --> B["Home network"]
    B --> C["Internet"]
    D["Home network"] --> E["Access type: HomeGroup: Connections: No Internet access"]
    E --> F["Local Area Connection"]
4. Click "Properes".
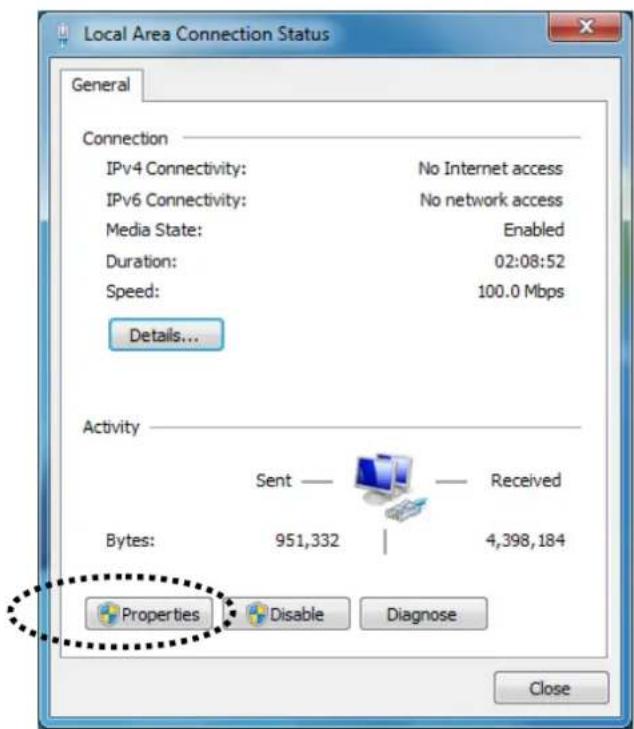
- Select "Internet Protocol Version 4 (TCP/IPv6) and then click "Properes".
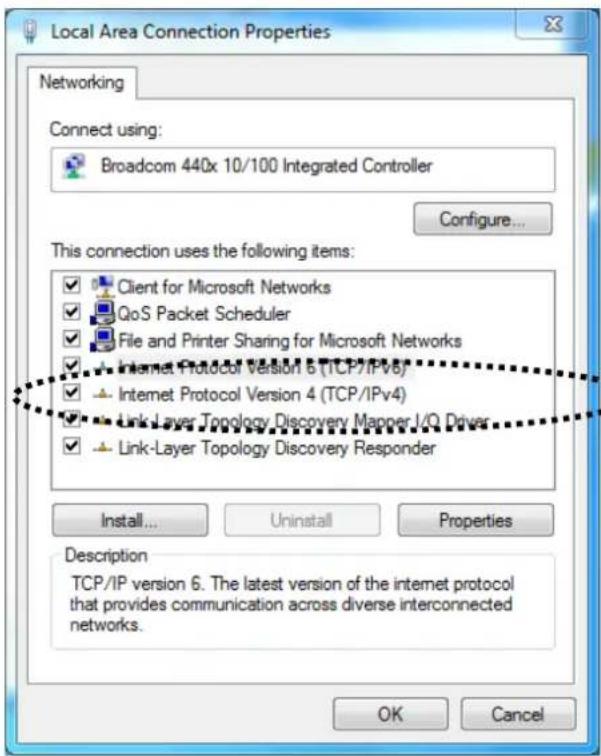
- Select "Use the following IP address", then input the following values:

Note: Your existing stac IP address will be displayed in the "IP address" eld before you replace it. Please make a note of this IP address, subnet mask, default gateway and DNS server addresses.
IP address: 192.168.10.20
Subnet Mask: 255.255.255.0
Click 'OK' when nished.
V-1-2-4. Windows 8
- From the Windows 8 Start screen, you need to switch to desktop mode. Move your curser to the boom le of the screen and click.
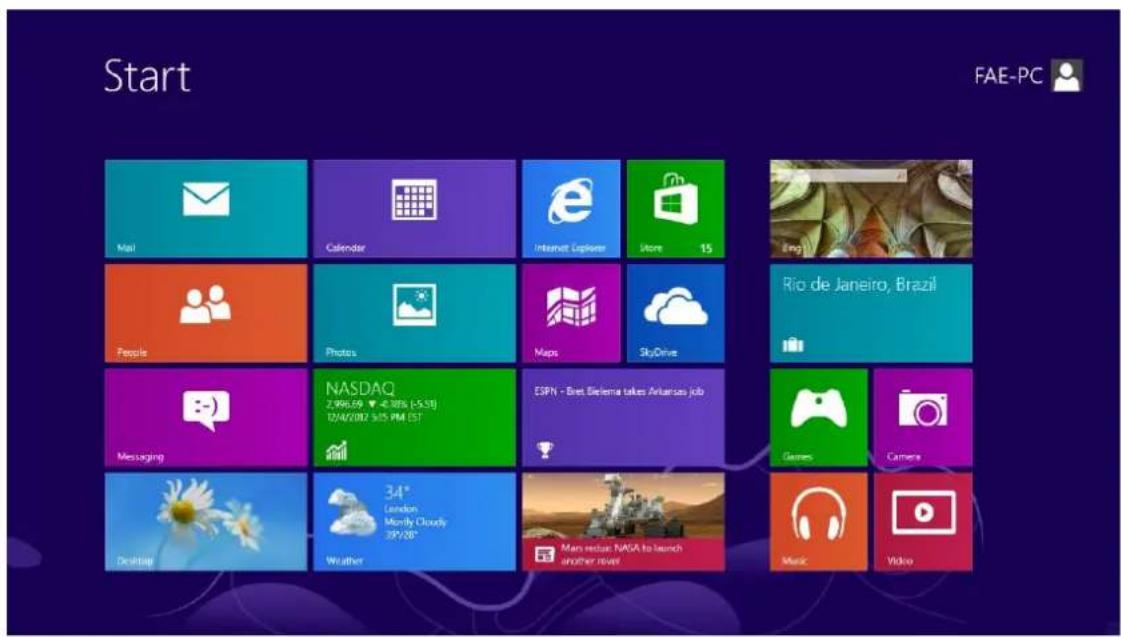
- In desktop mode, click the File Explorer icon in the bottom le of the screen, as shown below.
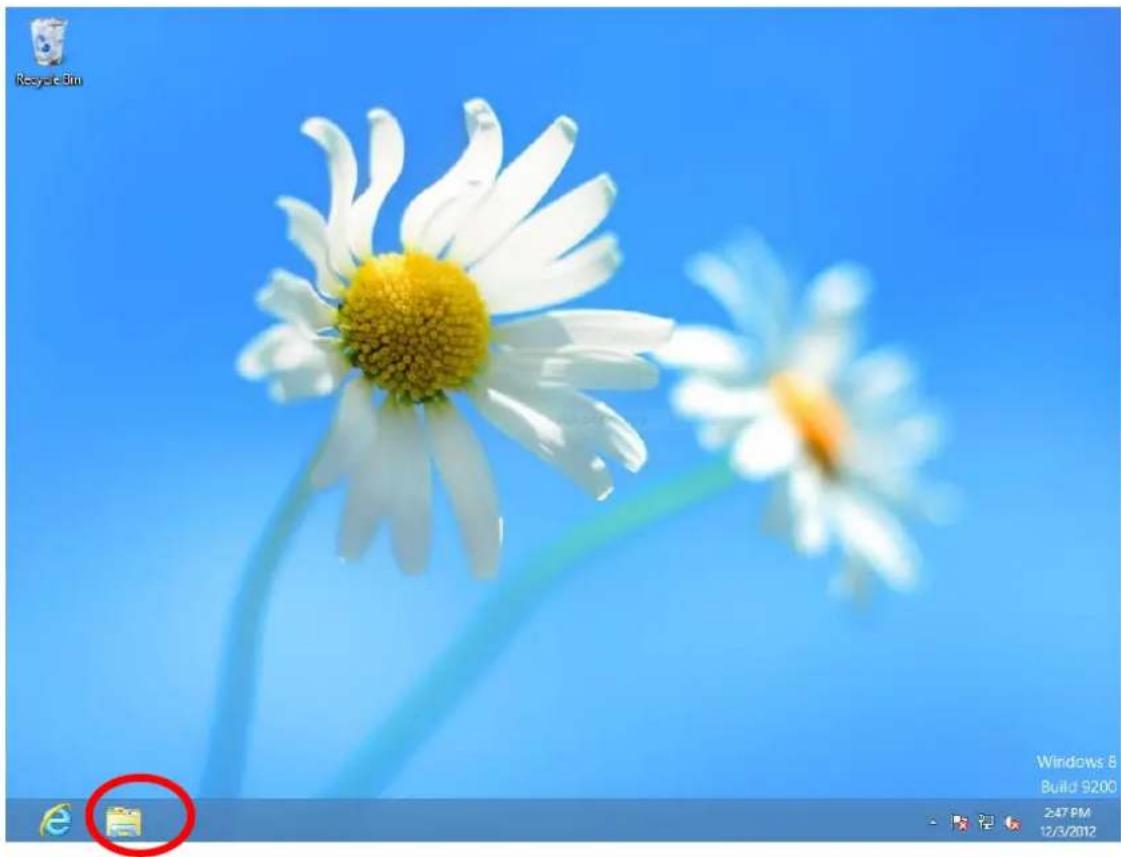
natural_image
Close-up of white daisies against a blue sky, with no visible text or symbols on the daisies or background.- Right click "Network" and then select "Properes".
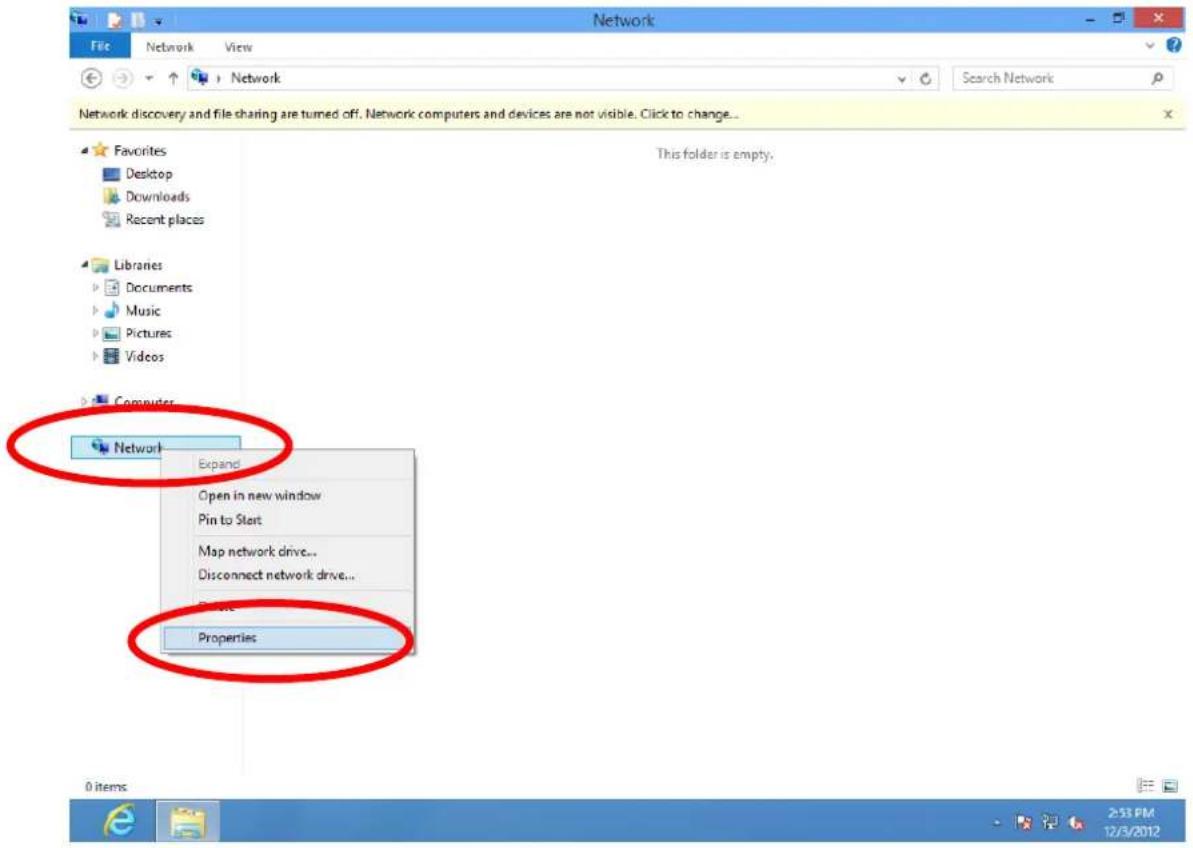
- In the window that opens, select "Change adapter sengs" from the le side.
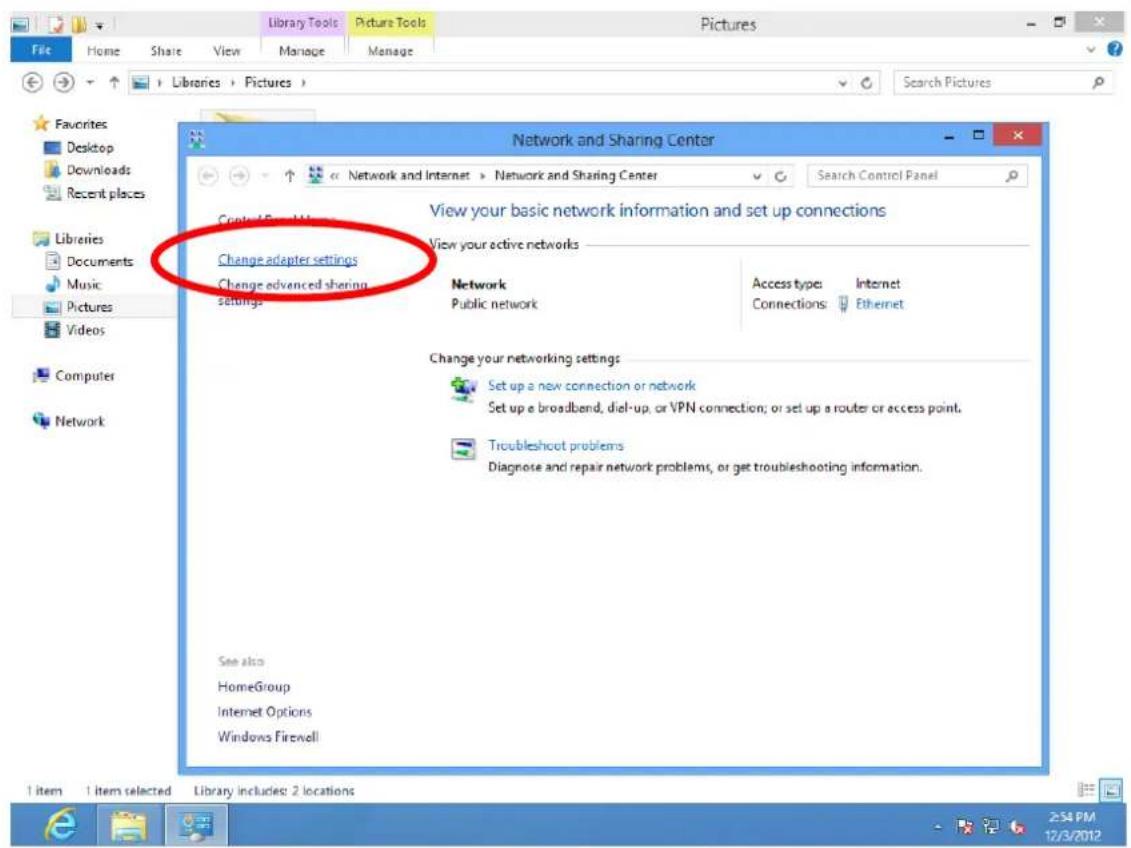
- Choose your conncon and right click, then select "Properes".
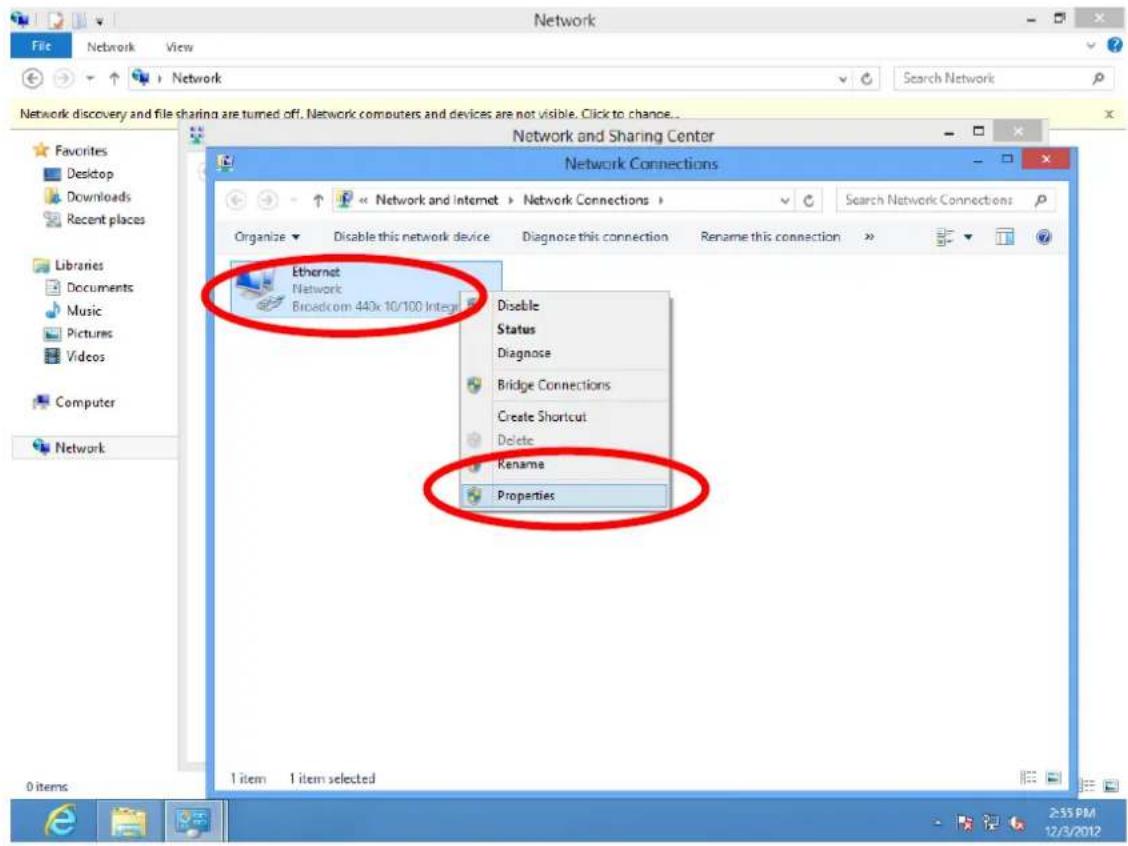
- Select "Internet Protocol Version 4 (TCP/IPv4) and then click "Properes".
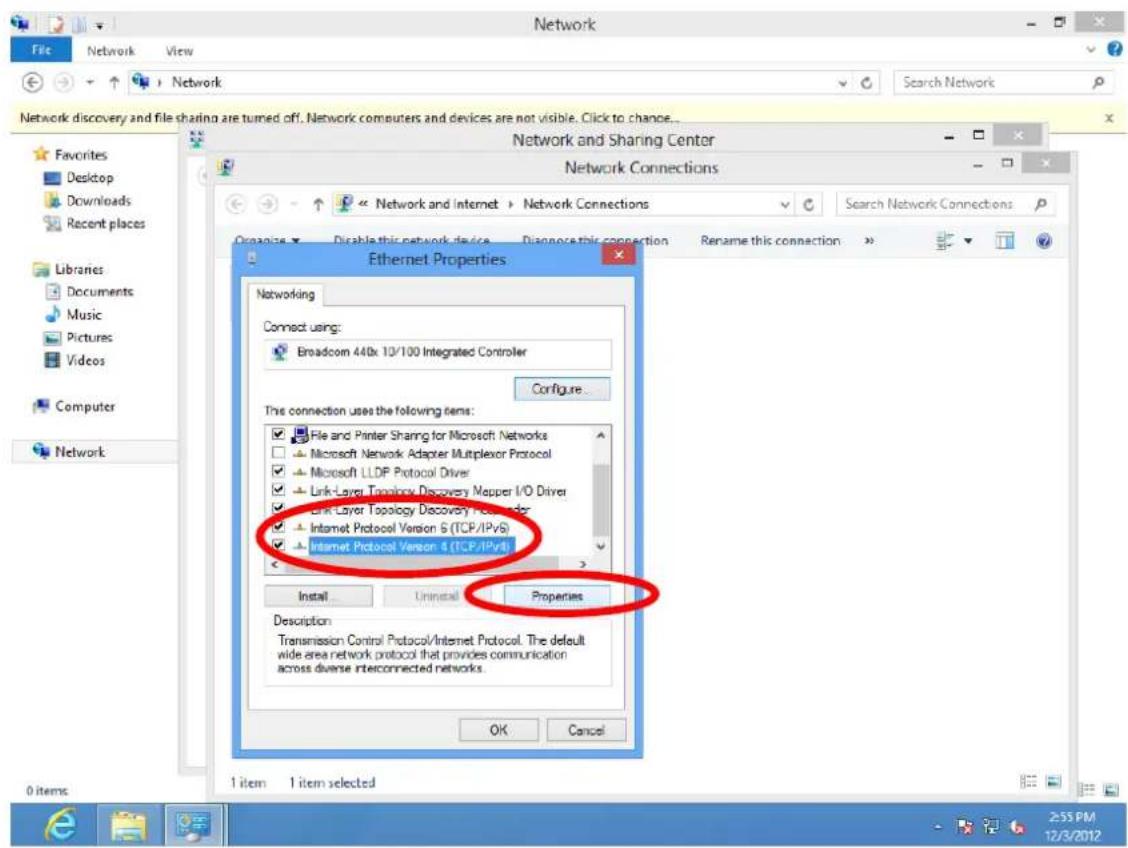
- Select "Use the following IP address", then input the following values:

Note: Your exisng stac IP address will be displayed in the "IP address" eld before you replace it. Please make a note of this IP address, subnet mask, default gateway and DNS server addresses.
IP address: 192.168.10.20
Subnet Mask: 255.255.255.0
Click 'OK' when nished.
V-1-2-5. Mac OS

Note: Please ensure that your wireless extender is switched on and connected to your Macintosh via Ethernet cable before you begin.
- Have your Macintosh computer operate as usual, and click on "System Preferences"
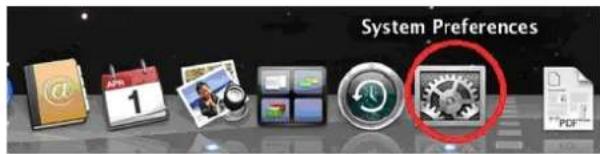
- In System Preferences, click on "Network".
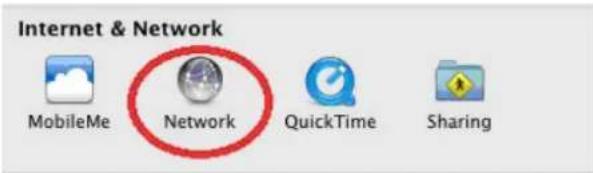
- Here you will see all of your network conneccons. Network Preferences will now display an Ethernet adapter, as shown below. The status of “Ethernet” should be “Connected”.
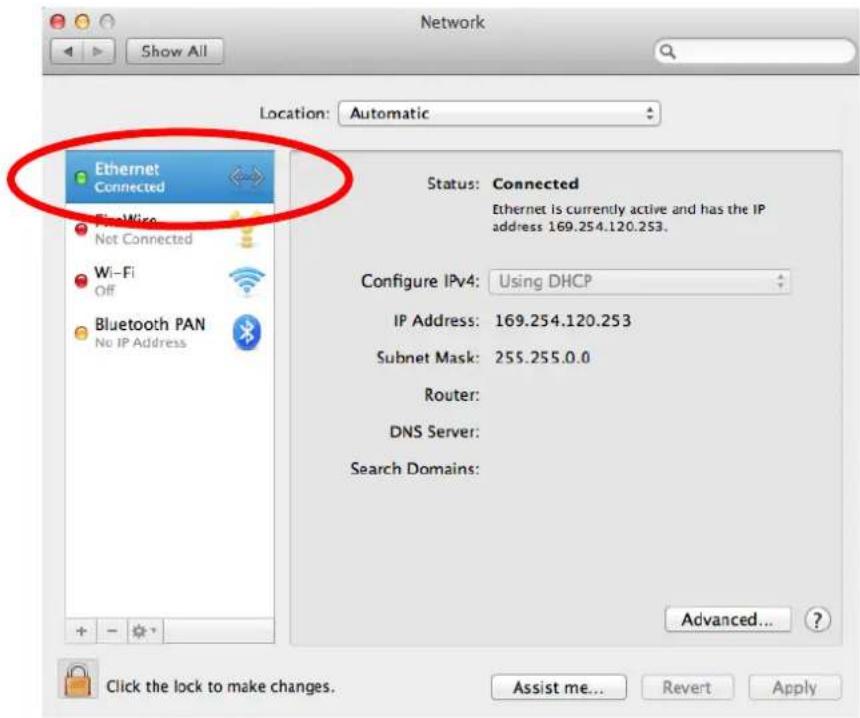
- Click on "Ethernet" in the le panel and then click the drop down arrow for the menu labeled "Congure IPv4" in the right panel. From the drop down menu, select "Manually".
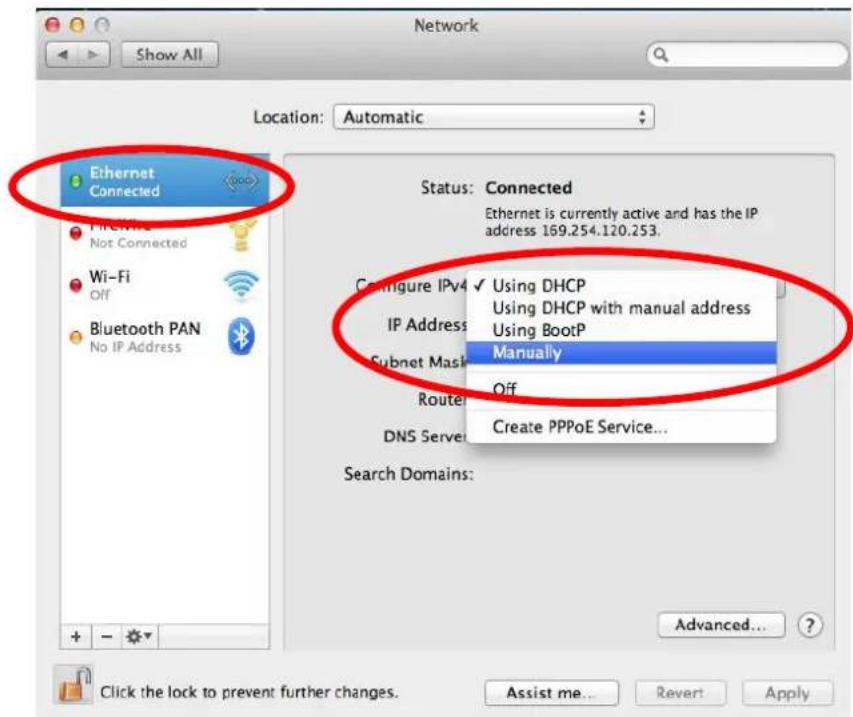
- In the panel on the right side, enter IP address 192.168.10.20 and subnet mask 255.255.255.0. Click on "Apply".

Note: Your existing stac IP address will be displayed in the "IP address" eld before you replace it. Please make a note of this IP address, subnet mask, router IP and DNS server address.
- In the le sidebar, "Ethernet" should now display "Connected" as shown below. In the right panel, you should see the IP address 192.168.10.20 and subnet mask 255.255.255.0.
V-1-3. How to Find Your Network Security Key
To nd your network security key, please follow the instrucons appropriate for your operang system.

Note: If you are using Windows XP or earlier, please contact your ISP or router manufacturer to nd your network security key.
V-1-3-1. Windows 7 & Windows Vista
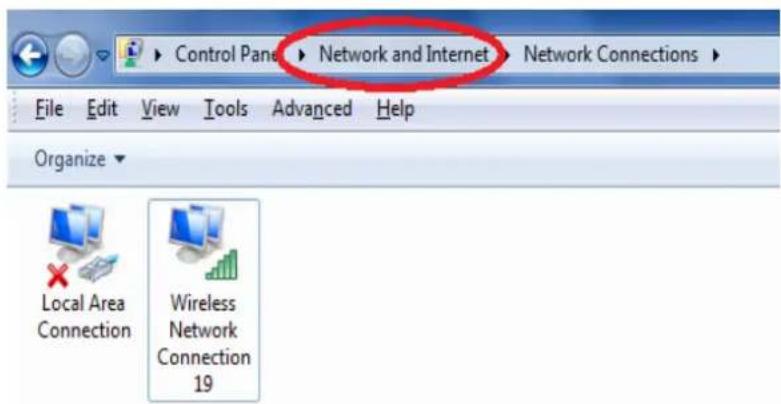
- Open "Control Panel" and click on "Network and Internet" in the top menu.
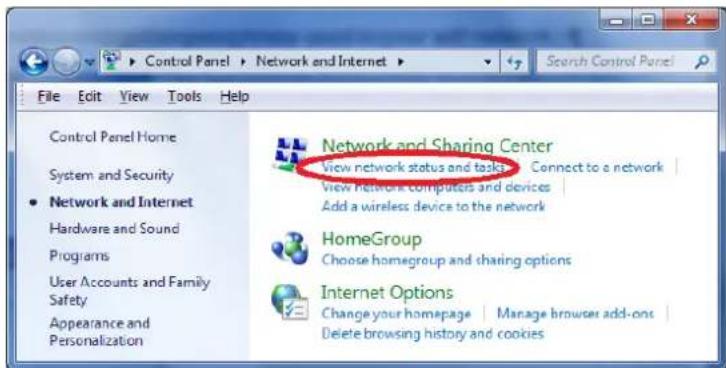
- Click on "View network status and tasks" which is under the heading "Network and Sharing Center".
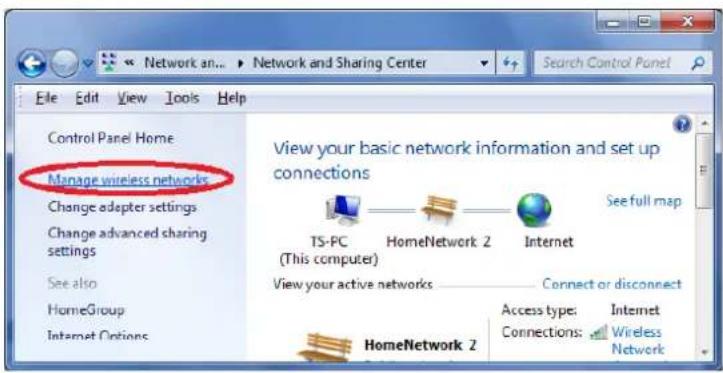
- Click on "Manage wireless networks" in the le menu.
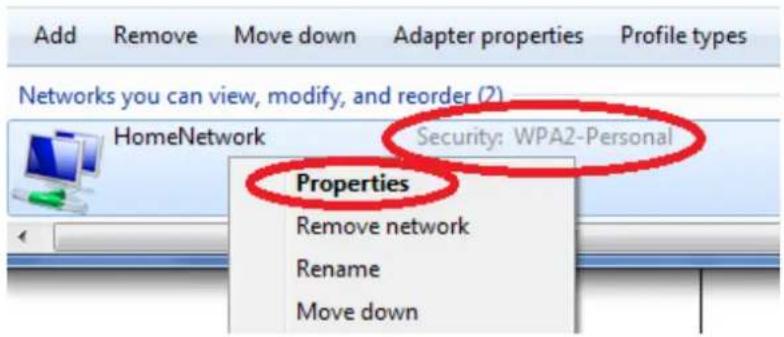
- You should see the prole of your Wi-Fi network in the list. Right click on your Wi-Fi network and then click on "Properes".
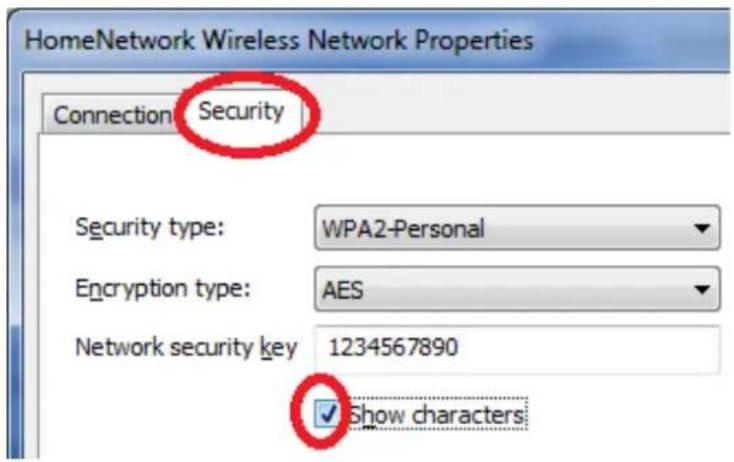
- Click on the "Security" tab, and then check the box labeled "Show characters". This will show your network security key. Click the "Cancel" buon to close the window.
V-1-3-2. Windows 8
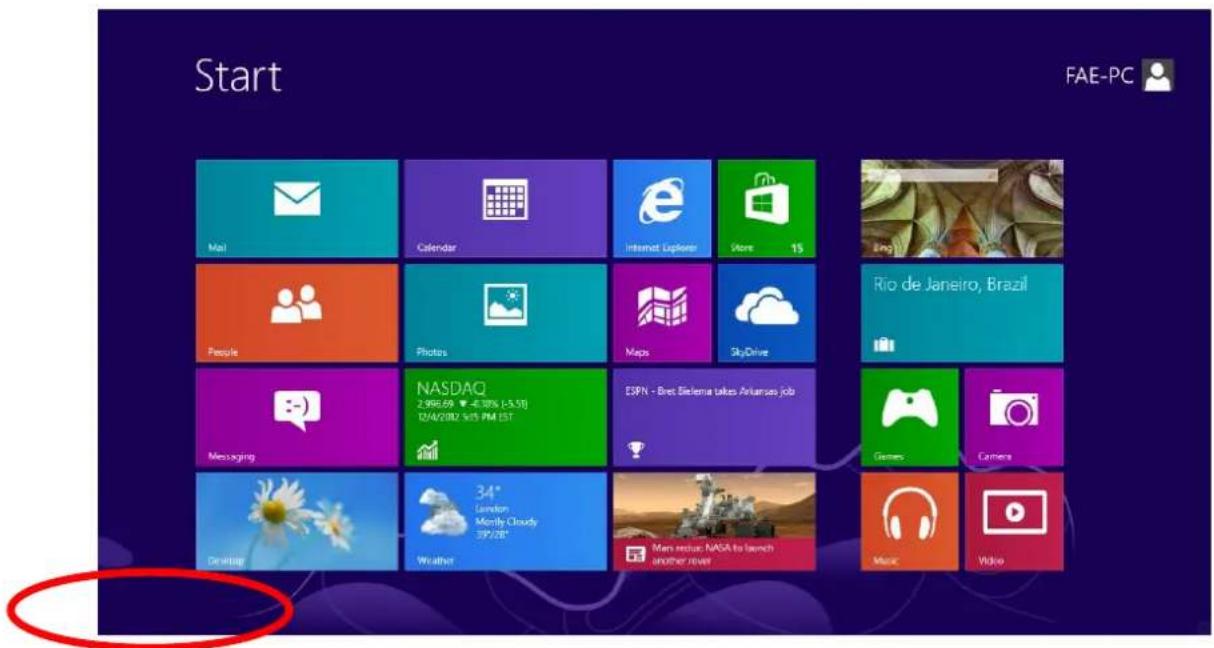
- From the Windows 8 Start screen, you need to switch to desktop mode. Move your curser to the boom le of the screen and click.
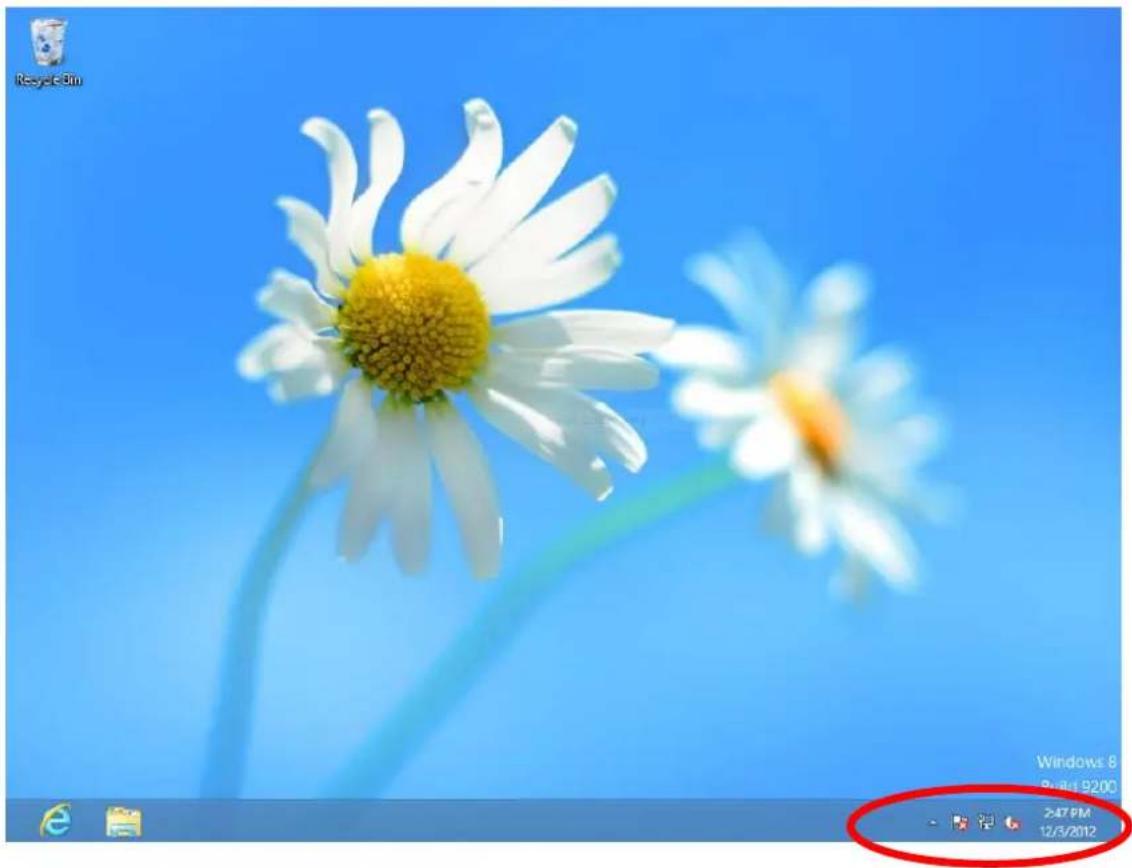
- In desktop mode, click the network icon in the bottom right corner.
natural_image
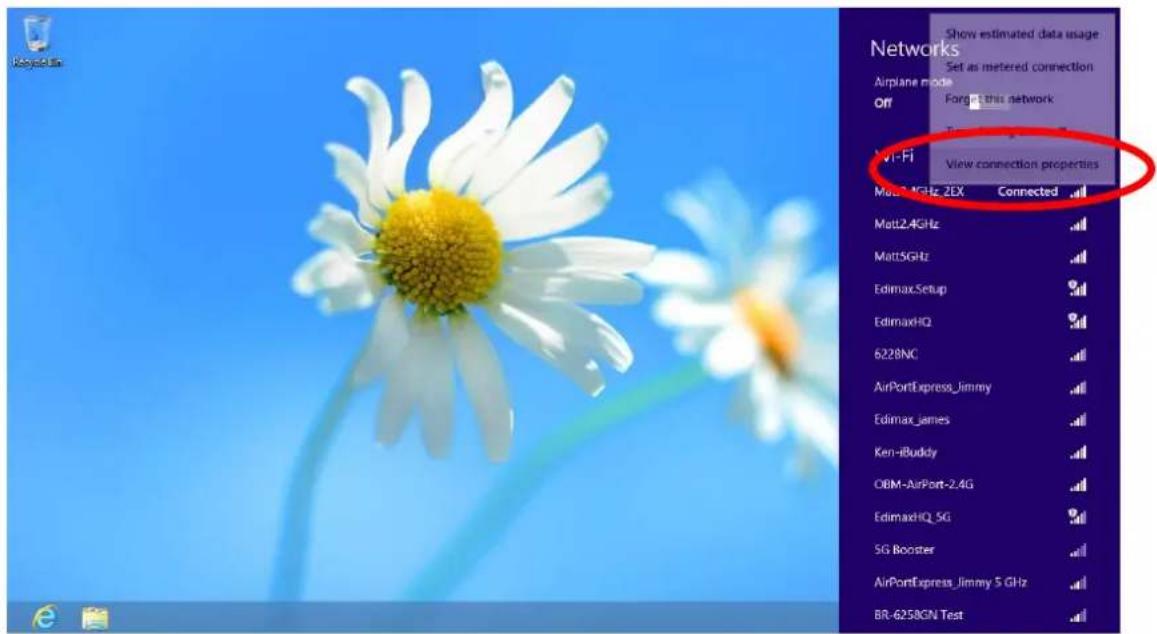
Close-up of white daisies against a blue sky, with a red circular overlay showing time and date (no text on the daisies or background)- Select your Wi-Fi conncon from the list and right click. Select "View conncon properes".
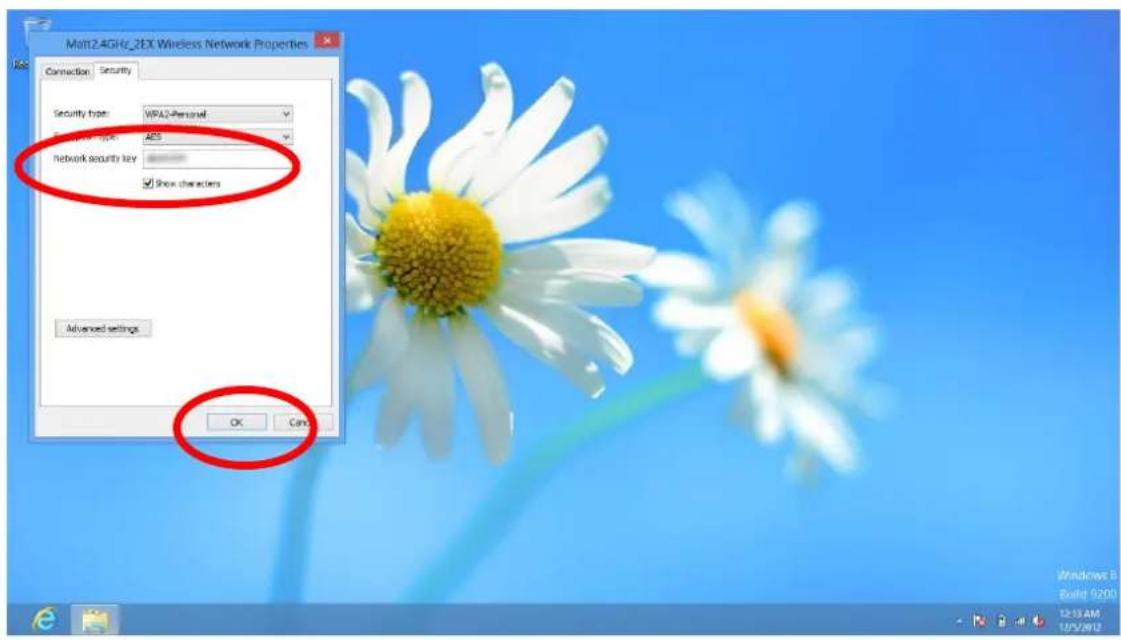
- In the window that opens, click the "Security" tab and check the box labeled "Show characters". Your network security key will be displayed in the eld "Network security key".
V-1-3-3. Mac
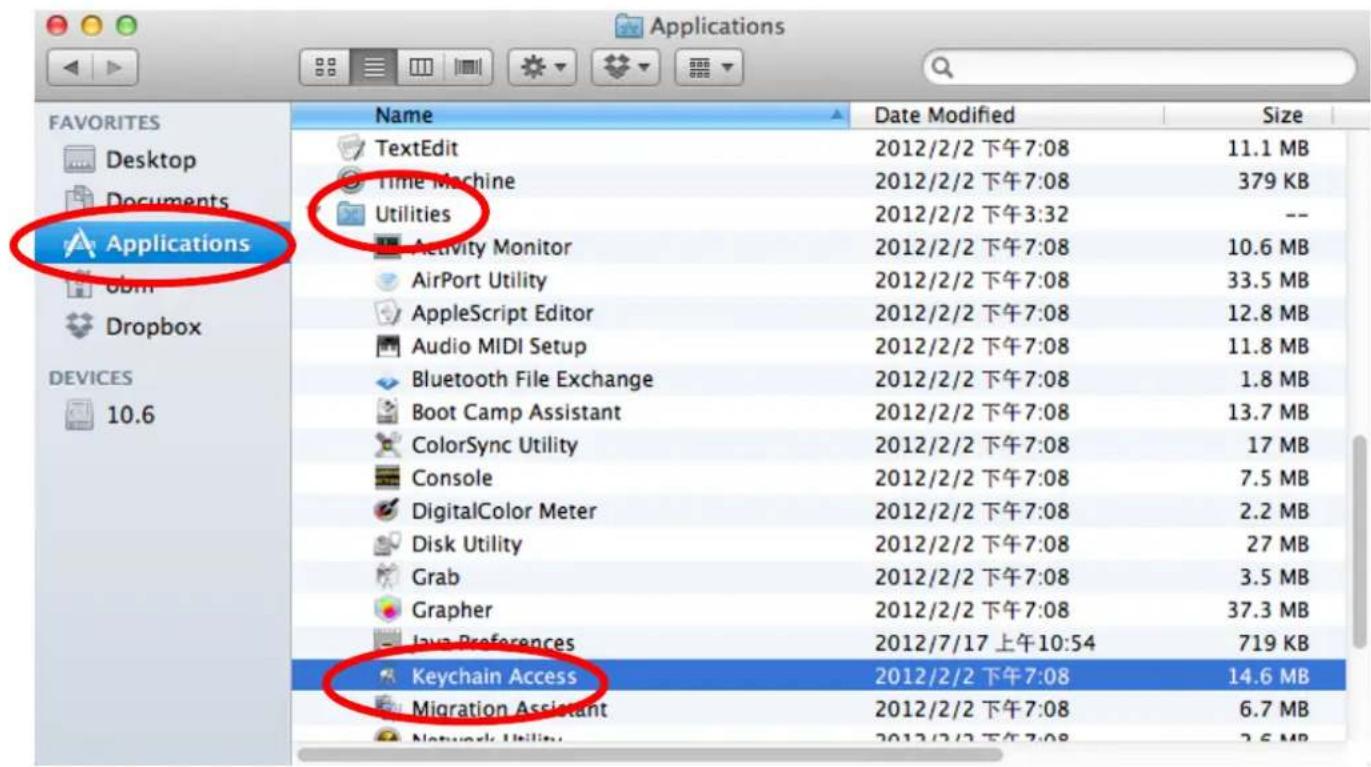
- Open a new Finder window, and select "Applicaons" from the menu on the le side. Open the folder labeled "Ulies" and then open the applicaon "Keychain Access".
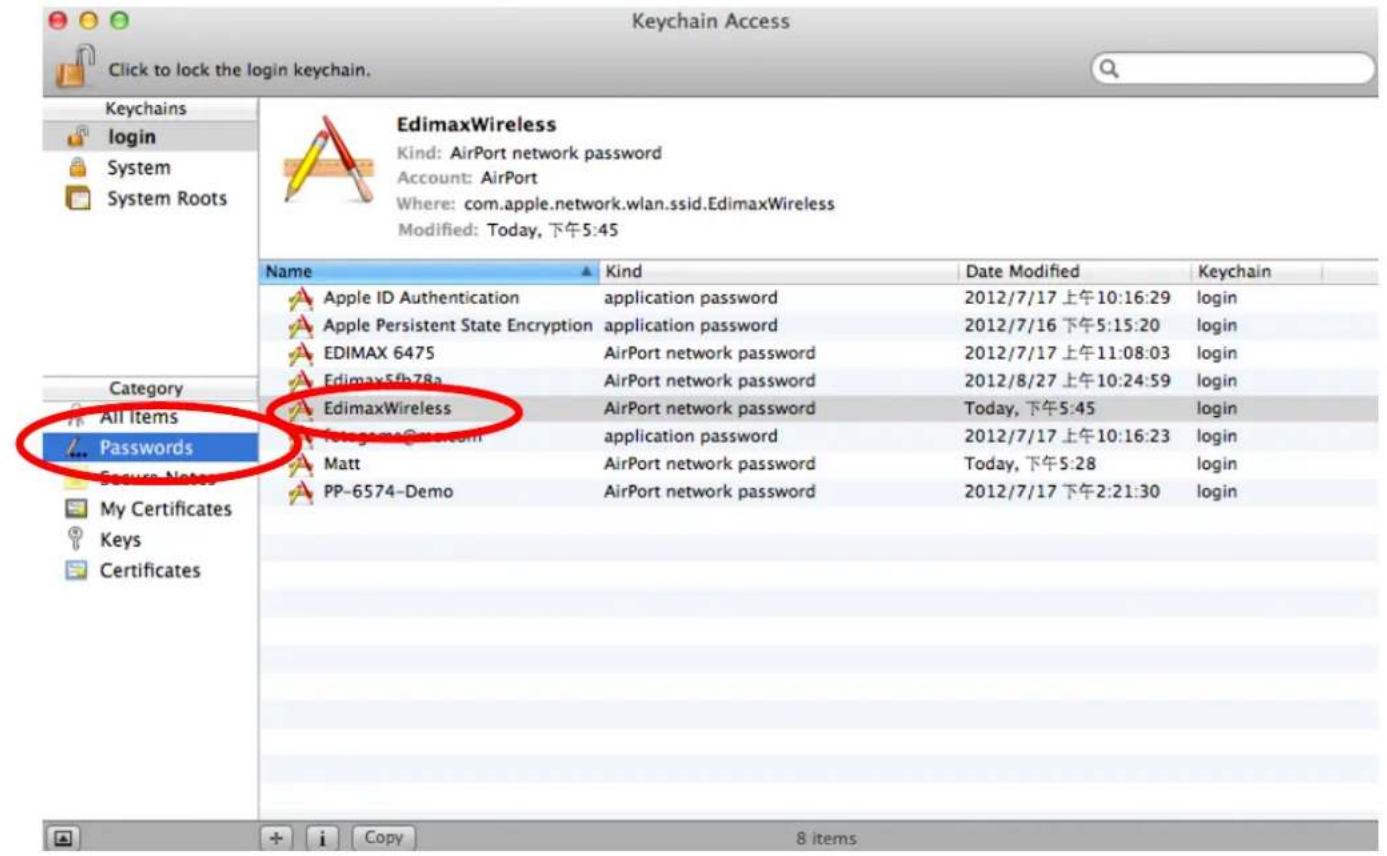
- Select "Passwords" from the sub-menu labeled "Category" on the le side, as shown below. Then search the list in the main panel for the SSID of your network. In this example, the SSID is "EdimaxWireless" – though your SSID will be unique to your network.
- Double click the SSID of your network and you will see the following window.
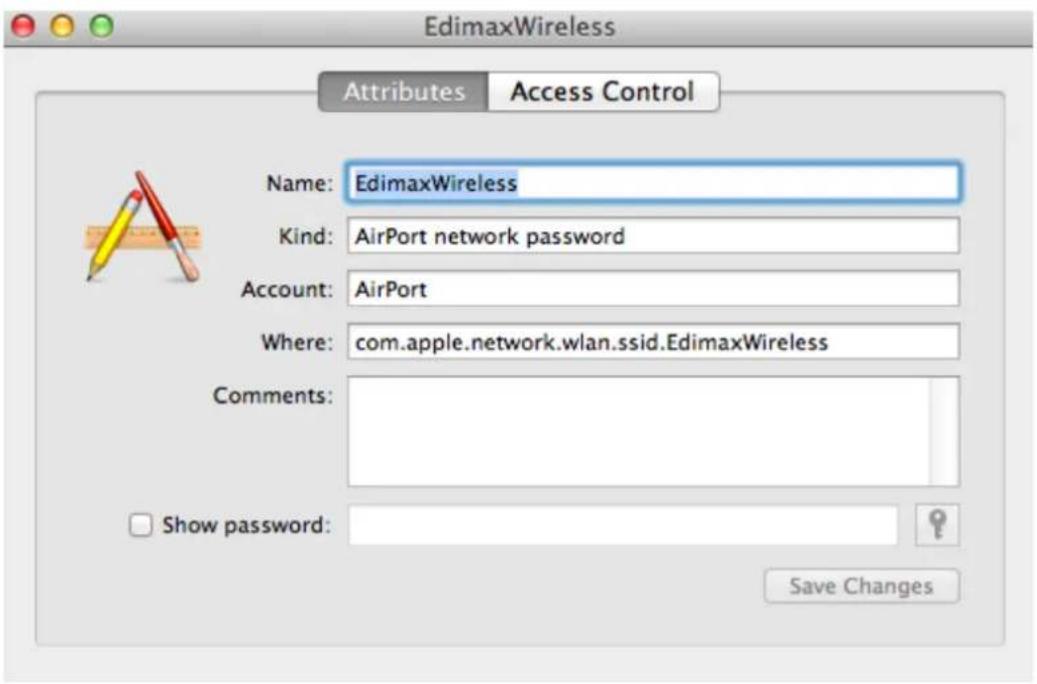
- Check the box labeled "Show password" and you will be asked to enter your administrave password, which you use to log into your Mac. Enter your password and click "Allow".
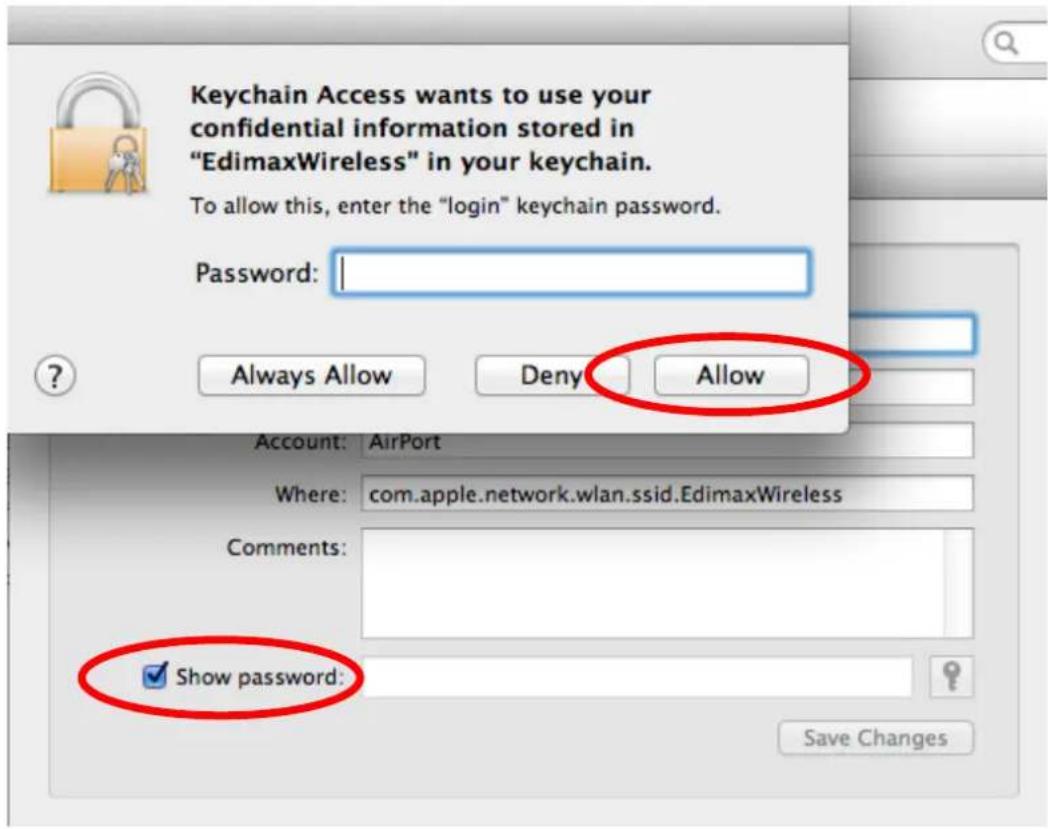
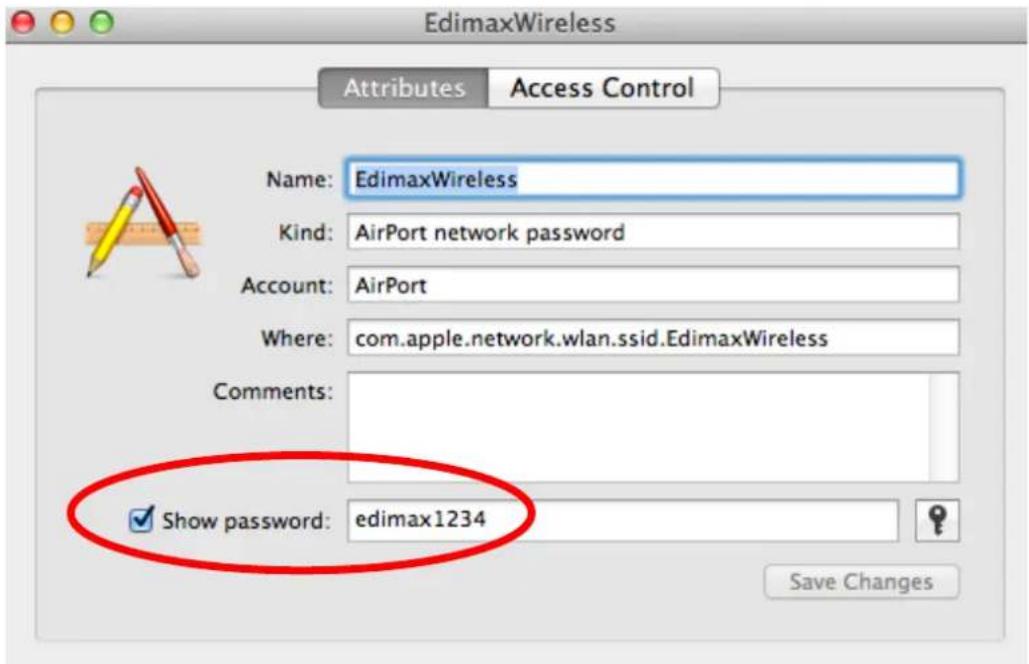
Your network security password will now be displayed in the eld next to the box labeled "Show password". In the example below, the network security password is "edimax1234". Please make a note of your network security password.
V-1-4. How to Find Your Router's IP Address
To nd your router's IP address, please follow the instrucons appropriate for your operang system.
V-1-4-1. Windows XP, Vista & 7
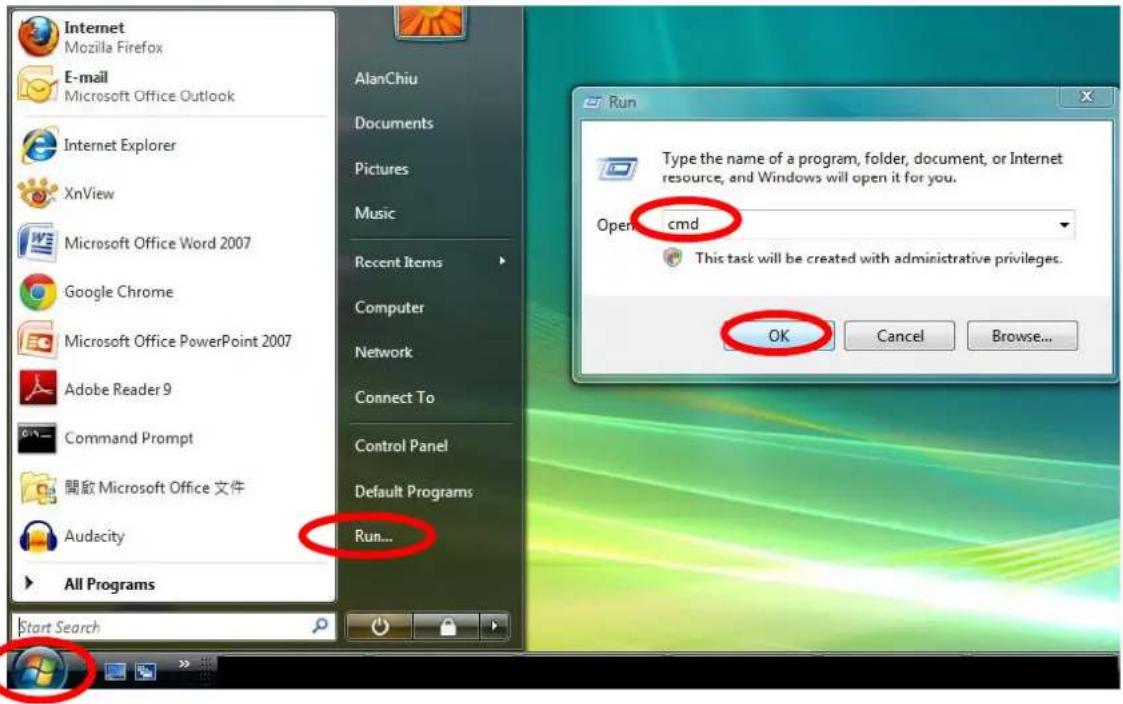
- Go to "Start", select "Run" and type "cmd", then press Enter or click "OK".
- A new window will open, type "ipcong" and press Enter.
![Microsoft Windows [Version 6.0.6002] Copyright 2006 Microsoft Corporation. All rights reserved. C:\Users\AlanCh.u>ipconfig](/content/2026/05/1024449/images/1f81fb56b8e28d99db18ceb026241812daaefff4e75857f6d64ca9adb0348b00.jpg)
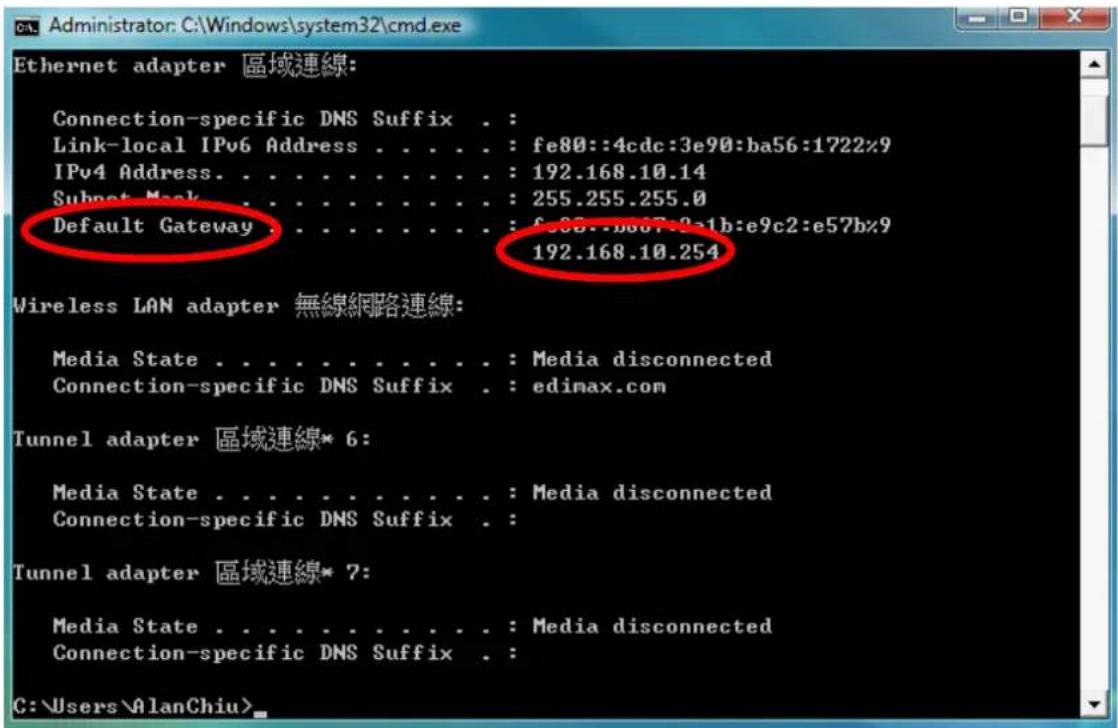
- Your router's IP address will be displayed next to "Default Gateway".
V-1-4-2. Windows 8
- From the Windows 8 Start screen, move your cursor to the top right corner of the screen to display the Charms bar.
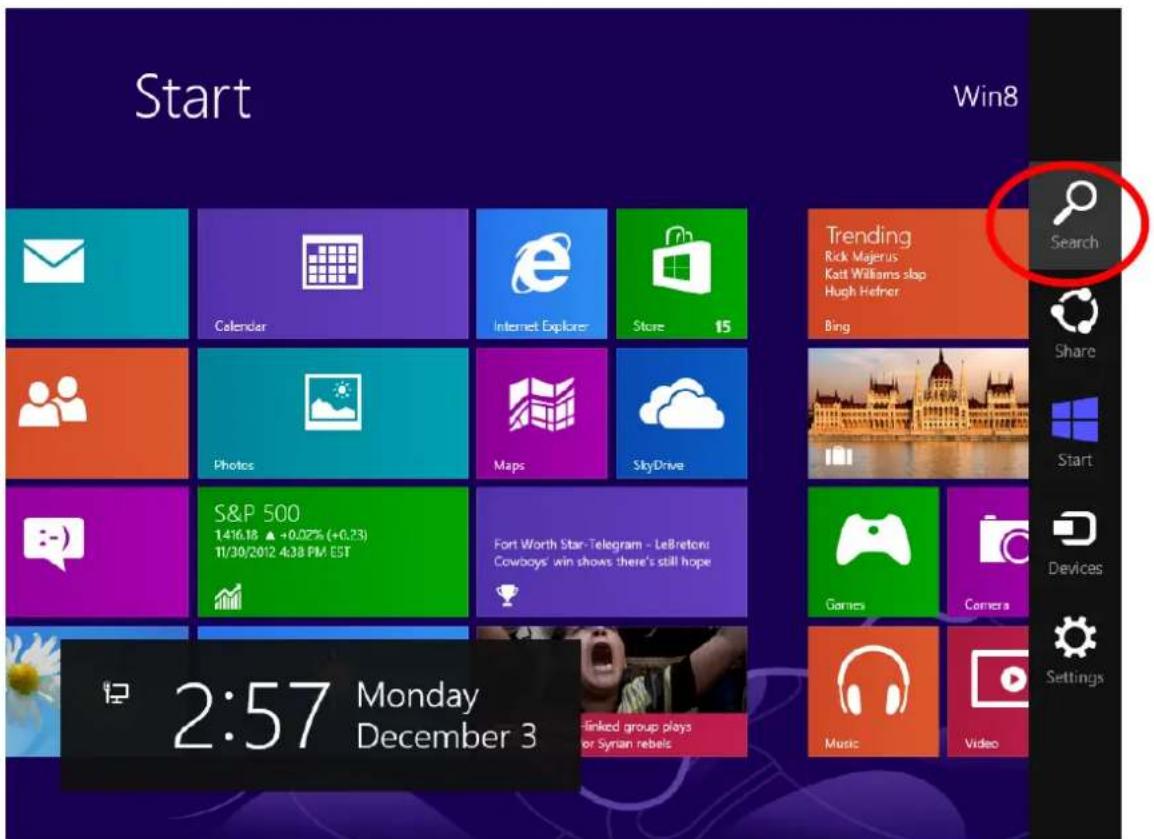
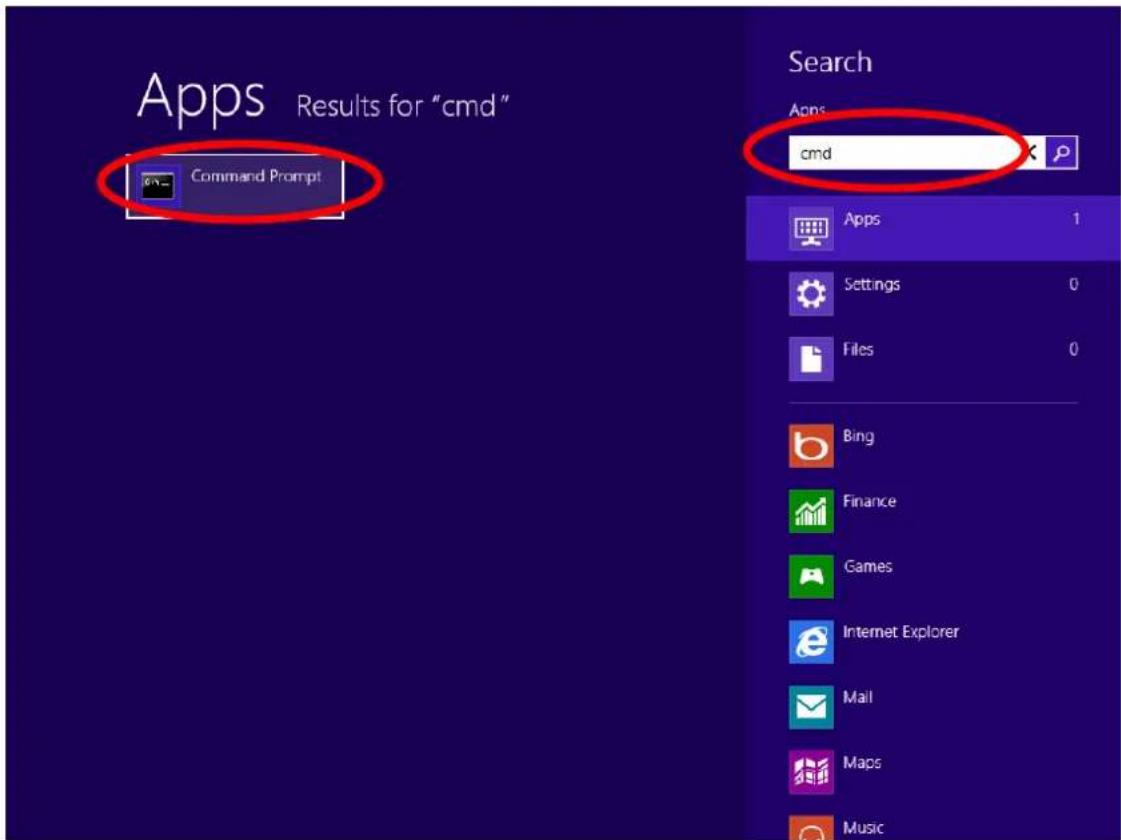
- Click "Search" and enter "cmd" into the search bar. Click the "Command Prompt" app which be displayed on the le side.
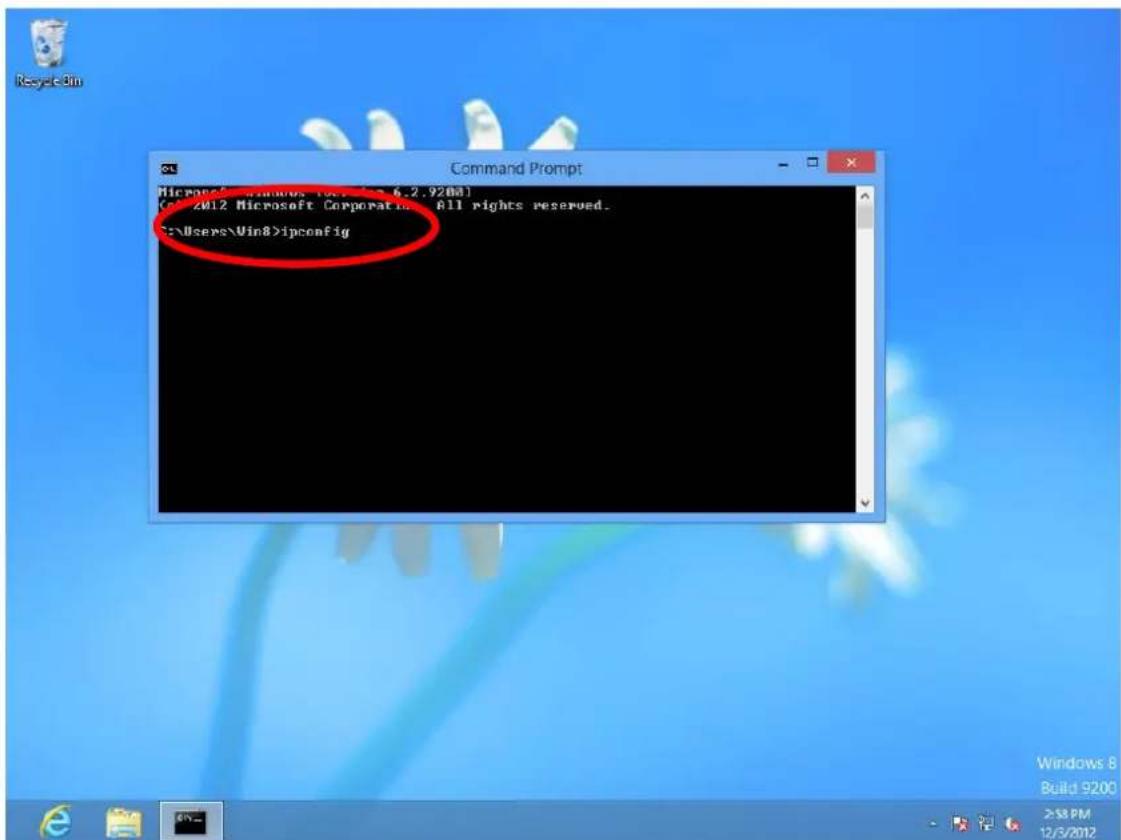
- A new window will open, type "ipcong" and press Enter.
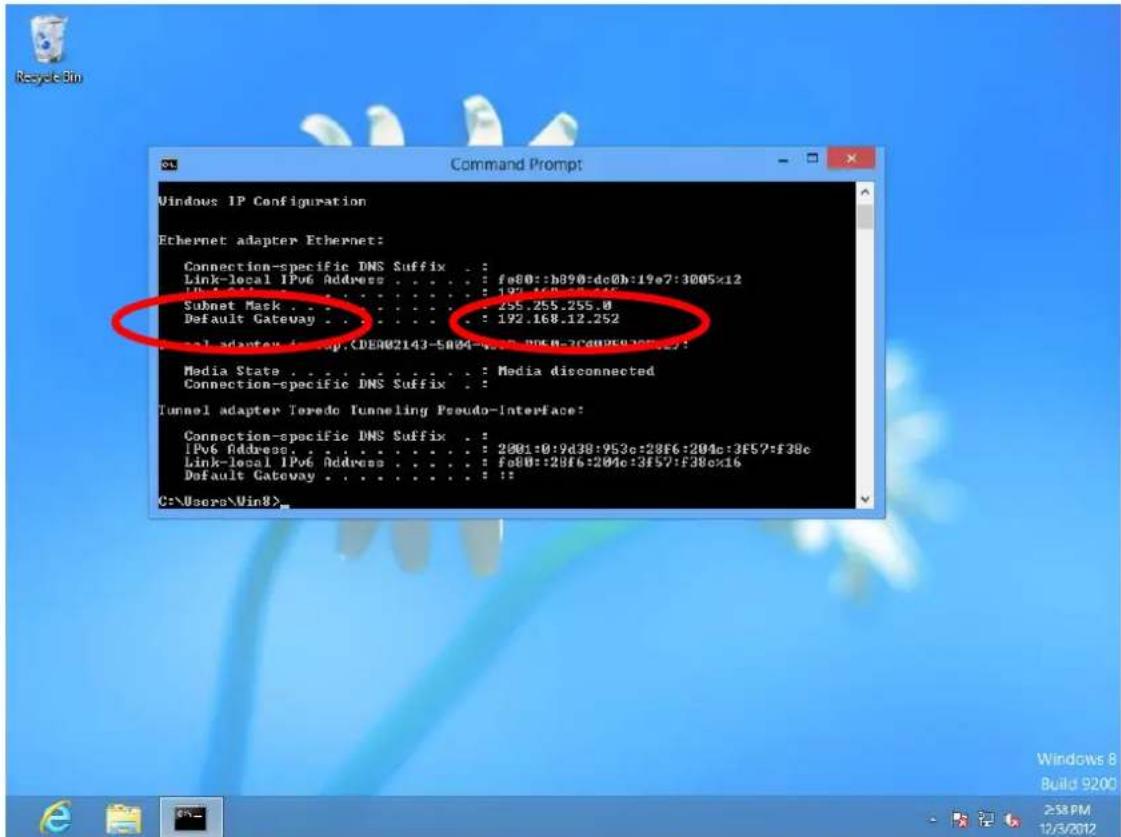
- Your router's IP address will be displayed next to "Default Gateway".
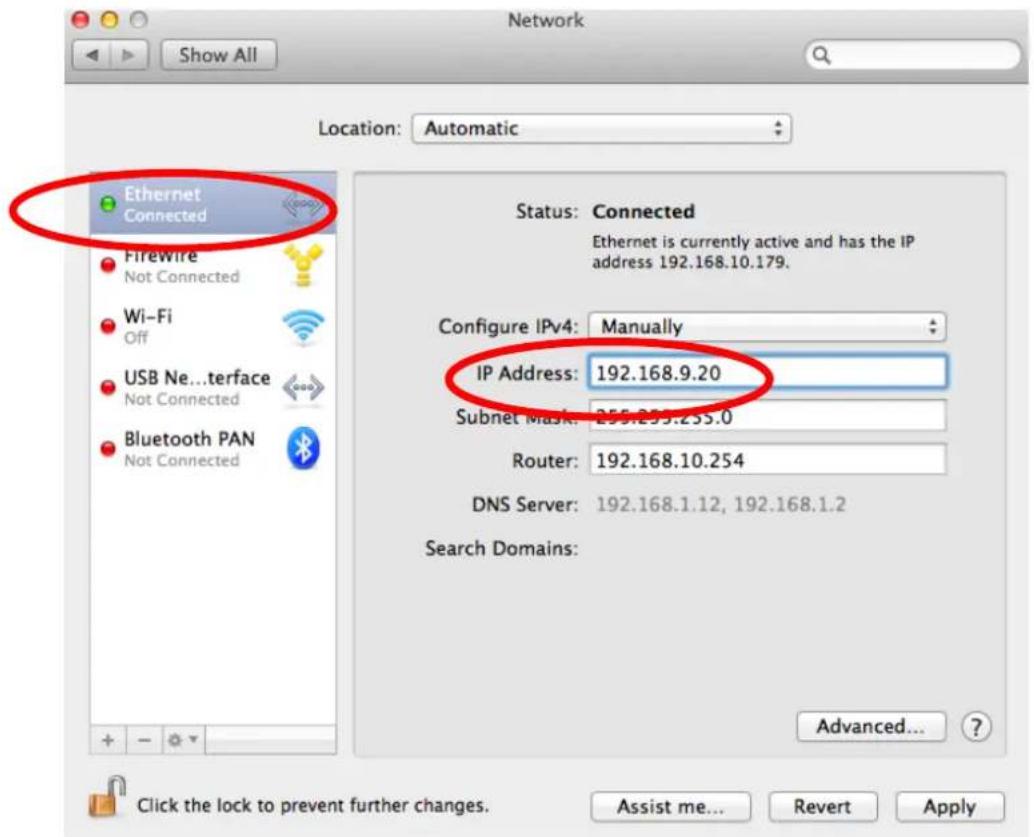
- Launch "System Preferences" and click on "Network".
- If you are using an Ethernet cable to connect to your network, your router's IP address will be displayed next to "Router".
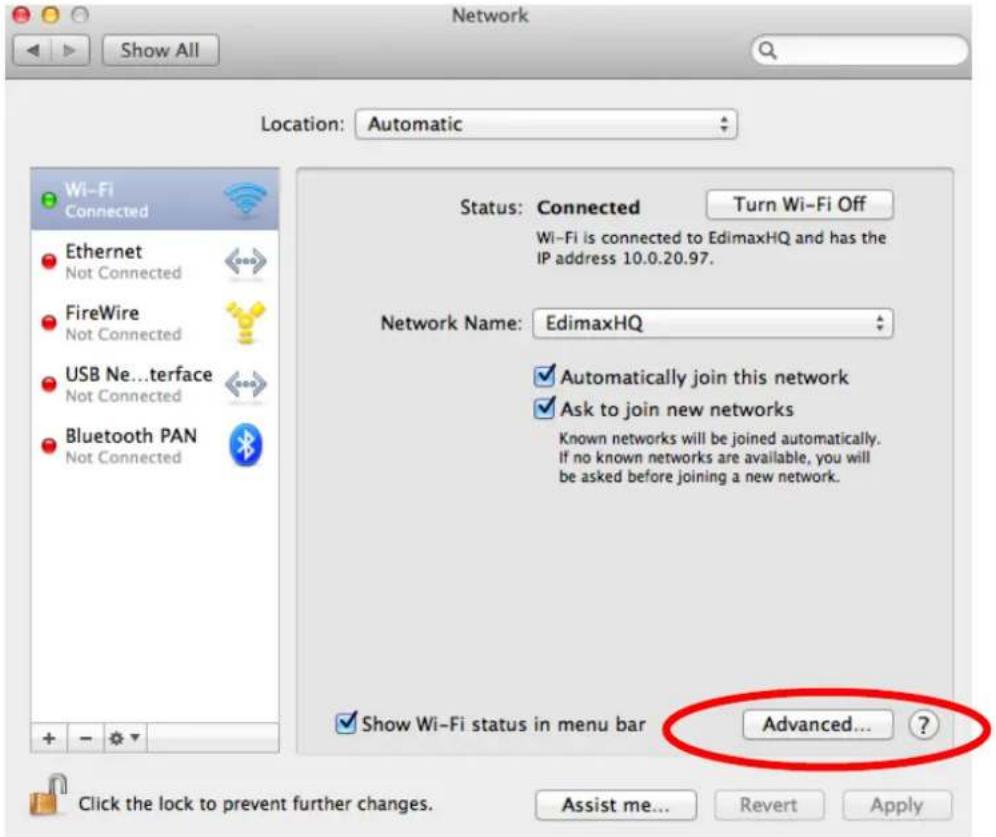
- If you are using Wi-Fi, click "Wi-Fi" in the le panel, and then "Advanced" in the boom right corner.
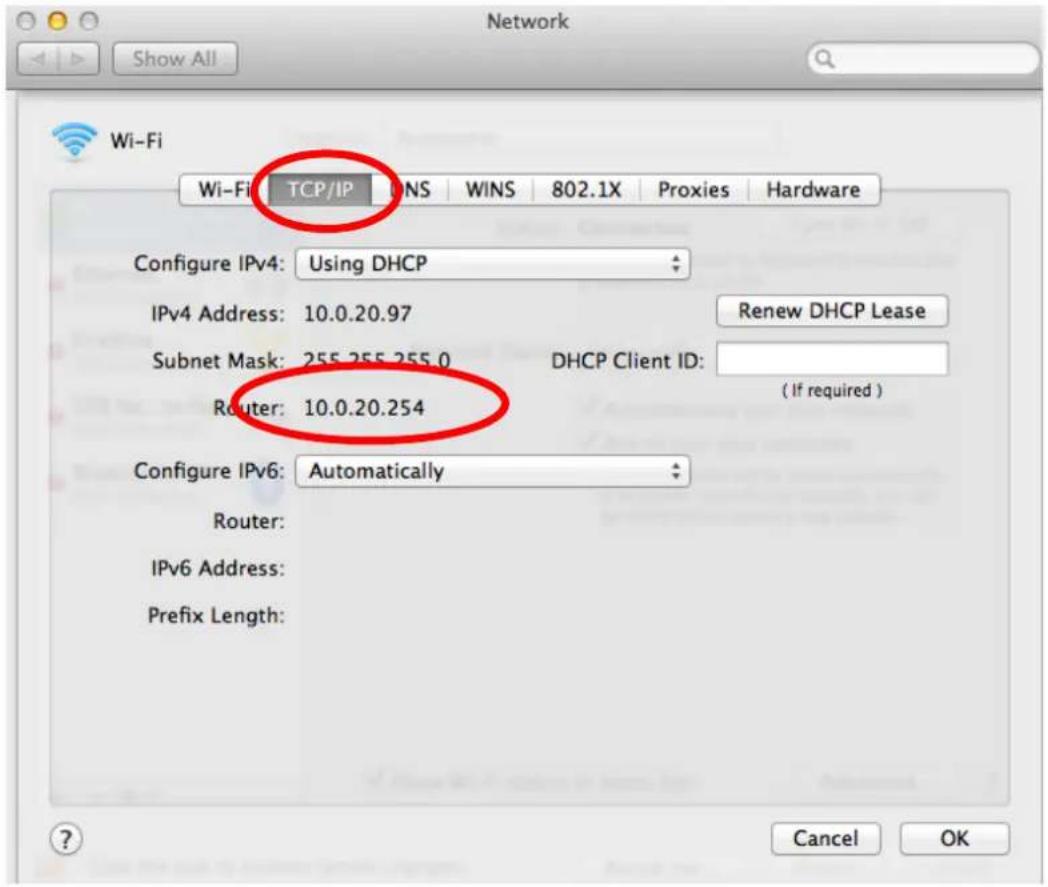
- Click the "TCP/IP" tab and your router's IP address will be displayed next to "Router".
V-2. Troubleshoong
If you are experiencing problems with your wireless extender, please refer to this troublesome guide before contacting your dealer of purchase for help.

Note: If you are experiencing problems immediately aer a rmware upgrade, please contact your dealer of purchase for help.
| Scenario | Soluon |
| I can’t log onto the browser-based conguraon interface. | a. Please check that the extender is correctly inserted into a power socket and check the LEDs on the front panel. If the extender is inializing aer being switched o or restarted, wait for a 2 minutes and try again.b. Make sure you are using the full, correct URL:hp://edimax.setupc. If you are using a MAC or IP address lter, try to connect the wireless extender using a dierent computer.d. Set your computer to obtain an IP address automacally (DHCP), and see if your computer canobtain an IP address.e. Ensure that all other Wi-Fi/Ethernet adapters are disabled or disconnected. |
| I can’t log onto the browser-based conguraon interface: incorrect password. | a. Password is case-sensitive. Make sure the “Caps Lock” light is not illuminated.b. If you do not know your password, restore the device to factory sengs. |
| I can’t establish a conneccon to my wireless extender. | a. If encrypon is enabled, please re-check WEP or WPA passphrase sengs on your wireless client. The password is case-sensitive. Make sure the “Caps Lock” light is not illuminated.b. Try moving closer to the wireless extender.c. Switch o the extender and switch it back on aer 10 seconds.f. Please check that the extender is correctly inserted into a power socket and check the LEDs on the front panel. |
| File downloads are very slow or frequently interrupted. | a. Reset the wireless extenderb. Try again later. Your local network may be experiencing technical dicules or very high usage.c. Change channel number. |
| The wireless extender is extremely hot. | a. It is normal for the wireless extender to heat up during frequent use. If you can safely place your hand on the wireless extender, the temperature of the device is at a normal level.b. If you smell burning or see smoke coming from wireless extender then disconnect the extender immediately, as far as it is safely possible to do so. Call your dealer of purchase for help. |
| My network device can’t access the Internet. | a. Ensure that your broadband router is fully funconal.b. Switch o both your network device and wireless extender and switch back on again.c. Ensure that the wireless extender is powered on (check the PWR LED). |
| My network is using a stac IP address, how do I assign an IP address to my | You can modify the IP address of the wireless bridge using the browser based conguraon interface. Please refer to III-6. System Ulity. |
V-3. Glossary
Default Gateway (Wireless bridge): Every non-access point IP device needs to congregate a default gateway's IP address. When the device sends out an IP packet, if the desnaon is not on the same network, the device has to send the packet to its default gateway, which will then send it out towards the desnaon.
DHCP: Dynamic Host Conguraon Protocol. This protocol automacally gives every computer on your home network an IP address.
DNS Server IP Address: DNS stands for Domain Name System, which allows Internet servers to have a domain name (such as www.Broadbandaccess point.com) and one or more IP addresses (such as 192.34.45.8). A DNS server keeps a database of Internet servers and their respective domain names and IP addresses, so that when a domain name is requested (as in typing "Broadbandaccess point.com" into your Internet browser), the user is sent to the proper IP address. The DNS server IP address used by the computers on your home network is the location of the DNS server your ISP has assigned to you.
DSL Modem: DSL stands for Digital Subscriber Line. A DSL modem uses your existing phone lines to transmit data at high speeds.
Ethernet: A standard for computer networks. Ethernet networks are connected by special cables and hubs, and move data around at up to 10/100 million bits per second (Mbps).
IP Address and Network (Subnet) Mask: IP stands for Internet Protocol. An IP address consists of a series of four numbers separated by periods, that idenes a single, unique Internet computer host in an IP network. Example: 192.168.2.1. It consists of 2 porons: the IP network address, and the host idener.
The IP address is a 32-bit binary paern, which can be represented as four cascaded decimal numbers separated by “.”: aaa.aaa.aaa.aaa, where each “aaa” can be anything from 000 to 255, or as four cascaded binary numbers separated by “.”: bbbbbbbb.bbbbbbbb.bbbbbbbb.bbbbbbbb, where each “b” can either be 0 or 1.
A network mask is also a 32-bit binary paern, and consists of consecutive leading 1's followed by consecutive trailing 0's, such as 1111111.1111111.1111111.00000000. Therefore somemes a network mask can also be described simply as "x" number of leading 1's. When both are represented side by side in their binary forms, all bits in the IP address that correspond to 1's in the network mask become part of the IP network address, and the remaining bits correspond to the host ID.
For example, if the IP address for a device is, in its binary form, 11011001.10110000.10010000.00000111, and if its network mask is, 11111111.11111111.11110000.00000000 It means the device's network address is 11011001.10110000.10010000.00000000, and its host ID is, 00000000.00000000.00000000.00000111. This is a convenient and ecient method for access points to route IP packets to their desnaon.
ISP Gateway Address: (see ISP for denion). The ISP Gateway Address is an IP address for the Internet access point located at the ISP's oce.
ISP: Internet Service Provider. An ISP is a business that provides connectivity to the Internet for individuals and other businesses or organizaons.
LAN: Local Area Network. A LAN is a group of computers and devices connected together in a relatively small area (such as a house or an oce). Your home network is considered a LAN.
MAC Address: MAC stands for Media Access Control. A MAC address is the hardware address of a device connected to a network. The MAC address is a unique idener for a device with an Ethernet interface. It is comprised of two parts: 3 bytes of data that corresponds to the Manufacturer ID (unique for each manufacturer), plus 3 bytes that are oen used as the product's serial number.
NAT: Network Address Translaon. This process allows all of the computers on your home network to use one IP address. Using the broadband access point's NAT capability, you can access the Internet from any computer on your home network without having to purchase more IP addresses from your ISP.
Port: Network Clients (LAN PC) uses port numbers to disnguish one network applicaon/protocol over another. Below is a list of common applicaons and protocol/port numbers:
| Applicaon | Protocol | Port Number |
| Telnet | TCP | 23 |
| FTP | TCP | 21 |
| SMTP | TCP | 25 |
| POP3 | TCP | 110 |
| H.323 | TCP | 1720 |
| SNMP | UCP | 161 |
| SNMP Trap | UDP | 162 |
| HTTP | TCP | 80 |
| PPTP | TCP | 1723 |
| PC Anywhere | TCP | 5631 |
| PC Anywhere | UDP | 5632 |
Access point: A access point is an intelligent network device that forwards packets between dierent networks based on network layer address informaon such as IP addresses.
Subnet Mask: A subnet mask, which may be a part of the TCP/IP informaon provided by your ISP, is a set of four numbers (e.g. 255.255.255.0) congured like an IP address. It is used to create IP address numbers used only within a parcular network (as opposed to valid IP address numbers recognized by the Internet, which must be assigned by InterNIC).
TCP/IP, UDP: Transmission Control Protocol/Internet Protocol (TCP/IP) and Unreliable Datagram Protocol (UDP). TCP/IP is the standard protocol for data transmission over the Internet. Both TCP and UDP are transport layer protocol. TCP performs proper error detecon and error recovery, and thus is reliable. UDP on the other hand is not reliable. They both run on top of the IP (Internet Protocol), a network layer protocol.
WAN: Wide Area Network. A network that connects computers located in geographically separate areas (e.g. dierent buildings, cies, countries). The Internet is a wide area network.
Web-based management Graphical User Interface (GUI): Many devices support a graphical user interface that is based on the web browser. This means the user can use the familiar Netscape or Microso Internet Explorer to Control/congure or monitor the device being managed.
Federal Communicaon Commission Interference Statement
This equipment has been tested and found to comply with the limits for a Class B digital device, pursuant to Part 15 of FCC Rules. These limits are designed to provide reasonable protecon against harmful interference in a residential installaon. This equipment generates, uses, and can radiate radio frequency energy and, if not installed and used in accordance with the instrucons, may cause harmful interference to radio communicaons. However, there is no guarantee that interference will not occur in a parcular installaon. If this equipment does cause harmful interference to radio or television recepon, which can be determined by turning the equipment o and on, the user is encouraged to try to correct the interference by one or more of the following measures:
- Reorient or relocate the receiving antenna.
- Increase the separaon between the equipment and receiver.
- Connect the equipment into an outlet on a circuit dierent from that to which the receiver is connected.
- Consult the dealer or an experienced radio technician for help.
FCC Cauon
This device and its antenna must not be co-located or operang in conjuncon with any other antenna or transmier. This device complies with Part 15 of the FCC Rules. Operaon is subject to the following two conditions: (1) this device may not cause harmful interference, and (2) this device must accept any interference received, including interference that may cause undesired operaon. Any changes or modicaons not expressly approved by the party responsible for compliance could void the authority to operate equipment.
For product available in the USA/Canada market, only channel 1\~11 can be operated. Selecon of other channels is not possible.
This device is restricted to indoor use when operated in the 5.15 to 5.25 GHz frequency range.
※ FCC requires this product to be used indoors for the frequency range 5.15 to 5.25 GHz to reduce the potential for harmful interference to co-channel Mobile Satellite systems.
※ This device will not permit operaons on channels 116-128 for 11na and 120-128 for 11a which overlap the 5600 -5650MHz band.
For a product that has the potential to be used in a body worn conguraon and has not been cered with a specific accessory device(s):
"For body worn operaon, this EUT name has been tested and meets FCC RF exposure guidelines when used with an accessory that contains no metal and that posions the handset a minimum of (specied distance) from the body. Use of other accessories may not ensure compliance with FCC RF exposure guidelines."
Federal Communicaons Commission (FCC) Radiaon Exposure Statement
This equipment complies with FCC radiaon exposure limits set forth for an uncontrolled environment. This equipment should be installed and operated with minimum distance 20cm between the radiator & your body.
R&TTE Compliance Statement
This equipment complies with all the requirements of DIRECTIVE 1999/5/EC OF THE EUROPEAN PARLIAMENT AND THE COUNCIL of March 9, 1999 on radio equipment and telecommunicaon terminal equipment and the mutual recognition of their conformity (R&TTE). The R&TTE Direcve repeals and replaces in the direcve 98/13/EEC (Telecommunicaons Terminal Equipment and Satellite Earth Staon Equipment) As of April 8, 2000.
Safety
This equipment is designed with the utmost care for the safety of those who install and use it. However, special aenon must be paid to the dangers of electric shock and stac electricity when working with electrical equipment. All guidelines of this and of the computer manufacture must therefore be allowed at all mes to ensure the safe use of the equipment.
EU Countries Intended for Use
The ETSI version of this device is intended for home and oce use in Austria, Belgium, Bulgaria, Cyprus, Czech, Denmark, Estonia, Finland, France, Germany, Greece, Hungary, Ireland, Italy, Latvia, Lithuania, Luxembourg, Malta, Netherlands, Poland, Portugal, Romania, Slovakia, Slovenia, Spain, Sweden, Turkey, and United Kingdom. The ETSI version of this device is also authorized for use in EFTA member states: Iceland, Liechtenstein, Norway, and Switzerland.
EU Countries Not Intended for Use
None
ΣDIMAX
NETWORKING PEOPLE TOGETHER
Edimax Technology co., Ltd
6F., No.3, Wu-Chuan 3rd Road, Wu-Gu, New Taipei
Edimax Technology Europe B.V.
- Edimax Technology Co., Ltd.
- Noce According to GNU General Public License Version 2
- CONTENTS
- PRODUCT INFORMATION......5
- CREATING A POWERLINE NETWORK 8
- BROWSER BASED CONFIGURATION INTERFACE.... 19
- POWERLINE UTILITY SOFTWARE 50
- APPENDIX....68
- PRODUCT INFORMATION
- I-1. Package Contents
- I-2. Hardware
- I-4. Safety Informaon
- CREATING A POWERLINE NETWORK
- II-1. Hardware Installaon
- II-2. iQ Setup
- II-3. WPS Setup
- II-4. Connecng to your HP-5101Wn
- II-5. Leaving a Powerline Network
- II-6. Reseng the Wireless Extender
- BROWSER BASED CONFIGURATION INTERFACE
- III-1. Home
- Status and Information
- System
- Wireless Settings
- LAN Settings
- III-2. iQ Setup
- III-3. Basic Seng
- Settings saved successfully!
- III-3-1. Security
- III-3-1-1. Disable
- III-3-1-1-1. 802.1x Authencaon
- III-3-1-2. WEP
- Security Settings
- III-3-1-2. WPA Pre-shared Key
- TKIP supports a maximum data rate of 54Mbps.
- III-3-1-3. WPA Radius
- III-4. WPS Seng
- WPS (Wi-Fi Protected Setup) Settings
- Click the "Start PBC" buon to acvate WPS – do not push the WPS/Reset buon on the extender.
- III-5. Wireless Advanced
- Wireless Advanced
- III-5-1. MAC Filtering
- III-6. System Utility
- Administrator
- III-6-1. Time Seng
- Time setting
- III-6-2. Scheduling Seng
- II-7. Conguraon Tool
- Configuration Tool
- You can also reset the device to factory defaults by pressing and holding the Reset/WPS buon for at least 10 seconds.
- See II-3. Resetng The Wireless Extender.
- III-7-1. Diagnosis
- III-7-2. Firmware Upgrade
- III-7-3. Reboot
- Reboot
- APPLY
- POWERLINE UTILITY SOFTWARE
- IV-1. Installaon
- IV-1.1 Win 8
- Step 7 When the following WinPcap Compatibility Assistant appears, select Run the program without geng help.
- IV-1.2 Win XP/Vista / 7
- IV-2. Using the Ulity Soware
- IV-2-1. Main Tab
- IV-2-2. Diagnoscs Tab
- IV-2-3. About Tab
- APPENDIX
- V-1. Conguring your IP address
- V-1-1. How to Congure Your Computer to Use a Dynamic IP Address
- V-1-1-1. Windows XP
- V-1-1-2. Windows Vista
- V-1-1-3. Windows 7
- IV-1-1-4. Windows 8
- V-1-1-5. Mac OS
- V-1-2. How to Modify the IP Address of Your PC or Macintosh
- V-1-2-1. Windows XP
- V-1-2-2. Windows Vista
- V-1-2-3. Windows 7
- Click "Local Area Connecon".
- Click "Properes".
- V-1-2-4. Windows 8
- V-1-2-5. Mac OS
- V-1-3. How to Find Your Network Security Key
- V-1-3-1. Windows 7 & Windows Vista
- V-1-3-2. Windows 8
- V-1-3-3. Mac
- V-1-4. How to Find Your Router's IP Address
- V-1-4-1. Windows XP, Vista & 7
- V-1-4-2. Windows 8
- V-2. Troubleshoong
- V-3. Glossary
- Federal Communicaon Commission Interference Statement
- FCC Cauon
- Federal Communicaons Commission (FCC) Radiaon Exposure Statement
- R&TTE Compliance Statement
- Safety
- EU Countries Intended for Use
- EU Countries Not Intended for Use
- ΣDIMAX
- NETWORKING PEOPLE TOGETHER
Brand : Edimax
Model : AV500 Nano
Category : Powerline Adapter