
DS-A2 - Car Mount ONKYO - Free user manual and instructions
Find the device manual for free DS-A2 ONKYO in PDF.


| Product Type | Car Mount |
| Brand | Onkyo |
| Model | DS-A2 |
| Dimensions (approx.) | 12 x 6 x 4 cm |
| Weight | 120 g |
| Material | Plastic and rubber |
| Power Supply | None (passive mount) |
| Primary Function | Secure holding of compatible devices in vehicle |
| Adjustability | Rotatable and tiltable |
| Installation | Dash or vent clip |
| Compatible Devices | Onkyo audio players and smartphones |
| Cleaning | Wipe with dry cloth |
| Safety Warning | Do not obstruct driver's view |
| Spare Parts Available | No |
| Repairability | Not repairable |
| Warranty | 1 year limited |
Frequently Asked Questions - DS-A2 ONKYO
User questions about DS-A2 ONKYO
0 question about this device. Answer the ones you know or ask your own.
Ask a new question about this device
Download the instructions for your Car Mount in PDF format for free! Find your manual DS-A2 - ONKYO and take your electronic device back in hand. On this page are published all the documents necessary for the use of your device. DS-A2 by ONKYO.
USER MANUAL DS-A2 ONKYO
Remote Interactive Dock
DS-A2
Instruction Manual
Contents
Important Safety Instructions ..... 2
Precautions....3
Getting Started 4
About the RI Dock 4
Features....4
Package Contents 4
Compatible iPods....4
Getting to Know the RI Dock....5
Remote Controller 6
Hooking Up the RI Dock....8
Using the RI Dock....9
Setting the OSD Mode 9
Controlling Your iPod without the OSD . 9
Controlling Your iPod with the OSD ... 9
TV Display Settings .....11
Setting the TV System.....11
Other Functions....11
Setting the Remote Controller's ID ...12
Using Your Amp's Remote Controller .13
Thank you for purchasing an Onkyo product. Please read this manual carefully before making any connections or using this product. By following these instructions, you'll get the best audio performance and the most listening pleasure from your Onkyo product. Keep this manual for future reference.
Troubleshooting 14
Specifications....15

Made for iPod

WARNING:
TO REDUCE THE RISK OF FIRE OR ELECTRIC SHOCK, DO NOT EXPOSE THIS APPARATUS TO RAIN OR MOISTURE.
CAUTION:
TO REDUCE THE RISK OF ELECTRIC SHOCK, DO NOT REMOVE COVER (OR BACK). NO USER-SERVICEABLE PARTS INSIDE. REFER SERVICING TO QUALIFIED SERVICE PERSONNEL.



The lightning flash with arrowhead symbol, within an equilateral triangle, is intended to alert the user to the presence of uninsulated "dangerous voltage" within the product's enclosure that may be of sufficient magnitude to constitute a risk of electric shock to persons.

The exclamation point within an equilateral triangle is intended to alert the user to the presence of important operating and maintenance (servicing) instructions in the literature accompanying the appliance.
Important Safety Instructions
- Read these instructions.
- Keep these instructions.
- Heed all warnings.
- Follow all instructions.
- Do not use this apparatus near water.
- Clean only with dry cloth.
- Do not block any ventilation openings. Install in accordance with the manufacturer's instructions.
- Do not install near any heat sources such as radiators, heat registers, stoves, or other apparatus (including amplifiers) that produce heat.
- Do not defeat the safety purpose of the polarized or grounding-type plug. A polarized plug has two blades with one wider than the other. A grounding type plug has two blades and a third grounding prong. The wide blade or the third prong are provided for your safety. If the provided plug does not fit into your outlet, consult an electrician for replacement of the obsolete outlet.
- Protect the power cord from being walked on or pinched particularly at plugs, convenience receptacles, and the point where they exit from the apparatus.
- Only use attachments/accessories specified by the manufacturer.
- Unplug this apparatus during lightning storms or when unused for long periods of time.
- Refer all servicing to qualified service personnel. Servicing is required when the apparatus has been damaged in any way, such as power-supply cord or plug is damaged, liquid has been spilled or objects have fallen into the apparatus, the apparatus has been exposed to rain or moisture, does not operate normally, or has been dropped.
14. Damage Requiring Service
Unplug the apparatus from the wall outlet and refer servicing to qualified service personnel under the following conditions:
A. When the power-supply cord or plug is damaged,
B. If liquid has been spilled, or objects have fallen into the apparatus,
C. If the apparatus has been exposed to rain or water,
D. If the apparatus does not operate normally by following the operating instructions. Adjust only those controls that are covered by the operating instructions as an improper adjustment of other controls may result in damage and will often require extensive work by a qualified technician to restore the apparatus to its normal operation,
E. If the apparatus has been dropped or damaged in any way, and
F. When the apparatus exhibits a distinct change in performance this indicates a need for service.
Precautions
- Recording Copyright —Unless it's for personal use only, recording copyrighted material is illegal without the permission of the copyright holder.
- Care —Occasionally you should dust the unit all over with a soft cloth. For stubborn stains, use a soft cloth dampened with a weak solution of mild detergent and water. Dry the unit immediately afterwards with a clean cloth. Don't use abrasive cloths, thinners, alcohol, or other chemical solvents, because they may damage the finish or remove the panel lettering.
- Never Touch this Unit with Wet Hands —Never handle this unit or its power cord while your hands are wet or damp. If water or any other liquid gets inside this unit, have it checked by your Onkyo dealer.
For U.S. models
FCC Information for User CAUTION:
The user changes or modifications not expressly approved by the party responsible for compliance could void the user's authority to operate the equipment.
NOTE:
This equipment has been tested and found to comply with the limits for a Class B digital device, pursuant to Part 15 of the FCC Rules. These limits are designed to provide reasonable protection against harmful interference in a residential installation.
This equipment generates, uses and can radiate radio frequency energy and, if not installed and used in accordance with the instructions, may cause harmful interference to radio communications. However, there is no guarantee that interference will not occur in a particular installation. If this equipment does cause harmful interference to radio or television reception, which can be determined by turning the equipment off and on, the user is encouraged to try to correct the interference by one or more of the following measures:
• R eorient or relocate the receiving antenna.
- Increase the separation between the equipment and receiver.
- C onnect the equipment into an outlet on a circuit different from that to which the receiver is connected.
• C consult the dealer or an experienced radio/TV technician for help.
For Canadian Models
NOTE: THIS CLASS B DIGITAL APPARATUS COMPLIES WITH CANADIAN ICES-003.
For models having a power cord with a polarized plug:
CAUTION: TO PREVENT ELECTRIC SHOCK, MATCH WIDE BLADE OF PLUG TO WIDE SLOT, FULLY INSERT.
Modèle canadien
REMARQUE: CET APPAREIL NUMÉRIQUE DE LA CLASSE B EST CONFORME À LA NORME NMB-003 DU CANADA.
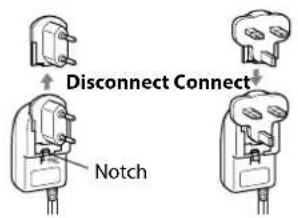
Before use, connect the appropriate AC plug adapter to the AC adapter.
The type of plug adapter depends on the place of purchase.
For European Models
Declaration of Conformity
We, ONKYO EUROPE ELECTRONICS GmbH LIEGNITZERSTRASSE 6. 82194 GROEBENZELL. GERMANY
declare in own responsibility, that the ONKYO product described in this instruction manual is in compliance with the corresponding technical standards such as EN60065, EN55013, EN55020 and EN61000-3-2, -3-3.
GROEBENZELL, GERMANY

ONKYO EUROPE ELECTRONICS GmbH


natural_image
Pure geometric diagram with intersecting lines and circles, no text or symbols present
natural_image
Pure geometric diagram with intersecting lines and a circular pattern, no text or symbols presentGetting Started
About the RI Dock
With the Onkyo RI Dock, you can easily play the music stored on your Apple® iPod® through your Onkyo audio system and enjoy great sound, and watch iPod slideshows and videos on your TV. In addition, the onscreen display (OSD) allows you to view, navigate, and select your iPod's playlists (artists, albums, songs, genres, composers) on your TV, and with the supplied remote controller, you can control your iPod from the comfort of your sofa. You can even use your Onkyo amp's remote controller to operate your iPod.
RI, which stands for Remote Interactive, is an exclusive Onkyo control system that allows all RI-capable Onkyo audio components to be turned on or off together, and your amp to turn on automatically and select the appropriate input source when playback is started on a source component. It also allows you to control your iPod with your amp's remote controller. In this manual, the DS-A2 Remote Interactive Dock is referred to as the "RI Dock."
Features
□ Play your iPod music through your Onkyo audio system and enjoy great sound
□View, navigate, and select your iPod's playlists (artists, albums, songs, genres, composers) on your TV
□ Control your iPod from the comfort of your sofa with the supplied remote controller
□ Watch iPod videos and slideshows on your TV
□ Supports all iPods with a dock connector, including the iPod mini, iPod photo, and iPod nano
□ Charges your iPod's battery while you enjoy your music
Package Contents
Make sure you have the following items:
• DS-A2 Remote Interactive Dock • AC adapter

-
AV cable

-
Remote controller


• RI cable

- Button-type battery (CR 2025)
• Instruction manual
Compatible iPods
■ Made for:
• iPod photo (software 1.2.1 or later)
- iPod mini (software 1.4.1 or later)
- iPod nano (software 1.1.1 or later)
- 5th Generation iPod with video (software 1.1.1 or later)
- 4th Generation iPod with Click Wheel (software 3.1.1 or later)
- 3rd Generation iPod with touch wheel and buttons
(software 2.3 or later)
Note:
- Before using the RI Dock, update your iPod with the latest software, available from the Apple Web site at: www.apple.com
For the latest information on the RI Dock, see the Onkyo Web site at: www.onkyo.com

natural_image
Pure geometric diagram with intersecting lines and a central star-like pattern (no text or symbols)
DS-A2_En.book Page 5 Friday, July 7, 2006 9:24 AM
natural_image
Pure geometric diagram with intersecting lines and circular shapes, no text or symbols presentGetting Started—Continued
Getting to Know the RI Dock


natural_image
Pure geometric diagram with a rectangle and a crosshair symbol (no text or labels)■ Adjusting the iPod Adaptor

The iPod adapter needs to be adjusted to match your particular iPod. Insert your iPod into the RI Dock. If there's a gap between the back of your iPod and the adapter, turn the adapter counterclockwise to close the gap. Turning the adapter counterclockwise moves it forward. Turning it clockwise moves it backward.
5

natural_image
Pure geometric diagram with concentric circles and radial lines, no text or symbols present
natural_image
Pure geometric diagram with intersecting lines and circles, no text or symbols present

natural_image
Pure geometric diagram with intersecting lines and circular shapes, no text or symbols presentGetting Started—Continued
Remote Controller

① SETUP button
Used to set the TV system (PAL/NTSC) and the remote controller's ID.
② MODE button
Sets the OSD mode to On or Off.
③ MENU button
Used to select the previous menu on the onscreen display and iPod.
④ Play/Pause [▶] button
Starts or pauses playback of the selected song.
⑤ Previous and Next [ɪ/ɪ] buttons
The Previous [▶] button selects the previous track. During playback it selects the beginning of the current track. The Next [▶▶] button selects the next track. Press and hold the Previous [▶] button to rewind. Press and hold the Next [▶] button to fast forward.
⑥ SHUFFLE button
Sets the Shuffle function to Songs, Albums, or Off.
⑦ PLAYLIST/PAGE MODE [A/[] buttons
Used to select the page modes. During play-back or when the OSD mode is set to Off, they select playlists.
⑧ ALBUM/PAGE [1/[] buttons
Used to page through the playlists (artists, albums, songs, genres, composers) displayed on your TV. During playback or when the OSD mode is set to Off, they select albums.
⑨ RESUME button
Used to resume playback. It has no function when the OSD mode is set to Off.
⑩ SELECT button
Used to select songs and menus on the onscreen display and iPod.
⑪ Up and Down arrow [1/[] buttons
Used to navigate songs and menus on the onscreen display and iPod.
⑫ REPEAT button
Sets the Repeat function to One, All, or Off.
⑬ VOLUME [V[ ] buttons
Adjust the volume on the Onkyo amp or AV receiver. They don't affect the iPod's volume setting.
![ONKYO DS-A2 - ⑬ VOLUME [V[ ] buttons - 1](/content/2026/05/1023938/images/ee705ffcb7e7529e57154b832e9dfbc5d6527d17e26eb560993ca36d89b9423e.jpg)
natural_image
Pure electrical circuit lines without any symbols![ONKYO DS-A2 - ⑬ VOLUME [V[ ] buttons - 2](/content/2026/05/1023938/images/e897db0a644b2dea8083c42a0bfa45686d403ded484f75ae2262181f373080e5.jpg)
natural_image
Pure geometric diagram with intersecting lines and a circular pattern (no text or symbols)Getting Started—Continued
Replacing the Battery
Use only a battery of the same type (CR 2025).
- To open the battery compartment, press the small hollow and slide open the cover.

- While pressing the tab as shown, slide out the old battery.
Slide the new battery into the battery compartment with the positive side facing up.

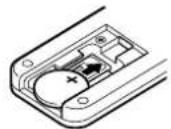
- Slide the cover shut.

Notes:
- If the remote controller doesn't work reliably, try replacing the battery.
- If you intend not to use the remote controller for a long time, remove the battery to prevent damage from leakage or corrosion.
- A n expired battery should be removed as soon as possible to prevent damage from leakage or corrosion.
Caution: Replacing the battery incorrectly may cause an explosion. Use only a battery of the same type or an equivalent.
Aiming the Remote Controller
When using the remote controller, point it toward the RI Dock's remote control sensor, as shown below.
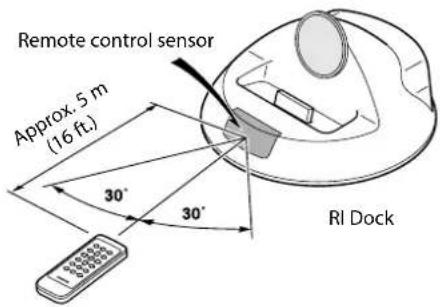
Notes:
- If the RI Dock is placed on top of another component, the remote controller's signal may be obstructed and the remote controller may not work reliably.
- T he remote controller may not work reliably if the RI Dock is subjected to bright light, such as direct sunlight or inverter-type fluorescent lights. Keep this in mind when installing.
- If another remote controller of the same type is used in the same room, or the RI Dock is installed close to equipment that uses infrared rays, the remote controller may not work reliably.
- D on't put anything on top of the remote controller, such as a book or magazine, because a button may be pressed continuously, thereby draining the batteries.
- T he remote controller may not work reliably if the RI Dock is installed in a rack behind colored glass doors. Keep this in mind when installing.
- T he remote controller will not work if there's an obstacle between it and the RI Dock's remote control sensor.

natural_image
Pure geometric shape with no text, numbers, or symbols
natural_image
Pure geometric diagram with intersecting lines and circular shapes, no text or symbols presentGetting Started—Continued
Hooking Up the RI Dock
Depending on the Onkyo amp that you're using, choose connection methodA or B.
A: Connect the RI Dock's AUDIO OUT L/R jacks and VIDEO OUT jack to an RI Dock-compatible input on your Onkyo amp. (You might need to change the input display to "HDD" or "DOCK.")
B: Connect the RI Dock's AUDIO OUT L/R jacks to the TAPE (MD, CDR) IN jacks on your Onkyo amp. And connect the RI Dock's VIDEO OUT jack directly to your TV.
See your amp's instruction manual for details.
Note: When the AC adapter is unplugged or not connected to the RI Dock, the RI Dock will output no sound or video, functions will not work, and your iPod's battery will not be charged.
Caution: Connect the supplied RI cable to only racks. Do not connect headphones to the rack, as it will damage your equipment.

flowchart
graph TD
    A["AC adapter"] --> B["Wall outlet"]
    B --> C["Supplied AV cable"]
    C --> D["White"]
    C --> E["Audio INPUT L"]
    C --> F["Red Yellow R"]
    C --> G["White"]
    D --> H["RI-capable amp or TV"]
    E --> I["VIDEO INPUT"]
    F --> J["White"]
    style A fill:#f9f,stroke:#333
    style B fill:#ccf,stroke:#333
    style C fill:#cfc,stroke:#333
    style D fill:#fcc,stroke:#333
    style E fill:#cff,stroke:#333
    style F fill:#ffc,stroke:#333
    style G fill:#fcc,stroke:#333
- Using the supplied AV cable, connect the RI Dock's AUDIO OUT L/R jacks to a suitable audio input on your amp. And connect the RI Dock's VIDEO OUT jack to a video input on your Onkyo AV receiver or TV. The input you use depends on the type of Onkyo amp you have. See your amp's instruction manual for details.
- Using the supplied rable, connect the RI Dock's jack to an jack on one of the Onkyo components in your system.
- Connect the supplied AC adapter to the RI Dock's DC IN jack.
If you've connected the RI Dock's AUDIO OUT L/R jacks to your amp's TAPE (MD, CDR) IN jacks and also want to connect the RI Dock's VIDEO OUT jack to your amp
Connect the RI Dock's VIDEO OUT jack to an unused video input on your amp.
When you want to watch an iPod slideshow or video, select the video input source first, and then select the TAPE (MD, CDR) input source. Your AV receiver will output the audio being fed to the TAPE (MD, CDR) input, and because the video source doesn't change when the TAPE input source is selected, it'll continue to output the video being fed to the video input.
■What to do if you already have a component connected to your amp's TAPE input or RI Dock-compatible input
Connect the RI Dock to an unused AV input on your amp, and select the input source manually.
Using the RI Dock
Setting the OSD Mode
Set the OSD (onscreen display) mode before you start using the RI Dock.
- Plug in the AC adapter.
-
Turn on your TV and amp, and select the appropriate inputs on your TV and amp.
-
Insert your iPod into the RI Dock.
3rd generation iPod:
Before inserting a 3rd generation iPod, set the OSD mode as explained in step 4.

- Use the remote controller's [MODE] button to set the OSD mode.

On: Playlists (artists, albums, songs, genres, composers) are displayed on your TV, and you can navigate and select your music while looking at your TV. While this mode is selected, your iPod displays the Onkyo logo.
Off: Nothing is displayed on your TV and you navigate and select your music by using your iPod's display.
Notes:
- T o prevent dock connector damage, don't twist your iPod when inserting or removing it, and be careful not to knock over the RI Dock while your iPod is inserted.
- D on't use the RI Dock with any other iPod accessories, such as FM transmitters and microphones, because they may cause a malfunction.
- You can't change the OSD mode while watching an iPod slideshow or video.
Controlling Your iPod without the OSD
To control your iPod without the OSD, set the OSD mode to Off, and use the remote controller as explained on page 6.
Controlling Your iPod with the OSD
When the OSD mode is set to On and your iPod is inserted in the RI Dock, playlists (artists, albums, songs, genres, composers) will be displayed on your TV.
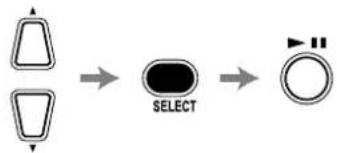
■ Playing Songs
flowchart
graph LR
    A["Two Shape"] --> B["SELECT"]
    B --> C["Circle with Arrow"]
- Use the Up and Down arrow [J/[] buttons to select Playlists, Artists, Albums, Genres, Songs or Composers, and then press the [SELECT] button.
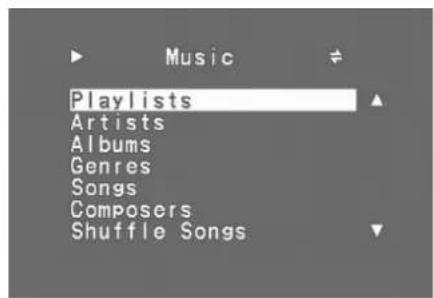
Top Menu
- Use the Up and Down arrow [√/[] buttons and [SELECT] button to select a song, and press the Play/Pause ▶ button to start playback.
When selecting songs, use the [MENU] button to go back to the previous menu.
Using the RI Dock—Continued
■ Using the Page Modes
With the page modes, you can quickly locate your favorite songs even when your song lists, artist lists, and so on are very long. There are four page modes: L, M, S, and P. These stand for Large, Medium, Small, and Page. In P mode, you can page through the list consecutively. In the S, M, and L modes, you can page through the list in progressively larger steps.
-
Use the PAGE MODE Up and Down [J/[]▼ buttons to select a page mode.
Depending on the size of the list, it may not be possible to change the page mode. -
Use the PAGE Up and Down [√/[] buttons to page up or down the list.
![Repeat mode Shuffle modePlayback status Now Playing ≠A01 1/5 No More Fat Campaign snowman The Alan Smithy Band [......] 01:20 04:59 Playback time Total time](/content/2026/05/1023938/images/64ff2ce419d0cd9293d30fde60d6a2aed08a448f0abe63cb610bbf12871e36f8.jpg)
![▼Never / Das n▲ [L] First song on the next page previous page Page mode](/content/2026/05/1023938/images/946462eafc80a71e7682551b399b736d2ca110fefb7cdb3cf4578aa59b567b02.jpg)
Repeat modesShuffle modes
All repeat
91 One-track repeat
Note:
- While playing a playlist, you can use the PLAYLIST Up and Down [√] buttons to select other playlists. While playing an album, you can use the ALBUM Up and Down [√] buttons to select other albums.
■ Resume Function
With the Resume function, you can resume playback of the song that was playing when you removed your iPod from the RI Dock or changed the OSD mode to Off.
- Select and play a song displayed on your TV.
- During playback or while playback is paused, remove your iPod from the RI Dock or change the OSD mode to Off. The current song is remembered.
- When you reinsert your iPod into the RI Dock (set the OSD mode to On), press the [RESUME] button to resume playback of the remembered song.
■ Song Shuffle
You can play all of the songs in your iPod in random order.
- P r ess the [MENU] button repeatedly to select the top menu, and use the Up and Down arrow [√] buttons to select "Shuffle Songs," and then press the [SELECT] button.
■ Now Playing
During playback, you can display information about the current song.
- P r ess the [MENU] button repeatedly to select the top menu, and use the Up and Down arrow [√[] buttons to select "Now Playing," and then press the [SELECT] button.
Notes:
- T he Resume function can be used only when the OSD mode is set to On.
- If the AC adapter is disconnected, the remembered song will be forgotten.
- If the Resume function is used during shuffle playback, when the iPod is reinserted in the RI Dock, playback will resume with any song.
Using the RI Dock—Continued
TV Display Settings
When the OSD mode is set to On, you can change the background color and set the screen saver.
- Press the [MENU] button repeatedly to select the top menu.
- Use the Up and Down arrow [ ][ ] buttons to select "Settings," and then press the [SELECT] button.
- Use the Up and Down arrow [ ][ ] buttons to select Background Color or Screen Saver, and then press the [SELECT] button.
- Use the Up and Down arrow [ ][ ] buttons to select an option, and then press the [SELECT] button.
■ Background Color
You can change the background color of the onscreen display on your TV to any one of the following eight colors: None (black), Blue1, Blue2, Green1, Green2, Magenta, Red1, or Red2.
Screen Saver
You can set the time at which the screen saver is activated to any one of the following four options: 1 minute, 5 minutes, 10 minutes, or Off (screen saver off).
When the screen saver activates, the onscreen display on your TV disappears. Press any button on the remote controller to cancel the screen saver and resume the onscreen display.
Setting the TV System
While the OSD mode is set to On, you can set the RI Dock's video output to PAL or NTSC. If the onscreen display looks distorted on your TV, try changing the TV system.
- While pressing and holding down the [SETUP] button, press the VOLUME Up [ ] button for more than 3 seconds to select NTSC, or press the VOLUME Down [ ] button for more than 3 seconds to select PAL.
Other Functions
■ Functions
Depending on your amp and generation of iPod, you may also be able to use the following functions.
Note:
- Y our amp may take several seconds to startup, so you might not hear the first few seconds of the first song.
- System On Function 1
When you turn on your amp, the iPod turns on as well. With some amps, you may need to press the [ON] button on your amp's remote controller's twice to turn on the other components in your system.
- System Off Function
When you turn off your amp, the iPod turns off as well.
• A uto Power On Function 2
If you start iPod playback while your amp is on Standby, your amp will automatically turn on and select your iPod as the input source. Then, your iPod will start playback.
- D irect Change Function 2
If you start iPod playback while listening to another input source, your amp will automatically select your iPod as the input source.
- TimerPlay 1
You can use your amp's Timer function to turn on your amp and iPod and start playback at a specified time.
• U sing Your Amp's Remote Controller
You can use your amp's remote controller to control basic iPod functions (see page 13).


natural_image
Simple geometric diagram with a crosshair and concentric circles on a gray rectangle (no text or symbols)
natural_image
Pure geometric lines and shapes without any text, numbers, or symbols

natural_image
Pure geometric diagram with concentric circles and radial lines, no text or symbols presentUsing the RI Dock—Continued
Operating Notes:
- T he RI Dock must be connected to your amp with both an cable and an audio cable to use the functions.
- If your amp doesn't support the System On, System Off, Auto Power On, and Direct Change functions, you'll need to turn your amp on and off and select the input source manually.
- B before you select another input source, stop iPod playback to prevent your amp from selecting the iPod input source by mistake.
- If any accessories are connected to your iPod, your amp may not be able to select the input source properly.
- While your iPod is in the RI Dock, its volume control has no effect. If you adjust your iPod's volume control while it's in the RI Dock, make sure it's not set too high before you reconnect your headphones.
■ Using Your iPod's Alarm Clock
You can use your iPod's Alarm Clock function to automatically turn on your iPod and amp at a specified time. Your amp's input source will automatically be set to the input to which your iPod is connected.
Notes:
- T his function is not supported by 3rd generation iPods.
- T his function only works when the OSD mode is set to Off.
- To use this function, your iPod must be in the RI Dock, and the RI Dock must be connected to your amp with both an RI cable and an audio cable.
- When you use this function, be sure to set your amp's volume control to a suitable level.
- Y our amp may take several seconds to startup, so you might not hear the first few seconds of the first song.
■ Charging Your iPod's Battery
The RI Dock charges your iPod's battery while your iPod is in the RI Dock.
Notes:
- T o charge your iPod battery, the AC adapter must be plugged into a suitable wall outlet and connected to the RI Dock's DC IN jack.
- See your iPod's instruction manual for more information on battery charging.
Setting the Remote Controller's ID
If you've changed the remote control ID of your Onkyo AV receiver to differentiate it from your other Onkyo components' remote controllers, you can change the remote control ID of the RI Dock's remote controller to match. The default ID is 1.
- While pressing and holding down the [SETUP] button, press one of the following buttons for more than 3 seconds to set the ID:
ID #1:PLAYLIST Up [▲button
ID #2:ALBUM Up [ ]button
ID #3:PLAYLIST Down [button
ID #4:ALBUM Down []button
Note: If you change the remote controller's ID, make sure your AV receiver is set to the same ID. Otherwise, you won't be able to control it.
Using the RI Dock—Continued
Using Your Amp's Remote Controller
The following table shows which buttons on your amp's remote controller you can use to control your iPod while it's in the RI Dock. Be sure to select the appropriate remote mode first, and point your remote controller at your amp. Note that some buttons may be labelled differently, and some remote controllers may not have certain buttons.
| iPod function | Remote controller button to use | Description | |||
| TAPE mode | MD mode C | DR mode HDD mode | |||
| Turn on/off | [STANDBY], [ON] — | iPod is turned on and off (3rd generation iPods do not turn on). | |||
| Play | Play [▶] | Starts playback on the iPod. If the iPod is not already on, it's turned on automatically.(On 3rd generation iPods, works as Play/Pause.) | |||
| Pause | Pause [■Stop [ ] Pause [ ] | ■■ | Pauses iPod playback.(On 3rd generation iPods, works as Play/Pause.) | ||
| Next song | [▶▶][▶▶] | Next [▶▶] | Selects the next iPod song. | ||
| Previous song | [◀◀],[◀◀] | Previous [◀◀] | Restarts the current iPod song. Press it twice to select the previous song. | ||
| Fast forward | — | Fast Forward [▶▶] | Press and hold to fast forward the iPod. | ||
| Rewind | — | Rewind [◀◀] | Press and hold to rewind the iPod. | ||
* With 3rd generation iPods, some functions may not work even with the latest software.
* To select the next or previous photo in an iPod photo slideshow, use the controls on your iPod photo.
The following functions can be used with the iPod photo, iPod mini, iPod nano, and 4th and 5th generation iPods and some Onkyo amps.
| iPod function | Remote controller button to use | Description | |||
| TAPE mode | MD mode | CDR mode | HDD mode | ||
| Shuffle | [DOLBY MODE] | [RANDOM], [PLAYMODE], [SHUFFLE] | Sets the iPod's Shuffle function to: Songs, Albums, or Off. | ||
| Repeat | [REVERSE MODE] | [REPEAT] | Sets the iPod's Repeat function to: One, All, or Off. | ||
| Backlight | REC [●] | [DISPLAY], [SCROLL] | The iPod's backlight comes on for 30 seconds. | ||
| Playlist/Album mode | Reverse Play [] | [ENTER], [PROGRAM], [MEMORY] | — | To use the next four functions with modes other than HDD, first select Playlist/Album mode by using one of these buttons, and then press the listed button while "Playlist/Album mode" is displayed on your TV (about 5 seconds). | |
| Next playlist | Fast Forward [▶▶] | [PLAYLIST UP] | Selects the next playlist on the iPod. Select Playlist/Album mode first (see above). | ||
| Previous playlist | Rewind [◀◀] | [PLAYLIST DOWN] | Selects the previous playlist on the iPod. Select Playlist/Album mode first (see above). | ||
| Next album | Next [▶▶] | [ALBUM UP] | Selects the next album on the iPod. Select Playlist/Album mode first (see above). | ||
| Previous album | Previous [◀◀] | [ALBUM DOWN] | Selects the previous album on the iPod. Select Playlist/Album mode first (see above). | ||
* D epending on your amp, some buttons may not work as expected.
Troubleshooting
There's no sound
• M ake sure your iPod is actually playing.
- Make sure your iPod is inserted properly in the RI Dock.
- Make sure your amp is turned on, the correct input source is selected, and the volume is turned up.
- M make sure the plugs are pushed in all the way.
- Make sure the AC adapter is connected to a suitable wall outlet and connected to the RI Dock.
■ The RI Dock's remote controller doesn't control your iPod
- If the RI Dock is placed on top of another component, the remote controller's signal may be obstructed and the remote controller may not work reliably. In this case, try repositioning the RI Dock.
- Make sure your iPod is properly inserted in the RI Dock.
- When you use the RI Dock's remote controller, point it toward the RI Dock (see page 7).
- Some of the remote controllers buttons work differently depending on the OSD mode: On or Off (see page 6).
■ Your amp's remote controller doesn't control your iPod
- Make sure your iPod is properly inserted in the RI Dock.
- If your amp's remote controller has remote mode buttons, make sure you've selected the right mode.
- C check the RI Dock's RI MODE switch setting.
- When you use your amp's remote controller, point it toward your amp.
- T he RI Dock must be connected to your amp with both an cable and an audio cable.
- T he TAPE IN on some amps can be set to TAPE, MD, or CDR. Make sure the RI Dock's RI MODE switch setting and the remote control mode match this setting. See your amp's manual for more information.
If you still can't control your iPod, start playback by pressing your iPod's Play button. Remote operation should then be possible. - Make sure your amp's remote controller is set to the correct remote control ID.
■ The onscreen display doesn't appear on your TV
- Set the OSD mode to On. With 3rd generation iPods, you need to set the OSD mode while your iPod is not in the RI Dock.
- Try setting the TV system to PAL or NTSC (see page 11).
■ To watch an iPod slideshow or video on TV:
- Set the OSD mode to Off, and use your iPod's controls or remote controller to select and start the slideshow or video.


natural_image
Pure geometric diagram with intersecting lines and a central circular pattern (no text or symbols)
DS-A2_En.book Page 15 Friday, July 7, 2006 9:24 AM

natural_image
Pure geometric diagram with intersecting lines and circular shapes, no text or symbols presentSpecifications
Power supply: AC adapter (12 V DC)
Power consumption (iPod not inserted):
North American model: 0.9 W
Other models: 1.1 W
Weight: 0.51 lbs. (230 g)
Dimensions (W x H x D): 4-7/16 x 2-3/8 x 4-7/16 inches
112×60×112mm
Connectors: VIDEO OUT, AUDIO OUT L/R,
RI jack
Specifications and features are subject to change without notice.
In catalogs and on packaging, the letter at the end of the product name indicates the color. Specifications and operation are the same regardless of color.
- T he operating instructions in this manual apply to the iPod as of July 2006, and may change with future upgrades to the iPod software.
- T he AC adapter supplied with the RI Dock is designed exclusively for use with the RI Dock. Do not use it with another device. Likewise, do not use any other AC adapter with the RI Dock. Doing so may damage the RI Dock.
- If there's any noise when listening to an FM or AM radio station on your tuner or receiver, try moving its antenna away from the RI Dock, iPod, and AC adapter's cable. In addition, don't wrap the AC adapter's cable around any other cables.


15


natural_image
Pure geometric diagram with concentric circles and radial lines, no text or symbols present
DS-A2_En.book Page 16 Friday, July 7, 2006 9:24 AM

natural_image
Pure geometric diagram with intersecting lines and circular shapes, no text or symbols present
ONKYO CORPORATION
Sales & Product Planning Div. : 2-1, Nisshin-cho, Neyagawa-shi, OSAKA 572-8540, JAPAN Tel: 072-831-8023 Fax: 072-831-8124
Suite 1, Gregories Court, Gregories Road, Beaconsfield, Buckinghamshire, HP9 1HQ. UNITED KINGDOM Tel: +44-(0)1494-681515 Fax: +44(0)-1494-680452

ONKYO CHINA LIMITED
Unit 1&12, 9/F, Ever Gain PlazaTower 1, 88, Container Port Road, Kwai Chung, N.T., HONG KONG Tel: 852-2429-3118 Fax: 852-2428-9039 http://www.ch.onkyo.com/
10607-1
SN 29344254
(C) Copyright 2006 ONKYO CORPORATION Japan. All rights reserved.


natural_image
Pure electrical circuit lines without any symbols
natural_image
Pure geometric diagram with intersecting lines and symbols (no text or labels)Onkyo Remote Controller Compatibility
The RI Dock can be used with any Onkyo remote controller that has the capability to control an Onkyo RI cassette tape deck, MD recorder, CD recorder, or RI Dock. This type of remote controller is supplied with Rcompatible Onkyo AV receivers and separate collection amps and receivers. See your receiver's or amp's instruction manual for more information. The following table shows which Functions are supported by Onkyo AV receivers.
| Model | TAPE MD CDR HDD/DOCK | ||||
| Basic RI functions Advanced RI functions | |||||
| Play, Stop, Next, Previous, Volume | Auto Power On/Off, Direct Change | Play, Stop, Next, Previous, Volume, Auto Power On/Off, Direct Change, Shuffle, Repeat, Playlist | |||
| TX-LRS52, DW-S500, NC-500 | X | ||||
| TX-DS777, TX-DS989, TX-8211, TX-8511, TX-8011, TX-2100, A-9211 | √ | X | |||
| AV receivers:TX-DS494, TX-DS595, TX-DS696,TX-DS797, TX-DS898, TX-SR302,TX-SR303, TX-SR401, TX-SR402,TX-SR500, TX-SR501, TX-SR600,TX-SR601, TX-SR700, TX-SR701,TX-SR800, TX-SR900DVD receivers:DR-S2.0, DR-2000HTiB:HT-S570, HT-S580, HT-S650, HT-S660,HT-S670, HT-S680, HT-S760Systems:CS-210, MC-35TECH, CR-305FX, CR-505,A-911, A-911LTD, A-911Mark2,A-911Mark2LTD | √ | X | |||
| AV receivers:TX-SR502, TX-SR602, TX-SR702DVD receivers:DR-S2.2, DR-L50HTiB:HT-S770, HT-S780, HT-S870, LS-V950,LS-V955Systems:A-905, A-905X, A-905TX, A-907X, A-909,A-909X, A-909LTD, R-801A, R-805TX,A-905TX, CR-305TX, CR-505,CR-505DAB | √ | X | |||
| AV receivers:TX-NR801, TX-NR901,TX-NR1000,TX-NR5000, TX-SR503, TX-SR603Systems:A-905FX, A-933, A-9755, A-9555 | √ | X | |||
| CS-315UK, A-9755, A-9555 | √X | √ | |||
| TX-8222, TX-8522AV receivers:TX-SR304, TX-SR504, TX-SR573,TX-SR574, TX-SR603X, TX-SR604,TX-SR653, TX-SR674, TX-SR703,TX-SR803, TX-SR804HTiB:HT-S590, HT-S790, HT-S890, HT-S894,HT-S907, HT-S990THXSystems:CS-V720, DR-UN7, DR-815, CR-N7,CS-315, CS-515, CS-715, CS-315UK,CR-515DAB, CR-715DAB | √ | ||||
SN 29355594
(C) Copyright 2006 ONKYO CORPORATION Japan. All rights reserved.
Printed in Japan
10607-1

* 2 9 3 5 5 5 9 4 *


natural_image
Pure geometric diagram with intersecting lines and symbols (no text or labels)- Remote Interactive Dock
- DS-A2
- Instruction Manual
- Contents
- WARNING:
- CAUTION:
- Important Safety Instructions
- Damage Requiring Service
- Precautions
- For U.S. models
- FCC Information for User CAUTION:
- NOTE:
- For Canadian Models
- Modèle canadien
- For European Models
- Getting Started
- About the RI Dock
- Features
- Package Contents
- Compatible iPods
- ■ Made for:
- Getting Started—Continued
- Remote Controller
- ① SETUP button
- ② MODE button
- ③ MENU button
- ④ Play/Pause [▶] button
- ⑤ Previous and Next [ɪ/ɪ] buttons
- ⑥ SHUFFLE button
- ⑦ PLAYLIST/PAGE MODE [A/[] buttons
- ⑧ ALBUM/PAGE [1/[] buttons
- ⑨ RESUME button
- ⑩ SELECT button
- ⑪ Up and Down arrow [1/[] buttons
- ⑫ REPEAT button
- ⑬ VOLUME [V[ ] buttons
- Replacing the Battery
- Notes:
- Aiming the Remote Controller
- Hooking Up the RI Dock
- Using the RI Dock
- Setting the OSD Mode
- 3rd generation iPod:
- Controlling Your iPod without the OSD
- Controlling Your iPod with the OSD
- ■ Playing Songs
- Using the RI Dock—Continued
- ■ Using the Page Modes
- Repeat modesShuffle modes
- ■ Resume Function
- ■ Song Shuffle
- ■ Now Playing
- TV Display Settings
- ■ Background Color
- Screen Saver
- Setting the TV System
- Other Functions
- ■ Functions
- - System On Function 1
- - System Off Function
- • A uto Power On Function 2
- - D irect Change Function 2
- - TimerPlay 1
- • U sing Your Amp's Remote Controller
- Operating Notes:
- ■ Using Your iPod's Alarm Clock
- ■ Charging Your iPod's Battery
- Setting the Remote Controller's ID
- Using Your Amp's Remote Controller
- Troubleshooting
- There's no sound
- ■ The RI Dock's remote controller doesn't control your iPod
- ■ Your amp's remote controller doesn't control your iPod
- ■ The onscreen display doesn't appear on your TV
- ■ To watch an iPod slideshow or video on TV:
- Specifications
- ONKYO CORPORATION
- ONKYO CHINA LIMITED
- Onkyo Remote Controller Compatibility
Brand : ONKYO
Model : DS-A2
Category : Car Mount