
BRP-430 - Blu-ray player LENCO - Free user manual and instructions
Find the device manual for free BRP-430 LENCO in PDF.


| Product Type | Blu-ray Player |
| Model | BRP-430 |
| Brand | Lenco |
| Dimensions (W x D x H) | 280 mm x 200 mm x 50 mm |
| Weight | 1.5 kg |
| Power Supply | AC 100-240V, 50/60 Hz |
| Power Consumption | 20 W (max), < 0.5 W standby |
| Disc Types Supported | BD-ROM, BD-R/RE, DVD-Video, DVD±R/RW, CD-DA, CD-R/RW |
| Video Outputs | HDMI 1.4 (1080p upscale), Composite RCA |
| Audio Outputs | HDMI, Optical, Coaxial, Analog Stereo |
| USB Port | 1 x USB 2.0 (front) for media playback |
| Supported Video Formats | MPEG-2, MPEG-4, H.264, VC-1, AVCHD |
| Supported Audio Formats | Dolby Digital, DTS, MP3, WMA, AAC |
| Supported Photo Formats | JPEG, PNG, BMP |
| Remote Control | Infrared remote with battery (CR2025) |
| Parental Control | Yes (disc rating and password) |
| Firmware Update | Via USB or disc |
| Care and Cleaning | Use a soft dry cloth; avoid liquids and abrasives |
| Safety Features | Overheat protection, auto power-off after 30 min idle |
| Spare Parts Availability | Remote control, power cord (standard) |
Frequently Asked Questions - BRP-430 LENCO
User questions about BRP-430 LENCO
0 question about this device. Answer the ones you know or ask your own.
Ask a new question about this device
Download the instructions for your Blu-ray player in PDF format for free! Find your manual BRP-430 - LENCO and take your electronic device back in hand. On this page are published all the documents necessary for the use of your device. BRP-430 by LENCO.
USER MANUAL BRP-430 LENCO
Please read this User Manual carefully to ensure proper use of this product and keep this manual for future reference.
Content
Important Safety Instructions 2
- Overview 3
- Front Panel and Rear Panel Illustration 4
- Output Illustration 7
- Remote Control 9
- System Setting 11
- Audio, Video, Picture files on disk or USB devices 15
- BD-Live Operation 20
- Trouble shooting 22
- Specifications 23
Important Safety Instructions
1) Read these instructions.
2) Keep these instructions.
3) Heed all warnings.
4) Follow all instructions.
5) Do not use this apparatus near water.
6) Clean only with dry cloth.
7) Do not block any ventilation openings, install in accordance with the instructions.
8) Do not install near any heat sources such as radiators, heat registers, stoves, or other apparatus (including amplifiers) that produce heat.
9) Do not defeat the safety purpose of the polarized plug. If the provided plug does not fit into your outlet, consult an electrician for replacement of the obsolete outlet.
10) Protect the power cord from being walked on or pinched particularly at plugs, convenience receptacles, and the point where they exit from the apparatus.
11) Only use attachments/accessories specified by the manufacturer.
12) Unplug this apparatus during lightening storms or when unused for long periods of time.
13) Refer all servicing to qualified service personnel. Servicing is required when the apparatus has been damaged in any way, such as power-supply cord or plug is damaged, liquid has been spilled or objects have fallen into the apparatus, the apparatus has been exposed to rain or moisture, does not operate normally, or has been dropped.
14) Mains plug is used as the disconnect device, the disconnect device shall remain readily operable.
15) The ventilation should not be impeded by covering the ventilation openings with items, such as newspapers, table-cloth, curtains, etc.
16) No naked flame sources, such as lighted candles, should be placed on the apparatus.
17) Attention should be drawn to the environmental aspects of battery disposal.
18) The use of apparatus in moderate climate.
19) Portable Cart Warning
A product and cart combination should be moved with care. Quick stop, excessive force, and uneven surface may cause the product and cart combination to overturn.

(Symbol provided by RETAC)
WARNING: To reduce the risk of fire or electric shock, do not expose this apparatus to rain or moisture.
WARNING: The batteries must not be exposed to excessive heat such as sunshine, fire or the like.

The symbol indicates that dangerous voltages constituting a risk of electric shock are present within this unit.

The symbol indicates that there are important operating and maintenance instructions in the literature accompanying this unit.

This symbol indicates that this product incorporates double insulation between hazardous main voltage and user accessible parts. When servicing use only identical replacement parts.
1. OVERVIEW
This BD player has the capability of providing high-definition, cinema-like pictures and multi-channel audio. Soundtracks in more than one language are usually included on the disk, and subtitles in more languages are often included as well.
1.1 PLAYABLE DISK TYPES
The following types of disks can play in the REF player:
| Blu-Ray^TMDisks |  | DVD-RW |  |
| DVD Video Disks (DVD-ROM) |  | DVD-R |  |
| Audio CDs (CDDA) |  | DTS-CD | |
| DVD-RAM |  | MP3/WMA/JPEG Data CD | |
| VCD | SVCD |
NOTES:
For writeable DVD-RAsMs (DVD-RW, DVD-R)
- Only DVD-RAM/-RW/-R recorded with UDF or ISO9660 format can be played back.
- The disks must be finalized, VR-mode only
- This Blu-ray disk player supports DVD disks that are compatible with DVD-RAM Standard Version 2.0.
- Playback may not work for some types of disks, or when specific operations, such as angle change and aspect ratio adjustment, are being performed. Information about the disks is written in detail on the box. Please refer to this if necessary.
- Some DVD-VR disks will be playable but not all features are available.
For writeable CD disks
- Only CD-R/-RW media recorded with UDF or ISO9660 format can be played, and they must be finalized.
1.2 REGION CODE
If the Region number of a BD or DVD disk does not correspond to the region number of this Blu-ray disk player, the BD player cannot play the disk. The region code is printed on the rear panel of the BDPlayer.
2. Front Panel and Rear Panel Illustration
2.1 Front panel
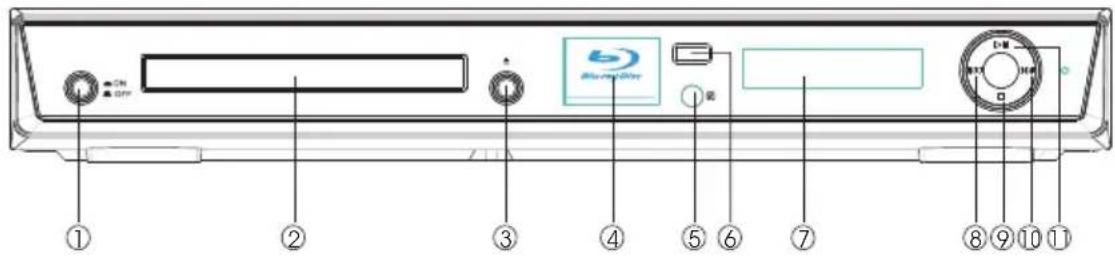
① POWER
⑤ SENSOR
⑨ STOP BUTTON
② CABIN DOOR
⑥ USB
⑩ NEXT BUTTON
③ OPEN/CLOSE BUTTON
⑦ DISPLAY
⑪ PLAY/PAUSE BUTTON
④ BD LIGHT
⑧ PREV BUTTON
2.2 Rear panel(2CH Audio output)
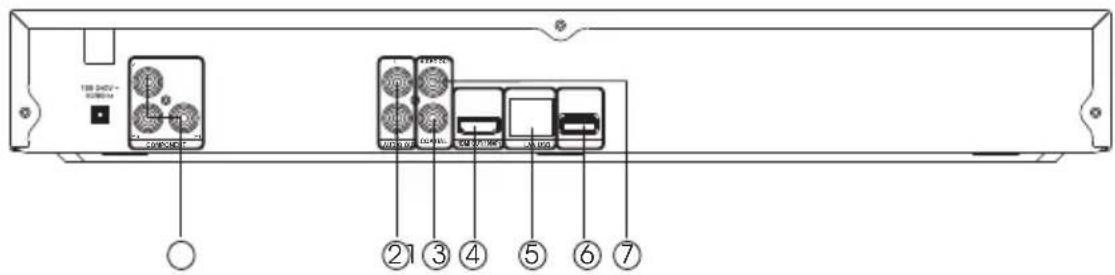
① Component Video output (Y, Pb, Pr)
⑤ LAN
② 2 CH Audio output(L,R)
⑥ USB 2.0
③ Digital Audio COAXIAL output
⑦ Composite VIDEO output
④ HDMI output
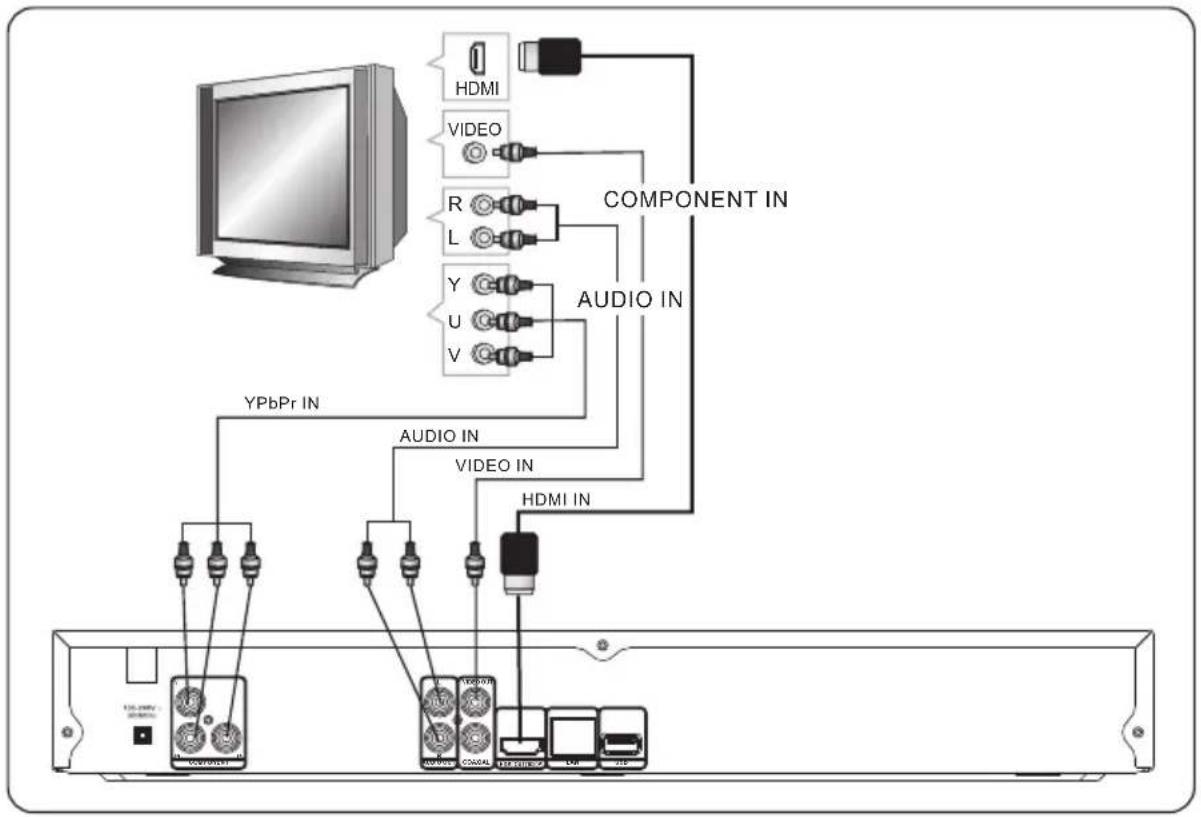
2.3 TV Set Connections
flowchart
graph TD
    A["Monitor"] --> B["HDMI"]
    A --> C["VIDEO"]
    A --> D["R"]
    A --> E["L"]
    A --> F["Y"]
    A --> G["U"]
    A --> H["V"]
    B --> I["AUDIO IN"]
    C --> J["COMPONENT IN"]
    D --> K["VIDEO IN"]
    E --> L["VIDEO IN"]
    F --> M["VIDEO IN"]
    G --> N["VIDEO IN"]
    H --> O["VIDEO IN"]
    P["HDMI IN"] --> Q["HDMI"]
    R["YPbPr IN"] --> S["HDMI"]
    T["ACI HDMI / ACI In"] --> U["ACI HDMI / ACI In"]
2.3.1 CONNECT BD PLAYER TO TV SET BY AV CABLE
Connect the BD player's FL and FR jack to the audio input jack on the TV. Connect the BD player's video out jack to the video input jack of TV.
2.3.2 CONNECT THE BD PLAYER TO TV SET USING THE Y/Pb/Pr JACKS
Use the COMPONENT Cable(not supplied) to connect BD player to your TV. Connect the BD player's Audio output L and R jack to the audio input jack on the TV.
2.3.3 CONNECT THE BD PLAYER TO TV SET USING THE HDMI OUTPUT
Use the HDMI cable (not supplied) to connect BD player to your TV.
Notes: The player supports video resolution up to 1080p 60Hz on HDMI output.
2.3.3 Connecting to an AV Amplifier with Digital Audio Input
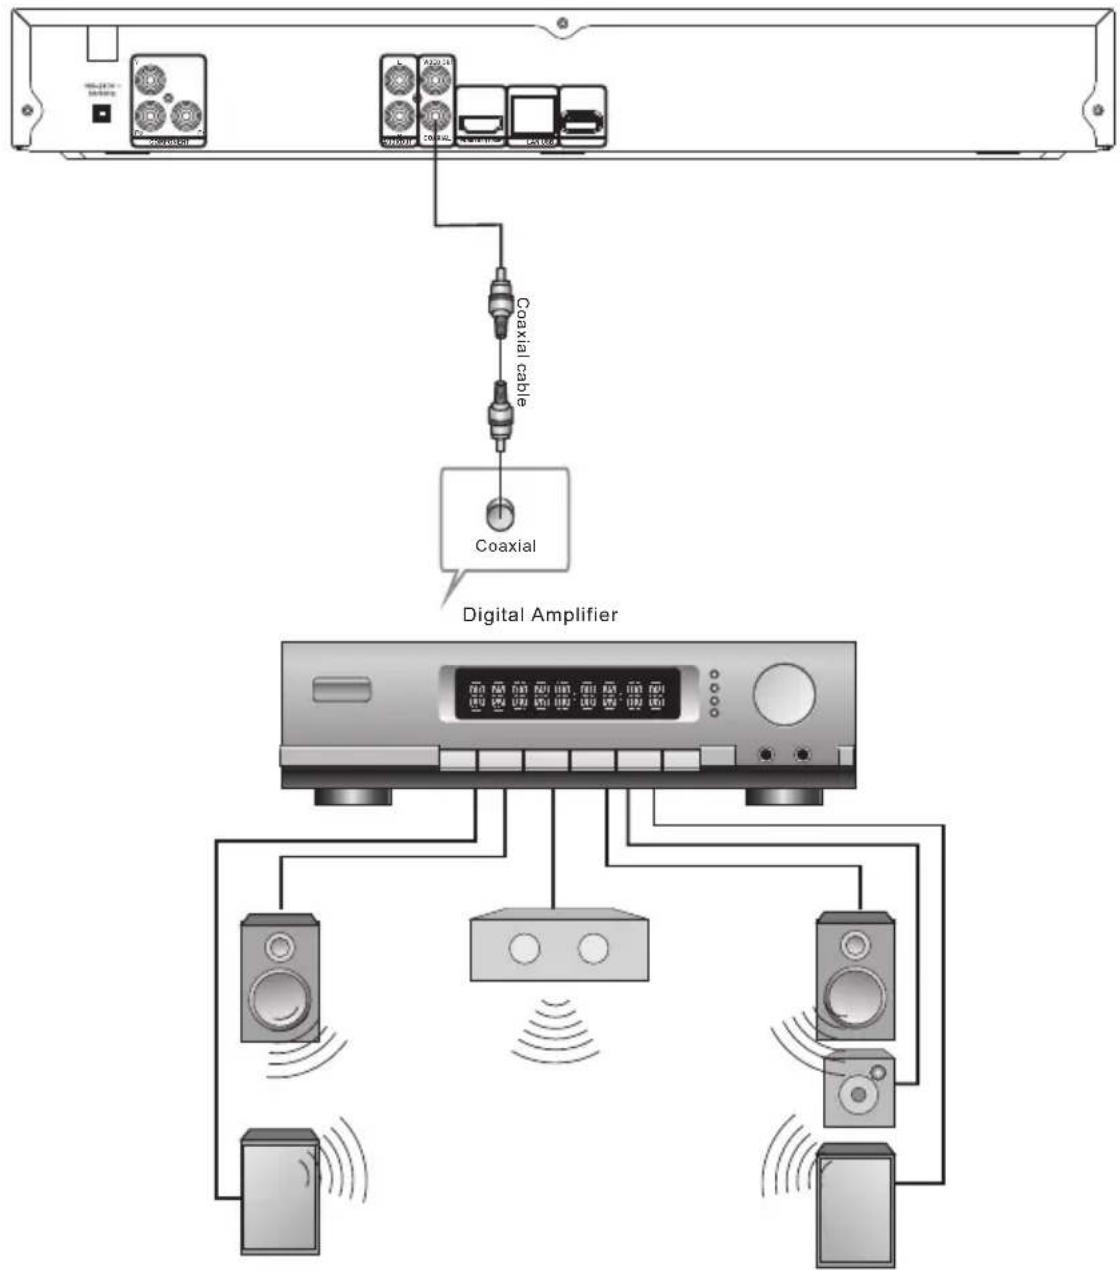
Notes:
- Select the Coaxial digital audio output.
- Set the digital Amplifier to the AV input connected to the BD player.
3. Output Illustration
3.1 Video Output Capabilities
Each of the video outputs are capable of different levels of functionality, as described in the table below. Actual output will depend on setup menu settings and TV capabilities for HDMI televisions.
| BD Player Video Output | Resolutions Supported (NTSC Models) | Resolutions Supported (PAL Models) |
| HDMI | 1080p 60/50/30/25/241080i 60720p 60/30/24420p 60/30/24480i | 1080p 60/50/30/25/241080i 50720p 50/30/24576p 60/30/24576i 50 |
| Component Video | 1080i 60/48720p 60/30/24576p 60/30/24480p 60/30/24NTSC SD (480i) | 1080i 60/48720p 60/30/24576p 60/30/24480p 60/30/24PAL SD (576i) |
| Composite Videov | NTSC SD (480i) | PAL SD (576i) |
3.2 Audio Output Capabilities
Each of the audio outputs are capable of different levels of functionality, as described in the table below. Actual output will depend on
- BD player setup menu settings,
- What types of audio tracks are encoded on the disk, and,
- Surround sound receiver capabilities (for BD players connected to a surround-sound system through HDMI or SPDIF)
| BD PlayerAudio Output | Audio tracks that can be sent directly to output |
| HDMI | Dolby TrueHDDolby Digital PlusDTS-HD High-Resolution AudioDolby DigitalDTSPCM (From mono up to 7.1 |
| SPDIF | Dolby DigitalDTSPCM (stereo only, up to 96 Khz) |
channels
@96
3.3 Connectors Description
3..3.1 SPDIF Digital Audio Output audio output
The SPDIF output is a digital audio output. If you have a surround-sound receiver with a SPDIF (coaxial) input, connect this output to the coaxial input of the surround sound receiver.
3.3.2. Stereo Audio Outputs
These are analog, "old fashioned" stereo (left/right) outputs. If your TV does not have an HDMI input, you can connect these outputs to the stereo audio inputs of a TV.
3.3.3. Composite Video
If your TV does not have component or HDMI video inputs, connect this output to the composite video input of the television.
3.3.4. HDMI 1.3 Audio/Video Output
If you are using a surround-sound audio receiver with an HDMI input, connect the HDMI output of the BD player to the HDMI input of the audio receiver. (You will need to connect a second HDMI cable from the HDMI output of the audio receiver to the HDMI input of the television)
If your surround-sound audio receiver does not have an HDMI input (or if you are not using a surround- sound receiver), connect this output directly to the HDMI input of the TV. One of the other audio outputs can be connected to the audio receiver.
3.3.5. Ethernet Connector
For BD-Live only, use an Ethernet cable to connect this connector to access Ethernet while playing BD-Live disk.
3.3.6. USB 2.0 Connector
Used for external USB memory access, play supported audio/video files on USB memory or store download content into USB memory for BD-Live
4. Remote Control
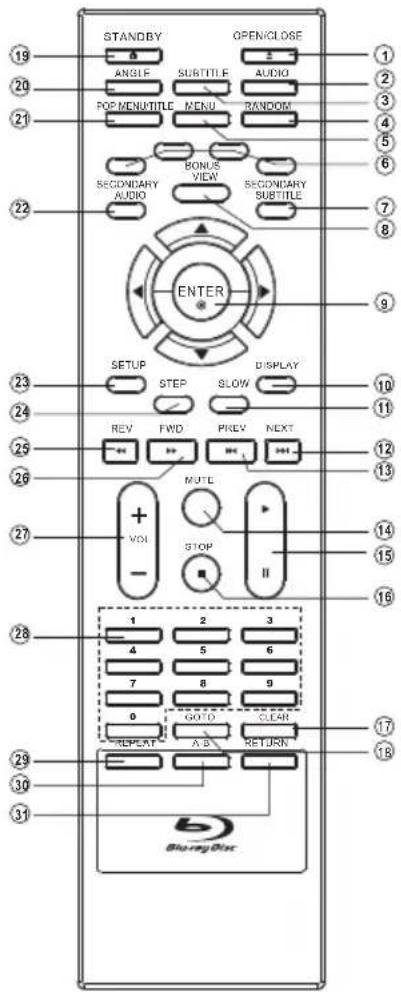
1.Open/Close
Press this button to open/close the disk tray.
2.Audio
This key is used to cycle through the movie audio soundtracks available on the disk. (Not available on all disks).
3. Subtitle
This key can be used to enable/disable subtitles during BD/DVD playback. If the disk has more than one subtitle language, it can also be used to cycle through the subtitle languages.
4.Random
Used for random playback of audio files on disk. (Not available on all disks).
5.Menu
Pressing this key will immediately stop playback, and bring up the main or 'top' menu of the BD or DVD disk. (Not available on all disks) In the main menu, you can typically choose subtitle language, audio track, or different scene etc.
6.Colour Keys
The red, green, yellow, and blue keys are used to implement disk-specific features on some BD disks. (Not available on all disks).
7. Secondary Subtitle
Used to bring up the subtitle (if available) for the picture-in-picture (director's commentary, etc) on a BD title. If the disk has more than one director's commentary subtitle language, it can also be used to cycle through the subtitle languages. (Not available on all disks).
8.Bonus View
On BD disks, this button is used to turn the video portion of the director's commentary (picture-in-a-picture) on and off. (Not available on all disks).
Note: Director's commentary must have been turned on in the BD's main menu in order for this key to work.
9.Menu Navigation Keys
These keys are used when navigating the menus on BD and DVDs. They are also used for navigating the setup menus for the BD player.
10.DISPLAY
Press this button to show current play status and time information.
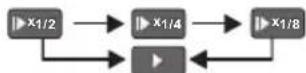
11.SLOW
Pressing this button will cause the video to be played at 1/2, 1/4, 1/8 speed.
12.NEXT
Press this button to play next title, chapter, track or file if valid.
13.PREV
Press this button to play previous title, chapter, track or file if valid.
14.MUTE
Pressing this button to avoid audio output, pressing the MUTE button again will resume audio output. ✕ Mute ▼ Mute Off
15.Play/Pause
Pressing the bottom of this button will pause audio and video playback. Pressing the top of this button will resume playback.
16.STOP
This button stops playback of a BD/DVD movie or files on disk.
17. CLEAR
When entering numeric values via the numeric keypad, this button is used to clear a number entered incorrectly.
18.GOTO
This button is used with the numeric keypad to jump to a specific track on an audio CD.
19. STANDBY
Press the STANDBY button to turn the BD player on or off.
Note: Press STANDBY key during system (about 20s) startup will be no effect.
Press STANDBY key during system is on, system will enter low power standby mode in about 6s.
20.Angle
Some BD and DVDs are filmed with more than one camera angle. During playback of such a disk, pressing this button will allow you to switch camera angles. (Not available on all disks)
21.Pop Menu/Title
On BD disks only, this button can be used to bring up the main movie menu. (Not available on all disks).
22. Secondary Audio
On BD disks equipped with multiple director's commentaries in several languages, pressing this key will cycle through all of the languages available for the director's commentaries. (Not available on all disks).
23. Setup
Bring out the settings menu of the BD player. This key will not work during disk play-back
24. Step
Pressing this button will play movie by one frame.
25.Fast Reverse
Used to "Fast Reverse" during content playback.
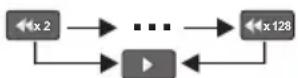
26.Fast Forward
Used to "Fast Forward" during content playback.
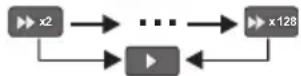
27.Volume
Pressing the top (+) half of this button will increase the volume of the BD player's audio output. Pressing the bottom (-) half of this button will decrease the volume of the BD player's audio output.
28.Numeric Keypad
These buttons are used with the GOTO button to jump to specific title/chapter (track) or time.
29.REPEAT
This button is used to cycle through the possible "repeat" modes based on content played.
BD/DVD or video files on disk:

CDDA or audio Files on disk:
30.A-B
When a disk is playing, pressing this button once will save a "start point" for repeating playback. Pressing this button again to select a "end point" then playback will repeat from the start point to the end point.
31. Return
When navigating files on a data CD or USB stick, pressing this button will return you to the previous folder or menu.
5. System Setting
Press SETUP button under stop status or press RIGHT button in main menu. System will bring out setting menu as below picture:
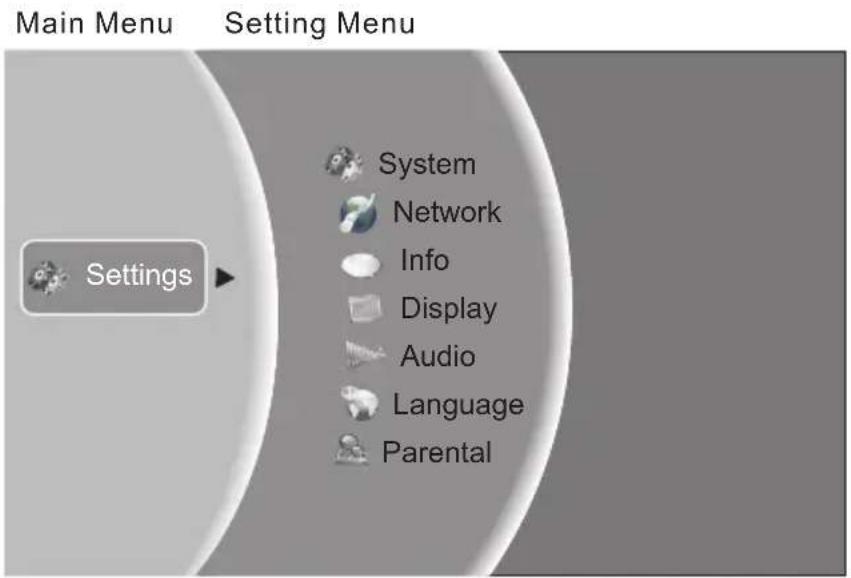
5.1Language
5.1.1 OSD: set language.
5.1.2 Menu: set language used for BD\DVD menu (not available on all disk).
5.1.3 Audio: select audio language for BD\DVD disk (not available on all disk).
5.1.4 Menu: select subtitle language used for BD\DVD disk (not available on all disk).
5.2Display
5.2.1 TV Type: Select to output NTSC or PAL video format.
5.2.2 Resolution: Set maximum resolution of your TV here to get best video quantity, if you are not sure, please use HDMI Auto, system will read the preferred resolution your TV supported via EDID.
5.2.3 TV Aspect: Select right video ratio based on your TV. (Refer to below table)
Note: Aspect setting only effect HDMI and component output, and 4:3 setting has no effect if resolution has been set to 720p or 1080i or 1080p).
| TV Aspect Menu Selection | ||||
| If your TV is more rectangular (16:9), choose: | If your TV is more square (4:3), choose: | |||
| 16:9 Full | 16:9 Pillarboxed | 4:3 Letterboxed | 4:3 Pan Scan | |
| Disk Contents | ||||
| Movie in widescreen format | Movie will fill entire screen | No effect - Movie will fill entire screen | Movie will be shown in rectangular "wide" aspect ratio (Horizontal bars will be shown above/below movie) | Center of movie will be shown on TV. Left and right portion of movie contents will not be shown |
| HD television episodes in widescreen format | Episode will fill entire screen | No effect - Episode will fill entire screen | Episode will be shown in rectangular "wide" aspect ratio (Horizontal bars will be shown above/below movie) | Center of episode will be shown on TV. Left and right portion of episode contents will not be shown |
| SD (4:3) television episodes | Episode will be stretched horizontally to fit entire screen | Episode will be shown in center of screen; vertical bars will appear on sides of screen | No effect - Epiode will fill entire screen | No effect - Epiode will fill entire screen |
| Cropped Movie (Movie put on disk in 4:3 Aspect Ratio) | Movie will be stretched horizontally to fit entire screen | Movie will be shown in center of screen; vertical bars will appear on sides of screen | No effect - Cropped movie will fill entire screen | No effect - cropped movie will fill entire screen |
Note:4:3PS and 4:3LB only valid under SD mode (resolution is 480p/576p or 480i/576i).
5.2.4 Film Mode: system will output 1080p 24Hz if this item is set to ON and disk movies are recorded on film at rate of 24 frames per second.
Note: this item only effect when Resolution is set to 1080p, and make sure your TV can support 1080P24Hz mode.
5.3 Audio
5.3.1 PCM Downsampling: select right bitrate for PCM signal to ensure your SPDIF receiver can handle it correctly. It's no effect for HDMI digital audio output.
5.3.2 Digital Output:
If you only have two speakers, set PCM stereo.
If you connect receiver with more than two speakers, please refer to below tables:
| Receiver Capabilities | |||
| Can decode DTS | Can decode Dolby Digital | Can decode Dolby Digital Plus | |
| I want the highest-fidelity audio movie soundtrack possible | Set to ‘Bistream Legacy’ for disks with DTS soundtracks. | Set to ‘Bistream Legacy’for disks with Dolby digital soundtracks.Set to PCM 5.1 or PCM 7.1 for disks without Dolby sound tracks (depending on the number of speakers connected to your surround receiver) | Set to ‘Bistream Legacy’fo disks with DD+ soundtracks.Set to PCM 5.1 or PCM 7.1 for disks without Dolby Digital plus sound tracks (depending on the number of speakers connected to your surround receiver) |
| I want to hear the directors commentary on the BD disk-OR-I want to set this menu item once and then forget it | Set the output to ‘Bistream Mixed’ | Set to ‘Bistream mixed’ if your receiver also supports DTS.Otherwise, set the output to PCM 5.1 or PCM 7.1 (depending on the number of speakers connected to your surround receiver) instead. | |
| Receiver Capabilities | |||
| Can decode DTS-MA Essential | Can decode Dolby TrueHD | Can't decode DTS-HD or Dolby TrueHD | |
| I want the highest-fidelity movie soundtrack audio possible | Set to Passthru for disks with DTS-HD soundtracks.Set to DTS re-encode otherwise | Set to Passthru for disks with Dolby TrueHD soundtracks.Set to DTS re-encode otherwise | Go back to the table in question 5 to decide. |
| I want to hear the directors commentary on the BD disk--OR-I want to set this menu item once and then forget it | Set the output to DTS re-encode | ||
5.3.3 Dynamic Range Control: means that you can allow the BD player to make the loud parts of amovie's audio track quieter than they would be in the theatre, without making the dialog of theactors any quieter. (It effects on analog audio output and digital output should be set to PCM or Bitstream Mixed).
5.4 System
5.4.1 Optical Disc Auto Play: This option is used to tell the BD player whether or not to start loading the main title menu of a disk as soon as the disk tray is closed.
5.4.2 BD-Live Internet Access: Control BD player accessing internet
Limit access : Only allow the inserted Blu-Ray disk to download content from a BD-Live website which has a valid online certificate. This will reduce the chances of downloading malicious content onto the player.
Always allow access: Allow the BD the inserted Blu-Ray disk to access content from all BD-Live internet sites whose internet address is encoded onto the disk. There is no danger of malicious code download from valid commercial BD disks, but choosing this option and downloading BD-live content via illegally authored BD disks, or disks obtained from questionable sources, could result in malicious code being downloaded onto the player.
Prohibit access : Blocks the inserted Blu-Ray disk from accessing BD-Live content over the internet.
5.4.3 BD-Live Storage:
Show BD-Live storage information, select storage device to clear Blu-ray storage.
5.4.4 Screen Saver Duration:
This BD player will activate a setting mode by video output (TV will go "B" after certain period of time set by this item when system is playing music file or in stop/fullstop mode.
5.4.5 CEC support:
Set this item to enable/disable CEC:
The CEC feature is designed to allow CEC-enabled devices to command and control each other without user intervention. For example: If your TV is also CEC-enabled and you will turn off your TV, the Blu-Ray player will get a CEC signal and turn off automatically. Or if you turn on your Blu-Ray player, your TV will automatically turn on and switch to HDMI input.
Note: Not every CEC-Enabled unit is compatible with the BRP-430 or otherwise.
5.4.6 Reset Settings:
Reset all settings to factory default (Parental Control level will not be reset).
5.5 Network
Press "ENTER" button when the item is highlighted, then select "WIRED" to config network:
5.5.1 Link Status:
Show if ethernet cable is connected to BD player.
5.5.2 MAC Address
Show MAC address of this BD player.
5.5.3 IP Mode
Choose IP mode here for internet access.C"Masing1" mode, 4.5.5 \~ 4.5.8 will be activated for user input, otherwise they are inactivated.
5.5.4 IP Address:
Show current IP address or access user input while in "Manual" IP mode.
5.5.5 Subnet Mask:
Show current Subnet Mask or access user input while in "Manual" IP mode.
5.5.6 Gateway:
Show current Gateway or access user input while in "Manual" IP mode.
5.5.7 Primary DNS:
Show current Primary DNS or access user input while in "Manual" IP mode.
5.5.8 Secondary DNS:
Show current Secondary DNS or access user input while in "Manual" IP mode.
Press ENTER key while Apply button is highlighted to activate setting you made, or press ENTER key while Cancel button is highlighted to cancel changes you made for network settings.
5.6 Info
This item shows software and hardware information for loader and main board, no changes are allowed.
5.7 Parental
5.7.1 Parental Country:
Use this menu item to tell the BD player what country you are in.(Currently this menu item has no effect)
5.7.2 Parental Control:
To turn parental control ON or OFF,
5.7.3 Parental Level:
To restrict playback of disks encoded with a rating level equal to or higher than the level you set. Parental Control must be turned on for this menu item to have an affect
5.7.4 Parental Password:
Change new password for Parental Control menu operation. (Default value is: 6666)
6. Audio, Video, Picture files on disk or USB devices
6.1 INTRODUCTION
This section explains how to play back PC-type audio, pictures, and video files that have been placed onto a disk or USB memory stick.
6.2 Supported Audio, Video, Picture files types
Video
• .MPEG4 (.mp4) files
- .m4v files
- .mkv files
Music:
- .mp3 files
- .wma files
.aac files
Picture:
- .jpeg files
• .Png files
6.3 Disk or USB devices preparation
6.3.1 CD-R/RW, DVD+/-R, DVD+/-RW, BD-R or BD-RE with supported files recorded in UDF or ISO9660 format (must be finalized) can be playback on this BD player.
6.3.2 USB device with supported files on it's FAT/FAT32 partition will be recognized.
6.4 Browsing video files
6.4.1 Select Videos icon in main menu which will appear after BD player read out disk or/and USB device. Press ENTER key while Video icon is highlighted, system will bring out a sub menu for file source selection.(Figure 5-1)
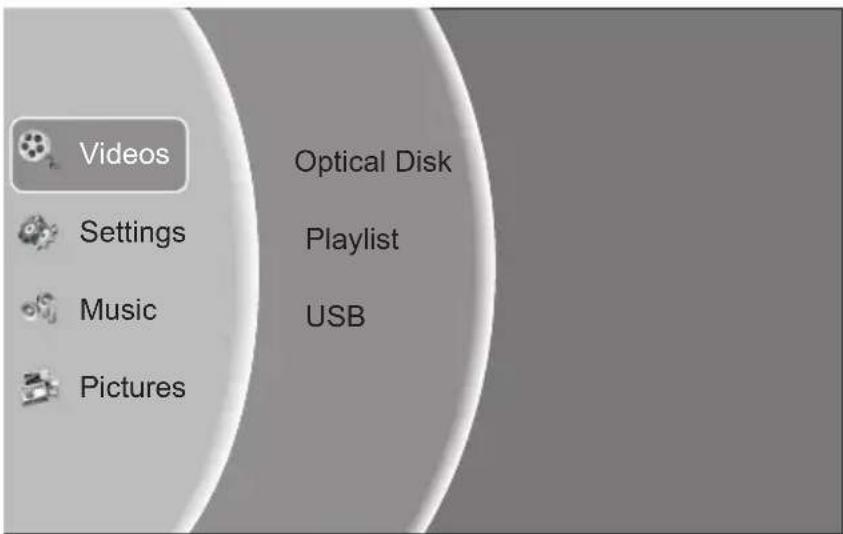
Figure 5-1 Video Media Selector
6.4.2 Select disk or USB to open a browser which allow you to view files on current disk/USB device, so you can choose any files you want to play.( Figure 5-2 )
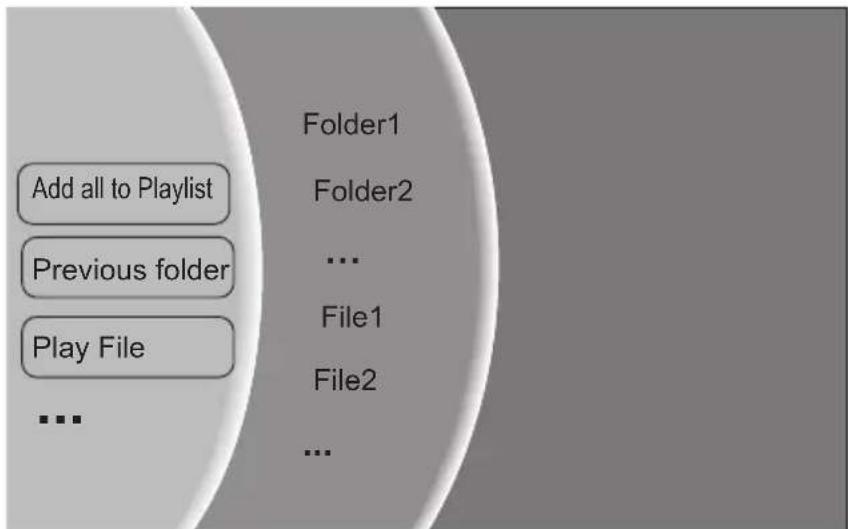
Figure 5-2 Video Browser Screen
6.5 Browsing Audio files
6.5.1 Select Music icon in main menu which will appear after BD player read out disk or /and USB device. Press ENTER key while Music icon is highlighted, system will bring out a sub menu for file source selection.(Figure 5-3)
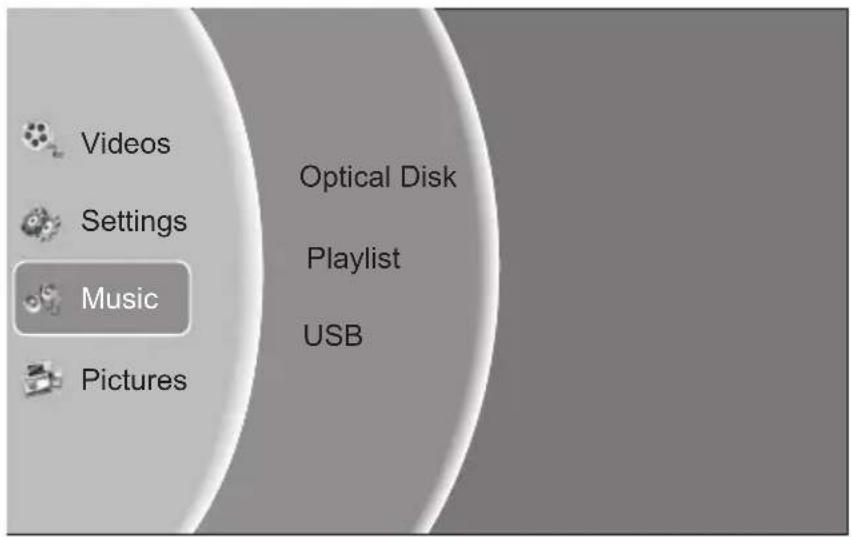
Figure 5-3 Audio Media Selector
6.5.2 Select disk or USB to open a browser which allow you to view files on current disk / USB device, so you can choose any files you want to play.(Figure 5-4)
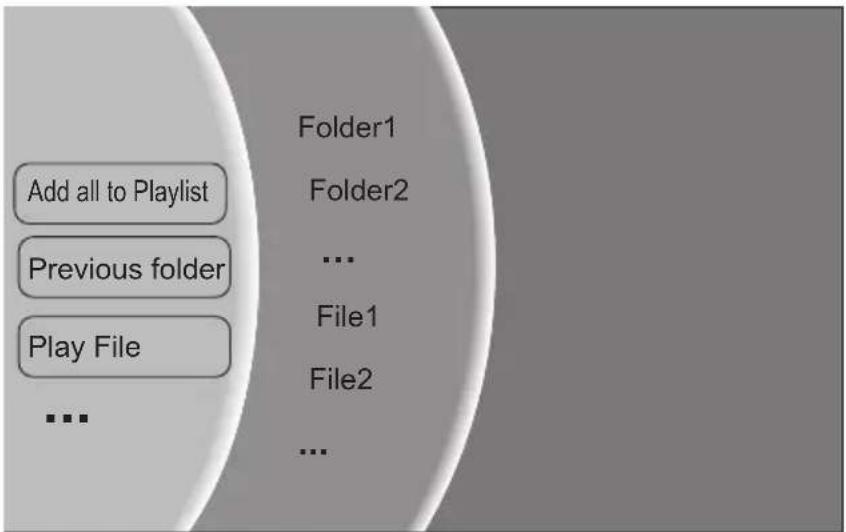
Figure 5-4 Audio Browser Screen
6.6 Browsing picture files
6.6.1 Select Pictures icon in main menu which will appear after BD player read out disk or/and USB device. Press ENTER key while Pictures icon is highlighted, system will bring out a sub menu for file source selection.(Figure 5-5)
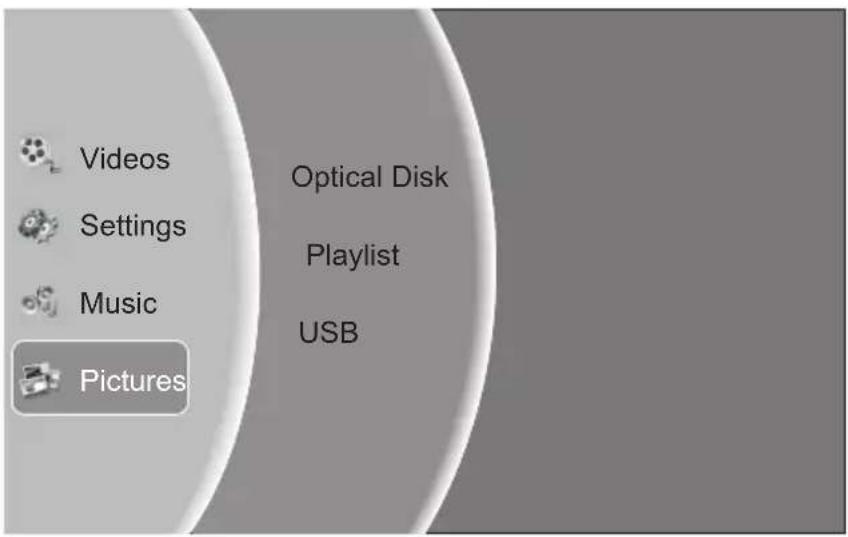
Figure 5-5 Picture Media Selector
6.6.2 Select disk or USB to open a browser which files you can view disk/USB device, so you can choose any files you want to play.(Figure 5-6)
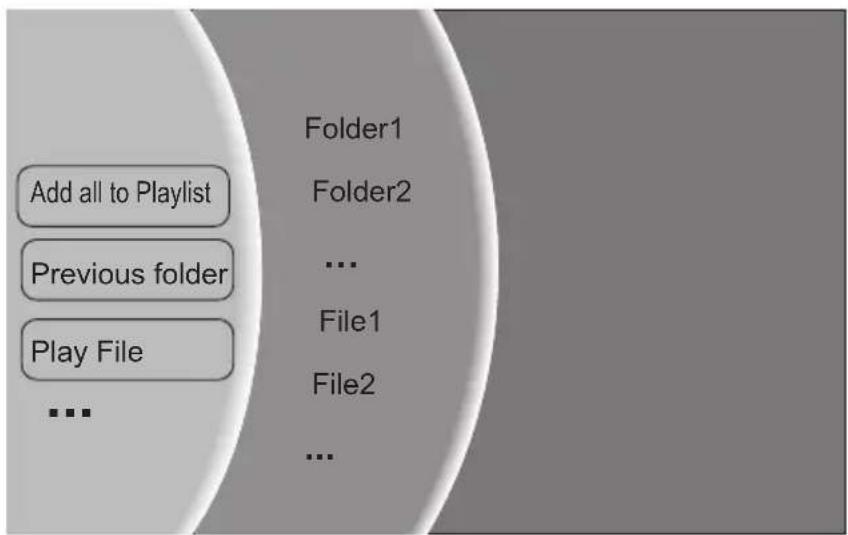
Figure 5-6 Picture Browser Screen
6.7 File playback
6.7.1 Refer to Figure 5-7, select "Play All" to play all selected type files on selected media, or select "Play Current Folder" to play all selected type files in current folder.
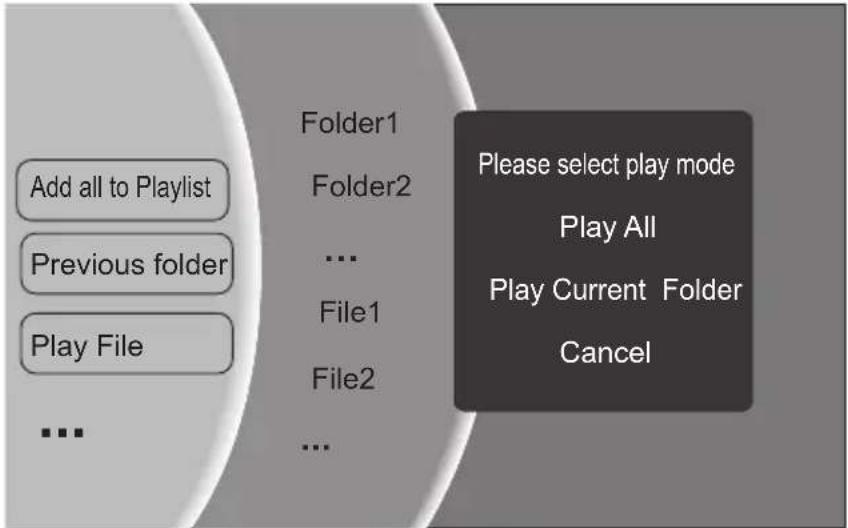
Figure 5-7 Multi-files operation
6.7.2 Also you can choose to play current highlighted file refer to Figure 5-8.
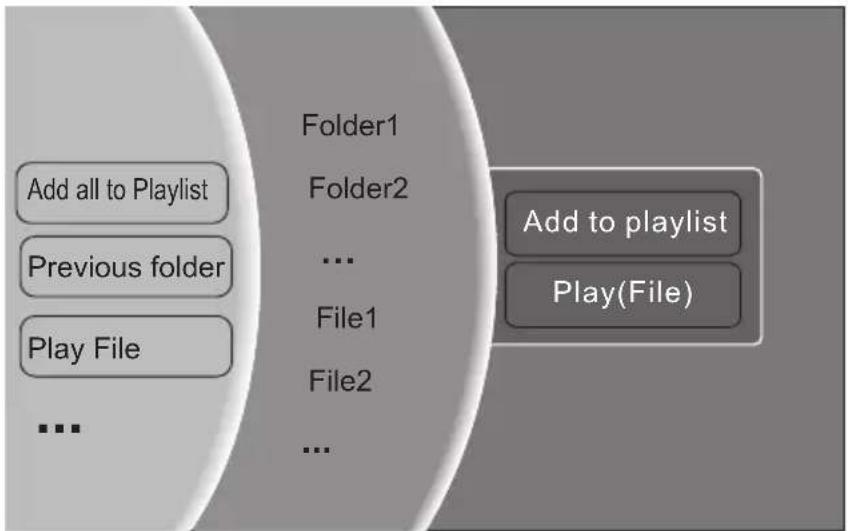
Figure 5-8 Single file operation
6.8 Creating Playlist and Playlist Playback
6.8.1 In file browser mode( refer to Figure 5-2, 5-4 and 5-6), press "ENTER" key while "Add All to Playlist" is highlighted and validated type files in current folder into playlist, or refer to Figure 5-8, choose "Add to playlist" icon and press ENTER and current highlighted file into playlist.
6.8.3 In Media Selector Menu(refer to Figure 5-1), you can choose "playlist" to play files in playlist.
7. BD-Live Operation
7.1 Description
Some (but certainly not all) BD disks contain additional features that are made available to players that are connected to the internet, and have additional memory added. These additional features may include things like
-the ability to download new movie trailers,
-additional 'commentary' by actors and directors,
-multiple play and chat
In order to access BD-Live functions, the player must be properly configured for BD-Live internet access, and it must be equipped with additional memory.
7.2 Adding external BD-live Memory to player
7.2.1 Obtain USB memory which has been formatted as FAT32.
7.2.2 Insert the USB memory stick into the USB slot on the player.
7.3 Setting BD-Live Internet Access Mode
7.3.1 In the BD Player's main setup menu, go to the 'Other" menu choice; Then, choose "BD-Live Internet Access". Be sure that "Limit Access" or "Always Allow Access" is checked.
7.3.2 Once the USB memory stick has been inserted, if there is not at least 100Mbyte of free space on the device, you should choose "Clear BD Storage" from the "Other" setup menu item
7.3.3 In the BD Player's main setup menu, go to the 'Network' menu choice; Then, choose "IP mode". Set up the Network IP addresses per your router's or ISPs recommendations
NOTE: The 'Connectivity Test' must pass, or you are not connected to the internet, and cannot access BD-Live Content on the web.
7.4 BD-Live Internet Access Example
7.4.1 Obtain a BD-Livedisk like
7.4.2 Select BD-Live option from Special Features Menu (or in some disk, you can see BD-Live option in main menu)
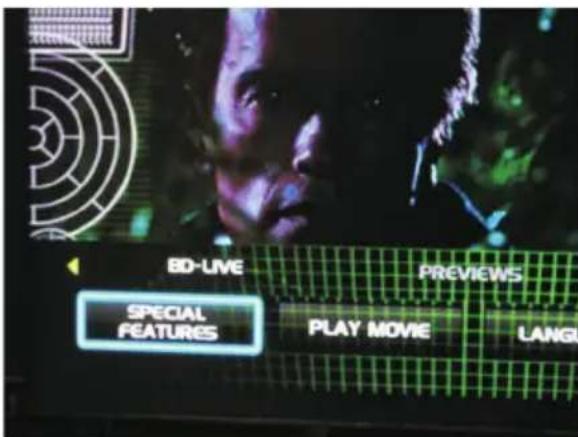
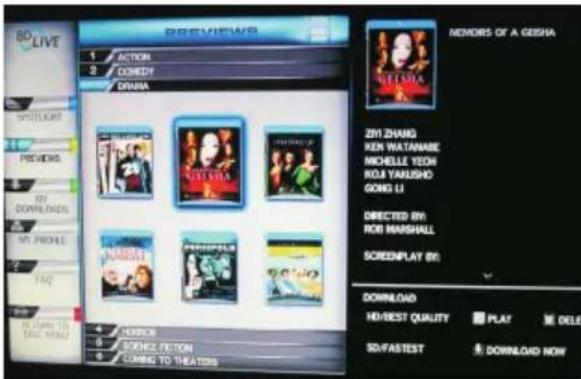
7.4.3 The player will connect to internet and show download menu as below picture. Note: This can take several minutes.
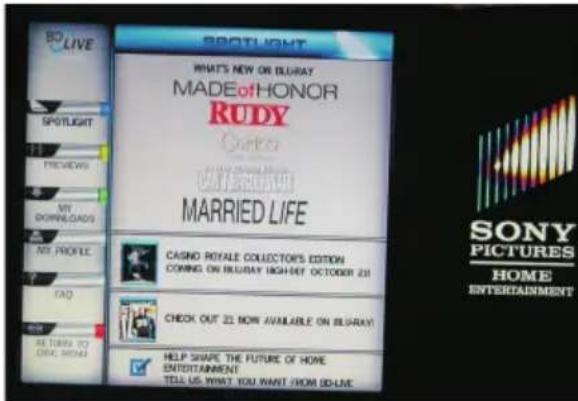
7.4.4 You can select the content to download from the Previews sub menu. Note: This can take several minutes.
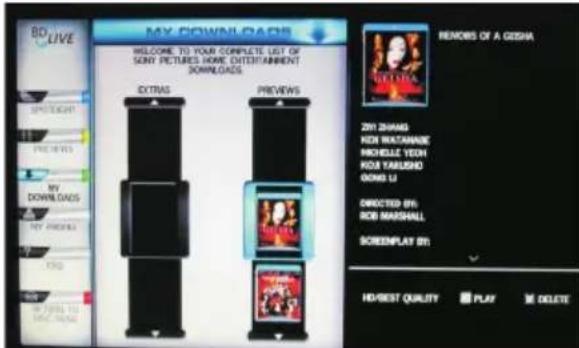
7.4.5 The downloaded content is stored under My Downloads. You can choose to either play back or delete the downloaded content
7.5 BD-Live Notes
7.5.1 This player only supports the connection of USB memory in order to store BD 2.0 downloaded content
7.5.2 Any externally connected device will be set as BD-Live storage and internal storage will be ignored in same time.
7.5.3 Some BD-Live content will be expired and not playable, user need to manually delete the contents in BD storage in order to free space.
8. Trouble shooting
If you have any questions, please consult the troubleshooting guide below.
NO PICTURE OR SOUND
- Ensure the power button is on.
- Ensure the power outlet is operational.
● Ensure the power cord is not damaged. - Ensure the power plug is connected firmly to the outlet.
REMOTE NOT WORKING
● Make sure the Main unit's POWER button is on.
● Ensure the remote batteries are working.
- Point the remote control directly at the player's IR sensor.
- Remove any obstacles between the remote and the IR sensor.
PICTURE BUT NO SOUND
● Ensure the audio jacks are securely connected.
● Ensure the audio connector is not damaged.
- Ensure you have set the player's AUDIO settings correctly.
- Ensure you have entered the correct AV input for your TV.
● Ensure the audio is not set to mute.
UNIT NOT WORKING
● Turn off the power, and then turn it on again.
SOUND BUT NO PICTURE
- Ensure the video jacks are securely connected.
- Ensure you have entered the correct AV input for your TV.
● Ensure the video connector is not damaged. - Ensure you have set the player's VIDEO settings correctly.
"NO DISC" DISPLAYED
● Ensure you have put the disc on the tray.
● Ensure the disc is not upside down.
● Ensure the disc is not distorted, stained or scratched.
POOR PICTURE OR SOUND
- Ensure you have set the player's AUDIO settings correctly.
● Ensure the disc is not scratched or stained. - Ensure the AV connector or the output terminal is not damaged.
9. Specifications
General
Power requirements: AC 100-240 Volt, 50/60Hz
Power consumption: 35W
Discs Compatibility:
BD, DVD, DVD+/-R/RW, VCD, CD-DA, CD-R/RW.
Video out
Video out: 1.0V(p-p)/75Ω, sync, negative polarity, RCA pin jack x 1, HDMI and YUV Component
Audio out
2 channel out: RCA pin jackx2
Coaxial out: 0.5V(p-p)75Ω, RCA pin Jack x I
Frequency response: 20Hz to 20kHz
S/N ratio:>90dB
Total harmonic distortion: <-65dB
[Accessories]
Remote Control x 1
Users Manual x 1
Specifications are subject to change without notice.
Weight and dimensions are approximate.
This product incorporates copyright protection technology that is protected by U.S. patents and other intellectual property rights. Use of this copyright protection technology must be authorized by Macrovision, and is intended for home and other limited viewing uses only unless otherwise by Macrovision. Reverse engineering or disassembly is prohibited.
Manufactured under license from Dolby Laboratories. Dolby and the double-D symbol are trade marks of Dolby Laboratories. Copyright 1992 -1997 Dolby Laboratories. All rights reserved.
This device complies with Part 15 of the FCC Rules. Operation is subject to the following two conditions:(1) this device may not cause harmful interference, and(2) this device must accept any interference received, including interference that may cause undesired operation.
Manufactured under license under U.S. Patent # s: 6,836,549; 6,381,747; 7,050,698; 6,516,132; and 5,583,936 & other U.S. and worldwide patents issued & pending. DTS is a registered trademark and the DTS logos, Symbol, DTS-HD and DTS-HD Advanced Digital Out are trademarks of DTS, Inc. ©1996-2008 DTS, Inc. All Rights Reserved.
![LENCO BRP-430 - [Accessories] - 1](/content/2026/05/1023834/images/2ec10c07c3d0fa1b09bcf966ef866fb16ea5a9fb44fa0b91424fc2946fb22c8c.jpg)
If at any time in the future you should need to dispose of this product please note that: Waste electrical products should not be disposed of with household waste. Please recycle where facilities exist. Check with your Local Authority or retailer for recycling advice. (Waste Electrical and Electronic Equipment Directive)
- Content
- Important Safety Instructions 2
- Important Safety Instructions
- OVERVIEW
- PLAYABLE DISK TYPES
- NOTES:
- REGION CODE
- Front Panel and Rear Panel Illustration
- Front panel
- Rear panel(2CH Audio output)
- TV Set Connections
- CONNECT BD PLAYER TO TV SET BY AV CABLE
- CONNECT THE BD PLAYER TO TV SET USING THE Y/Pb/Pr JACKS
- CONNECT THE BD PLAYER TO TV SET USING THE HDMI OUTPUT
- Connecting to an AV Amplifier with Digital Audio Input
- Output Illustration
- Video Output Capabilities
- Audio Output Capabilities
- Connectors Description
- 3..3.1 SPDIF Digital Audio Output audio output
- Stereo Audio Outputs
- Composite Video
- HDMI 1.3 Audio/Video Output
- Ethernet Connector
- USB 2.0 Connector
- Remote Control
- 1.Open/Close
- 2.Audio
- Subtitle
- 4.Random
- 5.Menu
- 6.Colour Keys
- Secondary Subtitle
- 8.Bonus View
- 9.Menu Navigation Keys
- 10.DISPLAY
- 11.SLOW
- 12.NEXT
- 13.PREV
- 14.MUTE
- 15.Play/Pause
- 16.STOP
- CLEAR
- 18.GOTO
- STANDBY
- 20.Angle
- 21.Pop Menu/Title
- Secondary Audio
- Setup
- Step
- 25.Fast Reverse
- 26.Fast Forward
- 27.Volume
- 28.Numeric Keypad
- 29.REPEAT
- 30.A-B
- Return
- System Setting
- 5.1Language
- 5.2Display
- Audio
- Digital Output:
- System
- Network
- Secondary DNS:
- Info
- Parental
- Audio, Video, Picture files on disk or USB devices
- INTRODUCTION
- Supported Audio, Video, Picture files types
- Video
- Music:
- Picture:
- Disk or USB devices preparation
- Browsing video files
- Browsing Audio files
- Browsing picture files
- File playback
- Creating Playlist and Playlist Playback
- BD-Live Operation
- Description
- Adding external BD-live Memory to player
- Setting BD-Live Internet Access Mode
- BD-Live Internet Access Example
- BD-Live Notes
- Trouble shooting
- NO PICTURE OR SOUND
- REMOTE NOT WORKING
- PICTURE BUT NO SOUND
- UNIT NOT WORKING
- SOUND BUT NO PICTURE
- "NO DISC" DISPLAYED
- POOR PICTURE OR SOUND
- Specifications
- General
- Discs Compatibility:
- Video out
- Audio out
- [Accessories]
Brand : LENCO
Model : BRP-430
Category : Blu-ray player