
3KEL6652 - Refrigerator BALAY - Free user manual and instructions
Find the device manual for free 3KEL6652 BALAY in PDF.


| Product Type | Freestanding fridge-freezer |
| Brand | Balay |
| Model | 3KEL6652 |
| Total Net Capacity | 315 litres |
| Fridge Net Capacity | 225 litres |
| Freezer Net Capacity | 90 litres |
| Energy Efficiency Class | F |
| Annual Energy Consumption | 228 kWh |
| Noise Level | 38 dB(A) |
| Climate Class | SN-T |
| Dimensions (H x W x D) | 186.0 x 60.0 x 65.0 cm |
| Weight | 68 kg |
| Power Supply | 220-240 V, 50 Hz |
| Current | 10 A |
| Refrigerant | R600a |
| Freezer Star Rating | 4 stars |
| Defrost Type | Fridge: automatic; Freezer: manual |
| Door Hinge | Right, reversible |
| Shelves Material | Glass |
| Number of Shelves | 4 fridge shelves + 1 freezer drawer |
| Interior Light | LED |
| Control Type | Mechanical rotary knob |
| Reversible Doors | Yes |
Frequently Asked Questions - 3KEL6652 BALAY
User questions about 3KEL6652 BALAY
0 question about this device. Answer the ones you know or ask your own.
Ask a new question about this device
Download the instructions for your Refrigerator in PDF format for free! Find your manual 3KEL6652 - BALAY and take your electronic device back in hand. On this page are published all the documents necessary for the use of your device. 3KEL6652 by BALAY.
USER MANUAL 3KEL6652 BALAY
natural_image
Line drawing of a refrigerator with open doors and internal compartments (no text or symbols)Removal and Disposal of old appliances 17
Safety Advice and General Warnings 17
Getting to know the unit 18
Control panel 19
Connecting the appliance /Turning it on /Setting the temperature 21
Turning off and disconnecting the appliance 23
Refrigerator equipment 23
Freezing and storing frozen food 24
Defrosting and cleaning the unit 25
Practical energy-saving advice 27
Information about the noises the appliance makes while in use 27
Small easily-solved problems 28
Technical Assistance Service 30

Indice
Removal and Disposal of old appliances
Disposal of your old appliance
Old appliances contain materials which can be recovered and should, therefore, be disposed of at an official centre for the collection and recovery of recyclable materials.
You should render your old appliance useless prior to disposing of it and replacing it with a new one:
- Unplug your appliance from the mains electricity supply.
- Cut the mains cable on your appliance and remove it, together with the plug.
- Remove all locks and/or closure fittings from the door or disable them in order to prevent any children that might come to play with the appliance from getting locked inside and running the risk of death (suffocation).
All refrigeration and freezing appliances contain insulating and refrigerating gases which need to be specially treated and disposed of. Make sure that the piping on your appliance's cold circuit is not damaged in any way before disposing of it at your local Official Collection Centre.
Recommendations for the disposal of packing material
Do not let children play with the packing material or any part of it. This appliance is not a toy! The cardboard and plastic sheeting used for packing may give rise to suffocation!
The packing material is there to protect your new appliance during transportation to your home. All the packing materials used are environmentally friendly and can either be recycled or re-used. Help protect the environment by making sure that packing material is disposed of/recycled by environmentally friendly means.
Your Supplier or Local Authority will be pleased to inform you as to how these materials may best be disposed of in such a way as not to harm the environment.
This appliance is labelled in accordance with European Directive 2002/96/EG concerning used electrical and electronic appliances (waste electrical and electronic equipment - WEEE). The guideline determines the framework for the return and recycling of used appliances as applicable throughout the EU.
Safety Advice and General Warnings
Read and observe both these instructions of use and all other information that comes with your appliance. Keep these instructions for later use or for later owners.
This appliance has been designed for
- use solely in a household environment,
• the refrigeration and freezing of food.
Should the appliance be used for industrial purposes, then the relevant rules and standards should be taken into consideration.
en

Warning!
Install and connect this appliance to the mains electricity supply in accordance with the assembly instructions attached.
Should the appliance be or have been damaged in any way, then it should not be used (turned on). In case of doubt, get in touch with the distributor you purchased your appliance from.

Warning!
Do not obstruct the ventilation and aeration openings on the appliance

Warning!
Do not use methods other than those described by the manufacturer in order to speed up the defrosting process

Warning!
Do not use electrical appliances not authorised by the manufacturer inside the refrigeration and freezing compartments

Warning!
Do not damage the parts and components that comprise the refrigeration circuit, for example by piercing the refrigerant fluid pipes with sharp objects, bending the pipes or scratching the materials that surfaces are coated with, etc. If the refrigerant fluid spurts out under pressure, then you are in danger of injury to your eyes. The agent may also catch fire.
Emergency procedure
- Rinse your eyes with abundant water; contact a doctor.
- Keep the appliance away from sparks used to light flames or fire sources.
- Remove the mains cable from the mains electricity supply. Ventilate the room thoroughly for several minutes.

Danger of explosion
Keep drinks with high alcohol content in hermetic containers; they should also be placed in an upright position at all times.

Important
- Do not block the ventilation grilles on the refrigerator casing.
- Do not use mechanical devices or any other method to accelerate the thawing-out process, other than those recommended by the manufacturer.
- Do not damage the refrigeration circuit.
• Always use the internal electrical components recommended by the manufacturer for your refrigerator/freezer.
Getting to know the Unit

These instructions are valid for different models and may, therefore, describe features and points which are not relevant to your particular appliance.
Figure 1
A Refrigerator compartment
B Freezing compartment
1-9 Control panel
10 Interior lighting
11 Refrigerator shelves
to store bread and pastries, cooked food, milk products, meat and cold meats.
12 Vegetable drawer
to store fruit and vegetables
13 Door shelves, to store small jars and cans.
14 Butter and cheese compartment
15 Egg rack
16 Bottle rack to store large bottles
17 Freezer drawer
18 Fan
Control panel
Figure 2
1 ON/OFF switch for the refrigerator compartment
This switch allows the refrigerator compartment to be turned on and off independently of the rest of the unit.
2 Refrigerator temperature setting button
Press this button continuously or repeatedly until the desired temperature lights up on the indicator panel (from "eco" to +2°C).
"eco" is the highest compartment temperature.
2 is the lowest compartment temperature (+2°C).
For information about the "Super" setting, see section 3 "Super Indicator".
3 "Super" indicator for ultra-fast refrigeration
This indicator shows when the ultra-fast refrigerator mode has been turned on/off.
This function is turned on by pressing button 2, "Refrigerator temperature setting button", until the "Super" indication lights up.
This function allows food and drink in the refrigerator compartment to be refrigerated. The function must be turned on when you wish to cool the food or drink down.
When the function is activated, the refrigerating system works in order that lower temperatures are reached inside the refrigerator.
This function turns itself off automatically 6 hours after it is turned on and the refrigerator returns to the setting that it was set to before the "super" function was activated.
4 Freezer temperature setting button
Press this button continuously or repeatedly until the desired temperature lights up on the indicator panel (Set temperatures from "eco" to "max" light up in turn. "eco" appears after "max").
"eco" is the highest compartment temperature.
"max" is the lowest compartment temperature.
5 «Alarm» Indicator
The alarm is activated when the freezer compartment reaches a temperature which is too high to keep frozen food frozen.
The indicator turns itself off when the compartment returns to its normal working temperature.
en
The alarm may also be activated from time to time in the following situations (these situations do not represent any immediate risk to frozen products):
- When the appliance is turned on.
- When large quantities of fresh food are put in the freezer.
6 "Super frost" button/ indicator for ultra-fast freezing
This button turns the ultra-fast freezing function on and off.
The indicator on the button itself shows when the function has been activated.
Large quantities of food can be frozen at the same time using this function.
It is recommended that the function be turned on 24 hours before putting the fresh food in the freezer.
When the function is activated, the unit works in order that the lowest possible temperature is reached inside the freezer (ultra low).
The "Super frost" ultra-fast freezing function turns itself off automatically when the food has been frozen (this process may take up to two days).
This function may be turned off manually by pressing ultra-fast freezing button 6 for a second time.
7 ON/OFF switch for the freezer compartment
This switch allows the freezer compartment to be turned on and off independently of the rest of the unit.
Climate class - Maximum room temperatures
Each appliance's climate class is shown on its characteristics plate and indicates what temperature ranges the appliance is designed to work in.
| Climate class Room | temperature |
| SN +10 °C to 32 °C | |
| N +16 °C to 32 °C | |
| ST +18 °C to 38 °C | |
| T +18 °C to 43 °C |
Ventilation
Figure 3
The hot air produced between the appliance and the wall behind it must be allowed to escape easily, otherwise the appliance shall have to work harder than necessary and thereby incur high and unnecessary electricity consumption. For this reason, the ventilation and air openings must never be blocked.
Usable capacity
Information on the usable capacity can be found inside your appliance on the rating plate.
Connecting the appliance/ Turning it on/ Setting the temperature
Clean the appliance before turning it on for the first time.
Connecting the appliance
The mains electricity supply socket must be easily accessible. Connect the appliance to a 220-240 V (N/SN) or 220-230 V (ST)/50 Hz AC electricity current via an earthed electricity socket fitted in accordance with relevant standards. The connection must be protected by a fuse of at least 10 amps.
When an appliance is to be used in a Non-European country, it is necessary to check that the connection voltage and the type of current described on the appliance's characteristics plate are the same as the national mains electricity system. The characteristics plate is on the bottom left-hand side inside the refrigerator compartment. Should it be necessary to change the mains electricity supply plug, then this must be carried out by the brand's specialist technicians.
Warning!
Do not under any circumstances whatsoever connect the appliance to electronic energy-saving connection devices (e.g. Ecoboy, Sava Plug, etc.) or inverse rectifiers which convert DC currents into 230 AC currents (e.g. solar energy systems, maritime electricity systems).
Connecting the appliance
Figure 2
- Press button 1 to turn the refrigerator compartment on. The light comes on when the door is opened.
- Press button 7 to turn the freezer compartment on.
- Alarm indicator 5 will light up when the freezer compartment has been turned on. This light will go out when the freezer reaches its normal working temperature.
The appliance is factory-set to the following basic settings
Refrigerator temperature: +4°C
Freezer temperature: -18°C
Setting the temperature
The set temperatures can be changed. See the descriptions in the following sections:
2 Refrigerator temperature setting button.
4 Freezer temperature setting button.
Note refrigeration zones in the refrigerator compartment!
The air circulation in the refrigerator compartment means that there are zones at different temperatures.
Depending on the model, the zone for sensitive foods is right at the bottom between the arrow on the side and the glass surface below (fig. 11/1 and 2) or between the two arrows (fig. 12/1 and 2). Ideal for storing meat, fish, sausage and salad mixtures, etc.
en
Information and warnings regarding the appliance when in use
- The fan (Fig. 1/18) turns itself on and off as required by the refrigerator compartment.
• The front of the freezer housing heats up slightly. This prevents condensed water from forming in the area of the door seal. - When the refrigeration system is working, drops of water or frost form on the back wall of the refrigerator. This is perfectly normal and occurs for technical reasons. It is not necessary to scrape the frost or dry the drops as they should disappear automatically. Defrosting water is collected in the drainage duct (Fig. 8/A) and returned to the refrigerator system, where it then evaporates.
- When air conditions are extremely humid, condensed water may form inside the refrigerator, particularly on the glass shelves. Should this happen, then food in the refrigerator should be wrapped and a lower temperature set.
• Sometimes after closing the door, it may not be possible to open it straight away. This is because a depression is created inside the appliance when the door is opened. When this happens, wait two or three minutes before trying to open the door again to allow the depression inside the appliance to be compensated for.
- The refrigeration system your appliance uses means that frost may form quite quickly on some points of the freezer shelves. This does not in any way affect the working order of your appliance or bring about any increase in electricity consumption. Accumulated frost need only be removed if the layer of frost or ice reaches a thickness of more than 5 mm on the entire freezer shelf surface.
- Do not allow grease or oil to come into contact with plastic parts inside the refrigerator or the door seal. Both this plastic and the rubber door seal are liable to perish.
• To enhance appliance performance to the full, do not place foodstuff near to the refrigerator compartment sensor (fig. 1/19).
Turning off and disconnecting the appliance
Turning off the appliance
- Press button 1 to turn the refrigerator compartment off. The light inside the refrigerator goes out.
- Press button 7 to turn the freezer compartment off.
Disconnecting the appliance
When the appliance is not to be used for a long period of time:
- Remove the plug from the mains electricity socket.
- Defrost and clean the appliance.
- Leave the doors on the appliance open.
Refrigerator equipment
The positions of the shelves in the refrigerator and the racks and shelves on the inside of the door can be changed individually:
Figure 4
- Slide the shelves forwards, tilt them downwards and remove.
Figure 5
- Lift the racks and shelves on the inside of the door and remove or set to new position.
Optional equipment
(not included on all models)
Bottle rack
Figure 6
The rack means that bottles do not fall over when the door is opened or closed.
en
Freezing and storing frozen food
Things to remember when buying ultra-frozen products
Make sure that the wrapping on the frozen product is not or has not been damaged in any way.
Check the best before/expiry dates on food. Make sure that these have not passed.
The temperature indication on the freezer at the establishment where you purchase your food should show a minimum temperature of -18^ .
Whenever possible take the products home straight away in an isothermal bag.
Freezing fresh food at home
Warning!
Do not use materials which may be harmful to the health when wrapping or sealing food.
Suitable material to wrap food up in Plastic film, polyethylene bags and film, aluminium foil, boxes and containers specially designed for frozen food.
Suitable material to seal food wrapping with
Elastic bands, plastic clips, string, non-freezable adhesive tape, etc. Whenever possible, ensure that frozen food already in the freezer compartment does not come into contact with the fresh food you wish to freeze.
Information about the max. freezing capacity according to current standards can be found on the rating plate.
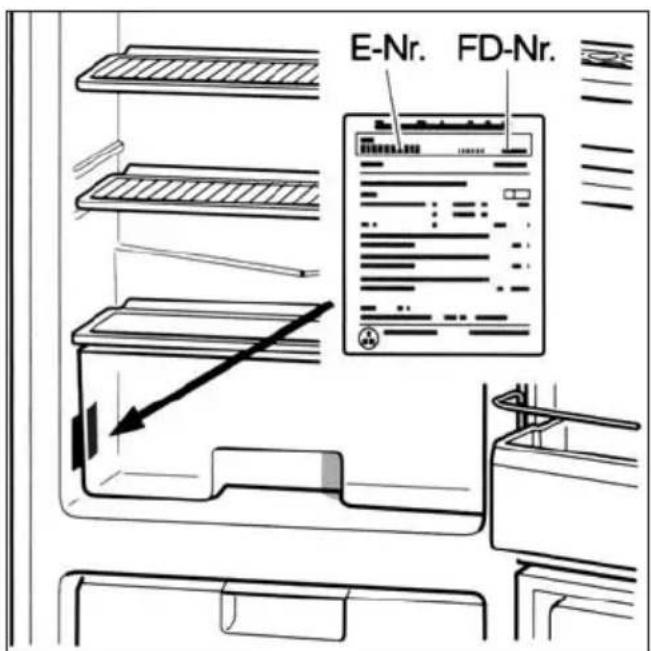
The maximum freezing capacity for fresh food in 24 h (distributed on the freezer racks) is indicated on the characteristics plate (in Kg/24h), see figure 10.
In order for it to maintain its nutritional value, vitamins and appearance, it is necessary to freeze the middle of the food as fast as possible. For this reason, the appliance's maximum freezing capacity should not be exceeded.
In the event of needing to freeze a large quantity of foodstuff, all the freezer drawers can be removed (except the lowermost drawer) and the food can be stacked on the freezer shelves. To remove the drawers, pull them out to their limit and then tilt them upwards.
When freezing products in the freezer drawers, reduce the appliance's freezing capacity slightly.
If you wish to keep already-frozen food in the freezer, turn the "super" function on several hours before putting the fresh food in the freezer.
Storing frozen products
- In order not to obstruct the free circulation of air inside the appliance, make sure that all the freezer drawers in the compartment are pushed in to the limit.
Freezing calendar
In order not to affect its quality and nutritional value, frozen food should be consumed before its maximum "best before date" at -18^ is up.
Fish, up to 6 months pre-cooked food, bread and pastries
Cheese, poultry up to 8 months and meat
Fruit and vegetables up to 12 months Making ice cream Warning!
Do not use electric ice-cream makers inside the freezer compartment.
Making ice cubes
Figure 7 (not included on all models)
3/4 fill the ice tray with water. Place it in the freezer compartment.
Separate the bottom of the ice tray from the bottom of the freezer compartment using a blunt object (e.g. the handle of a spoon). To remove the ice cubes from the tray, place the tray under running tap water for a short period of time or bend it slightly.
Place the ice tray in the first drawer to make ice cubes more quickly (Fig. 1/17).
Defrosting and cleaning the unit
Clean the refrigerator once a month.
You are recommended to clean the freezer compartment each time you defrost it.
Danger of electric shock!
Do not use any kind of vapour/steam cleaning device. Hot steam could damage the surfaces on the appliance or its electric system. The electrical safety of your appliance could be seriously affected!
Do not scrape ice or frost using knives or other sharp objects.
Do not damage the parts and components which make up the cold circuit, for example by piercing the refrigerant fluid pipes.
If the refrigerant fluid spurts out under pressure, then you are in danger of injury to your eyes. The agent may also catch fire.
Under no circumstances whatsoever are you to use electric appliances or active fire sources (e.g. candles or petrol lamps) inside the appliance.
en
Defrosting the freezer compartment
- Remove the drawers and any food they may contain from the freezer compartment. Place frozen food on the cold accumulator (if supplied). Store the drawers in the coldest place possible.
- Unplug the appliance from the mains electricity socket.
• After defrosting the appliance, empty the defrosting water that has gathered. Clean and dry the bottom of the freezer compartment with a sponge.
Special defrosting sprays
Observe the instructions and warnings provided by the spray manufacturer strictly.

Warning!
Special defrosting sprays should be used with the utmost caution. These sprays can be a source of explosive gas or contain solvents or propellants which may harm the plastic parts on the unit or even be harmful to the health.
Practical defrosting advice
• To speed the defrosting process up, a pan with very hot (not boiling) water can be placed on a protective support base inside the freezer compartment
Cleaning the appliance
- Clean with warm water and a small amount of disinfecting detergent, such as mild manual washing-up liquid.
The door seal should only be cleaned with clean water. It should be dried properly after cleaning.
Make sure that the water used to clean the appliance does not enter the drainage orifice and flow to the evaporation tray.
Under no circumstances should abrasives, scrubbing products or cleaning substances which contain acid or chemical solvents be used.
Never wash the shelves, racks, containers or drawers in a dishwasher. The parts may lose shape!
- Plug the mains cable into the mains electricity socket. Connect the fuse.
Practical energy-saving advice
• Install the appliance in a cool, dry, well-ventilated room. Remember that the appliance should not be installed in a position in which it receives direct sunlight or near to an active heat source, such as a cooker, radiator, etc.
- Let food and drink reach room temperature before putting them in the freezer.
- Defrost frozen products by placing them, for example, in the refrigerator compartment. In this way, the cold temperatures given off by the frozen food will help refrigerate the fresh food in the refrigerator.
- Keep the door on the appliance open for as short a time as possible.
- Clean the rear grille on the refrigerator (condenser) to enhance appliance performance to the full.
Information about the noises the appliance makes while in use
Perfectly normal sounds
Quiet humming sound
This is unavoidable when the compressor is in use.
Strange quiet gurgling sound
This is caused when the compressor is on by the refrigerant fluid as it enters the narrower pipes.
Abrupt clicks
These are only heard when the regulator turns the compressor on and off.
Easily solved noises
The appliance is on an uneven surface
Level the appliance using a spirit level and the built-in threaded feet or wedges.
If the appliance is in contact with furniture or other appliances
Separate the appliance from the furniture or appliances it is in contact with.
The drawers, baskets, shelves or racks shake or are stuck in place
Check the affected parts over. Put them back in their right position if necessary.
The bottles or containers come into contact with each other
Separate the bottles and the containers slightly.
en
Small easily-solved problems
Before getting in touch with the This will help you avoid unnecessary expense
Official Technical Assistance Service: as technical assistance for the situations listed
Before calling the technical service, is not covered by the appliance's warranty.
check to see if the problem or fault
you have noticed figures among the .
following list of recommendations
Problem Possible cause Solution
The light The light bulb is faulty. Change the light bulb.
inside the
refrigerator 1. Unplug the appliance
does not work from the mains electricity
although the supply or switch the fuse to off.
refrigeration
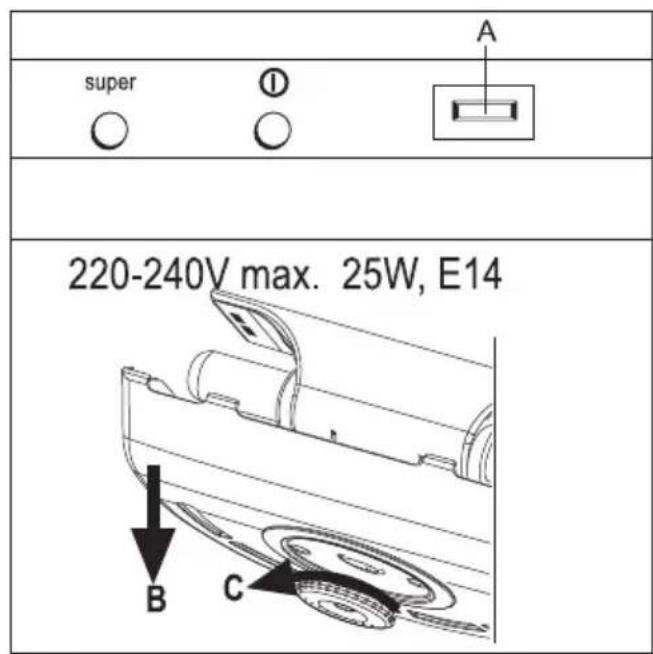
system 2. Release the screen (Fig. 9/B)
works by turning the lower wheel in an
anti-clockwise direction
(Fig. 9/C), as shown in the figure.
- Change the blown light bulb.
(Bulb:,220-240 V, AC E14 base),
see faulty bulb for Watts.
The switch on the light Check that the switch on the light
is stuck (Fig. 9/A). inside the refrigerator moves freely
Water
has built up
at the bottom
of the
appliance.
The defrosting water
drainage tube is blocked
(Fig. 8/B).
Clean the drainage channel
and the drainage hole (Fig. 8/B).
See section "Cleaning the
appliance"
Problem Possible cause Solution
The “alarm” The ventilation and air Unblock the ventilation indicator openings are blocked. openings lights up
The freezer compartment Close the door. door is open.
Too much fresh food Do not exceed the appliance's has been out in the maximum freezing capacity. freezer compartment.
None of the The electricity supply Check that the electricity supply screens has been cut for some reason; is in order. The fuse must be set or indicators the fuse has been triggered; to on. light up. the plug is not properly inserted in the socket.
en
Technical Assistance Service
If the repair cannot be performed or the problem continues and cannot be solved by following the recommendations outlined in the section "Small easily-solved problems":
- Disconnect the appliance from the mains electricity supply or switch the fuse off.
- Do not open the doors on the appliance without good reason.
The telephone number of your nearest Technical Assistance Service is listed in the relevant Phone book or Technical Assistance Service Directory. When calling the Technical Assistance Service, do not forget to quote your appliance's product number (E-Nr.) and series number (FD).
Both numbers can be found on the appliance's characteristics plate.
Fig. 10
Remember that by quoting your appliance's product and series numbers, you may be able to avoid the Technical Assistance Service unnecessary call-outs and expense which you will otherwise be charged for.
natural_image
Diagram of a refrigerant cabinet with airflow arrows indicating heat or circulation (no text or symbols)3

natural_image
Pure technical diagram of a structural component with no text, numbers, or symbols4
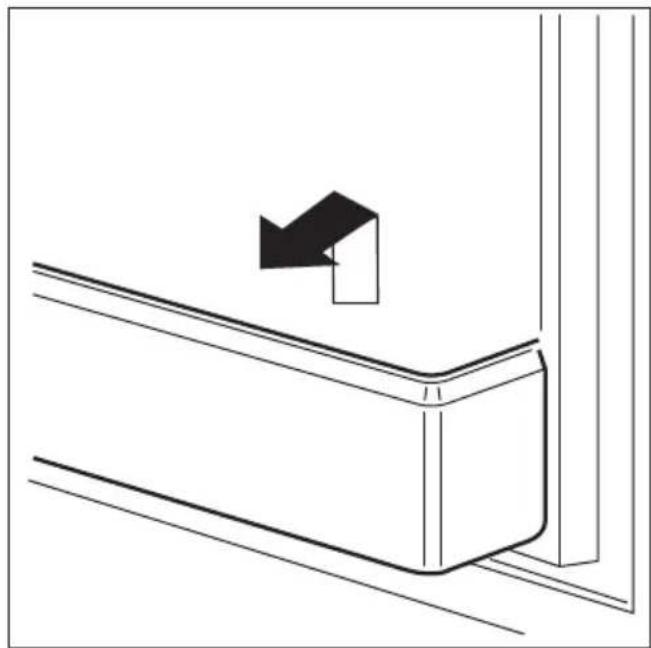
natural_image
Pure technical line drawing of a door handle and adjacent wall corner (no text or symbols)5

natural_image
Simple line drawing of a bottle placed inside a rectangular container, with no text or symbols present.6

natural_image
Illustration of hands placing a cube-shaped object into a basket with an arrow indicating rotation (no text or symbols)7

8
9
11

12
Subject to modification
- Indice
- Removal and Disposal of old appliances
- Disposal of your old appliance
- You should render your old appliance useless prior to disposing of it and replacing it with a new one:
- Recommendations for the disposal of packing material
- Safety Advice and General Warnings
- en
- Warning!
- Emergency procedure
- Danger of explosion
- Important
- Getting to know the Unit
- Figure 1
- Control panel
- Figure 2
- "Super frost" button/ indicator for ultra-fast freezing
- ON/OFF switch for the freezer compartment
- Climate class - Maximum room temperatures
- Ventilation
- Figure 3
- Usable capacity
- Connecting the appliance/ Turning it on/ Setting the temperature
- Connecting the appliance
- Setting the temperature
- Note refrigeration zones in the refrigerator compartment!
- Information and warnings regarding the appliance when in use
- Turning off and disconnecting the appliance
- Turning off the appliance
- Disconnecting the appliance
- Refrigerator equipment
- Figure 4
- Figure 5
- Optional equipment
- Bottle rack
- Figure 6
- Freezing and storing frozen food
- Things to remember when buying ultra-frozen products
- Freezing fresh food at home
- Suitable material to seal food wrapping with
- Storing frozen products
- Freezing calendar
- Making ice cubes
- Defrosting and cleaning the unit
- Defrosting the freezer compartment
- Special defrosting sprays
- Practical defrosting advice
- Cleaning the appliance
- Practical energy-saving advice
- Information about the noises the appliance makes while in use
- Perfectly normal sounds
- Easily solved noises
- Small easily-solved problems
- Problem Possible cause Solution
- Technical Assistance Service
Brand : BALAY
Model : 3KEL6652
Category : Refrigerator