ReadMe Mobile - E-reader BINATONE - Free user manual and instructions
Find the device manual for free ReadMe Mobile BINATONE in PDF.

| Product Type | E-reader |
| Brand | Binatone |
| Model | ReadMe Mobile |
| Display Technology | E Ink (estimated) |
| Screen Size | 6 inches (estimated) |
| Resolution | 800 x 600 pixels (estimated) |
| Backlight | No (estimated) |
| Dimensions (W x H x D) | 170 x 120 x 10 mm (estimated) |
| Weight | 200 g (estimated) |
| Battery Type | Lithium-ion rechargeable |
| Battery Life | Up to 2 weeks (estimated) |
| Charging Port | Micro USB (estimated) |
| Storage Capacity | 4 GB internal (estimated) |
| Supported Formats | PDF, EPUB, TXT, HTML (estimated) |
| Connectivity | USB 2.0 |
| Wi-Fi | No (estimated) |
| Audio | No speaker (estimated) |
| Text-to-Speech | No (estimated) |
| Dictionary | Built-in (estimated) |
| Bookmark Function | Yes |
| Font Adjustment | Yes (size and type) |
| Languages | English, French, German, Spanish (estimated) |
| Maintenance | Clean with soft, dry cloth |
| Safety Precautions | Avoid moisture; use only supplied charger |
| Spare Parts Available | USB cable, manual |
| Warranty | 1 year (estimated) |
Frequently Asked Questions - ReadMe Mobile BINATONE
User questions about ReadMe Mobile BINATONE
0 question about this device. Answer the ones you know or ask your own.
Ask a new question about this device
Download the instructions for your E-reader in PDF format for free! Find your manual ReadMe Mobile - BINATONE and take your electronic device back in hand. On this page are published all the documents necessary for the use of your device. ReadMe Mobile by BINATONE.
USER MANUAL ReadMe Mobile BINATONE
text_image
Binatone Recent Reads:6 books Zombie Nights Men and Depression Black Silk Forever In Time Fall Love The Fo Bookshelf Browse your collection of books Download BooksYou may download this user guide at www.binatonetelecom.com
Warning:
- This unit does not have a touch screen, to operate use the keyboard and optical finger navigation key
- Before operating this set, please read these instructions carefully.
- WiFi connectivity limited to 802.11b/g, if the router is set to 802.11n, please modify the settings to 802.11 b/g.
- Use only the power adaptor supplied with your product.

blank page
Table of contents
1 Introduction 5
2 Main Features 5
3 Controls and Connections 6
4 Getting Started 6
4.1 Charging 6
4.2 Inserting Media 7
4.3 Connecting to the PC 8
4.4 Turn on/off 8
4.5 Lock and Unlock 8
4.6 Basic Operations Of The Readme Mobile 9
4.7 Operating the Readme Mobileusing your Optical Finger Navigation (OFN) control · 9
5 Home 10
5.1 Customising the Home Screen 10
5.2 Applications Menu 12
6 Using the On-screen Keyboard 13
7 Sleep/Wake button 13
8 Making a Wireless Connection 14
9 eBook Reader 15
9.1. Reading a book 15
9.2. Downloading a book 16
10 Browser 16
10.1 Open Browser 16
10.2 Setting your home page 16
10.3 Open a Web Page 16
10.4 Refresh a Web Page 17
10.5 Zoom in and Out of a Webpage 17
10.6 Open a New Browser Window 17
10.7 Finding Text within a Webpage 17
10.8 Select Links within Webpages....17
10.9 Downloading unknown application from the Web 18
10.10 Manage Bookmarks.... 18
10.11 Customise Browser Options 19
11 Email 20
11.1 Open Email 20
11.2. Account Settings 21
11.3. Reading Emails 21
12. Photo Browser 22
- Music 23
- Video Player 24
- Alarm Clock 25
- Calculator 25
- ApkInstaller 26
- Explorer 26
- Settings 27
19.1. Set Date&Time 29
- Frequently Asked Questions.... 29
- Specification 31
- If You Need Help 32
- Safety Instructions 32
23.1. Replacing Batteries 33
- Cleaning The Device 33
- Disposal Of The Device(Environment) 33
- Guarantee And Service 34
27 Declaration Of Conformity 35
1 Introduction
Thank you for purchasing this Readme Mobile.
This Readme Mobile enables you to surf the internet via a wireless connection with multimedia playback.
This user guide contains important safety information and operation instructions, so please read all the instructions carefully before using the Readme Mobile and keep it for future reference.
We have done our best to produce a complete and accurate manual; however, we cannot ensure there are no errors or omissions. We also have no responsibility for damages or loss of data caused by improper operation.
The instruction manual is subject to change for improvement without notice.
Trademarks and trade names used in this user's manual are owned by their respective companies or organisations.
2 Main Features
- 7 inch TFT LCD, 800x480 pixel 16:9
- Full keyboard
• Optical Finger Navigation (OFN) sensor - Pre-install ebook reader for download and reading
- Compatible to DRM format
• Decorative appearance, good quality - Surf the web via wireless connections
- Send and receive Emails
- Listen to music, view pictures and videos
- Screen auto rotate.
• SD card slot for additional storage. - Mini USB 2.0 port.
• 3.5mm stereo earphone socket.
3 Controls and Connections
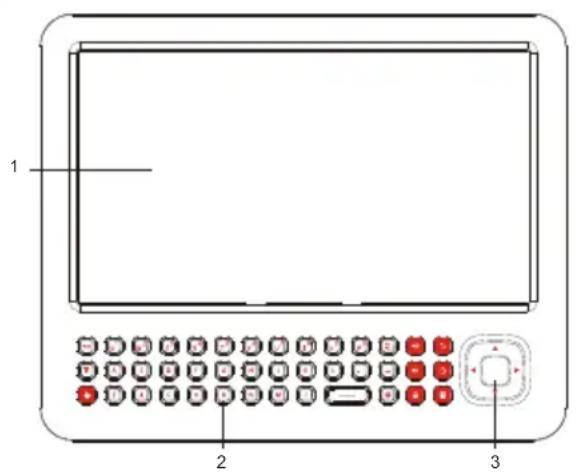
text_image
1 2 3
natural_image
Technical line drawing of a rectangular frame with vertical slats and a central rectangular block, no text or symbols present.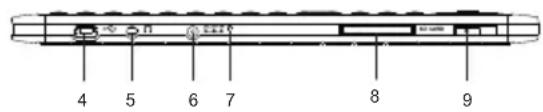
text_image
4 5 6 7 8 9- TFT LCD screen
- Keyboard
- Optical Finger Navigation (OFN)
- Mini USB connector
-
Earphone jack
-
DC input socket
- Charging indicator
- SD card socket
- Power/lock button
- Reset hole
4 Getting Started
4.1 Charging
Your Rwidran Metratis supplied polymer rechargeable battery.
New batteries are not charged when shipped. Before you start using your device, you need to charge the battery.
Follow the steps below to connect your device to the mains power and charge the battery.
- Plug one end of the AC power adaptor into the DC input socket on your device.
- Plug the other end into a 230Vac mains socket. The charge LED turns red to indicate charging.
Note: The red charging LED will light up when the battery is charging. Once the battery is fully charged, the charging LED will turn off.
If your device battery is totally discharged, it may take a while before you can power up your device. Only plug the charger/adapter into the DC input socket when you want the device to be in the charging state.
Battery performance depends on your usage patterns.
Tips to improve battery performance
As the device has a large screen, it will consume a lot of power. To extend battery life, you can consider the following:
- Reduce the display brightness.
- Reduce web searches.
- Turn off the Wi-Fi.
NOTE
- If you are not going to use your Readme Mobile for a long time, in order to avoid damage caused by battery excessive battery discharge, please be sure to do a battery charge once a month to prevent battery from running down.
- With built in Lithium polymer batteries, it has to be charged regularly. Battery damage caused by excessive discharge battery will not be covered by guarantee. Only use the power adapter supplied. Use of other chargers may cause damage, which is also not covered by guarantee.
If the device battery is discharged, you will not be able to connect to a PC to copy files, and should charge the battery first and turn on your Readme Mobile.
4.2 Inserting Media
Your Readme Mobile supports SD cards.
You can operate books, music, pictures, files and applications on the device through a memory card and internal memory.
To fit a memroy card, insert it into the SD card socket in the side of your Readme Mobile, and push gently until it clicks into place.
Note: Do not use excessive force while inserting a memory card. Insert with the gold contacts facing down when looking at the screen.
To remove a SD card from your Readme Mobile, press the memory card until it clicks and then springs out.
Note: Only remove an SD card when the power is off, or using the Settings application - SD card & device storage / Unmount SD card.
4.3 Connecting to the PC
Files can be transferred directly into your Readme Mobile by using the USB data cable.
- Make sure that your computer has been started.
- Connect the mini plug of the USB cable to the mini USB port on your Readme Mobile and plug the other end into a free USB port to your PC.
- The computer system detects “New hardware” and starts to install the driver automatically. Wait for the system to finish the installation. When it has finished, a new “Removable Disk” will be created in “My Computer”.
- Drag and drop the files on your computer to the "Removable Disk".
- To disconnect the USB cable from the computer, double click the Safely Remove Hardware icon on the task bar of the computer. Click the USB Mass Storage Device, and then click OK, Then you can unplug the Readme Mobile safely.
Note: Before connecting to the PC, make sure that you have turned on your Readme Mobile. If the battery runs down, it needs recharging before connecting to the PC.
Please do not disconnect the USB cable during loading. It may cause a malfunction of the player and the files.
USB connection cannot use as battery charger, use original AC adapter charger included on giftbox.
When connecting USB port to PC, internal memory and SD card cannot access by ebook device, make sure unplug USB cable after file transfer completed.
4.4 Turn on/off
- To turn on the device, press and hold the power button. It will take a short time for your Readme Mobile to initialise.
• To turn off the device, press and hold the power button, then select Power off and OK.
4.5 Lock and Unlock
Locking the device manually
- Press the Power button once
Unlock the device
- Press the Unlock button
- Press Select or OFN button and drag the Unlock icon from the bottom to the green dot of the screen.
You can also set the master volume level from the lock screen. Press Select or OFN button and drag Sound icon from top to the bottom to toggle between the sound ON and OFF modes.
4.6 Basic operations of the ReadMe Mobile


| • Press → increase volume. | |
| • Press → to reduce volume. | |
 | • Press to return to the home screen.• Press and hold for 1 second to switch between tasks. |
 | • Press to open the options list.• Press and hold (about 3 seconds) to launch onscreen keyboard. Press again to hide the keyboard. |
| [760H] | • Unlock screen. |
| Num | • Press once to lock number status keys, press again to release. |
 | • Shift to capital letters. |
| • Cursor select button, same function as OFN button. | |
 | • Backspace/Delete function. |
| [BWWA] | • 4 direction keys. |
 | • Press to return to previous screen.• Press to hide the onscreen keyboard.• Press to exit a dialog box, options menu or notifications panel.• Press to cancel an operation.• In browser mode, press and hold to access Favourites and browse history pages. |
4.7 Operating the Readme Mobile using your Optical Finger Navigation (OFN) control
| Action Function | Operations | |
| Select • Select onscreen items such as applications and settings icons. • Select onscreen buttons. • Type using the onscreen keyboard. | Gently move cursor over an item on screen, press OFN or 🖱 button to select the item that you wish to activate. | |
| Select and hold | Open the available options for an item, for example, select and hold a contact or a link on a web page. (Think of this as using the right-click button on a mouse). | Move cursor over an item on screen, press OFN or 🖱 button and hold in place for 2~3 seconds. |
| Drag Move items on the screen or shift the view on the screen. | Move cursor over an item on screen, press 🖱 button and hold, move it across the screen until you have reached the target position. | |
| Slide and Scroll Quickly move vertically or horizontally across the screen. | Press 🖱 button and hold, swipe vertically or horizontally across the screen until you have reached the target screen position. | |
5 Home
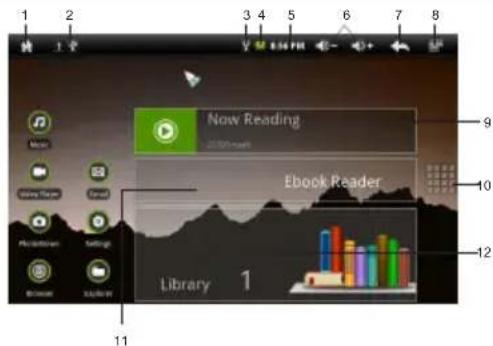
text_image
1 2 3 4 5 6 7 8 New Reading Ebook Reader Library 1 9 10 12 11The Home screen is the starting point for using your device.
- Same function as Home key, select to return to the Home screen at any time.
-
The notification panel, shows information about connections, messages and other items. Select and pull down for notification details and clear up.
-
Wi-Fi net connection and signal strength.
-
Battery status
-
Time display
-
Adjust volume, V+/V-
-
Same function as Back key, select to exit and return to the previous screen.
-
Same function as Menu key, select to open menu options
-
Select to open ebook previous reading.
-
Application icon, select to open the application menu.
-
Select to open ebook application.
-
Select to browse ebooks library.
5.1 Customising the Home Screen
Home screen customized for ebook application, you can modify Home screen to suit your preferences.
Add Shortcuts
Use Shortcuts for quick access to applications.
-- Navigate to a Home screen.
-- Press and hold on the screen or press the Menu button and select Add to pop up the Add to Home screen menu.
-- Select Shortcuts, then select and follow the prompts to add one to the Home screen: Applications, Bookmark, Email, Music playlist, Settings
- Adding Shortcuts from Applications
-- Navigate to a Home screen
-- Move cursor on top of applications Applications
-- Select and hold an application icon. The shortcut icon is automatically placed on the selected Home screen. - Removing Shortcuts
-- Select and hold the Shortcut icon until the Application icon changes into the trash bin, then drag the icon into the trash bin, until both the icon and the trash bin turn red 📄, then the shortcut from the home screen.
Add Widgets
Widgets are self-contained applications that you can place on the Home screen to enter your favourite features.
- Adding Widgets to the Home screen
-- Click and hold on the screen or press the Menu key/select 📄 on the home screen and select Add to pop up the Add to Home screen menu.
-- Select Widgets to add it to a home screen. - Removing Widgets
-- Select and hold the Widget icon until the Application icon changes into the trash bin, then drag the icon into the trash bin, until both the icon and the trash bin turn red, then release to remove the widget from the home screen.
Add Folders
Place Folders on the Home screen to organize items together on the Home screen.
-- Navigate to the desired Home screen
-- Clickress the Men the key select [==] on the home screen and select Add to Home screen menu.
-- Select Folders, and then select New folder, and a new folder appears on the home screen.
Removing Folders
-- Select and hold the Folder icon until the Application icon changes into the trash bin, then drag the icon into the trash bin, until both the icon and the trash bin turn red 📋, then release to remove the folder from the home screen.
Change the Wallpaper
Choose a picture to display in the background of the Home screen. You can choose from pre-load wallpaper images or from pictures on your memory card.
-- From Home screen, press the Menu key or select 📄 on the home screen.,
-- Salsoullallpapersmarge then select
- Pictures: Choose a picture from the installed memory card. Select a picture to select it, then use the crop tool to resize the picture, if desired. Select Save to save the pictures as a wallpaper.
- Live wallpapers: Choose from pre-loaded interactive animated wallpapers.
Select a wallpaper to see an example, then adjust Settings, if available, and select Set wallpaper.
- Wallpapers: Choose from pre-loaded wallpaper images. Select a wallpaper, then select Set wallpaper.
5.2 Applications Menu
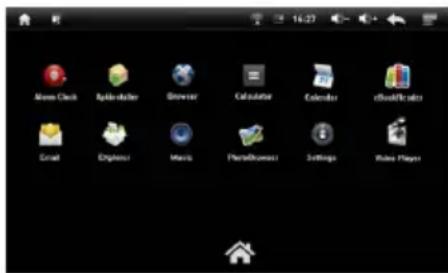
text_image
Master Clock Apache folder Browser Calculator Calculus eBookPlace Email Expenses Music Photo viewer Settings Mouse PlayerThe Applications menu screen holds all the applications on the device. Applications that you download and install from the web are also added to the applications screen.
You can place shortcuts to applications on the Home screen, for quick access to the application.
- From a home screen, select the Applications icon .
- Slide screen up and down to scroll through the application screens.
- Select an icon to launch the desired application.
6 Using the On-screen Keyboard
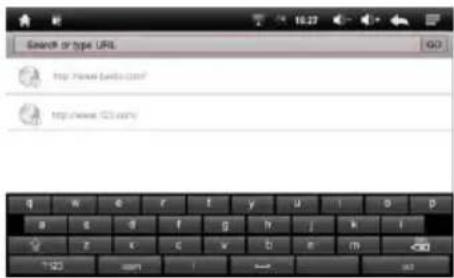
text_image
Search or type URL http://www.baidu.com/ http://www.cs.com/The onscreen keyboard lets you enter text, such as passwords, filenames, email messages, etc. It appears automatically when you launch certain applications or when you select on a text or number field.
- Select on a text or number field to bring up the keyboard.
- When entering texts or numbers, each letter or number appears above the key you have pressed.
- Select ABC, ?123, ALT
onscreen keyboard to switch between different input modes. - Long press on the onscreen keyboard to show the accented characters.
- Select and hold the word you have typed to activate the following edit text options: Select all, Select text, Cut all, Copy all, Input method.
- Press the Back key or select ← to exit.
7 Sleep/Wake button
When you are not actively using your Readme Mobile, you can press the [ 🔒] button briefly to turn off the display and save the battery.
When you turn off the display, the "locked" home screen appears dimly if you press any key, screen turn on and then you press UNLOCK key or select and hold the Unlock icon move from the bottom to the select of the screen to return to your previous activity.
8 Making a Wireless Connection
Before you can surf the Internet, send and receive emails, download content and applications etc, you must join a Wi-Fi network that is connected to the Internet.
For Wi-Fi networks that are not secured with a PIN code, you can easily connect to them and access the Internet freely. However, for Wi-Fi networks that are secured with password, you need to have the password to access the Internet.
- From the homescreen or Application menu, select Settings 🔒 to enter the settings interface, or on the home screen, press the Menu key or select ☐, then select Settings on the menu bar.
• Select Wireless & networks. - Select Wi-Fi to turn on wireless connection. √ appears in the Wi-Fi checkbox.
- Select Wi-Fi settings. Your device will start to scan for the networks within range and display a list of available Wi-Fi networks.
- Select the Wi-Fi network that you want your device to be connected with. If the network is not secured with a password, your device will start to establish a link with it. If it is a secured network (WPA / WPA2 / WEP), you will be prompted to enter the wireless password.
- Select on the password field to launch the onscreen keyboard. Enter the password and select Connect.
- Your device will start to establish a link to the network. Once a connection is established, —Connected will appear below the name of the Wi-Fi network.
- Press the Home key to return to the home screen.
Note: 📷 will appear on the status bar of your home screen.
Warning
Wireless lan connection supporting 802.11 b/g mode only, 802.11n mode is not supported.
9 eBook Reader
You can view and download books through this eBook Reader application.
Make sure no USB connection to PC, otherwise internal memory or SD card ebooks cannot read.
Disconnect USB cable and restart Ebook reader application.
9.1 Reading a book

text_image
Recent Reads:2 books 20320.epub oppenhe:3566135661 Bookshelf Browse your collection of books Download Books
- From a Home screen or Application menu, select the eBook Reader / Shelves to enter the book interface.
• Select Bookshelf to enter your book list.
• Select a book to enter. - Press directional keys to navigate to the next page, or use OFN cursor to move right or left to navigate to the previous or next page.
• Press the Menu key then you can
Select Font Size to change the font size for your desired reading preference: S, M, L, XL, XXL.
Select Go To to jump to a desired page.
Select Bookmarks to use bookmarks in the book: Show Bookmarks, Add Bookmarks, Delete Bookmarks.
Select TOC to open the table of contents of the book, and tap one to enter directly.
Belekinfo to view book details.
On the bookshelf list, tap and hold a book to pop up a window, then you can select View to read or select Delete to delete the book.
9.2 Downloading a book
Note: You must join a Wi-Fi network that is connected to the internet before you can search for and download your eBooks.
- From a Home screen or Application menu, tap the eBook Reader / Shelves Ebook reader OSD to enter the book interface.
• toSelect DownloadBooklogues.
Select a catalog and select to enter
Select the desired book, which displays in thumbnails of the covers, and select to enter
Download
Your device begins to download the book in the background. Once the download is complete, you will get a notification, and the book will appear on the bookshelf.
10 Browser
The device is equipped with a full HTML Browser, which allows you to enter the internet.
Note: You must join a Wi-Fi network that is connected to the internet before you can surf the web via the browser application.
10.1 Open Browser
From a Home screen or Application menu, select Browser

10.2 Setting your home page
By default, By default, the home page is www.google.com
• To set another home page, press Menu key or select and select More.
• Select Settings, then Set home page.
• The Set home page dialog box opens, with the onscreen keyboard.
• Enter the web address of the home page and select Done.
- Select OK to confirm.
10.3 Open a Web Page
- In the Browser window, select in the URL field, where the current http:// address line is shown, to open the onscreen keyboard.
- Enter the web address in the URL field using the onscreen keyboard and select Go.
Note: As you enter the address, matching web page addresses will appear on the screen. Select an address to go directly to that web page or continue to enter the web page address.
10.4 Refresh a Web Page
- On the web page, press the Menu key or select 📄.
- Select Refresh.
10.5 Zoom in and Out of a Webpage
- Launch the zoom control by sliding across the screen in one direction.
- Select the zoom control icon to zoom in and zoom out.
10.6 Open a New Browser Window
You can open multiple browser windows and switch between different web pages.
- In the Browser window, press the Menu key or select and select New Window. A new browser window opens at the home page.
Switch between browser windows
• In the Browser window, press the Menu key or select □ and sel Windows.
- Select to select the browser window you wish to display.
10.7 Finding Text within a Webpage
- When viewing a webpage, press Menu key or tap and then tap More > Find on page.
• A search bar appears with the on screen keyboard. - Enter the text using the onscreen keyboard and tap Done. The matching texts are highlighted on the screen.
- Select < or > to go to the previous or next matching text.
10.8 Select Links within Webpages
Web page links
• Select and hold the link
• A pop-up menu opens
- Select to select Open, Open in new window, Bookmark link, Save link, Share link or Copy link URL.
Email links
• Select and hold the link
• A pop-up menu opens
- Select to select Send email or Copy.
If you select Send email, the Email application will launch automatically.
• Enter the recipient and subject using the onscreen keyboard and tap Next.
• Enter the message and then tap Send to send the email, Save as draft or Discard.
Tip: If you exit the email application without saving the message you have composed, the message will be automatically saved as draft in the Draft folder of your default email account.
10.9 Downloading unknown application from the Web
Before you can download web applications, you must first enable downloading from the
Settings menu.
- Press the Menu key or tap, and then tap Settings > Applications.
- Tap Unknown sources to enable or disable the downloading of unknown applications.
When enabled, √ appears next to the option.
Note: Applications downloaded from the web can be from unknown sources. To protect your device and personal data, download applications only from trusted sources.
View your downloads
- In the Browser window, press Menu key or select □ and then select More>Downloads.
10.10 Manage Bookmarks
You can store as many bookmarks as you want on your device.
Bookmark a webpage
• In the Browser window, go to the web page you want to bookmark.
- Press the Menu key or select □ and then select Bookmarks. The bookmark option opens.
- Select Add bookmark and enter / modify the bookmark name.
• Edit the location if needed.
- Select OK.
Open a bookmark
- In the Browser window, press the Menu key or select and then select Bookmarks. The bookmark option opens.
Select to select the bookmark to open it.
10.11 Customise Browser Options
You can customise the Browser to suit your browsing preferences by setting the display, privacy, and security options. In the Browser window, press the Menu key or select □ and then select More > Settings or modify the following browser settings according to your preference.
• Page content settings
Text size
Default zoom
Open pages in overview
Text encoding
▶ Block pop-up windows
Load images
Auto-fit pages
▶ Landscape-only display
Enable JavaScript
Enable plug-ins
Open in background
Set home page
- Privacy settings
Clear cache
Clear history
Accept cookies
▶ Clear all cookie data
Remember form data
▶ Clear form data
Enable location
▶ Clear location access
• Security settings
Remember password
Clear passwords
Show security warnings
- Advanced settings
Website settings
Reset to default
When appears next to the option, the setting is enabled. To disable, tap the option again.
11 Email
Use Email to view and manage all your email accounts in one application.
Note: You must join a Wi-Fi network that is connected to the internet before you can access or send new emails.
11.1 Open Email
• From a Home screen or Application menu, tap Email ____.
• Input your Email address and password and tap Next.
- Select to select your account type: POP3, IMAP or Exchange.
- Nextelect
- Enter the Account name (optional) and Your name (optional) to be displayed on outgoing messages, and then tap Done.
The email application will start to load your messages. It might take a few minutes for the messages to load completely.
Note: When you have set up an email account, the account will open by default when you open Email.
If you have set up more than one email account, the email accounts will appear in Your accounts list. Select to select the account you wish to access.
• To enter the Emailbox interface, press the Menu key or select ☐, then you can
➢ Refresh: Check for new messages.
➢ Compose: Compose and send email messages.
Folders: View your email folders.
Accounts: View all accounts. To add a new account, press the Menu key or select to select Add account. To delete an email account, select and hold the email account that you want to delete, then select Remove account to delete.
Account settings: Check or modify account settings.
11.2 Account Settings
- When on the emailbox interface, press the Menu key or select to show the menu bar.
• Select Account settings, then you can
Account name: Edit your account name
Your name: Edit your name
Email check frequency: Never, Every 5 minutes, Every 10 minutes, Every 15 minutes, Every 30 minutes, Every hour.
Default account: Set which account your emails will be sent from by default.
Email notifications: Set notification on the status bar when a new email arrives.
Select ringtone: Set ringtone from the list for the arrival of new emails.
- Incoming settings: Modify incoming server settings.
Outgoing settings: Modify outcoming server settings.
11.3 Reading Emails
- When on the emailbox, select a mail and select to open.
• To reply to an email message, select Reply or Reply all.
• To delete an email message, select Delete. - Press the Menu key or select ☐ to show the menu bar, then you can
▶ Delete an email message
Forward an email message
Reply to an email message
Mark an email message as unread
12 Photo Browser
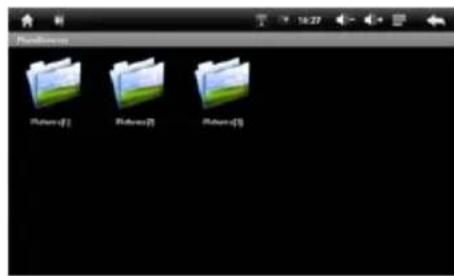
text_image
Pattern-01 Patterns-01 Patterns-02The Photo Browser application lets you view photos and images stored in the internal memory or memory card.
- From a Home screen or Application menu, tap Photo Browser 📋 to enter photo mode.
- Select a folder and select to enter ,the photos are displayed in thumbnails.
- Select a photo and select to view in browsing mode.
From the photo thumbnail list, step-by-step look-in-photthen you can
- Delete the photo
• See photo details
• Set the photo as the home screen wallpaper.
While viewing a photo, press Select or OFN button on screen to pop up a tool bar.
• to Sieve the previous or next photo
• Re selectedly to zoom in to a photo.
• Repeatedly to zoom out from a photo.
- Select repeatedly to cycle through the brightness options.
• repeatedly to rotate a photo clockwise.
• resectly to rotate a photo counterclockwise.
• to Select between the browsing and slideshow mode.
• repeatedly to open the selections menu, and select Settings to set the slideshow settings, or select Set as wallpaper to set the photo as the home screen wallpaper.
- Select 🔍 to exit, and return to the previous screen.
13 Music
The Music application lets you play digital audio files(MP3 or WAV format) stored in the internal memory or memory card.
• From a Home screen or Application menu, select Music to enter your music library.
- The music can be displayed in different categories such as Albums, Artists, Songs and Playlists.
- Select to select a category and select a song in the category to start playback.
- Press the Back key or tap to return to the previous screen.
In the music library list, tap and hold a song to pop up a window, then you can
• Play the selected song
• Add the song to a playlist
- Delete the song
• Search for the song in the music library or internet.
While listening to a song, you can
- Select to select songs from the list.
- Select to turn shuffle on or off. (Shuffle is off when the icon is gray)
- Select to cycle through the repeat modes: Repeat all songs, Repeat current song, Repeat is off.
- Select to pause or resume the song playback.
- Select to go to the previous or next song.
- Drag the progressive bar to the desired playing point.
On the playing interface, press the Menu key or select ☐, to pop up a menu bar.
- Select Library to go to your music library
- Select Party shuffle to turn the Party shuffle on or off.
- Select Add to playlist to add the song to a playlist.
• Select Delete to delete the song.
14 Video Player
The Video Player application lets you play video files (Mpeg4, H264 25fps@720P) stored in the internal memory or memory card.
• From a Home screen or Application menu, select Video Player 📋 to enter your video list.
- Select and select a video to start playback.
- Press the Back key or select to return to the previous screen.
When in the video list, select and hold a video to pop up a window, then select Delete to delete the video file.
While viewing a video, press Select or OFN button on screen to pop up a tool bar.
• Drag the progressive bar to the desired playing point.
- Select 📄 to set your bookmark, so you can start playing from the bookmark next time the video is started.
- Select repeatedly to cycle through the video brightness options.
• Select ◀◀/▶◀ to go to the previous or next video.
- Select // / ▶ to pause or resume the video playback.
- Select ✗ repeatedly to change the display mode: full screen, original, 16:9, 4:3
- Select to return to the previous screen.
- Select [...] to pop up a selection window, then you can
➢ Delete your Bookmark and play from the beginning
Delete bookmark
Change play mode: Single, Repeat one, Repeat all, Return
▶ Get help for the selection options
Return to the previous screen
15 Alarm Clock
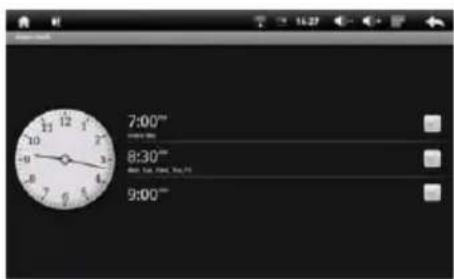
text_image
7:00" 8:30" 9:00"
- From a Home screen or Application menu, select Alarm Clock alarms page.
to enter the - Select the clock to select a clock mode to be displayed on the screen, and select on one of the 5 options to select your style.
- Press the Menu key or select to pop up the menu bar, then you can,
Select Add alarm to add a new alarm setting, then to set the Time, Ringtone, Vibrate, Repeat and Label.
Select Hide clock or Show clock.
Select Settings to set: Alarm in silient mode, Alarm volume, Snooze duration, Side button behaviour.
• To delete an alarm clock, select and hold the selected alarm to show a pop up window, and then select Delete alarm.
- Press the Back key or select ← to exit and return to the previous screen.
Note: Indicates that the option is activated.
When the alarm rings, tap Snooze or Dismiss to snooze or dismiss the alarm.
16 Calculator
You can use the Calculator to perform simple and advanced arithmetical calculations.
• From a Home screen or Application menu, select Calculator to enter.
- Select on the numbers and mathematical operators to perform simple calculations.
- Press the Menu key or select ☐ to pop up a menu bar, and select Advanced panel to access operators such as sin, cos, tan, log etc.
• To clear calculation histories, select =.
- Press the Back key or select < □>to exit and return to the previous screen.
17 ApkInstaller
- From a Home screen or Application menu, select ApkInstaller to enter applications management.
- Select Install to install the desired application. Find the right path, and select the application to install.
- Select Manage to manage all the applications. Select the selected application, a pop up window appears and then you can
▶ Launch into the application
▶ Export the application
Uninstall the application
Cancel the window
• to Select to Ex the application management.
Note: Applications downloaded from the web can be from unknown sources. To protect your device and personal data, download applications only from trusted sources. Also download and install applications that are compatible with the Readme Mobile with Android 2.1 operating system.
18 Explorer
The Explorer application is a free file manager for your device. It allows you to browse files and folders stored on your device and SD card.
• From a Home screen or Application menu, tap Explorer to enter files management.
- Selet the memory source: SD card or Internal Memory.
• Function of icons:
Home: Go to the Home interface of the files management.
Level Up: Go up to level in the directory.
Multi: To select multiple folders or files.
Editor: To copy, Delete, Move, Paste or Rename a folder or file.
▶ Back: Backward operation.
▶ Next: Forward operation.
• Then select and tap to enter the desired files at the right path.
- Tap and hold a folder or file to pop up a window, then you can:
Copy:Select Copy, then select the desired path, select Editor > Paste
Delete,Selectto delete the selected folder or file.
Move:Select Move, then select the desired path, select Editor > Paste
Rename,Selectinput a new name.
• To edit multi folders or files at a time,
Select Multi
➢ Selet the folders or files
Select Editor, and then edit the folders or files.
19 Settings
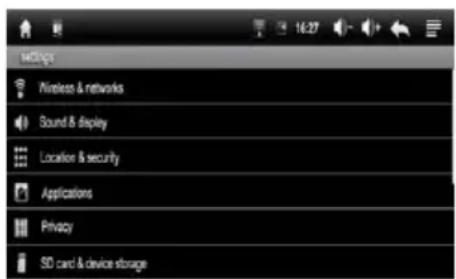
text_image
M 16:27 Wireless & networks Sound & display Location & security Applications Privacy SD card & device storageThe system settings let you customise and configure your Readme Mobile.
- From a Home screen or Application menu, select Settings to enter settings interface, or on the home screen, press the Menu key or select, then select Settings on he menu bar.
- Select the settings items to make the desired configuration. √ indicates that the opt on is activated
- Press the Back key or select to exit and return to the previous screen.
Wireless & networks Configure your device wireless connections, such as Wi-Fi.
Wi-Fi
Wi-Fi settings
Sound & display Set the device and notification ring tones, or set screen brightness and screen timeout.
• Sound settings
Media volume
▶ Notification ringtone
Audible selection
SD card notifications
• Display settings
Orientation
Animation
Brightness
Screen timeout
Location & security Set location and security.
Use wireless networks
Visible passwords
Applications Manage applications.
Unknown sources: Allow installation of non-Market applications.
➢ Manage applications: Manage and remove installed applications.
Running services: View and control currently running services.
➢ Development: Set options for application development.
Privacy Restore all settings to the factory default.
SD card & device storage Show the available storage card memory (when SD card is inserted) or the device internal memory (when no SD card is inserted).
- SD card
Total space
Available space
▶ Unmount SD card
Format SD card
• Internal flash storage
Available space
• Internal device storage
Available space
Language & keyboard Set the language and keyboard.
Select locale
Android keyboard
User dictionary
Date & time Set date and time.
Update Media Library Update the media library.
Online Help Get an online help.
About device View information about your Readme Mobile.
19.1 Set Date&Time
- From a Home screen or Application menu, select Settings 🔒 to enter the settings interface, or on the home screen, press Menu key or select ☐, then select Settings on the menu bar.
- Select Date&Time and tap to enter, and then you can
▶ Automatic: Use network-provided values
Set date:Select + or – on each date field to change the Month, Day and Year, Set to confirm the date setting. then select
Select time zone
Set time: Select – on each time field to change the Hour and Minute, then select Set to confirm the time setting.
Use 24-hour format or 12-hour format.
Select the date format
20 Frequently Asked Questions
- My Readme Mobile does not turn on.
• Make sure that the power adapter is securely connected
• Make sure that you are using the power adapter that was included with your Readme Mobile.
• Make sure that the Readme Mobile is turned on.
- My Readme Mobile does not recognize the memory card.
• Make sure that you have inserted a certified memory card.
• Make sure that you have inserted the memory card correctly.
• With your memory card inserted, power off and reset the device.
3. My Readme Mobile shows a low-battery warning
• The Readme Mobile is low on power and needs to be charged before you can use it.
4. I cannot access the web
- Check the wireless signal indicator in the status bar at the select of the screen. If there is no signal, you are not connected.
- The Readme Mobile only supports the Wi-Fi standard 802.11b/g, so please verify your Wi-Fi router is set to 802.11b/g, and not 802.11n.
5. The display freezes or does not respond
- Press and hold the power button to turn the Readme Mobile off and turn it on again.
• Use a PIN to PRESS the reset hole on the back, to restart the Readme Mobile.
6. There is no sound coming from the Readme Mobile
- Unplug and reconnect the headset. Make sure that the connector is pushed in all the way.
• The volume may be deactivated or set too low.
21 Specification
| Display | Digital LCD, TFTPanel size: 7 inchesScreen aspect ratio: 16:9Resolution: 800*480 pixels |
| I/O | DC in |
| Power Supply | AC Adapter 5V/2A |
| Battery | 2100 mAh |
| Operating system | Android 2.1 |
| USB port | Mini USB 2.0(high speed) device |
| Wireless | 802.11 b/g |
| Supported card SD card | |
| Supported photo format | JPEG, BMP, PNG, GIF |
| Supported audio format | M P3, Wav |
| Supported video format | Mpeg4, H.264 25fps@720P |
| Supported eBook format | Support PDF, FB2, e-PUB,TXT |
| Storage condition | Humidity<90%,-20~60°C |
| Working condition | Humidity <80%,0~45°C |
| Size L*W*H : (mm) | 180*145.8*9.9MM |
| Weight (g) | 280 g (without power supply) |
22 If you need help...
The Binatone Helpline is available from 9.00 am to 5.00 pm,
Mondays to Fridays, please call
0845 345 9677 for UK
+491805938802 for Europe
Australia customer service number 1300 768 112 or email to service@shriro.com.au
India customer service number +91 7503011385 or email to assist@binatonetelecom.in
23 Safety Instructions
- Please remove the earphones immediately when lightning occurs;
- Do not use the earphone at high volume to prevent hearing damage;
- Do not let the product come into contact with liquid. If it gets into water, switch off the product immediately as continuous use may cause fire or electric shock;
- Do not expose the product to extreme high temperatures or humidity;
- Electrical equipment can cause serious injury if you use it when you are wet or standing in water;
- Do not use the product near explosives or flammable gas as it may cause an explosion;
- Do not let any metal or combustible materials get into the product through the memory card slot or USB slot, as this may cause fire or electric shock;
- The product is a precision electronic device. Handle it with care as the screen may become damaged when dropped;
- Unauthorised disassembling of the product in any manner may damage the device, and is not covered by the warranty.
- Do not place the product close to anything with strong magnetic power. Strong magnets may cause malfunction to the product or the screen. In addition, do not use the product close to strong radio waves as this may damage the data in the product.
- Please insert the memory card correctly. If the memory card cannot be inserted, please check whether the product supports it or the card is inserted in the correct direction.
- Forced insertion may damage the product.
23.1 Replacing batteries
CAUTION
RISK OF EXPLOSION IF BATTERY IS REPLACED BY AN INCORRECT TYPE. DISPOSE OF USED BATTERIES ACCORDING TO THE INSTRUCTIONS.
The battery in your Readme Mobile is not a user replaceable part.
If you think the battery needs replacing, please call the Binatone Helpline:
0845 345 9677 for UK, +491805938802 for Europe, 1300 768 112 for Australia, +91 7503011385 for India.
24 Cleaning The Device
- Do not clean any part of the product with thinners or other solvents and chemicals as this may cause permanent damage to the product which is not covered by the warranty.
- When necessary, clean it with a damp cloth.
- Keep your product away from hot, humid areas or strong sunlight, and do not let it get wet.
- Every effort has been made to ensure high standards of reliability for your product. However, if something does go wrong, please do not try to repair it yourself but contact Customer Service for assistance.
25 Disposal Of The Device(Environment)
At the end of the product lifecycle, you should not dispose of this product with normal household waste. Take this product to a collection point for the recycling of electrical and electronic equipment. The symbol on the product, user's guide and/or box indicates this.

Some of the product materials can be re-used if you take them to a recycling point. By reusing some parts or raw materials from used products you make an important contribution to the protection of the environment.
Please contact your local authorities in case you need more information on the collection points in your area.
26 Guarantee And Service
This product is guaranteed for 12 months* from the date of purchase shown on your sales receipt. The Guarantee does not cover damage by misuse or negligence, or by excessive voltages — for example, lightning.
*The warranty period will vary depending on the country of your purchase.
Please keep your sales (till) receipt — this is your guarantee. You should also keep the original packaging material.
27 Declaration Of Conformity
Binatone Telecom PLC
1 Apsley Way
London
NW2 7HF
United Kingdom
Dial: +44 (0) 208 955 2704

text_image
BinatoneEC Declaration of Conformity
We the manufacturer / Importer : Binatone Telecom Plc
| l | A | p | s | l | e | y | W | a | y |
| London | |||||||||
| NW2 7HF | |||||||||
| United | Kingdom |
Declare under our sole responsibility that the following product
Type of equipment:
Model Name:
Country of Origin:
Brand:
Mobile ebook device
ReadMe Mobile
China
Binatone
complies with the essential protection requirements of R&TTE Directive 1999/5/EC on the approximation of the laws of the Member States relating to Radio Spectrum Matters, the Council Directive 2004/108/EC on the approximation of the laws of the Member States relating to electromagnetic compatibility (EMC) and the European Community Directive 2006/95/EC relating to Electrical Safety.
Assessment of compliance of the product with the requirements relating to the essential requirements according to Article 3 R&TTE was based on Annex III of the Directive 1999/5/EC and the following standard:
Radio Spectrum: EN 300328 V1.7.1:2006-10
EMC: EN 301489-1:V1.8.1:2008-04
EN 301489-17:V1.3.2;2008-04
SAR EN 50371:2002
Electrical Safety: EN 60950:2006+A11 2009
The product is labelled with the European Approval Marking CE as show. Any Unauthorized

modification of the product voids this Declaration.
Manufacturer / Importer
(signature of authorized person)

Signature:
Position: Engineering Manager
Full Name: Henry Leung
Date: 18 May 11