DC60W - Cooker SERVIS - Free user manual and instructions
Find the device manual for free DC60W SERVIS in PDF.

| Product Type | Freestanding Electric Cooker |
| Brand | Servis |
| Model | DC60W |
| Width | 60 cm |
| Height | 85-90 cm (adjustable) |
| Depth | 60 cm |
| Weight | Approx. 50 kg |
| Power Supply | 220-240 V ~ 50/60 Hz, 10.5 kW |
| Number of Burners | 4 (2 large, 2 small) |
| Burner Types | Electric solid plates or halogen (varies) |
| Oven Type | Electric fan oven with grill |
| Oven Capacity | Approx. 65 liters |
| Oven Functions | Fan, conventional, grill, defrost |
| Cleaning | Enamel interior, easy-clean door |
| Safety Features | Child lock, automatic shut-off, cool-touch door |
| Spare Parts Availability | Directly from Servis or authorized dealers |
| Energy Class | A (typical) |
| Timer | Programmable timer with minute minder |
| Defrost Function | Yes, in oven |
| Interior Light | Yes |
Frequently Asked Questions - DC60W SERVIS
User questions about DC60W SERVIS
0 question about this device. Answer the ones you know or ask your own.
Ask a new question about this device
Download the instructions for your Cooker in PDF format for free! Find your manual DC60W - SERVIS and take your electronic device back in hand. On this page are published all the documents necessary for the use of your device. DC60W by SERVIS.
USER MANUAL DC60W SERVIS
natural_image
Illustration of a double boiler front panel with control knobs and indicator lights (no text or symbols)
text_image
REGISTER TO ACTIVATE YOUR 2 YEAR GUARANTEE NOW SERVIS.CO.UK 0880 0124382 Parts & Labour for 2 years. Go to www.servis.co.uk for more information SERVIS SINNERY@SINNERYContents>
01 Welcome
02 Safety Instructions
05 Your Oven
09 Technical Specification
10 Installation
12 Usage
20 Cleaning and Care
23 Troubleshooting
24 Guarantee
27 Index
WELCOME >
SAFETY INSTRUCTIONS >
WELCOME>
Thank you for choosing this Servis Electric Double Oven, which has been designed and manufactured to give you many years of trouble-free service.
You may already be familiar with using a similar product but please take time to read these instructions, which have been written to ensure you get the very best from your purchase.
WARRANTY >
Servis provides you with a guarantee which will protect you should your Oven develop a fault during the guarantee period. To ensure that you get a prompt and efficient service, please register your Oven immediately.
You will find a warranty card included within the packaging. To register, complete the form, or:
» Visit us at www.servis.co.uk
» Call us on 0800 0124 382
ITEMS INCLUDED >

text_image
Oven with Racks Grill Pan and Handle Figure 101
T: 0800 0124 382 T: 0800 0124 382

Visit servis.co.uk
To ensure your safety and the safety of others, please read the following safety precautions before you use your Oven.
Your Oven has been produced to conform with all relevant safety regulations relating to electrical appliances. Maintenance and repair work must only be carried out by authorised service technicians. Installation and repair work performed without following these instructions may be dangerous.
Your Oven has been designed for non-professional domestic use only.
» Unpack and examine your Oven for any damage. If you think there is a defect, contact the Servis helpdesk.
Remove and dispose of all packaging responsibly, following local laws and regulations. Do not leave packaging within the reach of children as it can be a source of danger.
Before connecting your Oven to the mains electrical supply, make sure that the Oven is rated correctly for the type of electrical supply in your house by checking the information on the rating plate.
If the power supply cable is damaged, contact the Servis helpdesk. The cable must only be replaced by authorised personnel.
» Disconnect your Oven from the electrical supply before changing the lamp.
» Make sure that your Oven is turned off at the mains before carrying out any cleaning or maintenance.

Visit servis.co.uk
SAFETY INSTRUCTIONS >
» Allow the Oven to fully cool before touching any of its surfaces.
» Do not keep flammable materials close to the Oven when it is in operation.
» Make sure that electrical cables from other devices cannot come into contact with the hot parts of your Oven.
» Make sure that all Control Knobs are set to the 0 position when the Oven is not in use.
» Whilst grilling, the Top Oven door must be closed.
» The Oven must be installed by an authorised technician prior to use.
» Children should be supervised to ensure that they do not play with the Oven.
The Oven is not intended for use by persons (including children) with reduced physical, sensory and mental capabilities or lack of experience and knowledge, unless they have been given supervision or instructions concerning the use of the Oven by persons responsible for their safety.
» Do not move away from the Oven while cooking with fat or oil. Flaring may occur in the case of overheating. Never pour water into flaring oil.
» Do not place anything on the Oven door when it is open. This could disrupt the balance of the oven or damage the door.
» Protect your Oven from atmospheric effects such as rain, snow, sun and dust.
» Unauthorised repairs could result in unforeseen dangers for the user. Repairs should only be undertaken by an approved service agent.
» Do not make any alterations to your Oven, unless authorised to do so by Servis.
If you notice a crack in the Cook Top, switch off the Hot plates immediately to prevent electrical shocks and contact the Servis helpdesk.
» Do not use the Oven to heat a room.
CE Declaration of conformity
Your oven has been designed to be used only for cooking. Any other use (such as heating a room) is improper and dangerous.
Your oven has been designed, constructed and marketed in compliance with:
» Safety requirements of the 'LVD' Directive 2006/95/EC.
» Safety requirements of the 'EMC' Directive 2004/108/EC.
» Requirements of the Directive 93/68/EC.
YOUR OVEN >
FRONT VIEW>

text_image
Rack Position 2 Rack Position 1 ① Rack Position 5 Rack Position 4 Rack Position 3 Rack Position 2 Rack Position 1 ② Oven Rack ③ Top Oven ④ Main Oven ⑤ Oven Lamp ⑥Figure 2
① Rack Positions; available rack positions for the Top Oven
②OvenRack
3 TopOven
4 MainOven
5 OvenLamp
6 Rack Positions; available rack positions for the Main Oven
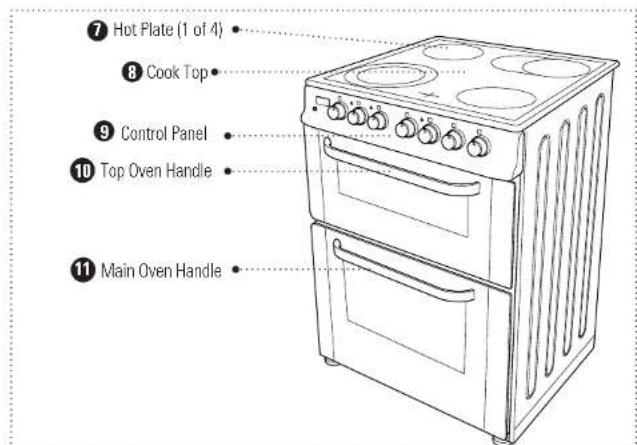
7 Hot Plate (1 of 4)
8 Cook Top: allows you to cook through use of the hot plates
9 Control Panel: allows you to adjust the different settings
10 Top Oven Handle
11ain Oven Handle
text_image
⑦ Hot Plate (1 of 4) ⑧ Cook Top ⑨ Control Panel ⑩ Top Oven Handle ⑪ Main Oven HandleFigure 3
YOUR OVEN >
REAR VIEW >

text_image
Electrical Connection Terminals Adjustable feet (1 of 4) Figure 41 Electrical Connection Terminals; connect your Oven to the mains supply.
② Adjustable feet; allow you to level your Oven.
ELECTRICAL INFORMATION >
Your Oven requires a 220-240V, 50Hz mains supply. Do not use any other supply.
TECHNICAL SPECIFICATION INSTALLATION

TECHNICAL SPECIFICATION >
| Model Number DC60W/DC60SS | |
| Power Supply 220-240 V AC, 50Hz | |
| Maximum Power (W) 10400 W | |
| Size (H x W x D) (mm) 900 x 600 x 600 | |
| Oven Volume (Main Oven / Top Oven) 56lt / 35lt | |
| Electric Cooker Energy Rating (Main Oven /Top Oven) | A / B |
| Energy Consumption Main Oven; | Conventional: 0,88 kWhFan Air Convection: 0,79 kWhTop Oven:Conventional: 0,85 kWh |
INSTALLATION REQUIREMENTS >
Before unpacking and manoeuvring your Oven, please take the time to read and become familiar with the following points:
To avoid risk of injury, please take care when moving your Oven. It is heavy and we recommend that a minimum of two people move the Oven.
To unpack the Oven and manoeuvre it into position, one person should hold it by the front feet and the other person at the edge of the lid at the rear.
Please be aware of the following safety points when installing your Oven:
Your Oven is 600 mm wide. Ensure that the installation area can accommodate the Oven and allow sufficient ventilation.
» Ensure that there are no combustible or flammable materials such as curtains or cushions in the vicinity of the installation.
» Cabinets and furniture surrounding your Oven must be of material resistant to temperatures greater than 100^ C.
» Ensure that there is at least a 20 mm gap between the back wall and the rear of your Oven. This is to allow ventilation and provide sufficient air circulation.
INSTALLATION>
USAGE >
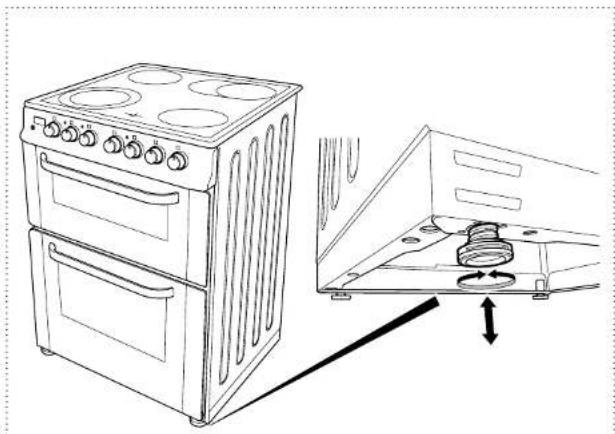
ADJUSTING THE FEET >
For safe operation, it is important that your Oven is stable and balanced. The four adjustable feet are used to level your Oven. Make sure that your Oven is level prior to cooking.
To increase the height of the Oven, turn the feet anti-clockwise (Figure 5).
② To decrease the height of the Oven, turn the clockwise (Figure 5).
natural_image
Line drawing of a two-tier electric stove next to an open oven with a coiled spring (no text or symbols)Figure 5
CONTROL PANEL OVERVIEW >

text_image
1 Digital Minute • Minder 2 Top Oven • Thermostat • Light 3 Main Oven • Thermostat • Light 4 Hot Plate Warning Light 5 Top Oven Control Knob 6 Main Oven Control Knob 7 Temperature Control Knob 8 Hot Plate Control KnobsFigure 6
1 Digital Minute Minder; displays the current time and can act as a timer to assist with meal preparation.
2 Top Oven Thermostat Light; when illuminated, indicates that the Top Oven has not yet reached the set temperature.
3 Main Oven Thermostat Light; when illuminated, indicates that the Main Oven has not yet reached the set temperature.
4 Hot Plate Warning Light; when illuminated, indicates that a Hot Plate is still warm.
5 Top Oven Control Knob: allows you to select cooking settings for the Top Oven.
6 Main Oven Control Knob; allows you to select cooking settings for the Main Oven.
7 Temperature Control Knob; allows you to adjust the temperature of the selected cooking setting.
8 Hot Plate Control Knobs; allow you adjust each Hot Plate individually.
USAGE>
USING YOUR OVEN FOR THE FIRST TIME >
»When you first use your Oven you may notice a slight smell. This is perfectly normal and is caused by the insulation materials on the heater elements. We suggest that before using your Oven for the first time you leave it empty, and set at maximum temperature for 45 minutes. Make sure that there is sufficient ventilation in the installation area.
The surfaces of the Hot Plate are covered with a protective layer. When using for the first time, operate the Hot Plates without a pan at level 3 for 5 minutes.
Adjusting the Hot Plates:
The control knob for each hot plate can be easily identified from the symbol above the knob. Each knob has 7 different positions:
To select the desired position, rotate the control knob either clockwise or ant-clockwise. When a Hot Plate is on, the Hot Plate warning light will illuminate.
»When the knob is in the 0 position, the associated Hot Plate is turned off. The remaining settings can be used as follows:
Setting Use
1 Keeping Hot
2-3 Heating at Low Temperature
4-5-6 Cooking, Frying and Boiling
»Please ensure that the control knob is in the 0 position after use. The Hot Plate Warning light will stay on after the Hot Plate is turned off to warn that the Hot Plate is still hot. The Warning Light will only go out after the Hot Plate has sufficiently cooled. Do not touch a Hot Plate before this time.
When using the Hot Plates we recommend that you use pan with a flat base and size that matches the heating elements. Always centre the pan on the heating element to ensure maximum efficiency and reduce heat loss.
The Digital Minute Minder:
The Digital Minute Minder can be used as a timer to assist with your cooking preparations. To set the required time:
» Simultaneously press the + and - buttons below the Digital Minute Minder until the display starts to flash.
Set the desired time by using the + and - buttons. Once the time has been set, press the + or - button. The Symbol will be displayed and the timer will begin counting down.
At the end of the selected time period, your Oven will produce an audible beep but continue carrying out the selected cooking setting. Turn all knobs to the 0 position to turn the Oven off.
Please Note: You can change the tone of the audible beep:
While the current time is displayed, press and hold the - button until you hear an audible beep. Press the - button again to cycle through the 3 available options. Once you have selected the desired tone wait for the display to return to the current time setting.
USAGE>
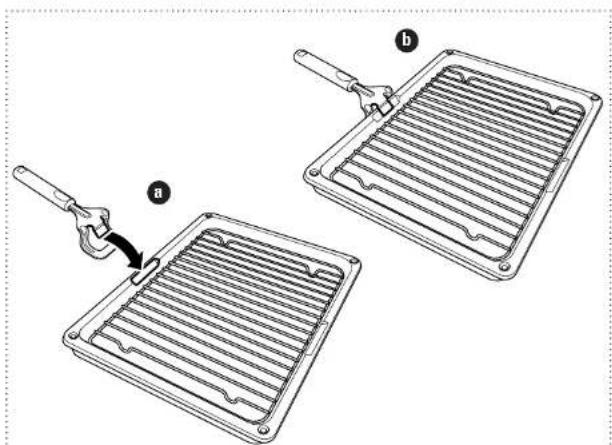
The Grill Pan Handle Set:
Warning: Always use an oven glove to protect your hand when using the grill as the metal parts can become very hot.
The Grill Pan has a detachable handle. When using the Grill Pan Handle, make sure that it is centralised and secure as shown in Figure 7.
Do not leave the handle in position when grilling as it will become very hot.
natural_image
Diagram showing two arrangements of heat exchangers with a tool, labeled (a) and (b), no text or symbols present.Figure 7
Using the Top Oven:
The Top Oven control knob allows you to select a setting suitable for your cooking needs. To make a selection:
» Turn the Top Oven Knob, until the desired setting is selected.
When the temperature inside the Top Oven reaches the set value, the thermostat will switch off the heating element and the thermostat light will go off.
» Please ensure that the Top Oven Control Knob is in the 0 position after use.
The available settings are as follows:

Grill: Use this setting for grilling. When grilling please use the Grill Pan and Handle set
ed and always remove the Grill Pan by using the handle.
op Oven Door must always be open when grilling

Double Grilling: This setting is intended for wider area grilling. When grilling please use ill Pan and Handle set provided and always remove the Grill Pan by using the handle.
op Oven Door must always be open when grilling

Top and Bottom Heating: With this setting, the heat generated by the upper and lower g elements ensures that your food is cooked evenly, top and bottom.
When using this setting we recommend that you pre-heat the Top Oven for 10 minutes. You will find this setting ideal for cooking cakes, flans, spaghetti, lasagne and pizza. Please refer to the table on page 19 for further information.
The Top Oven Door must always be closed when using this setting
USAGE >
☐ Top Heating: Select this setting for frying the upper side of food that has already been cooked or for heating pre-cooked food. The Top Oven Door must always be closed when using this setting.
Using the Main Oven:
The Main Oven Control Knob allows you to select a setting suitable for your cooking needs. To make a selection:
» Turn the Main Oven Control Knob, until the desired setting is selected.
» When the temperature inside the Main Oven reaches the set value, the thermostat will switch off the heating element and the thermostat light will go off.
» Please ensure that the Main Oven Control Knob is in the 0 position after use.
The available settings are as follows:
Defrost: This setting is intended to defrost your food in a short period of time. Place the food to be defrosted a rack in the third position (see Figure 2 for information on rack positions). We also recommend placing a tray on the bottom rack to collect any water formed during the defrosting process.
☐ Top and Bottom Heating: With this setting, the heat generated by the upper and lower heating elements ensures that your food is cooked evenly, top and bottom.
When using this setting we recommend that you pre-heat the Main Oven for 10 minutes. You will find this setting ideal for cooking cakes, flans, spaghetti, lasagne and pizza. Please refer to the table on page 19 for further information.
Top and Bottom Heating with Fan: When this setting is selected, the hot air generated by the upper and lower heating elements is circulated by the oven fan. We recommend pre-heating the Main Oven for 10 minutes when using this setting. This setting is best suited for single tray cooking and cooking pastries. Please refer to the cooking chart on page 19 for further information on the best use of your oven.
Fan and Circular Heating: This setting spreads hot air equally throughout the oven and is appropriate for cooking with one or more trays. When using this setting, pre-heat the oven for 10 minutes. Please bear in mind that when cooking with more than one tray additional cooking time will be required and that each tray may not necessarily cook at the same rate. We recommend alternating the position of the trays to achieve an even cooking time.
Temperature Control Knob
The Temperature Control Knob allows you to set the desired temperature for a selected cooking setting. To adjust the temperature:
» Turn the Temperature Control Knob, until the desired temperature is selected.
» The light above the Temperature Control Knob will illuminate when a tempearture has been selected.
» Please ensure the Temperature Control Knob is in the 0 position after use.
USAGE>
CLEANING AND CARE >
Cooking Chart
We have included a cooking chart to help you get the best from your Oven. Please refer to the table below for helpful information on cooking times, temperatures and rack positions.
| Food | Cooking Temperature | Time (Min) | Rack Position |
| Top Oven: | |||
| Small Cakes 160-185 | ^ 20-25 1 | ||
| Burgers Max Setting 20-25 2 | |||
| Beef Max Setting 25-30 2 | |||
| Toast | Max Setting | 5-10 | 2 |
| Main Oven: | |||
| Small Cakes 160-185 | ^ 20-25 2-3 | ||
| Larger Cakes | 150-160 ^ 30-40 | 2 | |
CLEANING AND CARE >
Before cleaning your Double Oven ensure that all Control Knobs are in the 0 position and that all parts have been allowed to cool.
Interior Cleaning:
» Avoid using harsh abrasive cream and powder based cleaners.
» Do not use steam cleaners when cleaning your oven.
» General cleaning of the interior of your Oven can be carried out using a wet cloth and warm soapy water.
» Use an approved oven cleaner from time to time, or if your oven interior becomes especially dirty.
In order to prevent damage to your Oven, always test an approved cleaner on a small area first and follow the manufacturer's instructions for use.
Exterior Cleaning:
» Avoid using abrasive cleaners or scouring pads as they may damage enamel surfaces.
» Use a warm wet cloth and mild detergent when cleaning metallic and enamelled surfaces.
» Use a glass cleaner to clean the interior surfaces of windows and doors.
CLEANING AND CARE >
Cleaning the Hob:
» Remove the plug from the electrical supply socket before cleaning.
» Make sure that the hob has completely cooled before you begin cleaning.
» Wipe the hob with a suitable washing up liquid applied to a warm damp cloth and dry the Oven with a clean cloth.
» Remove any food or fat with a suitable scraper.
If aluminium foil or plastic has melted on the hob, remove from the hot cooking area with a suitable scraper. Do the same for sugar or foods containing sugar.
Changing the Oven Lamps:
We recommend that the Oven lamp be replaced by authorised personnel. The rating of the replacement bulb should be 230V, 25W Type E14, heat resistant to 100°C.
Transportation:
Before transporting your Oven, make sure that it is disconnected from the electrical supply:
» Remove all accessories, trays and any items that are liable to become loose.
» Tape the oven door closed to prevent it from opening and becoming damaged during transit.
» Protect the Oven from damage by using either the original packaging or suitable packaging materials.
» Protect the external surfaces, especially glass with cardboard or paper.
TROUBLESHOOTING >
GUARANTEE >
TROUBLESHOOTING INFORMATION >
If your Oven is not operating as expected, you may find a simple solution listed in the table below.
If you are experiencing a fault not covered in the manual, please contact the Servis helpdesk.
| Fault Possible Cause Solution | ||
| The Oven does not turn on.The Hot Plates do not heat. | There is no power to the Oven. | Make sure that the electrical connections are working and that the switches are in the on or open position. |
| The Oven does not heat to the level expected. | The Control Knob may not be on the required setting.The Oven door may be left open. | Make sure the Control Knob is on the required setting.Close the Oven door. |
| The Oven Lamp does not illuminate. | The lamp has failed.There is no power to the Oven. | See page 21 for further information.Make sure your electrical supply is turned on. |
| The Oven is cooking food unevenly. | The Oven racks are incorrectly positioned. | Position the racks following the cooking guidelines. |
DISPOSAL>
All packaging and materials used are environmentally friendly and recyclable. Please dispose of any packaging in an environmentally friendly manner. Consult your local council for further details.

Please refer to the rear cover for disposal instructions.
GUARANTEE >
The Servis guarantee covers the cost of parts/labour/call out charges to repair an appliance should any covered component fail in its normal functions necessitating a repair or replacement to resume those functions.
The Servis guarantee does not cover:
Accidental damage.
»Use in a commercial environment.
»Incorrect or faulty installation.
» Deliberate damage or neglect.
» Repairs to cosmetic parts.
GUARANTEE>
»Damage caused by foreign objects or substances.
»Claims in respect to routine inspection or maintenance.
The Servis guarantee is not transferable.
For your Servis guarantee to be valid, you will need to retain your original purchase receipt and be able to provide it when you make a claim.
The above summary does not include all of the terms and conditions and exclusions which can be found on our website www.servis.co.uk.
KNOW YOUR RIGHTS >
Household contents insurance
Your household insurance may cover you for accidental damage, fire or theft of your product.
Data Protection Act (1988)
Please note that any information provided will be processed by us or our agents in compliance with the provisions of the Data Protection Act 1988, for the purpose or providing cover and handling claims, if any, which may necessitate providing such information to third parties.
INDEX>
A
Adjusting the feet 11
Adjusting the hot plates 13
C
Changing the oven lamps 21
Cleaning the hob 21
Control panel 12
Cooking chart....19
D
Defrost (main oven)....17
Digital minute minder 14
Double grilling (top oven)....16
E
Electrical information 08
Exterior cleaning 20
F
Fan and circular heating (main oven)....18
G
Feet, adjustment 13
Food storage guidance 11
Fuse....10
G
Grill (top oven) 16
Grill pan and handle set....15
Guarantee....24
J
Installation requirements....10
Interior cleaning 20
s
Safety instructions....02
T
Technical specifications....09
Temperature control knob 18
Top and bottom heating (main oven).....17
Top and bottom heating (top oven)....16
Top and bottom heating with fan .....18
Top heating (top oven)....17
Transportation 22
Troubleshooting....23
U
Using the main oven 17
Using the top oven 16
Using your oven for the first time....13
W
Warranty 01
T: 0800 0124 382
E: info@servis.co.uk

Visit
servis.co.uk
SERVIS
EFFICIENCY BY DESIGN

The symbol on the product or on its packaging indicates that this product may not be treated as household waste. Instead it shall be handed over to the applicable collection point for the recycling of electrical and electronic equipment. By ensuring this product is disposed of correctly, you will help prevent potential negative consequences for the environment and human health, which could otherwise be caused by inappropriate waste handling of this product. For more detailed information about recycling of this product, please contact your local city office; your household waste disposal service or the shop where you purchased the product.