
RHM3003 - Microwaves RUSSELL HOBBS - Free user manual and instructions
Find the device manual for free RHM3003 RUSSELL HOBBS in PDF.


| Product Type | Microwave oven with grill and convection |
| Model | RHM3003 |
| Brand | Russell Hobbs |
| Oven Capacity | 30 L |
| External Dimensions (LxWxH) | 520 mm x 510 mm x 335 mm |
| Net Weight | Approx. 19.9 kg |
| Rated Voltage | 230V - 240V ~ 50Hz |
| Microwave Input Power | 1450 W |
| Microwave Output Power | 900 W |
| Grill Power | 1100 W |
| Convection Power | 2500 W |
| Turntable Diameter | 315 mm |
| Cooking Functions | Microwave, Grill, Convection, Combination (Microwave+Grill, Microwave+Convection, Grill+Convection, Microwave+Grill+Convection), Defrost by Weight/Time, Auto Menu (10 menus), Quick Start, Multi-stage Cooking, Kitchen Timer, Clock |
| Power Levels | 5 levels: 100%, 80%, 50%, 30%, 10% |
| Child Lock | Yes, press STOP/CLEAR for 3 seconds to lock/unlock |
| Accessories Included | Glass turntable, turntable ring, grill rack |
| Safety Features | Door safety lock system, auto shut-off when door opened, child lock |
| Cleaning and Care | Wipe interior and exterior with damp cloth; clean waveguide cover; wash glass turntable in warm soapy water; avoid harsh detergents |
| Power Plug | 13A BS1363 plug with 13A fuse |
| Guarantee | 12 months from date of purchase |
| Customer Service | 0845 209 7461, Monday-Friday 9am-6pm, Saturday 9am-1pm, www.productcareuk.com |
Frequently Asked Questions - RHM3003 RUSSELL HOBBS
User questions about RHM3003 RUSSELL HOBBS
0 question about this device. Answer the ones you know or ask your own.
Ask a new question about this device
Download the instructions for your Microwaves in PDF format for free! Find your manual RHM3003 - RUSSELL HOBBS and take your electronic device back in hand. On this page are published all the documents necessary for the use of your device. RHM3003 by RUSSELL HOBBS.
USER MANUAL RHM3003 RUSSELL HOBBS
natural_image
Exterior view of a modern kitchen oven with digital display and control knobs (no visible text or symbols)Model number: RHM3003
Important safety instrucons, please read carefully and keep them for future reference
For Customer Services & Spare Parts please call
0845 209 7461
Opening mes: Monday – Friday 9am – 6pm & Saturday 9am – 1pm
Or visit us at www.productcareuk.com
Contents
About this microwave oven.... 2 Pa
Unpacking your microwave oven.... 3
Safety instrucons.... 4
Microwave oven installaon.... 10
Feature diagram.... 11
Turn table installaon.... 12
Control panel.... 13
How to use your microwave oven.... 14
Cooking.... 16
Cleaning and care.... 26
Important utensil informaon.... 28
Connecon to the mains supply.... 29
Problem solving.... 32
Guarantee.... 33
Technical specicaon.... 34
For Customer Services & Spare Parts please call 0845 209 7461
Opening mes: Monday - Friday 9am – 6pm & Saturday 9am – 1pm or visit us at www.productcareuk.com
About this microwave oven
Microwaves are high-frequency electromagnec waves similar to radio waves. While radio waves may vary in length from one metre to many kilometres, microwaves are very short (less than 12.5 cenmetres). Microwaves do not make any heat themselves but only cause water molecules in food to vibrate. This vibraon produces heat that cooks the food. This is why your food will come out of the microwave piping hot, when your utensils inside the oven stay much cooler. The microwaves do not stay in the air or in the food when you open the microwave oven door.
The microwave oven will work using an ordinary household electrical socket. Inside the microwave oven is the magnetron, which turns the electrical energy into microwaves. Microwaves cannot go through metal, so the inside of the oven is lined with metal. The door is lined with a ne metal mesh which stops microwaves geng through. This means that when the microwave oven door is shut, there is no possibility that microwaves can be released. This is why the microwave oven has been made so that it will not work when the door is open.
For Customer Services & Spare Parts please call 0845 209 7461
Opening mes: Monday - Friday 9am – 6pm & Saturday 9am – 1pm or visit us at www.productcareuk.com
Unpacking your microwave oven
Before you use your microwave oven
- Remove all the packaging. Do not remove the small piece of card from the right hand side of the cavity wall. This is called a wave-guide cover and allows the microwaves to pass through to cook the food. Please ensure you keep this cover clean at all me.
- Check the oven aer unpacking for any visual damage such as:
- A misaligned door
- Any damage to the door
● Dents or holes in the door window and screen
- Dents in the inside
- If you can see any damage do not use the oven
This microwave oven weighs approximately 20kg so you must put it on a horizontal surface that is strong enough to support this weight.
The oven must be placed away from high temperatures and steam.
Do not put anything on the top of the microwave oven.
For Customer Services & Spare Parts please call 0845 209 7461
Opening mes: Monday - Friday 9am – 6pm & Saturday 9am – 1pm or visit us at www.productcareuk.com
Safety instrucons
To reduce the risk of re, electric shock, other injuries and exposure to excessive microwave oven energy, follow these basic precautions:
➢ Do not use the oven for any reason other than preparing food, such as for drying clothes, paper or any other non-food items, or for sterilising purposes.
➢ Do not use the oven when it is empty. This could damage the oven.
Do not store anything in the oven, such as papers, cookbooks and so on.
➢ Do not cook any food surrounded by a membrane, such as egg yolks, potatoes, chicken livers, ready meals and so on without piercing them several mes.
➢ Ensure you do not use any corrosive chemicals or vapours in the appliance. It is not designed for industrial or laboratory use.
➢ Never put any objects into the openings on the outer case.
For Customer Services & Spare Parts please call 0845 209 7461
Opening mes: Monday - Friday 9am – 6pm & Saturday 9am – 1pm or visit us at www.productcareuk.com
Safety instrucons
To reduce the risk of re, electric shock, other injuries and exposure to excessive microwave oven energy, follow these basic precautions:
➢ Do not use this oven near water, in a wet basement, or near a swimming pool
➢ Failure to keep the oven clean could lead to deterioraon of the surface. This could badly aect the life of the appliance, and potenally be harmful.
➢ Never remove parts from the oven such as the feet, screws and so on.
➢ Only use microwave safe utensils, in line with these instrucons, whilst cooking.
Do not try to deep-fry foods in this oven.
▶ Only use the accessories supplied by the manufacturer
For Customer Services & Spare Parts please call 0845 209 7461
Opening mes: Monday - Friday 9am – 6pm & Saturday 9am – 1pm or visit us at www.productcareuk.com
Safety instrucons
➢ Heat from the contents of a container may be transmied to the container itself, so please be careful when removing it from the oven. Please remember that the food or liquid inside will be releasing some steam or will be spiting. Never cover any container fully, always leave a gap for steam to escape.
➢ Cooking utensils may become hot because of heat transferred from the heated food. This is especially true if plasc wrap has been covering the top and handles of the utensil. You may need oven gloves to handle the utensil.
The contents of feeding boles and baby food jars shall be sred or shaken and the temperature should be checked before consumpon, in order to avoid burns.
➢ Always test the temperature of cooked food, never eat or drink food or liquid straight from the oven, it may be extremely hot. Allow it to stand for a few minutes and sr to distribute the heat evenly.
For Customer Services & Spare Parts please call 0845 209 7461
Opening mes: Monday - Friday 9am - 6pm & Saturday 9am - 1pm or visit us at www.productcareuk.com
Safety instrucons
➢ Food containing a mixture of fat and water (e.g. stock) should stand for 30 to 60 seconds in the oven aer it has been turned o. This is to allow the mixture to sele and to prevent it from bubbling when a spoon is placed in it, or a stock cube is added.
When heang or cooking food or liquid, remember that there are certain foods (such as Christmas puddings, jam and mincemeat) which heat up very quickly.
When heang or cooking foods that contain a lot of fat or sugar, do not use plasc containers.
➢ Always have the glass tray and turntable support in place when using the oven.
➢ Do not cook food directly on the glass tray. Put food on a suitable plate or in a bowl before pung it in the oven.
For Customer Services & Spare Parts please call 0845 209 7461
Opening mes: Monday - Friday 9am – 6pm & Saturday 9am – 1pm or visit us at www.productcareuk.com
Safety instrucons
To reduce the risk of re in the oven cavity:
Do not overcook food.
➢ Do not leave the microwave oven unaended while you are using it and if using paper or plasc containers check regularly to ensure they do not ignite.
➢ Remove wire twist-es from bags before pung the bag in the oven.
If materials inside the oven smoke or catch re, keep the oven door closed to se the ames, turn the oven o at the wall switch, or shut the power o at the fuse or circuit-breaker panel.
➢If the supply cord is damaged, it must be replaced by the manufacturer, a qualified service engineer, or a similarly qualified person, in order to avoid a hazard.
Warning: Children should not use this microwave oven.
Warning: This appliance is not intended for use by any person (including children) with reduced physical, sensory or mental capabilities, or lack of experience and knowledge, unless they have been given supervision or instrucon concerning use of the appliance by a person responsible for their safety. Children should be supervised to make sure that they do not play with the appliance.
Safety instrucons
Warning: It is dangerous for anyone, other than a qualified person to carry out any service or repair which involves the removal of the cover. This cover gives protecon against exposure to microwave energy.
Warning: If the door or door seals are damaged, the oven must not be operated until it has been repaired by an engineer. The door seals are located around the window on the inside of the door. These seals are not airght, although no microwaves can be released, it is normal for small amounts of air or steam to escape when the oven is in use.
Warning: Liquids and other foods must not be heated in sealed containers as they are liable to explode.
Warning: Do not use the microwave when it is empty.
For Customer Services & Spare Parts please call 0845 209 7461
Opening mes: Monday - Friday 9am – 6pm & Saturday 9am – 1pm or visit us at www.productcareuk.com
Microwave oven installaon
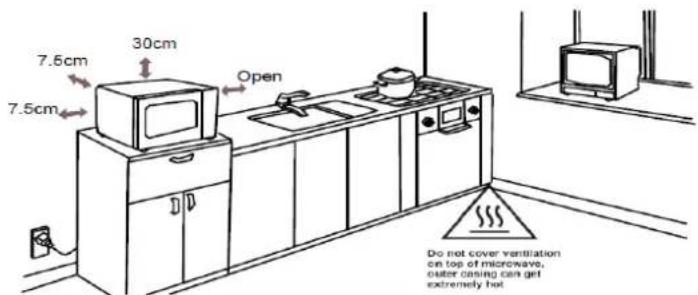
➢ Place on a level surface that provides enough space for the outlet vents.
➢ A minimum clearance of 7.5cm is required between the oven and any adjacent walls. One side must be open. Leave a minimum clearance of 30cm above the oven.
➢ Place the oven as far away from radios and TV's as possible. Using the oven may cause interference with the recepon.
Plug the oven into a suitable 13 amp mains socket, make sure the voltage is the same as on the rang label (do not use extension cables or mains socket adaptors).
Warning: Do not install the oven over a cooker or
any other heat producing appliance.
This will damage the oven.
Feature Diagram
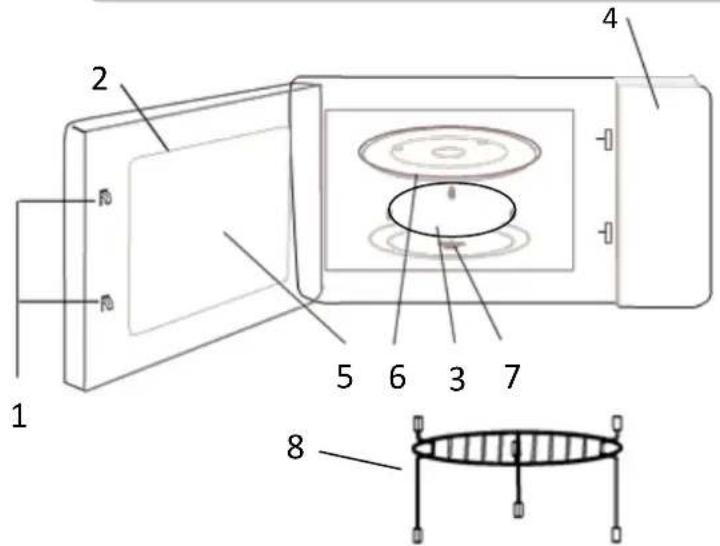
- Door Safety Lock System
- Oven Window
- Turntable Ring
- Control Panel
- Door Guard
- Glass Turntable – To be used for microwave, combinaon, grilling or convecon cooking.
- Plasc turntable drive
- Grill rack – To be used in the combinaon cooking & Grilling. Rack can be used either way up to alter the distance to the grilling element.
Warning - do not use the oven when empty or for warming plates. Always keep the oven cavity, door assembly and waveguide cover clean
For Customer Services & Spare Parts please call 0845 209 7461
Opening mes: Monday - Friday 9am – 6pm & Saturday 9am – 1pm or visit us at www.productcareuk.com
Turn table installaon
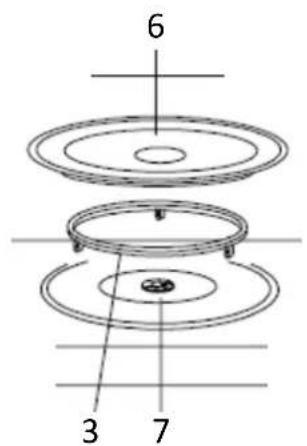
Before rst use, check that any securing tape has been removed from the glass tray and turntable ring assembly. These parts must never be restricted from rotang.
➢ Never place the glass tray upside down.
Both the glass tray and turntable ring assembly must always be used during cooking.
➢ Do not place the food directly onto the glass tray, always place on, or in, a suitable microwaveable cookware.
➢ If the glass tray or turntable ring assembly has been damaged in anyway, please use the contact details at the boom of this page.
For Customer Services & Spare Parts please call 0845 209 7461
Opening mes: Monday - Friday 9am – 6pm & Saturday 9am – 1pm or visit us at www.productcareuk.com
Control Panel
natural_image
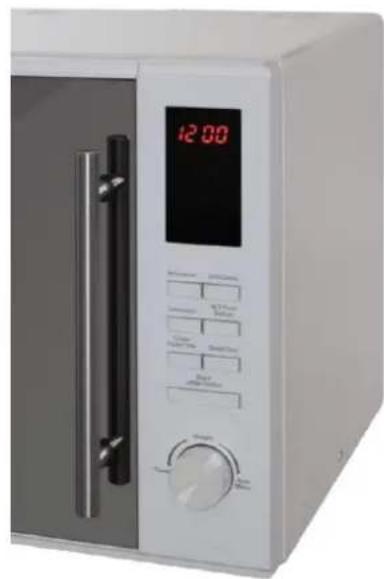
Front view of a white microwave oven with digital display and control knobs (no visible text or symbols)MENU ACTION SCREEN Cooking me, power, acon indicators, and clock me are displayed.
CLOCK/KITCHEN TIMER Press this buon to set the clock.
MICROWAVE Press this buon to use the microwave funcon.
GRILL/COMBI Press this buon to use the grill and combinaon cooking. The grill element is located on the top of the cavity.
CONVECTION Press this buon to use the convecon funcon, an element at the back of the unit is used for convecon cooking
W.T./TIME/DEFROST Press this buon for the defrost funcon.
AUTO MENU Turn the dial to access the auto menu.
TIMER/WEIGHT This rotaonal dial is used for a number of funcons.
STOP/CLEAR Press the Stop/Clear buon to clear everything.
START/+30 SEC/CONFIRM Press this buon to start the cooking process.
How to use the microwave oven
Clock Seng
When the microwave oven is rst turned on, the oven will display "0:00", the buzzer will ring once.
1) Press "CLOCK/KITCHEN TIMER" once. "00:00" is shown.
2) Turn the "TIMER/WEIGHT" dial to adjust the hour gures, the input me should be within 0 - 23(24-hour).
3) Press "CLOCK/KITCHEN TIMER" buon again and the minute gures will ash.
4) Turn the "TIMER/WEIGHT" dial to adjust the minute gures, the input me should be within 0 - 59 (60-minutes).
5) Press "CLOCK/KITCHEN TIMER" to nish the clock seng procedure. The ":" will ash.
Note:
1) If the clock is not set, it will not funcon when powered.
2) During the process of clock seng, if you press " STOP/CLEAR ", the oven will go back to the previous status.
For Customer Services & Spare Parts please call 0845 209 7461
Opening mes: Monday - Friday 9am – 6pm & Saturday 9am – 1pm or visit us at www.productcareuk.com
How to use the microwave oven
Kitchen Timer
1) Press "CLOCK/KITCHEN TIMER" twice, LED will display 00:00.
2) Turn "TIMER/WEIGHT" dial to enter the desired me.(The maximum me is 95 minutes.)
3) Press " START/+30SEC./CONFIRM" to conrm seng.
4) When the kitchen me is reached, the buzzer will ring 5 mes to indicate the me is complete.
Note: The kitchen Timer is for use alongside other kitchen appliances. It's an additional funcon to the cooking.
For Customer Services & Spare Parts please call 0845 209 7461 Opening mes: Monday - Friday 9am – 6pm & Saturday 9am – 1pm or visit us at www.productcareuk.com
Cooking
Microwave Cooking
1) Press the "MICROWAVE" buon once, and "P100" will be displayed.
2) Turn the "TIMER/WEIGHT" to select the microwave power. "P100", "P80", "P50", "P30" and, "P10" will be displayed.
3) Press "START/+30 SEC./CONFIRM" to conrm.
4)Turn the "TIMER/WEIGHT" dial to adjust the cooking me.(The me seng should be between 0:05-95:00.)
5) Press "START/+30 SEC./CONFIRM" to start cooking.
| Press power button | Cooking power |
| P100 | 100% |
| P80 | 80% |
| P50 | 50% |
| P30 | 30% |
| P10 | 10% |
To stop the cooking process at anyme press the "STOP/CLEAR" buon.
For Customer Services & Spare Parts please call 0845 209 7461
Opening mes: Monday - Friday 9am - 6pm & Saturday 9am - 1pm or visit us at www.productcareuk.com
Cooking
Grill Cooking
1) Press the "GRILL/CONV./COMBI." buon once, and "G-1" will be shown.
2) Press "START/+30 SEC./CONFIRM" buon to conrm.
3) Turn "TIMER/WEIGHT" to adjust the cooking me. (The me seng should be 0:05-95:00.)
4) Press "START/+30 SEC./CONFIRM" buon to start the cooking process.
Note: Half way through the grill me, the unit will pause and sound twice to tell you to turn the food over. In order to achieve more even grilling, you should turn the food over, close the door, and then press "START/+30 SEC./CONFIRM" to connue cooking. If the food is not turned, the oven will wait one minute and the grilling will resume automacally.
Cooking
Combinaon Cooking (Microwave + Convecon)
1) Press the "GRILL/COMBI." buon once, and "G-1" will display.
2) Turn the "TIMER/WEIGHT" dial to select the combination preferred cooking method. Stop turning when "C-1","C-2","C-3" and "C-4" are on the display. The table below indicates what funcons will be acvated in the cooking process.
3) Press the "START/+30 SEC./CONFIRM" buon to conrm.
4) Turn "TIMER/WEIGHT" dial to adjust the cooking time. (The me setng should be 0:05-95:00).
5) Press "START/+30 SEC./CONFIRM" to start the cooking process.
| Display Micro wave cooking | Grill cooking Convecon | ||
| C1 • • | |||
| C2 • • | |||
| C3 • • | |||
| C4 • • • | |||
For Customer Services & Spare Parts please call 0845 209 7461
Opening mes: Monday - Friday 9am - 6pm & Saturday 9am - 1pm or visit us at www.productcareuk.com
Cooking
Convecon Cooking (with preheang funcon)
The convecon cooking allows you to cook food using the unit as a traditional oven, the microwave funcon is not used. It is recommended that you preheat the oven to the appropriate temperature before placing the food in the oven.
1) Press the "CONVECTION" buon once, and "140", the cooking temperature will ash.
2) Turn the "TIMER/WEIGHT" dial to select the desired convecon funcon temperature. Note: the temperature can be chosen from 140 degrees to 230 degrees, in 10 degree intervals.
3) Press the "START/+30 SEC./CONFIRM" buon to conrm the chosen temperature.
4) Press the "START/+30 SEC./CONFIRM" buon to start the preheang. When the preheang temperature is reached, the buzzer will sound twice to remind you to place the food in the oven. The preheated temperature will display and ash. Open the door and place the food in the microwave oven.
5) Put the food into the oven and close the door.
Turn "TIMER/WEIGHT" dial to adjust the cooking me. (The maximum me available is 95 minutes.)
6) Press the "START/+30 SEC./CONFIRM" buon to start cooking.
Note:
a. The cooking me cannot be put in unl the preheang temperature is achieved, Once the temperature is achieved the door must be opened to input the cooking me.
b. If the me is not put in during 5 minutes of reaching the temperature, the oven will stop preheang. The buzzer sound ve mes and turn back to waing states.
For Customer Services & Spare Parts please call 0845 209 7461
Opening mes: Monday - Friday 9am – 6pm & Saturday 9am – 1pm or visit us at www.productcareuk.com
Cooking
Convecon Cooking( Without pre-heang funcon)
1) Press the "CONVECTION" buon once, and "140", the cooking temperature will ash.
2) Turn the "TIMER/WEIGHT" dial to select the desired convecon funcon temperature. Note: the temperature can be chosen from 140 degrees to 230 degrees, in 10 degree intervals.
3) Press the "START/+30 SEC./CONFIRM" buon to conrm the chosen temperature.
4) Turn the "TIMER/WEIGHT" dial to adjust the cooking me. (The maximum seng me is 95 minutes.)
5) Press the "START/+30SEC./CONFIRM" key to start cooking.
Mul-Stage Cooking
Two stages can be set. If one of the stages is for defrosng this should be programmed to come on rst. The buzzer will ring once aer each stage and then the next stage will start.
Note: The Auto menu or the pre heang funcons cannot be set as one of the mul-stage cooking.
Example: if you want to defrost the food for 5 minutes, then to cook with 80% microwave power for 7 minutes. The steps are as following:
1) Press "W.T./TIME DEFROST" twice, the screen will display "d-2";
2) Turn the "TIMER/WEIGHT" dial to adjust the defrost me to 5 minutes;
3) Press the "MICROWAVE" buon once;
4) Turn the "TIMER/WEIGHT" dial to choose 80% microwave power II "P80" display (see earlier instrucons for power levels)
5) Press "START/+30SEC./CONFIRM" to conrm;
6) Turn the "TIMER/WEIGHT" dial to adjust the cooking time of 7 minutes;
7) Press "START/+30SEC./CONFIRM" to start cooking.
Cooking
Quick Start cooking
1) Press the "START/+30SEC./CONFIRM" key to cook with 100% power level for 30 seconds. Each press on the same key can increase the cooking me by 30 seconds. The maximum cooking me is 95 minutes.
2) During the microwave, grill, convecon and combinaon cooking process, press the "START/+30SEC./CONFIRM" key to cook with 100% power level for 30 seconds. Each press on the same key can increase the microwave cooking by 30 seconds.
Note: this funcon cannot work under defrost and auto menu cooking.
Timed Quick Start cooking
1) Turn the "TIMER/WEIGHT" dial to an clockwise to adjust the cooking me. (The maximum seng me is 95 minutes.). Reduce the cooking me by rotang further an clockwise.
2) Press the "START/+30SEC./CONFIRM" key to start the cooking process on 100% power level.
Cooking
Defrosng by Weight
1) Press " W.T./Time DEFROST" buon once, the oven will display "d 1".
2) Turn the "TIMER/WEIGHT" dial to select the weight of the food. At the same me, "g" will illuminate in red.
The weight should be set between 100-2000g.
3) Press the "START/+30SEC./CONFIRM" key to start defrosng.
Defrosng by Time
1) Press " W.T./TIME DEFROST " key twice and the oven will display "d 2"
2) Turn the "TIMER/WEIGHT" dial to select the cooking me. The maximum seng me is 95 minutes.
3) Press " START/+30SEC./CONFIRM" key to start the defrosng process.
For Customer Services & Spare Parts please call 0845 209 7461
Opening mes: Monday - Friday 9am - 6pm & Saturday 9am - 1pm or visit us at www.productcareuk.com
Cooking
Auto Menu
1) Turn the "TIMER/WEIGHT" dial clockwise to choose the required funcon, and "A1", "A2", "A3".... "A10" will be displayed.
2) Press the "START/+30 SEC./CONFIRM" buon to conrm the menu you need.
3) Turn the "TIMER/WEIGHT" dial to choose the weight of menu, and "g" indicator will light.
4) Press "START/ +30 SEC./CONFIRM" to start the cooking process.
Note: When you choose A9 cake, please do not put the cake mix in to the oven immediately. The oven needs to be preheated to 180 degree rst. Aer several minutes, the buzzer sounds twice to remind you to put the cake into the oven. Aer pung the cake in the oven, please press start again.
The mer will count down, and the cake will be cooked perfectly.
For Customer Services & Spare Parts please call 0845 209 7461
Opening mes: Monday - Friday 9am – 6pm & Saturday 9am – 1pm or visit us at www.productcareuk.com
Cooking
| Display | Weight | Power | |
| A1 Pizza | 200 | 200 C-4 | |
| 300 | 300 | ||
| 400 | 400 | ||
| A2 Potatoe | 1 | 1 (230g) 100% | |
| 2 | 2 (460g) | ||
| 3 | 3 (690g) | ||
| A3 Meat | 150 | 150 100% | |
| 300 | 300 | ||
| 450 | 450 | ||
| 600 | 600 | ||
| A4 Fish | 150 | 150 80% | |
| 250 | 250 | ||
| 350 | 350 | ||
| 450 | 450 | ||
| 650 | 650 | ||
| A5 Vegetable | 150 | 150 100% | |
| 350 | 350 | ||
| 500 | 500 | ||
| A6 Beverage | 1 | 1 (240ml) 80% | |
| 2 | 2 (480ml) | ||
| 3 | 3 (720ml) | ||
| A7 Pasta | 50 | 50 (add 450ml of water) | |
| 100 | 100 (add 800ml of water) | ||
| 150 | 150 (add 1200ml of water) | ||
| A8 Popcorn | 50 | 50 100% | |
| 100 | 100 | ||
| A9 Cake | 475 | 475 Preheat to | |
| A10 Chicken | 500 | 500 C-4 | |
| 750 | 750 | ||
| 1000 | 1000 | ||
| 1200 | 1200 |
Cooking
Inquiring Funcon
1) During cooking state, press "CLOCK/KITCHEN TIMER" to check the current me. It will be displayed for 2-3 seconds.
2) In cooking state, press "MICROWAVE", the "GRILL/ COMBI." or the "CONVECTION", the current power level will be displayed for 2-3 seconds.
Child lock
Lock on: In waing state, press "STOP/CLEAR" for 3 seconds, there will be a long "beep" as the lock acvates a red key will illuminate in the display. LED will display current me or 0:00. Lock o: In locked state, press "STOP/CLEAR" for 3 seconds, there will be a long "beep" denong that the lock is released, the lock symbol will disappear.
Specicaon
(1) The buzzer will sound once when turning the knob at the beginning;
(2) The "START/+30 SEC./CONFIRM" buon must be pressed again to continue cooking if the door is opened during a cooking cycle.
(3) Once the cooking programme has been set, if the "START/+30 SEC./CONFIRM" buon is not pressed in 5 minutes. The current me will be displayed and the seng will be cancelled.
(4) The buons will beep if they are pressed correctly, they will not beep if not.
(5) The buzzer will sound ve mes to remind you when cooking is nished.
Cleaning and care
Before you clean the oven, turn it o and unplug it.
Keep the inside of the oven clean. When food or liquids sick to the oven walls, wipe with a damp cloth. We recommend that you do not use harsh detergent or abrasives.
On the right hand side wall of the cavity is the wave guide cover, microwaves are passed through this to enable your food to cook. It is important that this wave guide cover is kept clean at all mes. To do this wipe with mild detergent and water, then dry.
You should clean the outside of the oven with a damp cloth. Don't allow water to seep into the venlaon openings.
➢ Do not allow the control panel to become wet. Clean with a so, damp cloth. Do not use detergents, abrasives or spray-on cleaners on the control panel.
If steam builds up inside or around the outside of the oven door, wipe with a so cloth. This may happen when the microwave oven is used in humid conditions.
For Customer Services & Spare Parts please call 0845 209 7461
Opening mes: Monday - Friday 9am – 6pm & Saturday 9am – 1pm or visit us at www.productcareuk.com
Cleaning and care
➢ Regularly remove the glass turntable to clean it, and wash it in warm soapy water.
➢ Ensure that the turntable support and oven oor are cleaned regularly. Simply wipe the boom surface of the oven with mild detergent and water, then dry. You can wash the turntable support in mild soapy water.
When removing the turntable support of the oven, make sure you put it back properly.
If the inside of the oven smells, put a cup of water with the juice and skin of one lemon in a deep microwave bowl. Microwave it for three minutes, wipe thoroughly and then dry with a so cloth.
➢ Failure to maintain the oven in a clean condion, especially if liquid is le under the turntable, could lead to deterioraon of the surface that could adversely act the life of the appliance and possibly result in a hazardous condion.
For Customer Services & Spare Parts please call 0845 209 7461 Opening mes: Monday - Friday 9am – 6pm & Saturday 9am – 1pm or visit us at www.productcareuk.com
Important utensil informaon
➢ Do not use metal pans or dishes with metal handles without food in the microwave/oven
➢ Do not use anything with a metal trim, without food in the microwave/oven.
➢ Do not use paper covered wire twist-es on plasc bags.
➢ Do not use melamine dishes as they contain a material which will absorb microwave energy. This may cause the dishes to crack or burn, and will slow down the cooking speed.
➢ Use only cookware that is approved to be used in a microwave oven.
➢ Do not cook using a container with a restricted opening, such as boles, as they may explode.
➢ Do not heat baby boles with the teat left on and remove if replacing the bottle back into the oven.
➢ Do not use the microwave oven for heang utensils.
For Customer Services & Spare Parts please call 0845 209 7461
Opening mes: Monday - Friday 9am – 6pm & Saturday 9am – 1pm or visit us at www.productcareuk.com
Connecon to the mains supply
WARNING- THIS APPLIANCE MUST BE EARTHED
This appliance is designed to operate from a mains supply of 230V – 240V \~ 50HZ. Check that the voltage marked on the product corresponds with your supply voltage.
This product is ed with a 13A plug complying with BS1363.
If this plug is unsuitable or needs to be replaced, please note the following:
Important: The wires in the mains lead are
Coloured in accordance with the following code:
GREEN/YELLOW-EARTH
BLUE-NEUTRAL
BROWN-LIVE
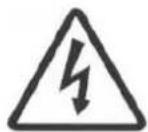
DANGER
Electric
Shock Risk
For Customer Services & Spare Parts please call 0845 209 7461
Opening mes: Monday - Friday 9am - 6pm & Saturday 9am - 1pm or visit us at www.productcareuk.com
Connecon to the mains supply
For UK use only – Plug ng details (where applicable):
As the colours of the wires in the mains lead of this appliance may not correspond with the coloured markings identifying the terminals in your plug, proceed as follows:
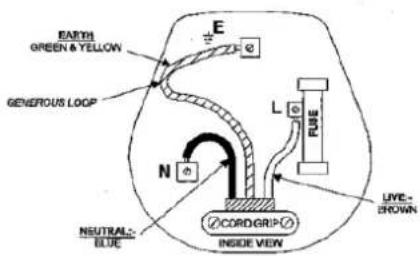
The GREEN/YELLOW wire is the EARTH and must be connected to the terminal which is marked with the leer E or by the earth symbol or coloured GREEN or GREEN/YELLOW.
The BLUE wire is the NEUTRAL and must be connected to the terminal marked with the leer N or coloured BLACK.
The BROWN wire is the LIVE wire and must be connected to the terminal marked with the leer L or coloured RED.
Always ensure that the plug cord grip is fastened correctly.
If a 13A (BS1363) fused plug is used it must be ed with a 13amp fuse conforming to BS1362 and be BSI or ASTA approved.
Non-rewireable mains plug
If your appliance is supplied with a non-rewireable plug ed to the mains lead you will nd that it incorporates a fuse, the value of which is indicated either on the base of the plug or on the fuse carrier. Should the fuse need replacing, you must use an ASTA approved fuse (conforming to BS1362) of the same rang.
If the fuse cover is lost the plug must not be used until a replacement is obtained from an electrical supplier.
If you need to remove the plug, cut it from the mains lead and dispose of it. Never aempt to re-use this plug or insert it into a socket outlet, as there is a very great risk of an electric shock.
For Customer Services & Spare Parts please call 0845 209 7461 Opening mes: Monday - Friday 9am – 6pm & Saturday 9am – 1pm or visit us at www.productcareuk.com
Problem solving
The microwave oven may cause interference to your radio, TV or similar equipment. If it does, you can get rid of the interference by moving the radio, TV or equipment as far away from your microwave oven as possible.
If the oven doesn't work -
➢ Make sure the mains plug is plugged in securely. If it is not, remove the plug from the socket, wait 10 seconds and plug it in again securely.
➢ Check the premises for a blown circuit fuse or a tripped main circuit breaker. If these seem to be working properly, test the socket with another appliance.
If the microwave power will not work –
▶ Check to see whether the mer is set.
➢ Make sure the door is securely closed. Otherwise, the microwave energy will not ow into the oven
For Customer Services & Spare Parts please call 0845 209 7461
Opening mes: Monday - Friday 9am – 6pm & Saturday 9am – 1pm or visit us at www.productcareuk.com
Guarantee
This product is guaranteed for 12 months from the date of the original purchase. If any defect arises due to faulty materials or workmanship, the faulty product must be returned to the place of purchase.
Refund or replacement is at the discretion of the store.
The following conditions apply:
• The product must be returned to the retailer with the original proof of purchase.
- The product must be installed and used in accordance with the instrucons contained in this instrucon guide and any other instrucons for use which has been supplied.
• It must be used for domesc purposes only and for its intended use.
• This guarantee does not cover wear and tear, damage, misuse or consumable parts.
This does not aect your statutory rights.
For Customer Services & Spare Parts please call 0845 209 7461 Opening mes: Monday - Friday 9am – 6pm & Saturday 9am – 1pm or visit us at www.productcareuk.com
Specicaons
Model Number: RHM3003
Rated Voltage: 230V - 240V \~ 50Hz
Rated Input Power(Microwave): 1450W
Rated Output Power(Microwave): 900W
Rated Power(Grill): 1100W
Rated Power(Convecon): 2500W
Oven Capacity: 30 L
Turntable Diameter: 315 mm
External Dimensions(LxWxH): 520mmX510mmX335mm
Net Weight: Approx. 19.9 kg
For Customer Services & Spare Parts please call 0845 209 7461
Opening mes: Monday - Friday 9am – 5pm & Saturday 9am – 1pm or visit us at www.productcareuk.com
For Customer Services & Spare Parts please call 0845 209 7461 Opening mes: Monday - Friday 9am – 6pm & Saturday 9am – 1pm or visit us at www.productcareuk.com
Revision 1

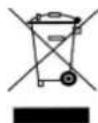
This symbol is known as the 'Crossed-out wheelie bin Symbol'. When this symbol is marked on a product/baeries, it means that the product/baeries should not be disposed of with your general household waste. Only discard electrical/electronic/baery items in separate collecon schemes, which cater for the recovery and recycling of materials contained within. Your co-operaon is vital to make sure the success of these schemes and for the protecon of the environment. For your nearest disposal facility, visit www.recycle-more.co.uk or ask in store for details.
We reserve the right due to possible changes to design to alter the instrucon manual without prior noce.
- Model number: RHM3003
- Contents
- About this microwave oven
- Unpacking your microwave oven
- Safety instrucons
- Microwave oven installaon
- Feature Diagram
- Warning - do not use the oven when empty or for warming plates. Always keep the oven cavity, door assembly and waveguide cover clean
- Turn table installaon
- Control Panel
- How to use the microwave oven
- Clock Seng
- Note:
- Kitchen Timer
- Cooking
- Microwave Cooking
- Grill Cooking
- Combinaon Cooking (Microwave + Convecon)
- Convecon Cooking (with preheang funcon)
- Convecon Cooking( Without pre-heang funcon)
- Mul-Stage Cooking
- Quick Start cooking
- Timed Quick Start cooking
- Defrosng by Weight
- Defrosng by Time
- Auto Menu
- Inquiring Funcon
- Child lock
- Specicaon
- Cleaning and care
- Important utensil informaon
- Connecon to the mains supply
- WARNING- THIS APPLIANCE MUST BE EARTHED
- Non-rewireable mains plug
- Problem solving
- If the oven doesn't work -
- If the microwave power will not work –
- Guarantee
- The following conditions apply:
- This does not aect your statutory rights.
- Specicaons
- Revision 1
Brand : RUSSELL HOBBS
Model : RHM3003
Category : Microwaves