
Cadet 200 Roll Up - Boat ZODIAC - Free user manual and instructions
Find the device manual for free Cadet 200 Roll Up ZODIAC in PDF.


| Product Type | Inflatable Boat |
| Brand | Zodiac |
| Model | Cadet 200 Roll Up |
| Overall Length | 200 cm (6 ft 7 in) |
| Overall Width | 120 cm (3 ft 11 in) |
| Weight | Approximately 20 kg (44 lbs) |
| Maximum Load Capacity | 200 kg (441 lbs) |
| Maximum Persons | 2 adults + 1 child |
| Material | PVC (Polyvinyl Chloride) |
| Air Chambers | 2 separate chambers |
| Floor Type | Inflatable drop-stitch floor |
| Motor Capacity | Up to 3.0 hp (2.2 kW) |
| Recommended Motor Shaft Length | Short shaft (381 mm) |
| Valve Type | Boston valve (leaf and spring type) |
| Included Accessories | Repair kit, oars, manual pump, carry bag |
| Storage | Roll up for compact storage |
| Cleaning | Wash with mild soap and water; rinse thoroughly |
| Safety Features | D-rings for towing and mooring; grab lines |
| Spare Parts Availability | Valves, patches, floor parts available from Zodiac dealers |
| Warranty | 1 year against manufacturing defects |
Frequently Asked Questions - Cadet 200 Roll Up ZODIAC
User questions about Cadet 200 Roll Up ZODIAC
0 question about this device. Answer the ones you know or ask your own.
Ask a new question about this device
Download the instructions for your Boat in PDF format for free! Find your manual Cadet 200 Roll Up - ZODIAC and take your electronic device back in hand. On this page are published all the documents necessary for the use of your device. Cadet 200 Roll Up by ZODIAC.
USER MANUAL Cadet 200 Roll Up ZODIAC
● CAREFULLY READ THIS MANUAL BEFORE OPERATING YOUR BOAT.
- THIS OWNER'S MANUAL IS IN TWO VOLUMES THAT MUST BE KEPT TOGETHER.
NOTICE:
THE OWNER'S MANUAL IS IN TWO VOLUMES:
- VOLUME 1
DEALS WITH OPERATING PRECAUTIONS AND SAFETY RECOMMENDATIONS THAT MUST BE OBSERVED.
- VOLUME 2
DEALS WITH TECHNICAL SPECIFICATIONS AND ASSEMBLY PROCEDURE OF THE BOAT AND ITS EQUIPMENT.
VOLUME 2
TECHNICAL SPECIFICATIONS - ASSEMBLY PROCEDURE
ZODIAC
CADETS
CADET ROLL UP 200 - 240 - 260
CADET SOLID 260 - 285 - 310 - 340
CONTENTS
| Page | Page | ||
| ⇒Assembly procedure | 2 | ⇒Pressure | 8 |
| ⇒Check on unpacking | 2 | ⇒Assembly of equipment | 9 |
| ⇒Assembly | 3 - 5 | ⇒Deflation - folding the boat | 10 |
| ⇒Inflation system | 6 | ⇒General description | I - IV |
→Inflation 7
ASSEMBLY PROCEDURE
We recommend that you follow the specific order of the assembly procedure. Proceed step by step and refer to the corresponding pages.
| PROCEDURE PAGE SECTION | ||
| 1. inventory the elements composing your boat, 2and learn how to recognise them I - IV | CHECK ON UNPACKING | |
| DESCRIPTION | ||
| 2. activate valves in inflating position 6 | INFLATION SYSTEM | |
| 3. slightly inflate the main buoyancy tube 7 | INFLATION | |
| 4. CADET RU 200 - RU 240 : Insert the wooden slats in their pocketsCADET RU 260 : install the rolling floorCADET SOLID : assemble the floorboard | 3 - 5 | ASSEMBLY |
| 5. Install the seat (except CADET RU 200) | 9 | ASSEMBLY OF EQUIPMENT |
| 6. finish inflation of the boat to the correct pressure 7 - 8 | INFLATION / PRESSURE | |
| 7. Install the oars | 9 | ASSEMBLY OF EQUIPMENT |
CHECK ON UNPACKING

DO NOT USE A SHARP TOOL
The pack must contain: 1 buoyancy tube +
| ZODIAC\Cadet Roll up Cadet Solid | C200RU | C240RU | C260RU | C260S | C285S | C310S | C340S |
| Floorboard | S (1) S | (1) R (1) | PF (1) PF | (1) | PF (1) | PF (1) | |
| inflatable keel | 1 | 1 | 1 | 1 | |||
| Stringer | 2 | 2 | 2 | 2 | |||
| Repair kit | 1 | 1 | 1 | 1 | 1 | 1 | 1 |
| Owner's manual (2) | 1 | 1 | 1 | 1 | 1 | 1 | 1 |
| Equipment standard | |||||||
| Removable wooden seat | 1 | 1 | 1 | 1 | 1 | 1 | |
| Carry bag | 1 | 1 | 1 | 1 | 1 | 1 | 1 |
| Reinforced aluminium oar | 2 | 2 | 2 | 2 | 2 | 2 | 2 |
| Foot-pump | 1 | 1 | 1 | 1 | 1 | 1 | 1 |
(1) S = Slats R = Rolling floor PF = Marine Plywood Floor
(2) 2 volumes
You can equip your boat with many optional accessories (transportation wheels, boarding ladder, lifting rings etc.). Ask your dealer to advise you.
| NOTICE : | IF YOU WISH TO ADD LIFTING RINGS, YOU MUST FIX THEM ON THE BUOYANCY TUBE, NEVER ON THE FLOOR |
ASSEMBLY
Choose a smooth and clean surface
IF THE BUOYANCY TUBE WAS STORED AT A TEMPERATURE BELOW 0°C / 32°F, LEAVE IT AT 20°C / 68°F FOR 12 HOURS BEFORE UNFOLDING.
CADET SOLID : INSTALL THE MARINE PLYWOOD FLOOR:
-
Sprinkle some starch in the angle (joint of the buoyancy tubes to the bottom) to facilitate fitting. CAUTION, NEVER USE TALCUM POWDER.
• Make sure you identify the parts and direction in which they fit: -
The floorboard consists of 3 main sections and 2 sections in the bow [fig 1 and 4]
-
The bow sections have an upside and a downside.
-
Insert the bow section (1) into the bow angle.
- Insert the rear section (5) against the transom (6) as show on fig 1.
- Fit all sections together [fig.1].
- Position sections 3 and 4 as an apex (in a tent-like position) [fig 1 and 2].
- Check that all sections are correctly aligned [fig 4].
- Check that the floorboard is correctly fitted in the angles.
- Flatten the apex by standing on it (in the boat) and pulling the lifelines to prevent the fabric being pinched [fig. 2].
- Assemble the stringers (see instructions bellow).
CADET SOLID : ASSEMBLY OF THE STRINGERS
The stringers are essential to good working of the boat: they lock the floorboard together and stiffen its structure.
- To facilitate the fitting of the first stringer, slide the other stringer under the boat, about 20 cm from the side [fig. 3-a].

DO NOT PUT THE STRINGER IN POSITION UNDER THE BOAT UNTIL THE FLOOR IS FLATTENED.
- Position the stringer on the edge of the floorboard. The reference mark on the stringer (8) must remain on top (the thicker part should be towards the top) [fig. 3].
- Fit the stringers between the two buffers (9) of sections 3 and 5 [fig. 4].
- Rotate the stringer in the angle so as to press them against the bottom [fig. 3-b and 4].
- Because of the self-locking system of the floorboard, the stingers will fit into place once the buoyancy tube is inflated.
ASSEMBLY


ASSEMBLY
CADET ROLL UP 200 - 240: INSTALL THE SLATTED FLOOR:
Boat deflated, slide the slats in their pockets starting by the closest to the transom. If the slats are difficult to insert, lubricate it with liquid soap.
CADET ROLL UP 260 : INSTALL THE ROLLING FLOOR:


INFLATION SYSTEM
The inflation system is composed of:
THE FOOT PUMP
a. connecting tip
b. hose end piece
c. hose base
d. outlet for inflation

THE STANDARD VALVES
(1) cap (2) valve insert (3) base
To activate the standard valves into INFLATION position:
• Free the valve insert from its protection.
- Unscrew the valve cap.
- Screw the valve support onto its base (screw it tight but without exaggeration, not to deteriorate the screw thread) and check that the valve cap stays accessible.
TO DEFLATE:
Unscrew the valve support from its base

THE SEMI-RECESSED VALVES
To activate the valves:

press the push-in stem a quarter of a turn
Inflation position
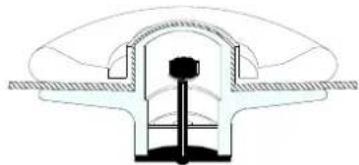
diaphragm closed, the inner button springs upwards
Deflation position
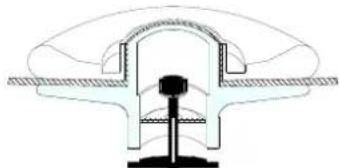
diaphragm open, the inner button goes down
NOTICE:
TO SCREW OR UNSCREW THE VALVE CAPS, TURN WITHOUT PRESSING OR FORCING (THIS COULD UNSCREW THE INNER VALVE SYSTEM).
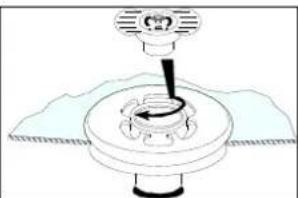
INFLATION
Activate all valves into inflation position.
Fit the hose to the foot-pump.
To inflate your boat properly, the bottom side of the foot-pump must rest on a flat ground.
Pump evenly to inflate rapidly.


DO NOT USE A COMPRESSOR OR A BOTTLE OF COMPRESSED AIR
You can use the electrical air pump ACCESS (ask your Dealer).
TO INFLATE THE MAIN BUOYANCY TUBE
- Insert the pump hose end piece
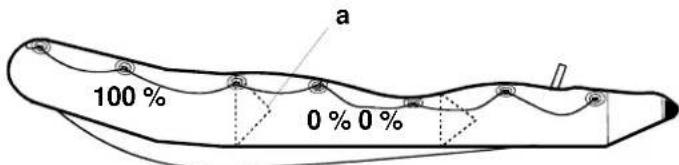
- Inflate (pressure = 240 mb, refer to PRESSURE section) making sure that each compartment is equal. When correctly inflated, the internal bulkheads (a) are not visible.

NEVER COMPLETELY INFLATE A COMPARTMENT TO FULL PRESSURE IF OTHER COMPARTMENTS ARE TOTALLY DEFLATED

1


2

CADET SOLID : INFLATE THE KEEL
- Once the floor in assembled, start inflation of the keel (pressure = 240 mb).
Inflation is over: fit the valve caps tight (clockwise).
| NOTICE : | A slight air-leak before screwing the valve caps is normal.ONLY THE VALVE CAPS CAN ENSURE FINAL AIR TIGHTNESS. |
PRESSURE
The correct pressure for the buoyancy tube and the keel is 240 mb / 3,4 PSI (green area of the pressure indicator).
If your boat is not equipped with a ACCESS pressure indicator, we recommend that you purchase one from your Dealer. This will permit a quick and efficient control of the pressure during inflation. Without a pressure indicator, stop inflating when the foot-pump gets difficult to operate, and the boat is « hard » (you should not be able to bend the cone ends).
| Ambient temperature of air and water Ambient have an effect on the boat's internal +1°C / +1,8°F pressure -1°C / -1,8°F -4 mb / 0,06 PSI | int temperature tubes' internal pressure |
Therefore, it is important to anticipate:
Because of temperature variations (especially when this variation is important between the beginning and the end of the day, in hot areas) check and adjust the pressure in the inflated compartments by inflating or deflating. Be sure that pressure remains within the recommended zone, between 220 mb/3,10 PSI and 270 mb/3,85 PSI (green area).
RISK OF UNDERPRESSURE
EXAMPLE: Your boat is in direct sunlight on the beach (temperature =50°C/122°F) at recommended pressure (240 mb/3,4 PSI). after putting it in the colder water (temperature =20°C/68°F), the internal temperature and pressure of the tubes will both drop (up to 120 mb/1,7 PSI) and YOU WILL HAVE TO INFLATE AGAIN until you regain the lost pressure due to the difference in temperatures. Therefore, a loss of pressure at the end of the day when ambient temperature drops is perfectly normal.
NOTICE :
Proper inflation is critical to the performance of the boat. It is the pressure in the tubes that gives your boat the necessary rigidity to perform well. Under-inflation causes improper flexing of the tubes which will result in stress and chafe
RISK OF OVERPRESSURE
EXAMPLE: Your boat is inflated to the recommended pressure (240 mb/3,4 PSI) at the beginning of the day (low ambient temperature =10°C/50°F). Later in the day, your boat is in direct sunlight on the beach or on a yacht's deck (temperature =50°C/122°F). Internal temperature of all inflated compartments can then increase and reach up to 70°C/158°F (especially for dark-coloured tubes). The consequence will be a doubling of previous pressure (480 mb/6,8 PSI). YOU WILL THEN HAVE TO DEFLATE until you reach the recommended pressure.

WHEN YOUR BOAT IS OVER INFLATED, PRESSURE BECOMES TOO STRONG FOR THE INFLATABLE STRUCTURE, AND COULD CAUSE A BREAK IN THE FABRIC ASSEMBLY
IN CASE OF OVERPRESSURE
STANDARD VALVE (A):
Free some air by pushing on the diaphragm (1) with a blunt object.
Beware not to fold down the diaphragm.
SEMI-RECESSED VALVE (B):
Deflate by pressing the spring loaded button.


ASSEMBLY OF STANDARD EQUIPMENT
TO ASSEMBLE AND INSTALL THE OARS:
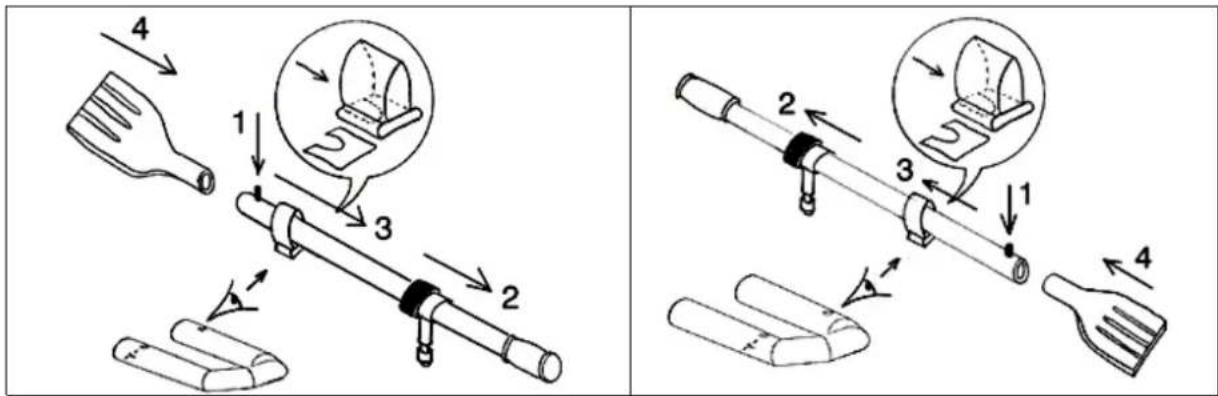


THE REMOVABLE SEAT (EXCEPT C 200 ROLL UP)
Install the seat before the boat is totally inflated.

DEFLATING / FOLDING THE BOAT
- Deflate the boat.
- Replace the valve protections.
- Remove oars and equipment.
- Remove the floorboard (For Cadets solid only - for cadets Roll up with a slatted floor, It is not necessary to remove the slats to fold the boat).
- Empty the boat of all water and sand by opening the self-bailers, dry it.
- Fold in the 2 sides of the main buoyancy tube (A), fold the cones onto the transom, then roll up the boat around the transom (C). Start again if you feel there is still some air left in the tubes.


Stow the boat in its bag as follows (D):
Stow the boat folded on its bag open (back side of the bag visible).
. Position the floor sections and stringers flat on the boat (Cadet Solid), then the oars dismantled.
. Close the bag and fasten the two front straps.
. Tight the side ropes (make sure that all equipment stays inside).
. To finish, store the foot-pump in the front pocket.

- VOLUME 2
- TECHNICAL SPECIFICATIONS - ASSEMBLY PROCEDURE
- ZODIAC
- ASSEMBLY PROCEDURE
- CHECK ON UNPACKING
- ASSEMBLY
- CADET SOLID : INSTALL THE MARINE PLYWOOD FLOOR
- CADET SOLID : ASSEMBLY OF THE STRINGERS
- CADET ROLL UP 200 - 240: INSTALL THE SLATTED FLOOR
- CADET ROLL UP 260 : INSTALL THE ROLLING FLOOR
- INFLATION SYSTEM
- THE FOOT PUMP
- THE STANDARD VALVES
- TO ACTIVATE THE STANDARD VALVES INTO INFLATION POSITION
- TO DEFLATE
- THE SEMI-RECESSED VALVES
- NOTICE
- INFLATION
- TO INFLATE THE MAIN BUOYANCY TUBE
- CADET SOLID : INFLATE THE KEEL
- PRESSURE
- THEREFORE, IT IS IMPORTANT TO ANTICIPATE
- RISK OF UNDERPRESSURE
- RISK OF OVERPRESSURE
- IN CASE OF OVERPRESSURE
- STANDARD VALVE (A)
- SEMI-RECESSED VALVE (B)
- ASSEMBLY OF STANDARD EQUIPMENT
- TO ASSEMBLE AND INSTALL THE OARS
- THE REMOVABLE SEAT (EXCEPT C 200 ROLL UP)
- DEFLATING / FOLDING THE BOAT
Brand : ZODIAC
Model : Cadet 200 Roll Up
Category : Boat