
WL-8000AP - Access Point AIRLIVE - Free user manual and instructions
Find the device manual for free WL-8000AP AIRLIVE in PDF.


| Product Type | Wireless Access Point |
| Brand | AirLive |
| Model | WL-8000AP |
| Wireless Standards | IEEE 802.11b/g |
| Max Data Rate | 54 Mbps |
| Frequency Band | 2.4 GHz |
| Channels | Up to 13 (varies by region) |
| Default SSID | default |
| Default IP Address | 192.168.1.252 |
| Default Subnet Mask | 255.255.255.0 |
| Power Supply | 9V DC via included adapter |
| LED Indicators | Power (green), Error Status (red), Wireless Link/Act (green), LAN (green) |
| Interfaces | 1 x 10/100 Ethernet (LAN), Reset button |
| Antenna | External, adjustable |
| Security | WEP 40/128/256-bit, WPA, WPA2 (via firmware), 802.1x, MAC address filtering |
| Management | Web-based GUI (HTTP) |
| Advanced Features | Multiple SSID, Hidden SSID, TX Power control, WMM (Video Blast), Interference Avoidance |
| Firmware Upgrade | Via web interface |
| Regulatory Certifications | FCC Part 15 Class B, CE Mark |
| Operating Environment | Indoor |
| Cleaning Instructions | Wipe with dry, soft cloth; do not use liquid or aerosol cleaners |
| Repairability | No user-serviceable parts inside; refer to qualified service personnel |
Frequently Asked Questions - WL-8000AP AIRLIVE
User questions about WL-8000AP AIRLIVE
0 question about this device. Answer the ones you know or ask your own.
Ask a new question about this device
Download the instructions for your Access Point in PDF format for free! Find your manual WL-8000AP - AIRLIVE and take your electronic device back in hand. On this page are published all the documents necessary for the use of your device. WL-8000AP by AIRLIVE.
USER MANUAL WL-8000AP AIRLIVE
natural_image
Collection of network equipment including a OvisLink switch, wireless router, and USB drive (no visible text or labels)FCC Certifications
This equipment has been tested and found to comply with the limits for a Class B digital device, pursuant to Part 15 of the FCC Rules. These limits are designed to provide reasonable protection against harmful interference in a residential installation. This equipment generates, uses and can radiate radio frequency energy and, if not installed and used in accordance with the instructions, may cause harmful interference to radio communications. However, there is no guarantee that interference will not occur in a particular installation. If this equipment does cause harmful interference to radio or television reception, which can be determined by turning the equipment off and on, the user is encouraged to try to correct the interference by one or more of the following measures:
- Reorient or relocate the receiving antenna.
- Increase the separation between the equipment and receiver.
- Connect the equipment into an outlet on a circuit different from that to which the receiver is connected.
- Consult the dealer or an experienced radio/TV technician for help.
CAUTION:
Any changes or modifications not expressly approved by the grantee of this device could void the user's authority to operate the equipment.
This device complies with Part 15 of the FCC rules. Operation is subject to the following two conditions: (1) This device may not cause harmful interference, and (2) This device must accept any interference received, including interference that may cause undesired operation.
FCC RF Radiation Exposure Statement
This equipment complies with FCC RF radiation exposure limits set forth for an uncontrolled environment. This equipment should be installed and operated with a minimum distance of 20cm between the radiator and your body.
CE Mark Warning
This is a Class B product. In a domestic environment, this product may cause radio interference, in which case the user may be required to take adequate measures.
All trademarks and brand names are the property of their respective proprietors.
Specifications are subject to change without prior notification.
Table of Content
Introduction .... 1
APPLICATION....2
PARTS NAMES AND FUNCTIONS .... 3
FACTORY DEFAULT SETTINGS....5
Setup 6
Configuration....7
LOGIN....7
BASIC SETUP 8
ADVANCED SETUP....9
IP SETTING....11
PRIVACY....12
MANAGE 16
DOWNLOAD....18
STATISTICS....19
INTRODUCTION
The Wireless 802.11b+g Access Point (AP) is an IEEE802.11g compliant access point. It not only provides a high transfer rate up to 54Mbps, which is almost five times faster than the already existing 11Mbps 802.11b products, but is also backward compatible with the Wireless B equipments.
The AP provides 40/128/256 bit WEP encryption, WPA and IEEE802.1x, which ensures a high level of security to protects users' data and privacy. The MAC Address control prevents the banned or unauthorized MAC Addresses from accessing your Wireless LAN. Your network security is therefore double assured.
Placed anywhere along with an Ethernet LAN, the AP allows up to 200 wireless stations within its area of coverage to access transparently to the corporate network.
The web-based configuration utility allows users to configure via web browser. Advanced setup and firmware upgrade can be done easily.
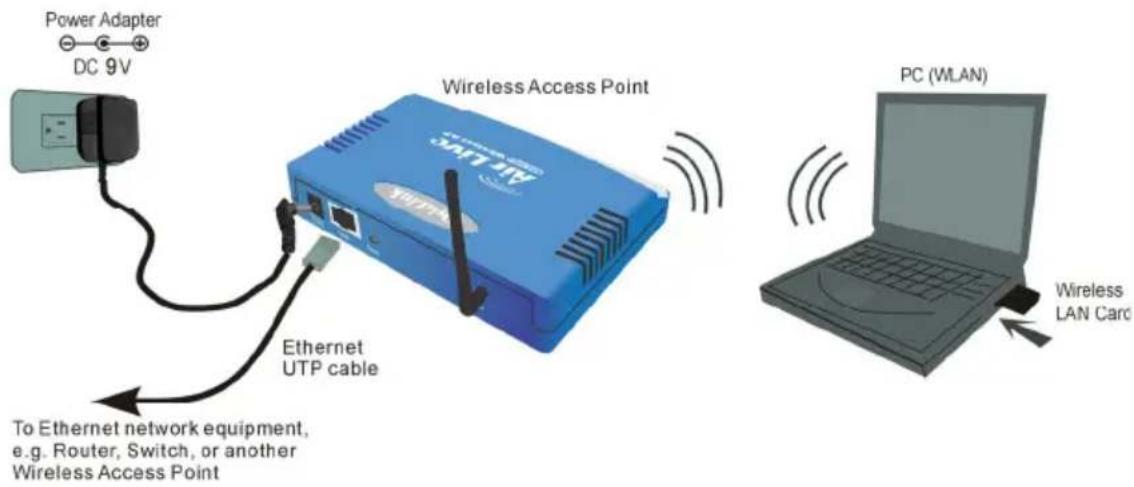
Application
Parts Names and Functions
1. Top Panel: (LED Indicators)
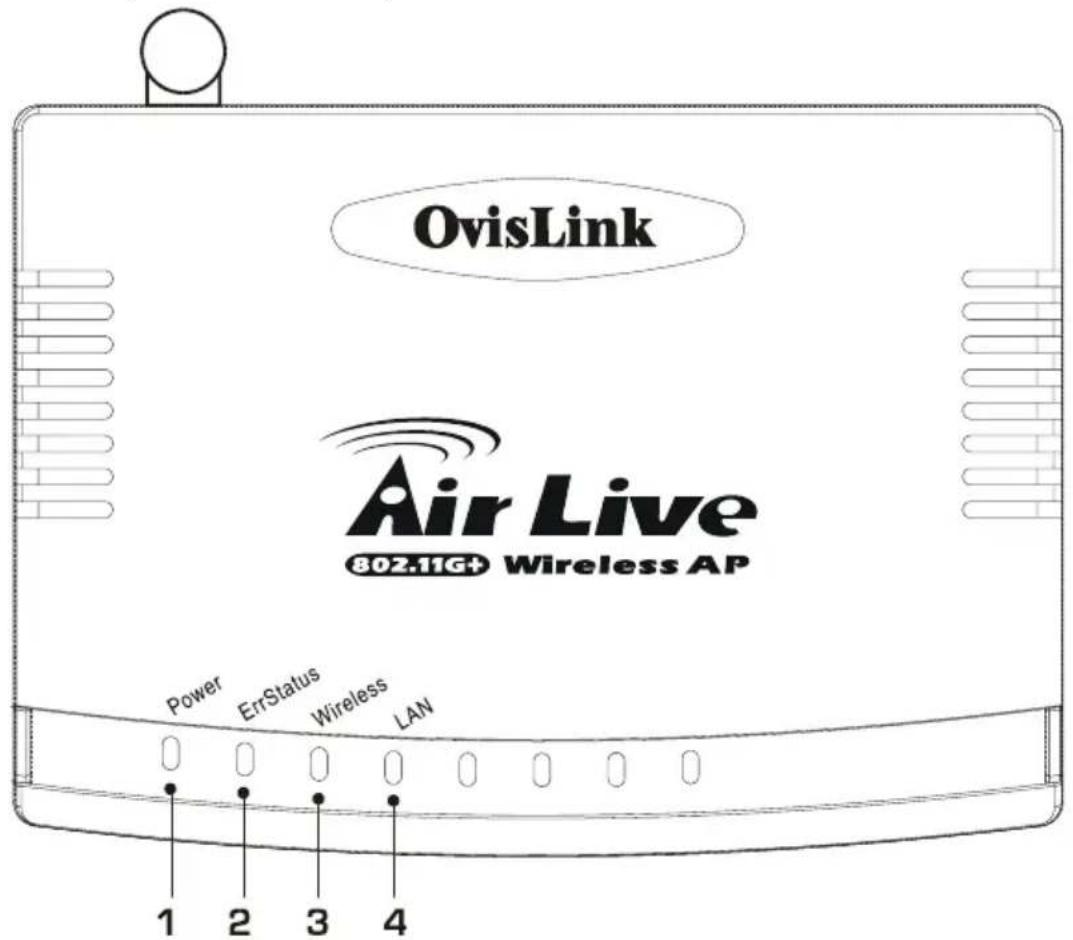
| LED Indicator | Color | Status | ||
| Solid | Flashing | |||
| 1 | Power | Green | Turns solid green when power is applied to this device. | N/A. |
| 2 | ErrStatus | Red Turns solid device is not working properly. | When when on self-test failure occurs. | |
| 3 | Wireless Link/Act. | Green | Turns solid green when connected and associated to at least a client station. | Receiving/ Sending data |
| 4 LAN Green | — | Turns solid green when linked to a local network. | Receiving/ Sending data | |
Table 1: LED Indicators
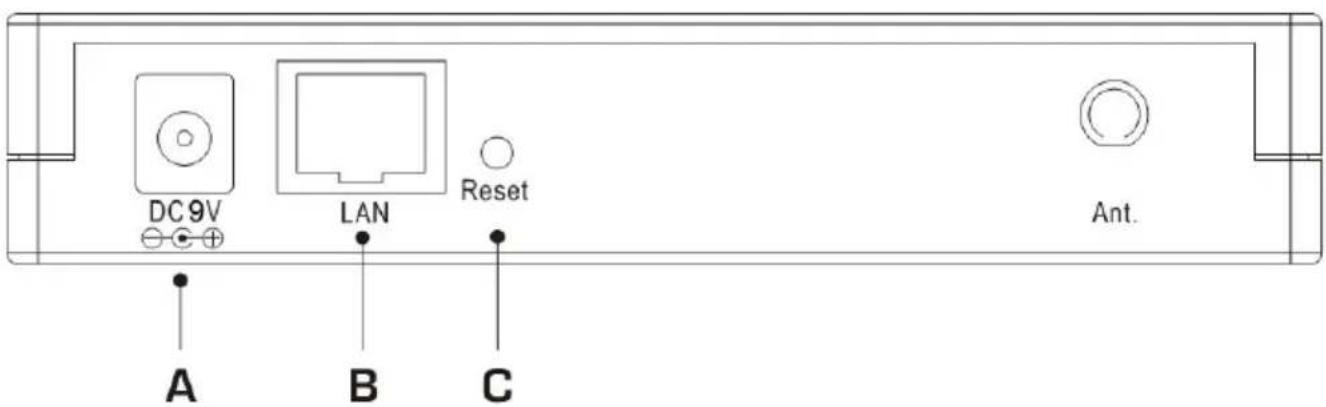
2. Rear Panel: Connection Ports
| Port/button | Functions | |
| A | 9V DC | Connects to the power adapter plug |
| B | LAN | Connects to Ethernet |
| C | (Factory) RESET | Press for 5 seconds to reboot this device and restore factory settings.Performing the Factory Reset will erase all previously entered device settings. |
Table 2: Connection Ports
Factory Default Settings
| Setting Wireless Access Point | ||
| Device Name Wireless AP | ||
| SSID | Default | value: |
| Channel | 6 | |
| WEP | Default | value: |
| IP Address | 192.168.1.252 | |
ovislink
Disabled
SETUP
Note: Before your starting hardware connection, you are advised to find an appropriate location to place the Access Point. Usually, the best place for the Access Point is at the center of your wireless network, with line of straight to all your wireless stations. Also, remember to adjust the antenna; usually the antenna is placed higher, the performance will be better.
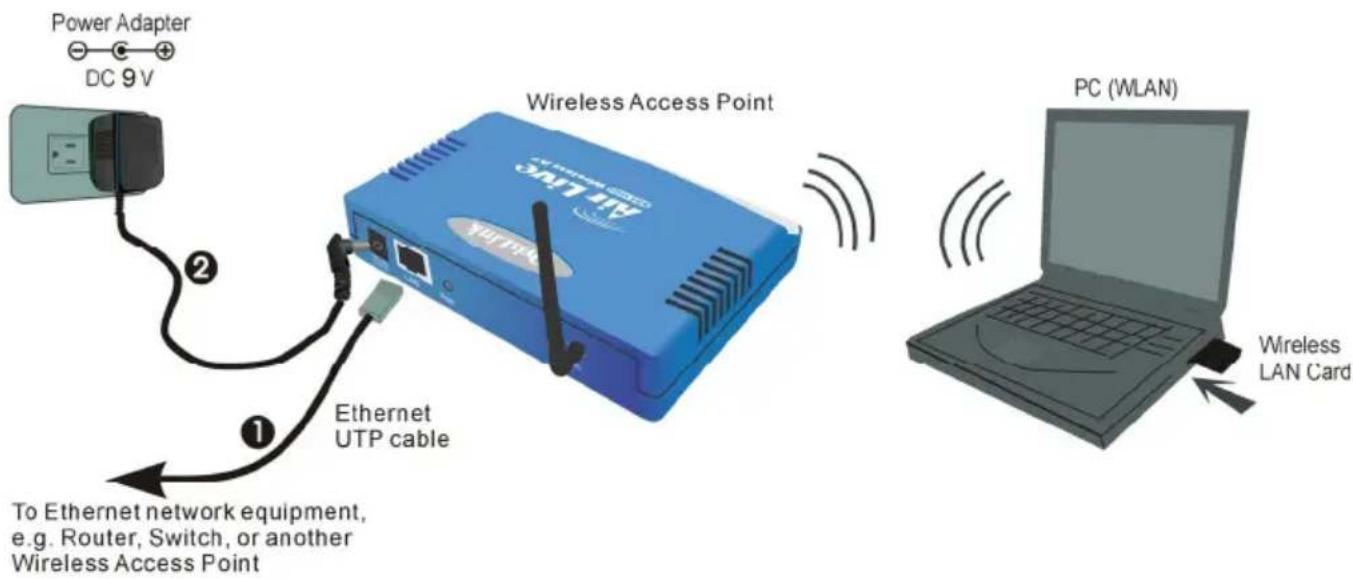
1. Connect to your local area network:
Connect an Ethernet cable to the Ethernet port of this Wireless Access Point, and the other end to a hub, switch, router, or another wireless access point.
2. Power on the device:
Connect the included AC power adapter to the Wireless Access Point's power port and the other end to a wall outlet.
Check the LEDs:
The Power, Wireless Link/Act. and LAN should be ON. Wireless Link/Act. and LAN will blink if the data is being transmitted or received.
3. Configure your PC:
Make sure your local PC(s) has wireless network adapter installed.
Login
- Start your computer. Connect an Ethernet cable between your computer and the Wireless Access Point.
- Make sure your wired station is set to the same subnet as the Wireless Access Point, i.e. 192.168.1.10
- Start your WEB browser. In the Address box, enter the following:
HTTP://192.168.1.252
Address
http://www.192.168.1.252
The configuration menu includes: Basic Setup, Advanced Setup, IP Setting, Privacy, Manage, Download, and Statistics. The details for the configuration menu are described as follows.
Basic Setup
The Setup page displays baci local and WLAN settings for the AP and enable you to change the settings.
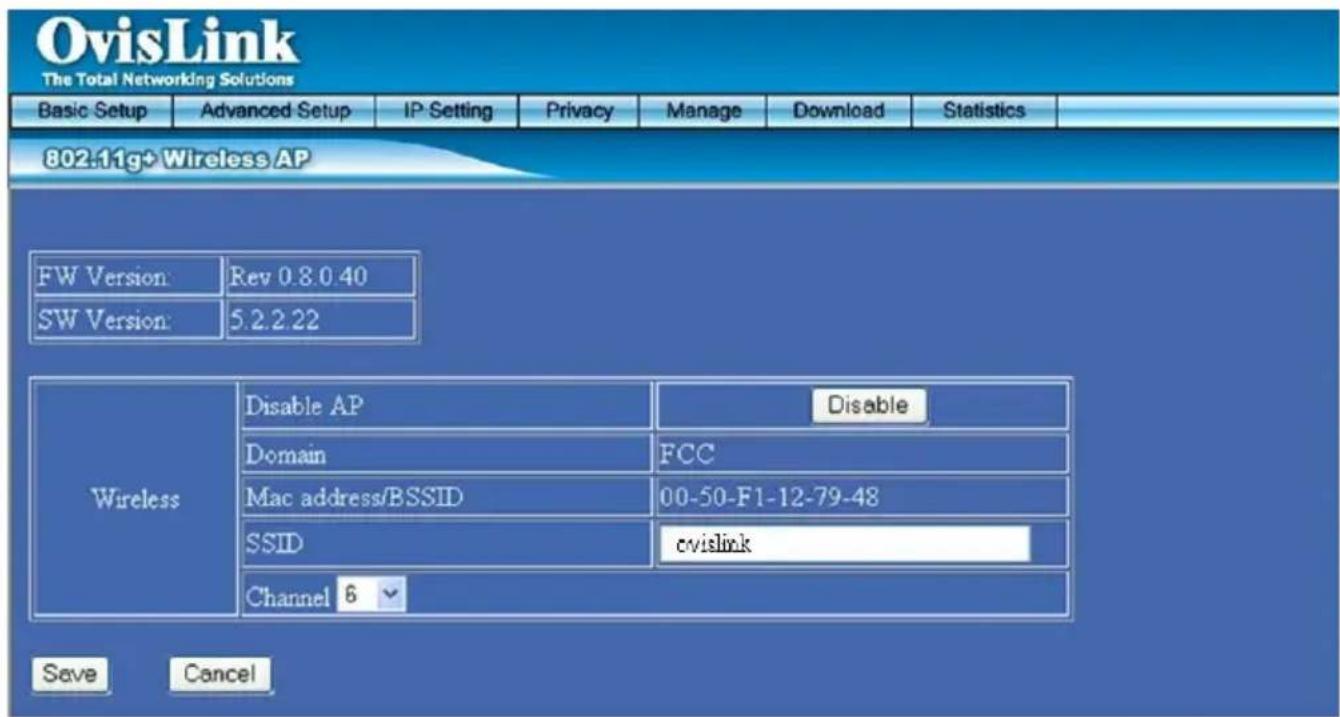
| FW Version | The current version of the firmware installed in this device. |
| SW Version | The current version of the software installed in this device. |
| Wireless | |
| Enable/Disable AP | Enable/Disable Click to enable/disable the AP. |
| Domain | The AP's domain determines the channel number. |
| MAC address/BSSID | The AP's MAC address/BSSID. BSSID displays the ID of current BSS, which uniquely identifies each BSS. It is also the MAC address of this Access Point. |
| SSID | SSID is the unique name shared among all points in your wireless network. It is case-sensitive and must not exceed 32 characters. It must be identical for all points in the network. Make sure that all points in the network are the same. |
| Channel | The number of channels supported depends on the region of this Access Point. All stations communicating with the Access Point must use the same channel. |
| Save | After completing the settings, Click Save to save the settings. |
| Cancel | Click Cancel to discard the data you have entered since last time you press Save. |
Advanced Setup
It is not recommended that settings in this page to be changed unless advanced users want to change to meet their wireless environment for optimal performance.
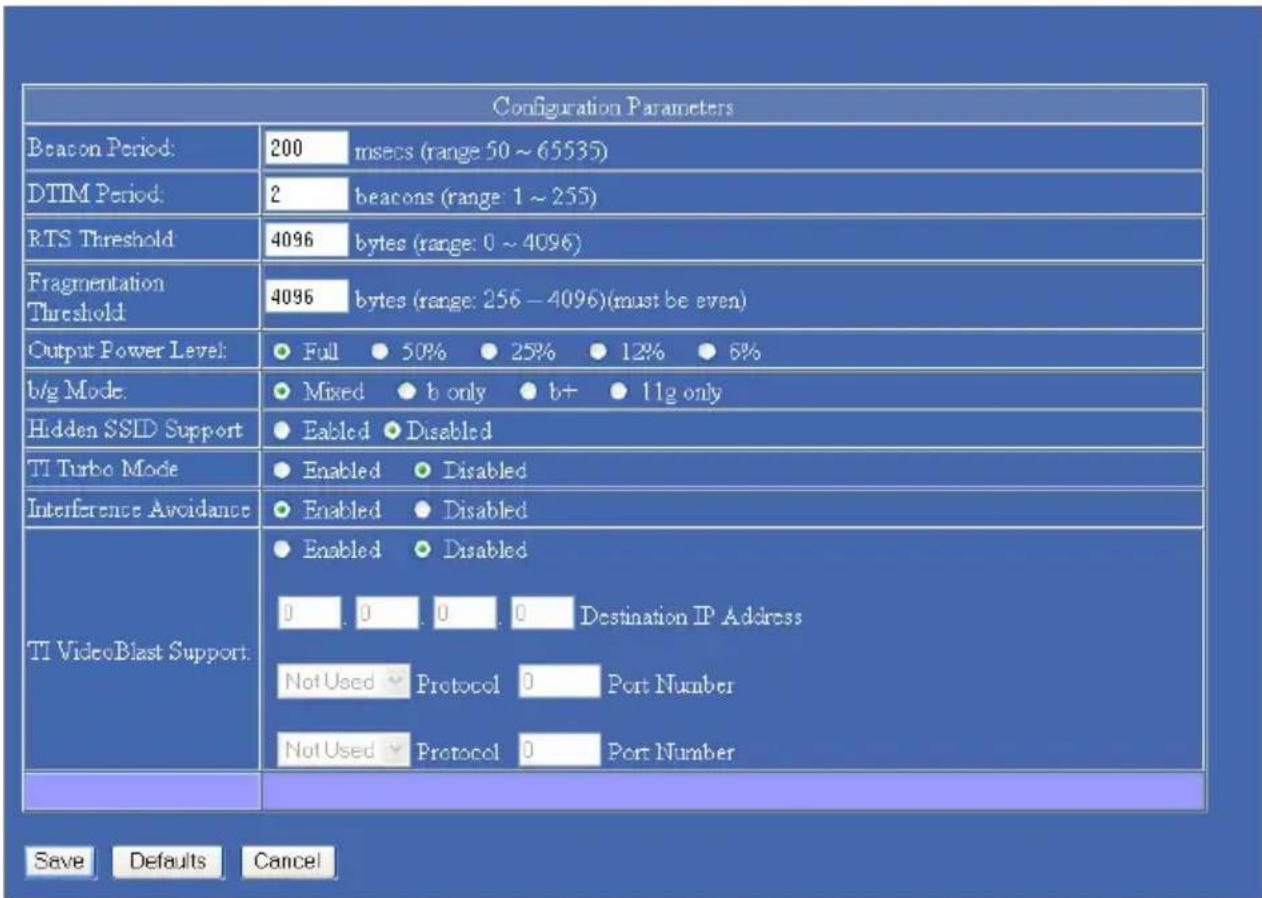
| Beacon Period | Beacon Period is the amount of time between beacon transmissions. Before a station enters power save mode, the station needs the beacon period to know when to wake up to receive the beacon (and learn whether there are buffered frames at the access point). The default value is 200. |
| DTIM Period | DTIM stands for Delivery Traffic Indication Message. A DTIM is a countdown field informing clients of the next window for listening to broadcast and multicast messages. When the access point has buffered broadcast or multicast message for associated clients, it sends the next DTIM with a DTIM Period value. Access point clients hear and awaken to receive the broadcast and multicast messages. The default DTIM period is ‘2’. |
| RTS Threshold | RTS (Request To Send) is a control frame sent from the transmitting station to the receiving station requesting permission to transmit. This value is recommended to remain at its default setting of 4096. Should you encounter inconsistentdata flow, only minor modifications of this value are recommended. |
| Fragment Threshold | Fragmentation mechanism is used for improving the efficiency when high traffic flows along in the wireless network. The value can be set from 256 to 4096. The default value is 4096. |
| Output Power Level | You can choose the percentage of maximum power to meet your requirement. The default is Full. |
| b/g Mode | You can choose one mode of the following you need.◎Mixed: 802.11b supported rate and 802.11g supported rate.◎b only: 802.11b supported rate only.◎b+: 802.11b supported rate and 22 Mbps PBCC rate.◎11g only: 802.11g supported rate only.The default is Mixed mode. |
| Hidden SSID Support | Click ●Enabled or ●Disabled to hide or broadcast the SSID. |
| TI Turbo Mode | Click ●Enabled or ●Disabled to enable or disable enhancing throughput rate. |
| Interference Avoidance | Click ●Enabled or ●Disabled to enable or disable the Access Point's energy detection mechanism. |
| TI Video Blast Support | ◎Enabled/ ◎Disabled: enable or disable the vHCF feature. |
| Destination IP Address: The destination IP address with preferred bandwidth. | |
| Protocol: The destination AP's protocol. | |
| Port Number: The destination AP's port number. | |
| Save | After completing the settings, Click Save to save the settings. |
| Defaults | Click to restore the AP to factory default settings. |
| Cancel | Click Cancel to discard the data you have entered since last time you press Save. |
IP Setting
The IP Settings page displays the IP address for the AP.
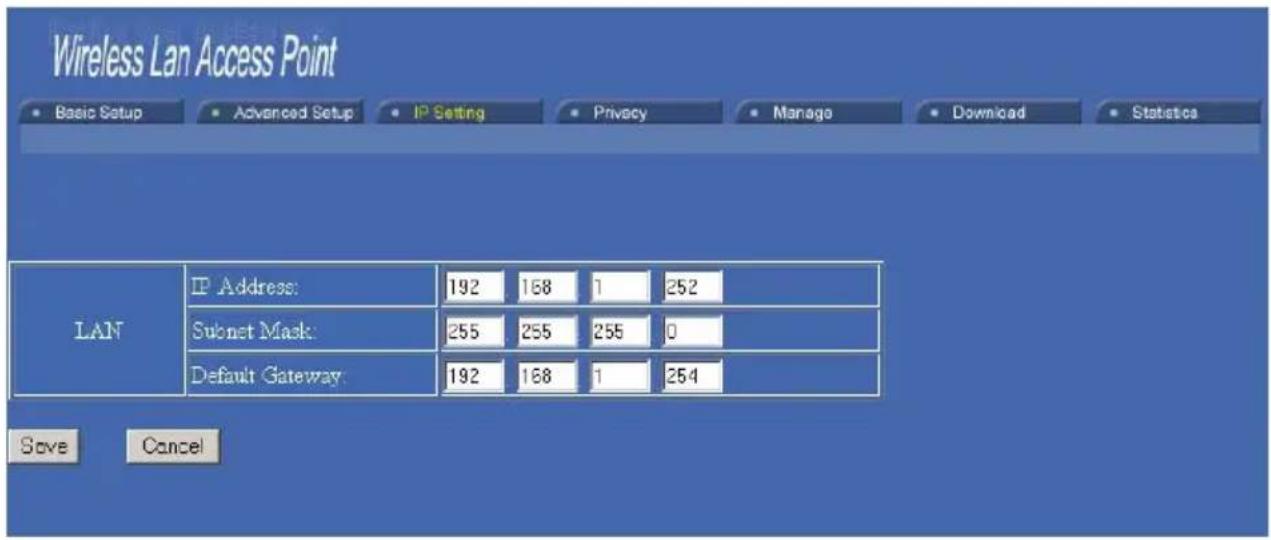
| IP Address | This field can be modified only when DHCP Client is disabled. If your system manager assigned you static IP settings, then you will have to enter the information provided. |
| Subnet Mask | Enter the information provided by your system manager. |
| Default Gateway | Enter the information provided by your system manager. |
| Save | After completing the settings, Click Save to save the settings. |
| Cancel | Click Cancel to discard the data you have entered since last time you press Save. |
Privacy
The Privacy page displays WLAN security settings. You can select WEP, 802.1x, or WPA to be the privacy mode for the AP.
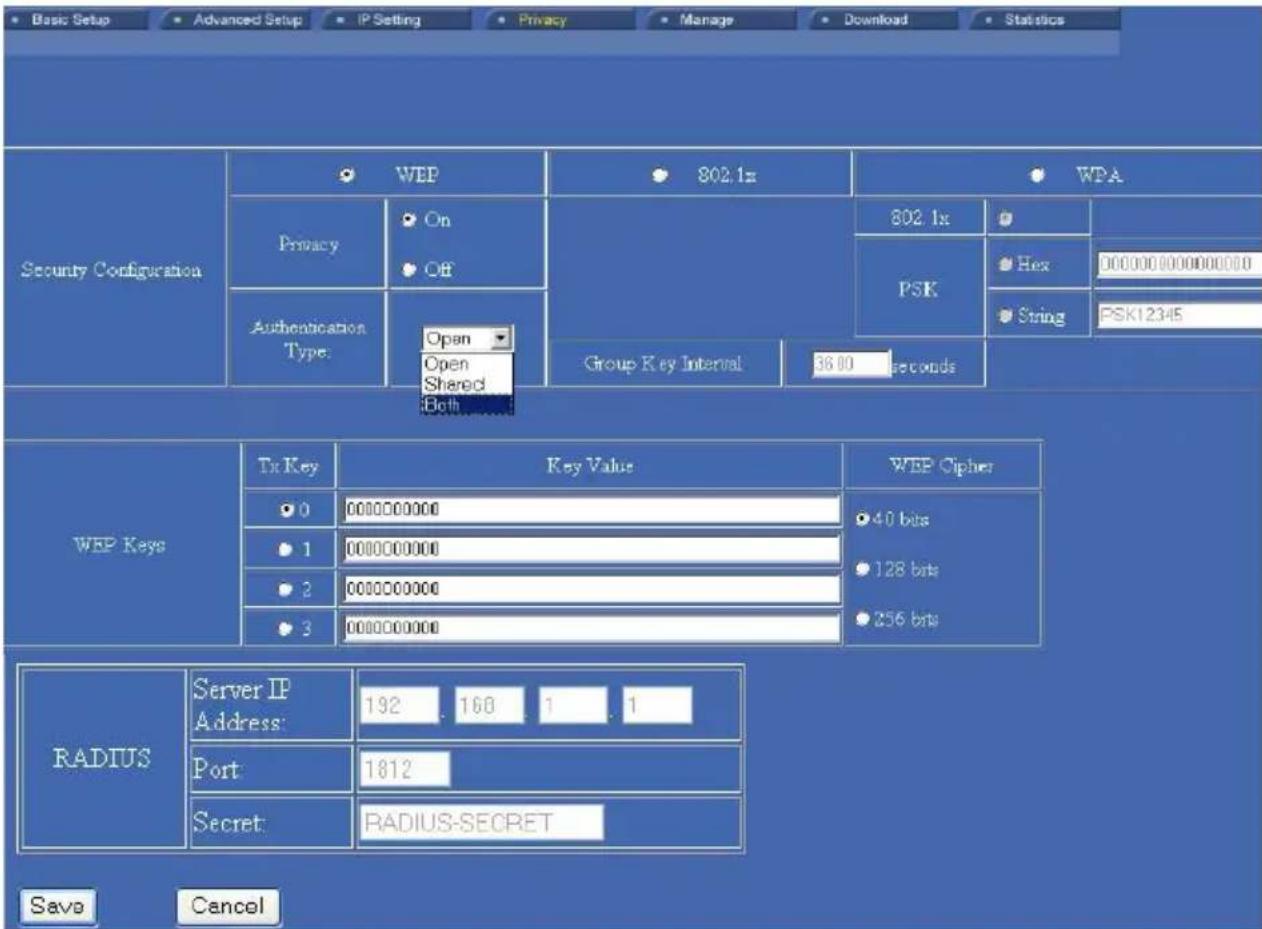
WEP
| Privacy | Turn privacy on and off when security is set to WEP. When security is set to 802.1x or WPA, privacy is turned on automatically. |
| Authentication Type | Open: If the type is selected, the associated station should set the same Authentication type as AP.Shared: If the type is selected, there must be a key to be shared between the AP and the associated station.Both: Both Open and Shared are selected. |
| WEP Keys | |
| Tx Key | The selected key for transmission when WEP is selected. |
| Key Value | Please set the Key Value according to the WEP Cipher you select.If 40bits is selected, 10 Hex characters are needed.If 128bits is selected, 26 Hex characters are needed.If 256bits is selected, 58 Hex characters are needed. |
| WEP Cipher | You can choose one from ⊙40bits⊙128bits⊙256bits. 256bits is the highest WEP level among the three. |
RADIUS
Not Required.
| Save | After completing the settings, Click Save to save the settings. |
| Cancel | Click Cancel to discard the data you have entered since last time you press Save. |
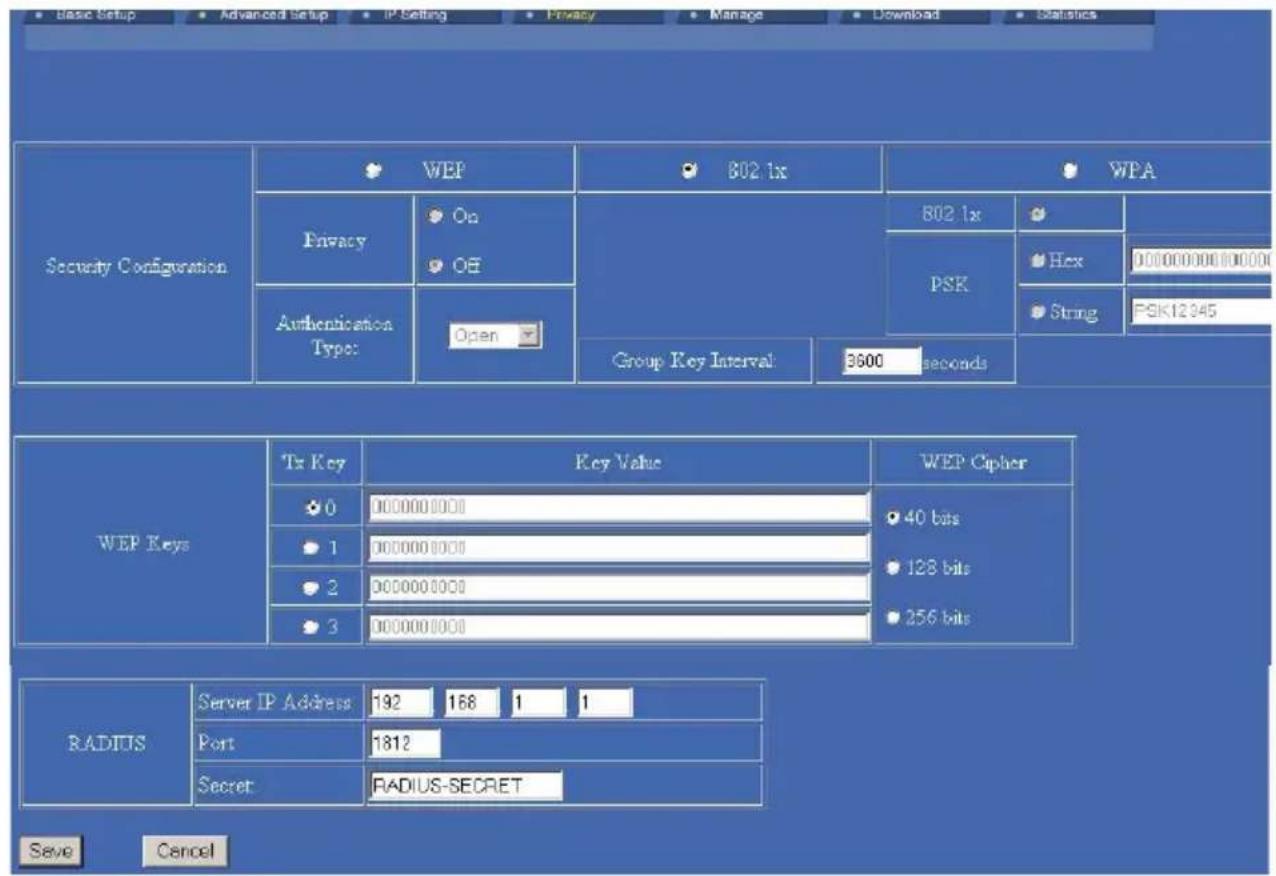
802.1x
Group Key Interval Please enter the value to decide how long it should change the
| Group Keys. The default is 3600 seconds. | |
| WEP KeysNot Required. | |
| RADIUS | |
| Server IP Address | Enter the RADIUS Server’s IP Address provided by your ISP. |
| Port | Enter the RADIUS Server’s port number provided by your ISP.The default is 1812. |
| Secret | Enter the secret phrase that the AP shares with the RADIUS Server. |
| Save | After completing the settings, Click Save to save the settings. |
| Cancel | Click Cancel to discard the data you have entered since last time you press Save. |
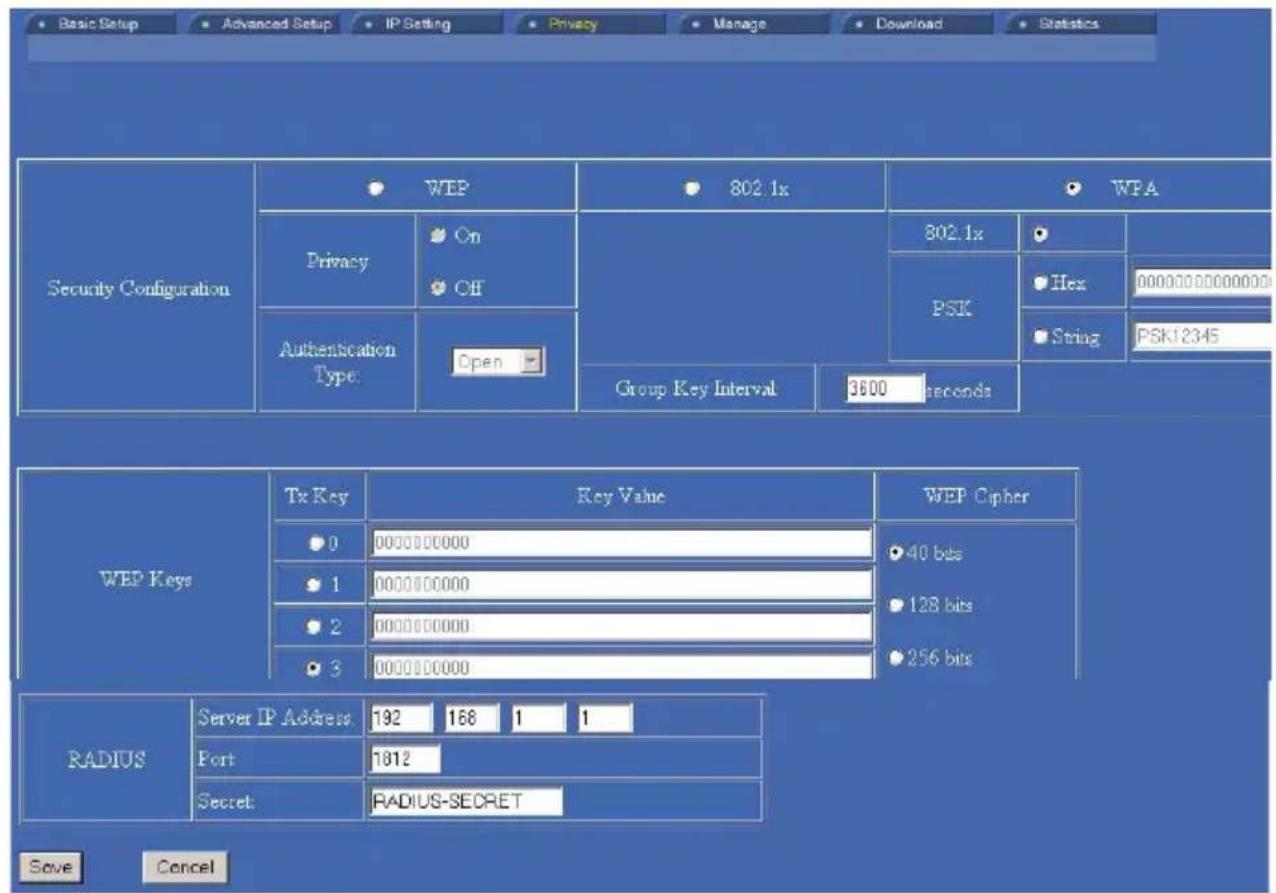
| WPA | |
| 802.1x | WPA stations authenticate with RADIUS Server over 802.1x.Enter a period of time in Group Key Interval field to decide how long to change group keys. |
| PSK Hex | WPA stations share the pre-shared key (PSK) with AP, you have to enter 64 characters for the key. Enter a period of timein Group Key Interval field to decide how long to change group keys. |
| PSK String | WPA stations share the pre-shared key (PSK) with AP, 8-63 characters are needed for the key. Enter a period of time in Group Key Interval field to decide how long to change group keys. |
| WEP KeysNot Required. | |
| RADIUS | |
| Server IP Address | Enter the RADIUS Server's IP Address provided by your ISP. |
| Port | Enter the RADIUS Server's port number provided by your ISP. The default is 1812. |
| Secret | Enter the secret phrase shared between the AP and the RADIUS Server. |
| Save | After completing the settings, Click Save to save the settings. |
| Cancel | Click Cancel to discard the data you have entered since last time you press Save. |
Manage
The management page displays information about stations that are currently associated with the AP.
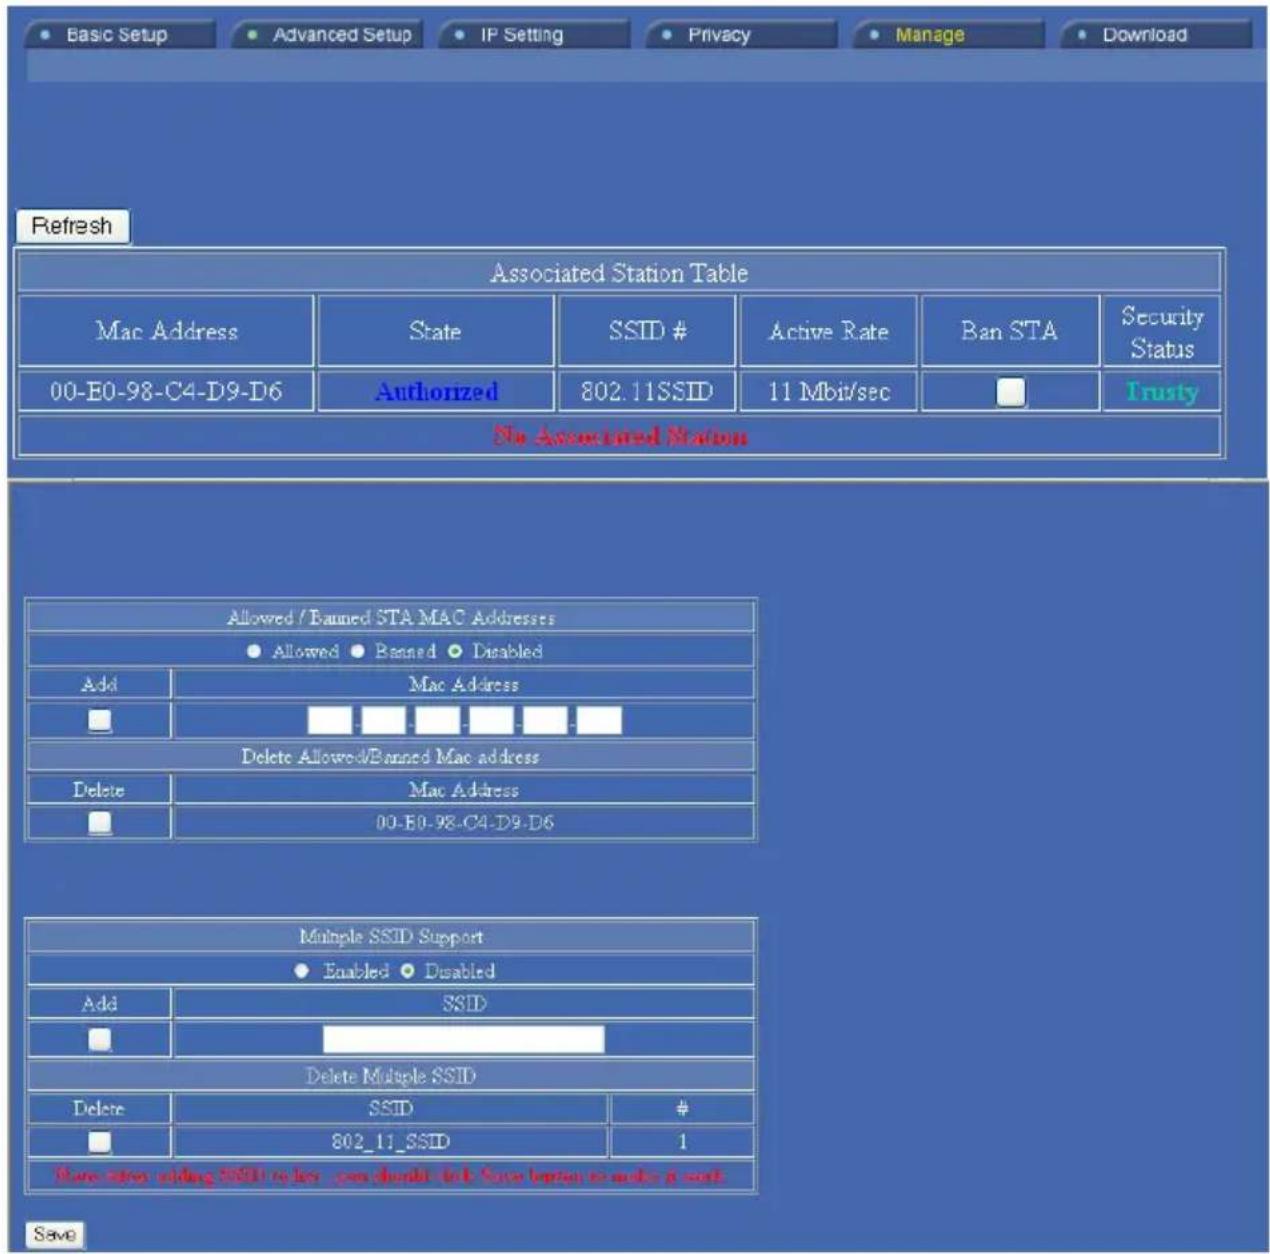
| Refresh | Click Refresh to update the Associated Station Table. |
Associated Station Table
| Mac Address | The Mac address of the station associated with the AP. |
| State | The current state between the associated station and the AP. |
| SSID | The SSID for the associated station. |
| Active Rate | The current data transmitting/receiving rate. |
| Ban STA (wireless) | Press the button to remove the Mac Address from the table if |
| station) | Banned is selected in Allowed/Banned STA MAC Address. Press the button to add the Mac Address in the table if Allowed is selected in Allowed/Banned STA MAC Address. If Allowed/Banned STA MAC Address is disabled, there will be no effect when pressing the button. |
| Security Status | The station ‘s security Status. |
| Allowed/Banned STA MAC Address | |
| ◎Allowed ◎Banned ◎Disable | ◎Allowed: only the stations shown in the table can associate with the AP.◎Banned: the stations shown in the table can’t associate with the AP.◎Disable: The table is disabled. |
| Add/Mac Address | Enter a Mac address in Mac Address field and click Add to add the address. Click Save on the bottom left corner to let the change take effect. |
| Delete Allowed/Banned Mac Address | Click Delete to remove the address from the Mac Address field. |
| Multiple SSID Support▪ The table can only be enabled when Privacy is set to WEP with Privacy off.▪ When the table is enabled, you cannot change privacy settings.▪ SSID strings can be added or removed at any time.▪ Enabling or disabling the table requires an AP reboot. | |
| ◎Enabled ◎Disabled | Click to enable or disable Multiple SSID Support. |
| Add SSID | Click Add to add the SSID entered in SSID field. The SSID can be up to 32 characters. You have to click Save to make it work. |
| Delete SSID | Click Delete to remove added SSID(s) in the table. |
Download
You can download the latest firmware (from your distributor) and upgrade the Wireless Point.
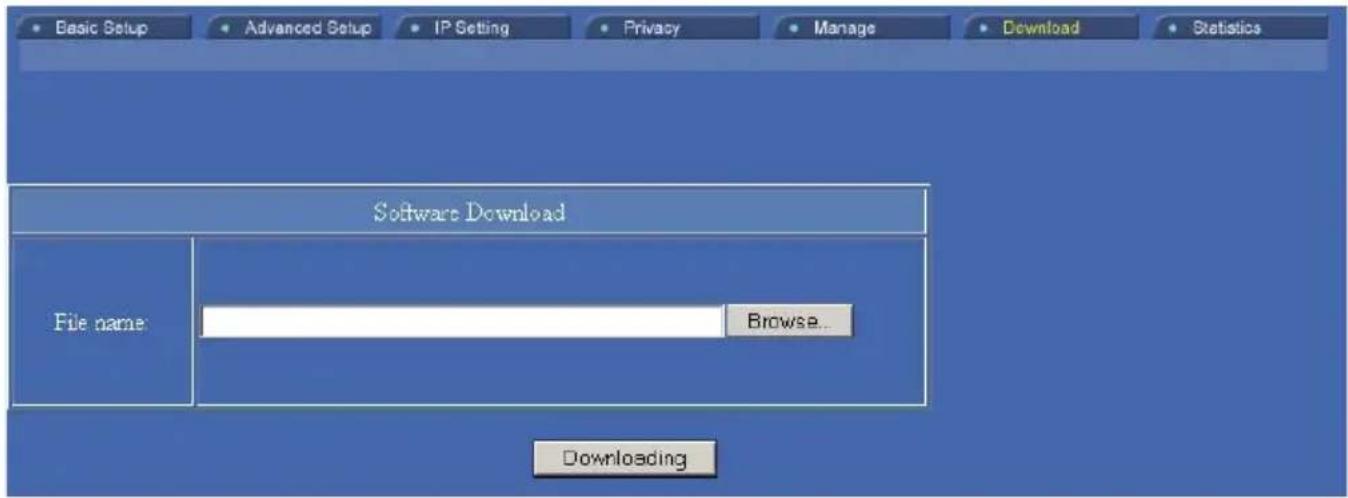
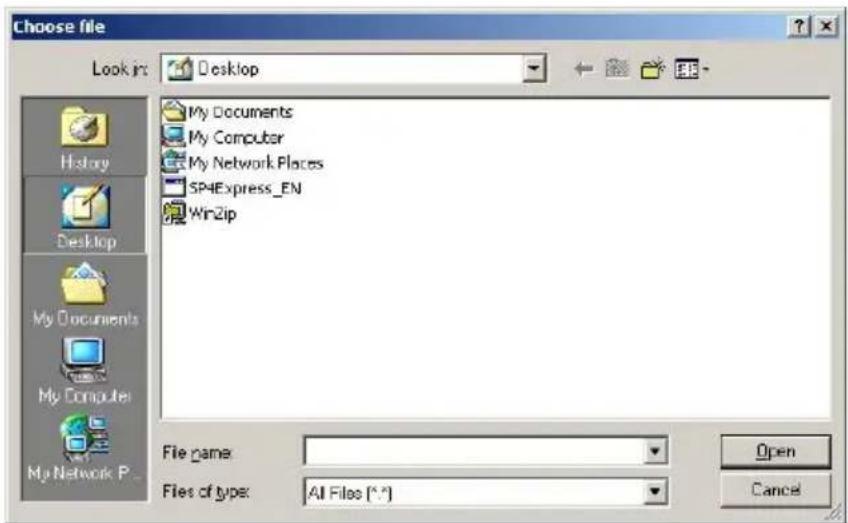
| Browse... | Enter the new firmware's path and file name (i.e. C:\FIRMWARE\firmware.bin). Or, click the Browse... button, find and open the firmware file (the browser will display to correct file path). | |
| Downloading | Click Downloading | to start downloading the file. |
Statistics
The Statistics table shows the packets sent/received over wireless and ethernet LAN respectively.
Click Refresh to update the data.
| LAN | Send | Uncasts frames | 0 |
| Multicasts frames | 0 | ||
| Receive | Uncasts frames | 0 | |
| Multicasts frames | 6 | ||
| Wireless | Send | MPDUs | 0 |
| MSDUs | 0 | ||
| Multicast MSDUs | 6 | ||
| Failed MSDUs | 0 | ||
| Retry MSDUs | 0 | ||
| Receive | MPDUs | 0 | |
| MSDUs | 0 | ||
| Multicast MSDUs | 0 | ||
| FCS Error MPDUs | 20 | ||
| Mic Failure MSDUs | 0 | ||
| Decrypt Error MPDUs | 0 |
- FCC Certifications
- CAUTION:
- FCC RF Radiation Exposure Statement
- CE Mark Warning
- Table of Content
- Introduction .... 1
- Setup 6
- Configuration....7
- INTRODUCTION
- Application
- Parts Names and Functions
- Top Panel: (LED Indicators)
- Rear Panel: Connection Ports
- Factory Default Settings
- SETUP
- Connect to your local area network:
- Power on the device:
- Check the LEDs:
- Configure your PC:
- Login
- Basic Setup
- Advanced Setup
- IP Setting
- Privacy
- RADIUS
- 802.1x
- Manage
- Download
- Statistics
Brand : AIRLIVE
Model : WL-8000AP
Category : Access Point