
GBP 7000 3D - Blu-ray player GRUNDIG - Free user manual and instructions
Find the device manual for free GBP 7000 3D GRUNDIG in PDF.


| Product Type | Blu-ray Player |
| Brand | Grundig |
| Model | GBP 7000 3D |
| Dimensions (W x H x D) | 430 x 44 x 230 mm |
| Weight | 2.1 kg |
| Power Supply | 110 - 240 V~, 50/60 Hz |
| Max. Power Consumption | 17 W |
| Standby Power Consumption | ≤ 1 W |
| Playback Standards | PAL, NTSC |
| Disc Types Supported | 3D BD, 2D BD, DVD-Video, DVD-RW, DVD+RW, DVD-R, DVD+R, CD-R, CD-RW, MP3, JPEG, MPEG4 |
| Video Output Resolution | Up to 1080p via HDMI |
| 3D Playback | Yes (requires 3D TV and compatible disc) |
| HDMI Output | 1 x HDMI Out |
| Video Output (RCA) | 1 x Composite Video Out |
| Audio Outputs | Analog L/R, Digital Coaxial |
| USB Port | 1 x USB 2.0 (FAT32/16) |
| Network Connectivity | Ethernet (RJ45), Wi-Fi 802.11b/g/n |
| BD-Live | Yes (requires USB memory ≥1GB and internet) |
| NetFusion (DLNA) | Yes |
| DIGI LINK (CEC) | Yes (HDMI-CEC) |
| Audio Formats | Dolby Digital, Dolby Digital Plus, Dolby TrueHD, DTS, MP3, WMA |
| Laser Type | Class 2 Semiconductor Laser (BD: 400-410 nm, DVD: 650-663 nm, CD: 770-800 nm) |
| Cleaning | Use soft dry cloth; no solvents; disc clean from center out |
| Safety Notes | Do not open casing; avoid moisture; unplug during storms |
Frequently Asked Questions - GBP 7000 3D GRUNDIG
User questions about GBP 7000 3D GRUNDIG
0 question about this device. Answer the ones you know or ask your own.
Ask a new question about this device
Download the instructions for your Blu-ray player in PDF format for free! Find your manual GBP 7000 3D - GRUNDIG and take your electronic device back in hand. On this page are published all the documents necessary for the use of your device. GBP 7000 3D by GRUNDIG.
USER MANUAL GBP 7000 3D GRUNDIG
natural_image
Exterior view of a GRUNDIG 86P 700K 3D printer unit (no visible text or symbols on body beyond branding)
FOR A GOOD REASON
GRUNDIG
3 SET-UP AND SAFETY
4 GBP 7000 3D
4 Packing contents
4 Special features
6 OVERVIEW
6 The Blu-ray player controls
7 The remote control
9 CONNECTION AND PREPARATION
9 Connecting the LED/LCD TV using an HDMI cable
9 Connecting the LED/LCD TV using RCA cables
9 Connecting a digital audio system with a coaxial cable
10 Connecting an MP3 player or a USB memory stick
10 Connecting to the internet with ethernet cable
10 Connecting to the internet with wireless antenna
11 Connecting to the mains supply
11 Putting batteries in the remote control
12 INITIAL SETUP
12 Switching on the Blu-ray player
12 Menu navigation
12 First installation by using the Quick Setup
13 First installation by using the functions in the main menu
13 Selecting the language of the screen menu
13 Adapting the Blu-ray player to the LED/LCD-TV
14 Selecting the Blu-ray mode
15 Network settings by using wired connection
16 Network settings by using wireless connection
18 BD/DVD PLAYBACK
18 Special features of Blu-ray Discs
18 Special features of the DVD
18 Preparation
18 Inserting the disc
19 Playback
19 Removing the disc
19 Adjusting the volume
19 Muting
19 Additional playback functions
22 BD LIVE
22 Adding BD-Live memory to the player
22 Setting up the player for BD-Live internet access
23 Using BD-Live
23 BD-Live notes
24 PLAYING AUDIO/VIDEO FILES
24 Playing the contents of a data device or a USB memory stick
25 Playing picture CDs
26 Playing audio CDs
27 NetFusion MODE
27 About NetFusion
27 Setting NetFusion function
28 Preparation
28 Using NetFusion function
29 SPECIAL SETTINGS
29 Audio settings
29 Existing settings in the Audio menu
30 Language settings
30 Existing settings in the Language menu
31 Parental control
31 Existing settings in the Parental menu
32 System settings
32 Existing settings in the System menu
33 INFORMATION
33 Licence conditions
33 Environmental note
34 Cleaning the device
34 Cleaning the disc
34 Technical data
34 System
35 Troubleshooting
Please note the following instructions when setting up the system:
■ The device is designed for the playback of video and audio signals from compact discs, USB and similar data devices. Any other use is expressly prohibited.
If you want to set up the device on wall shelves or in cupboards, please ensure that it is adequately ventilated. There must be at least 10 cm of space at the side, above and behind the device.
- Do not cover the device with newspapers, table cloths, curtains, etc.
- When setting up the device, remember that furniture is often coated with various types of varnish and plastic, which often contain chemical additives. These additives may cause corrosion to the feet of the unit. This may leave stains on the surface of the furniture which can be difficult or impossible to remove.
If the device is exposed to sudden changes in temperature, for example when taken from the cold into a warm room, wait at least two hours before using it.
■ The device is designed for use indoors. If you use it outdoors, make sure it is protected from moisture such as dripping or splashing water.
■ Use the device only in a moderate climate.
- Do not place the device close to heating units or in direct sunlight, as this will impair cooling.
- Do not place any vessels containing liquids, such as vases, on the device. Do not insert any foreign objects in the disc compartment.
- Do not place any objects such as burning candles on the device.
- Do not open the device casing under any circumstances. Warranty claims are excluded for damage resulting from improper handling.
■ Thunderstorms are a danger to all electrical devices. Even if the device is switched off, it can be damaged by a lightning strike to the mains. Always disconnect the mains plug during a storm.
■ Always keep the disc compartment closed to prevent dust from collecting on the laser optics.
- Do not use cleaning agents as they may damage the housing. Clean the device with a clean and dry cloth.
Notes:
- Do not connect any other equipment while the device is switched on. Switch off the other devices as well before connecting them.
- Only plug the device into the mains socket after you have connected the external devices. Make sure the power plug is freely accessible.
Packing contents
Blu-ray disc player
Remote control
2 batteries
(Micro, R03/UM 4/AAA, 2 x 1,5 V)
User manual
HDMI cable

Special features
■ Grundig Blu-ray Disc player provides high definition video playback at up to 1080 p resolution for an amazing viewing experience.
■ 3D playback with the latest technology in 3D Blu-ray Discs when connected to a 3D compatible LED/LCD-TV.
■ Upconversion of standard definition DVDs for enhanced picture quality at up to 1080 p over an HDMI connection.
■ Rich multi channel surround sound.
■ Easy and simple HDTV connection using a single HDMI cable.
■ Digital and analogue outputs for connecting your home theater system or amplifier.
- PIP functionality that lets you display primary and secondary video at the same time (if available on the Blu-ray Disc).
■ Pop-up menu display without interrupting playback (if available on the Blu-ray Disc).
■ HDMI 1080 p /50 fps output (Blu-ray Disc only) that provides smooth playback of video with a frame rate of 50 frames per second (TV must be connected with an HDMI cable and be compatible with 1080 p 50 frame).
■ Access to BD-Live functions, with internet connection and an additional memory (if available on the Blu-ray Disc).
■ The device supports NetFusion. This allows you to combine media streaming with controlling a connected media receiver while streaming content to it from another PC on a network.
■ The MP3 and WMA music data formats can also be played back via USB input or Audio CDs.
It is possible to display digital photograph files that have been burned onto a data disc, DVD+/-R, DVD+/-R/(W) or a Blu-ray Disc.
■ The DIGI LINK

Your player is equipped with the DIGI LINK function. This function uses the CEC (Consumer Electronics Control) protocol.
CEC allows external devices which are connected to the »HDMI« sockets by an HDMI cable (e.g. Blu-ray Disc player and LCD/LED-TV) to be operated with a remote control.
Prerequisite is that the devices connected support CEC. Read the user manual for the LCD/LED-TV to find out how to activate the corresponding function.
| LogoDisc type | |
| 3D Blu-ray Disc |  |
| Blu-ray Disc |  |
| DVD-video Disc (DVD-ROM) |  |
| DVD-RW |  |
| DVD+RW |  |
| DVD-R |  |
| DVD+R |  |
| WMA |  |
| JPEG |  |
| MPEG4 |  |
| CD-R |  |
| CD-RW |  |
Notes:
■ Writable DVD discs (DVD-RW, DVD-R) must be finalized; only VR-mode is allowed. Play-back may not work for some types of discs, or when specific operations, such as angle change and aspect ratio adjustment, are being performed. Information about the discs is written in detail on the box. Please refer to this if necessary.
- Do not allow the disc to become dirty or scratched. Fingerprints, dirt, dust, scratches or deposits of cigarette smoke on the recording surface may make it impossible to use the disc for playback.
■ CD-R/-RW, DVD-RW/-R recorded with UDF or ISO9660 format can be played back.
■ Windows Media Audio (WMA) files must be written to the disc with a .wma file extension in order to be recognized and played back properly.
■ JPEG picture files must be written to the disk with an .jpeg or .jpg file extension in order to be recognized and played back properly.
The Blu-ray player controls
The front of the device
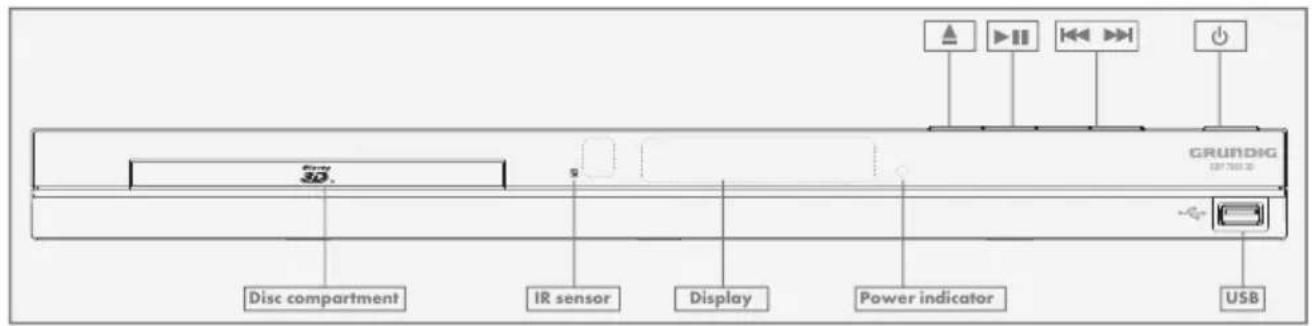
Disc com- partment

Compartment for BDs/ CDs.
Infra-red sensor for remote control signals.

Display of the device.
Power indicator
Lights up when the device is at standby mode.

USB socket for connecting MP3 player, a USB memory stick or a card-reading device.

Switches the device on from standby mode and off again.

Plays next title, chapter, track or file if exists.

Plays previous title, chapter, track or file if exists.

Starts and pauses playback.

Opens or closes the disc compartment.
The back of the device

110 - 240 V 50/60 Hz
Power cord.
ETHERNET
Socket for connecting the internet.
HDMI OUT
Video/audio output socket (digital signal) for connecting LED/LCD-TV.
AUDIO OUT L/R
Audio output sockets (left/right analogue channel) for connecting an audio system.
VIDEO OUT
Video output socket for connecting a LED/LCD-TV or AV receiver with an RCA socket.
COAXIAL
Audio output socket (coaxial) for connecting a digital multi-channel audio/video amplifier.
WLAN ANTENNA
Antenna for wireless internet reception.
The remote control
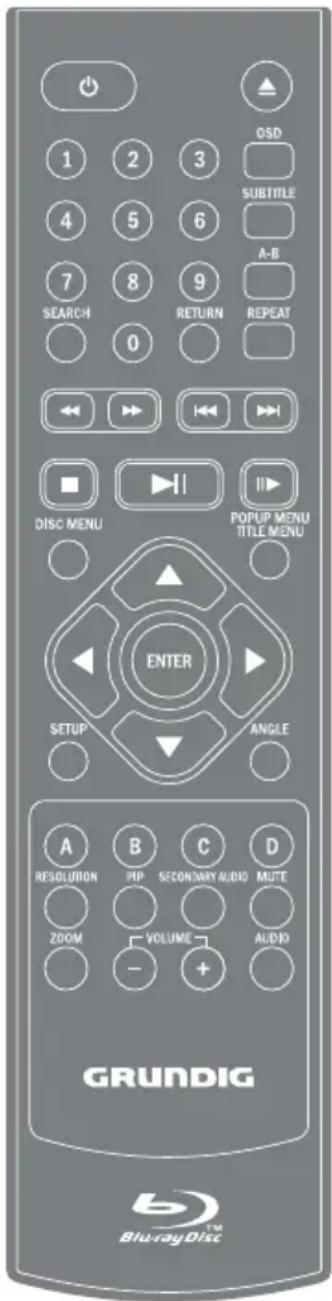

Switches the device on from standby mode and off again.

Opens or closes the disc compartment.
1 - 0
Number buttons for various data.
SEARCH
Press repeatedly to switch between search modes: title, chapter and time. Then use number buttons and »ENTER« button to select the point you want to play.
RETURN
Press to return to the previous menu during the settings or the folder or menus when playing a WMA/MP3/JPEG disc.
OSD
Shows current playback status and time information.
SUBTITLE Press to enable/disable subtitles during BD/DVD playback. If the disk has more than one subtitle language, use the cursor buttons to select the subtitle languages and press »ENTER« to confirm.
A-B
During playback, press once to store a "start point" for repeating playback. Press again to select an "end point", then the playback repeats from the beginning to the end (not available on all disks). The third press cancels this function.
REPEAT
Cycles through the possible repeat modes based on content played.

Rewinds the playback to the beginning.

Fast forwards the playback to the end.

Plays previous title, chapter, track or file if exists.

Plays next title, chapter, track or file if exists.

Stops the playback.

Starts or pauses playback.


Frame-by-frame playback.
DISC MENU
Immediately stops playback and brings up the main or 'top' menu of the BD or DVD disc. (Not available on all discs). In the main menu, you can typically choose subtitle language, audio track, or different scene etc.
POPUP MENU TITLE MENU
On BD discs: to bring up the main movie menu (not available on all discs).

Cursor buttons, select various functions in the menus.
ENTER
Confirms selected functions in the menus.
SETUP
Opens the settings menu of the device.
ANGLE
Selects various camera angles for certain scenes or passages on the BD and DVD during play-back (not available on all discs).
COLOR BUTTONS
The red, green, yellow and blue buttons start disc-specific features on some BD discs (if available on the Blu-ray Disc).
RESOLUTION
At stop mode, sets the video output resolution (your TV should support setting the resolution. Please refer to your TV's user manual).
PIP
Opens the PIP function.
SECONDARY AUDIO
During PIP playback, press to set the audio of the second video.
MUTE
Mutes the sound.
ZOOM
Zooms in on scenes during play-back (only DVD).
- VOLUME +
Sets the volume.
AUDIO
During playback, press to set the audio channel.
CONNECTION AND PREPARATION
Notes:
■ Do not connect any other equipment while the device is switched on.
Switch off the other equipment as well before connecting it.
■ Only plug the device into the mains socket after you have connected the external devices.
Connecting the LED/LCD TV using an HDMI cable

1 Connect the HDMI cable enclosed into the »HDMI« socket on the back of the device and the corresponding socket (HDMI) on the LED/LCD TV.
Connecting the LED/LCD TV using RCA cables

1 Connect a standard cinch cable into the »VIDEO OUT« socket on the back of the device and the corresponding socket (VIDEO IN) on the LED/LCD TV.
2 Connect standard cinch cables into the »AUDIO OUT L/R« sockets on the back of the device and the appropriate sockets (AUDIO IN) on the LED/LCD TV.
Connecting a digital audio system with a coaxial cable

flowchart
graph TD
    A["Television"] -->|To Video input| B["Amplifier"]
    C["BD Player"] -->|To Coaxial-digital audio input| D["Coaxial cable"]
    D -->|To Video input| A
1 Connect a coaxial digital cable into the digital output »COAXIAL« on the back of the device and into the corresponding socket of the digital amplifier.
Connecting an MP3 player or a USB memory stick
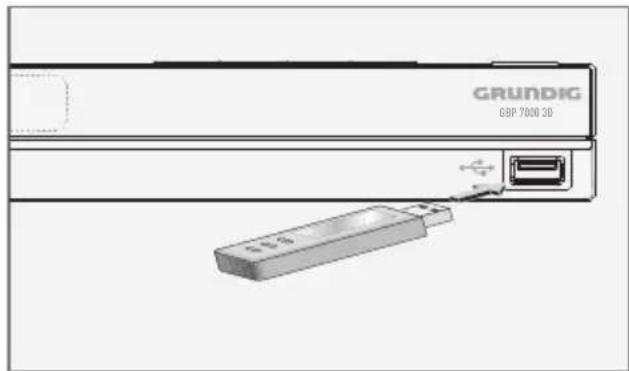
natural_image
Diagram of a Grundig industrial air conditioner unit with a USB flash connector (no text or symbols on the device itself)Note:
■ The device must be switched off while the USB connection is being made. If it is not switched off, data can be lost.
1 Switch off the device by pressing » ⏻ «.
2 Connect the USB interface of the MP3 player to the »« socket on the device, using a standard USB cable;
or
insert the USB plug of the USB memory stick in the »« socket on the device.
Notes:
■ To remove the MP3 player or the USB memory stick, switch off the device and pull out the cable for the data medium.
■ The USB socket on the device does not support a connection for a USB extension cable and is not designed for directly connecting to a computer.
Connecting to the internet with ethernet cable
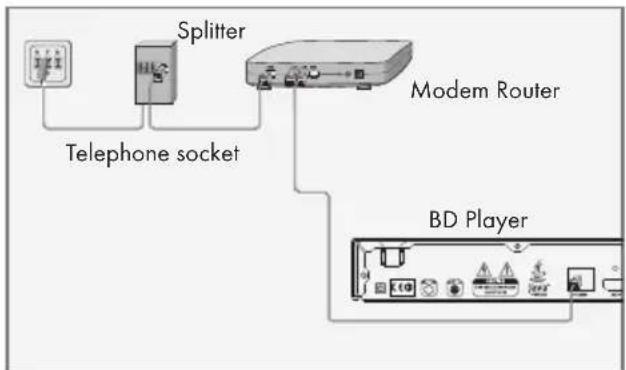
flowchart
graph TD
    A["Telephone socket"] --> B["Splitter"]
    B --> C["Modem Router"]
    C --> D["BD Player"]
1 Connect the Ethernet socket of the modem/router to the »ETHERNET« socket of the device using a standard network cable (Twisted pair, RJ45 plug).
- The data throughput level is 10/100 Mbit.
Connecting to the internet with wireless antenna
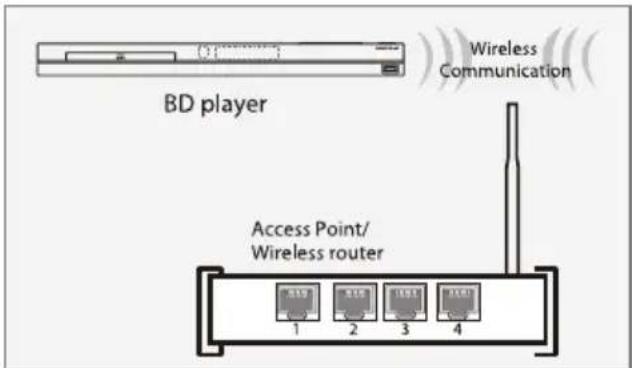
1 To activate the »WLAN ANTENNA«, unplug the network cable from the »ETHERNET« socket.
- The leds on the »WLAN ANTENNA« start blinking.
Note:
The network configuration and connection method may vary depending on the equipment in use and the network environment. The player is equipped with an IEEE 802.11n wireless module, which also supports the 802.11b/g standards. For the best wireless performance, you should use IEEE 802.11n certified WLAN network (access point or wireless router).
Connecting to the mains supply
Notes:
- Check that the mains voltage on the type plate (on the back of the device) corresponds to your local mains supply. If this is not the case, contact your specialist dealer.
■ Before connecting the AC power cord to the wall socket, ensure that all other connections have been made.

1 Plug the power cord into the wall socket.
Caution:
■ The device is connected to the mains with the power cord. Pull out the power plug if you want to completely disconnect the device from the mains.
■ Make sure the power plug is easily accessible during operation and not hindered by other objects.
Putting batteries in the remote control


1 Open the battery compartment by pressing down on the catch and then remove the lid.
2 Observe the polarity marked on the base of the battery compartment when inserting the batteries (micro batteries, 2 x 1.5 V, R 03/UM 4/AAA).
3 Close the lid of the battery compartment.
Notes:
- Do not expose the batteries to extreme heat, caused for example by direct sunlight, heaters or fire.
■ Remove the batteries when they are flat or when you know that the device will not be used for a long period of time. The manufacturer accepts no liability for damage caused by leaking batteries.
Environmental note:
■ Batteries, including those which do not contain heavy metal, should not be disposed of with household waste. Always dispose of used batteries in accordance with local environmental regulations.
Switching on the Blu-ray player
If you connect the device to the mains, it switches to standby.
1 Plug the power cord into the wall socket.
- The power indicator turns on.
2 Press » ⏻ «.
- The power indicator turns off.
- Display: »HELLO«.
3 Switch on the LED/LCD-TV, select the input setting on the LED/LCD-TV that matches the connection method you used to connect the Blu-ray player.
Menu navigation
When you switch on the device, the main menu of the device automatically appears on the screen.
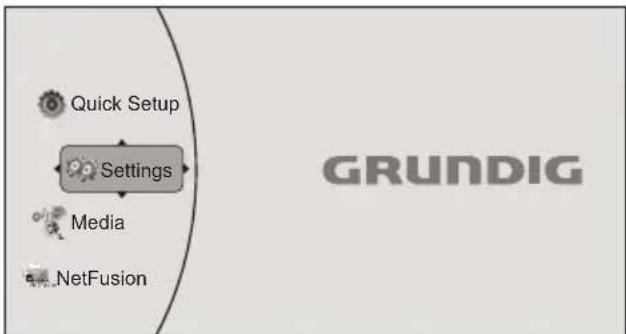
flowchart
graph TD
    A["Quick Setup"] --> B["Settings"]
    B --> C["Media"]
    B --> D["NetFusion"]
    style B fill:#cccccc,stroke:#333
    style C fill:#ffffff,stroke:#333
    style D fill:#ffffff,stroke:#333
    subgraph GRUNDIG
        A
        B
        C
        D
    end
2 Confirm your selection by pressing »ENTER«.

flowchart
graph TD
    A["Settings"] --> B["BD-Live"]
    A --> C["Display"]
    A --> D["Audio"]
    A --> E["Language"]
    A --> F["Parental"]
    A --> G["System"]
    A --> H["Network"]
    I["Language"] --> J["OSD"]
    I --> K["Menu"]
    I --> L["Audio"]
    I --> M["Subtitle"]
    I --> N["English"]
    I --> O["Auto"]
    I --> P["Auto"]
    I --> Q["None"]
3 Press »RETURN« to return to the main menu.
First installation by using the Quick Setup
Use the »Quick Setup« function to make the initial settings.
If you need more settings, refer to the chapter "First installation by using the functions in the main menu", see next page.
1 Press »SETUP« to open the main menu.
2 In the main menu select »Quick Setup« by using »▲« or »▼« and press »ENTER« to confirm.
- Display: »Would you like to do Quick Setup? Yes - No« appears.
3 Select »Yes« by using »◀« or »▶« and press »ENTER« to confirm.
- Display: »OSD Language Settings« menu appears.
4 Select your language by using »▲« or »▼« and press »ENTER« to confirm.
- Display: »Resolution« menu appears.
5 Depending on the type of the TV connected to the device, select resolution by using »▲« or »▼« and press »ENTER« to confirm.
- Display: »TV Aspect« menu appears.
6 Depending on the type of the TV connected to the device, select TV Aspect by using »▲« or »▼« and press »ENTER« to confirm.
- Display: »Quick Setup Complete! Exit« appears.
7 Press »ENTER« to exit the Quick Setup.
First installation by using the functions in the main menu
Selecting the language of the screen menu
1 Press »SETUP« to open the main menu.
2 In the main menu select »Settings« by using »▲« or »▼« and press »ENTER« to confirm.
3 Select »Language« by using »▲« or »▼« and press »ENTER« to confirm.

flowchart
graph TD
    A["Settings"] --> B["BD-Live"]
    A --> C["Display"]
    A --> D["Audio"]
    A --> E["Language"]
    A --> F["Parental"]
    A --> G["System"]
    A --> H["Network"]
    I["Language"] --> J["OSD"]
    I --> K["Menu"]
    I --> L["Audio"]
    I --> M["Subtitle"]
    I --> N["English"]
    I --> O["Auto"]
    I --> P["Auto"]
    I --> Q["None"]
4 Select »OSD« by using »▲« or »▼« and press »ENTER« to confirm.
5 Select your language by using »▲« or »▼« and press »ENTER« to confirm.
6 Press »RETURN« to return to the »Settings« menu.
Adapting the Blu-ray player to the LED/LCD-TV
Setting the TV system (TV norm)
Select »PAL« for LED/LCD-TV with the PAL system or »NTSC« for those with the NTSC system.
3 Choose the setting (»PAL« or »NTSC«) by using »▲« or »▼« and press »ENTER« to confirm.
Setting the HDMI resolution
You can select the ideal setting for the connected LED/LCD-TV. The abbreviation behind the number means: »p« = progressive, »i« = interlace.
The function can only be selected once the LED/LCD-TV is connected to the »HDMI« socket.
1 In the »Display« menu select »Resolution« by using »▲« or »▼« and press »ENTER« to confirm.

2 Choose the setting (»HDMI Auto«, »1080p«, »1080i«, »720p«, »576p«, »576i«) by using »▲« or »▼« and press »ENTER« to confirm.
Note:
■ The output resolution is based on the type of LED/LCD-TV connected to the device, as described in the table below:
| LED/LCD-TV TYPE | Correct Resolution Setting |
| If your TV is a standard-definition PAL TV (SD TV) | 576i/480i |
| If your TV is an enhanced-definition TV (EDTV) | 576p/480p |
| If your TV is a high-definition TV (HDTV) capable of 720p only | 720p |
| If your TV is a high-definition TV (HDTV) capable of 1080i only | 1080i |
| If your TV is HDMI equipped, and if your TV is a high-definition TV (HDTV) capable of 1080p [any frame rate], and you are connected to your TV via HDMI, | 1080p (HDMI) |
| If your TV is HDMI equipped, and you are connected to your TV via HDMI, and you wish the BD player to set the output based on information exchanged between the TV and the player over the HDMI cable. | HDMI auto |
Selecting the TV format
The setting depends on your LED/LCD-TV. If you have a LED/LCD-TV with a 4:3 format, select the 4:3 setting; if you have a LED/LCD-TV with a 16:9 format, select the 16:9 setting.
1 In the »Display« menu select »TV Aspect« by using »▲« or »▼« and press »ENTER« to confirm.
2 Choose the setting (»16:9 Wide«, »16:9 Pillarbox«, »4:3 Pan and Scan«, »4:3 Letterbox«) by using »▲« or »▼« and press »ENTER« to confirm.
Selecting the film mode
The movies are recorded on film at a rate of 24 frames per second. However not all televisions can display 24 frames per second. Off can be selected for 50 frames per second format.
Only the HDMI output of the player is capable of supporting 1080 p video output at any frame rate.
1 In the »Display« menu select »Film Mode (1080p24)« by using »▲« or »▼« and press »ENTER« to confirm.
2 Choose the setting (»Auto«, »Off«) by using »▲« or »▼« and press »ENTER« to confirm.
Setting deep color
HDMI 1.3 supports 10-bit, 12-bit and 16-bit (RGB or YCbCr) color depths while 8-bit was supported in previous versions. This expands the colors displayed from millions to billions, which is much more vivid than the previous.
1 In the »Display« menu select »Deep color« by using »▲« or »▼« and press »ENTER« to confirm.
2 Select »Auto« or »Off« by using the cursor buttons and press »ENTER« to confirm.
Selecting the Blu-ray mode
There are two options:
- Automatic: If you select »Automatic«, 3D Blu-ray disc plays in 3D effect or 2D Blu-ray disc plays in 2D effect automatically.
- Forced 2D: If you select »Forced 2D«, disc plays in 2D, regardless of whether it is 3D or 2D.
End settings for the LED/LCD-TV
1 Press »SETUP« to return to the main menu.
Network settings by using wired connection
The device must be connected to a wired router with an ethernet cable.
Please see chapter "CONNECTION AND PREPARATION".
1 Press »SETUP« to open the main menu.
2 In the main menu select »Settings« by using »▲« or »▼« and press »ENTER« to confirm.
3 Select »Network« by using »▲« or »▼« and press »ENTER« to confirm.

4 Select »IP Mode« by using »▲ « or »▼ « and press »ENTER« to confirm.
5 Choose the setting (»Dynamic« or »Manual«) by using »▲« or »▼« and press »ENTER« to confirm.
Notes:
■The IP Mode option provides two configuration modes for IP:
- Dynamic - Enables DHCP, the addresses are automatically assigned by the router.
- Manual - Requires user to configure network settings such as IP address, subnet mask, gateway, etc. It is able to show subnet mask, gateway, primary DNS, secondary DNS when "IP Mode" is set as "Manual".
■ If you choose the option "Dynamic", go to step 11.
If you choose the option "Manual", continue with step 6).
6 Select »IP address« by using »▲« or »▼« and press »ENTER«.
Enter the IP address by using the number buttons.
Select »Ok« by using »▼« and press »ENTER« to confirm,
or select »Cancel« by using »▶« and press »ENTER« to cancel the setting.
Enter the Subnet Mask by using the number buttons.
Select »Ok« by using »▼« and press »ENTER« to confirm,
or select »Cancel« by using »▶« and press »ENTER« to cancel the setting.
8 Select »Gateway« by using »▲« or »▼« and press »ENTER«.
Enter the Gateway address by using the number buttons.
Select »Ok« by using »▼« and press »ENTER« to confirm,
or select »Cancel« by using »▶« and press »ENTER« to cancel the setting.
Note:
■ The primary and secondary DNS (Domain Name System) in the next setting are the network addresses of the server allocated by the provider.
9 Select »Primary DNS« by using »▲« or »▼« and press »ENTER«.
Enter the Primary DNS by using the number buttons.
Select »Ok« by using »▼« and press »ENTER« to confirm,
or select button »Cancel« by using »▶« and press »ENTER« to cancel the setting.
10 Select »Secondary DNS« by using »▲« or »▼« and press »ENTER«.
Enter the Secondary DNS by using the number buttons.
Select »Ok« by using »▼« and press »ENTER« to confirm, or select »Cancel« by using »►« and pres. »ENTER« to cancel the setting.
11 Select »Apply« by using »▼« and press »ENTER« to confirm the setting;
_or select »Cancel« by using »▶« and press »ENTER« to cancel the setting.
12 If the connection is successful, »Network Test« appears.
End setting by using »ENTER«.
Network settings by using wireless connection
The device must be connected to a wireless router with the WLAN Antenna.
Please see chapter "CONNECTION AND PREPARATION".
Note:
The red led of the »WLAN Antenna« blinks when the antenna is active and the blue led blinks when the wireless connection is active.
1 Press »SETUP« to open the main menu.
2 In the main menu select »Settings« by using »▲« or »▼« and press »ENTER« to confirm.
3 Select »Network« by using »▲« or »▼« and press »ENTER« to confirm.
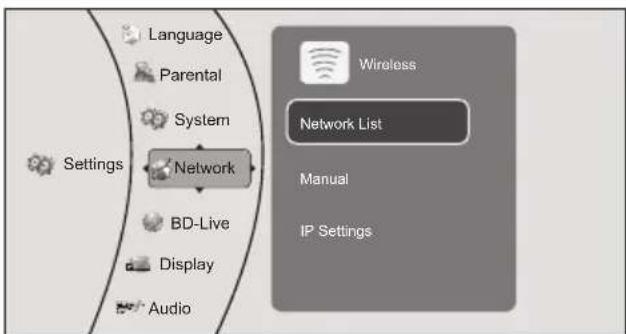
4 Select »Network List« by using »▲« or »▼« and press »ENTER« to confirm.
- Display: The list of available wireless networks appears.

flowchart
graph TD
    A["Settings"] --> B["Language"]
    A --> C["Parental"]
    A --> D["Sy"]
    A --> E["Ne"]
    A --> F["BD"]
    A --> G["Display"]
    A --> H["Audio"]
    I["Network Test"] --> J["Wireless"]
    I --> K["Network List"]
    I --> L["Network Test"]
5 Select the wireless network you like by using »▲« or »▼« and press »ENTER« to confirm.
Note:
If the network is encrypted, the wireless network password (security code WEP or WPA) screen appears.
6 Press »ENTER«, the keyboard appears.
Select the first character of the password (capital and small letters, numbers, symbols) by pressing »▲«, »▼«, »◀« or »▶« and confirm by pressing »ENTER«. Repeat the procedure for all characters.
After you finish entering all characters, select the push button »OK« on the keyboard by pressing »▲«, »▼«, »◀« or »▶« and press »ENTER« to confirm.
Notes:
■ You can choose between numbers, lower and upper case letters, and special characters.
If you make a mistake during entry, press »▲«, »▼«, »◀« or »▶« to select the push button »×« and press »ENTER« to confirm. The last character is deleted.
7 Select »Connect« to connect to the wireless network by using »▲« or »▼«,
or select »Delete« by using »◀« or »▶« to delete the wireless network from the list; or select »Cancel« by using »◀« or »▶« to cancel the setting;
or select »Disconnect« by using »◀« or »▶« to disconnect from the wireless network; and press »ENTER« to confirm.
- Display: "» « Connection to (WLAN network name), Verifying Internet Connection..." appears.
- Display: »«, if the connection is successful.
8 Press »SETUP« to return to the main menu.
Note:
For the »IP Settings« and »Network test« settings, see "Network settings by using wired connection" section.
Manual settings in wireless connection
1 At step 4 in "Network settings by using wireless connection" section, select »Manual« by using »▲« or »▼« and press »ENTER« to confirm. - Manual setting menu opens.

2 Select »Encryption« by using »▲« or »▼« and press »ENTER« to confirm.
3 Select the encryption from your wireless network by using »▲« or »▼« and press »ENTER« to confirm.
- The keyboard appears.
![Language Manual OK 1 2 3 4 5 6 7 8 9 0 q w e r t y u i o p a s d f g h j k l ; z x c v b n m , . / Space - = \ [ ]'](/content/2026/05/1018644/images/3c9146fcd5f4e5d9ec2b480110d68a4977d952bd94a012f1f7b03f33640d33a3.jpg)
5 Select the first character of the network name (capital and small letters, numbers, symbols) by pressing »▲«, »▼«, »◀« or »▶« and confirm by pressing »ENTER«.
Repeat the procedure for all characters.
After you finish entering all characters, select the push button »OK« on the keyboard by pressing »▲«, »▼«, »◀« or »▶« and press »ENTER« to confirm.
Notes:
■ You can choose between numbers, lower and upper case letters, and special characters by using the push buttons »◀« and »◀« in the keyboard.
If you make a mistake during entry, press »▲«, »▼«, »◀« or »▶« to select the push button »☒« and press »ENTER« to confirm. The last character is deleted.
6 Select »Password« by using »▲« or »▼« and press »ENTER« to confirm.
- The keyboard appears.
7 Select the first character of the password (capital and small letters, numbers, symbols) by pressing »▲«, »▼«, »◀« or »▶« and confirm by pressing »ENTER«. Repeat the procedure for all characters.
After you finish entering all characters, select the push button »OK« on the keyboard by pressing »▲«, »▼«, »◀« or »▶« and press »ENTER« to confirm.
8 Select »Connect« by using »▼« and press »ENTER« to confirm, or select »Cancel« by using »►« and press »ENTER« to cancel the setting.
- Display: "» « Connection to (WLAN network name), Verifying Internet Connection..." appears. - Display: » «, if the connection is successful.
9 Press »SETUP« to return to the main menu.
IP Settings
Please refer to "Network settings by using wired connection".

This item incorporates copyright protection technology that is protected by U.S. patents and other intellectual
property rights. Use of this copyright protection technology must be authorized by Rovi Corporation, and is intended for home and other limited viewing uses only unless otherwise authorized by Rovi Corporation. Reverse engineering or disassembly is prohibited.

You can recognise a 3D Blu-ray disc by the logo on the label. The same copyright protection for Blu-ray Disc logo which
is described above is also effective for Blu-ray 3D Discs.
Special features of Blu-ray Discs
The massive storage capacity of a Blu-ray (BD) Disc allows a far higher standard of picture and audio quality and a wealth of special effects and enhanced features.
BLU-RAY AND JAVA
This player features Java support, enabling you to get the most out of the latest Blu-ray Discs.
When a BD disc is loaded, always explore the title menu to enjoy these extra features.
BLU-RAY AND HDMI
HDMI is the only domestic medium capable of transmitting the huge volumes of data required by the very high picture resolutions and advanced digital audio codecs that make Blu-ray such an exciting medium.
PLAYING A BLU-RAY DISC
Blu-ray Discs play very much like standard DVDs but with a very much higher level of interactivity. All the standard features of DVD player operate exactly the same but there are some differences.
Special features of the DVD

You can recognise a DVD by the logo on the label.
The discs have one or more tracks depending
on the content of the DVD.
Each track can contain one or more chapter. Selecting the track and chapter is simple and convenient.
You can control and direct playback of a DVD using the menu of the DVD player on the television screen.
Preparation
1 Switch on the LED/LCD TV, select the input setting on the LED/LCD TV that matches the connection method you used to connect the Blu-ray player.
2 If an audio system or an AV receiver is connected to the Blu-ray player, switch it on and select the audio input for the Blu-ray player.
3 Switch on the Blu-ray player.
- If there is no disc in the compartment, »NO DISC« appears after a short time.
- If a disc has been inserted, it is scanned and »LOAD« appears.
Inserting the disc
1 Press »« to open the disc compartment.
- Display: »OPEN«.
2 Insert the disc in the compartment with its label facing upwards.
3 Press » « to close the disc compartment.
- Display: »CLOSE« and then »LORD«; the disc is scanned and then the total duration of the disc is shown.
- The disc menu opens automatically.
Note:
■ Some disc menus direct you to set the menu language first. If that happens, select the language by using cursor buttons and press »ENTER«.
Playback
1 Select »Play« if this option is available by using the cursor buttons and press »ENTER«;
or
press » « to start playback.
- The playback starts.
Note:
If the message »Prohibited« appears on the television screen, the selected function is not possible with this disc.
1 Press » to open the disc compartment.
2 Remove the disc from the compartment.
3 Press » to close the disc compartment.
Adjusting the volume
1 Adjust the volume by pressing »- VOLUME « or » VOLUME +« on the remote control.
Muting
1 Activate the mute with »MUTE« on the remote control.
- Display: » X Off«.
2 Deactivate the mute with » MUTE « on the remote control.
- Display:» On«.
Additional playback functions
Viewing information
You can view information about the title, chapter, playing time and much more on the screen.
1 Press »OSD« on the on the remote control.
- Display: The information line appears.
2 Press »OSD« on the on the remote control to deactivate the function.
- Display: The information line disappears.
Disc menu navigation
The disc may contain several titles and chapters you can choose from.
1 Press »DISC MENU« on the remote control.
- Main menu of the disc opens.
2 Select the title that you want by using the cursor buttons and press »ENTER« to confirm.
3 In the selected title, choose the chapter or part that you want by using the cursor buttons and press »ENTER« to confirm.
4 Press »DISC MENU« on the remote control to return to the main menu of the disc.
Fast forward and fast reverse
1 During playback, press »◀◀« on the remote control to fast reverse, or press »▶▶« on the remote control to fast forward through the disc.
Note:
- When you repeatedly press the button, each time the fast forward or fast reverse motion speed changes. The speed increases through the following sequence: Fast x 2, Fast x 4, Fast x 8, Fast x 16, Fast x 32, Fast x 64, Fast x 128.
2 Press»« to resume normal playback.
- Playback continues.
Selecting previous and next chapters
1 During playback, press »◀◀« to play the previous chapter or press »▶◀« to play the next chapter.
- When you release the button, the device skips the current chapter and playback starts from the selected chapter.
Search functions
1 Press »SEARCH« repeatedly to switch between search modes: »Goto Title«, »Goto Chapter« and »Goto Time«.
2 In the selected mode, press number buttons and »ENTER« button to select the point you want to play.
Note:
For example to select title 4, you should press respectively the buttons »0«, »0«, »0«, »4«, »ENTER«.
- Playback of the selected point starts automatically.
Enlarging or reducing the picture (only DVD)
1 Press »ZOOM« repeatedly to switch between »Zoom Off«, »Zoomx2« and »Zoomx4«.
- Display: » Zoom x2 «, the selected part of the picture is enlarged 2 times.
- Display: » Zoom x4 «, the selected part of the picture is enlarged 4 times.
Note:
2 To quit the function, press again »ZOOM« until »Zoom Off« appears on display.
- Display: » Zoom Off «.
Frame-by-frame playback
1 During playback, press »| | |►« to advance the scene frame by frame.
2 Press »▶II« to resume playback.
Repeating a chapter or a track
(controlled by the Blu-ray Disc)
1 During playback, press »REPEAT« repeatedly to select a repeat mode: »Repeat Title«, »Repeat Chapter«, »Repeat Off«.
- Display: » Repeat Title«, the current title is repeated.
- Display: » Repeat Chapter«, the current chapter is repeated.
2 To quit the function, press again »REPEAT« until »Repeat Off« appears on display.
- Display: » Repeat Off «.
Repeating a selected section
(controlled by the Blu-ray Disc)
1 During playback, press »A-B« to select a start point for a section to be repeated.
- Display: » ↩ Repeat A-«, the start point of the section is selected.
2 At the point you want to be the end point, press »A-B« again to set the end point for the section to be repeated.
- Display: » Repeat A-B«, the end point of the section is selected. The selected section starts to be repeated.
3 To quit the function, press again »A-B« until »Repeat Off« appears on display.
- Display: » Repeat Off «.
Selecting and displaying subtitles
If the disc provides subtitles, they can be displayed on your TV screen.
If the subtitles are available in several languages, you can select the one you want.
1 During playback, press »SUBTITLE« on the remote control.
- »Subtitle« and »PIP Subtitle« menu appears.
2 Select the Subtitle menu that you want by using the cursor buttons and press »ENTER« to confirm.
3 In the selected Subtitle menu, select the options that you want by using the cursor buttons and press »ENTER« to confirm.
- Display: for example » 01/02 DEU«.
4 To switch of the subtitles, select »Subtitle Off« at step 3 by using the cursor buttons and press »ENTER« to confirm.
Notes:
- You can set the subtitle from the disc menu also. Please see "Disc menu navigation" section.
■ While playing video files from a USB or an optical disc, to clearly obtain all the characters in subtitles, the subtitle file must be in UTF-8 format. The name of the video file and the subtitle file should be the same.
In order to prepare UTF-8 format, you should do the following method:
1 Open the .srt file in the NotePad application.
2 Go to the "File" drop-down menu and select "Save As...".
3 The file name and file type will remain the same.
4 Under the Encoding section of this window, select the "UTF-8" option from the drop-down menu.
5 Click "Save" to keep your changes.
Selecting the dubbed language or the audio format
These settings allow you to listen to a dubbed language other than the default one if the disc provides alternatives.
1 During playback, press »AUDIO« on the remote control.
- »Audio« and »PIP Audio« menu appears.
2 Select the dubbed language that you want by using the cursor buttons and press »ENTER« to confirm.
Pop-up menu/Title menu
If the disc provides pop-up or title menus, you can use this function.
1 During playback, press »POPUP MENU/TITLE MENU« to open pop-up or title menu.
2 Select the option that you want by using the cursor buttons and press »ENTER« to confirm.
3 To quit the function, press »POPUP MENU/TITLE MENU« again.
Selecting the camera angle for particular scenes or passages
Some discs provide scenes or passages which were filmed several times from different camera angles.
1 During playback, press »ANGLE« on the remote control.
- Angle menu appears.
2 Select the angle that you want by using the cursor buttons and press »ENTER« to confirm.
- Display: for example »01/03«.
Playing secondary video (Picture in picture / PIP)
(controlled by the Blu-ray Disc)
1 During playback, press »PIP« on the remote control to turn on secondary video (picture in picture / PIP) function.
- The secondary video playback appears on display.
2 To quit function press »PIP« again.
Selecting the dubbed language for the PIP function
(controlled by the Blu-ray Disc)
1 During PIP playback, press »SECONDARY AUDIO« on the remote control.
- The secondary audio menu opens.
2 Select »On« or »Off« by using the cursor buttons and press »ENTER« to confirm.
Using the color buttons
The RED, GREEN, YELLOW and BLUE buttons are used with interactive menus when operating a BD-Video disc that includes JavaTM applications (BD-J). For more information about operating this kind of a disc, please read the instructions that came with the disc.
Some Blu-ray discs contain additional features that are made available to players that are connected to the internet, and have additional memory added.
These additional features may include things like:
- the ability to download new movie trailers,
- additional "commentary" by actors and directors,
- multiperson game play and chat.
In order to access BD-Live functions, the player must be properly configured for BD-Live internet access, and it must be equipped with additional memory.
Adding BD-Live memory to the player
1 Insert an at least 1Gbyte USB memory stick into a PC drive, and make sure that it is formatted as FAT32.
2 Insert the USB plug of the USB memory stick in the »« socket on the device (see "CON-NECTION AND PREPARATION" section).
Setting up the player for BD-Live internet access
1 Press »SETUP« to open the main menu.
2 In the main menu select »Settings« by using »▲« or »▼« and press »ENTER« to confirm.
3 Select »BD-Live« by using »▲« or »▼« and press »ENTER« to confirm.
4 Select »BD-Live Internet Access« by using »▲« or »▼« and press »ENTER« to confirm. Make sure that the option »Limit Access« or »Always Allow Access« is selected.
5 Select »Limit Access« or »Always Allow Access« by using » ▲ « or » ▼ « and press »ENTER« to confirm.
Note:
■ Once the USB memory stick has been inserted, if there is not at least 100 Mbyte of free space on the device, you should choose »Erase Blu-ray Storage« from the »BD-Live« setup menu item.
6 Press »RETURN« and select »Network« by using »▲« or »▼« and press »ENTER« to confirm.
Select »Network Test« by using the cursor buttons and press »ENTER« to confirm.
Note:
The "Link Status" must show that you are connected to the internet, otherwise you cannot access BD-Live content on the web (see "CONNECTION AND PREPARATION/Connecting to the internet with ethernet cable" section).
7 Press »RETURN« to return to the main menu.
Using BD-Live
1 Press »« to open the disc compartment.
2 Insert the Blu-ray Disc in the compartment with its label facing upwards.
3 Press » to close the disc compartment.
- In a few minutes, the BD-Live Menu appears.
7 Select the content to download from the »Previews« sub menu. The download is depending on the content size and network speed.
- The downloaded content is stored under »Media« - »USB« on the external USB memory stick. You can choose to either play-back or delete the downloaded content.
BD-Live notes
■ The Broadcom Reference system only supports the connection of USB memory in order to fulfill the BD 2.0 1GByte memory requirement.
■ You must have the BD-Live disc in the player to play any related (already downloaded) content.
■ Some BD-Live content could expire and will not play. You may need to manually delete the contents in storage in order to have free space. To do this, select respectively: »Settings«, »BD-Live«, »Erase Blu-ray Storage«.
A clock is not used to manage the expiration of downloaded BD-live content. Instead, time and expiration of content is managed by the BD-Live server on the internet.
Playing the contents of a data device or a USB memory stick
Preparation
1 Switch off the Blu-ray player with »◀«.
2 Connect a data device to the »« socket using a standard USB cable;
or
insert the USB plug of the USB memory stick in the »« socket on the device.
3 Switch on the LED/LCD-TV, select the input setting on the TV that matches the connection method you used to connect the Blu-ray player.
4 Switch on the Blu-ray player with »◀«.
5 Press »SETUP« to open the main menu.
6 Select »Media« by using »▲« or »▼« and press »ENTER« to confirm.
- The external device menu opens.

flowchart
graph TD
    A["Media"] --> B["USB"]
    B --> C["Videos"]
    B --> D["Music"]
    B --> E["Picture"]
7 Confirm »USB« with »ENTER«; or
select »USB« (if a disc is inserted - display »Optical Disc«) by using »▲« or »▼« and press »ENTER« to confirm.
Playing a title, a track or a picture
1 Select »Videos«, »Music« or »Pictures« by using »▲« or »▼« and press »ENTER« to confirm.
2 Chose the file from the selected option by using » ▲ « or » ▼ « and press » ENTER« to confirm.
3 Press » « Ito start playback.
- The selected file starts playing.

4 To stop playback, press » «.
Additional playback functions
■ Press » « Ito pause playback.
Press » « again to resume playback.
■ Select the playback speed during playback by pressing » ◀◀◀« or »▶▶◀.
■ During playback, select the next track/picture you want with »▶▶« or select the previous track/picture with »◀◀«.
■ During playback, press »REPEAT« repeatedly to select a repeat/random mode:
■ While playing back the picture, to enlarge the picture press »ENTER« repeatedly.
■ To set slide show effects and slide show delay for pictures:
press »POPUP MENU TITLE MENU«, select »Slide Show Effects« or »Slide Show Delay« with »▲« or »▼«, press »ENTER« to confirm, select the required effect or the delay with »▲« or »▼« and press »ENTER« to confirm.
Playing picture CDs
It is possible to display digital picture files or music files that have been burned onto a data disc, DVD+/-R, DVD+/-R/(W) or a Blu-ray Disc.
Preparation
1 Press » to open the disc compartment.
- Display: »OPEN«.
2 Insert the disc with pictures into the disc compartment.
3 Press »« to close the disc compartment.
- Display: »CLOSE«.
4 Select »Media« by using »▲« or »▼« and press »ENTER« to confirm.
5 Confirm »Optical Disc« with »ENTER«.
6 Confirm »Pictures« with »ENTER«.
- The picture summary opens.
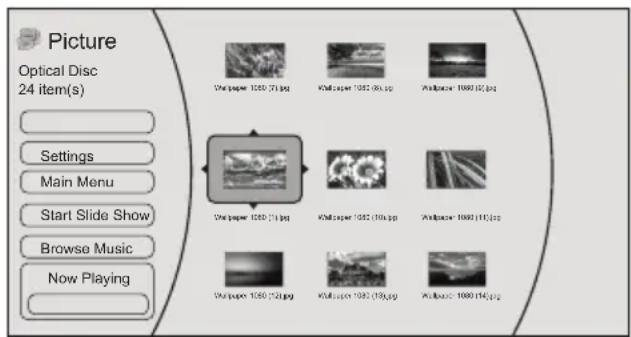
Displaying a picture
1 Chose the required picture from the summary by using »▲«, »▼«, »◀« or »▶« and press »ENTER« to display.
2 Press » « to stop playback.
Additional functions
■ Start a slide show
Select »Start Slide Show« by using »▲« or »▼« and press »ENTER« to confirm. All pictures will be displayed.
■ Settings
Select slide show effects and slide show delay.
■ Browse Music
Opens the music playing menu where you can select music files to play while you view pictures.
■ Main Menu
Switches to the main menu.
■ Repeat
During playback, press »REPEAT« to select the repeat mode:
- »Repeat All«,
- »Repeat Off«.
Playing audio CDs
Preparation
1 Press » to open the disc compartment.
- Display: »OPEN«.
2 Insert the disc with audio files into the disc compartment.
3 Press » « to close the disc compartment.
- Display: »CLOSE«.
- The folder summary opens.
Playback
1 Chose the required folder from the summary by using » ▲ « or » ▼ «, » ◀« and press »EN-TER« to confirm.
- The selected folder starts playing.

Additional playback functions
■ Press »▶to pause playback.
Press » « again to resume playback.
- Select the playback speed during playback by pressing » ◀ ◀ « or » ▶ ▶ «.
During playback, select the next title you want with » or select the previous title with »«.
■ During playback, press »REPEAT« repeatedly to select a repeat/random mode:
- »Repeat All«,
- »Random On«,
- »Repeat File«,
- »Repeat Off«.
■ Confirm »Previous folder« by pressing »ENTER«, to select the summary.
■ During playback, press »ENTER« and select »Main Menu«, to switch to the main menu.
About NetFusion
■ The device supports NetFusion. This allows you to combine media streaming with controlling a connected media receiver while streaming content to it from another PC on a network.
- You can easily access the Video, music and image files on the server through the NetFusion menu of your player.
■ You can share your video, music and image files through devices such as PC, mobile phone or NAS (Network Attached Storage) that function as DMS (Digital Media Server) compatible with NetFusion.
■ The player can also operate with DMS software that can be installed on a computer but, it is not guaranteed that it will run in full compatibility with software without a DMS certificate.
If you use a computer running with Windows operating system, it can be configured as Windows Media Player (Version 11) Digital Media server.
Settings to be made depend on the relevant software.
In order not to encounter any problems with media sharing, check the firewall settings of your modem and computer.
Setting NetFusion function
1 Switch on the Blu-ray player with »◀«.
2 Press »SETUP« on the remote control to open the main menu.
3 In the main menu select »Settings« by using »▲« or »▼« and press »ENTER« to confirm.
4 Select »System« by using »▲« or »▼« and press »ENTER« to confirm.
- The System menu opens.

flowchart
graph TD
    A["Settings"] --> B["Audio"]
    A --> C["Language"]
    A --> D["Parental"]
    A --> E["System"]
    A --> F["Network"]
    A --> G["BD-Live"]
    A --> H["Display"]
    I["System"] --> J["Optical Disc Auto Play"]
    I --> K["NetFusion"]
    I --> L["Screen Saver Duration"]
    I --> M["Auto Power Down"]
    I --> N["Digilink"]
    I --> O["Update Via Network"]
    I --> P["Restore factory defaults"]
    I --> Q["System Information"]
    R["Enable"] --> S["5 Minutes"]
    R --> T["20 Minutes"]
    R --> U["Off"]
5 Select »NetFusion« by using »▲« or »▼« and press »ENTER« to activate.
Check the network connection.
7 Press »RETURN« to return to the main menu.
Preparation
1 Switch on the Blu-ray player with »◀«.
2 Press »SETUP« on the remote control to open the main menu.
3 In the main menu select »NetFusion« by using »▲« or »▼« and press »ENTER« to confirm.
- Display: » Discovering«.
4 Select the shared media from the menu by using »▲« or »▼« and press »ENTER« to confirm.
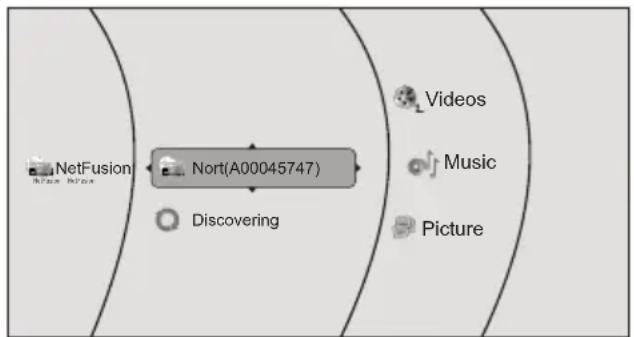
flowchart
graph TD
    A["NetFusion\nNort(A00045747)"] --> B["Discovering"]
    C["Videos"] --> D["Music"]
    E["Picture"] --> F["Data"]
Using NetFusion function
1 Select »Videos«, »Music« or »Pictures« by using »▲« or »▼« and press »ENTER« to confirm.
2 Depending on the configuration of the shared media choose the file/title from the selected option by using »▲« or »▼« and press »ENTER« to confirm.
3 Press » « Ito start playback.
- The selected folder/file starts playing.
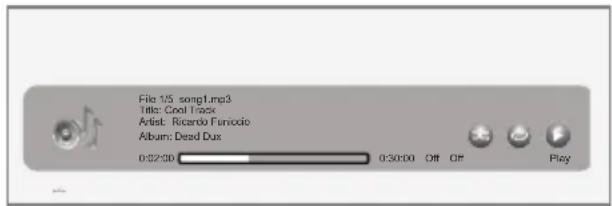
4 To stop playback, press » ■ «.
Note
■ File and folder structure of the DMS device in menu may vary depending on the Digital Media Server software in use.
■ Subtitles are not supported on video files that are played through the DMS device.
■ Video files played through DMS device support following formats that have obtained NetFusion certificate: »MPEG_PS_PAL«, »MPEG_TS_SD_EU«, »MPEG_TS_SD_EU_T« and »MPEG_TS_SD_EU_ISO«.
■ Audio files played through DMS device support following formats that have obtained NetFusion certificate: »LPCM« and »MP3«.
■ Image files played through DMS device support following formats that have obtained NetFusion certificate: »JPEG_SM«.
Additional playback functions
■ See chapter "Playing Audio/Video files", depending on the file in use.
Audio settings
1 Press »SETUP« on the remote control to open the main menu.
2 In the main menu select »Settings« by using »▲« or »▼« and press »ENTER« to confirm.
3 Select »Audio« by using »▲« or »▼« and press »ENTER« to confirm.
- The audio menu opens.
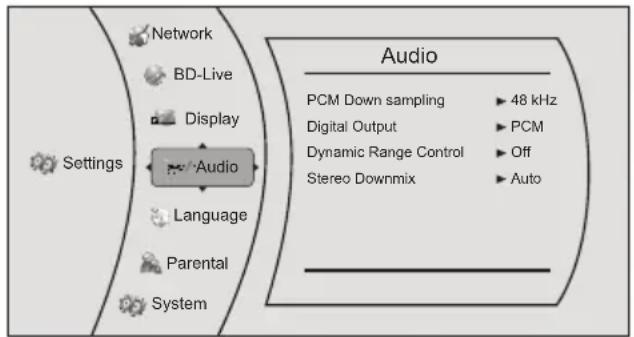
flowchart
graph TD
    A["Settings"] --> B["Network"]
    A --> C["BD-Live"]
    A --> D["Display"]
    A --> E["Audio"]
    A --> F["Language"]
    A --> G["Parental"]
    A --> H["System"]
    I["Audio"] --> J["PCM Down sampling ▶ 48 kHz"]
    I --> K["Digital Output ▶ PCM"]
    I --> L["Dynamic Range Control ▶ Off"]
    I --> M["Stereo Downmix ▶ Auto"]
    N[" "]
4 Select the required function by using »▲« or »▼« and press »ENTER« to activate.
5 Select your required settings by using »▲« or »▼« and press »ENTER« to confirm.
6 Press »RETURN« or »◀« to close the sub-menu;
or
press »SETUP« to return to the main menu.
Existing settings in the Audio menu
PCM Downsampling
Sets the player's digital output PCM sampling rate.
Options: 48 kHz, 96 kHz, Off.
Incorrectly setting the digital audio output's PCM sampling rate may result in unpredictable audio playback.
Digital Output
Sets the player's digital audio output sockets.
Options:
- PCM: Mixed digital audio sent over HDMI in PCM (if supported by HDMI device) and SPDIF in two channel PCM format.
- Bitstream HD: Original bitstream from disc is passed over HDMI and SPDIF using highest quality possible. HDMI has higher quality capabilities with advanced audio codecs like TrueHD and DTS-HD. BD audio limited to soundtrack for main movie (i.e. no PiP audio, no effects audio).
- Bitstream Legacy: Original bitstream from disc is passed over HDMI and SPDIF using legacy audio formats. BD audio limited to soundtrack for main movie (i.e. no PiP audio, no effects audio).
- Bitstream Mixed: BD audio streams are mixed and encoded into a single bitstream. Primarily intended for customers with SPDIF 5.1CH receivers who want to enjoy mixed BD audio in surround sound.
Dynamic Range Control
Is only active when a Dolby Digital signal is detected.
Options:
- Off: you can enjoy the movie with the standard Dynamic Range.
- On: when movie soundtracks are played at low volume or from smaller speakers, the system can apply appropriate compression to make low-level content more intelligible and prevent dramatic passages from getting too loud.
- Auto: the system turns on the Dynamic range control for all BD movie soundtracks except Dolby TruHD. If you have selected a Dolby TruHD track on the BD disc, Auto tells the player to only turn on dynamic range control if information embedded in the Dolby TruHD sound track tells it to do so.
Stereo Downmix
Sets »AUDIO OUT L/R« output to Auto, Stereo (LoRo) or Surround Encoded (LtRt).
Language settings
1 Press »SETUP« on the remote control to open the main menu.
2 In the main menu select »Settings« by using »▲« or »▼« and press »ENTER« to confirm.
3 Select »Language« by using »▲« or »▼« and press »ENTER« to confirm.
- The language menu opens.

flowchart
graph TD
    A["Settings"] --> B["BD-Live"]
    A --> C["Display"]
    A --> D["Audio"]
    A --> E["Language"]
    A --> F["Parental"]
    A --> G["System"]
    A --> H["Network"]
    I["Language"] --> J["OSD"]
    I --> K["Menu"]
    I --> L["Audio"]
    I --> M["Subtitle"]
    I --> N["English"]
    I --> O["Auto"]
    I --> P["Auto"]
    I --> Q["None"]
4 Select the required function by using »▲« or »▼« and press »ENTER« to activate.
5 Select your required settings by using »▲« or »▼« and press »ENTER« to confirm.
6 Press »RETURN« or »◀« to close the sub-menu;
or
press »SETUP« to return to the main menu.
Existing settings in the Language menu
Note:
■ Not all languages are available on all discs. Most discs only have one menu, audio or subtitle language available.
OSD Language
Sets the language of the player's screen menu. You can choose between several languages.
Menu Language
Sets the preferred menu language as the default language for the disc.
Audio Language
Sets the preferred audio language as the default language for the disc.
Some discs do not allow the user to select the audio language from the player setup menus. The audio language can only be selected from the BD/DVD disc setup menu (the menu that appears after the disc has been inserted).
Subtitle Language
Sets the preferred subtitle language as the default language for the disc.
Some discs do to not allow the user to select the subtitle language from the player setup menus. The subtitle language can only be selected from the BD/DVD disc setup menu (the menu that appears after the disc has been inserted).
Parental control
1 Press »SETUP« on the remote control to open the main menu.
2 In the main menu select »Settings« by using »▲« or »▼« and press »ENTER« to confirm.
3 Select »Parental« by using »▲« or »▼« and press »ENTER« to confirm.
- The Parental Password menu opens.

5 Select the required function by using »▲« or »▼« and press »ENTER« to activate.
6 Select your required settings by using »▲« or »▼« and press »ENTER« to confirm.
7 Press »RETURN« or »◀« to close the sub-menu;
or
press »SETUP« to return to the main menu.
Existing settings in the Parental menu
Parental Control (On/Off)
The parental control function works in conjunction with the different censorship classes assigned to discs. These classes help to control the types of disc that the family watches. There are up to 8 censorship classes for discs.
Parental Level
Sets different censorship classes assigned to discs such as:
- 1 [Kid Safe]: Suitable for all children.
- 2[G]: General audiences.
- 3[PG]: Parental guidance suggested.
- 4[PG-13]: Not suitable for anyone under 13.
- 5[PG-R]: Parental guidance recommended.
- 6[R]: Not suitable for anyone under 17 unless supervised by a parent or adult guardian.
- 7[NC-17]: Not suitable for anyone under 17.
- 8[Adult]: All discs can be played.
Parental Password
Sets the password as a 4 digit number.
Enter your new password with the numeric buttons »1...0«, select »Ok« with »▼« and press »ENTER« to confirm.
Please do not forget the password you choose.
System settings
1 Press »SETUP« on the remote control to open the main menu.
2 In the main menu select »Settings« by using »▲« or »▼« and press »ENTER« to confirm.
3 Select »System« by using »▲« or »▼« and press »ENTER« to confirm.
- The System menu opens.

flowchart
graph TD
    A["Settings"] --> B["Audio"]
    A --> C["Language"]
    A --> D["Parental"]
    A --> E["System"]
    A --> F["Network"]
    A --> G["BD-Live"]
    A --> H["Display"]
    I["System"] --> J["Optical Disc Auto Play"]
    I --> K["NetFusion"]
    I --> L["Screen Saver Duration"]
    I --> M["Auto Power Down"]
    I --> N["Digilink"]
    I --> O["Update Via Network"]
    I --> P["Restore factory defaults"]
    I --> Q["System Information"]
    R["Enable"] --> S
    T["On"] --> U
    V["5 Minutes"] --> W
    X["20 Minutes"] --> Y
    Z["Off"] --> AA
5 Select the required function by using »▲« or »▼« and press »ENTER« to activate.
6 Select your required settings by using »▲« or »▼« and press »ENTER« to confirm.
7 Press »RETURN« or »◀« to close the sub-menu;
or
press »SETUP« to return to the main menu.
Existing settings in the System menu
Optical Disc AutoPlay
There are two options:
- Disable: Once you have inserted the disc, press »lbr» ENTER« to start the play-back.
- Enable: Once you have inserted the disc, the playback starts automatically or the discmenu is displayed automatically.
NetFusion
Activates the access to the Digital Media Server.
Screen Saver Duration
Sets the time of entering screen saver status (Black screen). If the screen saver duration is off, there will not be black screen.
Auto Power Down
Automatically turns the player off if no settings are changed after a selected period of time (5, 10, 20 or 30 minutes).
Digilink (CEC)
Can be used to allow the LED/LCD TV remote control to control certain functions of the Blu-Ray player and for the Blu-Ray player to control certain functions of the LED/LCD TV.
Not all LED/LCD TVs are compatible with your player.
- On: allows mutual control of devices through HDMI.
- Off: does not allow CEC control.
Update Via Network
Downloads and installs product updates for your player.
If there is a new software available, the device updates itself if it is connected to network.
Resets your player to the default factory settings.
After presing »ENTER« a warning message appears. Select »Ok« to confirm or »Cancel« to cancel the function and press »ENTER« to close the menu.
Restore function does not reset the "Parental Control Password".
System Information
Indicates information about the player.
Licence conditions

Manufactured under license from Dolby Laboratories. Dolby and the double-D symbol are trademarks of Dolby Laboratories.

Manufactured under license under U.S. Patent Nos: 5,956,674; 5,974,380; 6,487,535 & other U.S.
and worldwide patents issued & pending. DTS, the Symbol, & DTS and the Symbol together are registered trademarks and the & DTS Digital Surround and the DTS logos are trademarks of DTS, Inc. Product includes software. DTS, Inc. All Rights Reserved.

This item incorporates copyright protection technology that is protected by U.S. patents and other intellectual property rights. Use of this
copyright protection technology must be authorized by Rovi Corporation, and is intended for home and other limited viewing uses only unless otherwise authorized by Rovi Corporation. Reverse engineering or disassembly is prohibited.

You can recognise a 3D Blu-ray disc by the logo on the label. The same copyright protection for Blu-ray Disc logo which is described
above is also effective for Blu-ray 3D Discs.
Environmental note

natural_image
Simple line drawing of a trash bin with crossed x's and no text or symbolsThis product has been manufactured with high quality parts and materials which can be reused and are suitable for recycling.
Therefore, do not dispose the product with normal domestic waste at the end of its service life. Take it to a collection point for the recycling of electrical and electronic equipment. This is indicated by this symbol on the product, in the user manual and on the packaging.
Please consult your local authorities to learn the nearest collection point.
Help protect the environment by recycling used products.
General information on laser devices
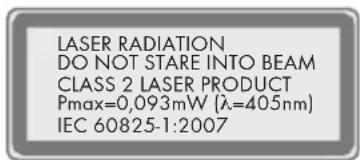
This device is a CLASS 2 LASER PRODUCT. This means that the device emits laser
radiation which is safe for momentary exposures, but can be hazardous for deliberate starting into the beam.
Caution:

■ Do not stare into beam.
■ If operating devices or methods other than those specified here are employed, it may lead to
dangerous exposure to emissions.
This device emits laser radiation. Because of the danger of eye injuries, the unit may only be opened or serviced by trained personnel.
If settings other than those stated here are used or other procedures are carried out, this may lead to dangerous exposure to radiation.
Cleaning the device
Pull out the power cord from the wall socket. Clean the device by using a soft cloth slightly moistened with a mild detergent solution. Do not use a solution containing alcohol, spirits, ammonia or abrasives.
Cleaning the disc

natural_image
Illustration of a hand holding a circular object with a finger pointing downward (no text or symbols)If the device is unable to scan CDs perfectly, use a standard, commercially available cleaning CD to clean the laser optics.
Other cleaning methods
may damage the laser optics.
Use a lint-free cloth for cleaning the CD and always wipe it from the inside out in a straight line. Do not use cleaning agents for conventional vinyl discs, nor any solvents or abrasive cleaners.
Technical data

This device is noise-suppressed according to the applicable EU directives.
This product fulfils the European directives 1999/5/EC and 2009/125/EC.
To obtain a copy of the Declaration of Conformity (Doc), please submit your request by using the contact information at www.grundig.com/download/doc.
The type plate is located on the back of the device.
This appliance can be operated in the following European countries.
| AT BE BG | CH CY CZ | DE DK | |||||
| EE ES FI FR | GB GR | HU IE | |||||
| IS | IT | LI | LT | LU | LV | MT | NL |
| NO | PL | PT | RO | SE | SI | SK | TR |
This appliance can be operated in countries outside Europe.
For customers in France;
Outdoor use limited to 10 mW e.i.r.p. within the band 2454-2483,5 MHz. Military Radiolocation use. Refarming of the 2.4 GHz has been ongoing in recent years to allow current relaxed regulation. Full implementation planned 2012.
WLAN
Network standard IEEE 802.11b IEEE 802.11g
Transfer rate 802.11b:11, 5.5, 2,1 Mbps 802.11g: 54, 48, 36, 24, 18, 12, 9, 6 Mbps
Operating channels: 13 (based on the router)
Safety: Hardware-WEP-Engine (64/128 Bit); WEP-Weak-Key-Avoidance (WEPplus), TKIP, Hardware-AES-Engine with support for CCM and OCB, 802.1x, SSN.
System
Power supply
Operating voltage: 110 - 240 V\~
Mains frequency: 50/60 Hz
Max. power consumption: 17 W
Power consumption in standby: ≤ 1 W
Playback standard
PAL, 50 Hz, 625 lines
NTSC, 60 Hz, 525 lines
Disc types
3D BD, 2D BD, DVD-video Disc (DVD-ROM), DVD-RW, DVD+RW, DVD-R, DVD+R, WMA, JPEG, MPEG4, CD-R, CD-RW
USB
USB 2.0 compatible FAT 32/16
Laser
Semiconductor laser
Wavelength for BD 400 - 410 nm
Wavelength for DVD 650 - 663 nm
Wavelength for CD 770 - 800 nm
Audio format
Digital MPEG4, Dolby Digital, Dolby Digital Plus, Dolby TrueHD, DTS Advance Digital out
Audio
BD/DVD 192 kHz
Signal to Noise ratio: 90 dB
Dimensions and weight
Device dimensions:
W × H × D : 430 × 44 × 230 mm
Device weight: 2.1 kg
Technical and design modifications reserved.
Troubleshooting
Not every picture or sound problem is caused by a defect in your device. Cables that have accidentally been disconnected, damaged discs and flat batteries for the remote control will impair functioning.
If the following measures do not resolve the problem satisfactorily, please contact your specialist dealer.
To reset this unit
| To return all settings other than some settings to the factory preset. | Select Yes in Restore Default Settings in the Setup menu. This returns all values in the Setup menu and the on-screen menu, except for parental setting to the default settings. |
Power
| No power. | Insert the AC power supply cord securely into a known active AC outlet. |
| The player switches to standby mode. | This is a power saving feature. |
| The Auto Power Down function is activated. Press »◀« on the player to turn the device on. |
Operation
| The remote control doesn't work properly. | The batteries are depleted. Replace them with new ones. |
| You are not pointing the remote control at the main unit's remote control signal sensor during operation. | |
| Colored glass may obstruct the signal reception/transmission. | |
| Don't place the signal sensor in direct sunlight or in areas that may be subject to sunlight exposure. | |
| The player is on but cannot be operated. | Select the correct playback source (BD-ROM or Media). |
| Some operations may be prohibited by the disc. | |
| Reset the device as follows:1. Press »« on the device to switch the device to standby. If the device doesn't switch to standby, alternatively, disconnect the AC power supply cord, wait one minute, then reconnect it.2. Press »« on the device to switch it on. If the device still cannot be operated, consult the dealer. | |
| Condensation has formed: Wait 1 to 2 hours for it to evaporate. | |
| Play fails to start even when (PLAY) is pressed. Play starts but then stops immediately. | Insert the disc correctly with the label facing up. |
| The disc is dirty. | |
| You tried to play a blank disc or unplayable disc on this device. | |
| Startup is slow. When the player is turned on, audio and video output takes a long time. | Startup takes time in the following situations.Immediately after a power failure or the AC power supply cord is connected.When the unit is connected with an HDMI cable. |
| Auto open while reading the disc. | The disc is dirty or any scratched. |
| The format of the disc is not supported. | |
| Try to reset the device. To do so, press "⏻", wait for 5 seconds and then press this button again. | |
| Audio and video momentarily pause while reading disc. | The disc is dirty or scratched. |
| Check the TV system setting, switch PAL/NTSC TV system in setup menu. | |
| Try to reset the device. To do so, press "⏻", wait for 5 seconds and then press this button again. | |
| The player is on with start logo and menu but has no image from the disc. | The disc is dirty or any scratch. |
| Try to reset the device. To do so, press "⏻", wait for 5 seconds and then press this button again. | |
| The unit freezes while reading CD-R/DVD-R disc | Reset the device, when you see " loading " on the screen, press »▲« to take out the disc, clean the disc and try it again. |
| If the device freezes again, the disc may have some contents the device can't support. Please stop playing the disc in this device. | |
| Audio and video momentarily pause. | This occurs between playlist chapters or scenes ([AVCHD]). |
| When playing a title recorded on both layers, the unit automatically switches between layers and plays the title in the same way as a normal program. However, video and audio may momentarily cut out when the unit is switching layers. | |
| BD-Video or DVD-Video is not played. | Ensure the disc is for the correct BD-Video region code or DVD-Video region number, and is not defective. |
| You have set a parental level to limit BD-Video or DVD-Video play. Change this setting. | |
| Some BD-Video can only be output with HDMI. | |
| Picture-in-picture is not played with BD-Video. | Confirm whether the disc supports picture-in-picture. |
| No subtitles. | Subtitles are not recorded on the disc. |
| Turn the subtitles on. Set "Subtitle" on the on-screen menu to " On ". | |
| Angle cannot be changed. | Angles can only be changed during scenes where different angles are recorded. |
| The resume play function does not work. | Memorized positions are canceled when- pressing »■« several times.- opening the disc tray. |
| The resume play function may not work depending on the disc. |
TV screen and video
| The images from this player do not appear on the television.Picture is distorted. | Make sure that the LED/LCD-TV is connected to the VIDEO OUT socket or HDMI OUT socket on this device. |
| Make sure that the LED/LCD-TVs input setting (e.g.,VIDEO 1) is correct. | |
| The device is likely to enter screen saver status. | |
| Try to reset the device. To do so, press " ", wait for 5 seconds and then press this button again. | |
| Video is not output in high-definition. | High definition video cannot be output through the VIDEO OUT. |
| Confirm that the HDMI Resolution in the Setup menu is set properly. | |
| The 4:3 aspect ratio picture expands left and right. | Use the LED/LCD-TV to change the aspect. Refer to your LED/LCD-TVs operating instructions. |
| When it is playing BD-LIVE disc, Video output is a black screen. | Insert a USB memory stick with a free space. Select BD-Live Storage from the BD-Live Menulist. Then restart the device. |
| Please check the internet is available or not. Some of the disc need the support of internet. | |
| Please check the connection cable to the router. If it is loose, please insert again. |
Internet
| Desired WLAN network not found. | - WLAN network is deactivated, switch on the WLAN network.- SSID is suppressed on the router; display SSID on the router.- Distance to router is too large; reduce distance to router. |
| Connection to router not established. | - MAC adress of the device is not enabled on the router; enable MAC address on the router.- Data transfer from the router is encrypted; Enter the network key (WEP orWPA) on the device.If this does not help, check the entire router configuration. |
Sound
| No sound. Low volume. Distorted sound. Cannot hear the desired audio type. | Check the connections and the “Digital Output” settings. Check the input mode on the amplifier/receiver if you have connected one. |
| Press »AUDIO« to select the audio signal. | |
| The sound effects (Re-master, V. Surround, etc.) will not work when the bitstream signal is output from the HDMI OUT socket or the »COAXIAL« socket. | |
| When “BD-Video Secondary Audio” is set to “Off”, Dolby Digital Plus, and Dolby TrueHD are output from the »COAXIAL« terminal as Dolby Digital or DTS Digital Surround bitstream. | |
| Cannot switch dubbed language or the audio format. | Try to reset the device. To do so, press "⏻", wait for 5 seconds and then press this button again. |
| There are discs for which audio cannot be changed because of how the disc was created. | |
| When connecting an amplifier/receiver using a coaxial cable or an HDMI cable, you cannot switch the audio if “Digital Output” is set to “Bitstream”. Set “Digital Output” to “PCM” or connect using audio cables. |
HDMI connections
| The 4:3 aspect ratio picture expands left and right.Screen size is wrong. | Change “TV Aspect ” type to “16:9 Wide”. |
BD-Live and USB connections
| Cannot connect network | Check if the disc is a legal copy. |
| Confirm whether the network connection is ok. | |
| After network connection, cannot download file | Check if the capacity of Storage is full. if it is full, please clear storage in the BD-Live menu and reset the device. |
| Confirm whether the network connection is ok. | |
| Change USB device and then test it. | |
| Succeed in downloading file, but playback pause. | Confirm the device is USB 2.0. if it is USB 1.1, playing may pause. |
| Pause playing the file in the USB device | Change USB device and then test it. |
AUS GUTEM GRUND
GRUNDIG
www.grundig.com
72011 411 4600 12/01
Blu-ray Player
GBP 7000 3D

natural_image
Exterior view of a GRUNDIG 8EP 7000.3D printer (no visible text or symbols on body beyond branding)
AUS GUTEM GRUND
GRUNDIG
natural_image
Diagram of a device labeled 'GRUNDIG GBP 7000 3D' with a USB cable inserted, showing no readable text or symbols beyond the label.Hinweis:
natural_image
Symbol of a trash bin with crossed lines and a horizontal bar, no text or labels present.natural_image
Illustration of a hand holding a circular object with a downward arrow, no text or symbols present802.11g: 54, 48, 36, 24, 18, 12, 9, 6 Mbps


- SET-UP AND SAFETY
- GBP 7000 3D
- OVERVIEW
- CONNECTION AND PREPARATION
- INITIAL SETUP
- BD/DVD PLAYBACK
- BD LIVE
- PLAYING AUDIO/VIDEO FILES
- NetFusion MODE
- SPECIAL SETTINGS
- INFORMATION
- Notes:
- Packing contents
- Special features
- The Blu-ray player controls
- The front of the device
- Disc com- partment
- Power indicator
- The back of the device
- - 240 V 50/60 Hz
- ETHERNET
- HDMI OUT
- AUDIO OUT L/R
- VIDEO OUT
- COAXIAL
- WLAN ANTENNA
- The remote control
- - 0
- SEARCH
- RETURN
- OSD
- A-B
- REPEAT
- DISC MENU
- POPUP MENU TITLE MENU
- ENTER
- SETUP
- ANGLE
- COLOR BUTTONS
- RESOLUTION
- PIP
- SECONDARY AUDIO
- MUTE
- ZOOM
- - VOLUME +
- AUDIO
- CONNECTION AND PREPARATION
- Connecting the LED/LCD TV using an HDMI cable
- Connecting the LED/LCD TV using RCA cables
- Connecting a digital audio system with a coaxial cable
- Connecting an MP3 player or a USB memory stick
- Note:
- Connecting to the internet with ethernet cable
- Connecting to the internet with wireless antenna
- Connecting to the mains supply
- Caution:
- Putting batteries in the remote control
- Environmental note:
- Switching on the Blu-ray player
- Menu navigation
- First installation by using the Quick Setup
- First installation by using the functions in the main menu
- Selecting the language of the screen menu
- Adapting the Blu-ray player to the LED/LCD-TV
- Setting the TV system (TV norm)
- Setting the HDMI resolution
- Selecting the TV format
- Selecting the film mode
- Setting deep color
- Selecting the Blu-ray mode
- End settings for the LED/LCD-TV
- Network settings by using wired connection
- Network settings by using wireless connection
- Manual settings in wireless connection
- IP Settings
- Special features of Blu-ray Discs
- BLU-RAY AND JAVA
- BLU-RAY AND HDMI
- PLAYING A BLU-RAY DISC
- Special features of the DVD
- Preparation
- Inserting the disc
- Playback
- Adjusting the volume
- Muting
- Additional playback functions
- Viewing information
- Disc menu navigation
- Fast forward and fast reverse
- Selecting previous and next chapters
- Search functions
- Enlarging or reducing the picture (only DVD)
- Frame-by-frame playback
- Repeating a chapter or a track
- Repeating a selected section
- Selecting and displaying subtitles
- Selecting the dubbed language or the audio format
- Pop-up menu/Title menu
- Selecting the camera angle for particular scenes or passages
- Playing secondary video (Picture in picture / PIP)
- Selecting the dubbed language for the PIP function
- Using the color buttons
- Adding BD-Live memory to the player
- Setting up the player for BD-Live internet access
- Using BD-Live
- BD-Live notes
- Playing the contents of a data device or a USB memory stick
- Playing a title, a track or a picture
- Playing picture CDs
- Displaying a picture
- Additional functions
- Playing audio CDs
- About NetFusion
- Setting NetFusion function
- Using NetFusion function
- Note
- Audio settings
- Existing settings in the Audio menu
- PCM Downsampling
- Digital Output
- Dynamic Range Control
- Options:
- Stereo Downmix
- Language settings
- Existing settings in the Language menu
- OSD Language
- Menu Language
- Audio Language
- Subtitle Language
- Parental control
- Existing settings in the Parental menu
- Parental Control (On/Off)
- Parental Level
- Parental Password
- System settings
- Existing settings in the System menu
- Optical Disc AutoPlay
- NetFusion
- Screen Saver Duration
- Auto Power Down
- Digilink (CEC)
- Update Via Network
- System Information
- Licence conditions
- Environmental note
- General information on laser devices
- Cleaning the device
- Cleaning the disc
- Technical data
- For customers in France;
- WLAN
- System
- Power supply
- Playback standard
- Disc types
- USB
- Laser
- Audio format
- Dimensions and weight
- Troubleshooting
- Blu-ray Player
- Hinweis:
Brand : GRUNDIG
Model : GBP 7000 3D
Category : Blu-ray player