
FastKey - Computer accessory LACIE - Free user manual and instructions
Find the device manual for free FastKey LACIE in PDF.


| Brand | LaCie |
| Model | FastKey |
| Product Type | USB Flash Drive (Computer Accessory) |
| Storage Capacity | Up to 120 GB |
| Interface | USB 3.0 SuperSpeed (backward compatible with USB 2.0) |
| Transfer Speed | Up to 260 MB/s (USB 3.0) |
| Storage Technology | Solid State Drive (SSD) with DRAM cache |
| Encryption | AES 256-bit hardware encryption (via LaCie Private-Public software) |
| Dimensions (Volume) | 26 cm³ (approx. 70 x 20 x 10 mm) |
| Weight | Approx. 20 g |
| Material | Sturdy aluminum body |
| Power Supply | Bus-powered via USB port |
| System Requirements | Windows XP/Vista/7, Mac OS X 10.5/10.6 (Intel), USB 3.0 or 2.0 port, 600 MB free disk space |
| Software Included | LaCie Private-Public encryption app, Wuala Online Storage link |
| Plug & Play | Yes (requires LaCie Setup Assistant for initial formatting) |
| Compatibility | Windows, Mac, Linux (FAT32 partition for cross-platform) |
| Maintenance | Clean with soft, dry cloth; avoid chemicals |
| Safety Precautions | Do not open, avoid water/moisture, keep away from heat/magnetic sources |
| Repairability | No user-serviceable parts; contact support for issues |
| Warranty | 1-year limited (consumer), 2-year (prosumer), 3-year (professional), 5-year (enterprise) available |
Frequently Asked Questions - FastKey LACIE
User questions about FastKey LACIE
0 question about this device. Answer the ones you know or ask your own.
Ask a new question about this device
Download the instructions for your Computer accessory in PDF format for free! Find your manual FastKey - LACIE and take your electronic device back in hand. On this page are published all the documents necessary for the use of your device. FastKey by LACIE.
USER MANUAL FastKey LACIE
to access an up-to-date online version of this document for the most recent content as well as expandable illustrations, easier navigation, and search capability.
natural_image
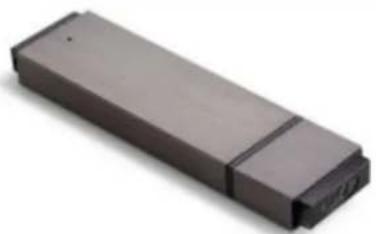
Exterior view of a rectangular electronic device with a dark body and two side connectors (no visible text or symbols)INTRODUCTION
natural_image
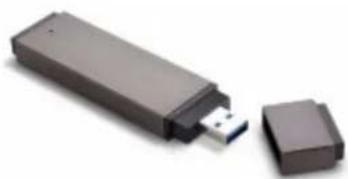
Two USB flash drives, one rectangular and one rectangular, shown against a white background (no text or symbols visible)Thank you for purchasing the LaCie FastKey. The FastKey is the perfect tool for all your portable storage needs:
- Easy to use - Plug & Play
- Compatible with all modern computers - USB 3.0 and USB 2.0
- Compact - 26cm ^3 fits on any keychain
- Durable body - strong aluminum build
• Large capacity - up to 120 GB - USB 3.0 speeds for Windows and Mac - Solid State Drive (SSD) Technology with a DRAM cache
• Lightning fast - Up to 260MB/s - Secure encryption - Protect your most important data using Advanced Encryption Standard 256 (AES 256)
This User Manual will guide you through the easy installation of your FastKey. You can also follow the simple steps to creating a secure, password-protected volume.
If you encounter problems, please confirm that all the installation steps have been followed. The chapters Connecting the FastKey to a Computer and Getting Help will answer most questions.
PACKAGE CONTENT
The LaCie FastKey includes:
- The User Manual
- LaCie Private-Public encryption application
- Wuala Online.url (Internet link to Wuala Secure Online Storage)
Important Info: Please save your packaging. In the event that the FastKey should need to be repaired or serviced, it must be returned in its original packaging.
MINIMUM SYSTEM REQUIREMENTS
- Computer with a USB 3.0 or USB 2.0 port
- Windows: Latest version of XP, Vista, or 7
- Mac: Latest version of OS X 10.5 or 10.6 (Mac Intel only for LaCie Private-Public software)
- Minimum free disk space: 600MB recommended
- High-speed Internet for online storage
Technical note: The LaCie FastKey transfer rates will be affected by the USB interface on your computer. While compatible with USB 2.0, LaCie recommends using a USB 3.0 port for optimal performance. Connecting the FastKey to a USB 2.0 port will only allow for USB 2.0 transfer rates. If you do not have a USB 3.0 port on your computer, consider adding one. LaCie offers a range of accessories including USB 3.0 PCI Express expansion cards for desktop computers and ExpressCard34 for laptops: www.lacie.com/accessories
USB SUPERSPEED 3.0 AND HI-SPEED 2.0 INTERFACES
USB 3.0
USB is a serial input/output technology for connecting peripheral devices to a computer. SuperSpeed USB 3.0 is the latest version of the USB standard, providing higher bandwidth and greater power economy.
Transfer rates for USB 3.0 can attain up to 5 Gigabits per second (Gb/s). Due to such high potential for reading and writing data, USB 3.0 is theoretically up to ten times faster than its predecessor, USB 2.0. To allow for easier adaption to new technology, USB 3.0 portable key drives and USB 3.0 cables are built for backwards compatibility. It is possible to connect them to USB 2.0 ports on a computer. Please note that transfer rates will always adhere to the speed of the computer's USB connection, type of cables, and type of connectors.

USB 3.0 Key, Flash Drive or Cable Interface End
USB 2.0
Hi-Speed USB 2.0 is the predecessor to USB 3.0. Since its release in 2000, USB 2.0 has provided the necessary bandwidth to support electronic and computer peripheral devices, including hard drives, CD/DVD drives, and digital cameras. Data transfer rates can reach up to 480 Megabits per second (Mb/s).
Similar to USB 3.0, the USB 2.0 standard requires native USB 2.0 cables and connectors to achieve Hi-Speed transfer rates. Please note that USB 2.0 cables and connectors are compatible with the USB 1.1 interface, an older and much slower iteration of the USB serial standard. USB 1.1 was released in 1998 with transfer rates of up to 12 Mb/s.

USB 2.0 Key, Flash Drive, or Cable Interface End
USB 3.0 NATIVE AND USB 2.0 COMPATIBLE
Your LaCie FastKey has the potential to reach USB 3.0 SuperSpeed transfer rates. However, it is also compatible with USB 2.0 interfaces to make certain that everyone can access data stored on the FastKey. If you are interested in USB 3.0 transfer rates but your computer does not include a USB 3.0 interface, please go to www.lacie.com/accessories to see our selection of PCI Express interface cards for desktops and ExpressCard34 for laptops.
CONNECTING THE FASTKEY TO A COMPUTER
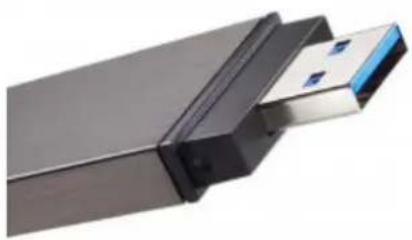
The FastKey is an easy plug & play USB Key. Locate the USB 3.0 or USB 2.0 port on your computer and attach the USB male end of the FastKey.
natural_image
Close-up of a black USB flash drive with metallic leads (no text or symbols visible)FastKey USB 3.0 Male Connection
RUNNING LACIE SETUP ASSISTANT
Before using your LaCie storage device, LaCie Setup Assistant software must be launched. It will:
- Easily format your storage device according to your needs.
- Copy the User Manual and software utilities onto the storage device.
Once LaCie Setup Assistant has finished formatting your storage device, you can install and run the included LaCie software utilities for additional features. Please see the applicable section(s) in your LaCie User Manual for more information.
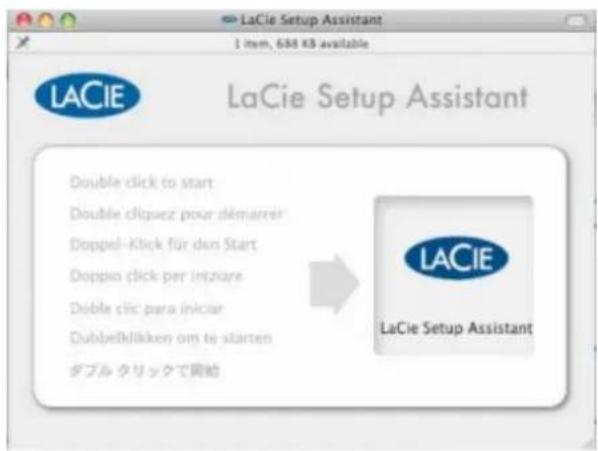
To launch LaCie Setup Assistant:
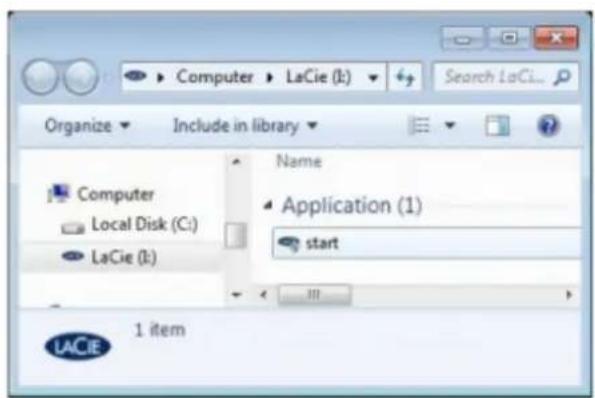
LaCie Setup Assistant should launch automatically once you have connected your LaCie storage device to a computer. If it has not launched, follow the steps below to begin preparing your LaCie storage device.
Windows users
Double click on the LaCie icon in My Computer/Computer and then double click start.exe.
Mac users
Double click on the LaCie icon on your desktop.
All users
Follow the on-screen instructions to partition your storage device and install preloaded software. You will be given the choice of creating a single partition called "LA-PUBLIC" or two partitions called "LaCie" and "LA-PUBLIC". Once you have selected, LaCie Setup Assistant will format your LaCie storage device. Please see About File System Formats to learn more about file system formats.
- Choose the single LA-PUBLIC partition to format the LaCie storage device for your operating system only: NTFS (Windows) or HFS+ (Mac).
- Choose two partitions if you intend to share data among computers with different operating systems (Windows Mac, and Linux). The LaCie partition will be formatted for your computer's operating system (NTFS or HFS+) and the LA-PUBLIC partition will be formatted for compatibility among many operating systems (FAT 32). Please note that the LA-PUBLIC partition cannot exceed 32 GB.
Important info for users who select sharing: If your LaCie storage device is 32 GB or less, LaCie Setup Assistant will only create a single partition called LA-PUBLIC.
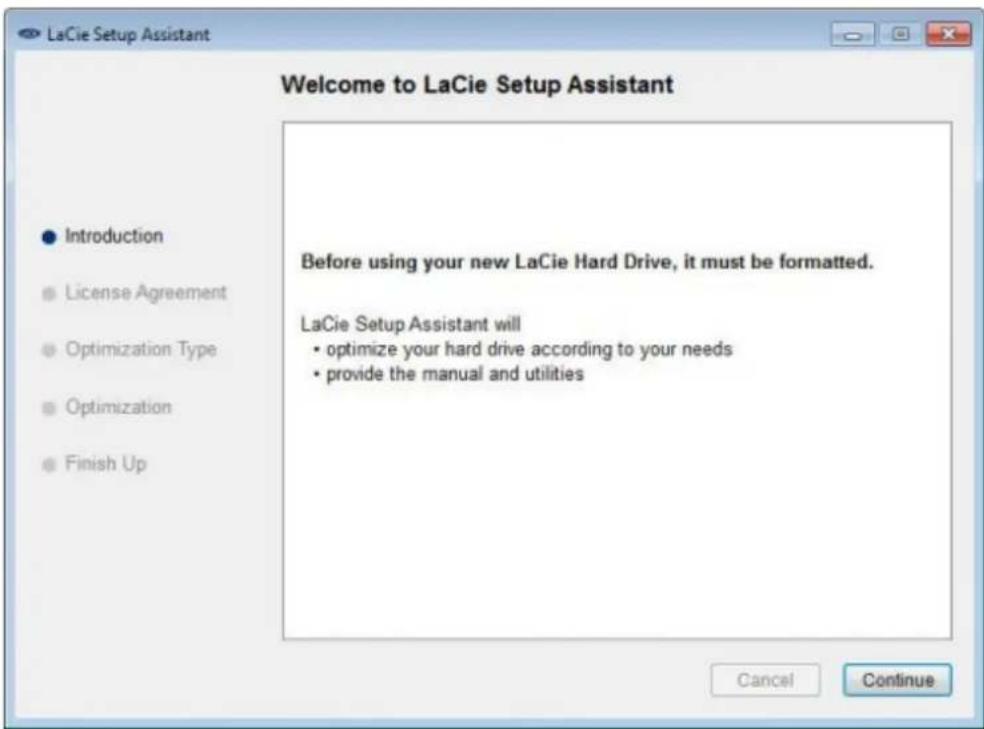
Important info: If you do not launch LaCie Setup Assistant or if you quit LaCie Setup Assistant after the formatting has begun, your storage device will not be ready to use. In such cases, you must format the storage device manually. Further, the User Manual and software utilities will not be available on your storage device. You may download User Manuals and select software utilities from the LaCie website: www.lacie.com/support/.
Important info: LaCie recommends that you copy the User Manual and utilities onto your computer's internal hard drive or another storage source when the setup is complete.
The LaCie Setup Assistant does not prevent you from using your computer's native disk utility program to format or partition your LaCie storage device. Simply follow the Setup Assistant through completion, then use your computer's native disk utility (Disk Management for Windows or Disk Utility for Mac) to reformat your drive. Please note that formatting a disk deletes all of its data, including the User Manual and LaCie Private-Public software. LaCie highly recommends that you copy all data stored on your LaCie storage device before launching the operating system disk utility.
UNMOUNTING THE LACIE KEY SAFELY
When you wish to remove the LaCie Key from a computer, please do so according to the requirements of your operating system. Both Windows and Mac offer simple methods of ejecting storage peripherals without the risk of losing data or interrupting the system operation. See Unmounting the LaCie Key for further information.
UNMOUNTING THE LACIE KEY
USB, FireWire, and eSATA external devices feature "plug & play" connectivity, which means that your storage device can be connected and disconnected while the computer is running. To prevent failures, however, it is important to follow these steps when disconnecting your LaCie storage device.
WINDOWS XP USERS
From the System Tray (located in the lower right-hand side of your screen), click the Eject icon (a small green arrow over a hardware image). A message will appear, listing the devices the Eject icon controls (it should say, "Safely remove..."). Click on the LaCie storage device in this prompt.
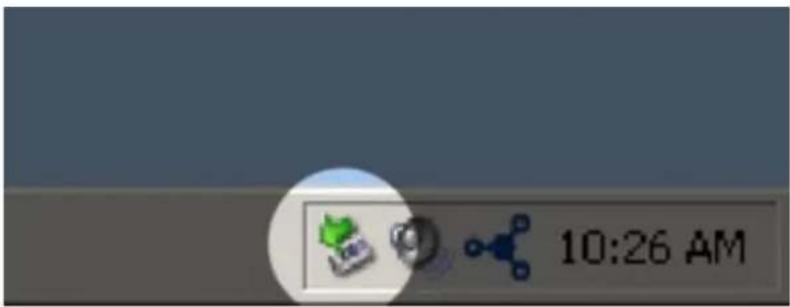
This message will appear: "Safe to Remove Hardware" (or similar). It is now safe to disconnect the device.
WINDOWS VISTA & WINDOWS 7 USERS
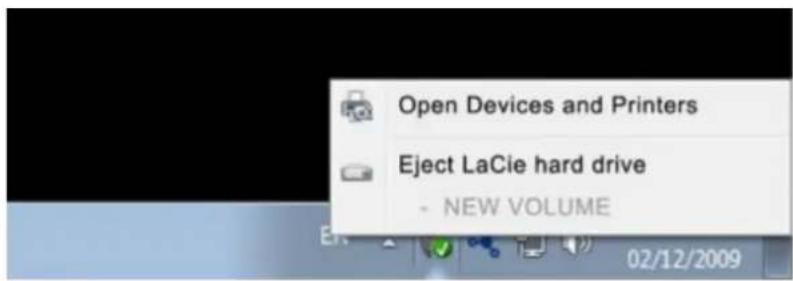
From the System Tray (located in the lower right-hand side of your screen) click on the plug icon (note the white check mark inside a green circle).

A message will appear, detailing the devices that may be safely unmounted.
Select Eject for the device you wish to unmount. A message will appear notifying you that it is safe to remove the device.
MAC USERS
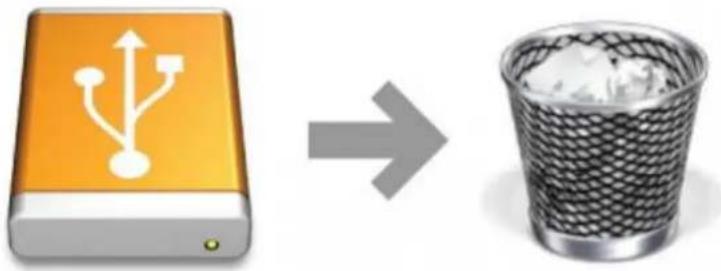
Drag the storage device icon to the trash. (The icon pictured below is a generic USB device icon. Your storage device may be represented by an icon that looks like the device itself.)
natural_image
Icon showing a USB drive next to a trash bin, symbolizing data transfer or waste reduction (no text or symbols present)When the icon disappears from the desktop, the storage device can be disconnected.
CREATING AND USING THE SECURE LA-PRIVATE VOLUME
Note: You may have questions following the creation of your secure LA-PRIVATE volume. Please see LA-PRIVATE Frequently Asked Questions for additional information on using and managing LA-PRIVATE.
Follow the directions below to install and run the included LaCie Private-Public application. LaCie Private-Public allows you to create a password-protected volume on your LaCie disk called LA-PRIVATE. Once created, LA-PRIVATE will use AES 256 encryption to keep your most important files safe.
MAC USERS - INSTALL MACFUSE BEFORE CREATING LA-PRIVATE
Note: Windows users may skip this section.
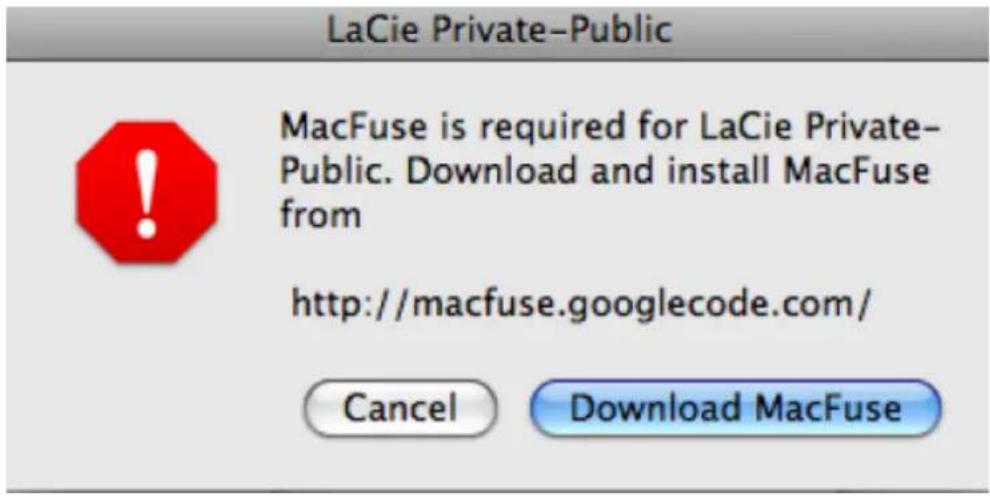
LaCie Private-Public requires MacFUSE to run on your Macintosh computer. If MacFUSE is already installed on your computer, please make certain that you are running the most recent version.
If MacFUSE is not installed on your computer, LaCie Private-Public will prompt you to install it before creating the encrypted LA-PRIVATE volume.
Insert the LaCie storage device into the compatible interface port on your computer. The LA-PUBLIC partition1 will appear on your desktop.
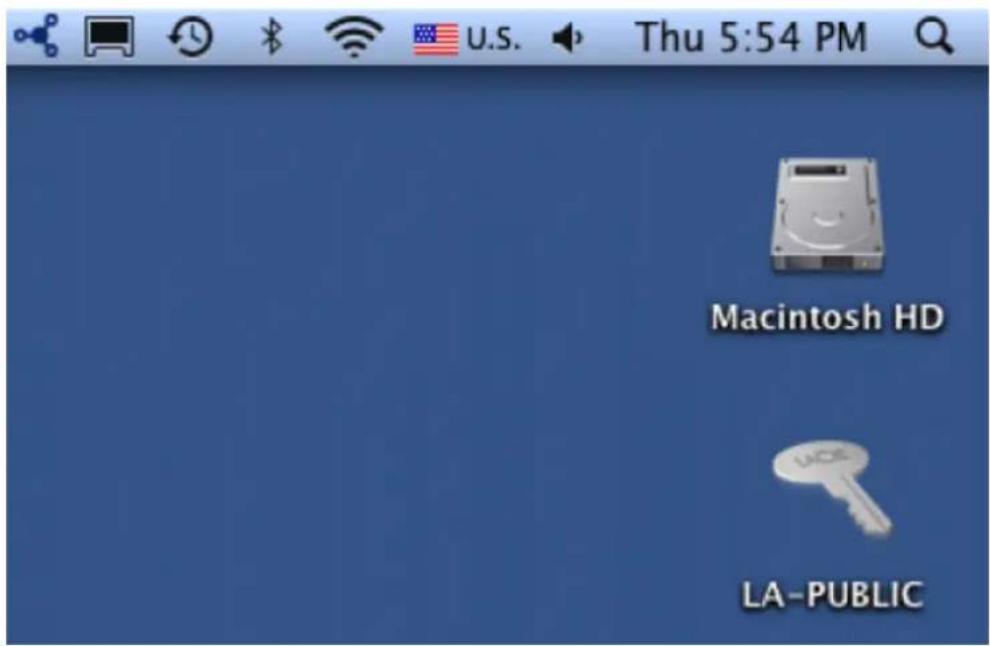
Click twice on the LA-PUBLIC icon on the desktop or open it using the Finder.2.
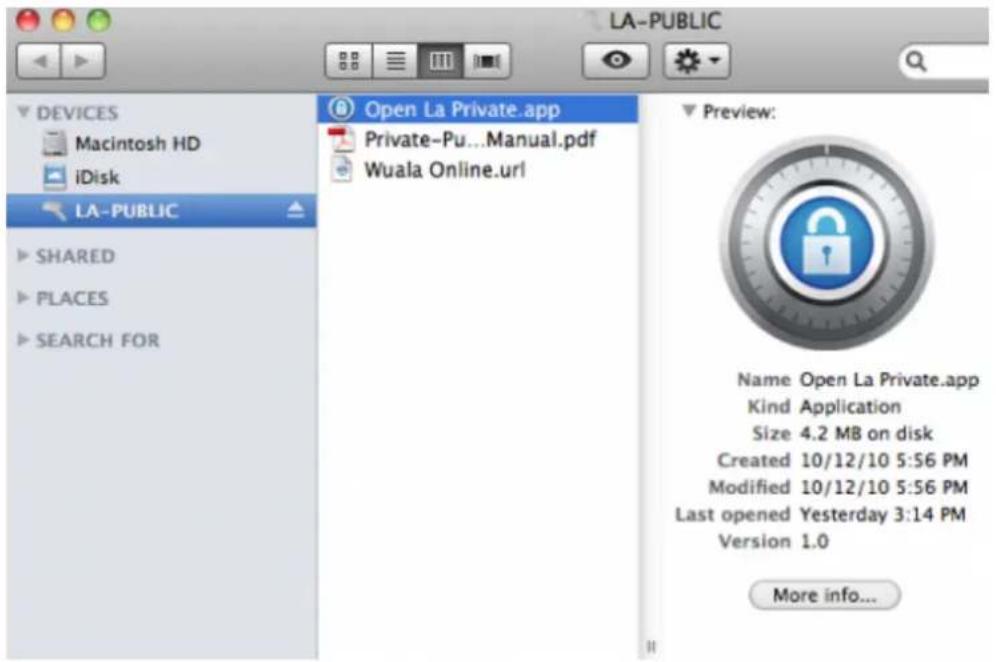
- If your computer does not have MacFUSE, a window will prompt you to install it. Click Download MacFuse
Follow the MacFUSE links to download the .dmg file.4.
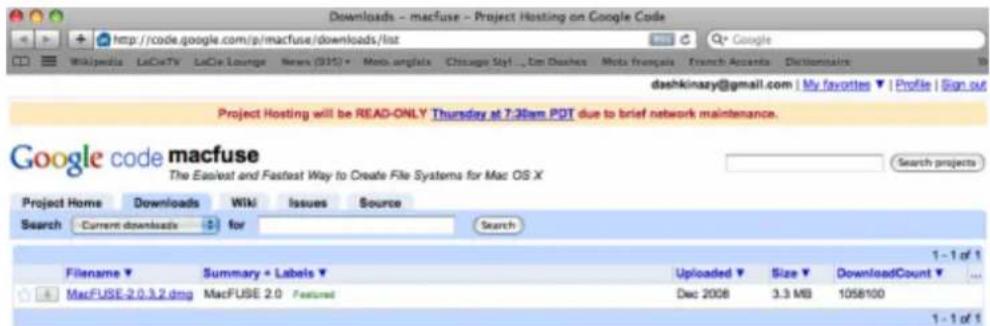
©2010 Google - Terms - Privacy - Project Hosting Help Powered by Google Project Hosting
Once downloaded, click twice on the MacFUSE.pkg file.5.
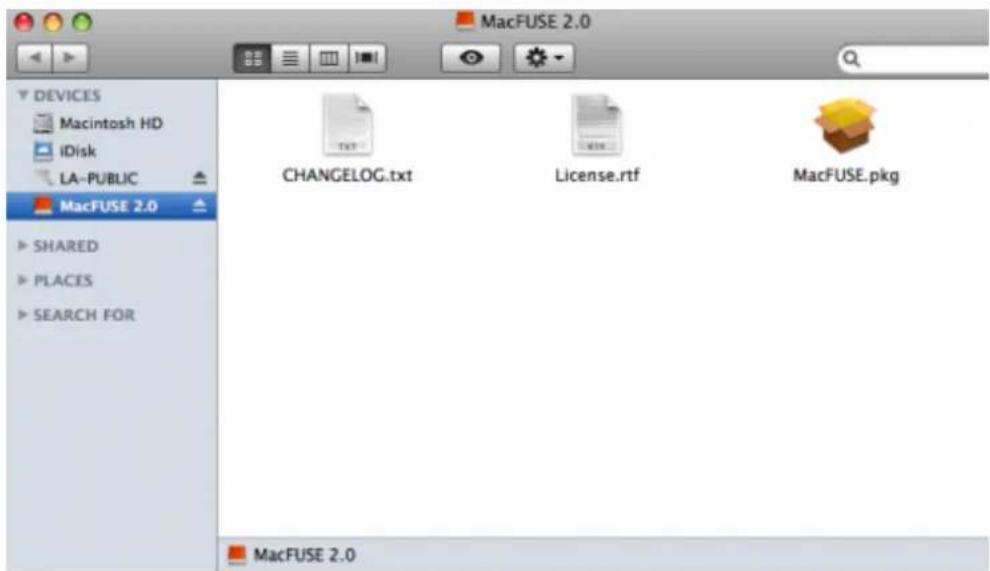
Follow the MacFUSE installer to completion. LaCie recommends accepting the licensing terms in order to 6, finish the MacFUSE installation. MacFUSE must be installed to create the LA-PRIVATE volume.
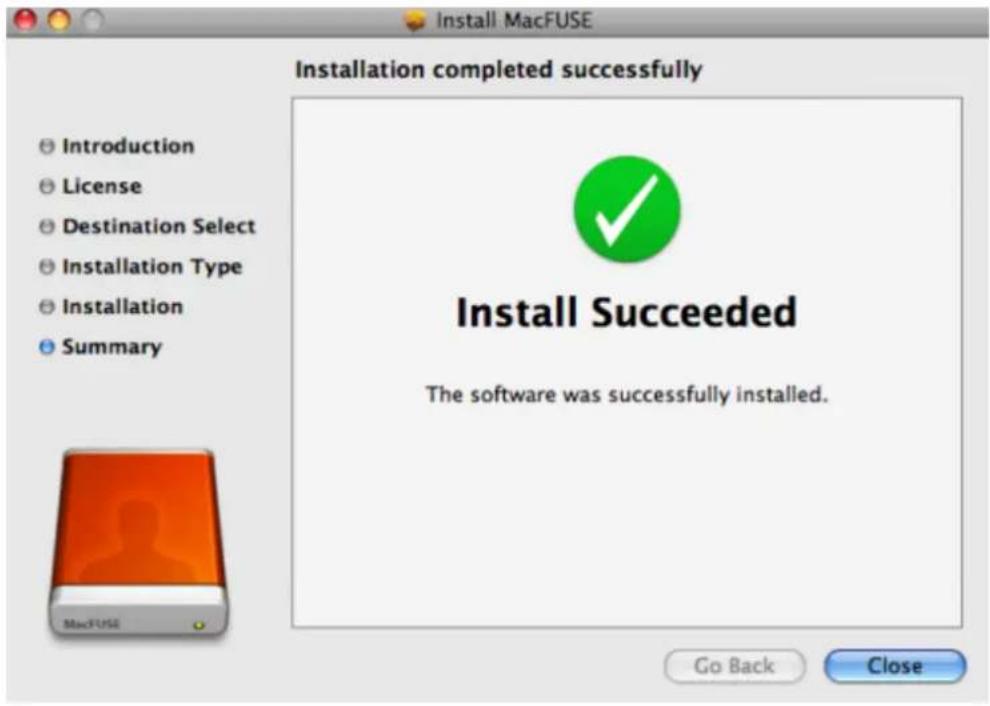
Go to the next section to create the LA-PRIVATE volume. 7.
CREATE THE LA-PRIVATE VOLUME
All users
Please read the following recommendations before creating LA-PRIVATE:
- Passwords. You will be prompted to create a password for the LA-PRIVATE volume. Since short passwords are easy to crack, LaCie recommends a minimum of 12 characters. Stronger passwords also include a combination of letters, numbers, and symbols. Accented letters or symbols are not supported. Please consider writing your password on paper and keeping it in a safe place. Data stored on the LA-PRIVATE volume cannot be recovered if the password is lost or forgotten.
- Time to create LA-PRIVATE. The estimated time to create the LA-PRIVATE volume is one minute per Gigabyte (GB). For example, 1 GB = 1 minute, 50 GB = 50 minutes, and 500 GB = 8 hours.
- FAT 32 size limitation. Due to format limitations, LA-PRIVATE cannot exceed 4 GB if LA-PUBLIC is a FAT 32 volume. To create a LA-PRIVATE volume greater than 4 GB, LA-PUBLIC must be formatted as NTFS (Windows) or HFS+ (Mac).
- Data stored on LA-PUBLIC. Consider the size of the LA-PRIVATE volume carefully, especially if you have already stored data on the LA-PUBLIC partition. Creating the LA-PRIVATE volume will not delete media on the LA-PUBLIC partition as long as there is adequate space. For example, you have copied 20 GB of data onto 32 GB of storage. When creating LA-PRIVATE, you can only use the storage that remains (i.e. less than 12 GB).
- Disable sleep mode on your computer. In most instances, LaCie Private-Public will pause when your computer goes into sleep mode. To avoid delays, LaCie highly recommends that you disable sleep mode on your computer before launching LaCie Private-Public to create LA-PRIVATE.
- Do not shut down your computer while LaCie Private-Public is creating LA-PRIVATE.
- Administration rights. You must have administration rights to your computer to access LA-PRIVATE.
Follow the steps below to create LA-PRIVATE:
Insert the LaCie storage device into the compatible interface port on your computer. The LA-PUBLIC1. partition will appear in My Computer/Computer (Windows) or on your desktop (Mac).
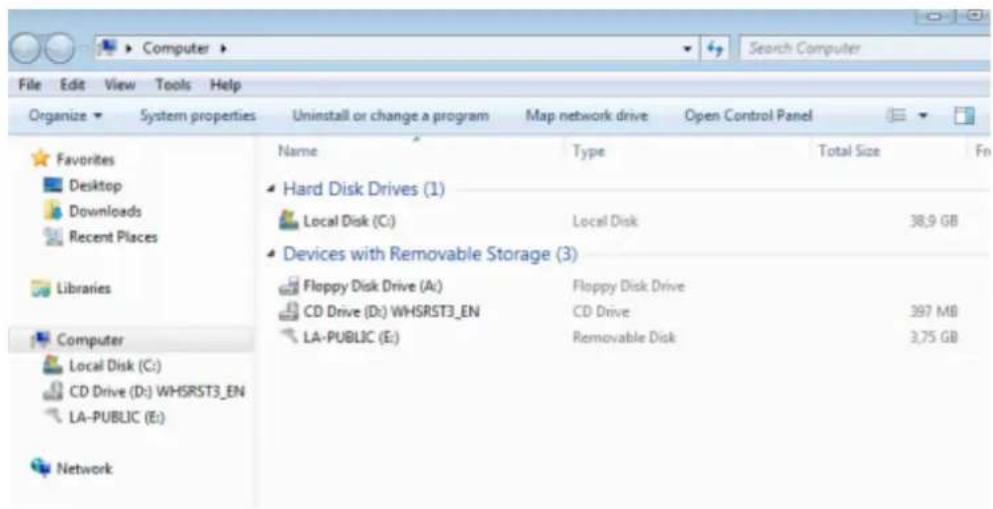
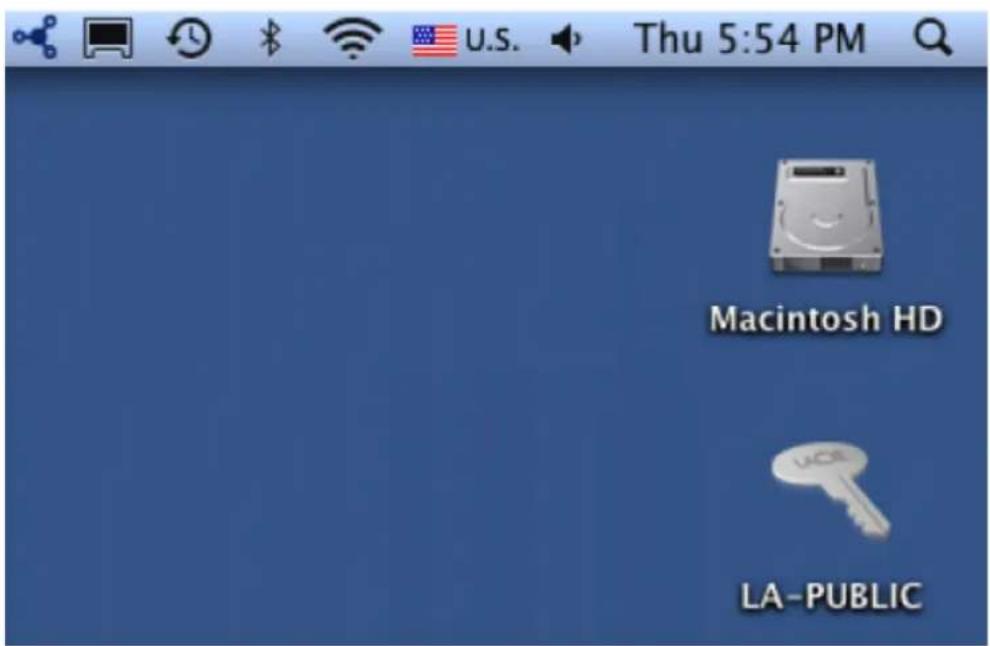
Click twice on the LA-PUBLIC icon in My Computer/Computer (Windows) or on the desktop (Mac).2.
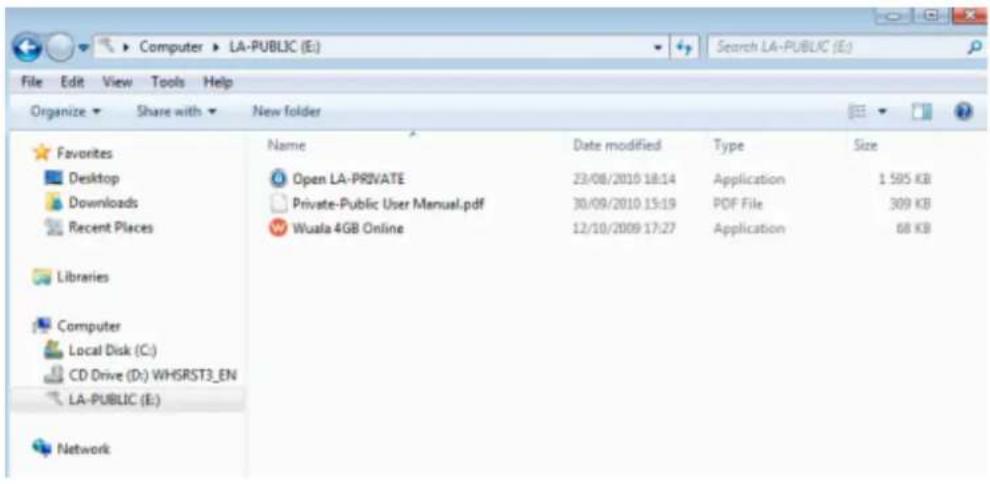
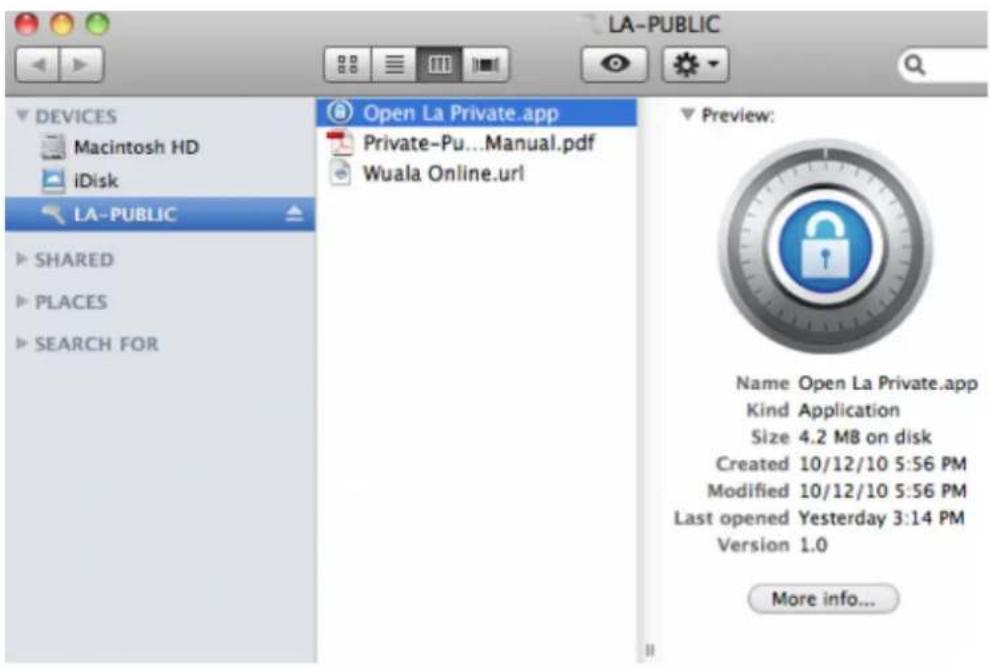
Click twice on the LaCie Private-Public application.3.
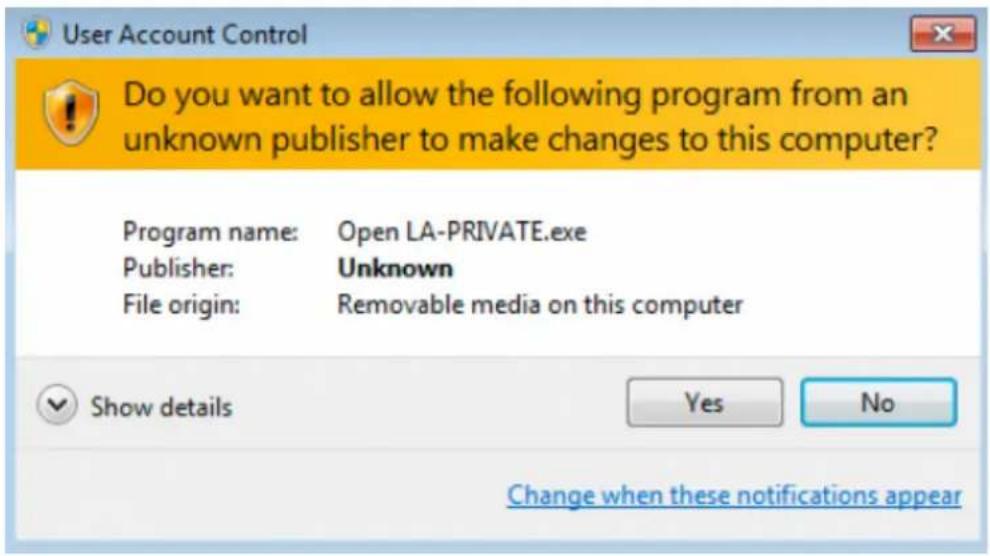
- Windows: You may receive a prompt asking if you wish to run LaCie Private-Public. Please confirm that you would like to continue.
The first window will ask you to enter a size for the LA-PRIVATE volume. Please note that you can use the5. pulldown menu to select the LA-PRIVATE capacity in MB (Megabytes) or GB (Gigabytes). As a guide, 1000 MB = 1 GB. Choosing GB will allow for sizes such as 1 GB, 10 GB, 50 GB, etc. It is not possible to enter 1.5 GB, 10.5 GB or 50.5 GB. Instead, use MB for capacity to select 1500 MB, 10500 MB or 50500 MB. LA-PRIVATE cannot exceed 4 GB if LA-PUBLIC is formatted FAT 32. Please enter the size of the LA-PRIVATE volume.
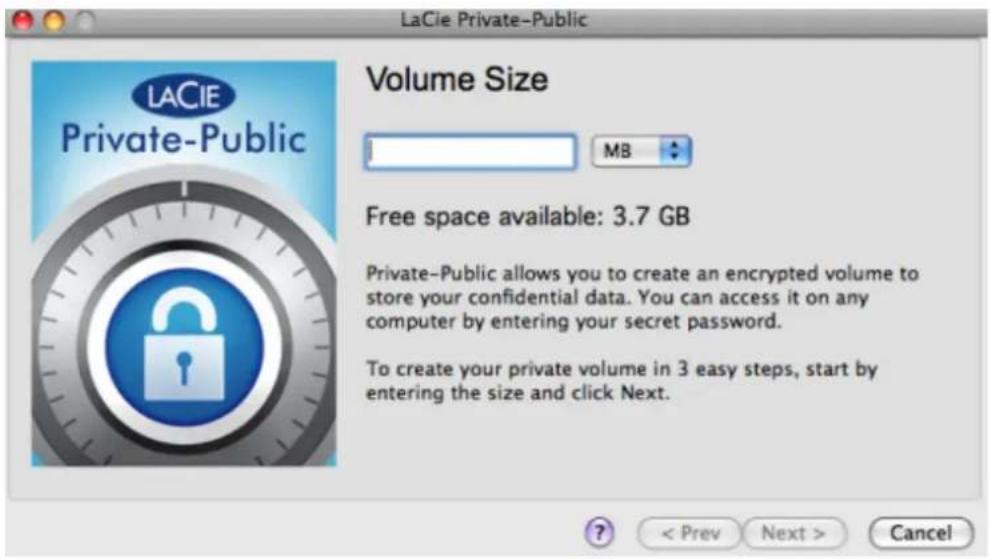
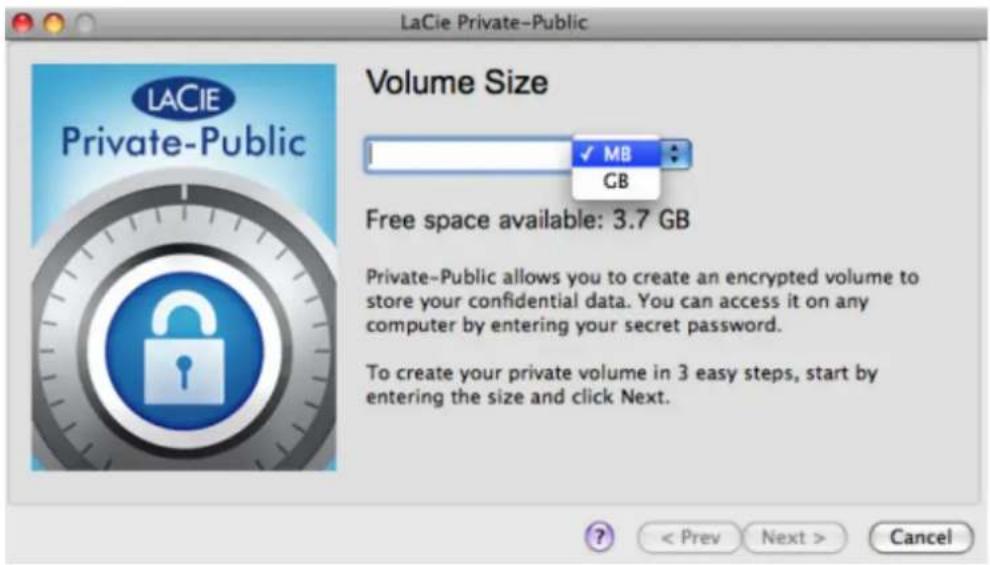
Click Next>.6.
- Enter and confirm your password. Selecting the check box for Display password will allow you to see the characters in the password field.
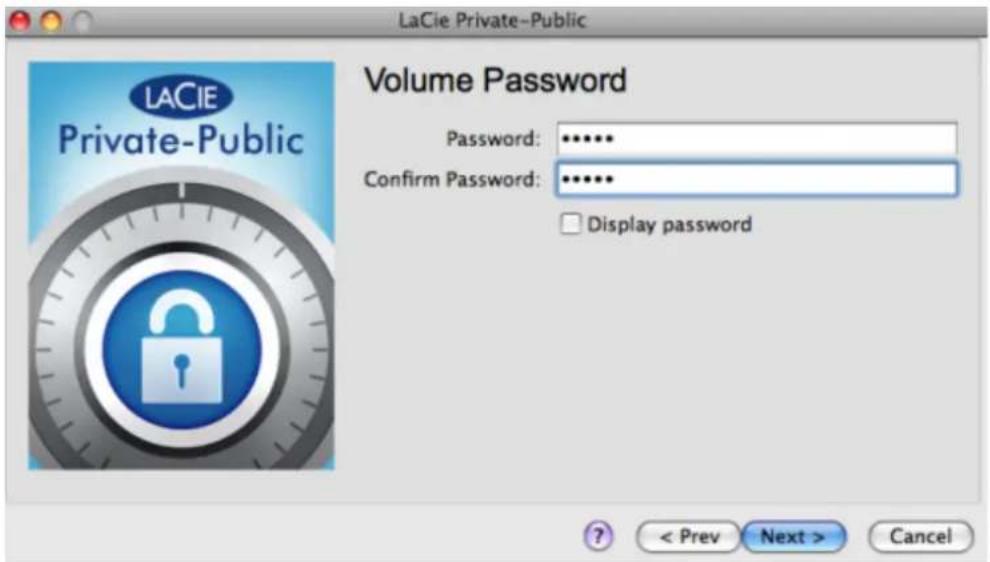
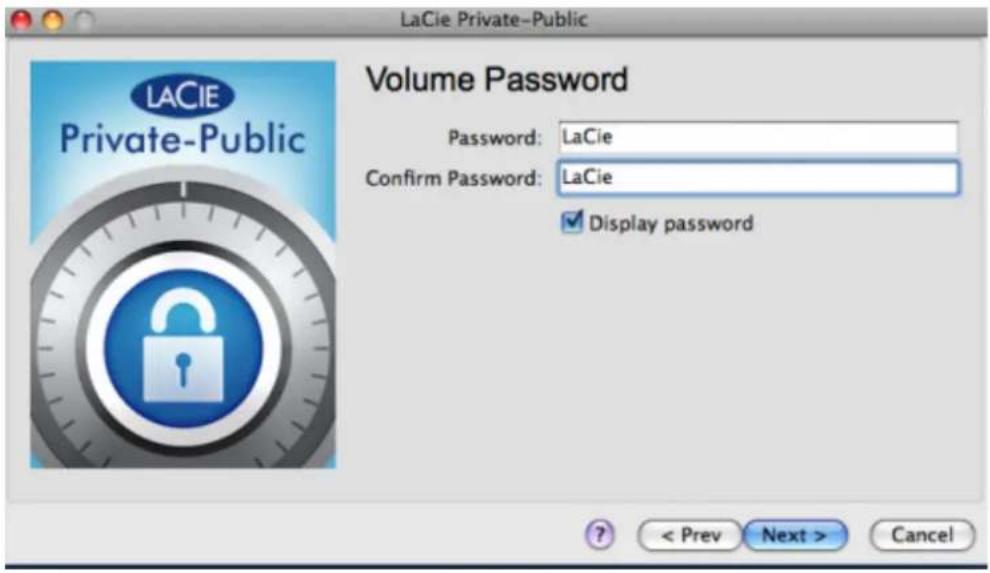
Click Next>.8.
Click Format to create the LA-PRIVATE volume with AES 256 encryption.9.
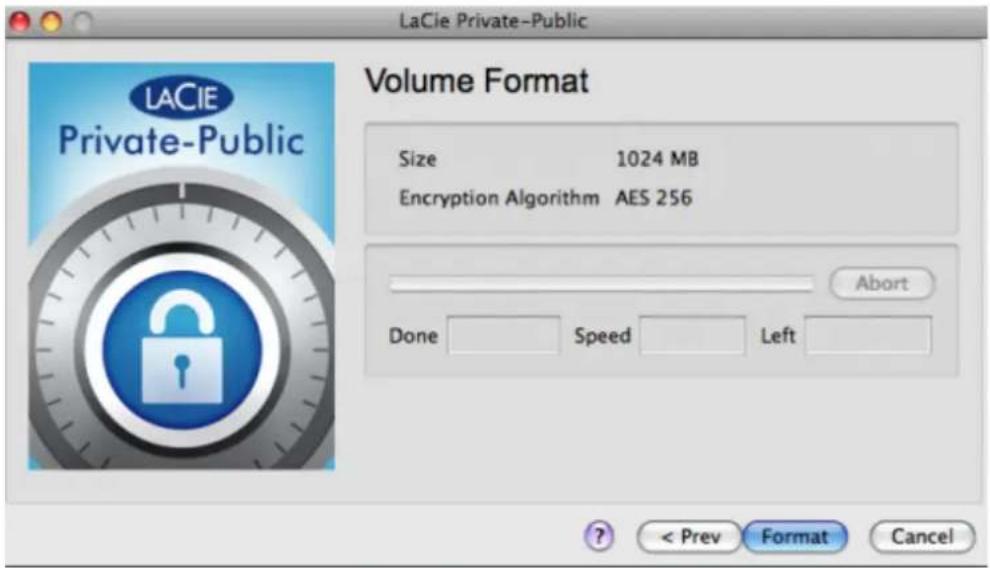
The format could take a few minutes to many hours. Estimate the time by assuming one minute per one10 gigabyte. Please do not turn off your computer during the format.
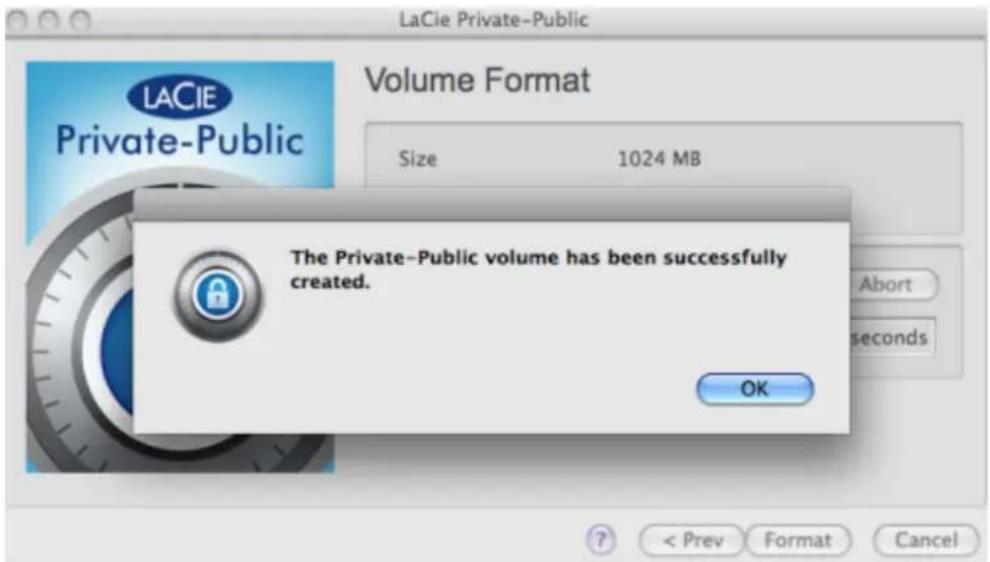
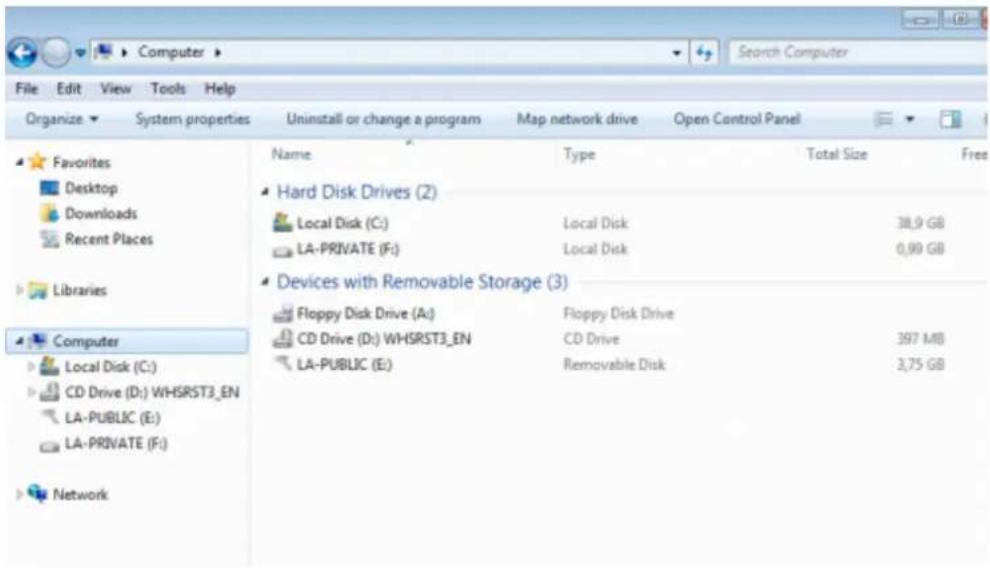
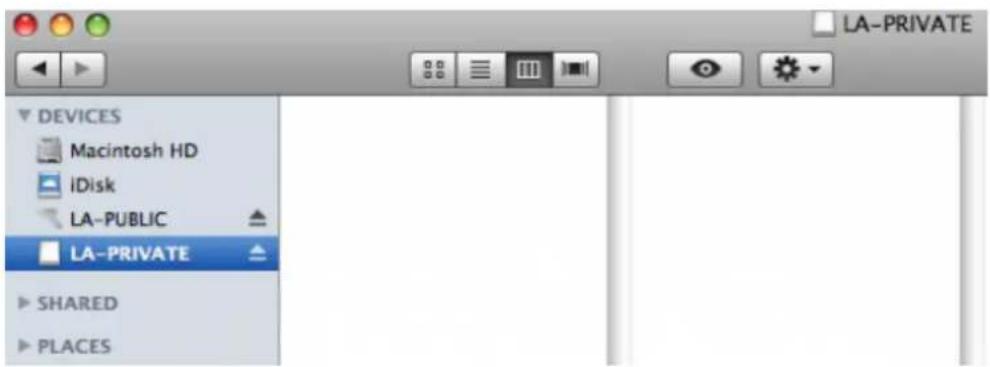
- Once the format is complete, LA-PRIVATE will mount automatically in My Computer/Computer (Windows) or in the Finder (Mac). It is now ready to store your most important data.
MOUNTING THE LA-PRIVATE VOLUME
LA-PRIVATE may be locked to protect data from being accessed by unauthorized users. Follow the steps below to unlock and mount the LA-PRIVATE volume.
Important Info: You must create LA-PRIVATE before attempting to mount the volume.
Insert the LaCie storage device into the compatible interface port on your computer. The LA-PUBLIC partition1 will appear in My Computer/Computer (Windows) or on your desktop (Mac).
Click twice on the LA-PUBLIC icon in My Computer/Computer (Windows) or on the desktop (Mac).2.
Click twice on the LaCie Private-Public application.3.
LaCie Private-Public will recognize that you have created a LA-PRIVATE volume. (If you have not created4.
LA-PRIVATE, the application will guide through the process. See the steps above.) Enter your password in the empty field. Please note that your password is case sensitive.
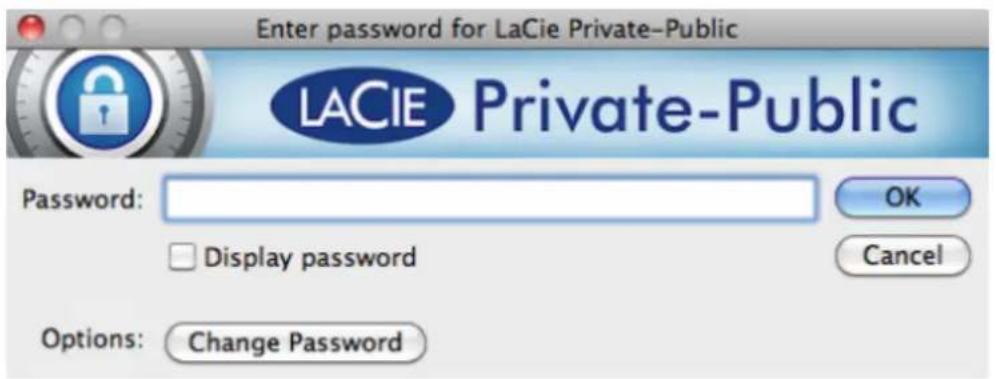
- To see the characters that you are typing, select the check box for Display password. Click OK.
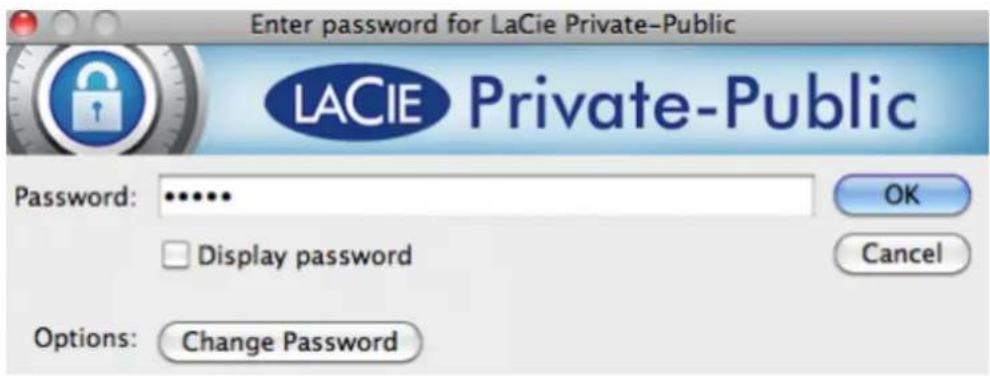
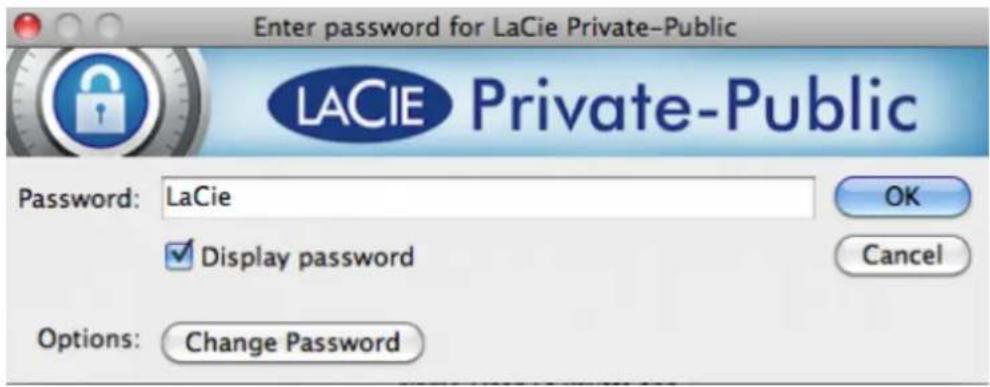
The LA-PRIVATE volume will appear in My Computer/Computer (Windows) or in the Finder (Mac).6.
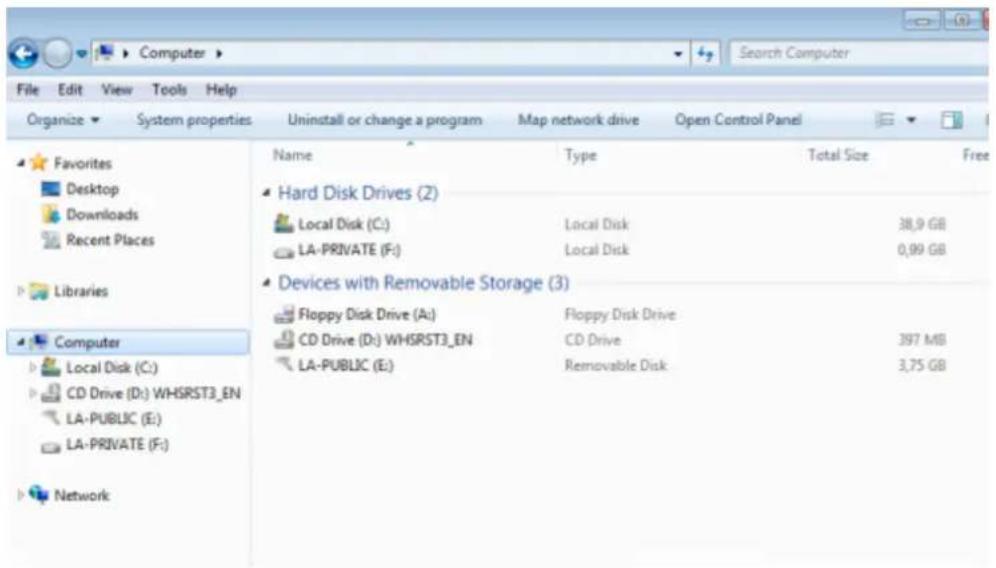
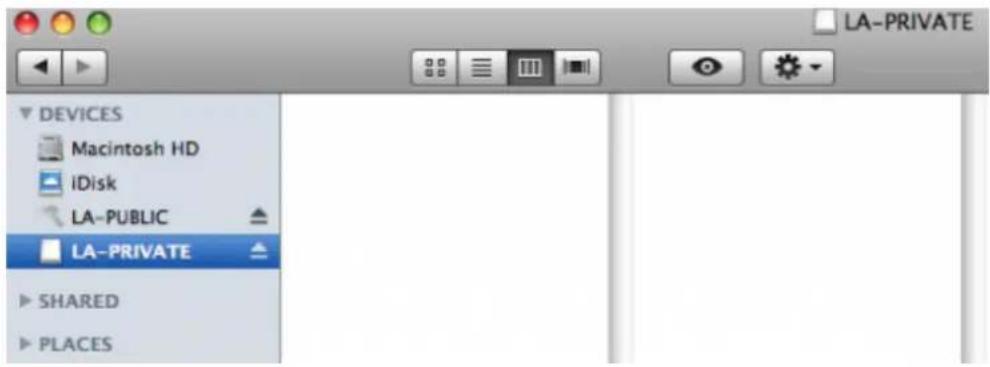
Copy and paste, drag and drop, or retrieve existing files from your encrypted LA-PRIVATE volume.7.
UNMOUNTING AND LOCKING LA-PRIVATE
Important Info: You may wish to unmount both LA-PRIVATE and LA-PUBLIC at the same time. For your security, LA-PRIVATE must be unmounted before LA-PUBLIC. Your operating system will alert you when attempting to unmount LA-PUBLIC first.
Problem Ejecting USB Mass Storage Device
×

Windows can't stop your 'Generic volume' device because it is in use. Close any programs or windows that might be using the device, and then try again later.
OK
The disk "LA-PUBLIC" couldn't be ejected because "Open La Private" is using it.
Quit that application and try to eject the disk again.

OK
Unmounting LA-PRIVATE will prevent others from accessing your private data. It is a great way to lock LA-PRIVATE since the secure volume will no longer be available for unauthorized use. Follow the steps below to unmount and lock LA-PRIVATE.
Windows
The LaCie Private-Public icon will appear in the System Tray when LA-PRIVATE is mounted. The System Tray1. is on the lower right side of the computer monitor.

Right-click on the LaCie Private-Public icon and select Dismount Private-Public.2.
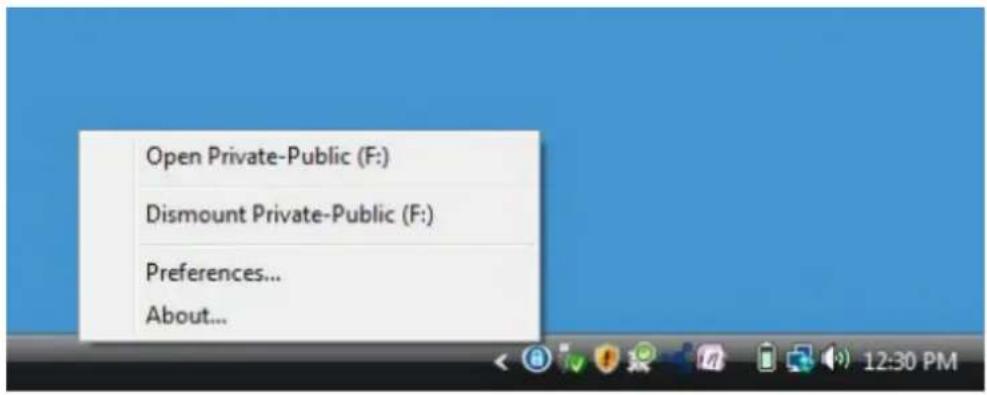
The LA-PRIVATE volume has been unmounted and locked. 3.
Mac
Go to the Dock and search for the LaCie Private-Public icon.1.
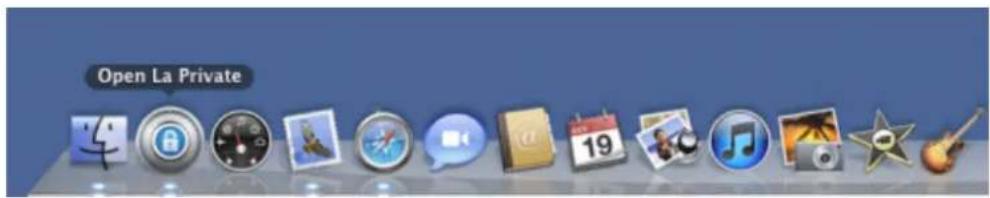
Select the LaCie Private-Public icon to choose the application. 2.
Go to the pulldown menu File > Quit.3.
LA-PRIVATE has been unmounted and locked. 4.
CHANGING THE LA-PRIVATE PASSWORD
Important Info: You must create the LA-PRIVATE volume before attempting to change its password.
Follow the steps below to change the password to LA-PRIVATE.
Insert the LaCie storage device into the compatible interface port on your computer. The LA-PUBLIC partition1. will appear in My Computer/Computer (Windows) or on your desktop (Mac).
Click twice on the LA-PUBLIC icon in My Computer/Computer (Windows) or on the desktop (Mac).2.
LaCie Private-Public will recognize that you have created a LA-PRIVATE volume and prompt you for the3.
password. (If you have not created LA-PRIVATE, the application will guide through the process. See the steps above.)
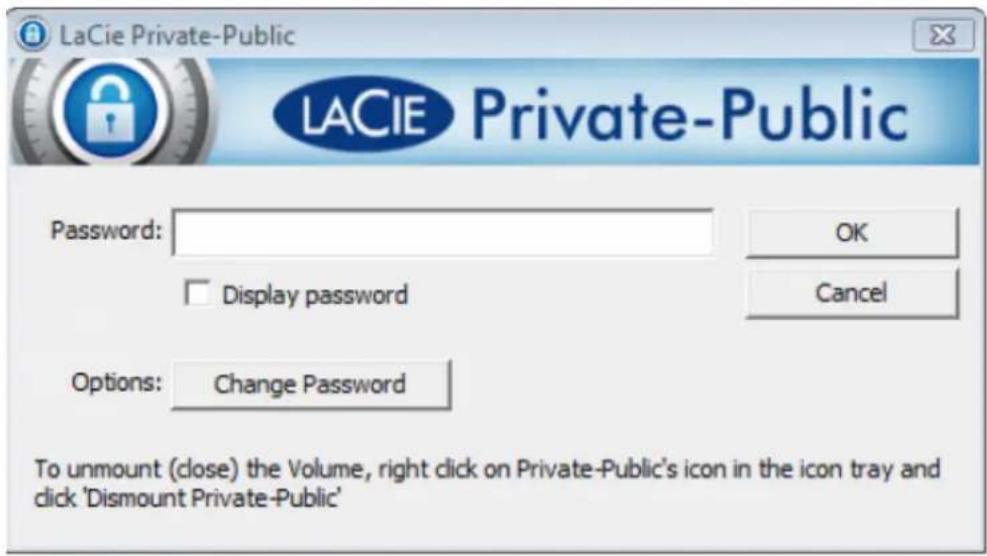
Click on the button Change Password.4.
- Enter your Current Password as well as the New Password. You must also complete the field Confirm Password with the new password.
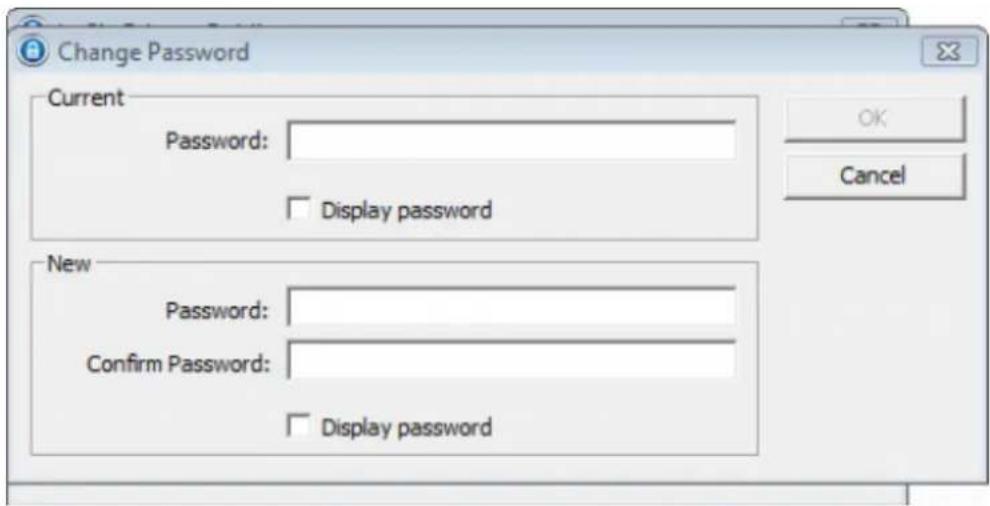
Check the Display Password boxes to see the characters as they are typed.6.
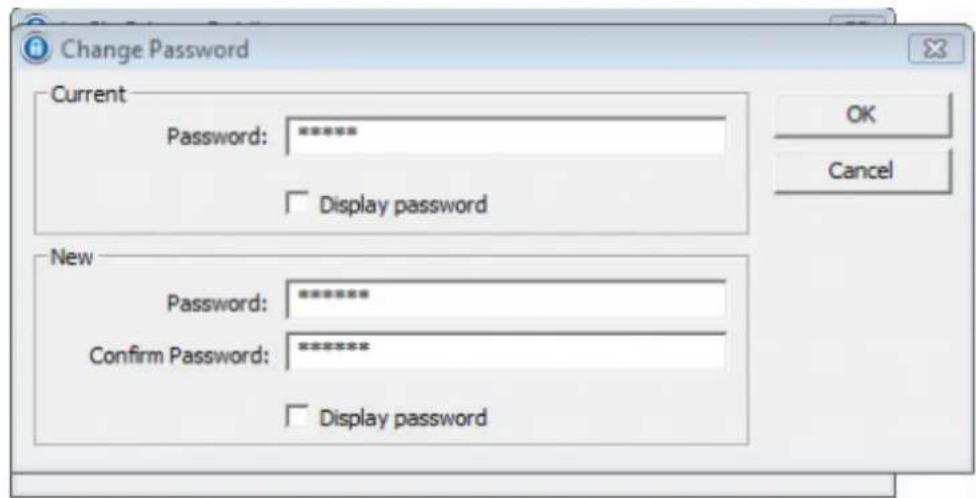
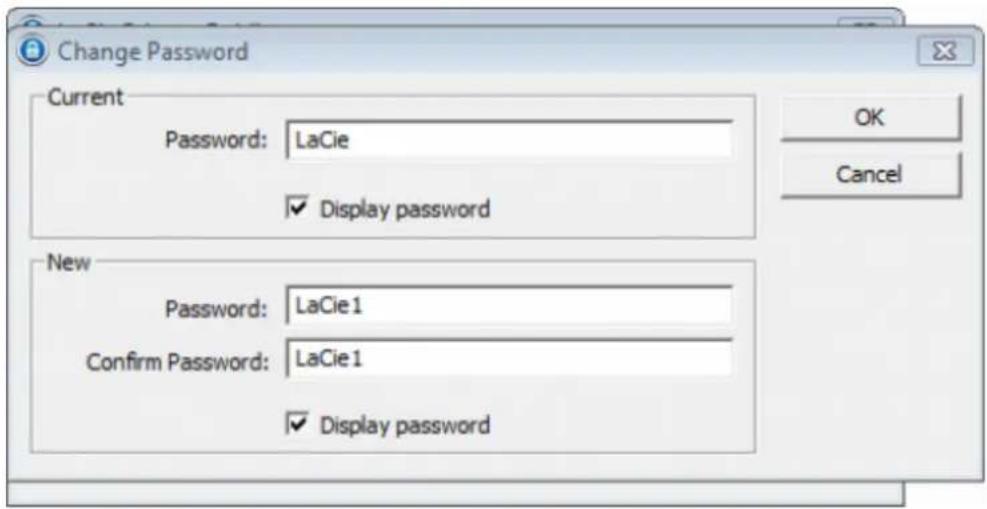
Click OK.7.
Your password has been changed.8.
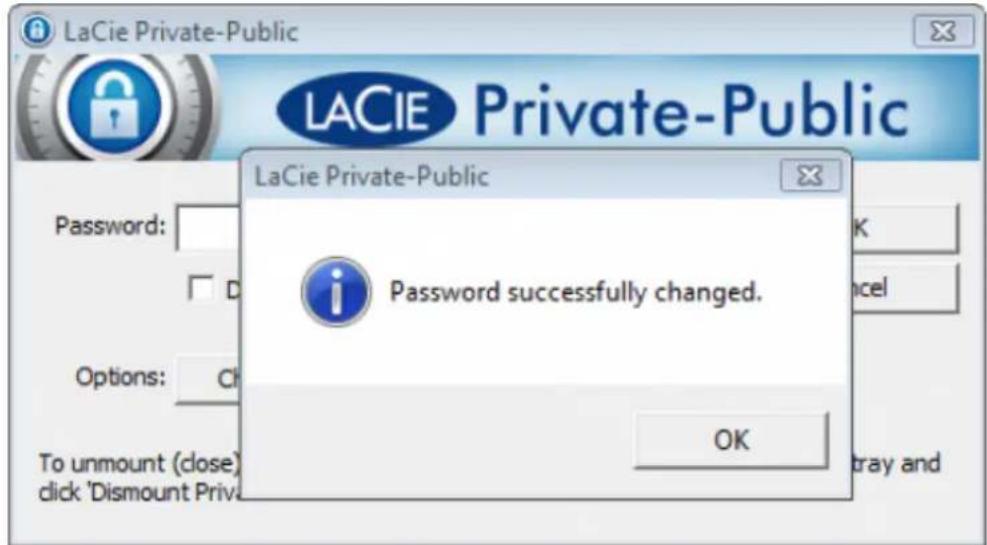
DELETE LA-PRIVATE
Important Info: Removing the LA-PRIVATE volume will delete all of its data. LaCie highly recommends that you copy all data from LA-PRIVATE to a temporary location before deleting the secure volume.
Invisible Files
Deleting LA-PRIVATE requires that hidden files are made visible. Follow the steps below to reveal hidden files and delete the LA-PRIVATE volume.
Windows
Insert the LaCie storage device into the compatible interface port on your computer. 1.
Click Start > My Computer/Computer. You should see LA-PUBLIC.2.
Go to the pulldown menu Tools > Folder Options.3.
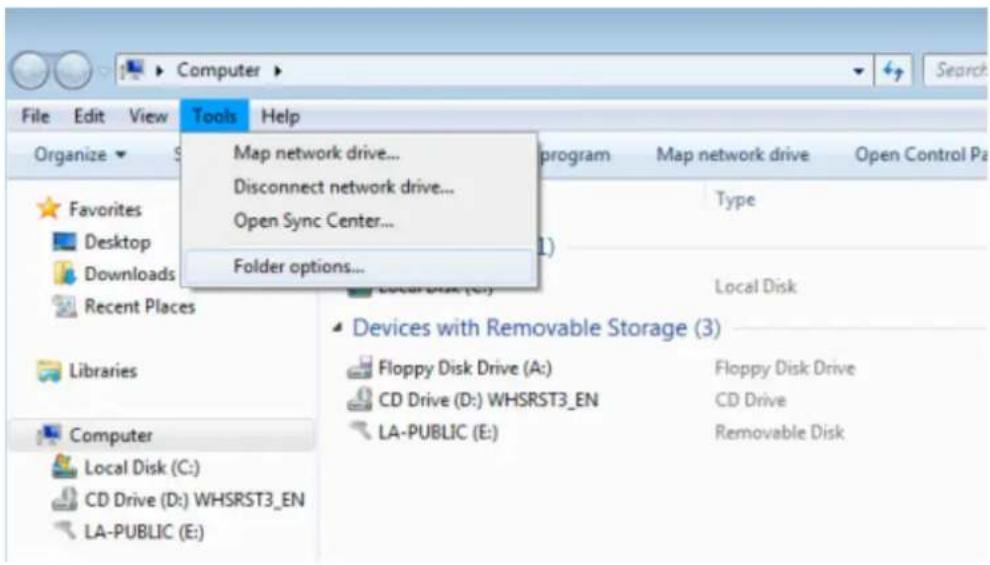
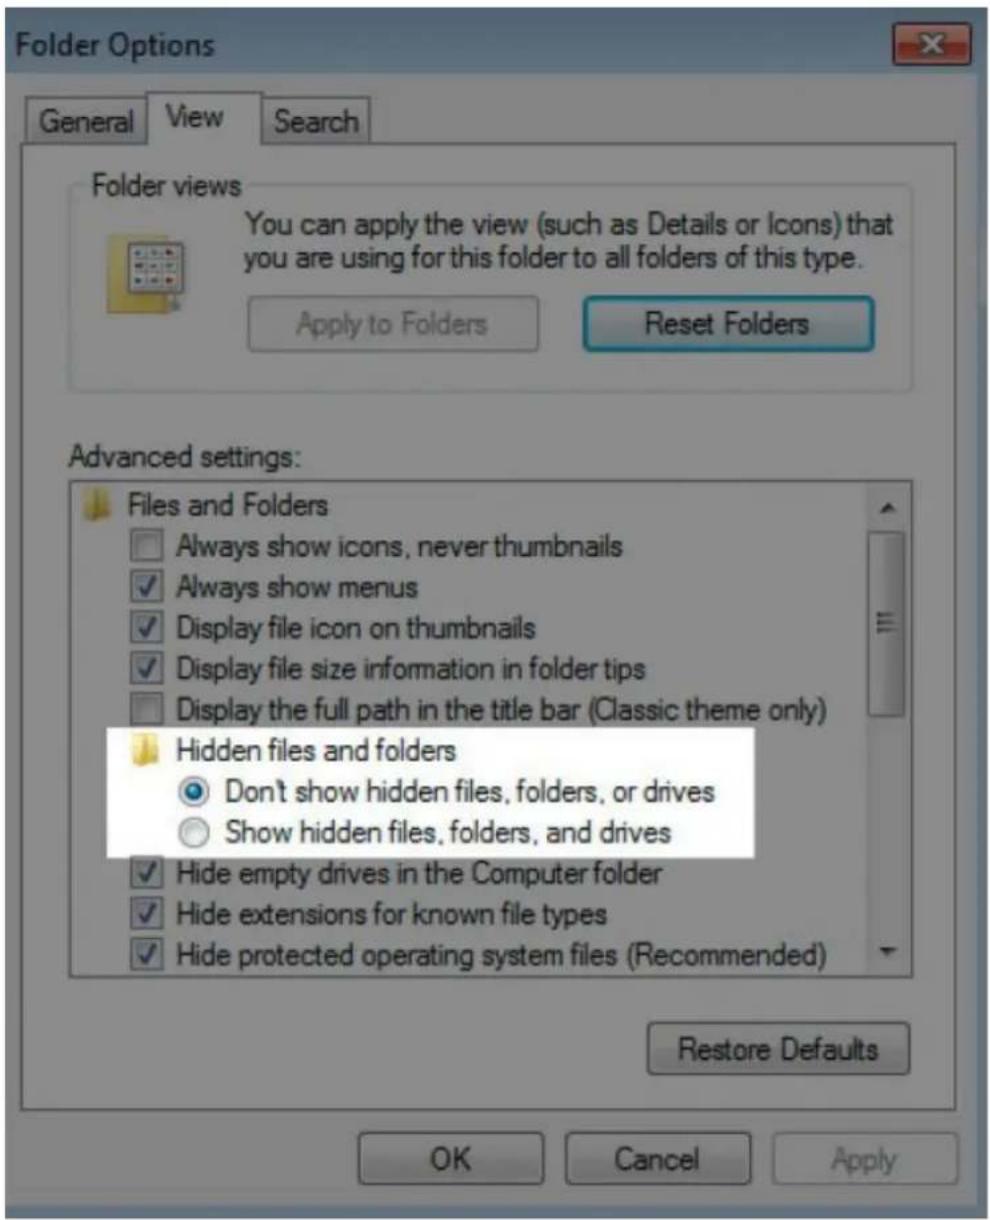
- Note the section called Hidden files and folders. The default setting is "Don't show hidden files, folders, or drives".
- Change the Hidden files and folders setting to "Show hidden files, folders, and drives". Click Apply.
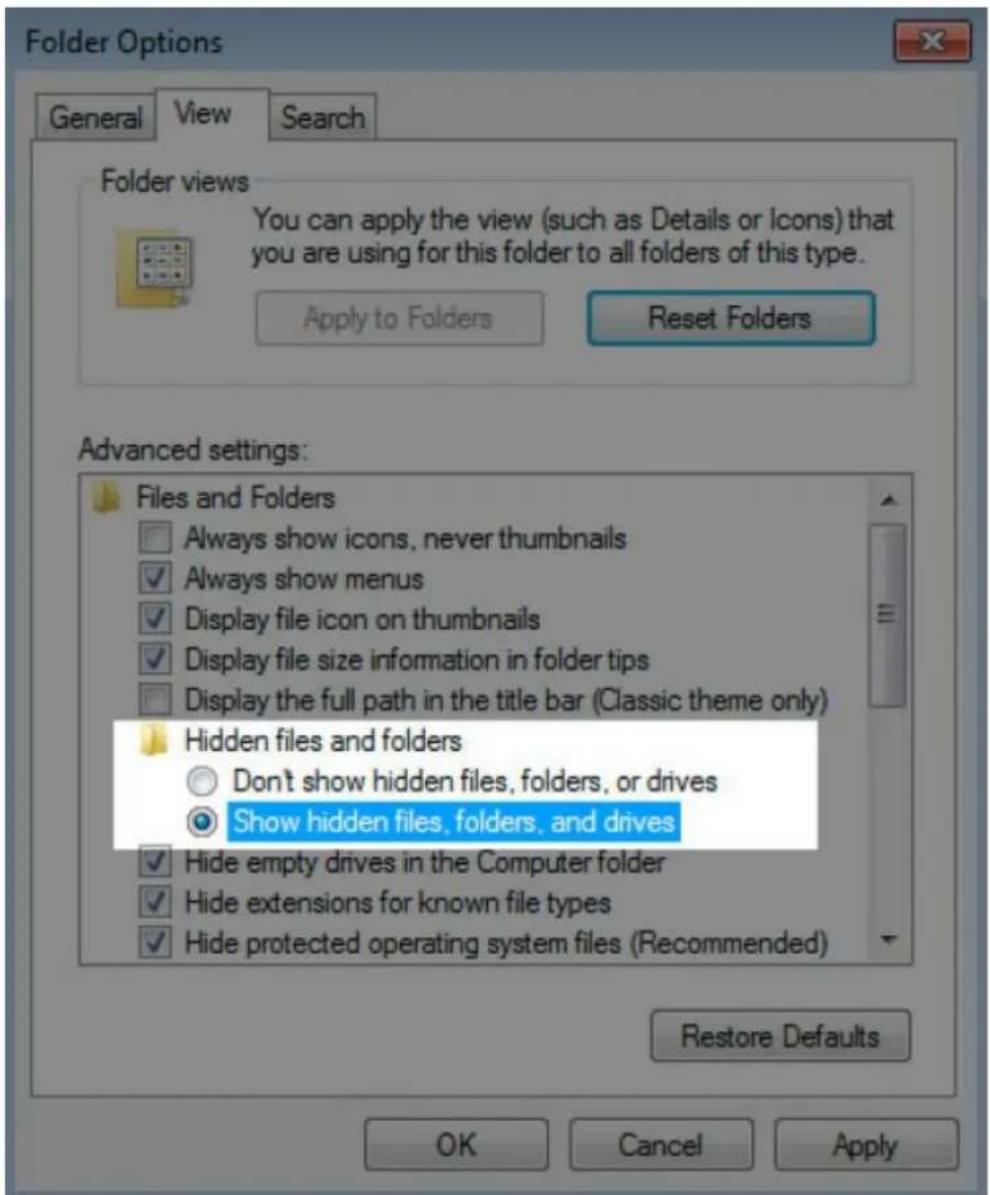
Go to the LA-PUBLIC partition and open the folder called LaTeX.6.
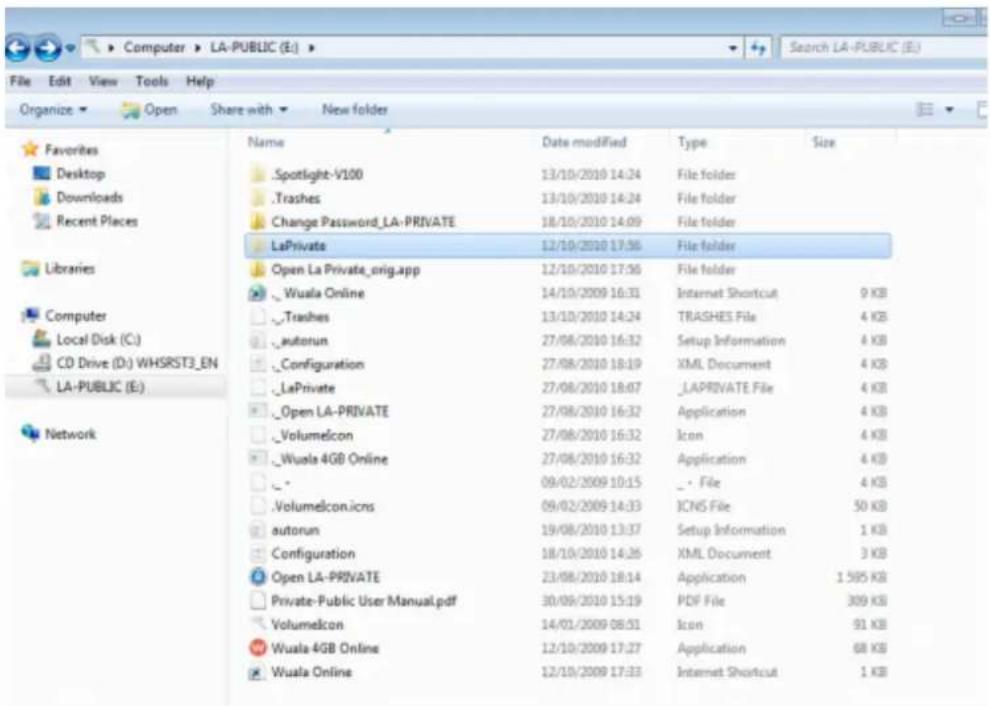
Look for the file called "LaPrivate.lc".7.
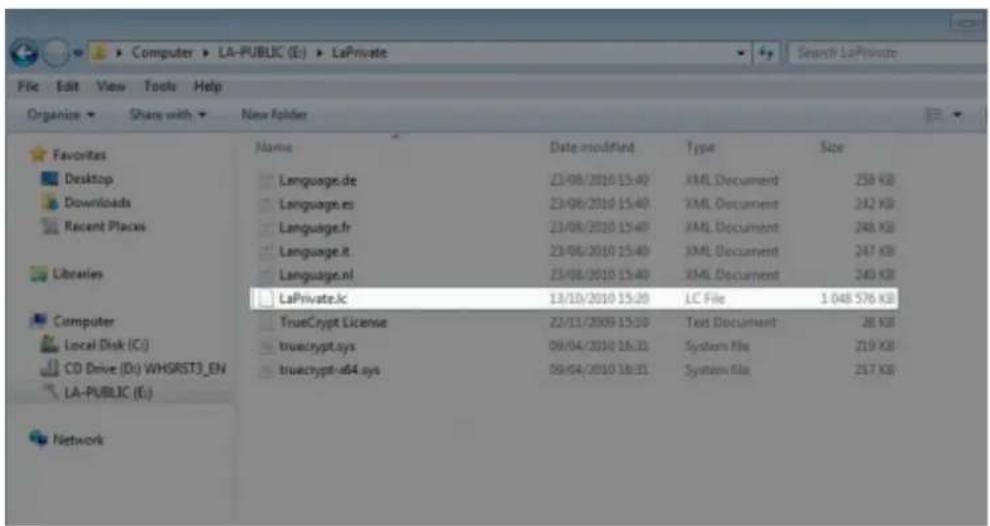
Right-click on "LaPrivate.lc" and select Delete.8.
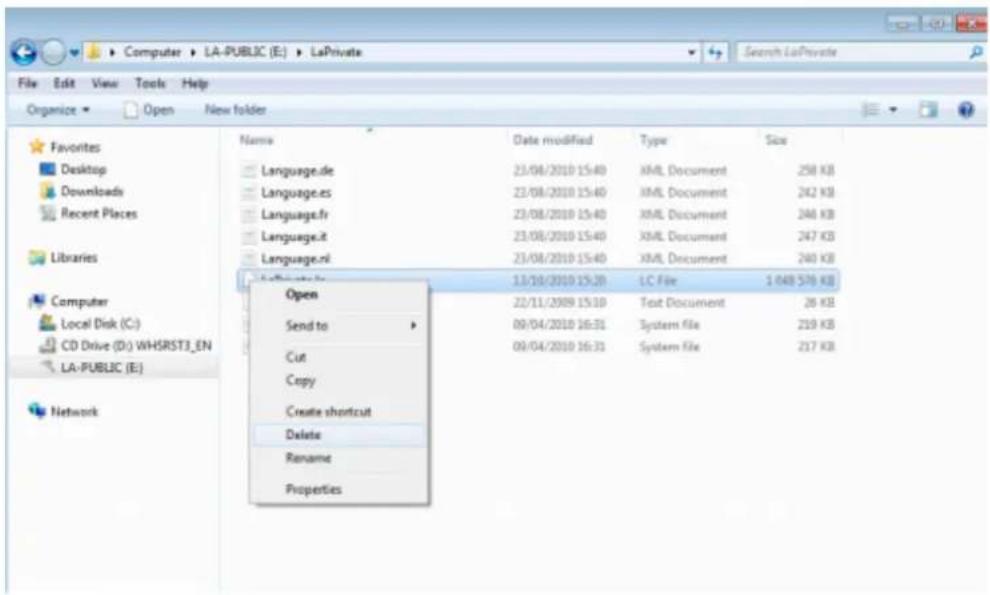
The LA-PRIVATE volume has been deleted.9.
- To restore your folder settings, go to Tools > Folder Options. Select "Don't show hidden files, folders, or drives" and click Apply.
Mac
Revealing hidden files in Mac OS X 10.5/10.6 requires the Terminal program.
Insert the LaCie storage device into the compatible interface port on your computer. The LA-PUBLIC icon1 should appear on the desktop.
Go to the pulldown menu Go > Utilities.2.
![Finder File Edit View Go Window Help Back Forward Select Startup Disk on Desktop Computer Home Desktop Network iDisk Applications Documents Utilities Recent Folders Go to Folder... Connect to Server... ⌘[ ] ⌘] ⌘↑ ⌘C ⌘H ⌘D ⌘K ▶ ⌘A ⌘O ⌘U](/content/2026/05/1018002/images/6a76af9623ce8a613587b806853061fe64f0bfb20ae7ef3620b04cd4aa5b3a0a.jpg)
Click twice on the program Terminal.3.
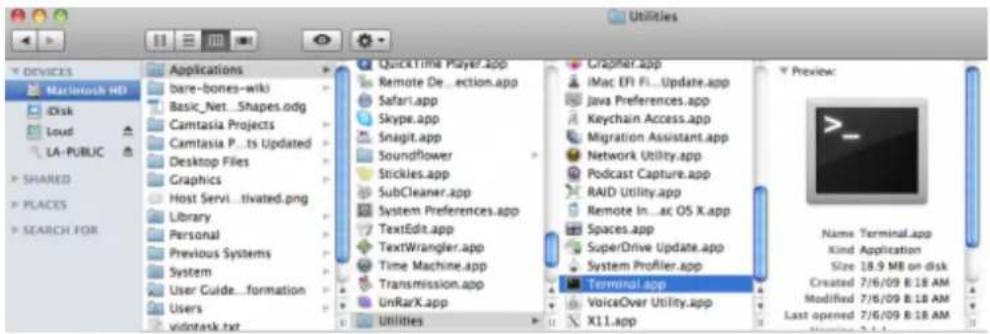
The Terminal window will appear. To reveal hidden files, type the following string exactly as it appears, 4. including spaces and capital letters:
defaults write com.apple.Finder AppleWebKitFiles YES
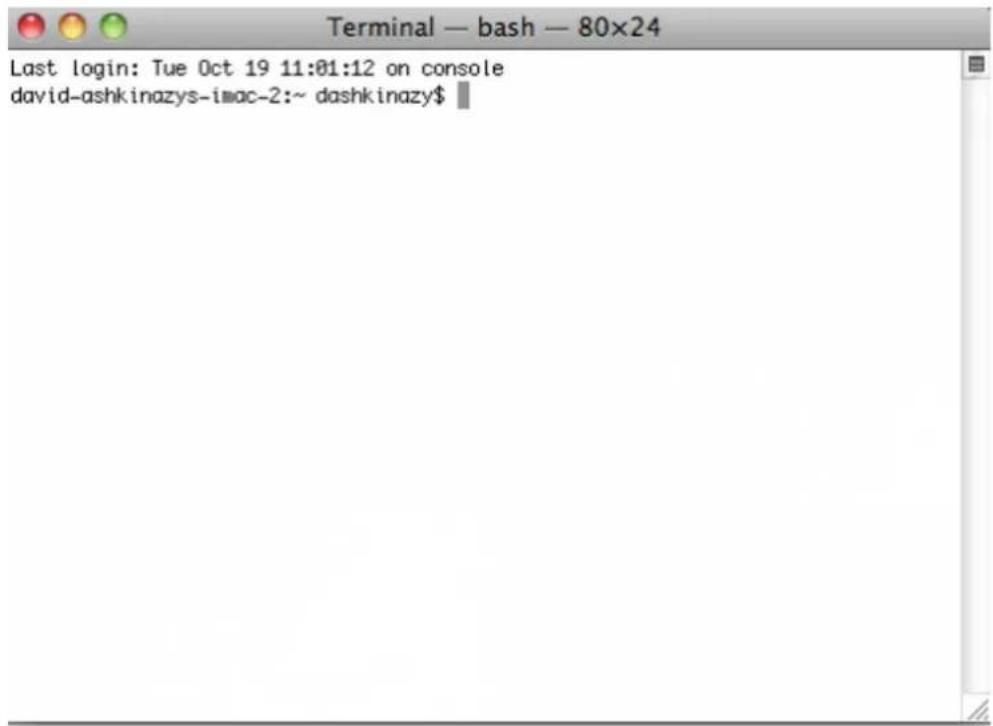
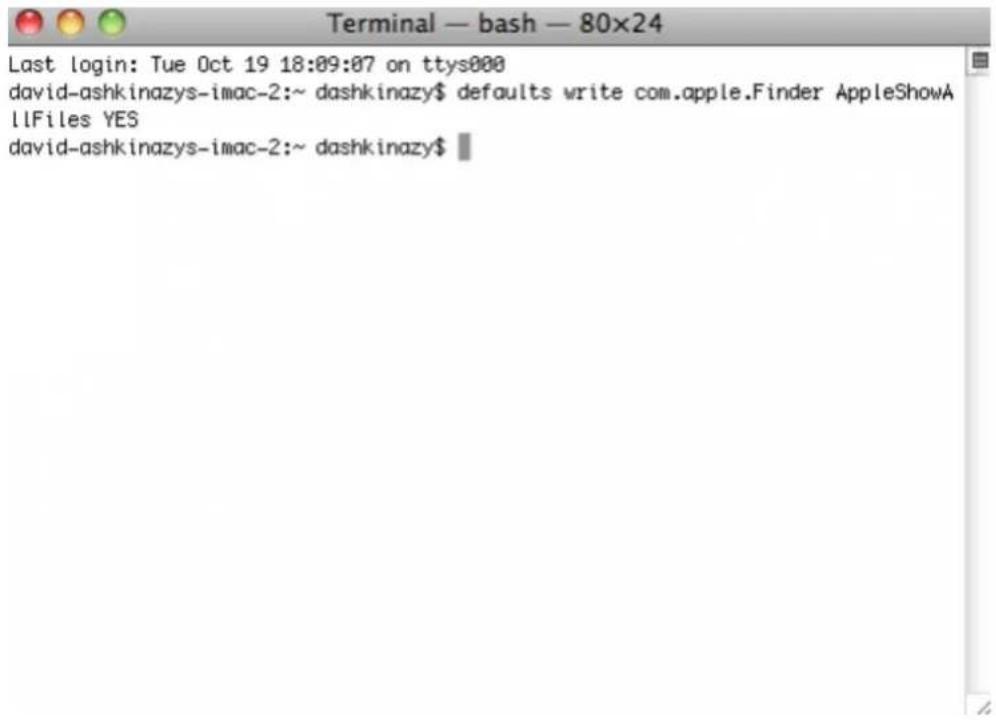
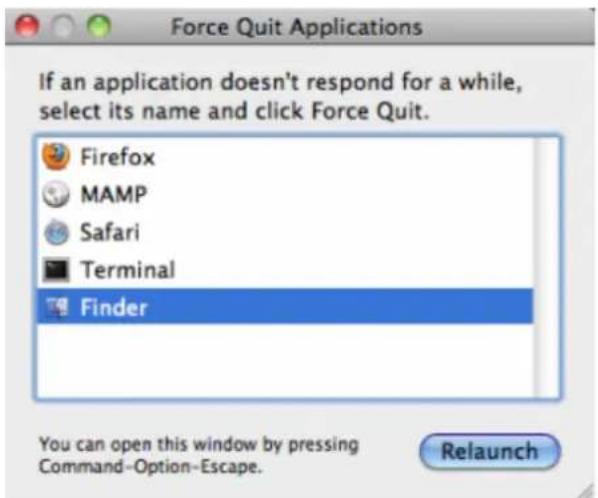
You must now restart the Finder. Push the following buttons on your Macintosh keyboard at the same time:5. option+cmd+esc. The Force Quit Applications window will open. Select Finder and click Relaunch.
After the Finder has restarted, open the LA-PUBLIC partition on your LaCie storage device. 6. Open the LaTeX folder and look for the file called "LaPrivate.lc".7.
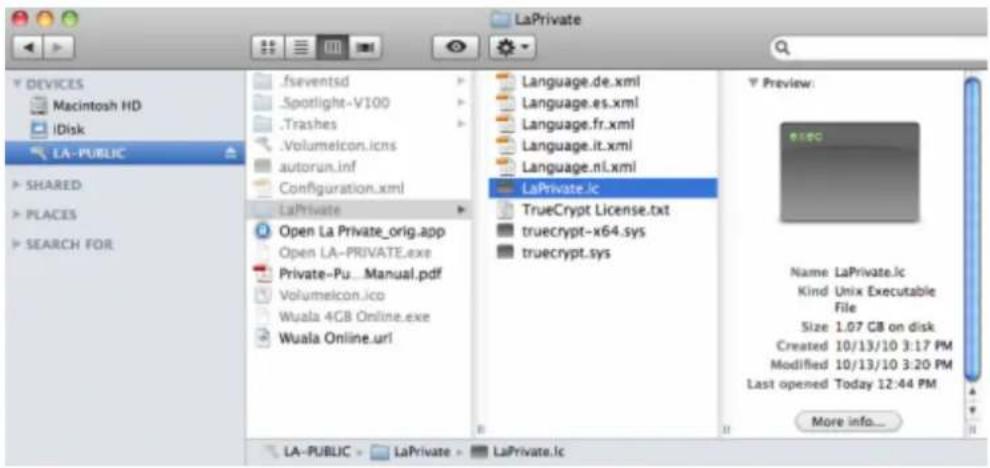
Right-click on "LaPrivate.lc" and select Move to Trash.8.
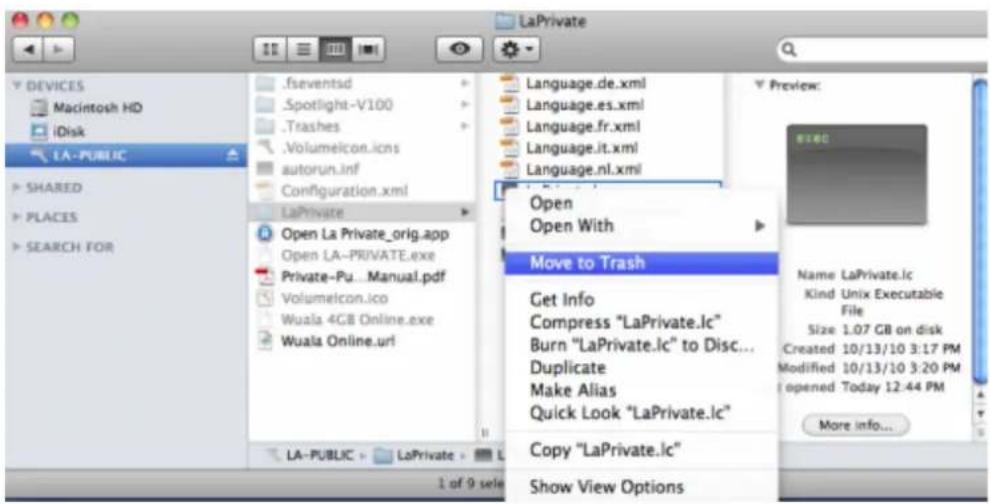
The LA-PRIVATE volume has been deleted.9.
- To conceal hidden files, go to the pulldown menu Go > Utilities. Open the Terminal application and type the following string exactly as it appears, including spaces and capital letters: defaults write com.apple.Finder AppleWebKitFiles NO
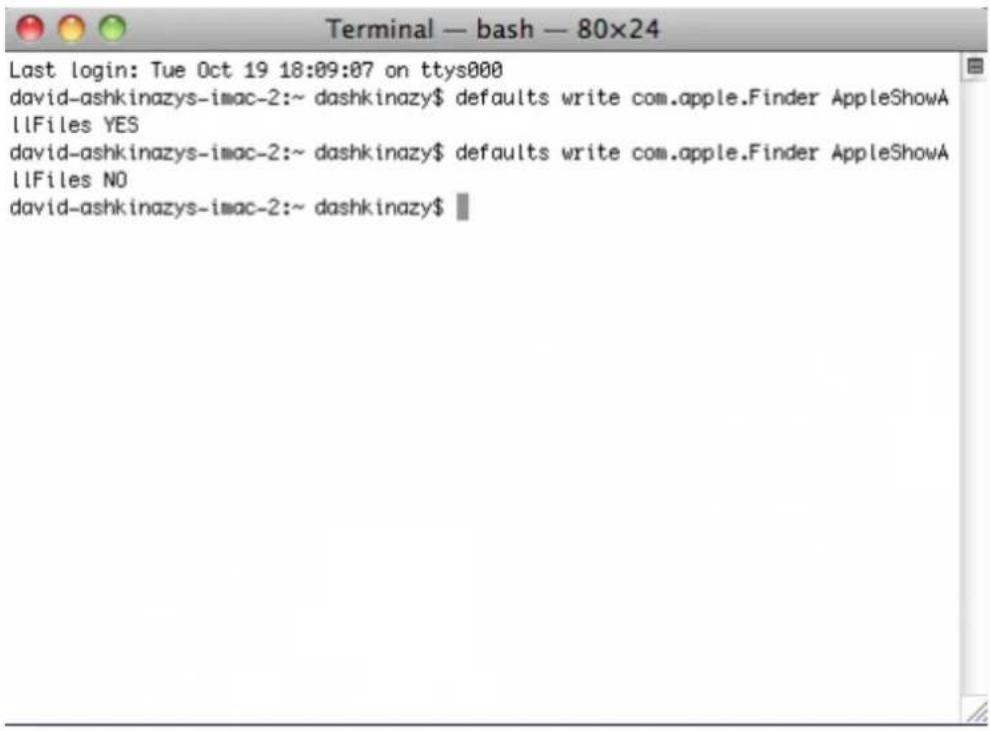
You must now restart the Finder. Push the following buttons on your Macintosh keyboard at the same time:11. option+cmd+esc. The Force Quit Applications window will open. Select Finder and click Relaunch. Hidden files are now concealed.12.
FORMATTING YOUR LACIE USB KEY
With the aid of LaCie Setup Assistant, you have created a partition called LA-PUBLIC. Using the LaCie Private-Public application included on your USB key, you can also create a secure volume called LA-PRIVATE. The LA-PRIVATE partition is password-protected and it uses strong AES 256 encryption to keep your most important data safe from unauthorized users.
You may also use Disk Management (Windows) or Disk Utility (Mac) to format and partition your LaCie USB Key. Please note that formatting any storage device will delete all of its data. Therefore, LaCie highly recommends copying all data stored on LA-PUBLIC and LA-PRIVATE before partitioning the USB key. Do not forget to copy the LaCie Private-Public application with your data. You may create a secure LA-PRIVATE volume once the format is complete.
Important Info: Formatting and partitioning your LaCie storage device will delete all data stored on the LA-PUBLIC and LA-PRIVATE partitions. LaCie highly recommends copying all data stored on your LA-PUBLIC and LA-PRIVATE partitions before attempting to partition the LaCie USB Key.
Please read the following section carefully before formatting and partitioning your LaCie storage device.
ABOUT FILE SYSTEM FORMATS
Windows Users
FAT 32: FAT is an acronym for File Allocation Table, which dates back to the beginnings of DOS programming. Originally, FAT was only 16 bits, but after the second release of Windows 95 it was upgraded to 32 bits, hence the name FAT 32. In theory, FAT 32 volume sizes can range from less than 1MB all the way to 2TB.
It is the native file system of Windows 98 and Windows Me, and is supported by Windows 2000, Windows XP, Windows Vista, and Windows 7. When FAT 32 is used with Windows 2000, Windows XP, Windows Vista, and Windows 7 however, volume size is limited to 32GB (by the Windows partition utility, i.e. Disk Manager), and the individual file size is limited to 4GB.
NTFS: This acronym stands for New Technology File System, and it is the native file system for Windows NT, 2000, XP, Vista, and 7. NTFS offers several features that are not available with FAT 32: file compression, encryption, permissions, auditing, and mirroring drives. The minimum supported volume size for NTFS is 10MB with a maximum of 2TB when initialized in the MBR format. The more recent GPT format does not assign limits to file or partition sizes. Volumes created in NTFS are native read and write for Windows NT, 2000, XP, Vista, and 7. Earlier versions of Windows and Mac OS X 10.5 or higher may read and write to the NTFS partitions with the help of third-party drivers.
See the table below for a comparison of NTFS and FAT 32.
| Windows File System Formats |
| Use NTFS if: |
| ...you will be using the storage device only with Windows XP, Vista, and 7 since performance will be enhances when compared to FAT 32. This file system is compatible in read-only mode with Mac OS 10.3 and higher. |
| Use FAT32 if: |
| ...you will be using your storage device with both Windows and Mac computers. Maximum single file size is limited to 4GB. |
Mac Users
You may customize the storage device by reformatting and/or partitioning it with separate file system formats. For optimal performance in Mac OS environments, format and partition the storage device as one large Mac OS Extended volume.
Mac OS Extended (HFS+): Mac OS Extended refers to the file system used by Mac OS X. HFS+ represents an optimization of the older HFS file system by using hard disk space more efficiently. With HFS+, you are no longer limited by block size.
MS-DOS File System (FAT 32): This is the Microsoft file system, more typically known as FAT 32. Use FAT 32 if you are going to be sharing your LaCie storage device between Mac and Window comptuers.
See the table below for a comparison between HFS+ and FAT 32 (MS-DOS).
| Mac File System Formats |
| Use HFS+ if: |
| ...you will be using the storage device on Macs only. Performance will be enhances when compared to FAT 32. HFS+ is NOT compatible with Windows OS. |
| Use FAT32 if: |
| ...you will be using your storage device with both Windows and Mac computers. Maximum single file size is limited to 4GB. |
FORMATTING INSTRUCTIONS
The steps listed below will help you to format and partition a storage device. For more information on choosing the optimal file format, refer to About File System Formats.
Caution: Formatting will erase everything on the storage device. LaCie highly recommends that you back up all data on your storage device before performing the steps below. LaCie is not responsible for any data lost due to formatting, partitioning, or using a LaCie storage device.
Important Info: Depending upon your LaCie storage device, formatting the "LaCie" partition or the "LA-PUBLIC" partition will delete the included User Manual and utilities. Please copy all data, including documentation and software from LaCie, before formatting your storage device. User Manuals and select software may also be downloaded from www.lacie.com/support/.
Note: Refer to your operating system's documentation for more information on reformatting and partitioning your storage device.
Windows Users
Technical Note on volumes larger than 2TB: Windows XP 32-bit - This version of Windows will not recognize volumes larger than 2TB; Windows XP x64, Vista and 7 - All of these versions of Windows can recognize volumes greater than 2TB. However, disks must be converted to the GPT file system before partitions greater than 2TB can be created. To do this, go to Windows Disk Management and right-click on the disk. Select Convert to GPT. You may now create partitions greater than 2TB.
Make sure the storage device is connected to and mounted on the computer.1.
-
Right-click on Computer and choose Manage. From the Manage window select Disk Management. From the list of storage devices in the middle of the Disk Management window, locate your LaCie device.3. By default, a partition is already created on the device with LaCie software utilities. Follow your operating4. system instructions to reset the existing partition.
-
To create a new partition, select New Simple Volume. Follow the on-screen instructions when the New Simple Volume Wizard appears.
Mac Users
Make sure the storage device is connected to and mounted on the computer.1.
Select Utilities from the Go menu in the Finder menu bar.2.
In the Utilities folder, double-click Disk Utility.3.
Disk Utility will display the message Select a disk, volume, or image. All connected storage devices, partitions, or disk images will be displayed in this column. Storage devices in this column may have multiple listings. The top name is the name of the physical device's manufacturer, and includes the formatted capacity.
Select the storage device in the left-hand column.4.
Click the Erase tab.5.
- Choose a format from the drop-down window. See About File System Formats for more information on choosing a file format.
Give the volume a name.7.
Click Erase... and confirm your selection in the popup window.8.
GETTING HELP
If you are having problems with your LaCie product, consult the table below for a list of available resources.
| Order Source Description Location | |||
| 1 | Quick Install Guide | Concise steps to follow for getting your product up and running | Printed and included in the product box, or download PDF from the product page |
| 2 | Support Pages | Includes interactive troubleshooting topics for most common problems | www.lacie.com/support/, select your product, then click the “Troubleshooting” tab |
| 3 | User Manual | Includes common troubleshooting topics | See Troubleshooting Topics |
| 4 | LaCie Lounge Technical Support forum | A free forum, moderated by LaCie, for customers to seek advice | www.lacielounge.com/index.php?option=com_kunena&Itemid=49&lang=en |
| 5 | Customer Support | Create an account on lacie.com, register your product, and fill out a support ticket | Create an account here: www.lacie.com/us/mystuff/login.htm?logout&rtn=mystuff |
Note: LaCie is dedicated to providing high quality products that enrich the lives of our customers. To help LaCie offer the best customer support, we encourage you to create an account and register your product at www.lacie.com/us/mystuff/login.htm? logout&rtn=mystuff. You can give us important feedback as well as receive updated information on your LaCie device.
TROUBLESHOOTING TOPICS
Note: Interactive troubleshooting, a highly effective way to resolve problems with your product, is available from www.lacie.com/support/. Select your product, then click the "Troubleshooting" tab.
All Users
Problem: My file transfers are too slow.
Q: Are there other USB devices connected to the same port or hub?
A: Disconnect any other USB devices and see if the performance increases.
Q: Is the storage device connected to a USB 2.0 port on your computer or a USB 2.0 external hub?
A: If your storage device is connected to a USB 2.0 port and/or a USB 2.0 hub, this is normal. A SuperSpeed USB 3.0 device can only operate at USB 3.0 performance levels when it is connected directly to a USB 3.0 port and/or USB 3.0 hub. Otherwise, the USB 3.0 device will operate at the slower USB transfer rates. Consider buying a USB 3.0 PCI Express Card (for desktop computers) or an ExpressCard 34 (for laptops) to allow your computer to achieve faster USB 3.0 transfer speeds. Visit www.lacie.com/accessories/ for information.
Q: Is the storage device connected to a SuperSpeed USB 3.0 port on your computer?
A: Check to see that the SuperSpeed USB 3.0 drivers for both your host bus adapter and device have been installed correctly. If in doubt, uninstall the drivers and reinstall them.
Q: Does your computer or operating system support SuperSpeed USB 3.0?
A: Please refer to the product packaging or consult the product support web page at www.lacie.com/support/ to check the minimum system requirements.
Q: Is your computer's internal hard drive limiting transfer speeds?
A: A low-performance internal hard drive (typically a notebook or netbook computer) will limit the transfer speed of external disks. This is especially true when the internal drive's transfer speed is significantly less than that of a LaCie USB 3.0 storage device.
Problem: File transfer error messages.
Q: Did you get an "Error -50" message while copying to a FAT 32 volume?
A: Certain characters cannot be included in the names of folders and files that are copied to a FAT 32 volume. These characters include but are not limited to:
Check your files and folders to ensure that these types of characters are not being used.
The easiest solution is to check for incompatible characters in file names, change them, then resume file transferring.
Q: Did you receive an error message telling you that the device has been disconnected directly after the disk exited sleep mode?
A: Please ignore this message.
Mac OS X Users
Problem: The storage device icon does not appear on my desktop.
Q: Is the USB device firmly attached to your computer's USB port?
A: Check the USB connection between the device and your computer. Confirm that it is fully seated in the USB port. You can also try disconnecting the device, waiting 10 seconds, and then reconnecting it. If the storage device is still not recognized, restart your computer and try again. Still not working? Read on.
Q: Is your Finder configured not to show storage devices on the desktop?
A: Go to your Finder and select the pulldown Finder > Preferences > General tab > Show these items on the desktop:. Confirm that Hard Disks is selected. If not, click on the check box and see if the storage device has mounted on the desktop. If it is already selected, go to the next topic.
Q: Is your device available to the operating system?
A: Open Disk Utility (Pulldown menu Go > Utilities > Disk Utility). If the storage device is listed in the left-hand column, click on it. Check to see if the Mount option on the top row of icons becomes active. If it does, click on it. If the storage device continues to have trouble mounting or the Mount option is not available, you may need to format it. See Formatting Your LaCie USB Key.
Q: Does your computer's configuration meet the minimum system requirements for use with this storage device?
A: Please refer to the product packaging or consult the product support web page at www.lacie.com/support/ to check the minimum system requirements.
Q: Did you follow the correct installation steps for the specific interface and operating system?
A: Review the installation steps in Connecting the FastKey to a Computer and Creating and Using the Secure LA-PRIVATE Volume. Confirm that all steps have been followed for your configuration (i.e. USB interface, operating system, etc).
Windows XP, Vista, and 7 Users
Problem: The storage device icon does not appear in My Computer/Computer.
Q: Is the USB device firmly attached to your computer's USB port?
A: Check the USB connection between the device and your computer. Confirm that it is fully seated in the USB port. You can also try disconnecting the device, waiting 10 seconds, and then reconnecting it. If the storage device is still not recognized, restart your computer and try again. Still not working? Read on.
Q: Is the storage device listed in Device Manager?
A: All LaCie devices appear in at least one place in Device Manager.
To access Device Manager, click on Start and select Run from the menu. For Windows Vista and Windows 7, press [Windows-button] and [R] on your keyboard.
Enter the command: devmgmt.msc
Click OK and the Device Manager program will open. For troubleshooting, look in the Disk Drives section. It might be necessary to click on + on the left side.
If it is unclear where to find the storage device or if it is present, unplug it, then reconnect it. The entry that changes is your LaCie storage device.
Q: Is your device available in My Computer/Computer?
A: If not, proceed to physical troubleshooting topics above.
Q: Is your storage device listed next to an unusual icon?
A: Windows Device Manager can usually provide information about failures in accessories. It does not display the exact cause, or a solution, but it can assist in troubleshooting most problems.
A problematic device can be found by its unusual icon. Instead of the normal icon based on the type of device, it is can be an exclamation point, question mark, or an X.
Right-click this icon, then choose Properties. The General tab will show why the device is not working.
Still not working? There may be a hardware defect or other problem. Time to contact www.lacie.com/support/.
LA-PRIVATE FREQUENTLY ASKED QUESTIONS
LA-PRIVATE is a secure volume that takes advantage of strong Advanced Encryption Standard (AES) 256 to keep your most important data safe. The included LaCie Private-Public application allows a user to easily create and manage a LA-PRIVATE volume (See Creating and Using the Secure LA-PRIVATE Volume). Please see our list of frequently asked questions below for further information on LA-PRIVATE.
Q: Does LaCie Private-Public work on a Macintosh computer?
A: Yes. LaCie Private-Public is supported on Macintosh computers with:
- The most recent versions of Mac OS X 10.5 or 10.6.
- An Intel processor
- MacFUSE (See Mac Users: Install MacFUSE Before Creating LA-PRIVATE)
Q: LaCie Private-Public will not let me create a LA-PRIVATE volume larger than 4 GB. Why?
A: There may be more than one reason that you cannot create a LA-PRIVATE volume larger than 4 GB. Two possible explanations:
- Your LaCie storage device already has data on LA-PUBLIC. LaCie Private-Public is protecting the data stored on LA-PUBLIC from being erased by limiting the size of LA-PRIVATE.
- You formatted LA-PUBLIC as FAT 32. Due to system format limitations, LA-PRIVATE cannot exceed 4 GB on a FAT 32 partition. You must recreate the LA-PUBLIC partition as NTFS (Windows) or HFS+ (Mac) in order to create a larger LA-PRIVATE volume. Please note that formatting a storage device will delete all of its data. Follow the steps below to create a new LA-PRIVATE volume:
Copy all data stored on the LaCie and LA-PUBLIC partitions as well as the existing LA-PRIVATE1. volume before reformatting your storage device. You can copy the data to a temporary location such as your internal hard drive or another storage device. Please make certain to copy your LaCie User Manual and software utilities as well. You will require LaCie Private-Public to recreate the new LA-PRIVATE volume.
- See About File System Formats for further information on formatting your storage device as NTFS or HFS+. You may name the new NTFS or HFS+ partition "LA-PUBLIC" for ease of reference but it is not mandatory. Once the format is complete, copy LaCie Private-Public to your new NTFS or HFS+ partition.3.
- See Creating and Using the Secure LA-PRIVATE Volume for instructions on creating a new LA-PRIVATE volume.
Q: I can only create a LA-PRIVATE volume with 1, 10, or 100 unit increments. For example, 5 GB, 50 GB, or 500 GB. I want to create a LA-PRIVATE volume that is 5.5 GB, 50.5 GB, or 550 GB. Is it possible?
A: Yes. See Create the LA-PRIVATE Volume. Please note the details regarding the pulldown menu for MB/GB in Step 5.
Q: Where do I go to access the LA-PRIVATE volume?
A: You must launch LaCie Private-Public to enter the password. See Mounting the LA-PRIVATE Volume.
Q: How do I lock the LA-PRIVATE volume from unauthorized access?
A: See Unmounting and Locking LA-PRIVATE.
Q: Can I change the LA-PRIVATE password?
A: Yes. See Changing the LA-PRIVATE Password for further information.
Q: What happens if the LA-PRIVATE password is lost or forgotten?
A: To protect your security, the LA-PRIVATE password is heavily protected and not available for others to recover. This also applies to an authorized user who has lost or forgotten his LA-PRIVATE password. Unfortunately, the data on LA-PRIVATE is not available to anyone, including LaCie, without the password. Please note that LaCie is not responsible for any data that has been lost due to a forgotten LA-PRIVATE password. Consider using a password that is easy for you to remember but close to impossible for unauthorized users to guess. As well, LaCie highly recommends noting your LA-PRIVATE password on paper and keeping it in a safe place.
Q: Do I have to be an administrator to use LaCie Private-Public and to open LA-PRIVATE?
A: You must have administrative rights to your computer in order to run LaCie Private-Public and to access the LA-PRIVATE volume.
PRECAUTIONS
Caution: Modifications not authorized by the manufacturer may void the user's authority to operate this device.
Important info: Any loss, corruption or destruction of data while using a LaCie storage device is the sole responsibility of the user, and under no circumstances will LaCie be held liable for the recovery or restoration of this data. To help prevent the loss of your files, LaCie highly recommends that you keep TWO copies of your data. Consider placing one copy of your data on an external storage device and a second copy on your computer's internal hard disk, another external storage device, or some other form of removable storage media. If you would like more information on backup, please refer to our website.
Important info: 1TB (Terabyte) = 1,000GB. 1GB = 1000MB. 1MB = 1,000,000 Bytes. Total accessible capacity varies depending upon operating environment (typically up to 10% less per TB).
HEALTH AND SAFETY PRECAUTIONS
- Only qualified persons are authorized to carry out maintenance on this device.
- Read this User Manual carefully and follow the correct procedure when setting up the device.
- Do not open a storage device or attempt to disassemble or modify it. Never insert any metallic object into the device to avoid any risk of electrical shock, fire, short-circuiting, or dangerous emissions. The storage device contains no user-serviceable parts. If it appears to be malfunctioning, have it inspected by a qualified LaCie Technical Support representative.
- Never expose your device to rain, or use it near water, or in damp or wet conditions. Never place objects containing liquids on the LaCie storage device, as they may spill into its openings. Doing so increases the risk of electrical shock, short-circuiting, fire, or personal injury.
GENERAL USE PRECAUTIONS
- Do not expose the LaCie storage device to temperatures outside the range of 5^ C to 30^ C (41° F to 86° F); or to operational humidity beyond 5-80%, non-condensing, or non-operating humidity beyond 10-90%, non-condensing. Doing so may damage the LaCie device or disfigure its casing. Avoid placing your LaCie storage device near a source of heat or exposing it to direct or indirect sunlight. Indirect sunlight includes, but is not limited to exposure to the sun through a window. Placing your LaCie device in an environment that is too cold may damage it.
- Do not use the LaCie device near other electrical appliances such as televisions, radios or speakers. Doing so may cause interference which will adversely affect the operation of the other products.
- Do not place the LaCie device near sources of magnetic interference, such as computer displays, televisions, or speakers. Magnetic interference can affect the operation and stability of your LaCie device.
- Never use excessive force on your LaCie device. If you detect a problem, consult the troubleshooting section in this manual.
- Protect your LaCie device from excessive exposure to dust during use or storage. Dust can build up inside the
device, increasing the risk of damage or malfunction.
- Never use benzene, paint thinners, detergent, or other chemical products to clean the outside of the LaCie device. Such products will disfigure and discolor the casing. Instead, use a soft, dry cloth to wipe the device.
WARRANTY INFORMATION
LaCie offers first-rate service and support through our generous three-tiered warranty policy. Our 1-, 2- and 3-year policies include comprehensive, complimentary web-based resources, expert in-house technical support, and worldwide repair and/or replacement coverage. To benefit from this warranty, please contact LaCie Support at www.lacie.com/us/support/index.htm where you can find online support and contact information. You may also contact representatives at the original point of purchase who will be able to help guide you. Warranties vary depending on the product:
- 1-year limited - consumer level
- 2-year limited - prosumer level
- 3-year limited - professional level
- 5-year limited - enterprise class level (more information: www.lacie.com/us/more/?id=10100)
- Optional 3-year LaCie Advance Care Option (sold separately) ^1
For a detailed list of product warranties, go to www.lacie.com/products/warranty.htm.
LACIE LIMITED WARRANTY POLICY
LaCie ("LaCie") warrants, to the original purchaser, that this equipment shall be free of defects in materials and workmanship for a period of one (1), two (2), three (3), or five (5) years, depending on the model, from LaCie's date of original shipment when the equipment is used normally and is properly serviced when needed. If you discover a defect covered by the warranty set forth above, your sole and exclusive remedy will be for LaCie, in its sole discretion to (i) repair or replace the product at no charge to you; or, if a repaired unit or replacement product is not available, (ii) to refund the current market value of your product. You acknowledge and agree that replacement product, at the sole option of LaCie, may be a new product or a remanufactured product. In order to receive the remedy set forth above, you must return the product during the warranty period and include with each returned product (i) a copy of your original purchase invoice to verify your warranty; (ii) a Return Material Authorization number; (iii) your name, address and telephone number; (iv) a copy of the bill of sale bearing the appropriate LaCie serial numbers as proof of date of original retail purchase; and (v) a description of the problem. The customer must pay all transportation costs for a returned product. The product will need to be returned to LaCie within the country of original retail purchase. This warranty applies only to hardware products; LaCie software, media, and manuals are licensed and warranted pursuant to separate written agreement. This warranty does not apply if the product has been misused or has been damaged by accident, abuse, misuse, or misapplication; if it has been modified without permission of LaCie; or if any LaCie serial number has been removed or defaced. If a customer has purchased a LaCie Advance Care Option (ACO) to go with this equipment, the ACO shall be valid for three (3) years from activation.
EXCEPT FOR THE LIMITED WARRANTY SET FORTH ABOVE, ALL PRODUCTS ARE SOLD "AS IS" AND LACIE EXPRESSLY DISCLAIMS ALL WARRANTIES OF ANY KIND, WHETHER EXPRESS, IMPLIED OR STATUTORY, INCLUDING THE IMPLIED WARRANTIES OF MERCHANTABILITY, NONINFRINGEMENT AND FITNESS FOR A PARTICULAR PURPOSE. WITHOUT FURTHER LIMITING THE GENERALITY OF THE FOREGOING, DOES NOT WARRANT (1) THE PERFORMANCE OR RESULTS OBTAINED FROM USING THIS PRODUCT, (2) THAT THE PRODUCT IS APPROPRIATE FOR THE CUSTOMER'S PURPOSES, (3) THE MANUAL IS ERROR FREE, OR (4) THAT NO DATA WILL BE LOST WHILE USING THE PRODUCT. THE ENTIRE RISK AS TO THE RESULTS AND PERFORMANCE IS ASSUMED BY THE CUSTOMER. THE WARRANTY AND REMEDIES SET FORTH ABOVE ARE EXCLUSIVE AND IN LIEU OF ALL OTHERS, ORAL OR WRITTEN, EXPRESS OR IMPLIED.
EXCLUSIONS AND LIMITATIONS
This Limited Warranty applies only to hardware products manufactured by or for LaCie that can be identified by the "LaCie" trademark, trade name, or logo affixed to them. The Limited Warranty does not apply to any non-LaCie hardware products or any software, even if packaged or sold with LaCie hardware. Manufacturers, suppliers, or publishers, other than LaCie, may provide their own warranties to the end user purchaser, but LaCie, in so far as permitted by law, provides their products "as is". Software distributed by LaCie with or without the LaCie brand name (including, but not limited to system software) is not covered under this Limited Warranty. Refer to the licensing agreement accompanying the software for details of your rights with respect to its use.
LaCie does not warrant that the operation of the product will be uninterrupted or error-free. LaCie is not responsible for damage arising from failure to follow instructions relating to the product's use. This warranty does not apply: (a) to consumable parts, unless damage has occurred due to a defect in materials or workmanship; (b) to cosmetic damage, including but not limited to scratches, dents and broken plastic on ports; © to damage caused by use with non-LaCie products; (d) to damage caused by accident, abuse, misuse, flood, fire, earthquake or other external causes; (e) to damage caused by operating the product outside the permitted or intended uses described by LaCie; (f) to damage caused by service (including upgrades and expansions) performed by anyone who is not a representative of LaCie or a LaCie Authorized Service Provider; (g) to a product or part that has been modified to alter functionality or capability without the written permission of LaCie; or (h) if any LaCie serial number on the product has been removed or defaced.
No LaCie dealer, agent, or employee is authorized to make any modification, extension, or addition to this warranty.
Any loss, corruption or destruction of data while using a LaCie drive is the sole responsibility of the user, and under no circumstances will LaCie be held liable for the recovery or restoration of this data. To help prevent the loss of your data, LaCie highly recommends that you keep TWO copies of your data; one copy on your external hard disk, for instance, and a second copy either on your internal hard disk, another external hard disk or some other form of removable storage media. LaCie offers a complete line of CD and DVD drives. If you would like more information on backup, please refer to our website.
LACIE IS NOT RESPONSIBLE FOR SPECIAL, INCIDENTAL, OR CONSEQUENTIAL DAMAGES RESULTING FROM ANY BREACH OF WARRANTY, OR UNDER ANY LEGAL THEORY, INCLUDING LOST PROFITS, DOWNTIME, GOODWILL, DAMAGE TO OR REPLACEMENT OF EQUIPMENT AND PROPERTY, AND ANY COSTS OF RECOVERING, REPROGRAMMING, OR REPRODUCING ANY PROGRAM OR DATA STORED IN OR USED WITH LACIE PRODUCTS EVEN IF IT HAS BEEN ADVISED OF THE POSSIBILITY OF SUCH DAMAGES.
Some states do not allow the exclusion or limitation of implied warranties or liability for incidental or consequential damages, so the above limitation or exclusion may not apply to you. This warranty gives you specific legal rights, and you may have other rights, which vary from state to state.
Your opening of your package, your use of the product, or your return of the enclosed Registration Card acknowledges that you have read and agree to the terms of this Agreement. You further agree that it is the complete and exclusive state of the agreement between us and supersedes any proposal or prior agreement, oral or written, and any other communications between us relating to the subject matter of this Agreement.
Read carefully all information related to warranty and precautions of use of your new LaCie product in the user's manual. For products purchased in the United States, you may contact LaCie at 22985 NW Evergreen Parkway, Hillsboro, Oregon 97124. Email: sales@lacie.com. Website: www.lacie.com. Customer service: 503-844-4503.
SERVICE DOA
On rare occasions, a newly purchased LaCie product may be delivered in non-working order. We are working to avoid these issues, but unfortunately, these situations may arise from time to time. Within the 15 calendar days of purchase, should you experience an issue with your new LaCie product, we ask you to return the product to the place where it was originally bought. You will be required to give a proof of purchase.
ADVANCE CARE OPTION
All products with a 3-year warranty can benefit from the LaCie Advance Care Option. This option can be purchased separately online within 30 days of the purchase date of your LaCie product and you will be asked to provide us with your proof of purchase. The Advance Care Option does not extend the original warranty period.
Under this warranty, LaCie will swap out a product without it needing to be returned first for minimal interruption of your workflow. LaCie will replace part of the product or all of it, depending on our screening process. You might receive a reconditioned product in non-retail packaging. LaCie will cover all freight costs.
The product's Serial Number must be submitted on the LaCie website first. To secure the Advance Care Option, your credit card number must be submitted as well. Should the product not be returned within 21 calendar days of the replacement product's shipment date, you will be charged for the full value of a new comparable product.
LaCie can only provide this optional warranty in countries where there is a local LaCie office. ^1
CUSTOMER WARNING
Please be sure to back up your data before returning your drive to LaCie for repair. LaCie cannot under any circumstances guarantee the integrity of data remaining on a returned drive. We make no provisions for data recovery and cannot be held liable for any data loss on drives or media returned to LaCie.
All products returned to LaCie must be securely packaged in their original box and shipped with postage prepaid, except for Products registered under the Advance Care Option.
LEGAL INFORMATION
COPYRIGHTS
Copyright © 2010 LaCie. All rights reserved. No part of this publication may be reproduced, stored in a retrieval system, or transmitted in any form or by any means, electronic, mechanical, photocopying, recording or otherwise, without the prior written consent of LaCie.
CHANGES
The material in this document is for information only and subject to change without notice. While reasonable efforts have been made in the preparation of this document to assure its accuracy, LaCie assumes no liability resulting from errors or omissions in this document, or from the use of the information contained herein. LaCie reserves the right to make changes or revisions in the product design or the product manual without reservation and without obligation to notify any person of such revisions and changes.
FCC STATEMENT
This device complies with Part 15 of the FCC Rules. Operation is subject to the following conditions:
- The devices may not cause harmful interference
- The devices must accept any interference received, including interference that may cause undesired operation.

This equipment has been tested and found to comply with the limits for a Class A digital device, pursuant to Part 15 of the FCC Rules. These limits are designed to provide reasonable protection against harmful interference in a residential installation. This equipment generates, uses and can radiate radio frequency energy and, if not installed and used in accordance with the instructions, may cause harmful interference to radio communications. However, there is no guarantee that interference will not occur in a particular installation. If this equipment does cause harmful interference to radio or television reception, which can be determined by turning the equipment off and on, the user is encouraged to try and correct the interference by one or more of the following measures:
Reorient or relocate the receiving antenna.1.
Increase the separation between the equipment and receiver.2.
Connect the equipment into an outlet on a circuit different from that to which the receiver is connected.3.
Consult the dealer or an experienced radio/TV technician for help.4.
Modifications to this product not authorized by LaCie could void the FCC & Industry Canada regulations and negate your authority to operate the product.
WEE

This symbol on the product or on its packaging indicates that this product must not be disposed of with your other household waste. Instead, it is your responsibility to dispose of your waste equipment by handing it over to a designed collection point for the recycling of waste electrical and electronic equipment. The separate collection and recycling of your waste equipment at the time of disposal will help to conserve natural resources and ensure that it is recycled in a manner that
protects human health and the environment. For more information about where you can drop off your waste equipment for recycling, please contact your local city office, your household waste disposal service, or the shop where you purchased the product.
TRADEMARKS
Apple, Mac, Time Machine, and Macintosh are registered trademarks of Apple Computer, Inc. Microsoft, Windows XP, Windows Vista, and Windows 7 are registered trademarks of Microsoft Corporation. Other trademarks mentioned in this manual are the property of their respective owners.
LICENSES AND FREE SOFTWARE
Your LaCie product ships with copyrighted software that are licensed under the GPL, AFL, Apache, Apple, BSD, GNU LGPL, MIT, OpenLDAP, OpenSSL, PHP, Python, and Creative Common. It also includes free software, the source code for which can be downloaded from the LaCie website: www.lacie.com/support/
Based on TrueCrypt, freely available at http://www.truecrypt.org/
Portions of this software are based in part on the works of the following people: Paul Le Roux, Bruce Schneier, John Kelsey, Doug Whiting, David Wagner, Chris Hall, Niels Ferguson, Lars Knudsen, Ross Anderson, Eli Biham, Joan Daemen, Vincent Rijmen, Phillip Rogaway, Hans Dobbertin, Antoon Bosselaers, Bart Preneel, Paulo Barreto, Brian Gladman, Wei Dai, Peter Gutmann, and many others.
This list of licenses can evolve over time and can be found on the user interface under the heading Credits.
CANADA COMPLIANCE STATEMENT
This Class A digital apparatus meets all requirements of the Canadian Interference-Causing Equipment Regulations.
JAPAN COMPLIANCE STATEMENT
This is a Class A product based on the standard of the Voluntary Control Council for Interference from Information Technology Equipment (VCCI). If this is used near a radio/TV receiver, it may cause radio interference. Install the equipment according to the manual.
MANUFACTURER'S DECLARATION FOR CE CERTIFICATION

We, LaCie, solemnly declare that this product conforms to the following European standards: Electromagnetic Compatibility Directive (2004/108/EC); Low-Voltage Directive: 2006/95/EC
- INTRODUCTION
- PACKAGE CONTENT
- MINIMUM SYSTEM REQUIREMENTS
- USB SUPERSPEED 3.0 AND HI-SPEED 2.0 INTERFACES
- USB 3.0
- USB 2.0
- USB 3.0 NATIVE AND USB 2.0 COMPATIBLE
- CONNECTING THE FASTKEY TO A COMPUTER
- RUNNING LACIE SETUP ASSISTANT
- To launch LaCie Setup Assistant:
- Windows users
- Mac users
- All users
- UNMOUNTING THE LACIE KEY SAFELY
- UNMOUNTING THE LACIE KEY
- WINDOWS XP USERS
- WINDOWS VISTA & WINDOWS 7 USERS
- CREATING AND USING THE SECURE LA-PRIVATE VOLUME
- MAC USERS - INSTALL MACFUSE BEFORE CREATING LA-PRIVATE
- CREATE THE LA-PRIVATE VOLUME
- MOUNTING THE LA-PRIVATE VOLUME
- UNMOUNTING AND LOCKING LA-PRIVATE
- Problem Ejecting USB Mass Storage Device
- Windows
- Mac
- CHANGING THE LA-PRIVATE PASSWORD
- DELETE LA-PRIVATE
- Invisible Files
- FORMATTING YOUR LACIE USB KEY
- ABOUT FILE SYSTEM FORMATS
- FORMATTING INSTRUCTIONS
- GETTING HELP
- TROUBLESHOOTING TOPICS
- Problem: My file transfers are too slow.
- Problem: File transfer error messages.
- Mac OS X Users
- Problem: The storage device icon does not appear on my desktop.
- Windows XP, Vista, and 7 Users
- Problem: The storage device icon does not appear in My Computer/Computer.
- Enter the command: devmgmt.msc
- LA-PRIVATE FREQUENTLY ASKED QUESTIONS
- PRECAUTIONS
- HEALTH AND SAFETY PRECAUTIONS
- GENERAL USE PRECAUTIONS
- WARRANTY INFORMATION
- LACIE LIMITED WARRANTY POLICY
- EXCLUSIONS AND LIMITATIONS
- SERVICE DOA
- ADVANCE CARE OPTION
- CUSTOMER WARNING
- LEGAL INFORMATION
- COPYRIGHTS
- CHANGES
- FCC STATEMENT
- WEE
- TRADEMARKS
- LICENSES AND FREE SOFTWARE
- CANADA COMPLIANCE STATEMENT
- JAPAN COMPLIANCE STATEMENT
- MANUFACTURER'S DECLARATION FOR CE CERTIFICATION
Brand : LACIE
Model : FastKey
Category : Computer accessory