
ALLFLAME HERO 6 - Barbecue Roesle - Free user manual and instructions
Find the device manual for free ALLFLAME HERO 6 Roesle in PDF.


| Brand | Roesle |
| Model | ALLFLAME HERO 6 |
| Product Type | Barbecue (Gas Grill) |
| Fuel Type | Liquid Propane (LP) or Natural Gas (NG) convertible |
| Number of Burners | 6 main burners + 1 side burner |
| Total Cooking Area | Approximately 720 sq. in. (primary) + 180 sq. in. (warming rack) |
| BTU Output | 60,000 BTU total (10,000 per burner) |
| Ignition Type | Electronic pulse ignition |
| Material | Stainless steel hood and burners, powder-coated steel cart |
| Cooking Grates | Porcelain-coated cast iron |
| Dimensions (L x W x H) | Approximately 60 x 24 x 45 inches (with lid closed) |
| Weight | Approximately 120 lbs (54 kg) |
| Assembly Required | Yes, detailed instructions included |
| Cooking Temperature | Up to 600°F (315°C) |
| Side Shelf | Folding side shelf with tool hooks |
| Storage Cabinet | Enclosed cabinet with door for propane tank storage |
| Thermometer | Built-in lid thermometer |
| Cleanup | Grease tray and removable drip cup |
| Safety Features | Gas shut-off valves, flame tamers, and regulator with safety device |
| Warranty | Limited 10-year warranty on burners, 5-year on other parts |
Frequently Asked Questions - ALLFLAME HERO 6 Roesle
User questions about ALLFLAME HERO 6 Roesle
0 question about this device. Answer the ones you know or ask your own.
Ask a new question about this device
Download the instructions for your Barbecue in PDF format for free! Find your manual ALLFLAME HERO 6 - Roesle and take your electronic device back in hand. On this page are published all the documents necessary for the use of your device. ALLFLAME HERO 6 by Roesle.
USER MANUAL ALLFLAME HERO 6 Roesle
Abb.: ALLFLAME HERO 4

Art-Nr. 251051 / 251052 / 251053 / 251054 / 251055 / 251056 / 251057 / 251058
support@roesle.de
www.roesle.com
Optional (ALLFLAME PEER)....9
Optional (ALLFLAME PEER)
Gasanschluss
(Brenner auf Düse)

DEE


Fehlerbehebung
Garzeiten


Contents
Introduction 33
About this manual 33
Using the gas grill correctly 33
Symbols used.... 33
Important safety instructions 33
General safety instructions 35
Safety instructions on avoiding grease fires....35
What to do in the event of a grease fire....35
Safety instructions for gas hoses....35
Safety instructions for the gas pressure regulator.....35
Safety instructions for the gas bottle 35
Safety instructions for the main burners, the back burner and the Crispzone 36
Safety instructions on storage....36
Before using the grill....37
Correct assembly 37
Option (ALLFLAME PEER) 37
Checking for defects 37
Checking for gas leaks 37
Cleaning the grease trap system....37
Checking the electronic ignition....37
Product description....38
Positions of the control knobs....39
Fold side table upwards 39
Gas connection....39
Size of the gas bottle 39
Installing the gas bottle in the cabinet.... 39
Setting up the gas bottle outside the cabinet ..... 40
Installing the pressure regulator....40
Fitting the hose connector....40
For Germany, Austria and Switzerland (50 mbar)......40
For Belgium, Denmark, Spain, Finland, the Netherlands, Norway, Sweden, France, the United Kingdom, Ireland, Italy, and Luxembourg (30 mbar) 40
Checking the main burners....41
Leak tests 41
Using the grill for the first time 42
Burning-off the gas grill 42
Lighting the main burners 43
Lighting the main burners and the Crispzone with the Jet Flame ignition system....43
Optional when using the Crispzone 43
Lighting the main burners manually....43
Ignition process for the Primezone infrared burner ...43
Ignition process for the back burner 44
Hose rupture protection 44
Cooking with the RÖSLE grill 45
Preheating the grill 45
Oiling the grill grates 45
Flashback 45
Primezone infrared burner 45
Back burner....46
Power supply....47
Battery compartment for the lighting....47
Grilling methods....47
Direct grilling with a closed grill lid 47
Indirect grilling with a closed grill lid 47
Combining both grilling methods 47
Cooking times: When is the food cooked? 47
Simple steps for professional grilling....48
After using the grill 48
Maintenance, cleaning and storage....49
Cleaning the glass pane 49
Cleaning the outer surfaces of the grill 49
Cleaning the grill chamber 49
Cleaning the grill grates 49
Cleaning surfaces 49
Cleaning enamelled grill grates 49
Cleaning the grease funnel and the grease drip tray..50
Cleaning the main burners 50
Removing the main burners....50
Over the winter....50
Using the gas grill after it has been in storage....50
Tips on extending the life the grill 51
Disposal.... 51
Using batteries....52
Disposing of the batteries....52
Warranty 52
Service and contact details....52
Declaration of Conformity 52
Troubleshooting 54
Technical data....56
Cooking times 58
You will find the assembly instructions for the gas grill on the separate sheet. Please read the instruction manual before starting to use the gas grill. Please keep the instruction manual in a safe location so that you can refer to it at any time. Only use the gas grill outdoors. Caution! Easily accessible parts of the gas grill can get very hot. Keep children at a safe distance.
Introduction
Dear RÖSLE customer,
Congratulations! You have chosen a high-quality ALL-FLAME gas grill from RÖSLE. You have made a good choice. It is a smart decision to buy a long-lasting, high-quality product.
This instruction manual is part of the product. It contains important safety instructions and information on using and disposing of the gas grill. If you sell the product to someone else, please pass on all the documents.
About this manual

On the following pages you will find information about how to start using the ALLFLAME gas grill, how to operate it and how to care for it. Read the
whole of the manual and pay attention to the warnings and notes. This will help you to avoid danger and can also extend the life of the product. Read the section "Important safety instructions" for the sake of your own safety. Follow all the instructions to make sure that you do not put yourself and other people at risk.
If you have questions about using the ALLFLAME gas grill that are not answered in this manual, please contact our service team.
Using the gas grill correctly
The ALLFLAME gas grill is intended only for private use outdoors. Never use it for other purposes.
The gas grill must only be used with liquid butane or propane gas to prepare food that can be grilled.
It must never be used with natural gas. Converting the grill to natural gas or attempting to operate the grill with natural gas is highly dangerous and will invalidate the type approval.
Using the grill as an open fireplace is not permitted.
The gas grill is not designed to be installed in or on caravans, camper vans and/or boats.
A failure to follow the safety instructions, warnings and precautionary measures may result in serious injury or death, or property damage caused by a fire or explosion. The manufacturer accepts no liability for damage caused by improper use and a failure to observe the safety precautions.
If you do not use the gas grill according to the instructions in this manual, this will invalidate your warranty.
Please use the grill for the intended purpose and follow the safety instructions to ensure that the grill functions correctly and has a long service life.
Symbols used
 | Danger! Warning! | ||
 | Danger of fire! | Caution! | |
 | Hot surface! | Note | |
 | Danger of poisoning! | Dispose of the product separately from normal household waste. | |
 | Danger of explosion! |
Important safety instructions
Danger! This safety instruction describes imminent dangers that could lead to death or serious injury.
Warning! This safety instruction describes a potential imminent danger that could lead to death or serious injury.
Caution! This safety instruction describes a potential imminent danger that could lead to minor injuries.
Note! This safety instruction describes a potential harmful situation that could lead to damage to the grill or to other objects.

Danger!
Danger of carbon monoxide poisoning!
Carbon monoxide cause loss of consciousness or death.
▶ Only use the ALLFLAME gas grill outdoors!
▶ Make sure that the grill is a safe distance away (at least 1.5 metres) from other objects.
▶ You must not use the grill in a garage, on a covered or enclosed veranda or terrace or in other enclosed spaces, or in or on a camper van or a boat.
▶ Make sure that the slots and ventilation openings at the back of the hood are always kept clear.
What to do if you inhale gas
▶ Move away from the gas grill and into the fresh air.
▶ Monitor your symptoms, which could include headaches, dizziness and nausea.
▶ See a doctor immediately or inform the emergency services.

Danger!
Danger of fire and explosion!
There must not be any flammable materials within 1.5 metres above, underneath, to the side of, in front of or behind the grill when it is in use. Flammable materials include (but are not restricted to) treated wooden decking, wooden porches and textiles.
We recommend moving the grill even further away from vinyl siding and large windows.
It is also a good idea to use the grill further away from building façades as any smoke that is produced can make them dirty.
▶ Turn off the gas supply on the gas bottle after you have finished using the grill.
Do not put a grill cover or other flammable items on the warming rack or in/under the grill.
▶ Make sure that the slots and ventilation openings at the back of the hood are always kept clear.
▶ Never cover the entire surface of the grill with food, grill plates, drip trays, pizza stones etc. as this can cause a build-up of heat in the lower part of the grill chamber.
- Keep the grill surface free from flammable vapours and liquids, such as alcohol and other flammable mixtures.
▶ You must not use the gas grill under an unprotected flammable roof, awning or overhang.
▶ Never leave the grill unsupervised when it is in use.
▶ Do not use charcoal, briquettes, logs or lava rocks in the gas grill.
▶ Only use the grill on level, firm, safe ground.
▶ Never put the grill on a flammable surface when it is in use and do not store flammable items under the grill.
▶ Never pour water on the gas grill to put out jets of flame!
What to do in the event of a fire
▶ Move away from the source of the fire and warn other people!
▶ Have a fire extinguisher (class F) ready for use in the event of an accident or incident.
In an emergency, call the fire service.

Danger!
Danger of burns from very hot surfaces and parts!
Easily accessible parts of the gas grill can get very hot and cause burns.
▶ Always wear grill gloves when using the grill.
▶ Only touch the grill in the places where it is designed to be touched when in use.
▶ Keep children (at least 2 metres) away from the grill.
▶ Make sure that no one touches the hot parts.
What to do in the event of burns
▶ Try to put out burning clothes using a blanket.
▶ Cool burnt skin using lukewarm water.
▶ Cover the burnt areas with a clean cloth.
Do not remove clothes which are stuck to the skin.
In the event of severe burns, call an ambulance immediately!

Warning!
Danger of injuries caused by the grill tipping over!
Moving the grill when it is in use can lead to injuries.
▶ Do not move it while it is in use.

Warning!
Danger of injuries caused by incorrect use!
If the grill is used by someone untrained, this can lead to serious injuries.
The grill must not be used by anyone (including children) with reduced physical, sensory or mental abilities or a lack of experience and/or knowledge.

Caution!
Danger of a malfunction!
Modifying the grill can lead to malfunctions and safety risks.
▶ Do not modify the grill.

Caution!
Danger of the grill or parts of it being damaged or deformed!
▶ Do not move the grill up or down steep steps or on very uneven ground.
▶ Make sure that it does not reach a temperature higher than 400° C/752°F.
General safety instructions
Safety instructions on avoiding grease fires
Residues and accumulations of grease and fat can lead to a grease fire. Follow these safety instructions to avoid a grease fire occurring.
▶ Clean your gas grill thoroughly at regular and/or appropriate intervals.
A "burn-off" is not a good enough substitute for cleaning in the lower part of the grill chamber.
Remove grease residues and accumulations in the grill chamber and on the burner covers, grill grates and grill plates.
Before you start using the gas grill, always remove any build-up of grease on all the outlets leading to the grease tray, on the removable grease funnel and in the grease tray.
▶ Never line the grill chamber or the grease funnel with aluminium foil or sand, because this will prevent the grease from flowing away. Instead, use drip trays to catch the juices that run out of the meat.
If the flames get out of control, take the food away from the flames until they subside.
What to do in the event of a grease fire
▶ Close the valve on the gas bottle.
▶ Turn all the control knobs to the OFF position.
▶ If possible, leave the lid open until the fire has gone out.
If the flames are intense and the fire is out of control, try to put it out immediately with a suitable extinguisher. Follow the instructions on the fire extinguisher.
▶ Also follow the important safety instructions on the danger of fire and firefighting in the previous section.
Safety instructions for gas hoses
▶ Make sure that the gas hose is not trapped.
▶ Make sure that the gas hose is not near any hot surfaces, because this can cause it to melt and subsequently leak.
The gas hose must not be laid directly underneath the grease funnel or the grease drip tray.
▶ Avoid unnecessary kinks in the gas hose.
▶ Every time you use the gas grill, check first that the gas hose screw connections are tight. If necessary, tighten them with two open-ended spanners.
▶ Every time you use the gas grill, check the gas hose for animal bites, cracks, porous areas, crushing and other damage. If the gas hose is damaged, replace it immediately.
▶ You must only use approved gas hoses.
The gas hose must not be more than 1.5 metres in length.
We recommend replacing the gas hose on your gas grill every 5 years. If national regulations have different requirements, these must take priority.
Safety instructions for the gas pressure regulator
▶ Make sure that the gas pressure regulator is fitted with the small ventilation opening underneath so that no water can get into the opening. This ventilation opening must be clean and free from dirt, grease, insects etc.
▶ No dirt must be allowed to get into the gas pressure regulator or its screw connection.
▶ Every time you use the gas grill, check first that the screw connection between the gas hose and the gas grill is tight. If necessary, tighten it with two open-ended spanners.
▶ You must only use approved pressure regulators that correspond to the operating pressure required by national regulations. You can find out more about this from a specialist retailer.
To ensure that the gas pressure regulator continues to function perfectly under normal operating conditions, we recommend having it replaced within 10 years of the date of manufacture. If national regulations have different requirements, these must take priority.
Safety instructions for the gas bottle
When you are handling gas bottles, do not smoke and keep the bottles away from any potential ignition sources.
▶ Also keep the bottles away from sources of excessive heat (above 50° C).
The gas bottle must always be installed upright and must be transported and stored with a safety cap fitted.
▶ You must make sure that the ventilation openings in the area of the cabinet where the gas bottle is stored are not blocked.
▶ Do not drop gas bottles.
▶ A dented or rusty gas bottle can be dangerous and should be checked by your gas supplier. Do not use a gas bottle with a damaged valve.
▶ Never under any circumstances attempt to remove the Safety instructions on storage
gas pressure regulator or other components of the gas hose while the grill is in use.
▶ Never attempt to repair or modify a connection component of a gas bottle yourself. Contact the manufacturer or an authorised specialist retailer.
Do not store spare gas bottles or gas bottles that are not connected in the cabinet.
When the gas in the gas bottle is running out, you can have the gas bottle refilled or replaced by an authorised specialist retailer.
▶ Only change the gas bottle in a well-ventilated area.
When you change the gas bottle, keep it away from potential ignition sources.
▶ Have the gas bottle tested every 10 years by an authorised specialist retailer. The test details are recorded on the gas bottle.
Liquefied gas is a petrochemical product like petrol and natural gas. At normal temperatures and pressures, it is a gas. Under additional pressure, for example in a gas bottle, it is a liquid. When the pressure is released, the liquid vaporises immediately and becomes a fuel gas with 250% of the volume.
▶ Propane gas smells similar to rotten eggs.
▶ Handle empty gas bottles with just as much care as full bottles. Even if the gas bottle no longer contains any liquid, there may still be gas pressure in the apparently empty bottle.
▶ Also follow the important safety instructions on the danger of carbon monoxide poisoning in the previous section.
Safety instructions for the main burners, the back burner and the Crispzone
▶ Never use the back burner at the same time as all the main burners to prevent the grill from overheating and to avoid the danger of fire and gas.
▶ Make sure that the grill is in a location where it is sheltered from the wind. This will allow for higher temperatures and more even heat distribution.
▶ Close the lid to control the flames and the heat and to prevent the danger of fire.
When using the back burner, always remove the warming rack, because it can be damaged by excess heat.
▶ Make sure that there enough room between the burner and the food for the rotisserie to turn freely.
▶ Clean the spatter guard at regular intervals to prevent a grease fire from occurring.
- Keep the ignition rod clean to prevent ignition problems or a build-up of gas.
▶ Always close the shut-off valve on the gas bottle after using the grill to prevent gas from escaping in the event of a potential leak.
If the gas grill is stored in a enclosed space, the gas bottle must be disconnected from the grill. Gas bottles must be stored outdoors in a well-ventilated location which is out of the reach of children and cannot be accessed by other people. Gas bottles which have been disconnected must not be stored in buildings, garages or other enclosed spaces.
If you do not disconnect the gas bottle from the grill, the entire grill with the gas bottle must be stored outdoors in a well-ventilated location.
The fuel gas is heavier than air. Escaping fuel gas can build up in lower-level areas and will not disperse. You should therefore avoid cellar steps, light wells and drain pipes.
Nozzles, gas pipes and gas burners must be checked at regular intervals for cobwebs, insects, cocoons and other types of blockages.
Before using the grill
Correct assembly
The grill must be correctly assembled following the assembly instructions.
Do not modify any of the components. If you modify components, you could cause a fire or an explosion, which could lead to deaths, serious injuries and property damage.
Option (ALLFLAME PEER)
Before you use the ALLFLAME PEER grill, you must always check that the side tables are locked in place horizontally.
Checking for defects
Every time you use the grill, you must make sure that it is in perfect condition. Check the following points in particular:
▶ Make sure that all the parts of the grill are correctly installed.
▶ Make sure that screws and fasteners have not come loose.
Look for any visible damage to the grill components.
Any defects must be rectified before the grill is used to ensure that it remains safe and functions correctly.
You must not use the grill or its accessories if anything is damaged.
Checking for gas leaks
Every time you use the grill, you must carefully carry out all the checks for gas leaks described in this instruction manual.
Carry out a leak test every time you use the grill, even if it has been assembled by a retailer or a third party.
▶ Never check for gas leaks with a naked flame. Do not use the gas grill if one of the gas connections is leaking.
Cleaning the grease trap system

Follow the safety instructions on avoiding grease fires on page 35.
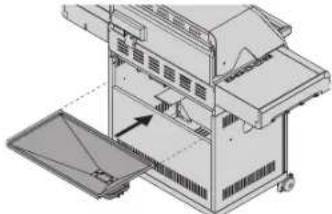

- Every time you use the gas grill, first remove any build-up of grease on all the outlets leading to the grease tray, on the removable grease funnel and in the grease tray.
- Also remove grease residues and accumulations in the grill chamber and on the burner covers, grill grates and grill plates.
- After cleaning the grease funnel, always push it back in as far as it will go.
Checking the electronic ignition

Follow the safety instructions on using batteries on page 52.
▶ Make sure that the battery is in good condition and is fitted with the correct polarity.
Some batteries have a packaging sleeve, which must be removed. Do not mistake the packaging sleeve for the battery label.
Put one AA 1.5 V battery into the battery compartment:
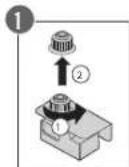
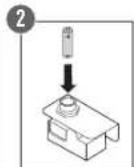


- Open the left-hand door on the front of the grill. The battery compartment for the ignition is under the grill plate.
- Open the compartment by turning the lid (1).
- Insert a battery, making sure that the polarity is correct (2).
- Close the battery compartment lid (3).
Product description
i Follow the enclosed assembly instructions to connect the battery compartment with the ignition system.

- To activate the ignition system, press the button on the right on the front of the control panel.
There is a lightning symbol on the button.
Product description

Components shown
A – Lid with glass insert
B - Warming rack
C - Crispzone
D - Side table
E - Cutlery holder
F - Castors with brakes (4x)
G – Strap to secure the gas bottle
H – Gas pressure regulator
I - Control knob for the main burners with Jet Flame ignition system
J - Control knob for the back burner/Crispzone (optional)
K - Grease drip tray (remove forwards)
L – Battery compartment for the lighting
M – Battery compartment for the ignition system
N - Ignition switch
0 – Switch for the control knob lights
P - Control knob for the Primezone
Q - Back burner
R - Primezone in the side table
S - Grease tray (remove backwards)
Positions of the control knobs

OFF position
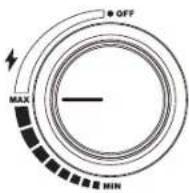
MAX position
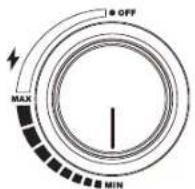
MIN position
Fold side table upwards
(before starting to use the grill)
Only the ALLFLAME PEER grill has folding side tables. Ignore this point if you have another type of grill.

Warning!
Danger of crushing in the folding mechanism and hinges!
Keep your fingers and hands away from moving parts when the table is being folded up or down.
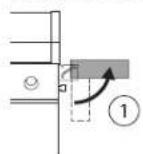


- Take hold of both sides of the side table and fold it upwards into a horizontal position (1).
- Then push the side table forwards carefully and press it downwards in the direction of the arrow (2) as far as it will go (3).
Gas connection

Follow the safety instructions on gas bottles on page 35.

Size of the gas bottle
When positioning the bottle holder, make sure that the gas bottle is the correct size.

Larger gas bottles are not permitted.
Installing the gas bottle in the cabinet
The bottle must be installed and stored upright.

Danger!
Danger of gas explosion!
Do not store any additional gas bottles in the cabinet.
- Open the cabinet.
- Insert the gas bottle into the bottle holders on the base plate.
If you are using a small gas bottle (5 kg), secure it with the strap provided. - Turn the gas bottle so that the valve is pointing towards the front of the grill.

Gas connection
Setting up the gas bottle outside the cabinet
- Open the doors of the cabinet.
- Slide the pressure regulator and the hose through the side opening in the cabinet.
- Position the gas bottle upright next to the grill.
- Make sure that the gas hose is not trapped or near hot surfaces.
- Avoid unnecessary kinks in the gas hose.
- Follow the instructions in the section "Installing the pressure regulator".
- After you have connected the gas hose/pressure regulator to the gas grill, check the connectors for leaks as described in the section "Leak tests".
Installing the pressure regulator
(depending on the design of the pressure regulator)

The pressure regulator must comply with the most recent version of the EN 16436 and EN16129 standards and the national regulations.
- Check the screw connection between the gas hose and the gas pressure regulator with an open-ended spanner and tighten it if necessary (by turning it anticlockwise).
- Remove the safety cap from the gas bottle.
- Insert the tip of the pressure regulator into the valve and turn the union nut anticlockwise by hand.
- Tighten the union nut firmly by hand. You could also use a gas regulator spanner.
Fitting the hose connector
For Germany, Austria and Switzerland (50 mbar)

- Screw the gas hose onto the multiple connector (on the right-hand side wall of the cabinet).
- Make sure that the individual connectors on the multiple connector are tight and tighten them if necessary (with two open-ended spanners).
For Belgium, Denmark, Spain, Finland, the Netherlands, Norway, Sweden, France, the United Kingdom, Ireland, Italy, and Luxembourg (30 mbar)

The 30 mbar models come with a universal adapter to connect the gas hose from the pressure regulator to the hose leading to the burner.
- Attach the universal adapter to the 1/4 " BSP external thread on the multiple connector.
- Tighten the connection. Use the second open-ended spanner to hold the connection in place.
- Use suitable hose clamps or double-ear hose clips to attach the hose to the adapter. Tighten the clips firmly.
Checking the main burners

(burners on nozzles)
- Open the grill lid.
- Lift out all the grill grates.
- Remove all the burner covers.
- Make sure that all the stainless steel main burners are correctly positioned over the appropriate nozzle of the gas valve.
- If a burner is no longer over the nozzle after the grill has been transported, for example, you must remove the burner and position it correctly (see the section "Removing the main burners" on page 50).
i Follow the instructions in reverse to replace the components.
Leak tests
The gas connections of the grill were tested for leaks in the factory. However, for safety reasons, you should check all the connections for leaks again before you start using the gas grill. The gas connections could have come loose or been damaged during transport.

For your own safety, check the gas connections every time you use the gas grill.
▶ Follow the safety instructions from page 33 onwards.
- Check that all the control knobs on the grill are in the OFF position.
- Close the gas pressure regulator following the instructions in the section "Installing the pressure regulator" on page 40.
- Open the gas bottle valve by turning it anticlockwise (at least 2 full turns).
- Check all the gas connections for leaks.
Brush all the components that conduct gas with a soap solution (approximately 50% liquid soap and 50% water). You can also use a suitable leak detection spray. If you see small bubbles, this indicates a leak.
- Fix the leak by tightening the leaky connection or hose clip if possible or replace the faulty components.
- Repeat the leak test.
- If the leak cannot be fixed, contact your specialist retailer.
▶ You must not use the grill if it has a leak.
Some leak detection sprays, including soapy water, may cause slight rusting.
▶ Clean the following connections (T to W) with water after the leak test.
Dry the connections thoroughly with a dry cloth.
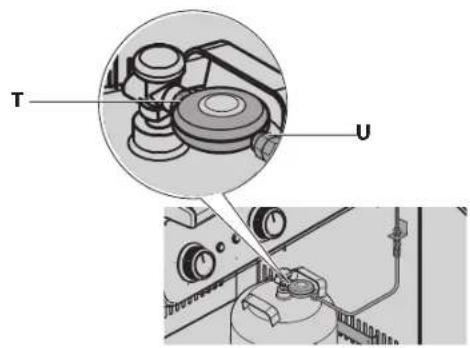
T) Connection between the pressure regulator and the gas bottle (with a union nut – the connection is on the gas bottle valve)
U) Connection between the gas hose and the pressure regulator (the connection is after the pressure regulator)

V) Both screw connections on the multiple connector (the connector is on the right-hand side wall of the cabinet)
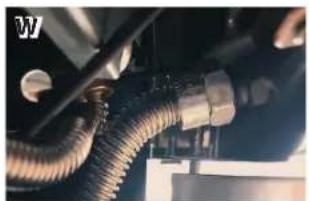
W) Connection between the corrugated hose and the valve unit (the connection is on the right-hand side under the control panel)
Carry out a visual check of the gas hose for cracks, porous areas, wear, cuts and animal bites.
▶ Also carry out a sniff test. If you can smell gas, the hose may be leaking.
If the hose is damaged, you must not use the grill.
▶ Replace the hose only with an approved replacement hose.
Installing individual components
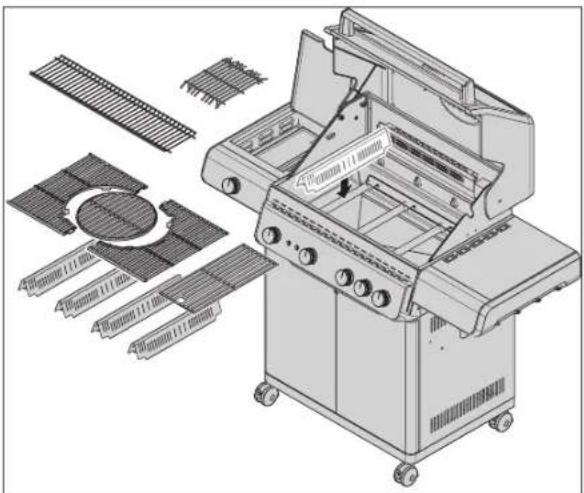
The figure shows the ALLFLAME HERO 4. The individual components may vary depending on the grill model.
- Install all the individual components, such as the burner covers, grill grates and warming rack, in the grill.
- Fit the components carefully to avoid damaging the enamel surface of the grill chamber.
Using the grill for the first time
Burning-off the gas grill

Follow the safety instructions on the danger of fire/burns/poisoning and explosions from page 5 onwards.

I – Control knob for the main burners
J - Control knob for the back burner/Crispzone (optional)
N - Ignition switch
0 - Switch for the control knob lights
P - Control knob for the Primezone
- Before burning off the grill, remove all the stickers and labels from the glass pane, the grill grates, the control knobs and other components.
If you do not do this, the stickers may melt and be difficult to remove.
- Remove the grill grates and wash them with a mild detergent.
▶ Follow the instructions in the section "Cleaning the grill grates" on page 49.
- Replace the grill grates.
▶ Follow the instructions in the section "Lighting the main burners" on page 43.
- Light all the main burners and turn them up fully with the lid closed.
Light all the additional burners (depending on the model). Leave the lids of the side tables open.
▶ Follow the instructions in the section "Lighting the main burners" on page 43.
- After a 30-minute burn-off, switch the grill off.
The gas grill will give off a slight smell when it is used for the first time. The smell is caused by the burning-off of manufacturing residues and lubricants from the production process.
Lighting the main burners

Follow the safety instructions for the main burners, the back burner and the Crispzone on page 36.
Lighting the main burners and the Crispzone with the Jet Flame ignition system
- Make sure that all the control knobs are in the OFF position.
- Open the grill lid.
- Open the gas bottle valve by turning it anticlockwise (at least 2 full turns).
- Check all the gas connections for leaks.
▶ Follow the instructions in the section “Leak tests” on page 41.
-
Push in the control knob for the burner you want to light and turn it slowly anticlockwise to the MAX position until you hear the click of the Jet Flame ignition.
-
Keep pressing the control knob for around 2 seconds after hearing the click so that the Jet Flame can light the main burner.
-
You can carry out a visual check of the ignition system. by looking from the side and from a distance away at the Jet Flame ignition area. After the ignition spark has been triggered by the control knob, the flow of gas is ignited and an ignition flame forms which lights the main burner.
-
If the main burner does not light immediately, turn the control knob back to the OFF position and wait for 2 minutes until the build-up of gas has dissipated.
▶ Repeat the ignition process.
-
Once the main burner has lit, repeat the process until all the main burners or the main burners that you want to use are lit.
-
Adjust the flame as required using the control knob.
▶ Turn the control knob anticlockwise to reach the MIN position.
-
If you do not succeed in lighting the gas grill, see the "Troubleshooting" table on page 54.
-
After you have finished cooking, press in the control knob (gas valve) for the main burner
▶ and turn it clockwise to the OFF position.
Optional when using the Crispzone
- After heating up, leave the control knob for the Crispzone and the neighbouring main burners in the MAX position.
Lighting the main burners manually
- Make sure that all the control knobs are in the OFF position.
- Open the grill lid.
-
Open the gas bottle valve by turning it anticlockwise (at least 2 full turns).
-
Check all the gas connections for leaks.
▶ Follow the section “Leak tests” on page 41.
- Press in the right-hand control knob and turn it slowly anticlockwise to the MAX position.
In some cases, the grill can only be lit using a match. Use a match that is at least 90 mm long and hold the burning match to the ignition hole on the right-hand side.
-
Once the right-hand burner has lit, the neighbouring burners can be turned on and will light automatically. Repeat the process until all the burners or the burners that you want to use are lit.
-
Adjust the flame as required using the control knob.
▶ Turn the control knob anticlockwise to reach the MIN position.
-
If you do not succeed in lighting the gas grill, see the "Troubleshooting" table on page 54.
-
After you have finished cooking, press in the control knob (gas valve) for the burner
▶ and turn it clockwise to the OFF position.
Ignition process for the Primezone infrared burner in the side table
- Open the lid of the infrared burner.
- Open the gas bottle valve by turning it anticlockwise (at least 2 full turns).
-
Check all the gas connections for leaks.
▶ Follow the section “Leak tests” on page 41. -
Press in the control knob of the infrared burner and turn it slowly anticlockwise to the MAX position.
-
Now light the Primezone by pressing the electronic ignition switch.
▶ Continue pressing the switch until the infrared burner lights and burns.
-
You can carry out a visual check of the ignition system by looking from the side and from a distance away at the ignition area of the infrared burner. After the ignition spark has been triggered by the ignition switch, the flow of gas is ignited and the infrared burner lights.
-
If the infrared burner does not light within 10 seconds, turn the control knob back to the OFF position and wait for 2 minutes until the build-up of gas has dissipated.
▶ Repeat the ignition process.
- Adjust the flame as required using the control knob.
▶ Turn the control knob anticlockwise to the MIN position.
- If you do not succeed in lighting the infrared burner, check the battery or see the "Troubleshooting" table on page 54.
- Press in the control knob (gas valve) for the infrared burner
▶ and turn it clockwise to the OFF position.
Ignition process for the back burner
▶ Following the assembly instructions, always use the back burner with all its components (splatter guard).
It may be difficult to see the flame of the back burner in sunny weather.
- Open the grill lid.
- Remove the warming rack.
- Turn the control knob to the OFF position.
- Open the valve on the gas bottle.
- Turn the control knob anticlockwise to the MAX position and at the same time press the electronic ignition to light the burner.
▶ Continue pressing the electronic ignition (for around 10 seconds) until the burner lights.
▶ Please note that the first ignition process may take slightly longer, because it takes time for the gas from the bottle to reach the burner.
- If the burner does not light, turn the control knob back to the OFF position and wait for around 1 minute until the gas build-up has dissipated.
- Repeat the ignition process.
In some cases you may need to use a match to light the burner if the electronic ignition does not produce a spark.
When making preparations, you should be aware that the rotisserie will pass through the middle of the food, so you should balance it on the grill with the help of the weight.
In the case of whole chickens or turkeys, you should tie the legs and wings to the body using butcher's string to prevent them from burning.
- Position the chicken (or other food) and the rotisserie on the grill and cook it according to the recipe.
- Put a drip tray full of liquid under the food to catch the meat juices.
- Cook the meat with the lid closed in the appropriate way for the type of meat.
Hose rupture protection
The integrated hose rupture protection in the gas pressure regulator is a small but important safety device for liquefied gas systems and gas grills. It provides protection from an uncontrolled gas leak and the resulting damage.
If a hose is damaged, comes loose or is pulled off, gas can escape. The hose rupture protection monitors the flow of gas when the grill is being used. If any damage occurs, it is detected by the hose rupture protection which shuts off the flow of gas.
Cooking with the RÖSLE grill

By-products of the cooking process, which can be chemical and toxic, can cause health problems, in particular in the case of incorrect use. These include cancer, problems during pregnancy and other harmful effects.
Preheating the grill
- Light the main burners as described in the section "Lighting the main burners".
- Turn the control knobs for the main burners to the MAX position and preheat the gas grill with the lid closed for 15 minutes or until it reaches a temperature of 250° C.
Oiling the grill grates
Before grilling, we recommend applying a thin film of oil to the grill grates, either with a brush or a spray. If you are storing the grill for a long period, you should regularly rub sunflower oil into the cast iron grill grates to protect them.
Flashback
When you cook meat over naked flames, flame flashbacks can occur, which are caused by the meat juices dripping onto the burners. These flashbacks give the meat a smoky flavour.
- Keep the flames under control to prevent the meat being burnt.
Remove excess fat from meat and poultry.
▶ Use a grill plate for very fatty meat and vegetables roasted with oil.
▶ If necessary, turn the flames down.
Primezone infrared burner
(not with PEER models)

Warning!
Danger of burns if your face, beard, hair or loose clothing comes near the flames!
▶ Never bend over the open grill!
▶ Keep at least 30 cm away when you light the Primezone.
▶ Follow the safety instructions on the danger of burns on page 34.
The infrared burner is designed to have a long service life, but some measures need to be taken to prevent the ceramic surface of the burner from cracking which could cause it to malfunction.
When using the Primezone, the gas grill should be positioned where it is sheltered from the wind, because a strong wind can effect the performance of the Primezone or blow the flames out.
▶ Do not close the side table cover while the burner is in operation or still hot.
Keep water (rain, a lawn sprinkler, a garden hose) away from the ceramic burner. Do not pour water on the burner to put out the flames. If the ceramic material gets wet, it can crack the next time the burner is used as a result of steam pressure.
▶ If the ceramic material has got wet:
1. Carefully remove the burner from the grill.
2. Turn it upside down so that the water can run out.
3. Leave it to dry thoroughly before using it again.
Avoid letting hard objects come into contact with the ceramic burner. Be particularly careful when removing and replacing the grill grate. If a hard object falls onto the ceramic burner, there is a risk that it could break.
Big temperature differences, in particular in winter, can cause stress cracks in the ceramic surface.
For the burner to function perfectly, the hot air must be able to escape from the grill. Inadequate ventilation will lead to a lack of oxygen which can cause flash-backs. If this happens repeatedly, it can damage the ceramic material. For this reason, you should never cover more than 75% of the grill grate surface.
The Primezone with the infrared burner is ideal for any food that needs to be grilled quickly, such as steaks. At a temperature of around 800°C, it produces crispy results and attractive grill marks.
▶ Preheat the infrared burner with the cover open for 5 minutes or until the ceramic burner glows an orange-red colour.
The infrared burner produces very intense heat. Do not leave food unattended on the infrared burner as it can burn quickly.
▶ Depending on your taste and how well done you want your food, grill it at a high, medium or low temperature and, if necessary, turn it frequently.
Alternatively, you can move the food from the Primezone to the main grill area or the warming rack, close the grill lid and finish cooking the food slowly at 120–160°C.
The Primezone side table is fitted with a grill grate that can be set to two different heights.
Before lighting the Primezone adjust the grill grate accordingly.
The lid of the Primezone side table can be removed by pressing the spring pin in the hinge.
The lower position is best for grilling meat. The higher position can be used like a normal gas burner and is ideal for use with saucepans and frying pans. The maximum diameter for saucepans and frying pans is 25 cm.

Grill grate: Lower position

Grill grate: Higher position
Back burner
i Only the ALLFLAME HERO 4 and HERO 6 grills have a back burner. Ignore this point if you have another type of grill.
Warning!
Danger of burns from very hot surfaces and parts!
Easily accessible parts of the gas grill can get very hot and cause burns.
▶ Follow the safety instructions on the danger of burns on page 34.
Follow the safety instructions on the back burner on page 36.
This burner is excellent for cooking joints of meat and whole chickens or turkeys slowly and evenly on the rotisserie.
For large food items, we recommend using the indirect cooking method to shorten the cooking time.
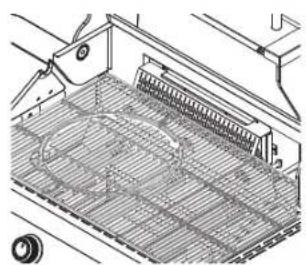
▶ Make sure that there is a fireproof drip tray of water under the food to catch the dripping fat.
▶ Check the outside of the food regularly to prevent it from burning.
Power supply

Follow the safety instructions on using batteries on page 52.
Battery compartment for the lighting
The battery compartment is on the left-hand side wall of the cabinet and can easily be removed because the back of the compartment is magnetic.
Put four AA 1.5 V batteries into the battery compartment:
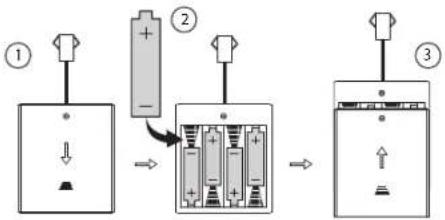
- To do this, open the left-hand door on the front of the grill.
- Open the compartment by sliding the lid (1).
- Insert the batteries, making sure that the polarity of each battery is correct (2).
- Close the battery compartment lid (3).

- To switch on the lighting, press the button on the right on the front of the control panel.
There is a light bulb symbol on the button.
When the burner is switched off in the OFF position, the control knob has a white light.
When the burner is switched on in the MAX position, the control knob has a red light.
The lighting does NOT switch off automatically!
Control knob with two different coloured lights
The lighting does not indicate that the burner has ignited and that there is a flame.
▶ Always carry out a visual check of the ignition process and the operation of the burner.
Grilling methods
Direct grilling with a closed grill lid
Direct grilling means that the high heat produced by the grill is transferred to the food from below directly rather than indirectly. Put your food on the grill grate and set all the burners to the heat specified in the recipe. Close the lid and only open it to turn the food or when you want to check the meat after the specified grilling time. You should always grill with the lid closed so that the heat is evenly distributed and the cooking process is energy-efficient.
Indirect grilling with a closed grill lid
In the case of indirect grilling, the lid is closed and only the two outer main burners are ignited.
Put a grease trip dray in the middle either under or on the grill grate and position the food over it.
This means that the food is not cooked directly, but via convection in the entire cooking area because of the closed lid. As a result, the food is cooked much more gently and also does not need to be turned.
Combining both grilling methods
In the case of particularly juicy joints of meat or steaks, you can combine both grilling methods. Firstly, you grill the meat using direct heat to produce a crispy outer crust and then you lower the temperature and finish cooking the meat indirectly on a low heat. If you occasionally brush the surface of the joint with oil or a marinade, the outside will remain crispy and the inside will be tender and juicy.
Cooking times: When is the food cooked?

Warning!
Meat that is not cooked through can cause serious health problems!
▶ Wash your hands and clean the utensils and surfaces thoroughly after handling raw meat.
▶ Make sure that the meat reaches the recommended internal temperature.
- Avoid letting raw meat come into contact with cooked meat.
Grilling is subject to wide range of influences, such as the thickness of the food, the starting temperature, the external temperature, the wind etc. If you are in any doubt, use a thermometer to check the core temperature of the meat. Do not rely on fixed cooking times. If you use a roast or steak thermometer, follow the instructions for use.
▶ A meat thermometer should stay in the meat for a few seconds before you read the temperature.
For steaks, burgers and joints of meat, put the thermometer into the side of the meat so that the tip reaches the middle. Make sure that the tip does not touch any bones.
To check the temperature of poultry, push the thermometer into the thickest part of the breast or the leg. Do not touch the bones. When the poultry has finished cooking, the breast should have a core temperature of 75° C and the leg 80° C.
▶ Take the roast joint or the poultry out of the grill around 5 minutes before it reaches the required core temperature.
Leave the meat to rest for 10 minutes before carving it, so that the juices make their way back into the middle.
The following details about cuts of meat, thickness, weight and grilling times are guidelines and are not set in stone.
▶ Grill steaks, fish fillets, chicken pieces (without bones) and vegetables using the direct method for the time specified in the table on page 21 or until the food is done to your satisfaction. Turn the food halfway through the cooking time.
▶ Grill joints of meat, pieces of poultry (with bones), whole fish and thicker cuts of meat using the indirect method for the time specified in the table. Alternatively you can use a meat thermometer that shows the required core temperature. The grilling times for beef will cook the meat until it is medium, unless otherwise specified.
The rough time guidelines are for meat from the fridge at a temperature of 7° C.
If you choose higher grill temperatures, we recommend only brushing marinade on the meat in the last 15 to 20 minutes of the cooking time to prevent the meat from browning too much or burning.

You will find a table of cooking times on the last page of the instruction manual. Cut this out and keep it near the grill so that you always have the cooking times ready to hand.
Simple steps for professional grilling
Read the recipe and follow the specific instructions.
Do not attempt to save time by putting the food on the grill too early when the grill has not yet reached the correct temperature.
▶ Use a grill spatula or tongs, but not a fork. Meat juices and aroma will escape which will allow the meat to dry out.
▶ Check whether the food fits on the grill before closing the lid. The ideal distance between the individual pieces of food is 2 cm.
Do not open the lid too often to look at the food. Every time you lift the lid, heat is lost.
If you keep the lid closed, you reduce the cooking time and achieve better results.
▶ Only turn the food once or as specified in the recipe.
▶ Never press food such as burgers flat. This squeezes out the meat juices and the food will dry out.
▶ Wash your hands and your utensils thoroughly with hot water and washing-up liquid before and after handling raw meat, fish or poultry. Instead, you can wear disposable gloves.
▶ Never put cooked food on a surface where you have previously put raw food.
▶ Do not defrost food at room temperature, but in the fridge.
After using the grill
▶ Follow the safety instructions on the dangers of very hot surfaces on page 34.
Leave your gas grill lit for 5 minutes after you have finished grilling to burn away excess fat and residues. Otherwise the burner openings could become blocked.
▶ A burn-off is not necessary and is not suitable as a cleaning process.
▶ After you have finished cooking, press in all the control knobs (gas valve) and turn them clockwise to the OFF position “●”.
▶ Let the grill cool down completely.
▶ Follow all the instructions on cleaning and storage in the next section.
▶ Follow the instructions in the section “Safety instructions on storage”.
Maintenance, cleaning and storage

Warning!
Danger of burns from hot surfaces!
▶ Make sure that the grill has cooled down completely before starting to clean it.
▶ Follow the safety instructions on the dangers of very hot surfaces on page 34.
Cleaning the glass pane
▶ Make sure that the grill has cooled down completely and put it in a cooler location (out of direct sunlight).
- Remove the thermometer, if there is one, to make it easier to clean the glass pane.
▶ Cover the inside of the glass with oven cleaner. If necessary, follow the instructions of the cleaning product manufacturer. - Cover the entire glass pane with clingfilm so that the cleaner does not dry out.
- Leave the cleaner to take effect for several hours or overnight.
- Remove the clingfilm.
- Rinse the glass pane with clean water.
- Refit the thermometer, but only tighten the screw until it is hand-tight.
▶ Do not let water or cleaning products get into the openings of the burners.
Cleaning the outer surfaces of the grill
▶ Only use a mild detergent and water.
▶ Rinse thoroughly with clean water.
Dry the surfaces afterwards.
Cleaning the grill chamber
Use oven cleaner or a suitable grill cleaner. (Follow the manufacturer's instructions.)
▶ Rinse thoroughly with clean water.
Dry the surfaces afterwards.
Do not let water or cleaning products get into the openings of the burners or nozzles.
Cleaning the grill grates
▶ Depending on the type of grill grate, remove deposits with a suitable grill cleaning brush.
▶ Wipe the grill grates with a damp cloth.
Cleaning surfaces
- Make sure that the grill has cooled down completely.
- If necessary, follow the instructions of the cleaning product manufacturer.
- Before giving the grill a thorough clean, remove all the grill grates, burner covers and burners.
- Clean the housing with a mild detergent and water.
- Rinse the surfaces thoroughly with clean water and dry them.
- After giving the grill a thorough clean, always dry it off by heating it up.
Do not use abrasive stainless steel polish, oven cleaner, abrasive cleaning products (kitchen cleaner), acidic cleaning products, lactic acid cleaner or scouring pads to clean the outer surfaces of the grill.
▶ Use a mild detergent and water.
▶ Do not let water or cleaning products get into the openings of the burners.
You can easily remove deposits on the grill grates with the RÖSLE barbecue cleaning brush.
Cleaning enamelled grill grates
▶ Do not use sharp, pointed tools to clean the grill grates and the grill chamber.
Do not put cast iron parts in the dishwasher.
Leave all the parts to cool off before cleaning them to avoid getting burnt or causing a thermal shock which can damage enamel and the cast iron.
▶ Soften food that has burnt on by soaking the parts in hot water and immediately afterwards clean all the surfaces gently. Do not use steel wool, a steel brush or abrasive cleaning products, as these would remove the enamel coating.
- Rinse the cast iron parts thoroughly with clean water afterwards.
Dry all the parts thoroughly.
▶ Never store the cast iron parts when they are wet.
▶ After cleaning the cast iron parts, rub them with neutral, heat-resistant cooking oil. Do not use olive oil!
▶ Rub off excess oil with a cotton cloth.
Cleaning the grease funnel and the grease drip tray
You must clean the grease funnel and the grease drip tray regularly to prevent the risk of a grease fire caused by the build-up of grease and oil.
- Remove the grease funnel and the grease drip tray.
- Remove any excess fat and clean the grease funnel and the grease drip tray with hot soapy water. Afterwards, rinse them with clean water.
- Never line the grill chamber or the grease drip tray with aluminium foil or sand.
Cleaning the main burners
The burners can become blocked with excess grease, meat juices and marinades, particularly after a long period of grilling, and the surface of the burners can start to become corroded.
- Remove the burners. See the instructions below.
- Clean the burners with hot water and detergent.
- Make sure that the burner openings are not blocked.
- Rinse the burners with clean water, dry them and replace them.
- Light the burners to prevent corrosion.
- Apply a thin coating of oil to the burners if the gas grill is not going to be used for a long period.
Removing the main burners
Make sure that:
- The gas grill has cooled down
- All the control knobs are in the OFF position
- The gas bottle is closed.
-
After refitting all the stainless steel main burners (X), make sure that they are correctly positioned over the appropriate nozzle of the gas valve (Y).
-
Turn off the gas supply on the gas bottle.
- Lift the grill grates and the burner covers out.
- Undo the fixing clip (Z) at the back edge of the main burner (inside).
- Push the main burner at the back to the right and then towards the valve.
- Now lift the main burner at the back slightly and pull it away from the valve.
- Clean each burner as described in the section "Cleaning the main burners" on page 33.

Make sure that the burner opening is over the nozzle!
Follow the instructions in reverse to replace the burners.
Over the winter
During the winter months, store the gas grill and the grill grates in a dry, enclosed and well-ventilated space.
Clean the grill grates.
- Rub the grill grates with sunflower oil to prevent rust.
▶ Regularly oil the metal parts (for example hinges).
Remove all 5 batteries from the battery compartments. It is essential to follow the safety instructions in the section "Using batteries".
Using the gas grill after it has been in storage
When you start using the gas grill again at the start of the barbecuing season, after the winter or after a long period of not using it, follow these steps:
Read the instruction manual again for your own safety.
▶ Check on www.roesle.com to see if there is an updated version of your instruction manual.
Carefully follow the steps in the section "Before using the grill".
▶ Check that all the burners are in the correct position (see the section "Removing the main burners").
▶ Make sure that all the grill grates and grill plates are clean.
▶ Check and clean the valve nozzles at the base of the valve.
▶ Check the gas hose carefully for cracks, kinks, bite marks and other damage.
▶ You must replace the gas hose immediately if it is damaged.
▶ Check all the gas valve openings, burner tubes and connections for problems.
It is essential to check that all the components that conduct gas are properly tightened.
▶ Check the level of gas in the gas bottle.
▶ Turn all the control knobs to the OFF position and connect the gas bottle.
▶ Check the valve and ignition area for spiders and other insects, which often make their home in this here and block the flow of gas.
Carry out additional checks and cleaning if one of the following symptoms occurs:
- A smell of gas and bright yellow, weak flames.
- The grill does not come up to temperature.
- The grill heats unevenly.
- One or more burners does not light.
Tips on extending the life the grill
With outdoor equipment made of steel, a little rust on the surface must be expected from time to time. If your grill is always covered, clean and dry, you have already done a great deal to prevent rust.
If you follow these tips, you will enjoy your RÖSLE gas grill for years to come:
▶ Check the gas grill for leaks every time you use it with a soap solution or a leak detection spray.
The grill surfaces (including the burner covers) should be kept clean and dry after grilling – especially after grilling with marinades, which contain salt and will corrode the surface.
The surfaces of the grill grates should be rubbed with oil after use.
Do not leave your grill outside and unprotected. After the grill has cooled down completely, you must put the appropriate RÖSLE cover over it to provide it with temporary protection from rain and snow. Do not store the grill near road salt.
To prevent moisture from building up, remove the cover regularly both in summer and in winter, to air the grill and allow moisture to escape.
Dry the grill carefully before storing it.
▶ With outdoor equipment made of steel, a little rust on the surface must be expected from time to time.
Light surface rust can be easily removed with a rag soaked in vinegar essence or with a commercial rust remover. Follow the instructions of the cleaning product manufacturer.
If the enamel has flaked off, you should use touch-up paint to cover the bare metal and prevent rust.
▶ Regularly check that the screw connections are tight and that the wheels are correctly fitted and move easily.
Disposal

Warning!
Danger of suffocation from packaging material!
▶ Keep plastic film and other packaging material out of the reach of children.

Your new grill has been protected by the packaging on its way to you. All the packaging materials used are environmentally friendly and recyclable. Dispose of the packaging in a way that does not harm the environment. For information on current disposal methods, please contact your dealer or your local authority waste disposal facility.

In Germany, private owners of old appliances can return them free of charge to the collection points of the public waste management authorities or to the take-back points set up by manufacturers or distributors as defined by the German Electrical and Electronic Equipment Act (ElektroG).
Using batteries

Danger!
Danger of batteries exploding!
▶ Make sure that the batteries are inserted correctly.
▶ Do not expose the batteries to extreme conditions.
▶ Batteries must not be modified or dismantled.
▶ Keep the batteries away from heat sources.
▶ Avoid naked flames and heat above 100° C.
▶ Do not leave batteries in direct sunlight.

Warning!
Danger of chemical burns from leaky batteries!
▶ Wear safely gloves to remove leaky batteries.
▶ Avoid touching the liquid that has leaked out.
▶ Clean the battery compartment with a dry cloth.
Disposing of the batteries
Batteries can contain toxic substances that are harmful to health and the environment. Batteries are subject to the EU Battery Directive 2006/66/EC. They must not be disposed of with normal household waste. Used batteries can contain substances that are harmful to health and the environment.
Please find out about the regulations in your local area for the separate disposal of batteries. By disposing of them correctly, you can protect people and the environment from possible negative consequences.

You will find this symbol on batteries that contain harmful substances.
Please return the batteries to the retailer or hand them in at a local authority recycling facility. You can return them free of charge. This is required by law.
Only put flat batteries in the containers provided.
All the batteries are recycled to recover valuable raw materials such as iron, zinc and nickel. Recycling batteries is an important contribution to protecting the environment. You can get more information about the environmentally friendly disposal of batteries from your local authority.
Warranty
This item is covered by the statutory warranty. The warranty covers defects in the item that are caused by a material or manufacturing fault. The statutory warranty begins from the date on the invoice/purchase receipt. Keep these somewhere safe so that you have proof of the date.
No liability is accepted for damage to RÖSLE products which is due to the following causes:
▶ defects in the item caused by transport damage that is not our responsibility
▶ defects resulting from inappropriate, improper or negligent use
▶ all parts that are subject to natural or normal wear
▶ common signs of use
▶ a fire caused by grease and oil residues
▶ defects caused by weathering or by chemical, physical, electrochemical or electrical influences
▶ defects caused by a failure to comply with the regulations and manufacturer's instructions on the handling, maintenance, cleaning and care of the item
repairs that have not been properly carried out
the installation of spare parts and accessories that do not correspond with the original design
If you have any questions or complaints, please contact the dealer that you purchased your product from.
Keep this instruction manual somewhere where you can easily refer to it.
Service and contact details
If you have questions or suggestions, please use our contact form in the service area of our website www.roesle.com.
RÖSLE GmbH & Co. KG
Declaration of Conformity
We hereby declare that this product complies with the statutory requirements of Regulation (EU) 2016/426 and Directive 2014/30/EU (EMC).


Troubleshooting
| Problem Solution | |
| No ignition, no flames, burner fault | ▸ Check whether the valve on the gas bottle is open.▸ Make sure that there is enough gas in the bottle.▸ Is the gas hose kinked? Straighten the hose.▸ Check whether the sparks are jumping from the electrode to the burner.▸ Can you light the burner with a long match? Check the ignition system. |
| The grill is not functioning correctly | STOP! Turn off the gas bottle and turn all the valves to the OFF position.DO NOT smoke!▸ Check all the gas connections.▸ Wait for 2 minutes until the build-up of gas has dissipated and try igniting the grill again. |
| ▸ The burners are not correctly fitted over the outlets. Position the burners exactly over the outlets.▸ The gas hose is blocked.Remove the gas hose from the gas grill. Turn the gas bottle on just for a second to remove a potential blockage in the hose. After a second, turn the gas bottle off again and refit the gas hose to the gas grill.▸ Blocked outlets:Remove the burners as described above. Check the gas valve openings and remove any residues that may be causing a blockage with a thin metal wire. Replace the burners over the outlets and test to see whether they now function perfectly.▸ Check the burners regularly to make sure that they are free from insects and spiders that could block the gas system or reduce the flow of gas. Make sure that you clean the venturi tubes of the burners carefully to remove all blockages. We recommend using a pipe brush to clean the tubes. | |
| No sparks form | ▸ The distance between the burner and the electrode must be only 5–8 mm.▸ If necessary, clean and adjust the electrode. |
| Irregular flames from the burners | Have you cleaned the burners? Clean the burners and remove all residues. Do not let water or cleaning products get into the openings of the burners. |
| Jets of flame occur | ▸ You may not have preheated the grill properly. Preheat the grill for around 15 minutes using all the burners.▸ Clean the grill grates, grease drip tray etc. to remove all grease residues. |
| Food sticks to the grill grates | The grill temperature is too low. Wait a few minutes before you turn the food so that it has time to brown properly. |
| Leaks ▶ Turn the gas bottle off. | ▸ Ventilate the area so that the build-up of gas can dissipate completely.▸ Check all the gas connections.▸ If there is a leak in the gas bottle, take it out of the cabinet and stand it upright in an open space.▸ Keep away from any gas or liquefied gas that is escaping from the gas bottle.▸ Keep the gas bottle at least 20 metres away from ignition sources, electrical equipment, flash lights, machines and engines.▸ Make sure that the air circulation is as good as possible so that the build-up of gas dissipates. |
| The Primezone (optional) “flashes” when it is in use. The burner makes a loud “whoosh” noise followed by continuous hissing and then stops burning. | ► The ceramic surface is covered with too much grease and deposits. The connections are blocked. The burners are overheating because of inadequate ventilation (the grill surface is almost completely covered with frying pans or saucepans).► Cracks or splits in the ceramic surface.► The seal of the ceramic surface is leaking.Turn off the burners and leave them to cool down for at least 2 minutes. Relight the burners and run them on a high heat for at least 5 minutes or until the ceramic surfaces are glowing evenly.Make sure that no more than 75% of the grill surface is covered with pans or accessories. Turn off the burners and leave them to cool down for at least 2 minutes, then relight them.Leave the burners to cool down and check them carefully for cracks. If you find any cracks, contact an authorised retailer to obtain a replacement Primezone. |
| A problem not listed here | Contact your specialist retailer. |
| Danger! | Do not line the grease funnel with aluminium foil!Is the grease funnel so dirty that grease cannot run down into the grease tray? If so, clean the grease funnel! |
| Grill fire | ► If a fire occurs in the grill, turn off the gas bottle.► If the gas bottle is burning or if you cannot reach the valve and turn it off, call the fire serviceimmediately!► Aim a garden hose at the middle of the gas bottle to cool it down, but never attempt to put out the flames with water. While the gas is burning, it cannot form puddles and explode.► Evacuate the area.Note:Most of the fires that occur in gas grills are caused by a build-up of grease and oil or by a failure to check the gas connections regularly and correctly. Remember this and follow the manufacturer's instructions about cleaning the grill and checking the gas connections.InsectsSpiders and other insects can occasionally make webs or nests in the burner pipes. This can block the flow of gas and cause a fire. This is known as a flashback. It can cause serious damage to the gas grill and put people and the surroundings of the grill at risk. We recommend checking and cleaning the burner pipes regularly. |
| A smell of gas Danger! | Escaping gas can cause a fire or an explosion.Regularly check all the connections and seals for leaks.► Immediately turn off the gas supply on the gas bottle.► Extinguish all naked flames and turn the control knobs to the OFF position.► Open the grill lid.► If possible, move the grill away from buildings and flammable objects.► Keep a safe distance from the grill and if you can still smell gas, notify the fire service immediately. |

Technical data
| Model ALLFLAME PEER 3 | ALLFLAME PRIME 4 ALLFLAME HERO 4 ALLFLAME HERO 6 | |||
| Colour Matt black | ||||
| Equipment | ||||
| Fire bowl Cast aluminium side parts and a porcelain enamel coating | ||||
| Primezone Left-hand side table | ||||
| Lid thermometer 60°-350°C (±10°C) | ||||
| Main grill grate VARIO+ | ||||
| Primezone grill grate Stainless steel | ||||
| Heat distributor Stainless steel | ||||
| Grease drip tray Stainless steel | ||||
| Wheels Castors with brakes | ||||
| Grill area | ||||
| Grill area in cm 60 x 45 | 70 x 45 | 92.5 x 45 | ||
| Warming area in cm | 60 x 16 | 70 x 16 | 92.5 x 16 | |
| Dimensions and weight | ||||
| Width in cm | 127 | 138 | 157 | |
| Depth in cm | 61 | 62 | ||
| Height with lid closed in cm | 118 | |||
| Working height of grill grate in cm | 90 | |||
| Approximate weight in kg | 46 | 51 | 63 | |
| Country code | DE, AT, CH | |||
| Article number | 251051 | 251052 | 251053 | 251054 |
| Category | I3B/P(50) | |||
| Gas type | Butane (G30)/propane (G31): 50 mbar | |||
| Main burner nozzle in mm | 0.81 | |||
| Crispzone nozzle in mm | 0.75 | |||
| Primezone nozzle in mm | 0.86 | |||
| Back burner nozzle in mm | 0.75 | |||
| Country code | BE, DK, ES, FI, NL, NO, SE, FR, GB, IE, IT, LU | |||
| Article number | 251055 | 251056 | 251057 | 251058 |
| Category | I3B/P(30) | |||
| Gas type | Butane (G30)/propane (G31): 30 mbar | |||
| Main burner nozzle in mm | 0.92 | |||
| Crispzone nozzle in mm | 0.88 | |||
| Primezone nozzle in mm | 0.98 | |||
| Back burner nozzle in mm | 0.88 | |||
| Burner unit | ||||
| CE | 2575-24 | |||
| Number of burners | 3 | 4 | 6 | |
| Model ALLFLAME PEER 3 | ALLFLAME PRIME 4 ALLFLAME HERO 4 ALLFLAME | HERO 6 | ||
| Back burner power in kW | 3.0 | |||
| Crispzone power in kW 3.0 | ||||
| Primezone power in kW 4.0 | ||||
| Main burner power in kW | 3 x 3.5 4 x 3.5 | 6 x 3.5 | ||
| Total power in kW 17 20.5 | 27.5 | |||
| Total consumption in g/h | 13.5 | 18 | 21 | 28 |
| Main burner ignition system | Piezo ignition, Jetflame | |||
| Primezone/back burner ignition system | Electronic ignition | |||
| Max. filling weight of the gas bottle in kg | 11 | |||
| LED lighting battery | 4 x AA R6 1.5V DC | |||
| Primezone/back burner ignition battery | 1 x AA R6 1.5V DC | |||
Subject to technical changes. Errors and omissions excepted.
The measurements are approximate figures.


Cooking times
| Food Thickness/weight Grilling time Temperature | |||
| Beef | |||
| Steak: New York, porterhouse, rib-eye, T-bone or fillet | 2 cm thick 4–6 minutes over direct high heat | ||
| 4 cm thick 10–14 minutes over direct high heat | |||
| 4 cm thick 6–8 minutes sear and then grill over indirect high heat for 8–10 minutes | |||
| 5 cm thick 14–18 minutes over direct high heat | |||
| 5 cm thick 6–8 minutes sear and then grill over high heat for 8–10 minutes | |||
| Flank steak 500g to 700g, | 2 cm thick | 8–10 minutes over direct high heat | |
| Pork | |||
| Chops, with or without bones 2 cm thick 6–8 | minutes over direct high heat | ||
| 2.5 cm thick 8–10 minutes over direct medium heat | |||
| Loin chops, suckling pig 0.45 kg–0.90 kg 3–4 minutes over direct low heat | |||
| Ribs, spare ribs 0.9 kg–1.35 kg 3–6 minutes over direct low heat | |||
| Country-style ribs 1.36 kg–1.81 kg 1.5–2 hours over direct medium heat | |||
| Poultry | |||
| Skinless, boneless chicken breast | 170 g–230 g | 8–12 minutes | over direct medium heat |
| Skinless, boneless chicken thighs | 120 g | 8–10 minutes | over direct high heat |
| Bone-in chicken breast | 280 g–350 g | 30–40 minutes over medium heat | |
| Bone-in chicken thighs | 30–40 minutes over medium heat | ||
| Chicken wings | 50 g–80 g | 18–20 minutes over direct medium heat | |
| Whole chicken | 1.2 kg–1.8 kg 45–90 minutes over medium heat | ||
| Whole turkey, not stuffed | 4.5 kg–5.5 kg | 2.5–3.5 hours | over low heat |
| 5.5 kg–7.0 kg 3.5–4.5 hours over low heat | |||
| Fish and seafood | |||
| Fish fillets or slices | per 1 cm | 3–5 minutes over direct high heat | |
| per 2.5 cm | 8–10 minutes over direct high heat | ||
| Whole fish | 500 g | 15–20 minutes over medium heat | |
| 1.5 kg | 30–45 minutes over medium heat | ||
| Vegetables | |||
| Corn on the cob | 10–15 minutes over direct medium heat | ||
| Mushrooms:Shiitake or button/portobello mushrooms | 8–10 minutes over direct high heat | ||
| 10–15 minutes over direct high heat | |||
| Onions: halved/sliced | 1.0 cm thick 8–10 minutes | 35–40 minutes | over direct medium heat/over medium heat |
| Potatoes Whole/in slices | 1.0 cm thick 12–14 minutes | 45–60 minutes | over direct medium heat/over medium heat |


Cooking times


RÖSLE GmbH & Co. KG


- OPTIONAL (ALLFLAME PEER)
- GASANSCHLUSS
- CONTENTS
- INTRODUCTION
- ABOUT THIS MANUAL
- USING THE GAS GRILL CORRECTLY
- IMPORTANT SAFETY INSTRUCTIONS
- DANGER
- DANGER OF CARBON MONOXIDE POISONING
- WHAT TO DO IF YOU INHALE GAS
- DANGER OF FIRE AND EXPLOSION
- WHAT TO DO IN THE EVENT OF A FIRE
- DANGER OF BURNS FROM VERY HOT SURFACES AND PARTS
- WHAT TO DO IN THE EVENT OF BURNS
- WARNING
- DANGER OF INJURIES CAUSED BY THE GRILL TIPPING OVER
- DANGER OF INJURIES CAUSED BY INCORRECT USE
- CAUTION
- DANGER OF A MALFUNCTION
- DANGER OF THE GRILL OR PARTS OF IT BEING DAMAGED OR DEFORMED
- GENERAL SAFETY INSTRUCTIONS
- SAFETY INSTRUCTIONS ON AVOIDING GREASE FIRES
- WHAT TO DO IN THE EVENT OF A GREASE FIRE
- SAFETY INSTRUCTIONS FOR GAS HOSES
- SAFETY INSTRUCTIONS FOR THE GAS PRESSURE REGULATOR
- SAFETY INSTRUCTIONS FOR THE GAS BOTTLE
- SAFETY INSTRUCTIONS FOR THE MAIN BURNERS, THE BACK BURNER AND THE CRISPZONE
- BEFORE USING THE GRILL
- CORRECT ASSEMBLY
- OPTION (ALLFLAME PEER)
- CHECKING FOR DEFECTS
- CHECKING FOR GAS LEAKS
- CLEANING THE GREASE TRAP SYSTEM
- CHECKING THE ELECTRONIC IGNITION
- PRODUCT DESCRIPTION
- COMPONENTS SHOWN
- POSITIONS OF THE CONTROL KNOBS
- FOLD SIDE TABLE UPWARDS
- DANGER OF CRUSHING IN THE FOLDING MECHANISM AND HINGES
- GAS CONNECTION
- SIZE OF THE GAS BOTTLE
- INSTALLING THE GAS BOTTLE IN THE CABINET
- DANGER OF GAS EXPLOSION
- SETTING UP THE GAS BOTTLE OUTSIDE THE CABINET
- INSTALLING THE PRESSURE REGULATOR
- THE PRESSURE REGULATOR MUST COMPLY WITH THE MOST RECENT VERSION OF THE EN 16436 AND EN16129 STANDARDS AND THE NATIONAL REGULATIONS
- FITTING THE HOSE CONNECTOR
- CHECKING THE MAIN BURNERS
- LEAK TESTS
- FOR YOUR OWN SAFETY, CHECK THE GAS CONNECTIONS EVERY TIME YOU USE THE GAS GRILL
- USING THE GRILL FOR THE FIRST TIME
- LIGHTING THE MAIN BURNERS
- FOLLOW THE SAFETY INSTRUCTIONS FOR THE MAIN BURNERS, THE BACK BURNER AND THE CRISPZONE ON PAGE 36
- LIGHTING THE MAIN BURNERS AND THE CRISPZONE WITH THE JET FLAME IGNITION SYSTEM
- OPTIONAL WHEN USING THE CRISPZONE
- LIGHTING THE MAIN BURNERS MANUALLY
- IGNITION PROCESS FOR THE PRIMEZONE INFRARED BURNER IN THE SIDE TABLE
- IGNITION PROCESS FOR THE BACK BURNER
- HOSE RUPTURE PROTECTION
- COOKING WITH THE RÖSLE GRILL
- PREHEATING THE GRILL
- OILING THE GRILL GRATES
- FLASHBACK
- PRIMEZONE INFRARED BURNER
- BACK BURNER
- POWER SUPPLY
- BATTERY COMPARTMENT FOR THE LIGHTING
- CONTROL KNOB WITH TWO DIFFERENT COLOURED LIGHTS
- GRILLING METHODS
- DIRECT GRILLING WITH A CLOSED GRILL LID
- INDIRECT GRILLING WITH A CLOSED GRILL LID
- COMBINING BOTH GRILLING METHODS
- COOKING TIMES: WHEN IS THE FOOD COOKED
- MEAT THAT IS NOT COOKED THROUGH CAN CAUSE SERIOUS HEALTH PROBLEMS
- SIMPLE STEPS FOR PROFESSIONAL GRILLING
- AFTER USING THE GRILL
- MAINTENANCE, CLEANING AND STORAGE
- DANGER OF BURNS FROM HOT SURFACES
- CLEANING THE GLASS PANE
- CLEANING THE OUTER SURFACES OF THE GRILL
- CLEANING THE GRILL CHAMBER
- CLEANING THE GRILL GRATES
- CLEANING SURFACES
- CLEANING ENAMELLED GRILL GRATES
- CLEANING THE GREASE FUNNEL AND THE GREASE DRIP TRAY
- CLEANING THE MAIN BURNERS
- REMOVING THE MAIN BURNERS
- OVER THE WINTER
- USING THE GAS GRILL AFTER IT HAS BEEN IN STORAGE
- TIPS ON EXTENDING THE LIFE THE GRILL
- DISPOSAL
- DANGER OF SUFFOCATION FROM PACKAGING MATERIAL
- USING BATTERIES
- DANGER OF BATTERIES EXPLODING
- DANGER OF CHEMICAL BURNS FROM LEAKY BATTERIES
- DISPOSING OF THE BATTERIES
- WARRANTY
- SERVICE AND CONTACT DETAILS
- DECLARATION OF CONFORMITY
- RÖSLE GMBH & CO. KG
Brand : Roesle
Model : ALLFLAME HERO 6
Category : Barbecue