
SFF6170DW - Multifunction Printer PHILIPS - Free user manual and instructions
Find the device manual for free SFF6170DW PHILIPS in PDF.


| Product Type | Monochrome laser multifunction printer |
| Brand | Philips |
| Model | SFF6170DW |
| Dimensions (W x D x H) | Approx. 410 x 400 x 310 mm |
| Weight | Approx. 12 kg |
| Power Supply | 220-240 V, 50/60 Hz |
| Main Functions | Print, copy, scan, fax |
| Supported Paper Sizes | A4, A5, B5 (JIS), Letter, Legal (13/14"), Exec, Custom |
| Data Compression | MH, MR, MMR, JBIG |
| Print Speed | Up to 22 ppm (A4) |
| Print Resolution | Up to 1200 x 1200 dpi |
| Paper Tray Capacity | 250 sheets |
| Connectivity | Ethernet 10/100 Base-TX, USB 2.0, Wi-Fi (802.11b/g/n) |
| Supported Operating Systems | Windows 2000 SP4, XP, Vista, 7, Server 2003/2008, Mac OS 10.4-10.6, Linux (Redhat, Debian, Suse, Fedora, Ubuntu) |
| Monthly Duty Cycle | Up to 15,000 pages |
| Toner Capacity | Standard cartridge: approx. 2,000 pages |
| Maintenance and Cleaning | Clean the exterior with a soft dry cloth. Use the cleaning mode in the menu. |
| Safety | CE compliance, auto-off after inactivity |
| Spare Parts and Repairability | Toner cartridge and drum available separately. Repairability index: 6.5/10 (estimated) |
| General Information | Manufactured by Sagemcom for Philips. Manual available in French and English. |
Frequently Asked Questions - SFF6170DW PHILIPS
User questions about SFF6170DW PHILIPS
0 question about this device. Answer the ones you know or ask your own.
Ask a new question about this device
Download the instructions for your Multifunction Printer in PDF format for free! Find your manual SFF6170DW - PHILIPS and take your electronic device back in hand. On this page are published all the documents necessary for the use of your device. SFF6170DW by PHILIPS.
USER MANUAL SFF6170DW PHILIPS
natural_image
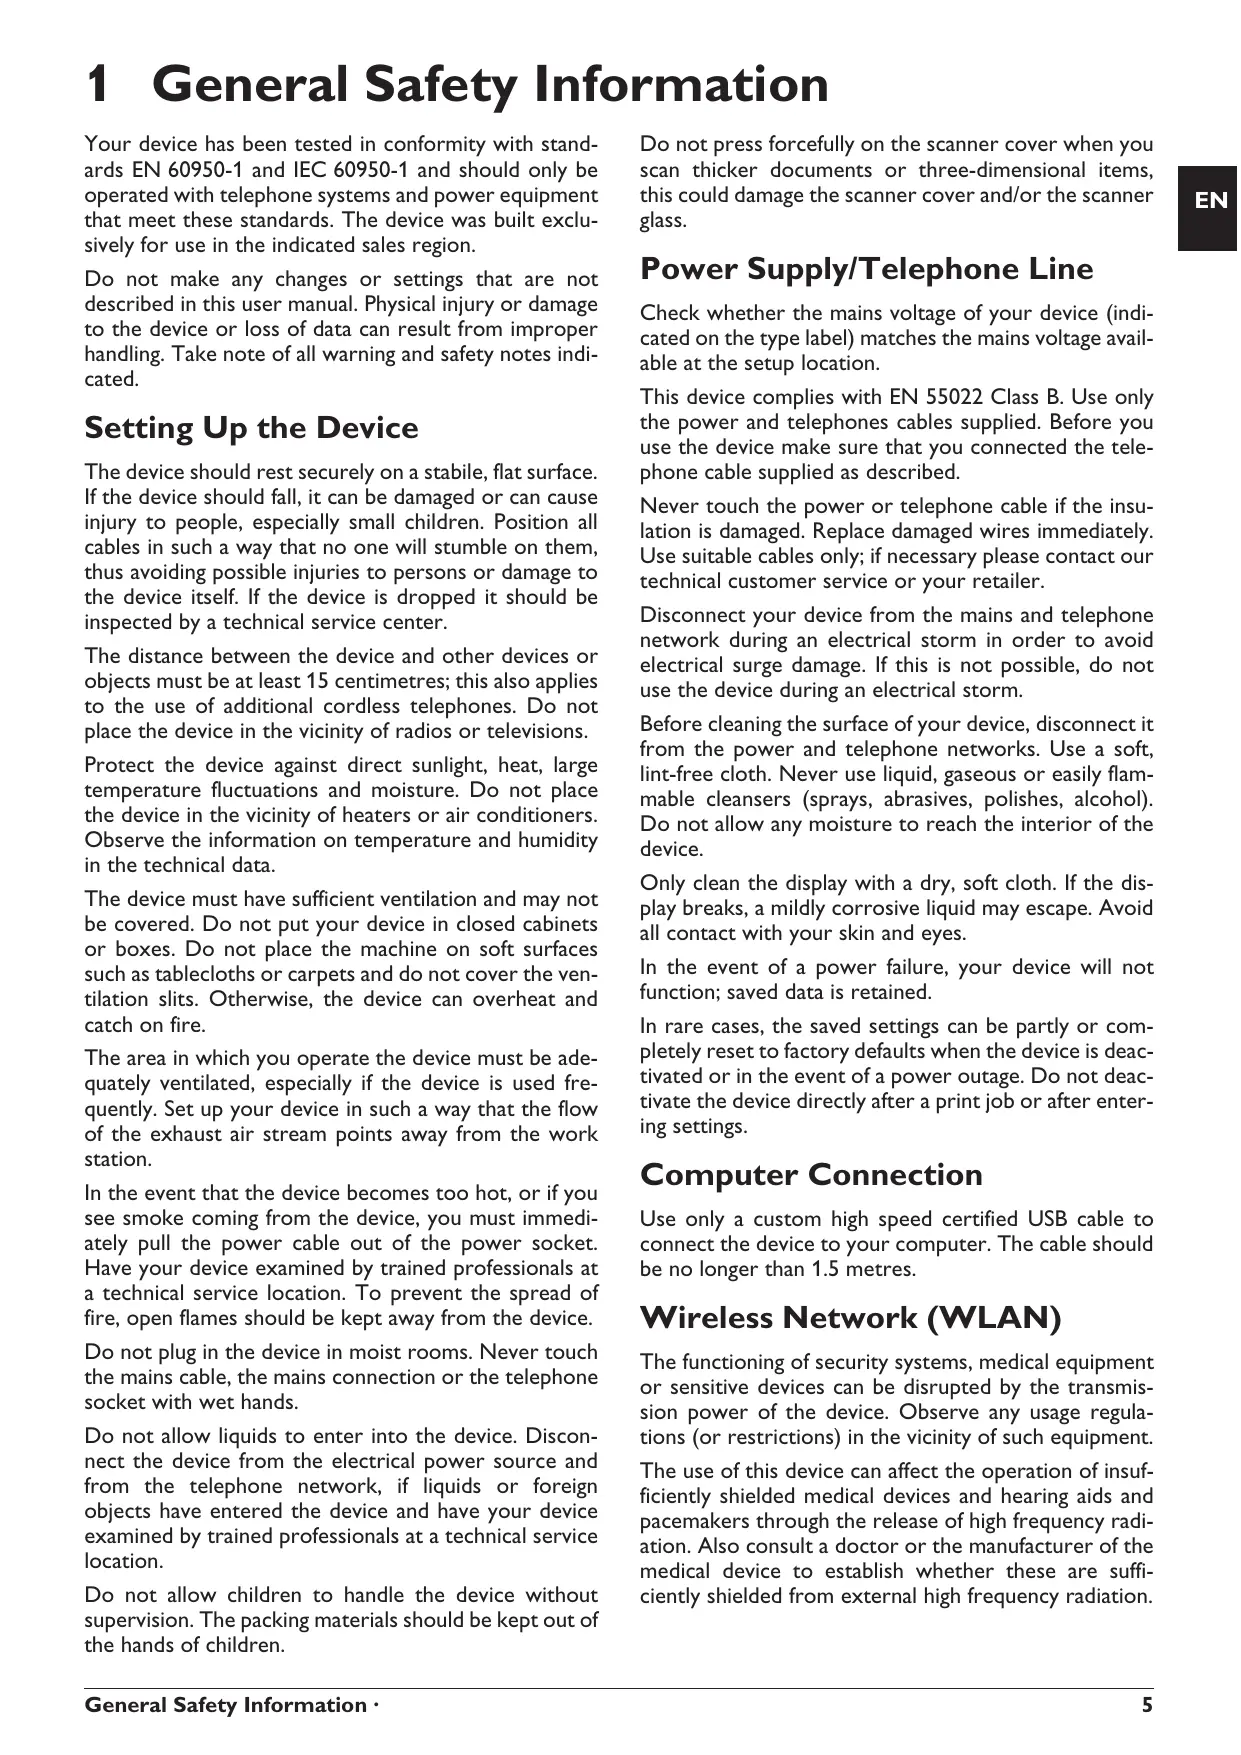
Exterior view of a Philips printer with control panel and paper feed (no visible text or symbols)SFF 6170dw
Register your product and get support at
www.philips.com/welcome
EN User Manual
Introduction
Dear Customer
With the purchase of this device, you have chosen a quality PHILIPS product brand. Their device fulfils the most varied requirements for private use or in your office and business everyday.
You use the power and toner saving functions to save electricity and toner, by switching the device to power saving mode or printing in toner saving mode. Use the ECO- button to make toner saving copies quickly and simply.
For printing purposes, your device utilises the most up-to-date laser printing technology. A starter cartridge is provided with the device. This starter cartridge is already installed; however you must remove the packaging used for transportation before you can use the device.
You can insert a supply of paper into the paper tray of up to 250 sheets. You can insert special paper formats, envelopes, slides, sheets of labels or printed documents into the manual paper feed.
The device is equipped with an automatic document feeder. Up to 50 Documents can be feed automatically into the machine to be scanned, faxed or copied. You can scan single documents or smaller templates using the flatbed scanner.
Your device has the image and text enhancement function Crystal with which you achieve optimal printing and copying quality for your documents.
Using the business card copy, you can copy both sides of a small document (for example of a business card) onto one page
Your device prints a weekly overview as a calendar page for you – for the current week, the coming week or a freely selectable week.
If you want, your device can print Sudoku puzzles in four different difficulty levels with solution.
In the telephone book of your device, you can save entries with multiple numbers and collect multiple entries into groups. You can assign various ring tones to the entries.
You have many functions available to you for fax transmission, for example, different resolutions or the timer function. You can secure your fax reception with a code. In that case, incoming faxes are not printed out, but rather are stored in the fax memory. With the fax polling function, you can retrieve faxes that lie ready in the dialled device.
The device prints the date and the exact arrival time on every incoming fax received. This allows you to document the exact time at which you have received a fax transmission. A memory buffer in the device ensures that the correct date and time of reception will be maintained even after a power loss.
With fax reception onto a USB storage medium, the device saves incoming faxes onto a connected USB storage medium. Fax messages are saved as TIFF files with receipt date and time.
The selection menu for USB storage media appears on the display as soon as you connect a USB storage medium (USB stick, external hard drive etc.) to the USB host port on the front of the device. You can print a list of all saved documents or individual documents as well as delete files. Save scanned documents or incoming faxes on to the USB storage medium.
You can connect the device to a computer and use it as a printer or scanner. You'll find the software on the supplied installation CD Companion Center SFX. In this way, you can scan and edit photos and texts, send and receive faxes and access the device's web interfaces, with which you can change many settings.
Your device has a WLAN connection. Thus, you can integrate the device into an existing wireless network (WLAN). All computers in the network can then access the device and scan or print.
We hope you enjoy your device and its many functions!
Table of Contents
Introduction 2
Dear Customer 2
1 General Safety Information...... 5
About this User Manual 7
2 Overview...... 8
Device Overview 8
Connections on the Rear Side 8
Panel with Display 9
Overview of the Menu Functions 10
3 Initial Operation 12
Packing Contents 12
Removing Packaging Material 12
Attaching the Document Support 14
Connecting the Telephone Cable 15
Connecting the Mains Cable 15
Initial Installation 15
Connecting to the Computer 16
4 Companion Center SFX 17
Requirements 17
Installing the Driver and Software 17
5 Web Interface 19
Calling the Web Interface 19
Access the Web Interface with an Internet Browser 19
6 Scanner 20
Loading Documents 20
Scan Document and Save to a Computer 21
Scan Document and Save onto a USB Storage Medium 22
Scanning Document and Saving on Network Computer 24
Scanning with the Companion Center SFX 25
7 Printer and Printing Media 26
Specifications for Print Media 26
Insert Paper into the Paper Tray 26
Load Paper into the Manual Paper Feed 28
Loading Envelopes 28
Inserting Slides and Labels 28
Loading Pre-printed Material 29
Print a List of Available Documents on USB Storage Medium 29
Print Document from USB Storage Medium 30
Delete Files on USB Storage Medium 31
Print Calendar 31
Sudoku: Printing a Game 32
8 Copier 33
Loading Documents 33
Make Copy Using Standard Settings 34
Creating Multiple Copies 35
Creating Crystal Copy with Image and Text Enhancement (Crystal) 35
Make Copies Using the Second Profile 35
Make Copies Using User-Defined Settings 36
Make Enlarged or Compressed Copies 36
Copying Several Documents onto one Page (= Mosaic Copy) 37
Copying both Sides of a Document onto One Side (= Business Card Copy) 37
Configure Settings for Second Profile 38
9 Telephone Book of the Device...... 39
Looking up an Entry 39
Saving Entry 39
Edit Entry 39
Delete an Entry 40
Delete all Entries 40
Printing the Telephone Book 40
Groups 40
Exporting/Importing the Telephone Book 41
10 Fax.... 42
Send a Fax Using Standard Settings 42
Loading Documents 42
Dialling a Number 43
Getting Outside Line 44
Sending Fax Later (= Timer Function) 44
Sending Fax Manually 44
Chain Dialling 44
Eavesdropping while Connection is Established ..... 44
Sending to Multiple Recipients (= Broadcasting) ..... 45
Using Fax Templates 45
Faxing with the Companion Center SFX 45
Fax Reception 47
Receiving Fax Manually 47
Receive Faxes Silently 47
Receiving Faxes onto USB Storage Medium 48
Time Stamp 48
Setting Protected Fax Reception 48
Polling Faxes 49
Jobs 49
Missed Calls 50
11 Networks.... 51
Wireless Network (WLAN) 51
Setting Up a Wireless Network (WLAN) 51
Switching Wireless Networking (WLAN) On/Off ... 52
Setting up a Wireless Network (WLAN) Using the Wizard 52
Setting Up a Wireless Network (WLAN) Manually 52
Additional Wireless Network Settings 55
12 Settings.... 56
Set Up Power Saving Function 56
Set Up Toner Saving Function 56
Set Up Paper Saving Function 56
Selecting the Country 57
Selecting the Language 57
Setting the Date and Time 57
Entering Your Telephone Number and Name ..... 58
Setting the Ring Tones 58
Deactivating the Button Tones 58
Configure Paper Settings 58
Set Resolution 59
Setting the Contrast 59
Setting the Brightness 59
Additional Scanner Options 60
Additional Copier Options 60
Setting the Fax Reception Mode 60
Silent Fax Reception 61
Additional Options for Fax Transmission 61
Additional Fax Reception Options 61
Locking the Device 62
Print Lists and Reports 63
13 Telephone Lines and Additional
Devices.... 64
Switching Caller Line Identification (CLIP) On/Off .. 64
Selecting the Dialling Process 64
Set up the Public Switch Telephone Network (PSTN) 64
Set up Private Branch Exchange (PABX) 64
DSL Connection 65
ISDN Connection 65
Registering and De-Registering Additional Cordless Telephones 65
Connecting Additional Devices 66
Using Additional Telephones (Easylink) 66
Using an External Answering Machine 66
14 Service.... 68
Access Help Pages 68
Display Counter Levels 68
Displaying the Toner Level 68
Checking the Firmware Version 68
Updating Firmware 69
Changing the Toner Cartridge 69
Fixing a Paper Jam 71
Fixing a Document Jam 74
Cleaning 74
Calibrating the Scanner 75
Using Service Codes 75
Power Cycling 76
Problems and Possible Causes 77
Error Messages and Possible Causes 79
15 Glossary 83
16 Appendix...... 86
Technical Data 86
Guarantee 87
Declaration of Conformity (DoC) 88
Customer Information 90
1 General Safety Information
Your device has been tested in conformity with standards EN 60950-1 and IEC 60950-1 and should only be operated with telephone systems and power equipment that meet these standards. The device was built exclusively for use in the indicated sales region.
Do not make any changes or settings that are not described in this user manual. Physical injury or damage to the device or loss of data can result from improper handling. Take note of all warning and safety notes indicated.
Setting Up the Device
The device should rest securely on a stabile, flat surface. If the device should fall, it can be damaged or can cause injury to people, especially small children. Position all cables in such a way that no one will stumble on them, thus avoiding possible injuries to persons or damage to the device itself. If the device is dropped it should be inspected by a technical service center.
The distance between the device and other devices or objects must be at least 15 centimetres; this also applies to the use of additional cordless telephones. Do not place the device in the vicinity of radios or televisions.
Protect the device against direct sunlight, heat, large temperature fluctuations and moisture. Do not place the device in the vicinity of heaters or air conditioners. Observe the information on temperature and humidity in the technical data.
The device must have sufficient ventilation and may not be covered. Do not put your device in closed cabinets or boxes. Do not place the machine on soft surfaces such as tablecloths or carpets and do not cover the ventilation slits. Otherwise, the device can overheat and catch on fire.
The area in which you operate the device must be adequately ventilated, especially if the device is used frequently. Set up your device in such a way that the flow of the exhaust air stream points away from the work station.
In the event that the device becomes too hot, or if you see smoke coming from the device, you must immediately pull the power cable out of the power socket. Have your device examined by trained professionals at a technical service location. To prevent the spread of fire, open flames should be kept away from the device.
Do not plug in the device in moist rooms. Never touch the mains cable, the mains connection or the telephone socket with wet hands.
Do not allow liquids to enter into the device. Disconnect the device from the electrical power source and from the telephone network, if liquids or foreign objects have entered the device and have your device examined by trained professionals at a technical service location.
Do not allow children to handle the device without supervision. The packing materials should be kept out of the hands of children. Do not press forcefully on the scanner cover when you scan thicker documents or three-dimensional items, this could damage the scanner cover and/or the scanner glass.
Power Supply/Telephone Line
Check whether the mains voltage of your device (indicated on the type label) matches the mains voltage available at the setup location.
This device complies with EN 55022 Class B. Use only the power and telephones cables supplied. Before you use the device make sure that you connected the telephone cable supplied as described.
Never touch the power or telephone cable if the insulation is damaged. Replace damaged wires immediately. Use suitable cables only; if necessary please contact our technical customer service or your retailer.
Disconnect your device from the mains and telephone network during an electrical storm in order to avoid electrical surge damage. If this is not possible, do not use the device during an electrical storm.
Before cleaning the surface of your device, disconnect it from the power and telephone networks. Use a soft, lint-free cloth. Never use liquid, gaseous or easily flammable cleansers (sprays, abrasives, polishes, alcohol). Do not allow any moisture to reach the interior of the device.
Only clean the display with a dry, soft cloth. If the display breaks, a mildly corrosive liquid may escape. Avoid all contact with your skin and eyes.
In the event of a power failure, your device will not function; saved data is retained.
In rare cases, the saved settings can be partly or completely reset to factory defaults when the device is deactivated or in the event of a power outage. Do not deactivate the device directly after a print job or after entering settings.
Computer Connection
Use only a custom high speed certified USB cable to connect the device to your computer. The cable should be no longer than 1.5 metres.
Wireless Network (WLAN)
The functioning of security systems, medical equipment or sensitive devices can be disrupted by the transmission power of the device. Observe any usage regulations (or restrictions) in the vicinity of such equipment.
The use of this device can affect the operation of insufficiently shielded medical devices and hearing aids and pacemakers through the release of high frequency radiation. Also consult a doctor or the manufacturer of the medical device to establish whether these are sufficiently shielded from external high frequency radiation.
USB Storage Media
Only use storage media that are compatible with the device. Ensure that the power of a USB device does not exceed the permitted amp limit of the USB connection. You can only connect one high power device (USB 2.0) to each USB connection. Do not connect additional devices—such as batteries, fans, charging devices—to your machine. The device only recognises storage media which are formatted with FAT16 or FAT32. NTFS is not supported.
Never pull out the storage medium while the device is accessing it. This could cause data to be damaged or lost.
When carrying out a Firmware update only use the Firmware file for your device from the website: www.sagemcom.com. Using other Firmware files can lead to your device not functioning properly. Sagemcom accepts no liability for device malfunctions which can be traced back to the use of third party Firmware.
The firmware running on the device is partly licensed under GPL. If you have any questions about the licensing of a specific part of the firmware, feel free to contact us on the email address: support.service@sagemcom.com. We can send you a CD containing the relevant source code for the cost of production.
Consumable Materials
Use only original consumable materials. These are available from a specialised retailer or through our order service (see back side of this user manual). Other consumable materials could damage the device or shorten its service life.
Dispose of old consumable materials according to the waste regulations of your country.
Caution when Handling Toner Powder:
If you breathe in toner powder, go into the fresh air immediately. Call a doctor immediately!
If you get toner powder in your eyes, rinse them with a lot of water for at least 15 minutes. Call a doctor immediately!
If you have swallowed toner powder, drink small amounts of water. Try NOT to vomit. Call a doctor immediately!
Never open a toner cartridge. Store both new and used cartridges in a place where they will not come into the hands of children.
In case of a paper jam, remove the paper carefully out of the device. Throw the paper away carefully: It is possible that the toner may not be completely set on the print-out, and toner dust could be released into the air.
If toner dust is released into the air, you should avoid allowing it to contact your skin and eyes. Do not inhale the released toner dust. Remove the toner dust from clothing or objects with cold water; hot water would only cause the toner to set. Never remove loose toner dust with a vacuum cleaner.
Repairs
The fuser unit and and its surroundings inside the device become hot during operation. Do not touch these parts if you have opened the device. Proceed with care when you are removing a paper jam for instance.
Should disruptions occur, follow the instructions on the display and on the error report.
Do not make any repairs to the device yourself. Improper maintenance can result in injuries or damage to the device. Only have your device repaired by an authorised service centre.
Do not remove the type label from your device; this would void the warranty.
Laser Safety
With specific reference to lasers, the equipment complies with laser product performance standards set by governmental, national, and international agencies as a Class 1 Laser Product. It does not emit hazardous light, as the beam is totally enclosed during all phases of customer operation and maintenance.
Direct (or indirect reflected) eye contact with the laser beam might cause serious eye damage. Safety precautions and interlock mechanisms have been designed to prevent any possible laser beam exposure to the operator. Only a qualified service technician should open the device and carry out service operations.
Class 1 Laser Product
About this User Manual
With the installation guide on the following pages, you can start using your device quickly and easily. Detailed descriptions can be found in the following sections of this user manual.
Read the entire user manual carefully. Follow all safety instructions in order to ensure proper operation of your device. The manufacturer accepts no liability if these instructions are not followed.
Symbols Used
Notice

Troubleshooting
This symbol designates tips that will help you to use your device more effectively and easily.
CAUTION!

Damage to the Device or Loss of Data!
This symbol gives warning of damage to the device and possible loss of data. These damages can result from improper handling.
DANGER!

Danger to Persons!
This symbol gives warning of danger to persons. Physical injury or damage can result from improper handling.
DANGER—LASER!

Radiation Hazard!
This symbol in the user manual or inside the device indicates a danger of visible and invisible radiation. Eye injuries or other damage can result from improper handling.
DANGER—HEAT!

Heat risk!
This symbol in the user manual or inside the device indicates a danger of hot surfaces. Physical injury or damage can result from improper handling.
2 Overview
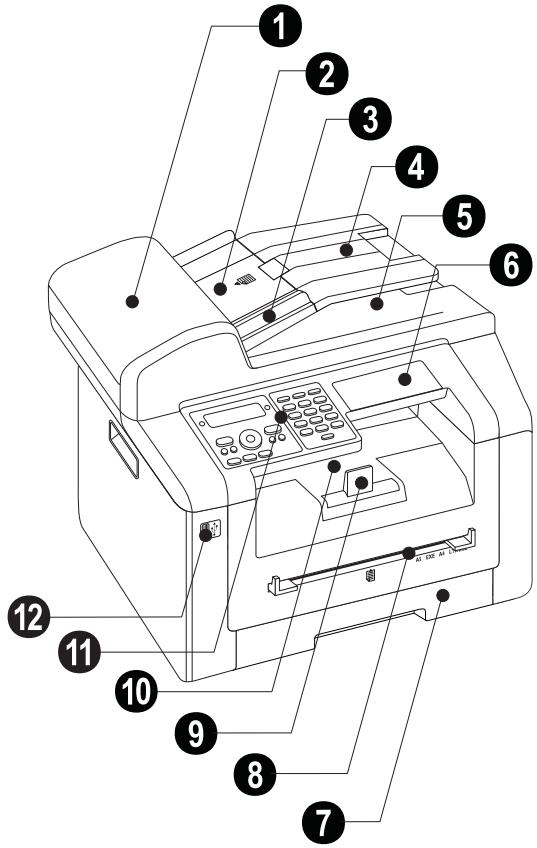
Device Overview
① Cover of the automatic document feeder
② Document feed slot
③ Document guide
4 Document support
5 Scanner cover
6 Letter keypad (covered)
⑦ Paper tray
⑧ Manual paper feed
9 Printer output tray
10 Device cover
11 Panel with display
4. socket—USB Host connection for storage medium
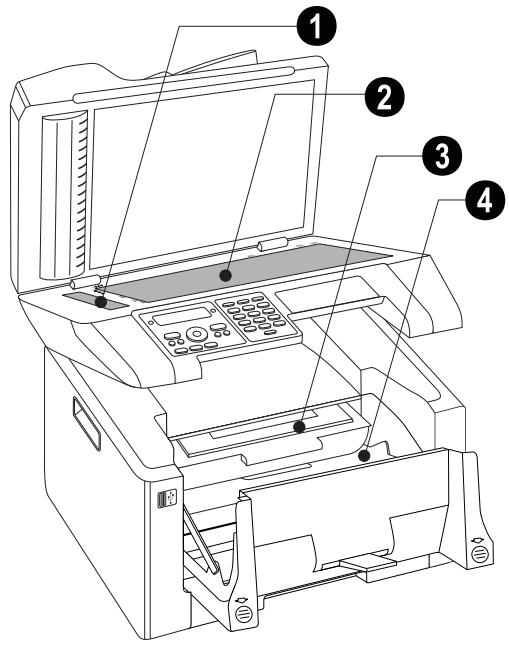
① Scanner glass of the automatic document feeder
② Scanner glass
③ Toner cartridge
4 Paper jam door (print unit)
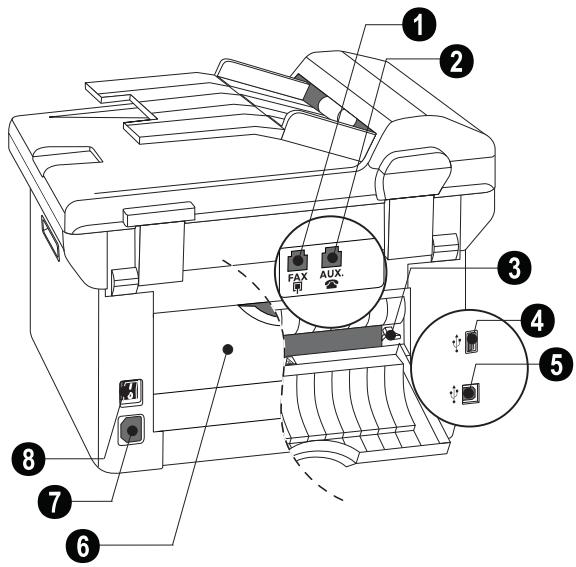
Connections on the Rear Side
① FAX/☐ socket—Connection socket for telephone cable
② AUX./☐ socket—Connection socket for additional devices
③ Tension lever of the fixer unit (Two levers!)
4 socket—USB Host connection for storage medium
5 socket—USB connection for the computer
⑥ Paper jam door (fuser unit)
⑦ Mains cable socket
8 On/Off switch
Panel with Display
Red lamp △—If the lamp flashes or is lit, please read what is indicated on the display
Green Lamp 📋—The green lamp 📋 on the panel will flash whenever there is a fax present in the memory.
☑—Function abort / return to the starting mode
C—Calling the menu functions / Returning to the previous menu level / deleting individual digits
▲/▼—Setting number of copies / navigation within the menu / selecting options / moving the cursor
OK—Press twice: making copies automatically. Press once: adjusting copies / Menu Navigation: confirming input
- Starting transmission of message / starting action
①—Set the contrast for the scanner
^9 /ZOOM—Set the zoom parameter (reduced or enlarged scans)
☑/DUPLEX—Select double-sided or one-sided printing (Duplex/Simplex)
F—Setting higher resolution for faxes (DEFAULT, FINE, SFINE, PHOTO) and copying (AUTO, TEXT, QUALITY, PHOTO)
FAX—Start a fax transmission or fax reception
COPY—Press twice: making copies automatically. Press once: adjusting copies
SCAN—Open selection menu for scanning functions
●—Redial / caller list: The redial / caller list contains the last numbers dialled and the last calls received (↓ indicates the numbers dialled, ↓ the calls received and * the calls missed).
- Broadcasting: You can send one fax to multiple recipients in succession.
—Listening while connection is established
Numeric keys (0—9)—Entering digits
ECO—Retrieves the paper, power and toner saving / make a copy using the toner saving function
Keys (A - Z)—Entering characters / ↑ - Shift key: Entering capital letters / ← - deleting individual characters / ← - add line break / ● and enter letter key - special characters / □ @ - enter space and @ sign
![1 2 ABC 3 DEF 4 GHI 5 JKL 6 MNO 7 PQRS 8 TUV 9 WXYZ * 0 Pause # ECO FAX COPY SCAN Q+ W- E€ R' T" Y$ U\ I\ 0& P% ← A( S) D[ F] G< H> J{ K} L~ M' ← ↑ Z= X! C; V? B' N: .- @ ●](/content/2019/08/101549/images/c4bbdf307cc75f63e00c46fa4594e36ad7a402a52eee7f4855f18178b25ca19d.jpg)
Overview of the Menu Functions
The following functions are available on your device. There are two ways in which you can call functions.
Navigating in the Menu: Press C to access the function menu. Page through ▲/▼ menu entries. Use OK to select a menu function. Press C to return to the previous menu level. Press Ⓤ to close the menu and return to the starting mode.
Calling Functions Directly: You can call a menu function directly using the function number. Press C and enter the appropriate function number using the numeric keypad. Confirm with OK. You will find the function number in the following list.
0 Settings
0 0 2 Setting the paper, power and toner saving functions. page 56
0 0 7 Deactivating the Button Tones ..... page 58
0 1 Setting the date and time...... page 57
0 2 1 Entering name ...... page 58
0 2 2 Entering number ...... page 58
0 3 1 Setting the Country ...... page 57
0 3 2 Set the telephone network*...... page 64
0 3 3 Setting the Language...... page 57
0 4 1 Setting the fax reception mode.....page 60
0 4 2 Set the number of ring tones for fax reception ...... page 58
0 5 1 Switch PABX operation on/off.....page 65
0 5 2 2 Enter a dialling code for the PABX operation...... page 65
0 5 3 Set the dialling mode (tone/pulse dialling)* ...... page 64
0 5 4 Selecting the Ring Tone ...... page 58
0 5 5 Setting the ring volume...... page 58
0 5 7 Switches Caller Line Identification (CLIP) on/off page 64
*Function is not supported in all countries and networks
1 Copier
10 Set the copier settings...... page 59
1 1 Make copies using standard settings .... page 34
1 2 Make copies using the second profile..page 35
1 3 Make enlarged or compressed copies. page 36
1 4 Copy several documents on one page (= Mosaic-copy) ...... page 37
1 5 Creates Crystal copy with image and text enhancement (Crystal)...... page 35
1 6 Copies both sides of a document onto one side (= business card copy) ...... page 37
2 Printer
20 Configure paper settings ......page 58
2 1 1 Print a list of available documents on USB storage medium......page 29
2 1 2 Print document from USB storage medium ......page 30
3 Scanner
3 1 Scan document and save to a computer ......page 21
3 2 Scan document and save onto a USB storage medium......page 22
3 6 Scans document and saves on network computer......page 24
30 Configure scanner settings......page 60
4 Fax
4 0 1 Set fax transmission......page 61
4 0 2 Set fax reception....page 61
4 0 3 Setting Protected Fax Reception....page 48
4 0 4 Switches time stamp on/off......page 61
5 Cordless Telephone
5 2 1 Registering cordless telephone* ....page 65
5 2 2 De-registering cordless telephone* ......page 66
5 2 3 Locating cordless phones*......page 66
*Function is optional and functions only with an original adapter, which you can purchase through our order service. More information: support.service@sagem-com.com
7 Jobs
7 1 Immediate job execution ...... page 49
7 2 Changing a job...... page 49
7 3 Deleting a job ...... page 49
7 4 Printing a job...... page 49
7 5 Printing the jobs list ...... page 63
8 Lists and Reports
80 Printing list of settings ...... page 63
8 1 Printing the List of Available Functions page 63
8 2 Printing fax journal ...... page 63
8 3 Printing the telephone book ...... page 63
8 4 Printing the jobs list ...... page 63
8 5 Print Calendar ...... page 31
8 6 Sudoku: printing a game...... page 32
8 7 Printing the Fax Templates...... page 45
9 USB Storage Medium
9 1 1 Print a list of available documents on USB storage medium ...... page 29
9 1 2 Print document from USB storage medium
...... page 30
9 1 3 Scan document and save onto a USB storage medium ...... page 22
9 1 4 Receiving faxes onto USB storage medium
...... page 48
9 1 5 Delete files on USB storage medium
...... page 31
9 Miscellaneous
9 2 Locking the Device...... page 62
9 3 1 Calibrating the Scanner...... page 75
9 3 3 Using service codes...... page 75
9 3 4 Checking the firmware version.....page 68
9 4 Query the counter levels...... page 68
9 4 6 Displaying the Toner Level ...... page 68
08 Wireless Network (WLAN)
0 8 0 Switches wireless network (WLAN) on/off
...... page 52
0 8 1 Sets up a Wireless Network (WLAN) using the wizard...... page 52
0 8 2 Sets up a Wireless Network (WLAN) manually....page 52
0 8 3 Set IP address assignment...... page 54
0 8 4 Set static IP address assignment..... page 54
0 8 5 Verify DHCP settings ...... page 54
0 8 6 Additional wireless network settings
...... page 55
3 Initial Operation
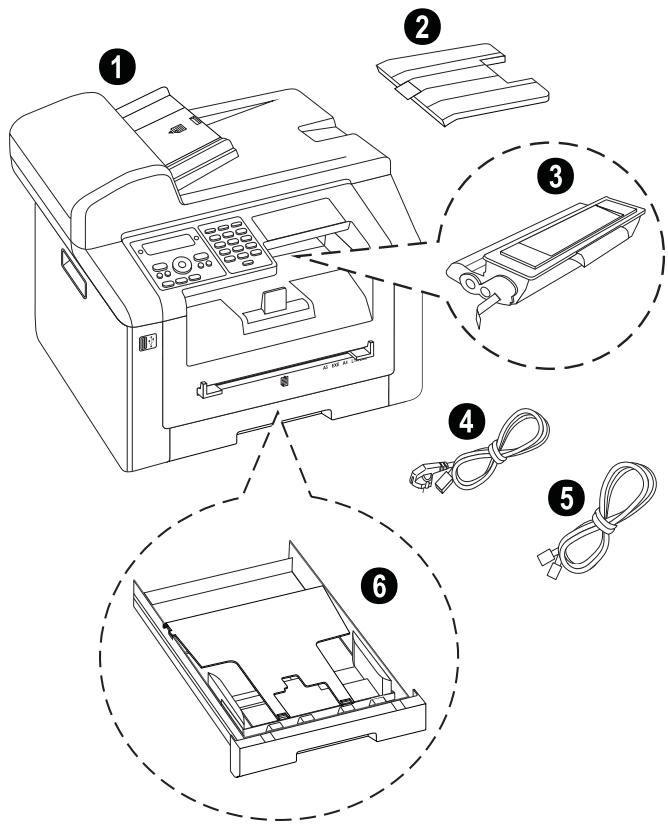
Packing Contents
1 Device
② Document support
③ Starter cartridge (already installed)
④ Mains cable with plug (country-specific)
⑤ Telephone cable with plug (country-specific)
⑥ Paper tray (already installed)
Installation-CD (not depicted)
User manual with installation guide (not depicted)
Notice

Missing Package Contents
If any of the parts are missing or damaged, please contact your retailer or our customer service.
Removing Packaging Material
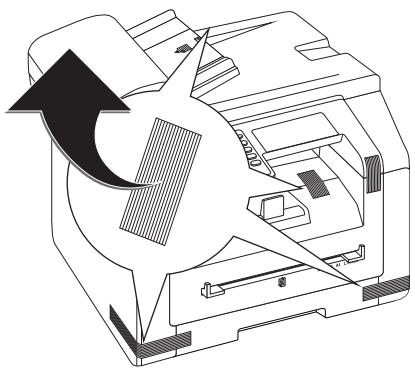
Removing Packaging Material from the Device
Remove the existing tape used for transportation from the device.
natural_image
Technical line drawing of a mechanical assembly with no visible text or symbolsRemove the Packaging Material from the Toner Cartridge
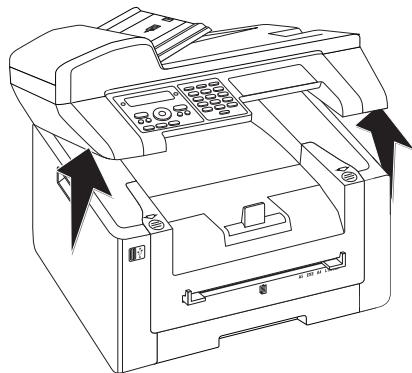
1 Open the upper device cover by gripping the cover on the arrow marks on the outside and lift upwards,
natural_image
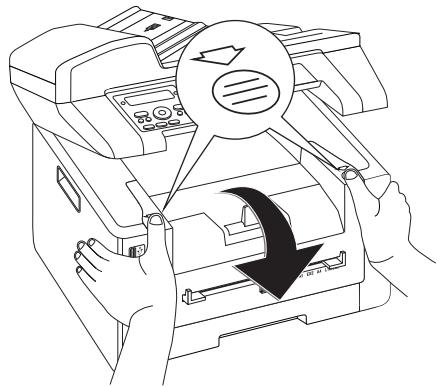
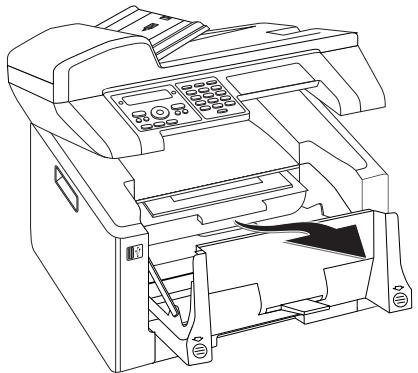
Line drawing of a printer with control panel and paper feed (no text or symbols)2 Open the device by lifting the device cover forwards
natural_image
Line drawing of hands operating a printer with a circular dial and directional arrow (no text or symbols)3 Remove the toner cartridge by gripping the handle in the middle and pulling it forwards out of the device
natural_image
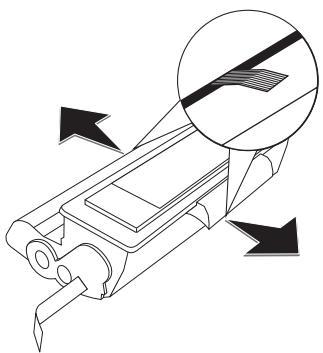
Line drawing of a printer with internal components and control panel (no text or symbols)4 Remove the tape and protective paper, but do not remove the protective strip from the cartridge yet.
natural_image
Technical line drawing of a mechanical component with directional arrows indicating movement (no text or symbols)DANGER!

Escaping Toner Dust!
Never open a toner cartridge. If toner dust is released into the air, you should avoid allowing it to contact your skin and eyes. Do not inhale the released toner dust. Remove the toner dust from clothing or objects with cold water; hot water would only cause the toner to set. Never remove loose toner dust with a vacuum cleaner.
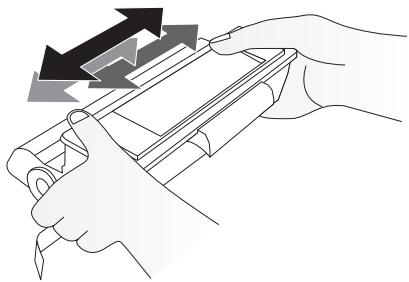
5 Shake the new toner cartridge back and forth several times in order to distribute the toner evenly, thereby improving the print quality.
natural_image
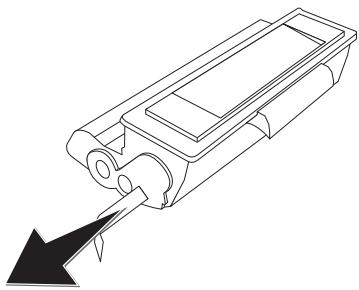
Illustration of hands using a tool to interact with a device, showing a black arrow indicating direction (no text or symbols present)6 Only after completely pull off the protection strip located on the left side of the cartridge.
natural_image
Technical line drawing of a mechanical component with a black arrow pointing to a detail (no text or symbols)DANGER!

Escaping Toner Dust!
Once you have removed the protection strip, do not shake the toner cartridge any more. Otherwise, it is possible that toner dust will be released into the air.
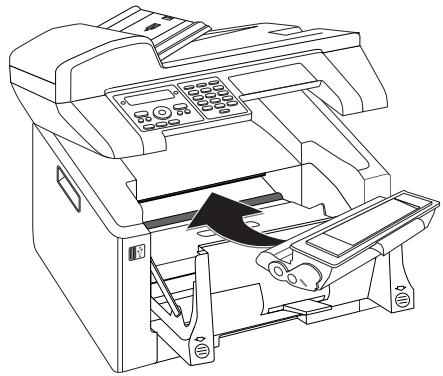
7 Place the toner cartridge into your device. The cartridge should snap securely into position.
natural_image
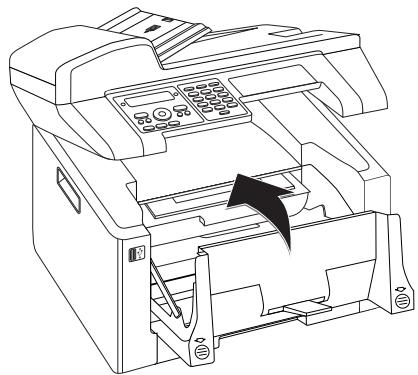
Line drawing of a printer with an arrow indicating a process or operation (no text or symbols present)8 Close the device.
natural_image
Line drawing of a printer with an open lid and internal mechanism, showing no text or symbols.CAUTION!

Toner Cartridge Not Inserted Correctly!
If the device cover would not close, the toner cartridge is not inserted correctly. Take the toner cartridge out and insert it again correctly.
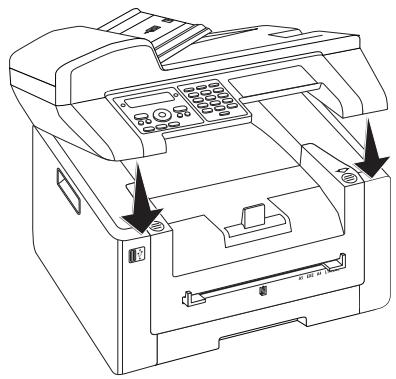
9 Close the upper device cover.
natural_image
Line drawing of a printer with control panel and buttons, showing mechanical components without any text or symbolsRemove the Packaging Material from the Paper Tray
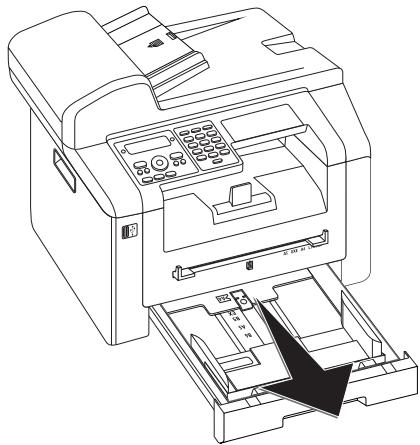
1 Pull the paper tray out of the device.
natural_image
Line drawing of a printer with internal components and paper feed (no text or symbols)2 Lift up the cover of the paper tray
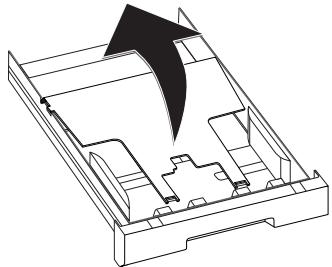
natural_image
Isometric technical diagram of a device casing with internal components and an arrow indicating direction (no text or symbols)3 Please remove the protective cardboard from the paper tray before loading paper.
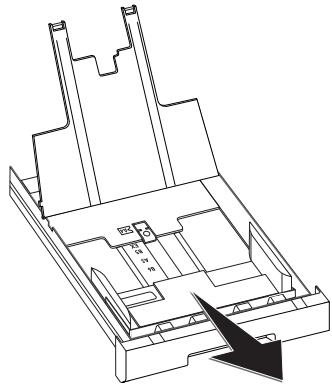
natural_image
Isometric line drawing of a mechanical or architectural component with no visible text, numbers, or symbols.4 Removing the tape in the paper tray which was used for transportation purposes.
Notice

Loading Paper
Adjust the paper tray to the paper and insert the paper (see also chapter Printing Media, page 26).
5 Close the paper tray cover.
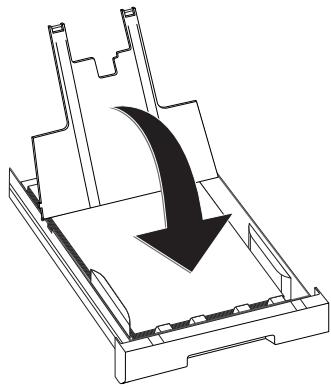
natural_image
Technical diagram of a mechanical component with a curved arrow indicating direction (no text or symbols)Notice

Cover of the Paper Tray
If the cover of the paper tray has become detached, fasten the lid into the supports Ensure that the flat side of the cover (with the inscription) faces upwards.
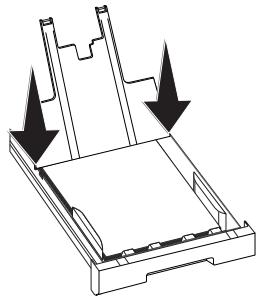
natural_image
Technical line drawing of a mechanical component with arrows indicating downward motion (no text or symbols)6 Push the paper tray into the device all the way to the stopping point.

natural_image
Line drawing of a printer with an open drawer and control panel, showing no text or symbols.Attaching the Document Support
Insert the document support into the two openings in the cover. The document support should snap securely into place.
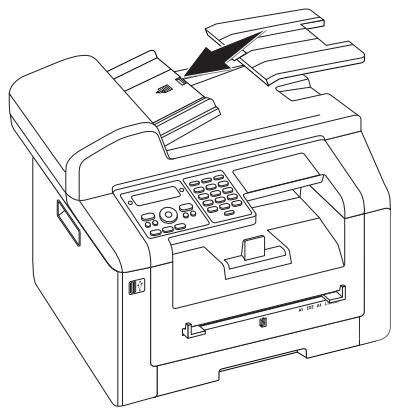
natural_image
Line drawing of a printer with control panel and paper feed (no text or symbols)Connecting the Telephone Cable
Connect the telephone cable to the device by inserting it in the socket designated with FAX/☐ (RJ-11-Connector). Insert the telephone plug into your PTT line socket.
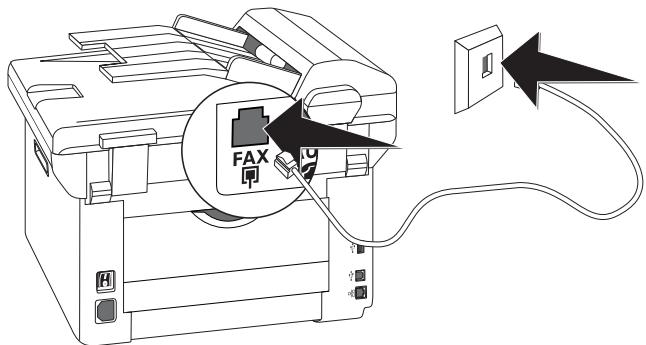
CAUTION!

Connection to an ISDN system!
You can not connect your devices directly to the digital output of the ISDN system. Details for ISDN connections can be found in the instructions provided with the terminal adapter or the dial-up router.
Notice

Connection to Private Automatic Branch Exchange
If you connect your device as extension to a telephone system, you must set it for working as an extension (also see Chapter Telephone Lines and Additional Devices, page 64).
Connecting the Mains Cable
CAUTION!

Mains Voltage at the Site of Installation!
Check whether the mains voltage of your device (indicated on the type label) matches the mains voltage available at the setup location.
1 Insert the mains cable into the connection located on the rear side of the device. Plug the power cable into the electrical outlet.
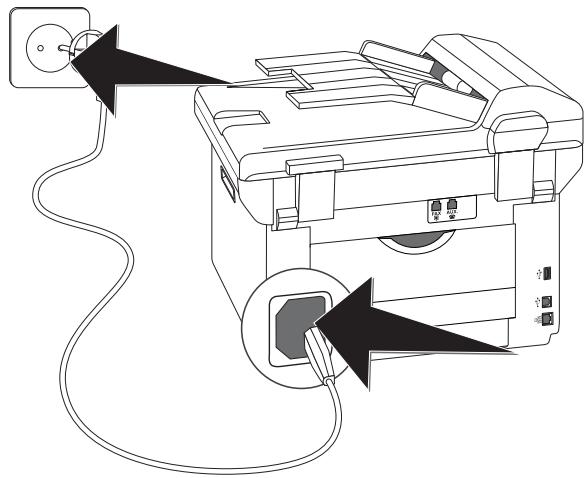
natural_image
Line drawing of a printer with cable and power outlet, no text or symbols present2 Switch the device on using the on/off switch on the rear.
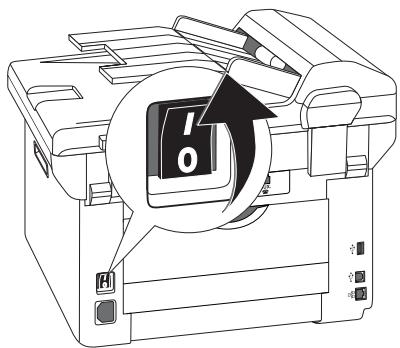
Initial Installation
After you connect your device to the mains voltage, the device starts. During the booting process, the lights flash. Wait until the initial installation process begins.
Selecting the Language
1 Use ▲/▼ to select the desired display language.
2 Confirm with OK.
Selecting the Country
CAUTION!

Setting the Country Correctly!
You must set the country in which you are operating the device. Otherwise your device is not adapted to the telephone network. If your country is not included in the list, you must select a different setting and use the correct telephone cable for the country. Consult your retailer.
1 Use ▲/▼ to select the country in which you are operating the device.
2 Confirm with OK.
Set the Time Zone
(Function is not supported in all countries and networks)
In countries with several time zones, you can select from preset time zones or manually enter the deviance of your time zone from UTC (see also chapter on setting the time zone, page 57). In countries with one time zone, the setting is adjusted automatically if you set the country correctly.
1 Use ▲/▼ to select the time zone in which you are operating the device.
2 Confirm with OK.
Notice

Automatic Changeover Between Summer Time/Winter Time
With setting the country and time zone, the automatic changeover between summer and winter time is switched on. The automatic changeover is switched off if you enter the deviance from UTC manually using the time zones editor
Entering Name
Your name and number are added together with date, time and page number at the top edge of each fax transmission (= header).
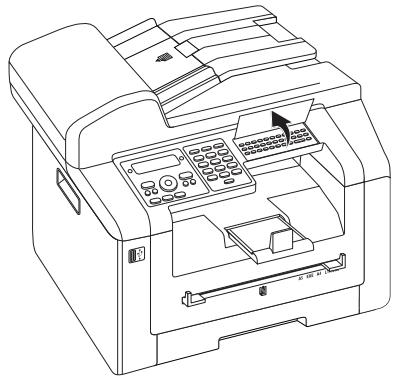
1 Fold the protective cover of the letter keypad up
natural_image
Line drawing of a printer with control panel and paper tray (no text or symbols)2 Enter the name using the keys (A—Z).
Notice

Enter Letters
Enter capital letters by pressing and holding key. You can enter space using @.
The special characters available are located directly above the letter keypad and can be entered by pressing the ●- key and the respective letter key at the same time.
You can move the cursor using ▲/▼. Use C to delete individual characters.
3 Confirm with OK.
Entering Number
1 Enter your number.
2 Confirm with OK.
Entering the Date and Time
1 Enter the date (two digits for each field), for example 3 1 0 5 2 5 for May 31th, 2025.
2 Enter the time, e.g. 1400 for 2 pm.
3 Confirm with OK.
Connecting to the Computer
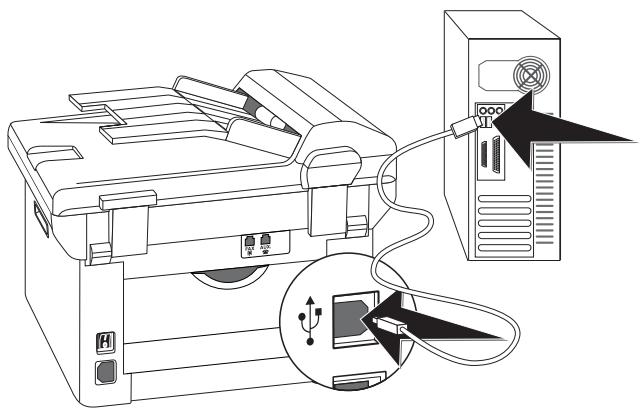
Using the USB cable, you can connect your device to a PC that is connected to a network. Other PCs on this network can then access the device if it is shared for use on the network. You cannot connect the device directly to a network with a USB cable, unless you have a USB print server connection.
You can connect the device to a computer and use it as a printer or scanner. You'll find the software on the supplied installation CD Companion Center SFX. In this way, you can scan and edit photos and texts, send and receive faxes and access the device's web interfaces, with which you can change many settings.
Notice

Network Connection
You can find information about installing your device in a network in chapter Networks (see also chapter Networks, page 51)
Requirements
Your computer must have one of the following operating systems.
Microsoft Windows
Connecting USB Cable
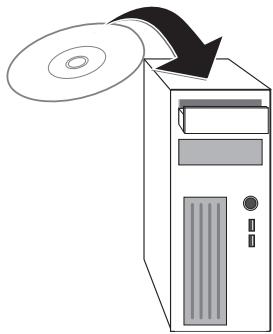
1 Close all open programs and applications before beginning the installation process. Place the installation CD in the CD-ROM drive of your computer. The program will start automatically.
natural_image
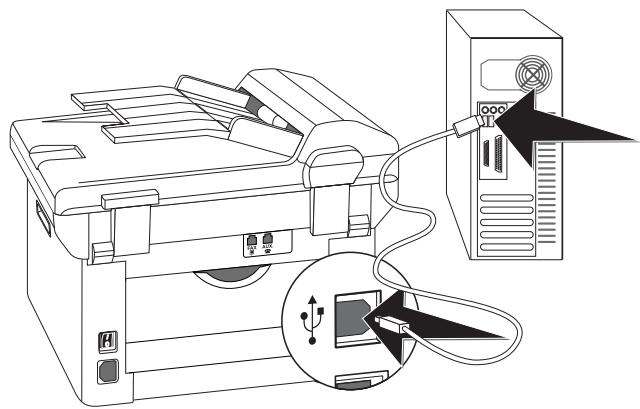
Diagram of a desktop computer tower with an open CD and a black arrow indicating rotation (no text or symbols)2 Connect the device to your PC with a typical USB cable. The USB port of your device can be found on the rear side.
Notice

Only high-speed certified USB cable
Use only a custom high speed certified USB cable to connect the device to your computer. The cable should be no longer than 1.5 metres.
natural_image
Line drawing of a computer setup with an attached tower and USB port (no text or symbols)4 Companion Center SFX
You can connect the device to a computer and use it as a printer or scanner. You'll find the software on the supplied installation CD Companion Center SFX. In this way, you can scan and edit photos and texts, send and receive faxes and access the device's web interfaces, with which you can change many settings.
Notice

Network Connection
You can find information about installing your device in a network in chapter Networks (see also chapter Networks, page 51)
Requirements
Your computer must have one of the following operating systems.
Microsoft Windows
Informations for the Technical Customer Services
Should problems with the computer connection arise, have the following information to hand when you contact technical customer services: hardware configuration of your computer, operating system installed and security programmes used (anti-virus programmes, firewall). Then we can help you more quickly.
Installing the Driver and Software
CAUTION!

Installing the Software first!
First install the software. The device may not be connected to the PC before this. After the software installation, the PC must be restarted. Only then should you connect your PC and the device with a USB cable.
1 Close all open programs and applications before beginning the installation process. Place the installation CD in the CD-ROM drive of your computer. The program will start automatically.
Notice

Starting Program Manually
If the program does not start automatically, select the CD-ROM drive in the Windows Explorer and start the program Setup.exe with a double-click.
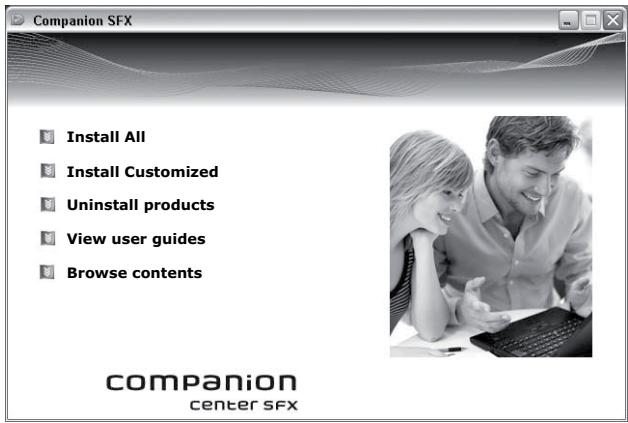
2 The Companion Center SFX window appears on the screen. Click on Install All to install the software and all drivers.
Click on Browse contents to view the files on the installation CD. Click on View user guides to access the device's instruction manual.
3 Next you will be asked to accept the licensing conditions. Click on Yes.
4 The software and drivers are installed. This Process May Take a Few Moments.
5 At the conclusion of the install process you must restart your computer. Make your selection as to whether the computer should restart automatically or whether you would like to restart the computer yourself at a later time.
6 Only after the restart, connect the device to your PC with a typical USB cable. The USB port of your device can be found on the rear side.
Notice

Only high-speed certified USB cable
Use only a custom high speed certified USB cable to connect the device to your computer. The cable should be no longer than 1.5 metres.
natural_image
Line drawing of a printer with an attached tower and USB cable, showing no text or symbols7 Your device is detected as a new peripheral device and registered.
8 If your operating system is Windows XP (Service Pack 2), an additional window will appear during the final installation. Select No, not this time, and click on Next.
9 Under Windows XP, select Install software automatically during the final installation and click on Next.
5 Web Interface
The web interface is available to you on all operating systems. You can access the web interface with the software Companion Center SFX or with an internet browser on your computer. The web interface shows you the current status of the device and all settings. You can edit the device settings and the telephone book.
You can access the internet interface if you have connected the device directly with a computer via the USB port or if the device is connected to a network.
Calling the Web Interface
1 Start the software Companion Center SFX, by clicking on the Companion Center SFX icon on your desktop or selecting Start > Programs > Companion Center SFX > Laser SFX > Companion Center SFX in the Start Menu.
2 The light in the upper-right corner shows whether or not the device is connected to the computer and is functioning properly.
3 Selecting the Settings tab.
![Companion Center SFX SAGEMCOM Scan Fax Settings Help MFP device [IP Address] SFF Status Settings Addressbook Settings / Login Username Password Please log in!](/content/2019/08/101549/images/ade41ab02128cb267b146998abbd711e6928d984e8c7cb1ee3c418124f73a7a6.jpg)
4 The internet interface's settings pages are protected with a password. Enter the login data:
Name: user
Password: user
5 Click on Login.
CAUTION!

Changing Password and Noting!
Change the password when you call the web interface for the first time, so that there is no unauthorised access to your device. Note down your password in a safe place. Should you forget your password, you must reset your device to factory settings, in order to be able to access it again. All personal settings will be deleted.
Access the Web Interface with an Internet Browser
You need the current IP address of the device in order to access the web interface with an internet browser. You will find the IP address on the settings list.
Notice

Prints the List of Settings
Press C, 80 and OK to print a list of all settings of your device.
1 Start an Internet browser on a computer, which is connected to the network.
Notice

Suitable Internet Browser
We recommend the following Internet browser. Windows PC: Internet Explorer (Version 6.0 or above), Apple Macintosh: Safari (version 1.3 or above), Linux: Conquerer (version 3.2.1 or above).
2 Enter the IP address of the device in the address bar of the browser.
3 Confirm using Return.
6 Scanner
You can scan a document and save it onto a USB storage medium or on a network computer.
You'll find the software on the supplied installation CD Companion Center SFX. In this way, you can scan documents from your computer, send faxes, and manage the device settings via the web interface (see also the chapter Installing Driver and Software, page 17).
| Specifications for Documents | |
| Width of Documents | 208–218 mm |
| Length of Documents | 277–600 mm |
| Paper Weight of the Documents | 60 - 90 g/m2 |
| Capacity | 50 page (80 g/m2) |
| Manufacturer's Recommendation for Optimum Operation | A4 · A5 · Letter · Legal (80 g/m2) |
CAUTION!

Unsuitable Documents!
Do not insert any documents into the device that ...
... are wet, have been edited with correction fluid, are soiled or have a coated surface.
… that are written on with a soft pencil, with paint, chalk or charcoal.
... originate from newspapers or magazines (printing ink).
… that are held together with office or notebook staples or with tape or glue.
... are pasted with note papers.
... are creased, crumpled or torn.
Loading Documents
The device is equipped with an automatic document feeder. Up to 50 Documents can be feed automatically into the machine to be scanned, faxed or copied. You can scan single documents or smaller templates using the flatbed scanner.
Insert Documents into the Automatic Document Feeder
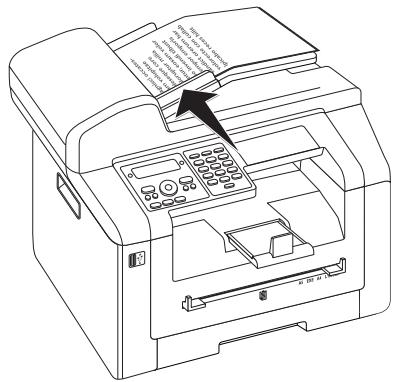
1 Insert the documents face up into the document feeder. The lower most document will be fed in first. You can insert up to 50 documents (80 g/m ^2 ) at a time.
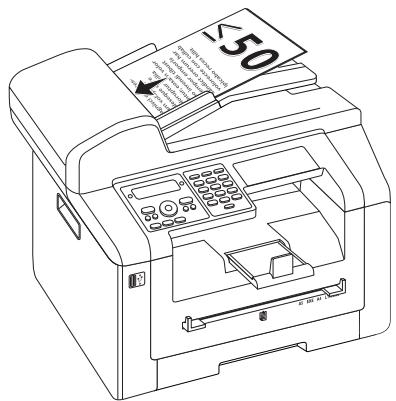
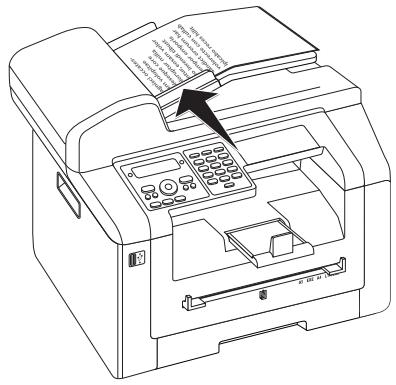
2 Push the document guide inwards, so that it lies level on the documents.
Place Documents onto the Flatbed Scanner
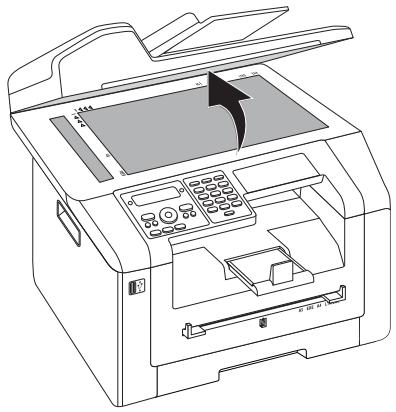
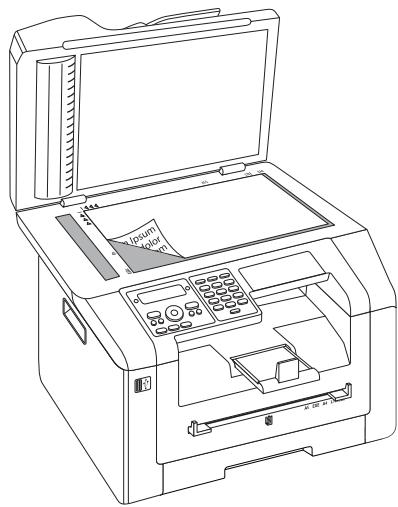
1 Open the scanner cover.
natural_image
Line drawing of a printer with control panel and paper tray (no text or symbols)2 Lay the document onto the scanner glass with the written side down.
natural_image
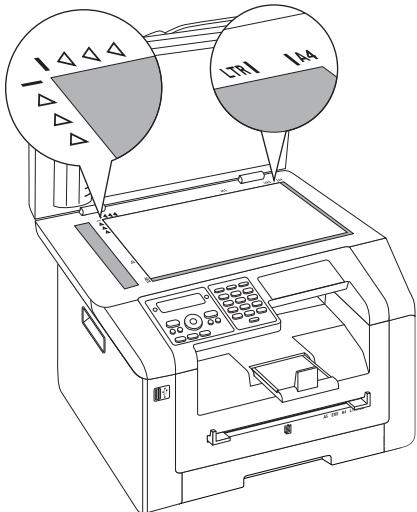
Line drawing of a printer with open lid and paper tray (no text or symbols)3 Align the document with the rear left corner of the scanner glass (arrow marks). The markings on the scanner border for the A4 and A5 formats will help you to position the document correctly.
Notice

Enlarge Detail
If you would like to copy a detail (such as a graphic) of your document, position the document so that the detail view is close to the source. Using the zoom function, you can separate the desired area from rest of the document.
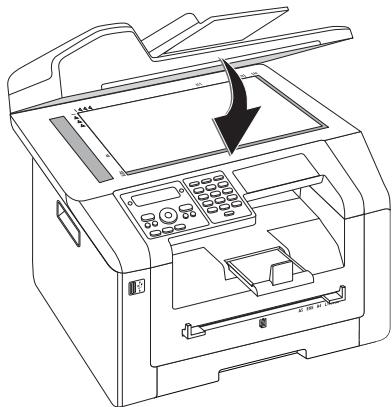
4 Close the scanner cover.
natural_image
Line drawing of a printer with an arrow indicating the process (no text or symbols present)Notice

Adjust Scanner Cover
The scanner cover is equipped with adjustable hinges, allowing you to lay even thicker documents (e.g. books) in the flat-bed scanner. Carefully lift the scanner cover so that it rests as evenly as possibly. Use clear sheets of plastic when copying three-dimensional objects (e.g. coins, flowers) to avoid damaging the scanner glass.
CAUTION!

Do Not Press on the Scanner Cover!
Do not press forcefully on the scanner cover when you scan thicker documents or three-dimensional items, this could damage the scanner cover and/or the scanner glass.
Scan Document and Save to a Computer
Using this function, scan a document with your device and transfer it onto a computer which is connected directly to the device using a USB cable.
Notice

Start Scanning from Computer
Using the Companion Center SFX software, you can call up the scan on the computer. You can also start the scanning process from any other graphics program if it is supported by the Twain Driver. Select the Twain Scanner Driver as your scanner.
Make Scans Using Standard Settings
1 Press SCAN.
2 Use ▲/▼ to select SCANTO PC USB.
3 Confirm with OK.
Notice

Access Function
You can also call the function by pressing C, 3 1 and OK.
4 Press OK.
Make Scans Using User-defined Settings
1 Press SCAN.
2 Use ▲/▼ to select SCANTO PC USB.
3 Confirm with OK.
4 Use ▲/▼ to select SETTINGS.
5 Confirm with OK.
Notice

Access Function
You can also call the function by pressing C, 3 1 and OK.
6 Using ▲/▼, select whether you want to scan the document in greyscale or in colour.
7 Confirm with OK.
8 Enter a name for the file.
Notice

Enter Letters
Enter capital letters by pressing and holding key. You can enter space using @.
The special characters available are located directly above the letter keypad and can be entered by pressing the ●- key and the respective letter key at the same time.
You can move the cursor using ▲/▼. Use C to delete individual characters.
9 Confirm with OK.
10 Using ▲/▼, select whether you would like to save the file as an image file or as a PDF file.
Notice

Select the File Format
For an image file, you can select whether you would like to save the file in TIFF or JPEG format (see also chapter on Selecting File Format, page 60).
11 Confirm with OK.
12 Select the desired resolution using ⚫F:
DRAFT(100)—Scanning with reduced resolution—for use on the Internet, for example
TEXT B&W (300)—Black and white scan with high resolution for optical character recognition of text documents (OCR)
PHOTO(200)—Scanning with higher resolution - for photographs, for example
HQ(300)—Scanning with highest resolution
13 Confirm with OK.
14 Set the desired contrast using ▲/▼.
-/1—Reduces the contrast / typeface appears lighter
4 (Factory settings)—Optimized adaptation for all documents
+/7—Increases the contrast / typeface appears darker (for example, documents with faint print)
15 Confirm with OK.
16 Using ▲/▼, select the desired level of brightness:
-/1—Reproduction is lighter
4 (Factory settings)—Optimized adaptation for all documents
+/7—Reproduction is darker
17 Press ◆. The document is scanned and transferred to the computer.
18 If you want to scan a multiple page document with the flatbed scanner, insert another page and select NEXT PAGE with ▲/▼NEXT PAGE.
19 Confirm with OK.
Scan Document and Save onto a USB Storage Medium
CAUTION!

Compatible USB Storage Media!
Ensure that the power of a USB device does not exceed the permitted amp limit of the USB connection. You can only connect one high power device (USB 2.0) to each USB connection. Do not connect additional devices—such as batteries, fans, charging devices—to your machine. The device only recognises storage media which are formatted with FAT16 or FAT32. NTFS is not supported.
Notice

Analysing USB Storage Medium
If a lot of documents are saved on the USB storage medium, it can take a while for the USB storage medium to be analysed. You can interrupt the process at any time, by pressing Ⓤ.
You can scan documents with your device and save them as JPG-, PDF-, or TIFF-files on a connected USB storage medium.
Notice

Folder Destination
The files will be stored in the folder [device name]\Scan on the USB storage medium. If this folder does not exist, then it will be created.
1 Insert the document.
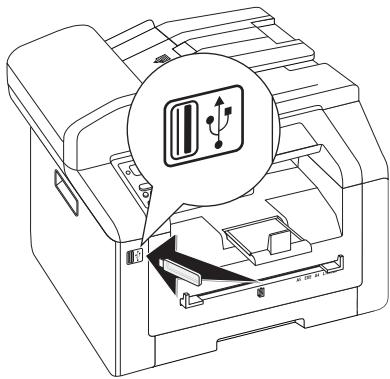
2 Make sure that a USB storage medium is connected to the USB host port on the front or on the backside of the device. Connect a USB storage medium as required.
natural_image
Line drawing of a printer with an icon highlighting internal components (no text or symbols present)Notice

Selection Menu for USB Storage Media
The selection menu for USB storage media appears on the display as soon as you connect a USB storage medium (USB stick, external hard drive etc.) to the USB host port on the front of the device.
3 Using ▲/▼ SCAN TO USB select from the menu or press C, 9 1 3 and OK.
Notice

Access Function
You can also call the function by pressing C, 3 2 and OK.
4 Using ▲/▼, select whether you want to scan the document in greyscale or in colour.
5 Confirm with OK.
6 Enter a name for the file.
Notice

Enter Letters
Enter capital letters by pressing and holding key. You can enter space using @.
The special characters available are located directly above the letter keypad and can be entered by pressing the ●- key and the respective letter key at the same time.
You can move the cursor using ▲/▼. Use C to delete individual characters.
7 Confirm with OK.
8 Using ▲/▼, select whether you would like to save the file as an image file or as a PDF file.
Notice

Select the File Format
For an image file, you can select whether you would like to save the file in TIFF or JPEG format (see also chapter on Selecting File Format, page 60).
9 Confirm with OK.
10 Select the desired resolution using ▲/▼:
DRAFT(100)—Scanning with reduced resolution—for use on the Internet, for example
TEXT B&W (300)—Black and white scan with high resolution for optical character recognition of text documents (OCR)
PHOTO(200)—Scanning with higher resolution - for photographs, for example
HQ(300)—Scanning with highest resolution
11 Confirm with OK.
12 Set the desired contrast using ▲/▼.
-/1—Reduces the contrast / typeface appears lighter
4 (Factory settings)—Optimized adaptation for all documents
+/?—Increases the contrast / typeface appears darker (for example, documents with faint print)
13 Confirm with OK.
14 Using ▲/▼, select the desired level of brightness:
-/1—Reproduction is lighter
4 (Factory settings)—Optimized adaptation for all documents
+/7—Reproduction is darker
15 Confirm with OK. The document is scanned and saved on the USB storage medium.
16 If you want to scan a multiple page document with the flatbed scanner, insert another page and select NEXT PAGE with ▲/▼.
CAUTION!

Removing USB Storage Media!
Never pull out the storage medium while the device is accessing it. This could cause data to be damaged or lost.
Scanning Document and
Saving on Network
Computer
Using this function, scan a document with your device and transfer it onto a computer which is connected to the device via network.
Notice

Start Scanning from Computer
Using the Companion Center SFX software, you can call up the scan on the computer. You can also start the scanning process from any other graphics program if it is supported by the Twain Driver. Select the Twain Scanner Driver as your scanner.
Make Scans Using Standard Settings
1 Press SCAN.
2 Use ▲/▼ to select SCAN TO LAN.
3 Confirm with OK.
Notice

Access Function
You can also call the function by pressing C, 3 6 and OK.
4 Select the desired target computer from the list of connected network computers using ▲/▼.
5 Confirm with OK.
6 Press OK.
Make Scans Using User-defined Settings
1 Press SCAN.
2 Use ▲/▼ to select SCAN TO LAN.
3 Confirm with OK.
Notice

Access Function
You can also call the function by pressing C, 3 6 and OK.
4 Select the desired target computer from the list of connected network computers using ▲/▼.
5 Confirm with OK.
6 Use ▲/▼ to select SETTINGS.
7 Confirm with OK.
8 Select the desired resolution using F:
DRAFT(100)—Scanning with reduced resolution—for use on the Internet, for example
TEXT B&W (300)—Black and white scan with high resolution for optical character recognition of text documents (OCR)
PHOTO(200)—Scanning with higher resolution - for photographs, for example
HQ(300)—Scanning with highest resolution
9 Confirm with OK.
10 Using ▲/▼, select whether you want to scan the document in greyscale or in colour.
11 Confirm with OK.
12 Enter a name for the file.
Notice

Enter Letters
Enter capital letters by pressing and holding ↑ key. You can enter space using ⊥ @.
The special characters available are located directly above the letter keypad and can be entered by pressing the ●- key and the respective letter key at the same time.
You can move the cursor using ▲/▼. Use C to delete individual characters.
13 Confirm with OK.
14 Using ▲/▼, select whether you would like to save the file as an image file or as a PDF file.
Notice

Select the File Format
For an image file, you can select whether you would like to save the file in TIFF or JPEG format (see also chapter on Selecting File Format, page 60).
15 Press ◆. The document is scanned and transferred to the computer.
16 If you want to scan a multiple page document with the flatbed scanner, insert another page and select NEXT PAGE with ▲/▼NEXT PAGE.
17 Confirm with OK.
Scanning with the Companion Center SFX
With the Companion Center SFX software, you can scan documents and then edit them on the computer.
1 Start the software Companion Center SFX, by clicking on the Companion Center SFX icon on your desktop or selecting Start > Programs > Companion Center SFX > Laser SFX > Companion Center SFX in the Start Menu.
2 The light in the upper-right corner shows whether or not the device is connected to the computer and is functioning properly.
3 Selecting the Scan tab.
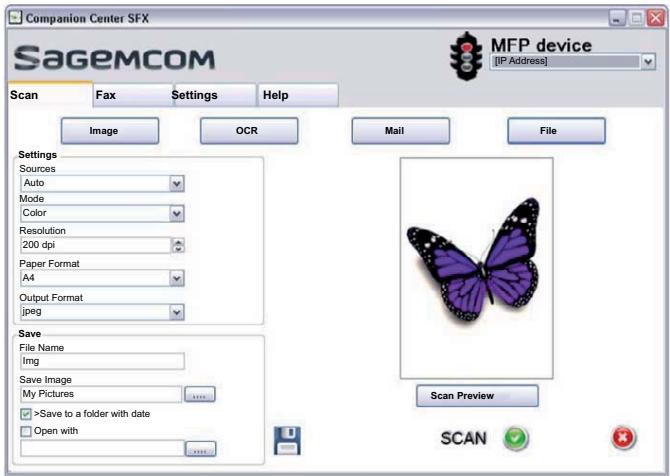
4 Select from the default settings for various usage profiles.
Image—Optimized settings for scanning photos.
OCR—(Optical character recognition) Reading printed text and importing it as a text document which can be edited and modified. Photos or handwritten texts are excluded from character recognition.
Mail—The scan is attached to an e-mail.
File—The scan is saved as a file.
5 If you would like to change the current settings, the following functions are available:
Sources—Automatic document feeder or flat-bed scanner as scan source
Mode—Scan in the black-and-white mode (also called “barcode mode”) or in the grey tone mode.
Resolution—Select the scan resolution
Paper Format—Setting the paper format
Output Format—Select the file format
6 In File Name, enter the name of the output file.
7 Under Save Image, select the folder where the file is to be saved. With the option >Save to a folder with date, the file is saved in a folder with the current date.
8 Activate the function Open with if you want to open the scanned file after the scanning process is complete. Select the desired program. For example, you can open an image file in an image-editing program, an OCR in a word-processing program, or an email attachment in your email program.
9 Click on Scan Preview to see a preview of the scanned document.
10 Click on the button Scan in order to start the scanning process.
7 Printer and Printing Media
Notice

Printing from Computer
When you install the Companion Center SFX on your computer, the device is also installed as a printer under Windows. In the print menu under Start > Settings > Printers, you will find your device listed as Laser Printer Scanner.
You can access your device from any program and use it to make black-and-white print-outs just as you would use any other printer. Simply select the Laser Printer Scanner as your printer.
Specifications for Print Media
You can insert normal printing paper or printed documents (forms) into the paper tray. You can insert special paper formats, envelopes, slides, sheets of labels or printed documents into the manual paper feed.
| Paper Tray | |
| Paper Sizes | Size A4·A5·B5 (JIS) ·Letter · Legal (13/14") ·Exec |
| Weight | 60–105 g/m2 |
| Capacity | 250 sheets |
| Manual Paper Feed | |
| Paper Sizes | Width: 98–216 mmLength: 148–356 mm |
| Weight | 60–165 g/m ^2 |
| Capacity | 1 sheets |
CAUTION!

Unsuitable Paper!
Do not insert any sheets of paper into the paper tray ...
... are wet, have been edited with correction fluid, are soiled or have a coated surface.
… that are held together with office or notebook staples or with tape or glue. Use sheets of labels for use in laser printers.
... are pasted with note papers.
... are creased, crumpled or torn.
CAUTION!

Forms from a Laser Printer!
Forms that have been printed out by a laser printer are not suitable for further printing.
Insert Paper into the Paper Tray
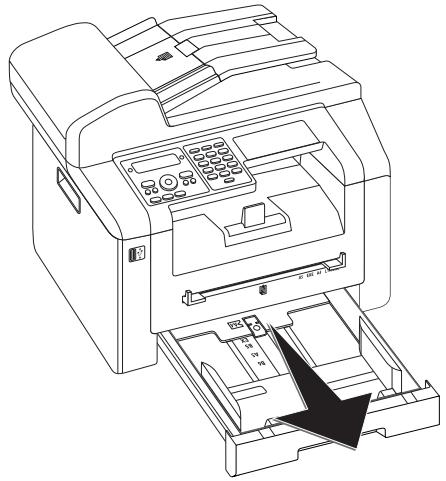
1 Pull the paper tray out of the device.
natural_image
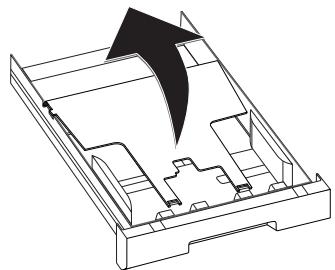
Line drawing of a printer with an open drawer and internal control panel (no text or symbols)2 Lift up the cover of the paper tray
natural_image
Isometric technical diagram of a mechanical component with an arrow indicating direction (no text or symbols)CAUTION!

Initial Operation!
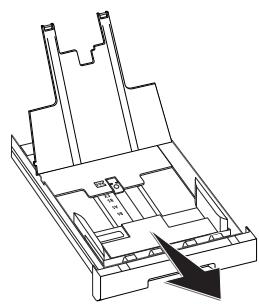
Please remove the protective cardboard from the paper tray before loading paper and replacing the paper tray into the device.
natural_image
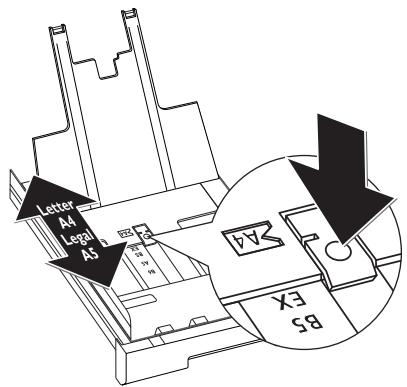
Isometric line drawing of a mechanical or architectural component with no visible text, numbers, or symbols.3 Adjust the length of the paper tray to the printer paper. Press the lock key on the base of the paper tray. Slide the rear panel until it snaps into the suitable marking: Legal = LG, A4 = A4, A5 = A5, Letter = LE, B5 = B5.
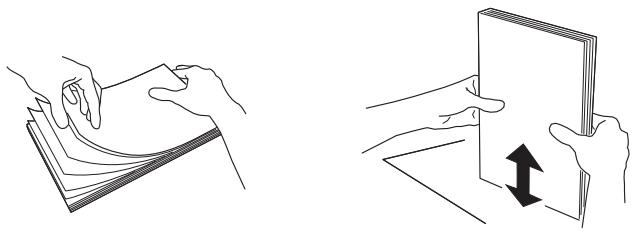
4 Separate the paper sheets by fanning them out, then align them by tapping edge of the stack lightly against a flat surface. This will prevent several sheets of paper from being drawn in all at once.
natural_image
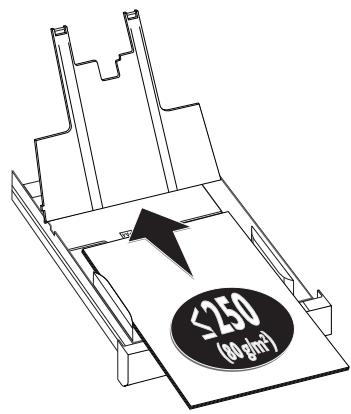
Two line drawings showing hands folding and holding a book, with an upward arrow indicating motion (no text or symbols)5 Insert the paper into the paper tray. You can load up to 250 sheets (80 g/m ^4 ).
Notice

Loading Pre-printed Material
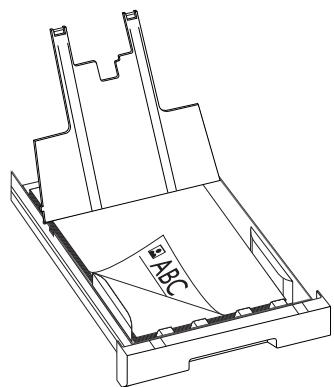
If you would like to print on an input sheet (for example, forms or stationery), place the input sheet face down in the paper tray, with the top of the page towards the front.
CAUTION!

Forms from a Laser Printer!
Forms that have been printed out by a laser printer are not suitable for further printing.
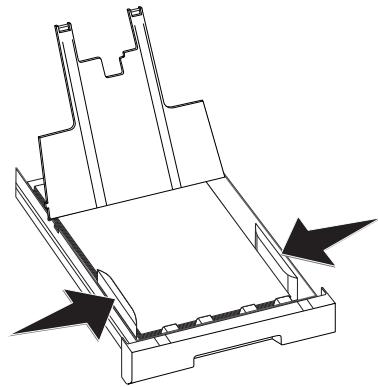
6 Enclose the paper with the two side paper guides. Be sure not to enclose it so tightly that it bends.
natural_image
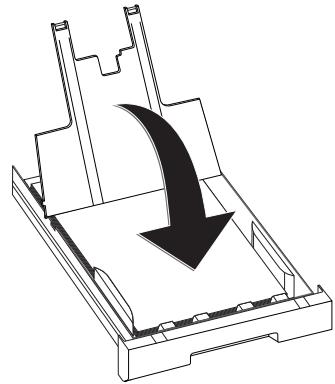
Technical line drawing of a mechanical component with arrows indicating direction (no text or symbols)7 Close the paper tray cover.
natural_image
3D diagram of a mechanical component with a curved arrow indicating direction (no text or symbols)Notice

Cover of the Paper Tray
If the cover of the paper tray has become detached, fasten the lid into the supports Ensure that the flat side of the cover (with the inscription) faces upwards.
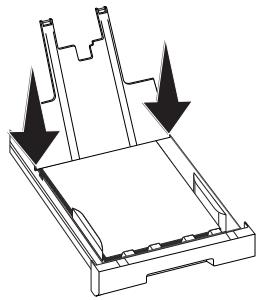
natural_image
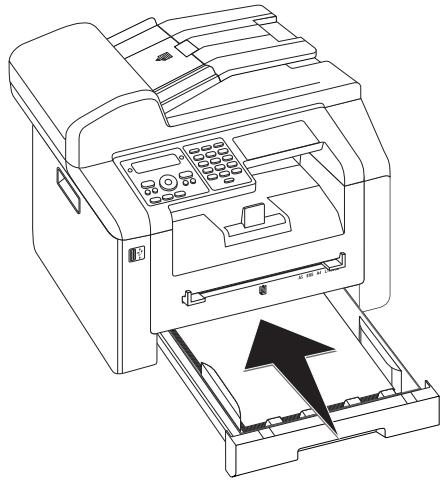
Technical line drawing of a mechanical component with arrows indicating downward motion (no text or symbols)8 Push the paper tray into the device all the way to the stopping point.
natural_image
Line drawing of a printer with an open drawer and control panel, showing no text or symbols.Load Paper into the Manual Paper Feed
1 Press C, 2 0 2 and OK.
2 Select the manual paper feed using ▲/▼.
3 Confirm with OK.
4 Load the paper into the manual paper feed on the front of the device.
5 Enclose the paper with the two side paper guides. Be sure not to enclose it so tightly that it bends.
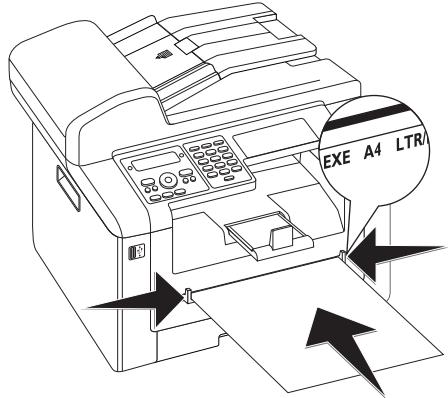
CAUTION!

Reset Settings
Reset the standard setting again after the print job so that the paper feed from the paper tray is guaranteed for incoming fax transmissions.
Loading Envelopes
You can print on envelopes directly using the manual paper feed.
CAUTION!

Unsuitable Envelopes!
Do not use envelopes with self-adhesive flaps, window envelopes or envelopes with metal fasteners.
1 Load the envelope into the manual paper feed on the front of the device. The short edge must face the direction of the device. The side which is to be printed should lay face up. The envelope flap must be face down on the left hand side.
2 Enclose the envelope with the two side paper guides. Ensure that the envelope is not inserted so tightly that it bends.
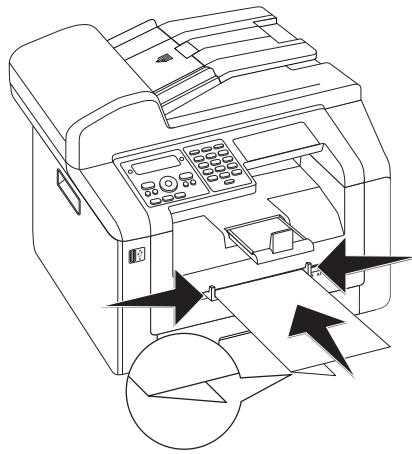
natural_image
Line drawing of a printer with paper being inserted, showing internal components and arrows indicating print direction (no text or symbols)Inserting Slides and Labels
Use slides which are designed for copiers and laser printers as they must stand up to high temperatures and printing. The printing side is usually somewhat rougher than the reverse side.
You can insert slides and sheets of labels into the paper tray and into the manual paper feed. It is preferable to use the manual paper feed for printing on this print media (see also chapter onLoad Paper into the Manual Paper Feed, page 28).
CAUTION!

Unsuitable Slides and Labels!
Do not use slides which are designed for manual inscription or for an overhead projector. These slides can melt in the device and damage it.
Use sheets of labels for use in laser printers. The labels must cover the entire sheet otherwise they could peel off in the device.
Loading Pre-printed Material
CAUTION!

Forms from a Laser Printer!
Forms that have been printed out by a laser printer are not suitable for further printing.
Insert the Template into the Paper Tray
If you would like to print on an input sheet (for example, forms or stationery), place the input sheet face down in the paper tray, with the top of the page towards the front.
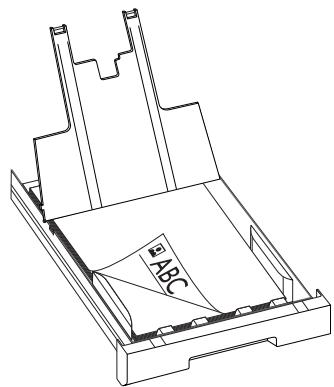
Load Templates into the Manual Paper Feed
If you would like to print on an input sheet (for example, forms or stationery), place the input sheet face up with the top of the page facing forwards (towards the device) into the manual paper feed.
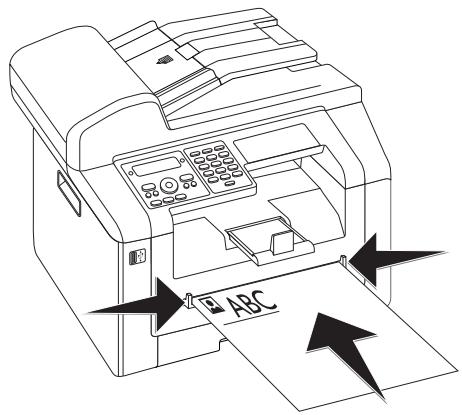
Print a List of Available Documents on USB Storage Medium
CAUTION!

Compatible USB Storage Media!
Ensure that the power of a USB device does not exceed the permitted amp limit of the USB connection. You can only connect one high power device (USB 2.0) to each USB connection. Do not connect additional devices—such as batteries, fans, charging devices—to your machine. The device only recognises storage media which are formatted with FAT16 or FAT32. NTFS is not supported.
Notice

Analysing USB Storage Medium
If a lot of documents are saved on the USB storage medium, it can take a while for the USB storage medium to be analysed. You can interrupt the process at any time, by pressing ☑.
You can print a list of all the TXT-, JPEG-, and TIFF files on the connected USB storage medium.
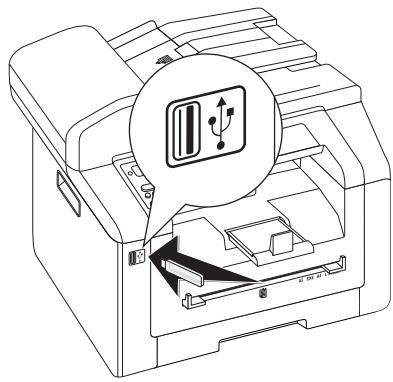
1 Make sure that a USB storage medium is connected to the USB host port on the front or on the backside of the device. Connect a USB storage medium as required.
natural_image
Line drawing of a printer with internal components and a speech bubble highlighting a device (no text or symbols present)Notice

Selection Menu for USB Storage Media
The selection menu for USB storage media appears on the display as soon as you connect a USB storage medium (USB stick, external hard drive etc.) to the USB host port on the front of the device.
2 Using ▲/▼ PRINT LIST select from the menu or press C, 9 1 1 and OK. The list is printed.
Notice

Access Function
You can also call the function by pressing C, 2 1 1 and OK.
CAUTION!

Removing USB Storage Media!
Never pull out the storage medium while the device is accessing it. This could cause data to be damaged or lost.
Print Document from USB Storage Medium
CAUTION!

Compatible USB Storage Media!
Ensure that the power of a USB device does not exceed the permitted amp limit of the USB connection. You can only connect one high power device (USB 2.0) to each USB connection. Do not connect additional devices—such as batteries, fans, charging devices—to your machine. The device only recognises storage media which are formatted with FAT16 or FAT32. NTFS is not supported.
Notice

Analysing USB Storage Medium
If a lot of documents are saved on the USB storage medium, it can take a while for the USB storage medium to be analysed. You can interrupt the process at any time, by pressing ☑.
You can print one or more of the TXT-, JPEG-, and TIFF files on the connected USB storage medium.
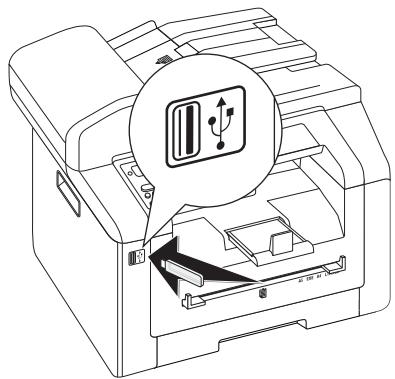
1 Make sure that a USB storage medium is connected to the USB host port on the front or on the backside of the device. Connect a USB storage medium as required.
natural_image
Line drawing of a printer with an open slot and a magnified inset showing internal components (no text or symbols)Notice

Selection Menu for USB Storage Media
The selection menu for USB storage media appears on the display as soon as you connect a USB storage medium (USB stick, external hard drive etc.) to the USB host port on the front of the device.
2 Using ▲/▼ PRINT FILE select from the menu or press C, 9 1 2 and OK.
Notice

Access Function
You can also call the function by pressing C, 2 1 2 and OK.
Notice

Navigating within the Directory
Press OK to open a folder in the directory. Use C to return to the next upper level directory
3 Enter the initial letters or select the file you would like to print ▲/▼.
4 Press OK to highlight the file. Files to be printed are flagged with a star (*).
5 To add more files, select the file using the arrow keys and press OK. You can only select files from the same directory.
Notice

Select Files Using the Arrow Keys
You can select multiple successive files. Press ↑ and OK to switch the function on/off. Highlight the desired files using ▲/▼. Once files have been selected, they cannot be removed from the selection.
6 Press ◆ to complete the selection.
Notice

Navigating in the Menu
Press Ⓥ to close the menu and return to the starting mode.
7 Enter the number of times you would like to copy the document (maximum of 9 9 copies).
8 Confirm with OK.
9 Using ▲/▼ select the paper source.
10 Confirm with OK.
11 Use ▲/▼ to select the desired paper format. Follow the specifications in the technical data.
12 Confirm with OK.
13 Using ▲/▼ select the weight of the inserted paper.
14 Press ◆ to start the printing process.
CAUTION!

Removing USB Storage Media!
Never pull out the storage medium while the device is accessing it. This could cause data to be damaged or lost.
Delete Files on USB Storage Medium
CAUTION!

Compatible USB Storage Media!
Ensure that the power of a USB device does not exceed the permitted amp limit of the USB connection. You can only connect one high power device (USB 2.0) to each USB connection. Do not connect additional devices—such as batteries, fans, charging devices—to your machine. The device only recognises storage media which are formatted with FAT16 or FAT32. NTFS is not supported.
Notice

Analysing USB Storage Medium
If a lot of documents are saved on the USB storage medium, it can take a while for the USB storage medium to be analysed. You can interrupt the process at any time, by pressing Ⓤ.
You can delete files from the connected USB storage medium.
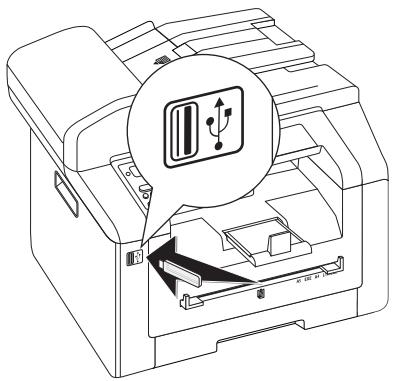
1 Make sure that a USB storage medium is connected to the USB host port on the front or on the backside of the device. Connect a USB storage medium as required.
natural_image
Line drawing of a printer with an open slot and internal components, no text or symbols presentNotice

Selection Menu for USB Storage Media
The selection menu for USB storage media appears on the display as soon as you connect a USB storage medium (USB stick, external hard drive etc.) to the USB host port on the front of the device.
2 Using ▲/▼ DELETE select from the menu or press C, 9 1 5 and OK.
Notice

Navigating within the Directory
Press OK to open a folder in the directory. Use C to return to the next upper level directory
3 Enter the initial letters or select the file you would like to delete ▲/▼.
4 Press OK to highlight the file. Files that are to be deleted are flagged with a star (*).
5 To add more files, select the file using the arrow keys and press OK. You can only select files from the same directory.
Notice

Select Files Using the Arrow Keys
You can select multiple successive files. Press ↑ and OK to switch the function on/off. Highlight the desired files using ▲/▼. Once files have been selected, they cannot be removed from the selection.
6 Press ◆ to complete the selection.
Notice

Navigating in the Menu
Press Ⓥ to close the menu and return to the starting mode.
7 Confirm the deletion with OK.
CAUTION!

Delete Files!
You cannot interrupt the deleting process. Deleted files cannot be restored.
CAUTION!

Removing USB Storage Media!
Never pull out the storage medium while the device is accessing it. This could cause data to be damaged or lost.
Print Calendar
Your device prints a weekly overview as a calendar page for you – for the current week, the coming week or a freely selectable week.
1 Press C, 8 5 and OK.
2 Using ▲/▼, select whether you would like to print a calendar page of the current week, the coming week or a freely selectable week.
3 Confirm with OK.
4 User-Defined Week: Enter the year and the week (two digits for each field) for which you would like to print a calendar page for example 2 5 4 0 for the year 2025, week 40.
5 Confirm with OK.
Sudoku: Printing a Game
Sudoku is a Japanese number puzzle. The game has 3 × 3 squares divided into 3 × 3 fields. Depending on the difficulty level, lesser or more digits are already given at the beginning of the game. The aim of the game is to fill digits from 1 to 9 in the game field is such a way that each digit appears only once in a row, a column and each of the nine blocks. There is only one solution.
Printing a Game
1 Press C, 8 6 1 and OK.
2 Using ▲/▼ select the difficulty level.
3 Confirm with OK.
4 Enter, how many copies of the Sudoku you would like to print (maximum 9 copies).
5 Confirm with OK.
6 Using ▲/▼ select if you would like to print the solution.
7 Confirm with OK.
Printing the Last Game Again
1 Press C, 8 6 2 and OK.
2 Enter, how many copies of the Sudoku you would like to print (maximum 9 copies).
3 Confirm with OK.
4 Using ▲/▼ select if you would like to print the solution.
5 Confirm with OK.
Printing the Solution
Notice

Last Solution Available
The solution of the last printed game is saved. The solutions of earlier games are no longer available.
Press C, 8 6 3 and OK.
Sudoku for Every Day
You can have a new Sudoku automatically printed each day.
1 Press C, 8 6 4 and OK.
2 Enter the time, e.g. 1400 for 2 pm.
3 Confirm with OK.
4 Using ▲/▼ select the difficulty level.
5 Confirm with OK.
6 Enter, how many copies of the Sudoku you would like to print (maximum 9 copies).
7 Confirm with OK.
8 Using ▲/▼ select if you would like to print the solution.
9 Confirm with OK.
10 Using ▲/▼ indicate whether you would like to turn printing on or off.
11 Confirm with OK.
Notice

Switching Off Function
You can turn off the daily Sudoku print by selecting the function as described above and by switching off the automatic printing under point 10.
8 Copier
| Specifications for Documents | |
| Width of Documents | 208–218 mm |
| Length of Documents | 277–600 mm |
| Paper Weight of the Documents | 60 - 90 g/m2 |
| Capacity | 50 page (80 g/m2) |
| Manufacturer's Recommendation for Optimum Operation | A4 · A5 · Letter · Legal (80 g/m2) |
CAUTION!

Unsuitable Documents!
Do not insert any documents into the device that ...
... are wet, have been edited with correction fluid, are soiled or have a coated surface.
… that are written on with a soft pencil, with paint, chalk or charcoal.
… originate from newspapers or magazines (printing ink).
… that are held together with office or notebook staples or with tape or glue.
... are pasted with note papers.
... are creased, crumpled or torn.
Loading Documents
The device is equipped with an automatic document feeder. Up to 50 Documents can be feed automatically into the machine to be scanned, faxed or copied. You can scan single documents or smaller templates using the flatbed scanner.
Insert Documents into the Automatic Document Feeder
1 Insert the documents face up into the document feeder. The lower most document will be fed in first. You can insert up to 50 documents (80 g/m ^2 ) at a time.
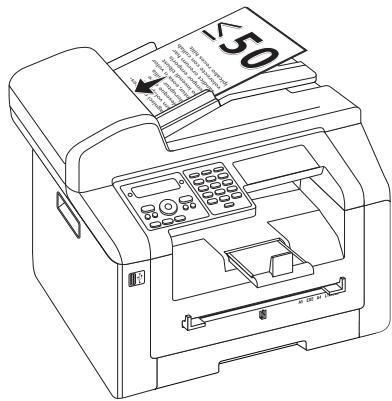
2 Push the document guide inwards, so that it lies level on the documents.
Place Documents onto the Flatbed Scanner
1 Open the scanner cover.
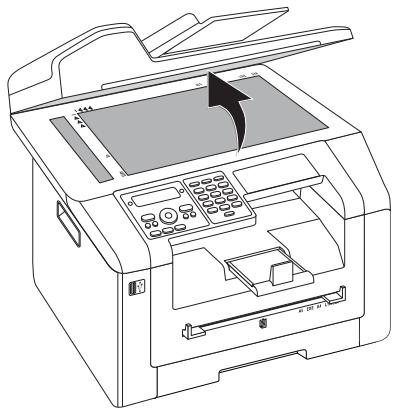
natural_image
Line drawing of a printer with control panel and paper tray (no text or symbols)2 Lay the document onto the scanner glass with the written side down.
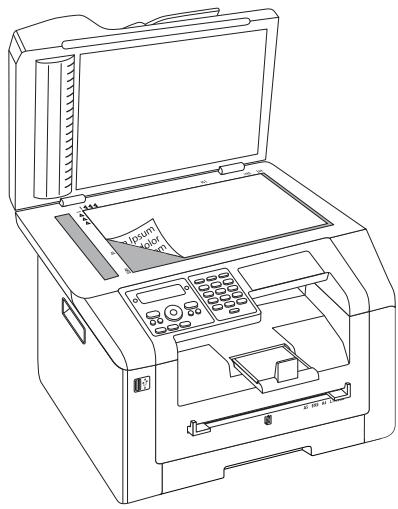
natural_image
Line drawing of a printer with open lid and internal compartments (no text or symbols)3 Align the document with the rear left corner of the scanner glass (arrow marks). The markings on the scanner border for the A4 and A5 formats will help you to position the document correctly.
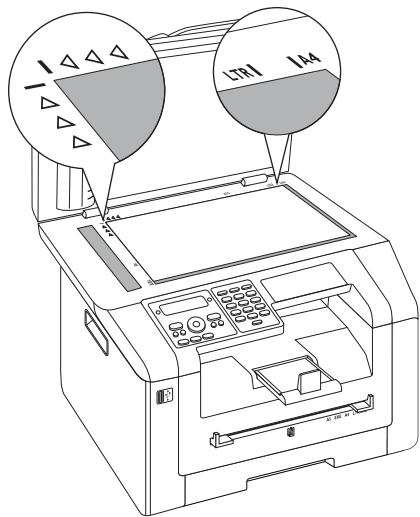
Notice

Enlarge Detail
If you would like to copy a detail (such as a graphic) of your document, position the document so that the detail view is close to the source. Using the zoom function, you can separate the desired area from rest of the document.
4 Close the scanner cover.
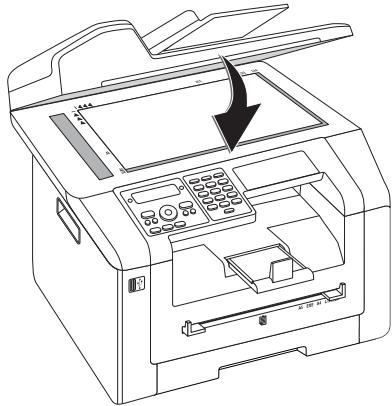
natural_image
Line drawing of a printer with an open lid and control panel, showing no text or symbols.Notice

Adjust Scanner Cover
The scanner cover is equipped with adjustable hinges, allowing you to lay even thicker documents (e.g. books) in the flat-bed scanner. Carefully lift the scanner cover so that it rests as evenly as possibly.
Use clear sheets of plastic when copying three-dimensional objects (e.g. coins, flowers) to avoid damaging the scanner glass.
CAUTION!

Do Not Press on the Scanner Cover!
Do not press forcefully on the scanner cover when you scan thicker documents or three-dimensional items, this could damage the scanner cover and/or the scanner glass.
Make Copy Using Standard Settings
In the starting mode, the selected settings for resolution, magnification/reduction factor, selected paper size and simplex or duplex appear in the display.
1 Insert the document.
2 Press COPY twice. The copy is created.
Notice

ECO button
Press COPY and ECO to make a copy using the toner saving function.
Notice

Access Function
You can also call the function by pressing C, 1 and OK.
Modifying the Settings
Notice

Settings for the Next Print Job
Using this function, select the settings for the next print job. Change the basic settings using the functions of chapter Settings (see also chapter Settings, Page 56).
Set Resolution
Press F. The configured resolution appears on the display. Press F again to change the setting. You can choose between:
AUTO—Optimised adjustment for all types of documents
TEXT—For texts with small print or drawings
QUALITY—For documents with many details
PHOTO—For the highest resolution
Notice

Modifying the Basic Settings
Modify the basic setting by pressing C, 1 0 3 and OK.
Setting the Zoom Parameter
1 Press 9/ZOOM. The magnification/reduction factor appears on the display.
2 Select the desired setting using ▲/▼. Standard values are saved, for example, for compressing A4 to A5 or for adjusting the European DIN formats to American letter and legal formats
3 Confirm with OK.
Select One Side/Both Side Printing (Simplex/Duplex)
Press 📋/DUPLEX, to select double sided printing (Duplex). Press ⚫F, twice to select single side printing (Simplex).
Notice

Modifying the Basic Settings
Modify the basic setting by pressing C, 101 and OK.
Setting the Contrast
1 Press Ⓞ.
2 Set the desired contrast using ▲/▼.
-/1—Reduces the contrast / typeface appears lighter
4 (Factory settings)—Optimized adaptation for all documents
+/7—Increases the contrast / typeface appears darker (for example, documents with faint print)
3 Confirm with OK.
Creating Multiple Copies
1 Insert the document.
2 Enter the number of times you would like to copy the document (maximum of 9 9 copies). You can also change the number by pressing ▲/▼.
3 Press COPY twice.
Notice

ECO button
Press COPY and ECO to make a copy using the toner saving function.
Creating Crystal Copy with Image and Text Enhancement (Crystal)
Your device has the image and text enhancement function Crystal with which you achieve optimal printing and copying quality for your documents.
Crystal automatically performs all adjustments and corrections with regard to image sharpness, colour management and contrast in order to obtain the best possible printing quality. Exposure errors are also corrected (underexposed images are brightened or parts of the image with extremely different contrasts are brought into balance).
1 Insert the document.
2 Press COPY.
3 Use ▲/▼ to select CRYSTAL COPY.
4 Confirm with OK.
5 A preview of the document is scanned for analysis. Thereafter, the device creates the Crystal copy for the document The profile with the settings is saved for other documents.
Create Multiple Crystal Copies with a Saved Profile
1 Press C, 1 5 and OK.
2 Use ▲/▼ to select PRE SCAN.
3 Confirm with OK.
4 A preview of the document is scanned for analysis. Thereafter, the device creates the Crystal copy for the document The profile with the settings is saved for other documents.
5 If you would like to copy other documents with the same settings, select using ▲/▼ PREV. PROFILE. Only the last profile used is saved.
6 Confirm with OK.
Make Copies Using the Second Profile
Save settings which you would like to use frequently in a second profile, for example in order to copy a frequently used document type (see also chapter, page 38).
Make Copy Using the Second Profile
1 Insert the document.
2 Press COPY.
3 Select the second profile using ▲/▼.
Notice

Access Function
You can also call the function by pressing C, 12 and OK.
4 Press COPY.
Make Several Copies Using the Second Profile
1 Insert the document.
2 Enter the number of times you would like to copy the document (maximum of 9 9 copies). You can also change the number by pressing ▲/▼.
3 Press COPY.
4 Select the second profile using ▲/▼.
Notice

Access Function
You can also call the function by pressing C, 1 2 and OK.
5 Press COPY.
Notice

ECO button
Press COPY and ECO to make a copy using the toner saving function.
Make Copies Using User-Defined Settings
Notice

Make Copies
You can start the copying process at any time, by pressing COPY. Press ECO to make a copy using the toner saving function.
1 Insert the document.
2 Press COPY.
3 Use ▲/▼ to select the desired profile.
4 Confirm with OK.
5 Using ▲/▼ select the paper source.
6 Confirm with OK.
7 For Paper in the Manual Paper Feed: Use ▲/▼ to select the desired paper format.
8 Confirm with OK.
9 For Paper in the Manual Paper Feed: Use ▲/▼ to select the weight of the inserted paper.
10 Confirm with OK.
11 Select the desired resolution using ▲/▼:
AUTO—Optimised adjustment for all types of documents
TEXT—For texts with small print or drawings
QUALITY—For documents with many details
PHOTO—For the highest resolution
12 Confirm with OK.
13 Set the desired contrast using ▲/▼.
-/1—Reduces the contrast / typeface appears lighter
4 (Factory settings)—Optimized adaptation for all documents
+/7—Increases the contrast / typeface appears darker (for example, documents with faint print)
14 Confirm with OK.
15 Using ▲/▼, select the desired level of brightness:
-/1—Reproduction is lighter
4 (Factory settings)—Optimized adaptation for all documents
+/7—Reproduction is darker
16 Confirm with OK.
17 Select one-sided print (Simplex) or double-sided print (Duplex) using ▲/▼.
18 Confirm with OK.
19 Select whether the copies should be output sorted or unsorted using ▲/▼.
20 Press COPY.
Make Enlarged or Compressed Copies
Notice

Make Copies
You can start the copying process at any time, by pressing COPY. Press ECO to make a copy using the toner saving function.
1 Insert the document.
2 Press COPY.
3 Use ▲/▼ to select ZOOM.
4 Confirm with OK.
Notice

Access Function
You can also call the function by pressing C, 1 3 and OK.
5 Enter the number of times you would like to copy the document (maximum of 9 9 copies).
6 Confirm with OK.
7 You can make copies of the document that are enlarged or that are compressed in size. Size compression is possible down to 25 percent of the size of the original, and enlargements of up to 400 percent can be made. Enter the the desired value using the numeric keypad.
Notice

Select the Preset Values
Using ▲/▼ select from the preset values. Standard values are saved, for example, for compressing A4 to A5 or for adjusting the European DIN formats to American letter and legal formats
8 Press COPY, to start the copying process or OK, to configure further settings (see also chapter on make copies using adjusted settings, page 36).
Copying Several Documents onto one Page (= Mosaic Copy)
Notice

Make Copies
You can start the copying process at any time, by pressing COPY. Press ECO to make a copy using the toner saving function.
You can copy several documents onto one page to save paper. The documents are adjusted automatically during the copying process.
1 Insert the document.
2 Press COPY.
3 Using ▲/▼ select MOSAIC 2>1 or MOSAIC 4>1.
4 Confirm with OK.
Notice

Access Function
You can also access the function via the menu:
a. Press C, 14 and OK.
b. Use ▲/▼ to select the desired layout.
① Two documents on one page.
② Four documents on one page.
1
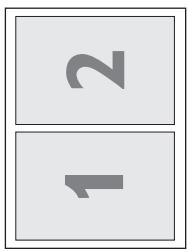
2
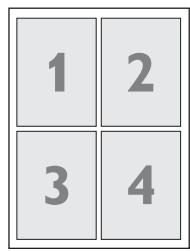
5 Press COPY, to start the copying process or OK, to configure further settings (see also chapter on make copies using adjusted settings, page 36).
Copying both Sides of a Document onto One Side (= Business Card Copy)
Using the business card copy, you can copy both sides of a small document (for example of a business card) onto one page
CAUTION!

Reproduction Not Permitted
The reproduction of certain documents (e.g. by scanning, printing, copying) is prohibited in many countries. Observe the legal notes for reproduction of certain documents in the appendix (page 86).
1 Insert the document. Place the document in the upper half of the scanning area.
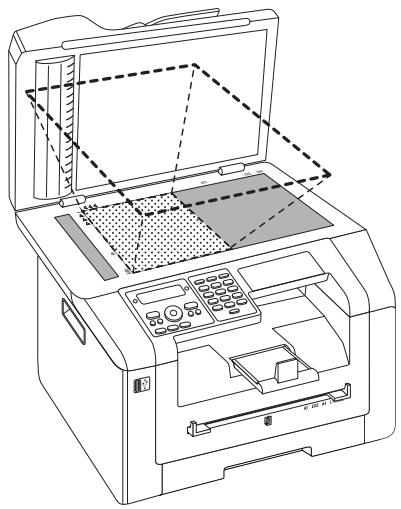
natural_image
Line drawing of a printer with open lid and internal control panel (no text or symbols)Notice

Document Size
The document cannot be larger than half of the print paper (for example) A5 document with A4 printing paper)
2 Press COPY.
3 Use ▲/▼ to select ID CARD COPY.
4 Confirm with OK.
Notice

Access Function
You can also call the function by pressing C, 1 6 and OK.
5 The first page of the document is scanned.
6 Turn the document over when the corresponding messages appear on the display. Place it in the same place as the first page.
7 Confirm with OK. The second page of the document is scanned and the copy is created.
Configure Settings for Second Profile
Select One Side/Both Side Printing (Simplex/Duplex)
1 Press C, 1 0 6 1 and OK.
2 Select one-sided print (Simplex) or double-sided print (Duplex) using ▲/▼.
3 Confirm with OK.
Print the Pages Sorted
Sorted copies can be output when creating multiple copies of a multiple page document. The devices scans both sides of the document and prints sorted copies of the document with the correct pagination
When using the unsorted copy process, copies of all sides are output one after the other; the copy process starts after the first side has been scanned.
1 Press C, 1 0 6 2 and OK.
2 Select whether the copies should be output sorted or unsorted using ▲/▼.
3 Confirm with OK.
Set Resolution
1 Press C, 1 0 6 3 and OK.
2 Select the desired resolution using ▲/▼:
AUTO—Optimised adjustment for all types of documents
TEXT—For texts with small print or drawings
QUALITY—For documents with many details
PHOTO—For the highest resolution
3 Confirm with OK.
Setting the Contrast
1 Press C, 1 0 6 4 and OK.
2 Set the desired contrast using ▲/▼.
-/1—Reduces the contrast / typeface appears lighter
4 (Factory settings)—Optimized adaptation for all documents
+/7—Increases the contrast / typeface appears darker (for example, documents with faint print)
3 Confirm with OK.
Setting the Brightness
1 Press C, 1 0 6 5 and OK.
2 Using ▲/▼, select the desired level of brightness:
-/1—Reproduction is lighter
4 (Factory settings)—Optimized adaptation for all documents
+/7—Reproduction is darker
3 Confirm with OK.
9 Telephone Book of the Device
Notice

Calling the Web Interface
You can also edit the entries of the telephone book with the device's web interface (see also the chapter Web Interface, page 19).
You can store new entries, search for entries as well as set and edit groups. You can save up to 250 entries in the telephone book of your device.
Notice

Navigating in the Editor
You can move the cursor using ▲/▼. Use C to delete individual characters. Press Ⓥ to close the menu and return to the starting mode.
Looking up an Entry
1 Press C, 5 1 1 and OK.
2 Select an entry using ▲/▼. Enter the initial letters with the letter keypad to quickly navigate through the telephone book.
Saving Entry
Notice

No Repeat Entries
You cannot save two entries under the same name.
1 Press C, 5 1 2 and OK.
2 Fold the protective cover of the letter keypad up
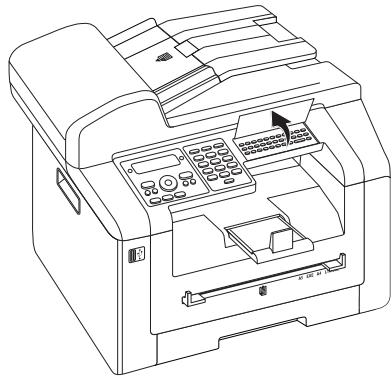
natural_image
Line drawing of a printer with control panel and paper feed (no text or symbols)3 Enter the name using the keys (A—Z).
Notice

Enter Letters
Enter capital letters by pressing and holding key. You can enter space using @.
The special characters available are located directly above the letter keypad and can be entered by pressing the ●- key and the respective letter key at the same time.
You can move the cursor using ▲/▼. Use C to delete individual characters.
4 Confirm with OK.
5 Enter the number using the number pad.
6 Confirm with OK.
Notice

Number from the Last Number Redial List
You can retrieve a saved number from the list of the last numbers dialled and last calls received (redial/caller list). Press ⬆. Select an entry using ▲/▼. Confirm with OK.
Notice

Outside Line Access Code
If you have set your device up to work on a public telephone network (see Private Branch Exchange) and entered the outside line access code, save the number without the outside line access code (see also chapter Setting up outside line access code (PABX), page 64).
7 You can assign a ring tone to the number. Use ▲/▼ or the number buttons 1 to 7 to select a ring tone.
8 Confirm with OK.
Notice

Assigning the Standard Ring Tone
Select 1, in order to assign the standard ring tone to the number.
9 Select the speed for fax transmissions to this recipient. Normally you can select the highest speed. Set a lower transmission speed if you are sending faxes into networks with poor line quality.
10 Confirm with OK. The entry is saved.
Edit Entry
1 Press C, 5 1 4 and OK.
2 Using ▲/▼ select the entry which you would like to edit.
3 Confirm with OK.
4 Edit the name.
5 Confirm with OK.
6 Edit the number.
7 Confirm with OK.
8 You can assign a ring tone to the number. Use ▲/▼ or the number buttons 1 to 7 to select a ring tone.
9 Confirm with OK.
Notice

Assigning the Standard Ring Tone
Select 1, in order to assign the standard ring tone to the number.
10 Select the speed for fax transmissions to this recipient. Normally you can select the highest speed. Set a lower transmission speed if you are sending faxes into networks with poor line quality.
11 Confirm with OK. The entry is saved.
Delete an Entry
1 Press C, 5 1 5 and OK.
2 Use ▲/▼ to select DELETE: SINGLE.
3 Confirm with OK.
4 Using ▲/▼ select the entry which you would like to delete.
5 Confirm with OK.
6 Use ▲/▼ to select DELETE: YES.
7 Confirm with OK.
Delete all Entries
CAUTION!

All Telephone Book Entries are Deleted!
This function deletes all entries and groups in your telephone book.
1 Press C, 5 1 5 and OK.
2 Use ▲/▼ to select DELETE: ALL.
3 Confirm with OK.
4 Use ▲/▼ to select DELETE: YES.
5 Confirm with OK.
Printing the Telephone Book
Printing List of all Entries
Press C, 83 and OK to print a list of all saved entries and groups in the telephone book.
Printing an Individual Entry
1 Press C, 5 1 1 and OK.
2 Select an entry using ▲/▼. Enter the initial letters with the letter keypad to quickly navigate through the telephone book.
3 Press COPY.
Groups
You can create groups containing several numbers. A message is sent to all members of this group in succession. A group is displayed as an individual telephone book entry.
Creating Group
1 Press C, 5 1 3 and OK.
2 Enter a name for the group.
3 Confirm with OK.
4 Enter the initial letters or select the entry you would like to add to the group using ▲/▼.
5 Entries which belong to the group are highlighted with a star (*). Add other members to the group by selecting the entries and press OK. Remove group members by selecting the highlighted entry and press OK.
6 Press ◆ to save the group.
Notice

Saving Group
You can also save the groups using ▲/▼ to select ACCEPT GROUP. You can find this menu entry at the end of the list of stored names. Confirm with OK.
Edit Group
1 Press C, 5 1 4 and OK.
2 Using ▲/▼ select the group you would like to edit.
3 Confirm with OK.
4 If necessary, enter a new name for the group.
5 Confirm with OK.
6 Entries which belong to the group are highlighted with a star (*). Add other members to the group by selecting the entries and press OK. Remove group members by selecting the highlighted entry and press OK.
7 Press ◆ to save the group.
Notice

Saving Group
You can also save the groups using ▲/▼ to select ACCEPT GROUP. You can find this menu entry at the end of the list of stored names. Confirm with OK.
Deleting a Group
Notice

Entries are Not Deleted
This function only deletes the group but not the telephone book entries contained in it.
1 Press C, 5 1 5 and OK.
2 Use ▲/▼ to select DELETE: SINGLE.
3 Confirm with OK.
4 Using ▲/▼ select the group you would like to delete.
5 Confirm with OK.
6 Use ▲/▼ to select DELETE: YES.
7 Confirm with OK.
Exporting/Importing the Telephone Book
You can save your telephone book entries onto a USB storage medium or import your entries from a USB storage medium.
Saving Telephone Book onto USB Storage Medium
1 Make sure that a USB storage medium is connected to the USB host port on the front or on the backside of the device. Connect a USB storage medium as required.
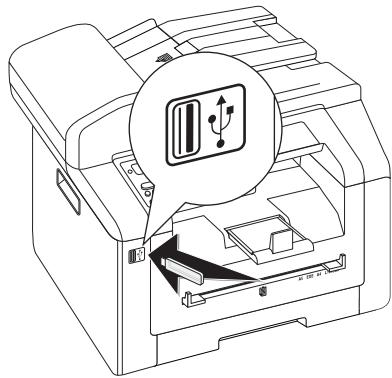
natural_image
Line drawing of a printer with an open slot and a speech bubble highlighting internal components (no text or symbols)2 Press C, 5 1 8 and OK. The telephone book is saved on the USB storage medium.
Load Telephone Book from USB Storage Medium
Notice

Data Format
The entries must be saved to the file „phone-book.csv“ in the root directory of the USB storage medium. The data in the file must be separated by semicolons „;“.
1 Make sure that a USB storage medium is connected to the USB host port on the front or on the backside of the device. Connect a USB storage medium as required.
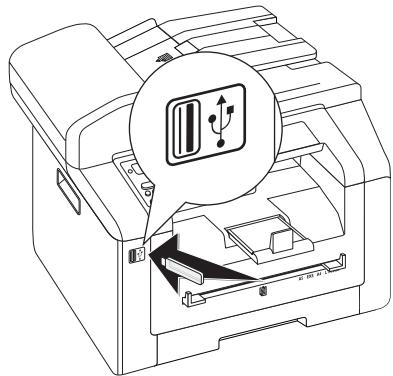
natural_image
Line drawing of a printer with an icon highlighting a device (no text or symbols present)2 Press C, 5 1 7 and OK. The entries are added to the existing entries. Current entries with the same name will not be overwritten.
10 Fax
Send a Fax Using Standard Settings
Your fax message will be sent using the standard settings. If you would like to adjust the settings yourself (for example resolution or contrast) for a fax transmission use function Send Fax Later, page 44).
1 Insert the document.
2 Press FAX.
Notice

Call Up Function Immediately
You can also call the function by pressing
C, 4 1 and OK.
3 Enter the desired number using the numeric keypad or select a saved entry.
4 Press FAX or ◆.
Notice

Automatic Redial
If the subscriber is busy, the device dials the number again after some time. Press ☑, in order to cancel the transmission process. After the transmission, the device prints out a transmission report depending on the settings.
| Specifications for Documents | |
| Width of Documents | 208–218 mm |
| Length of Documents | 277–600 mm |
| Paper Weight of the Documents | 60 - 90 g/m2 |
| Capacity | 50 page (80 g/m2) |
| Manufacturer's Recommendation for Optimum Operation | A4 · A5 · Letter · Legal (80 g/m2) |
CAUTION!

Unsuitable Documents!
Do not insert any documents into the device that ...
... are wet, have been edited with correction fluid, are soiled or have a coated surface.
… that are written on with a soft pencil, with paint, chalk or charcoal.
... originate from newspapers or magazines (printing ink).
… that are held together with office or notebook staples or with tape or glue.
... are pasted with note papers.
... are creased, crumpled or torn.
Loading Documents
The device is equipped with an automatic document feeder. Up to 50 Documents can be feed automatically into the machine to be scanned, faxed or copied. You can scan single documents or smaller templates using the flatbed scanner.
Insert Documents into the Automatic Document Feeder
1 Insert the documents face up into the document feeder. The lower most document will be fed in first. You can insert up to 50 documents (80 g/m ^2 ) at a time.
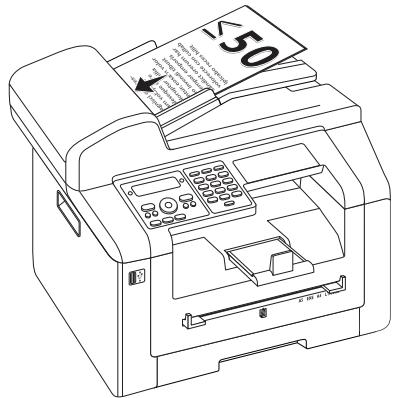
2 Push the document guide inwards, so that it lies level on the documents.
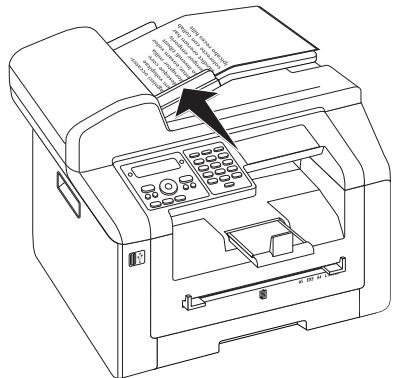
natural_image
Line drawing of a printer with an open lid and control panel, no text or symbols presentPlace Documents onto the Flatbed Scanner
1 Open the scanner cover.
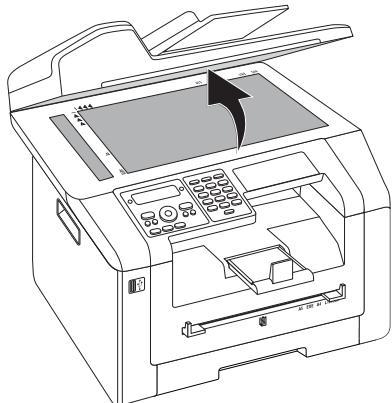
natural_image
Line drawing of a printer with control panel and paper tray (no text or symbols)2 Lay the document onto the scanner glass with the written side down.
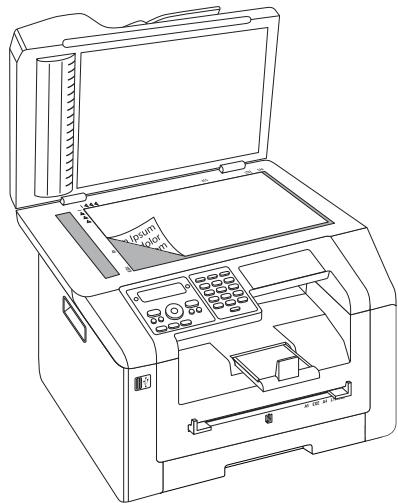
natural_image
Line drawing of a printer with open lid and control panel (no text or symbols)3 Align the document with the rear left corner of the scanner glass (arrow marks). The markings on the scanner border for the A4 and A5 formats will help you to position the document correctly.
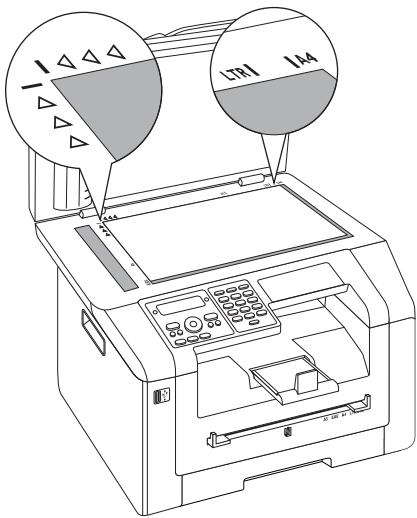
Notice

Enlarge Detail
If you would like to copy a detail (such as a graphic) of your document, position the document so that the detail view is close to the source. Using the zoom function, you can separate the desired area from rest of the document.
4 Close the scanner cover.
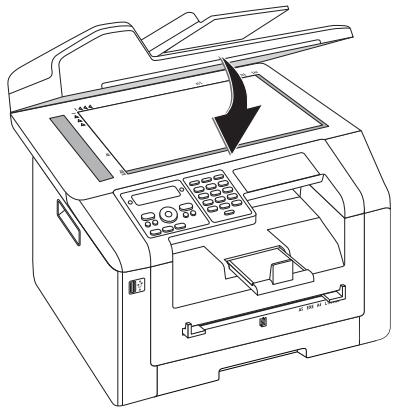
natural_image
Line drawing of a printer with an open lid and control panel, showing no text or symbolsNotice

Adjust Scanner Cover
The scanner cover is equipped with adjustable hinges, allowing you to lay even thicker documents (e.g. books) in the flat-bed scanner. Carefully lift the scanner cover so that it rests as evenly as possibly.
Use clear sheets of plastic when copying three-dimensional objects (e.g. coins, flowers) to avoid damaging the scanner glass.
CAUTION!

Do Not Press on the Scanner Cover!
Do not press forcefully on the scanner cover when you scan thicker documents or three-dimensional items, this could damage the scanner cover and/or the scanner glass.
Dialling a Number
Dial the desired number. There are several ways to do this:
Manual Dialling: Dial the desired number using the numeric keypad.
Telephone Book:
1 Press C, 5 1 1 and OK.
2 Select an entry using ▲/▼. Enter the initial letters with the letter keypad to quickly navigate through the telephone book.
Redial / caller list: The redial / caller list contains the last numbers dialled and the last calls received (■ indicates the numbers dialled, ▶ the calls received and * the calls missed).
1 Press C.
2 Select an entry using ▲/▼.
Getting Outside Line
Private branch exchanges (PABX) are typical in many offices and some households. You must dial an outside line access code in order to get a connection to the public telephone network (PSTN) from a PABX.
Enter the outside line access code with which you reach the public telephone network before you enter the desired number or select a stored entry. The outside line access code is usually 0.
Notice

Incorrect Outside Line Access Code
In rare cases, the outside line access code may be a different number or a two-digit number. For older telephone systems, the outside line access code can be R (= Flash). Press R to enter this outside line access code. If the connection to the public telephone network is not possible, contact your telephone system supplier.
Notice

Connection to Private Automatic Branch Exchange
If you operate your device permanently on an extension, save the outside line access code (see also chapter on setting Private Branch Exchange (PABX), page 64).
Sending Fax Later (= Timer Function)
This function is only available if you have set up your device in such a way that fax messages are sent from the memory (see also chapter on setting up fax messages from the memory, page 61).
If you would like to make use of the lower telephone tariffs or if the recipient can be reached at some specific time only, you can send the fax at a later time—within 24 hours.
1 Insert the document.
2 Press FAX.
3 Enter the desired number using the numeric keypad or select a saved entry.
4 Confirm with OK.
5 Enter the time, at which the document should be transmitted, e.g. 1 4 0 0 for 2 pm.
6 Confirm with OK.
7 Select the desired resolution using ▲/▼:
DEFAULT—For documents without special features
FINE—For texts with small print or drawings
SFINE—For documents with many details
PHOTO—For photos
8 Confirm with OK.
9 Set the desired contrast using ▲/▼.
-/1—Reduces the contrast / typeface appears lighter 4 (Factory settings)—Optimized adaptation for all documents
+/7—Increases the contrast / typeface appears darker (for example, documents with faint print)
10 Confirm with OK.
11 After a short warm up phase, the device will read the document into the memory and will send out the fax at the specified time.
Notice

Deleting a Job
To cancel a scheduled fax transmission, simply delete the document from the jobs list (also see chapter Jobs, page 49).
Sending Fax Manually
1 Insert the document.
2 Press ↘.
3 Enter the desired number using the numeric keypad or select a saved entry.
4 Press FAX or ◆.
Notice

Start Fax Reception from Additional Telephone
You can start the fax reception from an additional telephone that is connected to the device by pressing * 5:
Chain Dialling
You can combine and edit manually entered digits and saved entries, before the dialling process starts. If you have saved, for example, the telephone number prefix of an inexpensive telephone service provider (call-by-call) as a telephone book entry, select this entry and manually enter the subsequent telephone number or select another saved entry.
Eavesdropping while Connection is Established
You can listen while a connection is established, for example if a fax transmission constantly fails.
1 Insert the document.
2 Press FAX.
3 Enter the desired number using the numeric keypad or select a saved entry.
4 Press ↘.
Notice

No Hands-free Operation Possible
Hands-free operation is not possible with this function. You cannot answer if the subscriber picks up.
Sending to Multiple Recipients (= Broadcasting)
You can send one fax to multiple recipients in succession.
This function is only available if you have set up your device in such a way that fax messages are sent from the memory (see also chapter on setting up fax messages from the memory, page 61).
1 Insert the document.
2 Press FAX.
3 Enter the desired number using the numeric keypad or select a saved entry.
4 Press ➕.
5 Enter the next telephone numbers. Between the individual recipients, press ⚙️. You can enter up to 20 recipients.
Notice

Sending a Fax to a Group
A group from the telephone book is an entry in the list of recipients.
If a number appears in the list of recipients several times, (for example, is saved in different groups), the message is sent to this number several times.
6 Press FAX or ◆. The device transmits the fax message successively to all recipients.
Notice

Cancel Process
You can interrupt the process at any time, by pressing Ⓤ.
Notice

Transmission to Multiple Recipients
If your device cannot reach a recipient, the fax message is sent to the other recipients. After the device has called all recipients, it once again dials the numbers that previously could not be reached.
Using Fax Templates
Five fax templates, which you can use, are stored in your device. With these templates you can quickly create, for example, a short fax note or an invitation.
1 Press C, 4 5 and OK.
2 Use ▲/▼ to select the template you would like to print.
3 Confirm with OK. The device prints the template.
4 Fill the template and send it to the desired recipient per fax.
Faxing with the Companion Center SFX
With the software Companion Center SFX you can send, receive and manage faxes on your computer. You can either send scanned documents or files saved on the computer. With the cover sheet editor, you can design your own cover pages for your faxes, or use an existing document as the cover sheet. Apart from that, you can select from numerous fax settings.
1 Start the software Companion Center SFX, by clicking on the Companion Center SFX icon on your desktop or selecting Start > Programs > Companion Center SFX > Laser SFX > Companion Center SFX in the Start Menu.
2 The light in the upper-right corner shows whether or not the device is connected to the computer and is functioning properly.
3 Selecting the Fax tab.
Sending a Fax
1 Click on Send.
![Companion Center SFX Sagemcom Scan Fax Settings Help Send Cover page Advanced FAX BOX To Who? Recipient Name Recipient Number Add contact from adressbook >> << What? Cover page Source Fax Scan Preview MFP device [IP Address] Recipient Name Recipient Number When? Send Later FAX](/content/2019/08/101549/images/0e7880fb4bb243e1bfeeddd1b68ba112d7610560a1cb056f0ef94d34c59fa787.jpg)
2 In the field To Who? enter the name of the recipient under Recipient Name.
3 In Recipient Number, enter the recipient's fax number.
Notice

Add Recipients from the Telephone Book
Click on Add contact from adressbook to access the device's telephone book.
4 Click on >> to add the recipients to the list.
Notice

Sending to Multiple Recipients (= Broadcasting)
You can send one fax to multiple recipients in succession. Enter other recipient names and numbers or select entries from the telephone book. Click on >> to add the recipients to the list. Click on >> to remove a recipient from the send list.
5 Under Source Fax, select whether you want to scan a document with the device or send a file that is already saved on the computer.
6 Scan a document: Insert the document into the device. Select the desired resolution.
7 Sending a file: Select the saved file (file format *.TIFF or *.FAX).
8 If you would like to add a cover/title page to your fax, select the saved file under Cover page (file format *.TIFF).
Notice

Create Cover/Title Page with Editor
With the editor, you can create your own cover/title page for your fax. Click on Cover page (see also the Chapter Create Cover/Title Page with Editor, page 46.
9 Click on Fax in order to send the fax to all recipients in the send list.
Sending Fax Later (= Timer Function)
If you would like to take advantage of cheaper telephone rates or if the recipient is only available at certain times, you can send the fax a later time.
1 In the field When?, activate the functionSend Later.
2 Select the time and date that the document is to be sent.
3 Click on Fax. The fax will be sent automatically at the specified time.
Send Fax from a Program
You can send a file as a fax from any program with a printing function—such as, for example, a word-processing or text-editing program. The documents do not need to be printed out already.
1 In the program, click on the printing function.
2 Select FAX Laser SFX as the printer.
3 The software Companion Center SFX opens the window for sending faxes.
Create Cover/Title Page with Editor
With the cover sheet editor, you can design your own cover pages for your faxes, or use an existing document as the cover sheet.
1 Click on Cover page.
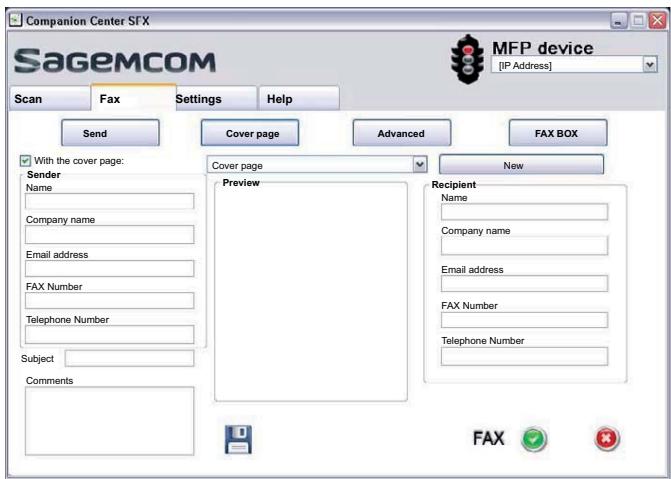
2 Activate the function With the cover page:.
3 Under Senderenter the data that is to appear on the cover sheet.
4 Under Subject, enter a short title for your fax. Under Comments you are able to add a note.
5 In Recipient, enter the recipient's information.
6 You can save created cover sheets as templates. Click on New in order to open the template editor and save a new template. Select an existing cover sheet template from the list of created templates.
Managing Faxes with the Fax Manager
The FAX Manager shows you the received faxes and provides you an overview of the status of the sent faxes. The outbox and inbox logs are automatically printed when their contents fill a page. After the automatic printing, the device creates a new journal.
1 Click on FAX BOX.
![Companion Center SFX Sagemcom Scan Fax Settings Help Send Cover page Advanced FAX BOX MFP device [IP Address] FAX Manager Outbox Sent items Deleted Items Drafts Send log](/content/2019/08/101549/images/0b901e9e58e2e191d71b5c606c4607b2c1185f32cf863ac4c0b1b10bf111f191.jpg)
2 Select the desired folder.
Outbox—Faxes that have not yet been sent (current send requests, delayed send requests, interrupted send requests)
Sent items—Sent faxes
Deleted Items—Deleted faxes (= recycle bin)
Drafts—Saved faxes that have not yet been sent
Send log—Information and transfer status of all faxes
Additional Options for Fax Transmission
1 Click on Advanced.
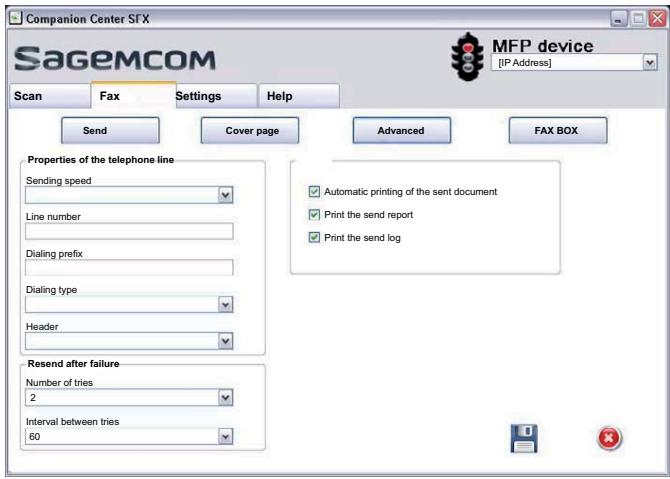
2 You have the following options available.
Sending speed—The device adjusts the transmission speed to the line quality. Set a lower reception speed if this adjustment takes a long time or no connection is made.
Line number—Enter your number.
Dialing prefix—This dialing code is automatically added to the number before sending (= external access code).
Dialing type—In some countries you can set the dialling mode to pulse dialling or tone dialling (DTMF tones).
Header—Your name and number appear in the page header of each fax transmission. If you do not wish to send out your information, you can turn this function off.
3 With the following options you set the number of repeat attempts for incomplete fax transfers.
Number of tries—Number of repeat attempts for interrupted fax transfers.
Interval between tries—Duration between two transfer attempts
4 You can activate the following options.
Automatic printing of the sent document—Prints the sent fax after the sending process is complete
Print the send report—The transmission report will be printed after each successful fax transfer as well as after interrupted transfers.
Print the send log—The send report is printed after every successful or interrupted transfer attempt.
Fax Reception
If you have not changed the factory settings, received faxes will be printed out automatically. If there is no paper or toner in your device, the device will store incoming fax transmissions in its memory. The green lamp 📋 on the panel will be lit whenever there is a fax present in the memory. After you have loaded paper into the device or inserted a new toner cartridge, the saved messages are printed.
Notice

Abort Fax Reception
After receiving the first page of a fax message, you can abort the transmission at any time by pressing ☑.
The fax memory can store up to 200 pages. Follow the specifications in the technical data.
CAUTION!

Message Memory Full!
If the message memory is full, no additional messages can be received.
Notice

Delete Fax Messages Sent
If there are problems with printing out saved fax messages, a service code is available (see also chapter on using service codes, page 75).
Receiving Fax Manually
Select manual fax reception under fax reception mode (see also chapter on Setting the Fax Reception Mode, Page 60). The device will not receive faxes on its own. This setting is useful, when you want to receive faxes via a modem connected to a computer. You can start fax reception manually, by pressing ◊.
Receive Faxes Silently
Set the number of rings ☑ (see also chapter setting the number of rings, page 58) and set the fax reception mode to fax mode (see also chapter setting the fax reception mode, page 60), in order to receive faxes without your device ringing.
Receiving Faxes onto USB Storage Medium
With fax reception onto a USB storage medium, the device saves incoming faxes onto a connected USB storage medium. Fax messages are saved as TIFF files with receipt date and time.
Use the Print Document from USB Storage Medium function to print the saved fax messages (see also chapter Print Document from USB Storage Medium, page 30)
Notice

Function not available
The function is switched off if you remove the USB storage medium. You cannot use the Protected Fax Reception and Receive Fax on USB Storage Medium functions at the same time.
1 Make sure that a USB storage medium is connected to the USB host port on the backside of the device. Connect a USB storage medium to the USB host port as required.
Notice

Connecting USB Storage Medium on the Backside
The USB storage medium must be connected to the USB port on the the back-side of the device in order to use this function.
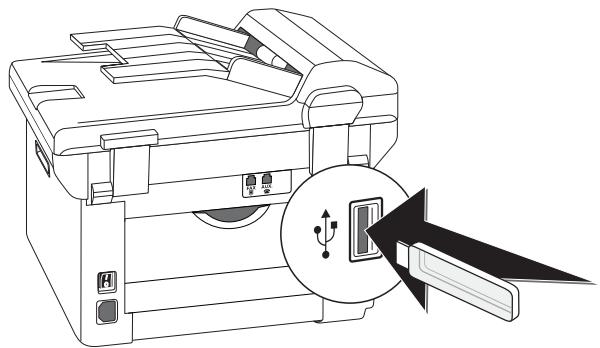
natural_image
Line drawing of a printer with an icon showing a USB symbol inserted into the print case (no text or symbols present)2 Press C, 9 1 4 and OK.
Notice

Access Function
You can also call the function by pressing C, 4 and OK.
3 Use ▲/▼ to select whether you would like to turn the function on or off.
4 Confirm with OK.
Time Stamp
The device prints the date and the exact arrival time on every incoming fax received. This allows you to document the exact time at which you have received a fax transmission. A memory buffer in the device ensures that the correct date and time of reception will be maintained even after a power loss.
If the time stamp function is activated, incoming faxes will be stored in the fax memory. As soon as the last page has arrived, the arrival time is stored and the device prints out all the pages. You can turn this function off (also see chapter Switches Time Stamp On/Off, page 61).
Setting Protected Fax Reception
You can secure your fax reception with a code. In that case, incoming faxes are not printed out, but rather are stored in the fax memory. Only after entering a PIN code can you print out these fax transmissions.
Notice

Function not available
You cannot use the Protected Fax Reception and Receive Fax on USB Storage Medium functions at the same time.
Entering the PIN Code
Notice

Default Access Code
The function is switched off with the factory-installed access code (☐☐☐☐). Change the access code to switch on the function. If you want to switch the function off enter the factory-installed code ☐☐☐☐ again.
1 Press C, 4 0 3 3 and OK.
Notice

Entering the PIN Code
If you have already saved a code, the device will ask you to provide the old code first before you can enter a new code.
2 Enter a four-digit PIN code.
3 Confirm with OK.
4 Enter the code again for confirmation purposes.
5 Confirm with OK.
Switching On and Off
1 Press C, 4 0 3 2 and OK.
2 Enter the four-digit PIN code.
3 Confirm with OK.
4 Use ▲/▼ to select whether you would like to turn the function on or off.
5 Confirm with OK.
Printing Out Fax Transmissions
1 Press C, 4 0 3 1 and OK.
2 Enter the four-digit PIN code.
3 Confirm with OK. The stored fax transmissions are printed out and deleted from the memory.
Polling Faxes
With the fax polling function, you can retrieve faxes that lie ready in the dialled device.
Polling Faxes Directly
1 Press C, 4 2 and OK.
2 Enter the desired number using the numeric keypad or select a saved entry.
3 Press ◆.
Time-Deferred Polling
1 Press C, 4 2 and OK.
2 Enter the desired number using the numeric keypad or select a saved entry.
3 Confirm with OK.
4 Enter the time, at which the document should be polled, e.g. 1 4 0 0 for 2 pm.
5 Confirm with OK.
6 The device is now in standby mode. You can continue to carry on telephone conversations or send other fax transmissions during this time.
Notice

Deleting a Job
To terminate the polling readiness, simply delete the document from the jobs list (also see chapter Jobs, page 49).
Jobs
All messages that have just been sent, that have been prepared for polling or that are to be sent or polled at a later time are present in the jobs list.
Jobs appear in the display one-at-a-time. After the job number and job status indicator, you will find the fax number to which a fax is to be sent or from which it is to be polled. Documents on the jobs list can fall into the following categories with regard to their status:
TX—Time-Deferred Sending POL—Time-delayed Fax Polling TR—Job in progress
Notice

Navigating in the Menu
Press ☑ to close the menu and return to the starting mode.
Immediate Job Execution
1 Press C, 7 1 and OK.
2 Using ▲/▼ select the job that you would like to execute immediately.
3 Confirm with OK. The transmission or polling will commence immediately.
Changing a Job
1 Press C, 7 2 and OK.
2 Using ▲/▼ select the job that you would like to modify.
3 Confirm with OK.
4 Enter the desired changes and confirm by pressing OK.
Deleting a Job
1 Press C, 7 3 and OK.
2 Using ▲/▼ select the job that you would like to delete.
3 Confirm with OK.
4 Confirm the deletion with OK.
Printing a Job
1 Press C, 74 and OK.
2 Using ▲/▼ select the job that you would like to print out.
3 Confirm with OK.
Printing the Job List
Press C, 7 5 and OK. The device will print out a list of all pending jobs.
Missed Calls
You can find reference to missed calls in the redial/caller list.
1 Press C.
2 Page through the dialled numbers, the calls received and calls missed in the list using ▲/▼ (↓ indicates the numbers dialled, ↓ the calls received and * the calls missed).
Notice

Displaying Telephone Book Names
Your device displays the name with which you have saved the number in the telephone book. The number and name will not be shown if the caller suppresses his number.
11 Networks
Using the USB cable, you can connect your device to a PC that is connected to a network. Other PCs on this network can then access the device if it is shared for use on the network. You cannot connect the device directly to a network with a USB cable, unless you have a USB print server connection.
Your device has a WLAN connection. Thus, you can integrate the device into an existing wireless network (WLAN). All computers in the network can then access the device and scan or print.
Notice

Calling the Web Interface
You can also edit the device's network settings with the device's web interface (see also the chapter Web Interface, page 19).
Wireless Network (WLAN)
In a wireless network (Wireless Local Area Network, WLAN) at least two computers, printers or other additional devices communicate with each other over radio waves (high frequency waves). The transmission of data in the radio network is based on the standards 802.11b and 802.11g.
DANGER!

Information on Using WLAN!
The functioning of security systems, medical equipment or sensitive devices can be disrupted by the transmission power of the device. Observe any usage regulations (or restrictions) in the vicinity of such equipment.
The use of this device can affect the operation of insufficiently shielded medical devices and hearing aids and pacemakers through the release of high frequency radiation. Also consult a doctor or the manufacturer of the medical device to establish whether these are sufficiently shielded from external high frequency radiation.
Infrastructure Wireless Network
In an infrastructure network, multiple devices communicate via a central access point (gateway, router). All data are sent to the access point (gateway, router) and distributed from there.
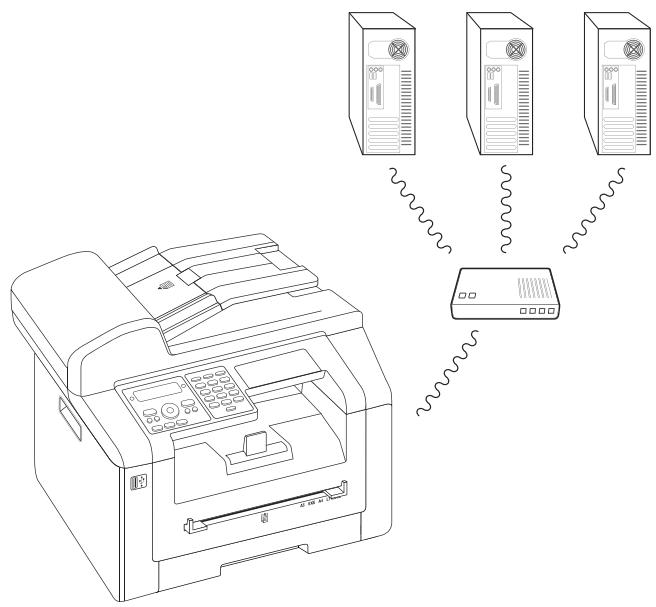
natural_image
Line drawing of a printer with three server racks connected to a device, no text or symbols presentSetting Up a Wireless Network (WLAN)
Notice

Information on Configuration
We recommend that the settings of your WLAN network should only be changed by a person with a good knowledge of the configuration of your computer.
Three steps are required to integrate your device into a wireless network (WLAN).
1 Configure the network on your PC.
2 Configure your device for network operation.
3 Install the software Companion Center SFX on your computer using the required printer drivers.
You must carry out certain network and security settings (for example the Service Set ID (SSID) and the password). The settings must match the information for the network. The device guides you through setting up the network using a configuration wizard.
Switching Wireless Networking (WLAN) On/Off
Wireless networking is activated by default. You have the option of turning this function off.
1 Press C, 0 8 0 and OK.
2 Use ▲/▼ to select whether you would like to turn the function on or off.
3 Confirm with OK.
Setting up a Wireless Network (WLAN) Using the Wizard
You can integrate your device very quickly and easily into an existing wireless network using Wi-Fi Protected Setup (WPS) or using a wireless network scan. Using WPS, all important settings like network name (SSID) are automatically configured and the connection protected with secure WPA Encryption.
Using Wi-Fi Protected Set-up (WPS)
Using Wi-Fi Protected Setup (WPS), you can integrate your device into an existing wireless network in two different ways very quickly and easily. You can activate the login with a pin code or using Push Button Configuration (PBC), if your access point (Access Point, Router) supports this method.
Using WPS with Pin Code
1 Press C, 0 8 1 1 and OK.
2 Use ▲/▼ to select WPS PIN.
3 A pin code appears on the display. Enter this pin code in your access point (Access Point, Router).
4 Press OK on the device. The WLAN access point and device connect automatically and create a WPA protected connection.
Using WPS with Push Button Configuration (PBC)
1 Press C, 0 8 1 1 and OK.
2 Use ▲/▼ to select WPS PBC.
3 Activate Push Button Configuration on the WLAN access point. The WLAN access point and device connect automatically and create a WPA protected connection.
Using Network Scan
Your device shows you a list of all available wireless networks. A wizard helps you connect with the desired wireless network.
1 Press C, 0 8 1 2 and OK.
2 The available wireless networks are displayed. Use ▲/▼ to select the desired wireless network.
3 Confirm with OK.
4 Select an encryption standard or switch off network security using ▲/▼
5 Confirm with OK.
6 Enter the password for the network.
Notice

WEP Key
With 64-bit encryption, the WEP key must be either 5 characters (ASCII) or 10 numbers (hexadecimal). With 128-bit encryption, the WEP key must be either 13 characters (ASCII) or 26 numbers (hexadecimal). You can find the WEP key in the network settings of your PC.
Notice

WPA Key
Enter an 8 to 63 character long password. The password can contain alphanumeric characters—numbers and letters—and any other symbol available on the keypad. The only invalid character is "€" (the euro currency symbol).
7 Confirm with OK.
8 The device connects with the wireless network and automatically attempts to obtain an IP address.
Setting Up a Wireless Network (WLAN) Manually
The PC and all other devices must have their parameters set up to the same network as the multifunction machine. All required information for setting the parameters, like name of the network (SSID), type of wireless network, WEP key, IP address and subnet mask must match the data from the network. You can obtain the necessary information from the network configuration of your computer or the access point (Access Point, Router).
1 Press C, 0 8 2 1 and OK.
2 Entering the SSID.
You can find the network name (Service Set ID) in the network settings of your computer. The SSID must match the SSID on the computer or on the access point (Access Point, Router).
3 Confirm with OK.
4 Select an encryption standard or switch off network security using ▲/▼
CAUTION!

Unprotected Wireless Networks are Accessible to Others!
Unprotected Wireless Networks are Accessible to Others! Always protect your network against unauthorised access. You can toggle between different encryption standards.
5 Confirm with OK.
6 Enter the password for the network.
Notice

WEP Key
With 64-bit encryption, the WEP key must be either 5 characters (ASCII) or 10 numbers (hexadecimal). With 128-bit encryption, the WEP key must be either 13 characters (ASCII) or 26 numbers (hexadecimal). You can find the WEP key in the network settings of your PC.
Notice

WPA Key
Enter an 8 to 63 character long password. The password can contain alphanumeric characters—numbers and letters—and any other symbol available on the keypad. The only invalid character is "€" (the euro currency symbol).
7 Confirm with OK.
With the connection mode, you set the IP address and subnet mask. If you have a DHCP or BOOTP server in your network which dynamically assign IP addresses, you can assign the settings automatically.
8 Select automatic or manual configuration using ▲/▼.
9 Confirm with OK.
Notice

This Process May Take a Few Moments
The automatic configuration of IP address and subnet mask on the connected network PCs may take a moment.
10 Manual Configuration: Enter the IP address (for example 192.168.001.×××).
Notice

IP-Address
The first three blocks of numbers refer to the IP field; this information must match the IP address on your computer. The last three digits determine are the individual IP address of the device. You can enter any number between 000 and 255. However, this number must be unique within the network; it may not be used on any other PC or network component.
11 Confirm with OK.
12 Manual Configuration: Enter the subnet mask (for example 255.255.255.000).
Notice

Subnet Mask
In a network with a gateway or router, the subnet mask indicates whether the respective data packets are addressed to an internal recipient in the network or whether they should be sent to a recipient outside of the network.
13 Confirm with OK.
Modifying Wireless Network Settings
Entering the Network Name (SSID)
You can find the network name (Service Set ID) in the network settings of your computer. The SSID must match the SSID on the computer or on the access point (Access Point, Router).
1 Press C, 0 8 2 1 and OK.
2 Entering the SSID.
3 Confirm with OK.
Setting Network Security
CAUTION!

Unprotected Wireless Networks are Accessible to Others!
Unprotected Wireless Networks are Accessible to Others! Always protect your network against unauthorised access. You can toggle between different encryption standards.
1 Press C, 0 8 2 2 and OK.
2 Select an encryption standard or switch off network security using ▲/▼
3 Confirm with OK.
4 Enter the password for the network.
Notice

WEP Key
With 64-bit encryption, the WEP key must be either 5 characters (ASCII) or 10 numbers (hexadecimal). With 128-bit encryption, the WEP key must be either 13 characters (ASCII) or 26 numbers (hexadecimal). You can find the WEP key in the network settings of your PC.
Notice

WPA Key
Enter an 8 to 63 character long password. The password can contain alphanumeric characters—numbers and letters—and any other symbol available on the keypad. The only invalid character is "€" (the euro currency symbol).
5 Confirm with OK.
Set IP Address Assignment
The IP address assignment allows you to select whether your device's IP address is assigned dynamically by a DHCP or BOOTP router/server or statically assigned by the user. You can enter IP addresses, subnet masks, gateways or two alternative domain name servers (DNS) for the configuration of the static network connection.
1 Press C, 0 8 3 and OK.
2 Select automatic or manual configuration using ▲/▼.
3 Confirm with OK.
Notice

This Process May Take a Few Moments.
The automatic configuration of IP address and subnet mask on the connected network PCs may take a moment.
Set Static IP Address Assignment
Notice

Available Function
This function is only available if you have selected static IP address assignment with the function 0 8 3.
Enter IP Address
The IP address is the address of the device in the network. It must not match the IP address of the computer or other network components, however it must be located in the IP field.
1 Press C, 0 8 4 1 and OK.
2 Enter the IP address (for example 192.168.001.×××).
Notice

IP-Address
The first three blocks of numbers refer to the IP field; this information must match the IP address on your computer. The last three digits determine are the individual IP address of the device. You can enter any number between 000 and 255. However, this number must be unique within the network; it may not be used on any other PC or network component.
3 Confirm with OK.
Entering the Subnet Mask
In a network with a gateway or router, the subnet mask indicates whether the respective data packets are addressed to an internal recipient in the network or whether they should be sent to a recipient outside of the network.
1 Press C, 0 8 4 2 and OK.
2 Enter the subnet mask (for example 255.255.255.000).
3 Confirm with OK.
Enter IP Address of the Access Point (= Gateway)
1 Press C, 0 8 4 3 and OK.
2 Enter the IP address of the access point (Access Point, Router).
3 Confirm with OK.
Enter Domain Name Server (DNS)
The DNS translates IP addresses in the names of internet pages and vice-a-versa. You can enter a primary and secondary DNS.
Enter Primary DNS
1 Press C, 0 8 4 4 and OK.
2 Enter the address of the primary DNS.
3 Confirm with OK.
Enter Secondary DNS
1 Press C, 0 8 4 5 and OK.
2 Enter the address of the secondary DNS.
3 Confirm with OK.
Verify DHCP Settings
Notice

Available Function
This function is only available if you have selected automatic IP address assignment with the function 0 8 3.
With these functions, you can verify the assigned network settings from your network's DCHP router. You cannot modify the settings.
Displaying the IP Address
1 Press C, 0 8 5 1 and OK.
2 The current IP address is displayed; it is the address that your device is registered with on the network.
Display Subnet Mask
1 Press C, 0 8 5 2 and OK.
2 The subnet mask being used is displayed.
Display IP Address of the Access Point (= Gateway)
1 Press C, 0 8 5 3 and OK.
2 The IP address of the access point (router) is displayed.
Display Primary DNS
1 Press C, 0 8 5 4 and OK.
2 The primary DNS address is displayed
Display Secondary DNS
1 Press C, 0 8 5 5 and OK.
2 The secondary DNS address is displayed
Additional Wireless Network Settings
Enter the Primary Windows Internet Name Service (WINS) Server
WINS is a network service that converts the IP address of the connected network components into NetBIOS names and vice-versa on the local area network (LAN). You can enter a primary and secondary WINS server.
1 Press C, 0 8 6 1 and OK.
2 Enter the address of the primary WINS server.
3 Confirm with OK.
Enter the Secondary Windows Internet Name Service (WINS) Server
1 Press C, 0 8 6 2 and OK.
2 Enter the address of the secondary WINS server.
3 Confirm with OK.
Enter the First Network Name (= NetBIOS)
The device is registered on the network with the NetBIOS name.
1 Press C, 0 8 6 3 and OK.
2 Enter the first NetBIOS name.
3 Confirm with OK.
Enter the Second Network Name (= NetBIOS)
1 Press C, 0 8 6 4 and OK.
2 Enter the second NetBIOS name.
3 Confirm with OK.
12 Settings
Notice

Modifying the Basic Settings
The changed settings are stored as new default settings. If you select a special function for a one-time process, take care to restore the default settings or factory settings after that.
Notice

Calling the Web Interface
You can also edit the device settings with the device's web interface (see also the chapter Web Interface, page 19).
Notice

Navigating in the Menu
You can move the cursor using ▲/▼. Press C to return to the previous menu level. Press Ⓤ to close the menu and return to the starting mode.
Set Up Power Saving Function
You use this function to set after what period of time the device switches to power saving mode following the print job. Whenever you receive a fax or if you would like to print or make a copy, your device will automatically switch back from its energy saving mode to its operating mode.
1 Press ECO.
2 Use ▲/▼ to select POWER SAVE.
3 Confirm with OK.
Notice

Access Function
You can also call the function by pressing C, 0 0 2 1 and OK.
4 Select the time (in minutes) after which the device should switch to power saving mode using ▲/▼. You can choose between: 0, 2, 10, 30 minutes (factory default: 2 minutes). Select ☑ if the device should switch to the power saving function immediately after a print job.
5 Confirm with OK.
Set Up Toner Saving Function
You use this function to switch on the toner saving function. The print appears a little paler, thereby increasing the number of pages that you are able to print with one toner cartridge.
1 Press ECO.
2 Use ▲/▼ to select TONER SAVE.
3 Confirm with OK.
Notice

Access Function
You can also call the function by pressing C, 0 0 2 2 and OK.
4 Use ▲/▼ to select whether you would like to turn the function on or off.
5 Confirm with OK.
Set Up Paper Saving Function
Using this function, switch on automatic Duplex printing for printing and copying in order to save paper. With Duplex printing, both sides of the paper are printed.
1 Press ECO.
2 Use ▲/▼ to select PAPER SAVE.
3 Confirm with OK.
Notice

Access Function
You can also call the function by pressing C, 0 0 2 3 and OK.
4 Select one-sided print (Simplex) or double-sided print (Duplex) using ▲/▼.
5 Confirm with OK.
Selecting the Country
CAUTION!

Setting the Country Correctly!
You must set the country in which you are operating the device. Otherwise your device is not adapted to the telephone network. If your country is not included in the list, you must select a different setting and use the correct telephone cable for the country. Consult your retailer.
1 Press C, 0 3 1 and OK.
2 Use ▲/▼ to select the country in which you are operating the device.
3 Confirm with OK.
Selecting the Language
1 Press C, 0 3 3 and OK.
2 Use ▲/▼ to select the desired display language.
3 Confirm with OK.
Setting the Date and Time
Entering the Date and Time
1 Press C, 0 1 1 and OK.
2 Enter the date (two digits for each field), for example 3 1 0 5 2 5 for May 31th, 2025.
3 Enter the time, e.g. 1400 for 2 pm.
4 Confirm with OK.
Set the Time Zone
Coordinated Universal Time (UTC) is the current standardised universal time format used. Starting from Greenwich in London (Zero Meridian), the world is split into time zones. These time zones are indicated with a deviance from UTC (in hours) for instance UTC+1 for Central European Time (CET)
In countries with several time zones, you can select from preset time zones or enter the deviance of your time zone from UTC. In countries with one time zone, the setting is automatically adjusted if you set country correctly (see also chapter Selecting the Country, page 57).
1 Press C, 0 1 2 and OK.
2 Use ▲/▼ to select the time zone in which you are operating the device.
3 Enter the Deviance from UTC Manually: Enter the deviance (in hours) using the numeric keypad, for example, 1 for UTC+1, The display shows the time zone editor.
Notice

Time Zone Editor
Press ▲/▼ to change the sign (+/-). You can also enter values under an hour, example, 0.15 (or 0.25) for a quarter of an hour, 0.30 (or 0.50) for half an hour or 0.45 (or 0.75) for three quarters of an hour.
4 Confirm with OK.
Notice

Automatic Changeover Between Summer Time/Winter Time
With setting the country and time zone, the automatic changeover between summer and winter time is switched on. The automatic changeover is switched off if you enter the deviance from UTC manually using the time zones editor
Set the Time Synchronization with SNTP Server
With the simple time network protocol (SNTP), you can synchronize the date and time of your device with a server in the network automatically.
Activating the Server Access
1 Press C, 0 1 0 3 and OK.
2 Use ▲/▼ to select whether you would like to turn the function on or off.
3 Confirm with OK.
Enter the SNTP Server Address
1 Press C, 0 1 0 1 and OK.
2 Enter the name of the SNTP server.
Notice

Enter the Server Address
This name can be in the form of an IP address, a DNS address or a NetBIOS name.
3 Confirm with OK.
Enter the SNTP Server Port
1 Press C, 0 1 0 2 and OK.
2 Enter the server port number (default setting: 123).
3 Confirm with OK.
Entering Your Telephone Number and Name
Your name and number are added together with date, time and page number at the top edge of each fax transmission (= header).
Fold the protective cover of the letter keypad up
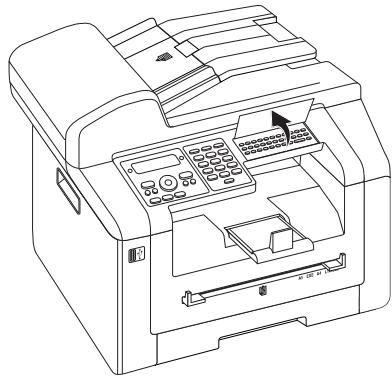
natural_image
Line drawing of a printer with control panel and drive mechanism (no text or symbols)Notice

Enter Letters
Enter capital letters by pressing and holding ↑ key. You can enter space using └ @.
The special characters available are located directly above the letter keypad and can be entered by pressing the ●- key and the respective letter key at the same time.
You can move the cursor using ▲/▼. Use C to delete individual characters.
Entering Name
1 Press C, 0 2 1 and OK.
2 Enter the name using the keys (A—Z).
3 Confirm with OK.
Entering Number
1 Press C, 0 2 2 and OK.
2 Enter your number.
3 Confirm with OK.
Setting the Ring Tones
Selecting the Ring Tone
You can use this function to select the standard ring tone. You can assign a separate ring tone to entries in the telephone book (see also chapter on saving an entry, page 39).
1 Press C, 0 5 4 and OK.
2 Select the desired ring tone using ▲/▼.
3 Confirm with OK.
Adjusting Volume Level
1 Press C, 0 5 5 and OK.
2 Select the desired volume level using ▲/▼.
3 Confirm with OK.
Setting the Number of Rings
You can use this function to set the number of rings for the fax reception mode. After the selected number of rings, the device switches to fax reception in the fax mode. Select ☑ to switch off the ring tone completely (see also chapter on silent fax reception, page 61).
1 Press C, 0 4 2 and OK.
2 Select the desired number of rings using ▲/▼.
3 Confirm with OK.
Deactivating the Button Tones
Every key press is accompanied by a sound. You can switch off the key tones on your device.
1 Press C, 0 0 7 and OK.
2 Use ▲/▼ to select whether you would like to turn the function on or off.
3 Confirm with OK.
Configure Paper Settings
Notice

Modifying the Basic Settings
The changed settings are stored as new default settings. If you select a special function for a one-time process, take care to restore the default settings or factory settings after that.
Set Paper Weight
1 Press C, 2 0 1 and OK.
2 Using ▲/▼ select the weight of the inserted paper.
3 Confirm with OK.
Set Paper Source
You can insert normal printing paper or printed documents (forms) into the paper tray. You can insert special paper formats, envelopes, slides, sheets of labels or printed documents into the manual paper feed.
1 Press C, 2 0 2 and OK.
2 Using ▲/▼ select the paper source.
3 Confirm with OK.
Setting the Paper Format
1 Press C, 2 0 3 and OK.
2 Using ▲/▼ select whether you would like to configure the paper format for the paper tray or whether you would like to use the manual feed.
3 Confirm with OK.
4 Use ▲/▼ to select the desired paper format. Follow the specifications in the technical data.
5 Confirm with OK.
Set Resolution
Setting the Resolution for Scanning
1 Press C, 3 0 3 and OK.
2 Select the desired resolution using ▲/▼:
DRAFT(100)—Scanning with reduced resolution—for use on the Internet, for example
TEXT B&W (300)—Black and white scan with high resolution for optical character recognition of text documents (OCR)
PHOTO(200)—Scanning with higher resolution - for photographs, for example
HQ(300)—Scanning with highest resolution
3 Confirm with OK.
Set Resolution for Fax Transmission
1 Press C, 4 0 1 3 and OK.
2 Select the desired resolution using ▲/▼:
DEFAULT—For documents without special features
FINE—For texts with small print or drawings
SFINE—For documents with many details
PHOTO—For photos
3 Confirm with OK.
Setting the Resolution for the Copier
1 Press C, 103 and OK.
2 Select the desired resolution using ▲/▼:
AUTO—Optimised adjustment for all types of documents
TEXT—For texts with small print or drawings
QUALITY—For documents with many details
PHOTO—For the highest resolution
3 Confirm with OK.
Setting the Contrast
Setting the Contrast for the Scanner
1 Press C, 3 0 4 and OK.
2 Set the desired contrast using ▲/▼.
-/1—Reduces the contrast / typeface appears lighter
4 (Factory settings)—Optimized adaptation for all documents
+/7—Increases the contrast / typeface appears darker (for example, documents with faint print)
3 Confirm with OK.
Set the Contrast for Faxes and Copying
1 Press C, 104 and OK.
2 Set the desired contrast using ▲/▼.
-/1—Reduces the contrast / typeface appears lighter
4 (Factory settings)—Optimized adaptation for all documents
+/7—Increases the contrast / typeface appears darker (for example, documents with faint print)
3 Confirm with OK.
Setting the Brightness
Set the Level of Brightness for Scanning
1 Press C, 3 0 5 and OK.
2 Using ▲/▼, select the desired level of brightness:
-/1—Reproduction is lighter
4 (Factory settings)—Optimized adaptation for all documents
+/7—Reproduction is darker
3 Confirm with OK.
Set the Level of Brightness for the Copier
1 Press C, 105 and OK.
2 Using ▲/▼, select the desired level of brightness:
-/1—Reproduction is lighter
4 (Factory settings)—Optimized adaptation for all documents
+/7—Reproduction is darker
3 Confirm with OK.
Additional Scanner Options
Setting the Paper Format
1 Press C, 3 0 6 and OK.
2 Use ▲/▼ to select the desired paper format. Follow the specifications in the technical data.
3 Confirm with OK.
Select the File Format
Using this function, select the file format that should be used as default for scanning documents.
1 Press C, 3 0 7 and OK.
2 Use ▲/▼ to select the desired file format.
3 Confirm with OK.
Additional Copier Options
Select One Side/Both Side Printing (Simplex/Duplex)
1 Press C, 101 and OK.
2 Select one-sided print (Simplex) or double-sided print (Duplex) using ▲/▼.
3 Confirm with OK.
Print the Pages Sorted
Sorted copies can be output when creating multiple copies of a multiple page document. The devices scans both sides of the document and prints sorted copies of the document with the correct pagination
When using the unsorted copy process, copies of all sides are output one after the other; the copy process starts after the first side has been scanned.
1 Press C, 102 and OK.
2 Select whether the copies should be output sorted or unsorted using ▲/▼.
3 Confirm with OK.
Setting the Fax Reception Mode
The built-in fax switch of your device distinguishes between fax messages and telephone calls. Faxes are automatically received, telephone calls can be received—even on additionally connected devices. While the device is checking the call, it continues to ring.
You have the following options available. The selected fax reception mode appears on the display.
1 Press C, 0 4 1 and OK.
2 Select the desired option using ▲/▼.
Notice

Fax Reception Mode with Additional Devices
You should set the device to EXT/Answering device, Fax or Manual Mode if you have additional devices connected to the AUX./ socket of your device.
3 Confirm with OK.
Manual Mode
(MANUAL)
The device will not receive faxes on its own. You can start fax reception manually, by pressing ◆. This setting is useful, when you want to receive faxes via a modem connected to a computer.
Fax Mode
(FAX)
In the fax mode, the device will ring for as many times as you have set with function 042 (also see chapter Setting the Number of Rings, page 58). Then the fax reception switches on. You should select this mode if you primarily receive faxes at your device.
EXT/Answering Machine Mode
(FAX-ANSWER)
You should set the device to this mode if you have additional devices connected to the AUX./☐ socket of your device. If an additionally connected answering machine receives a call, your device will check to determine whether or not the incoming call is a fax transmission. If the device recognises a fax signal, it will automatically receive the fax transmission.
If you do not have an answering machine connected or if a connected answering machine does not accept the call, the device will take over the call after a predetermined number of rings and automatically receive any possible fax transmission being sent.
Notice

Fax at Additional Telephone
If you pick up at an additional device and hear that you are receiving a fax (whistling tone or silence), you can start the fax reception by pressing * 5 on the additional telephone or pressing ◆ on the device. To use this function, additional telephones must be set to the tone dialling mode (DTMF/MFV tones) (for this purpose see the operating manual of your additional telephone).
Automatic Mode
(AUTOMATIC)
If the Automatic Mode is active, the device will check to determine whether the incoming call is a fax transmission or a telephone call. The device will automatically receive fax transmissions. While the device is checking the call, it continues to ring. You can accept telephone calls at any time. After a predetermined number of rings, the device will take over the call and automatically receive a possible silent fax transmission.
Silent Fax Reception
Set the number of rings ☑ (see also chapter setting the number of rings, page 58) and set the fax reception mode to fax mode (see also chapter setting the fax reception mode, page 60), in order to receive faxes without your device ringing.
Notice

Manual Fax Reception
If your device is set to the manual reception mode, you can neither hear nor receive incoming fax calls (see also chapter on setting the fax reception mode, , page 60).
Additional Options for Fax Transmission
Reducing Transmission Speed
The device adapts the transmission speed to the line quality. This may take some time, especially for overseas connections. Set a lower transmission speed if you are sending faxes into networks with poor line quality.
1 Press C, 4 0 1 5 and OK.
2 Select the desired speed using ▲/▼.
3 Confirm with OK.
Configuring the Display
Configure which information should be shown on the display during transmission.
1 Press C, 4 0 1 6 and OK.
2 Use ▲/▼, to select whether the transmission speed should be displayed or current page number being transmitted should be displayed.
3 Confirm with OK.
Set Fax Transmission from the Memory
You can set whether you would like to scan or send the documents immediately or whether you would like to send the documents from the cache memory. With direct transmission, the document is memorised during transmission. When sending from the memory, the document is read from the memory first and then the connection made with the recipient.
Notice

Message Memory Full
If the message memory is full, the documents are scanned and sent immediately.
1 Press C, 4 0 1 2 and OK.
2 Select the desired setting using ▲/▼.
3 Confirm with OK.
Turning Page Header On/Off
Your name and number appear in the page header of each fax transmission. If you do not wish to send out your information, you can turn this function off.
1 Press C, 4 0 1 4 and OK.
2 Use ▲/▼ to select whether you would like to turn the function on or off.
3 Confirm with OK.
Switching Transmission Report On/Off
After every transmission, the device prints out a transmission report. Two different settings are available.
1 Press C, 4 0 1 1 and OK.
2 Use ▲/▼ to select from the following settings:
ALWAYS—The transmission report will be printed after each successful fax transfer as well as after interrupted transfers.
ON ERROR—The transmission will only be printed if the fax transfer was not successfully completed or if it was terminated prematurely.
3 Confirm with OK.
Additional Fax Reception Options
Switches Time Stamp On/Off
The device prints the date and the exact arrival time on every incoming fax received (also see chapter Time Stamp, page 48). You have the option of turning this function off.
1 Press C, 4 0 4 and OK.
2 Use ▲/▼ to select whether you would like to turn the function on or off.
3 Confirm with OK.
Reducing the Reception Speed
The device adjusts the transmission speed to the line quality. Set a lower reception speed if this adjustment takes a long time or no connection is made.
1 Press C, 4 0 2 6 and OK.
2 Select a reception speed using ▲/▼.
3 Confirm with OK.
Set Page Adjustment
Received faxes can automatically be adjusted to the paper format inserted. You can also enter a fixed value (percentage) for the paper adjustment
Notice

Setting the Paper Format
For automatic adjustment, the format of the inserted paper must be set correctly (see also chapter Setting the Paper Format, page 59).
1 Press C, 4 0 2 4 and OK.
2 Use ▲/▼ to select automatic adjustment or whether you would like to enter a fixed value.
3 Confirm with OK.
4 Enter a Fixed Value: Enter a percentage for the compression between 70 and 100 percent.
5 Confirm with OK.
Set a Threshold for Pagination
Some fax transmissions contain more lines than can be printed. Using the threshold for pagination, set from which value these lines are printed on the second page. All lines below this value are deleted.
1 Press C, 4 0 2 7 and OK.
2 Use ▲/▼ to select from the following settings:
ON—All lines which lie more than three centimetres outside the page are printed on a second page. All surplus lines below this value are deleted.
OFF—All lines which lie more than one centimetre outside the page are printed on a second page. All surplus lines below this value are deleted.
3 Confirm with OK.
Printing Multiple Copies
You can apply settings to your device whereby multiple copies of fax transmissions are printed out upon reception.
1 Press C, 4 0 2 2 and OK.
2 Enter a value from 1 to 9 9.
3 Confirm with OK.
Locking the Device
With the locking function, you can prevent unauthorised persons from using your device. Only after entering of the correct code will it be possible to access functions or enter numbers. The lock will turn itself on again after each use of the device.
Entering the PIN Code
Notice

Default Access Code
The function is switched off with the factory-installed access code (☐☐☐☐). Change the access code to switch on the function. If you want to switch the function off enter the factory-installed code ☐☐☐☐ again.
1 Press C, 9 2 1 and OK.
Notice

Entering the PIN Code
If you have already saved a code, the device will ask you to provide the old code first before you can enter a new code.
2 Enter a four-digit PIN code.
3 Confirm with OK.
4 Enter the code again for confirmation purposes.
5 Confirm with OK.
Locking the Keyboard
This function locks the entire keyboard of the device.
1 Press C, 9 2 2 and OK.
2 Enter the four-digit PIN code.
3 Confirm with OK.
4 Use ▲/▼ to select whether you would like to turn the function on or off.
5 Confirm with OK.
Locking Manual Dialling
This function blocks the manual dialling of telephone numbers. Numbers from the telephone book can be called. Manual dialling of emergency number is not possible.
1 Press C, 9 2 3 and OK.
2 Enter the four-digit PIN code.
3 Confirm with OK.
4 Use ▲/▼ to select ONLY DIRECT..
5 Confirm with OK.
Lock USB Storage Medium
You use this function to block access to a connected USB storage medium.
1 Press C, 9 2 5 and OK.
2 Enter the four-digit PIN code.
3 Confirm with OK.
4 Use ▲/▼ to select whether you would like to turn the function on or off.
5 Confirm with OK.
Lock Settings
This function blocks the changing of settings on your device. The settings can be locked with a customizable administrator pin code
Entering the PIN Code
Notice

Default Access Code
The function is switched off with the factory-installed access code (☐☐☐☐). Change the access code to switch on the function. If you want to switch the function off enter the factory-installed code ☐☐☐☐ again.
1 Press C, 0 0 0 1 and OK.
Notice

Entering the PIN Code
If you have already saved a code, the device will ask you to provide the old code first before you can enter a new code.
2 Enter a four-digit PIN code.
3 Confirm with OK.
4 Enter the code again for confirmation purposes.
5 Confirm with OK.
Activate and deactivate functions
1 Press C, 0 0 0 2 and OK.
2 Enter the four-digit PIN code.
3 Confirm with OK.
4 Use ▲/▼ to select whether you would like to turn the function on or off.
5 Confirm with OK.
Print Lists and Reports
Printing the Functions List
Press C, 8 1 and OK to print a list of all functions of your device.
Printing the Telephone Book
Press C, 83 and OK to print a list of all saved entries and groups in the telephone book.
Printing Fax Journal
The journal contains a list of the last 30 message transmissions. The fax journal is automatically printed after 30 transmissions. You can print out the fax journal at any time.
Press C, 8 2 and OK.
Printing the Job List
Press C, 84 and OK. The device will print out a list of all pending jobs.
Prints the List of Settings
Press C, 80 and OK to print a list of all settings of your device.
13 Telephone Lines and Additional Devices
Switching Caller Line Identification (CLIP) On/Off
(Function is not supported in all countries and networks)
The number of an incoming call appears on the display. For this function to work, the Calling Line Identification Presentation (CLIP) must be activated for your telephone line. Enquire with your telephone company. Caller Line Identification may be associated with a fee.
Notice

Setting the Country Correctly
If the Caller Line Identification does not work even though the function is activated for your telephone line, check if you have set the correct country (also see Chapter Settings, page 57)
1 Press C, 0 5 7 and OK.
2 Use ▲/▼ to select whether you would like to turn the function on or off.
3 Confirm with OK.
Selecting the Dialling Process
(Function is not supported in all countries and networks)
In some countries you can set the dialling mode to pulse dialling or tone dialling (DTMF tones).
Notice

Selecting the Dialling Process
Only use pulse dialling if tone dialling is not yet activated for your telephone line.
1 Press C, 0 5 3 and OK.
2 Use ▲/▼ to select the desired dialling process.
3 Confirm with OK.
Set up the Public Switch Telephone Network (PSTN)
(Function is not supported in all countries and networks)
Notice

Public Switch Telephone Network (PSTN)
You can use this function to set your device to connect to the Public Switch Telephone Network (PSTN). To connect to a Private Branch Exchange (PABX) see also chapter on set up Private Branch Exchange (PABX), page 64.
Your device is automatically adjusted to the telephone network if you set the country correctly (see also chapter Selecting the Country, page 57). It is possible that further settings are required for the Public Switched Telephone Network (PSTN). Ask your retailer or the technical customer service department.
1 Press C, 0 3 2 and OK.
2 Select the desired setting using ▲/▼.
3 Confirm with OK.
Set up Private Branch Exchange (PABX)
Private branch exchanges (PABX) are typical in many offices and some households. You must dial an outside line access code in order to get a connection to the public telephone network (PSTN) from a PABX.
Notice

Additional Telephone No Extension
An additional telephone connected to the device on a telephone socket is not considered an extension.
You can set up your device for operation on an extension, indicate the length of the internal numbers (direct dial number) and save the code which must be selected in order to reach the Public Switched Telephone Network (PSTN) (= outside line access code).
Notice

Outside Line Access Code is Automatically Dialled
Once these settings are in place, you will no longer need to prefix the outside line access code every time you enter an external number. The device will automatically add the outside line access code in front of numbers that are the same length or longer than the configured direct dial numbers.
Set the connection type
1 Press C, 0 5 1 and OK.
2 Use ▲/▼ to set whether you operate your device on an extension.
3 Confirm with OK.
Setting the Outside Line Access Code
Enter the length of the direct dial number
1 Press C, 0 5 2 1 and OK.
2 Enter the appropriate length for internal numbers. Use C to delete individual characters. Assume the longest internal number, then add one digit to that. If your direct dial numbers consist of four digits, then you should input 5.
3 Confirm with OK.
Enter the outside line access code
1 Press C, 0 5 2 2 and OK.
2 Enter the outside line access code with which you reach the public telephone network. This is usually 0.
Notice

Incorrect Outside Line Access Code
In rare cases, the outside line access code may be a different number or a two-digit number. For older telephone systems, the outside line access code can be R (= Flash). Press R to enter this outside line access code. If the connection to the public telephone network is not possible, contact your telephone system supplier.
3 Confirm with OK.
DSL Connection
In the event that you use a DSL modem: Connect the device to the slot intended for analogue telephones/fax machines! For additional information, please consult the operating manual of your DSL system. Ask your telephone or internet service provider if necessary.
ISDN Connection
Your device is an analogue fax device (Group 3). It is not an ISDN device (Group 4), and therefore it cannot be operated directly on an ISDN connection. In order to do this, you need either an analogue adapter or a connection for analogue terminals. Details for ISDN connections can be found in the instructions provided with the terminal adapter or the dial-up router.
Registering and De- Registering Additional Cordless Telephones
(Function is optional and functions only with an original adapter, which you can purchase through our order service. More information: support.service@sagemcom.com)
Normally your cordless telephone is registered with your device in the factory. In the starting mode, press OK. The display shows on which base unit and with which number the cordless telephone is registered.
You can register in all up to 4 cordless telephones with your device. Using only original cordless phones as additional cordless phones ensures optimum use of all functions. You can get original cordless telephones through our order service or at specialist shops.
Notice

GAP Compatible
Additional cordless telephone must be GAP-compatible.
Registering Cordless Telephone
You must first bring the cordless telephone and then your device (= base station) in the registration mode to register a cordless telephone. Follow the instructions in the operating instructions of the cordless telephone.
1 Insert the Dect adapter into the USB host port on the reverse of the device.
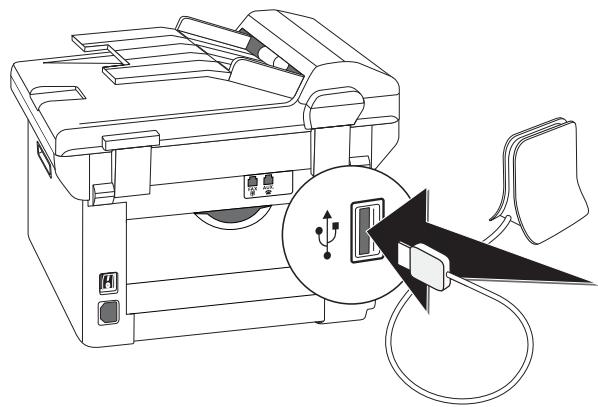
natural_image
Line drawing of a printer with a USB cable inserted into a slot, showing internal components (no text or symbols)2 A message appears on the display as soon as the device is configured as base unit. Bring the cordless telephone into registration mode.
3 Press C, 5 2 1 and OK on the device.
The cordless telephone is automatically registered. This process can take a few minutes. Then the number with which it is registered with the device appears on the display of the cordless telephone.
Notice

Registering other Cordless Telephones
You can register other cordless telephones with your device in the same manner. If you face any difficulties in registering, de-register all cordless telephones, and re-register them individually.
Notice

Display Date and Time
Date and time of the cordless telephone is continually synchronised with the device.
Deregistering Cordless Telephone
You can deregister a cordless telephone either from the device or from the cordless telephone. Follow the instructions in the operating instructions of the cordless telephone.
1 Press C, 5 2 2 and OK.
2 Using ▲/▼ to select which cordless telephone you are would like to de-register.
3 Confirm with OK. The device disconnects from the cordless telephone.
Looking for Cordless Telephone
This function helps you in locating cordless telephones, which you have misplaced. For this purpose the cordless telephones must be registered with the device and must be within its range.
1 Press C, 5 2 3 and OK.
2 All cordless telephones registered with the device ring for approx. one minute. You can end the search function by pressing ☑ on the device or pressing the button to hang up on the cordless telephone.
Connecting Additional Devices
You can operate additional devices on a telephone line, such as cordless telephones, answering machines, modems or charge counters.
Connection to the Device
You can connect additional devices directly to your device. Insert the telephone cable of the additional device into the AUX./☐ socket (RJ-11-connection) on the device.
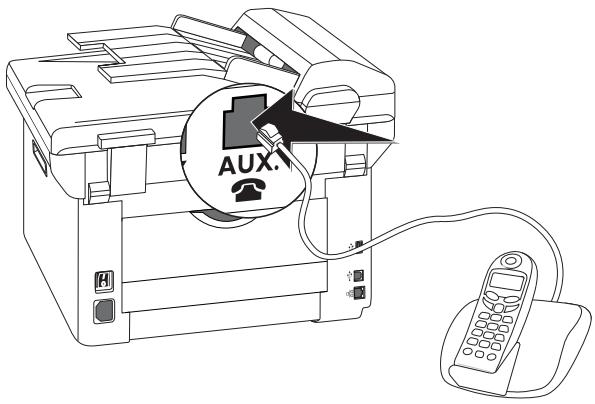
Connection to the Telephone Line
In order for the fax switch to function, the device must be first in the series if multiple devices are connected to the same telephone socket. Follow the correct order.
Notice

Connection to the First Telephone Socket
If you have multiple telephone sockets for the same telephone line, the device must be connected to the first telephone socket.
Using Additional Telephones (Easylink)
With the Easylink function you can control your device with additional telephones. To use this function, additional telephones must be set to the tone dialling mode (DTMF/MFV tones) (for this purpose see the operating manual of your additional telephone).
Starting Fax Reception
If you pick up at an additional device and hear that you are receiving a fax (whistling tone or silence), you can start the fax reception by pressing ☐ 5 on the additional telephone or pressing ◊ on the device.
Hang up the additional telephone when the ring tone changes. The device has accepted the reception of the fax message.
Taking Over the Line
If you pick up on an additional telephone and the device continues to ring or attempts to receive a fax, you can disconnect the device from the line. Press on the additional telephone.
Using an External Answering Machine
Your external answering machine must have parallel recognition for accepting incoming calls. Consult your retailer.
For the best operation, the answering machine must be connected to the AUX./ socket of the device. Select EXT/ answering machine mode as the fax reception mode (see also chapter on Setting the Fax Reception Mode, Page 60).
Notice

Length of Outgoing Message
The outgoing message must be shorter than ten seconds. Avoid music in your announcement. If the external answering machine has a “conserving function” (i.e. a function that changes the number of rings as soon as new messages have been recorded), switch it off.
Notice

Answering Machine Records Fax Signals
If the external answering machine records fax signals, but your device cannot receive faxes, inspect the connection of the external answering machine
EN
14 Service
Notice

Troubleshooting
Should disruptions occur, follow the instructions on the display and on the error report.
Notice

Calling the Web Interface
The device's web interface also provides an overview of the device status and various service functions (see also the chapter Web Interface, page 19).
Access Help Pages
With the Companion Center SFX software, you can display the device's operating instructions, access service pages on the Internet and order replacement items.
1 Click on Help.
![Companion Center SFX Sagemcom Scan Fax Settings Help MFP device [IP Address] USER GUIDE User Manual Support Site Order consumables](/content/2019/08/101549/images/3f4917b3ef9ba165eb3328d1398a794e931015865f37170fae04e79fe9e4d096.jpg)
2 Select the desired function.
Display Counter Levels
You can display different counter levels of the device for your information.
Display the Number of Fax Pages Sent
Press C, 9 4 1 and OK. The number of fax pages sent is shown
Display the Number of Fax Pages Received
Press C, 9 4 2 and OK. The number of fax pages received is shown
Display Number of Scanned Documents
Press C, 9 4 3 and OK. The number of scanned documents is displayed.
Display Number of Printed Pages
Press C, 9 4 4 and OK. The number of printed pages is displayed.
Display Number of Copied Pages
Press C, 9 4 5 and OK. The number of copied pages is displayed.
Displaying the Toner Level
Your device registers the extent of toner used for every print-out and calculates the toner level of the toner cartridge on that basis. The toner level is stored in each toner cartridge.
Press C, 946 and OK. The toner level of the toner cartridge is indicated by a percentile value between 100 percent (full) and 0 percent (empty).
Checking the Firmware Version
1 Press C, 9 3 4 and twice OK.
2 The information on the firmware version of the device is displayed.
3 Confirm with OK.
Updating Firmware
Notice

Calling the Web Interface
You can also edit the device firmware with the device's web interface (see also the chapter Web Interface, page 19).
The firmware defines the basic functions and capabilities of your device. Sometimes also referred to as the device driver. We constantly strive to implement improvements and innovations. Check our homepage www.sagemcom.com for information on the current firmware version available for your device.
CAUTION!

Do not interrupt power supply
Do not switch the device off during the print process and do not unplug the device from the power supply. If the Firmware update is not carried out error-free, your device will probably no longer function properly.
Wait until the firmware update is completed before performing more operations on your device.
CAUTION!

Settings will be Deleted
Depending on the firmware version of your device, all modified settings are deleted during a firmware update and reset to factory settings. If the settings are deleted, you will need to calibrate the scanner again (see also the chapter Calibrate Scanner, page 75).
1 Load the firmware from the specified internet page and save the file directly in the root directory of the USB storage medium (= highest directory level). The file shall not be saved in a folder.
CAUTION!

Use Only Original Firmware
When carrying out a Firmware update only use the Firmware file for your device from the website: www.sagemcom.com. Using other Firmware files can lead to your device not functioning properly. Sagem-com accepts no liability for device malfunctions which can be traced back to the use of third party Firmware.
2 Connect the USB storage medium with the firmware file to the USB host connection port.
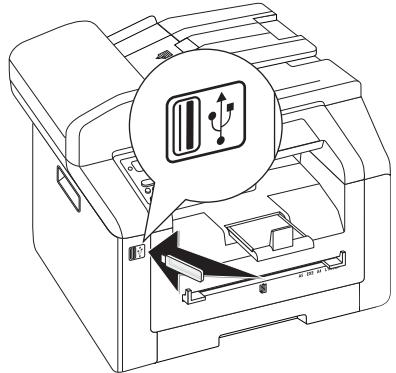
3 If the device detects the firmware file, a message appears on the display. Press ◆ to update firmware.
4 This process can take a few minutes. The devices re-boots twice. On completion of the procedure, the device starts the initial installation process (see also section Initial installation, Page 15).
CAUTION!

Removing USB Storage Media!
Never pull out the storage medium while the device is accessing it. If the Firmware update is not carried out error-free, your device will probably no longer function properly.
Changing the Toner Cartridge
Your device registers the extent of toner used for every print-out and calculates the toner level of the toner cartridge on that basis. The toner level is stored in each toner cartridge. You can use different toner cartridges as well as display the respective toner level of the toner cartridge.
DANGER!

Escaping Toner Dust!
Never open a toner cartridge. If toner dust is released into the air, you should avoid allowing it to contact your skin and eyes. Do not inhale the released toner dust. Remove the toner dust from clothing or objects with cold water; hot water would only cause the toner to set. Never remove loose toner dust with a vacuum cleaner.
CAUTION!

Use Original Consumable Materials!
Use only original consumable materials. These are available from a specialised retailer or through our order service. Other consumable materials can cause damage to the device.
CAUTION!

Observe Packaging Instructions
Follow the instructions on the packaging of the consumable materials.
1 Open the upper device cover by gripping the cover on the arrow marks on the outside and lift upwards,
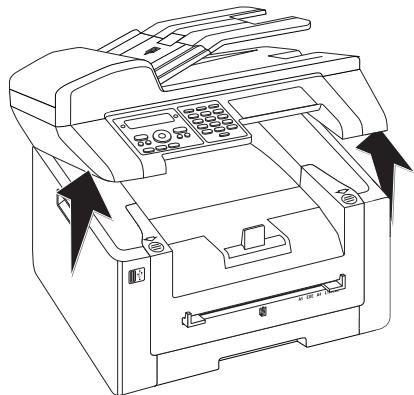
natural_image
Line drawing of a printer with control panel and scroll arrows indicating movement (no text or symbols)2 Open the device by lifting the device cover forwards
CAUTION!

Do Not Open During a Print Job!
Never open the cover while the device is printing.
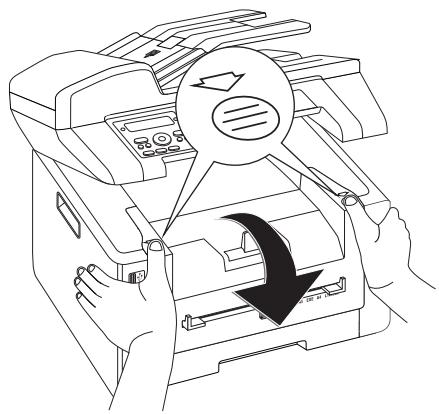
natural_image
Line drawing of a printer with hands operating it, showing a circular object being inserted (no text or symbols present)3 Remove the toner cartridge by gripping the handle in the middle and pulling it forwards out of the device
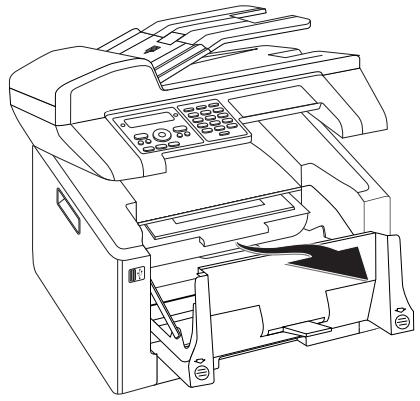
natural_image
Line drawing of a printer with internal components and control panel (no text or symbols)DANGER!

Escaping Toner Dust!
Carefully remove the toner cartridge from the device so that no toner dust spills out. Take care where you place the toner cartridge, escaping toner dust may soil the surface.
Store opened or used toner cartridges in their original packing or in a plastic bag in order to prevent toner dust from escaping. Dispose of old toner cartridges by turning them in at specialised shops or at a waste collection site. Never dispose of toner cartridges by throwing them into fire. Toner cartridges should never be allowed into the hands of children.
4 Take the new toner cartridge from the package.
5 Remove the tape and black protective paper, but do not remove the protective strip from the cartridge yet.
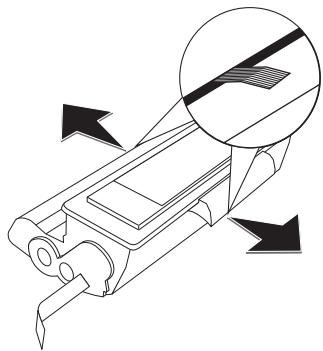
natural_image
Technical line drawing of a mechanical component with directional arrows indicating motion or force (no text or symbols)6 Shake the new toner cartridge back and forth several times in order to distribute the toner evenly, thereby improving the print quality.
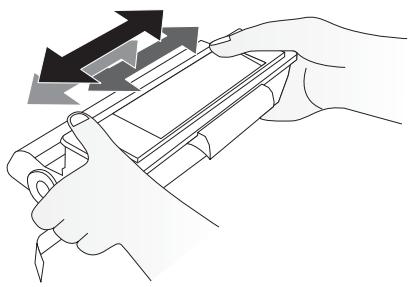
natural_image
Illustration of hands using a pen to apply a black arrow to a device (no text or symbols present)7 Only after completely pull off the protection strip located on the left side of the cartridge.
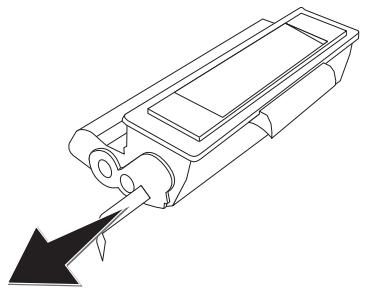
natural_image
Technical line drawing of a mechanical component with an arrow indicating direction (no text or symbols)DANGER!

Escaping Toner Dust!
Once you have removed the protection strip, do not shake the toner cartridge any more. Otherwise, it is possible that toner dust will be released into the air.
8 Place the toner cartridge into your device. The cartridge should snap securely into position.
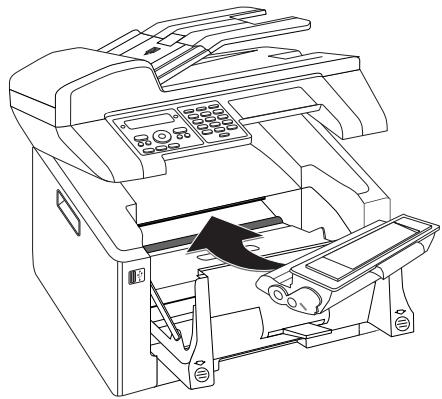
natural_image
Line drawing of a printer with an arrow indicating a process or operation, no text or symbols present.9 Close the device.
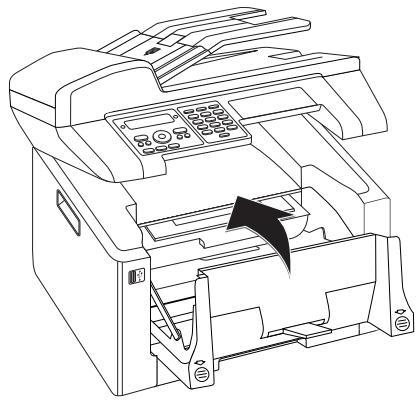
natural_image
Line drawing of a printer with a black arrow indicating a process or operation (no text or symbols present)CAUTION!

Toner Cartridge Not Inserted Correctly!
If the device cover would not close, the toner cartridge is not inserted correctly. Take the toner cartridge out and insert it again correctly.
10 Close the upper device cover.

natural_image
Line drawing of a printer with control panel and buttons, showing mechanical components without any text or symbolsFixing a Paper Jam
Your device is equipped with sensors that quickly recognises a paper jam. If trouble of this sort arises, the feeding of the printer paper is stopped immediately. Check all the following three areas for jammed paper: Paper tray/paper feed, print unit and fuser unit (see also the help below).
DANGER!

Escaping Toner Dust!
In case of a paper jam, do not forcefully remove the paper, but rather pull it gently out of the device and throw it away carefully. It is possible that the toner may not be completely set on the print-out, and toner dust could be released into the air. Do not inhale the released toner dust. Remove the toner dust from clothing or objects with cold water; hot water would only cause the toner to set. Never remove loose toner dust with a vacuum cleaner.
Clearing Paper Jam in Paper Tray/Paper Feed
1 Pull the paper tray out of the device.
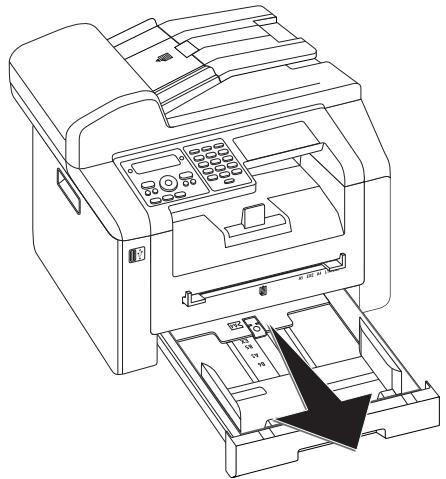
natural_image
Line drawing of a printer with an open drawer and internal control panel (no text or symbols)2 Carefully pull out the paper.
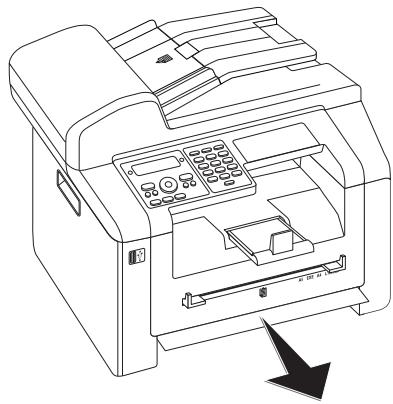
natural_image
Line drawing of a printer with control panel and paper feed, showing internal mechanism (no text or symbols)3 Push the paper tray into the device all the way to the stopping point.
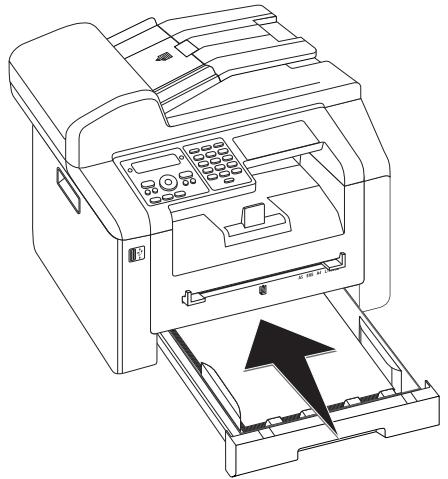
natural_image
Line drawing of a printer with an open lid and internal control panel (no text or symbols)Clearing Paper Jam in the Print Unit
1 Open the upper device cover by gripping the cover on the arrow marks on the outside and lift upwards,
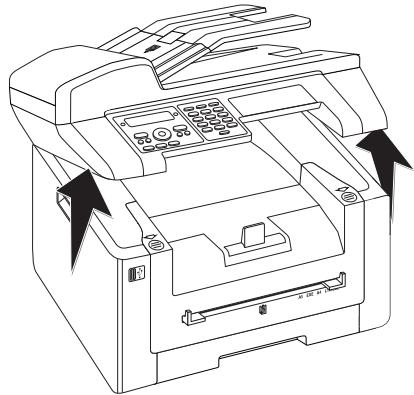
natural_image
Line drawing of a printer with arrows indicating movement or assembly (no text or symbols)2 Open the device by lifting the device cover forwards
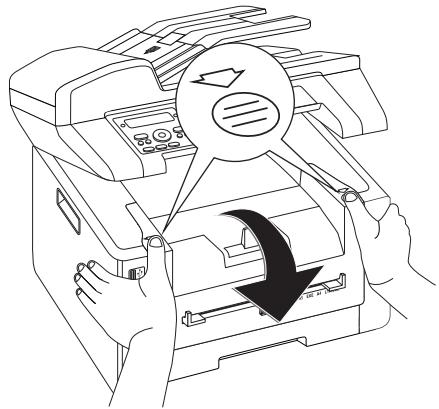
natural_image
Line drawing of a printer with hands operating it, showing a circular component being inserted (no text or symbols present)3 Remove the toner cartridge by gripping the handle in the middle and pulling it forwards out of the device
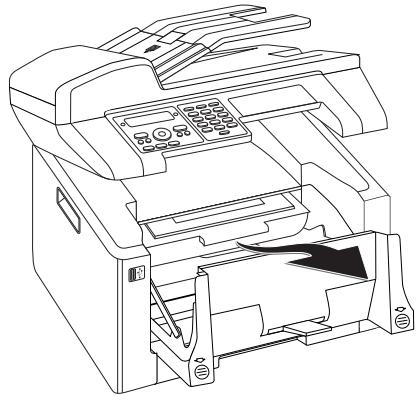
natural_image
Line drawing of a printer with internal components and no visible text or symbolsDANGER!

Escaping Toner Dust!
Carefully remove the toner cartridge from the device so that no toner dust spills out. Take care where you place the toner cartridge, escaping toner dust may soil the surface.
Never open a toner cartridge. If toner dust is released into the air, you should avoid allowing it to contact your skin and eyes. Do not inhale the released toner dust. Remove the toner dust from clothing or objects with cold water; hot water would only cause the toner to set. Never remove loose toner dust with a vacuum cleaner.
4 Open the paper jam flap.
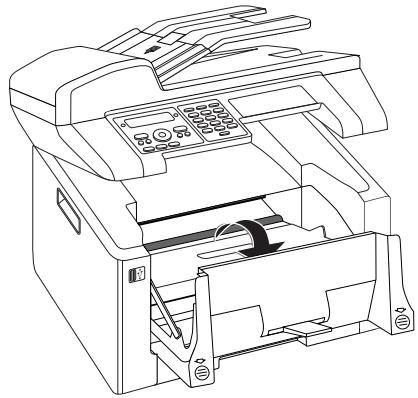
natural_image
Technical line drawing of a printer with internal components and control panel (no text or symbols)5 Carefully pull out the paper.
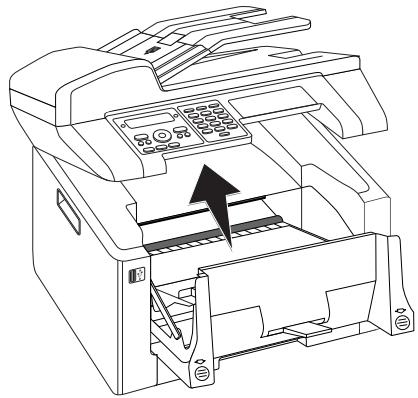
natural_image
Line drawing of a printer with an open lid and internal mechanism (no text or symbols)6 Close the paper jam flap.
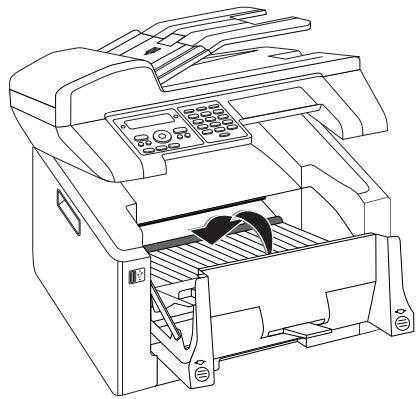
natural_image
Line drawing of a printer with internal components and control panel (no text or symbols)7 Place the toner cartridge into your device. The cartridge should snap securely into position.
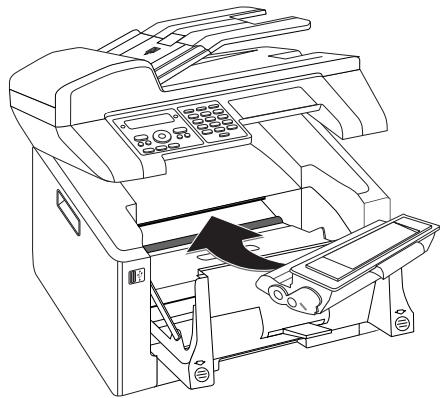
natural_image
Line drawing of a printer with internal components and a black arrow indicating motion (no text or symbols)8 Close the device.
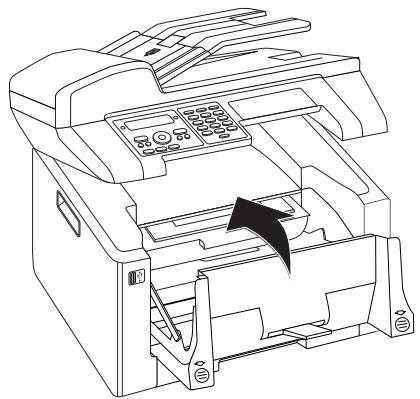
natural_image
Line drawing of a printer with an arrow indicating a process or operation (no text or symbols present)CAUTION!

Toner Cartridge Not Inserted Correctly!
If the device cover would not close, the toner cartridge is not inserted correctly. Take the toner cartridge out and insert it again correctly.
9 Close the upper device cover.
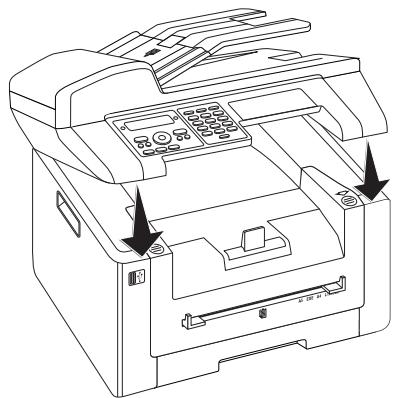
natural_image
Line drawing of a printer with control panel and buttons, no text or symbols presentFixing Paper Jam in the Duplex Unit/Fuser Unit
1 Open the paper jam flap on the reverse side of the device.
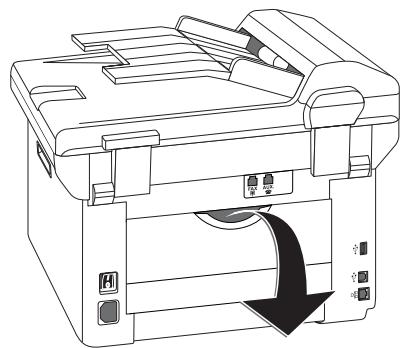
natural_image
Line drawing of a printer with a paper feed and paper outlet, showing internal components without any text or symbols.DANGER—HEAT!

Device Parts are Hot!
The fuser unit and and its surroundings inside the device become hot during operation. Do not touch these parts if you have opened the device. Proceed with care when you are removing a paper jam for instance.
2 Remove the paper guide on the fixer unit by pressing the tension lever on both sides downwards.
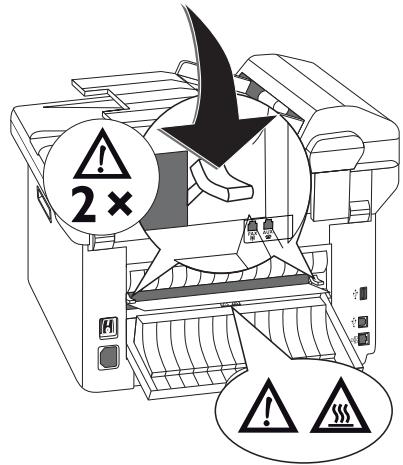
3 Carefully pull out the paper.
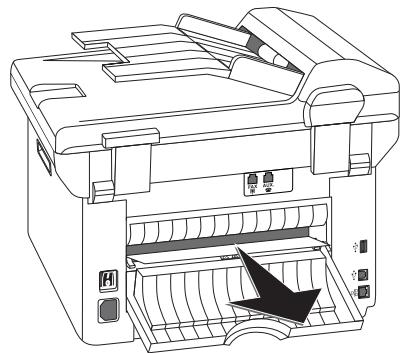
natural_image
Line drawing of a printer with an open drawer and internal structure, showing no text or symbols.4 Close the paper jam flap. The fuser levers will automatically fold into starting position when the paper jam cover is closed.
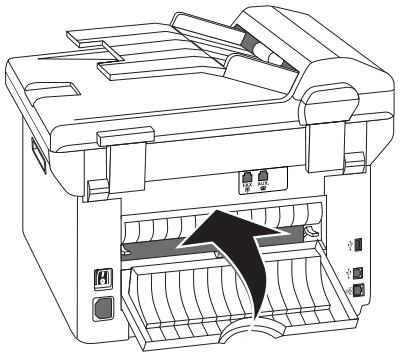
natural_image
Line drawing of a printer with an open drawer and internal structure, showing no text or symbols.Notice

Continue Print Job
Press ◆ after the problem has been rectified to continue the print job. Press ⬇ to suppress the error message.
Fixing a Document Jam
This allows you to remove a document jam in the automatic document feeder.
1 Open the cover of the automatic document feeder.
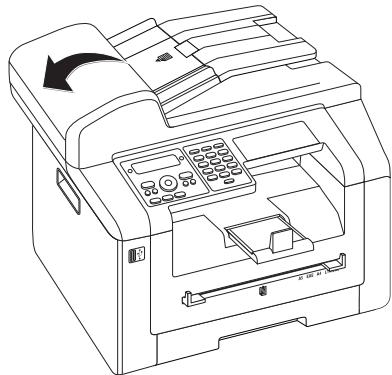
natural_image
Line drawing of a printer with control panel and scroll (no text or symbols)2 Carefully pull out the paper.
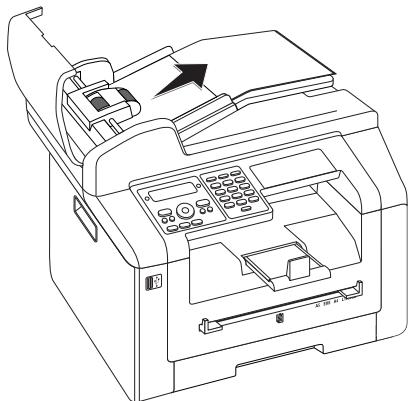
natural_image
Line drawing of a printer with control panel and paper feed (no text or symbols)3 Close the cover of the automatic document feeder.
Cleaning
If lines appear on the printed pages or on the fax transmissions or documents are not properly fed, you should clean the scanner and the document feeder.
Switch the device off and disconnect from the power supply before you clean it.
CAUTION!

Switching off the device!
Turn the device off using the on/off switch on the back before you remove the plug from the socket.
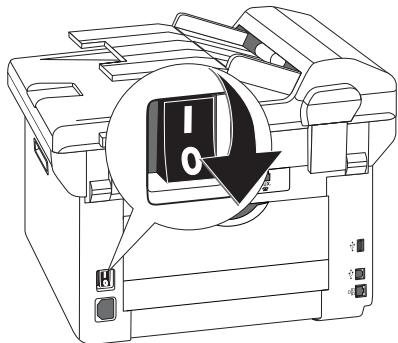
CAUTION!

Recommissioning!
Plug the power cable into the electrical outlet. Only after switch the device on using the on/off switch on the rear.
DANGER!

Instructions for Cleaning!
Use a soft, lint-free cloth. Never use liquid or easily flammable cleansers (sprays, abrasives, polishes, alcohol, etc.). Do not allow any moisture to reach the interior of the device.
Moisten the cloth slightly with cleaning alcohol in order to remove stubborn marks. The cloth must however, never be wet.
Notice

Fax Cleaning Sheets
Special fax cleaning sheets are available as accessories from our call centre. Insert a sheet into the document feeder. Press ☑; the page is ejected. Repeat this process at a few times.
Cleaning the Scanner
1 Open the scanner cover.
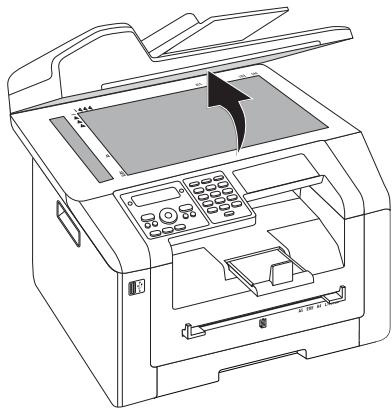
natural_image
Line drawing of a printer with control panel and paper airplane (no text or symbols)2 Carefully wipe the scanner glass of the flatbed scanner (①) and the automatic document feeder (②) with a lint-free cloth.
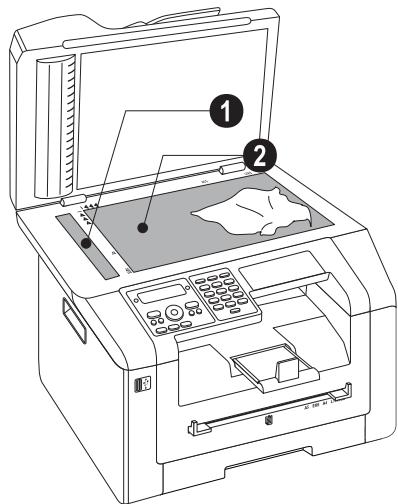
3 Close the scanner cover.
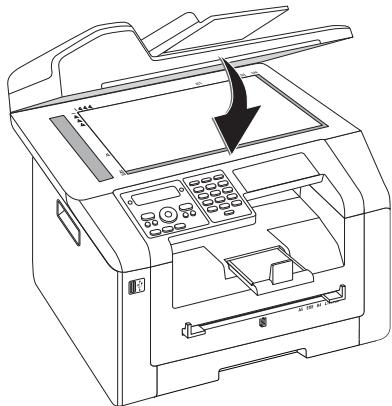
natural_image
Line drawing of a printer with an arrow indicating the process (no text or symbols present)Calibrating the Scanner
If vertical lines appear on the printed pages or on the fax messages, it is possible the scanner needs to be calibrated.
CAUTION!

Instructions for Calibrating!
The scanner is calibrated in the factory and normally no new calibration is needed. Do not use this function frequently. Clean the the scanner glass and the scanner film first before calibrating the scanner (see also chapter Cleaning, page 75).
1 Insert a white piece of paper into the document feeder.
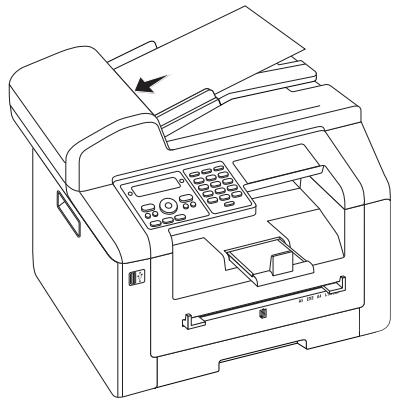
natural_image
Line drawing of a printer with control panel and paper feed (no text or symbols)2 Press C, 9 3 1 and OK.
3 Confirm with OK.
4 Wait until calibration is completed and the device returns to starting mode.
Using Service Codes
The service codes delete all the changed settings and your device is reset to factory settings. It may be possible that the device with the changed settings reacts differently than expected.
CAUTION!

Settings will be Deleted!
Only use the service codes if this is absolutely necessary. Some service codes also delete saved messages and telephone book entries.
1 Press C, 9 3 3 and OK.
2 Enter a service code:
7 0 1 5 8—Deletes all changed settings. Saved data and telephone book entries remain intact.
7 0 0 2 6—Deletes saved faxes, when there are problems with printing.
3 Confirm with OK.
4 Use ▲/▼ to select YES.
5 Confirm with OK.
Notice

Cancelling Entry
If you have entered the incorrect code, you can cancel the entry with NO.
Power Cycling
If a problem occurs that cannot be corrected with the instructions in this user manual (see also the help below), follow the steps given here.
1 Switch the device off using the on/off switch on the rear.
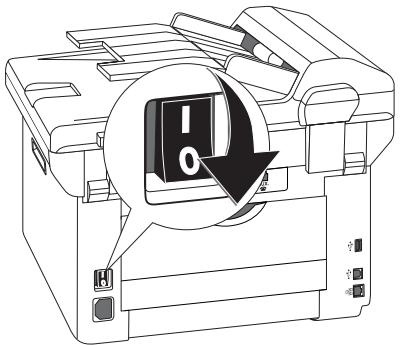
2 Wait at least ten seconds.
3 Switch the device on using the on/off switch on the rear.
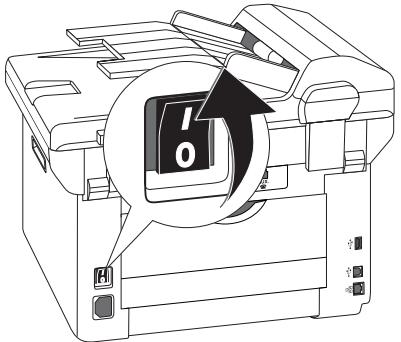
4 Follow the instructions on the display. If the problem repeats, please contact our technical customer service or your retailer.
Problems and Possible Causes
| General Information | Possible Cause(s) |
| The time and date flash on the display. | You must check the time and date after a short power failure. Confirm with OK. |
| No dial tone when lifting the headsetNo fax transmission | Check the installation of the device. Check that the device is connected to the mains voltage.Connect the telephone cable to the socket marked FAX/☐. Insert the telephone plug into your PTT line socket.If possible test your device in another telephone line before you contact technical customer services.Follow the instructions on the display. |
| Problems with Faxing | Possible Cause(s) |
| Fax transmissions are constantly interrupted. | Try to send the fax manually:Press ↘ and dial the number. If the recipient is using an answering machine, wait until you hear a whistling tone. Press ◆.It is possible that the recipient's device is not ready to receive. |
| Fax transmission to a fax number is not possible. | Call the number and check whether the number is a fax number and whether the connected fax device is ready to receive (whistling tone or silence). You can eavesdrop while the connection is establish (page 44). |
| Faxes sent are of poor quality. | Modify the resolution.Test the device by making a copy of the document. If the device is in order, the device of the recipient might be defective.Test the scanner by printing the functions list (press C,81and OK). If the function list is printed perfectly, it is possible the scanner is dirty or defective. Clean the scanner. |
| Fax recipient receives an empty sheet. | Insert the documents face down into the document feeder. |
| No fax reception | Check whether the manual fax reception mode is set. The device will not receive faxes on its own (page 60).. It is possible that the fax reception speed needs reducing (page 61). |
| You hear a whistling tone or silence in the handset. | The call is a fax. Press ◆ on the device. Press *5 on the additional telephone. Hang up. |
| Problems Printing or Copying | Possible Cause(s) |
| No printingPrinting is interrupted. | Paper or document jam, no paper or toner cartridge.Follow the instructions on the display.There could be a small pause after printing several pages.The device continues printing automatically. |
| Copy is blank. | Insert the documents face down into the document feeder.No toner cartridge inserted. |
| The device produces white lines when printing. | Clean the toner drum with a soft cloth.Clean the scanner and the document feeder (see also chapter Cleaning, page 75). |
| The device produces black lines when printing. | Clean the scanner and the document feeder (see also chapter Cleaning, page 75).The toner cartridge is damaged and must be replaced.Use only original consumable materials. |
| The device produces vertical lines when printing. | It is possible that the scanner needs calibrating (see also chapter Calibrating the Scanner, page 75). |
| The device makes a noise during printing. | The toner cartridge is almost empty and must be replaced. Use only original consumable materials. |
| Received faxes and copies are too light. | The sender's device is not set optimally.If the copy is also too light the toner is almost all gone and must be replaced. Use only original consumable materials. |
Error Messages and Possible Causes
| General Error Messages | Possible Cause(s) |
| INSERT PAPER | Paper must be inserted into the manual paper feed (see also chapter Load Paper into the Manual Paper Feed, page 28). |
| MEMORY FULL | Fax memory full! If the fax memory is full, no fax messages can be received. Print the stored fax messages so that the device is ready to receive again. |
| REMOVE PAPER | A document jam has occurred: Remove all documents from the document feeder. Remove the document jam (also see chapter Fixing a Document Jam, page 74). |
| PAPER JAM | A paper jam occurred: Check all the following three areas for jammed paper: Paper tray/paper feed, print unit and fuser unit (see also chapter Fixing a Paper Jam, page 71).Clear the paper jam. Press ◆ after the problem has been rectified to continue the print job. Press ☑ to suppress the error message. |
| WRONG PAPERPAPER SIZE | Problem with the paper format inserted. Make sure that you are using the proper paper format. Repeat the print job or copy process.There is no paper in the paper tray or the paper is not loaded correctly. Check the paper tray. |
| TONER LOW | The toner cartridge is almost empty and must be replaced soon. Use only original consumable materials. |
| TONER EMPTYNON GENUINE TONERNOT INSTALLED TONER | Problems with the toner cartridge: Toner cartridge empty, damaged, incorrect or no toner cartridge in device. Check the toner cartridge (see also chapter Changing Toner Cartridge, page 69).The toner cartridge is empty and must be replaced. Use only original consumable materials. |
| DEFECT TONER | The toner cartridge is not inserted correctly or can not be detected. Remove the toner cartridge from the device and insert the toner cartridge again. If the error occurs again, the toner cartridge is damaged and must be replaced (see chapter Changing the Toner Cartridge, page 69). Use only original consumable materials. |
| PRINT JOB ERROR | Error when printing or copying. Print job is aborted. Repeat the print job or copy process. |
| COOLING PRINTER | There could be a small pause after printing several pages. The device continues printing automatically. |
| PRINTER SYSTEM ERRORFUSER UNIT ERRORPAPER FEEDER ERRORLED ERRORSCANNER ERRORROLLER DIRTY | Device error! Use the quick help (see also chapter Power Cycling, page 76). If the problem repeats, please contact our technical customer service or your retailer. |
| USB Storage Medium Error Messages | Possible Cause(s) |
| MEDIA FULL | No storage space is available on the inserted USB storage medium (USB stick, external hard drive, etc.). Purge the data media or delete files to create storage space. |
| MEDIA MISSING | There is no USB storage medium (USB stick, external hard drive) connected to the device. Check whether a USB storage medium is connected. Disconnect this and connect it again. |
| WRONG MEDIA | The inserted USB storage medium cannot be accessed (no read/write access). It is possible the USB storage medium is damaged or uses an unsupported file system. The device only recognises storage media which are formatted with FAT16 or FAT32. NTFS is not supported. |
| USB OVERLOAD | The power consumption is too high or a USB device is defective. All USB devices are deactivated.1 Remove all connected USB devices.2 Press ◆.3 Insert another USB device into the device. Note with which USB device the error message occurs.You can only connect one high power device (USB 2.0) to each USB connection. Do not connect additional devices—such as batteries, fans, charging devices—to your machine. |
Error Messages on the Transmission Report
| Error Messages on the Transmission Report | Possible Cause(s) |
| General scanner error | During the scanning process, an error occurred, for example, a document jam (see also chapter on Fixing a Doc-ument Jam, page 74). |
| User break | The transmission process was interrupted by pressing the ☑-key on the transmitting unit. |
| Busy or no fax answerSubscriber has disconnected | If the subscriber is busy, the device dials the number again after some time. After six attempts, the transmis-sion process is cancelled. Try again at a later date.Call the number and check whether the number is a fax number and whether the connected fax device is ready to receive (whistling tone or silence). Press FAX or ◇ to send the message manually.Ask the recipient whether the device is ready to receive. |
| Non programmed number | The recipient's number is no longer stored in the device. This can occur, for example, if you have selected the tel-ephone book entry as a recipient for a fax message which should be sent at a later time and delete the tele-phone book entry before the time of transmission. |
| DisconnectedCan't communicateSubscriber has stoppedCheck called number | The transmission process was interrupted. Repeat the transmission process.Call the number and check whether the number is a fax number and whether the connected fax device is ready to receive (whistling tone or silence). Press FAX or ◆ to send the message manually.Ask the recipient whether the device is ready to receive.Repeat the transmission process with a lower transmission speed (see also chapter Reducing Transmission Speed, page 61). |
| Transmission failed | Fax Transmission: Repeat the transmission process.Call the number and check whether the number is a fax number and whether the connected fax device is ready to receive (whistling tone or silence). Press FAX or ◆ to send the message manually.Ask the recipient whether the device is ready to receive.Fax Reception: Fax reception was interrupted. Ask the sender to send the fax message again. |
| Voice contact | Call the number and check whether the number is a fax number and whether the connected fax device is ready to receive (whistling tone or silence). Press FAX or ◆ to send the message manually. |
| QUALITY | It is possible the error occurred because the recipient's number does not support the Error Correction Mode.Fax Transmission: The fax message sent was not received properly. Ask the recipient whether the transmission process needs to be repeated.Fax Reception: If the received fax message is illegible, ask the sender to send the fax message again. |
| Memory full | Fax memory full! If the fax memory is full, no fax messages can be received. Print the stored fax messages so that the device is ready to receive again. |
| Internal error | An error has occurred during printing of the received fax message.Check whether the device cover is open.Check whether the paper supply is empty (see also chapter Insert Paper into the Paper Tray, page 26).Check whether cartridge is empty (see also chapter Displaying the Toner Level, page 68 and Changing the Toner Cartridge, page 69).Check to see whether a paper jam has occurred (see also chapter Fixing a Paper Jam, page 71). |
| Received document error | The received fax message is possibly incomplete Ask the sender to check the length of the fax message. It is possible the message is too long to be able to transmit in full. |
| No document to be polled | In selected devices, no documents lay ready which could be retrieved. Perhaps the sender's device is not ready or the document is no longer available. |
| Incompatible coding | Fax transmission to mailbox: The mailbox number entered does not exist at the recipient’s side. |
| Unknown Mailbox number | Fax polling from a mailbox: The mailbox number entered does not exist at the recipient’s side. |
15 Glossary
Asymmetric Digital Subscriber Line (ADSL).
See Digital Subscriber Line (DSL)
Broadcasting
see Sending to Multiple Recipients
call hold
See Call Toggling
Call Toggling
You can switch back and forth between different telephone conversations by using the R key. The inactive telephone conversation is maintained in the interim, and the other party cannot listen in. This additional service must be enabled for your telephone line (see Call Waiting, see Flash Key).
Call Waiting
If another caller places a call to you while you are having a telephone conversation, you will hear a tone. If additional services are enabled for your telephone line, you can toggle back and forth between different telephone calls (see Flash Key; see Call Toggling).
Call-by-Call
Selection of the telephone service provider for each telephone call. It is possible to place telephone calls through different private service providers. By placing prefixes in front of the actual telephone number, one can choose a different service provider for each telephone call without entering into a firm contract relationship.
Caller List
The numbers of the last callers are stored in the caller list. This function requires that the caller identification function be enabled for your telephone line and that the caller not suppress the transmission of his or her telephone number (see Calling Line Identification).
Calling Line Identification (CLIP)
There are two types of Calling Line Identification Presentation (CLIP). If someone calls you, your device will show the caller's telephone number on the display. If another caller places a call to you while you are having a telephone conversation, you will hear a tone. Your telephone company must offer both services and must enable them for your telephone line. The transmission of your telephone number can be turned on and off temporarily or it can be turned off permanently (Calling Line Identification Restriction, CLIR).
CCITT
see Combining Numbers
Chain Dialling
Before the dialling process begins, you can freely combine and edit telephone book entries, manually entered digits, numbers from the redial list or numbers from the caller list. For example, if you have saved the telephone number prefix of an inexpensive telephone service-provider (see Call-by-Call) as a telephone book entry, select this entry and manually enter the desired telephone number or select another number from the telephone book, the redial list or the caller list.
CLIP
Calling Line Identification Presentation (see Calling Line Identification)
CLIR
Calling Line Identification Restriction (see Calling Line Identification)
CNG
Calling Signal (see Fax Signal)
Dialling Pause
Long-distance numbers or telephone numbers with sub-addresses/extensions sometimes require the insertion of a dialling pause to prevent the dialling from occurring too quickly and resulting in a loss of the connection. The second part of the number is dialled only after a short pause.
Digital Subscriber Line (DSL)
Data connection for private households or companies with high transmission speeds (broadband connection) usually for connection to the Internet. Fixed network telephone lines can be used for the DSL connection. Due to the frequency range used, Internet use via DSL can be used simultaneously with the telephone line. For private households, there are usually connections with different transmission speeds: Asymmetric Digital Subscriber Line (ADSL). A high download rate alongside a far lower upload speed.
Direct-Dial Number
Number used to directly dial a specific extension of a private branch exchange.
DTMF
Dual Tone Multi Frequency (see Tone Dialling)
Dual Tone Multi-Frequency (DTMF)
see Tone Dialling
Easylink
The Easylink function offers you additional options for managing external devices that are connected to the same telephone line as your device (starting fax reception, taking over the line, see Additional Devices). To use this function, additional telephones must be set to tone dialling (DTMF tones).
ECM
Error Correction Mode
Encoding
The data of your fax transmission are encoded and compressed for the transmission. The minimum standard is MH (Modified Huffmann). Better encoding methods are MR (Modified Read) or MMR (Modified Modified Read).
Error Correction Mode (ECM)
The ECM method reduces transmission errors that result, for example, from bad telephone lines, thereby reducing the duration of transmissions. Both of the connected fax machines must support ECM.
Fax Groups
Fax machines are classified in terms of internationally standardised fax groups based on their transfer type and speed. Connections between two devices of different groups is possible; the lowest common transfer rate is selected. The determination of the speed takes place during the handshake (see Handshake). Fax groups 1 to 3 are analogue fax machines. Nowadays, groups 1 and 2 are hardly to be found any longer; fax machines of group 3—which have a transfer speed that ranges from 9,600 to 33,600 bps—are currently most standard. Group 4 fax machines are digital devices that function exclusively on ISDN systems. They have a maximum transfer speed of 64,000 bps.
Fax Polling
With active fax polling, one can retrieve a document from another fax machine. For fax polling from a larger company offering several polling services, you can also enter sub-addresses / direct-dial numbers. In order to do this, you must insert a dialling pause between the fax number and the sub-address (see Dialling Pause).
Fax Signal, CNG Tone (= Calling Signal)
The tone that a fax machine sends out to announce a fax transmission. When the CNG tone occurs, the fax switch of the device recognises an incoming fax call and starts the fax reception.
Fax Switch
The fax switch checks incoming telephone calls and controls the ringing behaviour of the fax machine. According to the selected mode, fax transmissions will be received either automatically or manually.
Flash Key (R-key)
With the flash key, you can make use of additional telephone services if these special functions are enabled for your telephone line. The R key has replaced the hook-flash function. (see Call Waiting, Call-toggling).
Handshake
The handshake is the initial and final phase of a fax transmission. After establishing of the connection, fax machines check the group affiliation and features such as size compression or grey tones. After the fax transmission has been completed and before the connection is terminated, the receiving device confirms receipt of the transmission (see Fax Groups).
Hook-Flash Function
See Flash Key
ISDN
Integrated Services Digital Network
ITU
International Telecommunications Union (UN organisation)
LCD
Liquid Crystal Display
Memory
If there is no paper or toner in your device, the device will store incoming fax transmissions in its memory.
MH
Modified Huffmann (encoding process for faxes, see Encoding)
MMR
Modified Modified Read (encoding process for faxes, see Encoding)
MR
Modified Read (encoding process for faxes, see Encoding)
Outside Line Access Code
The outside line access code is the number or letter that must be dialled before the actual telephone number on a telephone of a private branch exchange in order to establish a connection to the public telephone network (see Private Branch Exchange).
PABX/PBX
Private Automatic Branch Exchange
Polling
see Fax Polling
POTS
Plain Old Telephone Service
Private Branch Exchange
Private branch exchanges are common in larger companies. Even private ISDN systems can be branch exchanges. To establish a connection to the public telephone network from a private branch exchange, one must dial a number or press a key before the actual telephone number; in most cases this is zero (see Outside Line Access Code).
PSTN
Public Switched Telephone Network
Pulse Dialling
A dialling process that is used in older telephone networks. You hear a clicking for each number dialled (see Tone Dialling).
RJ-11
Registered Jack 11 (also called Western plug, standardised telephone plug)
Scanning
The reading of a document into the fax memory or into the computer in order to send it, copy it or edit it.
Sender Identification (= Header)
The telephone number and name of the sender as well as the date and time of the fax transmission appear in the upper margin of each received fax.
Sending to Multiple Recipients (= Broadcasting)
With this function, you can send a fax message to multiple recipients.
Telephone number suppression (CLIR)
If you call a subscriber, your number appears on the display of the person whom you are calling. You can switch off this function and suppress your number (Caller Line identification Restriction, CLIR).
Time Stamp
The exact date and time of receipt appear in the page header of each received fax. A memory buffer guarantees that exact data are issued even after a power loss. In this way, you can verify exactly when a fax has reached you.
Tone Dialling (= Dual Tone Multi-Frequency)
In many countries, tone dialling has replaced pulse dial-ling, in which each number was sent as a corresponding number of pulses. With tone dialling, a specific tone is assigned to each key (referred to as DTMF tones).
Toner Level Memory
Your device registers the extent of toner used for every print-out and calculates the toner level of the toner cartridge on that basis. The toner level is stored in each toner cartridge. You can use different toner cartridges as well as display the respective toner level of the toner cartridge.
Transfer Speed
CCITT/ITU has published international standards for the transmission of data over telephone lines. All short names begin with V, so these are also referred to as V standards. The most important transmission speeds for fax transmissions are: V.17—7.200 to 14.400 bps, V.21—max. 300 bps, V.22—max. 1.200 bps, V.22 bis—max. 2.400 bps, V.27 ter—max. 4.800 bps, V.29—max. 9.600 bps, V.32 bis—max. 14.400 bps, V.34—max. 33.600 bps
TWAIN
(Tool Without an Interesting Name) With the TWAIN scanner driver you can access the device and scan documents from any application which supports this standard.
USB
Universal Serial Bus (computer port)
UTC
Coordinated Universal Time (UTC) Coordinated Universal Time is the current standardised universal time used. Starting from Greenwich in London (Zero Meridian), the world is split into time zones. These time zones are indicated with a deviance from UTC (in hours) for instance UTC+1 for Central European Time (CET)
Warm-Up Phase
Normally, the device is in the energy saving mode (see Energy Saving Mode). In the warm-up phase, the device heats up the printing unit until it has reached the necessary operating temperature, after which the copy or fax can be printed out.
16 Appendix
Technical Data
Dimensions (L × H × W)...... 430 × 346 × 393 mm
Weight ....../<12 kg
Mains Connection .... 220–240 V \~ / 50–60 Hz
Power Consumption
Stand-by Mode ....../<5,5 W
Warm Up Phase ....../<980 W
Printing....<550 W
Recommended Ambient.... 18–28°C
Relative Humidity....30–70% (non-condensing)
Connection Type....PSTN · PABX
Dialling Mode
.....Tone / pulse dialling (country dependent)
Standards
Safety......EN 60950-1
EN 60825-1
Emissions......EN 55022 Class B
EN61000-3-2
EN 61000-3-3
Immunity......EN 55024
Scanner
Type...... Black-and-White · 256 grey tones
Scan Width 216 mm
Resolution
Draft ......Grey tones · 100 dpi
Text ......Black-and-White · 200 dpi
Grey Tones......Grey tones · 200 dpi
Photo......Grey tones · 400 dpi
Speed
Standard....3,9 seconds/A4-page
Fine 3,9 seconds/A4-page
SFine 10,2 seconds/A4-page
Printer
Type......Class 1 Laser Printer
Emulation...... GDI
Warm-Up Time .... <10 sec.
Width....211 mm
Resolution 600 x 600 dpi
600×1200dpi
Speed....24 pages/minute
Memory
Redial / caller list ....50 Entries
Telephone Book 250 Entries
Fax Messages
......up to 200 pages (standard test letter)
Paper (Paper Tray)
Capacity 250 sheets
Weight....60-105 g/m²
Paper (Manual Paper Feed)
Capacity....1 sheets
Width....98–216 mm
Length 148–356 mm
Weight....60–165 g/m ^4
Document Feed Slot
Capacity....50 sheets
Width....208–218 mm
Length 277–600 mm
Weight....60 - 90 g/m²
Fax
Type ...... Group 3
Compatibility...... ITU-T T.30
Modulation.....V.17, V.21, V.27ter, V.29, V.34
Resolution
Standard 100 dpi
Fine 200 dpi
Super Fine 400 dpi
Photo......400 dpi
Transfer Speed 33.600 bps
Copier
Type ...... Black-and-White · 256 grey tones
Resolution
Automatic 200×203 dpi
Text.... 200 x 203 dpi
Quality 400 x 203 dpi
Photo.... 400×203 dpi
Speed up to 24 pages/minute
Multiple Copies up to 99 pages
Technical specifications subject to change without notice.
Guarantee
(Terms and Conditions for United Kingdom only)
In order to supply the guarantee, you should contact your dealer or Sagemcom Helpdesk. The proof of purchase will be required.
Please make usage of your equipment for the purpose for which it was designed and under normal usage conditions. Sagemcom do not accept any liability for any usage made out of the frame of its original designed purpose and any consequence that may arise from this usage.
Should any malfunctioning arise, the dealer or Sagem-com Helpdesk will advise you what to do.
A) General Guarantee Conditions
Sagemcom undertakes to remedy by repair or exchange at its own convenience, free of charge for labour and replacement parts, any defects in the equipment during the guarantee period of 12—twelve—months (3—three—months for accessories), from the date of original invoice of the Equipment, where those defects are a result of faulty workmanship.
Unless the customer has concluded with Sagemcom a maintenance contract in respect of the equipment which specifically provides for repairs to be carried out at the customer's premises, the repairs will not be carried out on the equipment at the customer premises. The customer must however return the defective equipment at his/her own expense, to the address given by the dealer or Sagemcom Helpdesk.
In case a product needs to be sent in for a repair, it always has to be accompanied by a proof of purchase (which is not altered, written on or in any way be made illegible) showing that the product is still under warrantee. In case no proof of purchase is enclosed, the Sagemcom repair center will use the production date as a reference of establishing the warrantee status of the product.
Apart from all legal obligatory rules, Sagemcom, do not give any Guarantee, either implicit or explicit which is not set force in the present section, and could not be hold responsible for any direct or indirect, material or immaterial damage, in or out of the frame of the present guarantee.
If any provision of this guarantee shall be held to be in whole or in part invalid or illegal due to an obligatory rule applicable to consumers pursuant to their national legislation, such invalidity or illegality shall not impair or affect the remaining provisions or parts of this guarantee.
This guarantee does not affect the Customer statutory rights.
B) Exclusions From Guarantee
Sagemcom shall have no liability under the guarantee in respect of:
•) Damage, defects, breakdown or malfunction due to one or more of the following:
– Failure to properly follow the installation process and instructions for use
– An external cause to the equipment (including but not limited to: lightening, fire, shock, vandalism, inappropriate conditions of electrical network or water damage of any nature)
- Modifications made without the written approval of Sagemcom
– Unsuitable operating conditions, particularly of temperature and humidity
– Repair or maintenance of the equipment by persons not authorized by Sagemcom
•) Wear and tear from normal daily use of the equipment and its accessories
•) Damage due to insufficient or bad packaging of equipment when returned to Sagemcom
•) Usage of new versions of software without previous approval of Sagemcom
•) Work on any equipment or software modified or added without the prior written consent of Sagemcom
•) Malfunctions not resulting from the Equipment or from software installed in user workstations for the purpose of use of the equipment.
Communication problems related to an unsuitable environment including:
– Problems related to access and/or connection to the Internet such as interruptions by access networks or malfunction of the line used by the subscriber or his correspondent
- Transmission faults (for example poor geographical coverage by radio transmitters, interference or poor line quality)
- The local network fault (wiring, servers, workstations) or the failure of the transmission network (such as but not limited to interferences, fault or poor quality of the network)
- Modification of the parameters of the cellular network carried out after the sale of the Product
•) The normal servicing (as defined in the user guide supplied with the equipment) as well as malfunctioning due to servicing not being carried out. Servicing costs are in any event always borne by the customer.
- Malfunctions resulting from the usage of products, consumables or accessories not compatibles with the equipment.
C) Out of Guarantee Repairs
In the cases set forth in B) as well as after expiry of the guarantee period, the customer must ask the Authorized Sagemcom Repair Centre for a cost estimation.
The repair and delivery costs will be invoiced to the customer.
The foregoing shall apply unless otherwise agreed in writing with the customer and only for the United Kingdom.
Helpdesk: 08 45 - 090 03 15

The CE symbol confirms conformity with the EU directives that apply to the device.
This terminal is designed for private use inside a building.
CE!
The following Alert Symbol (!) means that the radio-frequency band used by this equipment is not fully harmonised in Europe, and that the user must therefore imperatively consults the national legislation in force in the country of use, to learn about the possible restrictions of use.
European Union countries for which known national restrictions exist, at the date of this manual (see back page):
- France (restrictions on the use of this Wi-Fi application outdoor)
· Italy (restrictions on the use of this Wi-Fi application outdoor)
• Norway (in some regions)
Sagemcom declines any liability in the event the user has failed to comply with national regulations in force at the place of his installation.
Declaration of Conformity (DoC)
Hereby, Sagemcom Documents SAS declares that this SFF 6170dw is in compliance with the essential requirements and other relevant provisions of Directive 1999/5/EC.
You can find the complete Declaration of Conformity on our website www.sagemcom.com

As a participant in the ENERGY STAR programme, Sagemcom Documents SAS has made sure that this machine complies with the ENERGY STAR requirements.


Packaging: To facilitate packaging recycling, please conform to your local selective recycling rules.
Batteries: Old batteries have to be deposited in designated collection areas.
Product: The crossed out dustbin logo on your product signifies it is classified as Electrical and Electronic Equipment covered by special disposal regulations.
To enforce recycling, recovery of The Waste Electrical and Electronic Equipment (WEEE) and to protect the environment and human health, European regulations requires that you selectively collect waste equipment using one of the following options:
- Your retailer will take your equipment back if you are buying a replacement product.
- Waste equipment can also be deposited in designated collection areas.
The paper and cardboard packaging used can be disposed of as recyclable paper. Have the plastic wrapping and Styrofoam packaging recycled or dispose of it in the non-recyclable waste, depending on the requirements in your country.
Trademarks: The references mentioned in this manual are trademarks of the respective companies. The lack of the trademarks ® and ™™ does not justify the assumption that these dedicated terminologies are free trademarks. Other product names used herein are for identification purposes only and may be trademarks of their respective owners. Sagemcom disclaims any and all rights in those marks.
The reproduction of certain documents (e.g. by scanning, printing, copying) is prohibited in many countries. The list of such documents below is not intended to be complete, it only offers a general overview. In case of doubt, consult your legal advisor.
• Passports (personal identification)
- Entrance and exit visa papers (immigration papers)
• Military service documents
• Bank notes, travel checks, payment orders
- Postage stamps, tax stamps (stamped or unstamped)
· Loan papers, certificates of deposit, bonds
· Documents protected by copyright
Follow the statutory regulations of your country with regard to the legal validity of fax transmissions—particularly in connection with the validity of signatures, meeting delivery deadlines or disadvantages resulting from the loss of quality in the transmission, etc.
Take care to maintain the statutory regulations of your country regarding telecommunications secrecy and data privacy.
This product is intended for use on an analogue public telecommunications network (PSTN) and in the country specified on the packaging. Use in other countries can result in faulty functioning.
For more information, please contact the technical service centre for your country. Should problems arise during use of your machine, please contact your retailer first.
Neither Sagemcom nor its affiliates shall be liable to the purchaser of this product or third parties for damages, losses, costs, or expenses incurred by the purchaser or third parties as a result of accident, misuse, or abuse of this product or unauthorized modifications, repairs, or alterations to this product, or failure to strictly comply with Sagemcom operating and maintenance instructions.
Sagemcom shall not be liable for any damages or problems arising from the use of any options or any consumable materials other than those designated as original Sagemcom products or Sagemcom approved products.
Sagemcom shall not be held liable for any damage resulting from electromagnetic interference that occurs from the use of any interface cables other than those designated as Sagemcom products.
All rights reserved. No part of this publication may be reproduced, stored in a retrieval system or transmitted in any form or by any means, electronic, mechanical, photocopying, recording, or otherwise, without the prior written permission of Sagemcom. The information contained herein is designed only for use with this product. Sagemcom is not responsible, if this information is applied to other devices.
This user manual is a document that does not represent a contract.
Errors, printing errors and changes are reserved.
Copyright © 2010 Sagemcom Documents SAS
Customer Information
As part of our continuing quest for total customer satisfaction, all of our products are made with ease-of-use and reliability in mind.
In your user manual you will find all the information required to use your machine. If, after consulting your user manual, you still require assistance, you should contact our Call Centre. Our personnel are highly trained specialists who can ensure that you receive the maximum benefit from your product.
We can assist your more quickly if you do not call us from the machine, rather an external telephone. Keep a printout of the settings as well as the serial number of the machine handy. The serial number can be found on the type label.
Should problems with the computer connection arise, have the following information to hand when you contact technical customer services: hardware configuration of your computer, operating system installed and security programmes used (anti-virus programmes, firewall). Then we can help you more quickly.
United Kingdom
Telephone: 08 45 - 090 03 15 (0,10 £/minute)
Fax: 08 70 - 124 02 02
You can order original accessories from our homepage or—in some countries (see below)—per telephone on our toll-free number.
Use only original consumable materials. The warrantee does not cover damages to the device resulting from other consumables.
United Kingdom
Telephone: 0800 - 358 08 07
E-Mail: support.service@sagemcom.com
Internet: www.sagemcom.com
We hope that you will have lots of joy using your new product.

PHILIPS and the PHILIPS' Shield Emblem are registered trademarks of Koninklijke Philips Electronics N.V. and are used by Sagemcom under license from Koninklijke Philips Electronics N.V.
Documents Business Unit
- Introduction
- Dear Customer
- Table of Contents
- Telephone Lines and Additional
- Devices.... 64
- Service.... 68
- Glossary 83
- Appendix...... 86
- General Safety Information
- Setting Up the Device
- Power Supply/Telephone Line
- Computer Connection
- Wireless Network (WLAN)
- USB Storage Media
- Consumable Materials
- Caution when Handling Toner Powder:
- Repairs
- Laser Safety
- About this User Manual
- Symbols Used
- Notice
- Troubleshooting
- CAUTION!
- Damage to the Device or Loss of Data!
- DANGER!
- Danger to Persons!
- DANGER—LASER!
- Radiation Hazard!
- DANGER—HEAT!
- Heat risk!
- Overview
- Device Overview
- Connections on the Rear Side
- Panel with Display
- Overview of the Menu Functions
- Settings
- Copier
- Printer
- Scanner
- Fax
- Cordless Telephone
- Jobs
- Lists and Reports
- USB Storage Medium
- Miscellaneous
- Wireless Network (WLAN)
- Initial Operation
- Packing Contents
- Missing Package Contents
- Removing Packaging Material
- Removing Packaging Material from the Device
- Remove the Packaging Material from the Toner Cartridge
- Escaping Toner Dust!
- Toner Cartridge Not Inserted Correctly!
- Remove the Packaging Material from the Paper Tray
- Loading Paper
- Cover of the Paper Tray
- Attaching the Document Support
- Connecting the Telephone Cable
- Connection to an ISDN system!
- Connection to Private Automatic Branch Exchange
- Connecting the Mains Cable
- Mains Voltage at the Site of Installation!
- Initial Installation
- Selecting the Language
- Selecting the Country
- Setting the Country Correctly!
- Set the Time Zone
- (Function is not supported in all countries and networks)
- Automatic Changeover Between Summer Time/Winter Time
- Entering Name
- Enter Letters
- Entering Number
- Entering the Date and Time
- Connecting to the Computer
- Network Connection
- Requirements
- Microsoft Windows
- Connecting USB Cable
- Only high-speed certified USB cable
- Companion Center SFX
- Informations for the Technical Customer Services
- Installing the Driver and Software
- Installing the Software first!
- Starting Program Manually
- Web Interface
- Calling the Web Interface
- Changing Password and Noting!
- Access the Web Interface with an Internet Browser
- Prints the List of Settings
- Suitable Internet Browser
- Scanner
- Unsuitable Documents!
- Loading Documents
- Insert Documents into the Automatic Document Feeder
- Place Documents onto the Flatbed Scanner
- Enlarge Detail
- Adjust Scanner Cover
- Do Not Press on the Scanner Cover!
- Scan Document and Save to a Computer
- Start Scanning from Computer
- Make Scans Using Standard Settings
- Access Function
- Make Scans Using User-defined Settings
- Select the File Format
- Scan Document and Save onto a USB Storage Medium
- Compatible USB Storage Media!
- Analysing USB Storage Medium
- Folder Destination
- Selection Menu for USB Storage Media
- Confirm with OK.
- Removing USB Storage Media!
- Scanning Document and
- Saving on Network
- Computer
- Scanning with the Companion Center SFX
- Printer and Printing Media
- Printing from Computer
- Specifications for Print Media
- Unsuitable Paper!
- Forms from a Laser Printer!
- Insert Paper into the Paper Tray
- Initial Operation!
- Loading Pre-printed Material
- Load Paper into the Manual Paper Feed
- Reset Settings
- Loading Envelopes
- Unsuitable Envelopes!
- Inserting Slides and Labels
- Unsuitable Slides and Labels!
- Insert the Template into the Paper Tray
- Load Templates into the Manual Paper Feed
- Print a List of Available Documents on USB Storage Medium
- Print Document from USB Storage Medium
- Navigating within the Directory
- Select Files Using the Arrow Keys
- Navigating in the Menu
- Delete Files on USB Storage Medium
- Delete Files!
- Print Calendar
- Sudoku: Printing a Game
- Printing a Game
- Printing the Last Game Again
- Printing the Solution
- Last Solution Available
- Sudoku for Every Day
- Switching Off Function
- Copier
- Make Copy Using Standard Settings
- ECO button
- Modifying the Settings
- Settings for the Next Print Job
- Set Resolution
- Modifying the Basic Settings
- Setting the Zoom Parameter
- Select One Side/Both Side Printing (Simplex/Duplex)
- Setting the Contrast
- Creating Multiple Copies
- Creating Crystal Copy with Image and Text Enhancement (Crystal)
- Create Multiple Crystal Copies with a Saved Profile
- Make Copies Using the Second Profile
- Make Copy Using the Second Profile
- Make Several Copies Using the Second Profile
- Make Copies Using User-Defined Settings
- Make Copies
- Make Enlarged or Compressed Copies
- Select the Preset Values
- Copying Several Documents onto one Page (= Mosaic Copy)
- Copying both Sides of a Document onto One Side (= Business Card Copy)
- Reproduction Not Permitted
- Document Size
- Configure Settings for Second Profile
- Print the Pages Sorted
- Setting the Brightness
- Telephone Book of the Device
- Navigating in the Editor
- Looking up an Entry
- Saving Entry
- No Repeat Entries
- Number from the Last Number Redial List
- Outside Line Access Code
- Assigning the Standard Ring Tone
- Edit Entry
- Delete an Entry
- Delete all Entries
- Printing the Telephone Book
- Printing List of all Entries
- Printing an Individual Entry
- Groups
- Creating Group
- Saving Group
- Edit Group
- Deleting a Group
- Entries are Not Deleted
- Exporting/Importing the Telephone Book
- Saving Telephone Book onto USB Storage Medium
- Load Telephone Book from USB Storage Medium
- Data Format
- Fax
- Send a Fax Using Standard Settings
- Call Up Function Immediately
- Automatic Redial
- Dialling a Number
- Telephone Book:
- Getting Outside Line
- Incorrect Outside Line Access Code
- Sending Fax Later (= Timer Function)
- Deleting a Job
- Sending Fax Manually
- Start Fax Reception from Additional Telephone
- Chain Dialling
- Eavesdropping while Connection is Established
- No Hands-free Operation Possible
- Sending to Multiple Recipients (= Broadcasting)
- Sending a Fax to a Group
- Cancel Process
- Transmission to Multiple Recipients
- Using Fax Templates
- Faxing with the Companion Center SFX
- Sending a Fax
- Click on Send.
- Add Recipients from the Telephone Book
- Create Cover/Title Page with Editor
- Send Fax from a Program
- Managing Faxes with the Fax Manager
- Additional Options for Fax Transmission
- Click on Advanced.
- Fax Reception
- Abort Fax Reception
- Message Memory Full!
- Delete Fax Messages Sent
- Receiving Fax Manually
- Receive Faxes Silently
- Receiving Faxes onto USB Storage Medium
- Function not available
- Connecting USB Storage Medium on the Backside
- Time Stamp
- Setting Protected Fax Reception
- Entering the PIN Code
- Default Access Code
- Switching On and Off
- Printing Out Fax Transmissions
- Polling Faxes
- Polling Faxes Directly
- Time-Deferred Polling
- Jobs
- Immediate Job Execution
- Changing a Job
- Printing a Job
- Printing the Job List
- Missed Calls
- Displaying Telephone Book Names
- Networks
- Information on Using WLAN!
- Infrastructure Wireless Network
- Setting Up a Wireless Network (WLAN)
- Information on Configuration
- Switching Wireless Networking (WLAN) On/Off
- Setting up a Wireless Network (WLAN) Using the Wizard
- Using Wi-Fi Protected Set-up (WPS)
- Using WPS with Pin Code
- Using WPS with Push Button Configuration (PBC)
- Using Network Scan
- WEP Key
- WPA Key
- Setting Up a Wireless Network (WLAN) Manually
- Unprotected Wireless Networks are Accessible to Others!
- This Process May Take a Few Moments
- IP-Address
- Subnet Mask
- Modifying Wireless Network Settings
- Entering the Network Name (SSID)
- Setting Network Security
- Confirm with OK.
- Set IP Address Assignment
- This Process May Take a Few Moments.
- Set Static IP Address Assignment
- Available Function
- Enter IP Address
- Confirm with OK.
- Entering the Subnet Mask
- Enter IP Address of the Access Point (= Gateway)
- Enter Domain Name Server (DNS)
- Enter Primary DNS
- Enter Secondary DNS
- Verify DHCP Settings
- Displaying the IP Address
- Display Subnet Mask
- Display IP Address of the Access Point (= Gateway)
- Display Primary DNS
- Display Secondary DNS
- Additional Wireless Network Settings
- Enter the Primary Windows Internet Name Service (WINS) Server
- Enter the Secondary Windows Internet Name Service (WINS) Server
- Enter the First Network Name (= NetBIOS)
- Enter the Second Network Name (= NetBIOS)
- Settings
- Set Up Power Saving Function
- Set Up Toner Saving Function
- Set Up Paper Saving Function
- Setting the Date and Time
- Time Zone Editor
- Confirm with OK.
- Set the Time Synchronization with SNTP Server
- Activating the Server Access
- Enter the SNTP Server Address
- Enter the Server Address
- Enter the SNTP Server Port
- Entering Your Telephone Number and Name
- Setting the Ring Tones
- Selecting the Ring Tone
- Adjusting Volume Level
- Setting the Number of Rings
- Deactivating the Button Tones
- Configure Paper Settings
- Set Paper Weight
- Set Paper Source
- Setting the Paper Format
- Setting the Resolution for Scanning
- Set Resolution for Fax Transmission
- Setting the Resolution for the Copier
- Setting the Contrast for the Scanner
- Set the Contrast for Faxes and Copying
- Set the Level of Brightness for Scanning
- Set the Level of Brightness for the Copier
- Additional Scanner Options
- Additional Copier Options
- Setting the Fax Reception Mode
- Fax Reception Mode with Additional Devices
- Manual Mode
- (MANUAL)
- Fax Mode
- (FAX)
- EXT/Answering Machine Mode
- (FAX-ANSWER)
- Fax at Additional Telephone
- Automatic Mode
- (AUTOMATIC)
- Silent Fax Reception
- Manual Fax Reception
- Reducing Transmission Speed
- Configuring the Display
- Set Fax Transmission from the Memory
- Message Memory Full
- Turning Page Header On/Off
- Switching Transmission Report On/Off
- Additional Fax Reception Options
- Switches Time Stamp On/Off
- Reducing the Reception Speed
- Set Page Adjustment
- Set a Threshold for Pagination
- Printing Multiple Copies
- Locking the Device
- Locking the Keyboard
- Locking Manual Dialling
- Lock USB Storage Medium
- Lock Settings
- Activate and deactivate functions
- Print Lists and Reports
- Printing the Functions List
- Printing Fax Journal
- Telephone Lines and Additional Devices
- Switching Caller Line Identification (CLIP) On/Off
- Setting the Country Correctly
- Selecting the Dialling Process
- Set up the Public Switch Telephone Network (PSTN)
- Public Switch Telephone Network (PSTN)
- Set up Private Branch Exchange (PABX)
- Additional Telephone No Extension
- Outside Line Access Code is Automatically Dialled
- Set the connection type
- Setting the Outside Line Access Code
- Enter the length of the direct dial number
- Enter the outside line access code
- DSL Connection
- ISDN Connection
- Registering and De- Registering Additional Cordless Telephones
- GAP Compatible
- Registering Cordless Telephone
- Registering other Cordless Telephones
- Display Date and Time
- Deregistering Cordless Telephone
- Looking for Cordless Telephone
- Connecting Additional Devices
- Connection to the Device
- Connection to the Telephone Line
- Connection to the First Telephone Socket
- Using Additional Telephones (Easylink)
- Starting Fax Reception
- Taking Over the Line
- Using an External Answering Machine
- Length of Outgoing Message
- Answering Machine Records Fax Signals
- Service
- Access Help Pages
- Click on Help.
- Select the desired function.
- Display Counter Levels
- Display the Number of Fax Pages Sent
- Display the Number of Fax Pages Received
- Display Number of Scanned Documents
- Display Number of Printed Pages
- Display Number of Copied Pages
- Displaying the Toner Level
- Checking the Firmware Version
- Updating Firmware
- Do not interrupt power supply
- Settings will be Deleted
- Use Only Original Firmware
- Changing the Toner Cartridge
- Use Original Consumable Materials!
- Observe Packaging Instructions
- Do Not Open During a Print Job!
- Fixing a Paper Jam
- Clearing Paper Jam in Paper Tray/Paper Feed
- Clearing Paper Jam in the Print Unit
- Fixing Paper Jam in the Duplex Unit/Fuser Unit
- Device Parts are Hot!
- Continue Print Job
- Fixing a Document Jam
- Cleaning
- Switching off the device!
- Recommissioning!
- Instructions for Cleaning!
- Fax Cleaning Sheets
- Cleaning the Scanner
- Calibrating the Scanner
- Instructions for Calibrating!
- Using Service Codes
- Settings will be Deleted!
- Cancelling Entry
- Power Cycling
- Glossary
- Asymmetric Digital Subscriber Line (ADSL).
- Broadcasting
- call hold
- Call Toggling
- Call Waiting
- Call-by-Call
- Caller List
- Calling Line Identification (CLIP)
- CCITT
- CLIP
- CLIR
- CNG
- Dialling Pause
- Digital Subscriber Line (DSL)
- Direct-Dial Number
- DTMF
- Dual Tone Multi-Frequency (DTMF)
- Easylink
- ECM
- Encoding
- Error Correction Mode (ECM)
- Fax Groups
- Fax Polling
- Fax Signal, CNG Tone (= Calling Signal)
- Fax Switch
- Flash Key (R-key)
- Handshake
- Hook-Flash Function
- ISDN
- ITU
- LCD
- Memory
- MH
- MMR
- MR
- PABX/PBX
- Polling
- POTS
- Private Branch Exchange
- PSTN
- Pulse Dialling
- RJ-11
- Scanning
- Sender Identification (= Header)
- Telephone number suppression (CLIR)
- Tone Dialling (= Dual Tone Multi-Frequency)
- Toner Level Memory
- Transfer Speed
- TWAIN
- USB
- UTC
- Warm-Up Phase
- Appendix
- Technical Data
- Standards
- Scanner
- Printer
- Paper (Paper Tray)
- Paper (Manual Paper Feed)
- Document Feed Slot
- Fax
- Copier
- Guarantee
- (Terms and Conditions for United Kingdom only)
- A) General Guarantee Conditions
- B) Exclusions From Guarantee
- C) Out of Guarantee Repairs
- CE!
- Declaration of Conformity (DoC)
- Customer Information
- United Kingdom
Brand : PHILIPS
Model : SFF6170DW
Category : Multifunction Printer