
ExpressBake BMM4000SS - Bread maker SUNBEAM - Free user manual and instructions
Find the device manual for free ExpressBake BMM4000SS SUNBEAM in PDF.


| Product Type | Bread Maker |
| Brand | Sunbeam |
| Model | ExpressBake BMM4000SS |
| Dimensions (L x W x H) | Approx. 16 x 12 x 14 inches |
| Weight | Approx. 15 lbs |
| Power Supply | 120 V / 60 Hz / 600 W |
| Bread Loaf Size | 1.5 lb and 2 lb |
| Crust Control | Light, Medium, Dark |
| Programs | 12 Preset Programs including Basic, Whole Wheat, French, Sweet, Gluten-Free, ExpressBake (rapid), Dough, Jam, etc. |
| Timer Delay | Up to 13 hours |
| Keep Warm Function | Yes, up to 1 hour after baking |
| Viewing Window | Yes |
| Non-stick Pan | Yes, removable |
| Kneading Paddles | 1 paddle, removable |
| Measuring Cup & Spoon | Included |
| User Manual | Available for download |
| Cleaning | Wipe exterior with damp cloth; wash pan and paddles with warm soapy water |
| Safety Features | Overheat protection, automatic shutoff, cool-touch handle |
| Spare Parts Availability | Replacement pans and paddles available from Sunbeam |
| Warranty | 1-year limited warranty |
Frequently Asked Questions - ExpressBake BMM4000SS SUNBEAM
User questions about ExpressBake BMM4000SS SUNBEAM
0 question about this device. Answer the ones you know or ask your own.
Ask a new question about this device
Download the instructions for your Bread maker in PDF format for free! Find your manual ExpressBake BMM4000SS - SUNBEAM and take your electronic device back in hand. On this page are published all the documents necessary for the use of your device. ExpressBake BMM4000SS by SUNBEAM.
USER MANUAL ExpressBake BMM4000SS SUNBEAM
natural_image
Black and silver Sunbeam kitchen appliance with digital display and control panel (no visible text or symbols on main body)
Congratulations
For more information on your bread maker and if you have any concerns regarding the performance, please visit www.sunbeam.com.au or call:
Sunbeam Customer Service
Australia 1300 881 861
New Zealand 0800 786 232
Important instructions – retain for future use.
Sunbeam's Safety Precautions 1
Using your ExpressBake™ safely 2
Features of your ExpressBake ^TM 3
Control Panel 4
Quick Start Guide 5
Hints and Tips 6
Using the Time Delay 6
Using the Bake Only Menu 7
Power Interruption Program Protection 7
Fruit and Nut Dispenser 7
ExpressBake™ Hints & Tips 8
Care and Cleaning 9
Menu Functions 10
Menu Settings & Recipes:
Basic 11
Whole Grain 12
ExpressBake ^TM 14
Gluten Free 15
French 16
Sweet Breads 17
Oatmeal 19
Yoghurt 19
Dough 20
Bake 23
Cake 23
Jam 24
Questions and Answers 25
Troubleshooting 26
Sunbeam's Safety Precautions
SAFETY PRECAUTIONS FOR YOUR SUNBEAM BREADMAKER
- Do not use attachments not recommended by Sunbeam. They may cause fire, electric shock or injury.
- Do not use outdoors or for commercial use, or for any other purpose other than its intended use.
- This unit is intended for household use only.
- Do not exceed maximum capacity of 4^2/_3 cups flour or 5 teaspoons yeast.
Sunbeam is very safety conscious when designing and manufacturing consumer products, but it is essential that the product user also exercise care when using an electrical appliance. Listed below are precautions which are essential for the safe use of an electrical appliance:
- Read carefully and save all the instructions provided with an appliance.
- Always turn the power off at the power outlet before you insert or remove a plug. Remove by grasping the plug - do not pull on the cord.
- Turn the power off and remove the plug when the appliance is not in use and before cleaning.
- Do not use your appliance with an extension cord unless this cord has been checked and tested by a qualified technician or service person.
- Always use your appliance from a power outlet of the voltage (A.C. only) marked on the appliance.
- This appliance is not intended for use by persons (including children) with reduced physical, sensory or mental capabilities, or lack of experience and knowledge, unless they have been given supervision or instruction concerning use of the appliance by a person responsible for their safety.
- Children should be supervised to ensure that they do not play with the appliance.
-
The temperature of accessible surfaces may be high when the appliance is operating.
-
Never leave an appliance unattended while in use.
- Do not use an appliance for any purpose other than its intended use.
- Do not place an appliance on or near a hot gas flame, electric element or on a heated oven.
- Do not place on top of any other appliance.
- Do not let the power cord of an appliance hang over the edge of a table or bench top or touch any hot surface.
- Do not operate any electrical appliance with a damaged cord or after the appliance has been damaged in any manner. If damage is suspected, return the appliance to the nearest Sunbeam Appointed Service Centre for examination, repair or adjustment.
- For additional protection, Sunbeam recommend the use of a residual current device (RCD) with a tripping current not exceeding 30mA in the electrical circuit supplying power to your appliances.
- Do not immerse the appliance in water or any other liquid unless recommended.
- Appliances are not intended to be operated by means of an external timer or separate remote control system.
- This appliance is intended to be used in household and similar applications such as: staff kitchen areas in shops, offices and other working environments; farm houses; by clients in hotels, motels and other residential type environments; bed and breakfast type environments.
If you have any concerns regarding the performance and use of your appliance, please visit www.sunbeam.com.au or contact the Sunbeam Consumer Service Line. Ensure the above safety precautions are understood.
Using your ExpressBake™ safely
Before use
- Read all instructions, product labels and warnings. Save these instructions.
- Remove all foreign matter from the bread pan and baking chamber.
- Wipe over bread pan and kneading blade before use.
- Always use the bread maker from a 220-240V AC power outlet.
- Do not allow anything to rest on the power cord or allow it to touch any hot surface. Do not plug in cord where people may walk or trip on it or allow the cord to hang over the edge of a table or benchtop.
Whilst in use
- The bread maker does become quite warm during operation. Be careful to keep your hands and face away from the unit, and away from the steam vents.
- Do not open the lid or remove the bread pan during operation except as indicated in the instructions.
- Do not place anything on the bread maker lid. Do not cover the vents.
- This bread maker has a built-in Power Interruption Program Protection to maintain your baking cycle, in the advent of an interruption in your power supply (black out). Any extended power outage may result in the program being cancelled.
- Do not touch moving parts.
Where to use
- Use only on a stable, heat-resistant surface.
- Do not use the bread maker where it will be exposed to direct sunlight or other heat sources such as a stove or oven.
- Do not place on top of any other appliance.
- Keep the bread maker out of reach of children as it does become quite warm. Also if any buttons are accidentally touched during operation, baking may stop.
- Place the unit at least 200 millimetres away from walls and curtains as they may discolour from the heat.
After use
- Always turn the unit off and remove the plug from the power outlet after use and before cleaning.
- Use oven mitts when taking out the baking pan after baking.
- Allow the bread maker to cool down before cleaning or storing.
- Read instructions before cleaning. Do not immerse the unit or plug in water. This will cause electric shock or damage to the unit.

Hot Surfaces Do Not Touch
This symbol indicates, temperature of accessible surfaces may be high when the appliance is operating and for some time after use.
Features of your ExpressBake™
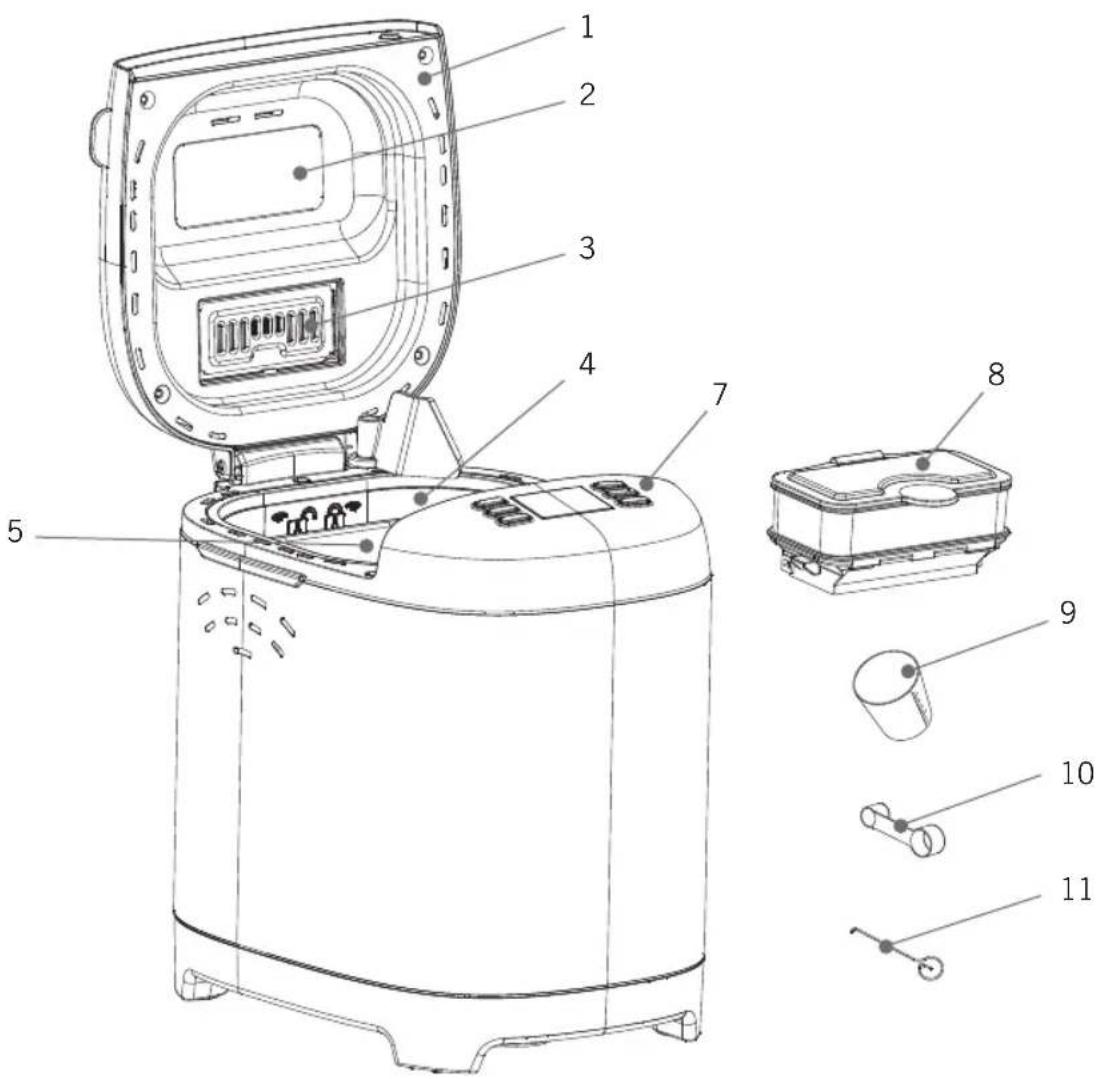
- Lid
- Viewing window
- Ingredient compartment
- Baking chamber
- Bread pan
-
Kneading blade (not shown)
-
Control panel
- Fruit & nut dispenser
- Measuring cup
- Measuring spoon
- Hook
Control Panel
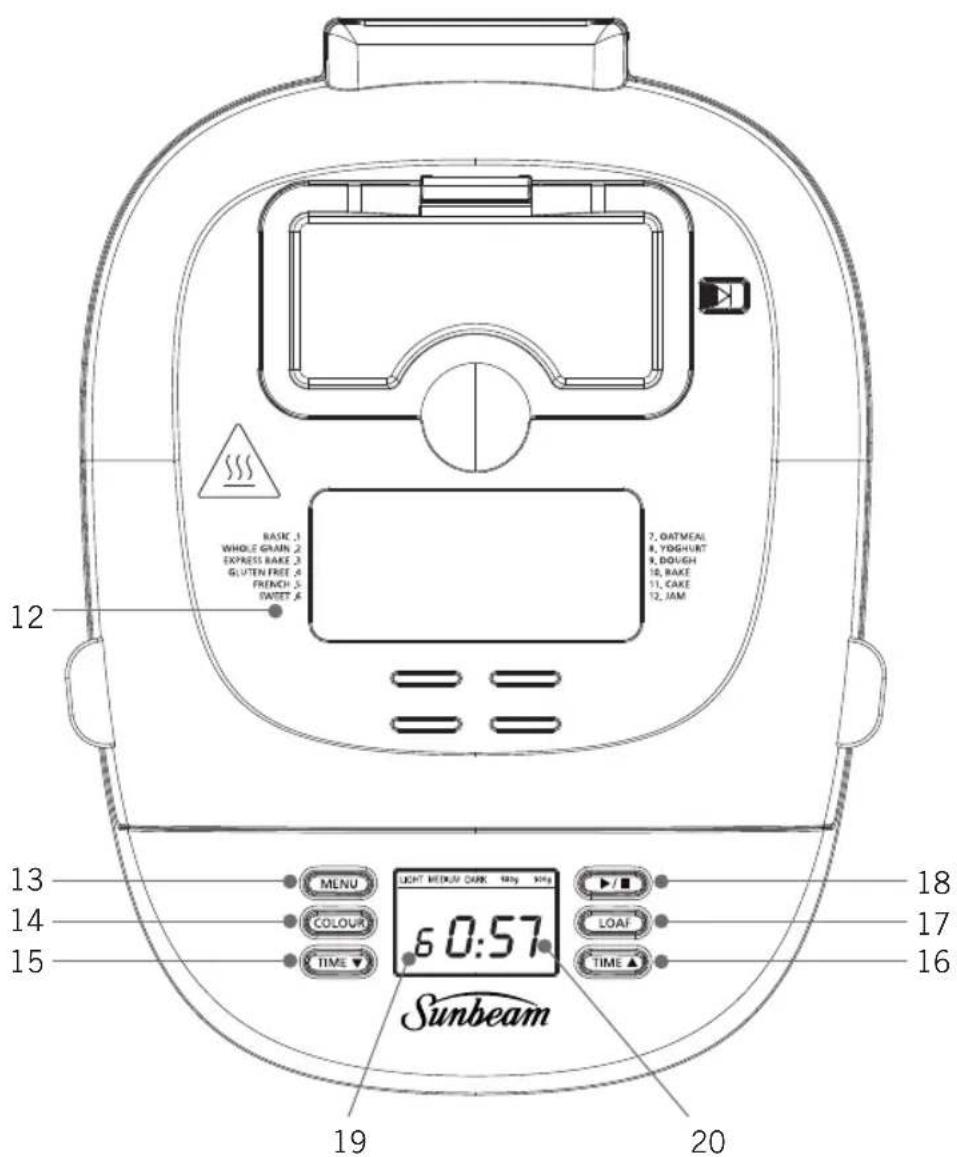
- Menu functions
- Menu select
- Crust colour
- Time decrease
-
Time increase
-
Bread size
- Start/stop
- Chosen program
- Operation time
Quick Start Guide
Step 1
Remove all packaging materials. Insert the kneading blade into the bread pan.
Step 2
Add ingredients into the bread pan before placing in the bread maker.
- Liquid ingredients
- Dry ingredients
- Yeast
Step 3
Insert the bread pan into the baking chamber twist clockwise to lock and close the lid.
Step 4
Attached fruit & nut dispenser by pushing it straight down into the ingredient compartment. Add food if required.
Step 5
Select the desired menu using the MENU button.
Step 6
Set the Time Delay if required.
Step 7
Select the crust colour using the CRUST button.
Step 8
Select the loaf size using the LOAF button.
Step 9
Press the START/STOP button.
Note: If you accidentally select the wrong menu option, hold Start/Stop button to reset the bread maker.
HINT: LIFT THE LID AND CHECK THE CONSISTENCY DURING THE FIRST 15 MINUTES OF KNEADING, TO ENSURE IT'S A FIRM, ROUND DOUGH. IF IT'S A LITTLE DRY, ADD A LITTLE WATER, IF IT'S A LITTLE WET, ADD A LITTLE FLOUR.
Keep Warm
If the bread is not removed after baking it will enter Keep Warm cycle for 60 minutes.
Removing the Bread
Allow the bread to cool in the pan for 10 minutes before removing. The blade is designed to stay in the bread pan however sometimes it can be baked into the bread. Ensure this is removed using the hook.
Hints and Tips
Measuring Ingredients
The most important secret of making bread is exact measurements. With wet ingredients, use the provided measuring cup. After filling the measuring cup, place it on a flat surface and view it at eye level to make sure the amount of liquid is exact.
With dry ingredients, always “level off” the measurement with the back of a knife or a spatula to make sure the measurement is exact.
Another helpful tip is to never use the cup to scoop the ingredients (for example, flour). By scooping, you could add up to one tablespoon of extra ingredients. Fill the measuring cup with a spoon before leveling off.
Ingredient order is important
The second most important secret of making bread is putting the ingredients into the bread maker in the exact order given in the recipe.
This means:
- FIRST, liquid ingredients
- SECOND, dry ingredients
- LAST, yeast
Temperature of Ingredients
Ensure all ingredients are at room temperature unless otherwise noted in the recipe.
Temperatures too low or too high can affect the way the bread rises and bakes. It's a good idea to start with all new, fresh ingredients (especially fresh flour and yeast).
Using the Time Delay
The ExpressBake ^™ allows you to delay the completion of your bread by up to 13 hours, so you can wake up to the smell of freshly baked bread, or go out for the day while your ExpressBake ^™ does all the work.
Note: Do not use the Time Delay when the recipe has perishable ingredients such as milk, eggs or cheese as these may spoil.
Note: The delay timer cannot be used with Menu 3: ExpressBake ^TM .
-
Follow steps 1 - 5 on page 12.
-
Press Time and Time buttons
until you reach the number of hours and minutes you want your bread to be ready. Press to add or minus time in 10 minute intervals.
- Press Start/Stop to begin delay start countdown.
Note: You do not need to take into account the amount of time required to cook the program selected. This is automatically registered in the ExpressBake ^™ when it is selected.
Using the Bake Only menu
The BAKE menu setting is useful if the bread crust is too light or requires more baking time. This setting will bake for 1 hour and 30 minutes and can be controlled by pressing the Start/Stop button at any time.
-
Press the MENU button to select the BAKE setting.
-
Adjust the amount of time using the TIME and TIME buttons.
-
Press the Start/Stop button.
Power Interruption Program Protection
Your bread maker features a 10 minute Power Interruption Protection that protects the program memory in the advent of power surges, or short term power failure (blackout) This means that if there is a power interruption during your bread making, the machine will retain its memory for at least 10 minutes and continue cooking when the power supply returns.
If you experience a power failure greater than 10 minutes you may need to discard ingredients and start again. If the power interruption occurs in the baking cycle, you can use the BAKE ONLY setting to finish baking.
Fruit and Nut Dispenser
Your ExpressBake™ has an Automatic Fruit and Nut dispenser which automatically releases dry ingredients into the dough during the kneading cycle. This will occur during the second kneading cycle, ensuring that the dried fruit and nuts are not crushed and the pieces remain whole and are evenly dispersed.
This option is available on all menus except ExpressBake ^™ , Jam and Bake Only. Do not overfill the dispenser and ensure the dispenser is closed prior to each use. The dispenser may be open from the previous time it was used.
ExpressBake™ Hints & Tips
Experienced cooks consider bread making to be as much of an art as a science. Keep in mind that some recipes may require a little experimentation before they are exactly the way you want them. Just don't give up. Still, there are special hints to ensuring quality bread almost every time.
Use Exact Measurements
It is extremely important to use exact measurements when baking bread. Level off all dry ingredients and make sure that all liquid ingredients are measured in a cup with the markings clearly labeled on the side.
Use Fresh Ingredients
You should always use fresh ingredients. The reasons are:
- Flour - If you have stored your flour for a long time, it may have become wet from absorbing moisture, or dry, depending on the area of the country in which you live. We recommend using fresh bread flour.
- Yeast - Fresh yeast is probably the most important ingredient in baking bread. If the yeast is not fresh, your bread may not rise. It is better to buy new yeast than to take a chance on yeast that has been stored for a long time.
You can test the freshness of your yeast. Simply fill a cup with warm water, then add and stir in 2 teaspoons of sugar. Sprinkle a few teaspoons of yeast on the surface of the water and wait. After 15 minutes, the yeast should foam and there should be distinct odor. If neither reaction happens, the yeast is old and should be thrown away.
Add Ingredients in the Correct Order
Read all recipes from top to bottom, and remember:
- FIRST, liquid ingredients
- SECOND, dry ingredients
- LAST, yeast
For Baking at High Altitudes
If you live above 3000 feet, you probably already know how to adjust other recipes like cakes and muffins. Higher altitudes tend to make dough rise faster and make flour drier. To compensate for high altitude baking, we recommend the following:
If the dough is too dry
- Increase the amount of water to the recipe, sometimes as much as 2–4 tablespoons per cup.
If the bread rises too high
- Reduce the amount of yeast. For each teaspoon of yeast, try reducing the yeast by 1/8 to 1/4 teaspoon.
- Reduce the amount of sugar. For each tablespoon of sugar, reduce the amount by 1 to 2 teaspoons.
Care and Cleaning
Before cleaning the ExpressBake ^™ , unplug it from the power outlet and allow it to cool completely.
To clean the exterior
Wipe exterior with a slightly dampened cloth and polish with a soft dry cloth.
Do not use metal scourers or abrasives as this may scratch the exterior surface.
To clean the non-stick baking pan
Gently wash bread pan in warm soapy water using a soft cloth and dry well before and after each use. Wipe baking pan and kneading blade with a damp cloth and dry thoroughly. Do not use any harsh abrasives or strong household cleaners as these may damage the non-stick surface.
Caring for your non-stick baking pan
Do not use metal utensils to remove ingredients or bread, as they may damage the non-stick coating. Do not be concerned if the non-stick coating wears off or changes colour overtime. This is result of steam, moisture, food acids, mixing of various ingredients and normal wear and tear. This is in no way harmful and does not affect the performance of your ExpressBake™.
Do not wash any part of your bread maker in a dishwasher.
Do not immerse the ExpressBake ^TM in water.
Storage
Make sure the ExpressBake ^™ is completely cool and dry before storing. Store the ExpressBake ^™ with the lid closed and do not place heavy objects on top of the lid.
Menu Functions
Your bread maker can bake almost any kind of bread. Recipes are included to show you which setting to use. The table below gives an overview of the available functions.
| Function Approx. Time(900g loaf) | Description |
| 1. Basic 3:00 Most commonly used. Gives good results with almost any recipe | |
| 2. Whole Grain 3:40 Longer rise time for breads containing more than 50% whole wheat flour | |
| 3. ExpressBakeTM | 0:59 Baking bread in under 1 hour |
| 4. Gluten Free 2:55 Baking of all gluten free breads | |
| 5. French 3:50 Bread with a longer knead, rise and bake for heartier crusts | |
| 6. Sweet 2:55 Bread with high amounts of sugar, fats and proteins | |
| 7. Oatmeal 3:00 Bread flavoured with oatmeal or rolled oats | |
| 8. Yoghurt 8:00 Homemade yoghurt | |
| 9. Dough 1:30 Prepare dough for rolls, specialty bread, pizza | |
| 10. Bake 1:00 Baking dough | |
| 11. Cake 1:50 Kneading, rising and baking | |
| 12. Jam 1:20 Jams and marmalades | |
Recipes
Menu 1: Basic
- Size - 680g/900g
- Crust - light/med/dark
- Fruit & Nut
- Time Delay
- Keep Warm
Use to bake standard bread loaves which are light in texture with a thin crust.
- Ensure kneading blade is in the bread pan.
- Add ingredients to the bread pan in order listed.
- Insert bread pan into the baking chamber and twist clockwise until the pan is clicked into place. Close lid.
- Add ingredients to the fruit and nut dispenser if required.
- Press the MENU button to Menu 1 (Basic). Choose CRUST and SIZE settings.
- Press START/STOP.
| White Bread 680g 900g | ||
| Water, luke-warm 1 cup 1 | 38 cups | |
| Butter or margarine 2 tablespoons 2 tablespoons | ||
| White Sugar 1 tablespoon 2 tablespoons | ||
| Skim Milk Powder 2 tablespoons 2 tablespoons | ||
| Salt 1 12 teaspoons 1 34 teaspoons | ||
| Bread Flour 3 cups | 4 cups | |
| Dry yeast | 1 34 teaspoons 2 teaspoons |
| Raisin Bread | 680g | 900g |
| Water, luke-warm | 78 cup | 1 14 cups |
| Butter or margarine 1 12 tablespoons | 2 tablespoons | |
| White Sugar | 2 tablespoons | 3 tablespoons |
| Skim Milk Powder | 1 12 tablespoons | 2 tablespoons |
| Salt | 1 teaspoon | 1 12 teaspoons |
| Cinnamon | 1 teaspoon | 1 12 teaspoons |
| Bread Flour | 3 cups | 4 cups |
| Dry yeast | 1 12 teaspoons | 2 teaspoons |
| Fruit & Nut Dispenser | ||
| Raisins | 34 cup 1 cup |
Menu 2: Whole Grain
- Size - 680g/900g
- Crust - light/med/dark
- Fruit & Nut
- Time Delay
- Keep Warm
Starts with a 25 minute preheat cycle during which flours or grains absorb liquid ingredients to soften and combine.
- Ensure kneading blade is in the bread pan.
- Add ingredients to the bread pan in order listed.
- Insert bread pan into the baking chamber and turn clockwise until the pan is clicked into place. Close lid.
- Add ingredients to the fruit and nut dispenser if required.
- Press the MENU button to Menu 2 (Whole Grain).
- Press START/STOP.
| Whole Grain Bread 900g | |
| Water, Luke-warm 1 | ^5/_8 cups |
| Brown Sugar ^1/ | ^3 cup |
| Salt 2 teaspoons | |
| Whole Wheat Flour 4 | ^2/_3 cups |
| Dry yeast 3 teaspoons |
| Honey Grain Bread 680g 900g | ||
| Water, Luke-warm 1 cup 1 | ^3/_8 cups | |
| Butter or margarine 2 tablespoons 2 12 tablespoons | ||
| Salt | 1 teaspoon | 1 34 teaspoons |
| Honey | 1 12 tablespoons 2 tablespoons | |
| Bread Flour | 2 14 cups | 2 12 cups |
| Whole Wheat Flour | 1 cup | 1 14 cup |
| Quick Cook Oats | 12 cup | ^2/_3 cup |
| Dry yeast | 1 34 teaspoons | 2 teaspoons |
| Buttermilk Bread 680g | |
| Water, luke-warm 1 1/4 cup | |
| Butter or margarine 1 1/2 tablespoons | |
| White Vinegar 1 teaspoon | |
| Brown Sugar 2 tablespoons | |
| Bread Flour 2 cups | |
| Whole Wheat Flour 1 cup | |
| Rye Flour 1 cup | |
| Powdered Buttermilk 2 tablespoons | |
| Gluten Flour 1 tablespoon | |
| Caraway Seeds 1 1/2 teaspoons | |
| Dried Yeast 1 3/4 teaspoons |
Menu 3: ExpressBake™
- Size - 680g/900g
- Keep Warm
Use to make breads in under 1 hour. The loaves tend to have a thicker, darker crust as well as being shorter and denser due to the shorter rise times and higher cooking temperature.
The delay timer and colour buttons cannot be used with this setting.
For best results always use hot water and the other ingredients at room temperature. The yeast should also be 'fast rising' or 'instant'.
- Ensure kneading blade is in the bread pan.
- Add ingredients to the bread pan in order listed.
-
Insert bread pan into the baking chamber and turn clockwise until the pan is clicked into place. Close lid.
-
Press the MENU button to Menu 3 (ExpressBake ^TM ).
-
Press START/STOP.
| White Bread ExpressBakeTM | 680g 900g | |
| Water, hot 46°C-52°C 1 cup & 2 tablespoons 1 1⁄2 cups | ||
| Oil 2 tablespoons 3 tablespoons | ||
| White Sugar 2 tablespoons 3 tablespoons | ||
| Salt 1 teaspoon 1 1⁄2 teaspoons | ||
| Bread Flour 3 cups 4 cups | ||
| Instant Yeast 4 teaspoons 5 teaspoons |
| Cheese & Rye BreadExpressBakeTM | 680g 900g | |
| Water, hot 46°C-52°C 1 cup & Oil | 2 tablespoons 1 1⁄2 cups | |
| 1 tablespoon | 4 teaspoons | |
| White Sugar | 1 tablespoon | 2 tablespoons |
| Salt 1 teaspoon 1 1⁄2 teaspoons | ||
| Bread Flour | 2 1⁄2 cups | 3 1⁄4 cups |
| Rye Flour | 1⁄2 cup | 2/3 cup |
| Parmesan Cheese, grated 1 tablespoon | 2 tablespoons | |
| Cheddar Cheese, grated | 1 cup | 1 1⁄4 cups |
| Instant Yeast 4 teaspoons 5 teaspoons |
Menu 4: Gluten Free
- Size - 680g/900g
- Crust - light/med/dark
- Fruit & Nut
- Time Delay
- Keep Warm
Designed for breads using gluten free ingredients.
Important - check all ingredients to ensure they are gluten free.
- Ensure kneading blade is in the bread pan.
- Add ingredients to the bread pan in order listed.
- Insert bread pan into the baking chamber and turn clockwise until the pan is clicked into place. Close lid.
- Add ingredients to the fruit and nut dispenser if required.
- Press the MENU button to Menu 4 (Gluten Free).
- Press START/STOP.
| Traditional Gluten Free 680g 900g | ||
| Water, luke-warm 1 cup & 3 tablespoons 1 cup & 7 tablespoons | ||
| Oil 2 tablespoons 3 tablespoons | ||
| Salt 1 teaspoon 1 12 teaspoon | ||
| Gluten Free Flour 3 cups 4 cups | ||
| White Sugar 2 tablespoons 2 tablespoons | ||
| Dry yeast 1 12 teaspoons 1 12 teaspoons | ||
Menu 5: French
- Size - 680g/900g
- Crust - light/med/dark
- Fruit & Nut
- Time Delay
- Keep Warm
Use to bake breads that a lighter in texture with a crispier crust. Generally loaves are lower in fat and sugar.
- Ensure kneading blade is in the bread pan.
- Add ingredients to the bread pan in order listed.
- Insert bread pan into the baking chamber and tun clockwise until the pan is clicked into place. Close lid.
- Add ingredients to the fruit and nut dispenser if required.
- Press the MENU button to Menu 5 (French).
- Press START/STOP.
| French Countryside Bread 900g | |
| Water, luke-warm 1 | ^3/_8 cups |
| Olive Oil 112 teaspoons | |
| Salt 112 teaspoons | |
| Bread Flour 4 cups | |
| White Sugar 1 tablespoons | |
| Dry Yeast 134 teaspoons |
Menu 6: Sweet Breads
- Size - 680g/900g
- Crust - light/med/dark
- Fruit & Nut
- Time Delay
- Keep Warm
For breads that require additional ingredients such as sugar, dried fruit or chocolate which sweetens the bread. the baking temperature is lower to prevent burning.
Note - a light crust colour is recommended for best results.
- Ensure kneading blade is in the bread pan.
- Add ingredients to the bread pan in order listed.
- Insert bread pan into the baking chamber and turn clockwise until the pan is clicked into place. Close lid.
- Add ingredients to the fruit and nut dispenser if required.
- Press the MENU button to Menu 6 (Sweet). Choose CRUST and SIZE settings.
- Press START/STOP.
| Springtime Bread 680g | |
| Water, Luke-warm 1 cup | |
| Butter or margarine 14 cup | |
| Egg 1 large | |
| Vanilla Extract 1 12 teaspoons | |
| Almond Extract 1 14 teaspoons | |
| Salt 1 teaspoon | |
| Bread Flour 3 34 cups | |
| White Sugar 12 cup | |
| Skim Milk Powder 3 tablespoons | |
| Dry yeast 1 12 teaspoons | |
| Fruit & Nut Dispenser | |
| Raisins 34 cup | |
| Orange Peel, shredded 1 12 teaspoons | |
| Apple Walnut Bread 680g | |
| Apple Sauce 34 cup | |
| Apple Juice | 38 cup |
| Butter or margarine 3 tablespoons | |
| Egg 1 large | |
| Salt 1 teaspoon | |
| Bread Flour 4 cups | |
| Brown Sugar 14 cup | |
| Cinnamon 1 14 teaspoons | |
| Bicarb of Soda 12 teaspoon | |
| Dry yeast 2 teaspoons | |
| Fruit & Nut Dispenser | |
| Chopped Walnuts 12 cup | |
Menu 7: Oatmeal
- Size - 680g/900g
- Crust - light/med/dark
- Time Delay
- Keep Warm
Has extra rising time to activate the yeast and prevent the bread from becoming too dense.
- Ensure kneading blade is in the bread pan.
- Add ingredients to the bread pan in order listed.
- Insert bread pan into the baking chamber and turn clockwise until the pan is clicked into place. Close lid.
- Add ingredients to the fruit and nut dispenser if required.
- Press the MENU button to 7 (Oatmeal).
- Press START/STOP.
| Oatmeal Bread 680g | |
| Water, luke-warm 1 1/4 cups | |
| Butter or margarine 2 tablespoons | |
| Honey 3 tablespoons | |
| Quick Cook Oats 3/4 cup | |
| Salt 1 3/4 teaspoons | |
| Bread Flour 3 3/4 cups | |
| Oat Bran 2 tablespoons | |
| Skim Milk Powder 2 tablespoons | |
| Dry yeast 1 3/4 teaspoons |
Menu 8: Yoghurt
Yoghurt setting is automatically set to 8 hours at 43^ C. The bread maker will heat up the ingredients and keep warm to allow fermentation to take place.
- Measure and add ingredients to the bread pan and mix ingredients thoroughly.
- Insert bread pan into the baking chamber and turn clockwise until the pan is clicked into place. Close lid.
- Press the MENU button to Menu 8 (Yoghurt).
- Press START/STOP.
| Yoghurt | |
| Milk 1.9 litres | |
| Yoghurt containing live cultures | 12 cup |
Menu 9: Dough
- Time Delay
Use to create dough which can be shaped and baked to create bread, rolls, pizza bases or pasta.
- Ensure kneading blade is in the bread pan.
- Add ingredients to the bread pan in order listed.
- Insert bread pan into the baking chamber and turn clockwise until the pan is clicked into place. Close lid.
- Add ingredients to the fruit and nut dispenser if required.
- Press the MENU button to Menu 9 (Dough).
- Press START/STOP.
| Basic white dough | |
| Water, luke-warm 1 34 cups | |
| Oil 2 teaspoons | |
| Salt 2 teaspoons | |
| Skim Milk Powder 2 teaspoons | |
| White Sugar 1 teaspoon | |
| Bread Flour 4 12 cups | |
| Dry yeast 1 teaspoon | |
-
On completion, remove the dough from the baking chamber. Ensure the blade is removed from the dough before shaping.
-
Shape as desired. Cover and allow to rise for about 30 minutes. Glaze and top as desired.
-
Preheat oven to moderately hot (200°C/180°C fan-forced). Bake until hollow when tapped. Cool on a wire rack.
| Bread Pretzel Dough | |
| Water, Luke-warm | 78 cup |
| White Sugar 12 teaspoon | |
| Salt 14 teaspoon | |
| Bread Flour 2 cups | |
| Dry yeast 112 teaspoons | |
- On completion, remove the dough from the baking chamber. Ensure the blade is removed from the dough before shaping.
- Divide dough into 12 pieces. Roll each into 20cm rope. Form into pretzel shape or leave in stick shape. Place on greased baking tray, brush with beaten egg. Sprinkle with coarse salt.
- Preheat oven to moderately hot (220°C fan-forced). Bake for 12-15 minutes. Cool on a wire rack.
| Butter Rolls | |
| Water, Luke-warm 1/4 cup | |
| Egg 1, large | |
| Milk 3/4 cup | |
| Butter 1/4 cup | |
| White Sugar 2 tablespoons | |
| Salt 1 teaspoon | |
| Bread Flour 2 3/4 cups | |
| Instant dried yeast 2 teaspoons | |
| Olive oil, rosemary and salt, to serve | |
- On completion, remove the dough from the baking chamber. Ensure the blade is removed from the dough before shaping.
- Lightly grease 2 rectangular baking trays. Preheat oven to moderately hot (200°C/180°C fan-forced).
- Roll each portion of dough on a lightly floured surface to desired shape. Place on prepared baking trays.
- Cover and allow to rise for about 30 minutes.
- Bake for 30 minutes or until golden.
| Pizza Dough 680g 900g | ||
| Water, Luke-warm 1 cup 1 | ^3/_8 cups | |
| Olive Oil 2 tablespoons 3 tablespoons | ||
| Salt 12 teaspoon ^3/_4 teaspoon | ||
| Plain Flour 3 cups 4 cups | ||
| Dry yeast 1 12 teaspoons 2 teaspoons |
- On completion, remove the dough from the bread maker. Ensure the blade is removed from the dough before shaping.
- Grease 2 pizza trays. Preheat oven to hot (220°C/200°C fan-forced).
- Divide dough in half. On a lightly floured surface, roll each portion into a circle. Place onto prepared trays and stretch to fit the tray (12 inch for 680g, 14 inch for 900g).
- Spread pizza bases with your favourite toppings. Stand for about 1 hour to rise slightly. Cook for 15 minutes or golden and cooked through.
Menu 10: Bake
- Fruit & Nut
- Time Delay
Bake setting is for baking dough, the preset time is 60 minutes but this can be adjusted using the TIME buttons. This setting can be used instead of an oven for baking prepared dough.
- Add ingredients to the bread pan.
- Press the MENU button to Menu 10 (Bake).
- Adjust the bake time using the TIME buttons.
-
Press START/STOP.
-
Insert bread pan into the baking chamber and turn clockwise until the pan is clicked into place. Close lid.
Menu 11: Cake
• Colour - light/med/dark
- Fruit & Nut
- Time Delay
- Keep Warm
This setting kneads, rises and bakes with the aid of raising agents.
- Ensure the kneading blade is in the bread pan.
- Add ingredients to the bread pan in the order listed.
- Insert bread pan into the baking chamber and turn clockwise until the pan is clicked into place. Close lid.
- Press the MENU button to Menu 11 (Cake).
- Press START/STOP.
| Vanilla Pound Cake | |
| Egg, beaten 3, large | |
| Milk 1/ | 3 cup |
| Bread Flour 2 cups | |
| Baking Powder 3 teaspoons | |
| Butter, melted 1⁄2 cup | |
| Sugar 1 cup | |
| Vanilla Extract 1 teaspoon | |
Menu 12: Jam
- Keep Warm
Use to prepare preserves, chutneys and ketchup.
- Ensure kneading blade is in the bread pan.
- Add ingredients to the bread pan in order listed.
-
Insert bread pan into the baking chamber and turn clockwise until the pan is clicked into place. Close lid.
-
Press the MENU button to Menu 12 (Jam).
-
Press START/STOP.
-
On completion, pour jam into sterilised jars and seal immediately.
| Strawberry Jam Makes 3 cups | |
| Strawberries, hulled, halved 1-1 12 cups | |
| Caster sugar 1 cup | |
| Jam setta 1 tablespoon | |
| Lemon Juice 2 teaspoons |
| Orange Marmalade Makes 3 cups | |
| Oranges, washed (see notes below recipe) 3 | |
| Lemon, washed (see notes below recipe) 1 | |
| Caster Sugar 1 14 cups | |
| Jam setta 2 tablespoons |
- With a vegetable peeler, shave off the bright layer of peel from 1 orange and the lemon. Chop finely.
- Remove and discard remaining white peel from orange and lemon. Peel remaining oranges, discard peels. Slice fruit into 1cm pieces.
- Add all ingredients into the bread pan.
| Frozen Berry Jam Makes 3 cups | |
| Frozen Berries 340g | |
| Liquid Fruit Pectin 85g | |
| Lemon Juice 1 tablespoon | |
| Caster Sugar 1 34 cups |
Questions and Answers
| Question Answer | |
| Why does the height and shape of each loaf differ? | It is normal for the height and shape of each loaf to vary depending on the ingredients, accurate measurement of ingredients and the room temperature. |
| Kneading blade comes out with the bread | This can happen as the kneading blade is removable for easy cleaning. Use the supplied hook to remove the blade from the loaf.Caution: Kneading blade or the bonus blade hook will be hot. Allow bread to cool before removing blade. |
| Bread has floured corners | This may occur if the flour is not mixed in completely to the dough. Check bread about 10 minutes into the kneading cycle. If all the flour is not incorporated, use a silicon spatula to remove the flour from the sides of the bread pan so it can be incorporated into the dough.Bread may also have floured corners if the pan is not inserted properly.Ensure it is clicked into place, before you start the machine. |
| Can ingredients be halved or doubled? | No. if there is too little in the bread pan, the blade will not be able to knead well. If there is too much, the bread may rise out of the bread pan. |
| Can fresh milk be used instead of powered milk? | Yes. Be sure to decrease the same measurement of water to equal liquid substitution. Fresh milk is not recommended when using the Delay Timer, as it may spoil in the bread pan. |
| Bread is deflated and not made properly | Bread can be heavily affected by season and dry heat. Please add more water to bring the flour together. |
| Why is there grease found on the bread? | It is important to wipe clean the bread pan and kneading blade before use. |
| Display shows 0:00 and is flashing | The baking cycle is complete and the bread maker is in keep warm mode. Press Start/Stop to turn off the keep warm feature. |
| The display shows 'HHH' or 'LLL' | The internal temperature of the baking chamber is too high or too low.Let the unit rest before using again. |
| The display shows 'EEO' and continuously beeps | Temperature sensor circuit is broken. Call customer service team. |
| The display shows "EE1" and continuously beeps | Temperature sensor circuit is bypassed. Call customer service team. |
| Can the bread maker settings be changed after the bread maker has started? | No, the bread maker can only be reset by holding the Start/Stop button for 3 seconds. |
Troubleshooting
Machine Malfunctions
| Display Window Time Indicator | Bread Ingredients | Sides of takes | Browned & bread | Sides Under centre | brown Slices | ||||
| Check the following: | does not turn on | not mixed | too long to bake | collapse & bottom damp | browned | sticky & raw or not baked | but flour coated bottom | unevenly & sticky | |
| Unplugged | X | ||||||||
| Bread pan not inserted | X | ||||||||
| Lid was repeatedly opened during operation or left open | X | X | |||||||
| Blade not inserted | X | ||||||||
Control Panel
| Program selection was wrong | X | X | X | X | |
| Mode selection was wrong (DOUGH mode was chosen) | X | ||||
| Bread left in bread pan too long after baking | X | X | |||
| Bread sliced just after baking (steam was not allowed to escape) | X | ||||
| Kneading process was not complete | X | ||||
| Power disruption | X |
The Beep Menu:
| Select a setting from the Menu, Crust or Timer | 1 short beep |
| Completion of bread baking process | 5 beeps |
| Completion of Keep Warm Cycle | 5 beeps |
Troubleshooting continued
Baking Results
| Open, | Bread | Browned | |||||||||
| Heavy Check the following | Not baked coarse or dense texture | Bread doesn't in centre | Floured holey texture | Over Collapse | & floured rises too much | rise enough | top | browned | sides, centre sticky/raw | ||
Measurement Errors
| FLOUR | Not enough | X | ||||||||
| Too much | X | X | ||||||||
| YEAST | Not enough | X | X | |||||||
| Too much | X | |||||||||
| WATER & LIQUID | Not enough | X | X | |||||||
| Too much | X | X | X | X | X | X | ||||
| SUGAR | Omitted | X | X | X | ||||||
| Too much | X | X | ||||||||
| SALT | Omitted | X | X | X |
Flour
| Stale/generic flour used | X | X | |||
| Self raising flour was used | X | X | X |
Yeast
| Old yeast used | X | X | X |
| Wrong type of yeast used | X | X | X |
| Hot water was used instead of water at room temperature | X | X | |
This Sunbeam product is covered by a 12 month replacement or repair warranty, which is in addition to your rights under the Australian Consumer Law (if your product was purchased in Australia) or New Zealand Consumer Guarantees Act (if your product was purchased in New Zealand).
Should you experience any difficulties with your product during the warranty period, please contact our customer service line for advice on 1300 881 861 in Australia, or 0800 786 232 in New Zealand.
Australia
www.sunbeam.com.au 1300 881 861
New Zealand
www.sunbeam.co.nz 0800 786 232
Upon receipt of your claim, Sunbeam will seek to resolve your difficulties or, if the product is defective, advise you on how to obtain a replacement or refund.
To assist us in managing warranty claims, we recommend you register your product as soon as practicable after purchase, on our Sunbeam website and uploading a copy of your original receipt. View the Support section of the Sunbeam website.
In order to make a claim under our warranty, you must have the original proof of purchase documentation for the product and present it when requested (if not already uploaded to our website).
Should your product develop any defect within 12 months of purchase because of faulty materials or workmanship, we will replace or repair it, at our discretion, free of charge. A product presented for repair may be replaced by a refurbished product of the same type rather than being repaired. Refurbished parts may be used to repair the product.
Our replacement or repair warranty only applies where a defect arises as a result of faulty material or workmanship during the warranty period. Your warranty does not cover misuse or negligent handling (including damage caused by failing to use the product in accordance with this instruction booklet), accidental damage, or normal wear and tear.
Your warranty does not:
• cover freight or any other costs incurred in making a claim, consumable items, accessories that by their nature and limited lifespan require periodic renewal (such as filters and seals) or any consequential loss or damage; or
• cover damage caused by:
- power surges, power dips, voltage supply problems, or use of the product on incorrect voltage;
- servicing or modification of the product other than by Sunbeam or an authorised Sunbeam service centre;
- use of the product with other accessories, attachments, product supplies, parts or devices that do not conform to Sunbeam specifications; or
- exposure of the product to abnormally corrosive conditions; or
- extend beyond 3 months if the product is used in commercial, industrial, educational or rental applications.
The benefits given to you by our warranty are in addition to other rights and remedies under law in relation to the product.
In Australia our goods come with guarantees that cannot be excluded under the Australian Consumer Law. You are entitled to a replacement or refund for a major failure and for compensation for any other foreseeable loss or damage. You are also entitled to have the goods repaired or replaced if the goods fail to be of acceptable quality and the failure does not amount to a major failure.
Our goods also come with guarantees that cannot be excluded under the New Zealand Consumer Guarantees Act.
If your warranty claim is not accepted, we will inform you and if requested to do so by you, repair the product provided you pay the usual charges for such repair. You will also be responsible for all freight and other costs.
Should your product require repair or service after the warranty period, contact your nearest Sunbeam service centre. For a complete list of Sunbeam's service centres, visit our website or call our customer service line for advice on 1300 881 861 in Australia, or 0800 786 232 in New Zealand.
Need help with your appliance?
Contact our customer service team or visit our website for information and tips on getting the most from your appliance.
Australia I visit www.sunbeam.com.au
phone 1300 881 861
New Zealand I visit www.sunbeam.co.nz
phone 0800 786 232
NEWELL AUSTRALIA PTY LTD. ABN 68 075 071 233
Sunbeam is a registered trademark.
ExpressBake is a trade mark.
Made in China to Sunbeam's specification.
Due to minor changes in design or otherwise,
the product you buy may differ slightly from the one shown here.
Approved by the appropriate electrical regulatory authorities.
© Sunbeam 2023.
09/23
- Congratulations
- Important instructions – retain for future use.
- Sunbeam's Safety Precautions
- SAFETY PRECAUTIONS FOR YOUR SUNBEAM BREADMAKER
- Sunbeam is very safety conscious when designing and manufacturing consumer products, but it is essential that the product user also exercise care when using an electrical appliance. Listed below are precautions which are essential for the safe use of an electrical appliance:
- Using your ExpressBake™ safely
- Before use
- Whilst in use
- Where to use
- After use
- Hot Surfaces Do Not Touch
- Features of your ExpressBake™
- Control Panel
- Quick Start Guide
- Step 1
- Step 2
- Step 3
- Step 4
- Step 5
- Step 6
- Step 7
- Step 8
- Step 9
- Keep Warm
- Removing the Bread
- Hints and Tips
- Measuring Ingredients
- Ingredient order is important
- Temperature of Ingredients
- Using the Time Delay
- Using the Bake Only menu
- Power Interruption Program Protection
- Fruit and Nut Dispenser
- ExpressBake™ Hints & Tips
- Use Exact Measurements
- Use Fresh Ingredients
- Add Ingredients in the Correct Order
- For Baking at High Altitudes
- If the dough is too dry
- If the bread rises too high
- Care and Cleaning
- To clean the exterior
- To clean the non-stick baking pan
- Caring for your non-stick baking pan
- Do not wash any part of your bread maker in a dishwasher.
- Storage
- Menu Functions
- Recipes
- Menu 1: Basic
- Menu 2: Whole Grain
- Menu 3: ExpressBake™
- Menu 4: Gluten Free
- Menu 5: French
- Menu 6: Sweet Breads
- Menu 7: Oatmeal
- Menu 8: Yoghurt
- Menu 9: Dough
- Menu 10: Bake
- Menu 11: Cake
- Menu 12: Jam
- Questions and Answers
- Troubleshooting
- Troubleshooting continued
- Australia
- New Zealand
- Your warranty does not:
- • cover damage caused by:
- Need help with your appliance?
Brand : SUNBEAM
Model : ExpressBake BMM4000SS
Category : Bread maker