
5KCM0512A - Coffee maker KITCHENAID - Free user manual and instructions
Find the device manual for free 5KCM0512A KITCHENAID in PDF.


| Product Type | Precision Press Coffee Maker (French press) |
| Brand | KitchenAid |
| Model | 5KCM0512A |
| Power Source | 2 AAA batteries (included) |
| Capacity | Up to 5 cups (coffee) |
| Carafe Material | Stainless steel |
| Integrated Scale | Yes, measures in grams or ounces |
| Timer | Yes, with LCD display |
| Brew Method | French press (manual immersion) |
| Recommended Coffee Grind | Coarse |
| Safety Features | Do not immerse in water; do not use without lid; keep away from children |
| Cleaning | Hand wash only; do not use in dishwasher |
| Battery Replacement | Accessible via screw on bottom of carafe |
| Parts Included | Plunger assembly, filter disc, mesh filter, rubber gasket |
| Usage | Indoor household use only |
Frequently Asked Questions - 5KCM0512A KITCHENAID
User questions about 5KCM0512A KITCHENAID
0 question about this device. Answer the ones you know or ask your own.
Ask a new question about this device
Download the instructions for your Coffee maker in PDF format for free! Find your manual 5KCM0512A - KITCHENAID and take your electronic device back in hand. On this page are published all the documents necessary for the use of your device. 5KCM0512A by KITCHENAID.
USER MANUAL 5KCM0512A KITCHENAID
KitchenAid
PARTS AND FEATURES
PARTS AND ACCESSORIES

COFFEE MAKER SAFETY
IMPORTANT SAFEGUARDS
When using electrical appliances, basic safety precautions should always be followed, including the following:
- Read all instructions.
- Do not touch hot surfaces. Use handles or knobs.
- To protect against fire, electric shock and injury to persons do not immerse the Coffee Maker in water or other liquid.
- This appliance is not intended for use by persons (including children) with reduced physical, sensory or mental capabilities, or lack of experience and knowledge, unless they have been given supervision or instruction concerning use of the appliance by a person responsible for their safety.
- Children should be supervised to ensure that they do not play with the appliance.
- Allow to cool before putting on or taking off parts, and before cleaning appliance.
- Do not operate any appliance after the appliance malfunctions, or has been damaged in any manner. Return appliance to the nearest authorised service facility for examination, repair, or adjustment.
- Do not use outdoors.
- Do not use near or on a hot gas or electric burner stove, or in a heated oven.
- Do not use the appliance for other than intended use.
- Do not use the Coffee Maker without lid properly closed.
- Do not use the Coffee Maker with loose or weakened handle.
- Do not clean the Coffee Maker with abrasive cleaners, steel wool, or other abrasive materials.
SAVE THESE INSTRUCTIONS
COFFEE MAKER SAFETY
- This product is designed for indoor household use only. Not designed for commercial use.
- Do not overfill the Coffee Maker.
- Pressing too fast or with more than 7 kg of force can cause burns. Keep face away from top of press.
- Use only coarse ground coffee. Fine grind can clog the filter and create high pressure.
- Place the Coffee Maker on a non-slip surface.
SAVE THESE INSTRUCTIONS
IMPORTANT: Before using the Precision Press Coffee Maker, wash all parts by hand in hot, soapy water. Dry thoroughly. To avoid damage, do not wash in the dishwasher and do not immerse in water.
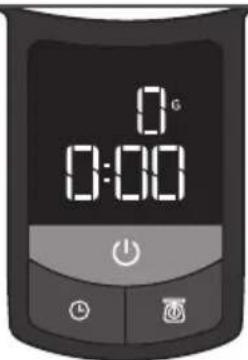
1
Press the POWER button to turn on the Precision Press Coffee Maker. The LCD display will read --- for a few moments before changing to 0 G and 0:00 minutes when it is ready to use.
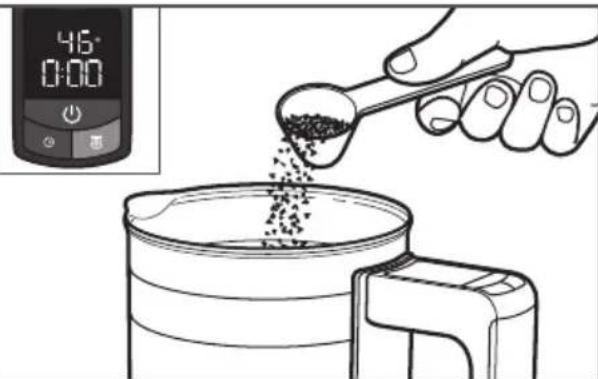
2
Scoop coarsely ground coffee into the carafe. The scale will weigh the coffee automatically. See the "Coffee dosage guide" for recommended coffee amounts. To switch from grams to ounces, press and hold the SCALE button for 3 seconds. The LCD display will switch from 0 G to 0.0 Oz.

3
Press the SCALE button to tare your measurement. To ensure scale accuracy, slowly pour hot water (91-96°C) into the carafe (allowing sufficient time for scale to adjust). Fill according to your desired number of cups, the scale will automatically measure the water to help you get the right amount. Do not fill past the MAX fill line.
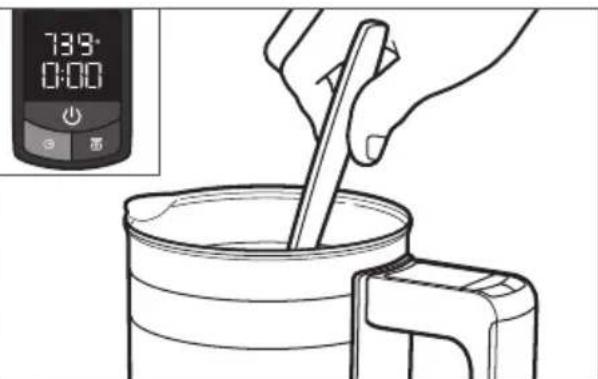
4
Press the TIMER button. Gently stir the coffee back and forth to "break the crust."
TIP: This step allows the coffee to "bloom." As the coffee grounds steep in the water, a "crust" of grounds will develop on top of the water. This is a sign that the coffee is brewing properly.
NOTE: The scale measurement will increase with time and temperature. This is normal.

TIP: For best pour, slightly lift the plunger handle before serving.
TIP: After brewing is complete and you have served the coffee, pull the plunger up, so that it is not resting in the oily ground coffee. This will assist the cleanup process.
COFFEE DOSAGE GUIDE
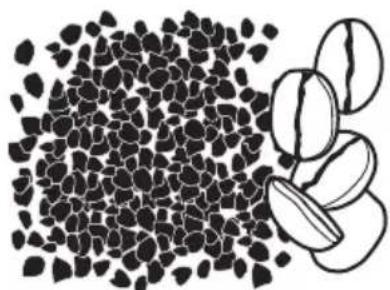
Example of recommended coarsely ground coffee.
Use the integrated scale in your Precision Press Coffee Maker and the chart below when filling it with coffee grounds and water. Use coarse-ground coffee (see picture to the left).
| Cups | Water oz. (weight) | Water grams | Coffee grams | Approx. # of level scoops |
| 2 10 | 296 | 18 | 2 | |
| 3 15 | 444 | 28 | 3 | |
| 4 20 | 591 | 37 | 4 | |
| 5 | 25 | 739 | 46 5 |
CARE AND CLEANING
REPLACING THE BATTERIES
The Precision Press Coffee Maker is powered by 2 AAA batteries (included). To replace the batteries, use a Phillips-head screwdriver to access the battery compartment on the bottom of your Coffee Maker.
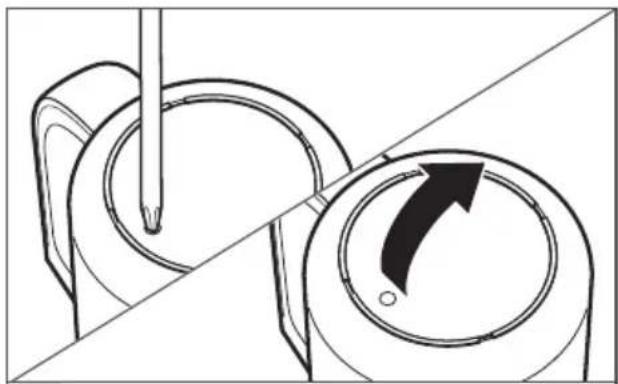
Flip the carafe over, and use a Phillips-head screwdriver to remove the screw on the compartment cover. Lift the compartment cover as shown.

2 Replace the 2 AAA batteries in the compartment. Make sure to use the screw when reattaching the compartment cover.
CLEANING THE PRECISION PRESS COFFEE MAKER
IMPORTANT: It is critical to thoroughly clean the Precision Press Coffee Maker after each use. The taste of your coffee can be impacted if the carafe and plunger assembly is not thoroughly cleaned of all grounds, coffee oil residue, or soap after each use.

Clean all parts of the Precision Press Coffee Maker by hand only. Allow all parts to cool then lift the plunger lid while tilting to free it from the carafe. Wash with a soft, damp cloth. Dry thoroughly with a soft, dry cloth. To avoid damage, do not wash in the dishwasher and do not immerse in water.

To prepare the plunger assembly for cleaning, first hold the plunger handle in one hand, and use the other hand to twist the filter disc assembly until it completely separates from the plunger and you can slide the filter disc assembly and lid off.
CARE AND CLEANING

3
Next, gently lift the top of the filter assembly to remove the mesh filter disc and the rubber gasket. You will have four separate parts to clean: the filter top, the rubber gasket, the mesh filter disc, and the filter bottom.
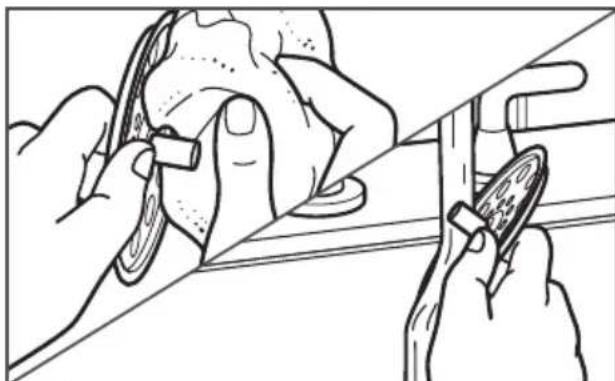
4
After removing the filter parts from the plunger, wash each thoroughly with a soft, damp cloth. Dry with a soft, dry cloth. Make certain to rinse all soap from the mesh filter disc because any soap or coffee oil residue left on the filter will impact the flavour of your next brew.
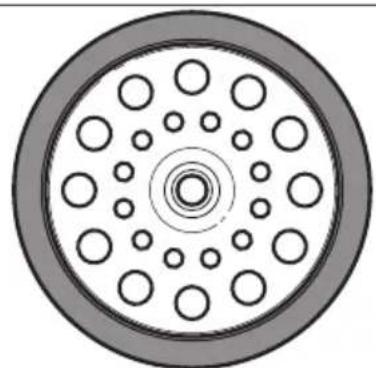
5
To reassemble properly, make certain that the rubber gasket is evenly centered and fully seated in position inside the filter disc assembly.
TROUBLESHOOTING
If your Precision Press Coffee Maker should fail to operate as expected, please check the following:
- If coffee is too bold: Be sure to serve the coffee immediately after your preferred brew time is complete, or the coffee will continue to extract, making it stronger.
Other possible fixes: Grind your coffee at a coarser grind level, and/or steep for less time.
- If coffee is too weak: Either grind your beans to a finer consistency or brew for more time.
- If coffee tastes bitter or unpleasant after use: Taste can be impacted if the Precision Press Coffee Maker isn't thoroughly cleaned. Make certain that all soap, grounds, and oily residue is thoroughly rinsed off all parts after each use. See the "Care and cleaning" section for more information.
- If there's too much resistance when plunging your grind may be too fine.
- If there's too little resistance when plunging your grind may be too coarse.
Do not return the Precision Press Coffee Maker to the retailer, as they do not provide service.
KitchenAid
© 2015. All rights reserved.
Specifications subject to change without notice.
W10781760A
10/15


- PARTS AND FEATURES
- COFFEE MAKER SAFETY
- IMPORTANT SAFEGUARDS
- WHEN USING ELECTRICAL APPLIANCES, BASIC SAFETY PRECAUTIONS SHOULD ALWAYS BE FOLLOWED, INCLUDING THE FOLLOWING
- SAVE THESE INSTRUCTIONS
- 1
- 2
- 3
- 4
- COFFEE DOSAGE GUIDE
- CARE AND CLEANING
- CLEANING THE PRECISION PRESS COFFEE MAKER
- 5
- TROUBLESHOOTING
- IF YOUR PRECISION PRESS COFFEE MAKER SHOULD FAIL TO OPERATE AS EXPECTED, PLEASE CHECK THE FOLLOWING
- KITCHENAID
Brand : KITCHENAID
Model : 5KCM0512A
Category : Coffee maker