
VLCAM230 - Video Conferencing System Vivolink - Free user manual and instructions
Find the device manual for free VLCAM230 Vivolink in PDF.


| Product Type | Video Conferencing Camera |
| Brand | Vivolink |
| Model | VLCAM230 |
| Image Sensor | 1/2.8-inch CMOS |
| Resolution | 1920 x 1080 (Full HD) |
| Frame Rate | Up to 30 fps |
| Lens | 12x optical zoom |
| Field of View | 72.5° (wide) |
| Connectivity | Ethernet (RJ45) |
| Network Protocols | TCP/IP, HTTP, RTSP, RTMP |
| Video Compression | H.264, H.265 |
| Audio | Built-in microphone |
| Control | Web GUI, remote control |
| Power Supply | 12V DC |
| Power Consumption | < 12W |
| Dimensions (W x H x D) | 200 x 150 x 150 mm |
| Weight | 1.5 kg |
| Mounting | Tripod, ceiling mount |
| Operating Temperature | 0°C to 40°C |
| Maintenance | Clean with soft dry cloth |
| Warranty | 2 years |
Frequently Asked Questions - VLCAM230 Vivolink
User questions about VLCAM230 Vivolink
0 question about this device. Answer the ones you know or ask your own.
Ask a new question about this device
Download the instructions for your Video Conferencing System in PDF format for free! Find your manual VLCAM230 - Vivolink and take your electronic device back in hand. On this page are published all the documents necessary for the use of your device. VLCAM230 by Vivolink.
USER MANUAL VLCAM230 Vivolink
VLCAM230 Streaming via
YouTube
This guide will help you to quickly and easy set up your camera to be able to stream via your YouTube channel.
First you need to connect the camera to the network and configure the settings in the Camera Web GUI to your own networks settings. You can choose DHCP, or you can set your own IP Address and DNS. It is recommended to use static IP Addresses.
1.
Check your IP settings on your PC and on your Router so you know what IP Address to give the VLCAM230.
- Open Command Prompt
- Type: ipconfig
• Information will show like below example:
IPv4...192.168.1.11
Subnet Mask... 255.255.255.0
Default Gateway... 192.168.1.1
From this information you will know what IP range you should put the camera in.
2.
Change the cameras IP Address to this for example: 192.168.1.163 but first you need to connect to the camera.
- Change you PC's IP Address to 192.168.5.2
- Plug in the network cable between your PC and the camera
- Log in to the cameras Web GUI via the default IP Address 192.168.5.163 in your browser
- Choose English as language
- User: admin Pass: admin
- Select "Configurations" from the top tabs
3.
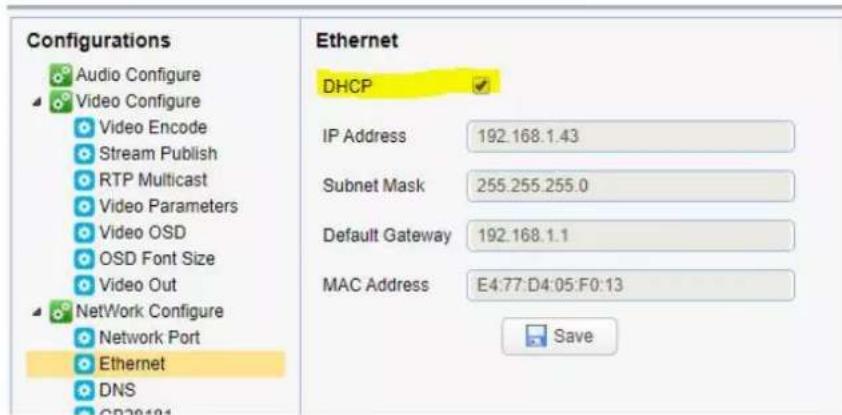
Changing the cameras IP Address. Select "Ethernet" in the left menu and fill in the IP Address, Subnet Mask and Default Gateway.
• The Cameras IP Address is by default 192.168.5.163
• The Subnet Mask is by default 255.255.255.0
- The Default Gateway is the IP Address of your Router which your camera will be connected to. In the example below the Default Gateway's default IP Address is 192.168.1.1. In this example it is not changed
• The Mac Address should not be changed
- Remember to press "Save"
4.
Under the "Ethernet" menu you can select "DNS". Type in the IP Address of the router in the "Preferred DNS Server" field. If you have an Alternative DNS Server you can fill it in here. Press "Save".
DNS
Preferred DNS Server
192.168.1.1
Alternative DNS Server
197.84.84.84

Save
NOTE:
To find your DNS Server info, you can look it up in the Network Settings on your PC or MAC. DNS Server info can be found when logged in to your router.
Important: If you have made a static IP Address on your camera and you have forgotten the IP, you can reset the IP Address to the default by typing these three keys in below order:
* # Manual
5.
Create an event on YouTube and get the following info from YouTube. Youtube will give you two keys "Stream Key" and "Stream URL".

Fill these two keys into the "Host Address" and "Stream Name" in the camera settings.

6.
Youtube may need an open audio stream configuration to push the stream normally. The Audio can be turned ON or OFF from the Youtube streaming platform.

7.
Ready to stream! From the Youtube streaming platform you can "Go Live" now. It might take a short while from opening Youtube to get the stream feed preview from your camera.